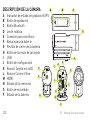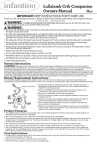
1
UK
FR
DE
IT
ES
User Manual
Manuel de l’utilisateur
Benutzerhandbuch
Istruzioni per l'uso
Manual de instrucciones
ABOUT THE CAMERA
A
B
C
D
E
F
G
H
I
J
K
L
M
N
O
P
Record/GPS Status
Record Switch
Bluetooth Button
Rotating Lens
Microphone Plug
Battery Slot
Battery Latch
Card Format Button
USB
Configuration Switch
microSD card Slot
Connect View Slot
HDMI
Memory Status
Power Button
Battery Status
2 UK User Manual
A
E
H
I
P
G
O
J
1
2
F
K
N
A
M
L
BASIC FEATURES
3
+ GETTING READY
+ POWER ON
+ Push door up to open.
+ Insert battery with (+) aligned.
+ Align back door slightly above
camera and slide down until it clicks.
+ Push power button firmly and
immediately release.
+ Camera beeps and front Record/GPS
LED blinks bright green.
+ You are ready to record.
4
+ RECORD
+ Start: slide switch forward. Camera beeps once
and the front Record/GPS LED turns red.
+ Stop: slide switch back. Camera beeps twice and
the front Record/GPS LED turns green.
+ Congrats, your first video!
Note: Record/GPS status will flash while
camera is obtaining a GPS position
Fix and go solid once a GPS fix is achieved.
UK User Manual
5
+ USING THE GPS FUNCTION
GPS in the Contour+ is turned on automatically when the camera is
powered on. The GPS module must acquire 4 GPS satellites in
order to obtain a position fix (Fix). The Record/GPS Status LED on the
front of the camera will flash (either green or red, depending if
the camera is recording or not) while the camera searches for satellites
and obtains a Fix. Once a Fix has been obtained, the Record/GPS
Status light will remain a solid color (green or red).
The ability for the GPS module in the camera to acquire satellites is
affected by environmental variables. The Contour+ is most
efficient in obtaining a Fix in an ‘open sky’ or ‘unobstructed horizon’
situation. Key environmental variables are as follows:
+ Outdoors (GPS will not work indoors or an obstructed overhead situation).
+ No tall buildings, cliffs, or objects blocking the view to the sky or horizon.
+ Not in a natural or urban ‘canyon’ where the satellite signals can bounce
around before getting to the camera.
+ The record slider of the camera (where the GPS antenna is located) is not
obscured by clothing, other equipment, or the user’s body.
+ The camera battery is well charged (more that 30% power).
6
+ No other electronic devices nearby that are
emitting electronic noise that
could interfere with the camera’s antenna.
+ No trees overhead.
+ The camera is stationary until a Fix is acquired.
Note: The Contour+
will still record video
even if the GPS system
has not obtained a Fix.
Under ideal condition (as described above), the Contour+ camera will
typically obtain a Fix within 30 to 60 seconds. If your camera has
not obtained a Fix within 4 minutes, power down the camera, remove
the battery for at least 10 seconds, re-install the battery, and
power up the camera. This process will reset the GPS module.
If the Contour+ had obtained a Fix within two to four hours from being
powered off and the battery has remained in the camera, then the camera
will typically obtain a Fix in less than 30 seconds when powered back up.
Connect the Contour+ to Storyteller or use the mobile app tool to
automatically load the AssistNow file onto the microSD card and into
the camera’s memory. This file contains current data pertaining to
deviations in GPS satellite orbits and can help the GPS module obtain
a Fix faster (often 30 seconds or less).
UK User Manual
7
+ CAMERA CONFIGURATION SWITCH
Use switch under back door to select video format.
Default Formats:
1: 1280 x 720 @ 60 fps
2: 1920 x 1080 @ 30 fps
+ POWER
Recharge
+ Connect to computer with
USB cable.
+ Red light indicates charging.
+ Charge complete when light
turns green (about 4 hrs).
Note: Always turn camera off
before removing microSD card.
8
Alternate Formats:
+ 1280 x 960 @ 30 fps
+ 1280 x 720 @ 30 fps
+ Picture Mode
Power Off
+ Press and hold power
button for 3 seconds.
+ Double beep &
lights turn off.
+ STATUS
Press power button while the camera is powered on to check status.
Memory / Battery Available
Green > 50%
Yellow 20-50%
Red < 20%
+ ERROR CONDITIONS
When the camera cannot record due to an error, it will beep three times.
Look at the status LEDs to determine what is wrong.
+ Battery status flashes red, camera shuts off. The battery is too low.
+ Memory status flashes yellow. The is no microSD card in the camera.
+ Memory status flashes red. microSD card is full.
+ Memory status flashes yellow and red. microSD card needs
formatting in camera (see page 18).
UK User Manual
9
+ ROTATING FLAT SURFACE MOUNT
+ It is best to adhere the mount to the helmet at room temperature.
+ Locate the best spot for your camera. The mounting area should
be smooth and flat.
+ Check the angle and position by sliding camera onto
mount and taking a test video.
+ Clean the surface with alcohol and adhere mount.
The adhesive takes up to 24 hours to fully cure.
+ Slide your camera onto rails.
+ Unlock the mount and rotate
camera to the perfect angle.
+ Press “Lock” to lock the
camera into place.
Note: Before using any of our mounts in recreational activities, you need to determine if the
holding power of the mount is appropriate and safe. Contour does not warrant lost cameras.
10
+ LEASH
+ Unclip leash.
+ Loop one end of leash
through side hole of camera,
then out back. It is helpful
to use a pin to help thread
the leash through the camera.
+ Attach other half of leash to mount.
+ Clip leash together.
Note: DO NOT ATTACH THE LEASH TO THE CAMERA WHEN THE CAMERA IS MOUNTED
ON HELMET OR GOGGLES, WHEN THE CAMERA WILL BE USED IN HIGH WINDS OR AT
HIGH VELOCITIES, OR IN ANY OTHER CIRCUMSTANCES WHEREBY THE CAMERA COULD
CAUSE INJURY OR HARM IN THE EVENT THAT IT COMES LOOSE FROM THE MOUNT AND
REMAINS TETHERED BY THE LEASH. BY ATTACHING THE LEASH TO THE CAMERA, YOU
AGREE TO WAIVE ANY CLAIMS AGAINST CONTOUR, INC. AND ANY OF ITS AFFILIATES,
AGENTS, EMPLOYEES, OFFICERS OR DIRECTORS ARISING FROM THE USE OF THE LEASH.
UK User Manual
11
ADVANCED FEATURES
13
+ SOFTWARE
+ Contour Storyteller - Mac/PC editing software that connects to your
camera with USB cable. www.contour.com/support
+ Mobile App - works with Connect View card to align camera and change
settings. www.contour.com/mobile
+ ADJUST CAMERA SETTINGS
Load Storyteller onto computer, connect camera to USB port, open Storyteller
and select “Tools → Configure Camera,” or adjust using mobile app.
You can adjust:
+ Resolution and Frame Rate
+ Exposure Level
+ Sharpness
+ Contrast
+ Audio Level
+ White Balance
+ GPS Sample Rate
+ GPS Power
+ Auto-Shut Off
+ SETTING WHITE BALANCE
The Contour+ automatically adjusts the White Balance level. Connection
to Storyteller allows you to configure the White Balance to these factory
preset levels:
Automatic (Default)
2,800 K Incandescent
4,000 K Fluorescent
14
5,000 K Daylight D50
6,500 K Overcast D65
7,500 K Cloudy
9,000 K Shade
10,000 K Xenon HID
+ DOWNLOADING FILES DIRECTLY FROM THE CAMERA
+ Connect the camera to any PC or Mac using the supplied USB cable.
+ The camera will mount as a generic storage device.
+ Navigate to the mounted device.
+ Video and still image files are located in the
\DCIM\100MEDIA directory.
Video files can be copied to your hard drive and played with any .mov
video player (i.e. Quicktime, Windows Media Player, Storyteller and VLC).
Mac Users: Please make certain when deleting files from your microSD
card to empty the “trash bin” while the camera is connected to
your Mac. Otherwise, the deleted files will remain on your camera’s
microSD card in a hidden folder and may prevent subsequent
videos from recording properly.
UK User Manual
15
+ PLAYING HDMI VIDEO
+ With the camera powered on, connect an HDMI cable between the
camera’s HDMI output port and a video display.
+ The camera will display a screen showing thumbnails of videos
stored on the microSD card.
+ Press and release the Power Button to toggle through the available videos.
+ Slide the Record Switch forward to Play a video in full-screen.
+ While a video is playing, slide the Record Switch back to Pause.
+ While a video is paused, press and release the Power button to
return to the thumbnails of videos stored on the microSD card.
+ STREAMING HDMI VIDEO
+ With the camera powered off, connect an HDMI cable between the
camera’s HDMI output port and a display, recorder, or transmitter.
+ When the camera is powered on video will start streaming
through the HDMI port.
+ The video will continue to stream while the camera is powered
on, even if the camera is recording.
16
+ BLUETOOTH
The Contour+ has Bluetooth 2.1 + EDR onboard and a Connect View
card pre-installed. Using a mobile device and the Contour Camera
mobile app, you can configure your camera settings in real-time and
preview what your camera sees.
+ Check the compatibility of your mobile device at www.contour.com/mobile.
+ Download and install the Contour Camera mobile app onto your mobile device.
+ Press Bluetooth button (see C on page 1) and hold it down for 5 seconds,
this turns Bluetooth on and initiates a pairing request. The front LED
will begin flashing blue. (Note: if you slide the record switch forward the
camera will go out of Bluetooth mode).
+ On your Mobile device, enable Bluetooth. Wait while your mobile device
locates the Contour+ camera. Once you see ‘Contour+’, select
it to accept the pairing request. You will know the pairing is complete
when the front LED on the camera goes solid blue.
+ Open the Contour App to configure your camera settings in real-time
and preview what your camera sees.
+ If your Bluetooth connection is lost the app will let you know; if this
happens, you’ll need to turn your Bluetooth back on by pressing
the Bluetooth button once. A single beep will sound and the camera
will connect with the pre-existing pairing.
+ To turn Bluetooth off, press the Bluetooth button on your camera.
UK User Manual
17
+ microSD CARD FORMATTING
microSD Card not included. Accepts up to 32GB microSD.
All microSD cards MUST be formatted before
use in the Contour+ camera. Follow the directions below.
1. Remove microSD card.
2. Power on the camera - it will triple beep.
3. Insert the microSD Card.
4. Using a small narrow object (such as the end of a paper clip), firmly
depress the format button (See “H” on page 1) and hold it down
until the camera beeps once and the Memory status LED flashes once.
This should take no longer than 10 seconds.
5. Power off the camera by holding down the power
button for 3 to 5 seconds.
6. Power on the camera. It is now ready to shoot video on the
reformatted microSD card.
Note: All existing data on microSD card will be lost during the reformat process.
18
Cautions and Warranty
This Important Product Information Guide contains regulatory, safety,
handling, disposal and recycling information, as well as the 180-day
limited warranty for your Contour+ camera.
Read all safety information below and operating instructions before using Contour+
camera to avoid injury. For detailed operating instructions and the
latest Important Product Information Guide, go to: www.contour.com/support.
WARNING: Failure to follow these safety instructions could result in fire,
electric shock, or other injury or damage.
Battery and Handling
The lithium-ion battery may present a hazard if mistreated. Do not
disassemble, crush, or puncture the lithium-ion battery. Do not immerse
battery in water and store in a cool dry place when not in use. Do not use
or leave battery near a heat source or in direct sunlight. Contour+ uses
a rechargeable lithium-ion, 3.7V, 1050mAh battery. Do not use batteries
other than those specifically designed for the Contour+. Use of any other
UK User Manual
19
battery may invalidate the warranty provided by Contour, Inc. and may
present a risk of fire or explosion.
To charge, only use the Contour USB Cable with a high power USB port
on a computer or other device that is compliant with the USB 2.0 or 1.1
standards, or a Contour wall, car or battery charger.
Disposal information
Do not dispose of either the Contour+ camera or lithium-ion battery in a fire.
Dispose of batteries in accordance with local laws and regulations.
20
Leash Use: DO NOT ATTACH THE LEASH TO THE CAMERA WHEN THE
CAMERA IS MOUNTED ON HELMET OR GOGGLES, WHEN THE CAMERA
WILL BE USED IN HIGH WINDS OR AT HIGH VELOCITIES, OR IN ANY
OTHER CIRCUMSTANCES WHEREBY THE CAMERA COULD CAUSE INJURY
OR HARM IN THE EVENT THAT IT COMES LOOSE FROM THE MOUNT AND
REMAINS TETHERED BY THE LEASH. BY ATTACHING THE LEASH TO
THE CAMERA, YOU AGREE TO WAIVE ANY CLAIMS AGAINST CONTOUR,
INC. AND ANY OF ITS AFFILIATES, AGENTS, EMPLOYEES, OFFICERS OR
DIRECTORS ARISING FROM THE USE OF THE LEASH.
FCC information
Contour+ Camera
Model: 1500
This device complies with
Part 15 of the FCC Rules.
Bluetooth information
FCC ID: QOQWT21A
IC ID: 5123A-BGTWT21N
ACN: 135 810 098
Operation is subject to the following two conditions:
+ This device may not cause harmful interference, and
+ This device must accept any interference received, including
interference that may cause undesired operation.
UK User Manual
21
Warning: Changes or modification to this unit not expressly approved
by party responsible for compliance could void the user’s authority to
operate the equipment. Note: This equipment has been tested and found
to comply with the limits for a Class B digital device, pursuant to Part
15 of the FCC Rules. These limits are designed to provide reasonable
protection against harmful interference in a residential installation. This
equipment generates, uses and can radiate radio frequency energy and
if not installed and used in accordance with instructions, it may cause
harmful interference to radio communications. There is no guarantee that
interference will not occur in a particular installation. If this equipment
does cause harmful interference to radio or television reception, which can
be determined by turning the equipment off and on, the user is encouraged
to try to correct the interference by one or more of the following measures:
+ Reorient or relocate the receiving antenna.
+ Increase separation between equipment and receiver.
+ Connect the equipment into an outlet on a circuit different from that
to which the receiver is connected.
22
+ Consult the dealer or an experienced radio/TV technician for help.
The CE symbol on your Contour+ camera indicates that it is in
compliance with the Electromagnetic Compatibility
(EMC) directive, and Limits and Methods of Measurement of
Radio Interference Characteristics of ITE.
Industry Canada
This Class B device meets all requirements of the Canadian
Interference-Causing Equipment Regulations.
Cet appareil numerique de la classe B respecte toutes les
exigences du Reglement sur le materiel broulleur du Canada.
Repairing or Modifying
Never attempt to repair or modify a Contour+ camera yourself.
Disassembling Contour+ camera, including the removal of external
screws, may cause damage that is not covered under the warranty.
The Contour+ camera does not contain any user-replaceable parts,
except the microSD card and battery.
UK User Manual
23
RoHS
Contour+ cameras comply with the European Union’s R0HS directive
2002/95/EC and similar regulations that may be adopted by other countries
for European Sales.
CONTOUR, INC. LIMITED WARRANTY Contour, Inc. (“Manufacturer”) warrants
to the original end user (“Purchaser”) that for the 180 days (“Warranty
Period”), the Contour+ camera (excluding any third party software) and
accessories (“Product”) will be free from defects in materials and workmanship
when properly installed and used for its intended purpose and in its intended
operating environment. This warranty does not apply to any Product that
has been: (i) altered, repaired or modified or (ii) damaged or destroyed by
accidents or similar events or by any intentional, reckless or negligent acts
or omissions of any party. In the event of a defect, return the Product to the
original place of purchase or Manufacturer, but only after instructed to do
so by Manufacturer. Purchaser shall ship and bear the cost of shipping the
Product to Manufacturer and Manufacturer shall bear the cost of shipping
the Product back to Purchaser after the completion of service under this
limited warranty. Purchaser’s exclusive remedy and Manufacturer s entire
24
liability under this warranty will be for Manufacturer at its option to repair or
replace the Product or refund purchase price less any rebates. Manufacturer
does not warrant against loss of any data (including data stored on Product
returned to Manufacturer for service), and assumes no liability for such loss.
Purchaser assumes all liability, and as such releases Manufacturer from
any liability, for any accident, injury, damage, death, loss, illegal activity or
any other claim that may occur resulting from or during use of the Product,
whether or not such use is foreseeable by Manufacturer.
ALL IMPLIED WARRANTIES OF MERCHANTABILITY OR FITNESS FOR
A PARTICULAR PURPOSE ARE LIMITED TO THE DURATION OF THE
APPLICABLE EXPRESS WARRANTY. ALL OTHER EXPRESS OR IMPLIED
CONDITIONS, REPRESENTATIONS AND WARRANTIES, INCLUDING
ANY IMPLIED WARRANTY OF NON-INFRINGEMENT, ARE DISCLAIMED.
Some jurisdictions do not allow limitations on how long an implied
warranty lasts, so the above limitation may not apply to Purchaser. This
warranty gives Purchaser specific legal rights, and Purchaser may also
have other rights which vary by jurisdiction.
UK User Manual
25
All third party software provided with the Product is provided “AS IS”.
Purchaser assumes the entire risk as to the quality, performance, accuracy
and effect of such software, and should it prove defective, Purchaser, and not
Manufacturer, assumes the entire cost of all necessary servicing or repair.
TO THE EXTENT NOT PROHIBITED BY LAW, IN NO EVENT WILL
MANUFACTURER BE LIABLE FOR ANY LOST DATA, REVENUE OR PROFIT,
OR FOR SPECIAL, INDIRECT, CONSEQUENTIAL, INCIDENTAL OR PUNITIVE
DAMAGES, HOWEVER CAUSED REGARDLESS OF THE THEORY OF LIABILITY,
ARISING OUT OF OR RELATED TO THE USE OF OR INABILITY TO USE
THE PRODUCT, EVEN IF MANUFACTURER HAS BEEN ADVISED OF THE
POSSIBILITY OF SUCH DAMAGES. IN NO EVENT WILL MANUFACTURER’S
LIABILITY EXCEED THE AMOUNT PAID BY PURCHASER FOR THE PRODUCT.
The foregoing limitations will apply even if any warranty or remedy
provided under this Agreement fails of its essential purpose. Some
jurisdictions do not allow the exclusion or limitation of incidental or
consequential damages, so the above limitation or exclusion may not
apply to Purchaser.
26
Contour Disclaimer
All purchasers, users, and any or all parties involved or engaging in
the use of Contour, Inc. (“Contour”) products agree to the following:
+ Contour does not promote or endorse high risk, careless and/or
dangerous actions when using its products.
+ Contour is not liable for any use or misuse of Contour Products
or any video captured that may be considered illegal.
+ Contour is not responsible for any illegal actions taken while
recording, attempting to record, or editing video that was
captured with our products.
+ Contour Products’ primary purpose is recording legal sports activities
as seen by all Local, State, Federal, and Country laws.
UK User Manual
27
We are here to help
Keeping Shoot and Share simple is what we are all about. We would love
to help you have a great Contour+ experience so please contact us with
any questions you have.
How to get service
To obtain warranty service, register your product at www.contour.com
within 180 days from the date you purchased this product. If service
is required, you may be instructed to deliver the product freight prepaid,
in either its original packaging or packaging affording an equal
degree of protection, to the company and provide proof of purchase in
the form of a bill of sale or receipt which evidences that the unit is
within the warranty period. Contour will, at its sole discretion, replace
or repair the product. Please do not return the product to Contour
unless specifically instructed to do so.
Hours: Monday - Friday 9am to 6pm PST
USA toll free phone: 866.397.6920
International phone: +1 206 792.5226
Email: [email protected]
Web: www.contour.com/support
28
Contour Hands-free Camera and/or associated software and other
Contour products are protected by copyright, international treaties,
and various patents, including: U.S. patents: D616,006. Other patents
are registered or pending in the U.S. and in various countries around
the world. Visit www.contour.com for a list of applicable patents.
All trademarks and registered trademarks mentioned herein are recognized as
the property of their respective holders. Contour+ is a product of Contour, Inc. in
Seattle, Washington. www.contour.com ©2011 Contour, Inc. All rights reserved.
UK User Manual
EU Version 2011.02
29
FR Manuel de l’utilisateur
31
À PROPOS DE LA CAMÉRA
A
B
C
D
E
F
G
H
I
J
K
L
M
N
O
P
État d’enregistrement/du GPS
Bouton d’enregistrement
Bouton Bluetooth
Lentille rotative
Prise microphone
Logement de la batterie
Loquet de verrouillage de la batterie
Bouton de formatage de carte
USB
Bouton de configuration
Logement Carte microSD P
Logement Connect View
O
HDMI
État de la mémoire
Bouton marche/arrêt
N
État de la batterie
A
E
H
I
G
J
1
2
F
K
A
M
L
32
FR Manuel de l’utilisateur
FONCTIONS DE BASE
33
+ PRÉPARATION
+ Poussez le compartiment vers le
haut pour l’ouvrir.
+ Insérez la batterie conformément
au pôle (+).
+ Alignez le compartiment arrière
légèrement au-dessus de la
caméra puis faites-le glisser vers
le bas jusqu’au déclic.
34
+ MISE SOUS TENSION
+ Appuyez fermement sur le bouton
marche/arrêt et relâchez-le
immédiatement.
+ La caméra émet un bip et la DEL
avant d’enregistrement/du GPS
clignote en vert clair.
+ Vous pouvez enregistrer.
+ ENREGISTREMENT
+ Start : faites glisser le bouton vers l’avant. La caméra émet un bip et
la DEL avant d’état de l’enregistrement/du GPS devient rouge.
+ Stop : faites glisser le bouton vers l’arrière. La caméra émet deux bips
et la DEL avant d’état de l’enregistrement/du GPS devient verte.
+ Félicitations, vous avez tourné votre première vidéo !
Remarque : la DEL d’état de l’enregistrement/du GPS clignote le temps que la caméra
obtienne un point GPS fixe et cesse de clignoter une fois qu’un point GPS fixe a été obtenu.
FR Manuel de l’utilisateur
35
+ UTILISATION DE LA FONCTION GPS
Le GPS de la caméra Contour+ s’active automatiquement au démarrage de la
caméra. Le module GPS doit capter 4 satellites GPS pour obtenir un point de
position fixe. La DEL d’état de l’enregistrement/du GPS, située à l’avant de la
caméra, clignote (soit en vert soit en rouge, selon que la caméra enregistre
ou non) lorsque la caméra recherche des satellites et tente d’obtenir un
point de position fixe. Une fois un point fixe obtenu, le voyant d’état de
l’enregistrement/du GPS ne clignote plus ; il reste vert ou rouge. La capacité
du module GPS de la caméra à capter des satellites est influencée par des
variables environnementales. La caméra Contour+ réussit plus facilement à
obtenir un point fixe lorsque le ciel ou l’horizon sont dégagés. Les principales
variables environnementales sont les suivantes :
+ Extérieur (le GPS ne fonctionne pas en intérieur ou lorsque le
ciel est encombré).
+ Aucun bâtiment de grande taille, escarpement ou objet bloquant
la vue vers le ciel ou l’horizon.
+ Ne pas se trouver dans un canyon naturel ou urbain où les signaux des
satellites peuvent rebondir sur des obstacles avant d’atteindre la caméra.
+ La molette d’enregistrement de la caméra (au niveau de l’antenne du GPS)
ne doit pas être obstruée par des vêtements, d’autres matériels ou le
corps de l’utilisateur.
36
+ La batterie de la caméra est bien chargée
(plus de 30 % de charge).
+ Aucun autre dispositif électronique à proximité
émettant du bruit électronique susceptible
d’interférer avec l’antenne de la caméra.
+ Pas d’arbres encombrant la vue vers le ciel.
+ La caméra reste immobile jusqu’à l’obtention
d’un point de position fixe.
Remarque : la caméra
Contour+ continue
d’enregistrer des vidéos
même si le système GPS
n’a pas obtenu de point
de position fixe.
Dans des conditions idéales (telles que décrites ci-dessus), la caméra
Contour+ obtient généralement un point de position fixe dans un délai de 30
à 60 secondes. Si votre caméra n’a pas obtenu de point de position fixe dans
un délai de 4 minutes, éteignez-la, enlevez la batterie pendant au moins
10 secondes, réinstallez la batterie et rallumez la caméra. Cette méthode
permet de réinitialiser le module GPS.
Si la caméra Contour+ a obtenu un point de position fixe dans un délai de
deux à quatre heures avant sa mise hors tension et que la batterie est restée
dans la caméra, celle-ci obtiendra généralement un point de position fixe en
moins de 30 secondes lors de son redémarrage.
Connectez la caméra Contour+ au logiciel Storyteller avant de l’utiliser afin
de charger automatiquement le fichier AssistNow sur la carte microSD et
dans la mémoire de la caméra. Le fichier contient des données actuelles
FR Manuel de l’utilisateur
37
relatives aux déviations d’orbites de satellites GPS et peut permettre au
module GPS d’obtenir plus rapidement un point de position fixe (souvent
en 30 secondes ou moins).
+ BOUTON DE CONFIGURATION DE LA CAMÉRA
Utilisez le bouton situé sous le compartiment arrière pour
sélectionner le format vidéo.
Formats par défaut :
1: 1280 x 720 à 60 images par seconde
2: 1920 x 1080 à 30 images par seconde
+ ALIMENTATION
Recharge
+ Connectez la caméra à l’ordinateur
via le câble USB.
+ Le voyant rouge indique que la
charge est en cours.
+ La charge est terminée lorsque
le voyant est vert
(après environ 4 heures).
38
Autres formats :
+ 1280 x 960 à 30 images par seconde
+ 1280 x 720 à 30 images par seconde
+ Picture Mode
Mise hors tension
+ Appuyez sur le bouton marche/
arrêt et maintenez-le enfoncé
pendant 3 secondes.
+ Un double bip est émis et les
voyants s’éteignent.
Remarque : mettez toujours la
caméra hors tension avant de
retirer la carte microSD.
+ INDICATEUR D’ÉTAT
Appuyez sur le bouton marche/arrêt pendant que la caméra est allumée
afin de vérifier son état.
+ Mémoire/batterie disponible
Vert > 50 %
Jaune 20-50 %
Rouge < 20 %
+ SIGNAUX D’ERREUR
Lorsque la caméra ne peut pas enregistrer en raison d’une erreur, elle
émet un triple bip. Vérifiez les DEL d’état pour déterminer le problème.
+ Le voyant d’état de la batterie clignote en rouge ; la caméra s’éteint.
La batterie est trop faible.
+ Le voyant d’état de la mémoire clignote en jaune. Il n’y a pas de carte
microSD dans la caméra.
+ Le voyant d’état de la mémoire clignote en rouge.
La carte microSD est pleine.
+ Le voyant d’état de la mémoire clignote en jaune et en rouge. Il est
nécessaire de formater la carte microSD dans la caméra (voir page 48).
FR Manuel de l’utilisateur
39
+ FIXATION PLATE ROTATIVE
+ Il est conseillé de coller la fixation au casque à température ambiante.
+ Déterminez le meilleur endroit pour fixer votre caméra. La zone de
fixation doit être lisse et plate.
+ Vérifiez l’angle et la position en faisant glisser la caméra sur la
fixation et en tournant une vidéo test.
+ Nettoyez la surface avec de l’alcool et collez la
fixation. Le temps de durcissement de
l’adhésif est de 24 heures maximum.
+ Faites glisser votre caméra sur les rails.
+ Déverrouillez la fixation et faites
tourner la caméra pour obtenir
un angle optimal.
+ Appuyez sur « Lock » pour bloquer
la caméra dans sa position.
Remarque : avant d’utiliser l’une de nos fixations pour des activités de loisirs, vous devez
déterminer si la résistance de collage de la fixation est appropriée et sécurisée. La garantie
Contour n’inclut pas la perte de caméras.
40
+ DRAGONNE
+ Déclipsez la dragonne.
+ Passez une extrémité de la
dragonne dans le trou situé
sur le côté de la caméra.
L’utilisation d’une épingle
permet de faciliter le passage
de la dragonne dans la fente
de la caméra.
+ Attachez l’autre moitié de la dragonne à la fixation.
+ Clipsez à nouveau la dragonne.
Remarque : N’ATTACHEZ PAS LA DRAGONNE À LA CAMÉRA SI CELLE-CI EST FIXÉE
SUR UN CASQUE OU SUR DES LUNETTES, SI LA CAMÉRA EST UTILISÉE PAR VENT
FORT OU À GRANDE VITESSE, OU DANS TOUTE AUTRE CIRCONSTANCE OÙ LA
CAMÉRA POURRAIT ENTRAÎNER DES BLESSURES SI ELLE VENAIT À SE DÉTACHER
DE LA FIXATION ET RESTAIT ATTACHÉE PAR LA DRAGONNE. EN ATTACHANT
LA DRAGONNE À LA CAMÉRA, VOUS CONSENTEZ À DÉGAGER CONTOUR, INC.
ET SES AFFILIÉS, AGENTS, EMPLOYÉS, PRÉPOSÉS OU DIRECTEURS DE TOUTE
RESPONSABILITÉ DÉCOULANT DE L’UTILISATION DE LA DRAGONNE.
FR Manuel de l’utilisateur
41
FONCTIONS AVANCÉES
43
+ LOGICIEL
+ Contour Storyteller - Logiciel d’édition pour Mac/PC se connectant à votre
caméra via un câble USB. www.contour.com/support
+ Application mobile - fonctionne avec la carte Connect View pour aligner
l’angle de la caméra et modifier les paramètres. www.contour.com/mobile
+ RÉGLER LES PARAMÈTRES DE LA CAMÉRA Chargez le logiciel Storyteller
sur l’ordinateur, connectez la caméra au port USB, lancez Storyteller et
sélectionnez « Tools (Outils) → Configure Camera (Configurer la caméra) »
ou effectuez les réglages via l’application mobile.
Vous pouvez ajuster les paramètres suivants :
+ Résolution et cadence
+ Contraste
de prise de vue
+ Niveau sonore
+ Niveau d’exposition
+ Balance des blancs
+ Netteté
+ Taux d’échantillonnage GPS
+ Alimentation GPS
+ Arrêt automatique
+ RÉGLAGE DE LA BALANCE DES BLANCS
+ Contour+ ajuste automatiquement le niveau de la balance des blancs. La
connexion à Storyteller vous permet de configurer la balance des blancs
en utilisant l’un des réglages d’usine prédéfinis suivants :
Automatique (par défaut)
2 800 K Incandescent
4 000 K Fluorescent
44
5 000 K Lumière du jour D50 9 000 K Ombragé
6 500 K Ciel couvert D65
10 000 K Xenon HID
7 500 K Nuageux
+ TÉLÉCHARGEMENT DIRECT DES FICHIERS DEPUIS LA CAMÉRA
+ Connectez la caméra à un PC ou Mac à l’aide du câble USB fourni.
+ La caméra s’installe comme un périphérique de stockage générique.
+ Recherchez le périphérique installé.
+ Les fichiers vidéo et photo se trouvent dans le répertoire
\DCIM\100MEDIA.
Vous pouvez copier les fichiers vidéo sur votre disque dur et les lire
à l’aide de tout lecteur vidéo .mov (p. ex. Quicktime, Windows Media
Player, Storyteller et VLC).
Utilisateurs Mac : lors de la suppression des fichiers de votre carte
microSD, veillez à vider la corbeille pendant que la caméra est
connectée à votre Mac. Sinon, les fichiers supprimés resteront sur la
carte microSD de votre caméra, dans un dossier masqué, et pourront
empêcher le bon enregistrement de futures vidéos.
FR Manuel de l’utilisateur
45
+ LECTURE VIDÉO EN HDMI
+ Une fois que la caméra est allumée, raccordez un câble HDMI
entre la sortie HDMI de la caméra et un écran vidéo.
+ La caméra affiche un écran avec des vignettes de vidéos
enregistrées sur la carte microSD.
+ Appuyez et relâchez le bouton marche/arrêt pour sélectionner
tour à tour les vidéos disponibles.
+ Faites glisser le bouton d’enregistrement vers l’avant pour
regarder une vidéo en plein écran.
+ Pendant la lecture d’une vidéo, faites glisser le bouton d’enregistrement
vers l’arrière pour mettre la vidéo en pause.
+ Lorsqu’une vidéo est en pause, appuyez sur le bouton marche/arrêt et
relâchez-le pour revenir aux vignettes de vidéos stockées sur la carte microSD.
+ TRANSMISSION VIDÉO EN CONTINU VIA HDMI
+ Une fois que la caméra est éteinte, raccordez un câble HDMI entre la
sortie HDMI de la caméra et un écran, un enregistreur ou un transmetteur.
+ Lorsque la caméra est allumée, la vidéo commence à transmettre les
images en continu via le port HDMI.
+ La vidéo continue à diffuser les images en continu tant que la caméra reste
allumée, même si la caméra est en train d’enregistrer.
46
+ BLUETOOTH
La caméra Contour+ intègre la fonctionnalité Bluetooth 2.1 EDR et possède
une carte Connect View préinstallée. Si vous utilisez un dispositif mobile et
l’application mobile de la caméra Contour, vous pouvez configurer les paramètres
de votre caméra en temps réel et prévisualiser ce qui s’affiche sur votre caméra.
+ Vérifiez la compatibilité de votre dispositif mobile sur www.contour.com/mobile.
+ Téléchargez et installez l’application mobile de la caméra Contour sur votre
dispositif mobile.
+ Appuyez sur le bouton Bluetooth (voir C page 32) et maintenez-le enfoncé pendant
5 secondes afin d’activer le Bluetooth et de lancer la demande d’appariement. La
DEL avant se met à clignoter en bleu. (Remarque : si vous faites glisser le bouton
d’enregistrement vers l’avant, la caméra quitte le mode Bluetooth).
+ Sur votre dispositif mobile, activez le Bluetooth. Attendez que votre dispositif
mobile détecte la caméra Contour+. Une fois qu’apparaît « Contour+ »,
sélectionnez l’icône pour accepter la demande d’appariement. L’appariement est
terminé lorsque la DEL avant de la caméra devient bleu fixe.
+ Ouvrez l’application Contour pour configurer les paramètres de votre caméra en
temps réel et prévisualiser ce qui s’affiche sur votre caméra.
+ L’application vous informe en cas de perte de la connexion Bluetooth. Pour
rétablir le Bluetooth, appuyez une fois sur le bouton Bluetooth. Votre caméra
émet alors un bip sonore et se reconnecte à l’appariement préexistant.
+ Pour éteindre le Bluetooth, appuyez sur le bouton Bluetooth de votre caméra.
FR Manuel de l’utilisateur
47
+ FORMATAGE DE LA CARTE microSD
Carte microSD non incluse. Accepte les cartes microSD jusqu’à 32 Go.
Toutes les cartes microSD DOIVENT être formatées avant d’être
utilisées dans la caméra Contour+. Suivez les instructions ci-dessous.
1. Retirez la carte microSD.
2. Allumez la caméra, elle va émettre un triple bip.
3. Insérez la carte microSD.
4. À l’aide d’un petit objet fin (comme la pointe d’un trombone), appuyez
fermement sur le bouton de formatage (voir « H » à la page 26) et
maintenez-le enfoncé jusqu’à ce que la caméra émette un bip et que
la DEL d’état de la mémoire clignote une fois. Cela devrait prendre
moins de 10 secondes.
5. Éteignez la caméra en maintenant enfoncé le bouton marche/arrêt
pendant 3 à 5 secondes.
6. Allumez la caméra. Elle est désormais prête à enregistrer des vidéos
sur la carte microSD reformatée.
Remarque : toutes les données existantes sur la carte microSD seront perdues
lors du processus de reformatage.
48
Avertissements et garantie Le présent Guide d’informations importantes sur
le produit contient des informations relatives à la réglementation, à la sécurité,
à la manipulation, à la mise au rebut et au recyclage, ainsi que la garantie de
180 jours de la caméra Contour+.
Lisez attentivement toutes les informations de sécurité et instructions d’utilisation
suivantes avant d’utiliser la caméra Contour+, afin d’éviter toute blessure. Pour obtenir
des instructions d’utilisation détaillées ou accéder au dernier Guide d’informations
importantes sur le produit, rendez-vous sur : www.contour.com/support.
AVERTISSEMENT : tout manquement aux présentes instructions de sécurité
peut entraîner un incendie, un choc électrique ou d’autres blessures et
dommages.
Manipulation de la batterie
La batterie lithium-ion peut présenter un danger si elle n’est pas manipulée
correctement. Ne démontez pas, n’écrasez pas et ne percez pas la batterie
lithium-ion. Ne plongez pas la batterie dans l’eau et stockez-la dans un endroit
sec lorsqu’elle n’est pas utilisée. N’utilisez pas et ne laissez pas la batterie à
proximité d’une source de chaleur ou à la lumière directe du soleil. La caméra
Contour+ utilise une batterie lithium-ion rechargeable de 3,7 V et 1 050 mAh.
FR Manuel de l’utilisateur
49
N’utilisez pas de batteries autres que celles spécifiquement conçues pour la
caméra Contour+. L’utilisation de tout autre type de batterie peut rendre la
garantie fournie par Contour, Inc. nulle et non avenue et entraîner des risques
d’incendie ou d’explosion.
Pour la charge, utilisez uniquement le câble USB Contour sur un port USB haute
puissance de votre ordinateur ou d’un autre dispositif conforme aux normes USB
2.0 ou 1.1, un adaptateur mural ou de voiture ou un chargeur de batterie Contour.
Informations relatives à la mise au rebut
Ne jetez ni la caméra Contour+ ni la batterie lithium-ion au feu. Jetez les
batteries conformément à la réglementation locale en vigueur.
50
Utilisation de la dragonne : N’ATTACHEZ PAS LA DRAGONNE À LA CAMÉRA
SI CELLE-CI EST FIXÉE SUR UN CASQUE OU SUR DES LUNETTES, SI LA
CAMÉRA EST UTILISÉE PAR VENT FORT OU À GRANDE VITESSE, OU DANS
TOUTE AUTRE CIRCONSTANCE OÙ LA CAMÉRA POURRAIT ENTRAÎNER DES
BLESSURES SI ELLE VENAIT À SE DÉTACHER DE LA FIXATION ET RESTAIT
ATTACHÉE PAR LA DRAGONNE. EN ATTACHANT LA DRAGONNE À LA CAMÉRA,
VOUS CONSENTEZ À DÉGAGER CONTOUR, INC. ET SES AFFILIÉS, AGENTS,
EMPLOYÉS, PRÉPOSÉS OU DIRECTEURS DE TOUTE RESPONSABILITÉ
DÉCOULANT DE L’UTILISATION DE LA DRAGONNE.
Informations FCC
Caméra Contour+
Modèle : 1500
Cet appareil est conforme à la
partie 15 des règlements de la FCC.
Informations relatives au Bluetooth
Numéro FCC : QOQWT21A
Numéro CI : 5123A-BGTWT21N
Numéro d’immatriculation : 135 810 098
Le fonctionnement est soumis aux deux conditions suivantes :
+ Cet appareil ne peut causer d’interférence néfaste.
+ Cet appareil doit accepter toute interférence reçue, y compris une
interférence pouvant provoquer un fonctionnement indésirable
FR Manuel de l’utilisateur
51
Avertissement : tout changement ou modification apporté(e) à cette unité et
non expressément approuvé(e) par la partie responsable de la conformité peut
annuler le droit d’utilisation de l’équipement octroyé à l’utilisateur. Remarque :
cet équipement a été testé et déclaré conforme aux limitations d’un appareil
numérique de classe B, conformément à la partie 15 des règlements de la
FCC. Ces limitations visent à apporter une protection raisonnable contre
les interférences néfastes dans le cadre d’une installation résidentielle. Cet
équipement génère, utilise et peut émettre de l’énergie en radiofréquence.
S’il n’est pas installé et utilisé conformément aux instructions, il peut
provoquer des interférences néfastes aux communications radio. Il n’existe
aucune garantie de non interférence avec une installation particulière. Si cet
équipement provoque une interférence néfaste à la réception d’ondes radio
ou de signaux de télévision (ce qui peut être constaté en éteignant puis en
rallumant l’appareil), il est recommandé à l’utilisateur d’essayer de corriger
l’interférence par une ou plusieurs des mesures suivantes :
+ Réorientez ou déplacez l’antenne de réception.
+ Augmentez la distance entre l’équipement et le récepteur.
+ Branchez l’équipement dans une prise faisant partie d’un autre circuit
que celui auquel le récepteur est branché.
+ Demandez l’assistance du distributeur ou d’un technicien radio/TV expérimenté.
52
Le symbole CE sur votre caméra Contour+ indique qu’elle est conforme
à la directive relative à la compatibilité électromagnétique (CEM) et à la
norme Limites et méthodes de mesure des caractéristiques de perturbations radioélectriques produites par les appareils de traitement de
l’information (ATI).
Industrie Canada
Cet appareil numérique de la classe B respecte toutes les exigences du
Règlement sur le matériel brouilleur du Canada.
Réparation ou modification
N’essayez en aucun cas de réparer ou de modifier vous-même la caméra
Contour+. Le démontage de la caméra Contour+, y compris le retrait
des vis externes, peut entraîner des dommages non couverts par la
garantie. La caméra Contour+ ne contient aucune pièce remplaçable par
l’utilisateur, à l’exception de la carte microSD et de la batterie.
RoHS
Les caméras Contour+ sont conformes à la directive européenne ROHS
2002/95/CE et aux règlements similaires pouvant être adoptés par
d’autres pays pour les ventes en Europe.
FR Manuel de l’utilisateur
53
CONTOUR, INC. GARANTIE LIMITÉE Contour, Inc. (« Fabricant ») garantit à
l’utilisateur final initial (« Acheteur ») que la caméra Contour+ (à l’exclusion de
tout logiciel tiers) et ses accessoires (« Produit ») seront exempts de tout vice
matériel et de fabrication pendant une période de 180 jours (« Période de garantie ») s’ils sont correctement installés et utilisés dans les conditions et dans
l’environnement de fonctionnement pour lequel ils ont été prévus. La présente
garantie ne s’applique pas à un produit qui aurait été : (i) transformé, réparé
ou modifié, ou (ii) endommagé ou détruit du fait d’accidents ou autres événements similaires, ou du fait d’actes intentionnels, de négligence, d’inattention
ou d’omissions de toute partie. En cas de vice, retournez le produit au site où il
a été acheté ou auprès du Fabricant, uniquement si ledit Fabricant vous a invité
à le faire. L’Acheteur prend en charge les coûts d’envoi du Produit au Fabricant
et le Fabricant prend en charge les coûts de renvoi du Produit à l’acheteur une
fois le service effectué dans le cadre de la présente garantie limitée. La réparation ou le remplacement du Produit ou le remboursement de son prix d’achat
abaissé de tout rabais, à la discrétion du Fabricant, constituent le recours
exclusif de l’acheteur et l’entière responsabilité du Fabricant. Le Fabricant ne
fournit aucune garantie contre la perte de données, quelles qu’elles soient,
notamment les données stockées sur le produit retourné au Fabricant pour sa
54
réparation. En outre, le Fabricant ne saurait être tenu responsable d’une telle
perte. L’Acheteur assume toute responsabilité et décharge à ce titre le Fabricant
de toute responsabilité liée à un accident, une blessure, un dommage, un décès,
une perte, une activité illégale ou tout autre événement, quelle qu’en soit la
nature, et qui résulterait de ou serait survenue lors de l’utilisation du Produit,
qu’un tel usage soit ou non prévisible pour le Fabricant.
TOUTE GARANTIE TACITE DE QUALITÉ MARCHANDE OU D’ADÉQUATION À UN
USAGE PARTICULIER EST LIMITÉE À LA DURÉE DE LA GARANTIE EXPRESSE
APPLICABLE. TOUTE AUTRE CONDITION, DÉCLARATION ET GARANTIE,
EXPRESSE OU IMPLICITE, Y COMPRIS TOUTE GARANTIE DE NON-VIOLATION,
SONT EXCLUES. Certaines juridictions n’autorisant pas la limitation de la durée
des garanties tacites, il est possible que les limitations susmentionnées ne
s’appliquent pas à l’Acheteur. Cette garantie confère à l’Acheteur des droits
légaux spécifiques, et l’Acheteur peut avoir d’autres droits qui peuvent changer
d’une juridiction à l’autre.
Tout logiciel tiers fourni avec le Produit est fourni « EN L’ÉTAT ». L’acheteur
assume la totalité du risque concernant la qualité, les performances, la
FR Manuel de l’utilisateur
55
précision et l’effet dudit logiciel. Si ledit logiciel s’avère défectueux, les
coûts nécessaires à tout entretien ou réparation sont à la charge exclusive de l’Acheteur et non du Fabricant. SOUS RÉSERVE DE DISPOSITIONS
LÉGALES CONTRAIRES, LE FABRICANT NE POURRA EN AUCUN CAS
ÊTRE TENU RESPONSABLE DE LA PERTE DE DONNÉES, DE REVENUS
OU DE PROFITS NI DE DOMMAGES PARTICULIERS, INDIRECTS, IMMATÉRIELS, ACCESSOIRES, PUNITIFS, QUELLE QU’EN SOIT LA CAUSE ET
SELON TOUTE DÉFINITION DE RESPONSABILITÉ, RÉSULTANT DE OU LIÉ
À L’UTILISATION DU PRODUIT OU À L’IMPOSSIBILITÉ D’UTILISER LEDIT
PRODUIT, MÊME SI LE FABRICANT A ÉTÉ INFORMÉ DE L’ÉVENTUALITÉ
DE TELS DOMMAGES. LA RESPONSABILITÉ DU FABRICANT NE POURRA
EXCÉDER EN AUCUN CAS LE MONTANT PAYÉ PAR L’ACHETEUR POUR
L’ACQUISITION DU PRODUIT.
Les limitations susmentionnées s’appliquent même en cas de nonrespect de l’objet principal de toute garantie ou de tout recours prévu par
le présent Contrat. Certaines juridictions n’autorisant pas l’exclusion ou
la limitation des dommages accessoires ou immatériels, il est possible
que la limitation ou l’exclusion précitée ne s’applique pas à l’Acheteur.
56
Avis de non-responsabilité de Contour Tout acheteur, tout utilisateur ou
toute partie utilisant ou participant à l’utilisation de produits de Contour, Inc
(« Contour ») convient de ce qui suit :
+ Contour n’encourage et n’approuve pas la pratique d’activités à
hauts risques, imprudentes et/ou dangereuses lors de l’utilisation
de ses produits.
+ Contour décline toute responsabilité liée à l’utilisation ou à l’usage
impropre de produits Contour ou à toute vidéo enregistrée
pouvant être considérée comme illégale.
+ Contour n’est pas responsable des actes illégaux commis lors de
l’enregistrement, de la tentative d’enregistrement ou de l’édition
de vidéos enregistrées avec ses produits.
+ L’usage principal prévu pour les produits Contour est l’enregistrement
d’activités sportives légales, conformes à la réglementation locale et
nationale en vigueur.
FR Manuel de l’utilisateur
57
Nous sommes là pour vous aider Notre objectif est de faciliter au maximum
l’utilisation de votre caméra et le partage de vos vidéos. Nous souhaitons
vous offrir la meilleure expérience possible avec votre caméra Contour+ ;
n’hésitez pas à nous contacter pour toute question.
Comment obtenir le service de garantie Pour obtenir le service de garantie,
enregistrez votre produit sur www.contour.com dans les 180 jours suivant la
date d’achat du produit. Si une réparation est nécessaire, il se peut que vous
ayez à expédier le produit franco de port, soit dans son emballage original,
soit dans un emballage offrant un niveau de protection équivalent, à la
société, accompagné d’une preuve d’achat, sous la forme d’un acte de vente
ou d’un reçu, établissant que le produit est couvert par la garantie. Contour
procédera, à sa seule discrétion, au remplacement ou à la réparation du
produit. Veuillez ne pas expédier le produit à Contour sans y avoir été
expressément invité.
Horaires : du lundi au vendredi, de 9 heures à 18 heures,
heure standard du Pacifique
Numéro gratuit États-Unis : 866.397.6920
Numéro international : +1 206 792.5226
E-mail : [email protected]
Site Web : www.contour.com/support
58
La caméra mains libres Contour et/ou les logiciels associés et autres produits
Contour sont protégés par des copyrights, des traités internationaux et plusieurs
brevets, notamment les brevets américains : D616,006. D’autres brevets sont
déposés ou en instance aux États-Unis et dans d’autres pays. Consultez le
site www.contour.com pour obtenir une liste des brevets applicables.
Les marques commerciales et marques déposées mentionnées dans le présent
document sont la propriété de leurs détenteurs respectifs. Contour+ est un
produit de Contour, Inc. à Seattle, Washington. www.contour.com
©2011 Contour, Inc. Tous droits réservés.
FR Manuel de l’utilisateur
EU Version 2011.02
59
DE Benutzerhandbuch
61
ÜBER DIE KAMERA
A Aufnahme-/GPS-Status
BAufnahmetaste
CBluetooth-Taste
D Rotierende Linse
EMikrofonstecker
FAkkufach
GAkkuverriegelung
HKartenformatierungstaste
IUSB
JKonfigurationsschalter
KmicroSD-Karte-Anschluss
L Connect View-Anschluss
MHDMI
NSpeicherstatus
OEin-/Austaste
PAkkustatus
A
I
P
E
H
G
O
J
1
2
F
K
N
A
M
L
62
DEBenutzerhandbuch
GRUNDFUNKTIONEN
63
+ ERSTE SCHRITTE
+ Schieben Sie die Abdeckung zum
Öffnen nach oben.
+ Legen Sie den Akku so ein, dass die
Pole korrekt ausgerichtet sind.
+ Setzen Sie die hintere Abdeckung
oben an der Kamera an, und ziehen
Sie sie herunter, bis sie einrastet.
64
+ EINSCHALTEN
+ Drücken Sie kurz und fest auf
die Ein-/Austaste.
+ Sie hören ein akustische Signal,
und die Aufnahme-/GPS-LED
an der Vorderseite blinkt grün.
+ Sie können mit der
Aufzeichnung beginnen.
+ AUFNEHMEN
+ Starten: Schieben Sie die Aufnahmetaste nach vorne. Sie hören ein
akustisches Signal, und die Aufnahme-/GPS-LED an der Vorderseite
leuchtet rot.
+ Beenden: Schieben Sie die Aufnahmetaste wieder nach hinten. Sie hören
zweimal ein akustisches Signal, und die Aufnahme-/GPS-LED an der
Vorderseite leuchtet grün.
+ Herzlichen Glückwunsch, Sie haben Ihr erstes Video erstellt!
Hinweis: Während die Kamera eine GPS-Positionsbestimmung durchführt, blinkt der
LED für den Aufnahme-/GPS-Status. Sobald die Kamera einen Fixpunkt ermittelt hat,
leuchtet die LED permanent.
DEBenutzerhandbuch
65
+ VERWENDUNG DER GPS-FUNKTION
Die GPS-Funktion wird beim Einschalten der Contour+ Kamera automatisch
aktiviert. Das GPS-Modul benötigt vier GPS-Satelliten, um einen
Fixpunkt zu ermitteln. Die LED für den Aufnahme-/GPS-Status an der
Vorderseite der Kamera blinkt (entweder grün oder rot – je nachdem, ob
die Kamera aufzeichnet oder nicht), während die Kamera nach Satelliten
zur Positionsbestimmung sucht. Wurde ein Fixpunkt ermittelt, leuchtet
die LED dauerhaft grün oder rot. Die Funktion des GPS-Moduls zur
Satellitensuche ist von Umgebungsfaktoren abhängig. Am effektivsten ist die
Positionsbestimmung unter freiem Himmel oder an nicht überdachten Orten.
Schlüsselfaktoren sind:
+ Die Kamera muss im Freien verwendet werden (GPS funktioniert nicht in
geschlossenen Räumen).
+ Es dürfen keine hohen Gebäude, Felsen oder sonstigen Objekte die Sicht
auf Himmel oder Horizont versperren.
+ Der Benutzer sollte sich nicht in natürlichen Schluchten oder Straßenschluchten befinden, in denen die Satellitensignale zurückgeworfen
werden, ehe sie die Kamera erreichen.
+ Der Aufnahmeschieberegler der Kamera (in dem sich die GPS-Antenne
befindet), darf nicht durch Kleidung, Ausrüstung oder Körperteile
verdeckt werden.
66
+ Der Akku muss geladen sein (über 30 %
Hinweis: Die Contour+
verbleibende Leistung).
Kamera zeichnet
+ Es dürfen sich keine anderen elektronischen
auch dann Videos auf,
wenn das GPS-System
Geräte in der Nähe befinden, die ein
keinen Fixpunkt
elektronisches Rauschen verursachen und
ermitteln konnte.
dadurch die Kameraantenne stören können.
+ Der Benutzer sollte sich nicht unter Bäumen aufhalten.
+ Die Kamera darf während der Positionsbestimmung nicht bewegt werden.
Unter Idealbedingungen (siehe oben) benötigt die Contour+ Kamera
normalerweise 30 bis 60 Sekunden zur Fixpunktermittlung. Konnte
nach 4 Minuten kein Fixpunkt bestimmt werden, schalten Sie die Kamera
ab, nehmen Sie den Akku für mindestens 10 Sekunden aus der
Kamera heraus, legen Sie ihn anschließend wieder ein, und schalten Sie die
Kamera ein. Auf diese Weise wird das GPS-Modul zurückgesetzt.
Wenn die Contour+ Kamera innerhalb von zwei bis vier Stunden vor
dem Ausschalten einen Fixpunkt ermittelt hatte und der Akku nicht
herausgenommen wurde, dauert die Positionsbestimmung nach dem
erneuten Einschalten in der Regel höchstens 30 Sekunden.
Verbinden Sie die Contour+ Kamera vor der Nutzung mit Storyteller,
damit die AssistNow-Datei automatisch auf die microSD-Karte und in den
DEBenutzerhandbuch
67
Speicher der Kamera geladen wird. Diese Datei enthält aktuelle Daten
zu Abweichungen in den GPS-Satellitenbahnen und sorgt dafür, dass
das GPS-Modul schneller einen Fixpunkt findet (häufig unter 30 Sekunden).
+ KAMERAKONFIGURATIONSSCHALTER
Mit dem Schalter unter der hinteren Abdeckung können Sie das
Videoformat festlegen.
Standardformate:
1: 1280 x 720 bei 60 Frames/Sekunde
2: 1920 x 1080 bei 30 Frames/Sekunde
+STOMVERSORGUNG
Aufladen
+ Schließen Sie die Kamera
mit einem USB-Kabel an den
Computer an.
+ Ein rotes Licht weist auf den
Ladevorgang hin.
+ Der Ladevorgang ist nach etwa
4 Stunden abgeschlossen; das
Licht wird Grün.
68
Alternative Formate:
+ 1280 x 960 bei 30 Frames/Sekunde
+ 1280 x 720 bei 30 Frames/Sekunde
+ Bildmodus
Ausschalten
+ Halten Sie die Ein-/Austaste
3 Sekunden lang gedrückt.
+ Sie hören zweimal ein
akustisches Signal, die
Kontrolllämpchen gehen aus.
Hinweis: Schalten Sie die Kamera
immer aus, bevor Sie die microSDKarte entnehmen.
+ STATUS
Drücken Sie bei eingeschalteter Kamera die Ein-/Austaste, um den
Status zu überprüfen.
+ Verfügbarer Speicher / Akku
Grün: > 50 %
Gelb: 20-50 %
Rot: < 20 %
+ FEHLERMELDUNGEN
Wenn die Kamera aufgrund eines Fehlers keine Aufnahme starten kann,
hören Sie dreimal ein akustisches Signal. Die Status-LEDs weisen auf die
Fehlerursache hin.
+ Akkustatuslämpchen blinkt rot, Kamera schaltet sich aus.
Die Akkuleistung ist zu gering.
+ Speicherstatuslämpchen blinkt gelb. Es befindet sich keine
microSD-Karte in der Kamera.
+ Speicherstatuslämpchen blinkt rot. Der Speicher der
microSD-Karte ist voll.
+ Speicherstatuslämpchen blinkt gelb und rot. Die microSD-Karte
muss in der Kamera formatiert werden (siehe Seite 78).
DEBenutzerhandbuch
69
+ DREHHALTERUNG FÜR FLACHE OBERFLÄCHEN
+ Die Halterung sollte bei Raumtemperatur an den
Helm angebracht werden.
+ Suchen Sie eine geeignete Stelle für die Anbringung Ihrer
Kamera. Die Stelle sollte glatt und flach sein.
+ Überprüfen Sie den Winkel und die Position, indem Sie die Kamera
auf der Halterung befestigen und ein Testvideo aufnehmen.
+ Reinigen Sie die Oberfläche mit Alkohol, und befestigen
Sie die Halterung. Nach 24 Stunden ist die
Selbstklebevorrichtung vollständig durchgehärtet.
+ Arretieren Sie die Kamera in den
Halterungsschienen.
+ Entsperren Sie die Halterung, und
drehen Sie die Kamera, bis Sie den
idealen Winkel gefunden haben.
+ Drücken Sie auf die Sperre, um die
Kamera zu arretieren.
Hinweis: Prüfen Sie vor der Verwendung der Halterung zu Freizeitzwecken, ob die Halterung
fest und sicher befestigt ist. Contour haftet nicht für verloren gegangene Kameras.
70
+ BEFESTIGUNGSBAND
+ Lösen Sie das Befestigungsband.
+ Führen Sie ein Ende des Bands
durch die Öse an der Seite
der Kamera und dann wieder
zurück. Hierbei kann eine
Nadel hilfreich sein.
+ Befestigen Sie die andere Hälfte
des Befestigungsbandes an der Halterung.
+ Schließen Sie das Befestigungsband.
Hinweis: BEFESTIGEN SIE DAS BAND NICHT AN DER KAMERA, WENN DIESE AN
EINEM HELM ODER EINER BRILLE BEFESTIGT IST ODER BEI STARKEM WIND ODER
HOHEN GESCHWINDIGKEITEN VERWENDET WIRD, ODER WENN DIE KAMERA SICH
VON DER HALTERUNG LÖSEN KÖNNTE UND DURCH DIE BEFESTIGUNG AM BAND
VERLETZUNGEN VERURSACHEN KÖNNTE. MIT DEM BEFESTIGEN DES BANDS AN
DER KAMERA VERZICHTEN SIE AUF JEDWEDE SICH AUS DER NUTZUNG DES BANDS
ERGEBENDEN ANSPRÜCHE GEGENÜBER CONTOUR INC., DESSEN VERBUNDENEN
UNTERNEHMEN, VERTRETERN, MITARBEITERN UND FÜHRUNGSKRÄFTEN.
DEBenutzerhandbuch
71
ERWEITERTE FUNKTIONEN
73
+ SOFTWARE
+ Contour Storyteller - Bearbeitungssoftware für Mac und PC, die über ein
USB-Kabel mit Ihrer Kamera verbunden wird. www.contour.com/support
+ Mobile App - dient in Verbindung mit der Connect View-Karte zum
Ausrichten der Kamera und zum Ändern von Einstellungen.
www.contour.com/mobile
+ KAMERAEINSTELLUNGEN ANPASSEN
Laden Sie Storyteller auf Ihren Computer, schließen Sie die Kamera
über den USB-Port an, starten Sie Storyteller und wählen Sie „Tools →
Configure Camera“ (Extras → Kamera konfigurieren) oder nehmen Sie die
Anpassungen mit Hilfe der mobilen App vor.
Sie können folgendes einstellen:
+ Auflösung und Bildrate
+ Kontrast
+ Belichtung
+ Lautstärke
+ Bildschärfe
+ Weißabgleich
+ GPS-Sample-Rate
+ GPS-Leistung
+ Automatisches Ausschalten
+ WEISSABGLEICH EINSTELLEN
+ Wenn das Streaming auf der Kamera gestartet wird, haben Sie über
ein Menü Zugriff auf die Einstellungen für den Weißabgleich.
Automatisch (Standard)
2.800 K Weißglühend
4.000 K Kaltweiß
74
5.000 K Tageslicht D50
6.500 K Bedeckt D65
7.500 K Bewölkt
9.000 K Schatten
10.000 K Xenon HID
+ DATEIEN DIREKT ÜBER DIE KAMERA HERUNTERLADEN
+ Schließen Sie die Kamera mit dem im Lieferumfang enthaltenen
USB-Kabel an einen PC oder Mac an.
+ Die Kamera wird wie ein gewöhnliches Speichermedium erkannt.
+ Navigieren Sie zur angeschlossenen Kamera.
+ Die Video- und Standbilddateien befinden sich im Verzeichnis
\DCIM\100MEDIA.
Sie können Videodateien auf die Festplatte kopieren und mit einem
beliebigen Videoplayer für .mov-Dateien (z. B. Quicktime, Windows
Media Player, Storyteller und VLC) wiedergeben.
Mac-Benutzer: Stellen Sie beim Löschen von Dateien auf der
microSD-Karte sicher, dass Sie den Papierkorb leeren,
wenn die Kamera mit Ihrem Mac verbunden ist. Anderenfalls
verbleiben die gelöschten Dateien in einem verborgenen
Ordner auf der microSD-Karte und können die fehlerfreie
Aufnahme von Videos beeinträchtigen.
DEBenutzerhandbuch
75
+ HDMI-VIDEOS WIEDERGEBEN
+ Verbinden Sie bei eingeschalteter Kamera einen Video-Bildschirm
über ein HDMI-Kabel mit dem HDMI-Anschluss der Kamera.
+ Auf der Kamera werden verkleinerte Vorschaubilder der auf der
microSD-Karte gespeicherten Videos angezeigt.
+ Drücken Sie kurz auf die Ein-/Austaste, um durch die verfügbaren
Videos zu blättern.
+ Schieben Sie die Aufnahmetaste nach vorne, um ein Video im
Vollbildformat abzuspielen.
+ Schieben Sie während der Wiedergabe eines Videos die Aufnahmetaste nach
hinten, um die Wiedergabe anzuhalten.
+ Während das Video angehalten ist, drücken Sie kurz auf die Ein-/Austaste,
um zu den verkleinerten Vorschaubildern der auf der microSD-Karte
gespeicherten Videos zurückzukehren.
+ HDMI-VIDEOS STREAMEN
+ Verbinden Sie bei ausgeschalteter Kamera einen Bildschirm, Rekorder oder
Transmitter über ein HDMI-Kabel mit dem HDMI-Anschluss der Kamera.
+ Beim Einschalten der Kamera wird das Video-Streaming über
den HDMI-Anschluss gestartet.
+ Der Video-Stream wird fortgesetzt, solange die Kamera
eingeschaltet bleibt (auch bei Aufzeichnungen).
76
+ BLUETOOTH
Auf der Contour+ Kamera ist Bluetooth 2.1 + EDR Onboard und eine Connect View-Karte
vorinstalliert. Durch die Verwendung der Contour Camera App auf einem
mobilen Gerät können Sie Kameraeinstellungen in Echtzeit konfigurieren und eine
Kameravorschau anzeigen.
+ Überprüfen Sie die Kompatibilität mit Ihrem mobilen Gerät unter www.contour.com/mobile.
+ Laden Sie die Contour Camera App herunter und installieren Sie sie auf dem mobilen Gerät.
+ Drücken Sie auf die Bluetooth-Taste (siehe C auf Seite 62) und halten Sie sie fünf
Sekunden lang gedrückt. Die Bluetooth-Funktion wird damit eingeschaltet und eine
Verbindungsanfrage gestartet. Die LED an der Vorderseite blinkt blau. (Hinweis: Wenn Sie
die Aufnahmetaste nach vorn schieben, wird der Bluetooth-Modus beendet).
+ Aktivieren Sie die Bluetooth-Funktion für das mobile Gerät. Warten Sie, bis es die
Contour+ Kamera gefunden hat. Sobald ‘Contour+’ angezeigt wird, wählen Sie es aus, um
die Verbindungsanfrage zu bestätigen. Die Verbindung ist abgeschlossen, sobald die LED
an der Vorderseite durchgehend blau leuchtet.
+ Starten Sie die Contour Camera App, um die Kameraeinstellungen in Echtzeit zu
konfigurieren und eine Kameravorschau anzuzeigen.
+ Wird die Bluetooth-Verbindung unterbrochen, informiert Sie die App darüber. In diesem
Fall müssen Sie die Bluetooth-Funktion wieder einschalten, indem Sie kurz auf die
Bluetooth-Taste drücken. Sie hören ein akustisches Signal und die Kamera stellt die vorige
Verbindung wieder her.
+ Um die Bluetooth-Funktion auszuschalten, drücken Sie auf die Bluetooth-Taste der Kamera.
DEBenutzerhandbuch
77
+ FORMATIEREN DER microSD-KARTE
microSD-Karte nicht inbegriffen-Karte Es können microSD-Karten
mit einer Speicherkapazität von bis zu 32 GB verwendet werden. Jede
microSD-Karte MUSS vor der Verwendung in der Contour+ Kamera
formatiert werden. Gehen Sie dazu folgendermaßen vor:
1. Nehmen Sie die microSD-Karte aus der Kamera.
2. Schalten Sie die Kamera ein. Sie hören dreimal ein akustisches Signal.
3. Legen Sie die microSD-Karte ein.
4. Drücken Sie mit einem kleinen, dünnen Gegenstand (z. B. mit dem
Ende einer Büroklammer) auf die Formatierungstaste (siehe „H“
auf Seite 52). Halten Sie die Taste so lange gedrückt, bis Sie ein
akustisches Signal hören und die Speicherstatus-LED aufblinkt. Dies
sollte nicht länger als 10 Sekunden dauern.
5. Schalten Sie die Kamera aus, indem Sie die Ein-/Austaste 3 bis 5
Sekunden gedrückt halten.
Hinweis: Während der
6. Schalten Sie die Kamera ein. Die
Neuformatierung werden alle
neu formatierte microSD-Karte
vorhandenen Daten auf der
microSD-Karte dauerhaft gelöscht.
ist nun bereit zur Aufnahme.
78
Warnhinweise und Garantie
Dieses wichtige Produkthandbuch enthält Informationen zu Richtlinien,
Sicherheit, Bedienung, Entsorgung und Recycling sowie die auf 180 Tage
begrenzte Garantie für die Contour+ Kamera.
Lesen Sie vor der ersten Verwendung der Contour+ Kamera alle unten angegebenen
Sicherheitsinformationen und Betriebsanleitungen, um Verletzungen zu vermeiden.
Ausführliche Bedienungsanleitungen und die aktuelle Ausgabe des wichtigen
Produkthandbuches finden Sie unter: www.contour.com/support.
ACHTUNG: Eine Nichteinhaltung dieser Sicherheitshinweise kann zu Feuer,
elektrischem Schlag oder anderen Verletzungen oder Schäden führen.
Nutzung des Akkus
Der Lithium-Ionen-Akku kann bei unsachgemäßer Verwendung eine Gefahr
darstellen. Bauen Sie den Akku nicht auseinander, drücken Sie ihn nicht platt,
und bohren Sie ihn nicht auf. Tauchen Sie den Akku nicht in Wasser, und lagern
Sie ihn bei Nichtgebrauch an einem kühlen, trockenen Ort. Verwenden oder
lagern Sie den Akku nicht in der Nähe einer Hitzequelle oder unter direkter
Sonneneinstrahlung. Contour+ verwendet einen aufladbaren Lithium-Ionen-Akku
(1050 mAh, 3,7 V). Verwenden Sie nur Akkus, die speziell für den Einsatz mit der
DEBenutzerhandbuch
79
Contour+ Kamera konzipiert wurden. Bei Verwendung anderer Akkus ist die von
Contour Inc. gewährte Garantie möglicherweise ungültig, und es besteht ein
Feuer- und Explosionsrisiko.
Verwenden Sie zum Aufladen des Akkus ausschließlich das Contour USB-Kabel
an einem leistungsstarken USB-Port eines Computers oder eines anderen
Gerätes, das mit den Standards USB 2.0 oder 1.1 kompatibel ist. Alternativ
können Sie auch ein Contour Wand-, Auto- oder Akku-Ladegerät verwenden.
Hinweise zur Entsorgung
Werfen Sie die Contour+ Kamera oder den Lithium-Ionen-Akku nicht ins Feuer!
Entsorgen Sie Akkus gemäß den vor Ort geltenden Gesetzen und Bestimmungen.
80
Verwendung des Befestigungsbands: BEFESTIGEN SIE DAS BAND
NICHT AN DER KAMERA, WENN DIESE AN EINEM HELM ODER EINER
BRILLE BEFESTIGT IST ODER BEI STARKEM WIND ODER HOHEN
GESCHWINDIGKEITEN VERWENDET WIRD, ODER WENN DIE KAMERA SICH
VON DER HALTERUNG LÖSEN KÖNNTE UND DURCH DIE BEFESTIGUNG AM
BAND VERLETZUNGEN VERURSACHEN KÖNNTE. MIT DEM BEFESTIGEN
DES BANDS AN DER KAMERA VERZICHTEN SIE AUF JEDWEDE SICH AUS
DER NUTZUNG DES BANDS ERGEBENDEN ANSPRÜCHE GEGENÜBER
CONTOUR INC., DESSEN VERBUNDENEN UNTERNEHMEN, VERTRETERN,
MITARBEITERN UND FÜHRUNGSKRÄFTEN.
FCC-Hinweise
Contour+ Kamera
Modell: 1500
Dieses Gerät stimmt
mit dem Abschnitt 15 der
FFC-Vorschriften überein.
Informationen zu Bluetooth
FCC-ID: QOQWT21A
IC-ID: 5123A-BGTWT21N
ACN: 135 810 098
Der Betrieb unterliegt den beiden folgenden Bedingungen:
+ Dieses Gerät darf keine schädlichen Störungen verursachen.
+ Dieses Gerät muss Empfangsstörungen akzeptieren, einschließlich
Störungen, die zu einem ungewünschten Betrieb führen können.
DEBenutzerhandbuch
81
ACHTUNG: Änderungen oder Modifikationen an diesem Gerät, die nicht
ausdrücklich durch die verantwortliche Partei genehmigt wurden, können
die Betriebserlaubnis des Geräts außer Kraft setzen. Hinweis: Dieses Gerät
wurde getestet und für übereinstimmend befunden mit den Grenzwerten für
Digitalgeräte der Klasse B gemäß Abschnitt 15 der FCC-Vorschriften. Diese
Grenzwerte wurden entwickelt, um Benutzern einen angemessenen Schutz vor
schädlicher Interferenz bei einer Installation in privat genutzten Räumen zu
bieten. Dieses Gerät erzeugt und nutzt Funkwellen und kann diese ausstrahlen.
Sofern das Gerät nicht ordnungsgemäß installiert und gemäß der Anleitung
betrieben wird, kann es zu Störungen der Radio-/Funkübertragung kommen.
Störungen können nicht ausgeschlossen werden. Sollte das Gerät Störungen
beim Radio- und Fernsehempfang verursachen, was sich durch Ein- und
Ausschalten des Geräts bestätigen lässt, empfehlen wir dem Benutzer, die
Störung folgendermaßen zu beheben:
+ Richten Sie die Empfangsantenne neu aus, oder stellen
Sie sie an einem anderen Ort auf.
+ Vergrößern Sie den Abstand zwischen dem Gerät und dem Receiver.
+ Verwenden Sie für das Gerät und den Receiver jeweils einen
eigenen Stromkreislauf.
+ Wenden Sie sich an den Händler oder einen erfahrenen
Radio/TV-Techniker, wenn Sie weitere Hilfe benötigen.
82
Die CE-Kennzeichnung auf der Contour+ Kamera weist darauf hin,
dass das Gerät der EMV-Richtlinie (Elektromagnetische
Verträglichkeit) und den Funkstöreigenschaften – Grenzwerte und
Messverfahren informationstechnischer Geräte entspricht.
Für Kanada
Dieses Gerät der Klasse B erfüllt alle Anforderungen der kanadischen
Bestimmungen zu störungsverursachenden Geräten („Canadian
Interference-Causing Equipment Regulations“).
Reparaturen oder Modifikationen
Versuchen Sie niemals, die Contour+ Kamera selbst zu reparieren.
Das Zerlegen der Contour+ Kamera in Einzelteile, einschließlich der
Entfernung äußerer Schrauben, kann zu Schäden führen, die nicht unter die
Garantie fallen. Kein Teil der Contour+ Kamera kann durch den Benutzer
ausgetauscht werden, mit Ausnahme der microSD-Karte und des Akkus.
RoHS-Richtlinie
Contour+ Kameras entsprechen der RoHS-Richtlinie 2002/95/EG zur Beschränkung gefährlicher Stoffe in der Europäischen Union und ähnlichen
Richtlinien anderer Länder, die für den Verkauf in Europa angepasst werden.
DEBenutzerhandbuch
83
CONTOUR, INC. – HAFTUNGSBESCHRÄNKUNG Contour Inc. („Hersteller“)
gewährleistet gegenüber dem Endbenutzer („Käufer“) für die Dauer von 180
Tagen („Garantiezeitraum“), dass die Contour+ Kamera (ausschließlich der
Software von Drittanbietern) und das mitgelieferte Zubehör („Produkt“) frei
von Material- und Produktionsschäden ist, vorausgesetzt, das Produkt wurde
fachgerecht installiert und ausschließlich für den vorgesehenen Zweck und in
der vorgesehenen Nutzungsumgebung verwendet. Diese Garantie gilt nicht für
Produkte, die (i) umgebaut, repariert oder verändert wurden; oder (ii) aufgrund
eines Unfalls oder ähnlichen Vorfalls oder durch absichtliche, unbedachte
oder fahrlässige Handlungen oder Unterlassungen jedweder Art beschädigt
oder zerstört wurden. Senden/bringen Sie ein defektes Gerät zu dem Händler,
bei dem Sie es erworben haben, oder zum Hersteller, wenn dieser Sie dazu
aufgefordert hat. Der Käufer trägt die Kosten für den Versand zum Hersteller,
dieser wiederum trägt die Kosten für den Versand an den Käufer, nachdem
das Produkt im Rahmen dieser Garantie repariert wurde. Diese Garantie sieht
vor, dass der Hersteller in vollem Umfang verpflichtet ist, das Produkt im
Rahmen seiner Möglichkeiten zu reparieren, zu ersetzen oder einen Teil des
Kaufpreises abzüglich von Preisnachlässen rückwirkend zu erstatten. Für den
Käufer stellt dies das ausschließliche Rechtsmittel dar. Der Hersteller kann
nicht haftbar gemacht werden für mögliche Datenverluste (einschließlich der
84
Daten, die auf dem zur Reparatur an den Hersteller zurückgesandten Produkt
gespeichert sind). Im Falle von Unfällen, Verletzungen, Beschädigungen, Tod,
Verlust, illegalen Handlungen oder jedwedem anderen Anspruch, der sich aus
der Nutzung des Produkts ergibt, ist allein der Käufer haftbar. Der Hersteller
übernimmt für diese Fälle keinerlei Gewähr, auch wenn eine derartige Nutzung
für den Hersteller vorhersehbar war.
JEDWEDE GARANTIE BEZÜGLICH DER MARKTTAUGLICHKEIT ODER
EIGNUNG FÜR EINEN BESTIMMTEN ZWECK IST BESCHRÄNKT AUF DIE
DAUER DER GELTENDEN, AUSDRÜCKLICHEN GARANTIE. JEDWEDE ANDEREN AUSDRÜCKLICHEN ODER STILLSCHWEIGENDEN BEDINGUNGEN,
DARSTELLUNGEN ODER GARANTIEN, EINSCHLIESSLICH SÄMTLICHER
STILLSCHWEIGENDER GARANTIEN DER NICHT-VERLETZUNG, WERDEN
ABGELEHNT. In einigen Rechtsgebieten darf der Gültigkeitszeitraum
stillschweigender Garantien nicht begrenzt werden, daher gilt für die Käufer
in diesen Rechtsgebieten der oben genannte Gültigkeitszeitraum nicht.
Diese Garantie verleiht dem Käufer gewisse Rechte; je nach Rechtsgebiet
hat der Käufer möglicherweise weitere Rechte.
Sämtliche im Lieferumfang enthaltene Software von Drittanbietern wird
im aktuellen Zustand bereitgestellt. Der Käufer übernimmt sämtliche
DEBenutzerhandbuch
85
Risiken, die in Zusammenhang mit Qualität, Leistung, Genauigkeit und
Auswirkungen dieser Software auftreten können, und er, nicht der
Hersteller, übernimmt im Falle eines Schadens die gesamten Reparaturund Servicekosten. SOWEIT RECHTLICH NICHT UNZULÄSSIG, SCHLIESST
DER HERSTELLER JEGLICHE HAFTUNG FÜR EINKOMMENS-, GEWINNODER DATENVERLUSTE ODER FÜR SONDER-, INDIREKTE, FOLGE- ODER
NEBENSCHÄDEN UND STRAFSCHADENSERSATZANSPRÜCHE VÖLLIG
AUS, UNABHÄNGIG VON DER URSACHE UND DER HAFTUNGSTHEORIE,
DIE SICH AUS DER VERWENDUNG ODER IM ZUSAMMENHANG MIT DER
VERWENDUNG ODER DEM UNVERMÖGEN DER VERWENDUNG DER
SOFTWARE ERGEBEN, SELBST WENN DER HERSTELLER VON EINER
MÖGLICHKEIT DIESER SCHÄDEN UNTERRICHTET WURDE. IN KEINEM
FALL ÜBERSTEIGT DIE HAFTUNG DES HERSTELLERS DEN VOM KÄUFER
BEZAHLTEN KAUFPREIS FÜR DAS PRODUKT.
Die vorangegangenen Garantiebeschränkungen sind auch dann gültig,
wenn eine unter diesen Vertrag fallende Garantie oder ein Rechtsmittel
ihren/seinen Hauptzweck verfehlt. In einigen Rechtsgebieten ist der
Ausschluss oder die Beschränkung von zufälligen oder Folgeschäden
nicht zulässig, daher gilt die oben genannte Beschränkung oder der
Ausschluss möglicherweise nicht für den Käufer.
86
Contour Haftungsausschluss
Jeder Käufer, Benutzer und an der Nutzung von Produkten von Contour
Inc. („Contour“) Beteiligte stimmt dem Folgenden zu:
+ Contour fördert oder unterstützt keinerlei risikoreiche, nachlässige
bzw. gefährliche Handlungen im Zusammenhang mit der
Nutzung seiner Produkte.
+ Contour ist nicht haftbar zu machen für die Nutzung oder
missbräuchliche Nutzung von Contour Produkten oder aufgezeichnete
Videos, die als illegal eingestuft werden könnten.
+ Contour ist nicht verantwortlich für illegale Handlungen im
Zusammenhang mit der Aufzeichnung, der versuchten Aufzeichnung
oder Bearbeitung von mit unseren Produkten aufgezeichneten Videos.
+ Der Hauptzweck der Contour Produkte ist die Aufzeichnung von nach
dem Gesetz legalen Sportaktivitäten.
DEBenutzerhandbuch
87
Wir sind für Sie da Wir sorgen dafür, dass Ihnen Shoot&Share immer leicht
von der Hand geht, und möchten Ihnen zu einem großartigen Contour+
Erlebnis verhelfen. Wenden Sie sich also bei Fragen und Problemen an uns.
Den Service in Anspruch nehmen Um den Garantieservice in Anspruch
zu nehmen, registrieren Sie Ihr Produkt unter www.contour.com
innerhalb von 180 Tagen ab dem Kaufdatum. Falls Sie den Service in
Anspruch nehmen möchten, werden Sie möglicherweise aufgefordert,
das Produkt unter Übernahme der Zustellungskosten dem Unternehmen
zuzusenden – entweder in der Originalverpackung oder einer vergleichbar
geschützten Verpackung. Legen Sie einen Kaufnachweis (Rechnung oder
Erhaltsbestätigung) bei, der belegt, dass der Garantiezeitraum noch
nicht abgelaufen ist. Daraufhin wird Contour das Produkt – nach eigenem
Ermessen – ersetzen oder reparieren. Senden Sie das Produkt nur dann an
Contour, wenn Sie ausdrücklich dazu aufgefordert werden.
Service-Zeiten: Montag-Freitag (9 bis 18 Uhr PST)
Gebührenfreie Hotline in den USA: 866.397.6920
Internationale Hotline: +1 206 792.5226
E-Mail: [email protected]
Web: www.contour.com/support
88
Die Contour Freihandkamera bzw. damit verbundene Software und andere
Contour Produkte sind durch Urheberrechte, internationale Abkommen
und verschiedene Patente, darunter das US-amerikanische Patent
D616,006, geschützt. Weitere Patente sind in den USA und einer Reihe
anderer Ländern angemeldet oder registriert. Eine Liste der geltenden
Patente finden Sie unter www.contour.com.
Alle in diesem Dokument erwähnten Marken und registrierten Marken sind
Eigentum ihrer jeweiligen Inhaber. Contour+ ist ein Produkt von Contour
Inc., Seattle, Washington, USA. www.contour.com
©2011 Contour Inc. Alle Rechte vorbehalten.
DEBenutzerhandbuch
EU Version 2011.02
89
IT Istruzioni per l'uso
91
INFORMAZIONI SULLA VIDEOCAMERA
A Stato Registrazione/GPS
B Interruttore registrazione
C Pulsante Bluetooth
D Lente rotante
E Presa microfono
F Alloggiamento batteria
G Sicura batteria
H Pulsante formattazione scheda
IUSB
J Interruttore configurazione
P
K Slot Scheda microSD
L Slot Connect View
O
MHDMI
N Stato memoria
O Pulsante di accensione
P Stato batteria
N
A
E
H
I
G
J
1
2
F
K
A
M
L
92
IT
Istruzioni per l’uso
FUNZIONI BASE
93
+ OPERAZIONI PRELIMINARI
+ Spingere verso l’alto per aprire
lo sportellino.
+ Inserire la batteria con il segno
(+) disposto correttamente.
+ Allineare lo sportellino posteriore
leggermente al di sopra della
videocamera e farlo
scorrere in basso finché non
scatta in posizione.
94
+ ALIMENTAZIONE ACCESA
+ Premere saldamente il pulsante
di accensione e rilasciarlo
immediatamente.
+ La videocamera emette un segnale
acustico e il LED Registrazione/GPS
lampeggia con il colore verde.
+ A questo punto, è possibile registrare.
+ REGISTRA
+ Avvio: spostare l’interruttore in avanti. La videocamera emette
un segnale acustico una sola volta e il LED anteriore
Registrazione/GPS diventa rosso.
+ Interruzione: spostare l’interruttore indietro. La videocamera
emette un segnale acustico due volte e il LED anteriore
Registrazione/GPS diventa verde.
+ Il primo video è fatto!
Nota: mentre la videocamera cerca di ottenere il rilevamento della posizione GPS, lo
stato Registrazione/GPS lampeggia e quando ottiene il rilevamento, la luce diventa fissa.
IT
Istruzioni per l’uso
95
+ USO DELLA FUNZIONE GPS - La funzione GPS viene attivata automaticamente
in Contour+ all’accensione della videocamera. Il modulo GPS deve acquisire
4 satelliti GPS per ottenere il rilevamento della posizione (Rilevamento). Il
LED dello stato Registrazione/GPS nella parte anteriore della videocamera
lampeggia (di luce verde o rossa, a seconda che la registrazione sia o meno
in corso) mentre la videocamera cerca i satelliti e ottiene il rilevamento. Una
volta ottenuto il rilevamento, la spia dello stato Registrazione/GPS rimane
accesa fissa (verde o rosso). La capacità del modulo GPS della videocamera
di acquisire i satelliti è influenzata da variabili ambientali. Contour+ è più
efficiente nell’ottenere il rilevamento in situazione di “cielo aperto” o di
“orizzonte privo di ostacoli”. Le principali variabili ambientali sono:
+ Ambiente esterno (il GPS non funzione in ambienti chiusi o dove c’è
un ostacolo nel soffitto).
+ Nessun edificio alto, colline od oggetti che bloccano la vista verso
il cielo o l’orizzonte.
+ Non in un “canalone” naturale o urbano dove i segnali dei satelliti
possono rimbalzare prima di raggiungere la videocamera.
+ Il cursore di registrazione della videocamera (dove si trova l’antenna GPS)
non è oscurato da indumenti, altre apparecchiature o il corpo dell’utente.
+ La batteria della videocamera è ben carica (più del 30% di carica).
+ Nessun altro dispositivo elettronico nelle vicinanze che emetta rumore
elettronico che potrebbe interferire con l’antenna della videocamera.
96
+ Nessun albero in alto.
+ La videocamera rimane ferma fino a quando
viene acquisita la posizione.
Nota: Contour+ registra
filmati anche se il
sistema GPS non ha
rilevato la posizione.
In condizioni ideali (come descritto sopra),
la videocamera Contour+ ottiene in genere il
rilevamento della posizione in 30 o 60 secondi.
Se la videocamera non ha ottenuto il rilevamento della posizione entro
4 minuti, spegnerla, rimuovere la batteria per almeno 10 secondi,
installarla nuovamente e riaccendere la videocamera. Questa
operazione azzera il modulo GPS.
Se Contour+ ha rilevato la posizione entro un lasso di 2-4 ore dopo
essere stata spenta e la batteria è rimasta nella videocamera,
quest’ultima dovrebbe in genere rilevare la posizione in meno di 30
secondi quando viene riaccesa.
Collegamento di Contour+ a Storyteller prima dell’utilizzo della
videocamera per caricare automaticamente il file AssistNow nella
scheda microSD card e nella memoria della videocamera. Il file
contiene i dati attuali relativi alle deviazioni nelle orbite dei satelliti GPS
e può accelerare il rilevamento della posizione dal parte del modulo
GPS (spesso in non più di 30 secondi).
IT
Istruzioni per l’uso
97
+ INTERRUTTORE CONFIGURAZIONE VIDEOCAMERA
Per selezionare il formato video, utilizzare l’interruttore presente
sotto lo sportellino posteriore.
Formati predefiniti:
1: 1280 x 720 a 60 fps
2: 1920 x 1080 a 30 fps
Formati alternativi:
+ 1280 x 960 a 30 fps
+ 1280 x 720 a 30 fps
+ Modalità immagine
+ ALIMENTAZIONE
Ricarica
+ Collegare al computer con un
cavo USB.
+ La spia rossa indica che la
batteria si sta caricando.
+ La carica è completa quando
la spia diventa di colore verde
(circa 4 ore).
98
Spegnimento
+ Tenere premuto il pulsante di
accensione per 3 secondi.
+ Viene emesso un doppio
segnale acustico e le spie si
spengono.
Nota: spegnere sempre la
videocamera prima di
rimuovere la scheda microSD.
+ STATO
Premere il pulsante di accensione mentre la videocamera
è accesa per verificare lo stato.
+ Memoria/Batteria disponibile
Verde > 50%
Giallo 20-50%
Rosso < 20%
+ ERRORI
Quando la videocamera non è in grado di registrare a causa di un errore,
emette un segnale acustico 3 volte. Osservare i LED dello stato per
determinare quale sia il problema.
+ Lo stato della batteria lampeggia con una luce rossa e la videocamera
si spegne. Il livello di carica della batteria è troppo basso.
+ La spia dello stato memoria lampeggia con una luce gialla. Nessuna
scheda microSD nella videocamera.
+ La spia dello stato memoria lampeggia con una luce gialla. La scheda
microSD è piena.
+ La spia dello stato memoria lampeggia di colore giallo poi diventa
rossa. È necessario formattare la scheda microSD nella
videocamera (vedere pagina 108).
IT
Istruzioni per l’uso
99
+ SUPPORTO ROTANTE PER SUPERFICIE PIATTA
+ È consigliabile far aderire il supporto al casco a temperatura ambiente.
+ Individuare il punto migliore per la videocamera. L’area di installazione
deve essere liscia e piatta.
+ Controllare angolazione e posizione facendo scorrere la videocamera
sull’apposito supporto e registrando un filmato di prova.
+ Pulire la superficie con alcol e fare aderire il supporto. L’indurimento
dell’adesivo richiede fino a 24 ore.
+ Far scorrere la videocamera sulle guide.
+ Sbloccare il supporto e ruotare
la videocamera fino a
raggiungere l’angolazione ideale.
+ Premere “Lock” per bloccare
la videocamera nella
posizione scelta.
Nota: prima di utilizzare i vari supporti in attività ricreative, è necessario stabilire se la
potenza di sostegno del supporto è adeguata e sicura. Contour non offre garanzie per
la perdita delle videocamere.
100
+ CORDINO
+ Sganciare il cordino.
+ Inserire un’estremità del cordino
nel foro laterale della
videocamera e farlo fuoriuscire.
Utilizzare uno spillo per
facilitare il passaggio del cordino
attraverso il foro della videocamera.
+ Fissare l’altra metà del cordino al supporto.
+ Riagganciare il cordino.
Nota: NON COLLEGARE IL CORDINO ALLA VIDEOCAMERA QUANDO LA VIDEOCAMERA
VIENE MONTATA SU UN CASCO O SUGLI OCCHIALI, QUANDO LA VIDEOCAMERA
VIENE UTILIZZATA IN PRESENZA DI VENTI FORTI O A VELOCITÀ ELEVATE O IN
QUALSIASI ALTRA SITUAZIONE NELLA QUALE LA VIDEOCAMERA POTREBBE
CAUSARE DANNI O FERITE QUALORA SI SGANCIASSE DAL SUPPORTO E RESTASSE
LEGATA AL CORDINO. COLLEGANDO IL CORDINO ALLA VIDEOCAMERA, L’UTENTE
ACCETTA DI RINUNCIARE A QUALSIASI RIVENDICAZIONE NEI CONFRONTI DI
CONTOUR, INC., DELLE SUE AFFILIATE, DEI RISPETTIVI AGENTI, DIPENDENTI,
DIRIGENTI O DIRETTORI RELATIVA ALL’USO DEL CORDINO.
IT
Istruzioni per l’uso
101
FUNZIONI AVANZATE
103
+ SOFTWARE
+ Contour Storyteller: software di editing per Mac/PC che si collega alla
videocamera con un cavo USB. www.contour.com/support
+ Applicazione mobile: funziona con la scheda Connect View per allineare la
videocamera e modificare le impostazioni.www.contour.com/mobile
+ IMPOSTAZIONI DI REGOLAZIONE VIDEOCAMERA
Caricare Storyteller nel computer, collegare la videocamera alla porta USB,
aprire Storyteller e selezionare “Tools → Configure Camera,” (Strumenti →
Configura videocamera) oppure regolare con l’applicazione mobile.
È possibile regolare:
+ Risoluzione e frame rate
+ Livello di esposizione
+ Nitidezza
+ Contrasto
+ Tasso di campionamento GPS
+ Livello audio
+ Alimentazione GPS
+ Bilanciamento del bianco + Spegnimento automatico
+ IMPOSTAZIONE DEL BILANCIAMENTO DEL BIANCO
+ Contour+ regola il bilanciamento del bianco automaticamente. Collegandosi
a Storyteller, è possibile configurare il bilanciamento del bianco in base ai
seguenti livelli predefiniti:
Automatico (predefinito)
2.800 K, lampada incandescente
4.000 K, lampada fluorescente
104
5.000 K, luce solare D50
6.500 K, cielo poco coperto D65
7.500 K, cielo nuvoloso
9.000 K, ombra
10.000 K, Xenon HID
+ SCARICAMENTO DI FILE DIRETTAMENTE DALLA VIDEOCAMERA
+ Collegare la videocamera a qualsiasi PC o Mac utilizzando il
cavo USB in dotazione.
+ La videocamera viene montata come un generico dispositivo
di archiviazione.
+ Accedere al dispositivo installato.
+ I file video e di immagine si trovano nella directory \DCIM\100MEDIA.
È possibile copiare i file video sul disco rigido e riprodurli con
qualsiasi lettore di filmati .mov (ad es. Quicktime, Windows Media
Player, Storyteller e VLC).
Utenti Mac: quando si eliminano i file dalla scheda microSD,
assicurarsi di svuotare il “cestino” della videocamera mentre è
collegata al Mac. In caso contrario, i file eliminati resteranno nella
scheda microSD della videocamera in una cartella nascosta e
potrebbero impedire la corretta registrazione dei filmati futuri.
IT
Istruzioni per l’uso
105
+ RIPRODUZIONE DI FILMATI HDMI
+ Con la videocamera attivata, collegare un cavo HDMI tra la porta di
uscita HDMI della videocamera e un monitor video.
+ La videocamera visualizza una schermata contenente le anteprime
dei filmati memorizzati sulla scheda microSD.
+ Premere e rilasciare il pulsante di accensione per attivare o
disattivare i diversi filmati disponibili.
+ Spostare in avanti l’interruttore di registrazione per riprodurre un
filmato a schermo intero.
+ Mentre il filmato è in riproduzione, spostare indietro l’interruttore di
registrazione su pausa.
+ Mentre il filmato è in pausa, premere e rilasciare il pulsante di accensione
per tornare alle anteprime dei video memorizzati sulla scheda microSD.
+ STREAMING DI FILMATI HDMI
+ Con la videocamera disattivata, collegare un cavo HDMI tra la porta di
uscita HDMI della videocamera e un monitor, registratore o trasmettitore.
+ Quando la videocamera è accesa, lo streaming dei filmati HDMI si
avvia tramite la porta HDMI.
+ Il filmato continua ad andare in streaming mentre la videocamera è
accesa, anche se sta registrando.
106
+ BLUETOOTH
Contour+ è dotato di Bluetooth 2.1 + EDR integrato e di una scheda Connect View
preinstallata. Utilizzando un dispositivo mobile e l’applicazione mobile Contour Camera,
è possibile configurare le impostazioni della videocamera in tempo reale e ottenere
l’anteprima di ciò che viene acquisito dalla videocamera.
+ Per verificare la compatibilità del proprio dispositivo mobile, visitare
www.contour.com/mobile.
+ Scaricare e installare l’applicazione mobile Contour Camera sul dispositivo mobile.
+ Premere il pulsante Bluetooth (vedere il punto C a pag. 32) e tenerlo premuto per 5
secondi. Verrà attivato Bluetooth e verrà inviata una richiesta di associazione. Il LED blu
anteriore inizierà a lampeggiare. (Nota: se si fa scorrere l’interruttore di registrazione in
avanti, la videocamera esce dalla modalità Bluetooth).
+ Sul dispositivo mobile, abilitare Bluetooth. Attendere che il dispositivo mobile individui
la videocamera Contour+. Quando viene visualizzato ‘Contour+’, selezionare questa voce
per accettare la richiesta di associazione. Quando il LED situato nella parte anteriore
della videocamera diventa blu fisso, l’associazione è completa.
+ Aprire l’applicazione mobile Contour per configurare le impostazioni della videocamera
in tempo reale e ottenere l’anteprima di ciò che viene acquisito dalla videocamera.
+ Se la connessione Bluetooth si interrompe, l’applicazione segnala il problema.
In questo caso, riattivare Bluetooth premendo una volta il rispettivo pulsante. Verrà
emesso un segnale acustico singolo e la videocamera si collegherà utilizzando
l’associazione preesistente.
+ Per disattivare Bluetooth, premere il pulsante Bluetooth situato sulla videocamera.
IT
Istruzioni per l’uso
107
+ FORMATTAZIONE SCHEDA microSD
Scheda micro SD non inclusa. Supporta schede microSD fino a 32 GB È
INDISPENSABILE formattare tutte le schede microSD prima di utilizzarle
nella videocamera Contour+. Seguire le istruzioni riportate di seguito.
1. Rimuovere la scheda microSD.
2. Accendere la videocamera (emette un segnale acustico 3 volte).
3. Inserire la scheda microSD.
4. Con un piccolo oggetto appuntito (ad esempio l’estremità di una graffetta),
premere saldamente il pulsante di formattazione (vedere “H” su pagina
78) e tenerlo premuto fino a quando la videocamera emette un singolo
segnale acustico e il LED dello stato della memoria lampeggia una volta sola.
L’operazione non dovrebbe richiedere più di 10 secondi.
5. Spegnere la videocamera tenendo premuto il pulsante di
accensione per 3-5 secondi.
6. Accendere la videocamera. Ora è possibile registrare dei filmati sulla
scheda microSD riformattata.
Nota: durante la procedura di riformattazione, tutti i dati esistenti sulla
scheda microSD andranno persi.
108
Precauzioni e garanzia
Questa importante guida descrittiva del prodotto contiene informazioni
relative a norme, sicurezza, gestione, smaltimento e riciclaggio,
oltre alla garanzia limitata di 180 giorni per la videocamera Contour+.
Prima di utilizzare la videocamera Contour+, leggere attentamente le informazioni
sulla sicurezza riportate di seguito e le istruzioni operative per evitare qualsiasi
tipo di lesione. Per istruzioni operative dettagliate e per leggere l’Importante guida
descrittiva del prodotto aggiornata, visitare il sito: www.contour.com/support.
ATTENZIONE: se le istruzioni per la sicurezza non vengono rispettate, si
possono provocare incendi, shock elettrici o altri danni o lesioni.
Batteria e modo d’uso
La batteria agli ioni di litio può diventare pericolosa se non è trattata
correttamente. Non smontare, schiacciare o forare la batteria. Non
immergerla nell’acqua e conservarla in un luogo fresco e asciutto se non viene
utilizzata. Non utilizzare o lasciare la batteria vicino a una fonte di calore o alla
luce diretta del sole. La videocamera Contour+ utilizza una batteria ricaricabile
agli ioni di litio da 3,7 V, 1050 mAh. Non utilizzare batterie diverse da quelle
progettate specificamente per la videocamera Contour+. Se si utilizzano altre
IT
Istruzioni per l’uso
109
batterie, si invalida la garanzia fornita da Contour, Inc. e si potrebbero provocare
incendi o esplosioni.
Per ricaricare la batteria, utilizzare solo il cavo USB Contour GPS in una porta
USB ad alta potenza di un computer o di un altro dispositivo conforme
agli standard USB 2.0 o 1.1 oppure un adattatore Contour a parete, per
automobili o un caricabatterie.
Informazioni per lo smaltimento
Non bruciare la videocamera Contour+ o la batteria agli ioni di litio. Per lo
smaltimento delle batterie, rispettare le leggi e i regolamenti locali.
110
Utilizzo del cordino: NON COLLEGARE IL CORDINO ALLA VIDEOCAMERA
QUANDO LA VIDEOCAMERA VIENE MONTATA SU UN CASCO O SUGLI
OCCHIALI, QUANDO LA VIDEOCAMERA VIENE UTILIZZATA IN PRESENZA DI
VENTI FORTI O A VELOCITÀ ELEVATE O IN QUALSIASI ALTRA SITUAZIONE
NELLA QUALE LA VIDEOCAMERA POTREBBE CAUSARE DANNI O FERITE
QUALORA SI SGANCIASSE DAL SUPPORTO E RESTASSE LEGATA AL CORDINO.
COLLEGANDO IL CORDINO ALLA VIDEOCAMERA, L’UTENTE ACCETTA DI
RINUNCIARE A QUALSIASI RIVENDICAZIONE NEI CONFRONTI DI CONTOUR,
INC., DELLE SUE AFFILIATE, DEI RISPETTIVI AGENTI, DIPENDENTI, DIRIGENTI
O DIRETTORI RELATIVA ALL’USO DEL CORDINO.
Informazioni FCC
Videocamera Contour+
Modello: 1500
Questo dispositivo è conforme
alla parte 15 delle regole FCC.
Informazioni su Bluetooth
ID FCC: QOQWT21A
ID IC: 5123A-BGTWT21N
ACN: 135 810 098
Il funzionamento è soggetto alle condizioni seguenti:
+ Il dispositivo può non provocare interferenze dannose.
+ Il dispositivo deve accettare le interferenze ricevute, comprese quelle
che possono provocare funzionamenti indesiderati.
IT
Istruzioni per l’uso
111
Attenzione: eventuali modifiche o variazioni all’unità non approvate
espressamente da un responsabile della conformità potrebbero annullare il
diritto dell’utente a utilizzare il dispositivo. Nota: questo dispositivo è stato
testato e dichiarato conforme ai limiti stabiliti per i dispositivi digitali di classe
B, in base alla parte 15 delle regole FCC. Tali limiti sono stati fissati per
garantire una protezione ragionevole contro interferenze dannose in caso di
installazione residenziale. Il dispositivo genera, utilizza e irradia energia in
radiofrequenza e, se non viene installato e utilizzato in accordo con le istruzioni,
può causare interferenze dannose per le comunicazioni radio. Non vi è alcuna
garanzia che non si verifichino interferenze con una determinata installazione.
Qualora il dispositivo dovesse provocare interferenze dannose alla ricezione
radio o televisiva (determinabili spegnendo e riaccendendo i dispositivi), l’utente
può tentare di correggere il difetto adottando una delle misure seguenti:
+ Riorientare o riposizionare l’antenna di ricezione.
+ Aumentare la distanza tra dispositivo e ricevitore.
+ Collegare il dispositivo a una presa di corrente appartenente a un circuito
diverso da quello a cui è collegato il ricevitore.
+ Per ulteriori informazioni, consultare il rivenditore o un tecnico
radio/TV esperto.
112
Il simbolo CE sulla videocamera Contour+ ne indica la conformità
alla Direttiva europea sulla Compatibilità Elettromagnetica (EMC)
e ai Limiti e metodi di misurazione delle Caratteristiche delle
interferenze radio per le Apparecchiature di tecnologia informatica.
Industry Canada
This Class B device meets all requirements of the Canadian
Interference-Causing Equipment Regulations.
Riparazione o modifica
Non tentare di riparare o modificare da soli la videocamera Contour+.
Se si smonta la videocamera Contour+ o si rimuovono semplicemente
le viti esterne, si possono provocare danni non coperti dalla garanzia. La
videocamera Contour+ non contiene parti sostituibili dall’utente, fatta
eccezione per la scheda MicroSD e la batteria.
RoHS
Le videocamere Contour+ sono conformi alla direttiva europea ROHS
2002/95/EC e ad altre normative simili in vigore in altri paesi
concernenti la commercializzazione in Europa.
IT
Istruzioni per l’uso
113
GARANZIA LIMITATA DI CONTOUR, INC. Contour, Inc. (“Produttore”) garantisce all’utente finale originale (“Acquirente”) che per 180 giorni (“Periodo di
garanzia”) la videocamera Contour+ (escluso il software di terzi) e i relativi
accessori (“Prodotto”) non presenteranno difetti a livello di materiali e fattura,
a patto che siano stati installati correttamente e utilizzati per gli scopi previsti
e negli ambienti stabiliti. La garanzia non è ritenuta valida per un Prodotto che
sia stato: (i) alterato, riparato o modificato; oppure (ii) danneggiato o distrutto
da un incidente o un evento simile o da atti deliberati, sconsiderati o negligenti
o da omissioni di terzi. Nel caso si verifichi un difetto, restituire il Prodotto
al punto di acquisto originale o al Produttore, ma solo dopo aver ricevuto
l’approvazione esplicita del Produttore. L’Acquirente deve sostenere le spese
di spedizione del Prodotto al Produttore e il Produttore si accollerà le spese
di spedizione per restituire il Prodotto all’Acquirente dopo avere eseguito la
necessaria manutenzione prevista da questa garanzia limitata. L’unico diritto
dell’Acquirente e la sola responsabilità del Produttore previste dalla garanzia
sono la riparazione o la sostituzione (a sua scelta) da parte del Produttore del
Prodotto o il rimborso del prezzo d’acquisto tolti eventuali ribassi. Il Produttore non fornisce garanzie contro la perdita di dati (compresi i dati memoriz114
zati nel Prodotto restituito al Produttore per l’assistenza) e declina qualsiasi
responsabilità per tali perdite. L’Acquirente si assume tutta la responsabilità, e
di conseguenza libera il Produttore da eventuali obblighi, riguardo a eventuali
incidenti, lesioni, danni, decessi, perdite, attività illegali o altre rivendicazioni
che potrebbero verificarsi per o durante l’uso del Prodotto, siano essi prevedibili o meno dal Produttore.
TUTTE LE GARANZIE DI COMMERCIABILITÀ O IDONEITÀ PER UNO SCOPO
PARTICOLARE SONO LIMITATE ALLA DURATA DELLA GARANZIA ESPRESSA APPLICABILE. TUTTE LE ALTRE CONDIZIONI, RAPPRESENTAZIONI E
GARANZIE ESPRESSE O IMPLICITE, COMPRESE LE GARANZIE IM-PLI-CITE E DI NON VIOLAZIONE, VENGONO NEGATE. Alcune giurisdizioni non
prevedono limitazioni riguardo alla durata di una garanzia implicita, quindi
la limitazione sopra citata potrebbe non applicarsi all’Acquirente. Questa
garanzia concede all’Acquirente diritti legali specifici, ai quali potrebbero
aggiungersi altri diritti variabili in base alla giurisdizione in questione.
Il software di terzi allegato con il Prodotto viene fornito “COSÌ COM’È”.
L’Acquirente si assume tutti i rischi a livello di qualità, prestazioni, preIT
Istruzioni per l’uso
115
cisione ed effetti del software e, qualora tale software dovesse rivelarsi
difettoso, l’Acquirente, e non il Produttore, dovrà sostenere tutti i costi di
assistenza e riparazione necessari. NELLA MISURA MASSIMA CONSENTITA DALLA LEGGE, IN NESSUN CASO IL PRODUTTORE POTRÀ ESSERE
RITENUTO RESPONSABILE DI EVENTUALI PERDITE DI DATI, RICAVI O
PROFITTI O DI DANNI SPECIALI, INDIRETTI, CONSEGUENTI, INCIDENTALI O PUNITIVI, ANCHE PROVOCATI AL DI LÀ DELLA TEORIA DELLA
RESPONSAIBLITÀ, DERIVANTI O COLLEGATI ALL’USO O ALL’INCAPACITÀ
DI USARE IL PRODOTTO, ANCHE NEL CASO IN CUI IL PRODUTTORE SIA
STATO AVVISATO DEL POSSIBILE VERIFICARSI DI TALI DANNI. IN NESSUN CASO LA RESPONSABILITÀ DEL PRODUTTORE PUÒ SUPERARE
L’IMPORTO PAGATO DALL’ACQUIRENTE PER ACQUISTARE IL PRODOTTO.
Le summenzionate limitazioni si applicheranno anche se la garanzia o il
diritto garantiti da questo Accordo non raggiungeranno lo scopo prefissato. In alcune giurisdizioni non è prevista l’esclusione o la limitazione
di danni incidentali o conseguenti, quindi la limitazione o l’esclusione
potrebbe non applicarsi all’Acquirente.
116
Limitazione di responsabilità di Contour
Tutti gli acquirenti, gli utenti e chiunque altro sia coinvolto nell’uso dei
prodotti di Contour, Inc. (“Contour”) accettano le seguenti condizioni.
+ Contour non promuove né avalla rischi, disattenzione e/o azioni
pericolose quando si utilizzano i suoi prodotti.
+ Contour non è responsabile di eventuali usi o usi impropri dei prodotti
Contour o di eventuali filmati registrati illegalmente.
+ Contour non è responsabile di eventuali azioni illegali eseguite durante
la registrazione, il tentativo di registrazione o l’editing di filmati realizzati
con i suoi prodotti.
+ Lo scopo principale dei prodotti Contour è la registrazione di attività
sportive legali, come stabilito da tutte le leggi locali, statali e federali.
IT
Istruzioni per l’uso
117
Assistenza clienti Il nostro primo obiettivo è rendere estremamente
semplice il processo di registrazione e condivisione. Desideriamo
garantire agli utenti la possibilità di utilizzare al meglio la videocamera
Contour+, pertanto siamo a completa disposizione per qualsiasi domanda.
Come contattare l’assistenza Per richiedere l’applicazione della garanzia,
è necessario registrare il prodotto all’indirizzo www.contour.com entro
180 giorni dalla data di acquisto del prodotto. Se l’utente deve ricorrere
all’assistenza, è possibile che gli venga chiesto di spedire all’azienda
il prodotto con spese prepagate, nella confezione o nell’imballaggio
originale con lo stesso livello di protezione, e di fornire una prova di
acquisto, sotto forma di atto di vendita o ricevuta, che attesti che l’unità è
ancora nel periodo di garanzia. Contour sostituirà o riparerà il prodotto a
sua unica discrezione. Non restituire il prodotto a Contour a meno che non
sia stato espressamente richiesto.
Orari: lun-ven, dalle 9:00 alle 18:00 (fuso orario del Pacifico)
Numero gratuito U.S.A.: 866.397.6920
Numero internazionale: +1 206 792.5226
E-mail: [email protected]
Web: www.contour.com/support
118
Le videocamere portatili Contour e/o i software ad esse associati e gli altri
prodotti Contour sono protetti dal copyright, dai trattati internazionali e
da numerosi brevetti, tra cui: brevetti U.S.A.: D616,006. Altri brevetti sono
registrati o in attesa di approvazione negli Stati Uniti e in molti paesi di
tutto il mondo. Per un elenco completo dei brevetti validi, visitare il sito
www.contour.com.
Tutti i marchi e i marchi registrati citati sono dei rispettivi proprietari.
Contour+ è un prodotto di Contour, Inc. con sede a Seattle, Washington.
www.contour.com ©2011 Contour, Inc. Tutti i diritti riservati.
IT
Istruzioni per l’uso
EU Version 2011.02
119
ES Manual de instrucciones
121
DESCRIPCIÓN DE LA CÁMARA
A Indicador de estado de grabación/GPS
B Botón de grabación
C Botón Bluetooth
D Lente rotativa
E Conexión para micrófono
F Ranura para la batería
G Pestillo de cierre de la batería
H Botón de formato de la tarjeta
IUSB
J Botón de configuración
P
K Ranura Tarjeta microSD
L Ranura Connect View
O
MHDMI
N Estado de la memoria
O Botón de encendido
P Estado de la batería
N
A
E
H
I
G
J
1
2
F
K
A
M
L
122
ES Manual de instrucciones
FUNCIONES BÁSICAS
123
+ ANTES DE EMPEZAR
+ Para abrir el compartimento,
empújelo hacia arriba.
+ Introduzca la batería con el
símbolo (+) en el sentido indicado.
+ Alinee el compartimento posterior
ligeramente por encima de
la cámara y deslícelo hacia abajo
hasta que escuche un clic.
124
+ ENCENDIDO
+ Pulse el botón de encendido
firmemente y suéltelo de inmediato.
+ La cámara emite un pitido y el LED
frontal de grabación/GPS parpadea
en un verde brillante.
+ Ya puede empezar a grabar.
+ GRABACIÓN
+ Iniciar: deslice el botón hacia adelante. La cámara emite un pitido y el
LED frontal de grabación/GPS pasa a ser de color rojo.
+ Detener: deslice el botón hasta su posición inicial. La cámara emite dos
pitidos y el LED frontal de grabación/GPS pasa a ser de color verde.
+ ¡Felicidades! Acaba de grabar su primer vídeo.
Nota: el indicador de estado de grabación/GPS parpadeará mientras la cámara obtiene
un punto de posición del GPS y dejará de parpadear cuando lo haya localizado.
ES Manual de instrucciones
125
+ USO DE LA FUNCIÓN DE GPS
La función de GPS de la cámara Contour+ se activa automáticamente al encender
el dispositivo. El módulo del GPS debe conectar con 4 satélites GPS para obtener
un punto de posición (establecida). El LED que indica el estado de grabación/GPS
en la parte frontal de la cámara parpadeará (en verde o en rojo, en función de si
la cámara está grabando o no) mientras la cámara busca satélites y obtiene un
punto de posición. Una vez obtenido el punto de posición, el indicador luminoso de
estado de grabación/GPS dejará de parpadear (se iluminará en verde o rojo).Las
condiciones ambientales pueden influir en la capacidad del módulo del GPS de la
cámara para conectar con los satélites. El software Contour+ es más eficaz a la
hora de obtener un punto de posición en entornos de “cielo abierto” u “horizonte
despejado”. A continuación, se indican las condiciones ambientales que más
influyen a la hora de conectar con los satélites:
+ Entorno exterior (el GPS no funciona en interiores ni en
espacios no despejados).
+ Espacios sin edificios altos, precipicios u objetos que bloqueen
la vista del cielo o el horizonte.
+ No se recomienda el uso en “cañones” naturales o urbanos, ya que las señales
de los satélites pueden rebotar antes de llegar a la cámara.
+ El control deslizante de grabación de la cámara (donde está ubicada la antena
del GPS) no queda tapado por ropa, otra equipación ni el cuerpo del usuario.
+ La batería de la cámara está bien cargada (más del 30% de la carga).
126
+ No hay otros dispositivos electrónicos cerca
que emitan señales que puedan interferir
con la antena de la cámara.
+ No hay árboles alrededor.
+ La cámara permanece inmóvil hasta que
se obtiene un punto de posición.
Nota: la cámara Contour+
puede grabar vídeos
incluso cuando el sistema
de GPS no ha obtenido un
punto de posición.
En las condiciones idóneas (descritas anteriormente), la cámara Contour+
suele obtener un punto de posición en un intervalo de 30 a 60 segundos. Si la
cámara no ha obtenido el punto de posición en 4 minutos, apáguela, extraiga
la batería durante al menos 10 segundos, vuelva a insertarla y encienda la
cámara. Este proceso restablece el módulo del GPS.
Si la cámara Contour+ recibe el punto de posición durante un intervalo de 2
a 4 horas después del apagado y la batería ha permanecido en la cámara, es
probable que se obtenga un punto de posición en menos de 30 segundos a
partir del próximo encendido.
Conecte Contour+ a Storyteller antes de utilizar la cámara para cargar
automáticamente el archivo AssistNow en la tarjeta microSD y en la
memoria de la cámara. Este archivo contiene datos actuales relativos a las
desviaciones de las órbitas de los satélites GPS y pueden ayudar al módulo
del GPS a obtener un punto de posición con mayor rapidez
(normalmente, en 30 segundos o menos).
ES Manual de instrucciones
127
+ BOTÓN DE CONFIGURACIÓN DE LA CÁMARA
Use el botón situado debajo del compartimento posterior para
seleccionar el formato de vídeo.
Formatos predeterminados:
1: 1.280 x 720 @ 60 fps
2: 1.920 x 1.080 @ 30 fps
+ RECARGA Y APAGADO
Recarga
+ Conecte la cámara al ordenador
con el cable USB.
+ Una luz roja indica que se está
realizando la carga.
+ Cuando la carga está completa,
la luz pasa a ser de color verde
(aproximadamente, tras 4 horas).
128
Otros formatos:
+ 1.280 x 960 @ 30 fps
+ 1.280 x 720 @ 30 fps
+ Modo de película
Apagado
+ Pulse el botón de encendido
durante 3 segundos
sin soltarlo.
+ Se escuchan dos pitidos y las
luces se apagan.
Nota: apague siempre la
cámara antes de extraer
la tarjeta microSD.
+ ESTADO
Para comprobar el estado, pulse el botón de encendido mientras la
cámara está encendida.
+ Memoria/batería disponible
Verde > 50%
Amarillo 20-50%
Rojo < 20%
+ INDICACIONES DE ERROR
Cuando la cámara no puede grabar a causa de un error, emite tres
pitidos. Observe los LED de estado para determinar el problema.
+ Los indicadores de estado de la batería parpadean en rojo y luego
se apagan. La carga de la batería es demasiado baja.
+ El indicador de estado de la memoria parpadea en amarillo.
No hay tarjeta microSD en la cámara.
+ El indicador de estado de la memoria parpadea en rojo.
La tarjeta microSD está llena.
+ El indicador de estado de la memoria parpadea en amarillo y rojo.
Es necesario formatear la tarjeta microSD en la cámara
(consulte la pagina 138).
ES Manual de instrucciones
129
+ ROTACIÓN DEL SOPORTE PARA SUPERFICIE PLANA
+ Es mejor fijar el soporte al casco a temperatura ambiente.
+ Busque la mejor ubicación para la cámara. El área de
colocación del soporte debe ser lisa y plana.
+ Compruebe el ángulo y la posición deslizando la cámara
en el soporte y realice un vídeo de prueba.
+ Limpie la superficie con alcohol y fije el soporte.
El adhesivo tarda hasta 24 horas en surtir
efecto completamente.
+ Deslice la cámara por los rieles.
+ Desbloquee el soporte y gire la
cámara hasta lograr el
ángulo perfecto.
+ Pulse “Lock” para bloquear
la cámara en esa posición.
Nota: antes de utilizar alguno de nuestros soportes en actividades recreativas, es necesario
determinar si la fijación del soporte es adecuada y segura. La garantía de Contour no incluye
la pérdida de cámaras.
130
+ CORREA
+ Abra el clip de la correa.
+ Pase un extremo de la correa a
través del orificio lateral de la
cámara, dando una vuelta
completa como se indica en la
ilustración. Resulta útil utilizar
un alfiler para ayudar a pasar la
correa a través del orificio de la cámara.
+ Haga lo mismo con la otra mitad de la correa en el soporte.
+ Cierre el clip para unir las dos partes de la correa.
Nota: NO FIJE LA CORREA A LA CÁMARA CUANDO ÉSTA SE MONTE SOBRE UN CASCO O
GAFAS PROTECTORAS, CUANDO LA CÁMARA SE VAYA A USAR CON VIENTOS FUERTES O A
VELOCIDADES ELEVADAS NI EN NINGUNA OTRA CIRCUNSTANCIAS EN LAS QUE LA
CÁMARA PUEDA CAUSAR DAÑOS O LESIONES EN EL CASO DE SOLTARSE DEL SOPORTE Y
QUEDAR SUJETA POR LA CORREA. AL FIJAR LA CORREA A LA CÁMARA, USTED RENUNCIA
A DEMANDAR A CONTOUR, INC. Y SUS FILIALES, AGENTES, EMPLEADOS, RESPONSABLES
O DIRECTORES POR POSIBLES PROBLEMAS DERIVADOS DEL USO DE LA CORREA.
ES Manual de instrucciones
131
FUNCIONES AVANZADAS
133
+ SOFTWARE
+ Contour Storyteller: software de edición para Mac/PC que se conecta
a la cámara con un cable USB. www.contour.com/support.
+ Mobile App - se utiliza con la tarjeta Connect View para alinear la
cámara y cambiar la configuración. www.contour.com/mobile.
+ AJUSTE DE LA CONFIGURACIÓN DE LA CÁMARA Cargue Storyteller en el
ordenador, conecte la cámara a un puerto USB, abra Storyteller y seleccione
“Tools” (Herramientas) → “Configure Camera” (Configurar Cámara), o bien
ajuste la configuración de la cámara mediante Mobile App.
Puede ajustar las opciones siguientes:
+ Resolución y fotogramas
por segundo
+ Nivel de exposición
+ Nitidez
+ Contraste
+ Nivel de audio
+ Balance de blancos
+ Tasa de muestreo del GPS
+ Encendido del GPS
+ Apagado automático
+ CONFIGURACIÓN DEL BALANCE DE BLANCOS
+ Contour+ ajusta automáticamente el nivel del balance de blancos. La conexión
con Storyteller permite configurar el balance de blancos según los niveles
preconfigurados de fábrica:
Automático (Predeterminado)
2.800 K: Tungsteno
4.000 K: Fluorescente
134
5.000 K: Luz de día normal D50 9.000 K: Sombra
6.500 K: Nublado D65
10.000 K: Xenón HID
7.500 K: Brumoso
+ DESCARGA DE ARCHIVOS DIRECTAMENTE DESDE LA CÁMARA
+ Conecte la cámara a cualquier equipo PC o Mac mediante el cable
USB suministrado.
+ La cámara aparecerá como dispositivo de almacenamiento genérico.
+ Acceda al dispositivo conectado.
+ Los archivos de vídeo y de imágenes fijas están ubicados en el
directorio \DCIM\100MEDIA.
Los archivos de vídeo pueden copiarse en el disco duro y reproducirse
con cualquier reproductor de vídeos .mov (p. ej., Quicktime, Windows
Media Player, Storyteller y VLC).
Usuarios de Mac: cuando borre archivos de la tarjeta microSD,
asegúrese de vaciar la papelera mientras la cámara está conectada
al Mac. En caso contrario, los archivos eliminados permanecerán
en la tarjeta microSD de la cámara en una carpeta oculta y podrían
impedir que los próximos vídeos se grabaran correctamente.
ES Manual de instrucciones
135
+ REPRODUCCIÓN DE VÍDEOS HDMI
+ Con la cámara encendida, conecte un cable HDMI entre el puerto de
salida HDMI de la cámara y una pantalla de vídeo.
+ La cámara mostrará una pantalla con imágenes en miniatura de los
vídeos almacenados en la tarjeta microSD.
+ Pulse y suelte el botón de encendido para pasar de un vídeo a otro.
+ Deslice el botón de grabación hacia adelante para visualizar
un vídeo en pantalla completa.
+ Durante la reproducción de un vídeo, puede deslizar el botón de grabación
hasta su posición inicial para detenerlo.
+ Mientras un vídeo está detenido, puede pulsar y soltar el botón de
encendido para volver a las imágenes en miniatura de los vídeos
almacenados en la tarjeta microSD.
+ TRANSMISIÓN (STREAMING) DE VÍDEOS HDMI
+ Con la cámara apagada, conecte un cable HDMI entre el puerto de salida
HDMI de la cámara y una pantalla, una grabadora o un transmisor.
+ Al encender la cámara, se iniciará la transmisión (streaming) del vídeo a
través del puerto HDMI.
+ El vídeo continuará transmitiéndose (streaming) mientras la cámara esté
encendida, incluso si la cámara está grabando.
136
+ BLUETOOTH
Contour+ incluye Bluetooth 2.1 + EDR integrado y una tarjeta Connect View
preinstalada. Con un dispositivo móvil y la aplicación para móvil de
Contour Camera, podrá configurar su cámara en tiempo real y previsualizar
lo que ve la cámara.
+ Compruebe la compatibilidad de su dispositivo móvil en www.contour.com/mobile.
+ Descargue e instale la aplicación para móvil de Contour Camera en su
dispositivo móvil.
+ Mantenga pulsado el botón Bluetooth (véase C en página 32) durante 5
segundos para activar el Bluetooth e iniciar una solicitud de emparejamiento.
El LED frontal empezará a parpadear en azul. (Nota: si desliza el botón de
grabación hacia adelante, la cámara abandonará el modo Bluetooth.)
+ Active el Bluetooth en el dispositivo móvil. Espere mientras el dispositivo móvil
localiza la cámara Contour+. Cuando vea ‘Contour+’, selecciónelo para aceptar
la solicitud de emparejamiento. El emparejamiento finaliza cuando el LED
frontal de la cámara deja de parpadear.
+ Abra Contour App para configurar la cámara en tiempo real y previsualizar lo
que ve la cámara.
+ La aplicación le notificará si se pierde la conexión Bluetooth. Si esto sucede,
pulse una vez el botón Bluetooth para activar el modo Bluetooth Oirá un pitido y
la cámara se volverá a emparejar con el dispositivo existente.
+ Para desactivar el Bluetooth, pulse el botón Bluetooth de la cámara.
ES Manual de instrucciones
137
+ FORMATEADO DE LA TARJETA microSD
Tarjeta microSD no incluida. La cámara admite tarjetas microSD de
hasta 32 GB. Todas las tarjetas microSD se DEBEN formatear
antes de utilizarlas en la cámara Contour+. Siga las instrucciones
que se indican a continuación.
1. Extraiga la tarjeta microSD.
2. Encienda la cámara (emitirá un triple pitido).
3. Inserte la tarjeta microSD.
4. Mediante un objeto fino y pequeño (como el extremo de un clip), pulse
el botón de formato firmemente (consulte el punto “H” en la pagina
104) y manténgalo pulsado hasta que la cámara emita un pitido y el
LED que indica el estado de la memoria parpadee una vez.
Esto debería producirse en un máximo de 10 segundos.
5. Apague la cámara pulsando el botón de encendido de 3 a 5 segundos.
6. Encienda la cámara. Ahora, el dispositivo está preparado para grabar
vídeos en la tarjeta microSD reformateada.
Nota: todos los datos existentes en la tarjeta microSD se perderán durante el
proceso de reformateado.
138
Precauciones y garantía
La presente Guía de información importante sobre el producto contiene
información sobre normativas, seguridad, manipulación, eliminación y reciclaje
así como sobre la garantía limitada de 180 días para la cámara Contour+.
Lea toda la información de seguridad y las instrucciones de funcionamiento que
encontrará a continuación antes de usar la cámara Contour+ para evitar daños. Para
obtener más instrucciones de funcionamiento y la Guía de información importante
sobre el producto más actualizada, visite: www.contour.com/support.
ADVERTENCIA: el incumplimiento de estas instrucciones de seguridad puede
ser causa de incendios, descargas eléctricas u otros daños y lesiones.
La batería y su manipulación
La batería de iones de litio puede presentar un peligro si se manipula
incorrectamente. No desmonte, aplaste ni perfore la batería de iones de litio.
No sumerja la batería en el agua y guárdela en un lugar fresco y seco cuando no
la utilice. No utilice ni deje la batería cerca de una fuente de calor o bajo la luz
directa del sol. Contour+ utiliza una batería recargable de iones de litio de 3,7 V
y 1.050 mAh. No utilice baterías que no se hayan diseñado específicamente para
la cámara Contour+. El uso de cualquier otra batería puede invalidar la garantía
ES Manual de instrucciones
139
suministrada por Contour, Inc. y puede presentar riesgo de incendio o explosión.
Para cargar la batería, utilice sólo el cable USB Contour con un puerto USB de
alta potencia de un ordenador u otro dispositivo compatible con los
estándares USB 2.0 ó 1.1, o el cargador de pared, coche o batería de Contour.
Información de eliminación
No deseche la cámara Contour+ ni la batería de iones de litio en el fuego.
Deshágase de las baterías de acuerdo con las leyes y los reglamentos locales.
140
Uso de la correa: NO FIJE LA CORREA A LA CÁMARA CUANDO ÉSTA SE
MONTE SOBRE UN CASCO O GAFAS PROTECTORAS, CUANDO LA CÁMARA SE
VAYA A USAR CON VIENTOS FUERTES O A VELOCIDADES ELEVADAS
NI EN NINGUNA OTRA CIRCUNSTANCIAS EN LAS QUE LA CÁMARA PUEDA
CAUSAR DAÑOS O LESIONES EN EL CASO DE SOLTARSE DEL SOPORTE Y
QUEDAR SUJETA POR LA CORREA. AL FIJAR LA CORREA A LA CÁMARA,
USTED RENUNCIA A DEMANDAR A CONTOUR, INC. Y SUS FILIALES,
AGENTES, EMPLEADOS, RESPONSABLES O DIRECTORES POR POSIBLES
PROBLEMAS DERIVADOS DEL USO DE LA CORREA.
Información sobre la FCC
Cámara Contour+
Modelo: 1500
Este dispositivo cumple con el
Apartado 15 del Reglamento de la FCC.
Información sobre el Bluetooth
ID de la FCC: QOQWT21A
ID de IC: 5123A-BGTWT21N
ACN: 135 810 098
Su funcionamiento está sujeto a las dos condiciones siguientes:
+ Este dispositivo no puede causar interferencias perjudiciales, y
+ Este dispositivo debe aceptar cualquier interferencia recibida, incluidas
las interferencias que puedan causar un funcionamiento no deseado.
ES Manual de instrucciones
141
Advertencia: los cambios o las modificaciones realizados en esta unidad y
que no hayan sido aprobados explícitamente por la parte responsable del
cumplimiento podrá anular la autoridad del usuario para utilizar el equipo.
Nota: este equipo ha sido probado y cumple con los límites establecidos para
los dispositivos digitales de la Clase B, de conformidad con el Apartado 15
del Reglamento de la FCC. Estos límites están diseñados para proporcionar
una protección razonable contra interferencias perjudiciales en instalaciones
residenciales. Este equipo genera, utiliza y puede irradiar energía de
radiofrecuencia y, si no se instala y utiliza de acuerdo con las instrucciones,
puede causar interferencias perjudiciales a las comunicaciones de radio.
Sin embargo, no hay garantía de que no se produzcan interferencias en una
instalación en particular. Si este equipo causa interferencias perjudiciales
para la recepción de radio o televisión, lo cual puede determinarse apagando
o encendiendo el equipo, se recomienda al usuario que intente corregir la
interferencia mediante una o más de las siguientes medidas:
+ Reorientar o reubicar la antena receptora
+ Aumentar la distancia entre el equipo y el receptor
+ Conectar el equipo a una toma de corriente de un circuito diferente
al que está conectado el receptor
+ Consultar al distribuidor o a un técnico con experiencia en
radio/televisión para obtener ayuda
142
El símbolo CE en la cámara Contour+ indica que cumple con la directiva
EMC de compatibilidad electromagnética y con los Límites y métodos
de medida de las características de interferencia de equipos de
tecnología de la información.
Etiqueta Industry Canada
Este dispositivo de Clase B cumple todos los requisitos de las
Regulaciones sobre equipos que causan interferencias de Canadá.
Reparaciones o modificaciones
Nunca intente reparar o modificar la cámara Contour+ usted mismo.
Desmontar la cámara Contour+, incluida la retirada de los tornillos externos,
puede causar daños que no están cubiertos por la garantía. La cámara
Contour+ no contiene piezas reemplazables por el usuario, con excepción de
la tarjeta microSD y la batería.
RoHS
Las cámaras Contour+ cumplen con la directiva europea ROHS 2002/95/CE
de restricción de ciertas sustancias peligrosas en aparatos
eléctricos y electrónicos así como con regulaciones similares que puedan
adoptarse en otros países para la venta en Europa.
ES Manual de instrucciones
143
GARANTÍA LIMITADA DE CONTOUR, INC. Contour, Inc. (“Fabricante”)
garantiza al usuario final original (“Comprador”) que por un período de 180
días (“Período de garantía”), la cámara Contour+ (con excepción de cualquier
software de terceras partes) y sus accesorios (“Producto”) estarán libres de
defectos en lo que concierne a materiales y mano de obra, siempre y cuando
se instalen adecuadamente, se utilicen para el propósito al que se destina
y se utilicen en el ambiente de funcionamiento previsto. Esta garantía no se
aplica a ningún producto que haya sido: (i) alterado, reparado o modificado; o
(ii) dañado o destruido por accidentes o eventos similares, por cualquier acto
negligente, imprudente o intencional, o por omisiones de cualquier parte. En
caso de defecto, lleve el Producto al local de compra original o al Fabricante,
pero sólo después de haber recibido tal instrucción por parte del Fabricante.
El Comprador enviará y asumirá los costes de envío del Producto al Fabricante y el Fabricante asumirá los costes de enviar nuevamente el Producto al
Comprador, una vez completado el servicio cubierto por esta garantía limitada.
La compensación para el Comprador y toda responsabilidad del Fabricante, de
acuerdo con esta garantía, se limitará a la reparación, sustitución del Producto
o reembolso del precio de compra sin ningún descuento, a criterio del Fabri144
cante. La garantía del Fabricante no cubre ninguna pérdida de datos (incluidos
los datos almacenados en el Producto enviado al Fabricante para reparación),
ni asume ninguna responsabilidad por tal pérdida. El Comprador asume total
responsabilidad, y en tal sentido libera al Fabricante de cualquier responsabilidad, por cualquier accidente, lesión, daño, muerte, pérdida, actividad ilegal
o cualquier otra reclamación que pueda ocurrir como resultado del uso o del
uso del Producto, independientemente de si dicho uso está o no previsto por el
Fabricante.
TODAS LAS GARANTÍAS IMPLÍCITAS DE COMERCIABILIDAD Y ADECUACIÓN
A UN FIN PARTICULAR ESTÁN LIMITADAS A LA DURACIÓN DE LA GARANTÍA
EXPLÍCITA APLICABLE. EL FABRICANTE RENUNCIA A CUALQUIER OTRA
CONDICIÓN EXPLÍCITA O IMPLÍCITA, MANIFESTACIONES Y GARANTÍAS, INCLUIDA CUALQUIER GARANTÍA IMPLÍCITA DE INEXISTENCIA DE INFRACCIÓN.
Algunas jurisdicciones no permiten limitación a la duración de las garantías implícitas, por lo que la limitación anterior podrá no aplicarse al Comprador. Esta
garantía otorga al Comprador derechos legales específicos, y el Comprador
también puede tener otros derechos que varíen según la jurisdicción aplicable.
ES Manual de instrucciones
145
Todo el software de terceros suministrado con el Producto se proporciona
“TAL CUAL”. El Comprador asume todo riesgo en lo concerniente a la
calidad, el rendimiento, la exactitud y efecto de tal software, y en caso
de defecto, el Comprador y no el Fabricante será quien asuma todos
los costes de reparación o mantenimiento necesarios. DENTRO DE LA
LEGISLACIÓN APLICABLE, EN NINGÚN CASO EL FABRICANTE SERÁ
RESPONSABLE POR NINGUNA PÉRDIDA DE DATOS, INGRESOS O BENEFICIOS, NI DE NINGÚN DAÑO ESPECIAL, INDIRECTO, CONSECUENCIAL,
INCIDENTAL O PUNITIVO CAUSADO SIN PERJUICIO DE LA TEORÍA DE
LA RESPONSABILIDAD, DERIVADO O RELACIONADO CON EL USO O LA
FALTA DE CAPACIDAD PARA EL USO DEL PRODUCTO, AUN CUANDO SE
HAYA ADVERTIDO AL FABRICANTE SOBRE LA POSIBILIDAD DE QUE SE
PRODUZCAN TALES DAÑOS. EN NINGÚN CASO LA RESPONSABILIDAD
DEL FABRICANTE EXCEDERÁ EL IMPORTE PAGADO POR PARTE DEL
COMPRADOR POR EL PRODUCTO.
Las limitaciones anteriores se aplicarán aun cuando cualquier garantía o
compensación otorgada en virtud del presente Contrato no alcancen su
principal objetivo. Algunas jurisdicciones no permiten la exclusión o limitación de daños incidentales o consecuenciales, por lo que las limitaciones
o inclusiones anteriores pueden no ser de aplicación para el Comprador.
146
Renuncia de responsabilidad de Contour
Todos los compradores, usuarios y cualquier parte o todas las partes
que intervienen o participan en el uso de los productos de Contour, Inc.
(“Contour”) están de acuerdo en las siguientes disposiciones:
+ Contour no promueve ni respalda acciones de alto riesgo, negligentes
y/o peligrosas durante la utilización de sus productos.
+ Contour no se hace responsable de ningún uso o mal uso de los
productos Contour ni de ninguna grabación de vídeo que pueda ser
considerada ilegal.
+ Contour no asume ninguna responsabilidad en relación con acciones
ilegales que puedan realizarse durante la grabación, intentos de
grabación o edición de vídeo grabado con nuestros productos.
+ El principal objetivo de los productos Contour es la grabación de
actividades deportivas de acuerdo con las leyes locales, estatales,
federales y del país.
ES Manual de instrucciones
147
Estamos aquí para ayudarle Nuestra misión es conseguir que grabar
y compartir sus imágenes sea muy sencillo para usted. Estaremos
encantados de ayudarle para que tenga una fantástica experiencia con su
cámara Contour+. No dude en ponerse en contacto con nosotros si tiene
alguna pregunta.
Cómo obtener servicio técnico Para obtener el servicio técnico incluido
en la garantía, registre su producto en www.contour.com en el plazo de
180 días a partir de la fecha de compra del producto. Si requiere servicio
técnico, puede que le pidamos que envíe el producto a la empresa con
franqueo pagado en su embalaje original, o uno que ofrezca un mismo
grado de protección, y que incluya una prueba de compra (factura o recibo
de compra) que demuestre que el aparato se encuentra en el período
de garantía. Contour reemplazará o sustituirá el producto a su única
discreción. No devuelva el producto a Contour a no ser que se le indique
expresamente.
Horario: de lunes a viernes, de 9:00 a 18:00 PST
Teléfono gratuito para EE.UU.: 866.397.6920
Teléfono internacional: +1 206 792.5226
Correo electrónico: [email protected]
Web: www.contour.com/support
148
ES Manual de instrucciones
Las cámaras “manos libres” de Contour y/o el software asociado y otros
productos de Contour están protegidos por leyes de copyright, tratados
internacionales y varias patentes como, por ejemplo, la patente de Estados
Unidos D616,006. Puede haber otras patentes registradas o pendientes
en los EE.UU. y en varios países en todo el mundo. Visite www.contour.
com para consultar la lista de las patentes aplicables.
Todas las marcas comerciales y las marcas registradas mencionadas en
este documento están reconocidas como propiedad de sus respectivos
titulares. Contour+ es un producto de Contour, Inc. en Seattle, Washington.
www.contour.com ©2011 Contour, Inc. Todos los derechos reservados.
Contour+ SKU#1509 EU Version 2011.02
149
150