1
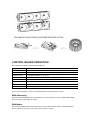
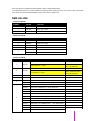
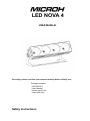
LED NOVA 4
USER MANUAL
For safety, please read this user manual carefully before initially use.
Package Included:
* LED NOVA 4
* User Manual
* Power Input Cord
* 5mm Allen Key
Safety Instructions
•Do not open this device, there is no user-serviceable parts inside.
• DO not look at the light source when the device is on.
• CAUTION: This unit's housing may be hot when lights are operating.
• Install this device in a location with adequate ventilation, at least 20 inch (50 cm) from adjacent surfaces.
• Do not leave any flammable material within 50 cm of this unit while operating or connected to power.
• Use a safety rope when mounting this device overhead.
• Do not hang units using only the coffin locks.
• Do not operate this device outdoors or in any location where dust, excessive heat, water, or humidity may affect it.
• Do not operate this device if the housing, lenses, or cables appear damaged.
• Do not connect this device to a dimmer or rheostat.
• ONLY connect this device to a grounded and protected circuit.
• ONLY use the hanging bracket to carry this device.
• In case of a serious operating problem, stop using immediately.
• The maximum ambient temperature is 104° F (40° C). Do not operate this device at higher temperatures.
Power Input & Power Linking
This device has an auto-switching power supply work with input voltage range of 100~240 VAC, 50/60 Hz.
Link up to the maximum 4 devices at 120 VAC or 8 at 230 VAC. DO NOT exceed this number.
DMX Linking & Connection
This device can work with a DMX controller using a regular DMX serial connection.
This device uses a regular DMX protocol for its DMX modes: 3, 5, 9, 48 and 53 channels.
Art-Net™ Connection
Art-Net™ is an Ethernet protocol that uses TCP/IP to transfer large amounts of DMX512 data over a large network
Art-Net™ uses the EtherCon® RJ 45 connection. Art-Net™ is Designed by and Copyright Artistic Licence
Holdings Ltd.
1) Disconnect the DMX controller from this device
2) Use RJ45 cables connect this device to your computer
3) You can link the other these devices with RJ45 cables or regular DMX cables.
4) You can use the Art-Net software to control and programming these devices.
(Your computer needs the relevant software of Art-Net protocol.)
Cooling Fans:
This device has cooling fans controled by temperature sensor. When the device temperature inside reach about
60 C, the fans start working from a slow speed to fast as the temperature increasing.
Mounting
This device can be mounted in many orientation provided each individual device is secured through the mounting
bracket.
The coffin locks are for device alignment only and are not weight bearing.
DO NOT hang device using only the coffin locks.
Use a safety rope when mounting this device overhead.
CONTROL BOARD OPERATION
Press the Menu until one of the following displayed:
Display
Function
1.DMX Address
To set DMX address
2.DMX Channel
To set DMX channel modes: CH 03, CH 05, CH 09, CH12, CH17
3.Dimmer Curve
To set dimmer speeds: 01, 02, 03, 04
4.Sound
To set sound active mode and the sensitivity (Speed 000 ~ Speed 100)
Mode
5.Static Color
To set static colors: Static Color R, G, B, GB, RG, RB, RGB
6.Manual Color
To set user mode intensity of R, G, B separately for color mixing and strobe rate
7.Auto Program
To set built-in automatic programs: Pr 01 ~ Pr 10 and speeds 000 ~100
8.Master/Slave
To set Master/Slave modes
Use Up and Down button to select your desired operation, then press Enter to confirm.
DMX Addressing:
After select the "DMX Address" and press Enter, then use Up and Down to set the desired DMX address
(001~512), press "Enter" again to confirm.
DMX Modes
After select the "DMX Channel" and press Enter, then use Up and Down to set the desired DMX mode
(CH 03, CH 05, CH 09, CH12, CH17), press "Enter" again to confirm.
Dimmer Speed Setting:
After select the "Dimmer Curve" and press Enter, then use Up and Down to set the desired dimmer speed
(01, 02, 03, 04), press "Enter" again to confirm.
Sound Mode
Entered "Sound mode", use <UP> and <DOWN> to set the sensitivity Sen 000 ~ Sen 100, press Enter to confirm.
Setting Static Colors
Entered "Static Color", you can select the desired solid color via the UP or DOW N buttons and confirm by Enter
(see following graphic).
Mode:
Static Color
Value:
Function:
Static color <R>
Red
Static color <G>
Green
Static color <B>
Blue
Static color <RG>
Red + Green
Static color <BG>
Green + Blue
Static color <RB>
Red + Blue
Static color <RGB>
Red + Green + Blue
User Mode
This mode allows the user set intensity of R, G, B separately to get endless color mixing from the control
board without DMX controller to set the device to run strobe desired.
Entered user mode "Manual color", use <UP> and <DOWN> to select the " R / G / B" for Colors intensity or "S" for
strobe.
Use <UP> and <DOWN> to set the colors intensity values " 0 ~ 255" or Strobe speed values "000 ~ 100"
(Freeze, Slow ~ Fast), then press "Enter" to confirm.
Automatic Mode
This fixture has a built-in automatic program.
Entered "Auto Program" mode, use <UP> and <DOW N> to select the built-in programs "Pr01 ~ Pr -12"
then press the "Enter" to confirm.
Use <UP> and <DOWN> to select the operating speed of the program(Value:Speed 000 ~ Speed100, Freeze,Slow ~
Fast), press "Enter" to confirm.
Mode:
Auto Program
Value:
Function:
Auto program Pr 01
RGB
Auto program Pr 02
7 colors switching
Auto program Pr 03
RGB
Auto program Pr 04
7 colors Fading
Auto program Pr 05
Color Macros Fading
Auto program Pr 06
Chase 1
Auto program Pr 07
Chase 2
Auto program Pr 08
Chase 3
Auto program Pr 09
Chase 4
Auto program Pr 10
Loop above pr 01~pr 09
Master/Slave Operation
colors switching
colors fading
This mode allows for multiple units slave fixtures to follow a single master fixture.
1) Set the master fixture to one of the standalone operating modes: automatic, sound, user mode or static color modes
2) For slave units, entered the Master/Slave mode, select "Slave", press Enter.
DMX VALUES
3 Channels Mode:
CHANNEL
VALUE
FUNCTION
1
000-255
Red: 0% ~ 100%
2
000-255
Green: 0% ~ 100%
3
000-255
Blue: 0% ~ 100%
VALUE
FUNCTION
1
000-255
Red: 0% ~ 100%
2
000-255
Green: 0% ~ 100%
3
000-255
Blue: 0% ~ 100%
4
000-255
Master Dimmer 0% ~ 100%
000-009
No function
010-255
Strobe : Slow ~ Fast(1~30Hz)
5 Channels Mode:
CHANNEL
5
9 Channels Mode:
CHANNEL
VALUE
FUNCTION
Red 0% ~ 100%
1
000-255
When values 169-208 in
Warm white 0% ~ 100%
CH. 9 are activated
Green 0% ~ 100%
2
000-255
When values 169-208 in
Cool white 0% ~ 100%
CH. 9 are activated
3
000-255
Blue 0% ~ 100%
4
000-255
Master Dimmer 0% ~ 100%
000-009
No function
010-255
Strobe : Slow ~ Fast(1~30Hz)
000-019
No Function
020-039
RED 100% / GREEN 0% ~ 100% / BLUE 0%
040-059
RED 100%
060-079
RED 0% / GREEN 100% / BLUE 0% ~ 100%
080-099
RED 0% / GREEN 100% ~ 0% / BLUE 100%
100-119
RED
120-139
RED 100% / GREEN 0% / BLUE 100%
140-159
RED 100% / GREEN 0% ~100%
160-179
RED 100%~ 0% / GREEN 100%
180-199
RED 100% / GREEN 100% / BLUE 100%
200-204
White Color Temprature 1
205-209
White Color Temprature 2
5
6
~ 0% / GREEN 100% / BLUE 0%
0% ~ 100% / GREEN 0% / BLUE 100%
~ 0%
/ BLUE 0%~100%
~ 0% / BLUE 100%
WARM
7
8
9
210-214
White Color Temprature 3
215-219
White Color Temprature 4
220-224
White Color Temprature 5
225-229
White Color Temprature 6
230-234
White Color Temprature 7
235-239
White Color Temprature 8
240-244
White Color Temprature 9
245-249
White Color Temprature 10
250-255
White Color Temprature 11
000-009
No function
010-032
Auto Program PR 01
RGB
033-056
Auto Program PR 02
7 colors switching
057-080
Auto Program PR 03
RGB
081-104
Auto Program PR 04
7 colors Fading
105-128
Auto Program PR 05
Color Macros Fading
129-152
Auto Program PR 06
Chase 1
153-176
Auto Program PR 07
Chase 2
177-200
Auto Program PR 08
Chase 3
201-224
Auto Program PR 09
Chase 4
225-248
Auto Program PR 10
Loop above pr 01~pr 09
249-255
Sound active
000-255
Speed of Auto Programs (Slow ~ Fast)
000-009
Default dimmer speed
010-048
Linear dimmer
049-088
Non-linear dimmer 1
089-128
Non-linear dimmer 2
129-168
Non-linear dimmer 3
169-208
WW/CW Mode ON
209-255
WW/CW Mode OFF
COOL
colors switching
colors fading
12 Channels Mode:
CHANNEL
VALUE
FUNCTION
1
000-255
Red 0% ~ 100%
2
000-255
Green 0% ~ 100%
3
000-255
Blue 0% ~ 100%
4
000-255
Red 0% ~ 100%
5
000-255
Green 0% ~ 100%
6
000-255
Blue 0% ~ 100%
7
000-255
Red 0% ~ 100%
8
000-255
Green 0% ~ 100%
9
000-255
Blue 0% ~ 100%
10
000-255
Red 0% ~ 100%
11
000-255
Green 0% ~ 100%
12
000-255
Blue 0% ~ 100%
LED 1
LED 2
LED 3
LED 4
17 Channels Mode:
CHANNEL
VALUE
FUNCTION
1
000-255
Red 0% ~ 100%
2
000-255
Green 0% ~ 100%
3
000-255
Blue 0% ~ 100%
4
000-255
Red 0% ~ 100%
5
000-255
Green 0% ~ 100%
6
000-255
Blue 0% ~ 100%
7
000-255
Red 0% ~ 100%
8
000-255
Green 0% ~ 100%
9
000-255
Blue 0% ~ 100%
10
000-255
Red 0% ~ 100%
11
000-255
Green 0% ~ 100%
12
000-255
Blue 0% ~ 100%
13
000-255
Master Dimmer 0% ~ 100%
000-009
No function
010-255
Strobe : Slow ~ Fast(1~30Hz)
000-009
No function
010-032
Auto Program PR 01
RGB
033-056
Auto Program PR 02
7 colors switching
057-080
Auto Program PR 03
RGB
081-104
Auto Program PR 04
7 colors Fading
105-128
Auto Program PR 05
Color Macros Fading
129-152
Auto Program PR 06
Chase 1
153-176
Auto Program PR 07
Chase 2
177-200
Auto Program PR 08
Chase 3
201-224
Auto Program PR 09
Chase 4
225-248
Auto Program PR 10
Loop above pr 01~pr 09
249-255
Sound active
0000-255
Speed of Auto Programs (Slow ~ Fast)
000-009
Default dimmer speed
010-048
Linear dimmer
049-088
Non-linear dimmer 1
089-128
Non-linear dimmer 2
129-168
Non-linear dimmer 3
169-208
WW/CW Mode ON
209-255
WW/CW Mode OFF
14
15
16
17
LED 1
LED 2
LED 3
LED 4
colors switching
colors fading
When CH 17 @ 169-208, WW/CW ON, CH 1 ~ CH 8 function as following:
1
000-255
Warm white 0% ~ 100%
2
000-255
Cool white 0% ~ 100%
3
000-255
Warm white 0% ~ 100%
4
000-255
Cool white 0% ~ 100%
5
000-255
Warm white 0% ~ 100%
6
000-255
Cool white 0% ~ 100%
7
000-255
Warm white 0% ~ 100%
LED 1
LED 2
LED 3
LED 4
8
000-255
LED ARRAY:
Cool white 0% ~ 100%
1
2
3
4
CLEANING AND MAINTENANCE
Caution: DANGER TO LIFE!
Disconnect from mains before starting maintenance operation!
The operator has to make sure that safety-relating and machine-technical installations are inspected by an expert after
every four years in the course of an acceptance test.
The operator has to make sure that safety-relating and machine-technical installations are inspected by a skilled
person once a year.
The following points have to be considered during the inspection:
1) All screws used for installing the devices or parts of the device must be tightly connected.
2) There must not be any deformations on housings, fixations and installation spots (ceiling, suspension, trussing).
3) The electric power
cables must not show any damages, material fatigue (e.g. porous cables) or sediments.
Further instructions depending on the installation spot and usage have to be adhered by a skilled installer and any
safety problems have to be removed.
Replacing the fuse
If the fine-wire fuse of the device fuses, only replace the fuse by a fuse of same type and rating.
Before replacing the fuse, unplug mains lead.
Procedure:
Step 1: Unscrew the fuseholder on the rearpanel with a fitting screwdriver from the housing (anticlockwise).
Step 2: Remove the old fuse from the fuseholder.
Step 3: Install the new fuse in the fuseholder.
Step 4: Replace the fuseholder in the housing and fix it.
TECHNICAL SPECIFICATIONS:
Power supply: 100~240 V AC, 50/60 Hz ~
Power consumption: 120 W
DMX control channels: 3,5,9, 12 or 17 chs
DMX512 connection: 3-pin XLR
Sound-control: via built-in microphone
LED type: 30 W COB Tri-color RGB
Number of LEDs: 4
Beam angle: 30°
Dimensions (LxWxH): 425 x 187 x 163 mm
Weight: 4 kg
Maximum ambient temperature Ta: 40°
Maximum housing temperature TC (steady state): 80° C
Min. distance from flammable surfaces: 0.5 m
Min. distance to lighted object: 0.1 m
Fuse: T 2 A, 250 V