1
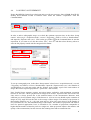
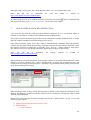
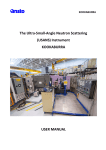
DINGOUSERMANUAL
DINGO User manual
This guide is not intended to replace your local contact, but to jog your memory if you are
operating independently. Anything strange, call your local contact…
Numbers for DINGO instrument scientists:
Ulf Garbe, office – 7217
Floriana Salvemini, office – 7591
Klaus-Dieter Liss, office – 9479
Joseph Bevitt, office – 7232
DINGO status is visible from outside Ansto at the following webpage:
http://www.nbi.ansto.gov.au/dingo/
Reactor status and cold source temperature visible at (do not leave this webpage open for
long periods of time):
http://prism.nbi.ansto.gov.au/reactor/ReactorInfo.swf
Other useful numbers:
Emergencies: 888
(not emergency, working alone form etc…): 3434
Health Physics: 9779
IT helpdesk: 9200
Feedback on the manual: [email protected]
1
Table of content
4.4. GENERAL
4.5. OPENING AND CLOSING THE SAMPLE BEAM SHUTTER
4.6. STARTING AN EXPERIMENT
4.7. DETECTOR CONFIGURATION
4.8. LUNCHING AN EXPERIMENT
5. QUICK GUIDE TO DATA RECONSTRUCTION
6. QUICK GUIDE TO DATA VISUALIZATION AND EVALUATION
7. BEFORE YOU LEAVE
2
1. RESPONSIBILITIES
1.1 The Head, Bragg Institute has overall responsibility for the implementation of this work
instruction within the Bragg Institute.
1.2 The Head, Bragg Institute is responsible for:
· Nominating the OPAL NBI Source Officer
· Nominating Instrument Scientists for each NBI at the OPAL NBF.
1.3 The OPAL NBI Source Officer has the following responsibilities and authorities to:
· Ensure that the operation of the NBI complies with the OPAL NBF Source Licence,
· Authorise nominated NBI Operators, and
· Enable the opening of the secondary shutters.
1.4 Instrument Scientists are to:
· Ensure that persons comply with the latest applicable Bragg Institute Procedures and Instructions
· Nominate NBI Operators of their NBI according to PO-P-011.
· Ensure this work instruction is implemented.
1.5 Other responsibilities are detailed in section 5 of this work instruction.
2. PREREQUISITES
2.1 A current SAC Approval form for DINGO must be displayed on the instrument
2.2 If Sample Environment Equipment is in use, the relevant equipment instructions will be located in
the instrument control cabin.
3. PRECAUTIONS
3.1 An NBI Operator may only use DINGO with the approval of the Instrument Scientist except when
NBF Staff are being trained in the operation of an NBI by an Instrument Scientist.
3.2 When working with the DINGO instrument, the operator must obey all radiation warning
indicators and signs and follow all procedures required by the Safety Interlock System.
3.3 Samples that are to be placed on the instrument must meet all necessary safety standards relating
to toxicity, flammability and radioactivity (see PO-P-004).
3.4 Sample Environment equipment must only be used within specified tolerances (see the specific
work instructions for sample changer, cryostats, furnace, pressure cells, and cryomagnet).
3.5 Before samples are removed from the OPAL NBF they must have an appropriate Clearance
Certificate as described in PO-P-004.
3.6 For samples requiring special environmental conditions the Instrument Scientist must approve the
experimental conditions, obtain SAC approval and ensure that, if relevant, an Instruction Manual is
provided.
4. METHOD
4.1 GENERAL
4.1.1 All neutron scattering instruments must be used in accordance with Bragg Institute Procedure
PO-P-008.
4.1.2 Samples are placed in holder or in air as appropriate to the instrument environment and
experimental requirements.
4.1.3 Details of the samples, the instrument configuration and the environmental conditions may be
recorded using the sample name, sample description and sample title descriptors in the instrument
data file.in a manual log along with other relevant information such as details of personnel, Proposal
Number, instrument configuration and Sample Environment used.
Note: Generation of the electronic log is not automatic upon running a sample.
4.1.4 Any operations to be performed by people within the Experimental Area must be performed
while the sample shutter is closed. It is forbidden for any person to be in the instrumental area while
3
the shutter is open. Access to the instrument area is mediated by the Safety Interlock System and
described in section4.2 of this document.
4.2 OPENING AND CLOSING THE SAMPLE BEAM SHUTTER
Your local contact will train you in how to enter the enclosure and load samples. Before you do this
independently you must sign the training form to acknowledge you have received the training.
The sample shutter may only be opened after going through the interlock procedure and ensuring no
one is in the instrument area. This procedure is:
4.2.1. The NBI Operator activates the interlock by pressing the lockup initiation (exit) button located
in the instrument area with the exit door closed.
4.2.2. Visible and audible warnings will indicate the sequence has been initiated.
4.2.3. All present in the instrument area must move into the instrument cabin and within 20 seconds
the door must be closed. This is locked by the SIS. Only then will it be possible to open the beam. Estops in the instrument area or control cabin can be used but they also close the secondary shutters. An
abort button may be used to stop the procedure. This is located next to the exit button in the
instrument area.
4.2.4. The beam is then opened using the safety control panel. The operation of the interlock system is
specified in NBIP-ER-…...
4.3 STARTING AN EXPERIMENT
4.3.1 DINGO has a number of operating parameters which are determined before running an
experiment, usually by the instrument scientist. These are controlled using the instrument control
server (SICS). The main control parameters are:
· the camera box position: dz
· the camera translation stage position: dy
· the motion of the sample stage: sx, sy, sz
The SICS User Manual is provided in the instrument cabin.
SICS basic commands are listed below and they can be input by client Putty_ics1 (please, refer to pag.
11 of the current manual for instructions on how to start client Putty_ics1) :
4
Warning! Emergency stop: in order to interrupt any motor driving type INT1712 3
4.2 DETECTOR CONFIGURATION
According to the needed spatial resolution, different reference configurations can be set-up.
-
Pixel size of 25 µm
The standard set–up is: 100 mm lens mounted on the camera and the small nose with a field of view
of 10x10 cm set in place.
Select the 5x5 tertiary shutter (1) from the safety control panel situated at the size of the DINGO door
enclosure or at the entrance of DINGO cabin. Using client Putty, drive the camera translation table dy
to 115.
Picture
-
Pixel size of 50 µm
The standard set–up is: 100 mm lens is mounted on the camera and the big nose with a field of view
of 10x10 cm set in place. Select the 10x10 tertiary shutter (2) from the safety control panel situated at
the size of the DINGO door enclosure or at the entrance of DINGO cabin. Using client Putty, drive
the camera translation table dy to 220.
-
Pixel size of 100 µm
5
The standard set–up is: 50 mm lens is mounted on the camera and the big nose with a field of view of
20x20 cm set in place. Select the 20x20 tertiary shutter (3) from the safety control panel situated at the
size of the DINGO door enclosure or at the entrance of DINGO cabin. Using client Putty, drive the
camera translation table dy to 125.
If high intensity is needed, the high of the camera box should be changed. Using client Putty, drive
the camera translation table dz to 100. Ensure that the sample stage is at a proper distance to avoid
any collision. If not, drive sx through client Putty. Select the high intensity 20x20 tertiary shutter (4)
from the safety control panel.
Note: no safe interlock is provided for dy at the moment. Be careful when driving dy since the lens
can collide with the mirror mounted in front of the scintillator screen. A safe value for dy is 45.
Finally ensure that the camera lens diaphragm is fully open and the cap is taken off.
4.2.1.
CAMERA FOCUSING
Once the detector has been configured, the camera focus can be adjusted.
At the first stage the lens focus has to be optimized using light. Partially close the lid of the camera
box, leaving a narrow slit to let the room light in. Then replace the scintillator screen mounted on the
nose with the millimetric grid sticked on the aluminium plate of the proper side. The grid has to face
towards the mirrors.
1. Ensure that ANDOR software has been quit to avoid error message.
2. Start DINGO Camera Server from HP PC desktop CCAM-1-DINGO located on the left side
when exit DINGO enclosure.
3. Select the window “Config” from the Command Menu in the bottom and set the cooling
temperature to -90 °C. Input 0.5 s as exposure time. Activate “Multi on” to set up a
6
continuous camera acquisition and click on “Take shot”.
Manually focus the lens by twisting the focus ring by small steps. You’ll be able to see when the
image is sharp by selecting the label “Image” from the top Command Menu in DINGO Camera
Server. You might have to twist the focus ring back and forth, moving through and beyond your
chosen point of focus until you see that focus is spot on and the grid is well visible.
! Important notice! When the image of the grid is sharp, take note of the number of pixels that “cover”
10 mm by dragging the cursor on the two extreme lines of the grid that correspond to such distance.
Read the value on the tag that pops-up on the captured image. This information will be used to
estimate the current pixel-size and the field of view.
Replace the grid with the scintillator screen and close the lid to check the focus for neutron. Stick the
“Siemens star” on the scintillator. Exit DINGO enclosure according to standard safety procedure and
then open the secondary shutter from remote control monitor.
4. On DINGO Camera Server from HP PC desktop CCAM-1-DINGO input 5 s as exposure
time.
5. Activate “Multi off” and click on “Take shot”.
6. When the neutron radiography is taken, go to “Meta Data” in the top Command Menu and
take note of the “Sharpness factor”.
7. Using client Putty, drive the camera translation table by incrementing and decrementing dy
value by step of 0.5.
8. Take a shot and check the “Sharpness factor” for each dy.
9. Then set dy at the value showing the highest “Sharpness factor”.
Close the shutter from the safety control panel and enter DINGO enclosure according to standard and
safety procedure. Remove the “Siemens star” from the scintillator and place it back in its box.
4.3
SAMPLE SET-UP
Place your sample properly allocated in the sample holder on the rotation stage.
Using client Putty, drive the sample stage at sx = 0 to be centred with respect to the neutron beam and
the detector. Then adjust the high and the closest possible distance from the detector by setting sz and
sy, respectively (see the common commands in section 4.3.1 of this document).
In the case of tomographic experiment, be sure that the sample does not collide the scintillator or
other component of the detector while the rotating table moves.
Note: a safety interlock is provided for sx, sy and sz. Refer to the instrument control software (SICS)
manual to control, change and check the parameters.
Once the sample position is optimized, exit DINGO enclosure according to standard and safety
procedure and then open the secondary shutter from the safety control panel.
7
Top view
100
sx
CCD camera
Neutron source
- 100
Top view
CCD camera
270
0
Neutron source
sy
Front view
-70
CCD camera
sz
Neutron source
- 300
8
4.4
LANCHING AN EXPERIMENT
Ensure that DINGO Camera Server has been quit to avoid error message. Start ANDOR from HP PC
desktop DAV2-DINGO located in DINGO cabin. Select the window “Acquisition” from the
Command Menu.
In order to take a radiographic image or to check the optimum exposure time, in the sheet “Setup
camera” select single “Acquisition mode”, internal “Triggering”, 1MHz at 16-bit as “Readout Rate”
and input the “Exposure time (sec)”. Click on the grey button
in the Command Menu to start the
acquisition. If you want to save the shot select “File”, “Save as” and then select directory where to
store the file properly named with fits-unsigned-16bit format.
To set up a tomography scan, in the sheet “Setup camera” select kinetic “Acquisition mode”, external
“Triggering” and 1MHz at 16-bit as “Readout Rate”. Input the “Exposure time (sec)”, the “Number of
Accumulations” per each step angle and the “Kinetic series length” equal to the total number of
images that will be acquired (projections + open beam + dark current).
Note: Parallel beam geometry requires projection images preferably with equiangular separation
between 0° and 180°. “Ideal” projections are images free of noise. In practice this is never the case
since noise is always present due to the statistical nature of the measurement. Detectors need
sufficient grey levels (dynamic range). If the detector is 12 bit or less one should acquire a number of
images at every angle and use the sum or the average of these images. The number of projections is
theoretically defined as π x N / 2 for 180° scans and π x N for 360° scans where N is the number of
row pixels that can “see” the transmitted image of the sample. The number of projections can often be
lower for practical applications, but it is advisable to use a number of projections comparable or
higher than the number of detector pixels in a single row. More projections improve the statistics and
quality of the reconstruction, but also increase the scanning times and reconstruction time.
9
Select sheet “Binning” and define the region of interest where your sample fit.
Then move to sheet “Spooling” end enable spooling. Select .Tif as file type and name the file and
choose the directory: D:\filer\experiment\data\spool\yourfolder.
10
Then click the “OK” button to save the configuration.
In order to create the external trig that will be read by the camera software, start the Instrument
Control Server (SICS) by running the client Putty_ics1.
Log in using the account provided by your personal contact and type “SICS client”. Then type cd
batch/ to have access to the list of script available. Open the reference script by writing vi
scan_soma.tcl and then input cp scan_soma.tcl scan_soma_yourscan.tcl to rename the script.
Finally vi scan_soma_yourscan.tcl to open the script. Press “Insert” or “A”on the keyboard in order to
be able to modify the script.
Picture showing the essential value to modify.
11
number of open beam
number of accumulation per open beam
exposure time
number of projections
step angle
number of accumulation per projection
exposure time
! to be inserted only if the acquisition of a second frame is
needed to cover the whole volume of the sample.
high of the table stage
number of projections
step angle
number of accumulation per projection
exposure time
number of dark current
number of accumulation per dark current
exposure time
12
When the script is ready press “Esc” on the keyboard, then :wq to save and quit the script.
Note:
the
full
list
of
commands
http://www.fprintf.net/vimCheatSheet.html#
for
Vim
text
editor
is
availed
at
In order to start the scan, go to ANDOR software Click on the grey button
in the Command Menu
and using client Putty, type exe scan_soma_your.tcl in the other open window.
5
QUICK GUIDE TO DATA RECONSTRUCTION
Copy your raw data from the folder previously defined in directory D:/ to a new dedicate folder in
network V:/ from HP PC desktop DAV2-DINGO located in DINGO cabin.
Then you can operate the following procedure on the workstation available in DINGO cabin or on the
dedicate windows machine locate in the Imaging room in H77.
Open ImageJ software, select “File”, then “Import” from the Menu Command. Select the directory
with the raw data and click on the first image. Once the stack has been opened and visualized, export
the sequence of images as single files by selecting “File”, “Save as”, “Image sequence” and create a
new folder where to save the decompressed data. Repeat the procedure for all raw files.
Note:
the
full
list
of
commands
http://imagej.nih.gov/ij/docs/index.html
for
ImageJ
software
is
availed
at
When all data have been decompressed, open Octopus software. In the Menu Command select “Other
function” and press “Rename file”. Select “Original path” to import the decompressed files and
rename them by writing the desired name in “basename” tag and distinguishing among beam profile,
dark current and projection images.
When the images stack is ready, follow the instruction available on the Octopus Reconstruction User
Manual. The Manual is available on DINGO cabin or can be consulted by selecting the “Help” button
from the Command Menu.
Please refer to the procedure described starting from section 6 “Main window” at pag. 19 or to the
following general guide:
1) Open Octopus (Octopus Reconstruction v.8.8)
2) Select dataset
a. select directory
13
3)
4)
5)
6)
7)
i. use decomposed data (folder = decomp)
b. Select open beam images (first open beam image)
c. Select dark images (first dark image)
d. IF: ob & di images are stacked images (i.e. not 5x separate files, but 5 images within
one file), then:
i. Open ImageJ
ii. Do the following for both di and ob stacked images:
1. Open ‘image sequence ’
2. Despeckle
3. Remove outliers
4. Then “save as/image sequence”
5. Label: “di_SampleX_” or “ob_SampleX_”
6. Save to “decomp” folder
Data parameters
a. For Last angle, specify: 360° or 180° (or other applicable value)
b. Assign pixel size (in mm)
c. Tilt: leave at 0
d. OK
Preparation/crop images
a. Select directory (decomp folder)
b. Select directory for resized images (accept default: called resized)
c. OK
d. Trim image from left to right
e. Accept
Preparation/filter spots
a. Select directory of images (resized folder)
b. Select directory for cleaned images (default folder = “clean”)
c. To remove random spots
i. Need to modify the “custom level”
1. Will need to experiment with various values
2. Aim for a ‘fraction filtered’ value: 0.01-0.015% for Gadox scintillator
3. Aim for a ‘fraction filtered’ value: 0.1% for Lithium Fluoride
scintillator
Preparation/Normalise images
a. Select folder for clean
b. Do you want to normalise for beam intensity = YES
c. Select an area which does not include the sample (or sample container)
d. Select ring filter = moderate (e.g. 2 or 3)
Preparation/Correct axis tilt
a. *Note: this process is a little shonky – try it once or twice, and if the tilt is too high, it
might not be working – if so, this can be corrected in reconstruction phase*
b. Select “normalised” folder
c. Select folder – select “save” and then “current folder”
d. Select first image (for projection at 0 degrees)
e. Select middle image (for projection at 180 degrees)
14
f. Normalise projections with flat field = NO
g. Select a lateral slice area which includes the sample in all orientations
i. If the tilt is consistent, continue
ii. If not, come back to later (e.g. after parallel beam reconstruction)
8) Preparation/Sinograms
a. Selected rotated folder
b. Select sinograms folder: new folder (“sinograms”)
9) Reconstruction/parallel beam reconstruction
a. Select sinogram folder
b. Select reconstructed folder (select default folder)
c. Untick “Exit on finish”
d. Choose middle slice (default slice)
i. Scan/Adjust rotation axis
1. right click rotation axis value
ii. Fix the rotation for that slice (this should balance the axis for whole sample)
iii. “Evaluate”
e. Options/Apply ring filter
i. Enter values of “maximum ring width”
1. Play around with it
2. (too big, data lost; too small, ring artifacts retained)
ii. Reconstruct slice
f. Options/Beam hardening correction
i. Two first values: e.g. = 0.05, 0.05, x, x
ii. Try three (or even four) values
iii. Aim = make line profile flat for both sample and background sections
g. Scan/Adjust tilt
i. Right-click “tilt”
ii. May need to choose different options (i.e. adjust evaluation parameters)
until standard deviation shows flattening
iii. Then run with “Evaluate”
iv. Different slices may show differential tilt
1. represented by shadowing effects on reconstructed slices
h. “Reconstruct volume”
i. Choose slice near one end
ii. If tilt is required for different parts of the specimens, will need to
“reconstruct” different sections of the sample separately
1. For this: copy in same values from “Quality” section of
“Reconstruction.txt” notebook file that is saved in the “Reconstruct”
folder into
2. Except: “tilt”
3. Reconstruction
iii. After reconstruction:
1. Rescale
a. Ensure that these values are consistent for all volumes
15
i. This may require manually entering the values,
because the given spectrum may not include these!
b. Rescaling will allow for smaller dataset and consistent
contrasting
i. Do not delete temporary files
10) Optional: Import reconstruction image sequence into ImageJ for orthogonal views
a. Click “image/stacks/orthogonal views”
b. Note: Only possible once the scans have been reconstructed
c. Warning: can make compy run quite slow!
16
6
QUICK GUIDE TO DATA VISUALIZATION AND EVALUATION
Operate on the workstation available in DINGO cabin or copy your reconstructed folder and use the
dedicate Ubuntu machine located in the Imaging room in H77.
Start VGStudio MAX from the Windows Start menu. You will see VGStudio MAX 2.2 with an empty
scene:
To launch the Import Wizard select File > Import with the appropriate format of your input data. Follow
the instructions in the Import Wizard to specify how you would like your data imported.
The position of the slices is shown relative to the selected coordinate system.
The image below shows the locations of the function buttons in the 2D slice window:
With the Set brightness button selected the displayed Window/Level (similar to contrast and intensity)
of the slices can be changed. Press and hold the left mouse button over the slice. Dragging in an
up/down direction will change the Level and a left/right direction changes the Window setting.
This feature is enabled by default and can be disabled in the Preferences.
The actual slice image can be moved by pressing and holding the middle mouse button. To scroll
through the slices use the mouse wheel. Pressing and holding <Ctrl> combined with the mouse wheel
will zoom in/out. With the pan/zoom button selected the slice is moved using the left mouse button
instead.
Pressing the Focus button will center and refit the slice window on the currently selected object. By
quickly double-clicking on the Focus button, the dataset will also be centered, i.e. jump to the slice in
the middle of the dataset.
17
All interaction with the data in the 3D window takes place directly in the window itself. The shortcut
icons to change between the different modes of interaction with the 3D data is shown below:
If the Rotate mode is selected the current object is rotated by dragging the mouse pointer in the 3D
window while holding the left mouse button pressed. Pressing and holding the middle mouse button
will spin the object around the axis through the window.
In Move mode pressing and holding the left mouse button will drag the object across the screen.
Pressing and holding the middle mouse button will zoom in or out. A quick double click with the
middle mouse button in the 3D window switches between the Rotate and Move mode.
Pressing the Center and focus camera button will re-center and refit the 3D window on the currently
selected object.
Hereafter you can find a step by step guide for basic actions:
1. File/import/image stack
i.
Directory: D:/…/reconstructed
ii.
Next
iii.
Insert pixel sizes in “resolution” fields (all X,Y,Z axes – should be the same for
all values)
iv.
Preview
1. Trim dataset to minimise size
a. Do this via Top, Right and Front projections
v.
Next
vi.
Finish
2. Additional filtering:
i.
Median filter or Gaussian filter may help
3. Registration
i.
For changing the alignment of the sample
ii.
Simple registration – align the sample
4. Object/Surface determination
i.
Define both background and material with different
5. Rendering
i.
Choose different renderers: isosurface renderer/volume renderer/sum
along ray
ii.
Opacity manipulation area
1. Slide red line across the until air is subtracted
2. Slide until fossils come into view (rock will be removed too)
18
iii.
iv.
v.
3. Black line (opacity curve) can be used to define transparency
4. Right click on black line – insert handle
Optional: disable (or delete!):
1. Can be used to remove the air/rock/matrix (delete = permanent) –
will remove useless data, and speed things up
Appearance colour scale:
1. Try using a preset selection (e.g. rainbow spectrum)
2. Set additional handles on opacity manipulation area
3. Right click on appearance spectrum
a. Choose “set colour between handles”
Clipping plane/box:
1. Adds a plane/box that can be made visible or invisible
2. Crops each plane individually
6. File/”save as”
i.
.vgl file
7. Can “save image” (screenshot)
8. Can save image stacks
9. Note: Videos
a. Animation/Keyframer mode/classic
i.
Centre animation:
1. Unlock the object(s)
2. Click the “Navigation cursor” button
3. Hold Ctrl and left-click where you want the centre of your animation
4. In transformation window, click on “Centre on navigation cursor”
5. Load new animation setting, e.g.
a. Default curves: circle (for circling through)
b. Default curves: clip (for going through samples)
For further details about commands and procedure, follow the instruction available on VGStudio MAX
User Manual. The Manual is available on DINGO cabin or can be consulted by selecting the “Help”
button from the Command Menu.
7
BEFORE YOU LEAVE
Before you leave the instrument, please:
- Clean and return your sample holders.
- Photocopy/scan the relevant pages of the logbook.
- Take all raw and treated data either using a thumb drive, by burning the data to a CD/DVD (ask your
local contact nicely) or using ANSTO sharefile (web-based system) at sharefile.ansto.gov.au.
19