1
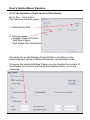
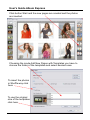
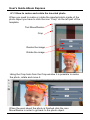
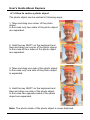
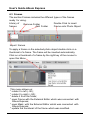
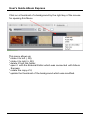
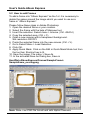
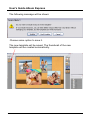
User's Guide
User's Guide
Album Express 5
www.SPC-international.com
Index
1.0 Introduction
2.0 Getting started and System Requirement
3.0 Workflow of Album Express
4.0 Five Major sections of Album Express
4.1 Photo
4.1.1 How to add a photo to the current page
4.1.2 The function of Auto Insert of the photos
4.1.3 How to resize and rotate the inserted photo
4.1.4
4.1.5
4.1.6
4.1.7
4.2
4.3
4.4
4.5
4.6
5.0
5.1
5.2
5.3
6.0
7.0
How to resize a photo object
How to add some effect, shadow and rotate selected photo object
How to edit, arrange and move photo object
How to create Photo Object
Masks
Frames
Cliparts
Backgrounds
Text
How to add your own creation - Clip Arts, Frames, Masks,
Backgrounds, ready to use templates into Album Express
How to add “Clip Arts”
How to add Frames
How to add Mask
How to add/delete and arrange a page in the storyboard
How to create and save new template
8.0 How to resize the project
9.0 How to add a page with another size or resize the page in the project
10.0 Export Project
User's Guide Album Express
1.0 Introduction
"Album Express 4" Professional is stand-alone software specifically designed to
expedite the creation and the layout process of high quality professional digital photo
albums.
Album Express can quickly and easily help you create complete professional digital
photo albums just by using its ready-to-use wide range of templates, masks, frames,
backgrounds, and its built in text and effects editors. It is so simple to learn and use that
no special artistic skills are required!
Album Express, unlike other traditional imaging software that are complex and can
reduce your productivity, is so easy to use that you will be able to create professional
photo album layouts in just a few minutes! With Album Express, you will save so much
time that the software will pay for itself after just one use! And because you will be able
to customize and personalize your own templates, your creations will always be
distinguishable and unique! Any album page you build with Album Express can be
saved as a template and reused for future projects, so your custom library will increase
exponentially as you use the product!
Album Express can convert a selection of your images into unique photo collages
instantly. Then re-organize, crop, color, balance, and package your composition as your
creative talents and imagination will allow. Entire Album Design projects can be reused
over and over again with different photos, saving you valuable time and effort.
Album Express can be linked to any external photo editor(s) of your preference: like
Photoshop, Lightroom, Aperture, Nikon NX2, Corel Photo Paint, etc., leveraging your
exiting software investment whether you own a PC or a Mac.
Album Express is the perfect design solution for magazine, flush mount, scrapbooks
and even matted albums. Album Express is so much more than an album design tool. It
can easily be used for Signature Studio Prints, Collages, Stationary, Sports Trader
Cards, Custom Studio Proof Prints and any other product where you wish to combine
multiple images, masks, borders, and frames.
Album Express has been designed for discriminating photographer who wishes to
provide that personal and creative touch to his/her album creations.
User's Guide Album Express
2.0 Getting started and System Requirement
It is very important to set the working environment of
Album Express before we actually use it for making our Album
pages.
• After the successful installation of Album Express, insert the USB
dongle.
• Set the minimum Resolution Monitor to 1024 x 768 pixels.
The instructions for installation an application onto
Windows Vista and Windows 7
The following procedures have got to be made in order to get to
work software correctly:
1.Parental protection.
Regarding Windows Vista.
You should do following:
* go to the Control Panel;
* User Accounts;
* Parental Controls;
* Family safety options and set to NEVER.
Regarding Windows 7.
You should do following:
* go to the Control Panel;
* User Account and Parental Controls;
* User's Account;
* Change the settings of your User Account;
* take and drag the cursor down;
* click "OK".
2. Run application as administrator.
*Click with the right key of the mouse on the folder of
application and set – Run as administrator.
3. Quick Time. Our software requests Quick time version 7.6 or
later.
* Update or install Quick Time.
User's Guide Album Express
SYSTEM REQUIREMENTS - WINDOWS PLATFORM
• Operating System Windows 2000 Service Pack 4 or higher
• QuickTime 7.6 or higher
• 2GB RAM (Recommended 4GB)
• Pentium 4 or higher recommended
SYSTEM REQUIREMENTS - MACINTOSH PLATFORM
• Operating System Mac OS X 10.4.11 or higher
• 2GB RAM (Recommended 4GB)
• PowerPC G5 or Intel Core Recommended
• HD 40 GB (Recommended SATA 7200RPM Speed)
• Setting the Preference of Album Express.
2.1 How to set the Preference of Album Express
Open Album Express. Go File - Edit – Preferences. The window of
the preferences opens. You can set the resolution and the number
of the last actions which were saved in the memory.
To connect Album Express with an external editor click the button
Change. Select an external editor which you like to connect Album
Express with.
Use the button Empty to delete the files of temporarily saved
projects.
User's Guide Album Express
3.0 Workflow of Album Express
After the successful installation of Album Express, insert the USB
dongle. Click on the icon of Album Express.
The interface of the software opens.
Recent Projects
New project
Open Project
Exit
Click the button “New Project” and the dimension window opens.
You can choose the size from custom sizes or create own one
writing the desired values in the voices Width, Height and
Resolution.
User's Guide Album Express
When you want to add your new dimension as custom click the
button Save Preset. You will find your new dimension in the list of
the custom dimensions at the next opening of “Album Express”.
When the dimension of the new project has been chosen the
workflow of Album Express is opened.
Choose a folder of the template from the library of them. Double
click on the thumbnail of one. It opens on the work space of
“Album Express”.
Library of
templates
Ready pages
of the project
Photo Mask Frame Clipart Background
Effects
Layers of the
objects on the
opened page
User's Guide Album Express
4.0 Five major sections of Album Express
4.1 Photo
Open Album Express. The section photo opens as default.
Select
your folder
Remove Folder
Add a new
Folder
Double Click for
inserting photo
into template
Import of Photos
To import your photos into “Album Express” do following:
* click button Add a new folder;
* select that created folder;
* click the button Import of Photos;
* choose desired photo/photos and click OK.
The thumbnails of all imported photos will be created and showed
in the window of the Photo Section.
Click on thumbnail of a photo by the right key of the mouse for
opening this Menu
Choosing the voice Open in external Editor the photo will be
opened in the external editor which Album Express was connected.
User's Guide Album Express
4.1.1 How to add a photo to the current page
To insert the photo into photo object:
- Select a photo object on the template.
To select the photo object click on it in the opened template or
select the layer of it in the window “Objects”.
- Double click on the thumbnail of the photo.
It will be resized and inserted into selected photo object
automatically.
To insert a photo into photo object without importing it in Album
Express double click on the photo object and choose the direction
where desired photo is.
To insert the photo as a new photo object:
- take the thumbnail of the photo and drag it onto template;
- don't select any photo object on the template and double click of
the thumbnail of the photo. It will be inserted on the template as a
new photo object.
The new layer will be created in the window “Objects”.
Note: changing the size of the photo object the inserted photo is
never distorted.
User's Guide Album Express
4.1.2 The function of Auto Insert of the photos
Go to File - Auto Insert...
The following window opens
1. Select photo files
2. Choose mode:
* Replace Project Photos;
* Add New Pages;
* Add Pages with Templates.
Choosing the mode Replace Project Photos all photos in the
opened project will be substituted with the new selected ones.
Choosing the mode Add New Pages you can decide the number of
the Rows and Columns and the space between them on every
new page.
User's Guide Album Express
Click button Start and the new pages are created and the photos
are inserted.
Choosing the mode Add New Pages with Templates you have to
choose the folder of the templates and select desired ones.
To insert the photos
in Shuffle way click
here
To use the original
size of the templates
click here
User's Guide Album Express
4.1.3 How to resize and rotate the inserted photo
When you need to resize or rotate the inserted photo inside of the
photo object you have to click the icon “Crop” on the left part of the
template.
Tool Move/Resize
Crop
Resize the image
Rotate the image
Using the Crop tools from the Crop window it is possible to resize
the photo, rotate and move it.
When the work about the photo is finished click the icon
Move/Resize in order to go back to the photo object.
User's Guide Album Express
4.1.4 How to resize a photo object
The photo object can be resized in following ways:
1. Take and drag one corner of the photo
object.
In this case only two sides of the photo object
are expanded.
2. Hold the key SHIFT on the keyboard and
take and drag one corner of the photo object.
In this case all four sides of the photo object
are expanded.
3. Take and drag one side of the photo object.
In this case only one side of the photo object
is expanded.
4. Hold the key SHIFT on the keyboard and
take and drag one side of the photo object.
In this case two opposite sides of the photo
object are expanded.
Note: The photo inside of the photo object is never distorted.
User's Guide Album Express
4.1.5 How to add some effect, shadow and rotate
selected photo object
Select a photo object clicking on it in the template or clicking on its
layer in the window “Objects”.
The window Property shows all values of selected photo object.
Using the tools which are presented in the window Property it is
possible to add the shadow, rotate, add an edge and apply some
desired effect to the selected photo object.
Note: using the tools from window Property you can change the
position and values only of the photo object. The position and the
values of the inserted photo doesn't change!
User's Guide Album Express
To block the position of the photo object click here
Now it isn't possible to move and to resize that photo object, but it
is possible to change the property values using the tools from the
window Property.
User's Guide Album Express
When all modifies were done this photo object can be blocked
provided that you click here
It isn't possible to do anything with photo object when the layer of
the photo object was locked.
Click another time on the lock of that layer in order to unlock it.
User's Guide Album Express
4.1.6 How to edit, arrange and move photo object
Click with the right key of the mouse on the photo object in order to
open that menu:
Choosing the voice Edit Photo the photo is opened in the external
editor directly. After editing of the photo you return to Album
Express and the old photo will be updated with the new.
Choosing the voice Edit Copy of Photo the copy of that photo is
opened in external editor for editing. When you return to Album
Express the old photo will be substituted with the new one and this
new photo will be saved in the Photo folder near the old one.
Choosing voice Level become possible to change the layer
position of the photo object.
To arrange the photo objects it is necessary to select all objects
(hold the key Shift) which you need to arrange and click on the
selected objects with the right key of the mouse. Choose the voice
Arrange and choose the type of the arrangement from the
submenu.
User's Guide Album Express
Choosing the voice Flip Horizontal or Flip Vertical the photo object
can be flipped on horizontal or vertical axes.
Choosing the voice Copy Style you copy the style of the selected
photo object. Select some other photo object and choose the voice
Past Style. The Style from one photo object will be applied onto
other one.
Choosing the voice Remuve Photo you can delete the photo from
photo object.
Choosing the voice Remove Mask you can delete the mask from
the photo object which was applied before.
Choosing the voice Remove Frame you can delete the frame from
the photo object which was applied before.
User's Guide Album Express
4.1.7 How to create Photo Object
For creating a photo object in the current page:
1. Select the tool “Create Photo Object” clicking on it by the left key
of the mouse.
2. Select the area into template where you want to insert photo.
Create Photo Object
Created area
The layer with the photo object will be created in the Layers
window automatically.
Double click on a thumbnail of a photo to insert it into created
photo object. The photo will be inserted and resized automatically.
To delete the photo object it is necessary to select it clicking on by
the left key of the mouse or select the layer of this photo object in
the Layer window. It is possible to delete it using the icon Trash in
the Layer window or push the key Delete from the Keybord.
User's Guide Album Express
4.2 Masks
The section Masks includes the different types of the masks ready
for using.
Remove Folder
Library of
Double Click to insert
the Masks
Mask onto Photo Object
Add Folder
Import Masks
To apply a mask on the selected photo object double click on a
thumbnail of mask. The mask applied onto selected photo object
automatically.
Click on thumbnail of a mask by the right key of the mouse for
opening this Menu
This menu allows us:
* rotate it to left (- 90);
* rotate it to right (+ 90);
* delete it from the folder;
* open it with the External Editor which was connected with Album
Express;
* create the copy of it;
* update the thumbnail of the mask which was modified.
User's Guide Album Express
4.3 Frames
The section Frames includes the different types of the frames
ready for using.
Library of
frames
Remove Folder
Add Folder
Double Click to insert
Frame onto Photo Object
Import frames
To apply a frame on the selected photo object double click on a
thumbnail of a frame. The frame will be inserted automatically.
Click on a thumbnail of a frame by the right key of the mouse to
open this Menu
This menu allows us:
* rotate it to left (- 90);
* rotate it to right (+ 90);
* delete it from the folder;
* open Frame with the External Editor which was connected with
Album Express;
* open Mask with the External Editor which was connected with
Album Express;
* update the thumbnail of the frame which was modified.
User's Guide Album Express
4.4 Cliparts
The section Cliparts includes the different types of the cliparts
ready for using.
Library of
the cliparts
Remove Folder
Add Folder
Double Click for inserting
Clipart into template
Import Cliparts
To apply a clipart on the selected photo object double click on a
thumbnail of a clipart.
To delete the clipart from the template select clipart and click the
key Delete from the keyboard.
Click on thumbnail of a clipart by the right key of the mouse for
opening this Menu
This menu allows us:
* rotate it to left (- 90);
* rotate it to right (+ 90);
* delete it from the folder;
* open it with the External Editor which was connected with Album
Express;
* create the copy of it;
* update the thumbnail of the clipart which was modified.
User's Guide Album Express
Double click on the thumbnail of the clipart to apply it onto template.
Take and drag on some corner to resize the clipart proportionally.
Take and drag on some side to resize the clipart not proportionally.
Click with the right key of the mouse on it to change the level
position of it.
It is possible to change the level position of
the objects from the Level window directly.
Select the layer of the object and use the
buttons down in this window.
It is possible to add a shadow to the clipart
using the Properties window.
It is possible to edit and rotate selected
clipart using the function in the Properties
window.
Push the button Reset when you need to turn
to the original values of the clipart.
User's Guide Album Express
4.5 Backgrounds
The section Backgrounds includes the different types of the
backgrounds ready for using.
Library of the
backgrounds
Remove Folder
Add Folder
Double Click to insert
Background into Template
Import Backgrounds
To apply a background on the template double click on a thumbnail
of a background.
Note: to apply coloured background click on the button “Colour”
and choose a desired colour.
User's Guide Album Express
Click on a thumbnail of a background by the right key of the mouse
for opening this Menu.
This menu allows us:
* rotate it to left (- 90);
* rotate it to right (+ 90);
* delete it from the folder;
* open it with the External Editor which was connected with Album
Express;
* create the copy of it;
* update the thumbnail of the background which was modified.
User's Guide Album Express
4.6 Text
The section Text includes the different text tools which allow to
write, edit and add text to the current template.
Click Text tool for
creating “Text Object”
Text's properties
window
Text Object
Write your text here
To apply the text on a template do following:
* click Button Text tool;
* create the text object on the template;
* write your text in the text window;
* choose the font, size and colour of the text;
* click button Apply Text.
To delete the text object:
* select it;
* click the key Delete on the keyboard.
It is possible to delete the text object from the Layer's window:
* select text layer;
* click the icon trash.
User's Guide Album Express
5.0 How to add your own creation - Clip Arts, Frames,
Masks, Backgrounds, ready to use templates into
Album Express
5.1 How to add “Clip Arts”
To add a clipart into "Album Express " as the 1st it is necessary to
delete the space around the image which you want to use as an
object of “Clipart”.
Please follow these steps in Adobe Photoshop:
1. Open the image which you want to use as a object of clipart in
Adobe Photoshop.
2. Select the desired area by tool "Lasso".
3. Copy the selected area. (Ctrl + C)
4. Open a new canvas with a transparent background.
Set resolution 300 DPI.
User's Guide Album Express
Save PNG Format
5.
6.
7.
8.
Paste the selected object into the new canvas. (Ctrl + V).
Go to Select Menu > Load Selection.
Click OK.
Apply Quick Mask. Click on the Edit in Quick Mask Mode
Tool from the tool bar.
Shortcut key is Q.
9. Save the image: File menu > Save As
10.In the activated Save As Dialog box,
Save in AlbumExpress\Clip Art\Your Folder.
Note: Save it as PNG file format and with Alpha Channels
11. Click Save.
User's Guide Album Express
5.2 How to add Frames
To add a frame into "Album Express" as the 1st it is necessary to
delete the space around the image which you want to use as a
frame in “Album Express”.
Please follow these steps in Adobe Photoshop:
1. Open the desired frame or your creation.
2. Select the frame with the help of Marquee tool.
3. Invert the selection. Select menu > Inverse. (Ctrl +Shift+I)
4. Copy the selected area. (Ctrl + C)
5. Open a new canvas with a transparent background.
Set resolution 300 DPI.
6. Paste the selected frame into the new canvas. (Ctrl + V).
7. Go to Select Menu > Load Selection.
8. Click OK.
9. Apply Quick Mask. Click on the Edit in Quick Mask Mode tool from
the tool bar. Shortcut key is Q.
10. Save the image: File menu > Save As
11. In the activated Save As Dialog box, Save in
HardDisk:AlbumExpress\Frames\SampleFrame\
Sampleframe_overlay.png
Note: Save it as PNG file format and with Alpha Channels.
User's Guide Album Express
12. Click Save.
Important Note: You must also save the same frame again in
JPEG format!
Please follow these steps in Adobe Photoshop:
13) Select the Canvas with the frame, which you have opened
previously. Copy it.
Note: You will get the previous selection.
14) Apply solid black colour to the selection so that frame is
covered by the black colour. (Set the foreground colour, black) Edit Menu > Fill. Foreground colour
15) Save the image, File menu > Save As
16) In the activated Save As Dialog box, Save in
HardDisk:AlbumExpress\Frames\SampleFrame\
Sampleframe_Mask.jpg
17) Click Save.
Note: Save it as the file JPEG format with the same file name.
User's Guide Album Express
5.3 How to add Mask
To add your own Mask in Album Express you have to keep the
desired portion as Black (colour),where the image has to be seen
and the border/outline of the Mask must be White.
Follow these steps to create a Mask in Adobe Photoshop and add
it into “Album Express”:
1. Open the new canvas.
Here 1500x1500 Pixels, Resolution and set
Mode-Grayscale in the New Canvas Dialog box and set
background Black.
2. Trace an Oval in the new canvas with the Elliptical Marquee tool.
3. Invert the selection. Select Menu > Inverse (Crtl+Shift+I)
4. Apply solid black colour to the selection so that the selection is
filled by the White colour. (Set the foreground colour, black) Edit Menu > Fill.
5. Save the image, File menu > Save As
6. In the activated Save As Dialog box, Save in
HardDisk:\AlbumExpress\Mask\YourFolder\Mask.jpg
7. Click Save.
Note: Save it as JPEG file format.
User's Guide Album Express
6.0 How to add/delete and arrange a page in the
storyboard
To change the position of ready page use the buttons “Send
backward page” and “Bring forward Page”
To add a blank page click on the button “Add a blank page”.
To rename a ready page click on it by the right key of the mouse
and type a new name in the opened window.
To delete the ready page select it from ready pages. It opens
on the work space. Click the button “Delete selected Page”
Add a blank
page
Move position
of page
Copy page
Delete selected
page
It is possible to change the position of the pages using that scroll
menu:
* select desired page;
* click with the right key of the mouse on the
thumbnail of it;
* choose the desired action/position for this page.
User's Guide Album Express
7.0 How to create and save new template
1. Open a new blank page clicking on the button Add a new Page.
2. Click the button “Create Photo Object” and and create one or
more of them on the blank page.
3. Using the libraries of Album Express add masks, cliparts, frames,
effects and background.
4. Create a new folder into “Library of Templates” clicking the button
“Create a new folder of templates”.
5. Write a name for new folder.
6. Open it.
7. Click the button Save Template
8. Type a name of the template;
9.Click OK.
Create/Delete
new Folder Template
Library
of Template
Save Template
Add new Page
User's Guide Album Express
The following message will be shown:
Choose some option to save it.
The new template will be saved. The thumbnail of the new
template will be created automatically.
User's Guide Album Express
8.0 How to resize the project
When you need to resize the project go to
File – Edit - Project Properties...
Choose the size from the Custom
Sizes or type your desired size here
Click Apply
Note: The project was resized. All objects and photos were resized
proportionally.
To create the new thumbnail of the page click here
User's Guide Album Express
9.0 How to add a page with another size
or resize the page in the project
When you need to resize the project go to File – Edit - Project
Properties...
Choose the size from the Custom
Sizes or type your desired size here
All objects and photos on the page will be resized proportionally.
User's Guide Album Express
14.0 Export Project
1. Select menu File
2. Save project as...
3. Menu File - Export project.
The following window opens:
Here it is necessary to select:
* all pages or some ones;
* format of the exported file;
* split pages;
* export preview.
4.Click the button export.
5. Select a folder of the destination.
The application divides all available memory for 1.5 GB during the
rendering . For example: the memory is 15GB : 1.5 GB. In this
case 10 rendering processes (10 pages are exporting) are starting
in the same time. The time of the rendering is reduced and the
application doesn't crash.