1
BASIC Development
Software
(Catalog Numbers 1747-PBASE)
Programming Manual
Important User
Information
Because of the variety of uses for the products described in this publication, those
responsible for the application and use of this control equipment must satisfy
themselves that all necessary steps have been taken to assure that each application
and use meets all performance and safety requirements, including any applicable
laws, regulations, codes and standards.
The illustrations, charts, sample programs and layout examples shown in this
guide are intended solely for purposes of example. Since there are many variables
and requirements associated with any particular installation, Rockwell
International Corporation does not assume responsibility or liability (to include
intellectual property liability) for actual use based upon the examples shown in
this publication.
Rockwell Automation publication SGI-1.1, Safety Guidelines for the Application,
Installation and Maintenance of Solid-State Control (available from your local
Rockwell Automation office), describes some important differences between
solid-state equipment and electromechanical devices that should be taken into
consideration when applying products such as those described in this publication.
Reproduction of the contents of this copyrighted publication, in whole or part,
without written permission of Rockwell Automation, is prohibited.
Throughout this manual we use notes to make you aware of safety considerations:
ATTENTION
!
Identifies information about practices or circumstances that
can lead to personal injury or death, property damage or
economic loss.
Attention statements help you to:
• identify a hazard
• avoid a hazard
• recognize the consequences
IMPORTANT Identifies information that is critical for successful
application and understanding of the product.
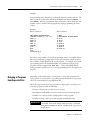
PLC-5 is a registered trademark; and SLC 500, RSLogix, and RSLinx are trademarks of Rockwell Automation.
Table of Contents
Preface
Who Should Use This Manual . . . . . . . . . . . . . . . . . . . . . . . . . . . . . .
Purpose of this Manual . . . . . . . . . . . . . . . . . . . . . . . . . . . . . . . . . . . .
Terms and Abbreviations. . . . . . . . . . . . . . . . . . . . . . . . . . . . . . . . . . .
Conventions Used in this Manual . . . . . . . . . . . . . . . . . . . . . . . . . . . .
Rockwell Automation Support . . . . . . . . . . . . . . . . . . . . . . . . . . . . . .
Local Product Support . . . . . . . . . . . . . . . . . . . . . . . . . . . . . . . . .
Technical Product Assistance. . . . . . . . . . . . . . . . . . . . . . . . . . . . .
Your Questions or Comments on this Manual . . . . . . . . . . . . . . .
P-1
P-2
P-4
P-5
P-5
P-5
P-5
P-6
Chapter 1
Installing the Software
What Your Software Does. . . . . . . . . . . . . . . . . . . . . . . . . . . . . . . . . .
Hardware Requirements . . . . . . . . . . . . . . . . . . . . . . . . . . . . . . . . . . .
Hardware for Interfacing Your Personal Computer with the
BASIC or BASIC-T Module . . . . . . . . . . . . . . . . . . . . . . . . . . . . .
Installation Procedure . . . . . . . . . . . . . . . . . . . . . . . . . . . . . . . . . .
Directory Structure . . . . . . . . . . . . . . . . . . . . . . . . . . . . . . . . . . . .
Backing-up Your Software. . . . . . . . . . . . . . . . . . . . . . . . . . . . . . . . . .
1-1
1-2
1-2
1-3
1-5
1-6
Chapter 2
Getting Familiar with Your
Development Software
i
Starting Your Software . . . . . . . . . . . . . . . . . . . . . . . . . . . . . . . . . . . . 2-1
Toplevel Menu . . . . . . . . . . . . . . . . . . . . . . . . . . . . . . . . . . . . . . . . . . 2-2
Main Menu . . . . . . . . . . . . . . . . . . . . . . . . . . . . . . . . . . . . . . . . . . . . . 2-2
Status Line . . . . . . . . . . . . . . . . . . . . . . . . . . . . . . . . . . . . . . . . . . 2-3
Message Line . . . . . . . . . . . . . . . . . . . . . . . . . . . . . . . . . . . . . . . . . 2-4
Function Keys . . . . . . . . . . . . . . . . . . . . . . . . . . . . . . . . . . . . . . . . 2-4
Using Help Outside a Program . . . . . . . . . . . . . . . . . . . . . . . . . . . 2-4
Using Help Within a Program . . . . . . . . . . . . . . . . . . . . . . . . . . . 2-5
Typical Pull-down Menu . . . . . . . . . . . . . . . . . . . . . . . . . . . . . . . 2-5
Navigating Within Windows . . . . . . . . . . . . . . . . . . . . . . . . . . . . 2-6
Editing a BASIC Program . . . . . . . . . . . . . . . . . . . . . . . . . . . . . . . . . . 2-9
General Editing . . . . . . . . . . . . . . . . . . . . . . . . . . . . . . . . . . . . . . . 2-9
Saving Your Program . . . . . . . . . . . . . . . . . . . . . . . . . . . . . . . . . 2-10
Translating Your Program . . . . . . . . . . . . . . . . . . . . . . . . . . . . . . 2-11
Physically Connecting to Your BASIC or BASIC-T Module . . . . 2-11
Changing to Terminal Mode. . . . . . . . . . . . . . . . . . . . . . . . . . . . 2-12
Downloading Your Program . . . . . . . . . . . . . . . . . . . . . . . . . . . . 2-13
Exiting a BASIC Program . . . . . . . . . . . . . . . . . . . . . . . . . . . . . . . . . 2-13
Publication 1746-PM001A-US-P
Table of Contents
ii
Chapter 3
Configuring Your Software
Setup and Configuration Menu . . . . . . . . . . . . . . . . . . . . . . . . . . . . . 3-1
Command Line Switches . . . . . . . . . . . . . . . . . . . . . . . . . . . . . . . 3-2
Loading Files from the Command Line . . . . . . . . . . . . . . . . . . . . 3-4
Configuring Your Edit Options . . . . . . . . . . . . . . . . . . . . . . . . . . . . . 3-4
Configuring Display Setup . . . . . . . . . . . . . . . . . . . . . . . . . . . . . . . . . 3-7
Configuring Mouse and Keyboard Options . . . . . . . . . . . . . . . . . . . . 3-7
Configuring Your Filename Extensions. . . . . . . . . . . . . . . . . . . . . . . . 3-8
Configuring Your Printer Options . . . . . . . . . . . . . . . . . . . . . . . . . . 3-11
Configuring Your Memory Options . . . . . . . . . . . . . . . . . . . . . . . . . 3-11
Backup Files, Temporary Files, and Autosave . . . . . . . . . . . . . . . . . . 3-12
Backup Files . . . . . . . . . . . . . . . . . . . . . . . . . . . . . . . . . . . . . . . . 3-12
Temporary Files . . . . . . . . . . . . . . . . . . . . . . . . . . . . . . . . . . . . . 3-12
Autosave . . . . . . . . . . . . . . . . . . . . . . . . . . . . . . . . . . . . . . . . . . . 3-12
Search and Replace Defaults . . . . . . . . . . . . . . . . . . . . . . . . . . . . . . . 3-13
Terminal Emulation Mode Selection . . . . . . . . . . . . . . . . . . . . . . . . 3-13
Save Configuration and Exit . . . . . . . . . . . . . . . . . . . . . . . . . . . . . . . 3-14
Chapter 4
Editing a Program
Using Simple Editing Techniques. . . . . . . . . . . . . . . . . . . . . . . . . . . . 4-1
Searching Operations . . . . . . . . . . . . . . . . . . . . . . . . . . . . . . . . . . . . . 4-2
Using Block Operations . . . . . . . . . . . . . . . . . . . . . . . . . . . . . . . . . . . 4-3
Text Formatting, Undo, and Redo . . . . . . . . . . . . . . . . . . . . . . . . . . . 4-6
Advanced Editing Techniques. . . . . . . . . . . . . . . . . . . . . . . . . . . . . . . 4-7
Drawing Lines . . . . . . . . . . . . . . . . . . . . . . . . . . . . . . . . . . . . . . . 4-8
Using the Calculator . . . . . . . . . . . . . . . . . . . . . . . . . . . . . . . . . . . 4-9
The ASCII Table . . . . . . . . . . . . . . . . . . . . . . . . . . . . . . . . . . . . . 4-9
Using Windows . . . . . . . . . . . . . . . . . . . . . . . . . . . . . . . . . . . . . . 4-9
Using Keystroke Macros . . . . . . . . . . . . . . . . . . . . . . . . . . . . . . . 4-11
Using Cursor Markers. . . . . . . . . . . . . . . . . . . . . . . . . . . . . . . . . 4-15
Chapter 5
Manipulating Files
Publication 1746-PM001A-US-P
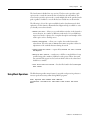
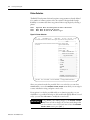
The File Menu . . . . . . . . . . . . . . . . . . . . . . . . . . . . . . . . . . . . . . . . . . .
Selecting Project Files . . . . . . . . . . . . . . . . . . . . . . . . . . . . . . . . . . . . . .
User Menu . . . . . . . . . . . . . . . . . . . . . . . . . . . . . . . . . . . . . . . . . . .
User-defined Programs . . . . . . . . . . . . . . . . . . . . . . . . . . . . . . . . . . . . .
Name Selection. . . . . . . . . . . . . . . . . . . . . . . . . . . . . . . . . . . . . . . .
Selecting a Filename . . . . . . . . . . . . . . . . . . . . . . . . . . . . . . . . . . . .
Swap Method Selection. . . . . . . . . . . . . . . . . . . . . . . . . . . . . . . . . .
Memory Required Selection . . . . . . . . . . . . . . . . . . . . . . . . . . . . . .
Use COMMAND.COM Option . . . . . . . . . . . . . . . . . . . . . . . . . .
Starting Directory . . . . . . . . . . . . . . . . . . . . . . . . . . . . . . . . . . . . . .
51
52
52
54
55
55
55
56
57
57
Table of Contents
iii
Chapter 6
Overview of the Language . . . . . . . . . . . . . . . . . . . . . . . . . . . . . . . . . . 6-1
Writing Programs Using the
BASIC Development Language Translator Directives . . . . . . . . . . . . . . . . . . . . . . . . . . . . . . . . . . . . . . 6-2
Include . . . . . . . . . . . . . . . . . . . . . . . . . . . . . . . . . . . . . . . . . . . . . 6-3
Label . . . . . . . . . . . . . . . . . . . . . . . . . . . . . . . . . . . . . . . . . . . . . . . 6-4
Text . . . . . . . . . . . . . . . . . . . . . . . . . . . . . . . . . . . . . . . . . . . . . . . 6-5
Line Number . . . . . . . . . . . . . . . . . . . . . . . . . . . . . . . . . . . . . . . . 6-6
Increment . . . . . . . . . . . . . . . . . . . . . . . . . . . . . . . . . . . . . . . . . . . 6-6
Breakpoint . . . . . . . . . . . . . . . . . . . . . . . . . . . . . . . . . . . . . . . . . . 6-7
Debug on
Debug off . . . . . . . . . . . . . . . . . . . . . . . . . . . . . . . . . . . . . . . . . . . 6-7
Macros . . . . . . . . . . . . . . . . . . . . . . . . . . . . . . . . . . . . . . . . . . . . . . . . 6-8
Creating Your Own Programming Macro . . . . . . . . . . . . . . . . . . . . . . 6-8
Bringing in Programs from Separate Files . . . . . . . . . . . . . . . . . . . . . . 6-9
Subprogram CALL 70, CALL 71 . . . . . . . . . . . . . . . . . . . . . . . . 6-10
Programming Macros . . . . . . . . . . . . . . . . . . . . . . . . . . . . . . . . . 6-10
Merging a Program File. . . . . . . . . . . . . . . . . . . . . . . . . . . . . . . . 6-10
Creating a Second Program . . . . . . . . . . . . . . . . . . . . . . . . . . . . . . . . 6-11
Entering the Program . . . . . . . . . . . . . . . . . . . . . . . . . . . . . . . . . 6-11
Translating . . . . . . . . . . . . . . . . . . . . . . . . . . . . . . . . . . . . . . . . . 6-13
Downloading . . . . . . . . . . . . . . . . . . . . . . . . . . . . . . . . . . . . . . . 6-15
Executing . . . . . . . . . . . . . . . . . . . . . . . . . . . . . . . . . . . . . . . . . . 6-15
Chapter 7
Printing Your Program
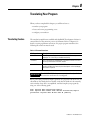
Setting Up Your Printer . . . . . . . . . . . . . . . . . . . . . . . . . . . . . . . . . . .
Printer Selection . . . . . . . . . . . . . . . . . . . . . . . . . . . . . . . . . . . . . .
Printer Setup . . . . . . . . . . . . . . . . . . . . . . . . . . . . . . . . . . . . . . . . .
Printer Device/File . . . . . . . . . . . . . . . . . . . . . . . . . . . . . . . . . . . .
Serial Printers . . . . . . . . . . . . . . . . . . . . . . . . . . . . . . . . . . . . . . . .
Using the Printer Controls . . . . . . . . . . . . . . . . . . . . . . . . . . . . . . . . .
Copies to Print . . . . . . . . . . . . . . . . . . . . . . . . . . . . . . . . . . . . . . .
Line Numbering . . . . . . . . . . . . . . . . . . . . . . . . . . . . . . . . . . . . . .
Print Margin . . . . . . . . . . . . . . . . . . . . . . . . . . . . . . . . . . . . . . . . .
Eject Page . . . . . . . . . . . . . . . . . . . . . . . . . . . . . . . . . . . . . . . . . . .
Printing All or Part of a Document . . . . . . . . . . . . . . . . . . . . . . . . . . .
Printing In Background. . . . . . . . . . . . . . . . . . . . . . . . . . . . . . . . .
7-1
7-2
7-3
7-3
7-4
7-5
7-5
7-5
7-5
7-5
7-6
7-6
Chapter 8
Translating Your Program
Translating Feature . . . . . . . . . . . . . . . . . . . . . . . . . . . . . . . . . . . . . . .
Eliminating Translator Errors . . . . . . . . . . . . . . . . . . . . . . . . . . . . . . .
Find Next Compiler Error. . . . . . . . . . . . . . . . . . . . . . . . . . . . . . .
Translator Configuration . . . . . . . . . . . . . . . . . . . . . . . . . . . . . . . . . .
8-1
8-4
8-4
8-4
Publication 1746-PM001A-US-P
Table of Contents
iv
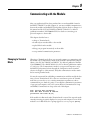
Chapter 9
Communicating with the
Module
Changing to Terminal Mode . . . . . . . . . . . . . . . . . . . . . . . . . . . . . . . 9-1
Downloading File . . . . . . . . . . . . . . . . . . . . . . . . . . . . . . . . . . . . . . . . 9-3
Uploading File . . . . . . . . . . . . . . . . . . . . . . . . . . . . . . . . . . . . . . . . . . 9-4
Hex File Transfers. . . . . . . . . . . . . . . . . . . . . . . . . . . . . . . . . . . . . . . . 9-6
Uploading Hex Files . . . . . . . . . . . . . . . . . . . . . . . . . . . . . . . . . . . 9-6
Downloading Hex Files . . . . . . . . . . . . . . . . . . . . . . . . . . . . . . . . 9-7
Backing Up the Module Image . . . . . . . . . . . . . . . . . . . . . . . . . . . 9-8
Restoring the Module Image. . . . . . . . . . . . . . . . . . . . . . . . . . . . . 9-9
Debugging Your Program . . . . . . . . . . . . . . . . . . . . . . . . . . . . . . . . . . 9-9
Debugging Example . . . . . . . . . . . . . . . . . . . . . . . . . . . . . . . . . . 9-11
Making Corrections to Your Program. . . . . . . . . . . . . . . . . . . . . 9-14
RS-232 Communications Setup . . . . . . . . . . . . . . . . . . . . . . . . . . . . 9-14
Autobaud . . . . . . . . . . . . . . . . . . . . . . . . . . . . . . . . . . . . . . . . . . 9-15
General Setup Parameters . . . . . . . . . . . . . . . . . . . . . . . . . . . . . . 9-16
Terminal. . . . . . . . . . . . . . . . . . . . . . . . . . . . . . . . . . . . . . . . . . . 9-16
Com Port Settings. . . . . . . . . . . . . . . . . . . . . . . . . . . . . . . . . . . . 9-16
Colors . . . . . . . . . . . . . . . . . . . . . . . . . . . . . . . . . . . . . . . . . . . . . 9-17
Save Setup. . . . . . . . . . . . . . . . . . . . . . . . . . . . . . . . . . . . . . . . . . 9-17
DH485 Communications Setup . . . . . . . . . . . . . . . . . . . . . . . . . . . . 9-18
Attach . . . . . . . . . . . . . . . . . . . . . . . . . . . . . . . . . . . . . . . . . . . . . 9-18
General Setup Parameters . . . . . . . . . . . . . . . . . . . . . . . . . . . . . . 9-19
Terminal. . . . . . . . . . . . . . . . . . . . . . . . . . . . . . . . . . . . . . . . . . . 9-19
Com Port Settings. . . . . . . . . . . . . . . . . . . . . . . . . . . . . . . . . . . . 9-20
Who Active. . . . . . . . . . . . . . . . . . . . . . . . . . . . . . . . . . . . . . . . . 9-21
Who Listen . . . . . . . . . . . . . . . . . . . . . . . . . . . . . . . . . . . . . . . . . 9-22
Colors . . . . . . . . . . . . . . . . . . . . . . . . . . . . . . . . . . . . . . . . . . . . . 9-22
Save Setup. . . . . . . . . . . . . . . . . . . . . . . . . . . . . . . . . . . . . . . . . . 9-22
Appendix A
BASIC Macro Library
Publication 1746-PM001A-US-P
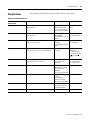
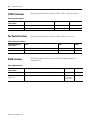
Library Overview . . . . . . . . . . . . . . . . . . . . . . . . . . . . . . . . . . . . . . . .
Screen Functions. . . . . . . . . . . . . . . . . . . . . . . . . . . . . . . . . . . . . . . . .
Keyboard Functions . . . . . . . . . . . . . . . . . . . . . . . . . . . . . . . . . . . . . .
SLC Backplane Functions . . . . . . . . . . . . . . . . . . . . . . . . . . . . . . . . . .
Clock Functions . . . . . . . . . . . . . . . . . . . . . . . . . . . . . . . . . . . . . . . . .
Battery Back-Up . . . . . . . . . . . . . . . . . . . . . . . . . . . . . . . . . . . . . . . . .
Program Control. . . . . . . . . . . . . . . . . . . . . . . . . . . . . . . . . . . . . . . . .
String Routines . . . . . . . . . . . . . . . . . . . . . . . . . . . . . . . . . . . . . . . . . .
[CTRL-C] Functions . . . . . . . . . . . . . . . . . . . . . . . . . . . . . . . . . . . . .
Port Control Functions. . . . . . . . . . . . . . . . . . . . . . . . . . . . . . . . . . . .
DH485 Functions . . . . . . . . . . . . . . . . . . . . . . . . . . . . . . . . . . . . . . .
1771-DB/B Backplane Functions . . . . . . . . . . . . . . . . . . . . . . . . . . . .
A-1
A-2
A-3
A-4
A-5
A-6
A-6
A-7
A-8
A-8
A-8
A-9
Table of Contents
v
Appendix B
The DOS Directory Shell
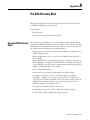
Using the DOS Directory Shell. . . . . . . . . . . . . . . . . . . . . . . . . . . . . . B-1
DOS Directory Shell Operation. . . . . . . . . . . . . . . . . . . . . . . . . . B-2
File Operations from the DOS Directory Shell . . . . . . . . . . . . . . . B-4
Publication 1746-PM001A-US-P
Table of Contents
vi
Publication 1746-PM001A-US-P
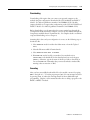
Preface
Read this preface to familiarize yourself with the rest of the manual. This preface
covers the following topics:
• who should use this manual
• the purpose of this manual
• how to use this manual
• terms and abbreviations
• conventions used in this manual
• Rockwell Automation support
Who Should Use This
Manual
Use this manual if you are responsible for designing, installing, programming, or
troubleshooting control systems that use Allen-Bradley small logic controllers.
You should have a basic understanding of SLC 500™ products, PLC products, and
1771 and 1746 I/O products. You should understand programmable controllers
and be able to interpret the ladder logic instructions required to control your
application. If you do not, contact your local Rockwell Automation representative
for information on available training courses before using this product.
P-1
Publication 1746-PM001A-US-P
P-2
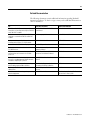
Purpose of this Manual
Chapter
This manual is a programming guide when using the BASIC Development
Software, 1747-PBASE.
Title
Contents
Preface
Describes the purpose, background, and scope of this manual. Also lists related
publications.
1
Installing the Software
Described how to install the BASIC Development Software onto your personal
computer.
2
Getting Familiar with Your
Development Software
Describes the basic concepts of the BASIC Development Software, including
how the help system works, using the pull-down menus, and creating a simple
first program.
3
Configuring Your Software
Provides information on a number of configuration options including mouse,
display, printer, memory, function keys, and Terminal mode.
4
Editing a Program
Covers all editing techniques, including searches, moving blocks of text, text
formatting, and advanced editing features.
5
Manipulating Files
Provides information on file management, from simple loads, saves, and merges,
to creating your own User Menus.
6
Writing Programs Using the
BASIC Development Language
Begins with an overview of the BASIC language, macros, and program
organization. A second sample program is written, translated and downloaded.
7
Printing Your Program
Covers all aspects of printer setup and printing.
8
Translating Your Program
Prepares your BASIC development program for downloading to the BASIC or
BASIC-T module.
9
Communicating with the BASIC
or BASIC-T Module
Provides information on changing to Terminal mode, downloading to and
uploading from the module, and debugging your BASIC program.
Appendix A
BASIC Macro Library
Lists the programming macros available through the BASIC Development
Software.
Appendix B
The DOS Directory Shell
Explains how to display a DOS directory tree and directory from which you can
execute a large number of DOS commands.
Publication 1746-PM001A-US-P
P-3
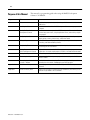
Related Documentation
The following documents contain additional information regarding Rockwell
Automation products. To obtain a copy, contact your local Rockwell Automation
office or distributor.
For
Read this document
Publication Number
A BASIC and BASIC-T manual that provides
SLC 500™ BASIC and BASIC-T Modules
information on installing and using the 1746-BAS User Manual
and 1746-BAS-T modules.
1746-UM004A-US-P
A reference manual that explains the BASIC
language as used with the BASIC and BASIC-T
modules.
BASIC Language Reference Manual
1746-RM001A-US-P
A user manual that provides information on
installing and using the 1771-DB/B module.
BASIC Module User Manual
1771-6.5.113
An overview of the SLC 500 family of products
SLC 500™ System Overview
1747-SO001A-US-P
A description of how to install and use a Modular
SLC 500 Processor
Modular Hardware Style Installation and
Operation Manual
1747-6.2
A reference manual that contains status file data
and instruction set information for SLC 500
processors
SLC 500™ and MicroLogix™ 1000
Instruction Set Reference Manual
1747-6.15
A description of how to install and use a module
that acts as a bridge between DH485 networks
and devices requiring DF1 protocol.
DH-485/RS-232C Interface Module User’s 1747-6.12
Manual
In-depth information on grounding and wiring
Allen-Bradley programmable controllers
Allen-Bradley Programmable Controller
Grounding and Wiring Guidelines
1770-4.1
A glossary of industrial automation terms and
abbreviations
Allen-Bradley Industrial Automation
Glossary
AG-7.1
An article on wire sizes and types for grounding
electrical equipment
National Electric Code
Published by the National Fire Protection
Association of Boston, MA
Publication 1746-PM001A-US-P
P-4
Terms and Abbreviations
The following terms and abbreviations are specific to this product. For a complete
listing of Allen-Bradley terminology, refer to the Allen-Bradley Industrial
Automation Glossary, publication number ICCG-7.1.
• A-Stack error — occurs when too many expressions are PUSHed onto the
argument stack or when you attempt to POP data that does not exist
• BASIC development language enhanced BASIC language that comes with
the BASIC Development Software (catalog number 1747-PBASE) and
provides programming support for the BASIC and BASIC-T modules.
• DH485 network communication protocol
• dialog box — a box that appears on the screen of the BASIC Development
Software displaying available options for a selected menu item
• EMS — refers to the expanded memory that may be installed on your personal
computer. The BASIC Development Software uses expanded memory not
extended memory.
• EPROM Erasable Programmable Read Only Memory
• file — a BASIC program file
• filename extension — the characters to the right of the filename and period.
• Hypertext help — a context-sensitive help system that allows access to help
from practically any point in the BASIC Development Software.
• keystroke macros — a recorded series of keystrokes invoked by one keystroke
to reduce the number of keystrokes needed to perform a function
• memory module — BASIC or BASIC-T modules EEPROM or UVPROM
• MTOP system control value that holds the last valid memory address
• program port — the port used to program the module. Either PRT1 or port
DH485 can be used as the program port.
• programming macros — commands available through the BASIC
Development Software designed to streamline programming
• QuickStroke — refers to a key or pair of keys that are pressed rapidly to
perform a function or access a menu. These keys are shown within braces [ ],
for example, [Alt-F10].
• RAM — Random Access Memory
• ROM — Read Only Memory, refers to the optional memory module memory
space (EEPROM or UVPROM)
• RS-232/423 serial communication interface
• RS-422 differential communication interface
• RS-485 network communication interface
• SLC 500 SLC 500 fixed and modular controller
Publication 1746-PM001A-US-P
P-5
Conventions Used in this
Manual
The following conventions are used throughout this manual:
• Bulleted lists such as this one provide information, not procedural steps.
• Numbered lists provide sequential steps or hierarchical information.
• Italic type is used for emphasis.
• Text in this font indicates words or phrases you should type.
• Key names match the names shown and appear in bold, capital letters within
brackets (for example, [ENTER]).
• The progression to arrive at a screen through a menu path is shown as follows:
Path: Toplevel menu → Edit mode → File → load file in cur.win.
• The progression to arrive at a screen through a QuickStroke is shown as
follows:
QuickStroke: <SHIFT-F5>
Rockwell Automation
Support
Rockwell Automation offers support services worldwide, with over 75 Sales/
Support Offices, 512 authorized Distributors and 260 authorized Systems
Integrators located throughout the United States alone, plus Rockwell Automation
representatives in every major country in the world.
Local Product Support
Contact your local Rockwell Automation representative for:
• sales and order support
• product technical training
• warranty support
• support service agreements
Technical Product Assistance
If you need to contact Rockwell Automation for technical assistance, please review
the information in the appropriate chapter first. Then call your local Rockwell
Automation representative.
Publication 1746-PM001A-US-P
P-6
Your Questions or Comments on this Manual
If you find a problem with this manual, please notify us of it on the enclosed
Publication Problem Report.
If you have any suggestions for how this manual could be made more useful to you,
please contact us at the address below:
Rockwell Automation
Control and Information Group
Technical Communication, Dept. A602V
P.O. Box 2086
Milwaukee, WI 53201-2086
Publication 1746-PM001A-US-P
Chapter
1
Installing the Software
This chapter begins with a general description of your BASIC Development
Software and then steps you through installing the software on your personal
computer. Major topics include:
• a general description of the BASIC Development Software
• the necessary hardware for installation
• the BASIC Development Software disk sets
• how to install your software
• how to back up your disks
What Your Software
Does
This section provides a general outline of what the BASIC Development Software
can do. Standard features of the BASIC Development Software include:
• communication terminal capabilities
• debugger feature to troubleshoot software that is executing on the BASIC or
BASIC-T module
• translator utility to convert BASIC Development Software programs for
downloading to the module
• windows that allow you to edit up to 100 files (or different parts of the same
files) simultaneously
• adjacent window function for easy movement between split windows
• pull-down menu system and QuickStroke shortcuts
• dynamic display function key labels with [Shift] [Ctrl] and [Alt] keys
• user-definable keystroke macros that allow you to replace a series of commonly
used keystrokes with a single keystroke
• undo up to 65,535 operations and then redo the last undo
• line, stream, and columnar block operations, including inter-window copy,
move, and cut-and-paste capability
• search and replace multi-file search across directories or files
• DOS shell and DOS directory shell with multi-directory display
• Hypertext help that provides a context-sensitive on-line help system, available
at all times
• automatic extension that allows specific default setups for editing, translating,
and compiling
• language support (auto-indent, construct matching) for BASIC
1
Publication 1746-PM001A-US-P
1-2
Installing the Software
• linedraw facility that lets you program graphic screens that translate into
BASIC and can be executed from the module
• simple text formatting features including intelligent word wrap and reformat,
indent and outdent
• mouse support to speed menu selections
• pop-up programmer’s calculator with hex, decimal, octal and binary
operations, a simulated printing tape, and the ability to paste the result into a
program
• pop-up ASCII table with hexadecimal and decimal equivalents
• full EMS support where large files may be edited completely in EMS memory
• swap out memory to EMS memory or disk when running other programs or
large compiles
• user menus that you can create for rapidly selecting your most frequently
edited files, or for selecting frequently used programs installed in your personal
computer
• user-configurable default switch set-ups for search and replace, and multi-file
search functions
• multiple default directories based on file extensions (.bas files in one directory;
.bdl files in another)
The BASIC Development Software requires an MS-DOS compatible personal
computer with at least 640K byte available RAM installed and at least 2M byte of
available disk space on the hard drive. Your personal computer must be operating
with a DOS version between 3.1 and 6.22.
Hardware Requirements
Your BASIC Development Software supports almost all video cards and video
modes. EGA 43 line and VGA 50 line modes are built in. Other video modes can
be configured using the command line. Refer to Chapter 3 for additional
information on configuring video modes.
The software supports Microsoft, MOUSE SYSTEMS, LOGITECH or any
compatible mouse. It also supports the Expanded Memory Specification 4.0 and
above.
Hardware for Interfacing Your Personal Computer with the BASIC or
BASIC-T Module
A minimum of one communication port must be available on your personal
computer. You need one of the following combinations of accessories to interface
your personal computer with the module.
Publication 1746-PM001A-US-P
Installing the Software
1-3
To interface the communication port (COM1 or COM2) on your personal
computer with port DH485 on the module, use an Allen-Bradley 1747-PIC
Interface/Converter:
• for direct connection to port DH485 on the module
• plus an Allen-Bradley 1747-AIC Isolated Link Coupler to interface your
personal computer with a DH485 network on which the module resides
To interface the communication port (COM1 through COM8) on your personal
computer with the port PRT1 on the module, use a 9-pin female to 25-pin male
for the 1771-DB/B null modem cable or a 9-pin female to 9-pin female D-shell for
the 1746-BAS or 1746-BAS-T null modem cable.
To communicate with the module without using one of the communication ports
on your personal computer, use an Allen-Bradley 1784-KR DH485 Interface Card
and 1747-AIC Link Coupler for direct connection to port DH485 on the module.
For cable details and jumper settings associated with these different configurations,
refer to the SLC 500 BASIC and BASIC-T User Manual (publication number
1746-UM004A-US-P).
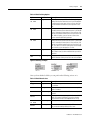
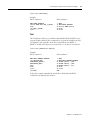
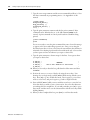
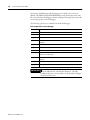
You should have two 3.5 inch disks or three 5.25 inch disks.
Table 1.1 Disk Contents
Disk Contents
Number 3.5 inch disks
Contents
5.25 inch disks
1
INSTALL.EXE IDENTIFY.TXT
MACROS.EXE HELP.EXE
INSTALL.EXE
HELP.EXE
2
IDENTIFY.TXT
TRANS.EXE
IDENTIFY.TXT
MACROS.EXE
3
none
BASICEX.EXE
MISC.EXE
IDENTIFY.TXT
TRANS.EXE
IDENTIFY.TXT
BASICEX.EXE
MISC.EXE
Installation Procedure
Before installing your BASIC Development Software, the autoexec.bat file in your
personal computer should be modified to include the \ABBASIC\BDS directory in
its path command. This allows the BASIC Development Software to be initiated
from any directory in the hard disk.
Use some form of file editing (most DOS systems come with an editing program
called EDLIN) to add this statement to the path line in the autoexec.bat file on
your personal computer. You may need to refer to the DOS manual for your
personal computer for detailed information on structuring and editing this file. An
example of a typical path statement with this directory added would be as follows:
PATH=C:\;C:\DOS;C:\MOUSE;C:\ABBASIC\BDS;
Publication 1746-PM001A-US-P
1-4
Installing the Software
IMPORTANT When modifying your path command in the autoexec.bat file, do
not remove any other directories from the existing path. Add
C:\ABBASIC\BDS; to the end of the current path line. This
assumes you are installing your BASIC Development Software on
the hard drive called C:. If you are installing on a different hard
drive, substitute the letter of that drive for the C: above.
Check your config.sys file to be sure it establishes a minimum of 20 files and 20
buffers. In most DOS systems, this file can be read by typing TYPE CONFIG.SYS. If
necessary, edit this file to include the lines:
FILES=20
BUFFERS=20
IMPORTANT The number of files and buffers required is a minimum of 20. If
the current number is greater than 20, do not reduce this number
to 20. Doing so may cause some other software installed on your
personal computer to become inoperable.
An automated installation program is provided to ease installation. The installation
program automatically creates sub-directories and copies files from the disks to the
hard disk.
IMPORTANT The installation procedure may be aborted at any time by
pressing and holding the [Ctrl] key and then pressing [c]. This
leaves the installation incomplete and the software inoperable.
To run the installation program:
1. Insert Disk 1 into the disk drive.
2. Type: A:INSTALL and press [Enter].
IMPORTANT Substitute the letter of the drive you are using, if it is not drive A.
I
Follow the instructions displayed.
Two megabytes of free disk space is required to install this software. If you choose a
drive with less than that amount of available memory, the following message is
displayed:
There is not enough room on you disk drive. The minimum number of
free bytes must be 2000000.
WARNING: Software was not properly installed.
C:\>
This indicates that the installation procedure has been aborted. If you still wish to
use this drive, you must free some space by deleting any unnecessary files you have
on that disk and then try the installation again.
Publication 1746-PM001A-US-P
Installing the Software
1-5
You may also choose a different drive. If the drive you choose has sufficient
memory, the installation procedure continues. You are prompted to approve or
alter the directory in which the software is to be installed:
Specify main directory in which to install files.
C:\ABBASIC
Press [Enter] to accept the directory name or type a new directory name and press
[Enter].
IMPORTANT If you alter a directory or sub-directory name, be sure to change
the autoexec.bat file appropriately, as described in the beginning
of the installation procedure section.
When you are finished loading the disks, you are reminded to modify your
config.sys and autoexec.bat files as described in the previous section.
Directory Structure
The default directory structure after installation is as follows:
• \ABBASIC – main directory
• \ABBASIC\BAS – sub-directory to store the user BASIC source programs.
This is your working directory.
• \ABBASIC\BDS – sub-directory that stores the BASIC Development Software
files
• \ABBASIC\BDS\HELP – sub-directory that stores the help files
Change to your working directory before invoking PBASE. Additional working
directories can be created anywhere on your hard disk.
You can change the sub-directory names after the installation process if the default
names are not acceptable. The HELP sub-directory must reside directly under the
BDS sub-directory or its equivalent. Do not rename the HELP sub-directory.
IMPORTANT If you alter a directory or sub-directory name, be sure to change
the autoexec.bat file appropriately, as described in the beginning
of the installation procedure section.
Rockwell Automation grants you a license to install and use this software on a
single personal computer, and to make one copy for backup purposes only. You are
not licensed to install this software on more than one personal computer or to
distribute it in any way. See the outside of the software package for licensing
information.
Publication 1746-PM001A-US-P
1-6
Installing the Software
Backing-up Your
Software
ATTENTION This software is protected under the copyright laws of the United
States. Unauthorized reproduction of copyrighted software
violates U.S. copyright laws. Criminal penalties may include fines
or imprisonment.
!
You need as many blank, double-sided, double density disks for backup as you
received for the original software installation (two-3.5 inch or three 5.25 inch
disks).
Your blank disks need not be formatted. Refer to your DOS manual for more
information.
Publication 1746-PM001A-US-P
Chapter
2
Getting Familiar with Your Development
Software
This chapter is intended to give you an overview of the BASIC development
software so that you can understand the software’s general structure. The topics in
this chapter include:
Starting Your Software
• software start-up
• toplevel menu
• main menu
• program editing and exiting
After installation, follow these steps to start your software.
1. Reboot your personal computer. This is necessary to activate any changes made
to the autoexec.bat and config.sys files.
2. If your mouse driver is not automatically installed by your autoexec.bat file,
execute whatever command is necessary to install it prior to starting the BASIC
development software.
3. Change to your working directory. If you accepted the default directory
assignments during software installation (refer to Chapter 1), the BAS
subdirectory was created for use as a working directory. To change to this
directory, type: > CD\ABBASIC\BAS at the DOS prompt and press the
[Enter] or [Return] key (indicated throughout this manual by [Enter]).
The > moves to the end of the line: CD\ABBASIC\BAS.
4. Type: > PBASE at the DOS prompt and press [Enter]. The software
determines your monitor type and displays the Toplevel menu.
IMPORTANT If your personal computer does not recognize the command
PBASE, the path command in your autoexec.bat file may not
have been modified correctly.
If you have a mouse and it is not working, you can still proceed by using the arrow
keys. You may want to go back and check to make sure your mouse driver was
installed either through the autoexec.bat file or through commands you entered.
IMPORTANT There are additional mouse setup options listed in the Setup and
Configuration menu. These include a mouse ON/OFF option.
Refer to Chapter 3 for additional information on the Setup and
Configuration menu.
1
Publication 1746-PM001A-US-P
2-2
Getting Familiar with Your Development Software
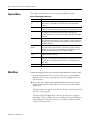
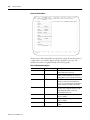
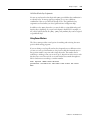
Toplevel Menu
The Toplevel menu allows you to create and edit your BASIC program.
Table 2.1 Toplevel Menu Selections
Selection
Description
Select a project
file
allows you to select a project file through your own custom menu. Selecting
a project file is also available from the Other menu, and is described in
Chapter 5.
Edit mode
allows you to enter Edit mode and open a new file window or enter the
presently active window. All main menu functions are available in this mode.
Translate/compile allows you to immediately translate/compile a selected file, provided you
have correctly set up the filename extension and compiler program.
Translate/compile is also available from the Other menu and is described in
Chapter 8.
Main Menu
teRminal [232]
switches your personal computer to Terminal mode so you can establish
communications with the BASIC or BASIC-T module or other port device you
have configured. Terminal mode is also available from the Other menu and is
described in Chapter 9.
User-defined
program
allows you to temporarily leave the BASIC development software and
execute a program at the DOS level of your personal computer. Select the
program from a menu that you have created. User Defined Program is also
available from the Other menu and is described in Chapter 5.
Configuration
menu
displays a menu of set up features for mouse, display, printer, editing, etc.
Chapter 3 describes this menu.
shell to DOS
temporarily exits the BASIC development software and takes you back to
DOS where you can run programs or execute DOS commands. You can return
by typing exit at the DOS prompt. Shell to DOS is also available from the
Other menu.
Quit
exit your PBASE software and return to DOS
The Main menu appears once you enter Edit mode through the Toplevel menu.
1. From the Toplevel menu, move the cursor or the mouse to select the Edit
mode option. You can also type in [E] since that is the highlighted letter on
this menu item.
2. If cursoring, press [Enter] after highlighting Edit mode. If using a mouse,
click the left mouse button when the mouse cursor is positioned over Edit
mode option.
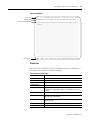
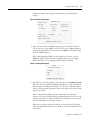
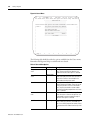
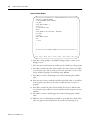
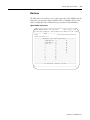
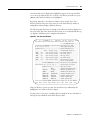
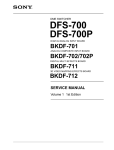
The Main menu screen appears as shown below. You are now in Edit mode and
can write or edit a program.
Near the top left of the Main menu is the letter A; and near the top right is
?No-File?. These are labels for the current window, which opened when you
selected Edit mode. They tell you that you are looking at window A, which
contains no file at this time.
Publication 1746-PM001A-US-P
Getting Familiar with Your Development Software
2-3
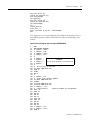
Figure 2.1 Window A
Status Line
Message Line
Labels for Current Window
L:3
C:1
1747-PBASE V X.XX
[Text Edit]
↑
Ins 175k
06-12-91
1:15pm
File Window Block cUrsor Search Text Layout Print Macro Config Other Exit
+=+A+========================================================??No-File??+====+
|>> EOF <<
|
|
|
|
|
|
|
|
|
|
|
|
|
|
|
|
|
|
|
|
|
|
|
|
|
|
|
|
|
|
|
|
|
|
|
+----------------------------------------------------------------------------+
Function Keys
1Help
2Menu
3Term
4Indent 5Save
6Search 7MarkBl 8BasHlp 9CopyBl 0MoveBl
Status Line
The status line is the first line at the top of the Main menu screen. Following is a
description of the status line in the previous figure:
Table 2.2 Status Line Indicators
Indication
Description
L:3
indicates that your cursor is in the third line of the active window
C:1
indicates that your cursor is in the first column of the active window
1747-PBASE
indicates that you are working with the BASIC development software
[TEXT EDIT]
indicates that you are in Text Editing mode
R
does not appear in this example, but would appear if you were creating
a keystroke macro (described in Chapter 4) to indicate when you are
recording
↑
indicates that the [caps lock] key on your keyboard is on.
Ins
toggles between this and Or to indicate whether you are in Insert or
Overstrike mode of text editing.
175K
indicates the amount of currently available RAM memory for your
personal computer
06-12-91
the current date from your personal computer’s clock
1:15pm
the current time from your personal computer’s clock
Publication 1746-PM001A-US-P
2-4
Getting Familiar with Your Development Software
Message Line
The message line is the third line on the main menu screen, just below the
pull-down menus. The software displays normal operating messages, instructions,
or error messages on this line as dictated by your selections and actions.
Function Keys
The function keys are listed along the bottom of the screen (1 through 10).
For additional function keys press and hold the [Shift], the [Alt] or the [Ctrl]
keys prior to pressing the function keys. For example, press [F2] to move your
cursor up to the main menu. Press [Shift-F2] to print the date and time in the
active window. Press [Alt-F2] to bring up the calculator. Press [Ctrl-F2] to
move to the next error if an error file was loaded for examination.
The function key menu changes as you select different menus, or after you select a
specific function key. This way, the most commonly used features can be accessed
by pressing a function key. For example, pressing [F8] to bring up help on the
module causes a new function key menu to appear.
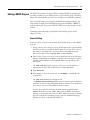
Using Help Outside a Program
1. Press [F1], or click the left mouse button when the cursor is on 1 Help at the
bottom left corner of the screen. Help is context-sensitive, meaning that a help
screen appropriate for the current subject appears. If you are not working on
any specific subject at the time, 1747-PBASE REFERENCE GUIDE - TABLE OF
CONTENTS appears.
2. Move the cursor or arrow keys to B. Editor Quick Reference and press
[Enter] or the left mouse button. You should now be looking at 1747–PBASE
QUICK REFERENCE. Help screens may range from a couple sentences to several
paragraphs.
3. Scroll through this help screen by using the up/down, right/left cursor (arrow)
keys or the page-up/page-down keys. To the far right of the help screen is a
column with arrows at the top and bottom. Place your mouse cursor on the
upper or lower arrow, and click the left mouse button to scroll through the
help screen. Notice that many of the help screens include words or items that
are highlighted (or in a different color if you have a color monitor). These
items are related topics for which additional help information is available.
4. Place the cursor on goto Line number and press [Enter] or the left mouse
button. The help screen for goto Line number appears with more related
topics you can select from this screen.
Publication 1746-PM001A-US-P
Getting Familiar with Your Development Software
2-5
5. Press the [Backspace] key or move the mouse cursor to Back–
track<BackSpace> and click the left mouse button. This steps you back
through the help screens you have accessed and eventually brings you back to
1747-PBASE REFERENCE GUIDE - TABLE OF CONTENTS. From there you can
select other topics that may be of benefit. There is also a comprehensive Help
Index that can be selected.
6. Press the [ESC] key or move the mouse cursor to Done<ESC> and click the left
mouse button to exit any help screen at any time. The main menu screen
reappears.
Using Help Within a Program
1. Type a command such as GOTO after the main menu screen reappears. (GOTO
has an entire section of Hypertext help available.)
2. Press [F8] or move the mouse cursor to 8 BasHlp at the bottom of the screen
to bring up help on the module and BASIC language.
3. Press the [ESC] key or move the mouse cursor to Done<ESC> and click the left
mouse button to exit help on GOTO.
4. Move the cursor up or down so that it is no longer on the same line as the GOTO
statement.
5. Press [F8] or move the mouse cursor to 8 BasHlp and click the left mouse
button. If you are not on a word, the BASIC Language Reference Manual TABLE OF CONTENTS appears. From this table of contents, you can access a
broad range of help screens on the modules, including hardware setup, and
programming information.
6. Press the [ESC] key or move the mouse cursor to Done<ESC> and click the left
mouse button to exit help. The main menu reappears.
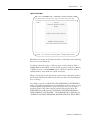
Typical Pull-down Menu
PBASE uses a pull-down menu to allow access to the options you need.
For example, the File menu is available once you enter Edit mode through the
Toplevel menu.
Path: Toplevel menu → Edit mode → File
QuickStroke: available for individual items within the File menu
If using a mouse, move the cursor over to the File menu at the top left and click the
left mouse button to pull-down the File menu. If you do not have a mouse, press
[F2] on your keyboard to get you up to the pull-down menus. Cursor to the right
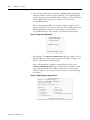
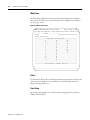
or left to highlight File and press [Enter]. The FILE dialog box appears:
Publication 1746-PM001A-US-P
2-6
Getting Familiar with Your Development Software
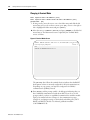
Figure 2.2 File Dialog Box
L:3
C:1
1747-PBASE V x.xx
[Text Edit]
Ins 175k
06-12-91
1:15pm
File Window Block cUrsor Search Text Layout Print Macro Config Other Exit
+------------------FILE-------------------+
|Edit new file...
|=========================?No-File?=+
|Load file into current window... <ShftF5>|
|Save file in current window
|save file As...
<F5>
|Information about current file...
|
|
|
|
|
|
|
|-----------------------------------------|
|Merge file from disk...
|(save Block to disk...
)
|
|
|
|
|-----------------------------------------|
|
|DOS directory shell
<CtrlF4>|
|
|Quit
<AltX>
|
|
+---------------Cancel<ESC>---------------+
|
|
|
|
|
|
|
|
|
|
|
|
|
1 Help
2
3
4
|
5
6
7
8
9
0
|
The FILE dialog box lists all the available options. Use your up and down arrow
keys to move to the option you want. Press [Enter] to select your option. If you
wish to leave the dialog box without selecting anything, press Cancel <ESC>.
Some of the options have a QuickStroke assignment listed on the right. For
example, pressing [Shift F5] instead of pulling down the File menu would load a
file into the current window.
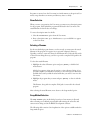
Navigating Within Windows
Windows are labeled alphabetically in their top left corner. Your BASIC
Development Software can open up to 100 windows simultaneously. Each may
contain a separate file, or they can be linked together and contain different parts of
the same large file. You can open and close these windows independently of each
other.
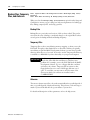
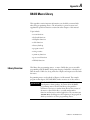
The following screen shows an example with 3 windows opened simultaneously.
Window A contains a file called BASE#1 while windows B and C both contain a
file called BASE#2. In this case, B and C are linked together; you are actually
looking at different parts of the same file.
Publication 1746-PM001A-US-P
Getting Familiar with Your Development Software
2-7
Figure 2.3 Window Labels
L:3
C:1
1747-PBASE V x.xx
[Text Edit]
Ins 175k
06-12-91
1:15pm
File Window Block Cursor Search Text Layout Print Macro Config Other Exit
ε
+=+A+=======D:\ABBASIC\BAS\BASE#1=+
|
|
|100 (this is BASE #1)
|
+=+B+= =======D:\ABBASIC\BAS\BASE#2===+
|100 (this is BASE #2)
|
|110 for x = 1 to 100
|
|110 for x = 1 to 50
|
|120 a = x * 2
|
|120 a = x * 2 + 5
|
|130 if a = 60 then 180
|
|130 if a = 70 then 180
|
|140 next x
|
|140 next x
|
|
|150 goto 190
|
|180 print "a = 60"
|
|180 print "a = 70"
|
|200 end
|
|
|
|>> EOF <<
| +=+C+=
|
| |550 for x = 1 to 100
|
| |560 a = x * 2
|
|
| |570 if a = 60 then 600
|
|
| |580 next x
|
|
| |590 goto 700
|
|
| |600 print "a = 60"
|
|
| |700 end (end of BASE #2)
|
↔
|150 goto 200
=========D:\ABBASIC\BAS\BASE#2==+«
|
|
| |>> EOF <<
|
|
| |
|
+----------------------------------------------------------------------------+
1 Help 2Menu 3Term 4Indent 5Save 6Search 7MarkBl 8BasHlp 9CopyBl 0MoveBl
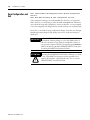
A more complete explanation of the options available through the Window menu
is in Chapter 4. At this point, we simply want you to understand the concept
behind the windows feature. To accomplish that, make a few adjustments to the
current window:
1. If using a mouse, move the cursor over to the Window menu (near the top left)
and click the left mouse button. If you do not have a mouse, press [F2] on
your keyboard to access the pull-down menus. Cursor to the right or left to
highlight the Window menu and press [Enter].
Publication 1746-PM001A-US-P
2-8
Getting Familiar with Your Development Software
Figure 2.4 Adjusting the Current Window
L:3
C:1
1747-PBASE V x.xx
[Text Edit]
Ins 175k
06-12-91 1:15pm
File Window Block cUrsor Search Text Layout Print Macro Config Other Exit
+----------WINDOW----------+
+=+A+|Open
|=====================C:\ABBASIC\BAS\FIRST.BDL==+
|
|Close
|
|
|Split
|
|
|
|List...
|
|
|
|--------------------------|
|
|
|Next
<ShftF1>
|
|
|
|Previous
<CtrlF1>
|
|
|
|(Adjacent
<AltW>)
|
|
|
|--------------------------|
|
|
|Hide
|
|
|
|Modify size <ScrollLockOn>|
|
|
|Zoom
|
|
|mInimize
|
|
|
|--------------------------|
|
|
|linK...
|
|
|
|(Unlink)
|
|
|
+--------Cancel<ESC>-------+
|
|
<AltF1>
<CtrlF3>
|
|
|
|
|
+--------------------------------------------------------------------------------+
1 Help
2
3
4
5
6
7
8
9
0
2. Cursor down, or move your mouse to select Modify size on the Window
menu. When it is highlighted, press [Enter] or click the left mouse button.
The border of the A window changes to highlighted (or a different color),
indicating it is ready to have its size or position modified. Instructions appear
on the message line directly above the A window.
3. Press and hold [Shift] and [left arrow]. The A window shrinks to the left.
If you let go of [left arrow] and press [up arrow], the screen shrinks
upwards.
4. Let go of [Shift], and press [right arrow]. You are now positioning the A
window.
5. Press [ESC] when you are finished adjusting the size and shape of the A
window.
6. Pull down the Window menu again. Cursor down to select Zoom on the
Window menu. Zoom causes the A window to return to full size.
Publication 1746-PM001A-US-P
Getting Familiar with Your Development Software
Editing a BASIC Program
2-9
The BASIC Development Language (BDL) streamlines BASIC programming by
providing a number of screen editing features, open-format line entry, and macros.
Macros are commands that represent a more complex series of BASIC commands.
After you finish writing your program in the BASIC development language, you
must translate/compile it into the BASIC language that the BASIC or BASIC-T
module understands. This creates a BAS file, which you can then download to the
module.
Translating and downloading are described in the following sections and in
Chapters 8 and 9.
General Editing
In the last section you positioned and sized the A window. Now you edit a BASIC
program.
1. If using a mouse, move the cursor over to the File menu at the top left and click
the left mouse button to pull down the File menu. If you do not have a mouse,
press [F2] on your keyboard to move the cursor to the pull-down menus.
Cursor to the right or left to highlight File and press [Enter].
2. Cursor down, or move your mouse to select save file As on the File menu.
When it is highlighted, press [Enter] or click the left mouse button. You also
could have pressed A since it is the highlighted letter corresponding to this
menu item.
The SAVE FILE AS dialog box appears on the screen. On the first line, it
indicates that the file in the current window is named ?No-File?.
3. Type: FIRST.BDL
4. Press [Enter] or move the mouse cursor to OK<ENTER>, and click the left
mouse button.
The SAVE FILE AS dialog box disappears and
“C:\ABBASIC\BAS\FIRST.BDL Saved” appears in the message line (third line
from the top). Your message will be different if your software is not installed on
the C: drive, or if you are using different directory names.
You have just saved a file containing the GOTO statement under the name
FIRST with the file extension of BDL. BDL stands for BASIC development
language, and entering the file extension .BDL enables the software to identify
the correct compiler for translating your program into the BASIC language.
Filename extensions are described in Chapter 3.
Publication 1746-PM001A-US-P
2-10
Getting Familiar with Your Development Software
5. Use the previously saved program:
FIRST.BDL
6. Move the cursor to the top left corner of the window.
7. Type in the following program:
{THIS IS A FIRST PROGRAM}
REM FIRST PROGRAM
FOR X=1 TO 100
A=X*2
PRINT A
NEXT X
END
Notice that there are no line numbers entered here. Also notice that when you
type in the lines within the for/next loop, they are indented. This is because the
BASIC development software recognizes that you are entering a BASIC
development language program (since your filename extension is BDL) and
the default parameters are set for smart indenting. There are a number of other
related parameters for BDL files discussed in Chapter 3.
Saving Your Program
Path: Edit mode → File → save file as
Path: Edit mode → File → save file as → save file in current
window
QuickStroke: [F5]
We recommend that you periodically save sizeable programs as you work on them
to avoid losing large quantities of work in the event of a system error or power
failure.
The BASIC development software has an autosave feature that offers two methods
for automatically saving files as you work on them. It also has a backup feature with
several methods for making backup files. These features are described in Chapter 3.
1. If using a mouse, move the cursor over to the File menu at the top left and click
the left mouse button. If you do not have a mouse, press [ F2] to move the
cursor to the pull-down menus. Cursor to the right or left to highlight the File
menu and press [Enter].
2. Move the cursor to Save file in current window and press [RETURN] or
click the left mouse button.
Since you have previously named and saved the file in the current window and
selected Save file in current window, the software assumes you are saving
it under its existing name. A message appears in the message line indicating
that the save was completed.
Publication 1746-PM001A-US-P
Getting Familiar with Your Development Software
2-11
Translating Your Program
Path: Toplevel menu → Translate/compile
Path: Toplevel menu → Edit mode → Other → Translate/compile
QuickStroke: [CTRL F8]
1. If using a mouse, move the cursor over to the Other menu and click the left
mouse button. If you do not have a mouse, press [F2] to get to the pull-down
menus. Cursor to the right or left to highlight the Other menu and press
[Enter].
2. Move the cursor to Translate/compile and press [Enter] or click the left
mouse button. A dialog box appears asking you to select a translator/compiler.
At this point, there is only one available that recognizes the .BDL extension
under which you saved your file.
3. Move the cursor to select 1747–PBASE Translator and press [Enter] or the
left mouse button.
If you did not make any errors in entering this program, the translation occurs
successfully. If you had errors, an error message appears in the message line, and the
cursor moves to the location of the error in the program.
After successfully translating a .BDL file, a new file is created using the same name
but with the .BAS extension. The .BAS file contains the BASIC language version of
your program, including line numbers. In our case, there is now a file named
FIRST.BDL and a file named FIRST.BAS.
IMPORTANT Translation is required only if your file was written using the
BASIC Development Language (BDL). If you wrote the file
using the BASIC language as described in the BASIC Language
Reference Manual (publication number 1746-RM001A-US-P) or
the SLC 500™ BASIC and BASIC-T Module User Manual
(publication number 1746-UM004A-US-P), translation is not
necessary.
Physically Connecting to Your BASIC or BASIC-T Module
At this point you could download the FIRST.BAS program to the module and
execute it on the module. To do so requires that you connect the module to one of
your personal computer’s serial ports (COM1 through COM8). If you have the
Allen-Bradley 1784-KR card installed in your personal computer, you could
connect to this instead of a serial port.
You may need to refer to Chapter 3 for details on terminal selection, and Chapter 9
for details on Terminal mode setup. Refer to the SLC 500™ BASIC and BASIC-T
Modules User Manual (publication number 1746-UM004A-US-P) for details on
making hardware connections.
Publication 1746-PM001A-US-P
2-12
Getting Familiar with Your Development Software
Changing to Terminal Mode
Path: Toplevel menu → teRminal [232]
Path: Toplevel menu → Edit mode → Other → teRminal [232]
QuickStroke: [F3]
1. If using a mouse, move the cursor over to the Other menu and click the left
mouse button. If you do not have a mouse, press [F2]. Cursor to the right or
left to highlight the Other menu and press [Enter].
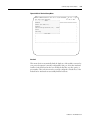
2. Move the cursor to teRminal [RS-232] and press [RETURN] or click the left
mouse button. The Main menu screen is replaced by the Terminal Mode
screen, as follows:
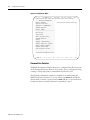
Figure 2.5 Terminal Mode Screen
HELP<F1> |MENU<F2> |EXIT<F3> |COM1 1200 8 1 N |LOG CLOSED |ANSI |07-04-91 06:33pm
File Setup Display deBug Exit
↑↓→←
to
Edit
PBASE RS-232 TERMINAL MODE Version x.xx
The [RS-232] that follows the terminal selection indicates that the BASIC
development software is currently configured for RS-232 communications.
Depending on your system, you may have configured it for DH485
communications [DH485] instead.
3. Press [Enter] and the prompt symbol > should appear indicating that you
have established communications with the module. If you do not see the
prompt symbol, you have not established communications with the module.
Verify your terminal selection (Chapter 3), the communications setup
(Chapter 9), and jumper settings on the module and cabling (SLC 500™
BASIC and BASIC-T Modules User Manual, publication number
1746-UM004A-US-P).
Publication 1746-PM001A-US-P
Getting Familiar with Your Development Software
2-13
Downloading Your Program
Path: Toplevel menu → teRminal [232] → File → Download from host
to module
Path: Toplevel menu → Edit mode → Other → teRminal [232] → File
→ Download from host to module
QuickStroke: [PgDn]
1. If using a mouse, move the cursor over to File on the Terminal mode screen
and click the left mouse button. If you do not have a mouse, press [F2].
Cursor to the right or left to highlight the File menu and press [Enter].
2. Move the cursor to Download from host to module and press [Enter] or
click the left mouse button. A dialog box appears asking you to enter a
filename for downloading.
3. Pressing [Enter] causes the translated version (FIRST.BAS) of the file you are
actively working on (FIRST.BDL) to be downloaded to the module.
IMPORTANT Only files with the .BAS extension can be downloaded to the
module.
Exiting a BASIC Program
To exit a program:
1. Press [F3] to exit terminal mode. This returns you to the main menu screen in
Edit mode.
2. If using a mouse, move the mouse cursor over to Exit on the second line of the
screen, and click the left mouse button. You can also press [F2] on your
keyboard to access the pull-down menus and cursor left or right to highlight
Exit and press [Enter]. This returns you to the Toplevel menu.
3. From the Toplevel menu, move the mouse cursor down to Quit and click the
left mouse button. You can also cursor up or down to highlight Quit and press
[Enter]. This quits the BASIC development software and returns you to the
DOS level.
Publication 1746-PM001A-US-P
2-14
Getting Familiar with Your Development Software
Publication 1746-PM001A-US-P
Chapter
3
Configuring Your Software
This chapter describes how to configure your software. Major topics include:
• edit options
• display options
• mouse and keyboard options
• filename extensions
• printer options
• memory options
• file backup, temporary file, and autosave
• search and replace defaults
• Terminal Emulation mode selection
• save configuration and exit
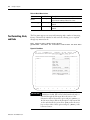
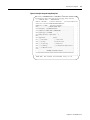
Setup and Configuration
Menu
The Setup and Configuration menu can be selected from the Toplevel menu or the
Main menu.
Path: Toplevel Menu → Configuration Menu
Path: Main Menu → Config
To access the Setup and Configuration menu from the Toplevel menu, for example,
move the cursor using your mouse to the Configuration menu option and click
the left mouse button. If you do not have a mouse, cursor up or down to highlight
the Configuration menu option and press [Enter].
1
Publication 1746-PM001A-US-P
3-2
Configuring Your Software
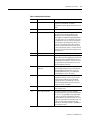
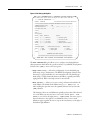
Figure 3.1 Configuration Menu
L:3
C:1
1747-PBASE V x.xx
[Text Edit]
Ins 175k
06-12-91 1:15pm
File Window Block cUrsor Search Text Layout Print Macro Config Other Exit
+------SETUP AND CONFIGURATION-----+
+|DOS=5.0
CPU=80386
|===========================?No-File?=+
||Video Card = VGA Color
|
|
||PBASE Path = C:\ABBASIC\BDS\
|
|
||Expanded Memory N/A
|
|
||Serial #
|
|
||----------------------------------|
|
||Edit settings...
|
|
||Display setup...
|
|
||Mouse / Key repeat setup...
|
|
||Filename extensions...
|
|
||Printer...
|
|
||sWapping / Expanded memory...
|
|
||Backups / Temp files / Autosave...|
|
||Search and Replace defaults
|
|
||Terminal Selection Menu...
|
|
||saVe configuration and exit
|
|
||
|
|
PBASE1
|+========Exit Setup<ESC>===========+
|
|
|
|
|
+-----------------------------------------------------------------------------+
1 Help 2
3
4
5
6
7
8
9
0
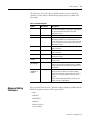
Command Line Switches
The BASIC Development Software allows you to configure almost all of its options
via the Configuration menu. However, if you need to force a configuration setting
or change a setting temporarily, a command line switch can be used.
The following command line switches are available for use when starting the
BASIC Development Software. To use any of them type PBASE followed by the
desired switch or switches. (A space between PBASE and the / is optional; however,
if using more than one switch, each must be separated by a space.)
Publication 1746-PM001A-US-P
Configuring Your Software
3-3
Table 3.1 Command Line Switches
Switch
Equals
Summary
/MN
Mouse disable
The BASIC Development Software auto-detects the
presence of a mouse driver. The BASIC
Development Software requires DOS version 3.1 or
higher.
/MY
Mouse enable
/KN
Don’t change keyspeed
/KY
Change keyspeed
/KR
1784-KR card is installed
If you choose to use this card, first verify that its
driver resides in the main subdirectory of the BASIC
Development Software (ABBASIC\BDS unless you
renamed it during installation). Then you must use
this command line switch every time you run the
BASIC Development Software.
/EN
Don’t try to use enhanced
keyboard
Some personal computers and some special
memory resident programs do not work when the
BASIC Development Software tries to use the
enhanced keyboard functions. If you experience
keyboard problems, try the /EN switch.
/NR
No restore
Disables the Restore feature of the BASIC
Development Software. Use this if you have the
Restore feature turned ON (via the Setup and
Configuration menu), and would like to run the
BASIC Development Software without restoring
the previous status of the editor.
/B
Black and white
Forces the software to display screens in black and
white instead of color.
/Xn
Sets screen length to n
The /X and /Y switches are used to override
automatic detection of screen size and redefine the
size. This is to accommodate custom video modes
on some of the SUPER or ENHANCED EGA/VGA
(and other) boards. The values you enter for n must
be legal for your particular custom video mode. Use
of either of these switches disables the Video
Mode options when display setup is selected from
the configuration menu.
Some personal computers with special ANSI.SYS
replacement files encounter problems when
attempting to alter the keyspeed or keyboard
repeat speed. If you experience keyboard problems,
try the /KN switch. (/KY is the default.) If this fixes
your problem, be sure to go into the Configuration
menu and select saVe configuration and exit. This
saves /KN as the default and you do not need to
use either of these command line switches again.
To restore the previous settings, start the software
using the /KY command line switch and again save
the configuration.
Publication 1746-PM001A-US-P
3-4
Configuring Your Software
Table 3.1 Command Line Switches
Switch
Equals
Summary
/Yn
Sets screen width to n
/V
No snow suppression on
CGA monitor
/EMSOFF
Don’t use expanded memory Do not use Expanded Memory. This disables any
expanded memory options available through the
configuration menu.
Do not wait for retrace on CGA video I/O. This
disables snow suppression on CGA monitors.
Loading Files from the Command Line
Files to be loaded may be specified on the command line with the PBASE
command. If more than one file is specified (separated by a space), then windows
are created for each additional file. DOS wild card characters (* and ?) are allowed.
Examples:
PBASE *.BAS
opens windows as required to load all .BAS files in the current
directory.
PBASE TEST.BDL TEST.BAS
opens a window for TEST.BDL and then opens a
window for TEST.BAS.
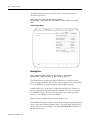
Configuring Your Edit
Options
Path: Toplevel Menu → Configuration menu → Setup and
Configuration menu → Edit settings
Path: Main Menu → Config → Setup and Configuration menu → Edit
settings
Selecting Edit settings from the Setup and Configuration menu causes the
following dialog box to appear:
Publication 1746-PM001A-US-P
Configuring Your Software
3-5
Figure 3.2 Edit Settings Dialog Box
L:3
C:1
1747-PBASE V x.xx
[Text Edit]
Ins 175k
06-12-91 1:15pm
File Window Block cUrsor Search Text Layout Print Macro Config Other Exit
+------SETUP AND CONFIGURATION------+
+|DOS=5.0
CPU=80386
|===============================?No-File?=+
||Video+±±±±±±±±±±±±±±±±±±±±±±±±±EDIT SETTINGS±±±±±±±±±±±±±±±±±±±±±±±±±+
|
||PBASE|Page break string........
|
|
||Expan|Word delimits............ ( ) " ' # $ @ ! % * { } ? /
|
|
||Seria|Max undo count........... 50
|
|
||±±±±±|
|
|
||Edit |
|
|
||Displ|Cursor:
|
|
|
|
||Mouse|
Insert
||Filen|
( ) ±
( ) Underline
||Print|
( ) ±
||sWapp|
||Backu|
.
Overwrite
| 9
Options:
[ ] Truncate spaces
|
|
( ) 1/2 block
[ ] Control±Z at EOF
|
|
( ) ±
( ) 1/3 block
[ ] CR/LF at EOF
|
|
( ) ±
( ) Full block
[ ] Restore previous status
|
|
.
||Searc|
||Termi|Tab expand:
||SaVe |
(.) Tabs
||
( ) Spaces
|
Column block move style:
(.) Delete space
( ) Leave space
|+=====|
OK<ENTER> Cancel<ESC> Help<F1>
|
|
|
|
(.) Insert
|
|
( ) Overwrite
|
|
|
|
Default mode:
|
|
|
|
|
+===============================================================+
|
+------------------------------------------------------------------------------+
STRING INPUT: Next field<TAB>, Previous<ShftTAB>, Select<Spacebar>
The EDIT SETTINGS dialog box allows you to configure several miscellaneous
editor parameters which affect the operation and use of your BASIC Development
Software. Press [Tab] to move to the next option.
• Page break string allows the configuration of a user-definable page
break string of up to 10 characters. The BASIC Development Software treats
this string as a page break when it is encountered in a file. The default page
break string is a single form-feed character (ASCII 12), typically entered by
typing [Ctrl–L]. Refer to the help screens for more details.
• Word delimits allows you to enter a string of characters that define the
word delimits. The default word delimits string is ()”’,#$@!%*{}?/ |9
where striking the space bar enters the [space] character and |9 enters the
[Tab] character.
The characters chosen as word delimiters typically are those that follow the end
of a word. When you move the cursor one word to the left [Ctrl - left
arrow] or one word to the right [Ctrl - right arrow], the cursor stops at
the next character to the right of a word delimiter. If two or more word
delimiters appear together, the cursor stops at the next character to the right of
the furthest right delimiter.
Publication 1746-PM001A-US-P
3-6
Configuring Your Software
In the example below, the delimiter string is [space] ? : . The cursor stops
at each w since a word delimiter is encountered:
winter winter?winter:winter
• Max undo count allows you to configure the amount of undo steps for
each window. The maximum count is 65535. Setting this option to 0 turns
undo off. The default count is set to 50. The larger this number, the less
memory is available for editing.
• Insert/Overwrite allows you to choose between four different cursor
sizes. You can configure different sizes for the insert and overwrite cursors to
make it easy to determine which mode you are in. Move your mouse cursor to
select the desired cursor size and click the left mouse button. If you do not have
a mouse, press [Tab] to access this field, use the up or down arrow keys to
position the cursor on the desired field, and then press [Tab] again to select
the item and move on to the Options field.
• Options To select these miscellaneous edit options, move your mouse
cursor to the desired field and then click the left mouse button. If you do not
have a mouse, press [Tab] to access this field, use the up or down arrow keys to
position the cursor, and press [Space bar] to select the desired items.
– Truncate spaces This option tells 1747-PBASE whether or not to
truncate spaces that trail lines of text. This truncation only occurs when
loading a file.
– Ctrl–Z at EOF Some programs require a [Ctrl–Z] (ASCII 26) at the
end of a text file. Selecting this option toggles this feature on and off.
– CR/LF at EOF This option determines whether or not a Carriage
Return/Line Feed pair is placed at the end of the file. This is the normal
termination for DOS files.
– Restore previous status allows you to toggle the Restore feature
ON and OFF. With Restore on, the entire STATUS of the editor is saved
when you exit the BASIC Development Software. This includes loaded
files, windows, cursor positions, marked blocks, and history lists for
virtually every prompt.
IMPORTANT If a file to be loaded is specified from the command line,
the restore feature is not invoked. Restore may also be
suppressed by using the /NR option on the DOS
command line when initiating the BASIC Development
Software.
Publication 1746-PM001A-US-P
Configuring Your Software
3-7
• Tab expand allows you to configure how 1747-PBASE handles tab
characters and the [Tab] key. When Tabs is selected, pressing [Tab] causes a
tab character to be inserted and moves the cursor to the next tab stop. When
Spaces is selected, pressing [Tab] causes spaces (ASCII 32) to be inserted to
the next tab stop.
IMPORTANT If Tabs is selected, tab spacing can be changed at any time in the
future. If Spaces is selected, tab spacing for the file cannot be
changed by entering a new tab setting on the Layout menu.
• Column block move style allows you to either leave the space intact or
delete the space where the marked columnar block originated. Refer to the help
screen for an example.
• Default mode allows you to configure whether 1747-PBASE is in the
Insert or Overwrite mode when it is first invoked. When you are in Edit mode,
you can toggle this mode by pressing [Insert].
IMPORTANT The word wrap function should turned off when editing .BAS
and .BDL files. You can use the word wrap function for general
word processing applications.
Configuring Display
Setup
Path: Toplevel Menu → Configuration menu → Setup and
Configuration menu → Display setup
Path: Main Menu → Config → Setup and Configuration menu →
Display setup
Selecting the Display setup option from the Setup and Configuration menu
allows you to set the video mode at 25 lines or 43/50 lines. Selecting 43/50 lines
allows you to view more of your program on the screen, but the text size is
considerably smaller. Refer to the help screens for details.
Configuring Mouse and
Keyboard Options
Path: Toplevel Menu → Configuration menu → Setup and
Configuration menu → Mouse / Key repeat setup
Path: Main Menu → Config → Setup and Configuration menu
→ Mouse / Key repeat setup
Selecting the Mouse / Key repeat setup option from the Setup and
Configuration menu allows you to enable/disable a mouse, adjust the sensitivity of
the mouse, and turn the mouse cursor off when the keyboard is used. It also allows
you to set the keyboard repeat speed (delay between keystrokes when a key is held
down) and the keyboard repeat delay (delay before repeating begins when a key is
held down). Refer to the help screen for details.
Publication 1746-PM001A-US-P
3-8
Configuring Your Software
Configuring Your
Filename Extensions
Path: Toplevel Menu → Configuration menu → Setup and
Configuration menu → Filename extensions
Path: Main Menu → Config → Setup and Configuration menu →
Filename extensions
To configure your filename extensions:
1. Select Filename extensions from the Setup and Configuration menu. You
get a list of the filename extensions that are currently recognized by the BASIC
Development Software. You can add (Create) or remove (Delete) extensions
from this list as needed.
Effect on Programming: Upon loading a file, the software searches this list for
the extension of the file being loaded.
Figure 3.3 Extension Setup
=
L:3
C:1
1747-PBASE V x.xx
[Text Edit]
Ins 175k
06-12-91 1:15pm
File Window Block cUrsor Search Text Layout Print Macro Config Other Exit
+------SETUP AND CONFI+--------EXTENSION SETUP----------+
+|DOS=3.30
CPU=80386
|
Create<Ins> Delete<Del>
||Video Card = VGA Colo|
Copy<F4> Edit<F3>
||PBASE Path = C:\ABBAS|
||Expanded Memory N/A
|
DEFAULT
||Serial # 1234567
|
BDL
||---------------------|
BAS
||Edit settings...
|
DOC
||Display setup...
↑
|==========?No-File?==+
|
|
|
|
|
|
|
|
|
|
|
|
|
|
|
||Mouse / Key repeat se|
Edit<ENTER> Done<ESC> Help<F1> |
|
||Filename extensions..+=================================+
|
↓
||Printer...
|
|
||sWapping / Expanded memory...
|
|
||Backups / Temp files / Autosave...|
|
||Search and Replace defaults
|
|
||Terminal Selection Menu...
|
|
||saVe configuration and exit
|
|
||
|
|
|+========Exit Setup<ESC>===========+
|
|
<PgUp><PgDn><Home><End>
LIST BOX: Next field<TAB>, Previous<ShftTAB>,
+-------------------------------------------------------------------------------+
↑↓
2. Press [Tab] to move to the next option. Press [Enter] to make selection.
3. Highlight the filename extension you wish to edit (BDL in this case) from the
extension setup list and select Edit<F3>. You get the EXTENSION SETUP
dialog box for the BDL extension. There you can see that the Edit mode for
BDL files is text, the Indent style is smart, the Tab spacing is 2, the Right
margin is 78 and Word wrap is off.
Effect on Programming: If, for example, you select a program called
FIRST.BDL to be loaded into an edit window, the software searches the
filename extension list, and finds BDL. It refers to the parameters entered in
the EXTENSION SETUP dialog box for BDL as the file is loaded. When you edit
Publication 1746-PM001A-US-P
Configuring Your Software
3-9
this file, the indents, tabs, margins, and word wraps are guided by these
settings.
Figure 3.4 Extension Dialog Box
+--------------------------EXTENSION SETUP------------------------+
| Extension:
BDL
|
| Edit mode:
Indent style:
.
|
( ) Text
( ) Off
|
( ) Document
( ) Auto
Tab spacing:
Right margin: 78
|
|
|
.
|
2
( ) Smart
[ ] Word wrap
|
|
|
| Language type:
[1747_PBASE
]
↓
|
| Default directory: ................................
|
| Compiler-Program setup
|
|
|
|
OK<ENTER> Cancel<ESC> Help<F1>
|
+-----------------------------------------------------------------+
4. Move the cursor down to highlight Language type for the .BDL extension.
(Use your mouse or press [Tab] to move the cursor.) Press [down arrow] to
bring up the Language list box. Note that 1747-PBASE was selected from this
list for the .BDL extension.
Effect on Programming: While you edit programs, the software notes the
from the extension setup table and interacts accordingly.
Refer to the help screen on Language Specific Support for details.
Language type
Figure 3.5 Language Dialog Box
+-----------LANGUAGE--------------+
|
Create<Ins> Delete<Del>
|
|
|
|
1747-PBASE
|
NONE
|
BASIC
|
↑
↓
|
|
|
|
|
OK<ENTER> Cancel<ESC> Help<F1> |
+---------------------------------+
5. Press [ESC] to exit the Language list box and return to the EXTENSION SETUP
dialog box. The next parameter, Default directory, is used to define DOS
directory paths for loading and saving files. You can enter a disk drive and/or
directory and sub–directory path here. Refer to the help screen on the Default
directory for details.
Effect on Programming: When you enter a filename to be loaded into a
window, you can enter a DOS path along with the filename. If you do not, the
currently active directory will be searched for that filename. If it is not found,
then the default directory entered is searched.
When you save a file from an open window, you can also enter a DOS path
along with the filename. If you do not, the file is saved in the default directory
entered here.
Publication 1746-PM001A-US-P
3-10
Configuring Your Software
6. Move the cursor down by pressing [Tab] to highlight Compiler–Program
setup for the .BDL extension, and press [Enter]. The Compiler/Program
setup list box appears from which the desired compiler can be selected. In this
case, the .BDL extension has only one compiler to select from: the
1747-PBASE Translator.
Effect on Programming: When you attempt to translate/compile a file, the
software again refers to the extension setup table. There it finds that files with
.BDL as their filename extension use the compiler program called the
1747-PBASE Translator. This compiler is used during translate/compile.
Figure 3.6 Compiler Setup Dialog Box
+-----COMPILER/PROGRAM SETUP------+
|
|
Create<Ins> Delete<Del>
Copy<F4> Edit<F3>
|
|
|
|
|
1747±PBASE Translator
|
|
|
|
|
|
|
|
Edit<ENTER> Done<ESC> Help<F1> |
+---------------------------------+
7. Press [Enter]. The COMPILER/PROGRAM SETUP dialog box appears. You can
define a number of compiler-specific parameters here. Refer to Chapter 8 for
details on the parameters in this dialog box.
Effect on Programming: Compiling is controlled by the settings in the
COMPILER/PROGRAM SETUP dialog box. Parameters there determine, among
other things, whether the file is saved first, whether the screen is cleared,
whether compiler errors are processed, and how memory is allocated during
the compile.
Figure 3.7 Compiler/Program Setup Variables
+---------------------COMPILER/PROGRAM SETUP------------------------+
| Description:
1747±PBASE Translator
|
| Command line: BTRAN <FILE> /I\ABBASIC\BAS................
|
| Program type: [1747-PBASE
|
]
| Memory requited in k bytes(0=all):
0
|
|
|
| Swap method:
Options:
.
|
|
( ) Use default
|
( ) No swap
[X] Save all files
|
|
( ) To disk only
[ ] Reload file
|
|
( ) To EMS only
[ ] Do NOT process compiler errors
|
( ) To EMS then to disk
[ ] Clear screen
|
|
|
|
|
|
OK<ENTER> Cancel<ESC> Help<F1>
|
+==================================================================+
Publication 1746-PM001A-US-P
Configuring Your Software
Configuring Your Printer
Options
3-11
Path: Toplevel Menu → Configuration menu → Printer
Path: Main Menu → Config → Printer
When you select the Printer option from the Setup and Configuration menu,
you get a list of common printers. You can select a printer from this list or you can
select Create<Ins> to add a printer if it is not listed. By selecting Edit<F3> , you
can modify the parameters for a listed printer or a printer you have added.
Refer to Chapter 7 for information on printing and printer configuration.
Configuring Your
Memory Options
Path: Toplevel Menu → Configuration menu → sWapping/Expanded
memory
Path: Main Menu → Config → sWapping/Expanded memory
When you select the sWapping/Expanded memory option from the Setup and
Configuration menu, you get a screen with several memory-related parameters.
These allow you to optimize the use of conventional memory (the first 640K of
RAM memory), expanded memory, and disk space in your personal computer.
IMPORTANT The BASIC Development Software uses expanded memory, not
extended memory. Most 80386-based personal computers come
with software (typically called EMM for Expanded Memory
Manager) that allows you to designate some of your memory as
expanded memory. Some 80386 and most 80286, 8088,
8086-based personal computers need a special board for
expanded memory. Refer to the hardware and DOS
documentation provided with your computer.
During editing or file manipulation, it is common for the conventional memory of
your personal computer to fill completely. When this happens, the BASIC
Development Software may attempt to move portions of a file into expanded
memory or onto a disk drive. This memory swapping is done with no effect on you
as a user.
You should find out how much expanded memory (EMS) your personal computer
has before setting values to any of these parameters. As you become more proficient
in using this software and begin using shell to DOS or user-defined program
features, you should determine the maximum program size that you expect to use
and allocate memory accordingly.
IMPORTANT Verify your personal computer’s expanded memory size before
selecting your memory option. If sufficient memory is not
available, a system error may occur.
The memory swapping parameters here are similar to those in the compiler setup
screen that you access when setting up a compiler for a specific filename extension
(Chapter 8). Be aware that any memory swapping method selected for a compiler
overrides the method selected here when that compiler is used. Refer to the help
screens for details.
Publication 1746-PM001A-US-P
3-12
Configuring Your Software
Backup Files, Temporary
Files, and Autosave
Path: Toplevel Menu → Configuration menu → Backups/Temp files/
Autosave
Path: Main Menu → Config → Backups/Temp files/Autosave
When you select the Backups/Temp files/Autosave option from the Setup and
Configuration menu, you get a dialog box with several parameters for backing up
files, making temporary files, and saving open files.
Backup Files
Backup files are a previously saved versions of files you have edited. They can be
restored in the event of damage or undesired changes to the original file. You have
several options for backup method and backup frequency.
Temporary Files
Temporary files are those created during memory swapping, or when you use the
DOS shell. Though you have limited access to these files, and they are typically
erased when you quit the BASIC Development Software, you can select a specific
directory where they are to be stored. You can also use the Temporary file directory
to send files to a RAM disk if you have that utility on your personal computer.
IMPORTANT If no directory paths are entered for the temporary files, they are
saved to the active disk drive and directory. This may cause
problems if, for example, you use the DOS Shell from the BASIC
Development Software, log on to a floppy disk drive, and then
exit back to the software. Temporary files are written to that
floppy disk and an error occurs if the floppy disk runs out of
space. To avoid this, you may want to enter the name of the
directory in which your software was installed, such as
C:\ABBASIC\BDS.
Autosave
The autosave feature causes files to be saved automatically after a specified period of
time or a specified period of keyboard inactivity. This prevents you from losing too
much of your work should there be a power failure or system error.
For details and descriptions of these parameters, refer to the help screens.
Publication 1746-PM001A-US-P
Configuring Your Software
Search and Replace
Defaults
3-13
Path: Toplevel Menu → Configuration menu → Search and Replace
defaults
Path: Main Menu → Config → Search and Replace defaults
When you select the Search and Replace defaults option from the Setup and
Configuration menu, you get a list box with three types of searches. When you
highlight one of these and select it, you get a dialog box with parameters for that
specific type of search.
These parameters are the defaults that define how the search is conducted. When
the actual search is performed in Edit mode, a nearly identical screen appears, with
the search parameters as you entered them. They can be altered at the time of the
search, and remain altered until you quit; however, they revert back to the default
values entered here the next time you run the BASIC Development Software.
User-defined keystroke macros can be created to select desired search and replace
settings. Keystroke macros are described in Chapter 4.
For details and descriptions of these parameters, refer to the help screens.
Terminal Emulation
Mode Selection
Path: Toplevel Menu → Configuration menu → Terminal Selection
Menu
Path: Main Menu → Config → Terminal Selection Menu
The Terminal Selection Menu option from the Setup and Configuration menu
allows you to select the Terminal Emulation mode desired for communicating with
your BASIC or BASIC-T module. The following three Terminal modes are
available:
• RS-232 Terminal Mode allows you to communicate to the RS-232 program
port (Prt1) of the module
• DH485 Terminal Mode allows you to communicate to the DH485 port of
the module
• General Purpose Communications Terminal Mode — allows you to use your
personal computer as a general purpose communications terminal. In this
mode, your personal computer can be used as an ASCII terminal that supports
phone/modem dialing. This mode should not be used for communication to
the module.
Refer to the SLC 500™ BASIC and BASIC-T Modules User Manual (publication
number 1746-UM004A-US-P), for information on connecting and
communicating with the module or other port device through the Terminal mode.
Publication 1746-PM001A-US-P
3-14
Configuring Your Software
Save Configuration and
Exit
Path: Toplevel Menu → Configuration menu → saVe configuration
and exit
Path: Main Menu → Config → saVe configuration and exit
Some configuration changes are saved immediately at the time you assign them,
while others are not saved until you select the saVe configuration and exit
option from the Setup and Configuration menu. At that time, you are prompted
to save the configuration if changes have been made and were not saved previously.
If you elect to exit without saving configuration changes, those that were changed
immediately remain changed. Only changes that are not saved until exiting are
abandoned.
IMPORTANT A file called DEFAULTS.BAT is included with the BASIC
Development Software package to restore the default values. It
will restore all values as if you had just installed the software in
your personal computer. This file is executed by typing DEFAULTS
(while in the directory in which DEFAULTS.BAT is stored) prior
to running the BASIC Development Software.
ATTENTION Executing the file DEFAULTS.BAT deletes all changes you made
to any of the BASIC Development Software parameters and
replaces them with the original default values. Do not execute
DEFAULTS.BAT from the DOS shell.
!
Publication 1746-PM001A-US-P
Chapter
4
Editing a Program
This chapter is designed to help you understand the file editing features available
with your BASIC Development Software. It provides a general description of the
features so you can apply them as needed when you begin writing your own
programs. major topics include:
• simple editing techniques
• search operations
• block operations
• text formatting
• advanced editing features
Using Simple Editing
Techniques
When you select Edit mode from the Toplevel menu, the main menu appears and
a window opens. This window, the A window, is immediately available for file
editing, or an existing file can be opened and loaded into it. At that point, your
keyboard provides you with some simple editing techniques.
IMPORTANT If using the keys on the numeric keypad of your personal
computer, make sure you have turned your [NumLock] off.
The following keys perform as described while editing text:
Table 4.1 Key Functions
Keys
Function
[right arrow]
Moves the cursor across the screen to the right.
[left arrow]
Moves the cursor across the screen to the left.
[up arrow]
Moves the cursor up the screen.
[down arrow]
Moves the cursor down the screen.
[Ctrl-right
arrow]
Moves the cursor one word to the right.
[Ctrl-left arrow] Moves the cursor one word to the left.
1
[Home]
Moves the cursor to the beginning of a line.
[End]
Moves the cursor to the end of a line.
[PageUp]
Scrolls the screen up by one full screen.
[PageDown]
Scrolls the screen down by one full screen.
[Ctrl-PageUp]
Scrolls the screen to the top of the page.
[Ctrl-PageDown]
Scrolls the screen to the top of the next page.
[Ctrl-Home]
Scrolls the screen to the top of the file.
[Ctrl-End]
Scrolls the screen to the end of the file.
Publication 1746-PM001A-US-P
4-2
Editing a Program
Table 4.1 Key Functions
Keys
Function
[Delete]
Deletes the character directly under the cursor.
[Backspace]
Deletes the character to the left of the cursor.
[Insert]
Toggles between Insert mode (new text is inserted to the left of the
cursor) and the Overstrike mode (new text overwrites the character
under the cursor).
Another technique for moving through a program is to select a line number. You
can select goto Line number when you pull down the cUrsor menu.
Path: Toplevel Menu → Edit Mode → cUrsor → goto Line number
QuickStroke: [Alt F8]
There are a number of other QuickStrokes and simple editing techniques available.
They are listed in Hypertext help when you select Quick Reference from the help
index or table of contents.
Searching Operations
The Search menu provides methods of searching for various expressions. This
description is limited to a general explanation of the selections within that menu.
For a detailed explanation on implementing menu selections, refer to the network
of help screens. Refer to Chapter 2 for details on using Help.
Path: Toplevel menu → Edit mode → Search
Quickstroke: available for individual items within the Search
menu.
Figure 4.1 Search Menu
L:3
C:1
1747-PBASE V x.xx
[Text Edit]
Ins 175k
06-12-91 1:15pm
File Window Block cUrsor Search Text Layout Print Macro Config Other Exit
+----------------SEARCH----------------+
+=+A+====================|Search for text...
<F6>
|>> EOF <<
|search and Replace...
<ShftF6>|
|===?No-File?=+
|
|
|repeat Previous search
<CtrlF6>|
|
|
|--------------------------------------|
|
|
|multiple File search...
<AltF>
|
|
|
|List files from last search...<AltG>
|
|
|
+--------------Cancel<ESC>-------------+
|
|
|
|
|
|
|
|
|
|
|
|
|
|
|
|
|
|
|
|
|
|
|
|
|
|
|
+------------------------------------------------------------------------------+
1 Help
Publication 1746-PM001A-US-P
2
3
4
5
6
7
8
9
0
Editing a Program
4-3
The Search menu is divided into two sections. The first section provides search
options used to search the current file that is loaded into the edit window. The
second section provides options used to search multiple files in the specified search
path, regardless of whether or not the file has been loaded into an edit window.
The following is a list of the options available from the Search menu and a brief
explanation of their function. Remember that Hypertext help is available to assist
you should you need more details:
• Search for text — allows you to search within a window, in the forward or
reverse direction, in a number of different search modes, for several different
expressions, literals, or phrases. For a complete description and examples of this
search option, refer to the help screen.
• search and Replace — allows you to replace the searched item with a
selected item. This is the same as Search for text, except that it allows for
replacement of the searched characters during the search.
• repeat Previous search — repeats the last Search for text or search
and Replace
• multiple File search — searches any or all files on any disk drive for any
specified string with a number of different search options. Where the search
was successful, files appear in a list box from which a file can be selected and
loaded into a window.
• List files from last search — lists the files found in the last multiple
File search.
Using Block Operations
The Block menu provides many features for use with word processing software to
increase speed and accuracy when editing BASIC programs.
Path: Toplevel menu → Edit mode → Block
QuickStroke: available for individual items within the Block
menu.
Publication 1746-PM001A-US-P
4-4
Editing a Program
Figure 4.2 Block Menu
L:3
C:1
1747-PBASE V x.xx
[Text Edit]
Ins 175k
06-12-91 1:15pm
File Window Block cUrsor Search Text Layout Print Macro Config Other Exit
+--------------BLOCK-------------+
+=+A+=======|(Copy block
<F9>)
|======================?No-File?=+
|>> EOF <<
|(Move block
<F10>)
|
|
|
|(Delete block
<CtrlF10>)|
|
|
|--------------------------------|
|
|
|cut and Paste
|
|
|
|(save Block to disk...<CtrlF5>) |
|
|
|(Indent line block
<AltI>)
|
|
|
|(Undent line block
<AltU>)
|
|
|
|--------------------------------|
|
|
|Window copy...
<ShftF9>
|
|
|
|window moVe...
<ShftF10>
|
|
|
|--------------------------------|
|
|
|mark Lines of text
|
|
|
|mark cOlumns of text <ShftF7>
|
|
|
|mark Stream of text
|
|
|
+-----------Cancel<ESC>----------+
|
<F7>
<AltF7>
|
|
|
|
|
|
|
|
+------------------------------------------------------------------------------+
1 Help
2
3
4
5
6
7
8
9
0
Before you can manipulate a block (copy, move, delete, etc.), you must first define
the block using one of the three marking options on the Block menu.
IMPORTANT If you are unable to change any characters in a file, that file has
probably been locked. Files can be locked (made read-only) or
unlocked through the File menu. Move the cursor to the
Information About Current File option and press [Enter] or the
left mouse button. Below the description of the current file are
the unlock and lock options. Press [Tab] and/or the arrow keys
to select either of these options and press [Enter] or the left
mouse button.
The following is a list of the options available from the Block menu and an
explanation of their function. Remember that Hypertext help is available with
more details:
Publication 1746-PM001A-US-P
Editing a Program
4-5
Table 4.2 Block Defining Options
Option
QuickStroke
Description
mark Lines
of text
[F7]
allows you to mark specific lines in a file beginning or
ending with the line where the cursor is positioned prior
to selecting this menu item. If using a mouse, click the
left mouse button to define this cursor position in the
file.
mark cOlumns [Shift-F7]
of text
allows you to mark specific columns in a file beginning
or ending with the column where the cursor is positioned
prior to selecting this menu item. If using a mouse, click
the left mouse button to define this cursor position in the
file. With this option, you can fan out to control the
column and row width being selected.
mark Stream
of text
[Alt-F7]
allows you to mark a stream of text in a file beginning or
ending with the character where the cursor is positioned
prior to selecting this menu item. If using a mouse, click
the left mouse button to define this cursor position in the
file. This option is similar to marking lines of text except
that it allows you to take portions of a line.
End block
[F7]
only appears while you are in the process of marking
text. Select it after you have marked all that you want of
the block.
turn marking [Ctrl-F9]
oFf
only appears after you have marked text. It allows you to
remove all block marking in the file in the active window.
Figure 4.3 Marking Examples
MARK
LINES
OF TEXT
<F7>
MARK
COLUMNS
OF TEXT
<ShiftF7>
MARK
STREAMS
OF TEXT
<AltF7>
Once you have defined a block, you can perform the following actions on it.
Table 4.3 Block Menu Actions
Option
QuickStroke
Description
Copy block
[F9]
allows you to copy a block to the current cursor position
in a window.
Move block
[F10]
allows you to move a block to the current cursor position
within a window.
Delete block [Ctrl-F10]
allows you to delete the block within the currently active
window.
cut and
Paste
allows you to move, copy, or append a block to a hidden
buffer for insertion elsewhere in any active window.
Only one block can be in the hidden buffer at a time.
save Block
to disk
[Ctrl-F5]
allows you to save a block to a disk as a separate file.
Indent line
block
[Alt-I]
moves a block one tab stop to the right. This can be used
only on blocks made by marking lines of text.
Publication 1746-PM001A-US-P
4-6
Editing a Program
Table 4.3 Block Menu Actions
Text Formatting, Undo,
and Redo
Option
QuickStroke
Description
Undent line
block
[Alt-I]
moves a block one tab stop to the left. This can be used
only on blocks made by marking lines of text.
Window copy
[Shift-F9]
allows you to copy any block to the currently active
window.
window moVe
[Shift-F10]
allows you to move any block to the currently active
window.
The Text menu supports text entry and formatting with a number of timesaving
features. This menu also includes an undo and redo, allowing you to step back
through any unwanted work.
Path: Toplevel menu → Edit mode → Text
QuickStroke: available for individual items within the Text menu
Figure 4.4 Text Menu
L:3
C:1
1747-PBASE V x.xx
[Text Edit]
Ins 175k
06-12-91
1:15pm
File Window Block cUrsor Search Text Layout Print Macro Config Other Exit
+-------------TEXT--------------+
+=+A+===========================|Undo
<CtrlF7> |===?No-File?=+
|>> EOF <<
|Redo
<CtrlDEL>|
|
|
|-------------------------------|
|
|
|Sort text...
|
|
|
|upper Case
|
|
|
|Lower case
|
|
|
|cenTer line
|
|
|
|time/Date stamp
<ShftF2> |
|
|
|-------------------------------|
|
|
|re±Format paragraph
|
|
|
|-------------------------------|
|
|
|rePeat command n times<CtrlR>
|
|
|
+----------Cancel<ESC>----------+
|
<AltR>
|
|
|
|
|
|
|
|
|
|
|
|
|
|
+------------------------------------------------------------------------------+
1 Help
2
3
4
5
6
7
8
9
0
IMPORTANT If you are unable to change any characters in a file, that file has
probably been locked. Files can be locked (made read-only) or
unlocked through the File menu. Move the cursor to the
Information About Current File option and press [Enter] or
the left mouse button. Below the description of the current file
are the unlock and lock options. Press [Tab] and/or the arrow
keys to select either of these options and press [Enter] or the
left mouse button.
Publication 1746-PM001A-US-P
Editing a Program
4-7
The following is a list of the options available from the text menu and a brief
explanation of their function. Remember that Hypertext help is available with
more details.
Table 4.4 Text Menu Options
Advanced Editing
Techniques
Option
QuickStroke
Description
Undo
[Ctrl-F7]
allows you to undo your last editing actions, excluding
file saves and file loading. The amount of undo stops can
be set from 0 to 65535 through the Setup and
Configuration menu.
Redo
[Ctrl-Delete] allows you to reverse your last undo.
Sort text
allows you to sort the lines of your file into ascending or
descending, alphabetical or numerical order. You can
control which column of characters is to be sorted, and
you can confine the sorting to a specific area you have
defined with a block.
upper Case
allows you to change a word, line, or block to all
upper-case letters.
Lower Case
allows you to change a word, line, or block to all
lower-case letters.
cenTer line
Centers the currently selected line between column 1
and the right margin.
time/Date
stamp
[Shift-F2]
causes the current date and time to be inserted at the
cursor location.
re-Format
paragraph
[Alt-R]
places text into a paragraph that extends from the left
margin to the right margin and wraps lines as needed.
This feature is generally used when paragraphs of text
are involved.
rePeat
command n
times
[Ctrl-R]
allows you to type in a number of repetitions followed by
the key you want to repeat. For example, selecting
rePeat command n times and then typing 74x results in
seventy-four x’s being inserted at the current cursor
location.
Typing 20 followed by the delete key causes the next
twenty characters to be deleted.
This section deals with the more sophisticated editing techniques available with the
BASIC Development Software. These topics include:
• lines
• calculator
• ASCII Table
• windows
• keystroke macros
• cursor markers
Publication 1746-PM001A-US-P
4-8
Editing a Program
The Other menu provides access to the first three of the advanced features
described in this section.
Path: Toplevel menu → Edit mode → Other
QuickStroke: available for individual items within the other
menu.
Figure 4.5 Other Menu
L:3
C:1
1747-PBASE V x.xx
[Text Edit]
Ins 175k
06-12-91
1:15pm
File Window Block cUrsor Search Text Layout Print Macro Config Other Exit
+----------------OTHER----------------+
+=+A+==================================|Select a project file...
<AltENTER>|=+
|>> EOF <<
|User defined program...
|
|-------------------------------------| |
| |
|
|Translate/Compile
<CtrlF8>
| |
|
|find neXt error
<CtrlF2>
| |
|
|-------------------------------------| |
|
|Calculator
<AltF2>
|
|Ascii table
<AltA>
| |
|
|shell to DOS
<AltF5>
| |
|
|Linedraw
<AltL>
| |
|
|-------------------------------------| |
|
|teRminal [RS±232]
|
+-------------Cancel<ESC>-------------+ |
|
|
|
|
|
|
|
|
|
|
|
|
|
|
<F3>
| |
| |
+-------------------------------------------------------------------------------+
1 Help 2
3
4
5
6
7
8
9
0
Drawing Lines
Path: Toplevel Menu → Edit mode → Other → Linedraw
QuickStroke: Toplevel Menu → Edit mode → [Alt-L]
The linedraw feature, available through the Other menu, is useful in creating
boxes, bar graphs, and tables. When used in a print statement, these lines translate
for use in any BASIC program executed through the BASIC module.
Linedraw allows you to draw single or double lines and boxes in a window. The
lines are saved with the file and translated into BASIC code if you are using the
1747-PBASE Translator. Be aware that some printers may require special line
characters to be defined in order to print the lines.
Hypertext help is available with more details on this feature.
Your BASIC Development Software comes with an example line-drawing program
that uses this feature with programming macros. You can load this program into a
window and review it as an example. It is called LINEDRAW.BDL and resides in
the BAS sub-directory.
Publication 1746-PM001A-US-P
Editing a Program
4-9
Using the Calculator
Path: Toplevel Menu → Edit mode → Other → Calculator
QuickStroke: Toplevel Menu → Edit mode → [Alt-F2]
The calculator feature, available through the Other menu, is useful for doing quick
math operations right on your personal computer where the result can be pasted
into the active file.
The calculator works with decimal, hexadecimal, octal, or binary formats. It can
perform addition, subtraction, multiplication, and division. It can also perform
logical AND, OR and exclusive OR functions. The calculator has a tape output so
you can review your entries, and a paste option that pastes the calculation result at
the last cursor location in the active window.
Hypertext help is available with more details on this feature.
The ASCII Table
Path: Toplevel menu → Edit mode → Other → ASCII table
QuickStroke: Toplevel menu → Edit mode → [Alt-A]
The ASCII table is a view-only, three-page ASCII table with character, decimal,
and hexadecimal columns.
Using Windows
Path: Toplevel menu → Edit mode → Window
QuickStroke: available for individual items within the Window
menu
Windows are labeled alphabetically in their top left corner. The software can open
up to 100 windows simultaneously. Each may contain a separate file, or they can be
linked together and contain different parts of the same large file. You can open and
close these windows independently of one another.
Publication 1746-PM001A-US-P
4-10
Editing a Program
Figure 4.6 Window Menu
L:3
C:1
1747-PBASE V x.xx
[Text Edit]
Ins 175k
06-12-91 1:15pm
File Window Block cUrsor Search Text Layout Print Macro Config Other Exit
+----------WINDOW----------+
+=+C+|Open
|====================C:\ABBASIC\BAS\FIRST.BDL==+
|
|Close
|
|
|
|Split
|
|
|
|List...
|
|
|
|--------------------------|
|
|
|Next
<ShftF1>
|
|
|
|Previous
<CtrlF1>
|
|
|
|Adjacent
|
|
|
|--------------------------|
|
|
|Hide
|
|
|
|Modify size <ScrollLockOn>|
|
|
|Zoom
|
|
|mInimize
|
|
|
|--------------------------|
|
|
|linK...
|
|
|
|(Unlink)
|
|
|
+--------Cancel<ESC>-------+
|
<AltF1>
<AltW>
<CtrlF3>
|
|
|
|
|
|
|
+-------------------------------------------------------------------------------+
1 Help 2
3
4
5
6
7
8
9
0
The best way to understand and become proficient at using the window features is
to apply them as you edit files. Hypertext help is available to assist you. The
window menu items are explained briefly in the following table.
Table 4.5 Window Menu Options
Option
Publication 1746-PM001A-US-P
QuickStroke
Description
Open
opens a new window. A new file may or may
not be loaded at the same time.
Close
closes the current window. If the file in that
window has been edited but not saved, you
are prompted to save or abandon the changes.
Split
splits the current window horizontally or
vertically. A new file can be loaded in the
process. If not, the existing file is duplicated in
the split window and linked to the original.
List
[Alt-F1]
lists the open windows by window letter,
filename, status, and path. Windows can be
selected, deleted, hidden, saved, and
previewed through this list.
Next
[Shift-F1]
alphabetically selects the next window,
unless it is hidden.
Previous
[Ctrl-F1]
alphabetically selects the previous window,
unless it is hidden.
Adjacent
[Alt-W]
prompts for a direction to activate an adjacent
window.
Editing a Program
4-11
Table 4.5 Window Menu Options
Option
QuickStroke
Hide
Description
hides a specific window. To bring it back,
select List from the Window menu, select the
hidden window on the WINDOW LIST dialog
box, and then press [Enter] or select
OK<ENTER>.
Modify size
[Scroll Lock On] moves or resizes a window.
Zoom
[CTRL-F3]
increases a window to full size. Zooming the
same window a second time returns it to its
original size.
mInimize
reduces a window to a single line icon.
linK
allows you to view and/or edit different
sections of the same file by placing those
sections in different windows. This is useful
for large files and when doing block editing.
Unlink
unlinks a previously linked window.
Using Keystroke Macros
Keystroke macros allow you to record a series of key presses that accomplish a
specific task. The recorded keystrokes are then saved as a keystroke macro that can
be played back with a single QuickStroke.
Path: Toplevel menu → Edit mode → Macro
Figure 4.7 Macro Menu
L:3
C:1
1747-PBASE V x.xx
[Text Edit]
Ins 175k
06-12-91
1:15pm
File Window Block cUrsor Search Text Layout Print Macro Config Other Exit
+------MACRO---------+
+=+A+=============================================|Keystroke macros... |File?=+
|>> EOF <<
+-----Cancel<ESC>----+
|
|
|
|
|
|
|
|
|
|
|
|
|
|
|
|
|
|
|
|
|
|
|
|
|
|
|
|
|
|
|
|
|
|
|
+------------------------------------------------------------------------------+
1 Help 2
3
4
5
6
7
8
9
0
Publication 1746-PM001A-US-P
4-12
Editing a Program
Keystroke macros make your work easier and faster by allowing you to cut down on
repetitive actions. For example, suppose that every time you create a program file,
you enter the same information in a header. You can create a file that contains this
information and splice it into each new program file. To do this, you create a file
containing the header information, save it to disk under the name header, and
then use the Merge file from disk option from the File menu.
This makes things faster, but you still have to go through the steps of getting the
file and merging it into your program. Creating a keystroke macro would allow you
to complete the merge process with one keystroke.
IMPORTANT When recording keystrokes to create a keystroke macro, do not
use the mouse to select menu items or to position the cursor. Use
the actual keystrokes, including the function keys and the
appropriate letter keys to select menu item.
IMPORTANT When recording keystrokes, avoid using the cursor keys to select
menu items or filenames. If you record cursoring down to select
the sixth file in the list, and that list increases or decreases in
number, you will probably end up selecting the wrong file.
Follow the step by step procedure below to create a keystroke macro to consolidate
the file merging in the above example. Remember that Hypertext help is available
to assist you.
1. Press [Alt-F10] to begin keystroke recording.
Notice the blinking reverse R character in the status line at the top of the
screen. The R stands for recording and alerts you that all keystrokes are being
recorded until you press [Alt-F10] again.
2. Press the keys that you would use to accomplish the file splicing:
• [F2] brings up the Main menu
• [F] selects the File menu
• [M] selects Merge file from disk
• [type in the name of the file to load]
• [Enter]
3. Press [Alt-F10] again to stop keystroke recording. Once recording is
terminated, you asked if you want to save the keystroke macro. Select the Yes
option. The EDITING KEYSTROKE MACRO dialog box appears. You are
prompted to enter a description, QuickStroke key assignment, and mode
specification for the keystroke macro.
4. Type in Company header, the description for this keystroke macro. DO NOT
press [Enter]. Doing so will save the macro without a QuickStroke
assignment. If you press [Enter] by mistake, you can return to the EDITING
KEYSTROKE MACRO dialog box by pressing [F3].
Publication 1746-PM001A-US-P
Editing a Program
4-13
5. Move the mouse cursor to the QuickStroke assignment field and click the left
mouse button. If you do not have a mouse, press [Tab] to move the cursor to
the QuickStroke assignment field and then press [Space bar]. The EDIT
QUICKSTROKE dialog box appears.
6. Press [Alt-B], the QuickStroke for this macro. Legal QuickStroke key
assignments are described in Valid QuickStroke Key Assignments on
page 4-15.
7. Press [Tab] to move down to the Mode field. This is described in Editing
Keystroke Macros.
8. Press [Enter] to leave the Mode field unchanged and return to the keystroke
MACRO MANAGER dialog box. There you see Company header added to the list
of keystroke macros with [Alt-B], the QuickStroke that activates it, on the
right.
From this point on in the current editing session, whenever you press [Alt-B],
the header is entered at the current cursor location.
Changing Recorded Keystrokes
Before leaving the keystroke MACRO MANAGER dialog box, you may want to make a
change to the recorded keystrokes. For example, you find that the company header
is always left-highlighted after the file-merge operation you defined with the
{Alt-B] QuickStroke. Since it is necessary to turn this block marking off before any
other block editing can be done, you can add the necessary keystrokes to the
macro.
1. From the keystroke MACRO MANAGER dialog box, highlight the Company
header keystroke macro, and press [F3] to edit it.
2. On the EDITING KEYSTROKE MACRO dialog box, select Edit keystrokes
with the mouse and press the left mouse button. If you do not have a mouse,
press [Tab] to move the cursor to highlight Edit keystrokes, and then press
the space bar or down arrow.
3. Move the cursor down the list of keystrokes to the line immediately preceding
where you wish to insert keystrokes.
4. Press
• [INS-F2] to insert the keystroke to access the pull-down menus.
• [INS-B] to insert the keystroke to access the block menu.
• [INS-F] to insert the keystroke to turn the block marking off.
5. Press [Enter], indicating that you are done editing keystrokes.
6. Press [Enter], indicating that you are done editing the keystroke macro.
7. Press [Enter], indicating that you are done with the keystroke MACRO
MANAGER.
Publication 1746-PM001A-US-P
4-14
Editing a Program
The whole process of splicing header information into any new file has now been
reduced to one keystroke, [Alt-B], and has been saved permanently to the active
disk drive.
Editing Keystroke Macros
You have just recorded, saved, renamed, and edited a keystroke macro using a
step-by-step approach. This sub-section is intended to provide an overview of all of
the options available to create, delete, copy, edit, or play back a keystroke macro
from the MACRO MANAGER dialog box.
Table 4.6 Macro Manager Options
Option
QuickStroke
Description
Create
[INS]
creates a new keystroke macro. Selecting create brings up the
EDITING KEYSTROKE MACRO dialog box. There are four
fields in this dialog box.
• Description – enter up to 25 characters
• QuickStroke assignment – press [Tab] to get to this field,
followed by the space bar to allow you to edit it. Enter the
keystroke that will trigger the macro.
• Mode – Press [Tab] to get to this field, followed by the
space bar or down arrow to display the options you may
select. Mode selection determines whether the keystroke
macro can be invoked from Edit or Terminal modes.(1)
• Edit Keystroke – Press [Tab] to get to this field, followed
by the space bar or down arrow to display a list of the
actual keystrokes programmed for the selected macro. You
can cursor up or down the list and then add [INS], delete
[DEL], or change [F3], the keys as needed.
Delete
[DEL]
erases a keystroke macro that was previously saved.
Copy
[F4]
duplicates a keystroke macro. You are prompted for a
descriptive name for the duplicate. Then you are prompted to
replace or reassign the QuickStroke key.
Edit
[F3]
allows you to edit the existing keystroke macro. Selecting this
brings up the EDITING KEYSTROKE MACRO dialog box.
Playback
[Enter]
executes the highlighted keystroke macro immediately and
returns to the Edit mode. You can use this to execute any
keystroke macro on the list, including those that have not been
assigned a QuickStroke.
Done
[Esc]
exits the keystroke MACRO MANAGER dialog box and returns
to the Edit mode.
(1) In some cases, it may be useful to assign keystroke macros for use in Terminal mode. They could be written to send
commands like RUN, CONT, NEW, or LIST to the BASIC or BASIC-T modules.
Publication 1746-PM001A-US-P
Editing a Program
4-15
Valid QuickStroke Key Assignments
You can use any keystrokes that begin with [Alt] provided that the combination is
not already in use. A message appears prompting you to enter a different
combination if the one you selected is already in use. The QuickStroke key
assignments are listed when you select Quick reference in Hypertext help.
In addition to the [Alt] keystrokes, you may be able to assign additional special
function keys, depending on you personal computer’s keyboard. For example, on
AT or PS/2 style keyboards, the [F11], [F12], and [center] keys can be assigned
as QuickStroke keys.
Using Cursor Markers
The Cursor menu provides several options for marking and retrieving the cursor
position while writing programs.
If you are editing a very large file and need to frequently access a different section,
you can set a cursor position marker at a key location and then instantly move to
that position marker at any time with a single keystroke. The markers can be
stacked up to 10 deep so that you can access up to 10 positions in the reverse order
that they were stored. You can also set several random access marks throughout a
file for random access according to a marker number.
Path: Toplevel → Edit mode → cUrsor
QuickStroke: available for individual items within the Cursor
menu
Publication 1746-PM001A-US-P
4-16
Editing a Program
Figure 4.8 Cursor Menu
L:3
File
C:1
1747-PBASE V x.xx
[Text Edit]
Ins 175k
06-12-91
1:15pm
Window Block cUrsor Search Text Layout Print Macro Config Other Exit
+-------------CURSOR POSITION------------+
+=+A+=============|Push position onto marker stack<AltF3> |=========?No-File?=+
|>> EOF <<
|Get position from marker stack <ShftF3>|
|
|---------------------------------------|
|
|
|
|Set random access mark
|
|
|
|Retrieve random access mark
|
|
|
|---------------------------------------|
|
|
|goto Line number...
|
|
+--------------Cancel<ESC>--------------+
<AltF8> |
|
|
|
|
|
|
|
|
|
|
|
|
|
|
|
|
|
|
|
|
|
|
| 1 Help
|
2
3
4
5
6
7
8
9
0
|
+------------------------------------------------------------------------------+
The following table briefly describes the options available from the Cursor menu.
Remember that Hypertext help is available with more details.
Table 4.7 Cursor Menu Options
Option
QuickStroke
Description
Push position onto marker
stack
[Alt-F3]
stores up to 10 cursor positions in a marker
stack. They are stored in the order they are
saved each time this menu option is selected.
Get position from marker
stack
[Shift-F3]
retrieves a stored cursor position from the
marker stack and causes the cursor to move to
that position. Positions are retrieved in the
reverse order that they were saved.
Set random access mark
stores up to 10 cursor position for random
retrieval within each window. These are not the
same cursor positions as those in the marker
stack. They are stored with a marker number
from 0 through 9 and prompted when this menu
option is selected.
Retrieve random access
mark
retrieves the selected, stored cursor position and
causes the cursor to move to that position. You
are prompted for marker number 0 through 9
when this menu option is selected.
goto Line number
Publication 1746-PM001A-US-P
[Alt-F8]
prompts for a line number and then positions the
cursor at that line in the file. The number you
enter is not a BASIC program line number; rather,
it is the absolute line number from the top of the
file.
Chapter
5
Manipulating Files
The goal of this chapter is to familiarize you with the manipulation features of your
BASIC Development Software, including:
• the File menu
• project file selection
• user-defined programs
The File Menu
The first pulldown menu to the left of the main menu is the File menu. This menu
is the most commonly used feature for file manipulation.
Path: Toplevel menu → Edit mode → File
QuickStroke: available for individual items within the File menu
Figure 5.1 File Menu
L:3
C:1
1747-PBASE V x.xx
[Text Edit]
Ins 175k
06-12-91 1:15pm
File Window Block cUrsor Search Text Layout Print Macro Config Other Exit
+------------------FILE-------------------+
|Edit new file...
|=========================?No-File?=+
|Load file into current window... <ShftF5>|
|
|Save file in current window
|
|
|save file As...
<F5>
|Information about current file...
|
|
|
|
|-----------------------------------------|
|
|Merge file from disk...
|
|
|
|
|(save Block to disk...
)
|-----------------------------------------|
|
|DOS directory shell
<CtrlF4>|
|
|Quit
<AltX>
|
|
+---------------Cancel<ESC>---------------+
|
|
|
|
|
|
|
|
|
|
|
+------------------------------------------------------------------------------+
1 Help 2
3
4
5
6
7
8
9
0
The following table provides a brief explanation of the options available from the
File menu.
1
Publication 1746-PM001A-US-P
5-2
Manipulating Files
Table 5.1 File Menu Options
Option
QuickStroke
Edit new file
Description
creates a new window where a new or existing file is
loaded. A dialog box appears from which you can either
type in the filename or select it from a directory list. The
directory list has the flexibility to list files from any
directory on any disk drive in your system. There are also
sort options for the directory list that allow you to list
files by extension, name, size, date, and time.
Load file into current [Shift-F5] loads a file into the existing window and replaces any
window
file currently in the window. If the current file has been
changed and not saved, you are first prompted to save
or abandon the changes. Then a dialog box appears from
which you can select a new file to load.
Save file in current
window
save file As
Selecting Project Files
save the files in the currently active window. It saves
the file under its original name and replaces any
previously saved version.
[F5]
saves the files in the currently active window under a
different name. You can type a new name with
extension in the dialog box that appears, or you can
select an existing name from the directory list in the
dialog box. If you select the name of an existing file, you
are asked if you want to overwrite that file before the
save takes place.
Information about
current file
gives you the current filename, location, and amount of
disk space used. From the dialog box displayed, you can
also change the filename or lock the file so it cannot be
modified.
Merge file from disk
merges another file into the file you are editing at the
current cursor location. A dialog box appears from which
you can select the file you wish to merge.
save Block to disk
saves a block to a disk as a separate file. A block is a
portion of a program you have marked to be copied
moved, or deleted, etc. See Using Block Operations on
page 4-3 for details on selecting a block.
DOS directory shell
[Ctrl-F4]
displays DOS directories and directory trees from which
you can select files. See Appendix B for more
information on the DOS directory shell.
Quit
[Alt-X]
takes you out of the BASIC Development Software. IF
any open files have been changed and not saved, you
will be prompted to save or abandon the changes.
The Select a project file option creates a personalized menu of frequently used files.
It helps with organization and saves file loading time. This option can be accessed
from either the Toplevel menu or the Other menu (under the Main menu).
User Menu
Path: Toplevel menu → Select a project file
Path: Toplevel menu → Edit mode → Other → Select a project file
QuickStroke: Toplevel menu → Edit mode → [Alt-ENTER]
Publication 1746-PM001A-US-P
Manipulating Files
5-3
Figure 5.2 User Menu
L:3
C:1
1747-PBASE V x.xx
[Text Edit]
Ins 175k
06-12-91
1:15pm
File Window Block Cursor Search Text Layout Print Macro Config Other Exit
+=+A+===============================================================?No-File?= +
|>> EOF <<
+---------------User Menu---------------+
|
|
|
Create<Ins> Delete<Del> Copy<F4>
|
|
|
|
Edit<F3>
|
|
|
|
|
|
|
|
|
|
|
|
|
|
|
| Example Linedraw Program with macros
|
|
|
|
|
|
|
|
|
|
|
|
|
|
|
|
|
|
|
+=======================================+
Go<ENTER> Cancel<ESC> Help<F1>
|
|
|
|
|
|
|
|
|
+-----------------------------------------------------------------------------+
LIST BOX:
Next field<TAB>, Previous<ShftTAB>,
↑↓<PgUp><PgDn><Home><End>
Behind the user menu is the A window and above it is the Main menu, indicating
that you are now in Edit mode.
Use the up or down arrow keys or click you mouse on the vertical scroll bar to
highlight different files. When you reach the file you wish to load, press [Enter]
or click your mouse on the Go<ENTER> option. The file is loaded into the next
available window. A new window is created, if necessary.
When you load a file into the User menu, you must create a descriptive name for
the file under which the file will be listed on the user menu. The actual filename
does not change.
For example, you have two BASIC files called FURN1.BDL and FURN2.BDL,
used to control heat-treating furnaces. If you add them to the user menu, you can
load them quickly using the Select a project file option. Also, you can create a
descriptive name so that others using the software will recognize them. The
FURN1.BDL file could be listed as “FURNACE CONTROL PROGRAM,
MAIN FURNACE, SOUTH WALL”. The FURN2.BDL file could be listed as
“FURNACE CONTROL PROGRAM, BACKUP FURNACE, WEST WALL”.
Publication 1746-PM001A-US-P
5-4
Manipulating Files
To load files into the User menu:
1. Select the Create<Ins> option from the user menu.
2. Enter a descriptive filename to the right of the Name option.
3. Enter the actual filename to the right of the select a Filename option.
4. Select the OK<ENTER> option when you are finished.
Notice that the descriptive name now appears on the User menu.
Besides inserting a file on the User menu, you also have the option to edit, delete,
or copy an existing file on the User menu.
User-defined Programs
The User-defined program option on the Toplevel menu allows you to drop out of
the BASIC Development Software to execute other programs on your personal
computer. User-defined programs may be your word processing program, a file or
disk management program, or a spreadsheet.
User-defined programs appear on a User menu, just like the project files discussed
in the previous section. However, this is an entirely different User menu and the
programs on it are generally independent programs, executable at the DOS level of
your personal computer.
Path: Toplevel menu → User defined program
Path: Main menu → Edit mode → Other → User defined program
Figure 5.3 User-defined Programs User Menu
+-----------------BASIC MODULE PROGRAM DEVELOPMENT ENVIRONMENT-----------------+
|
|
|
+------------User Menu-----------+
|
|
|
Create<Ins> Delete<Del>
|
|
|
|
Copy<F4> Edit<F3>
|
|
|
|
|
|
|
| Screen±saver program
|
|
|
| Spreadsheet
|
|
|
| Star±Death Computer Game
|
|
|
| Word Processing
|
|
|
|
|
|
|
| Go<ENTER> Cancel<ESC> Help<F1> |
|
|
+================================+
|
|
|
|
Allen±Bradley Company, Copyright 1994
|
|
1747-PBASE
|
|
All Rights Reserved
|
|
This software is licensed to: ABBASIC
|
|
FACSYS
|
+===============================================================================+
1 Help 2
3
4
5
6
7
8
9
0
Publication 1746-PM001A-US-P
Manipulating Files
5-5
Programs are entered onto the User menu in a similar manner as the previous User
menu, except that there are memory and directory issues to clarify.
Name Selection
When you enter a program into the User menu, you must create a descriptive name
for the program, under which the program will be listed in the User menu. The
actual filename for the file does not change.
To create a descriptive name for the file:
1. Select the Create<Ins> option from the User menu.
2. Enter a descriptive name, up to 120 characters, as you would like it to appear
on the User menu.
Selecting a Filename
For the user-defined program feature to work correctly, you must enter the actual
filename of the program as it appears in you personal computer’s directory.
Typically, you have to enter more than just the filename here. Unless the file resides
in the current working directory, you have to provide a complete DOS path for the
program.
To select the actual filename:
1. Highlight the select a Filename option and press [Enter] or click the left
mouse button.
A dialog box appears, giving you the option to view a directory listing of you
personal computer. Use this directory listing to move through your directories
and disk drives until you find the actual name that you want to enter into the
User menu.
2. Highlight the program that you want and press [Enter] or select it with the
mouse.
The filename, along with its complete DOS path, is entered for the selected
program.
After selecting the actual filename, move down to the Swap method option.
Swap Method Selection
The Swap method option in this dialog box refers to how memory is allocated
when executing a user-defined program while still retaining the active files and
current screens being used in the BASIC Development Software.
The following table contains a brief explanation of the options available under the
Swap method option.
Publication 1746-PM001A-US-P
5-6
Manipulating Files
Table 5.2 Swap Method Options
Option
Description
No swap
when executing a user-defined program, no additional memory is
freed up by swapping BASIC Development Software out to disk or
EMS. EMS refers to your computer’s expanded memory, if it has
any.
To disk only
when executing a user-defined program, additional memory is freed
up by swapping BASIC Development Software out to disk.
To EMS only
when executing a user-defined program, additional memory is freed
up by swapping BASIC Development Software out to EMS.
To EMS then to disk
when executing a user-defined program, additional memory is freed
up by swapping BASIC Development Software out to EMS first and
then to disk.
Use default method
the swap method used is the same as selected for Shelling to DOS
IMPORTANT You may select a user-defined program that was executed with no
problems before, and find that it is now too large for you personal
computer’s RAM memory. This is because the program now has
to share RAM memory with the BASIC Development Software.
For large RAM memory-consuming files, you generally have to
select the To EMS or To disk only options when adding those
files to the User menu.
To select the swap method:
1. Highlight Swap method.
2. Select the desired Swap method.
After selecting the Swap method, move to Memory required.
Memory Required Selection
The Memory required option in this dialog box refers to how much memory is
required to run your user-defined program. The BASIC Development Software
checks its available memory before attempting to run the user-defined program. If
the amount of available memory is greater than the amount specified by this
option, then the BASIC Development Software will not swap itself out to EMS or
disk.
To select Memory required:
1. Highlight Memory required.
2. Enter the amount of memory required for your user-defined program.
After selecting the amount of memory required, move down to Options.
Publication 1746-PM001A-US-P
Manipulating Files
5-7
Use COMMAND.COM Option
The Use COMMAND.COM option allows you to use internal DOS commands like
DIR, DEL, COPY, etc. from the User-defined Programs menu.
To select Use COMMAND.COM:
1. Highlight Use COMMAND.COM.
2. Use the space bar to toggle your selection.
• [X] = Yes
• [Y] = No
After selecting Options, move to Starting directory.
Starting Directory
If you failed to define a complete directory path to the filename you entered above,
you may do so here. For example, you could enter C:\WORD if the word
processing filename you selected resided in the C: drive of your personal computer
in the Word directory on that drive. Refer to you DOS manual for details on
defining directories and directory paths.
Publication 1746-PM001A-US-P
5-8
Manipulating Files
Publication 1746-PM001A-US-P
Chapter
6
Writing Programs Using the BASIC Development
Language
This chapter is designed to help you write programs using the BASIC development
language. It begins with an overview of the language. Other topics include:
• translator directives
• keystroke and programming macros
• program integration from separate files
• second program creation
Overview of the
Language
The BASIC Language Reference Manual (publication number
1746-RM001A-US-P) and the SLC 500™ BASIC and BASIC-T Modules User
Manual (publication number 1746-UM004A-US-P) define the syntax that
provides the core of the BASIC development language. This core is then enhanced
by the addition of translator directives and programming macros, all structured to a
simple, open format that requires no line numbers. Descriptive label references are
used as destinations for transferring control, instead of line numbers.
As an example, a BASIC development language program for printing the date is
shown below. It uses a translator directive and a programming macro, and
translates to about nine lines in BASIC. That means if you were not using the
BASIC development language, instead of typing the three lines on the left, you
would have to type in the eleven lines on the right.
REM EXAMPLE PROGRAM
{$I INCLUDE.BDL}
PRINT_DATE()
1
0
10
20
30
40
50
60
70
80
90
100
REM ...
REM EXAMPLE PROGRAM
PUSH A
CALL 44
POP A
P. A,”/”,
POP A
P. A,”/”,
POP A
P. A,” ”,
POP A
Publication 1746-PM001A-US-P
6-2
Writing Programs Using the BASIC Development Language
The initial statement {$I INCLUDE.BDL} is called a translator directive. There are
several translator directives described in the next section of this chapter; however,
this particular one has to be included in the beginning of your BASIC development
language programs if you want to use any of the BASIC programming macros. It
directs the 1747-PBASE Translator to a file called INCLUDE.BDL at the time the
file is translated. This file contains the programming macros described in Appendix
A of this manual.
IMPORTANT If you are using the 1771-DB/B, you must also include the line:
{$I INCLUDBB.BDL}.
The command PRINT_DATE() is one of those BASIC programming macros from
the INCLUDE.BDL file. A programming macro is like a BASIC subroutine that
has already been created for you. If you look through appendix A, you see that
there are close to 100 macros, including many with single or multiple variables.
To summarize, the core of the BASIC development language is the BASIC
language. The BASIC development language enhances the BASIC language by
offering translator directives and programming macros in an open format that does
not require line numbering.
Translator Directives
When you write a program using the BASIC development language, it eventually
must be translated to the BASIC language for downloading to the BASIC or
BASIC-T module. Translation is performed by the 1747-PBASE Translator
software.
This translation software is driven by translator directives that are included in a
program. These directives result in the simplified, open format of the BASIC
development language being translated to the commands and format of the BASIC
language. The following is a list of BASIC translator directives:
Comment
(Remark)
Any text located within { } curly brackets are program comments which are not
included in the translated program. Remarks (which are not translator directives,
mentioned here for comparison only) are included in the translated program. Both
of these can be used as an aid in debugging as well as program documentation.
Memory limitations of the BASIC or BASIC-T module may dictate that you use
more comments and fewer remarks.
Publication 1746-PM001A-US-P
Writing Programs Using the BASIC Development Language
6-3
Syntax:{ }
Syntax: REM
Example:
Before translation:
After translation:
{This is a comment}
REM THIS IS A REMARK
0 REM ...
10 REM THIS IS A REMARK
IMPORTANT If a dollar sign immediately follows the left curly bracket, it is not
interpreted as a comment. Comments are also not allowed inside
of comments.
Examples of illegal comments:
{$ comment}
{{comment}}
IMPORTANT Remarks (line zero) will be created by the 1747–PBASE
Translator for each .BDL program that is translated (indicated in
this manual by: 0 REM ...). This remark contains the translator’s
filename (BTRAN), followed by its revision number, path and
name of the program being translated, and date and time.
For example, upon translating the FIRST program of chapter 2 you would get
something like:
0 REM BTRAN V X.XX C:\ABBASIC\BAS\FIRST.BDL, 06-12-91 06:35pm
Include
The Include directive tells the translator to load another source code file into the
current program. This method of file inclusion allows you to frequently used
routines in many different programs without re-entering any code or having to edit
line numbers. The included file can contain any combination of program
statements and translator directives.
Syntax: {$I [filename.ext]}
Example:
Before translation:
REM INCLUDE EXAMPLE
{$I FIRST.BDL}
After translation:
0
10
20
30
40
50
60
REM ...
REM INCLUDE EXAMPLE
FOR X=1 TO 100
A=X*2
P. A
NEXT X
END
Publication 1746-PM001A-US-P
6-4
Writing Programs Using the BASIC Development Language
For this example, we have included the file FIRST.BDL. Its name was entered in an
include directive, and the entire program appeared after translation.
During translation, the translator first looks to see if there is a DOS path specified
with the include directive to indicate where the file FIRST.BDL can be found. For
example, you could use:
{$I A:\FIRST.BDL}
if the file FIRST.BDL is on the A: disk drive,
or
if the file FIRST.BDL is in the BDS
subdirectory of the BASIC Development Software.
{$I C:\ABBASIC\BDS\FIRST.BDL}
If no DOS path is specified with the include directive, then the translator looks to
see if a DOS path is specified in the translator’s command line. This is described in
Chapter 8.
If there is no DOS path specified in either the include directive or the translator’s
command line, then the translator searches the current working directory for the
file FIRST.BDL.
In either of these three cases, if the file is not found, then Error 25: File not
appears in the message line during translation.
found
IMPORTANT The file INCLUDE.BDL comes as part of the BASIC
Development Software package. It contains the BASIC
programming macros and the information necessary to translate
them. Therefore, the statement {$I INCLUDE.BDL} should
appear at the beginning of any program in which you intend to
use the programming macros.
Label
Labels are used instead of line numbers to reference a target location in a program.
A symbolic label is used anywhere you would have used a program line number in
BASIC to reference a branch or jump location. This makes programs easier to read
and understand, and there is no need to renumber the program after changes are
made.
The label name is a string of up to 30 ASCII characters. The character set is defined
to be [0..9, A..Z, a..z,_]. The label name cannot contain any tabs or spaces and
must begin with a letter.
Publication 1746-PM001A-US-P
Writing Programs Using the BASIC Development Language
6-5
Syntax: {$L [labelname]}
Example:
Before translation:
After translation:
REM LABEL EXAMPLE
IF A>C THEN GOTO GET_C_VALUE
A=55
{$L GET_C_VALUE}
C=107
0
10
20
30
40
REM ...
REM LABEL EXAMPLE
IF A>C THEN GOTO 40
A=55
C=107
Text
The Text directive allows you to include commands like RUN and LIST in your
program. When translated, these commands are not given line numbers; but they
are included in the output file. As the file is downloaded to the BASIC or
BASIC-T module, these directives are executed as soon as they are encountered.
Syntax: {$T [command for module]}
Example:
Before translation:
After translation:
REM TEXT COMMAND EXAMPLE
{$I INCLUDE.BDL}
FOREGROUND_BLACK()
BACKGROUND_RED()
CLS()
A=55
C=107
{$T RUN}
0 REM ...
10 REM TEXT COMMAND EXAMPLE
20 PRINT CHR(27),“[30m”,
30 PRINT CHR(27),“[41m”,
40 PRINT CHR(27),“[2J”,
50 A=55
60 C=107
RUN
In the above example, immediately after the file is downloaded, the RUN
command is encountered and executed.
Publication 1746-PM001A-US-P
6-6
Writing Programs Using the BASIC Development Language
Line Number
The Line Number directive allows you to specify a starting line number to be used
by the translator when it assigns line numbers to each program line. The line
number can be any number between the values of 1 and 65535.
Line Number directives can be placed anywhere in the program. The line following
the directive begins with the new number.
Syntax: {$N [linenumber]}
Example:
Before translation:
REM LINE NUMBERING
{$N 500}
IF A>C THEN GOTO GET_C_VALUE
A=55
{$L GET_C_VALUE}
{$N 800}
C=107
After translation:
0
10
500
510
800
REM ...
REM LINE NUMBERING
IF A>C THEN GOTO 800
A=55
C=107
Increment
The Increment directive allows you to specify a numeric value to be used as an
increment between line numbers. The translator uses this increment when it
assigns line numbers during translation. The number must be between the values
of 1 and 100.
This directive can be used throughout the program as often as needed. The line
number immediately following this directive is numbered according to the previous
increment. Any lines after that are numbered according to the new increment.
Syntax: {$S [number]}
Example:
Before translation:
REM INCREMENT LINES BY 5’S
{$S 5}
IF A>C THEN GOTO GET_C_VALUE
A=55
REM INCREMENT LINES BY 10’S
{$S 10}
{$L GET_C_VALUE}
C=107
END
Publication 1746-PM001A-US-P
After translation:
0
10
20
25
30
35
45
REM ...
REM INCREMENT LINES BY 5’S
IF A>C THEN GOTO 35
A=55
REM INCREMENT LINES By 10’S
C=107
END
Writing Programs Using the BASIC Development Language
6-7
Breakpoint
The Breakpoint directive inserts a STOP statement into the program when it is
translated. The STOP statement is inserted only if the Debug directive is turned on
{$D+}. When downloaded to the module and executed, program execution halts
when the STOP is encountered. Entering the command CONT (for CONTinue)
resumes execution from where it stopped.
Breakpoints can be used as debugging aids or to allow you to display or modify
variables.
Syntax: {$B}
Example:
Refer to the example for Debug.
Debug on
Debug off
When the Debug directive is programmed on {$D+}, STOP statements are inserted
at all the Breakpoints {$B} during program translation. {$D+} inserted anywhere in
the program turns Debug on until {$D–} is encountered. The default is for Debug
to be turned off {$D–}.
IMPORTANT The Debug directive is not related to the Terminal mode
debugger in any way. In fact, if you use theTerminal mode
debugger (described in Chapter 9), you should not use the Debug
directive or the Breakpoint directive. The Debug and Breakpoint
directives are useful for debugging programs from Terminal mode
without using the Terminal mode debugger.
Syntax:{$D+} to turn debug on
{$D–} to turn debug off
Example:
Before translation:
REM DEBUGGING
{$B}
{$D+}
IF A>C THEN GOTO GET_C_VALUE
{$B}
A=55
{$L GET_C_VALUE}
{$B}
C=107
After translation:
0
10
20
30
40
50
60
REM ...
REM DEBUGGING
IF A>C THEN GOTO 50
STOP
A=55
STOP
C=107
In the preceding example, the first breakpoint is not translated to a STOP. This is
because Debug has not been turned on at that point.
Publication 1746-PM001A-US-P
6-8
Writing Programs Using the BASIC Development Language
Macros
There are three types of macros used with the BASIC Development Software. They
are:
• keystroke macros temporarily or permanently record a series of keystrokes
and replace them with a single keystroke. Keystroke macros are described in
Chapter 4.
• programming macros streamline programming and make your programs
more readable and understandable. The BASIC Development Software comes
with a file called INCLUDE.BDL, which contains close to 100 programming
macros. These programming macros are listed and described in detail in
Appendix A. The 1771-DB/B backplane calls are in the INCLUDBB.BDL
file. These backplane calls are listed and described in detail in Appendix A.
Beginning a program with the statement {$I INCLUDE.BDL} allows you to use
any of them by simply typing in its macro call, such as foreground_green().
When your program is translated, the 1747–PBASE Translator goes to the
INCLUDE.BDL file to find the BASIC subroutine that corresponds to that
macro call.
• user-created programming macros support your programming needs.
While the programming macros described above already exist in the BASIC
Development Software, these are created by you. They are created using a
$MACRO translator directive described in the next section.
Creating Your Own
Programming Macro
The Macro directive is a translator directive that allows the user to define BASIC
statements as a macro that can be used in the program.
A programming macro must be defined before it can be called, or else a syntax error
results. The maximum number and size of macros defined in a source file is limited
only by the amount of memory available on your personal computer at translation
time. Programming macros cannot be nested.
Labels can be defined and used within a macro; however, these labels can be
referenced only from within the body of the macro. The translator assigns a unique
line number for each label in the macro when the program is translated.
The macro call is a string of up to 30 ASCII characters. The character set is defined
to be [0..9, A..Z, a..z,_]. The macro call cannot contain any tabs or spaces, and
must begin with a letter.
Syntax:{$MACRO [macrocall(%1,%2...%n)]}
{$ENDM}
The variables %1, %2... above refer to parameter values that are passed to the
programming macro. The maximum number of passed parameters, %n, is limited
to 20. The {$ENDM} directive marks the end of the macro definition.
Publication 1746-PM001A-US-P
Writing Programs Using the BASIC Development Language
6-9
Example:
A programming macro is written to set the wall clock’s day, month, and year. The
macro is named Setdate and is defined by the BASIC lines between {$MACRO...}
and {$ENDM}. After the programming macro is defined, it can be called again any
number of times, anywhere in that program, by simply programming the name
Setdate.
Example:
Before translation:
REM CREATE PROGRAM MACRO
{$MACRO Setdate(%1, %2, %3)}
PUSH %1
PUSH %2
PUSH %3
CALL 41
{$ENDM}
D=16
M=06
Y=90
Setdate(D,M,Y)
After translation:
0
1O
20
30
40
50
60
70
80
REM ...
REM CREATE PROGRAM MACRO
D=16
M=06
Y=90
PUSH D
PUSH M
PUSH Y
CALL 41
If you have a large number of your own programming macros or a number of them
that you use frequently, you may wish to create a file containing only those macros.
You could then include that file in all of your programs. For example, if you made
a programming macro file named mine.bdl, you could then begin all of your
programs with the command {$I Mine.bdl}. This would include that file
during translation and allow you to use your programming macros throughout the
program.
Bringing in Programs
from Separate Files
Depending on the circumstances, you may want to access other programs from
your program, or you may wish to copy other programs directly into your program.
There are several methods for accomplishing this.
When choosing between accessing a program as a subprogram or inserting it into
your main program, consider the following:
• the size of the program you wish to access or insert
• the frequency with which you need to execute it from your main program
• whether it is or may be used as a subprogram for other programs
• whether inserting it makes your main program unmanageably large
IMPORTANT If you are unable to merge or edit files, those files have probably
been locked. Files can be locked (made read-only) or unlocked
through the Information about current file option from
the File menu.
Publication 1746-PM001A-US-P
6-10
Writing Programs Using the BASIC Development Language
Subprogram CALL 70, CALL 71
In a main program, the BASIC commands CALL 70 and CALL 71 cause execution
to branch to a subprogram. The subprogram must have been previously stored in
the memory module of the BASIC or BASIC-T module. Execution can be
returned to the main program with a CALL 72. Refer to the BASIC Language
Reference Manual (publication number 1746-RM001A-US-P) or the SLC 500™
BASIC and BASIC-T Module User Manual (publication number
1746-UM004A-US-P).
IMPORTANT The BASIC and BASIC-T modules do not distinguish between
subprogram variables and main program variables. If a variable
used in the main program is changed in a subprogram, the main
program is affected.
Programming Macros
Appendix A describes the programming macros contained in the BASIC
Development Software. Programming macros are BASIC subroutines that can be
used through the BASIC development language. You can also create your own
programming macros using the $Macro translator directive described in this
chapter.
Merging a Program File
There are two ways to merge program files: the $Include translator directive and
the Merge file from disk option available from the File menu. $Include can
be used only with BASIC development language programs and is described in this
chapter in the translator directives section.
can be used with any program file. It prompts you for a
filename and then merges that file into your program at the current cursor location.
Merge file from disk
IMPORTANT If you merge two .BAS files with any identical line numbers, the
duplicate line numbers remain until you download the file to the
module. At that time, if there is more than one line of the same
number, the last line downloaded replaces any preceding lines
with that number. This is not a problem with .BDL files, since
line numbering is not allowed.
Publication 1746-PM001A-US-P
Writing Programs Using the BASIC Development Language
Creating a Second
Program
6-11
In Chapter 2, you created a simple program. Following is a more complex program
to illustrate many of the programming features described. It includes using
programming macros, labels, and line-draw.
After you type in this BASIC development language program, translating,
downloading, and executing it on your BASIC or BASIC-T module is briefly
described.
Saving a file with a .BDL extension before you begin working on it causes the
attributes for that extension to be used while you edit. Features such as indent
style, tab spacing, right margin, word wrap, and language type are established for
you.
Entering the Program
1. Pull down the File menu.
2. Select save file As. The SAVE FILE AS dialog box appears on the screen.
3. Type: SECOND.BDL
4. Press [Enter], or move the mouse cursor to OK<ENTER> and click the left mouse
button. The SAVE FILE AS dialog box disappears, and the message
C:\ABBASIC\BAS\SECOND.BDL Saved appears in the message line.
5. Type the first two lines of the Second program:
REM SECOND PROGRAM
{will print screen below, then check operator number}
Note that they are comments because they are enclosed in { }. Remember,
comments are not translated. If you want these lines in the translated BASIC
file, use REM instead of { }. We have indented all comments in this example
by five spaces to make them stand out.
6. Type {$I Include.bdl}
{$I Include.bdl} is not a comment because the { is followed immediately
by a $. $I is the include translator directive requesting that a separate file
(Include.bdl in this case) be included during translation. Include.bdl is the
file available with the BASIC Development Software that contains
programming macros. As you become more familiar with the BASIC
Development Software, you may wish to create your own file, mine.bdl for
example, that contains your own programming macros. You could then
include it during translation by beginning your program with the command
{$I Mine.bdl}.
Publication 1746-PM001A-US-P
6-12
Writing Programs Using the BASIC Development Language
7. Type the screen setup comment and the screen commands that follow it. Note
that these commands are programming macros. See Appendix A of this
manual.
{screen setup}
background_Black( )
High_Intensity ( )
foreground_Yellow ( )
cls ( )
8. Type the print statements comment and the first print command. Print
commands can be abbreviated as P. or the full command PRINT can be
entered. A print command on a line by itself results in a blank line being
printed.
{print statements}
print
You are now ready to enter the print commands that cause a boxed-in message
to appear on the screen when this program is run. Since you are using the
line-draw feature here, it is best to first enter the text and then draw the lines in
afterwards. Line drawing is performed in Overstrike mode only, so be sure that
you have spaces and not text wherever you expect to draw a line.
9. Type the print statements as shown except for the lines. Leave spaces where
you expect to draw a line.
P.tab(10),”
P.tab(10),”
P.tab(10),”
P.tab(10),”
WARNING
Use of this machine is restricted
“
“
“
“
10. When you are ready to draw the box, pull down the Other menu and select
Linedraw.
11. Position the cursor to a corner of the box by using the arrow keys. Line
drawing does not begin until you hold [Shift] while moving with the arrow
keys. Press [F2] to go into Double line mode. Press it again to go into Erase
mode (to erase lines), and press it again to go back to Single line mode.
12. Press and hold [Shift] while you move with the arrow keys to create the box.
Note that when you make a corner or intersection, the correct line characters
are exchanged for the straight line. If you make a mistake, press [ F2] to get to
Erase mode; and then move over the unwanted line with the arrow keys while
holding [Shift].
13. When you have completed the box, press [ESC] to exit Line-draw mode.
Publication 1746-PM001A-US-P
Writing Programs Using the BASIC Development Language
6-13
14. Continue typing in the rest of the program as shown:
hit_any_key( )
{pause and wait for keystroke}
cls ( )
{$L loop1}
Print “Enter your Operator Number”
{pause and wait for input}
get_key (op)
{check for input of 49 or 50 which are ASCII decimal for
1 or 2 }
if op=49 then goto op1setup
if op=50 then goto op2setup
{print error and loop back for another entry}
cls ( )
print “Invalid Entry . . Operator number not recognized”
goto loop1
{$L op1setup}
get_time (d1,m1,y1)
{setup for operator #1}
goto acknowledge
{$L op2setup}
get_time (d2,m2,y2)
{setup for operator #2}
{$L acknowledge}
cls ( )
cursor_down(11)
print_time ( )
print “Operator #”,op-48.” acknowledged”
end
Translating
Since this example is written using the BASIC development language, it must be
translated to the BASIC Language prior to downloading to the module. Do this by
selecting Translate/Compile from the Other menu, and then selecting
1747-PBASE Translator. The program on the following page is the previous
program after it is translated.
Publication 1746-PM001A-US-P
6-14
Writing Programs Using the BASIC Development Language
Figure 6.1 Second Program, After Translation (SECOND.BAS)
0
10
20
30
40
50
60
70
80
90
100
110
120
130
140
150
160
170
180
190
200
210
220
230
240
250
260
270
280
290
300
310
320
330
340
350
360
370
380
390
400
410
420
430
440
450
460
470
480
REM . . .
REM SECOND PROGRAM
P. CHR(27),”[40M”,
P. CHR(27),”[1M”,
P. CHR(27),”[33M”,
P. CHR(27),”[2J”,
P.
P. TAB(10),”
“
P. TAB(10),”
WARNING
“
P. TAB(10),”
Use of this machine is restricted
“
P. TAB(10),”
“
P.
P. “Hit any key to continue . . .”,
If (EOF) THEN GOTO 130
PUSH A
A=GET
POP A
P.
P. CHR(27),”[2J”,
P. “Enter your Operator Number”
IF (EOF) THEN GOTO 200
OP=GET
IF OP=49 THEN GOTO 270
IF OP=50 THEN GOTO 320
P. CHR(27), “[2J”,
P. “Invalid Entry . . Operator number not recognized”
GOTO 190
CALL 46
POP D1
POP M1
POP Y1
GOTO 360
CALL 46
POP D2
POP M2
POP Y2
P. CHR(27),”[2J”,
P. CHR(27),”[11B”,
PUSH A
CALL 46
POP A
P. A,”:”,
POP A
P. A,”:”,
POP A
P. A,” “,
POP A
P. “Operator #”, OP-48,” acknowledged”
END
If you do not have any errors, the message BASIC translator Version x.xx appears
in the message line after the translation is complete. If you have errors, correct
them and translate the program again. For details on translating programs and
finding translation errors refer to Chapter 8.
Publication 1746-PM001A-US-P
Writing Programs Using the BASIC Development Language
6-15
Downloading
Downloading a file requires that you connect your personal computer to the
module using the configurations described in the SLC 500 BASIC and BASIC-T
Modules User Manual (publication number 1746-UM004A-US-P). Module
jumpers should be set to support that configuration per the SLC 500™ BASIC and
BASIC-T Modules User Manual (publication number 1746-UM004A-US-P).
Before downloading, you also must select the correct terminal type through the
Configuration menu (described in Chapter 3) and set up the terminal through the
Setup menu (available when in Terminal mode). For complete details on terminal
setup and downloading, refer to Chapter 9.
Assuming this is done and your configuration is correct, use the following steps to
download a file:
1. Select Terminal mode from either the Other menu or from the Toplevel
menu.
2. Select the File menu while inTerminal mode.
3. Select Download from host to module.
4. If second.bdl was the last file you translated, its translated version
(second.bas) is the default file for the download and you need only press
[Enter]. Otherwise, type in the name of the file you wish to download, in
our case second.bas. Remember that you must download a translated file,
meaning it has an extension of .BAS.
Executing
After you have successfully downloaded a file to the module, execute it by typing
RUN to the right of >. To exit the program press [F3]. You can interrupt execution
by pressing [Ctrl C], unless this interrupt feature has been disabled through
programming. Chapter 9 of this manual describes how to debug a program on the
BASIC or BASIC-T module.
Publication 1746-PM001A-US-P
6-16
Writing Programs Using the BASIC Development Language
Publication 1746-PM001A-US-P
Chapter
7
Printing Your Program
This chapter describes how to set up a printer and print a program. Major topics
include:
• selecting and setting up a printer
• using the printer controls
• printing all or part of a document
Setting Up Your Printer
The Print menu, accessed from the main menu, is used both to set up the printer
and to control the printing of a file. Most of the discussion in this chapter involves
features selected from this menu.
Path: Toplevel Menu → Edit mode → Print
QuickStroke: none
Figure 7.1 Print Menu
L:3
C:1
1747-PBASE V x.xx
[Text Edit]
Ins 175k
06-12-91
1:15pm
File Window Block cUrsor Search Text Layout Print Macro Config Other Exit
+-------------PRINT-------------+
+=+A+=======================================|print current File
|==+
|>> EOF <<
|(print marked Block)
|
|
|
|-------------------------------|
|
|
|printer Setup...
|
|
|
|printer Type...IBM
|
|
|
|printer Device/file...LPT1
|
|
|
|-------------------------------|
|
|
|Copies to print...1
|
|
|
|Line numbering Off
|
|
|
|print Margin...1
|
|
|
|eject Page
|
|
|
+----------Cancel<ESC>----------+
|
|
|
|
|
|
|
|
|
|
|
+-------------------------------------------------------------------------------+
1 Help
1
2
3
4
5
6
7
8
9
0
Publication 1746-PM001A-US-P
7-2
Printing Your Program
Printer Selection
The BASIC Development Software has printer setup parameters already defined
for a number of common printers. Also, the software is designed with enough
flexibility to accommodate almost any printer. Printer setup begins by selecting a
printer.
Toplevel Menu → Configuration menu → Printer
Main Menu → Config → Printer
Main Menu → Print → Printer type
Path:
Path:
Path:
Figure 7.2 Printer Selection
L:3
C:1
1747-PBASE V x.xx
[Text Edit]
Ins 175k
06-12-91
1:15pm
File Window Block cUrsor Search Text Layout Print Macro Config Other Exit
+-------------PRINT-------------+
+=+A+=======================================|print current File
|==+
|>> EOF <<
|(print marked Block)
|
|
|
|-------------------------------|
|
|
|printer Setup...
|
|
|
|printer Type...IBM
|
|
|
| +-----SELECT A PRINTER TYPE----+|
|
| |
Create<Ins> Delete<Del>
||
|
| |
Copy<F4> Edit<F3>
||
|
| |+-----------------------------+||
|
| | IBM
||
|
| | OKIDATA
||
|
|_| C.ITOH
||
|
| EPSON
||
|
| TOSHIBA
||
|
| NEC
||
|
| HP Laserjet II
||
|
| NONE
||
|
|
||
|
|OK<ENTER> Cancel<ESC> Help<F1> ||
|
+===============================+|
+-------------------------------------------------------------------------------+
LIST BOX: Next field<TAB>, Previous<ShftTAB>,
<PgUp><PhDn><Home><End>
↑↓
Select your printer from the list provided. If it is not on the list, you can select
Create<Ins> to access the PRINTER DRIVER SETUP screen where you can assign it
a name, initialization string, and print control codes.
If your printer is on the list provided and does not function properly or as you
would like it to (possibly from being an older model with slightly different control
codes), you can select Edit<F3> to modify the control codes.
IMPORTANT Pressing [Enter] after making changes to the PRINTER DRIVER
SETUP screen saves those changes. If you have made changes that
you do not want to save or if you just want to leave the PRINTER
DRIVER SETUP screen, press [Esc.].
Publication 1746-PM001A-US-P
Printing Your Program
7-3
Following is a description of the parameters that you can create or modify on the
PRINTER DRIVER SETUP screen. Refer to the help screens for a more details.
• printer Type is entered if you are creating a new printer driver setup
• Initialization string is entered to initialize your printer (refer to the
documentation provided with the printer)
You can define up to 19 different printer codes for each printer. Each printer code
has the following definable fields:
• Code name is a string for the user’s benefit to identify the printer code. It
can be up to 17 characters. For example, you may want to use the names of the
fonts which correspond to each code. The string you enter here appears on the
printer setup screen.
• Printer control code is the actual string of characters you wish to send
to the printer. This would normally be an escape sequence to initiate a
particular action by the printer, such as changing font styles or line spacing;
but is not restricted to that.
Printer Setup
Path: Main Menu → Print → printer Setup
QuickStroke: none
When you select printer Setup, a menu of printer-specific control codes is
displayed. These codes originate in the PRINTER DRIVER SETUP screen
(described in the previous section).
Typically, these printer codes determine things like letter quality, font, and line
spacing. Printer codes differ depending on the printer. Move the cursor to highlight
the desired printer code, and press [Enter] or click the left mouse button.
Printer Device/File
Path: Main Menu → Print → printer Device/file
QuickStroke: none
When you select printer Device/file, you get a screen from which you can
select a printer device or file to direct your print output to. These device names can
be edited, or additional devices can be created as needed.
Typically, you select either a filename or a printer port here. If you select a filename,
print–data is sent to that file. If you select a port, print-data is sent directly to the
printer connected to that port.
Most printers communicate with a personal computer through its parallel
communications port (typically LPT1).
Publication 1746-PM001A-US-P
7-4
Printing Your Program
Serial Printers
Some printers use serial communications, and some are equipped for both serial
and parallel. This section deals exclusively with serial printer configuration.
The BASIC Development Software supports both parallel and serial printers. The
port set-up of your personal computer determines which port on your personal
computer is the printer output port. Refer to the documentation provided with
your personal computer and printer for additional information on port set-up.
IMPORTANT The following examples use COM2 as the serial printer port.
Make sure the port you specify as the serial printer port is not
already being used as the mouse port or as the interface port to
the BASIC or BASIC-T module.
When printing to a serial printer, you must match the baud rate, parity, number of
data bits, and the number of stop bits of your serial port to the corresponding
parameters of your printer. One way of doing this is by using the DOS Mode
command. For example:
mode COM2:9600,n,8,1
You can then use the DOS Mode command again to redirect printer output from
the LPT1 port to one of your serial communication ports. For example:
mode LPT1:=COM2:
If you do not want to redirect printer output, you can add a serial printer device to
the Print menu.
Path: Toplevel Menu → Edit mode → Print
QuickStroke: none
To specify a new printer device:
1. Select printer Device/file to access the PRINTER DEVICE dialog box.
2. Select Create<Ins> to enter a new printer device.
3. Enter the name of the serial communication port on your personal computer
that is to be the printer port, then press [Enter].
For this example, you would type in: COM2
The PRINTER DEVICE dialog box is displayed with the communication port
name you entered and is added to the top of the list of printer devices.
4. Highlight the port you named as the serial printer port and press [Enter].
All printer output is sent to the serial port you specified.
Publication 1746-PM001A-US-P
Printing Your Program
Using the Printer
Controls
7-5
We have already discussed printer setup; but before we actually print a file, this
section explains the various printer controls available from the BASIC
Development Software. Remember that Hypertext help is available with more
details.
Copies to Print
Path: Main Menu → Print → Copies to print
QuickStroke: none
This allows you to print multiple copies of a file or block. The default value is one.
Line Numbering
Path: Main Menu → Print → Line numbering
QuickStroke: none
This adds line numbers to the left hand side of your printout. These are not BASIC
line numbers but simply print line numbers beginning with the number one.
Print Margin
Path: Main Menu → Print → print Margin
QuickStroke: none
This allows you to define a left margin for printing only (in addition to any margin
or tab already defined in the file). The default value is one.
Eject Page
Path: Main Menu → Print → eject Page
QuickStroke: none
This causes the printer to scroll forward one page.
Publication 1746-PM001A-US-P
7-6
Printing Your Program
Printing All or Part of a
Document
The Print menu, accessed from the main menu, allows you to print a block or file
directly from a window.
Path: Main Menu → Print → print current File
QuickStroke: none
Following is a brief explanation of the two print options available from the Print
menu. Remember that Hypertext help is available with more details.
• Print current file prints all of the file in the currently active window.
To abort printing at any time press [Esc].
• print marked Block prints the currently marked block. This allows you
to print a portion of a file instead of the entire file. Refer to the block
operations discussion in Chapter 4 for information on the three block marking
methods.
There are other print options available by using the DOS shell. Refer to your DOS
manual for details.
Printing In Background
This requires that the DOS print spooler, PRINT.COM, be loaded prior to
running the BASIC Development Software. Also, there must be a path to where
the PRINT.COM file resides. Printing in the background is possible by:
1. Printing the file to disk.
2. Selecting it through the DOS directory shell (discussed in Appendix B).
3. Pressing [F8].
Publication 1746-PM001A-US-P
Chapter
8
Translating Your Program
When you have completed this chapter, you will know how to:
• translate your program
• locate and correct programming errors
• configure your translator
Translating Feature
The translate/compile feature available with the BASIC Development Software is
executed based on the extension portion of a filename. Refer to Chapter 3 for
details on setting up filename extensions. For proper program translation, the
following file extensions must be used:
Table 8.1 Filename Extensions
File Extension
Description
name.BDL
This is your source file you have written in the BASIC development
language. This is the file you should be translating.
name.BAS
This is the BASIC file created by the 1747-PBASE Translator. This file is
the file you download to the BASIC module.
name.MAP
This file is generated by the 1747-PBASE Translator. It is used for
tracking variables when executing the development software debugger
discussed in chapter 9.
IMPORTANT The 1747-PBASE Translator (BTRAN.EXE) works only with these
file extensions and cannot be reconfigured.
Before performing a translate/compile operation on a program, load the file into an
edit window. If it already has been loaded, verify that the window is the currently
active window. Once this is accomplished, translate/compile your program by
using one of the following paths:
Path: Toplevel Menu → Translate/compile
Path: Toplevel Menu → Edit mode → Other → Translate/compile
QuickStroke: Toplevel Menu → Edit mode → [CTRL F8]
1
Publication 1746-PM001A-US-P
8-2
Translating Your Program
The software checks the extension of the file in the active edit window and prompts
you to select a translator/compiler.
IMPORTANT The 1747-PBASE Translator expects your filename to have a
.BDL extension. If it does not, you get an error.
The file in the active edit window is always saved prior to translating. Other open,
altered files may be saved if the translator is configured to save all files as discussed
in the last section of this chapter.
Once selected, the translator/compiler translates the source code you have written
in the BASIC Development Language into BASIC. The translator:
• removes comments
• adds BASIC line numbers
• replaces labels with line numbers
• brings in include files
• expands programming macros
• checks for syntax errors
For example, the translator will accomplish these tasks in the following program:
Figure 8.1 Second Program, Before Translation (SECOND.BDL)
REM SECOND PROGRAM
{will print screen below, then check operator number}
{$I Include.bdl}
{screen setup}
background_Black( )
High_Intensity ( )
foreground_Yellow ( )
cls ( )
{print statements}
print
P.tab(10),”
“
P.tab(10),”WARNING
“
P.tab(10),”Use of this machine is restricted“
P.tab(10),”
“
hit_any_key( )
{pause and wait for keystroke}
cls ( )
{$L loop1}
Print “Enter your Operator Number”
{pause and wait for input}
get_key (op)
{check for input of 49 or 50 which are ASCII decimal for 1 or 2}
if op=49 then goto op1setup
if op=50 then goto op2setup
{print error and loop back for another entry}
cls ( )
print “Invalid Entry . . Operator number not recognized”
goto loop1
{$L op1setup}
Publication 1746-PM001A-US-P
Translating Your Program
8-3
get_time (d1,m1,y1)
{setup for operator #1}
goto acknowledge
{$L op2setup}
get_time (d2,m2,y2)
{setup for operator #2}
{$L acknowledge}
cls ( )
cursor_down(11)
print_time ( )
print “Operator #”,op-48.” acknowledged”
end
If no syntax errors are encountered during the translation, the translator creates a
native BASIC program (with the .BAS extension) ready for downloading to the
module:
Figure 8.2 Second Program, After Translation (SECOND.BAS)
0
10
20
30
40
50
60
70
80
90
100
110
120
130
140
150
160
170
180
190
200
210
220
230
240
250
260
270
280
290
300
310
320
330
340
350
360
370
380
REM . . .
REM SECOND PROGRAM
P. CHR(27),”[40M”,
P. CHR(27),”[1M”,
P. CHR(27),”[33M”,
P. CHR(27),”[2J”,
P.
P. TAB(10),”
“
P. TAB(10),”
WARNING
“
P. TAB(10),”
Use of this machine is restricted
“
P. TAB(10),”
“
P.
P. “Hit any key to continue . . .”,
If (EOF) THEN GOTO 130
PUSH A
A=GET
POP A
P.
P. CHR(27),”[2J”,
P. “Enter your Operator Number”
IF (EOF) THEN GOTO 200
OP=GET
IF OP=49 THEN GOTO 270
IF OP=50 THEN GOTO 320
P. CHR(27), “[2J”,
P. “Invalid Entry . . Operator number not recognized”
GOTO 190
CALL 46
POP D1
POP M1
POP Y1
GOTO 360
CALL 46
POP D2
POP M2
POP Y2
P. CHR(27),”[2J”,
P. CHR(27),”[11B”,
PUSH A
Publication 1746-PM001A-US-P
8-4
Translating Your Program
390
400
410
420
430
440
450
460
470
480
CALL 46
POP A
P. A,”:”,
POP A
P. A,”:”,
POP A
P. A,” “,
POP A
P. “Operator #”, OP-48,” acknowledged”
END
It also creates a .MAP file for use when executing the debugger discussed in
Chapter 9.
If the translator/compiler encounters any errors in your .BDL file, it aborts the
translation and tags these errors for you to correct. When translator errors are
found, you must correct them as discussed in the following section before
continuing.
Eliminating Translator
Errors
If the translator encounters errors when it translates your .BDL file, the translate
operation is halted, and the error window is created. The error window contains a
listing of all the errors that were generated and the corresponding program line
number.
If an error is found in an include file during translation, another window is opened
containing that include file. The cursor is placed at the error location in that file.
Find Next Compiler Error
This feature locates the next error in the source file window generated by the most
recent compile. If you are not currently on the source file window, you are bumped
to that window when the find neXt error option is selected.
Path: Toplevel Menu → Edit mode → Other → find neXt error
QuickStroke: Toplevel Menu → Edit mode → [Ctrl F2]
When the find neXt error option is selected, the cursor is positioned on the line
that caused the translator error; and a brief description of the error is shown on the
message line.
Translator Configuration
The configuration for the 1747-PBASE Translator converts .BDL files to .BAS
files. The translator configuration can be altered through the COMPILER/
PROGRAM SETUP dialog box, accessed through the following path:
Path: Toplevel Menu → Configuration menu → Filename extensions
→ BDL → Compiler–Program setup → 1747-PBASE Translator
Publication 1746-PM001A-US-P
Translating Your Program
8-5
Figure 8.3 Compiler Program Setup Dialog Box
↑
L:3
C:1
1747-PBASE V x.xx
[Text Edit]
Ins 175k
06-12-91 1:15pm
File Window Block cUrsor Search Text Layout Print Macro Config Other Exit
+------SETUP AND CONFI+------EXTENSION SETUP---------+
+|DOS=3.30
CPU=80386
||Video Card =
|
Create<Ins> Delete<Del>
|=============?No-File?==+
VGA Colo+±±±COMPILER/PROGRAM SETUP±±±±+
||PBASE Path = C:\ABBAS |
Create<Ins> Delete<Del>
|
|
|
||Exp+--------------------COMPILER/PROGRAM SETUP------------------------+
|
||Ser| Description:
|
1747±PBASE Translator
|
||±±±| Command line: BTRAN <FILE> /I\ABBASIC\BAS................
|
|
||Edi| Program type: [1747±PBASE
|
|
]
||Dis| Memory required in k bytes(0=all):
0
||Mou|
||Fil| Swap method:
Options:
.
|
|
|
|
|
|
|
||Pri|
( ) Use default
[ ] Clear screen
|
||sWa|
( ) No swap
[X] Save all files
|
|
||Bak|
( ) To disk only
[ ] Reload file
|
|
||Sea|
( ) To EMS only
[ ] Do NOT process compiler errors
||Ter|
( ) To EMS then to disk
||saV|
||
|
OK<ENTER> Cancel<ESC> Help<F1>
|
|
|
|
|
|
|
|
|+===+==================================================================+
|
|
|
+-------------------------------------------------------------------------------+
STRING INPUT: Next field<TAB>, Previous<ShftTAB>, History list < >
↓
Publication 1746-PM001A-US-P
8-6
Translating Your Program
The following table lists the translator configuration options available through the
COMPILER/PROGRAM SETUP dialog box. Included are descriptions specific to
the 1747-PBASE Translator.
Table 8.2 Translator Configuration Options
Publication 1746-PM001A-US-P
Options
Description
Command line
This allows you to select different parameters for the translator call.
The default command line is BTRAN <FILE> /I\ABBASIC\BAS. The
options for this line are BTRAN filename[.ext] [/Ipath] [/Tpath] where:
.ext - is replaced with .BDL
Ipath - is the path where your include files are located. It is your current
working directory if omitted here.
Tpath - is the path where the translator puts the translated BASIC file.
It will be put in the same directory as the source file if omitted here.
The following example would translate the file in the current working
directory using include files from a directory called INCLUDE in the D:
drive. The translated file would be saved on the A: drive:
BTRAN <FILE> /ID:\INCLUDE /TA:
Program type
This allows you to select a program or compiler type for each compiler–
program interface.
Memory required
Enter the amount of memory required for your compiler in k bytes
(0=all). When used in conjunction with swap method, this parameter
helps determine how much memory swapping is necessary.
Swap method
The options here determine the location where memory swaps take
place when they are necessary. They are affected by the amount
entered under memory required. Use default should normally be
selected for this. Options are:
Use default - selecting this causes the swap method selected when
configuring Swapping/expanded memory to be used.
No swap - no additional memory is freed before invoking the compiler/
program.
To disk only - causes swapping the software out to disk whenever
invoking the compiler/program. Use this if you need additional
memory space but do not have expanded memory in your personal
computer.
To EMS only - causes swapping the software to expanded memory
whenever invoking the compiler/program.
To EMS then to disk - causes all available expanded memory to be used
before any swapping to disk takes place.
Options
This includes a number of miscellaneous options as follows:
Clear screen - clears the BASIC Development Software from the screen
during a translate/compile. This allows you to watch for errors in the
compile at the DOS level. This should normally not be selected (off).
Save all files - When (on), this forces all files that are currently open
and have been altered to be saved before the translator is executed.
When (off), only the file in the currently active window will be saved
before the translator is executed.
Reload file - This reloads the file just compiled into the current window.
This is useful if your compiler alters the original file in some way.
This should normally not be selected (off).
Do NOT process compiler errors - If this option is selected, then
compiler errors are not processed. This should normally not be
selected (off).
Chapter
9
Communicating with the Module
After your application file has been translated into an understandable format for
the BASIC or BASIC-T module (Chapter 8), you must establish communications
between the module and the BASIC Development Software. Refer to Chapter 1 of
this manual and the SLC 500™ BASIC and BASIC-T Modules User Manual
(publication number 1746-UM004A-US-P) for details on connecting your
personal computer to the module.
This chapter describes how to:
• change to Terminal mode
• download your translated files to the module
• upload files from the module
• debug your program interactively on the module
• set up terminal communication parameters
Changing to Terminal
Mode
Changing to Terminal mode allows your personal computer to communicate with
the module. The Communication mode on the module is determined by jumpers.
(Refer to the SLC 500™ BASIC and BASIC-T User Manual, publication number
1746-UM004A-US-P or BASIC Module Series B User Manual, publication number
1771-6.5.113.) The Communication mode for your personal computer is set by
the BASIC Development Software through the configuration menu (terminal
selection in Chapter 3 of this manual). Verify that communication modes match
before enteringTerminal mode.
You may be unsuccessful in establishing communications with the module the first
time you enter Terminal mode. If so, there are several menu options in Terminal
mode that you can select to try to match communication parameters (such as
communication port, baud rate, parity). To modify the communication parameters
of your personal computer, refer to the sections RS-232 Communications Setup
and DH485 Communications Setup at the end of this chapter.
Path: Toplevel Menu → teRminal
Path: Main Menu → Other → teRminal
QuickStroke: Edit mode → [F3]
If the module is in Run mode when Terminal mode is entered, the output from the
currently executing program is displayed on your personal computer’s screen. If the
module is not in Run mode, the > prompt appears as soon as you press [Enter].
1
Publication 1746-PM001A-US-P
9-2
Communicating with the Module
The following table shows the BASIC commands that are executable on your
module from Terminal mode. Refer to the BASIC Language Reference Manual
(publication number 1746-RM001A-US-P) for additional information on these
commands
.
Table 9.1 Module Commands
Publication 1746-PM001A-US-P
Command:
Function:
Examples:
CONT
CONTinue program execution after a STOP statement
or CONTROL C command.
CONT
[CTRL] C
Stop current program execution and return module to
Command mode.
[CTRL] C
[CTRL] S
Interrupt a LIST command.
[CTRL] S
[CTRL] Q
Restart a LIST command after a CONTROL S command. [CTRL] Q
DISABLING
[CTRL] C
Disable the CONTROL C break function. CALL 18
disables the CONTROL C break function. CALL 19
re-enables the CONTROL C break function.
CALL 18 (disable)
CALL 19 (re-enable)
ERASE
Erase the program stored in ROM.
ERASE
LIST
LIST current program or indicated lines of program to
the console device.
LIST, LIST 10-50
LIST#
LIST current program or indicated lines of program to
the device connected to port PRT1.
LIST#, LIST#50
LIST@
LIST current program or indicated lines of program to
the device connected to port PRT2.
LIST@, LIST@50
MODE
Set up port parameters.
MODE(DH485,19200)
NEW
Erase the program stored in RAM.
NEW
NULL
Count the number of null characters the module
outputs after a carriage return.
NULL, NULL4
PROG
Program the EEPROM module with the current
program.
PROG1
Program the EEPROM module with port information for
all three ports and store MTOP information.
PROG2
Execute the first program stored in EEPROM when the
module is turned ON.
RAM
Select the current program from RAM memory.
RAM
ROM
Select the current program from EEPROM memory.
ROM, ROM3
RUN
Execute the currently selected program.
RUN
XFER
Transfer a program from EEPROM to RAM, then select
RAM mode.
XFER
Communicating with the Module
Downloading File
9-3
After you have created and translated your program, your next step is to download
the translated version to the module. Downloading is performed from the BASIC
Development Software while in Terminal mode. Access the Terminal mode as
discussed in the previous section.
Programs can be downloaded using RS-232 or DH485 communications from your
personal computer. If DH485 communications are desired, an adapter is available
that converts RS-232 into DH485. (Refer to the SLC 500 BASIC and BASIC-T
User Manual, publication number 1746-UM004A-US-P.)
1. Select Download from host to module using the path shown below:
Path: Toplevel Menu → teRminal → File → Download from host to
module
Path: Main Menu → Other → teRminal → File →Download from host
to module
QuickStroke: Toplevel Menu → teRminal → [Page Down]
You are prompted for a filename to download as shown on the following
screen.
Figure 9.1 File to Download Screen
↓>
↓↑→←
STRING INPUT: Next field<TAB>, Previous<ShftTAB>, History list<
File Setup Display deBug Exit
to Edit
PBASE RS-232 TERMINAL MODE Version x.xx
+-----------------FILE TO DOWNLOAD------------------+
|Filename: DEBUG.BAS
|
|
|
|+=======Directory List=========+
|
||Select this field to get
|
||a directory listing.
|
OK<ENTER>
|
||
|
||
|
|
||
|
|
||
|
||
|
||
|
||
|
||
|
||
|
|
|+==============================+
|
|
|
|
Cancel<ESC>
|
|
Help<F1>
|
|
Sort
|
|
+===================================================+
Publication 1746-PM001A-US-P
9-4
Communicating with the Module
2. Enter the path, filename, and file extension of the file to be downloaded. Enter
this filename using one of these methods:
• The default filename for this operation is the last file you successfully
translated during this session. If you want to download the default file, skip to
step 3.
• Either press [Tab], or select Directory List to access the directory screen and
select a file. Once this field is opened, you may select different directories or
exit directories by selecting the ..\. Note that a sort option is also available that
sorts the current directory. When you select Sort, you are prompted for a sort
key. Enter the letter(s) of the desired sort operation into the sort key window.
• Type in the path, filename, and file extension (for example,
\abbasic\bas\myfile.bas).
3. Once the filename has been keyed in or selected from the directory screen,
begin the download operation by pressing [Enter].
flashes on the status line of the BASIC Development Software,
and the lines of the file scroll across the screen as they are downloaded to the
module.
DOWNLOADING
Uploading File
The BASIC Development Software provides an upload utility that allows programs
to be copied from the module to your personal computer. This feature is primarily
used to back up files from the module.
Programs can be uploaded using RS-232 or DH485 communications from your
personal computer. If DH485 communications are desired, an adapter is available
that converts RS-232 into DH485. (Refer to the SLC 500™ BASIC and BASIC-T
User Manual, publication number 1746-UM004A-US-P.)
1. Select Upload from module to host using the path shown below:
Path: Toplevel Menu → teRminal → File → Upload from module to
host
Path: Main Menu → Other → teRminal → File → Upload from module
to host
QuickStroke: Toplevel Menu → teRminal → [Page Up]
You are prompted for a filename to upload, as shown on the following screen:
Publication 1746-PM001A-US-P
Communicating with the Module
9-5
Figure 9.2 File to Upload Screen
↓>
↑↓→←
STRING INPUT: Next field<TAB>, Previous<ShftTAB>, History list<
File Setup Display deBug Exit
to Edit
PBASE RS±232 TERMINAL MODE Version x.xx
+------------------FILE TO UPLOAD-------------------+
|Filename: BUGFIX.BAS
|
|
|
|+=======Directory List=========+
|
||Select this field to get
|
||a directory listing.
|
OK<ENTER>
|
||
|
||
|
|
||
|
|
||
|
||
|
||
|
||
|
||
|
||
|
|
|+==============================+
|
|
|
|
Cancel<ESC>
|
|
Help<F1>
|
|
Sort
|
|
+===================================================+
2. Enter the path, filename, and file extension that you intend to use to store the
uploaded file. Enter this filename using one of these methods:
• The default filename for this operation is the last filename you successfully
translated during this session. The default file extension is .UPL. If you want to
upload the default file, skip to step 3.
• Either press the [Tab] key, or select Directory List to access the directory
screen and select a file. Once this field is opened, you may select different
directories or exit directories by selecting the ..\. Note that a sort option is also
available that sorts the current directory. When you select Sort, you are
prompted for a sort key. Enter the letter(s) of the desired sort operation into
the sort key window.
• Type in the path, filename, and file extension
(for example: \abbasic\bas\myfile.bas).
IMPORTANT When a file is uploaded without specifying a filename, it will be
given the same filename as the most recently translated file and
the file extension of .UPL.
Publication 1746-PM001A-US-P
9-6
Communicating with the Module
3. Once the filename has been keyed in or selected from the directory screen,
begin the upload operation by pressing [Enter].
UPLOADING flashes on the status line of the BASIC Development Software, and
the lines of the file scroll across the screen as they are uploaded to the module.
IMPORTANT If the file specified already exists in your personal computer,
(always the case if you selected a file from the directory screen), a
confirmation box appears. This box asks you if you want to
overwrite the existing file or abort the upload operation.
Hex File Transfers
Hex is an abbreviation for hexadecimal data format. This data format is typically
used in electronic memories, including the module EEPROM and UVPROM
optional memory modules. Hex file transfers are used to upload and download hex
data to the module EEPROM or UVPROM. The primary use of hex file transfers
is to transfer the entire contents of the EEPROM from one module to the
EEPROM of another module. It can also be used to write the contents of
EEPROM to UVPROM via a PROM programmer.
Uploading Hex Files
Uploading hex files is similar to uploading program files, with a few exceptions.
Make sure you have changed to Terminal mode and established communications
with the module as described earlier in this chapter, and then proceed as follows:
1. Select Upload hex file from module to host using the path shown
below:
Path: Toplevel Menu → teRminal → File → uPload hex file from
module to host
Path: Main Menu → Other → teRminal → File → uPload hex file from
module to host
QuickStroke: none
You are prompted for a filename to upload just as you would be if uploading a
program file.
2. Enter the path, filename, and file extension that you intend to use to store the
uploaded file, as you would with a program file. If the filename you specify
already exists, you will be asked to confirm whether you wish to overwrite it.
3. A dialog box appears in which you must enter the starting and ending
addresses for the hex file upload. Always type in 8000H for the starting address.
Press [Tab] or use the mouse to move the cursor to the Ending Address field.
Publication 1746-PM001A-US-P
Communicating with the Module
9-7
4. If your module has the 1747-M1 memory module installed, type 9FFFH for the
ending address. If your module has the 1747-M2 memory module installed,
type FFFFH for the ending address. Refer to the SLC 500 BASIC and BASIC-T
User Manual publication number 1746-UM004A-US-P, if you need to verify
whether you have the M1 or the M2 memory module. For the 1746-BAS-T,
the memory modules are an 8K EEPROM, 1771-DBMEM1 (similar to the
1747-M1), and a 32K EEPROM, 1771-DBMEM2 (similar to the 1747-M2).
IMPORTANT You must enter the addresses exactly as indicated above to avoid a
checksum error when downloading this file to other EEPROMs
or UVPROMs.
5. Press [Enter] after typing in the ending address and the hex file upload
begins.
Downloading Hex Files
Downloading hex files is exactly like downloading program files. The addressing
information necessary when uploading hex files is embedded in the file and does
not need to be entered for a download. Make sure you have changed to Terminal
mode and established communications with the module as described earlier in this
chapter. Proceed as follows:
1. Select Download hex file from host to module using the path shown
below:
Path: Toplevel Menu → teRminal → File → dOwnload hex file from
host to module
Path: Main Menu → Other → teRminal → File → dOwnload hex file
from host to module
QuickStroke: none
You are prompted for a filename to download just as you would be if
downloading a program file.
2. Enter the path, filename, and file extension of the file to be downloaded, as
you would with a program file.
3. Press [Enter] after typing in the filename and the hex file download begins.
Besides the EEPROM memory options, the module also has two UVPROM
memory options as explained in the SLC 500 BASIC and BASIC-T User
Manual publication number 1746-UM004A-US-P, or the BASIC Module
Series B User Manual, publication number 1771-6.5.113. We recommend
using the utilities supplied with your PROM programmer when downloading
hex files to program UVPROMs.
Publication 1746-PM001A-US-P
9-8
Communicating with the Module
You can use any PROM programmer that:
• interfaces to your personal computer
• supports INTEL HEX file format
• accommodates the UVPROMs used in the module
Refer to the documentation provided with the PROM programmer for details
on its configuration, interface, and protocol.
Backing Up the Module Image
Backing up the module image enables you to back up the entire module contents,
including all programs contained in RAM, User PROM, battery-backed variables,
and all module configuration information to disk. This feature is compatible with
both the 1771-DB Series B and the 1746-BAS and 1746-BAS-T modules. Proceed
as follows:
1. Select Backup module image using the path shown below:
Path: Toplevel Menu → teRminal → File → Backup module image
Path: Main Menu → Other → teRminal → File → Backup module image
QuickStroke: none
You are prompted for a filename to back up.
2. Enter the path, filename, and file extension of the file to be backed up. The
default filename is MODULE.IMG.
3. Press [Enter] after typing in the filename and the module image backup begins.
The following information is uploaded from the module:
• BASIC program residing in RAM and stored in an Intel HEX format
named <FILENAME>.RAM
• All programs and configuration information residing in User PROM and
stored in a single Intel HEX format named <FILENAME>.ROM
• Battery-backed parameters (baud rates, port configurations, MTOP, etc.)
and stored All programs and configuration information residing in User
PROM and stored in a single Intel HEX format named
<FILENAME>.PRM
• User Battery-backed variables stored in an Intel HEX format file named
<FILENAME>.USR
An additional file, <FILENAME>.IMG will be created containing a list of files
saved during the backup process.
IMPORTANT If the file specified already exists in your personal computer, a
confirmation box appears. This box asks you if you want to
overwrite the existing file, or abort the backup operation.
Publication 1746-PM001A-US-P
Communicating with the Module
9-9
Restoring the Module Image
Restoring the module image enables you to completely restore the configuration of
a module to precisely match the state of the module that was previously backed up.
This feature is compatible with both the 1771-DB Series B and the 1746-BAS and
1746-BAS-T modules. Proceed as follows:
1. Select Restore module image using the path shown below:
Path: Toplevel Menu → teRminal → File → Restore module image
Path: Main Menu → Other → teRminal → File → Restore module
image
QuickStroke: none
You are prompted for a filename to restore.
2. Enter the path, filename, and file extension of the file to be restored. The
default filename is MODULE.IMG.
3. Press [Enter] after typing in the filename and the module image restoration
begins.
4. Respond to the following prompts:
• Restore both RAM and User PROM
• Restore RAM only
• Restore User PROM only
You can restore the programs residing in RAM, User PROM, or both.
All module configuration information (such as baud rates, port configuration)
stored in RAM or User PROM, will be restored if the corresponding menu
choice is selected. You can also restore all user defined battery-backed variables.
If the user defined battery-backed are not restored, your program should
re-initialize these variables.
Debugging Your
Program
The BASIC Debugger is a source-level debugger for the module. This debugger is
used exclusively to aid in debugging your BASIC programs (those that have a .BAS
filename extension). It allows you to execute your program line by line, examine
and modify variables, and stop at break points. All this can be done in Terminal
mode while online with the module.
Debugging requires that you first download your program to the module as
described earlier in this chapter. Start the debugger using the following path:
Path: Toplevel Menu → teRminal → deBug → Run Debugger
When the debugger is entered, it searches first for a .MAP file with the same
program name as the program downloaded to the module. (This map file is
generated during the translate process discussed in Chapter 8.) If no map file exists
(as is the case when the translate step is skipped), the debugger loads the native
BASIC file (the file that was previously downloaded) into the debug window.
Publication 1746-PM001A-US-P
9-10
Communicating with the Module
Not having a .MAP file may make debugging your original source code more
difficult. The DEBUGGING INFORMATION screen showing the name of the
file to be loaded into the debugger window is displayed. Pressing any key from this
screen brings up the source file debugger.
The following operations are available from inside the debugger:
Table 9.2 Operations from the Debugger
Function Key Operation
[F1] Help
Brings up the help screen.
[F2] Inquire
Examines and modifies a variable.
[F3] Watch
Examines the value of an executing variable in the watch window.
[F4] Gotill
Executes your program until the line that currently contains the cursor is
reached.
[F5] Screen
Displays the current status of the terminal screen.
[F6] Search
Searches for string in the current file.
[F7] Trace
Executes the program being debugged one line at a time.
[F8] Layout
Creates windows allowing combinations of the .BDL, .BAS, and Watch
windows to be displayed.
[F9] Run
Executes the BASIC program from the current location of the cursor in the
program.
[F10] Quit
Aborts, quits debugging.
[Tab] Field
Switches between the open debug windows.
IMPORTANT You may also manually insert breakpoints into your source code
using the {$B} directive (described in Chapter 6). The {$B}
breakpoint directive is not intended to be used with the debugger
discussed in this section.
Publication 1746-PM001A-US-P
Communicating with the Module
9-11
Debugging Example
The following example program will be used to illustrate the debugging features. It
is a simple program so that you can visualize each line’s execution as it is being
debugged.
REM THIS IS A DEBUGGING EXAMPLE
{SORT EVEN NUMBERED POSITIVE ENTRIES}
{$L START}
INPUT ”ENTER A NUMBER: ”,Y
FOR X=1 TO Y
IF X*2=Y THEN GOTO DONE
NEXT X
PRINT ”NUMBER IS ODD OR LESS THAN 1, RESTARTING”
GOTO START
{$L DONE}
PRINT ”NUMBER IS EVEN”
END
After entering the program, save it under the name DEBUG.BDL, and then
translate/compile it. If there are no errors, go to Terminal mode and download the
translated file (DEBUG.BAS) to the module. Follow the steps below to observe the
features available with the BASIC Debugger:
1. After downloading, type RUN to execute the program. You are prompted to
enter a number. If not, you may have a bug in the program, using the debugger
may help you find it.
2. Enter an odd number (less than 100) and press [Enter]. A message appears
indicating it is odd. You are prompted to enter a number again.
3. Enter an even number (less than 100) and press [Enter]. A message appears
indicating it is even, and the program terminates.
4. Select deBug from the menu at the top of the screen, then select Run
Debugger. If you have loaded a previously translated file for which a .MAP file
exists (as is the case with this example), a message appears indicating that
.MAP file will be used.
5. Press any key to continue. A split screen appears with your program
(DEBUG.BDL) above and a watch window below. The watch window is
where the variable values you designate will be displayed.
Publication 1746-PM001A-US-P
9-12
Communicating with the Module
Figure 9.3 Watch Window
+====================SOURCE FILE: C:\ABBASIC\BAS\DEBUG.BDL====================+
| REM THIS IS A DEBUGGING EXAMPLE
|
| {SORT EVEN NUMBERED POSITIVE ENTRIES}
|
| {$L START}
|
| INPUT ºENTER A NUMBER: º,Y
|
| FOR X=1 TO Y
|
| IF X*2=Y THEN GOTO DONE
|
| NEXT X
|
| PRINT ºNUMBER IS ODD OR LESS THAN 1, RESTARTINGº
|
| GOTO START
|
| {$L DONE}
|
| PRINT ºNUMBER IS EVENº
|
| END
|
| >> EOF <<
|
|
|
|
|
|
|
|==========================WATCH WINDOW=================================== ===|
|
|
|
|
|
1Help
|
2Inquir
3Watch
4Gotill
5Screen
6Search
7Trace
8Layout
9Run
0Quit
6. Press [F1] to bring up help on the BASIC Debugger, [ Esc] to return to the
debugger screen.
7. Move the cursor until it marks the variable y in the fourth line of the program.
8. Press [F2] to examine the value of that variable. Note that it is the even number
you entered in step 3. Also note that you have the option here to force a value
for this variable by typing it in and then pressing [Enter].
9. Press [Esc] to return to the debugger screen without changing the variable’s
value.
10. Move the cursor down to mark the variable x in the fifth, sixth or seventh line
of the program. Note that you can select a variable wherever it occurs in a
program.
11. Press [F2] to examine the value of that variable. Note that it is half the value
you entered in step 3, which is consistent with the way this program sorts even
numbers.
12. Press [Esc] to return to the debugger screen without changing the variable’s
value.
13. While the cursor is still marking the variable x , press [F3]. Note that x and its
value now appear in the watch window. You can do the same thing for y.
Publication 1746-PM001A-US-P
Communicating with the Module
9-13
14. Move the cursor down to anywhere on the line next x and then press [F4].
This causes the program to execute until it reaches the line you marked (next
x in this case). The Terminal mode screen appears, and the executing program
prompts you to enter a number.
15. Type the number 3 and press [Enter]. The Debugger screen returns, the line
next x is highlighted, the value for x in the watch window is 1 , and the value
for y is 3. You are stopped during program execution at the first encounter of
the line next x.
16. Press [F4] again. This time x is 2. Continue pressing [F4] until you fall through
the for/next loop, get the number is odd message, and are prompted to enter
another number.
17. Type the number 6 and press [Enter]. The Debugger screen returns, the value
for x in the watch window is 1, and the value for y is 6.
18. Press [F7]. This traces you through the program one line at a time, flashing to
the Terminal mode screen to execute, and then returning to the debugger.
There you see the value for x changing each time the trace passes through the
for/next loop.
19. Keep pressing [F7] until you trace through the program to completion. Note
that the debugger is terminated and you are returned toTerminal mode.
20. Repeat steps 4 and 5 to return to the debugger.
21. Press [F5]. This temporarily returns you to the Terminal mode screen. Press
any key to bring the debugger back.
22. Press [F6]. You see a search screen identical to the one in the BASIC
Development Software. You can use this to search for any characters in your
program, such as the variables you want to enter into the watch window.To
cancel the search press [Esc].
23. Press [F8]. Your screen is now split into three sections, with the translated
BASIC program at the top, your .BDL file in the middle, and the watch
window at the bottom.
24. Press [Tab] to move the cursor to each of the three windows. You can now
select variables from either the .BAS file or the .BDL file appearing on the
screen, prior to pressing [F2] (to examine) or pressing [F3] (to watch).
25. Press [F8] again. Now only the BASIC program is on the screen with the watch
window. To return to the original debugger screen, press [F8] again.
26. Press [F9] to run the program to completion and exit the debugger. You also
can exit the debugger at any time by pressing [Esc] or [F10].
Publication 1746-PM001A-US-P
9-14
Communicating with the Module
Making Corrections to Your Program
The normal sequence in writing programs using the BASIC Development Software
is:
1. Write a .BDL file using the BASIC development language.
2. Translate/compile the .BDL file to create a .BAS file.
3. Download the file to the module.
After downloading, you should test and debug your program. Give careful
consideration as to where you will make changes and corrections as a result of
testing and debugging. Remember, at this time you have three versions: the .BDL
and .BAS files in your personal computer and the downloaded file in your module.
Though it may be faster to make simple corrections in Terminal mode by line
editing the program in the module (described in the SLC 500 BASIC and BASIC-T
User Manual publication number 1746-UM004A-US-P and the BASIC Module
Series B User Manual, publication number 1771-6.5.113), these corrections will
not be reflected in the personal computer versions of the program.
If you do make minor changes to the program in the module, always go back to the
original .BDL file, duplicate those changes, and translate/compile the program.
Then download it to the module and verify that it works as intended. This ensures
that the versions all match and that you have some backup for the program in the
module.
If you must do extensive editing to a program, you should go back to the original
.BDL file. Even though you can upload an edited file from the module to your
personal computer, it will be a .BAS version of that file and cannot be reverse
translated to the .BDL format.
RS-232 Communications
Setup
Before configuring the terminal communication parameters, the type of
communications being used must be selected as either RS-232 or DH485.
NOTE
General Purpose Communications is not intended for use with
the module. This is done through the Terminal Selection menu
accessed through the Setup and Configuration menu. Refer to
Chapter 3 for details on terminal selection.
To configure the communication parameters for the communication type being
used, access the Terminal Setup menu using the following path:
Path: Toplevel Menu → teRminal [RS-232] → Setup
Path: Main Menu → Other → teRminal [RS-232] → Setup
Publication 1746-PM001A-US-P
Communicating with the Module
9-15
Figure 9.4 RS-232 Terminal Setup Menu
HELP<F1>|MENU<F2>|EXIT<F3>| COM1 1200 8 1 N|LOG CLOSED|ANSI | 06-12-91
↓↑→← to
File Setup Display deBug Exit
1:15pm
Edit
+------------------SETUP----------------------+
|Autobaud
|===============================+
|General (file names, etc.)...
|
|
|Terminal...
|
|
|com Port settings (baud rate, etc.)... <AltP>|
|
|Colors
|
|
|saVe setup
|
|
+-----------------Cancel<ESC>-----------------+
|
|
|
|
|
|
|
|
|
+------------------------------------------------------------------------------+
Autobaud
This menu selection automatically finds the baud rate of the module connected to
your personal computer’s currently configured RS-232 port. Note that Autobaud
searches for the baud rate but does not modify the data bits, stop bits, parity, or
port number. These selections must be correctly configured to match those of the
module before Autobaud can successfully find the baud rate.
Publication 1746-PM001A-US-P
9-16
Communicating with the Module
General Setup Parameters
This menu selection prompts you with a dialog box that gives you the following
general setup parameters:
• Upload path defines the DOS path in your personal computer where any
files uploaded from the module will be sent
• Download path defines the DOS path in your personal computer where
any files downloaded to the module will come from
• Log File is the name of the log file. You are always given the opportunity
to edit this filename just before opening a log file.
• Beep on downloads and UPLOADs causes your personal computer to
sound a beep when the file upload or download operation is completed or
terminated
• Word wrap in file viewer allows word–wrap when viewing a file
• Right margin for file viewer is the right margin for the word-wrap
when viewing a file
Terminal
The Terminal selection brings up a TERMINAL SETUP dialog box that allows
selection of ASCII or ANSI terminal emulation.
Com Port Settings
This menu selection brings up the PORT SETUP dialog box that allows
configuration of communications port parameters. The default settings shipped
with the BASIC Development Software match the default settings of the module’s
RS-232 port as follows:
Table 9.3 Default Settings
Publication 1746-PM001A-US-P
Com Port Settings
Defaults
Active com port
Com1
Baud rate
1200
Parity
No Parity
Data bits
8
Stop bits
1
Handshaking
enabled
Communicating with the Module
9-17
The following parameters are available:
• active Com port allows you to select the port on your personal computer
for use in communicating with the module
IMPORTANT Verify that the computer port you have selected for your
mouse does not conflict with the port selected for serial
communications with the module.
• Baud rate allows you to select a communications baud rate. Choices are
300, 600, 1200, 2400, 4800, 9600, or 19200.
• Parity allows you to select even, odd, or no parity
• Data bits allows you to select the number of data bits contained in each
character transferred to or from the module’s program port. Valid choices are 7
or 8.
• sTop bits allows you to select the number of stop bits. Valid choices are 1
or 2.
• Handshaking selects whether or not the software handshaking occurs
between your personal computer and the device it is communicating with.
Always enable this menu item while downloading or uploading programs to or
from the module.
Colors
Use this menu selection to change the screen background and foreground colors.
The up and down cursor keys change the foreground colors; the left and right
cursor keys change the background colors.
Save Setup
By selecting save Setup, you save all the current setup parameters pertinent to
RS-232 Terminal mode.
Publication 1746-PM001A-US-P
9-18
Communicating with the Module
DH485 Communications
Setup
Before configuring terminal communication parameters, the type of
communications being used must be selected as either RS-232 or DH485.
NOTE
General Purpose Communications is not intended for use with
the module. This is done through the Terminal Selection menu
accessed through the Setup and Configuration menu. Refer to
Chapter 3 for details on terminal selection.
To configure the communication parameters for the communication type being
used, access the Terminal Setup menu using the following path:
Path: Toplevel Menu → teRminal [DH485] → Setup
Path: Main Menu → Other → teRminal [DH485] → Setup
Figure 9.5 DH485 Terminal Setup Menu
HELP<F1>|MENU<F2>|EXIT<F3>| COM1 19200 DH-485
File Setup Display deBug Exit
|ANSI | 06-12-91
Terminal Address:0 Basic Address:1
1:15pm
↓↑→← to
Edit
+------------------SETUP----------------------+
|Attach
|===============================+
|General (file names, etc.)...
|
|
|Terminal...
|
|
|com Port settings (baud rate, etc.)... <AltP>|
|
|Who ACTIVE...
|
|
|wHo LISTEN
|
|
|Colors
|
|
|saVe setup
|
|
+-----------------Cancel<ESC>-----------------+
|
|
|
|
|
|
|
|
|
+------------------------------------------------------------------------------+
Attach
This parameter is used when it becomes necessary to re-establish lost
communications with the module. When selected, your personal computer
attempts to re-establish communications with the module at the configured
module address on the DH485 network.
Publication 1746-PM001A-US-P
Communicating with the Module
9-19
General Setup Parameters
This menu selection prompts you with a dialog box that gives you the following
general setup parameters:
• Upload path defines the DOS path in your personal computer where any
files uploaded from the module will be sent
• Download path defines the DOS path in your personal computer where
any files downloaded to the module will come from
• Log File is the name of the log file. You are always given the opportunity
to edit this filename just before opening a log file.
• Beep on downloads and uploads causes your personal computer to
sound a beep when the file upload or download operation is completed or
terminated
• Word wrap in file viewer allows word-wrap when viewing a file
• Right margin for file viewer is the right margin for the word-wrap
when viewing a file
Terminal
The Terminal selection brings up a TERMINAL SETUP dialog box that allows
selection of ASCII or ANSI terminal emulation.
Publication 1746-PM001A-US-P
9-20
Communicating with the Module
Com Port Settings
This menu selection brings up the PORT SETUP dialog box that allows
configuration of communications port parameters. The default settings shipped
with the BASIC Development Software match the default settings of the module’s
DH485 port as follows:
The following parameters are available:
• active Com port allows you to select the port on your personal computer
for use in communicating with the module. Choose between COM1 or
COM2.
IMPORTANT Verify that the computer port you have selected for your
mouse does not conflict with the port selected for serial
communications with the module.
• Baud rate allows you to select a communications baud rate. Choices are
1200, 2400, 9600, or 19200.
• Terminal Address allows you to select the terminal address on the
DH485 network
• Module Address allows you to select the module’s address on the DH485
network
• Maximum Node Address allows you to select the maximum node address
on the DH485 link. Valid selections range from 1 to 31.
Publication 1746-PM001A-US-P
Communicating with the Module
9-21
Who Active
The Who Active screen allows you to see the active nodes on the DH485 network.
Notice that your personal computer (BASIC SOFT) is included in the list at the
address configured for the communications port parameter Terminal Address.
Figure 9.6 Who Active Screen
HELP<F1>|MENU<F2>|EXIT<F3>| COM1 19200 DH-485
File Setup Display deBug Exit
|ANSI | 06-12-91
Terminal Address:0 Basic Address:1
1:15pm
↑↓→← to
Edit
+------------------SETUP-------------------+
|Attach
|==================================+
|General (file names, etc.)...
|
|
|----------------WHO ACTIVE - Active Station Identification-------------------|
|
0 BASIC SOFT (31)
12
24
|
|
1 BASIC MOD (31)
13
25
|
|
2 5/02
14
26
|
|
3
15
27
|
|
4
16
28
|
|
5
17
29
|
|
6
18
30
|
|
7
19
31
|
|
8
20
|
|
9
21
|
|
10
22
|
|
11
23
|
(31)
|
|------------------Port Settings<F2>
|
Cancel<Esc>
Help <F1>------------------|
|
|
+------------------------------------------------------------------------------+
Publication 1746-PM001A-US-P
9-22
Communicating with the Module
Who Listen
The Who Listen display shows the active nodes without placing the terminal on
the network. This allows you to insure that there are no duplicate node addresses
prior to going on line.
Figure 9.7 Who Listen Screen
HELP<F1>|MENU<F2>|EXIT<F3>| COM1 19200 DH-485
File Setup Display deBug Exit
|ANSI | 06-12-91
Terminal Address:0 Basic Address:1
1:15pm
↑↓→← to
Edit
+------------------SETUP-------------------+
|Attach
|==================================+
|General (file names, etc.)...
|
|
|-----------------------WHO LISTEN - Active Node Table------------------------|
|
0
12
24
|
|
1
*
13
25
|
|
2
*
14
26
|
|
3
15
27
|
|
4
16
28
|
|
5
17
29
|
|
6
18
30
|
|
7
19
31
|
|
8
20
|
|
9
21
|
|
10
22
|
|
11
23
|
|
|------------------Port Settings<F2>
|
Cancel<Esc>
Help <F1>------------------|
|
|
|
|
+ ----------------------------------------------------------------------------- +
Colors
Use this menu to change the screen background and foreground colors. The up and
down cursor keys change the foreground colors; the left and right cursor keys
change the background colors.
Save Setup
By selecting save Setup, you save all the current setup parameters pertinent to
DH485 Terminal Mode.
Publication 1746-PM001A-US-P
Appendix
A
BASIC Macro Library
This appendix contains important information you should be concerned with
when using programming macros. The information is general in nature and
supplements specific information contained in earlier chapters of this manual.
Topics include:
• screen functions
• keyboard functions
• backplane functions
• clock functions
• battery back-up
• program control
• string routines
• [Ctrl–C] functions
• port control functions
• DH485 functions
Library Overview
This library lists programming macros, or macro CALLs that you can use while
programming with the BASIC development language. Included is a description of
what the macro CALL does, along with a list of inputs and outputs associated with
the macro.
Programming macros are described in Chapter 6 of this manual. The example
program in that chapter (SECOND.BDL) makes extensive use of these macros.
IMPORTANT The file INCLUDE.BDL comes as part of the BASIC
Development software package. It contains all of the BASIC
programming macros listed in this library, along with the
information necessary to translate them. Review the contents of
the macro as listed in this file so you fully understand its
functions and interaction with its application. The statement {$I
INCLUDE.BDL} should appear at the beginning of any program in
which you intend to use these programming macros.
1
Publication 1746-PM001A-US-P
A-2
BASIC Macro Library
Screen Functions
The following table describes the macro CALLs that you use to perform operations
on the operator screen.
IMPORTANT Be aware that the screen macro CALLs pertain to the currently
configured program port only. Attempts to direct output to other
ports will be ignored during program translation
Table A.1 Operation Macros
Screen Macro CALLs
Macro
Inputs
Outputs
cls()
Clears the screen for an ANSI standard terminal.
None
None
home()
Places the cursor in the upper left hand corner of the screen on an
ANSI standard terminal.
None
None
clr_to_eol()
Clears from cursor to end of line.
None
None
go_to_xy(%1,%2)
Positions the cursor. %1 column is the x coordinate in the range 1 to
max_col. %2 row is the Y coordinate in the range 1 to max_row.
Max_row and max_col change depending on the display mode.
%1 = Column
(0 < col < 99)
%2 = Row
(0 < row < 99)
None
cursor_up(%1)
Moves the cursor up %1 rows.
%1 = the number of rows
to move the cursor up
None
cursor_down(%1)
Moves the cursor down %1 rows.
%1 = the number of rows
to move the cursor down
None
cursor_right(%1)
Moves the cursor right %1 columns.
%1 = the number of
columns to move the
cursor right
None
cursor_left(%1)
Moves the cursor left %1 columns.
%1 = the number of
columns to move the
cursor left.
None
cursor_save()
Saves the current cursor position.
None
None
cursor_restore()
Restores the cursor to the saved position.
None
None
high_intensity()
Prints characters in high intensity.
None
None
low_intensity()
Prints characters in low intensity.
None
None
blink()
Prints characters blinking.
None
None
reverse()
Prints characters in reverse video.
None
None
conceal_text()
Conceals printed text (no display of characters).
None
None
foreground_black()
Prints text with the foreground black.
None
None
foreground_red()
Prints text with the foreground red.
None
None
foreground_green()
Prints text with the foreground green.
None
None
foreground_yellow()
Prints text with the foreground yellow.
None
None
foreground_blue()
Prints text with the foreground blue.
None
None
foreground_magenta()
Prints text with the foreground magenta.
None
None
foreground_cyan()
Prints text with the foreground cyan.
None
None
foreground_white()
Prints text with the foreground white.
None
None
Publication 1746-PM001A-US-P
BASIC Macro Library
A-3
Table A.1 Operation Macros
Screen Macro CALLs
Macro
Inputs
Outputs
background_black()
Prints text with the background black.
None
None
background_red()
Prints text with the background red.
None
None
background_green()
Prints text with the background green.
None
None
background_yellow()
Prints text with the background yellow.
None
None
background_blue()
Prints text with the background blue.
None
None
background_magenta()
Prints text with the background magenta.
None
None
background_cyan()
Prints text with the background cyan.
None
None
background_white()
Prints text with the background white.
None
None
blink_off()
Has no special attributes.
None
None
lines()
Shows the user how fancy screens can be drawn.
None
None
Keyboard Functions
The following table describes the macro CALLs that you use to perform keyboard
functions.
Table A.2 Keyboard Macros
Keyboard Macro CALLs Macro
Inputs
Outputs
hit_any_key()
Prints Hit any key to continue , then waits on a program None
port key to be hit.
None
get_key(%1)
Gets the next key typed and places its ASCII decimal value in %1.
None
%1 = next key typed
get1_key(%1)
Gets the next character from PRT1.
None
%1 = next character
get2_key(%1)
Gets the next character from PRT2.
None
%1 = next character
Publication 1746-PM001A-US-P
A-4
BASIC Macro Library
SLC Backplane
Functions
The following table describes the macro CALLs that you use to communicate and
pass data on the backplane of the SLC 500. Backplane macros for the 1771-DB/B
are located in the file INCLUDBB.BDL.
Table A.3 Communication Macros
Backplane Macro CALLs
Macro
write_m1_image_unsigned(%1,%2) Converts a BASIC variable or constant value to
an unsigned integer (0 to 65535), then writes
this value to the M1 file. The offset position (0
to 63) in the M1 file is defined by the first input
variable.
Inputs
Outputs
%1 = The offset position (0
to 63) in the M1 file
None
%2 = BASIC variable or
constant to be converted
read_m0_image_unsigned(%1,%2) Reads an unsigned integer (0 to 65535) from the %1 = The offset position (0
M0 file. The offset position (0 to 63) in the M0 to 63) in the M0 file to be
file is defined by the first input variable. The
converted
variable which receives the data is the second
input variable.
write_m1_image_signed(%1,%2)
Converts a BASIC variable or constant value to
its binary representation (-32768 to 32767),
then writes the value to the M1 file. The offset
position (0 to 63) in the M1 file is defined by the
first input variable.
%1 = The offset position (0
to 63) in the M1 file
%2 = Variable
None
%2 = BASIC variable or
constant to be converted
read_m0_image_signed(%1,%2)
Reads a binary value (-32768 to 32767) from the %1 = The offset position (0
to 63) in the M0 file to be
M0 image file. The offset position (0 to 63) in
the M0 file is defined by the first input variable. converted
The variable which receives the data is the
second input variable.
%2 = Variable
copy_image_to_m1(%1,%2)
Allows the SLC processor to read the BASIC or
BASIC-T module’s M1 data.
%1 = Number of words to
be copied
%2 = The success
of the transfer
0 --> Run mode
1 --> Program mode
2 --> Test mode
10--> Illegal length
11--> Not
supported
copy_bas_out_to_slc_in(%1)
Allows the SLC processor to read the module’s
output data into the SLC processor’s input
image table.
None
%1 = The success
of the transfer
0 --> Run mode
1 --> Not Run mode
73--> No Response
copy_m0_to_image(%1,%2)
Allows the module to accept the SLC
processor’s M0 data.
%1 = Number of words to
be copied
%2 = The success
of the transfer
0 --> Run mode
1 --> Program mode
2 --> Test mode
10--> Illegal length
11--> Not
supported
copy_slc_out_to_bas_in(%1)
Allows the module to read the SLC processor’s
output image table data.
None
%1 = The success
of the transfer
0 --> Run mode
1 --> Not Run mode
73--> No Response
Publication 1746-PM001A-US-P
BASIC Macro Library
A-5
Table A.3 Communication Macros
Backplane Macro CALLs
Macro
Inputs
Outputs
wait_m1()
Waits for the M1 file to be read.
None
None
wait_m0()
Waits for the M0 file to be updated.
None
None
wait_input_image(%1)
Waits on the input image file to be read.
None
%1 = The success
of the transfer:
0 = Not read yet
1 = Has been read
2 = Not supported
wait_output_image(%1)
Waits for the SLC output image file to be
updated.
None
%1 = The success
of the transfer:
0 = Not read yet
1 = Has been read
2 = Not supported
Clock Functions
The following table describes the macro CALLs that you use to set and read the
clock.
Table A.4 Clock Macros
Clock Macro CALLs
Macro
Inputs
Outputs
input_time()
Asks the operator for the correct time, then sets the clock. No
input or output variables.
None
None
set_time(%1,%2,%3)
Sets the clock to the time indicated by %1, %2, and %3.
%1 = Hours (0 to 23)
%2 = Minutes (0 to 59)
%3 = seconds (0 to 59)
None
set_date(%1,%2,%3)
Sets the clock to the date indicated by %1, %2, and %3.
%1 = Days (1 to 31)
%2 = Months (1 to 12)
%3 = Years (0 to 99)
None
input_date()
Sets the Wall Clock date. It asks the operator for the date,
and sets the clock.
None
None
set_day()
Asks the operator for the day of week, and sets the Wall
Clock day of week.
None
None
get_time(%1,%2,%3)
Reads the time from the clock and returns the time in the
variables %1, %2, and %3.
None
%1 = Hours
%2 = Minutes
%3 = Seconds
print_time()
Reads the time from the clock and prints the time. The cursor None
is left at the end of the time. (That is, no carriage return/line
feed is sent.)
None
print_date()
Reads the date from the clock and prints the date. The cursor None
is left at the end of the date. (That is, no carriage return/line
feed is sent.)
None
print_day()
Reads the day from the clock and prints the day. The cursor is None
left at the end of the day. (That is, no carriage return/line feed
is sent.)
None
Publication 1746-PM001A-US-P
A-6
BASIC Macro Library
Battery Back-Up
The following table describes the macro CALLs used to control the battery
back-up.
Table A.5 Battery Back-up Macros
Battery Back–up
Macro CALLs
Macro
Inputs
Outputs
battery_on()
Enables battery back-up.
None
None
battery_off()
Disables battery back-up.
None
None
alloc_bat_var(%1)
Allocates battery backed memory for non-volatile data
storage. One parameter is required. %1 is the number of
variables to be stored. If the MTOP is not 5FFFh, then this
function is skipped.
%1 = Number
variables
None
read_bat_var(%1,%2)
Retrieves battery backed variables.
%2 = storage number
%1 = variable to
be retrieved
write_bat_var(%1,%2)
Writes battery backed variables.
%2 = storage number
%1 = variable to
be written
Program Control
The following table describes the macro CALLs used for program control.
Table A.6 Program Macros
Program Control
Macro CALLs
Macro
Inputs
Outputs
CALL_ram()
Transfers control of the BASIC program to the second line of the
program in RAM.
None
None
CALL_rom(%1)
Transfers control of the BASIC program to the second line of the
program specified in EEPROM.
%1 = number of ROM
program
None
ret()
Transfers control back to were it was in the main program prior to the
CALL.
None
None
Publication 1746-PM001A-US-P
BASIC Macro Library
String Routines
A-7
The following table describes the macro CALLs used for string routines.
Table A.7 String Routine Macros
String Routine
Macro CALLs
Macro
Inputs
Outputs
string_repeat(%1,%2)
Allows you to repeat a character %1 times and
copy it into $(%2).
%1 = Number of times to
repeat the character.
%2 = The string number
containing the character.
$(%2) = The new
string.
string_append(%1,%2)
Concatenates two strings (%1 and %2), then stores
the result in %2.
%1 = Number of string to $(%2) = The
concatenated string.
be appended.
%2 = Number of the base
string.
num_to_str(%1,%2)
Converts %1 from a numeric value to a string, then
stores the result in $(%2).
$(%2) = The string
%1 = Value to be
converted data.
converted.
%2 = Number of the base
string.
str_to_num(%1,%2,%3)
Converts (%1) from a string to a numeric value, then %1 = String number to be %2 = Validity of
stores the result in (%3). %2 is a validity code.
converted.
output value.
0 = Value not valid.
1 < Valid Value < 255
%3 = Converted
value.
find_str_in_str(%1,%2,%3)
Finds a string within a string. It locates the first
occurrence (position) of the string.
%1 = String to be found.
%2 = String to be
searched.
%3 = Result
0 = String not found
0 <> Found string
replace_str_in_str(%1,%2,%3) Replaces a string within a string.
$(%1) = Base string
%1 = String which
replaces the %2 string.
%2 = String to be
replaced.
%3 = Base String number.
insert_str_in_str(%1,%2,%3)
Inserts a string into a string.
%1 = Position to begin
$(%1) = Base string
insertion
%2 = Number of
characters to insert
%3 = Base String number
delete_str_in_str(%1,%2,%3)
Deletes a string from a string.
%1 = Base string number. $(%1) = Base string.
%2 = String number of
string to be deleted.
get_string_length(%1,%2)
Determines the length of a string.
%1 = Base string number %2 = String length
Publication 1746-PM001A-US-P
A-8
BASIC Macro Library
[CTRL-C] Functions
The following table describes the macro CALLs used for [Ctrl-C] functions.
Table A.8 Control-C Macros
Control-C Function
Macro CALLs
Macro
Inputs
Outputs
disable_c()
Disables the [CTRL-C] function.
None
None
enable_c()
Enables the [CTRL-C] function.
None
None
Port Control Functions
The following table describes the macro CALLs used for port control.
Table A.9 Port Control Macros
Port Control Function
Macro CALLs
Macro
Inputs
Outputs
clear_prt1_buffers()
Clears the PRT1 input and output buffers.
None
None
clear_prt2_buffers()
Clears the PRT2 input and output buffers.
None
None
DH485 Functions
The following table describes the macro CALLs used during DH485 port
communications.
Table A.10 DH485 Macros
DH485 Function
Macro CALLs
Macro
Inputs
Outputs
wait_common_input()
Waits on the DH485 Common Interface Input File to be updated.
None
None
copy_common_to_basic_in Copies the DH485 Common Interface Input File to the BASIC Input buffer. %1 = File Offset
put(%1,%2)
%2 = Number of
words to copy
Publication 1746-PM001A-US-P
None
BASIC Macro Library
1771-DB/B Backplane
Functions
A-9
The file INCLUDBB.BDL comes as part of the BASIC Development software
package. It contains all of the BASIC programming macros listed in this library,
along with the information necessary to translate them. Review the contents of the
macro as listed in this file so you fully understand its functions and interaction with
its application. The statement {$I INCLUDBB.BDL} should appear at the
beginning of any program in which you intend to use these programming macros.
This library only includes the backplane and number conversion macros for the
1771-DB/B. If you wish to use any of the general purpose BASIC macros, the
statement {$I INCLUDE.BDL} must also appear at the beginning of your
program.
Table A.11 1771-DB/B Backplane Macros
Number Conversion
CALLs
Macro
Inputs
Outputs
db_to_plc_16(%1,%2)
Converts the number from BASIC Floating-Point to PLC
16-Bit Unsigned Binary (4 digit hex)
%1=Value to be converted
%2=BTR word to store
value
None
db_to_plc_bcd_3(%1,%2)
Converts the number from BASIC Floating-Point to PLC
3-Digit, Signed, Fixed Decimal BCD +/- XXX.
%1=Value to be converted
%2=BTR word to store
value
None
db_to_plc_bcd_3_3(%1,%
2)
Converts the number from BASIC Floating-Point to PLC
3.3-Digit, Signed, Fixed Decimal BCD +/- XXX.XXX
%1=Value to be converted
%2=BTR word to store
value
None
db_to_plc_bcd_4(%1,%2)
Converts the number from BASIC Floating-Point to PLC
4-Digit, BCD XXXX
%1=Value to be converted
%2=BTR word to store
value
None
db_to_plc_bcd_6(%1,%2)
Converts the number from BASIC Floating-Point to PLC
6-Digit, Signed, Fixed Decimal BCD +/- XXXXXX
%1=Value to be converted
%2=BTR word to store
value
None
db_to_plc_oct(%1,%2)
Converts the number from BASIC Floating-Point to PLC
4-Digit, Signed, Octal +/-XXXX
%1=Value to be converted
%2=BTR word to store
value
None
db_to_plc5_float(%1,%2)
Converts the number from BASIC Floating-Point to PLC 5
Floating-Point
%2=BTR word to store
value
None
plc_16_to_db(%1,%2)
Converts the number from PLC 16-Bit Unsigned Binary (4 %1=BTW word that holds
digit hex) to BASIC Floating-Point
value to convert
2=Converted value
plc_bcd_3_to_db(%1,%2)
Converts the number from PLC 3-Digit, Signed, Fixed
Decimal BCD +/- XXX to BASIC Floating-Point
%1=BTW word that holds
value to convert
%2=Converted
value
plc_bcd_3_3_to_db(%1,%
2)
Converts the number from PLC 3.3-Digit, Signed, Fixed
Decimal BCD +/- XXX.XXX to BASIC Floating-Point
%1=BTW word that holds
value to convert
%2=Converted
value
plc_bcd_4_to_db(%1,%2)
Converts the number from PLC 4-Digit BCD XXXX to
BASIC Floating-Point
%1=BTW word that holds
value to convert
%2=Converted
value
Publication 1746-PM001A-US-P
A-10
BASIC Macro Library
Table A.11 1771-DB/B Backplane Macros
Number Conversion
CALLs
Macro
Inputs
Outputs
plc_bcd_6_to_db(%1,%2)
Converts the number from PLC 6-Digit, Signed, Fixed
Decimal BCD +/- XXXXXX to BASIC Floating-Point
%1=BTW word that holds
value to convert
%2=Converted
value
plc_oct_to_db(%1,%2)
Converts the number from PLC 4-Digit, Signed, Octal, +/ %1=BTW word that holds
-XXXX to BASIC Floating-Point
value to be converted
%2=Converted
value
plc5_float_to_db(%1,%2)
Converts the number from PLC 5 Floating-Point to BASIC %1=BTW word that holds
Floating-Point
value to be converted
%2=Converted
value
Table A.12 1771-DB/B Backplane CALLs
Backplane CALLs
Macro
Inputs
Outputs
btr()
Performs a block transfer read
None
None
btw()
Performs a block transfer write
None
None
btr_timed(%1)
Performs a block transfer read with a 2 second timeout None
Status of block
transfer
btw_timed(%1)
Performs a block transfer write with a 2 second timeout None
Status of block
transfer
set_btr_length(%1)
Sets block transfer read length (1 to 64)
%1=length of block transfer None
read buffer
set_btw_length(%1)
Sets block transfer write length (1 to 64)
%1=length of block transfer None
write buffer
Publication 1746-PM001A-US-P
Appendix
B
The DOS Directory Shell
This appendix supplements specific information about the DOS directory shell
contained in earlier chapters of this manual.
Topics include:
• shell operation
• file operations from the DOS directory shell
Using the DOS Directory
Shell
The DOS directory shell allows you to perform a large number of DOS related
tasks while the BASIC development software is still active. Not only does it display
DOS directories and build directory trees from which you can select files, but it is
also a fully integrated file/disk manager with the ability to:
• display up to four directories at a time, in either full directory display mode or
condensed display mode
• build a graphic directory tree you can move through and select directories as
the tree builds
• mark multiple files for copying, deleting, printing or loading, or prompt for a
DOS command to be repeated on all marked files. For example, you can mark
several .BDL files, enter the compiler command at the command prompt, press
[Enter], and all marked files are compiled.
• view or change file attributes
• view any file in a pop-up, Read-Only window for quick browsing
• sort directories by name, extension, size, date, and time (ascending or
descending). Multiple sorts are supported. Note that the sorted directory
cannot be stored on disk, but remains sorted for the current editing session. If
the BASIC development software is exited, the next time the directory is
displayed, it appears as it did before the sort.
• run any DOS command with the touch of a key
• examine the contents of any .ZIP or .ARC file by simply selecting it
• run any .EXE, .COM or .BAT file by simply selecting it
1
Publication 1746-PM001A-US-P
B-2
The DOS Directory Shell
DOS Directory Shell Operation
You can access the DOS directory shell two ways. From the main menu you can
pull down the File menu and then select DOS directory shell. You can also press
[Ctrl–F4] while you are in Edit mode. You cannot access the DOS directory shell
from the Toplevel Menu, Terminal mode, or while using the Shell to DOS feature.
Path: Toplevel Menu → Main Menu → File → DOS directory shell
QuickStroke: Main Menu Æ [Ctrl-F4]
IMPORTANT Be aware that Shell-to-DOS and DOS directory shell are two
distinctly different features. Shell-to-DOS temporarily drops out
of the BASIC development software and takes you back to the
DOS level where you can run programs or execute DOS
commands.
The following figure shows the DOS directory shell with the main menu in the
background. To the right is a listing of the keystrokes required to execute specific
DOS commands. To the left is the listing of the currently selected DOS directory.
(Files and directories listed here are examples.)
Figure B.1 DOS Directory Shell
L:3
C:1
1747-PBASE V x.xx
[DOS Shell]
Ins 175k
06-12-91
1:15pm
File Window Block cUrsor Search Text Layout Print Macro Config Other Exit
"C:\ABBASIC\BAS\SECOND.BAS" loaded.
+-----1747-PBASE DOS Shell------+
+===================E:\*.*====================+|Use cursor keys to move.
|
|A: B: C: D: E: F: G: H: I:
|
||<TAB> Toggle display mode
|E:4056K-4 files------------------------------||<Space> Mark/Unmark file
|
| ..
|
<DIR>
06-06-91 11:51a
||<CtrlBackSpace> Parent dir
| HELP
<DIR>
06-06-91 12:22a
||<F2> Change Directory
|
| OE14214B
264096
06-06-91 11:53a
||<F3> Delete File(s)
|
| BASE#1.BDL
139
05-28-91 02:44p
||<F4> Copy File(s)
|
| BASE#2.BDL
240
05-29-91 02:16p
||<F5> Rename File(s)
|
| DOSPROMP.BAT
480
04-16-91 11:14a
||<F6> Get New Dir Listing
|
0
06-06-91 12:21p
||<F7> Do any DOS Command
|
1522
06-06-91 11:53a
||<F8> Print file with PRINT.COM |
| EMPTY.BDS
| STATUS.BDS
|
||<F9> Load File into window
|
||<F10> Sort directory
|
|
|
||<ShftF3> Delete Marked files
|
|
||<ShftF4> Copy Marked files
|
|
||<ShftF8> Print Marked files
|
|
||<ShftF9> Load Marked files
|
|
||<ShftF10> Directory Tree
|
|
||<AltF1> Create Window
|
|
||<AltF2> Delete Window
|
+===========Select<ENTER>=Done<ESC>===========++====Press <F1> for more HELP===+
1Help 2ChDir 3Delete 4Copy 5Rename 6Dir Of 7CMD
8Print 9Load
0Sort
By pressing [Shift–F10], a directory tree is built that replaces the directory list.
The directory tree shows all directories and subdirectories for the current drive.
Publication 1746-PM001A-US-P
The DOS Directory Shell
B-3
Once the initial screen is displayed, a highlight bar appears at the top and allows
you to move up and down the tree. To select a new directory from the tree, press
[Enter] when the desired directory is highlighted.
By pressing [Alt–F1], a new directory window can be created. Up to four
directory windows may exist on the screen at a time. Each directory window is
independent and may display a different directory.
The following figure illustrates an example of two directory windows displayed on
the screen at the same time. Notice that the bottom one is condensed while the top
one displays a full directory list, complete with attributes.
Figure B.2 Two Directory Windows
L:3
C:1
1747-PBASE V x.xx
[DOS Shell]
Ins 175k
06-12-91 1:15pm
File Window Block Cursor Search Text Layout Print Macro Config Other Exit
+-----1747-PBASE DOS Shell------+
+================D:\SCREEN\*.*================+|Use cursor keys to move.
|
|A: B: C: D: E: F: G: H: I:
|
||<TAB> Toggle display mode
|D:4982K-6 files------------------------------||<Space> Mark/Unmark file
|
| ..
||<CtrlBackSpace> Parent dir
|
<DIR>
06-06-91 03:14p
| MCOM
000
2150
06-08-91 03:13p A
||<F2> Change Directory
|
| YPNLV
000
2146
06-06-91 06:58p A
||<F3> Delete File(s)
|
| MCOM
001
2150
06-08-91 03:14p A
||<F4> Copy File(s)
|
| YPNLV
001
2146
06-06-91 07:08p A
||<F5> Rename File(s)
|
| MCOM
002
2146
06-08-91 03:20p A
||<F6> Get New Dir Listing
|
||<F7> Do any DOS Command
|
|
|
+======D:\ABBASIC\BDS\*.*=======+||<F8> Print file with PRINT.COM |
+============|A: B: C: D: E: F: G: H: I:
||<F9> Load File into window
|
|
|D:4982K-67 files----------------||<F10> Sort directory
|
| ..\
HELP\
||<ShftF3> Delete Marked files
|
|
| 0E14214B
12072009
||<ShftF4> Copy Marked files
|
|
| BASE#1
||<ShftF8> Print Marked files
|
|
|>BASE#1.BAS
DOSPROMP.BAT
||<ShftF9> Load Marked files
|
|
|>BASE#1.BDL
EMPTY.BDS
||<ShftF10> Directory Tree
|
|
| STATUS.BDS
232COM.DB
||<AltF1> Create Window
|
|
| KEYMAC.DB
KEYMAP.DB
||<AltF2> Delete Window
|
>BASE#2
|
+============+====Select<ENTER> Done<ESC>=====++===Press <F1> for more HELP====+
1Help
2ChDir
3Delete
4Copy
5Rename
6Dir Of
7CMD
8Print
9Load
0Sort
Only one directory is active at a time; the active directory is indicated by the
highlight bar (not visible in the above figure).
You may create, re-size, move, and delete directory windows in any order. Refer to
the help screens available from the DOS directory shell.
Publication 1746-PM001A-US-P
B-4
The DOS Directory Shell
File Operations from the DOS Directory Shell
Individual files can be copied, deleted, renamed, viewed, sorted, printed and loaded
into a window from the DOS directory shell. Some of these operations can be
performed on several files at once if the files have been marked.
Files are marked by pressing the space bar when the filename is highlighted.
Marked files are indicated by the > character. In the previous figure with multiple
directories, notice that several of the files in the bottom directory are marked.
Exit the DOS directory shell by selecting Done<ESC> with your mouse or pressing
[ESC].
Publication 1746-PM001A-US-P
Index
Numerics
1747-AIC Isolated Link Coupler 1-2
1747-PBASE Translator 8-1
1747-PIC Interface/Convertor 1-2
A
abbreviations and terms P-4
accessing programs 6-9
advanced editing techniques
ASCII table 4-9
calculator 4-9
cursor markers 4-15
drawing lines 4-8
keystroke macros 4-11
windows 4-9
Allen-Bradley
contacting for assistance P-5
ANSI terminal 9-16, 9-19
ASCII
terminal 9-16, 9-19
ASCII table 4-9
ASCII terminal 9-16, 9-19
attach parameter 9-18
autobaud 9-15
autosave 3-12
language 6-1
outline 1-1
starting 2-1
BASIC module
backing up module image 9-8
choosing files 9-16
commands 9-2
communicating with 9-1
connecting to 2-11
debugging programs 9-9
DH485 communications 9-18
downloading files 9-3
downloading hex files 9-7
PC interface 1-2
restoring the module image 9-9
RS-232 communications 9-14
Terminal mode 9-1
uploading files 9-4
uploading hex files 9-6
baud rate
autobaud 9-15
choices 9-17
Block menu 4-3
block move style 3-7
blocks
saving 52
Breakpoint directive 6-7
B
backing up
module image 9-8
backing up software 1-5
backplane CALLs
1771-DBB A-9
backplane functions
1771-DB/B A-9
backplane macros
1771-DBB A-9
backup files 3-12
BASIC development language
creating a program 2-9, 6-11
macros 6-8
overview 2-9, 6-1
translator directives 6-2
BASIC development software
C
calculator 4-9
CALL 70 6-10
CALL 71 6-10
colors
Terminal mode screens 9-17, 9-22
com port settings
DH485 9-20
RS-232 9-16
command line
translator 8-6
command line switches 3-2
command.com option 57
comments 6-2
communicating with the module 9-1
compiling 8-1
Publication 1746-PM001A-US-P
2
Index
configuring software
autosave 3-12
backup files 3-12
default filename extensions 3-8
display options 3-7
edit options 3-4
keyboard options 3-7
memory options 3-11
mouse options 3-7
printer options 3-11
save 3-14
search and replace 3-13
temporary files 3-12
Terminal mode 3-13
connecting to BASIC module 2-11
contacting Allen-Bradley for assistance P-5
contents of manual P-2
copying text 4-5
creating a program 2-9, 6-11
cursor
motion 4-1
cursor markers 4-15
Cursor menu 4-15
cut and paste 4-5
D
Debug directive 6-7
debugging
example 9-11
making corrections 9-14
programs 9-9
defaults
filename extentions 3-8
restoring 3-14
definitions P-4
Deleting text 4-5
DH485
attach 9-18
com port settings 9-20
communications setup 9-18
interface card 3-3
WHO ACTIVE 9-21
WHO LISTEN 9-22
dialog box
definition P-4
directory structure 1-5
Publication 1746-PM001A-US-P
display
black and white 3-3
length and width 3-3
options 3-7
snow suppression 3-4
DOS
directory shell B-1
directory tree B-2
feature 1-1
downloading
files 9-3
from Terminal mode 9-3
hex files 9-7
program 2-13, 6-15
drawing lines 4-8
E
Edit mode 2-2, 4-1
editing options 3-4
editing programs
advanced techniques 4-7
block operations 4-3
changing to Terminal mode 2-12, 9-1
debugging 9-9
downloading 2-13, 6-15, 9-3
general editing 2-9, 6-11
making corrections 9-14
saving 2-10
search operations 4-2
simple techniques 4-1
translating 2-11, 6-13, 8-1
EEPROM 9-6
EMS
definition P-4
memory swapping 3-11, 56
software support 1-2
executing program 6-15
exiting program 2-13
extended memory
see EMS
extensions
filename 3-8
F
file loading 3-4
File menu 51
filename extensions 3-8
Index
files
autosave 3-12
backup 3-12
downloading 9-3
hex 9-6
loading 52
merging 52
saving 52
selecting project 52
temporary 3-12
uploading 9-4
function keys 2-4
G
goto line number 4-16
H
hardware requirements 1-2
help 2-4, 2-5
hex files
downloading 9-7
overview 9-6
uploading 9-6
Hypertext help P-4, 1-1
I
Include directive 6-3
INCLUDE.BDL 6-4, 6-8
Increment directive 6-6
Insert mode 3-7
Insert/Overwrite 3-6
inserting programs 6-9
installing software 1-3
K
keyboard
command line switch 3-3
options 3-7
keystroke macros
editing 4-14
overview 1-1, 4-11, 6-8
L
Label directive 6-4
language type 3-9
Line Number directive 6-6
3
linedraw
example 6-12
feature 1-2
uses 4-8
M
Macro directive 6-8
macro manager
dialog box 4-13-4-14
options 4-14
Macro menu 4-11
macros
battery back-up A-6
clock A-5
communication A-4
Ctrl C A-8
DH485 A-8
keyboard A-3
keystroke 1-1, 4-11, 6-8
library A-1
operation A-2
overview 6-8
port control A-8
program A-6
programming 6-8, 6-10
string routine A-7
Main menu
function keys 2-4
help 2-4, 2-5
message line 2-4
path 2-2
status line 2-3
windows 2-6
manuals
related P-3
map file 8-1, 9-9
marking
cursor location 4-15
text 4-5
turning off 4-5
memory
command line switch 3-4
expanded (see EMS)
options 3-11
swapping 55
translator 8-6
memory requirements
user-defined programs 56
Publication 1746-PM001A-US-P
4
Index
menus
block 4-3
cursor 4-15
file 51
macro 4-11
main 2-2
other 4-8
print 7-1
search 4-2
setup and configuration 3-1
toplevel 2-2
user (project files) 52
user (user-defined programs) 54
window 4-10
merging
files 52
programs 6-10
message line 2-4
module image
backing up 9-8
restoring 9-9
mouse
command line switch 3-3
driver 2-1
options 3-7
support 1-2
moving text 4-5
N
naming programs 55
O
other menu 4-8
Overstrike mode 3-7
P
printer
controls 7-5
device 7-3
options 3-11
selection 7-2
serial 7-4
setup 7-1, 7-3
printing
background 7-6
overview 7-1
program 7-6
product support P-5
Publication 1746-PM001A-US-P
program
downloading 2-13
editing 2-9
exiting 2-13
printing 7-6
saving 2-10
translating 2-11
programming
BASIC development language 6-1
debugging 9-9
debugging example 9-11
macros 6-8, 6-10
making corrections 1-1, 9-14
saving 2-10
search operations 4-2
second program 6-11
subprogram CALL 70 and CALL 71 6-10
translation 2-11, 8-1
writing programs 6-1
programming macros 6-8, 6-10
programs
user-defined 54
project files
selecting 52
publications
related P-3
pulldown menu 2-5
Q
QuickStroke
definition P-4
keystroke macros 4-15
overview 1-1
valid key assignments 4-15
quit 52
R
redo 4-7
related publications P-3
remarks 6-2
repeat command 4-7
replace 4-3
restore
command line switch 3-3
restoring
module image 9-9
restoring default values 3-14
Index
RS-232
autobaud 9-15
com port settings 9-16
communications setup 9-14
general setup parameters 9-16
S
saving
configuration 3-14
files in autosave 3-12
prior to translating 2-10, 8-6
program 2-10
search
defaults 3-13
multiple files 4-3
operations 4-2
Search menu 4-2
second program
BAS list 6-14, 8-3
BDL list 8-2
downloading 6-15
entering 6-11
executing 6-15
overview 6-11
translating 6-13
selecting project files 52
Setup and Configuration menu 3-1
software
backup 1-5
directory structure 1-5
disk contents 1-3
installation 1-3
outline 1-1
starting 2-1
sort 4-7
starting software 2-1
status line 2-3
T
Tab expand 3-7
temporary files 3-12
Terminal mode
changing to 2-12, 9-1
downloading 9-3
selection 3-13
uploading 9-4
terminal type 9-16, 9-19
terms and abbreviations P-4
5
text
copying 4-5
cut and paste 4-5
deleting 4-5
moving 4-5
sorting 4-7
Text directive 6-5
Toplevel menu 2-2
Translate/compile 2-2
translating
configuration 8-4
errors 8-4
feature 8-1
programs 2-11, 8-1
translator 8-1
configuration 8-4
translator directives
Breakpoint 6-7
comment 6-2
Debug 6-7
Include 6-3
Increment 6-6
Label 6-4
Line Number 6-6
Macro 6-8
overview 6-2
Text 6-5
troubleshooting
contacting Allen-Bradley P-5
U
undo 4-7
uploading
files 9-4
hex files 9-6
user menu
project files 52
user-defined programs 54
user-defined programs
command.com option 57
filenames 55
memory allocation 55
memory required 56
naming 55
overview 54
starting directory 57
UVPROM 9-7
Publication 1746-PM001A-US-P
6
Index
W
WHO ACTIVE 9-21
WHO LISTEN 9-22
window
labels 2-7
window menu 2-6, 4-10
windows 1-1, 2-6, 4-9
writing programs 6-1
Publication 1746-PM001A-US-P
Back Cover
Publication 1746-PM001A-US-P - May 2000 7
Supercedes Publication 1746-6.2 - November 1994
40072-096-01(A)
© 2000 Rockwell International Corporation. Printed in the U.S.A.