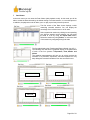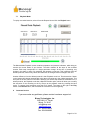
1
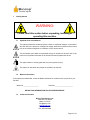
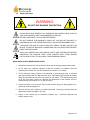
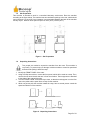
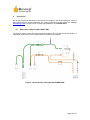
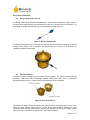
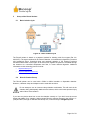
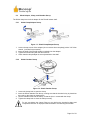
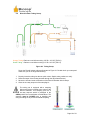
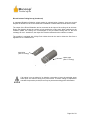
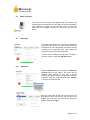
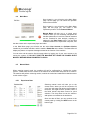
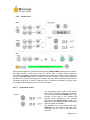
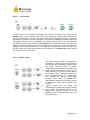
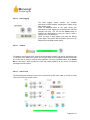
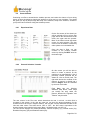
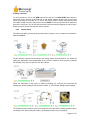
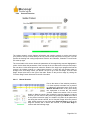
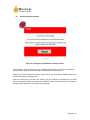
RICORDI® ISLET ISOLATOR MODEL No: RI-04 ______________________________________________________ USER MANUAL ______________________________________________________ © BIOREP 2013 TABLE OF CONTENTS 1 GETTING STARTED.......................................................................................................................... 3 1.1 1.2 1.3 1.4 1.5 1.6 1.7 SYMBOLS USED IN THIS MANUAL ................................................................................................... 3 MACHINE INFORMATION ................................................................................................................. 3 CONTACT INFORMATION ................................................................................................................. 3 SAFETY INFORMATION .................................................................................................................... 4 SITE PREPARATION .......................................................................................................................... 5 UNPACKING INSTRUCTIONS ............................................................................................................. 5 PACKING LIST ................................................................................................................................. 6 2 INTRODUCTION ................................................................................................................................ 7 3 MACHINE PARTS IDENTIFICATION ........................................................................................... 8 3.1 3.2 4 ACCESSORIES ...................................................................................................................................10 4.1 4.2 4.3 5 FRONT PANEL.................................................................................................................................. 8 REAR PANEL ................................................................................................................................... 9 DISPOSABLE TUBING SET (RI-TUBHC-01)....................................................................................10 BIOREP THERMOPROBE (TC-01) ....................................................................................................11 RICORDI CHAMBERS.......................................................................................................................11 SET-UP OF THE RICORDI ISOLATOR ........................................................................................12 5.1 BASIC ISOLATION CYCLE ...............................................................................................................12 5.2 RICORDI CHAMBER SET-UP ............................................................................................................12 5.3 500ML ADAPTER, CLAMP, AND CHAMBER SET-UP .........................................................................13 5.3.1 500ml Clamp/Adapter Set-up ................................................................................................13 5.3.2 500ml Chamber Set-up ..........................................................................................................13 5.4 600ML ADAPTER, CLAMP, AND CHAMBER SET-UP .........................................................................14 5.4.1 600ml Shaft Adapter Set-up ...................................................................................................14 5.4.2 600ml Chamber-Clamp Set-up ..............................................................................................14 5.4.3 600ml Clamp-Adapter Set-up ................................................................................................15 5.5 CHAMBER-THERMOPROBE SET-UP .................................................................................................15 5.6 HEATER SET-UP ..............................................................................................................................16 5.7 COOLER SET-UP .............................................................................................................................17 5.8 PRESSURE SET-UP...........................................................................................................................17 5.9 RICORDI ISOLATOR TUBING SET-UP ...............................................................................................18 6 OPERATION OF THE RICORDI ISOLATOR ..............................................................................20 6.1 POWER-UP .....................................................................................................................................20 6.2 POWER-UP SCREEN.........................................................................................................................21 6.3 LOGIN PAGE ...................................................................................................................................21 6.3.1 Add Users ..............................................................................................................................21 6.4 MAIN MENU ...................................................................................................................................22 6.5 MANUAL MODE .............................................................................................................................22 6.5.1 Experiment Data ....................................................................................................................22 6.5.2 Control Panel ........................................................................................................................23 6.6 PROTOCOL WIZARD........................................................................................................................26 6.6.1 Experiment Data ....................................................................................................................26 6.6.2 Protocol Selection / Creation ................................................................................................26 6.6.3 Isolator Setup.........................................................................................................................27 6.6.4 Protocol Execution ................................................................................................................28 6.7 E-STOP EMERGENCY BUTTON ......................................................................................................29 7 DATA VIEWER ..................................................................................................................................30 7.1 8 PLAYBACK MODE...........................................................................................................................31 CUSTOMER SERVICE .....................................................................................................................31 Page 2 of 31 1 Getting Started WARNING: Please, read this section before unpacking, installing or operating this machine. 1.1 Symbols Used in this Manual The lightning flash with arrowhead symbol, within an equilateral triangle, is intended to alert the user to the presence of dangerous voltage within the machine’s enclosure that may be of sufficient magnitude to constitute a risk of electric shock. The exclamation point within an equilateral triangle is intended to alert the user to the presence of important information in the literature that accompanies the device. This symbol warns of moving parts that may cause personal injury. This symbol is used when two people are needed to do the task. 1.2 Machine Information In the spaces provided below, record the Model and Serial No. located on the rear panel of your machine. Model No. __________________ Serial No.______________________ RETAIN THIS INFORMATION FOR FUTURE REFERENCE. 1.3 Contact Information Biorep Technologies, Inc. th 3225 NW 112 Street Miami, FL 33167 [email protected] www.biorep.com Tel: 305-687-8074 Fax: 305-688-8029 Page 3 of 31 1.4 Safety Information WARNING: DO NOT SKIP READING THIS SECTION. PLEASE READ AND OBSERVE ALL WARNINGS AND INSTRUCTIONS GIVEN IN THIS USER’S MANUAL AND THOSE MARKED ON THE UNIT. RETAIN THIS BOOKLET FOR FUTURE REFERENCE. DO NOT REMOVE THE MACHINE’S COVER OR YOU MAY BE EXPOSED TO DANGEROUS VOLTAGE. REFER SERVICING TO QUALIFIED PERSONNEL ONLY. TO REDUCE THE RISK OF FIRE OR ELECTRIC SHOCK, DO NOT EXPOSE THIS DEVICE TO RAIN OR MOISTURE. DANGEROUS HIGH VOLTAGES ARE PRESENT INSIDE THE ENCLOSURE. READ AND UNDERSTAND HOW MOVING PARTS ARE CONTROLLED BEFORE OPERATING THE MACHINE. KEEP YOUR FINGERS AWAY FROM MOVING PARTS; NEGLECTING TO DO SO MAY CAUSE PERSONAL INJURY. READ AND FOLLOW THESE INSTRUCTIONS: 1. Keep these instructions for future reference and heed all warnings stated in this manual. 2. Do not block any ventilation openings. Install the machine in accordance with the manufacturer’s instructions. See Site Preparation in section 1.5 for details. 3. Do not defeat the safety purpose of the polarized or grounding-type plug. A polarized plug has two blades with one wider than the other. A grounding-type plug has two blades and a third grounding prong, which is provided for your safety. If the provided plug does not fit into your outlet, consult an electrician for replacement of the obsolete outlet or contact Biorep Technologies, Inc. at (305) 687-8074. 4. Protect the power cord, the power entry module, and the plug from being walked on or pinched to avoid damaging them. 5. Refer all servicing of the machine to qualified personnel. Servicing is required when the apparatus has been damaged in any way. 6. Images in this manual are for instruction purposes only. change without notice. Accesories depicted may Page 4 of 31 1.5 Site Preparation This machine is intended to work in a controlled laboratory environment. Place the machine according to the figure below. The machine has two ventilation openings in the rear, which should not be blocked. A 10 inch (25.4 cm) clearance is recommended between the back of the machine and any object. Minmum Floor-space required is 74cm (29.3”) x 66cm (26.0”). Figure 1: Site Preparation 1.6 Unpacking Instructions Two people are needed to unpack the machine from the crate. This machine is very heavy. To prevent injury or damage, hold the machine to control its speed and direction while pulling it down the ramp. 1. Identify the FRONT PANEL of the crate. 2. Using a Phillips screw driver, remove the front panel, which will be used as a ramp. Then, remove the two wood braces that are in front the machine. These supports are attached to the sides of the crate with screws. 3. Turn the FRONT PANEL around and lay it down, so that the wood support is on the floor next to the pallet and the panel forms a ramp for the machine. 4. While one person pulls the machine toward the ramp, have a second person control the speed and direction of the machine. Figure 2: Unpacking Instructions Page 5 of 31 1.7 Packing List The following items are included with the purchase of a Ricordi Isolator Qty 1 1 2 1 1 1 1 Reference RI-04 RI4-TUBSET-WB TC-02 **Country Specific** RI-04-UM MRC-CLAMP/ADT 71285A157 Description Ricordi Isolator Ricordi Isolator Tubing Set (Sterile) Biorep Thermoprobe Power cord (115 or 230 VAC) User Manual Ricordi Chamber Clamp & Adapter 3/16” Allen Wrench Table 1: Packing List Page 6 of 31 2 Introduction This User Manual is intended to be used by scientists, researchers, and technicians who have already been trained in islet isolation procedures and technologies. This document contains the necessary information for unpacking, installing, and operating the machine. The Ricordi Isolator has been developed to assist in the dissociation process of the islet isolation procedure by automating and monitoring pancreas digestion. The machine accurately controls chamber movement, temperature and flow, and monitors system pressure in real time. In addition, the machine has the ability to generate reports that include a time-lapse record of every parameter during the procedure. The machine is intuitively controlled through the integrated touch-screen interface. The Ricordi Isolator enables the researcher not only to analyze each digestion, but to refine the procedure into a repeatable and efficient process by creating custom protocols for the machine to execute. The Ricordi Isolator brings all the benefits of modern industrial automation into your lab. 3 Perfusion 4 Isolation 2 Organ Transportation 5 Purification 1 Donnor 8 Transplant 6 Perifusion 7 Cell Transport Figure 3 Ricordi Isolator into the Islet Isolation Process Page 7 of 31 3 Machine Parts Identification 3.1 Front Panel Figure 4: Ricordi Isolator, Front View 1. Outlet 3-Way Pinch Valve 2. Biorep Thermoprobe Port 3. Shaker Shaft + Clamp 4. Inlet 3-way Pinch Valve 5. Peristaltic Pump 6. Cooling Tank 7. Total-Locking Casters 8. Size 17 Tubing Holder 9. Pressure Sensor 10. Transducer Protector 11. “T” Connector Holder 12. Touch Screen 13. Infrared Temperature Sensor 14. Emergency Stop Push Button 15. Spacers 16. Automatic Heater Page 8 of 31 3.2 Rear Panel Figure 5: Ricordi Isolator, Rear View 1. Bottom Vent 2. Top Vent 3. Serial Number Plate and Machine Identification 4. USB Port 1 5. USB Port 2 6. LAN Port 1 (LOCAL CONTROL NETWORK) 7. LAN Port 2 (INTERNET) 8. Fuse Box (AC Rating label) 9. Main Power Switch 10. Power cable entry Page 9 of 31 4 Accessories Not all the accessories described in this section are included in the RI-04 packing list; some of these items must be ordered separately. For ordering information please consult our webpage www.biorep.com or contact one of our sales representatives at +1-305-687-8074. 4.1 Disposable Tubing Set (RI4-TUBSET-WB) The Ricordi Isolator Tubing Set was specifically designed for use with the Ricordi Isolator. A disposable, sterile tubing set is included with this machine as an example. Figure 6: Ricordi Isolator Tubing Set (RI4-TUBSET-WB) Page 10 of 31 Accessories (Continued) 4.2 Biorep Thermoprobe (TC-01) The Biorep Thermoprobe features a standard type T thermocouple universal mini-plug connector and accurately measures fluid or gas temperature at the site of any female Luer connection. It is individually packaged and sterilized and is recommended for single use only. Figure 7: Biorep Thermoprobe The Biorep Thermoprobe can be inserted and attached onto the female Luer fitting on the Ricordi chamber base. Please, refer to Chamber-Thermoprobe Set-up in section 5.5 for directions on installing the Biorep Thermoprobe. Figure 8: Luer Connector 4.3 Ricordi Chambers The Ricordi Isolator is designed to work with a Ricordi Chamber. The 500ml and 600ml Ricordi chambers, made from either autoclavable Ultem® (translucent amber color) or disposable Durastar® Polymer (clear) . Custom size Ricordi Chambers are also available. Figure 9: Ricordi Chambers The 500ml and 600ml Ricordi Chambers have different means of securing the lid to the base; hence the clamp adapter used to secure it to the Ricordi Isolator shaft is different. For more information about securely assembling a chamber and adapting it to the Ricordi Isolator, please refer to Section 5.3 (for 500ml chamber) and 5.4 (for 600ml chamber). Page 11 of 31 5 Set-up of the Ricordi Isolator 5.1 Basic Isolation Cycle Figure 10: Basic Isolation Cycle The Ricordi Isolator is based on a patented method for isolating cells from organs (Pat. No. 6,833,270). The organ contained in the Ricordi Chamber, is simultaneously digested by chemical and mechanical action. Controlled linear and rotational agitation of the chamber produces mechanical dissociation of the organ. At the same time, digestive enzymes are circulated through the chamber at a controlled temperature and flow, to create chemical digestion. Additional information on this technology can be found at: http://www.biorep.com http://www.diabetesresearch.org 5.2 Ricordi Chamber Set-up The Ricordi Isolator can be used with a 500ml or 600ml reusable or disposable chamber. However, a different clamp and adapter must be used with each size. Do not attempt to use an incorrect clamp-chamber combination. This will result in the chamber being inadequately attached to the Isolator, which could cause personal injury and/or failure of the isolation. If you have any doubt about how to use the chamber correctly or if you don’t have the correct clamp and adapter for a chamber, please contact Biorep’s customer support in the USA at: +1(305)-687-8074, through our website www.biorep.com, or write directly to [email protected]. Page 12 of 31 5.3 500ml Adapter, Clamp, and Chamber Set-up The 500ml clamp has a built-in adapter for the Ricordi Isolator shaft. 5.3.1 500ml Clamp/Adapter Set-up Figure 11: 500ml Clamp/Adapter Set-up 1. Loosen the top screws of the adapter (do not remove them completely) with a 3/16” Allen wrench, ( included in accessories ). 2. Insert the shaft of the Ricordi Isolator completely into the adapter. 3. Tighten the screws firmly with the Allen wrench. 4. Check that the clamp/adapter is securely attached to the shaft. 5.3.2 500ml Chamber Set-up Key Knob 2,3 & 4 1 Notch Figure 12: 500ml Chamber Set-up 1. Loosen the clamp knob to open the clamp. 2. Insert the 500ml chamber from the top, making sure that the chamber’s key is placed into the notch on the clamp as shown above. 3. Pull the chamber down into the clamp, so that the lip is in contact with the clamp. 4. Tighten the clamp knob to close the clamp securely. Do not over-tighten the clamp; Doing so may deform the chamber’s shape and compromise the seal. An improper seal could lead to a leak during the isolation. Page 13 of 31 5.4 600ml Adapter, Clamp, and Chamber Set-up Due to the nature of the 600ml Ricordi Chamber, which relies on the clamp to create the seal, the 600ml Clamp and the Shaft Adapter are separate parts. It is recommended that the user secures the adapter to the Isolator shaft first. Prepare the contents of the chamber (marbles, pancreas, and screen or perforated plate) and place these into the base of chamber. After carefully attaching the lid of the 600ml chamber and securing with the clamp, insert the clamp-chamber assembly into the adapter. (Note: The chamber cannot be opened while the clamp is inside the adapter. Remove the clamp/chamber from the adapter if you must open it.) 5.4.1 600ml Shaft Adapter Set-up Figure 13: 600ml Adapter-Shaft Set-up 1. Loosen (do not remove) the top screws with the 3/16” Allen wrench (Included). 2. Insert the shaft completely into the adapter. 3. Tighten the screws firmly with the Allen wrench. 5.4.2 600ml Chamber-Clamp Set-up Figure 14: 600ml Chamber-Clamp Set-up 1. 2. 3. 4. Open the clamp. Insert chamber’s edge into clamp’s groove. Close clamp so that entire edge of the chamber is secured (lid to base). Close the clamp latch as shown. Page 14 of 31 5.4.3 600ml Clamp-Adapter Set-up Figure 15: 600ml Clamp-Adapter Set-up 1. 2. 3. 4. 5.5 Unscrew (do not remove) the adapter knob, so that the spring-loaded cap is loose. Insert the clamp and press it firmly against the back of the adapter. Tighten the adapter knob completely (Adapter should already be attached to the shaft). Test for a secure assembly. The clamp should not be able to move in any direction. Chamber-Thermoprobe Set-up Once the chamber is in place, the Biorep Thermoprobe (sold separately) has to be connected to the chamber for the temperature control to work. Figure 16: Chamber-Thermoprobe Set-up 1. Connect the Biorep Thermoprobe sensor to the Luer fitting on the Ricordi Chamber. Screw on and tighten the Luer connector completely. Incorrect attachment can cause leaks or errors in temperature reading. 2. Connect the Thermoprobe Connector to the T Thermoprobe Jack on the Isolator. Make sure that the positive (+) blade (which is a copper color) is connected to the top jack. Incorrect polarity will cause jack damage and an error in temperature reading. When priming the system with the solution, make sure there is no air trapped in the thermoprobe well. Trapped air creates an insulating effect that may cause the temperature control to fail. Purge any trapped bubbles by momentarily unscrewing the probe during priming. Make sure to re-tighten firmly. Page 15 of 31 To prevent the Thermoprobe cable from breaking during an isolation due to the aggressive shaking, wrap the cable around the size 17 silicone tubing. This will allow the Thermoprobe to move in unison with the Ricordi Chamber. 5.6 Heater Set-up A heating element, consisting of a coiled metal tube, provides controlled heat to the fluid that circulates through it. The coil surface temperature is constantly monitored by a thermocouple. Follow the instructions below and see Figure 15 to properly connect the Heating Element. Contact 1 Thumbscrew 4 4 B 1 A 2&3 Thermocouple Heating Element Figure 17: Heater Set-up 1. Loosen the thumbscrews to open the clamps enough to fit the heating element (coil) ends into the contact grooves. 2. The heating coil has to be properly assembled to work as intended. Make sure that end B of the heating element is inserted into the contact groove on the right and that end A fits completely into the thermocouple groove. Then, tighten the thumbscrews. 3. Close the heater cover carefully. The heating element must not touch the heater cover. If it does, loosen the thumbscrews and adjust the heating element as necessary. Page 16 of 31 5.7 Cooler Set-up The Cooler of the Ricordi Isolator consists of a temperature-controlled cooling tank and a cooling coil. The machine’s refrigeration system cools the tank’s contents to the target temperature. The coil is submerged in the tank and the digested preparation is circulated through it when cooling is desired. Please, refer to the directions and Figure 18 below. Figure 18: Cooler Set-up 1. Add water to the tank up to the fill-line (Approx. 600ml). IMPORTANT: Do not overfill tank; doing so may affect temperature control and/or cause spillage. 2. Turn on the cooler 30 minutes prior to an isolation to allow for the cooling system to reach the desired temperature. A thin ice film may form on the tank walls. This is normal. 3. Attach tubing to the coil as described in the Ricordi Isolator Tubing Set-up in section 5.9 and keep the cooling coil sitting outside the cooling tank at the beginning of the isolation. 4. Insert the cooling coil into the tank at the point in the isolation when cooling is desired. NOTE: The tank can be emptied at the end of the isolation by using a section of tubing and the peristaltic pump to create suction. 5.8 Pressure Set-up The pressure sensor has a range of 0 – 300 mmHg. To minimize the pressure reading pulsations from the peristaltic pump, use the “transducer protector” shown on Figure 19. Make sure the membrane on the transducer protector is oriented as shown on Figure 20. As the pressure builds up, the membrane is deflected upwards and the air above is compressed – this is the change sensed by the pressure sensor. If the membrane is installed upside down, it will not deflect properly, compromising the pressure readings. Figure 19 and 20: Pressure Set-up and transducer orientation Page 17 of 31 5.9 Ricordi Isolator Tubing Set-up Orange Tubing: Platinum cured silicone tubing 1/8” ID x 1/4” OD (TUB 16) Green Tubing: Platinum cured silicone tubing 1/4” ID x 3/8” OD (TUB 17) Figure 20: Tubing Set-up Set up the Ricordi Isolator tubing as illustrated in Figure 21. Double check your setup and make sure you do not forget the following: 1. 2. 3. 4. Properly insert the tubing into the two pinch valves. Switch valve positions to verify. Route the output of the heating element through the IR (Infrared Sensor). Secure the inlet and outlet connections of the Ricordi Chamber with tie-wraps. Close the one-way stopcock of the sampling kit. The tubing set is equipped with a sampling kit/port and syringe, located at the output of the Ricordi Chamber. This sampling port has a one-way stopcock which is packaged in the OPEN position due to sterilization considerations. The stopcock must be CLOSED prior to installing and using the tubing set to prevent accidental sampling. OPEN CLOSED Page 18 of 31 Ricordi Isolator Tubing Set-up (Continued) A suggested Digestion-Collection switch method is outlined below. However, there are several ways to do this and it is left to the researcher to establish a method that best suits his/her needs. The output of the Ricordi Chamber can be connected to the input of the cooling coil at all times. During the digestion phase the cooling coil sits outside the cooling tank. When switching to the collection phase, the cooling coil is submerged in the pre-cooled cooling tank for the heat exchange to occur. At this time, the output line must be redirected to the collection container. The machine is equipped with 3-Way Pinch Valves that can be used to divert the flow from a digestion line to a collection line. Inlet Valve (Size 16 Tubing) Outlet Valve (Size 17 Tubing) Figure 21: 3-Way Pinch Valves If all tubing is set up ahead of an isolation, remember to leave the peristaltic pump head open, and remove tubing from pinch-valves. If silicone tubing is subjected to extended compression periods, there may be permanent tubing profile deformation. Page 19 of 31 6 Operation of the Ricordi Isolator The main operation of the Ricordi Isolator is done through the touch-screen interface. This type of interface eliminates the need for an external keyboard or pointer device and provides a visual and intuitive interaction with the user. The operator should familiarize himself/herself with the different screens, features, and controls of the interface before attempting to operate the machine during an actual isolation. Anyone who will operate and/or supervise the use of this machine should read and understand this section in its entirety. This machine has been designed with alarm features that will help the user identify and correct potential problems. Alarm messages will be displayed at the bottom of the screen. This machine is fitted with a mechanical emergency stop push-button located below the touchscreen. This button can be pressed if a safety hazard occurs or in the event of a malfunction of the mechanism or the interface. When the emergency stop is engaged, all moving parts and heating and cooling elements will shut down immediately. The touch-screen interface of this machine has virtual buttons, represented by icons, to activate and deactivate the different features of the machine. Care was taken at the time of designing the icons, so that there is minimal ambiguity between on and off states (active and inactive). However, to avoid confusion please read this section of the manual carefully. Every button icon has two states: a “grayed-out” state and a “colored” state. When the button icon is “grayed-out” it represents an inactive or “OFF” condition. When the icon is colored, it represents an active or “ON” condition. If a “grayed-out” icon is pressed, the icon will change to a colored icon and the controlled feature will turn ON. If a colored icon is pressed, the feature will turn OFF and the icon will be “grayed-out”. 6.1 Power-Up The machine’s main power switch and fuse are located on the back of the machine, above the power cable entry module. Connect the power cord (provided in the accessory box) to the module and plug it into a 115-220VAC outlet. The press the toggle switch to turn the machine ON. Figure 22: Power Module Page 20 of 31 6.2 Power-up Screen This will be the first page that appears after the system has completed the boot-up process. In this page you will be prompted to touch anywhere to begin. Do not touch the screen or enter any commands via a plugged keyboard or mouse until you see this screen. 6.3 Login Page The Login Page allows you to log into your password protected user account. The user account saves the preferences of your experiments, and saves time by pre-filling some frequently used fields during the experiment process and during reporting. The first step is creating a user account. To create a new user account, press the Add User Button. 6.3.1 Add Users When the Add User button is pressed, the New User Account fields on the right of the screen will be enabled. Upon clicking on any field a pop-up keyboard will appear. Enter a unique username and password using the keyboard and press Accept. Click Save to create the user. Now you will be able to find your User name on the drop down list at the top left. The next time you do an isolation just select your user from the list, enter your password and press Login. Page 21 of 31 6.4 Main Menu Once logged in, you will arrive at the Main Menu page. On this page you can select the operation mode of the machine. Once logged in, you will arrive at the Main Menu page. On this page you can create a new experiment protocol via the Protocol Wizard. Manual Mode will take you to a control panel interface where you can manually manipulate the machine parameters in real time. Manual sessions can be recorded for later analysis, reporting or playback in the Data Viewer mode. You can think of Manual Mode as the experiment composer, and the data viewer as the experiment player and editor. In the Main Menu page you will also see the active User Account, the Software Version installed in your Isolator machine, and the machine Status Bar at the bottom. The Status Bar will display any alarms or important messages related to the function of the machine. You can also end the session from this page either by logging out of your user account or by turning the system off. DO NOT TURN THE MACHINE OFF FROM THE POWER ENTRY MODULE BEFORE BEING PROMPTED TO DO SO. 6.5 Manual Mode When entering manual mode, the machine will ask for confirmation to “initialize the motion system”. Please make sure the motion of the machine is unobstructed and press OK to continue. The machine will perform a homing routine, in which the vertical and rotational mechanisms move to their motion origins. 6.5.1 Experiment Data Selecting manual mode will take you to the screen below, where you will be required to fill out a form type page with all the relevant data of the donor, the organ and the operator. Most of the fields include drop-down menus for quick selection. The drop down list can be edited to add options not included in the default list. Once the data is filled, you can continue to the control panel by clicking the NEXT arrow on the bottom right. Page 22 of 31 6.5.2 Control Panel All the controls required to operate the machine during a Manual Mode experiment are located in this single interface. In this control panel you will be able to change motion parameters, temperature parameters, flow/pressure parameters and control the recording of your experiment for use in the Data Viewer mode. For reference, the term “indicator” will be used for fields that are read-only. This means that they are not editable, and only provide measurement data or other information to the user. A “control” is the term used for a field that is editable by clicking. These are usually variables set by the user to control the machine. 6.5.2.1 Temperature Control The temperature control section of the control panel has the following functionality: The “flame” icon on the top is the heater ON/OFF button. The indicator in the center is the Chamber PV (Present Value) measured by the chamber thermoprobe. The SP (Set Point) control to the right is the target temperature that the automatic control will reach and maintain. The “snowflake” icon on the bottom is the cooler ON/OFF button. The indicator in the center is the cooler PV, and the control to the right is the cooler SP. Page 23 of 31 6.5.2.2 Flow control The flow controls are all located at the bottom of the screen. The “Drop” icon on the left is the ON/OFF button for the peristaltic pump. The (+) and (--) buttons increment and decrement the flow rate by 5mL/min for each click. The flow-rate can also be changed by clicking on the control and entering a number on the pop-up keypad. The machine is constantly monitoring pressure on the chamber input line, and it is displayed in the indicator after the “@”. On the right hand side you will find the pinch valve controls. The Inlet Valve button controls the small pinch valve on the bottom. Pressing this button will close one channel and open the other. The active channel is highlighted in blue, and its number (1 or 2) is displayed. 1 stands for the channel closest to the machine, and 2 is the outer channel (away from the machine). The Outlet Valve button controls the top valve in the same manner. 6.5.2.3 Motion Control The motion controls, located in the upper left of the screen are used to adjust and monitor the two simultaneous reciprocating motions: Linear and angular. The linear motion is a vertical reciprocating motion which is turned ON by the vertical double arrow button on the top. The Freq. (frequency) in cycles per minute (Range: 30 to 200cpm) can be changed by pressing on the +/- increment buttons, or by changing the value through the pop-up keypad when pressing on the control. The Stroke value determines the amplitude of the motion and can be changed in the same manner (Range: 30 to 110mm). Angular motion can be turned ON independently by clicking on the circular double arrow button. Its frequency (Range 30 to 200cpm) and amplitude (Range: 45 to 180 degrees) can be changed the same way as for the vertical motion. Page 24 of 31 6.5.2.4 Data-Logging The Data logging section records your Isolation experiment for later analysis, reproduction or edition in the Data Viewer mode. Press the Record button at any point during your experiment to start logging all the parameters and their changes over time. You can use the Pause button to suspend the data-logging in case you want to make a change or two “off-the-record”. When you want to stop logging, just press the Record button again. The session will be added to the end of the Reports list in the Data-Viewer section. 6.5.2.5 Taskbar The taskbar at the bottom of the screen has the following functions: On the left, the Biorep Logo is a shortcut to the Main Menu screen. On the right, there will be navigation arrows that will take you to the next or previous screens when applicable. The most important feature is the Status Bar on the center, which provides the user with visual feedback on any errors or important messages from the system. 6.5.2.6 Active Icons The following figure shows the icons of the control panel in their active state, or in their 2 in the case of the flow control valves: nd state Page 25 of 31 6.6 Protocol Wizard Continuing our effort to streamline the Isolation process, and reduce the chance of error during setup, we have developed a wizard type interface to set-up and run your isolations. The wizard will guide you step by step through the setup of the machine, setup of the chamber, creation of your protocol and execution during the isolation process. 6.6.1 Experiment Data On the first screen of the wizard you will be required to fill out a form type page with all the relevant data of the donor, the organ and the operator. Most of the fields include drop-down menus for quick selection. The drop down list can be edited to include any other options not in the default list. Once the data is filled, you can continue to the protocol creation screen by clicking the NEXT arrow on the bottom right. 6.6.2 Protocol Selection / Creation On this screen you will be able to select or create a protocol for the machine to run automatically. A list of previously created protocols will be shown as a list on the left pane. The right table shows the contents of the protocol. A protocol is divided into a series of Stages, which are identified by the rows of the table. Each Step has the following attributes: Step Name, which helps you identify the step within the protocol; Names like “Digestion” and “Dilution” may be useful. The next column is the Flow rate, which determines the rate, in mL/min, at which fluid is circulated in the system. In the next two rows you can enter the target temperature for the chamber and for the cooler in degrees Celsius. The next two columns determine the state of the inlet and outlet valves. The state can be “ON” or “OFF”, the “ON” state is equivalent to the channel closest to the machine being open (State 1 in Manual mode, see 6.5.2.2). The last column displays the motion parameters: Vertical frequency (Vf), Vertical stroke (Vs), Rotational frequency (Rf) and Rotational stroke (Rs). Page 26 of 31 Creating a Protocol To create a protocol, click on the NEW button on the top left. Click ADD STEP button below to add a step to your protocol. A row filled with "X" will appear. Replace all the X with your protocol values by clicking on the fields. No “X” can be left on the protocol. Repeat the process to add more steps. Assign a name to the protocol and click SAVE to store your protocol in the machine's memory for future use. You will now see the name of the new protocol displayed on the left pane. Select a protocol from the list and click next to continue. 6.6.3 Isolator Setup The wizard will guide you through all the setup steps required to run an isolation as described in detail in section 5: The first Screens will deal with the setup of the cooling system and the chamber. The wizard will display the appropriate screens depending on your choice of chamber. After you have completed the chamber setup, the next step is to set up the heater. Follow the instructions in the screen to install the heating coil, and test your connection by pressing the “Check Heating Coil Connections” button. A “Test Passed” dialogue should appear. The following screens will then guide you through the rest of the setup, including pressure sensor and tubing circuit. After loading the organ, you should be ready to run your protocol. Page 27 of 31 6.6.4 Protocol Execution The Isolator protocol screen displays information and controls required to monitor and control your protocol. The top controls allow you to Play, Pause or Stop the protocol at any time. You can monitor the heating and cooling temperatures with the two indicators, Chamber PV and Cooler PV at the top right. The central table in this screen shows the parameters of the stage being executed highlighted in yellow. It also shows the parameters of the next step in the row below and of the previous step in the row above. Unlike timed protocols, where the duration of a stage is pre-programmed into the protocol, the Isolator protocol is a stage based protocol, in which the user decides when to change to the next Stage. When you decide it is time to go to the next Stage, click the “Next Stage” button below and to the right of the table. Return to the previous stage by clicking the “Previous Stage” button below and to the left of the table. 6.6.4.1 Manual Override Due to the nature of the isolation procedure, it is often required to deviate from a protocol to address an unforeseen issue. Click on the Manual Override button at any time during the experiment to access the full manual controls. Please see section 6.5.2 for more details on Manual controls. After making the required changes in manual override, you can return to the protocol by pressing the Back arrow. Back in the protocol execution page, the Isolator will retain all the parameters set during the manual override, and a “Override” Stage will to the protocol table. At this moment you can either press Previous Stage to return to the stage the Isolator was in before the override, or press Next Stage to continue with the following stage. Page 28 of 31 6.7 E-STOP Emergency Button Figure 23: Emergency Push-Button & Caution Screen If an emergency is encountered, the user can disable the machine by pressing the mechanical E-STOP button, which is a red button that is located below the touch-screen. When the E-STOP is pressed, the motors, pump, heater, and cooler will be disabled and the user interface will display a warning screen. When the emergency is resolved, the machine can be enabled by disengaging the E-STOP button by twisting clockwise and pressing the “RESET” button on the touch-screen. The machine will then reboot and take the user back to the login page. Page 29 of 31 7 Data Viewer In the main menu you can enter the Data Viewer (with playback mode). In this mode you will be able to review the data collected by the isolator during a recorded session, or a recorded protocol. In addition, the playback mode will allow you to re-play a previously executed protocol. The first screen of the Data viewer displays a table containing recorded sessions. You can display the recordings of an individual user or of all users. Select a particular session by clicking its corresponding row. After the session can be selected, you can export the data to a file by using the Export Data button, Delete the session by using Delete, or review the data of this session by navigating through the tabs. The first tabs displays the Experimental Data collected (see 6.5.1) . The following four tabs have a graphical display of the parameters of each of the four systems: Temperature, Flow, Motion and Valves. The graphical representations will help you to quickly analyze the execution of a perifusion experiment, and with experience it may help distinguish successful isolations from less successful ones. TEMPERATURE MOTION FLOW VALVES Page 30 of 31 7.1 Playback Mode To replay a recorded session, select it from the Reports list and click the Playbck button. The Manual Mode Playback screen contains temperature and pressure indicators, which help you monitor the current status of your isolator. The table contains all the steps of the recorded session. Each step corresponds to a single parameter change. At the time of recording, any change in the state or value of a parameter will generate a new step. This is different from the Wizard protocols, where many values and states can be changed from one Stage to the next. Another difference from the Wizard protocol is that Playback mode is a Timed execution. States on the isolator will change automatically at the same time-point as in the original experiment. This time-point is the first column in the table. Although you cannot skip forward or backward like in a wizard protocol, the Playback mode has a Manual Override option, which will allow you to modify the execution of the recording on the fly. Return to the playback mode by pressing the back arrow. To resume timed execution press the PLAY button. The button to the right of the Play button is the Reload button, and will restart the execution from the beginning. 8 Customer Service If you encounter any problems, please contact customer support at: Biorep Technologies, Inc. 3225 NW 112th Street Miami, FL 33167 [email protected] www.biorep.com Tel: 305-687-8074 Fax: 305-688-8029 Page 31 of 31