1
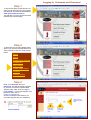
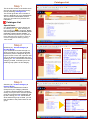
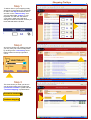
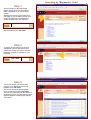
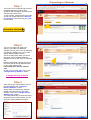
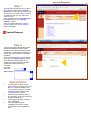
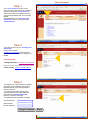
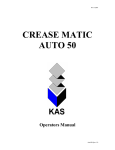
63 Belmont Avenue
Belmont WA 6104
Telephone : 1300 139 388
Facsimile : 1300 139 488
On-Line Store
Training Manual
www.quickcorporate.com.au
Help Line [email protected] Version 3.4
2
"Welcome"
Welcome to Quick Corporate Australia's On-line Store
We have developed this on-line ordering site to enhance our service levels to you, our valued client,
and to help you reduce your time spent ordering your office supply requirements.
Most of the enhancements made over the past years have been from your input, so your feedback on
this user manual or the actual on-line store is very important to us and very welcome. Should you have
any questions or require help on using the site, please do not hesitate to email us on
[email protected] or phone on 1300 139 388.
All of our account managers are trained in the use and functionality of our on-line store, and are always
available to help and advise you in different ways to access all of the great features of the on-line system. All of our new features have been designed to save you time and thus reduce your overall cost in
procuring your office supplies.
Page 2
Index
Page 3
Logging–In User Name Password
Page 4
Catalogue Lists & Product Groups
Page 5
Catalogue Lists & Product Groups
Page 6
Shopping Trolley
Page 7
Multiple Shopping Trolleys
Page 8
Searching by Keyword
Page 9
Searching by Product Code
Page 10
Proceeding to Checkout
Page 11
Proceeding to Checkout
Page 12
Special Requests
Page 13
Quick Order Form
Page 14
Quick Order Form
Page 15
Your Account “Changing Your Password”
Page 16
Your Account “Your History”
Logging In, Username and Password
Step 1
To log into the Quick Corporate On-Line
store you will need to open your internet
web browser and enter the web address:
www.quickcorporate.com.au
This will take you to the Quick Corporate
Australia Pty Ltd homepage.
Step 2
To enter the On-Line store please select
Store Login from the left hand side menu.
Then proceed to click your "left" mouse
button
Home
About
Promotions & News
Contact Us
Store Login
Credit Application
Careers
Privacy policy
Step 2
Enter your Username and your
Password. This will have been supplied
to you from our Quick Corporate Web
Support Team. Next, click on Login or
press <Enter> . If you have forgotten your
password, then click on :
Forgot your password?
and an e-mail will be sent back to you
from Web Support with your Password.
3
1
2
Enter your
username
here
Enter your
password
here
Select login to
enter the On-line
store
3
Catalogue List
Step 1
This is the first screen of the Online store
and you can return to this screen at any
time by selecting Catalogue List.
This screen gives the user a number of
options, depending on your requirements.
The next section will illustrate various
ways you can search for products and
information.
Catalogue List
Special Note:
Our non-stocked items will be flagged with
the following icon.
When the mouse is
held over this icon, a note will appear ’Please
note, this product is a non stock line & non
returnable. Please choose carefully’. To
look for alternative products you may view all
items within that group (search by name), or
Customer Support can assist by phoning
1300 139 388.
Step 2
Searching by : Product Category &
Product Group
If you would like to browse through our
range of products, we have segmented
the various product categories. By moving the mouse cursor over a specific category it will become highlighted and, then
clicking your ‘left’ mouse button while that
category is listed, it will take you to the
product group options in this category.
Step 3
Searching by : Product Category &
Product Group
You now have available the Product
Groups from your category selection.
To view the products within the Product
Group, move your cursor over the specific
group and it will become highlighted, and
by then clicking your ‘left’ mouse button
whilst inside that group as listed, you will
then be taken to the product items in this
group.
BOOKS
4
Catalogue List
Step 4
Searching by : Product Category &
Product Group
This view now shows the stock items that
make up this group. You can move backwards and forwards through these pages
by selecting the page numbers at the top
of the listing as this larger cut out shows
below.
Step 5
Searching by : Product Category &
Product Group
Select and click on the product you would
like more information on and a picture will
appear with any additional information,
your purchase price and the unit of
measure.
To close this window just click on the
"close window" button.
Close window
button
Step 6
Searching by : Product Category &
Product Group
Note - A red cross through the camera
icon denotes that there is currently no
picture available for this product and
when the icon is "clicked" the window
will be displayed with all other relevant
information without a picture.
5
Shopping Trolleys
Step 1
To add an item to your shopping trolley,
simply key in the quantity you would like
to order in the Qty box and then select
and click on the "add to trolley" icon.
You may also select <enter> on your
keyboard. You will now see that the
"your trolley" dollar figure will have
changed to show the number of items you
have selected and the $ value.
Step 2
At any time during your ordering process
you may view your current trolley status
by clicking on the "view trolley" items
button located on the top right hand
corner.
Step 3
This view shows you what you have in
your shopping trolley and contains the
"proceed to checkout" symbol and the
"continue shopping" symbol buttons.
Proceed to checkout
Continue shopping
6
Multiple Shopping Trolleys
Step 1
Another feature of the On-Line store is the
ability for many people to use the same
password and order using their own
shopping trolley.
Shopping trolleys are available by clicking
Into the “YOUR TROLLEY” screen.
Simply click on drop down bar where it
reads (Default) and then click onto the
word New Trolley 1.
You will then be presented with the “New
Trolley” naming screen.
Step 2
When you have the “New Trolley” screen
available, it is just a matter of giving the
trolley a name.
Simply type into the Trolley Name box
with a name and then click onto the
‘Create Trolley’ button.
We have just created a new trolley called
“Sam the trolley”
You may now start ordering as normal
using the new trolley “Sam the trolley”.
Special Notes
•
•
•
•
•
When you revisit the On-Line store
you will have to re-click onto the
“Your Trolley” bar so that the
multiple trolley drop down menu is
shown—this will show all named
trolleys.
To delete a trolley from the drop
down trolley menu simply click on
the Delete trolley button and the
trolley will disappear from the
menu.
When you first log into the On-Line
store the (Default) trolley will
always appear first.
Trolleys with goods in them will
stay active until the order is either
confirmed or the trolley is deleted.
There is no limit to the amount of
trolleys available.
7
Searching by "Keyword or Code"
Step 1
The next section of this manual will
explain how to search for a product by
either "Keyword" or by the products
"code".
Starting from the first screen after log-in
(see page 3) you are able to search for a
product by selecting the search entry
section located on the top order bar.
We are searching for :Tim Tams
Step 2
To search for a product by its name or
“keyword” type into the search entry
section the product you wish to find and
press the go button or <enter> on your
keyboard.
Tim Tams
Step 3
This screen shows your results from
typing in your “keyword” which just
happens to be Tim Tams.
The screen will list all relevant goods
which contain the keyword Tim Tams.
You are now presented with the options of
viewing the picture, scrolling through extra
pages of product or entering the quantity
you require.
8
Searching by "Keyword or Code"
Step 1
The next section of this manual will
explain how to search for a product by
either "Keyword" or by the products
"Code". Starting from the first screen
after log-in (see page 3) you are able to
search for a product by selecting the
search entry section located on the top
order bar.
We are searching for : Reflex and know
the code to be : 625040010
Step 2
Type into the search entry section the
code 625040010 which just happens to
be the code for Reflex copier paper in A4
size and press the go button or <enter>
on your keyboard.
625040010
Step 3
This screen shows your result from typing
in your “Code” which just happens to be
625040010 for Reflex A4 Copier paper in
white.
The screen will show only the product that
the code entered will represent.
You are now presented with the options of
viewing the picture or entering the
quantity you require.
Browse
625040010
PAPER REFLEX A4 80GSM WHITE
9
Proceeding to Checkout
Step 1
Your order is now complete and you have
finished entering the products and
quantities and are ready to proceed to the
checkout area of the store.
To now confirm, view and send your order
via the web, please select the “Proceed
to Checkout” button and click your “left”
mouse button.
Proceed to checkout
Step 2
You can now view your order in its
entirety, and make any additional
changes you may have, such as changing
your delivery address from your current
default delivery address shown.
This is a handy option when you would
like goods sent to a different delivery
address such as a new office or a building
site.
Please note that the changes are only for
this order and will not be reflected again
for any other orders made.
Lets change your delivery address
now.
By using your mouse “left” click on the
“Change Delivery Address” button.
Change delivery Address
Step 3
After clicking your mouse button you will
be presented with the “Change of
Delivery Address” screen.
Simply enter the new delivery address
details in the boxes shown and when
finished, click on the “Change delivery
Address now” button.
You will automatically be returned back to
the goods invoice screen where you can
view your delivery address changes.
10
Proceeding to Checkout
Step 4
Once you have changed the delivery
address (if required) you have the option
of entering in your “Purchase Order
Reference” and any “Additional Notes”
you may want to add.
Simply key in the information and when
finished select the “CONFIRM ORDER”
button to send the order through to Quick
Corporate Australia for processing.
Purchase Order Reference
Additional Notes:
CONFIRM ORDER
Step 5
Once you have confirmed your order, the
following screen will appear with your
On-Line Transaction reference number.
Please record this transaction number
somewhere for future reference as it will
not be available on your history until the
goods are picked, packed and
despatched to your office.
You may now continue browsing the store
or you can continue to key in more orders.
Step 6
Once you have confirmed your order and
the order has been received by Quick
Corporate Australia you will receive back
to you, via e-mail, a confirmation of your
order.
This confirmation will contain all relevant
information of the order you have just
placed On-Line.
Please check the details carefully.
If you have made a mistake or something
may be missing that you believe you have
keyed correctly, please call our web
support team quoting the web order
number on 1300 139 388.
Your order has been submitted successfully
Thankyou for ordering from Quick Corporate
Your On-Line Transaction reference Number is 111442
11
Special Requests
Step 1
Through Quick Corporate On-Line store
you are able to put through “Special
Requests” for items that you cannot find
on the store, are custom made, or are an
unusual item that you may want us to
source for you.
From anywhere in the site the Navigation
bar appears simply as a “Special
Request” button.
Once you have selected the “Special
request” button, the “special request”
screen will appear.
Special Request
Step 2
You are now presented with the special
request and additional notes screen.
Please type into the text fields provided,
your Name, e-mail address and then proceed to type your request into the field
provided.
Once you have done this, you may then
click onto the “Submit request” button
which will forward the request to our
support team here at Quick Corporate.
A response will be forthcoming.
Your Name:
Your Email:
Select one:
^
Additional Notes:
^^
^
^
Special Notes
•
•
•
•
You may want to send us your
phone number as well if you would
like us to respond verbally. This
can be done by typing in your full
name and phone number in the
“Additional Notes” section.
Please do not hesitate to ask us
any questions, even if you think the
question may be silly.
This section is great for ordering
more catalogues.
You may ask for specific
catalogues on furniture, coffee
machines and printed stationery
here.
12
Quick Order
Step 1
The “Quick Order” section of the OnLine store is the most user friendly and
time saving function on the Quick
Corporate site. This section allows the
user to create and maintain their own
“Quick Order” form on the website.
Frequently ordered products can be
added to the list and thus can be
accessed and ordered quickly.
Simply click onto the “Quick Order”
button from the top navigation bar.
Quick Order
Step 2
You will be presented with the “Quick
Order” screen which contains two
distinctly different sections, the “Top 10
List” and the “Categories” of your Quick
order form.
Your Top 10 Most Purchased Items
expand category
Step 3
Top 10 List
If you click on the “Expand Category”
button which is located next to :
Your top 10 most purchased items
you will be presented with the top 10
items you have purchased to date in one
whole listing regardless of the items
category listing.
13
Quick Order
Step 4
Categories
If you click on the “Expand All” button
which is located next to :
To View all items in your quick order form. Click here
you will be presented with your quick
order form broken into categories which
relate to our catalogue’s sections of
products.
These categories are as follows:
BOOKS
CANTEEN PRODUCTS
COFFEE MACHINES
COMPUTER SUPPLIES
DESK ACCESSORIES
DIARIES
FILING AND PRESENTATION
FIRST AID
JANITORIAL PRODUCTS
LABELLING
OFFICE EQUIPMENT
OFFICE FURNITURE
PAPER PRODUCTS
WRITING & CORRECTION
PRINTING
Step 5
You are now presented with your “Quick
Order” form expanded into its categories
for easy access to products.
You may also click on the “Expand Category” button next to each category on its
own. This will expand only that category
selected and list all items for that individual category.
To remove a product from the Quick
Order form simply click on the “remove
button” next to the item you wish to
remove.
remove
To add an item to your “Quick Order”
form , simply select the
“add to Quick list” option on the
expanded description and picture window.
14
Your Account
Step 1
The “Your Account” section of the
On-Line store is divided into two sections.
Simply click onto the “Your Account”
button above the top navigation bar and
you will be presented with your accounts
details.
These details are for “Changing your
Password” and for viewing your past
“Order History”.
Step 2
You will first view how you “Change your
Password”.
Firstly click onto the :
Change your password button and this
will take you to the screen to change your
details.
Account Details
Change Password : Change your password
Order history : View your order history
Step 3
To change your current password, please
enter your current password in the first
field followed by your new password in
the second field.
To confirm this change re-enter your
current password in the third field and
click onto the “Change Password”
button to confirm the change.
Your password has now been changed.
Current Password:
New Password:
Re-enter Password
Change Password
Reset
15
Your Account
Step 4
We will now view your “Order History”
Click onto the :
View your order history button and this
will take you to the screen which will show
you your last 10 orders placed over the
web ordering system.
Account Details
Change Password : Change your password
Order history : View your order history
Step 5
You are now presented with your history
of your last 10 orders placed over the
On-line store.
Your history will show the On-Line
reference number, your purchase order
number, the date the order was placed,
the person responsible for placing this
order, the product ID and expanded
description, and the quantity.
Special Notes
•
•
•
•
•
.
The history will only show the last
10 orders placed over the web thus
the next order will supersede an
order placed 10 orders ago.
Orders placed verbally through our
Quick Support section will not
appear on this history screen.
Orders placed via fax will not appear on this history screen.
This “history” of orders placed is
only for the account number the
password is placed against and
does not include any child or sub
accounts.
Dollar amounts for goods
purchased will not show on this
screen.
16