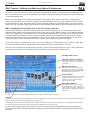
1
OpenArt-Arranger (OAA) User / Programming Manual OpenArt-Arranger User Manual OpenArt-Arranger V2.0 SEPTEMBER 2012 VERSION 7.1 REVISION 46 FIRST EDITION THIS MANUAL IS AVAILABLE FOR FREE DOWNLOAD AT www.wersidirect.com COPYRIGHT © 2011 WERSI DIRECT LTD WERSI DIRECT LTD The Bells of Ouzeley Straight Road Old Windsor SL42SH FREE PHONE : 0800 084 2013 [email protected] www.wersidirect.com Screen Shots, Text, Translation, Imagery : Benjamin Scott-Hyde & Robert New Wersi Direct LTD reserve the right to make technical modifications to hardware and software of the OAS instruments without prior notice. We disclaim any liability for differences between the features of any of the shipped instruments and OAS instruments not supplied by Wersi Direct LTD and the features described within this manual. This manual is designed and written as a guide to the Open Art Arranger, but may also contain references to the OAS 7 operating system too. No part of this manual may be reproduced or transmitted in any form or by any means, electronic or mechanical, including photocopying, recording or by any information storage and retrieval systems, without our express permission and contravenes copyright law. OpenArt-Arranger User Manual 1 - INTRODUCTION AND ACTIVATION OF THE OAA 1.1 The OAA (Open Art Arranger) must be activated on your instrument for you to access all the features available to you. 1.2 To do this, follow the following Procedure: 1) 2) 3) 4) 5) 6) 7) Press the SETTINGS button on the top right hand corner of the screen In the centre Column, press the ACTIVATIONS button Using the vertical scroll bar on the right hand side, move the scroll bar down until you can see OPEN ART ARRANGER – DEACTIVATED Select the OPEN ART ARRANGER line – it will have a yellow background once selected. Select the ACTIVATE NOW button at the top of the Screen, and enter the Activation Number supplied to you by Wersi Direct LTD, using the numeric keyboard that has appeared on the screen, and then press ENTER. If you do not have this code, please ring 0800 084 2013 for information. Once the correct activation number has been entered, a box will appear informing you that you have entered the correct code and that the OAA has been successfully installed. You will see on the list of activations, that the Open Art Arranger has now changed to OPEN ART ARRANGER ACTIVATED PLEASE NOTE: YOU WILL NOW NEED TO SWITCH OFF YOUR INSTRUMENT AND RESTART FOR THE OPEN ART ARRANGER TO BE READY FOR USE MAKE SURE THAT YOU FOLLOW THE CORRECT PROCEDURE WHEN SWITCHING OFF YOUR INSTRUMENT AT ALL TIMES. RING WERSI DIRECT LTD 0N 0800 084 2013 FOR YOUR ACTIVATION CODES OpenArt-Arranger User Manual OpenArt-Arranger User Manual Introduction The OpenArt-Arranger from WERSI is not just a normal activation, it is an advanced replacement module for the old Style Player and Arranger section of your instrument. This means, that true to the WERSI Philosophy, we are able to offer a new extension for all OAS instruments to existing and new owners. New highlights include: - New Styles! - New Accompaniment Sounds! - New Style & Realdrum Editor! - 4 x New Fills for Styles! - 3 Intros / Endings for Styles! - Yamaha Style Compatible! - New Virtual Arranger Functions! - New Editing Capabilities! - New Style Composer! - New Chord Presets! - New Remote Octave Feature! The OpenArt-Arranger, in conjunction with the Studio Drums activation brings a new lease of arranger-functions and playability to your instrument. You have the choice of 8 different playing modes to suit your playing style and playing ability. These range from Easy to advanced. The new arranger sounds and styles are incredible. You couldn’t ask to be in any finer company. This manual will take you through the OpenArt-Arranger features, functions and general operation. Whether you wish to know how to change a few sounds within a style or decide to delve deeper into Style Creation, this manual will give you the guidance and knowledge to do so. Happy Music Making! WERSI OpenArt-Arranger User Manual 2 - MAIN DISPLAY 2.1 Your main display on the OAS 7 instrument will now look like this: A) You now have a new button for Intro/Ending 3 for use with styles containing 3 or 4 intro/endings. You can access these variations by pressing this button. B) This button switches the Remote Octave button on and off. If you cannot see the box, then the Remote Octave is not activated. OpenArt-Arranger User Manual 3 – ACCOMPANIMENT DISPLAY 3.1 By pressing the ACCOMPANIMENT button at the top of your screen, you will see the following screen: 3.2 The Style player now offers the user an extended selection of harmony recognitions. You can select any of these harmony recognitions by selecting one from the list (the selected harmony will turn blue) You can save different harmony recognitions with your own pre-sets. If you do not save a specific selection, then the STANDARD harmony recognition is used. To amend standard settings, please consult the OAS 7 Programmers Manual. 3.3 Harmony recognition offers the following modes: Easy Chord 1 Easy Chord 2 Single Fingered Wersi Advanced Chords Bass to Lowest Interval Mode Piano Mode Pedal Harmony Organist Mode OpenArt-Arranger User Manual 3.4 ENDINGS WITHOUT ACCOMPANIMENT This means that you can have the style endings play with just the drum tracks only. The accompaniment tracks Bass + ACC1 – ACC5 are muted. Press the white box (a tick will appear) to activate this function. 3.5 AUTO FILL + - FUNCTION Yamaha ® Styles are in particular are often programmed with an extra fill-in available for each main variation. PLEASE DO NOT CONFUSE THESE WITH NORMAL FILLS AND BREAKS 1 & 2 OR AUTO FILL To Activate/deactivate the Auto Full + - Function: Press the White Box next to AUTO-FILL + - THE BOX NOW TURNS RED AND CONTAINS A TICK SYMBOL. To deactivate, press the box again and the box will change colour and the tick will disappear. 3.6 Extended Panel Function When you press to put a tick in the white box, next to EXT. PANEL FUNCTION (the box will turn red) the most important functions of the EXTENDED PANEL and functions from the VIRTUAL PANEL can now also be used/triggered by the rhythm/accompaniment buttons on the control panel of your instrument. OpenArt-Arranger User Manual 4 - HARMONY RECOGNITION 4.1 Easy Chord 1 This is a basic, simple method of auto accompaniment for beginners. This uses only notes contained in the chord, much like SINGLE FINGER WERSI. The following harmonies are recognised in the input of 1 -3 notes Note that where a note and a letter appear together, e.g. C2, it is referring to the Note, in this case C, and the Octave that that note is played, working from right to left, so that C2 would be the C note in the 2nd Octave. MAJOR CHORD = ROOT e.g. C= C major MAJOR 7th CHORD = ROOT + 1 WHOLE TONE or 2 SEMITONES e.g. C2 + Bb1 = C7 or A1 + AG1 = A7 MINOR CHORD = ROOT + A MINOR THIRD OR 3 SEMITONES ABOVE e.g. C2 + Eb2= C MINOR or A1 + C2 = A MINOR MINOR SEVENETH CHORD =ROOT + A MINOR THIRD OR 3 SEMITONES ABOVE + A WHOLE TONE OR 2 SEMITONES BELOW e.g. C2 + Eb2 + Bb1 = C MINOR Seventh MAJOR SEVENETH CHORD = ROOT + A SEMITONE BELOW e.g. C2 + B1 = Cmaj7 or A1 + Ab1 = AMaj7 A = A major 4.2 Easy Chord 2 Easy Chord 2 is also a simple, but limited form of auto-accompaniment control which, because of the introduction of dissonances (some notes not from the chord) makes it necessary to switch off the Lower 1 sounds. MAJOR CHORD = ROOT e.g. C= C major SEVENETH CHORD = ROOT + 1 White KEY TO THE LEFT e.g. C2 + B1 or C2 + A1 = C7 MINOR CHORD MINOR SEVENETH CHORD = ROOT + 1 BLACK KEY TO THE LEFT e.g. C2 + B1 or C2 + Ab1 = C minor A = A major = ROOT + 1 WHITE KEY + 1 BLACK KEY TO THE LEFT e.g. C2 + B1 + Bb1 or C2 + Ab1 + G1 = Cm7 OpenArt-Arranger User Manual 4.3 Single Finger Wersi A simple method of auto accompaniment, which due to the input of appropriate chord notes does not require the Lower Sounds to be turned off. MAJOR CHORD SEVENETH CHORD = ROOT e.g. C = C major MINOR CHORD = ROOT + A MINOR THIRD OR 3 SEMITONES ABOVE: e.g. C2 + Eb2 = C minor or A1 + C2 + A minor MINOR SEVENETH CHORD = ROOT + A MINOR THIRD OR 3 SEMITONES ABOVE AND A WHOLD TONE OR 2 SEMITONES BELOW e.g. C2 + Eb2 + Bb1 = Cm7 MAJOR SEVENETH CHORD = ROOT + A SEMITONE BELOW e.g. C2 + B1 = Cmaj7 or A1 + Gsharp1 = Amaj7 A = A major = ROOT + 1 WHOLE TONE OR 2 SEMITONES BELOW e.g. C2 plus Bb1 = C7 or A1 plus G1 = A7 MINOR (MAJ7) CHORD = ROOT + A MINOR THIRD OR 3 SEMITONES ABOVE AND A SEMITONE BELOW e.g. C2 + Eb2 + B1 = Cm(maj7) MAJOR NINTH CHORD = ROOT + A WHOLE TONE ABOVE + A MAJOR THIRD ABOVE e.g. C2 + D2 + E2 + Bb1 = C9 MINOR NINTH CHORD = ROOT + A WHOLE NOTE TONE ABOVE + A MINOR THIRD ABOVE + A WHOLE TONE BELOW e.g. C2 + D2 +Eb2 + Bb1 = Cm9 4.3.1 – You can MUTE ALL ACC TRACKS APART FROM DRUMS When using Single Finger Wersi by pressing the following three keys at once: A + Bb + B = ACCOMP CANCEL THIS FUNCTION WILL NOT WORK WITH THE EASY CHORD 1 + 2 OR PEDAL HARMONY 4.4 Advanced Chords This is a very comprehensive accompaniment mode which allows a great number of hand positions on the accompaniment section of your instrument (lower manual on the organ or lower section on the keyboard) that can be used for harmony recognition in the auto accompaniment. Please consult your own Harmony Guides for information regarding Chord Structure. 4.5 Bass to Lowest You can use the same positions as with the advanced Chords mode. In this mode, the lowest note in the chord position is taken as the bass note. Thus, through the selection of chord inversions, you can work a specific walking bass into your accompaniment, or play chords that require a different bass note than the root. For example, if you need to play a C chord with an E bass, you would play: E 1 + G1 + C 2 OpenArt-Arranger User Manual 4.6 Interval Mode Interval Mode is similar to Advanced Chords mode, but if there are less than 3 notes in the chord, only these exact notes are used in the accompaniment. Interval Mode is particularly suitable where the playback from the auto accompaniment is very elaborate and has many variations. 4.7 Piano Mode This mode is meant for playing with 2 hands over the complete range of the keyboard as would a pianist. In this mode, every note and chord played anywhere on the keyboard is recognised by the accompaniment harmony recognition system. However, intelligent programming ensures that melody notes are not used in the accompaniment. 4.8 Pedal Harmony This requires the use of a Pedal Board and Swell Pedal. This is an extremely simple method of automatic accompaniment via the pedal board but one that only has 3 harmony variations. It requires the root note to be played on the pedal board and the use of one of the kick switches on the swell pedal. MAJOR CHORD = ROOT ON PEDAL e.g. C = C major SEVENETH CHORD = ROOT ON THE PEDAL + LEFT KICK SWITCH e.g. G + Kick switch Left + G7 MINOR CHORD = ROOT ON THE PEDAL + RIGHT KICK SWITCH e.g. F + Kick Switch Right = F minor 4.9 Organist Mode In this mode, the bass track is automatically removed from the accompaniment i.e. the bass note can only be played on the pedal board. In addition, the other accompaniment tracks (ACC1 – ACC5) are only played as long as a chord is struck and held. OpenArt-Arranger User Manual 5. New Settings Display You can open this window by pressing the SETTINGS button in the main menu header bar. You have new features including CHORD CONTROL and REMOTE OCTAVE. Details of these can be found further on in your OAA manual. Chord Control (New with the OAA) Remote Octave (New with the OAA OpenArt-Arranger User Manual 6. Style Editor The OAA allows the user to change and edit several of the factory styles that came with your OAS instrument to your own personal taste. The Style editor in the OAA gives numerous possibilities for individual adaptation. 6.1 The Principles of Style Development A style is basically a time line of patterns and events which are programed in and can be played back using timbres and notes played back one after another. Unlike General Midi Standard Sequences, or GM Files, a style does not contain pieces of information that complete correct harmonies and variations at given times. In a Style, there are various accompaniment patterns of a determined length decided by you. These are, for example, Selection of Variation, use of intros and fills / breaks and selection of harmonies based on chords. In terms of technical and musical formulation, the development of styles differs greatly from one manufacturer to another. On style tracks, there are the following individual variations: A) B) C) Events which only affect notes; information laid down about sounds, volume and reverberation intensity are determined elsewhere. Events for all bits of information such as notes etc. Additional information regarding changing a sound or drum set (so called program change events) It may also be the case that with some styles, the individual tracks and variations are almost like small, mini-sequences, which use their own sounds with varying intensity (or velocity), which may apply for certain, individual notes. All this information can be found within the individual event sequences. These different procedures make it very difficult to therefore, to establish a system of editing all styles in exactly the same way. With so many different commands and changes built into so many different parts and layers of just one style, it can be a time consuming process to make changes, as these can be quickly reversed, changed or deactivated shortly afterwards by another command from another event in that style. It is therefore imperative that you read through this following section with great care. 6.2 Opening the Style Editor There are two ways to open the style editor. If you are on the MAIN window screen and have selected a style, press the QUICK EDIT button Alternatively, press the SETTINGS button in the header bar and then select the EDIT STYLES button on the top right hand corner, third column. OpenArt-Arranger User Manual 6.3 The Style Editor Window This is the screen show you will see when you open the Style Editor: The current activated style part is shown in red at the top right of the screen, for example here ‘Main A’. The Parts that are used in the selected style have a lighter blue/grey colour and appear to be “raised” The parts not used in the selected style are a dark blue and appear to be “depressed” (Intro 4 and End 4 in our example) Parts can be changed from either using your touch screen, or using the rhythm controls on your instrument. To exit the Style editor at any time, press the cross X in the box at the top right and you will be returned to the Main or the Settings window that you came from. OpenArt-Arranger User Manual 6.4 Descriptions of Individual Fields 6.4.1 Menu Bar When you select any of the individual selection fields, a tick automatically appears and the appropriate sub menu is opened. 6.4.2 Load/Save Panel The Style usually displayed is the last one used, although any other style can be loaded from here. Press the LOAD/SAVE button – a tick will appear in the box and a sub menu will open. Here you can activate the following procedures by pressing the following buttons: Style: Load a new Style Press to select a style in the drop down list Press the LOAD button Real Drum: Loads a Real Drum style Press to select a Real Drum from the drop down list Press the LOAD button To MIDI: Export an external MIDI-Program (Currently NOT AVAILABLE) Save: To save an edited style – the SAVE STYLE page opens, then you can carry out the standard save procedure. FROM MIDI: Import from an external MIDI Program (Currently NOT AVAILABLE) 6.4.3 Harmony Recognition If you press the HARMONY RECOGNITION button in the menu bar, a tick appears beside it. As in the accompaniment page, a drop down list for the Harmony Recognition variations appears. The same harmony recognitions are available: Easy Chord 1 Easy Chord 2 Single Finger Wersi Advanced Chords Bass to Lowest Interval Mode Piano Mode Organist Mode Pedal Harmony OpenArt-Arranger User Manual 6.4.4 Virtual Panel If you press the VIRTUAL PANEL button in the header bar, a tick appears beside it and a new sub menu appears. This Window (like the extended Panel) is used primarily in LIVE PLAY mode and appears on top of the main display. This allows you to edit the styles and have all the accompaniment variations available to you in direct view. The view shows the following parts of the activated style: Style Name Select TEMPO Beat Display and Time Signature Chord Display Start / Stop Button+ Auto Fill Off/ On button Active or Selected Style Variation Main A – Main D / Intros/ Endings / Breaks The active style part is high lighted in Red: All buttons are connected with the panel buttons on your instrument. OpenArt-Arranger User Manual 6.4.5 Extended Panel If you press the EXTENDED PANEL button, a tick appears beside it and a new sub menu appears: This window, just like the Virtual Panel, is used primarily in ‘LIVE PLAY’ mode and can also be placed on top of the Main Display. By pressing the advanced button, you can open/activate/deactivate, if necessary. From the Virtual Panel sub menu. - The Individual volume slider controls and the figures below them for the individual drum and ACC tracks correspond to the figures/displays from the accompaniment page and the settings there below “ACCMOPANI MENT VOLUMES” on the lower left - The Slider potentiometers (except for DRM2 + ACC5) are also linked to the controls on your instrument. 6.5.5.1 “HARM REC” Button The selection of possible Harmony Recognitions opens. 6.5.5.2 “NEXT ALL VAR” button This is a toggle switch for NEXT VARIATION to ALL VARIATIONS Next Variation = the changes made here are only valid for the next variation: they are automatically deleted All Variations = the changes made here are valid for all later / additional variations 6.5.5.3 “SOLO/MUTE” button This is a toggle switch to S to M, allowing you to switch the boxes below the slides between M and S 6.6 Extended + Virtual Panel functions VIA the ACC Buttons If the EXT PANEL FUNCTION in the “Accompaniment/Style Player” Menu is activated, the LED of the currently active ACC. Section on the control panel goes out and you can now control the most important functions of the Extended Panel and the Virtual Panel with the Rhythm/ACC buttons on the control panel of your instrument. The assignments are as follows: 1. TOP ROW 1. ACC Button (8 beat) 2. ACC Button 3. ACC Button 4. ACC Button 5. ACC Button 6. ACC Button 2. Solo/Mute DRM1 Solo/Mute Bass Solo/Mute ACC 1 Solo/Mute ACC 2 Solo/Mute ACC 3 Solo/Mute ACC 4 LOWER ROW 1. ACC Button 2. ACC Button 3. ACC Button 4. ACC Button 5. ACC Button 6. ACC Button Toggle Button Solo/Mute Toggle Button Next/All Var Intro Ending 3 Intro Ending 4 Auto-Fill On/Off NO FUNCTION OpenArt-Arranger User Manual The activated functions of the Extended Panel are indicated by illuminated LEDs of the accompaniment selection buttons on your control panel. NOTE: In Order to use the accompaniment selection buttons on your control panel normally again, you must deactivate the EXTENDED PANEL FUNCTION in the ACCOMPANIMENT/STYLE PLAYER 6.7 Screen Shots from the Main Display The following is the correct procedure for opening the VIRTUAL PANEL from the main play area. 1) 2) 3) Press QUICK EDIT or SETTINGS button and EDIT STYLES button Press the VIRTUAL PANEL button Press the MAIN/EDIT button which returns you to the main window You can open/activate/deactivate the EXTENDED PANEL window by pressing the Advanced button in the VIRTUAL PANEL ( +/- EXP.P ) You can close the Extended Panel window by pressing the “Advanced” button again, pressing the close button at the top right hand corner of the extended panel or by simply closing the Virtual Panel (Beenden) OpenArt-Arranger User Manual 7 Edit Accompaniment Tracks 7.1 Selection Style Parts All parts are displayed in this window- also you will see the Fill/Break editing facilities. Beneath the header bar is the line with the following information: 1) 2) Style Name + Time signature Tempo (this can be changed by selecting the white box and using the Data Wheel or transpose buttons) All parts in use in the current style have a light blue/grey background (raised) and can be activated by being pressed. Parts not in used all have a dark blue background (depressed) The buttons of the parts in use are connected in a parallel with the buttons on the instruments control panel and can be used from there. 7.2 Fill /Break Definition If you select the FILL / BREAK DEF button, a new sub menu appears, in which you can determine the Fill and breaks parts. You can change each by using the appropriate buttons. Pre-set Definition: the function set in PLAY BREAKS under the “ACCOMPANIMENT” header page must be ticked to ON. Example 1 (Both are set to Fill) Example 2 (Both are set to Break) PLEASE NOTE: The difference between a ‘Fill’ and a ‘Break’ is that a ‘Fill’ plays immediately, regardless of what beat of the bar the OpenArt-Arranger rhythm unit is playing and a ‘Break’ plays a 1 bar drum break on the first beat of the next bar. 7.3 Edit All Parts By activating the EDIT ALL PARTS button, you can, when editing volumes, sounds etc. of the individual accompaniment tracks, make your changes apply to all style parts. OpenArt-Arranger User Manual PLEASE NOTE: A change made to any track in the accompaniment with the EDIT ALL PARTS button activated, also changes the values and sound selection in ALL OTHER PARTS / VARIATIONS ON THIS ACCCOMPANIMENT TRACK. Please be sure before you make this change, as there is no UNDO facility. 7.4 Editing Volumes You can now process and edit the style you have activated as follows: 1) Adjust the Volumes of the individual tracks by adjusting the sliders on the screen, by inputing text by means of the date wheel in the boxes or using the sliders on the instrument. 2) 3) S = Solo – will play only this selected track M= Mute – will switch off this track You can select Solo and mute on one or more tracks. The Solo and Mute functions cannot be saved as an edited style. If there is a track that you wish not to sound in your style, but you do not want to delete said track, simply adjust the volume slide on that track to 0 (zero) and the save the style. 7.5 Changing Sounds All of the sounds used on the selected style are listed on the left of the screen. You can change any of these sounds to another sound in your library. 1) Press the sound box (box with the sound written in it) 2) You can use the user group and sound group boxes to help you find the sound you are looking for. 3) Select and load that sound into the style and press the ‘Back’ button. You will now see the newly selected sound name in the grey sound box. OpenArt-Arranger User Manual 7.6 Editing ACC Sounds / Drum Sets On the extreme left under Controller are the buttons with the accompaniment track descriptions i.e.: DRM 1, DRM 2, Bass, ACC1 etc. When you select one of these, a new window opens which allows you to change the individual sound parameters. Using the SOLO button, you can hear the selected track by itself. If the SOLO button is RED then it is activated and you will hear only that track – if the SOLO button is grey/blue, then all tracks will be heard. Controller: Possible Values: 1) 2) 3) 4) 5) 6) 0 – 127 -2/ -1 / 0 / +1 / + 2 0 = Left / 64 = Centre / 127 = Right 0 – 127 0 – 127 0 – 127 Volume Octave Pan Reverb Delay Chorus You can close this menu by pressing the BACK button at the top right. The changed volumes you may have made in this menu will have automatically changed on the previous page. OpenArt-Arranger User Manual 7.7 Pattern Editor The Pattern Editor allows the user to delve deeper into style editing. Think of the Pattern Editor as a form of “Expert Mode” Firstly, we must understand what a pattern is. A pattern is a sequence of selected musical notes (or events) which are played back mainly in a loop, which is repeated after x amount of bars. Each of the 8 accompaniment tracks (or channels) of the Open Art Arranger is able to play back and control up to 16 different pattern variations (per style part) The Variations A through D, Fills and breaks, and Intros and Endings are all classed as style parts. Styles in the Wersi format, .stw could control 8 x 16 = 128 patterns. In addition to this, a pattern has a range of parameters, which determines how the arranger handles the individual notes within it. Since the source notes of a style exist in a particular key and chord, the arranger needs information as to how the notes are to be transposed when the chord changes. How to open the Pattern Editor Window 1) 2) Select one of the buttons DRM1 to ACC 5 below controller, as was done in the last section to edit sounds. Each channel has used at least on pattern on each variation, intro, ending etc. etc. Select one of these pat terns by pressing one of the labelled boxes under AVAILABLE PATTERNS for XXXX You will now have the EDIT PATTERNS Window on display. OpenArt-Arranger User Manual 7.71 Chord Types As it would not sound great to have all patterns playing at all times, we are able to assign certain chords to certain patterns. A cross next to a chord name means that when that chord is played, this pattern will be the one that the auto accompaniment plays back. If there is no cross, or you remove the cross, that particular pattern is muted for that chord type. You can choose between ‘Major Chords’, ‘Minor’ Chords and ‘Septime’ - which means (all others). If you wish, you can simply tick the box next to each title to ‘tick all’ chords. 7.7.2 Root Notes A cross next to a root note means that the pattern is played for all chords with this root. 7.7.3 Key Limits You can limit the playing range for your instruments sounds by using the slider controls or by inputting notes in the selection fields with the data wheel or the transpose buttons. Notes in the pattern, which are outside of this area, are automatically moved to the defined area. It is recommended that the area determined should correspond to the natural playing range of the instrument being used. OpenArt-Arranger User Manual 7.7.4 Root Trans / Root Fixed Patterns within a style are usually in a determined Chord/ Key (usually C) if you now play a chord with a new root, for e.g. F major, the Open Art Arranger has to carry out a root transposition in order for the right note to sound. Using the Root Trans / root fixed toggle button, you can determine how this root transposition is to happen. Root Fixed: When transposing the root note, the pattern source notes are automatically moved to form an appropriate inversion wit the least possible tonal movement – i.e. no huge jumps This is best for chords. Root Trans: The pitch relationship of the pattern source notes is maintained when the root is transposed. This is best for melody and bass notes. This setting is also required for HIGH KEY editing. Once you have selected the ROOT TRANS you can use the HIGH KEY setting to determine the highest note for the octave limit. 7.7.5 High Key To put it simply, high key = highest note. Using the slider control or by inputting notes into the selection text box (using data wheel or transpose buttons) you can limit the playing area for the chord positions by setting the HIGH KEY. If the chord played has a root note that goes above the value set here, the notes worked out for the pattern are automatically transposed down one octave. This prevents the pitch differences after a chord change, for example from c major to Bbm7 being extreme and unnatural. 7.7.6 Transposing As well as transposing the root, the OpenArt-Arranger must decide how to transpose the notes in a chord type change, from major to minor for example. The patterns in a style (except in intros and endings) are assigned to a fixed chord type. In style programming, “maj7” chords are used with the root note “C” If you now use a different chord type, for example Cm7, the available source notes must be transposed accordingly. Another interesting use of patterns us the control or input of special sounds. Some instruments in the Open Art System have been recorded in such a way to include natural sounds, such as finger sounds in guitar playing. You can exclude the effected notes from the transposition by using an additional pattern for this area. There are several transposition tables within the Open Art Arranger, which you can select for your accompaniment track or your chord guidelines by pressing the transpose buttons. OpenArt-Arranger User Manual The following types of transpose are available: 1) MELODY - best for bass and, believe it or not, melody tracks 2) CHORD - Best for accompaniment tracks with chords, i.e. guitars, strings, pads For Intros and Endings, fills and Breaks containing both root note and chord changes, you should set BYPASS in combination with ROOT FIXED For Intros and Endings, fills and Breaks containing both root note and chord changes, you should set BYPASS in combination with ROOT FIXED This ensures that these parts are played back like midi sequences, independently of any chord played. For Intros/Endings with no chord changes, you can use the MELOMINOR. DORIAN 5 transposition tables. Depending on the table used, a chord type transposition only takes place if “ 1) There is a change from major to minor chord (or vice versa) 2) There is a change to a third, sixth or seventh The following transposition tables are only intended for intros and endings are should only be used with the following chord types: MELOMINOR melodic minor MELOMINOR 5 melodic minor 5 HARMMINOR harmonic minor HARMMINOR 5 harmonic minor 5 NATURAL MINOR natural minor NATURAL MINOR 5 natural minor 5 DORIAN Dorian DORIAN 5 Dorian 5 third & seventh& Fifth changes B3 / third change B3 + B5 / third + fifth change third and sixth change third & sixth & seventh change third + seventh change third + sixth + seventh+ fifth third and seventh change 7.7.7 Retrigger The open art arranger has retrigger rules for long notes, which you can select with the selection text box according to your accompaniment track or your ACC sound (by pressing and changing using the date wheel or transpose buttons) You can decide with this, how your ACC sounds with long notes should be handled with chord changes. BYPASS no changes – note go through unfiltered STOP hanging notes are stopped / switched off PITCH key pitch transposition PITCH ROOT RETRIGGER Key pitch on a new root note REROOT hanging notes are stopped and immediately restarted with a New root Hanging notes are stopped and immediately restarted with A new key OpenArt-Arranger User Manual 7.8 Saving an Edited Style When you have finished editing, you will need to save your style as the Open Art Arranger will not save it automatically for you. You can leave the edit screen and return to the Main screen to try out your style, but if you loaded a new style in before saving the edited one, you would loose all your work. At no point are you asked if you want to save the edited style, so don’t forget to save!! 1) 2) 3) 4) 5) 6) 7) Press the LOAD/SAVE PANEL Button Press the SAVE button Select a free storage space in the drop down list and select the line you wish to save (line turns yellow) Allocate any user group is you wish Open the text editor by pressing the name box, and input your name of the style you wish to save it as Press Enter to leave the virtual keyboard Confirm when you have finished by pressing save \ OpenArt-Arranger User Manual 7.9 Event Editor The Event Editor can be launched by pressing the button ‘Edit Events’ from within the Pattern Edit display: The pattern editor allows users to edit all aspects of the currently selected Style Track. The operation is nearly identical to that of the Sequencer MIDI Event Editor (See OAS 7 Programmers Manual). Header Bar: The header bar shows us what ‘Track’ and ‘Accompaniment Part’ is being edited. Event Display: The Event display shows us all events in the selected track, and their respective values. OpenArt-Arranger User Manual Event Position This area shows the ‘Time Position’ of the event within the Style sequence. Event: This box shows us what ‘Event’ is to be triggered. Event Values These two boxes show specific values such as what Controller the Event is or what Note is to be played. Length This box shows us the note length. The Val 2 box shows values such as volume, intensity of an Event. Pattern This box shows us the name of the currently selected pattern Back This button allows you to return to the Sequencer Main Display. Event Display Style Events Edit Events This section allows you to freely Edit Events in the style Event Style Sequence An ‘Event’ in MIDI terms is a ‘happening’ within a Style track, whereby, alongside note events (notes), many other events (which can influence sound and various controllers such as Volume, Sustain, Panorama, Expression etc) can occur. In our example, you can see 8 ‘Event’ field rows. The ‘Event Style Sequence’ is the area shown below: The Event Sequence is shown in the eight fields visible in the display. You can move the eight fields up and down by using the Transport Controls. The two central controls allow you to move up or down one field at a time. While the controls at the top and the bottom allow you to jump to the start of the sequence or to the end of the sequence. A full list of MIDI Controllers and their respective numerical controller numbers has already been provided in the ‘MIDI’ section of the OAS 7 Programming Manual. Here is a quick example of how to read an ‘Event’. We’ll use a ‘Note’ event in our example. The first box shows us the position of the event in the Style sequence. The 2nd box shows us that the Event is a note (Note On). The third box shows us that the note to be played in G2. The next box shows us that the volume of the G2 note is to be a value of 86 (out of a possible 0-127), and finally the last box shows us how long the note is to be (0:3:128). OpenArt-Arranger User Manual Paste Delete If an event has previously been copied, the event data will be shown here. The Paste button allows you to ‘Paste’ the event at your desire into any point of the event sequence of the style. Edit Initial CC’s Opens the Style (OAA) Edit Track Window (Edit Panorama, Volume, Reverb etc) Loop When Ticked, the pattern will play in a loop. This button allows you to ‘Solo’ the Style sequence. Deletes all events in the Style Event Sequence Edit Pattern Settings Change Sound Volume Opens the Pattern Editor Opens the ‘Change Sound window’. Tempo Play Bars / Beats Set the Tempo of the pattern The Play button will play the Style part sequence When unt-icked, the pattern will play just once. Solo Delete All Deletes the Event Use the Data Tempo Wheel to adjust the Volume of the overall pattern This section allows you to see how many bars and beats there are in the sequence. Our example shows us Bar 1 of 4, and it is currently on Beat 1 or Bar 1. The << & >> buttons allow you to navigate quickly through the beats and bars. Quantize When pressed, the Style sequence will instantly be quantized to the setting in the small box next to this button. Quantize Resolution Using the Tempo Data Wheel, you can change the resolution for quantization. Import / Export These buttons allow you to Export the current MIDI pattern, or Import your own MIDI pattern direct into the Style Track Part. Ensure that you have the correct setting, as the wrong setting will cause unwanted results! Remember, there is an Undo button! Within the eight visible field tracks, it is possible to suppress certain events in the display (for display purposes only). For example, if you want to see only the ‘Note’ events, you can remove all other events by ‘unticking’ the boxes on the far right side. You can do the same for any and all events displayed in the Event Display section. Update List - Press this button to update the Event List with any new events. Copy - Copies an event Exchange - Exchange an event Modify - Modify an existing event Touching the button ‘New Event’ opens an additional window for inputting notes and various controllers: OpenArt-Arranger User Manual You can add any of the different controllers into your track. It does help to have a knowledge of MIDI events so that you know what controller does what and to what effect they are desired. Note - This button allows you to insert a ‘note’ event into your track. PRG-Change - This allows you to insert an event controller to ‘change the sound’ at any given point. Controller - This allows you to insert a MIDI Controller (See MIDI section for list of MIDI Controllers). Pitch Bend - This allows you to insert a ‘pitch bend’ effect into the track. Aftertouch - This allows you to apply ‘Aftertouch’ to the track. MIDI EXPORT / IMPORT function The OpenArt-Arranger allows you both Export individual Style Parts as a MIDI file, or similarly, Import MIDI files into the Style part. This is especially helpful for users who like to professionally program MIDI data on their home computers. Sequencer software such as Logic offer flexible and easy editing feature and MIDI create tools that are not practical in a musical instrument with a touch screen ranging from 7 to 10.4” in size. Sequencer software such as Cubase, Logic and ProTools are all available from 3rd party suppliers. TO IMPORT MIDI: 1. Press the ‘Import’ button. 2. The Import screen is shown: 3. Navigate to where you’d like to Import the MIDI file from. Once Selected, press the ‘OK’ button. The MIDI file is now loaded into the Style Part Event Editor. 4. You will now need to Edit the MIDI part that you’ve loaded. If you have loaded a Drum Part, make sure that the Pattern Editors Transpose settings are set to Bypass. For musical sequences for instrumentation, follow the previously described rules and settings that are appropriate for these parts. TIP: When Editing / Creating a MIDI Sequence in your external computer sequencing software, we would recommend to remember to always program in the key of C and it’s respective Minor and other harmony counterparts (C7 etc for 7ths). TO EXPORT MIDI Although the OAA will allow you to edit and perfect your MIDI data within the Style Part inside the OAA itself, some people find it quicker and easier to work in an external Sequencer software. In this case, follow these simple instructions. 1. Press the ‘Export’ button: (The screen ot the right is shown) 2. Select the destination for Export: 3. Press the ‘OK’ button. The MIDI data will be successfully exported. Don’t forget to change the name before Export! OpenArt-Arranger User Manual 8 – Style Compose With the Open Art Arranger, you can not only edit styles, but also create your own toe tapping styles to impress your friends with, uniquely to your instrument. The compose Style feature differs from the familiar MIDI record method, essentially in that with this feature the complete sequence of a style, harmony sequence, selection of intro etc., behaviour of accompaniment tracks, can all be determined in advance. When you press the STYLE COMPOSE button, a tick appears and the appropriate page is opened. 8.1 Description of Display The display is divided into the following areas: HEADER BAR 1) 2) Drop down list of available style compose pre-sets Save button for saving and a back button for leaving this menu UPPER SECTION 1) 2) 3) 4) 5) Drop Down list for harmony selection “Switch to Major” and “Switch to Minor” but tons “Set to Sharp” and ‘Set to flat” buttons Root box with chord display which can be changed from C to Bb in Semitone steps “Load” button for loading a different style via load/save menu MIDDLE SECTION 1) 2) 3) 4) Per beat or bar – a box for each harmony, variation and accompaniment track Horizontal division into 12 boxes (beats or bars) Vertical division into groups of 12 ( 1-12, 13 -24 etc.) Up and down arrow buttons for switching from one group of 12 to the next LOWER SECTION 1) Boxes and buttons for event editing, and for bar, accompaniment track and variations selec tion OpenArt-Arranger User Manual 8.2 General Operation After pre-selecting the bar/beat pattern, put the required harmonies and accompaniment pattern into the appropriate boxes The following are possible: * Set Event = establish a new event * Copy Event = copy an already existing event * “……..” = A copied event appears in this box * Paste Event = inserts a copied event * Delete Event = deletes an existing event Set Event Accompaniment Parts Paste Event STYLE PARTS 8.3 Loading a Style-Compose Pre-set To load an existing Style Compose Pre-set, carry out the following: 1) 2) 3) Open the Drop down list by pressing the arrow in the header bar Press to select required pre-set (the line turns yellow) Close the drop down list by pressing the arrow again 8.4 Play a Style Compose Pre-set You can play back a style compose pre-set by using the currently active style via your instruments control panel buttons in the rhythm section. If you wish to use another style, you must load the style first. You can start and stop using the button on the control panel. Play back of the style always starts from the beginning. A vertical pink line indicates the start of a new bar / beat. The variations in use are also indicated on the instruments control panel. 8.5 Selecting a Bar or Beat Pattern You can choose which pattern the style compose pre-set will play back with the boxes ¼ - ½ - ¾ -4/4-6/4 Thereby enabling very rapid variation changes (either on every beat or in the middle or beginning or every bar) OpenArt-Arranger User Manual 8.6 Editing or Resetting a Style Compose Pre-set You can now also build your own style compose pre-sets. Open a style that you wish to set your own accompaniment parameters: 1) 2) 3) Press the Load Button Open a Style from the load/save panel Now use the Style Compose button to switch to the style compose menu You can now set the events you want in the respective boxes in the sequence table. The following events are possible: * Top line: * Middle Line: * Bottom Line: Harmonies / Chords Style Variations / Intros / Fills / Endings Activated Accompaniment Tracks Drum 1 to Acc 5 The maximum number of Style Compose bars/beats is well over 1000 and is limited only by a maximum of 230 events. 8.6.1 Selecting/Editing Harmonies Now select the harmonies you want in the top boxes of the sequence table • • • • • • Press the box next to Root (Tonic) to select the required harmonies and use the data wheel or transpose but tons to set the required root note (C – B) Press the SET TO FLAT/SHARP button to prepare an enharmonic change to the harmony display (♯ or b) Press the SWITCH TO MAJOR/MINOR button, if required, to pre-select major or minor ( DUR = Major, MOLL= Minor) Open the chord drop down list with the UP arrow button and press to choose the chord type you want Close the chord drop down list with the UP arrow button. Press the SET EVENT button èthe settings are applies THE CURRENT HARMONY HOLDS NOW UNTIL ANY OTHER HARMONIES ARE ADDED. YOU DO NOT NEED ENTRIES IN ALL THE BOXES 8.6.2 Selecting/Editing Variations • • • Select one of the variations/intros etc. by pressing a box in the lower right part of the screen (the box will turn light blue) Press the required box in the 2nd line of the sequence table Press the SET EVENT button è the settings are applied 8.6.3 Selecting/Editing the Active accompaniment track • • • Select/deselect the required accompaniment track by pressing a box in the lower left part of the screen (the tick is replaced by -- when deactivated Press the required box in the 3rd line of the sequence table Press the SET EVENT button è the settings are applied. 8.6.4 Deleting an Event • • Press the box of the event to be deleted in the sequence table (box will turn dark blue) Press the DELETE EVENT button è the entry is deleted OpenArt-Arranger User Manual 8.6.5 Copying an event • • • • • Press the box to be copied in the sequence table (box turns dark blue) Press the COPY EVENT button The copied element is inserted and displayed in the box (which may have been previously empty) between COPY EVENT and PASTE EVENT Press the box to be changed in the sequence table (box turns dark blue) Press the PASTE EVENT button è the previous entry (or the previously empty box) is replaced by the copied item. 8.7 Saving a new Style Compose Pre-set Finally, you should save the newly composed or changed style-compose pre-set. When you leave this menu, you will be asked if you want to save your work. YOU CAN SAVE A TOTAL OF 190 STYLE-COMPOSE PRESETS IN STORAGE LOCATIONS 10 – 199. 0-9 ARE RESERVED FOR FACTORY PRESETS • • • • • Press the SAVE button in the header bar The new display, SAVE COMPOSED STYLE will appear Use the text editor to enter the name in the box and confirm with enter Use the scroll bar or data wheel or transpose buttons to find a new storage location in the drop down list and select it by pressing. The line will turn YELLOW Press the SAVE button è you will be automatically returned to the Style Compose page. IN ORDER TO PLAY A STYLE WITH STYLE COMPOSE, YOU MUST SELECT YOUR STYLE COMPOSE PRESET BEFORE STARTING THE STYLE AND PLAY BACK WITH THE STYLE COMPOSE MENU OPEN OpenArt-Arranger User Manual 9 Chord Control (Apart of the OpenArt-Arranger) All Instruments Post Jan 2010 have OAA as standard. The Chord Control display is located in the ‘Setting’s display. On the left hand side of the display, at the bottom corner, you’ll see a button marked ‘Chord Control’. Pressing the ‘Chord Control’ button will open the Chord Control display. The Chord Control feature was added as a part of the OpenArt-Arranger extension for your OpenArt-System instrument. You can create a collection of chord / harmony patterns, which you can introduce whilst playing live using the ‘Remote Octave’ function (Remove Octave is explained in a later chapter in this Programming Manual). Additionally, this display can be used as a ‘personal training’ for learning new and complicated chords. Now let us explain the sections of the Chord Control ‘Direct Chord Select’ display. Chord Preset - Open the drop down menu by touching the downward pointing arrow. A list of all Chord Presets are located here. Close Button - This button exits the Direct Chord Select display and returns you to the ‘Settings’ menu display. Save Button - The Save Button opens the Save menu, allowing you to save a Chord Preset. OpenArt-Arranger User Manual 9.1 Harmony Type This drop down menu lists all available Harmony Types: Use the Tempo / Data Wheel to navigate through the list. To select a harmony, press on the name of the Harmony that you desire. It will then be highlighted in red. Tip: • Only full chords are shown e.g G7 with fifth = d) - although normally the fifth note in a scale can be left out of a chord. • Only the basic chord position is shown. You have to create inversions for more practical positions yourself. How to create Inversions: • • • Take the lowest note up 1 octave (8 notes). Repeat this until you have a sensible chord position (mostly between F-F#. F# is usually the split point between the melody and accompaniment sections of a single manual keyboard instrument (Abacus or Ikarus for example). Similarly, for lower inversions, move the top note down 1 octave Example: Inversions Up C maj - Basic position = C-E-G C maj - 1st inversion = E-G-C C maj - 2nd inversion = G-C-E Inversions Down C-E-G G-C-E E-G-C Major / Minor This button switches the ‘Harmony Type’ list between Major and Minor. Root (Tonic) Root (Tonic Note) displays the key note (the tonic) = 1st note in the scale. So for example, if you are playing a C scale, the tonic note would be C (as it is the first note of the C scale). If you were playing an F scale, the tonic note would be F and so on. To change the Root (Tonic) note, simply press on the data value box. It will turn red in colour. You can then use the Tempo / Data value wheel to select the desired Root note. You can move between C-B. At the same time, the changes are applied to the keyboard display and to the description of the corresponding keys or notes in the bottom right of the display. OpenArt-Arranger User Manual The Virtual Keyboard The virtual keyboard shows the keys / notes of the appropriate chord position corresponding to the harmony type. Below the keyboard, the corresponding 12 semitones of the scale: In our example, a C maj chord is shown and the 12 semi tones clearly show the ‘C’ note highlighted at the bottom of the screen. Harmony The Harmony section displays the notes / key names of the chord position shown on the keyboard. In addition, by pressing one of the semi tone buttons to the bottom left corner of the display, you can display its chord (in accordance with the selected harmony type) on the virtual keyboard. Change to Sharp (#) / Change to Flat (b) toggle button This toggle button allows you to change from sharp keys to flat keys and vice versa (that begin with a black note). Enharmonic changes: • • • • • C# maj / Db maj D# maj / Eb maj F# maj / Gb maj G# maj / Ab maj A# maj / Bb maj Next to it to the left of the toggle button, the chord and notes are shown. Chord Nr. (Number) These buttons show the saved chords of each Chord Preset. There are 12 chord numbers available for each Chord Preset. To select a Chord Number, simply press one of the 12 buttons. OpenArt-Arranger User Manual 9.2 Selecting / Loading a chord Preset. Open the top drop down menu in the centre of the top bar at the top of the display by touching the downward pointing arrow. A list of all Chord Presets are located here. Simply navigate through the menu using the Tempo / Data Wheel or use your finger to ‘drag’ the bar up and down to the right of the open drop down menu. Touch the desired Chord Preset. The Chord Preset will then be highlighted in red. You can close the drop down menu by simply pressing on the ‘upward pointing’ arrow at the top of the Chord Preset menu. 9.3 Saving Chord Presets You can save up to 12 chords in a Chord Preset. 1. 2. 3. 4. Select the key (Root / Tonic) Select the Scale (Major or Minor using the Toggle button) if required Select the required Harmony type in the drop-down list in the centre of the display. Save the chord table by pressing the desired number. TIP: Bear in mind now, when choosing a chord number button, that a saved chord preset can be loaded later with a key on the manual or pedal board using the new ‘Remote Octave’ feature. In Remote Octave mode, Chord Number 1 will be triggered by the first note of the selected octave. Number 12 will be the last note of the octave. This allows you to create a true ‘single-finger automatic’, since using just one key for the auto accompaniment produces major, minor and other chords and can be controlled with the ‘Remote Octave feature. Example: A recommended number choice when setting up a simply chord preset: (fron the extended chord family of C major) Starting Key: C maj Key Key Key Key Key Key Key Key Key Key Key Key = Cmaj (tonic) = C# dim = D min = C dim = E min = F maj (Sub Dominant) = F min = G7 (Dominant 7th Chord) = C aug = A min = C7 = Cmaj 7 No.1 No.2 No.3 No.4 No.5 No.6 No.7 No.8 No.9 No.10 No.11 No.12 In ‘Remote Octave mode. Selected octave: C-B Controlled by note C Controlled by note C# Controlled by note D Controlled by note Eb Controlled by note E Controlled by note F Controlled by note F# Controlled by note G Controlled by note G# Controlled by note A Controlled by note Bb Controlled by note B OpenArt-Arranger User Manual Saving A Chord Preset To save an Chord Preset, simply press the ‘Save’ button. You can save up to 40 Chord Presets. The Yellow save screen will appear. Choose a free location that you would like to save your new sound to by pressing on the location (it will then be highlighted in Yellow). If you wish to change the name of your sound, simply press on the large black bar at the top left hand corner of the screen that displays the ‘sound name’. The screen to the left will then be shown (displaying the Virtual Typewriter). Once you have input a new name, press the ‘Enter’ button. Finally, simply press the ‘Save’ button to complete the saving of your new Chord Preset.. OpenArt-Arranger User Manual 10 Remote Octave (The OpenArt-Arranger must be activated to use this function) To get to the Remote Octave page, press the SETTINGS button in the header bar of the Main display, and then select the REMOTE OCTAVE button in the lower centre of the display view. With the Remote Octave, you can assign up to 12 switch functions within the range of one octave (= 12 semitone keys) to keys selected by you on your manual or foot pedals. The keys used within this octave are muted. This feature allows you to do the following whilst playing live: • • • Activate functions which are difficult to select Use facilities not accessible directly from the main display Make switches, normally operated from positions further from the keyboard The remote Octave On/Off button is situated in the centre of the header bar. Press here to activate/deactivate the Remote Octave Control function. The Remote Octave feature provides players with access to difficult to select functions while playing live. When the ‘Remove Octave’ function is turned on, you will also see a symbol of an exclamation mark with the letter ‘R’ shown below it. The letter ‘R’ stands for ‘Remote Octave’ and when this can be seen on the Main Display, it means that the Remote Octave function is active. OpenArt-Arranger User Manual Remote Octave Explained: Remote Octave On / Off Button Back Button This button allows you to exit the Remote Octave Screen. This button activates or deactivates the Remote Octave Function Upper Manual The 5 Octave (61 notes) keyboard at the top of the display represents the Upper Manual of your instrument. Lower Manual The longer keyboard representation is for the Lower Manual. Instruments such as the Abacus Duo Pro, Duo Deluxe, Showtime and the new Louvre models have a 76 note lower manual which is longer than the standard 5 octave manuals of the Vegas, Verona, and Scala. Pedal Board A two octave representation of a pedal board is shown in the Remote Octave screen. Instruments such as the Scala, Louvre, Special Edition of the Verona and the new Abacus Showtime all have 25 note Pedal Boards. Instruments such as the Abacus Duo Pro, Verona and Vegas have 17 note portable pedal boards. Louvre, Abacus Duo Pro, Duo Deluxe & Abacus Showtime 76 Note Lower Manual The 76 Note Lower Manual means that you have greater choice for setting the functions of the Remote Octave. In any case, you will have nearly 5-6 octaves for normal play. Vegas, Verona & Scala 5 Octave (61 Note Lower Manual). The 5 Octave Lower Manual means that you will have a 4 octave range for normal play. Abacus Showtime, Verona (Special Edition), Scala & Louvre 25 Note Pedal Board The 25 Note Pedal Board has a larger range of notes, providing a greater choice function allocation within the Remote Octave. This also means that there is a greater area for normal pedal playing. Abacus, Vegas, Verona & Ikarus 17 Note Pedal Board The 17 Note Pedal Board has fewer notes, meaning that the area that you can allocate the Remote Octave functions to a smaller area. There will also be a smaller area for normal pedal playing. OpenArt-Arranger User Manual Remote Octave Explained (Continued). You can only switch the ‘Remote Octave’ function of or off in this menu. Selecting The Octave: Press the Lowest key of the Octave you wish to use on your Manual (Or one of your manuals if you have two manuals, or your Pedal Board. PLEASE NOTE: There must be 12 semi-tones (12 black and white notes) above the Lowest note that you have selected. i.e There must be a whole octave. The keys of the selected Octave will now be ‘highlighted’ in the display and will be encased in a dark box: Our example above shows that C4 was selected as the ‘Lowest Note’, meaning that the Octave above it (C4-C5) is now selected and this is where our ‘Remote Octave Functions’ will be assigned to. If you selected the ‘Lowest Note’ of the Pedal Board, the display will show the Octave on the Pedal Board Highlighted: This example of the Pedal Board shows that bottom C was selected as the ‘Lowest Note’ and the first Octave was selected of the Pedal Board. Description Of The Remote Octave Functions: Select one of the following and try it out: Arabic Tuning - You can switch between the first twelve saved ‘Arabic Scales’ with the manual Keys. (1st Note (Key of the selected Octave). Begleitung (Accompaniment) - Switch through the first 12 Rhythm / Accompaniment Selection Buttons on your Instruments Control Panel: e.g: 1st Manual Key, 8 Beat > 16 Beat > Disco > Dance etc. Pressing the same key on the keyboard manual again moves you through the Acc button Mapping levels: e.g: Repeat pressing of the Key 8 Beat Level 1 > 8 Beat Level 2 > B Beat Level 3 etc. OpenArt-Arranger User Manual Sounds - Control of the selected Sound Buttons on the Control Panel: Pressing the same manual key again moves you through the Sound Button levels (i.e Level 1 > Level 2 > Level 3 > Level 4 etc). Key 1: Tonewheel / Drawbars Key 2: Grand Piano Key 3: Electric Piano Key 4: Acoustic Guitar Key 5: Strings 1 Key 6: Orchestra Key 7: Trumpet Key 8: Tenor Sax Key 9: Accordion Key 10: Acoustic Bass Key 11: Synth Lead 1 Key 12: Synth Pad 1 Harmony Input (Harmonieingabe) - Loads a harmony of a Chord Preset selected within the Chord Control display. The Chord number sequence corresponds to the note sequence within the octave: E.g 1st Note = C > Chord No.1 2nd Note = C# / Chord No. 2 etc. Effects - Trigger a Sound Effect: The number sequence corresponds to that of the Effect Sound Push Buttons on the Control Panel. Buttons 11 and 12 have no sound effect allocated to them. PLEASE NOTE: Even on instruments with only 6 Effect Sound buttons, you can use all ‘10’ possible effects from the Effect Sound Button editor. They are all triggered by the keys / Pedals of the Remote Octave function. OpenArt-Arranger User Manual 11 Virtual Panel Press the button ‘Virtual Panel’ at the top right of the display to open the Virtual Panel. The Virtual Panel provides easy access to the rhythm section controls as well as a quick over view of information. Once pressed, the following ‘floating’ panel will appear: If you require even more information, you can switch between the Virtual Panel and the ‘Advanced mode’, which essentially opens the ‘Ext. Panel’ (already covered near the start of this manual). Press the ‘Advanced’ button to open the wider panel: OpenArt-Arranger User Manual The Additional panel shows the virtual style mixer. If you now choose to exit the OpenArt-Arranger Style Editor, the Virtual Panel remains, providing instant access to the Virtual Style Part Controls and Virtual Style Mixer: PLEASE NOTE: You can move the Panels with your finger. Simply press down and ‘hold down’ your finger over the grey area of the panel and move your finger. The panels will turn translucent while in transit across the display: OpenArt-Arranger User Manual 12 Style Record The OpenArt-Arranger features a 2nd Style Creator module called ‘Style Record’. With this function, we can edit existing Styles / Realdrum parts by way of editing all parts as well as being able to record new style parts, played on the keyboard of our instruments. Press the button ‘Style Record’ from the main style editor display. The following screen will open: The Style Record module allows us to Edit (Copy, Delete or Modify) every aspect of a style. The currently loaded style and its style infrastructure makeup will be shown in this display. Please make sure you have the correct style loaded that you wish to Edit. We will now explain each section of the Style Record screen in detail: Header Bar: Tempo - The shows us the currently set Tempo of the Style. Touch the Tempo field and use the Tempo Data Wheel to change the Tempo. Back - Press this button to return to the main Style Edit display of the OpenArt-Arranger. OpenArt-Arranger User Manual Style Parts The Style Parts overview shows us all of the currently active parts of the Style. For example, this style shows us that it has 4 Main parts (Variations A,B,C & D), 4 x Fills, 3 x Intros & 3 x endings and 2 x Breaks. Older OAS Styles (Pre OpenArt-Arranger) only had 4 Main Variations, 2 x Breaks and 2 Intro / Endings. All new OAA Styles have 4 Main Variations, 4 x Fills, 3 x Intro / Endings and 2 x Breaks - See OAA Styles and Franz Lambert / James Last Styles & Styles 2011 Styles. Edit Initial CC’s Opens the currently selected Style Parts ‘Track Edit. Modify Volume, Panorama, Reverb etc Takt Bar Resolution for the currently selected Style Part. Volume Overall Volume of the currently selected Style Part Style Part Selection Choose what part you would like to Edit Part Kopiern (Part Copy) This button will copy the entire content of a Style Part. If you choose to Copy a Style Part, you will be prompted to make sure you do intend to copy the part. Below this, you will see a ‘Paste’ button. See the example further down. Klangfarbe (Sound) Opens the display to allow you to change the sound. The sound will then be shown ont he Klangfarbe button, along with the respective Sound Bank Prg Number Delete Part This button allows you to delete an entire Style Part. You will be prompted to check that you actually do wish to delete the Style Part. Part Copy (Part Kopiern) The Part Copy button (Park Kopiern) allows you to copy an entire Style Part. Once you have pressed the ‘Part Kopiern’ button, a ‘Part Paste’ button will appear: 1. Press the ‘Part Kopiern’ button to copy the entire Style Part (This will copy the currently selected Style Part). 2. You will now see that a button has appeared where there was formerly a blank space. This button is labelled ‘Part Einfuegen’ which translates to ‘Part Paste’. To ‘Paste’ the copied Style Part, select another Style Part that you wish to replace with the copied Style Part and then press the ‘Part einfuegen’ button. You will be prompted with a box to ask whether you actually do wish to replace the entire Style Part with the Copied Style Part. Press ‘Yes’ to Proceed or ‘No’ to leave the current Style Part intact. OpenArt-Arranger User Manual Copying Style Parts to Other Styles Using the Part Kopiern (Part Copy) function, you can swap whole Style Parts between Styles. To do this, follow these easy i(10 step) instructions: 1. Open the Style that you wish to copy a Style Part from. 2. Enter the OpenArt-Arranger. 3. Press the ‘Style Record’ button to open the Style Record module. 4. Select the Style Part that you wish to copy. 5. Press the ‘Part Kopiern’ button. The part is now copied the the OpenArt-Arrangers memory. 6. Press the Back button. 7. Load the new Style that you wish to paste the copied Style Part to. 8. Press the Style Record button once more. 9. Select the Style Part that you wish to replace with the copied Style Part. 10. Press the ‘Part Einfuegen’ (Part Paste) button. You will be prompted by a warning box asking you whether you wish to replace the entire Style Part with the copied Style Part. Press Yes. Save the Style to ensure that the changes are made. Repeat the process for any and all Style Parts that you wish to copy. This is a quick and easy way of creating great styles with existing style elements / parts. Style Part Tracks You may or may not know that every Style Part is made up of no less than 8 Auto-Accompaniment tracks. Within Each Style Part, you will find 2 Tracks for Drums (Drums 1 & Drums 2), a Bass Track and 5 Generic Accompaniment Tracks. The Style Record Function shows them in the middle left of the display. As well as copy whole Style Parts, we can also copy individual tracks from within a Style Part. We will explain more about this shortly. First, let us explain the ‘Track’ section: Solo button This button allows you to ‘Solo’ the track that you have currently selected. Track Selection Track Copy This button allows you to Copy the currently selected track. You can choose which Track you wish to Edit or Copy from here. Simply press on the Track, until an X is shown in the box. Complete Track (All Parts) This button allows you to copy an entire track, inclusive of it’s maximum 16 parts. Track einfuegen This button allows you to Paste the copied track onto another track or into another style if you so desire. Delete Track This button allows you to delete an entire track. Complete Track (All Parts) Paste (einfuegen) This button allows you to paste the Copied ‘All Parts’ track, with all of its parts to your desired destination track. Change Sound Press this button to change the sound of the individual track - applies to all parts of the track. Initial Controller Press this button to open the Style Track Edit window. Edit (volume, panorama, Reverb etc) for the Track. OpenArt-Arranger User Manual Track Parts & Their Patterns Before we proceed any further, we must provide you with some information about how a Style is made up. This is to prevent any confusion with the next section. A Style Part is made up from 8 Tracks. Each of the 8 Tracks can have up to 16 patterns. Why the need for so many? Well as an example, nearly all WERSI factory Styles have 3 patterns per Style part. The 1st Pattern is for Major Chords, the 2nd Pattern is for Minor Chords and the 3rd Pattern is usually for others such as ‘7ths and Jazz type chord harmonies’. We must stress that a pattern can be for anything you wish, perhaps on Drum Track 1, you wish to have the 1st Pattern for the Bass Drum, the 2nd Pattern for the Snare Drum, the 3rd Pattern for the Hi-Hate cymbals, the 4th Pattern for a Tambourine... the uses are endless, and there is no right or wrong as such. Also, because the OpenArt-Arranger is the most advanced and intelligent arranger in an electronic keyboard instrument, it also accommodates for other Manufacturers style programming. Specifically, for Yamaha PSR (Tyros) styles and also others such as Technics, Korg and Roland (Harmony Types etc) to ensure that your WERSI instrument is cross-compatible. WERSI provides style programming detail usually only afforded to R&D labs inside some of the biggest household name keyboard manufacturers. That’s because we’re nice people. OK, now it’s time for us to explain the next part of the Style Record module to you. Patterns 1-16 Press on the Pattern that you wish to Edit, Delete or Copy. You can see how many Patterns there are for each Track, as they are ‘Low-Lighted in a darker-Grey colour: 3 Patterns exist in this example Delete Button This button allows you to Delete the currently selected pattern. Name This button allows you to ‘modify the name of the Pattern. Only a short name is possible. This helps to organise your patterns in terms of remembering what each pattern is programmed for. Edit Pattern This button allows you to launch the ‘Edit Pattern’ display. Edit Pattern Events This button allows you to launch the ‘Edit Style Event’ module. Chord Root / Type There two fields show the Patterns currently selected ‘Root Chord’ and ‘Chord Type’ i.e Major Chord in our example. Press the ‘Edit Pattern’ button to change this. Copy Pattern This button allows you to Copy a pattern. You can paste it to any Pattern slot (1-16) of any Track. Please bear in mind, that copying a pattern from a drum track to a normal accompaniment track may not be the wisest choice ;-) The ‘Copy Pattern’ function is also what we use to copy parts from other styles (say a Strumming Guitar part) or an elaborate Synth part from another style. You can then paste the Copied Pattern into the style that you are working on, or vice versa... let your imagination take over! OpenArt-Arranger User Manual Record Settings One of the exciting features of the Style Record module is the ability to be able to record your accompaniment directly from your instrument keyboard. This works in a similar way to the MIDI record function of your instrument, although a little more specific in function as we are only recording very short phrases / sequences. The Record Settings explained: Autoclick Loop Some people like to have a ‘click’ track to stay in time to. Professional studios use them, so why not when creating our styles? Press the box so that the X appears. A loud click sound will then keep time when you are recording. Overdub Replace: Press this button to choose whether you record in ‘Replacement mode’ (deleting any pre-recorded / programmed patterns) or in ‘Overdub’ mode, allowing you to ‘record over the top’ of any existing pattern. When in Replacement Mode, your display will look like this: Press this box if you wish for the Style pattern to be looped, meaning that you do not have to continually keep stopping and starting the recording. This is of course a personal preference. Auto-Quantize Press this button to activate the ‘AutoQuantize’ function. This will Quantize your recording to the resolution set in the Qunatize box next to this button. Quantize This field allows you to select the resolution that you would like the Auto-Quantize function to use. This offer s quick way of working, if you are proficient in Style Creation and / or MIDI Sequencing. Recording (10 Easy Steps To Create A New Pattern). The OpenArt-Arranger will always prompt you what to do when you’re creating a new Style Part, but here are some simple instruction for recording new patterns from scratch. 1. Select the Style Part 2. Select the Track 3. Select an Empty Pattern Slot (1-16) 4. Pess the ‘Create New Patter’ 5. Choose between Overdub and Replace -ment mode. 6. Press the ‘Record button. 7. Wait for the two bar count in. 8. Play! 9. Press the Stop Button. 10. Press the ‘Change Sound’ button and select the desire sound for playback. Bars / Beats This display will allow you to keep count on what bar and beat of the bar your current position is at. Record Press this button to start recording. There is a two bar count in (see the bar count in to the right). When you are ready to stop recording, press the ‘Stop’ button. OpenArt-Arranger User Manual How to create a ‘Blank Style’ to use as a Canvass for future Style Creation projects: Your instrument doesn’t contain ‘Blank Styles’ as such, but it is easy to take a style and strip it of it’s content, leaving just a blank style as the end result... this is a blank canvass for then creating a whole new style from scratch. If you are an advanced user, then you can create your own blank styles with the ‘Style Compose’ module, but for many users, this is the most user friendly way of achieving a blank style canvass: 1. Load the desired style. 2. Select each Style Part in turn and press the button ‘Delete Part’. 3. You will now see that all of the Tracks for the Style Part are empty: As well as the Tracks and Patterns being emptied of their content, you can also see that ‘Main A’ is no longer ‘Low-Lighted’ in the dark grey box, as it now is a blank, inactive Style Part. Only Paste Options remain for both the Style Parts and Patterns. Additionally, the Create New Pattern function is also available, allowing you to create a new Pattern from scratch for this now deleted Style Part. 4. Repeat the above process for every Style Part. 5. Press the ‘Back Button’ and then ‘Save’ the style. You might like to give the style a new name such as ‘Blank Style Canvass’ for example. OpenArt-Arranger User Manual OAS Turotial - Getting the Best from Styles & Realdrums Very often, we tend to find that our OAS instruments sound a little bit ‘dated’ or ‘tired’ when the accompaniment section is compared to some other new keyboards on the market. This is partly because WERSI is a small company with a small development team. Many of the the original Factory styles were created ten years ago on OAS version 3.30 and 4.1 respectively. Of course new styles have been created and added. The superb Styles 2011 add-on is one example of just how versatile the instrument is, and a large percentage of styles have been brought up to date. But what if you are do not have Styles 2011 and would like to simply get the best from the standard Factory Styles? Well, this tutorial will tell you how. Why a standard Factory Style isn’t at it’s full ‘sound’ potential... As previously mentioned, many of the Factory Styles were created a longtime ago. The sound engine and sound selection that the Styles were originally programmed to use was an entirely different system. When WERSI switched to OAS 5, the Styles were converted for OAS 5. This happened again with OAS 7. Thankfully, the conversion process only really needs to be tweaked. For the European markets, often the sounds (which can be a little harsh and Germanic in sound) are fine and are up to standards. However, for the slightly more sophisticated British and American markets, the styles need to be refined. Don’t worry, it’s easy work, it’s just knowing where to begin. As you know, there are 4 variations for a style, 2-3 intro and endings, 2 x break / fills and up to 4 fills for a style. With the OpenArt-Arranger (OAA) or the standard Factory Style Editor, we can edit all parts of the style. The word ‘Edit’ can often give people a feeling of dread... fear not, this tutorial will show you how to ‘easy’ edit a style to make them sound great. Let’s start with a recap of the sections of the OAA main ‘Edit’ screen. The Main OAA screen: Style Part ‘Selection’ buttons These buttons allow you to select what style part you wish to edit... Variation A, in our example. Edit All Parts button This button allows you to change every part of the style in one go. Any changes made while this button is active will affect all variations, fills and intro’s etc. Volume Sliders These Volume Sliders allow you to create the perfect ‘sound mix’ for your style. If a part is too loud, or too quiet, simply change the volume here. Solo & Mute buttons The buttons marked ‘S’ = Solo and the buttons marked ‘M’ = Mute. This allows you to quickly cut out parts or simply ‘solo’ a part to hear it in isolation away from the full backing. Controls This button allows you to set the individual instrument tracks ‘Volume, Reverb, Delay, Octave’ etc. Sounds The Sound buttons are the most important section of the style and what we will be looking at in this tutorial. The name of the currently active sound assigned to that instrument track is displayed on the long grey button. To change the sound, simply press the desired button. The Sound List will open, allowing you to change to any sound within the OpenArt-System. There are also special Accompaniment Only sounds that can be selected for use within your style. Tip: If you want to change a sound (say for example ‘Acc 4 track’ currently showing the CleanGuitar Acc sound) for every style part, before you change the sound, press the ‘Edit All Parts’ button. This will mean that the changed sound will be used on all style parts for Acc Track 4. OpenArt-Arranger User Manual So let us look at a Factory Style... In this example, we will use the Style ‘8 beat 1’. This is perhaps the oldest Style in your instrument and was one of the first styles to be showcased on the OAS prototypes at the Frankfurt Muikmesse in 2000. 8 Beat 1 When you play this style, say for example on Variation 1, you will hear there is a ‘choir - doooo girl vocal’ sound in the back ground, a strumming guitar and fairly standard 8 beat type drums. It’s is a nice style, but a little bit lacking in sound imagination. We can now improve this style with ease and very few changes to make the style sound ‘amazing’. It will bring the sound character right up to date with the modern arranger keyboards. 1. Choose a Sound Track 1. Let’s start by changing the choral ‘Doooo’ sound to a nice ‘Mantovani Strings’ sound. 2. Let’s change the ‘Steel Guitar’ General Midi sound to one of the new OAA Steel Guitars (not marked by an * in the sound list SteelGuitar Acc). We sometimes need to change the octave of accompaniment sounds to make them sound correct due to the way that the sounds are programmed for Accompaniment. Simply press the ‘Control’ button for Acc Track ‘Acc 1’ and change the Octave until it ‘sounds correct’. 3. Also change any additional Guitar sound listed to a different type of Guitar. For example, in the Factory Styles, many of the sounds come from the General Midi sample bank. These are ‘basic’ sounds and our Factory Sound Library has many, many superior sounds... Try changing any Electric Guitars to sounds such as ‘Solid Guitar’ or ‘Clean Guitar Acc’. These sounds, contain much better samples, more dynamic layers and sound characters. Already the style will sound improved. 4. Changing the Drums... The styles tend to use the ‘Standard Drum Kit 1’, which is a good workhorse kit, but with the variety and realness of Drums on modern keyboards, it would be nice to have a bit more ‘sparkle’ and sound character in our drums. Change the Drum sound for both Drum Tracks 1 and 2 to ‘Standard Kit 1’ which is taken from the ‘Studio Drums’ (sometimes called Drumsets 1) package. The Snare drums will be improved, the tambourines will sparkle and you’ll hear a new sound dimension to the style. We can go further and edit the Intro and Ending styles. In the factory style, on the intro and endings, a sound called ‘Crystal’ is used. A better sound to use is either ‘Dreaming’ or ‘Fairlight’. You may need to adjust the Octave of the Acc Track. Once you are happy, save the style. It will sound like a totally new creation! 2. Choose a New Sound to use OpenArt-Arranger User Manual How do I decide on what sounds to us? It can be hard to know what sounds to use. My advice is first to experiment and then to follow a simple guide rule: “If you are working with a ‘Natural Guitar’ sound, audition / try all of the different Natural Guitar sounds until you find the best one. A tip here specific to guitars... try using ‘Natural Guitar Slide’ (You’ll gain a fantastic guitar that ‘slides and bends’ and provides some spectacular sound results). Strings... try changing Strings 1 GM to Mantovani Strings or to ‘Classical Strings Large’. Brass... Try changing any Brass GM or Brass Ensemble sounds to ‘Brass Shake’, Fanfare Brass, Ultimate Brass (a Good one for Pop, Soul and Latin music styles) or one of the three different ‘BigBand Brass’ sounds. These sounds are more detailed and will provide a wider scope of musical pleasure. E-Pianos... Try changing any of the E-Piano GM sounds to ANY of the many E-Piano sounds in your instrument. Rhodes Piano, Vintage Gentle Piano and FM pianos are good replacement choices. Pianos. Try changing any of the Grand GM to either ‘Flugel’ Piano’ or ‘Klassik Piano’. These are stunning alternatives. Even the ‘Piano Dreams’ sample can sometimes add that little bit extra to a Piano track. Pads... Move away from the standard (and boring) sweep pads GM sounds and venture into the ‘Pads’ section. Experiment until you find some beautiful detailed pads, of which there are many to really transform any Pad track. Super-Articulated Sounds... What are they? A Super Articulated sound is a fancy name for a ‘Multi-Sampled’ sound. Yamaha introduced the name to their keyboards as a marketing ploy once they caught up with technology and were able to build Multi-Sampled, Multi-Dynamic Layered sounds into their instruments. WERSI had been doing this since 1990 with their Livestyle upgrade. Our OAS instruments have contained these so called ‘Super-Articulated’ sounds since the prototypes were launched. Our Doo-Bop sounds are multi sampled / dynamic layer sounds. When you hear the term Super-Articulated, all it means is that when you play, depending on how soft or hard you play, the sound and keyboard will respond to your touch. In the case of a doo-bop sound, you will either hear a ‘dooo sound’ or a ‘bop sound’. Similarly, if you use the BrassShake sound, when you depress a key hard, you will hear a ‘Brass Shake. When the keyboard / keys are depressed softly, a normal Brass sound will play. This is also true of the Jazz Trumpets and Jazz Trombones if we are to single them out. When the keyboard is played softly, the sound is soft and breathy, when played hard, the sound is forceful and crisp. Incorporating these sounds into styles... We encourage you to actively use the sounds like the ones mentioned above in your styles. The reason is simple... they sound better and provide more musical scope as a result of their sound design. When you use these sounds, please note that because they are complex sounds, and contain more sample layers / dynamic layers than the average GM sound bank used in most styles, more Polyphony of the OpenArt-System is used. Fear not though, as your instrument is more than up to the job of handling these beautiful sounds. Experiment and have fun... OpenArt-Arranger User Manual OpenArt-Arranger Styles & Total Presets OAA Style: Style No: Registration: Piano Ballad 901 Demo Piano Ballade Cha Cha 902 Demo Cha Cha Rock´n Roll 903 Demo Rock´n Roll Berts Swing 904 Demo Berts Swing Oberkrainer 905 Demo Oberkrainer Polka Walzer Schunkel 906 Demo Schunkelwalzer Guitar Swing 907 Demo Guitar Swing Slow Rock 908 Demo Slow Rock Big Band Fast 909 Demo Big Band Fast Slow Swing 910 Demo Slow Swing Disco Samba 911 Demo Schlager Schlager 912 Demo 16 Beat Italy 16-Beat Italy 913 Demo Hollywood 6-8 Ballad 914 Demo Slow Fox Hollywood 915 Demo Akkordeon Foxtrott Slow Fox 916 Demo Wiener Walzer Akkordeon Foxtrott 917 Demo Connie´s Jive Wiener Walzer 918 Demo Slow Waltz Jive 919 Demo 6-8 Ballad Slow Waltz 920 Demo Disco Samba Accompaniment-Sounds (for YAMAHA®-Styles): 56 Sounds (Sound-Bank 084) OpenArt-Arranger User Manual Harmony Types / Chords of the OpenArt-Arranger OpenArt-Arranger User Manual WERSI Direct Ltd - 0800 084 2013 - www.wersidirect.com - [email protected]