1
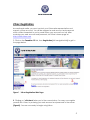
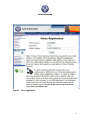
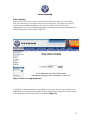
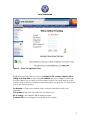
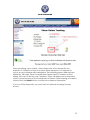
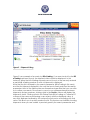
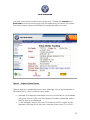
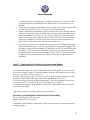
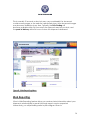
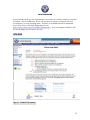
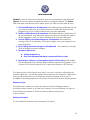
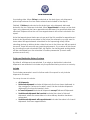
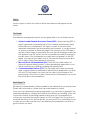
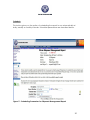
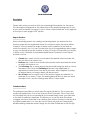
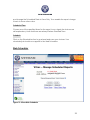
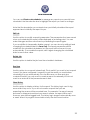
Canadian LTL Online Tracking for the Internet User’s Manual Updated: February 28, 2011 Table of Contents Introduction ……………………………………3 Prerequisites …………………………………..4 Registration …………………………………...5 Online Tracking .……………………………...8 Web Reporting ……………………………….14 Info Mail ……………………………….15 Shipment Management Report …………….17 Web Scheduler …………………………….....22 2 Introduction Vitrac allows Vitran's customers to track their shipments conveniently and quickly using the power of the World Wide Web. In addition to displaying the current status of your shipments, Vitrac also links to Vitran's state of the art document imaging system allowing access to copies of the bill of lading and/or proof of delivery documents. This manual provides a quick overview of Vitrac's functionality and briefly explains how to use the system. Currently, Vitrac consists of two components; online tracking and web reporting. Online Tracking Online tracking allows you to interactively query the status of individual shipments. You can specify a bill of lading number, purchase order number or pro number to locate a shipment and display its status in your web browser. Document images can be viewed seamlessly inside your web browser using Adobe's Acrobat viewer. Web Reporting Web reporting allows you to specify groups of shipments and generates a report listing the status of the matching shipments. A report consists of an email message sent to you containing the requested information. The email message will usually have an attached file (such as an Adobe Acrobat PDF or Microsoft Excel spreadsheet) that you can view or manipulate with your PC workstation. InfoMail InfoMail is used to automatically email notifications of deliveries to you as they occur. You can choose to receive status information only, or you can have proof of delivery document images emailed to you as well. You can enable delivery notifications only for specific shipments, or for all shipments. The Shipment Management Report lists the status of a group of shipments that you select. A flexible selection criterion allows you to customize this report to suit a wide variety of needs. The report can be run interactively, or you can save your selections and schedule the report to be emailed to you automatically at predetermined intervals. As the Vitrac system evolves new information will be documented in the form of online help and FAQ (frequently asked questions), files which can be viewed on the web site by clicking one of the various help 3 icons. Please take a moment to view the online help when new features appear. The online help files will contain links to a current copy of this document. Since Vitrac is evolving, some of the illustrations in this manual may be different than what you actually observe on the web site. Prerequisites Before you can start using Vitrac two prerequisites must be met... · · First, you must contact your Vitran sales representative and request a Web account. You will be assigned a web account and password which will be used to identify you to the Vitrac system. Your web account ensures that all of the information you require is made available to the Vitrac system. Your password ensures that only you will be able to retrieve that information. Second, you must register yourself with Vitrac using the web account and password assigned to your firm. Rather than force you to log in each and every time you visit the site, Vitrac sends a token (known as a cookie) back to your browser when you successfully log in. Your browser, in turn, will use the cookie to identify you on subsequent visits to www.vitran.com. More information on cookies and how they are used by Vitrac is included elsewhere in this document. In addition there are two software prerequisites which must be met ... 1. Since Vitrac uses cookies, your web browser must support cookies. 2. Vitrac makes document images and printed reports available as Adobe Acrobat PDF files. If you wish to access these features, you must acquire and install Adobe's Acrobat reader software. 4 Vitrac Registration As mentioned earlier, you must contact your Vitran sales representative and request a Vitrac account. You will be assigned a web account and password which will be forwarded to you by email when your account is set up. After receiving your web account and password, visit Vitran's home page at http://www.vitran.com 1. Click on the Canadian LTL link, then Registration (left navigation link) to get to the page below. Figure 1 Vitran Registration Web Page 2. Clicking on “click here’ takes you to the screen below. You may now register yourself with Vitrac, by entering your web account and password in the screen (Figure2). You are now ready to begin using Vitrac 5 . Figure 2 Vitrac Registration 6 Vitrac registration was designed to be a compromise between ease of use and security. Too much security would have made the system either complex or difficult to configure or cumbersome and awkward to use. Little or no security would not have been acceptable either. Your web account code determines what information is available for retrieval. If your firm has multiple locations each with different requirements, you may require multiple web accounts. Please inform your sales representative of your requirements so that your Vitrac account can be configured accordingly. When you successfully log in to Vitrac's registration screen, Vitrac sends a token (known as a cookie) to your web browser which stores the cookie on your hard disk. The cookie is just a number that is used to identify your company to the Vitrac system. Whenever you return to www.vitran.com to request information from Vitrac, your browser sends your cookie along with your request. Since the cookie is unique to your account, Vitrac is able to determine which information you are authorized to retrieve, so there is no need to log in each and every time you visit our site. Some notes about Cookies... 1. Your browser will not send a cookie to any other web site other than the one that it came from. 2. The customer ID assigned is just a number. It has no significance to anyone other than Vitran's shipment tracking system. 3. Not all web browsers support cookies, although most popular browsers do. If your browser does not support cookies, or if you have disabled them, you must upgrade and/or enable cookies to use the shipment tracking facilities on this site. 4. If you will be accessing our tracking facilities from multiple computers, each computer needs a cookie, so you must register each computer separately. 5. You may find that changes you make to your system (for example installing a new web browser) will cause cookies to be deleted. If this occurs you will need to reregister. 6. Cookies will automatically expire 90 days after the last time you use our tracking facility. If you do not use the system for an extended length of time, you will need to reregister to acquire a valid cookie. 7. In order to prevent unauthorized access, six consecutive attempts to register with the incorrect password will disable your account. If you forget your password, or if you would like to have your password changed, 8. please contact your account manager. Changing your password will invalidate all existing cookies. 7 Online Tracking Users that do not have a web account have restricted access to the system. They can track by pro number only as shown in figure 3. You may also see this screen if your cookie has expired, or if this is your first visit to Vitrac after registering. If you’ve just finished registering, clicking your browser's refresh button should bring you to the screen in figure 4. Figure 3 Vitrac for unregistered users In addition to being restricted to tracking one pro at a time by pro number, non registered accounts will not be able to view document images and only a subset of the shipment status information is available (Figure 3). 8 Figure 4 – Vitrac for registered users Registered users are able to track by consignee's PO number, shipper's bill of lading or pickup date as well as by pro number as shown in figure 4. Although the form allows you to input up to four search criteria, only one item at a time can be used to locate a shipment; remaining items are ignored. You may enter one of the following items: Pro Number is Vitran's pro number which uniquely identifies exactly one shipment. Pickup Date is the date the shipment was picked up. Bill of Lading is the shipper's bill of lading number. Customer PO is the consignee's purchase order number. 9 When specifying a pro number, Vitrac always tries to locate exactly one shipment. If a shipment is found, its status will be displayed. If no shipment is found, an error message will be displayed. The remaining search fields behave differently. Although, there is normally one shipment per PO number or bill of lading, this may not be the case. Therefore, Vitrac will display a list of shipments which can be browsed to find the shipment of interest. After entering your search criteria, click the Submit button to retrieve the shipment information. If you use Vitrac frequently, you may want to bookmark this page for easy access. 10 Figure 5 Shipment Listing Figure 5 is an example of a search by Bill of Lading . If an exact match for the Bill of Lading had been found, the shipment status would be displayed. In this instance, either the bill of lading entered was not found, or the user only entered a partial bill of lading number so a list of shipments is displayed. Note that the list is ordered by the search parameter (bill of lading in this case) and the first shipment displayed is the one that most closely matches the search parameter. Most of the table entries are themselves hyper links that you can click on to refine your search. Since there is a one to one correspondence between shipments and pro numbers, clicking a link in the Pro No. column will display the shipment's status. Clicking a link in the Pickup Date, Bill of Lading or Customer PO columns is the same as performing a new search with the displayed value. A new list is displayed ordered by the column the link was in and starting with that value. This allows you to quickly reorder the list. This feature can facilitate locating shipments when you are unable to precisely specify the search parameter and 11 can help overcome inconsistencies in data entry. Clicking the forwards and backwards buttons moves through all of the shipments you have in our system. The system retains shipment information for approximately two years. Figure 6 Shipment Status Display Figure 6 displays a sample shipment status. Although most of the information is self explanatory, a few comments are in order. · · example, the shipment information which is not relevant or not available will not be shown. In this case, the shipment has been delivered, and so the ETA date is not displayed in the example, there is only one PO number and BOL number for the shipment. Although this is the norm, there are often many PO's or BOL's 12 · · · corresponding to one shipment. If a large number of PO number of BOL numbers need to be displayed they will be listed at the bottom of the display. if document images are available you can click on one of the hyper links to view the documents. This is covered in more detail below. Vitrac's database is updated four times daily. Three times during business hours and once during the evening. Also, new document images could become available at any time. If you view a shipment's status and then return to view the same shipment status later in the day, the information may have changed. To ensure that the most up to date information is displayed click your browser's refresh or reload button. since there may be a short delay retrieving document image information, Vitrac initially attempts to estimate how large the document image (PDF) files will be using system averages (20 Kilobytes for a POD and 60 Kilobytes for a BOL). You can use these numbers to get a rough estimate of how long it will take to download the images. If you click your browser’s refresh or reload button an exact file size is shown when the images become available. Figure 7 Displaying Proof of Delivery in Abobe Acrobat Reader As mentioned earlier, you must install Adobe's Acrobat reader in order to view document images. When you install Adobe Acrobat it will install a plugin which allows you to view PDF files within your favorite web browser. Figure 7 shows a proof of delivery being displayed within Windows Internet Explorer using Adobe Acrobat Reader version 9.4. You can use the Acrobat toolbar immediately , above the image to zoom in or out, save the PDF to a disk file or print the image to your printer. Acrobat stores images using efficient methods, so documents can be viewed with minimum delay. Typical document download times are shown below. Document Type Average Size Download Time (56K modem) Proof of Delivery 25 Kb 5 seconds Bill of Lading 75 Kb 15 seconds In addition, there will be a small delay while the document is retrieved from the imaging system. 13 This is normally 10 seconds or less, but may vary considerably if a document contains many pages or the web site is particularly busy. New document images may become available at any time. Typically, the bill of lading will become available within 24 hours when the shipment reaches our dock, and the proof of delivery within 24 hours of when the shipment is delivered. Figure 8: Web Reporting Menu Web Reporting Vitrac's Web Reporting feature allows you receive status information about your shipments automatically by email. Although reports can be requested interactively, you will probably prefer to preconfigure Vitrac to 14 automatically send you the information you require on a daily, weekly or monthly schedule. Once configured, Vitrac will continue to send you reports until you reconfigure it to stop sending them. A menu of available reports is displayed when you click on the Web Reporting icon at http://www.vitran.com/Canadian_ltl/index.htm . Any new reports added in the future will appear in this menu as well. InfoMail Figure 9: InfoMail Parameters 15 InfoMail is used to notify you by email as soon as your shipments are delivered. Figure 9 shows the various parameters used to configure InfoMail. The Action item indicates what action will be taken when you click on the submit button. 1. Pickup Notifications for all shipments will enable pickup notifications for all your pickup shipments. Any pickup after you enable this option will be flagged so that you will be notified when they are delivered. 2. Delivery Notifications for all shipments will enable delivery notifications for all your shipments. Any shipments picked up after you enable this option will be flagged so that you will be notified when they are delivered. 3. Proof of Delivery document images for all shipments will enable the viewing of Proof of deliveries, document images once your shipment has been delivered. 4. Bill of Lading document images for all shipments will enable the viewing of bill of lading document images. 5. Exception Reports for: a. All late shipments, or b. Only late shipments that have a requested delivery date 6. Send pickup, delivery, and exception report in XLS format this will enable the sending of pickup, delivery and exception reports in XLS format. If you choose not to receive reports in XLS, reports will default to PDF format. The lower section of the form is used only if you wish to receive notifications for specific shipments. You will be notified by email when the shipment is delivered, and you will receive the Proof of Delivery document image as soon as it is available. If anything appears in this section, the previous section will be ignored. Reference Type The reference number you enter can either be a bill of lading number, a purchase order number, or a Vitran pro number. You must indicate the type of each reference number so that the system is able to perform the correct lookup. Reference Number It is the reference number for the shipment of interest. 16 Shipment Management Report Figure 10: Shipment Management Report Parameters The shipment management report has quite a few parameters, so it can be a little confusing. However, if you take a few moments to become familiar with the various parameters and how they are used, this report can satisfy a variety of needs. The parameters are described below. Starting and Ending Dates This is the range of dates to be included in the report. You can select a range of Pickup, Delivery or Appointment date, by changing the Date Type to the left of 17 the starting date. When Pickup is selected as the date type; only shipments picked up between the two dates entered are included in the report. Similarly, if Delivery is selected as the date type, only shipments delivered between the two dates are included. When Appointment is chosen as the date type, only shipments that have appointments between the specified dates are selected. Shipments that do not have appointments will not be included in the report. Note that appointment dates are unique and that it is possible for appointment dates to be specified as sometime in the future (for example, you may want to know about all appointments scheduled for the upcoming week). When selecting pickup or delivery dates, dates that are in the future are still accepted; however, there will never be any matching shipments. If you arrive at this screen by choosing the web scheduler's Edit Job option, the starting and ending dates will be calculated from the scheduler's Duration parameter (current week, previous month etc). Origin and Destination State or Province By default, all shipments are selected. If an origin or destination is selected, shipments are restricted to include only the specified state, province or country. Include The include parameter is used to further restrict the report to only include shipments of interest. You may choose to include: · · · · · All shipments Delivered shipments includes all shipments that have been delivered to the consignee. If a beyond carrier is used, this also includes shipments delivered to the beyond carrier’s dock. In Transit shipments includes all shipments except Delivered Shipments. Undelivered shipments that are late includes the subset of intransit shipments where the normal door to door delivery duration has been exceeded. Undelivered shipments with appointments includes the subset of in transit shipments that have appointments. 18 Sort By Use this option to select the order in which the shipments will appear on the report. File Format The shipment management report can be generated in one of three formats. 1. Adobe Acrobat Portable Document Format (PDF). When selecting PDF, a report is generated containing Vitran's pro number and shipment status information for your shipments. The report consists of the most often requested information and should satisfy most requests. It can be viewed on screen or printed on letter size paper. The contents of the PDF report are fixed. Some items of information (such as the bill of lading number) do not appear in the PDF report and it is not possible to modify the report to include them. If the information you need does not appear on the PDF report, you may need to select one of the other file formats which allow you to select which items appear in the report. 2. Microsoft Excel 4.0 Spreadsheet (XLS). Excel 4.0 is an older version of Microsoft's spread sheet product, so any spreadsheet application in use today should have no difficulty loading the spread sheet. 3. Comma Separated Values (CSV) This is a simple text format commonly used to import data into database or spread sheet applications. For both XLS and CSV file formats, you must use the various check boxes in the lower portion of the form to select which pieces of information you would like to include in the spreadsheet. Email Report To All reports (or spreadsheets) will be emailed to the address that you specify here. Please take a second to confirm that the email address is correct. Once you have selected the report parameters, you can elect to generate the report immediately by clicking the Submit button. Before proceeding, Vitrac first counts the number of matching shipments and gives you an opportunity to cancel your request if the report is empty or if it is too large. Even if you plan to schedule the report to run automatically, you may want to try submitting it once or twice just to make sure that you have selected the parameters correctly to get the results you want. 19 Schedule This button gives you the option of scheduling the report to run automatically at daily, weekly or monthly intervals. Scheduler parameters are described below. Figure 11: Scheduling Parameters for Shipment Management Report 20 Description Please take a few seconds to think up a meaningful description for the report. This description will appear as the subject line of the email message sent to you, and is used to identify the report to you in Vitrac's Web Scheduler. It also appears at the top of each page in PDF reports. Report Duration When scheduling reports the starting and ending dates you entered on the previous page are not applicable since it is not known when the report will be created. You must specify a range of dates which is relative to the date on which the report is run. You can choose from one of the predefined date ranges or you can specify a specific number of days. If the No of Days field is not empty, it will be used. Otherwise, the predetermined Report Duration is used. Report duration can be: · · · · Current day, week, month or year selects the period which includes the day on which the report is run. Previous day, week or month selects the period which precedes the date on which the report is run. The Following day or week selects the period following the date on which the report is run. Note that Following dates are only applicable to appointment dates since they are in the future. When applied to pickup or delivery dates, an empty report will always result. No. of Days can be used if none of the above ranges are suitable. For example, if you select 7 days, the ending date will be the date on which the report is run, and the starting date will be 7 days earlier. Scheduled Date This parameter specifies on which days the report will be run. The choices are mostly self explanatory. One of the choices (Don't Schedule Save Only) does not schedule the job to run repeatedly, but instead simply stores your selections in the Web Scheduler's database. This allows you to use the Web Scheduler to trigger the report manually at an arbitrary time without having to reenter all of the report parameters. You can also use the Save only option to temporarily disable existing scheduler entries. Simply use the Web Scheduler to edit the job 21 and change the Scheduled Date to Save Only. To reenable the report change it back to some other value. Scheduled Time Choose one of the specified times for the report to run. Again the choices are self explanatory. Note that times are always Eastern Standard Time. Schedule Click on the Schedule button to go ahead and save your choices. Your scheduled job should now appear in the Web Scheduler. Web Scheduler Figure 12: Vitran Web Scheduler 22 You can use Vitran's web scheduler to manage any reports you currently have scheduled. Use the selection box to highlight the report you want to manage. Note that the description you entered when you initially scheduled the report appears here to identify the report for you. Edit Job Use this option to modify a report's parameters. The parameters that were saved when you scheduled the report will be displayed as a starting point. You can make changes and then save them by scheduling the report again. If you would like to temporarily disable a report, you can do so by editing it and changing the scheduled date to Save Only. The report parameters will be retained in the scheduler's database, but the report will not be sent to you automatically. To reenable the report, edit it again changing the scheduled date to some other value. Delete Job Use this option to delete the job from the scheduler's database. Run Now Use this option to run reports interactively. This is useful if you want to test a report to see if you have configured it correctly to get the results you want before scheduling it to run automatically. This can also save you time and give consistent results if you only want to create a report occasionally, but do not want to reenter all of the parameters each time. Show History Use this option to display a history for the report. The history log is used to log errors when they occur. If you do not receive a report that you are expecting the reason will be recorded here. For example, if a report is empty because no shipments matched your search criteria, no report will be sent. However, error will be logged here. The history log is purged automatically once a week. When it is purged it leaves behind only the most recent entries. 23