1
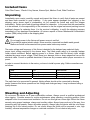
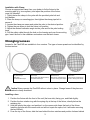
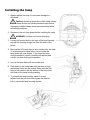
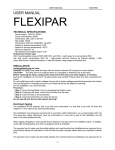
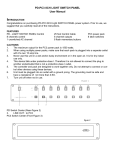
11” USER’S MANUAL Models: PA-FLEXIPARUL/B Black PA-FLEXIPARUL/W White This manual contains important information. Please read before operating fixture. 11” 8.63” Specifications Fixture Overview Beam angle adjustable theatrical light fixture Includes 4 lenses Rugged aluminum housing 10.5” Physical Color Size Weight Housing Material Black or White Body 11”W x 10.5”D x 11”H 8 lbs (3.64 kgs) Aluminum Environmental Location Max. ambient temperature Min. distance to flammable surface Min. distance to illuminated surface Indoor Only 113°F (45°C) 3.3ft (1m) 3.3ft (1m) Electrical Voltage Rated Power Lamp Dependent 600W Control Dimmer By voltage control using appropriate dimming system Optics Light Source Beam Angle HPL Lamps – maximum 600w various by changing lenses Rigging Orientation Mounting Points Approvals Any Side brackets or rear mount bracket, using 1/2” (13mm) mounting holes cETLus, CE Included Items Color/Filter Frame, 1 Each of Very Narrow, Narrow Spot, Medium Flood, Wide Flood lens Unpacking Immediately upon receipt, carefully unpack and inspect the fixture to verify that all parts are present and have been received in good condition. If any parts appear damaged from shipping or the shipping carton shows signs of mishandling, do not operate the fixture and notify the shipper immediately. Retain carton and all packing material for inspection. In the event that the merchandise is to be returned, it is the responsibility of the customer to use the original carton and packing to avoid additional charges for replacing them. It is the receiver’s obligation, to notify the shipping company immediately of any damaged merchandise. All returns require a Return Merchandise Authorization number (RMA) clearly listed on the shipping label. Power Do not apply power to the fixture until power source is verified. For protection against electric shock, fixture must be connected to suitable earth ground. Make sure fixture is disconnected from power mains before any service. The mains voltage and frequency of this fixture is decided by the halogen lamp selected. Apply proper input voltage required by the chosen lamp. The listed power rating is its average wattage under normal conditions. Before applying power to a fixture, check that the fixture’s input voltage matches the power source voltage. Check there is no damage, kinks or sharp edges that can cut the electrical cable. Consult a qualified electrician if there are any concerns about proper connection to power. In order to connect the device to the mains, you have to install a power plug. Cable connections are as follows: Cable Black White Green/Yellow Pin Live Hot Neutral Earth Ground International L N Ground symbol The earth has to be connected! In general, lighting effects should not be connected to dimming packs. However this fixture operates on line voltage and a halogen lamp. It may be dimmed using a quality dimmer. Mounting and Adjusting Do not mount the device on or near combustible surfaces. Always consult a qualified professional when rigging. Consider access for routine maintenance when selecting a mounting position. Allow adequate room for movement and ventilation. Do not use this light as a down light. Mount the fixture securely using proper hardware, clamps and a safety cables. Always keep cords out of the way, thus preventing any trip hazards. Secure all cables properly. Always hang the device with the color frame retaining clip in the locked position. Do not mount where the fixture will be exposed to rain, high humidity, extreme temperature changes or restricted ventilation. Do not obstruct any vents. 2 Installation with Clamp Choose an appropriate clamp from your dealer to fix the fixture to the mounting pipe (e.g. truss system), and adjust the position of the fixture once it is mounted. 1. Tightly fasten the clamp to the yoke with the provided yoke bolt and lock washer. 2. Place the clamp on mounting pipe, then tighten the clamp pipe bolt to secure it. 3. Loosen the clamp pan screw and rotate the yoke to the desired position. 4. Tighten the pan screw to lock the fixture into position. 5. Adjust the desired inclination angle via the yoke and fix the yoke locking knob. 6. Pull the safety-cable through the hole on the housing and over the mounting pipe. Insert the end in the carabiner and makes sure the latch closes. Changing Lenses Lenses for the FlexiPAR are available in four versions. The type or beam spread can be identified by the lens texture. VNSP NSP MFL WFL Very Narrow Spot Clear glass 15° Round beam shape Narrow Spot Stipple glass (slight diffuse texture) 19° Round beam shape Medium Flood Many facets, sized 6x12mm 21°x34° Oblong beam shape Wide Flood Fewer facets, sized 6x22mm 30°x51° Oblong beam shape Caution! Never operate the FlexiPAR without a lens in place. Change lenses if they become cracked or badly scratched. Installing a lens 1. Position the fixture with the front of the unit (the lens side) facing you, and tilted slightly. 2. Position the lens rotation ring with the spring clip at the top of the fixture, directly below the retaining clip. 3. Hold the lens by the edge, and position it so the convex side faces the back of the fixture. Installing the lens with the convex side out will not impair the optics, but it will make removing the lens difficult. 4. From the top of the fixture, slide the lens behind the lens catchers and position its base behind 3 the tabs on the bottom of the lens rotation ring. 5. Gently push the top of the lens inward until it snaps behind the spring clip. WARNING! Unplug the fixture before attempting to remove or install a lens. Removing a lens 1. FlexiPAR lenses get hot while the unit is in operation. Let the fixture cool before handling the lens. 2. Place the fixture on a flat, stable work surface. Do not install or remove lenses with the unit hanging. 3. Position the lens rotation ring with the spring clip at the top of the unit, directly below the retaining clip. 4. Tilt the front of the fixture down at least 45 degrees. 5. Press the spring clip with your finger to release the lens. 6. Allow the lens to drop forward from under the clip. 7. When the lens drops, remove your finger, allowing the lens to slide forward until it rests on the lens catchers. 8. Carefully remove the lens from the fixture Filter frame retaining clip The FlexiPAR is equipped with a spring-loaded retaining clip that prevents the color filter frame and accessories from falling out of the slot. WARNING! Hang the FlexiPAR with the color frame retaining clip in the locked position. 1. Release the retaining clip by pushing it sideways. The retaining clip opens. 2. lnsert the color frame. 3. Press the retaining clip down until it locks. Note: Use only accessories or top hats with 6.7 inch inside diameter. 4 Installing the lamp 1. Always replace the lamp if it becomes damaged or deformed. Caution! Operating lamps above their rated voltage reduces lamp life and can cause premature lamp failure. Improperly installed lamps cause premature lamp failure and socket problems. 2. Disconnect the unit from power before installing the lamp. WARNING! Let lamp cool before changing. 3. Loosen the knurled bolt on the back of the lamp housing and pull the housing straight out from the back of the fixture. 4. Remove the HPL lamp from its box, holding it by the base. To avoid premature lamp failure, do not touch the lamp glass with your fingers. If you touch the lamp during installation, clean it carefully with alcohol and a clean, lint-free cloth before operation. 5. Line up the lamp base with two socket pins. 6. Push down on the lamp base until the lamp is firmly seated and clicks into the socket. Make sure that the lamp is fully seated, with the bottom of the lamp heat sink flush to the lamp housing casting. 7. To reinstall the lamp housing, center it on the reflector and the bolt hole, then tighten the knurled bolt to secure the lamp housing in place. 5 Troubleshooting Symptom Possible Cause / Solution No Power Check for power on mains and any dimmer outputs Check internal wiring block & socket No light output Check & replace lamp Initial odor During the initial start-up some smoke or smell may arise. This is a normal process and does not necessarily mean that the device is defective. Maintenance Make sure fixture is cool and disconnected from power mains before any service or cleaning. Weekly operating hours and environmental conditions will establish how often the fixtures need cleaning. Fixtures should be cleaned and inspected at least once a month to maintain optimum performance. Accumulation of dust and fog residue increases heat buildup, can lead to malfunctions, overheating and reduction in maximum light output, reduced fixture life and overall performance. Before conducting any maintenance, disconnect fixture from power mains. 1. Disconnect fixture from power mains. 2. Use a vacuum with a soft brush to remove dust collected on external vents and internal components. If using an air compressor, use low pressures and extreme care to prevent damaging any internal parts. 3. Clean all optical elements when the fixture is cold. Use a soft lint free cotton cloth or tissue and cleaner safe for plastics. Do not use glass and window cleaners on the reflector. Chemicals in these cleaners will harm the reflective coating. Do not use paper towels or harsh materials to wipe the reflector. These materials can scratch the surface of the reflector. 4. Inspect clamps and safety cables to ensure fixture is secure and safe. 6 Accessory Items (sold separately) Order Code CLAMP-MEGA/B CLAMP-CBHALF Description Mega Heavy Duty Aluminum Clamp – Black Half Cheeseborough Coupler 300kg Max Load SAFETYCABLE30B SAFETYCABLE30S Safety Cable Black 30” Safety Cable Silver 30” CO-515M CO-STAGE20MBK CO-L520M Edison 5266BL 15a 125v Male Plug Stage 3-Pin Bastes 20A 125v Inline Male Plug Twistlock 205PBL 2311 20a 125v 2Pole, 3Wire Plug TA-BDRFLEXI/B TA-FRAMEFLEXI/B Barndoor for FlexiPar – 4 Leaf – Black Color/Filter Gel Frame – Black PA-FLEXIPARTOOL Tool for Flexipar Lens Removal PA-FLEXIPARLVN PA-FLEXIPARLN PA-FLEXIPARLM PA-FLEXIPARLW FlexiPar Very Narrow Lens FlexiPar Narrow Lens FlexiPar Medium Lens FlexiPar Wide Lens LHPL375 LHPL375X HPL 375w 115v Lamp HPL 375w 115v Extra Life Lamp LHPL575 LHPL575/120V LHPL575/230V LHPL575X HPL 575w 115v Lamp HPL 575w 120v Lamp HPL 575w 230v Lamp HPL 575w 115v Extra Life Lamp LHPL575X120V LHPL575X230V HPL 575w 120v Extra Life Lamp HPL 575w 230v Extra Life Lamp 7 Warranty and Claim Information Save original packing and documentation for warranty, service and return issues. Limited Warranty: This warranty covers defects or malfunctions in this equipment. This warranty lasts for a period of one year from date of purchase. It is the owner’s responsibility to provide invoices for proof of purchase, purchase date and dealer or distributor. If purchase date can not be provided, warranty period will start at manufacture date. It is the sole discretion of Techni-Lux to repair or replace parts or equipment. All shipping will be paid by purchaser. This warranty does not cover lamps, fuses, belts, power semiconductors, relays, cleaning, standard maintenance adjustments or normal wear items or any problem resulting from the following: improper wiring, incorrect voltage (including low or over voltage conditions and lightning), abuse, misuse, improper maintenance or an act of God or damage resulting from shipping. Warranty will be null and void if the product is altered, modified, misused, damaged, or subjected to unauthorized repairs. Lamps are covered by relevant manufacturer warranty. This warranty gives you specific legal rights, and you may also have other rights which vary from state to state. Any liability for consequential and incidental damages is expressly disclaimed. No other warranty, expressed or implied is made. Techni-Lux liability in all events is limited to, and shall not exceed, the purchase price paid. Returning equipment and Repairs: All returns must be accompanied by a Return Merchandise Authorization (RMA) number and sent pre-paid. Contact the dealer or Techni-Lux directly to obtain an RMA. The RMA number must be clearly listed on the shipping label. Due care must be exercised in packing all merchandise to be returned. All repairs must be accompanied by a written explanation of the claimed problem or error encountered. Techni-Lux is solely responsible for determining a product’s eligibility for coverage under warranty. If returning for consideration of credit, all accessories and documentation, original protective material and cartons must be included and the equipment, packing and carton must be in new resalable condition. Credit for returned merchandise will be issued at the lowest current price and is subject to a restocking fee. No returns accepted on discontinued items. Techni-Lux is not responsible for merchandise damaged in transit and reserves the right to refuse any return that is damaged by the carrier, not accompanied by a Return Authorization Number (RMA#) or sent by freight collect. Claims: All claims must be made within seven (7) days of receipt of merchandise. Any physical damage must be reported to carrier upon receipt of merchandise. 10900 Palmbay Drive • Orlando, FL 32824 U.S.A. www.techni-lux.com 8