1
Email Questionnaire 4.0
User Manual
2007/6/27
CompressWeb Inc.
Introduction
Email Questionnaire is a n interactive email survey system. Unlike other on-line
questionnaire systems that need a web server to construct, distribute and
manage results, Email Questionnaire is totally email based. It works with your
existing email system making on-line questionnaire surveys available to
anyone with an Internet connection. It is simple to use and will have you
distributing questionnaires in a matter of minutes.
Overview
Email Questionnaire is an easy to use tool that makes quick work of creating
simple questionnaires that are distributed to recipients via email.
Questionnaire replies are also retrieved via email making the need for a web
server obsolete. If you use a non-web based email (email is retrieved through
a mail client on computer) then you can start using Email Questionnaire today!
EQ’s powerful features include:
No web servers needed.
Mime standard supported.
Outlook/Outlook Express integration.
Direct dispatch via SMTP/Exchange Server.
Modify colour, font, alignment, etc easily.
Tree layout makes questionnaire editing simple.
Templates for easily creating great looking questionnaires
Questionnaire replies automatically retrieved using a number of methods.
Easy questionnaire management.
Various reports.
Extend or resend a questionnaire to new recipients anytime.
System Requirements
OS: Win98, Win2000, WinXP
Browser: IE5 and above
Email Client: Eudora, Outlook Express, Outlook, Yahoo! Mail, hotmail
http://www.compressweb.com
2
CompressWeb Inc.
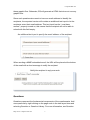
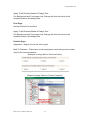
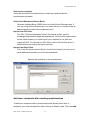
Questionnaire View
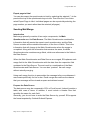
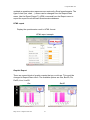
To create a new questionnaire, simply click the New toolbar icon or select New
from the File menu in the Questionnaire view. You can then select the
questionnaire template that you want to use from the Form menu. By default
the ‘untitled’template is chosen, this gives the greatest flexibility over
questionnaire design. If a predefined template is chosen it can be modified to
suit the type of questionnaire you are designing.
Select the questionnaire template
If the predefined template selected contains predefined macros, a dialog
pop-ups to let you specify the value. For example, the URL of a website or the
company name.
Specify the values for predefined macros
You could then choose the HTML template you would like to use.
Select the HTML template
http://www.compressweb.com
3
CompressWeb Inc.
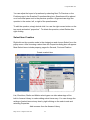
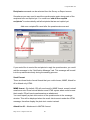
Tree Layout View
The Tree Layout View is used to design the questionnaire. Double click on the
top-most node, you can set the properties. Right clicking on the tree nodes
allows the addition of questionnaire components: pages, questions, select
items and comment items. The Windows drag and drop is fully supported
within the application.
Questionnaire
The top-most node represents the questionnaire that your are editing.
You could change the following properties for the questionnaire:
Title— The HTML title that will appear when the questionnaire is sent as a
HTML attachment.
Click The “M” button if you would like to add a Mail Merge field.
Email subject— The subject of the email that the questionnaire participants
receive.
Click The “M” button if you would like to add a Mail Merge field.
Logo— The image that you could put on the top-most of the questionnaire.
Usually, it is an image file of your company logo.
Set Logo as Link— Sets the URL property of your logo. Therefore, when
users click on your logo, the browser will navigate to the URL specified.
http://www.compressweb.com
4
CompressWeb Inc.
Redirect URL— By default, a “Thank you” page will appear after users click on
the submit button of the questionnaire. However, you may display your own
HTML pages if necessary. Put in the URL of the HTML page in this field and it
will appear after the questionnaire is submitted.
Submit button text— Change the text the “submit” button displays. Usually
you could translate it to your native language.
Reset button text— Change the text the “reset” button displays. Usually you
could translate it to your native language.
Edit Questionnaire properties
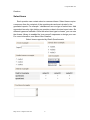
Reply Over Web Property page
When a recipient’s email client does not support HTML emails, or render the
HTML email incorrectly, the recipient may not be able to see or submit the
questionnaire. EQ provide a way to compensate this. You could generate a
web version of the questionnaire and put it in your website. After that, EQ
http://www.compressweb.com
5
CompressWeb Inc.
automatically put the URL at the end of the HTML version, and also in the plain
text version of the questionnaire. When the recipients are unable to reply the
questionnaire in the email client, they could navigate to the URL and reply
using their browsers.
Edit the Reply Over Web properties
Url— Specify the URL of your HTML files. EQ will then automatically notify the
recipients about this, and they could use this URL to reply when they have
problem to submit the questionnaire. If this field is left empty, you could
manually send this URL to your recipients too. Note that EQ will not help you to
publish the HTML files to the URL. You will need to copy the saved HTML files
to your web server.
Export Path— Specify the path where the HTML files will be saved. If this field
is not left empty, EQ will generate a HTML version of the questionnaire to the
path specified. You could then copy this file to your web server.
Export with Images— If selected, EQ will create a directory called “images”,
which all GIF/JPEG files are saved. Then the HTML file will contain links to
http://www.compressweb.com
6
CompressWeb Inc.
these graphic files. Otherwise, EQ will generate a HTML that does not use any
graphic files.
Since each questionnaire needs to have an email address to identify the
recipients, the exported version will contain an additional text input to let the
recipients enter their email address. This text input has the “must have
answer” property turned on, this means that the recipient will not be able to
submit with this field empty.
An additional text input to specify the email address of the recipient.
When sending a MIME embedded email, the URL will be placed at the bottom
of the email with a short message to notify the recipient.
Notify the recipient to reply over web
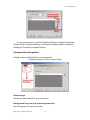
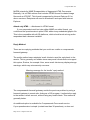
Questions
Questions represent the fundamental components of the questionnaire. Add
new questions by right clicking on the page node in the tree layout view and
selecting Question or Question Library. For more information, see Question
http://www.compressweb.com
7
CompressWeb Inc.
Creation.
Select Items
Each question can contain select or comment items. Select items require
a response from the recipient of the questionnaire and are included in the
generated reports. For example “checkboxes”are one type of select item. Add
new select items by right clicking on question nodes in the tree layout view. Six
different types are available. Once the select item type is chosen, you can use
the Answer Library to enabled the “pre-canned” responses or design your own.
For more information, see Select Item Creation.
Select items supported by Email Questionnaire
http://www.compressweb.com
8
CompressWeb Inc.
Comment Items
Comment items are used for designing the form but do not participate in the
generated reports. E.g. pictures. Add new comment items by right clicking on
question or page nodes in the tree layout view.
Three types of comment items are supported: Labels, Separator, and Images.
The examples of these comment items are listed below:
Example of Using Label Comment Item
Example of Using Separator Comment Item
Example of Using Image Comment Item
http://www.compressweb.com
9
CompressWeb Inc.
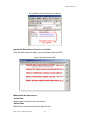
Question Creation
The questionnaire is designed and edited through the tree layout. Right click
the page node and select Question. The Question Properties dialog box will
then appear. Select the desired number of questions and edit the question text
in the “Edit Question” view.
Add a question from the page node
The Question Properties dialog box
Another way to create questions is to right click the page node and select
Question Library. You can then select some pre-defined questions. The
http://www.compressweb.com
10
CompressWeb Inc.
question library is classified into six predefined categories, plus the
user-defined one. You can traverse and select the questions you want to add.
If the question must be answered before submission, you could enable the
option for “Must have answer”. If respondent does not answer it correctly, a
warning message will be displayed.
Add questions from the predefined Question Library
A warning message to notify user that some answers are missing
The questions can be edited later if required by right clicking or double clicking
on the question in the tree layout view after it has been added to the
questionnaire. This will enable the properties form.
The question font can be changed one at a time or as a batch. Checking the
checkboxes to the left of question nodes in the design tree will allow the batch
option to be used. Change the font in the Question Properties dialog box, and
then select Apply To All Checked Nodes in Design Tree on the question
property form.
http://www.compressweb.com
11
CompressWeb Inc.
You can adjust the layout of questions by selecting Next To Previous on the
Position page in the Question Properties dialog box. Questions will be placed
on a horizontal pane next to the previous question. Alignment can align the
question in the center, left, or right of the questionnaire.
To edit the question, simply double click it or use the right mouse button on the
tree node and select “properties”. To delete the question, select Delete after
right clicking.
Select Item Creation
Right click on the question node in the design tree and choose Select from the
popup menu. After choosing a select item the Properties dialog box will appear.
Most Select items include property pages for General, Font and Position.
Create a select item
List, Checkbox, Radio and Matrix select types can take advantage of the
built-in Answer Library to make adding select items easy. You can change the
settings of select items at any time by right clicking on the select node and
selecting Properties.
Add answers from the Answer Library
http://www.compressweb.com
12
CompressWeb Inc.
For more information, see Text Properties Setting, Checkbox Properties
Setting, Radio Properties Setting, List Properties Setting, Matrix Properties
Setting and TextArea Properties Setting.
Common Item Properties
Setting common Select/Question item properties.
Change properties for the common items
General page
Set the description/label for the current item.
Background Page (only for question properties)
Set the background color of the item.
http://www.compressweb.com
13
CompressWeb Inc.
Apply To All Checked Nodes in Design Tree
For Background and Font pages only. Change the font and color for all
checked nodes in the design tree.
Font Page
Set the font/color for the item.
Apply To All Checked Nodes in Design Tree
For Background and Font pages only. Change the font and color for all
checked nodes in the design tree.
Position Page
Alignment— Align to the center, left or right.
Next To Previous— Place item on horizontal pane next to the previous select
item for the current question.
Example of using “Next to Previous”option
Steps to change “Next to Previous”property
http://www.compressweb.com
14
CompressWeb Inc.
Setting Text Properties
Use the General page to set the number of select items and edit their labels.
Set the font and color of the label on the Font page. You can also change the
font and color of all checked nodes in the design tree. On the Position page,
adjust the alignment and layout of select items. Alignment puts the item in the
center, left, or to right of the page. Checking Next To Previous will place this
select item on horizontal pane next to the previous select item for the current
question.
Must have answer — Disable the questionnaire submission if the answer is not
filled in.
Setting Checkbox Properties
If the question allows recipients to make multiple choices, you can use the
Checkbox select type. You can add up to 10 checkboxes at one time. Or by
simply clicking the icon next to Edit Label, an Answer Library dialog box will
appear. It lists predefined answer types that if selected will be added to your
answers for the current question.
Set the font and color of the label from the Font page. You also can change the
font and color of all checked nodes in the design tree. On the Position page,
adjust the alignment and layout of select items. Alignment makes the select
item appear on the left, right or center of the page. Checking Next To Previous
will place this select item on horizontal pane next to the previous select item for
the current question.
Setting Radio Properties
If the question allows recipients to make only one choice from a number of
possible selections then the Radio select type can be used. You can add up to
10 checkboxes at one time. Or by simply clicking the icon next to Edit Label, an
Answer Library dialog box will appear. It lists predefined answer types that if
selected will be added to your answers for the current question.
Set the font and color of the label from the Font page. You also can change the
font and color of all checked nodes in the design tree. On the Position page,
http://www.compressweb.com
15
CompressWeb Inc.
adjust the alignment and layout of select items. Alignment makes the select
item appear on the left, right or center of the page. Checking Next To Previous
will place this select item on horizontal pane next to the previous select item for
the current question.
Setting List Properties
The List select type is similar to the Radio select type in that only one answer
from a selection is allowed. However, it has a more compact design that can
save space if the number of possible selections is large.
On the General page a label for the list can be entered if desired. Enter list
items from the List Items page. Each list item must be entered on a separate
line. List items may contain spaces. Or by simply clicking the icon next to Edit
Label, an Answer Library dialog box will appear. It lists predefined answer
types that if selected will be added to your answers for the current question.
Set the font and color of the label from the Font page. You also can change the
font and color of all checked nodes in the design tree. On the Position page,
adjust the alignment and layout of select items. Alignment makes the select
item appear on the left, right or center of the page. Checking Next To Previous
will place this select item on horizontal pane next to the previous select item for
the current question.
Setting Matrix Properties
For grouping related questions together the Matrix select type can be used.
This type of select item lays out questions in a grid. Up to 100 questions and
possible answers for those questions can exist in a matrix at one time.
After adding a matrix it is possible to directly edit the labels for the questions
and answers on the property page. The answer type can be either checkboxes
or radio buttons . The answer labels can use built-in values by clicking the icon
next to the Edit Labels box. An Answer Library dialog box, which includes
general answers, will appear. Once selected, the default values of the type
selected will be used as labels for the question answers.
Set the font and color of all labels from the Font page. You also can change the
http://www.compressweb.com
16
CompressWeb Inc.
font and color of all checked nodes in the design tree.
Setting TextArea Properties
With TextArea, it is possible for the recipient of your questionnaire to type any
extended response to a question. For example a comment about something.
Use the General page on the property form to set number of TextArea’s and
edit their descriptive labels. Set the font and color of the label from the Font
page. You also can change the font and color of all checked nodes in the
design tree.
On Position property page, adjust the alignment and layout of TextArea item.
On the Position page, adjust the alignment and layout of select items.
Alignment makes the select item appear on the left, right or center of the page.
Checking Next To Previous will place this select item on the horizontal pane
next to the previous select item for the current question. The size of the
TextArea can be adjusted to suit the questionnaire layout. The dimensions
should be specified in pixels.
Must have answer — Disable the questionnaire submission if the answer is not
filled in.
Required Response Validation
Required responses validation makes sure that respondents have filled out the
surveys correctly. In the survey design phase, the designer can decide if the
question must have answer or the answer must have value.
If a question must have answer, at least one of selects under the question
node should be answered. Some of select types have “reply must have value”
attribute. They can be Text, Checkbox, List, or Multiple Selection. Generally, a
checkbox with “reply must have value” is used to make sure that the
respondents have read the term and agree it. If required responses aren’t
answered, a warning message will be shown.
http://www.compressweb.com
17
CompressWeb Inc.
Sending to recipients
After designing the questionnaire you can then send it to recipients. To send
the questionnaire use the Send command from the Form menu. To send a new
questionnaire the current view must be “Questionnaire view”. Each time a
questionnaire is dispatched, a new questionnaire database is created.
Specify the End Time
Survey End Date/Survey EndTime -- You will need to specify the end time for
the questionnaire. As the time expires, all the replies that EQ receives will be
dropped. You will not be able to see the result in EQ.
Allow Duplicate Replies – Sometimes the recipient may reply the
questionnaire several times. If you would not like this situation to happen, you
could uncheck this option. Then EQ only accepts the first reply for each email
address. All other replies will be dropped for the same email address.
Anonymous Survey – Some companies may impose restrictions that all
recipients should be kept anonymous in the survey. To achieve this, you will
need to use Anonymous Survey. All replies will not contain the recipients’email
address. EQ will display “anonymity” as recipients’email address in the
Anonymous Survey. However, since the replies are anonymous, EQ could not
tell one reply from another, therefore, the questionnaire is by default “Allow
Duplicate Replies”.
Specify the end time of the questionnaire
http://www.compressweb.com
18
CompressWeb Inc.
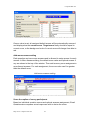
Select your recipients
There are several file formats that you could import and add as the
questionnaire recipients.
Select from Windows Address Book.
Windows Address Book (WAB) is the one that Outlook Express uses. If
you are using Outlook Express as your email clients, you could invoke its
address book and select the recipients from it.
Import from CSV files.
The CSV ("Comma Separated Value") file format is often used to
exchange data between disparate applications. Outlook also supports this
format, which means you could export your contacts to csv files and
import with EQ. You should use CSV files in favor of Excel files since it
uses less memory during the import process.
Import from Excel files.
This is the file format used by Excel. Use this file format if you have your
email addresses stored in your Excel’s worksheets.
Specify the recipients of the questionnaire
Add more recipients after sending questionnaires
To add more recipients after a questionnaire has already been sent to
recipients you must first switch to either Survey or Report views. Then the Add
http://www.compressweb.com
19
CompressWeb Inc.
Recipients command can be selected from the Survey or Report menus.
Sometimes you may need to send the questionnaire again since parts of the
recipients have not replied yet. You could use “add all non-replied
recipients” to automatically add all recipients that are not replied yet.
Add more recipient/Re -send after the questionnaire are sent
If you would like to remind the recipients to reply the questionnaire, you could
add the message in the “Notification Message” tab. This message will be add
into the questionnaire body during the sending process.
Send Format:
There are three kinds of email format that you could choose, MIME, Attach for
All or Attach only HTML.
MIME format – By default, EQ will send email in MIME format, except hotmail
email accounts. Since hotmail blocks some HTML syntax when users browse
their emails, EQ will send questionnaires as attachment.
You could specify a plain text version of the questionnaire in the message
window. This will be displayed when the email client cannot render the HTML
message, therefore display the plain text version instead.
Attach for All – Attachment in MHTML format
http://www.compressweb.com
20
CompressWeb Inc.
MHTML stands for MIME Encapsulation of Aggregate HTML Documents.
Basically, it is a HTML achieve that includes HTML file and its related image
files such as JPG/GIF. This format is supported by Internet Explorer 5.0 or
above versions. Recipients will need to download it and open with Internet
Explorer.
Attach only HTML –- Attachment in HTML format
If your respondent could not view either MIME nor mhtml format, you
could send the questionnaire in plain HTML without any embedded graphic file.
This is the compatible with all OS platforms, which should work as long as the
respondent has a browser installed.
Reply Method:
There are two replying methods that you could use: mailto or compressweb
formmail gateway.
The mailto method uses recipients’email clients to send the reply back to the
sender. This is generally not reliable since many email clients does not support
this syntax, Eudora, for example. Also, some email clients may display strange
warnings, which may raise security concerns.
Warning message for the “mailto” reply method
The compressweb formmail gateway avoids the previous problem by using a
formmail gateway in remote site. Acting as a CGI program, it redirects the reply
to the sender’s email account, without using any email clients. This method is
generally better.
An additional option is available for Compressweb Form-email service.
If your questionnaire is simple (contain less than 30 questions), or does not
http://www.compressweb.com
21
CompressWeb Inc.
contain lots of textareas, you could use the “Get” method. Since it is limited to
2048 bytes in its response length, do not use it in complex questionnaires.
For complex questionnaire, choose “Post” method instead. However, some
email clients, like Eudora, does not support this.
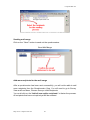
Choose “Get” or Post” as your form submission method
After the submission of the questionnaire, a thank you page will display to
notify that the reply is successfully sent.
“Thank you” page displayed after user submit the questionnaire
If your EQ is not registered, the formmail gateway will be disabled after 100
email replies. The submission will result in a warning page to notify you about
this.
http://www.compressweb.com
22
CompressWeb Inc.
Warning message for unregistered users
http://www.compressweb.com
23
CompressWeb Inc.
Customization
Question Library
The same questions are often repeated when designing questionnaires. To
avoid repeatedly constructing questions, Email Questionnaire allows adding
questions to the question library. This can save time by avoiding the need to
construct the same question layouts again and again. To add a question to the
question library simply right click on the question, then select Add Into
Question Library.
Add the question to Question Library
Adding questions from the question library is easy. Right click on the page
nodes in the tree layout view and select the Question Library command. You
can edit the questions in the question library any time by selecting the Edit
User Defined Library command from the file menu.
Insert question from Question Library
Apply HTML Templates
There are dozens of HTML templates available. It can be set in Form menu
then choose Apply Template.
http://www.compressweb.com
24
CompressWeb Inc.
Export page to Html
You can also export the questionnaire to html by selecting the asterisk (*) in the
panel at the top of the questionnaire layout view. Then from the Form menu
select Export Page to Html. Individual pages can be exported by selecting the
page number you want rather than the asterisk (all pages).
Sending Mail Merge.
Introduction
Mail merge primarily consists of two major components, the Main
Questionnaire and the Data Source. The Main Questionnaire contains the
information that will remain the same in each questionnaire, and the Data
Source contains all the variable information, in the form of fields. This is the
information that will change in the Main Questionnaire when the merge is
completed. Along with the information that remains the same, the Main
Questionnaire also contains merge fields, which are references to the fields in
the Data Source.
When the Main Questionnaire and Data Source are merged, EQ replaces each
merge field in the Main Questionnaire with the data from the respective field
contained in the Data Source. The end result is a combination of the Main
Questionnaire and Data Source. You can also “preview” the mail merge
without actually merging.
Using mail merge function to personalize the message tells your addressee it
was meant specifically for him or her. Email merge also reduces the chance
that your message will be viewed as spam and deleted unread.
Prepare the Data Source
The data source may be composed in CSV or Excel format. It should contain a
table, with rows of items. In addition, it must include a Header Row that
specifies the name for each field.
Generally, you do not have to write the Data Source by yourself. EQ supports
the format exported by Outlook/Outlook Express.
http://www.compressweb.com
25
CompressWeb Inc.
An example of the data source in Excel
Import the Data Source from csv or xls files
After the data source is ready, you could import them into EQ.
Import the data source file
Manipulate the data source
-Insert Data
Insert a new record into the data source.
-Delete Data
Delete the current record from the data source.
http://www.compressweb.com
26
CompressWeb Inc.
-Edit Data
Edit the current record of the data source.
-Set As Default
Set the current row as the default values of the data source.
Manipulate the data source
Prepare the Main Questionnaire
After the data source is ready, you could start to prepare your questionnaire for
mail merge. You will need to add merge fields to places that need personal
information.
When you are adding a question/list item, there will be a Merge Field button to
let you insert the Merge Field to your questionnaire.
Insert the Merge Field
http://www.compressweb.com
27
CompressWeb Inc.
Specify the “email address” field
Among the fields of the Header Row, one of them represents the email
address. However, EQ does not posses such knowledge. Therefore, you will
need to specify the very field for EQ in order to extract the email addresses.
Specify the “email address” field
Specify the “ID” field
Sometimes you may send several questionnaires to the same email address.
In this way, you could not judge by the returned email address to know which
questionnaire has been replied.
You could embed for each questionnaire a specific id, and EQ will pass this id
along the questionnaire. You could then judge by this id to know which
questionnaire has been replied.
Preview mail merge
You can preview your data p rior to performing the merge by clicking the
Preview Mail Merge on the mail merge pop-up dialog.
Select the recipients.
Before sending mail merge, you must select the recipients from the Mail Merge
dialog.
Select the recipients
http://www.compressweb.com
28
CompressWeb Inc.
Sending mail merge
Click on the “Send” button to send out the questionnaires.
Send Mail Merge
Add more recipients for the mail merge
After a questionnaire has been sent successfully, you will not be able to add
more recipients from the Questionnaire View. You will need to go to Survey
View and from Menu, Choose Survey=>Add Recipients.
You could click on the “Add all non-replies recipients” to fasten the process.
All recipients that have not replied yet will be selected.
http://www.compressweb.com
29
CompressWeb Inc.
Import HTML templates
EQ could import HTML files from your disk as HTML templates. However, there
are several limitations regarding how the HTML is composed:
-Cannot use external CSS (Cascading Style Sheets) files.
-Cannot use Javascript.
Also, you will need to add a tag manually in order to notify EQ to place the
questionnaire generated. The special tag is [# Insert_Questionnaire #].
EQ will look for the tag in the template; replace it with the questionnaire while
keeping all the style/font settings in the template intact.
If successful, the new te mplate will be placed along with other templates. You
could then choose Apply Template to use the new template.
There are two ways to import HTML template.
From Menu, Form=>Apply Template
Import HTML Template
From Menu, Form=>Import Templates
Import HTML Template
http://www.compressweb.com
30
CompressWeb Inc.
Scores Feature
In addition to feedback collection, you might need quantitative evaluation of
study, course, satisfaction, performance, service, health or personality profile.
Score feature provides an efficient index for survey designer. With setup
scores, evaluation forms can be easily conducted. To setup score, use the
Setup Score command from Form menu in Questionnaire view.
Specify default scores and optimal answers
All questions of the current questionnaire are listed in the Score dialog. For
each question, you can specify a default score and optimal response. Default
Score is the maximum value the question can get. Optimal Answer is
generally the correct or optimal response to the question, and assigned the
default score.
Specity default scores and optimal answers
http://www.compressweb.com
31
CompressWeb Inc.
Once a value is set, all assigned default scores will be automatically summed
and displayed as the current score. Target score finally should be equal to
current score, or the background color of current score will change from blue to
red.
Add more answers setting
Each question can have more answers and is allowed to setup scores for each
answer. In More Answers dialog, the default score value and optimal answer if
any are shown in the top of the window. Then add as many score assignments
as preferred answers. For each assignment, the score value can’t be greater
than the default score.
Add more answers setting
Score the replies of survey participants
Based on individual question scores and optimal answers assignment, Email
Questionnaire compares actual responses with to derive the score.
http://www.compressweb.com
32
CompressWeb Inc.
For each question, any responses matching to the assigned answer options
can have an associative score value. The highest one of them is regarded as
the actual score that the question gets. A sum of each question score is the
total score the participant can get. The calculated score is integrated into the
score column of the reply table in Survey View.
In Data View, an individual view of recipients’ replies is exactly presented.
Each question is annotated with correct or wrong symbol, and the obtained
score/default score. The question responses including one of assigned answer
options will be marked a right symbol, or wrong symbol.
Scores in Data View
http://www.compressweb.com
33
CompressWeb Inc.
Survey View
All questionnaires active and finished are listed in the top window of the Survey
View. The survey title, end time, open period and total number of replies are
listed. Selecting a questionnaire will show the recipients in the right hand
window.
Collect Replies
Choose Remove Survey from Survey menu, or icon on the toolbar. This will
collect email replies directly from the POP3 mail server or from Outlook
Express assuming these questionnaire response retrieval methods have been
enabled from the Tools/Options menu command.
Remove selected Replies
Sometimes, you may have some testing or duplicate replies in the
questionnaire result. You could delete them in the Survey View.
For each reply, it has a checkbox in front of it. If you want to remove the
specific reply, first check on the reply then from EQ Menu, Survey=>Remove
selected replies.
Adding Recipients
Choose Add Recipients from Survey menu or the Add Recipient icon on the
toolbar. The Send Again dialog will appear. You can also right click on the
questionnaire and select Add Recipients.
Use the Recipients page to add new or resend to existing questionnaire
recipients. This can be done any time after a questionnaire has been
dispatched. Pressing Ok will send the questionnaire to the email addresses
listed in the recipient list that are marked with an asterisk (*). Once sent, a sent
notification will be displayed. If the questionnaire contains many images the
upload time to the SMTP mail server may take a while.
Extend End Time
Choose Extend End Time from Survey menu or icon on the toolbar. You can
also right click on the questionnaire and chose the Extend End Time
command.
http://www.compressweb.com
34
CompressWeb Inc.
Use the End Date page to set the survey end date and if multiple replies from
the same recipient are allowed.
Export to Excel/CSV files
Choose Export from Survey menu, there are two options, Excel or Tab
Delimited files.
Stop Survey
Choose Stop Survey from Survey menu, or right click on the questionnaire
and select Stop Survey.
The survey can be stopped before its scheduled end time. All questionnaires
can be extended when completed or prematurely halted. Refer to the Extend
End Time command.
Delete Survey
Choose Delete Survey from Survey menu, or right click on the questionnaire
and select Remove Survey.
Use this command to remove the survey if it is no longer required. Once
deleted, you could still see the deleted survey using “Display deleted survey”.
However, if you choose to delete a previously deleted survey, it will be deleted
permanently.
Undelete Survey
Use this command to undelete a survey.
Display deleted survey
Use this command to see all surveys including deleted ones.
http://www.compressweb.com
35
CompressWeb Inc.
Report View
After dispatching the questionnaire, recipients will fill out the form and submit
the reply via the submit button on the questionnaire form. Replies will
automatically be collected by Email Questionnaire and added to the result
database. Before Email Questionnaire can gather replies the mail server
options need to be correctly set. See Mail Settings, Send Format and Reply
Method for more information on how to do this.
EQ can read the replies directly from the POP3 mail server. See the
Tools/options menu command. Then select the Mail Settings/Incoming Mail
property page. The polling frequency can be set from this page. In addition,
Email Questionnaire can read questionnaire replies from popular email clients.
Currently Outlook, Outlook Express and Eudora are supported. See the Mail
Add-In property page.
If Outlook or Eudora is used, replies will be automatically redirected to EQ
when they arrive to your inbox.
If Outlook Express is used, EQ will periodically poll Outlook Express mailbox
for questionnaire replies.
Clicking Collect Replies on the toolbar will poll the pop3 mail server or Outlook
Express for replies assuming these retrieval methods are used. Using Collect
Replies on Survey/Report menu in Survey/Report view has the same effect.
Selecting a questionnaire in the Survey or Report view will display the results
in either a tabular view or a report view. The Survey view will contain each
reply received, the individual responses to each question are shown. One row
in the grid corresponds to one reply to the questionnaire. You can export the
data to Excel or a tab delimited text file format for further analysis. To use this
feature switch to either the Survey or Report view and choose the Export
command from the Survey or Report menu.
The Report view shows a summary of the replies received. It provides a
graphical HTML based report. After selecting a questionnaire, the real-time
online report is displayed for that questionnaire. The report is constantly
http://www.compressweb.com
36
CompressWeb Inc.
updated as questionnaire responses are received by Email questionnaire. The
type of chart (bar, chart … ) shown can be changed from the Report/Chart
menu. Use the Export Report To HTML command from the Report menu to
export the report from the Email Questionnaire database.
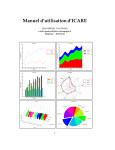
HTML report
Display the questionnaire result in HTML format.
HTML report example
Graphic Report
There are several kinds of graphic reports that you could use. This could be
changed in Report/Chart menu. The available options are: Bar, Bar3D, Pie,
Pie3D, Line, Line3D.
Bar
Bar3D
http://www.compressweb.com
37
CompressWeb Inc.
Pie
Pie3D
Line
Line3D
http://www.compressweb.com
38
CompressWeb Inc.
Data View
Data View provides the capability to recreate the orignial questionnaire
submission. In addition to the questionnaire body, Data View combines the
questoinnaire reply and displays the same output just before the recipient
submits. You could then print or save the submission.
A navigation control panel is provided in the Data View. You could use the
panel to browse through the submissions, search for a specific reply. You could
also manipulate the replies using the insert/delete/update buttons.
Add Reply
Choose Add Reply from the Data menu, or the
icon on the work area.
This will add a bla nk reply to the result database. If you are conducting a
phone survey, or you need to enter the survey result manually, you will need to
add a reply first. The new reply will be place in the 1 st in the result database.
Delete Reply
Choose Delete Reply from the Data menu, or the
icon on the work area.
This will delete the selected reply. A dialog will be presented to ask you
whether you want to remove this reply or not. Once deleted, the reply could not
be recovered.
Update Reply
Choose the
icon on the control panel.
When you need to modify the reply, you will need to first answer the
questionnaire as usual. After that all answers have been entered, instead of
clicking on the submit button in the questionnaire, click on the update button in
the control panel to commit the changes. If there is any field that has the “must
have answer” property enabled, you will need to enter the answers before you
could update the reply.
Goto Reply
Choose Goto Reply from the Data menu, or the
http://www.compressweb.com
39
icon on the work area.
CompressWeb Inc.
This allows you to jump to a specific reply instantly.
Find Reply
Enter the email address that you are looking for, then click the
icon to find.
When there are huge amount of replies in the result database, Find Reply
helps you to locate specific reply quickly. The search string you entered could
use wildcards to represent any characters.
A wildcard is a character that may be used in a search term to represent one or
more other characters. The two most commonly used wildcards are the
question mark (“?”) and an asterisk (“*”).
The question mark (“?”) may be used to represent a single alphanumeric
character in a search expression. For example, searching for the term
“ho?se” would yield results which contain such words as “house” and “horse”.
An asterisk (“*”) may be used to specify zero or more alphanumeric characters.
For example, searching for the term “h*s” would yield results which contain
such words as “his”, “homes”, “houses”.
Export the result to HTML
Choose Export Data to HTML from the Data menu.
After viewing the individual reply, you could choose to save it to disk, then send
it to others or backup it for later use.
Print the result in HTML
Choose Print from the File menu.
Since the Data View provides the same output as recipient’s submission, you
could print the result to in order to have further processing.
http://www.compressweb.com
40
CompressWeb Inc.
Command Reference
Menus
Files menu:
New
Open
Save
Save As
Edit User Defined
Question Library
Print
Print Preview
Print Setup
Exit
Create a new questionnaire
Open an existing questionnaire
Save the opened questionnaire with its current file name
Save the opened questionnaire with a specified file name
Edit user defined questions in the library
Print the view in the main window
Display the view as it would appear when printed
Select a printer and a printer connection
Exit Email Questionnaire
Edit menu:
Copy
Paste
Copy questionnaire components
Paste questionnaire components
View menu:
Toolbars
Views
Work Space
Status Bar
Manage the toolbar by Toolbar command
Switch to different view (Questionnaire View, Survey View,
Report View and Data View)
Show or hide the work space
Show or hide the status bar
Tools menu: Configuring Email Questionnaire.
Options …
Global Options setting
Help menu: Getting help and information.
Help Topics
Online Help
Online Support
About
Offers you an index to topics on which you can get help
Get more information in our website
Send an email to the product supporter
Display the version number of this application
http://www.compressweb.com
41
CompressWeb Inc.
Form/Survey/Report menus
Form menu: Only displays in Questionnaire view.
Send
Find Text
Export Page to
Html
Insert Template …
Set survey end date and recipients
Find text in the content of the questionnaire
Export the page you see in main window to html file
Set the background of the questionnaire. See Insert
Template Properties for more information
Survey menu: Only displays in Survey view
Export
Export replies to Excel file or CSV file. See Export Replies
for more information.
Collect Replies
Check for replies from pop3 server or Outlook Express
immediately
Add Recipients
Send the currently active survey to new recipients not in the
original recipient list
Extend End Time Extend the survey end time
Stop Survey
Stop to accept replies of the currently active survey
Remove Survey Remove the replies from database
Report menu: Only displays in Report view.
Chart
Export Report to
Html
Collect Replies
Select the presentation format of Graphic Report
Export report to html file
Collect replies from pop3 server or Outlook Express
immediately
Add Recipients
Send the currently active survey to new recipients not in the
original recipient list.
Extend End Time Extend the survey end time
Stop Survey
Stop to accept replies
Remove Survey Remove the replies from database
http://www.compressweb.com
42