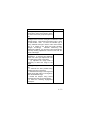
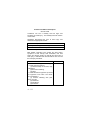
1
THE SOLDIER'S CREED
I am an American Soldier. I am a member of the
United States Army—a protector of the greatest
nation on earth. Because I am proud of the uniform I
wear, I will always act in ways creditable to the
military service and the nation it is sworn to guard.
I am proud of my own organization. I will do all I can
to make it the finest unit of the Army. I will be loyal to
those under whom I serve. I will do my full part to
carry out orders and instructions given my unit or me.
As a soldier, I realize that I am a member of a
time-honored profession—that I am doing my share
to keep alive the principles of freedom for which my
country stands. No matter what situation I am in, I
will never do anything, for pleasure, profit, or
personal safety, which will disgrace my uniform, my
unit, or my country. I will use every means I have,
even beyond the line of duty, to restrain my Army
comrades from actions disgraceful to themselves and
the uniform.
I am proud of my country and its flag. I will try to
make the people of this nation proud of the service I
represent, for I am an American Soldier.
TRADOC Pam 600-4
DEPARTMENT OF THE ARMY
HEADQUARTERS
UNITED STATES ARMY TRAINING AND DOCTRINE COMMAND
Fort Monroe, Virginia 23651-5000
PERSONNEL—GENERAL
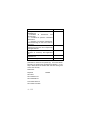
SOLDIER'S HANDBOOK
Page
PREFACE.....................................................................................viii
CHAPTER 1. GENERAL SUBJECTS
America’s Army .......................................................................... 1-1
The Army Song .......................................................................... 1-3
Army Organization...................................................................... 1-5
Rank Insignia.............................................................................. 1-5
Officer..................................................................................... 1-5
Warrant Officer ....................................................................... 1-6
Enlisted................................................................................... 1-7
Military Time ............................................................................... 1-8
Salutes and Honors.................................................................... 1-9
Saluting................................................................................... 1-9
Rendering Honor to the Flag................................................. 1-10
Courtesies ............................................................................ 1-13
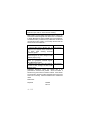
CHAPTER 2. BASIC SOLDIER SKILLS
Following Orders/Chain of Command......................................... 2-1
Personal Appearance and Uniform......................................... 2-2
This pamphlet supersedes TRADOC Pam 600-4,
1 January 1998.
i
Page
Hairstyle ................................................................................. 2-3
Insignia Placement.................................................................. 2-3
Belts and Buckles................................................................... 2-8
Jewelry ................................................................................... 2-8
Clothing Maintenance............................................................. 2-8
Boots ...................................................................................... 2-9
Physical Fitness Program......................................................... 2-10
Components of Physical Fitness .......................................... 2-10
Exercise Principles ............................................................... 2-11
Basic Combat Training Fitness Program.............................. 2-13
Field and Personal Hygiene...................................................... 2-16
Disease Prevention .............................................................. 2-16
Mental Fitness...................................................................... 2-18
Cold Weather Tips ................................................................ 2-19
Hot Weather Tips.................................................................. 2-22
First Aid for Training Injuries ................................................. 2-23
Soldiering.................................................................................. 2-24
Promotions ........................................................................... 2-24
Discipline .............................................................................. 2-26
Environmental Awareness........................................................ 2-26
Guard Duty ............................................................................... 2-28
Interior Guard ....................................................................... 2-28
Exterior Guard...................................................................... 2-30
Terrorism.................................................................................. 2-32
ii
Page
CHAPTER 3. ARMY CORE VALUES AND
HUMAN RELATIONS TOPICS
Section I. ARMY CORE VALUES .............................................. 3-1
Loyalty .................................................................................. 3-1
Duty....................................................................................... 3-2
Respect................................................................................. 3-2
Selfless Service.................................................................... 3-3
Honor .................................................................................... 3-3
Integrity ................................................................................. 3-4
Personal Courage ................................................................. 3-5
Section II. HUMAN RELATIONS TOPICS................................. 3-5
Serve as a Member of a Team.................................................... 3-6
The Buddy System................................................................ 3-7
Legal Actions .............................................................................. 3-8
Uniform Code of Military Justice............................................ 3-8
Legal Assistance..................................................................3-11
Comply with Provisions of the UCMJ........................................ 3-12
Fraternization...................................................................... 3-12
Larceny ............................................................................... 3-12
Robbery .............................................................................. 3-13
Homosexual Conduct.......................................................... 3-13
Laws and Regulations Governing Sexual Conduct............. 3-14
Rape—Article 120.......................................................... 3-14
Cruelty and Maltreatment—Article 93............................. 3-14
Assault with Intent to Commit Rape or Sodomy .............. 3-15
Indecent Assault............................................................. 3-15
Indecent Acts .................................................................. 3-15
iii
Page
Indecent Language......................................................... 3-15
Indecent Exposure ......................................................... 3-15
Adultery .......................................................................... 3-16
Prostitution...................................................................... 3-16
Pandering ....................................................................... 3-16
Offenses Related to AIDS ............................................... 3-16
Standards of Conduct/Joint Ethics Regulations ........................ 3-16
Army's Equal Opportunity and Prevention of Sexual
Harassment Policies and Programs .......................................... 3-18
Equal Opportunity Policy..................................................... 3-18
Equal Opportunity Program Components............................ 3-18
Army's Policy on Sexual Harassment.................................. 3-18
Behaviors that Constitute Sexual Harassment.................... 3-19
Suggested Individual Actions to Deal with
Sexual Harassment ............................................................ 3-19
The Army's EO Complaint System...................................... 3-19
Informal Complaints........................................................ 3-20
Formal Complaints.......................................................... 3-20
Right to be Heard and Discuss Problems ............................ 3-20
Make an Ethical Decision ......................................................... 3-21
Report Indications of Suicidal Intent ......................................... 3-22
Instill Values and Appreciation of Army Heritage
and Traditions........................................................................... 3-22
Values ................................................................................. 3-23
Heritage and Traditions ....................................................... 3-23
21-Gun Salute..................................................................... 3-23
Uniforms .............................................................................. 3-24
iv
Page
Chevrons ............................................................................ 3-24
Marching ............................................................................. 3-24
Military Music ...................................................................... 3-25
Taps .................................................................................... 3-25
Hand Salute......................................................................... 3-25
Managing Personal Finances ................................................... 3-25
Sure-Pay ............................................................................. 3-26
Checking Accounts ............................................................. 3-26
Leave and Earning Statement (LES) ................................... 3-27
Rape Prevention....................................................................... 3-27
Victim Responsibilities......................................................... 3-28
Assistance Responsibilities ................................................. 3-29
Maintain Spiritual, Emotional, and Mental Fitness .................... 3-30
Spiritual Fitness................................................................... 3-30
Emotional Fitness................................................................ 3-30
Mental Fitness..................................................................... 3-31
Exhibit Proper Soldier Behavior................................................ 3-31
The Soldier's Code.............................................................. 3-32
Army Core Values ............................................................... 3-32
Code of Conduct...................................................................... 3-33
Standards of Conduct............................................................... 3-34
Ethical Conduct................................................................... 3-34
Conduct On and Off Duty.................................................... 3-35
v
Page
CHAPTER 4: SELECTED COMMON TASKS
Section I: COMMUNICATIONS
113-305-1001 Communicate By Tactical Radio ......................... 4-1
Section II: NAVIGATION
071-329-1006 Navigate From One Point On The Ground
To Another Point While Dismounted ................... 4-3
Section III: WEAPONS
M16A2 RIFLE
071-990-0002 Operate An M16A1/M16A2 Rifle ...................... 4-10
M60 MACHINE GUN
071-990-0001 Operate An M60 Machine Gun......................... 4-22
HAND GRENADES
071-325-4407 Employ Hand Grenades ................................... 4-32
LAND MINES
071-325-4425 Employ an M18A1 Claymore Mine.................... 4-40
M203 GRENADE LAUNCHER
071-311-2127 Load an M203 Grenade Launcher.................... 4-48
071-311-2128 Unload an M203 Grenade Launcher ................ 4-50
M136 ATY LIGHT ANTI-ARMOR WEAPON
071-054-0001 Prepare An M136 AT4 Light
Anti-armor Weapon For Firing ......................... 4-51
071-054-0002 Restore An M136 AT4 Light Anti-armor
Weapon To Carrying Condition......................... 4-57
071-054-0003 Perform Misfire Procedures On An M136
AT4 Light Anti-armor Weapon .......................... 4-59
Section IV: TACTICS
071-326-0510 React To Direct and Indirect Fire...................... 4-61
071-326-0511 React To Flares................................................ 4-69
071-990-0003 Control Entry Into a Restricted Area................. 4-72
301-371-1000 Report Intelligence Information.......................... 4-75
vi
Section V: Nuclear, Biological Chemical
031-503-1013 Decontaminate Yourself and Individual
Equipment Using Chemical
Decontamination Kits........................................ 4-77
031-503-1018 React To A Nuclear Hazard or Attack.............. 4-82
031-503-1019 React To A Chemical or
Biological Hazard or Attack............................... 4-86
031-503-1035 Protect Yourself From Chemical/Biological
Contamination Using Your Assigned
Protective Mask................................................ 4-90
031-503-1036 Maintain Your Assigned Protective Mask....... 4-104
031-503-1037 Detect Chemical Agents
Using M8 Or M9 Detector Paper..................... 4-107
Section VI: FIRST AID
081-831-1000 Evaluate A Casualty ....................................... 4-111
081-831-1003 Perform First Aid to Clear An Object from
The Throat Of A Conscious Casualty ............. 4-117
081-831-1005 Perform First Aid to Prevent
or Control Shock............................................. 4-119
081-831-1008 Perform First Aid For Heat Injuries ................. 4-122
081-831-1032 Perform First Aid for Bleeding
of an Extremity................................................ 4-125
081-831-1034 Perform First Aid for a
Suspected Fracture ........................................ 4-129
081-831-1042 Perform mouth-to-mouth Resuscitation.......... 4-134
081-831-1044 Perform First Aid for Nerve Agent Injury......... 4-139
081-831-1045 Perform First Aid For Cold Injuries ................. 4-148
GLOSSARY....................................................................Glossary-1
REFERENCES .............................................................Reference-1
vii
PREFACE
This handbook is a handy pocket reference for subjects in
which you must maintain proficiency.
It condenses
information from field manuals, training circulars, Army
regulations, and other sources.
You will need this handbook in initial-entry training (IET).
Carry it with you at all times. Use it to review the training
you will receive and to prepare for proficiency testing. It will
also be useful throughout your military career.
This handbook addresses both general subjects and
selected combat tasks. It includes evaluation guides to test
your knowledge. You must know this information in order to
be an effective soldier. The information on selected combat
tasks is important, regardless of your grade or military
occupational specialty (MOS).
Unless this handbook states otherwise, masculine nouns
and pronouns do not refer exclusively to men.
viii
CHAPTER 1: GENERAL SUBJECTS
AMERICA’S ARMY
Every American can be proud of the history of the United
States Army. The American Army was created on June 14,
1775, when the Continental Congress first authorized the
muster of troops to serve under its own authority. Those
soldiers came from the provincial forces of the colonies,
which were at that time laying siege to Boston. From its
birth, the American Army has relied on the citizen soldier,
exemplified by the militia and the Minutemen who fought
the British at Lexington and Concord. Commanded by
General George Washington and supported by our French
allies, the Continental Army defeated the British at
Yorktown and secured the freedoms so eloquently stated in
the Declaration of Independence. Thus, the birth of the
Army preceded and guaranteed the birth of the Nation.
In the Constitution of the United States, the Founding
Fathers provided that Congress shall have the power "To
raise and support Armies" and to "provide for the common
defense." The Army raised for the nation's defense
incorporates two uniquely American ideas: civilian control
of the armed forces, and reliance on the citizen soldier.
Over the years, the organization and structure of the Army
have adapted to each challenge the Nation has faced, but
basic ideas have remained unchanged. As the Nation grew,
the Army defended the frontiers, protecting the nation's
growth. The Army served the domestic needs of the
Republic quietly and efficiently, often because it was the
only organization with the training, discipline, skills, and
resources to do the work.
The Army's fundamental purpose is to fight and win the
Nation's wars by establishing conditions for lasting peace
through land force dominance. This dominance is
established through integration of the complementary
capabilities of all the services. With this fundamental
1-1
purpose in mind, the framers of the Constitution intended
that armies were to be raised to "provide for the common
defense" and, together with the Navy, to "repel invasion."
When the United States became a world power in the 20th
century, the Army was called upon to defend our national
interests and rights on a wider scale that drew us into
alliances in regions far removed from our shores. In the
combat operations of the World Wars, in Korea, Vietnam,
and the Persian Gulf, the Army responded to the call to
duty and performed that duty well. In the 40-odd years of
Cold War, in many locations around the world, the Army
performed a deterrent role as part of the containment
strategy. In other places, at other times, the Army fulfilled
the Nation's expectations in operations too small to be
called "wars," although no less dangerous. To the soldiers
on the ground, operations URGENT FURY in Grenada and
JUST CAUSE in Panama were indistinguishable from the
combat operations of their forefathers. Operations
PROVIDE COMFORT in Iraq and RESTORE HOPE in
Somalia, although peace operations, also proved to be
dangerous. However, like those who went before them,
American soldiers responded readily in fulfilling the
unlimited liability aspect of their contract. Knowing that
simply joining the Army demands a willingness to place
one's life at risk, many have still joined and made the
ultimate sacrifice.
The realities of modern combat and the employment of
modem technologies have not changed the Army's role.
Under Title 10, United States Code, the Army provides to
the unified or joint force commander the capacity for land
force dominance. The world's best soldiers attain this
dominance through the application of overwhelming
combat power. These soldiers, who fight and live by Army
Values, employ the most modern technological equipment,
and are trained and led according to superior doctrine to
accomplish each mission with less casualties and collateral
1-2
damage. While other services may attack the land and
structures and peoples upon it, only the Army, by its longterm physical presence, can compel lasting change.
Soldiers may be sent where they do not want to go and for
reasons they may not understand. If this should happen to
you while you are in the Army, you can do no better than to
follow the Soldier's Creed. Remember also that regardless
of where you serve, as a soldier you are there to defend
the ideals of freedom, justice, truth, and equality found in
the Declaration of Independence and the Constitution of
the United States of America.
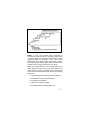
THE ARMY SONG: "The Army Goes Rolling Along" is the
official Army song and is played on many occasions. You
should stand at attention when it is played or sung. The
song was dedicated on Veterans Day, November 11, 1956.
The music was composed in 1908 by Lieutenant (later
Brigadier General) Edmund L. Gruber and was known
originally as the "Caisson Song" (Figure 1-1).
The Army Goes Rolling Along
Verse
March along, sing our song
With the Army of the free
Count the brave, count the true
Who have fought to victory.
We’re the Army and proud of our name!
We’re the Army and proud to
proclaim:
First
Chorus:
First to fight for the right
And to build the nation’s might.
And THE ARMY GOES ROLLING ALONG.
Proud of all we have done.
Fighting til the battle’s won.
And THE ARMY GOES ROLLING ALONG.
1-3
Refrain:
Then it’s hi! hi! hey!
The Army’s on its way.
Count off the cadence loud and strong:
For wher’er we go, you will always know
That THE ARMY GOES ROLLING ALONG.
Second:
Chorus:
Valley Forge, Custer’s ranks,
San Juan Hill and Patton’s tanks,
And the Army went rolling along.
Minutemen from the start,
Always fighting from the heart,
And the Army keeps rolling along.
Refrain:
Then it’s hi! hi! hey!
The Army’s on it’s way.
Count off the cadence loud and strong:
For where’er you go, you will always know
That THE ARMY GOES ROLLING ALONG.
Third
Chorus:
Men in rags, men who froze,
Still that Army met its foes,
And the Army went rolling along.
Faith in God, then we’re right
And we’ll fight with all our might
Refrain:
Then it’s hi! hi! hey!
The Army’s on it’s way,
Count off the cadence loud and strong:
(two! Three!)
For where’re we go, you will always know
That THE ARMY KEEPS ROLLING ALONG!
(Keep it rolling)
And THE ARMY GOES ROLLING ALONG!
Figure 1-1. The Army Song.
1-4
ARMY ORGANIZATION: The United States Army is made
up of two parts: the active and reserve components. The
Active Component consists of soldiers who are on full-time
active duty. The Reserve Component consists of the Army
National Guard and the Army Reserve. The Reserve
Component receives military training and is ready to be
called to active duty if necessary.
Army units can be organized several ways, but the
following example is fairly typical:
•
The squad is the smallest unit, consisting of eight to
ten soldiers. The squad leader is a noncommissioned
officer (NCO).
•
The platoon includes the platoon leader (lieutenant)
and two or more squads.
•
The company includes the company commander
(usually a captain, but sometimes a lieutenant), a
headquarters, and two or more platoons.
•
The battalion includes the battalion commander (a
lieutenant colonel), his staff and headquarters, and
several companies.
•
The brigade includes the brigade commander (a full
colonel), a headquarters, and several battalions.
You will learn more about units above brigade level as you
progress in your Army career.
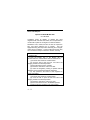
RANK INSIGNIA: You must be able to recognize the ranks
of Army personnel immediately.
OFFICER: The highest officer rank is the five-star general
(General of the Army) and the lowest is the second
lieutenant. Figure 1-2 shows the ranks with their insignia.
1-5
Figure 1-2. Officer insignia
Address all personnel with the rank of general as "General
(last name) “regardless of the number of stars. Likewise,
address both colonels and lieutenant colonels as “Colonel
(last name)” and first and second lieutenants as “
Lieutenant (last name) “
Warrant Officer: Address warrant officers as “Mr. (last
name) “or “Ms. (last name). “ Figure 1-3, page 1-7 shows
the five warrant officer ranks.
1-6
Figure 1-3. Warrant officer insignia.
ENLISTED: Enlisted ranks range from private to sergeant
major (grades E1 to E9) of the Army. Figure 1-4, page 1-8,
shows the enlisted ranks with their insignia.
Address privates (E1 and E2) and privates first class (E3)
as “Private (last name). “ Address specialists as “Specialist
(last name).” Address sergeants, staff sergeants,
sergeant's first class, and master sergeants as “Sergeant
(last name).” Address higher rank sergeants by their full
ranks in conjunction with their names.
Your drill sergeant will use the following evaluation guide to
test your ability to identify rank:
1-7
Figure 1-4. Enlisted insignia.
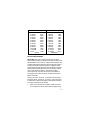
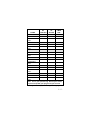
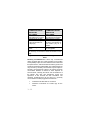
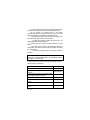
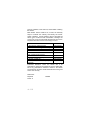
MILITARY TIME: All U. S. military services tell time by
using the numbers “1” to “24” for the 24 hours in a day. A
day begins at one minute after midnight and ends at
midnight the same day. For example, eight minutes after
midnight (12:08 am) is written in military time as “0008.”
Thirty-three minutes after two o ‘clock in the afternoon
(2:33 PM) is written as “1433.” Figure 1-5 shows a time
conversion chart.
1-8
Civilian Time Military Time Civilian Time Military Time
12:01 AM
1:00 AM
0100
1:00 PM
1300
2:00 AM
0200
2:00 PM
1400
3:00 AM
0300
3:00 PM
1500
4:00 AM
0400
4:00 PM
1600
5:00 AM
0500
5:00 PM
1700
6:00 AM
0600
6:00 PM
1800
7:00 AM
0700
7:00 PM
1900
8:00 AM
0800
8:00 PM
2000
9:00 AM
0900
9:00 PM
2100
10:00 AM
1000
10:00 PM
2200
11:00 AM
1100
11:00 PM
2300
12:00
1200
12:00 PM
2400
NOON
MIDNIGHT
Figure 1-5. Time Conversion chart.
SALUTES AND HONORS
SALUTING: The origin of the hand salute is uncertain.
Some historians believe it began in late Roman times when
assassinations were common. A citizen who wanted to see
a public official had to approach with his right hand raised
to show that he did not hold a weapon. Knights in armor
raised visors with the right hand when meeting a comrade.
This practice gradually became a way of showing respect
and, in early American history, sometimes involved
removing the hat. By 1820, the motion was modified to
touching the hat, and since then it has become the hand
salute used today.
During your time in the Army, you salute to show respect
toward an officer, the flag, or our country. The proper way
to salute with or without a weapon is described in FM 22-5
The rules of saluting are as follows:
•
When you meet someone outside, salute as soon as
you recognize an officer (when about six steps away).
1-9
•
Salute all officers (recognized by rank) in official
vehicles identified by special plates or flags.
•
Salute only on command when in formation.
•
If in a group and officer approaches, the first soldier to
recognize the officer calls the group to attention and all
personnel salute.
•
If you approach an officer while you are double-timing
alone, assume quick time march and render the hand
salute. When the salute is returned, execute order
arms and resume double-timing.
•
The salute is always initiated by the subordinate and is
terminated only after acknowledgment by the individual
being saluted.
•
Accompany the salute with an appropriate greeting,
such as, “Good morning/afternoon, sir/ma’am.“
•
Salutes are not required to be rendered by or to
personnel who are driving or riding in privately owned
vehicles.
•
It is not customary for enlisted personnel to exchange
salutes, except in some ceremonial situations.
•
Never render a salute with a noticeable object in your
mouth or right hand.
•
If you are on detail and officer approaches, salute if
you are in charge of the detail. Otherwise, continue to
work. If you are spoken to, then come to attention.
RENDERING HONOR TO THE FLAG: The flag of the
United States is the symbol of our nation. The union, white
stars on a field of blue, is the honor point of the flag. The
union of the flag and the flag itself, when in company with
other flags, is always given the honor position, which is on
the right. Rules for displaying the flag follows:
1-10
•
The flag of the United States will be displayed
outdoors at all Army installations.
•
Only one flag of the United States will be flown at one
time at any continental United States (CONUS) Army
installation except as authorized by the commanding
generals of major Army commands.
•
The flag will be displayed daily from reveille to retreat.
If illuminated, it may be displayed at night during
special events or on special occasions deemed
appropriate by the commander.
•
The flag of the United States is the only flag that may
be flown from a flagpole over an Army installation. An
exception is the Minuteman flag that, if awarded, may
be flown beneath the flag of the United States.
•
In unusual circumstances not covered in the Army
regulations, the judgment of the senior Army individual
present will be used to determine whether the flag
shall be displayed on a specific occasion.
When the flag is being raised in the morning or lowered in
the evening, you should stand at attention on the first note
of the national anthem or “To the Colors.” ("Colors” refers
to the flag of the United States and can also include the
unit flag). Give the required salute. If you are involved in
some duty that would be hampered by saluting, you do not
need to salute. You normally face the flag when saluting,
unless duty requires you to face in some other direction. At
the conclusion of the ceremony, resume your regular
duties.
Whenever the national anthem, "To the Colors,” or
"reveille” is played, and you are not in formation and not in
a vehicle, come to attention at the first note, face the flag,
and give the required salute. If no flag is near, face the
music and salute. If you are in formation, salute only on the
1-11
order ‘Present arms. “ If you are in civilian clothing, stand at
attention and place your right hand over your heart. These
honors also apply to the national anthems of foreign
countries during ceremonies or parades. The words to the
National Anthem are shown in Figure 1-6.
The Star-Spangled Banner
O say can you see by the dawn’s early light
What so proudly we hail’d at the twilight’s last gleaming
Whose broad stripes and bright stars through the perilous
fight
O’er the ramparts we watch’d were so gallantly streaming?
And the rocket’s red glare, the bomb bursting in air,
Gave proof through the night that our flag was still there,
O say does that star-spangled banner yet wave
O’er the land of the free and the home of the brave?
On the shore dimly seen through the mists of the deep,
Where the foe’s haughty host in dread silence reposes,
What is that which the breeze, o’er the towering steep,
As it fitfully blows, half conceals, half discloses?
Now it catches the gleam of the morning’s first beam
In full glory reflected now shines in the stream
‘Tis the star-spangled banner—O long may it wave
O’er the land of the free and the home of the brave!
O thus be it ever when free men shall stand
Between their loved home and the war’s desolation!
Blest with vict’ry and peace, may the heav’n rescued land.
Praise the power that hath made and preserved us a
nation!
Then conquer we must, when our cause it is just,
And this be our motto—”In God is our Trust, “
And the star-spangled banner in triumph shall wave
O’er the land of the free and the home of the brave.
Figure 1-6. National Anthem
1-12
Vehicles in motion should stop. If you are in a car or on a
motorcycle, dismount and salute. If you are with a group in
a military vehicle or bus, remain in the vehicle. The
individual in charge will dismount and salute.
When you are passing or being passed by colors which are
being presented, paraded, or displayed, salute when the
colors are six paces from you . Hold the salute until the
colors are six paces beyond you.
COURTESIES: The following rules will help you conduct
yourself appropriately in the presence of officers and
anyone senior to you in rank:
•
When talking to an officer, stand at attention unless
given the order “At ease. “ When you are dismissed, or
when the officer departs, come to attention and salute.
•
When an officer enters a room, the first soldier to
recognize the officer calls personnel in the room to
attention but does not salute. A salute indoors is
rendered only when one is reporting.
•
When accompanying a senior, walk on their left.
•
When entering or exiting a vehicle, the junior ranking
person is the first to enter, and the senior in rank is the
first to exit.
•
When an officer enters a dining facility, unless
directed, or a senior officer is present, the diners will
be given the order “At ease “by the first person who
sees the officer. You will remain seated at ease and
will continue eating unless the officer directs otherwise.
If you are directly addressed, you should rise to
attention, if seated in a chair. If you are seated on a
bench, stop eating and sit at attention until the
conversation is ended.
1-13
NOTE: The officer or NCO may give the directive “Carry
on." This means the soldier or soldiers should continue
with whatever they were doing previously.
This same directive may be used in many other situations
outside of formation, such as in the barrack and break
areas.
•
When outdoors and approached by an NCO, you
should stand (if seated) and greet the NCO by saying,
“Good morning sergeant,” “Good afternoon sergeant,”
or “Good evening, sergeant (last name if known). “
•
When you report to an officer for any reason, it is
important to make a good first impression. If you are
outdoors, approach the officer to whom you are
reporting and stop approximately two steps from them,
assuming the position of attention. Give the proper
salute and say, “Sir/Ma’am Private Smith reports. “ If
you are indoors, use the same procedures as above,
except remove your headgear before reporting. If you
are armed however, do not remove your headgear.
1-14
CHAPTER 2
BASIC SOLDIER SKILLS
FOLLOWING ORDERS/CHAIN OF COMMAND
The military cannot function unless all personnel strictly
obey and promptly execute all lawful orders given by their
superiors. Your oath requires you to do your utmost to
successfully complete the mission assigned, even at the
risk of your life, if necessary. There may be times when you
do not agree with the national or Army policy upon which
some orders are based. Nevertheless, as long as the order
is lawful, it is your responsibility to carry it out to the best of
your ability.
The Army has an established command channel to send
orders from the highest to the lowest levels in the least
possible time and with the least chance of
misinterpretation. The chain of command consists of a
succession of commanders. The President of the United
States, as Commander in Chief, down through the various
grades to enlisted persons leading the smallest Army units
and to their individual soldiers.
Each person in the chain of command has two basic
responsibilities: first, to accomplish the mission, and
second, to care for personnel and property. A superior in
the chain of command holds subordinates responsible for
everything their command does or fails to do. Each person
in the chain is delegated enough authority to accomplish
assigned duties.
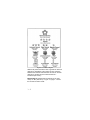
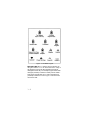
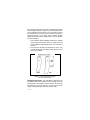
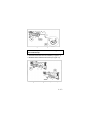
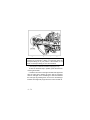
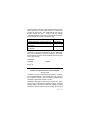
Figure 2-1 shows the relationship between initial-entry
training and combat organizations. Notice the similarities
and
differences
between
training
and
combat
organizations.
2-1
BCT/OSUT/AITCOMPANY
REGULAR UNIT
COMMANDER IN CHIEF
SECRETARY OF DEFENSE
SECRETARY OF THE ARMY
ARMY CHIEF OF STAFF
COMMANDER IN CHIEF
SECRETARY OF DEFENSE
SECRETARY OF THE ARMY
ARMY CHIEF OF STAFF
THEATER COMMANDER
ARMY GROUP
COMMANDER
CORPS COMMANDER
DIVISION COMMANDER
BRIGADE COMMANDER
BATTALION COMMANDER
COMPANY COMMANDER
PLATOON LEADER
SQUAD LEADER
POST COMMANDING
GENERAL
BRIGADE COMMANDER
BATTALION COMMANDER
COMPANY COMMANDER
SENIOR DRILL SERGEANT
DRILL SERGEANT
Figure 2-1. Chain of Command
Personal Appearance and Uniform
The Army is a uniformed service where discipline is judged,
in part, by the manner in which the individual wears the
uniform as prescribed. Therefore, a neat and well-groomed
appearance by soldiers is fundamental to the Army and
contributes to building the pride and esprit essential to an
effective military force.
Tattoos. Visible tattoos or brands on the neck, face or head
are prohibited. Tattoos or brands on other areas of the body
that are prejudicial to good order and discipline are
prohibited. Additionally, any type of tattoo or brand that is
visible while wearing a Class A uniform and detracts from a
soldierly appearance is prohibited.
Body Piercing. No attaching, affixing, or displaying
objects, articles, jewelry or ornamentation to or through the
skin while in uniform, in civilian clothes while on duty, or in
2-2
civilian clothes off duty on any military installation or other
places under military control except for earrings for
females. Females may wear any type of earrings off duty,
on or off military installations.
Hairstyle: Many hairstyles are acceptable in the Army for
soldiers who have completed basic combat training.
Male Personnel. The hair must not fall over the ears or
eyebrows or touch the collar (except for closely cut hair at
the back of the neck). Hair should be tapered, except that
"block cut" fullness in the back is permitted in moderate
degree. Neither the bulk nor length of hair may interfere
with the wearing of military headgear. Sideburns must be
neatly trimmed, not flared, and must not extend downward
beyond the lowest part of the exterior ear opening. The
face must be clean-shaven, except that mustaches are
permitted. If a mustache is worn, it must be neatly trimmed.
No part of the mustache will cover the upper lip line or
extend horizontally beyond or below the corner points of
the mouth where the upper and lower lips join.
Female Personnel. The hair must not fall over the
eyebrows and must not extend below the bottom edge of
the collar. Neither the bulk nor length of hair may interfere
with the wearing of military headgear. Any hair-holding
ornaments, such as barrettes or hairpins, must be of a
natural hair color or transparent. Makeup and nail polish
should be conservative and complement the uniform.
Extreme shades of lipstick and nail polish such as purple,
gold, blue, and white will not be worn. Unless directed to
wear another type of footwear, female personnel may wear
pumps with all uniforms except field uniforms.
Insignia Placement: Each soldier is responsible for
having the correct insignia properly placed on their uniform,
as follows:
Shoulder Sleeve Insignia. Soldiers in both basic combat
training and advanced individual training who are in one of
2-3
the following categories may wear organizational shoulder
sleeve insignia (shown in Figure 2-2). This insignia will be
worn centered on the left sleeve, 1/2 inch below the top of
the shoulder seam on all Army green uniform coats and, for
female personnel, on all Army green pantsuit jackets.
Subdued shoulder sleeve insignia will be worn on all field
and work uniforms.
§ Army National Guard (ARNG) and Reserve (USAR)
trainees are authorized to wear the insignia of their
parent ARNG or USAR organization from the start of
training.
§ Unit-of-choice trainees are authorized to wear, from
the start of training, the insignia of the specific unit for
which they enlisted.
Figure 2-2: Shoulder sleeve insignia
of current organization.
Distinguishing Insignia. The "US ARMY" insignia is worn
immediately above and parallel to the top edge of the left
breast pocket. This insignia consists of black, 3/4-inch high
block letters on a 1-inch wide by 4 1/2-inch long (or to the
edges of the pocket flap) strip of olive green cloth.
2-4
The name tape is worn immediately above and parallel to
the top edge of the right breast pocket of all field and work
uniform coats and shirts. It consists of black letters on a 1inch wide by 4 1/2-inches long (or to the edges of the
pocket flap) strip of olive green cloth.
Names ten letters or less will be printed in 3/4-inch high
Franklin Gothic Condensed. Names eleven letters or more
will be printed in 1/2-inch high Franklin Gothic Extra
Condensed (Figure 2-3). The name and US Army tapes will
be the same length.
Figure 2-3. Distinguishing insignia.
Rank Insignia. Soldiers will wear subdued pin-on rank
insignia centered on both collars of all field, work, and utility
uniform coats and jackets. The center line of the insignia
will be 1 inch from the collar point and will bisect the points
of the collar (Figure 2-4).
2-5
1 INCH
1 INCH
WORN ON FIELD,
WORK, UTILITY
UNIFORM COATS
AND JACKETS
Figure 2-4. Rank insignia.
The Army green shirt may be worn with or without the Army
green coat. Specialists 4 and below must always wear their
rank insignia on the collars of the green shirt (Figure 2-5).
Corporals and above must wear shoulder board rank
insignia.
CORPORAL
AND ABOVE
SP4 AND BELOW
Figure 2-5. Rank insignia, enlisted.
US and Branch Insignia. During initial-entry training,
males will wear the "US" insignia on both collars. The
bottom of the insignia disk will be 1 inch above the notches
on the collar, with the center line of the insignia bisecting
the notch and parallel to the inside edge of the collar on the
Army green, Army white, and Army blue uniform coats
(Figure 2-6). After completing AIT or one-station unit
2-6
training (OSUT), male soldiers will wear MOS branch
insignia on their left collar
(WORN DURING IET ONLY)
BRANCH INSIGNIA
US INSIGNIA
WORN ON ARMY GREEN, ARMY WHITE, AND ARMY BLUE UNIFORM.
Figure 2-6. US and branch insignia, enlisted male.
During initial-entry training, females will wear the "US"
insignia on both collars. The bottom of the insignia disk will
be worn 1 inch above the notches on the collars, with the
center line of the insignia bisecting the notch and parallel to
the inside edge of the collar on the Army green pantsuit
jacket, and Army green, Army white, and Army blue uniform
coats (Figure 2-7). The bottom of the insignia disk will be
5/8 inch above the collar lapel seam on the female classic
green uniform coat. After completing AIT or OSUT, female
soldiers will wear MOS branch insignia on their left collar.
US INSIGNIA
(WORN DURING IET ONLY)
BRANCH INSIGNIA
5/8 INCH
ARMY BLUE
UNIFORM COAT
CLASSIC GREEN UNIFORM COAT
Figure 2-7. US and branch insignia, enlisted female.
2-7
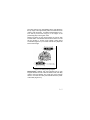
Belts and Buckles: The web belt will be a 1 1/4-inch web
or woven elastic web belt of black color with a black or
brass tip. A plain-faced, oval-shaped, solid brass buckle,
2 1/4 inches long and 1 3/4 inches wide, will be worn on the
web belt with the dress uniform. The black, open-faced
buckle, 1 11/16 inches long and 1 5/8 inches wide, will be
worn on the belt with all field and work uniforms. Only the
black-tipped belt is authorized with this buckle (Figure 2-8).
BRASS BUCKLE
BLACK BUCKLE
Figure 2-8. Buckles.
The tipped end of the belt will pass through the buckle to
the wearer's left and will not extend more than 2 inches
beyond the end of the buckle.
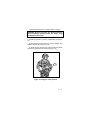
Jewelry: A wrist watch, identification bracelet, and up to
two rings (a wedding set is considered to be one ring) may
be worn with your uniform as long as they are conservative
and tasteful. You may wear a religious medal on a chain
around your neck provided neither medal nor chain can be
seen.
Clothing Maintenance: You are responsible for keeping
your clothing in good serviceable condition. Clean your
clothing regularly, keep it in good repair, and store it
properly. Carrying large or heavy objects in your pockets is
likely to change the shape of your tailored clothing.
2-8
Follow the cleaning and care instructions attached to most
clothing. Clean your clothing as soon as possible after it
becomes soiled. Dirty clothing wears out more quickly than
clean clothing because dirt cuts fibers and holds in
moisture from perspiration. Coated clothing such as
ponchos and raincoats should be wiped clean or washed
by hand with a soft brush and warm soapy water. These
items should be thoroughly rinsed and hung up to air-dry.
If you need to press clothing, be sure it is clean and that
the iron is not too hot. When pressing wool, use a damp
cloth between the iron and the fabric. To press cotton
clothing, dampen the surface of the cloth, then apply the
iron directly.
Before storing clothing, be sure it is clean and dry. Use
mothballs to protect wool clothing, and store it in a closed
container.
Boots: New boots should fit properly when you receive
them. They should have a chance to air between wearings,
so you should wear one pair one day and another pair the
next. Wear the ventilating plastic insoles so air can circulate
underneath your feet.
Scrape dirt or mud from boots and wash with just a little
water and soap. Wipe insides dry with a clean cloth and
remove all soapsuds from the outside. Stuff papers in the
toes and let boots dry in a warm, dry place. Do not put
them in the hot sun or next to a strong source of heat.
Polish after boots are dry.
Heels of boots should be replaced after wear of 7/16 of an
inch or more.
Remember, you are an AMERICAN soldier—
§ Take pride in your uniform.
§ Look like a soldier.
§ Think like a soldier.
§ Act like a soldier.
2-9
PHYSICAL FITNESS PROGRAM
The Army Physical Fitness Program (APFT) for IET will
include carefully structured, progressive, and challenging
physical training programs. It will focus on the progressive
development of cardio-respiratory endurance, muscular
strength and endurance, flexibility, anaerobic conditioning,
coordination, aggressiveness, competitiveness, good
posture, and appearance. The military fitness skills below
will be emphasized.
§ Agility, to include fast movement in enclosed spaces
(sprinting and lateral movement.
§ Balance and controlling fear of heights.
§ Vaulting, jumping, and landing correctly.
§ Forced marching with loads, to include cross-country
movement.
§ Strength development activities such as
climbing, pull-ups, and resistance exercises.
rope
§ Crawling.
§ Negotiation of natural and man-made obstacles
(confidence and obstacle courses).
As a first priority, physical fitness programs will enhance the
soldier's ability to complete essential individual combat
tasks. Preparation for the APFT is of secondary
importance. Maintenance of military skills, such as those
above, will also be emphasized. Commanders may
establish unit APFT standards that exceed Army minimum
standards because their unit missions require soldiers to be
more than minimally fit.
Components of Physical Fitness: The Army's policy is
that exercise periods will be of sufficient intensity,
frequency, and duration to produce a training effect. To do
this, the basic combat training unit fitness program is
2-10
designed to improve the five components of your physical
fitness:
Muscular Strength. This is the maximum force that a
muscle or muscle group can exert against resistance in one
effort. It can be measured by the maximum amount of
weight you can lift on the bench press, leg press, or similar
exercise.
Muscular Endurance. This is the capacity of a muscle or
muscle group to perform repeated movements with a
moderate level of resistance for a given period of time. The
maximum number of push-ups or sit-ups you can do in 2
minutes can measure it.
Body Composition. This is the relative amount of fat and
lean body tissue (muscle and bone) that comprises your
body. A calorie is a measure of energy. A pound of fat
represents an excess of 3,500 calories. To lose weight
(body fat), you must use more calories through exercise
than you take in by eating. The percentage of your body fat
can be estimated by several methods. The Army uses a
series of circumference measurements to make this
estimation.
Flexibility. This is the ability of the body joints to move
through the full range of motion. Improving flexibility by
stretching before and after exercise may help prevent injury
and relieve muscle tightness. It can be measured by
performing the sit-and-reach exercise for the lower back
and hamstrings.
Cardiorespiratory (Aerobic) Endurance. This is the
capacity of the heart and lungs to deliver oxygen to working
muscles and the muscles' ability to use this oxygen and get
rid of waste products over an extended period of time. This
can be measured by the 2-mile run (maximum effort).
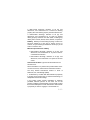
Exercise Principles: By following the seven exercise
principles, you will develop your physical fitness to a
degree that will enable you to meet the requirements for
2-11
assignment to an Army unit. The principles will also help
you maintain a positive attitude toward physical fitness for
the rest of your life. The seven exercise principles are as
follows:
Regularity. During basic combat training, physical training
(PT) will be performed three to six times a week on a
regular basis.
Progression. The duration and intensity of exercise is
increased progressively in small increments over time until
the desired level of fitness is achieved. During basic
combat training, you will establish physical fitness goals
with your drill sergeant. When your initial goal has been
reached, continue to exercise and notify your drill sergeant
to assist you in establishing a new goal to increase your
level of fitness.
Overload. The workload of each exercise session must
exceed the normal demand placed on the body in order to
bring about a training effect. As your level of fitness
improves, an increasingly greater demand must be placed
on the heart, lungs, and muscles to produce an overload.
Balance. A balance of activities ensures both muscular and
aerobic (cardiorespiratory) fitness. Physical activities will
develop all of the components of fitness: muscular strength,
muscular endurance, body composition, flexibility, and
cardiorespiratory endurance.
Specificity. Performing specific exercises produces
specific results and improvements. Your goal should be to
perform as many correct push-ups and sit-ups as you can
during muscular strength and endurance training sessions.
In addition, you should work hard to improve your speed
and endurance during all cardiorespiratory endurance
training sessions. This will improve your score on the Army
Physical Fitness Test (APFT).
2-12
Variety. A variety of exercise programs will be conducted to
make PT interesting and keep you motivated.
Recovery. During basic combat training, daily physical
training exercises will be performed using the hardday/recovery-day training routines. Recovery-day is defined
as a low-intensity workout on selected muscles designed to
allow those muscles to recover from the previous day's
high-intensity workout (hard-day). However, every PT
session will be physically demanding.
Basic Combat Training Fitness Program: The basic
combat training fitness program improves muscular
strength, muscular endurance, body composition, flexibility,
and cardiorespiratory endurance. The initials "FITT" will
help you remember how to apply the seven exercise
principles outlined above:
F-The "F" stands for frequency. In basic combat
training, you will do some type of exercise six days
each week on a hard-day/recovery-day schedule.
I-The "I" stands for intensity. You will be expected to
exercise hard enough to elevate your training heart rate
(THR) to a level between 60 and 90 percent of your
maximum heart rate. When you perform muscular
strength/endurance activities, the resistance should be
sufficient to develop strength/ endurance.
T-The first "T" stands for time. Maintain your training
heart rate for at least 20 minutes. This elevated pulse
rate must be maintained if significant improvement is to
occur on your 2-mile run. The time required to perform
correctly the specified number of repetitions during
muscular strength and endurance training sessions
represents the "T" in time.
T-The second "T" stands for type. There should be a
balance among types of exercise to improve muscular
2-13
strength, muscular endurance, and cardiorespiratory
endurance.
Nutrition. Nutrition is important in your fitness program. Eat
a variety of food and remember your goal is to increase
muscle mass and decrease fat mass. When eating—
§ Eat a variety of foods.
§ Avoid too much fat, especially saturated fat and
cholesterol.
§ Eat foods high in fiber and complex carbohydrates.
§ Avoid too much sugar.
§ Avoid too much salt.
§ Weigh in at least once a week at the same time of the
day.
§ Keep a record of your weight.
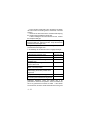
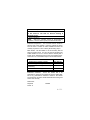
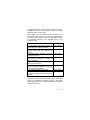
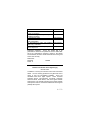
Fitness Assessment. The diagnostic APFT will be used to
assess your level of fitness and determine your target
training level for each phase of training. You must pass the
APFT at the basic combat training standard to graduate
from basic combat training. You will be tested in three
events: push-ups, sit-ups, and 2-mile run. Your drill
sergeant will explain the basic combat training standards,
which you must reach by the eighth week. You will receive
plenty of practice doing push-ups, sit-ups, and running.
Unless you establish goals, you may not realize your full
potential. The chart in Figure 2-9 will be used to record
your progress and establish goals to aid you in successfully
passing the final APFT. You should always try to reach the
highest level of physical fitness possible and exceed the
goals your drill sergeant has established for you.
2-14
PHASE
INITIAL
NUMBER
OF
PUSH-UPS
NUMBER
OF
SIT-UPS
TIME ON
2-MILE
RUN
PHASE I GOAL
DIAGNOSTIC
APFT
PHASE I
PHASE I GOAL
DIAGNOSTIC
APFT
PHASE II
PHASE II GOAL
DIAGNOSTIC
APFT
PHASE III
PHASE III GOAL
DIAGNOSTIC
APFT
PHASE IV
PHASE IV GOAL
DIAGNOSTIC
APFT
PHASE V
PHASE V GOAL
RECORD
AIT
APFT
Note: This is your personal log. Record your entries
in pencil and update your progress as you succeed.
Figure 2-9. IET physical fitness goal-setting log.
2-15
FIELD AND PERSONAL HYGIENE
Disease Prevention: You can best do your job in the Army
if you are free from disease. There are several simple
things you can do to prevent disease in yourself and
others.
Protect Yourself Against Respiratory Disease. The air
you breathe carries many diseases. Most of these
diseases, such as colds, will simply make you miserable
and increase the difficulty of doing your job. Others, such
as the flu, can be severe enough to kill. To keep from
getting respiratory diseases—
§ Avoid soldiers who are sick, if possible. Talk sick
soldiers into going on sick call.
§ Avoid using borrowed towels, caps, cigarettes, radios,
or anything else that others have handled.
§ Provide an opening for fresh air into your fighting
position or shelter. Fresh air dilutes contaminated air
and carries much of the contamination away.
Follow Waste Disposal Procedures in the Field. The
main reason for burying wastes is to prevent the breeding
of flies. Flies can spread diarrhea and dysentery.
Procedures for waste disposal are as follows:
§ Use the unit latrine for body wastes, or dig your own
1-foot deep by 1-foot wide cat hole. Cover it with dirt
when you are finished.
§ Use the garbage pit for other wastes or dig your own
garbage pit. Dig it deep enough to allow 4 inches of
dirt to cover the garbage when you are finished filling
the hole.
Prevent Skin Infections. Bathe frequently. If showers or
baths are not available, use a washcloth daily to wash your
armpits, genital area, feet, and anywhere else the skin is
2-16
prone to collect moisture, such as between the thighs or
under the breasts. Keep your skin dry. Use foot powder on
your feet, especially if you have had fungal infections on
the feet in the past. Use talcum powder in areas where
wetness is a problem, such as between the thighs or under
the breasts. Wear proper clothing. Loose-fitting uniforms
allow for better ventilation; tight-fitting uniforms reduce
blood circulation and ventilation. Avoid nylon or silk-type
undergarments. Cotton is more absorbent and allows the
skin to dry.
Prevent Dental Disease. Go to the dentist at least once a
year for an examination and treatment. Brush your teeth at
least once a day, preferably after every meal. Use dental
floss at least daily. Rinse your mouth with water after
brushing and flossing. Use toothpaste if it is available.
Prevent Genital and Urinary Tract Infections.
Male soldiers: Wash your genital area daily. Be sure to
wash the head of the penis and, if you have not been
circumcised, pull the foreskin back before washing. As a
minimum, use a condom when having sex to protect
yourself from sexually transmitted diseases (STD) including
venereal disease, HIV, and so forth.
Female soldiers: Wash your genital area daily. Don't use
perfumed soaps or female deodorants in the field; they may
cause irritation. Protect yourself by insisting that your sex
partner use a condom. Using a condom helps prevent
transmission of STD, HIV, and so forth. Don't douche
unless directed to by medical personnel. In the field, female
soldiers may drink too little fluid and hold their urine due to
lack of privacy. This increases the chance of developing a
urinary tract infection. Try to drink extra fluids, even when
the weather is not hot. Urinary tract infections are among
the most frequent medical problems that female soldiers
experience in the field.
2-17
Wash Your Hands Before Eating. Hands come into
contact with many sources of bacteria. Some sources of
contact are the latrine door, your friend's hands, your nose,
weapons and ammunition, and dirt and dust.
Apply Insect Repellent. Biting insects are a source of
discomfort, minor pain, and skin irritation. You can protect
yourself against insects by applying insect repellent, taking
malaria pills, and washing yourself and your uniform. When
you use insect repellent—
§ Apply it in spray or lotion form to all exposed skin. Do
not get the repellent in your eyes.
§ Apply it to your ankles to prevent ticks and mites from
creeping between your uniform and your boots.
Blouse your uniform inside your boots to further
reduce the risk.
§ Apply it to your shoulder blades where your shirt fits
tightly enough for mosquitoes to bite through.
§ Reapply some every two hours during strenuous
activity and after crossing streams.
Mental Fitness
Regulate Sleep Habits. Your schedule in the Army will
usually allow you time to get enough sleep to remain
mentally fit. Try to get 6 to 9 hours of sleep in every 24-hour
period. Some people need more sleep than others, so you
will need to find out what is best for you by noticing how
you perform after having had different amounts of sleep.
If you can't sleep because of the mission, discomfort, or
mental tension, don't worry about it. Sleep loss does no
permanent harm to body or mind. You can protect yourself
against the temporary effects of sleep loss on alertness,
mood, and task performance by—
2-18
§ Taking short stretch breaks or doing light exercise in
place.
§ Playing mental games or talking with buddies to stay
alert during dull watches or monotonous but critical
jobs like driving at night.
§ Not trusting your memory. Writing things down.
Double-checking
your
communications
and
calculations.
Improve Resistance to Stress. Fear and physical signs
or symptoms of stress are normal reactions before and
during dangerous situations. You should not let fear or
stress keep you from completing your training. The
following techniques can help reduce stress:
§ Talk about what is happening with others in your
group.
§ Learn ways to relax quickly.
Give each other moral support.
Cold Weather Tips
The key to keeping warm in cold climates is to wear the
correct clothing. Keep your clothes clean and dry. Wear
your clothes in loose layers, and avoid overheating. The
factors shown in Figure 2-10 increase the likelihood of cold
(and heat) injuries.
§ FEVER
§ RECENT ILLNESS
OR INJURY
§ OVERWEIGHT
§ PREVIOUS COLD
INJURY
§ DEHYDRATION
§EXERTION
§FATIGUE
§HEAVY MEALS
§USE OF ALCOHOLIC
BEVERAGES
§FEVERISH
REACTIONS TO
IMMUNIZATIONS
Figure 2-10. Factors that increase the likelihood
of cold or heat injuries.
2-19
Buddy System. Use the buddy system by watching what
your buddy does and how he wears his uniform. If you see
a cold injury develop, take immediate first aid measures.
Dehydration. You can dehydrate rapidly when exercising
or working hard in extreme cold. Sip liquids regularly, but
avoid alcohol. Do you feel warmer when you drink alcohol?
This is an illusion—it actually reduces the body's tolerance
to cold, increasing the risk of overexposure.
Trousers and Fatigue Pants. Wear your cotton trousers
over your fatigue pants. The trousers should be loosefitting. To keep the full cargo pockets from rubbing and
irritating your legs, tie the tape that runs inside each cargo
pocket around the thigh. For added warmth, tie the ankle
drawstrings and tuck the bowknots under the trouser legs.
Layered Clothing. Do not wear too much clothing,
because that will make you sweat. If you get wet from
sweating, you will get cold. Before you begin to sweat,
loosen your clothing. Open your uniform to allow cool air in
next to your body. If you continue to sweat, remove one or
more layers of clothing. Do not use blousing bands as they
will restrict the flow of blood in your legs. Instead, blouse
your trouser legs inside your boots. If you develop a cold,
use a handkerchief to prevent infecting fellow soldiers
when you cough or sneeze. When entering a warm
building, always remove your field jacket and gloves.
Scarf. The wool Army scarf can be used to keep your neck
warm, to cover your face against the cold and wind, or as a
stocking cap (by placing the open end over your head).
Gloves. During extreme cold, use the glove as a mitten,
which will keep your hands warmer. To do this, withdraw
your fingers from the fingers in the black leather gloves and
into the palm of your hand. Do this for short periods of time
until your hands are warm. Also, in case you lose the first
2-20
pair or get them wet, always have an extra pair of black
leather gloves and wool inserts.
Socks. Your feet are harder to keep warm than any other
part of your body. Especially try to keep them dry. When
they do get wet, put on dry socks. Massage and apply foot
powder to your feet before putting your boots back on. If
your feet are still cold, do exercises such as stomping your
feet, wiggling the toes inside the boots, bending at the
knee, or running in place.
Personal Cleanliness. Keep yourself clean. Sweatdampened clothing increases your vulnerability to trench
foot and to worse cold weather injuries. Change socks and
underwear regularly. Carry extra pairs of socks. On cold
weather hikes, place damp socks under your arms between
your field jacket and shirt. This will help dry the socks so
you can rotate them. (When carrying a rucksack, place
damp socks on your shoulders between your shirt and
outer garments. This helps dry the socks and cushion the
weight of the rucksack. Place your clean clothing with you
in the sleeping bag, positioning them to support the small of
your back or using them as a pillow (inside). Not only does
this add to your sleeping comfort, but your clothes will be
warm in the morning. Do not wrap feet or other body parts
in plastic to keep warm. Body heat causes moisture to
collect, which can cause serious injuries.
Clean Clothing. Always keep your clothes clean. Dirt and
grease will clog the air spaces in your clothing and reduce
the natural insulation. Before going to bed at night, clean
your body with soap and water and dry yourself thoroughly.
Sleeping Bag. Your sleeping bag and foam pad will keep
you warm and comfortable while you sleep. Always use the
outer case with your sleeping bag. Lace the two together
properly so that you can get out in a hurry. Know how to
use the quick-release slide fastener in emergencies. The
directions are sewn in the bag. Avoid sweating inside your
2-21
sleeping bag by wearing the least amount of clothing you
can and still keep warm. Do not keep your face inside the
bag. Water vapor (breath) escaping from your mouth will
cause your bag to become damp. If your face is cold, cover
it with your scarf or towel. When your bag is not being
used, open it so that fresh air can get into it. Always carry
your sleeping bag in its waterproof bag.
Fire. Do not put any type flame in tents or under ponchos
to keep warm. This can lead to loss of shelter or even to
loss of life.
Hot Weather Tips
Even if you are in good physical condition, your body must
acclimatize before you can do heavy work in hot
temperatures. Most of this acclimatization takes place
automatically during the first five to seven days, as your
workloads and exposure to heat are gradually increased.
Never forget that heat can be a killer. Leaders should be
considerate of subordinates who work in high
temperatures, and should heed warnings sent down
through command channels.
The factors shown in Figure 2-10, page 2-25, also increase
the chance of heat injury. The key to preventing heat
injuries is to maintain a normal body temperature. You can
protect yourself from the likelihood of heat injury by—
§ Drinking plenty of fluids to replace those lost through
increased perspiration.
§ Reducing exposure to heat during the hot part of the
day. Plan PT, road marches, patrols, and so forth for
early morning or evening activity.
§ Selecting clothing wisely. Wear loose clothing that
allows blood to circulate more easily and perspiration
to evaporate more freely. Wearing loose clothing and
a head covering insulates you from the sun and heat.
2-22
§ Using a buddy system to identify potential victims of
heat before injuries occur.
§ Taking breaks frequently and drinking plenty of fluids,
if you must work during periods of excessive heat.
First Aid for Training Injuries
Blisters. Seek medical help if the blister is red or painful.
Corns and Calluses. To prevent corns and calluses, use
moleskin padding. DO NOT treat these with medicated
pads.
Arch Pain. To ease arch pain, use an ice pack. As a
preventive measure, apply liniment before exercise and
use arch supports.
Sprains. Apply an ice pack to the ankle for 15 to
20 minutes; repeat after 1 hour. Seek medical help if
swelling or discoloration develops. To strengthen the ankle,
exercise it with toe-to-heel walking, one-legged activities,
and resistance exercises using boots, helmets, or socks
with stones as weights.
Achilles Tendinitis and Shin Splints. Use an ice pack
after exercise. As a preventive measure, improve tendon
flexibility with curb and wall stretches.
Knee Pain. To avoid knee pain, do straight leg lifts.
Improve flexibility by pulling the heel to the opposite
buttock.
Hamstring Pulls. Use an ice pack after exercise. Improve
flexibility—
§ By sitting with one leg straight and the other bent with
the sole of the foot against the knee of the
outstretched leg, reach for the outstretched foot.
§ By standing near a wall and leaning into it with legs
crossed at ankles.
2-23
Lower Back Pain. To prevent low back pain, improve
flexibility. Bend forward and backward. Tilt your pelvis.
While lying on the floor, bring your knees up to your chest,
hold them with your hands, tuck your chin in, and lift your
head, neck, and shoulders off the floor. Strengthen your
abdominal by doing curl-ups (partial sit-ups). Improve your
posture by lifting with your legs, NOT your back, and by
squatting and rising with a straight back.
SOLDIERING
Promotions: Most promotions in the Army are not
automatic. You will be promoted on the basis of superior
performance and increased skills in your fields of
specialization.
Promotion to Grade E2. A private will be advanced from
pay grade E1 to E2 after completing 6 months of active
duty, barring legal action. Local commanders may
recognize outstanding performance by promoting privates
to pay grade E2 after as few as 4 months of active duty.
Promotion to Grade E3. Unit commanders may advance a
private with 12 months time-in-service and 4 months timein-grade to private first class (E3). Commanders may
recognize outstanding performance by promoting privates
with as few as 6 months time-in-service and 2 months timein-grade.
Promotion to Grade E4. A private first class may be
promoted to corporal (E4) with 24 months time-in-service
and 6 months time-in-grade. Under certain conditions, this
time may be reduced to as few as 15 months time-inservice and 3 months time-in-grade (Figure 2-11).
2-24
Figure 2-11. Promotional steps.
Boards. In some units, soldiers being considered for
promotion to private first class or corporal go before formal
or informal boards for interviews. Boards select the best
qualified soldiers for promotion or for other soldier
opportunities. They select Soldier of the Month, Quarter,
and Year at several different levels. Being selected for any
of these honors can help you advance more rapidly.
Boards are normally made up of five soldiers senior to the
soldier appearing before them. Each board will use the
"whole soldier" concept to evaluate those recommended.
This means that board members will consider the following
eight areas:
§ Personal appearance, bearing, and self-confidence.
§ Oral expression and conversational skill.
§ Knowledge of world affairs.
§ Awareness of military programs.
§ Knowledge of basic soldiering (FM 21-15).
2-25
§ Self-improvement (enrollment in military or civilian
courses).
§ Achievements (honors, completion of unit training
courses, and so forth).
§ Soldier's attitude (includes leadership and potential
for advancement, trends in performance).
First impressions are very important when appearing before
boards. Pay special attention to your uniform, your
personal appearance in general, and your bearing.
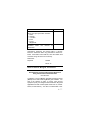
Discipline: is the cornerstone on which the Army is built. To
be successful in the Army you must develop your discipline
far above that required in civilian life. Soldiers must have
the discipline to react promptly to the orders given them
and to act correctly in the absence of orders.
You can develop good discipline as a soldier by—
§ Accomplishing all missions.
§ Always looking sharp.
§ Being proud of your unit.
§ Maintaining your weapons and equipment.
§ Not wasting time.
§ Cooperating with other soldiers.
§ Always telling your superiors the truth about
situations, no matter how bad the problems might be.
§ Meeting the standards set by your commander.
ENVIRONMENTAL AWARENESS
Recently, concern for our environment has increased. The
Former Army Chief of Staff, General Gordon R. Sullivan,
made the following statement:
2-26
"THE ARMY IS COMMITTED TO A COURSE OF ACTION
THAT MEETS CURRENT RESPONSIBILITIES AND
ENHANCES THE ENVIRONMENT FOR FUTURE
GENERATIONS."
When you were in school, you learned that an environment
consists of everything around an organism. Sunlight,
temperature, air, soil, minerals, and other living things are
elements of an organism's environment. All these elements
work together to make life possible on earth.
As new soldiers, you have the inherent personal and
professional responsibility to know, understand, and
support the Army's environmental program. It is your duty
as a soldier to protect the environment. You should—
1. Comply with installation environmental policies, unit
SOPs, ARs, and environmental laws and regulations.
2. Prevent environmental damage and pollution by applying
environmental awareness to daily activities and making
sound decisions that will not harm the environment.
3. Advise the chain of command on techniques to ensure
compliance with environmental regulatory requirements.
4. Identify the environmental
individual and team tasks.
risks
associated
with
5. Support the Army's recycling program.
6. Report hazardous material and waste spills immediately.
7. Make sound environmental decisions in the absence of a
supervisor or proper guidance by reviewing the following:
§ Training.
§ Guidance from the chain of command.
§ Concept of right and wrong.
The Army's environmental vision is to lead the nation in
environmental and national resource stewardship for
2-27
present and future generations. As new soldiers, you are
part of that vision.
GUARD DUTY
One of the most important duties you will perform in the
Army is guard duty. In a combat zone, an alert, cautious
guard can make the difference between life and death.
However, guards are important everywhere due to terrorist
threats that can occur anywhere.
Interior Guard
An interior guard is set up by the commander of the military
installation to protect property and to enforce specific
military regulations. The main guard is a combination of
patrols and fixed guard posts. Special guards are used to
protect parks, boats, aircraft, and other places or property.
A guard on post is governed by two sets of orders: general
orders and special orders. General orders outline the basic
responsibilities of all guards, while special orders give
details on how to perform on a certain post.
All interior guards must memorize, understand, and comply
with the three general orders.
General Order
Number 1—
General Order
Number 2—
General Order
Number 3—
"I will guard everything within the
limits of my post and quit my post
only when properly relieved."
"I will obey my special orders and
perform all my duties in a military
manner."
"I will report violations of my
special orders, emergencies, and
anything not covered in my
instructions to the commander of
the relief."
General Order Number 1 gives you responsibility for
everything that occurs within the limits of your post while
2-28
you are on duty. You must investigate immediately any
unusual or suspicious occurrence on or near your post,
provided you do not have to leave your post to do so. You
must apprehend all suspicious persons, using only
necessary force to overcome resistance. If you should
require relief for any purpose, you must contact the
commander of the relief for instructions.
General Order Number 2 requires you to become
thoroughly familiar with the special orders before you are
actually posted. In addition to the special orders connected
with your post, you are required to obey and carry out any
orders or instructions from the commanding officer, field
officer of the day, and officers and noncommissioned
officers of the guard. No other persons are authorized to
give orders to soldiers on guard duty. You should pass
instructions and special information to your relief when
appropriate.
Example
You are a guard on duty at an ammunition dump
and discover a hole in the fence, which you report to
the commander of the relief. You also pass the
information on to your relief so that special attention
can be paid to that part of the fence until the hole is
repaired.
General Order Number 2 also requires you to perform your
duties in a military manner, to be courteous to all, and to
speak to no one, except in the line of duty. You must
maintain an erect and soldierly bearing, carrying your
weapon as instructed by the commanding officer or
commander of the guard. You must salute individuals
according to Army regulations. The special orders will tell
you whether and when to challenge.
General Order Number 3 requires you to report all special
order violations and emergencies. In case of a fire on or
near your post, you should call, "Fire, post number _____."
2-29
You should alert the occupants if the fire is in an occupied
building, and should give the alarm or make sure one is
given. If possible, extinguish the fire. Help direct firefighting apparatus to the fire. If a disturbance occurs that
requires assistance, call, "The guard, post number _____."
If the danger is great, fire your weapon into the air three
times in rapid succession.
When you, as a guard, are asked "What are your orders?"
by an inspecting officer, the proper answer is: "Sir/Ma'am,
my orders are of two classes: general and special. My
general orders are, Number 1: I will guard everything within
the limits . . .," continuing until stopped by the officer or until
you recite all the general orders. You should be able to
answer any questions concerning the special orders for
your post.
Uniform, Arms, and Equipment. The commanding officer
prescribes uniform, arms, and equipment for guard mounts.
If armed, you must have completed training with the
weapon to be used on guard duty.
The sergeant of the guard will organize the soldiers making
up the guard into a formation, using commands and
movements described in FM 22-5. The commander of the
guard then prepares the guards for inspection. The officer
of the day inspects the guards and orders those found
unsatisfactory to fall out to the rear of the formation and
await further instructions. The guards then move to the
guardhouse, and the commander of the first relief prepares
the relief to be posted. At the appropriate time, the old
guard will be relieved by the new guard. The changing of
the guard is accomplished through a ceremony conducted
by the two commanders.
Exterior Guard
Exterior guards are not as formal and restricted as interior
guards. Examples of exterior guards are lookouts, listening
posts, outposts, certain patrols, and other guards in combat
2-30
zones and field training, and guards outside the limits of a
military installation. Exterior guards perform their duties
according to special orders and instructions.
You must be able to perform the following:
Recite the General Orders
1. General Order Number 1. The soldier successfully
recites, "I will guard everything within the limits of my post
and quit my post only when properly relieved."
2. General Order Number 2. Successfully recite, "I will obey
my special orders and perform all my duties in a military
manner."
3. General Order Number 3. Successfully recite, "I will
report violations of my special orders, emergencies, and
anything not covered in my instructions to the commander
of the relief."
React to an Inspecting Officer
The soldier—
1. Stops walking and assumes position of attention; when
the inspecting officer approaches, renders a proper hand
salute.
2. Executes order arms when salute is returned, and
remains at attention.
3. When told to “Carry on,” assumes position of attention
and renders a proper hand salute, holding it until it is
returned.
4. Resumes walking post.
Challenge Unknown Persons (Night) and Summon
Commander of Relief
The soldier—
2-31
1. Upon seeing or hearing an unknown person, comes to
port arms.
2. Commands, "Halt."
3. Calls out, "Who is/goes there?"
4. States, "Advance to be recognized."
5. Commands, "Halt," when the person can be seen but not
closer than 2 to 3 meters away.
6. Says, "State your business."
7. Requires unknown person to place identification on
ground and move back six steps.
8. Checks identification (ID) while keeping person under
observation
9. If ID and authorization do not match, moves to phone
and calls commander of the relief while keeping person
under observation.
10. Releases person to commander of the relief and
explains that their identification and authorization do not
match.
TERRORISM
In 1992, an American soldier was killed in an ambush in
Panama. In 1991, another soldier was killed in Panama in a
drive-by shooting. Also in 1991, an Air Force sergeant was
killed by a bomb in the entryway of his Korean apartment
house. Personal animosity did not cause these incidents.
These soldiers were killed simply because they were
American military personnel. As symbols of United States
power, soldiers are always at risk from criminals and
terrorists. While the level and type of threat vary from place
to place and time to time, you can do several things to
make you less likely to be the target of a criminal or
terrorist. By practicing these principles at all times, you will
2-32
be better prepared for that time when you are living and
working in an elevated threat environment.
§ Know the threat in your area. Be especially cautious
in high-crime areas or areas with a history of terrorist
activity.
§ Routinely practice crime-prevention measures.
§ Be inconspicuous. DO NOT call attention to yourself
by dress or action, such as by talking loudly or
flashing large sums of money.
§ Involve your family in security. A good personal
security program covers security at work, at home,
and while traveling.
§ Ensure family members know where other members
are at all times.
§ Ensure children DO NOT give any personal
information, such as phone numbers, where parents
work, and so on, to strangers.
§ Ensure family members know emergency phone
numbers (police, fire, medical).
§ When traveling, DO NOT discuss your work with
strangers (no one on the bus, airplane, or train needs
to know that you are a soldier).
§ DO NOT use luggage or wear clothing or accessories
that identify you as a soldier.
§ DO NOT work or drive in isolated or high-crime areas.
§ Avoid public demonstrations.
§ Know where safe areas are (police stations, military
installations).
§ Report all suspicious personnel or activities, to
include surveillance, to proper authorities (chain of
2-33
command, security officer, police). DO NOT confront
suspicious personnel.
§ Above all, stay alert. If something seems "wrong," it
might well be. Most attacks against US military
personnel have occurred to off-duty or traveling
personnel who were not following sound security
practices. Remember, there is no honor in becoming
a victim of a criminal or terrorist attack, so practice
personal protection to keep yourself and your family
from becoming a victim.
2-34
CHAPTER 3
ARMY CORE VALUES AND
HUMAN RELATIONS TOPICS
Section I: ARMY CORE VALUES
At the heart of our country's strength and power are moral
and ethical issues—guidelines for living. While there are
hundreds of positive values worthy of attention, a core set
of seven exemplifies the Army soldier. These values form
the bedrock upon which the Army's strength of character is
built. We are soldiers 24 hours a day, seven days a week,
and we live by these values on and off duty. Your actions
on or off duty are a reflection on yourself, the Army, and
your country. These values are:
L OYALTY
D UTY
R ESPECT
S ELFLESS SERVICE
H ONOR
I NTEGRITY
P ERSONAL COURAGE
LOYALTY
Bear true faith and allegiance to the U.S. Constitution, the
Army, your unit, and other soldiers.
Bearing true faith and allegiance is a matter of believing in,
and devoting yourself to, something or someone. A loyal
soldier is one who supports the leadership and stands up
for fellow soldiers. Wearing the uniform of the United States
Army is a highly visible means of expressing your loyalty.
You show your loyalty to your unit by doing your share. Any
time you choose one individual's actions—right or wrong—
over the safety and welfare of the rest of the unit, or over
your own interest and commitment, you are eroding the
value of loyalty.
3-1
DUTY
Fulfill your obligations.
Doing your duty means more than carrying out your
assigned tasks. The work of the United States Army is a
complex
combination
of
missions,
tasks,
and
responsibilities—all in constant motion. And the work,
inevitably, is a matter of building one assignment or task on
work that has been done previously. Doing your duty is a
very important responsibility. Duty also means being able
to accomplish tasks as part of a team. You must fulfill your
obligations as a part of your unit. Examples include:
voluntarily assuming your share of work load, unwillingly
serving as a member of a team, or assuming a leadership
role when appropriate. You demonstrate the value of duty
when you complete a task even when no one is looking, or
when you resist the temptation to take "shortcuts" that
might undermine the integrity of the final product. You do
your duty as a soldier every time you do something that
needs to be done—without being told.
RESPECT
Treat people as they should be treated.
In the Soldier's Code, we pledge to "treat others with dignity
and respect and expect others to do the same." Respect to
a soldier simply means treating people as they should be
treated. It means giving others the same consideration we
would like or expect to be given. The Army is one huge
team, made up of hundreds of component parts. There
must be connections—ground rules—so that when one
soldier approaches, works with, or talks to another, it is with
immediate and unquestioned cooperation and respect. The
Army mirrors our country's diversity. Each of us has
something to contribute. Respect is what allows us to
appreciate the best in other people. Respect is trusting that
all people have done their jobs—fulfilled their duty. Selfrespect is a vital ingredient within the Army value of respect
3-2
that results from knowing you have dug down deep to put
forth you best effort. Your self-respect is shown by taking
care of yourself physically, keeping fit, not using drugs or
tobacco products (smoking, chewing, and so forth). Finally,
respect for other people includes not using profanity and
obscene gestures. You are now in the military. What might
have been acceptable in your civilian life may not be
acceptable in the Army.
SELFLESS SERVICE
Put the welfare of the Nation, the Army, and your
subordinates before your own.
In serving your country, you are doing your duty loyally,
without thought of recognition or gain. The reward of
selfless service is the satisfaction of a job well done—a
successful accomplishment that reflects on the soldier and
his or her unit. The greatest means of accomplishing
selfless service is to dedicate yourself to the teamwork that
is the underlying strength of the Army. It is when thousands
of soldiers—work together as a team that spectacular
results arise. The basic building block of selfless service is
the commitment of each team member to go a little further,
endure a little longer, and look a little closer to see how he
or she can add to the effort of the unit, platoon, or
company. Selfless service is larger than just one person.
With dedication to the value of selfless service, each and
every soldier can rightfully look back and say, "I am proud
to have served my country as a soldier."
HONOR
Live up to Army values.
When we talk about "living up to" something, we mean
being worthy of it. We must make choices, decisions, and
actions based on the Army core values. Nowhere in our
values training does it become more important to
emphasize the difference between "knowing" the values
3-3
and "living" them than when we discuss the value of honor.
Honor is a matter of carrying out, acting, and living the
values of respect, duty, loyalty, selfless service, integrity,
and personal courage in everything you do. Noticing a
situation and deciding to take action to assist another
involves respect, duty, and honor. It was a matter of honor
that soldiers, at great risk to themselves, distributed food in
Somalia and kept the peace in Bosnia, while managing to
protect the communities. There are hundreds of examples
of soldiers who have distinguished themselves with
honorable actions and lives. The Nation's highest military
award is named "The Medal of Honor." This award goes to
soldiers who make honor a matter of daily living—soldiers
who develop habit of being honorable, and solidify that
habit with every value choice they make.
INTEGRITY
Do what’s right, legally and morally.
When we say that someone has integrity, we mean that
person respects the rules of an organization, the country,
and life. Such persons can be counted on to do the right
thing, live honestly, and relate to others without playing
games or having false agendas. Integrity is a quality you
develop by adhering to moral principles. It requires that we
do and say nothing that deceives others. As your integrity
grows, so does the trust others place in you. It's integrity
that requires us to pay our debts on time, turn in items that
someone else has lost, and follow rules as laid out in the
law or in the code of human ethics and morality. The
Soldier's Code says, "No mater what situation I am in, I will
never do anything for pleasures, profit, or personal safety
that will disgrace my uniform, my unit, or my country." The
more choices you make based on integrity, the more this
highly prized value will affect your relationships with family
and friends, and, finally, the fundamental acceptance of
yourself.
3-4
PERSONAL COURAGE
Face fear, danger, or adversity (physical or moral).
Personal courage has long been associated with our Army.
Accounts of the dangers and hardships that soldiers face
are legendary. With physical courage, it is a matter of
enduring physical duress and, at times, risking personal
safety. Facing moral fear or adversity may be a long, slow
process of continuing forward on the right path, especially if
taking those actions is not popular with others. When
considering personal courage, physical or moral, there is
one important point to be made. Nowhere does the value
say that fear must disappear—that you should not feel fear.
Some great instances of courage are those carried out by
the soldiers who have never seen a battlefield. You can
build your personal courage by daily standing up for and
acting upon the things that you know are honorable.
Section II: HUMAN RELATIONS TOPICS
The application of Army core values is witnessed through
our association with other soldiers and civilians. We are a
diverse group of people, with individual personalities and
beliefs. Several human relations duties help us work
together as a team. How well we will succeed in our
mission of defending our country will depend on how well
we work together. These are some of the soldier's humanrelations topics:
1. Serve as a member of a team.
2. Comply with Uniform Code of Military Justice.
3. Comply with Joint Ethics Regulations.
4. Comply with Equal Opportunity/Program on Sexual
Harassment (EO/POSH) policies.
5. Make an ethical decision.
6. Report indications of suicidal intent.
3-5
7. Instill values and appreciation of heritage.
8. Manage personal finances.
9. Educate on rape prevention.
10. Instill spiritual, emotional, and mental fitness.
11. Exhibit proper soldier behavior.
SERVE AS A MEMBER OF A TEAM
The Army defines team as a "group of individuals banded
together along organizational lines for the purpose of
accomplishing a certain goal."
Cohesion is the "glue" that brings people together to make
a team. It helps soldiers to develop and sustain their
commitment and resolve to accomplish the unit's mission.
The Army's description of cohesion includes these
elements:
§ Bonding: "The development of strong interpersonal
relationships among soldiers, and between them and
their leaders."
§ Commitment: "Dedication not only to the unit and
what it represents, but to the values and goals of the
nation as well."
§ Resolve: "The shared determination of soldiers and
their leaders to work interdependently to accomplish
the mission, and to sustain this capability over a long
period of time."
Cohesion is dependent on several factors:
§ Common goal
§ People working together.
§ Effective communication
§ Mutual assistance
3-6
The Buddy System
The Army’s Buddy System provides every soldier an
assigned buddy.
Requirements to be a buddy:
§ In IET, only same-gender soldiers will be buddies.
§ If there are non-English-speaking soldiers in a
platoon, they will be paired with English-speaking
buddies who can assist in interpreting instructions.
§ You will be paired based on your strengths that can
complement another’s weaknesses.
Responsibilities of a buddy:
§ Inform your buddy where you will be at all times.
§ Pass on information that might affect your buddy.
§ Discuss each day's training and the next day's
activities.
§ Lean on each other for problem solving.
§ Encourage your buddy to successfully complete all
training requirements.
§ Make sure your buddy adheres to appearance and
conduct standards.
§ Inform the drill sergeant of any problems or status
changes in your buddy.
§ Never go anywhere without a buddy.
§ Assist your buddy in living the Army core values.
The soldier’s responsibilities to the unit team:
§ Commitment to the squad, platoon, company, and
unit above self.
3-7
§ Cooperate with peers to accomplish goals.
§ Adopt standards and values of the unit.
LEGAL ACTIONS
Uniform Code of Military Justice
The Uniform Code of Military Justice (UCMJ) is the statute
that prescribes criminal law for soldiers. Non-judicial
punishment by commanders and judicial punishment by
courts-martial (military courts) are authorized by the UCMJ.
In addition to conduct, which would be criminal in the civilian
community, the UCMJ also provides for the punishment of
military offenses. The UCMJ applies to you 24 hours a day,
7 days a week, for as long as you are in the Army. It applies
to you on duty and off duty, in or out of uniform, on and off a
military installation, in the United States and overseas, and
while you are on pass or leave. Military offenses include
failure to repair, absence without leave, disrespect to
noncom missioned officers and commissioned officers, and
disobedience of orders.
The principle that an accused is innocent until proven guilty
applies to both non-judicial punishment and court-martial.
You have the right to be informed of any charges against
you, as well as the names of accusers and known witnesses.
You also have—
§
The right to remain silent. You do not have to say
anything that could be used to convict you. Anything
you say can be used as evidence against you.
§
The right to a military lawyer, unless you wish to hire
a civilian lawyer at your own expense.
§
Protection against double jeopardy. If found innocent
by court-martial, you cannot be tried again by a
court-martial for the same crime.
3-8
§
The right to sentence review. Convictions. in the
military, are automatically reviewed by higher
authority. The sentence cannot be increased but
may be left as it is or decreased.
§
The right to a speedy public trial.
§
The right to call witnesses favorable to you.
§
The right to an interpreter if you do not fully
understand the English language.
§
The right—if you are an enlisted person—to have at
least one-third enlisted court members.
§
The right to be tried by a military judge alone rather
than by a court-martial panel, unless the case is tried
as a capital offense. If the soldier does not elect trial
by military judge, a trial with members will
automatically be afforded the soldier.
Article 15. Article 15 of the Uniform Code of Military Justice
(UCMJ) is a form of non-judicial punishment that can be
imposed by a commanding officer for a relatively minor
offense. An Article 15 can be imposed upon any soldier who
does not demand a court-martial. Enlisted personnel are
notified in writing of any punishment administered under
Article 15.
There are two types of Article 15 proceedings: summarized
and formal. A summarized proceeding may be used for very
minor misconduct, the punishment for which should not
exceed an oral reprimand, extra duty, restriction for 14 days,
or any combination of these punishments. The maximum
punishments for a soldier grade E4 and below by a company
or field grade commander during a formal proceeding are
given in Figure 4-1.
There are three types of courts-martial: summary, special,
and general. Trials by courts-martial are the military
equivalents of trials by judges and juries.
3-9
COMPANY GRADE
COMMANDER ISSUES
ONE OF THE
FOLLOWING:
Admonition or reprimand
and restriction for 14 days
Extra duties for 14 days
Correctional custody for
7 days and forfeiture of
7 days' pay
FIELD GRADE
COMMANDER ISSUES
ONE OF THE
FOLLOWING:
Admonition or reprimand
and restriction for 60 days
Extra duties for 14 days
Correctional custody for
30 days and forfeiture of
1/2 month's pay for 2
months
Reduction in grade of one
Reduction in grade of one
grade
or more grades
Note: Restriction and extra duty may be combined, but
the total may not exceed the maximum allowed for extra
duty.
Figure 4-1. Maximum punishments for grade E4 and
below.
Summary Court-Martial. One active duty commissioned
officer comprises this court. Their purposes is to thoroughly
and impartially inquire into minor offenses and to make sure
that justice is done, with the interests of both the government
and the accused being safeguarded. Only enlisted personnel
may be tried by summary court-martial. Anyone subject to
summary court-martial may refuse to be tried by summary
court-martial. Whether an offense is minor depends on
several factors, including the nature and circumstances of
the offense. Age, rank, duty assignment, record, and
experience of the accused are also considered. The
maximum punishment that can be given by a summary
court-martial to a soldier pay grade E4 or below is—
§
Confinement at hard labor for one month.
§
Forfeiture of two-thirds of a month's pay for one
month.
3-10
§
Reduction to the lowest enlisted grade.
Special Court-Martial. This court consists of a military judge
and not less than three members. It is held for relatively
serious offenses. The maximum punishment that can be
given by a special court-martial is—
§
Confinement at hard labor for six months.
§
Forfeiture of two-thirds of a month's pay for six
months.
§
Reduction to the lowest enlisted grade.
Some special courts-martial are empowered to rule on a Bad
Conduct Discharge. This punitive discharge deprives a
soldier of many veterans' benefits.
General Court-Martial. This court consists of a military
judge and not less than five members. It is held for serious
offenses. A general court-martial may impose the death
penalty in certain cases.
Legal Assistance
You and your dependents are eligible to receive military
legal assistance. You can get most of the legal services
you could get from a civilian attorney, except appearance in
a civilian court. Among the available services are—
§
Advice and assistance with personal problems of a
civil nature, such as marriage, divorce, adoption, civil
damage actions, insurance, indebtedness, and
contracts.
§
Advice on tax matters and forms.
§
Preparation of wills and powers of attorney.
§
Notary public services.
§
Advice concerning sale or lease of real property.
3-11
§
Assistance in obtaining applications for certificates of
citizenship and naturalization.
You can get legal assistance by making an appointment at
the Staff Judge Advocate's Office.
COMPLY WITH PROVISIONS OF THE
UNIFORM CODE OF MILITARY JUSTICE (UCMJ)
Violations of the UCMJ can result in serious penalties. It is
important that you familiarize yourself with the UCMJ and
conduct yourself in accordance with its standards. The
following are some examples of offenses and punishment
for the offense.
Fraternization: It has been a long-established military
custom that officers will not associate with enlisted persons
on terms of military equality. Such associations commonly
are defined as fraternization and have been punishable by
court-martial. Fraternization is easier to describe than it is
to define, and it is seldom the subject that commands
attention unless it occurs along with some other criminal
offense. Nevertheless, the President expressly has
forbidden fraternization between officers and enlisted
personnel and between drill sergeants, NCOs, and
soldiers. As a matter of loyalty to the Army and your unit,
you have the responsibility to avoid fraternization, or even
the appearance of fraternization.
Larceny: Larceny involves wrongfully taking, obtaining, or
withholding money, personal property, or articles of value
from the owner or any other person.
The maximum punishment is as follows:
1. Bad-conduct discharge, forfeiture of all pay and
allowances, and confinement for 1 year for stealing military
property valued at $100 or less.
3-12
2. Bad-conduct discharge, forfeiture of all pay and
allowances, and confinement for 6 months for stealing
property other than military property valued at $100 or less.
3. Dishonorable discharge, forfeiture of all pay and
allowances, and confinement for 10 years for stealing
military property valued at more than $100, or stealing any
military motor vehicle, aircraft, vessel, firearm, or explosive.
Robbery: Robbery involves taking anything of value from
someone against his or her will, by means of force or
violence, or by threatening immediate or future injury of the
victim or someone else.
Maximum punishment for robbery:
§ Dishonorable discharge, forfeiture of all pay and
allowances, and confinement for 15 years if crime is
committed with a firearm.
§ Dishonorable discharge, forfeiture of all pay and
allowances, and confinement of 10 years for all other
cases.
Homosexual Conduct is grounds for dismissal from the
Armed Forces.
Sexual orientation is a personal and private matter and is
not a bar to service, unless there is homosexual conduct.
The Army defines homosexual conduct in terms of
Statement, Act, and Marriage (SAM).
1. A statement by a soldier that demonstrates a propensity
to engage in homosexual acts, a homosexual marriage, or
attempted homosexual marriage.
2. Any bodily contact, actively undertaken or passively
permitted, between persons of the same sex for the
purpose of satisfying sexual desires, and any bodily contact
that a reasonable person would understand to demonstrate
a propensity or intent to engage in a homosexual act.
3-13
3. A marriage or attempted marriage to a person of the
same sex.
It is not Army policy to pry into the personal lives of its
soldiers or to seek out homosexuals. The mere suspicion
that someone is homosexual is not sufficient reason to
discharge a soldier. The soldier needs to do or say
something that constitutes a homosexual act. Saying you
are a homosexual in order to evade your military obligation
is also illegal. You should not engage in any "witch hunts"
to expose homosexuals, or you may be the one who gets in
trouble instead of those whom you suspect. Have respect
for all soldiers and their right to privacy.
Depending on the circumstances, discharge "under other
than honorable conditions" or court-martial may be
appropriate if the soldier attempts, solicits, or commits a
homosexual act.
Laws and Regulations Governing Sexual Conduct
The following is a summary of the laws and regulations that
govern sexual conduct in the military.
Rape—Article 120
• A summary of the elements of rape is that the
accused had sexual intercourse by force, without
consent of victim.
§ The maximum punishment for rape is death.
Cruelty and Maltreatment—Article 93
§ A summary of the elements of cruelty and maltreatment is that the victim was subject to the orders of the
accused and that the accused was cruel toward,
oppressed, or maltreated the victim.
§ The maximum punishment is a 1-year confinement.
3-14
Assault with Intent to Commit Rape or Sodomy
§ The accused assaulted a person and intended to
commit rape or sodomy.
§ The maximum punishment for assault with intent to
commit rape is 20 years confinement. Assault with
intent to commit sodomy has a maximum punishment
of 10 years confinement.
Indecent Assault
§ The accused assaulted a person who is not his or her
spouse with the intent to gratify his or her lust or
sexual desires.
§ The maximum punishment is 5 years confinement.
Indecent Acts
§ The accused committed an indecent act with another
person.
§ The maximum punishment is 5 years confinement.
Indecent Language
§ The accused orally or in writing communicated
indecent language to another person,
§ The maximum punishment is 2 years confinement, if
indecent language is spoken to a child under the age
of 16 years; otherwise, the punishment is 6 months
confinement and a bad-conduct discharge.
Indecent Exposure
§ The accused exposed a certain part of his or her body
to public view in an indecent manner, and the
exposure was willful and wrongful.
§ The maximum punishment is 6 months confinement
and a bad-conduct discharge.
3-15
Adultery
§ The accused wrongfully had sexual intercourse with a
person, and either the accused or the other person
was married to someone else.
§ The maximum punishment is a 1-year confinement.
Prostitution
§ The accused had sexual intercourse with another
person who was not his or her spouse, and the
accused did so for money or other compensation.
§ The maximum punishment is a 1-year confinement.
Pandering
§ The accused wrongfully arranged for or enticed a
person to have sexual intercourse or sodomy with
another person.
Offenses Related to AIDS
§ The maximum punishment is 5 years confinement.
Army policy requires the commander to order a soldier that
has the HIV virus to inform any sexual partners of the
soldier's infection before engaging in intimate sexual
behavior, and to use condoms if the soldier engages in
sexual intercourse with a person other than his or her
spouse. (See AR 600-110, paragraph 2-17.)
Violation of this so-called "safe-sex" order is the crime of
willfully disobeying a superior commissioned officer under
Article 90, UCMJ.
The maximum punishment is 5 years confinement.
STANDARDS OF CONDUCT/JOINT ETHICS
REGULATIONS
As guardians of the public trust, soldiers are required to
place loyalty to the Constitution, laws, and standards of
3-16
ethical conduct above any personal gain. This ensures that
the public, as well as your fellow soldiers, will have
confidence in the integrity of the Army. To help you
understand the standards of ethical conduct you are
required to follow, the following examples illustrate both
proper and improper conduct.
Government property and personnel may be used only for
government purposes. For example, it would be wrong for
you to use an Army truck to move your brother in to a new
apartment, or require your subordinates to repair the roof of
the church you attend. It also would be wrong to use a
government telephone to make a personal long-distance
call, unless you use your personal calling card to pay for it.
Furthermore, you are required to notify your superior or the
Inspector General if you know of any fraud, waste, or
abuse of government property or personnel.
Soldiers will not be required or pressured to donate money
to buy a gift for a superior who, for example, is sick, being
reassigned, or retiring.
It is improper to misuse your official position for yourself,
your friends, family, or business associates. For example,
you may not require a subordinate to polish your boots, and
a superior may not ask you to buy cookies from his
daughter or insurance he sells in his spare time. It is also
improper for anyone to require or pressure you to join the
enlisted club or some private organization. However, it is
okay for someone, even a superior, to tell you about the
benefits of joining a club or private organization, as long as
he or she makes it clear you are free to join or not to join,
and that you will not be punished if you choose not to join.
All soldiers are required to be impartial in their official
dealings with others. You may not expect preferential
treatment from a superior, such as a 3-day pass you are
not entitled to, because you were buddies in high school.
Likewise, you may not favor subordinates by removing
3-17
them from the duty roster because they bought cookies
from your daughter or insurance from you.
Finally, all soldiers are expected to avoid creating even the
appearance of violating the law or ethical standards. If you
are not sure about something, you should seek the advice
of your superior or the local ethics counselor at your Staff
Judge Advocate's office.
ARMY'S EQUAL OPPORTUNITY AND
PREVENTION OF SEXUAL HARASSMENT
POLICIES AND PROGRAMS
Equal Opportunity Policy
The policy of the US Army (contained Chapter 6, AR 60020, Army Command Policy) is to provide equal opportunity
and treatment for soldiers, civilian employees, and their
families, without regard to race, color, religion, gender, or
national origin, and to provide an environment free of
sexual harassment. Soldiers are not assessed, classified,
trained, assigned, promoted, or otherwise managed on the
basis of race, color, religion, gender, or national origin.
Further, it is unlawful for a soldier to be a member of a
racist group or gang.
Equal Opportunity Program Components
To have a successful EO program, a combination of
elements must be in place. These elements include a
strong commitment by leaders to support the program,
sequential and progressive training at all levels, an
effective and responsive complaint system, affirmative
action plans, feedback mechanisms, and equal opportunity
advisors.
Army’s Policy on Sexual Harassment
The policy of the United States Army is that sexual
harassment is unacceptable conduct and will not be
tolerated.
3-18
Behaviors that Constitute Sexual Harassment
§ Verbal Comments: Telling sexual jokes; using
profanity, off-color sexual comments, or threats; or
barking, growling, oinking, and whistling at passersby.
§ Nonverbal Gestures: Leering, ogling (giving the
person "the eye" or "once over"), blowing kisses,
licking lips, or winking.
§ Printed Material: Distributing or posting sexually
oriented notes, letters, faxes, or computer mail.
§ Physical Contact: Touching, patting,
pinching, grabbing, cornering, or kissing.
hugging,
Suggested Individual Actions to Deal
with Sexual Harassment
1. Keep a diary or daily journal.
2. Talk with leaders or coworkers.
3. Use an intermediary spokesperson.
4. Write a letter or memorandum.
5. Confront the harasser.
6. Report the harassment to the chain of command.
The Army's EO Complaint System
Individuals are encouraged to attempt to resolve their
complaints by confronting the alleged offender or by
informing other appropriate officials about the offensive
behavior or other allegations of disparate or unfair
treatment. Individuals are responsible to advise the chain
of command of the specifics of discrimination or sexual
harassment and provide their chain of command an
opportunity to take appropriate action to resolve the
issue(s). All personnel must submit legitimate complaints
3-19
and should exercise caution against frivolous or reckless
allegations, as this can also lead to prosecution.
Informal complaints. An informal complaint is any
complaint not submitted in writing. Informal complaints are
not subject to any timeline suspense, nor are they
reportable to higher headquarters.
Help for Informal Complaints
§ Equal Opportunity Representative (EOR)
§ Adjutant General (AG)
§ EO hotlines
Formal complaints. A formal EO complaint is submitted in
writing using DA Form 7279-R (EO Complaint Form). This
form is available at your unit, selected agencies, and higher
headquarters, or from installation commanders.
Help for Formal Complaints (Alternative Agencies)
§
§
§
§
§
§
§
A higher echelon commander
Equal Opportunity Advisor (EOA)
Chaplain
Staff Judge Advocate (SJA)
Provost Marshal (PM)
Inspector General (IG)
Community Home-Finding Referral and Relocation
Services Office
§ Medical agency personnel
Right to be Heard and Discuss Problems
It is your right to ask advice about personal problems and to
give military authorities recommendations and "just and
honest" complaints or grievances. If you have a personal
problem too large to handle alone or an honest complaint,
see your drill sergeant, first sergeant, and, if necessary your
company com mander. These people will either assist you to
resolve the problem or get you in contact with someone that
3-20
can assist you. Make sure you have all the facts right and
they are all true.
Complaints and requests for assistance may also be made in
person, by phone, or in writing to the inspector general (IG).
The IG is the place to go if no one within the chain of
command has been able to help. During duty hours, see the
first sergeant if you want to visit the IG. You will not be
punished for making an honest complaint.
MAKE AN ETHICAL DECISION
The ethical decision-making process is something we all
have used at one time or another. It is the employment of
this process that allows us to make the choices we do.
1. Interpret the situation.
2. Analyze the factors and forces that relate to the problem.
The factors and forces that relate to the problem include—
§ Laws, orders, and regulations
§ Basic national values
§ Army core values
§ Unit operating values
§ Personal values
§ Institutional pressures
3. Choose the best course of action.
4. Implement the course of action.
Often, the "right" decision is clear. The ethical decisionmaking process is for those times when no clear best
decision can be found.
3-21
REPORT INDICATIONS OF SUICIDAL INTENT
Suicide and dealing with a suicidal person are vital
concerns. It is important that you recognize the warning
signs of a potentially suicidal individual. Suicidal warning
signs, such as the following threats, usually precede either
a suicide or a suicidal attempt:
§ I can’t take it.
§ You won’t have to worry about me.
§ I won’t be a problem to you anymore.
§ I want to go to sleep and never wake up.
§ Everyone would be better off if I were dead.
§ They’ll be sorry when I am gone.
§ I don’t want to live anymore.
§ Soon the pain will be over.
§ I’m going to kill myself.
Personnel you should report suicidal intentions to are:
§ Drill sergeants
§ Chain of command
§ Unit ministry team members (UMT)
§ Chaplains
§ Medical personnel
INSTILL VALUES AND APPRECIATION OF ARMY
HERITAGE AND TRADITIONS
Over the years, many soldiers have served, fought, and
died in defense of the beliefs and values that we hold dear.
This country was built on the dedication of our forefathers
to maintain a standard of freedom that could be passed on
3-22
to all of us. Our forefathers have left us with the rich
heritage full of tradition that makes America what it is
today.
Values
•
Loyalty: Bear true faith and allegiance to the US
Constitution, the Army, your unit, and other soldiers.
§ Duty: Fulfill your obligations.
§ Respect: Treat people as they should be treated.
§ Selfless Service: Put the welfare of the Nation, the
Army, and your subordinates before your own.
§ Honor: Live up to Army values.
§ Integrity: Do what's right, legally and morally.
§ Personal Courage: Face fear, danger, or adversity
(physical or moral).
Heritage and Traditions: The words heritage and tradition
hold important meaning for soldiers. It is through these
words that our modern-day duties have developed. The
why, how, and manner in which we serve in today's Army
can be traced back to the beginnings of this country and
beyond. The Army's heritage includes people, events and
ideas from the past that influence the present.
Tradition is defined as the visible, daily remainders of the
Army's ethic, the need for units to work together, and the
Army's proud heritage. Some traditions are—
21-Gun Salute: The 21-gun salute started with the British.
British naval vessels fired their cannons when entering a
foreign port as a salute or show of respect. Land bases
were expected to fire a large number of volleys to show
their greater respect for the British. There was, however, no
set number. Because of the limited amount of gunpowder a
ship could carry, the British government established a
3-23
seven-volley fire as a suitable number. They did not,
however, feel that seven would be enough for a return
salute. They made it known that land forces were expected
to fire three volleys for every one they fired. Thus, a 21volley salute evolved. It has developed further into the
highest number of firings given in honor of any American. It
is known also as the national salute and the salute to the
flag.
Uniforms: The uniform allows others to gather information
about its wearer without the wearer having to say anything.
The uniform represents the United States of America. The
uniform proclaims you as an American soldier.
§ The shoulder sleeve insignia identifies the unit that
the wearer is a member of.
§ The nametag identifies the wearer of the uniform.
§ Badges identify the skills of the wearer.
§ Ribbons display the individual's accomplishments.
Chevrons: Chevrons (a French word meaning "rafter")
have been used to display rank for quite some time.
Chevrons came into the American Army by way of the West
Point Cadre uniform. Between the years 1821 and 1832,
both officers and enlisted soldiers wore chevrons to
indicate rank. Chevrons have been used to identify the
enlisted ranks exclusively since 1832.
Marching: Soldiers have been marching in cadence since
Alexander the Great. Men marched in step because
fighting formations such as the Phalanx (overlapping
shields and long spears) required it. This ability was lacking
in the American soldier.
General George Washington commissioned Prussian
Officer Baron Friedreich von Steuben to establish drill
movements and regulations for the American Army. Thus,
a sense of alertness, urgency, attention to detail, self-
3-24
discipline, and confidence became part of the American
soldier. Drill is used for these same purposes today in order
to instill discipline and build esprit de corps.
Military Music: The idea of marching in step outside of
battle formation was a Roman innovation. The Romans
found out that soldiers moved with a little more spirit and
efficiency when they marched to a cadence. At first, only
drums were used to keep the marching cadence.
During the Renaissance Period, when the art of war was
revived, military music became art as well, and more and
more, new instruments were added.
Taps: Bugle calls have been used for hundreds of years to
alert troops on the march. Using military calls to direct
soldier movement has been done since ancient times.
General Butterfield, along with the brigade bugler (Oliver
W. Norton) created Taps one night in July of 1862. It was
developed to signal the end of the day's activities. It has
grown to signal much more than that today. It now also
marks the passage of an American fighting man from this
life, symbolizing the end of the combat soldier's struggle.
Hand Salute: It has been a long-established military
custom for juniors to remove their headgear in the
presence of superiors. In the British Army, as late as the
American Revolution, a soldier saluted by removing his hat.
With the advent of cumbersome headgear, which could not
be readily doffed, the act of removing the hat degenerated
into a gesture—grasping the visor. It finally became
conventionalized into something resembling our modern
hand salute. Saluting is one way members of the military
show respect for each other. The salute is a privilege to be
given and to receive.
MANAGING PERSONAL FINANCES
It is your duty as a soldier in the US Army to fulfill your
financial obligations and provide for your family. It will help
3-25
to understand SURE-PAY, saving and checking accounts,
and your Leave and Earnings Statement (LES).
Sure-Pay: The Army requires every new soldier to join the
SURE-PAY program. This requires every soldier to have a
direct deposit to a financial institution before or immediately
upon arrival at the training base. You can have your pay
deposited in a checking or savings account to a bank, a
credit union, or a savings and loan association.
Checking Accounts:
Individual Account: Only one person may write checks
against the account.
Joint Account: More than one person may write checks
against the account. This is recommended for married
soldiers.
Questions to Ask When Opening a Checking Account
1. Can I conduct my business at any of the branches?
2. Will I receive a deposit slip for my SURE-PAY deposit?
3. Will my canceled checks be returned in my monthly
statement?
4. Does a minimum balance have to be maintained?
5. Is there a monthly service charge for maintaining a
checking account?
6. Will my account be federally insured?
7. Can I have access to money after banking hours
(automated teller machine [ATM])?
8. Is there a charge for using the ATM?
9. Is there a charge for each check written?
3-26
Leave and Earning Statement (LES)
The LES is your detailed pay statement issued at the end
of each month. It shows your entitlements, deductions, and
allotments. It also shows your end-of-month pay and where
your pay is being deposited. It is your duty to review the
LES and ensure the information is correct. If you find an
error, report it to the finance office immediately.
The Consequences of Writing a Dishonored Check
Your bank and the institution to which the check was
written may each assess a service charge, sometimes as
much as $15.00, or higher.
Your reputation and credit rating may be damaged. If your
credit rating is damaged, it will cost you more to get credit,
if you can get it at all.
You will be counseled by your chain of command.
You may be added to the dishonored (bad check) list on
post.
Your check-cashing privileges may be suspended on post
for six months, a year, or indefinitely.
You may be
commander.
reprimanded
by
your
supervisor
or
You may be given a bad efficiency report, be reduced in
rank, receive a court-martial, be barred from reenlistment,
or be separated from the Army.
RAPE PREVENTION
Substantiated rape occurs in the United States every 5
minutes; in the Army, a rape occurs about every 71 hours.
More times than not, the assailant is someone known to the
victim, and the act can occur in the context of a
relationship. Rape can happen to anyone, but the National
Crime Survey data indicate that women between the ages
3-27
of 16 and 24 are most vulnerable. Your best defense is to
eliminate the opportunity of being attacked. Follow these
routine precautions:
§ Report any unauthorized males or females in the
barracks.
§ Don’t dress in view of a window.
§ Know where the phone is located.
§ Use the buddy system.
§ Be aware of what is going on around you.
§ Don’t get into compromising situations, such as
having your friends leave you alone at a social
occasion.
§ If you must go outdoors when it's dark, walk only in
lighted areas and use the buddy system. Avoid areas
where there are few people.
§ Walk in the middle of the sidewalk.
§ Buy time with talk. This may make the person
change his or her mind, or provide enough time for
help to arrive.
§ If you are in trouble, attract help any way you can.
Scream, yell for help, yell “fire,” or break a window in
a house where you think someone is home.
§ Report the misconduct, so it might not happen to
another.
§ Don’t let anyone intimidate you into having sex.
Report such intimidation immediately.
Victim Responsibilities
It is estimated that only 45 percent of all rape cases are
reported. Some of the reasons for not reporting are
embarrassment, a desire to keep it a secret, fear, and a
3-28
lack of confidence in the police and justice system. As a
victim, you may feel reluctant to report the incident. In spite
of your precautions, it is your duty as a soldier to take the
proper actions. It is your responsibility to—
§ Go to a safe place where a phone is available.
§ Call the local or military police.
§ Not shower, douche, change clothes, or straighten up
the site. You might destroy evidence.
§ Go directly, if you prefer, to a hospital or clinic and
have the police notified. Take a change of clothes
with you; the clothing you wore at the time of the
assault may be evidence.
§ Call a friend, a rape hot line, or Social Services. If a
support person is not provided, request one.
Assistance Responsibilities
It is every soldier’s duty to look out for his or her fellow
soldier. If you are ever in a position to assist someone who
has been sexually assaulted, do what you can, recognizing
your limitations. Here are some guidelines to follow when
assisting a victim:
§ Listen to what the victim has to say and sympathize
with his or her pain.
§ Don’t ask what the victim did to cause this to happen,
and don’t ask why he or she didn’t do something
differently.
§ Support his or her decision and efforts to report the
crime.
§ Encourage him or her to talk to a professional
counselor.
3-29
MAINTAIN SPIRITUAL, EMOTIONAL, AND MENTAL
FITNESS
Spiritual Fitness: In maintaining your spiritual fitness, you
must do what you feel is correct in order to keep your
beliefs, and respect others and their beliefs.
Beliefs fall into three categories: cultural, personal, and
religious (spiritual).
§ Cultural beliefs are those you obtain from your family
and society.
§ Personal beliefs are those you yourself form about
things.
§ Religious beliefs are those you obtain through the
type of faith you practice.
Emotional Fitness: Maintain emotional fitness by
balancing positive and negative emotions. Emotions can
include feelings of joy, sorrow, love, hate, and fear. As
soldiers, you encounter many situations that will affect you
emotionally.
Some examples of these situations are—
§ Losing a friend, loved one, or fellow soldier (sorrow).
§ Being promoted to the next rank/grade (joy).
§ Participating in armed conflict (fear).
§ Feeling a sense of camaraderie with your fellow
soldiers (happiness).
§ Feeling affection for your newborn child (love).
Positive emotions are those that cause you to maintain
balance in your life. Balance is the ability to display the
appropriate emotion for the situation, and to understand
and read the emotional state of others. Positive emotions
have a natural calming effect on the mind. When these
emotions are in control, you can handle situations with
relative ease, and stress levels are usually at their lowest.
3-30
Negative emotions are those that cause you to become
emotionally unbalanced. Emotional unbalance occurs
when you are unable to continue to maintain self-control in
a situation, or when you lose the ability to read the
emotions of others.
Maintaining your emotional fitness is a three-step process:
§ Recognize and understand the emotions you are
experiencing.
§ Think about your options.
§ Respond to them using the Army core values as your
guide.
Mental Fitness: Mental fitness refers to psychological well
being and satisfactory adjustment to society and the
ordinary demands of life. The following attributes are
needed in order to maintain good mental fitness:
§ Will
§ Self-discipline
§ Initiative
§ Judgment
§ Confidence
§ Intelligence
§ Cultural awareness
EXHIBIT PROPER SOLDIER BEHAVIOR
The Army family lives by the Army Values and Ethics, and
the Army expects you to also adopt these. Your supervisor
and fellow soldiers expect you to show them what you
know about these values every day and every time you
perform your duties.
3-31
The Soldier's Code
§ I am an American soldier—a protector of the greatest
nation on earth—sworn to uphold the Constitution of
the United States.
§ I will treat others with dignity and respect and expect
others to do the same.
§ I will honor my country, the Army, my unit, and my
fellow soldiers by living the Army values.
§ No matter what situation I am in, I will never do
anything for pleasure, profit, or personal safety, which
will disgrace my uniform, my unit, or my country.
§ Lastly, I am proud of my country and its flag. I want to
look back and say that I am proud to have served my
country as a soldier.
Army Core Values
§ Loyalty: Bear true faith and allegiance to the US
Constitution, the Army, your unit, and other soldiers.
§ Duty: Fulfill your obligations.
§ Respect: Treat people as they should be treated.
§ Selfless Service: Put the welfare of the Nation, the
Army, and your subordinates before your own.
§ Honor: Live up to Army values.
§ Integrity: Do what's right, legally and morally.
§ Personal Courage: Face fear, danger, or adversity
(physical or moral).
CODE OF CONDUCT
President Dwight Eisenhower in Executive Order 10631
published the Code of Conduct in 1955. President Jimmy
Carter amended it in 1977. It outlines the basic
responsibilities and obligations of all members of the armed
forces of the United States. It is based on time-honored
3-32
concepts and traditions that date back to the American
Revolution. The code will give you strength in the event you
fall into the hands of the enemy. It will guide your conduct
and it may save your life.
CODE OF CONDUCT
For Members of the Armed Forces of the United States
1. I am an American, fighting in the forces which guard my
country and our way of life. I am prepared to give my life in
their defense.
2. I will never surrender of my own free will. If in command,
I will never surrender the members of my command while
they still have the means to resist.
3. If I am captured, I will continue to resist by all means
available. I will make every effort to escape and aid others
to escape. I will accept neither parole nor special favors
from the enemy.
4. If I become a prisoner of war, I will keep faith with my
fellow prisoners. I will give no information or take part in
any action that might be harmful to my comrades. If I am
senior, I will take command. If not, I will obey the lawful
order of those appointed over me and will back them up in
every way.
5. When questioned, should I become a prisoner of war, I
am required to give name, rank, service number, and date
of birth. I will evade answering further questions to the
utmost of my ability. I will make no oral or written
statements disloyal to my country and its allies or harmful
to their cause.
6. I will never forget that I am an American, fighting for
freedom, responsible for my actions, and dedicated to the
principles that made my country free. I will trust in my God
and in the United States of America.
3-33
STANDARDS OF CONDUCT
Ethical Conduct
As guardians of the public trust, soldiers are required to
place loyalty to the Constitution, laws, and standards of
ethical conduct above any personal gain. This ensures that
the public, as well as your fellow soldiers, will have
confidence in the integrity of the Army. To help you
understand the standards of ethical conduct you must
adhere to, each of the following examples illustrate both
proper and improper conduct:
Misuse of Government Property and Personnel.
Government property and personnel can be used only for
government purposes. For example, it would be wrong for
you to type a personal letter on a government computer;
take pens and paper bought by the Army and give them to
your children to play with; use an Army truck to move your
brother into a new apartment; or require your subordinates
to repair the roof of the church you attend. It also would be
wrong to use a government telephone to make a personal
long distance call, unless you use your personal calling
card to pay for it. Further, you are required to notify your
superior or the Inspector General if you know of any fraud,
waste, or abuse of government property or personnel.
Pressure to Contribute. Soldiers cannot be required or
pressured to donate money to buy a gift for a superior who,
for example, is sick, being reassigned, or retiring. However,
it is proper for someone to ask you to make a small
contribution, such as $5, for a gift to a superior, so long as
it is made clear that you are free to contribute less or
nothing at all. It is also proper for someone to distribute an
announcement of a party for a superior who is leaving, and
include a small amount for a departure gift in the fee for the
party. Also, for example, you can take flowers to your
superior's house when you and your spouse are invited
3-34
over for a cookout, but it would be wrong for your superior
to require or pressure you to bring flowers.
Abuse of Authority. It is improper to misuse your official
position for yourself or others. You cannot require a
subordinate to polish your boots, and superiors cannot ask
you to buy cookies their children are selling or products
they sell in their spare time such as insurance. It is also
improper for anyone to require or pressure you to join the
enlisted club or a private organization. However, it is proper
for someone, even a superior, to tell you about the benefits
of joining a club or private organization, so long as they
make it clear that you are free to join or not join as you
desire and that you will not be punished if you choose not
to join.
Preferential Treatment. All soldiers are required to be
impartial in their official dealings with others. You cannot
expect preferential treatment from a superior, such as a 3day pass you are not entitled to, because you were buddies
in high school. Likewise, you cannot favor a subordinate by
removing him from the duty roster because he bought
cookies from your daughter or insurance from you.
Violation of Laws and Ethics. All soldiers are expected to
avoid creating even the appearance of violating the law or
ethical standards. If you are not sure about something,
seek the advice of your superior or ask the ethics counselor
at your local Staff Advocate's office.
Conduct On and Off Duty
As a soldier, you have accepted a solemn obligation: to
defend the ideals of freedom, justice, truth, and equality
found in the Declaration of Independence and the United
States Constitution. Whether you are serving a single term
or making a career of the military, your actions should
never be contrary to the ideals and principles upon which
this nation was founded.
3-35
Because you have special responsibilities as a member of
the armed forces, special standards govern your conduct
whether you are on or off duty. You are subject to the
Uniform Code of Military Justice (UCMJ) as well as to the
laws governing other citizens and residents of the United
States.
You are expected and encouraged to carry out your
obligations as a private citizen. It is hoped that you will
register, vote, and express your personal opinions on
political candidates and issues.
So that the military remains free of involvement with any
particular political party, your political activities are
somewhat restricted while you are on active duty. You may
not, for instance, take part in partisan political campaigns or
conventions. You may take part in political rallies or
meetings or in public demonstrations provided you do not
wear your uniform or participate during duty hours. You
must make sure that people do not think you are
representing the Army at any of these activities.
3-36
CHAPTER 4: SELECTED COMMON TASK
Section I: Communications
Communicate By A Tactical Radio
113-305-1001
Conditions: Given an operational radio (SINCGARS,
MSRT, VRC-12 series, etc.), with a SOI, KYK-13 with TEK
and fill cable, ACP 125(E) (and U.S. Supplement-1),
appropriate technical manuals and an operational distant
station.
Standards: Established voice communications with the
distant tactical radio/network, within 3 minutes.
Performance Steps
1.Collect references, resources and assembled MANPACK.
2.Place radio into operation.
3.Enter Net.
4.Transmit message.
Evaluation Preparation: Provide the soldier with the all of
the resource material listed in the conditions statement.
Brief Soldier: Tell the soldier that he or she will be required
to establish voice communications with the distant tactical
radio/network, within 3 minutes. The 3 minute time limit is
only an administrative training requirement.
Performance Measures
Results
1.Collected references, resources and
assembled MANPACK
GO / NO GO
4-1
Performance Measures
Results
2. Placed radio into operation
a.Preset controls.
b.Turned CB1 on MANPACK to "ON".
c.Tested Radio Transmission (RT)
circuits.
d.Tested transmitter.
e.Set battery life condition.
3. Entered Net
a.Loaded Traffic Encryption Key (TEK).
b.Hopset
c.Operated radio.
4. Transmitted message
a.Established secure Single Channel
communications.
b.Used
prowords,
call
signs,
frequencies,
item
numbers
and
authentication.
GO / NO GO
GO / NO GO
GO / NO GO
Evaluation Guidance: Score the soldier GO if all
performance measures are passed. Score the soldier NO
GO if any performance measure is failed. If the soldier
scores NO GO, show the soldier what was done wrong and
how to do it correctly.
References
Required
ACP 125 (E)
ACP 125 U.S. Suppl-1
(Computer Based Training)
FM 24-18
FM 24-19
TM 11-5820-401-10-1-HR
TM 11-5820-890-10-1
TM 11-5820-890-10-8
4-2
Related
Section II: Navigation
Navigate From One Point On The Ground To Another
Point While Dismounted
071-329-1006
Conditions: Given a standard 1:50,000 scale military map
of the area, a coordinate scale and protractor, compass,
and pencil and paper.
Standards : Move on foot from the start point to the correct
destination or objective by the most advantageous route to
negotiate based on the terrain and the tactical situation.
Performance Steps
1. Identify topographic symbols on a military map.
a.Identify the six basic colors on a military map (black,
blue, brown, green, red, and red-brown).
b.Identify the symbols used on a military map to represent
physical features, such as physical surroundings or objects.
c.Identify the marginal information found on the legend.
(1)Marginal information at the top of the map sheet
(2)Marginal information at the bottom of the map sheet.
2. Identify the five major and three minor terrain features on
a military map.
a.Major terrain features are hills, ridges, valleys, saddles,
and depressions.
b.Minor terrain features are draws, spurs, and cliffs
3.Determine grid coordinates for the point on the map.
a.Locate the grid square in which the point is located.
b.Determine a six-digit grid coordinate.
A six-digit
coordinate will locate a point on the ground within 100
meters.
c.Determine an eight-digit grid coordinate. An eight digitgrid coordinate will locate a point on the ground to within 10
meters.
d.Record the grid coordinates with the correct two-letter
100,000-meter- square identifier.
4-3
Performance Steps
4.Measure distance on a map.
a.Identify the scale of the map. The map scale is the ratio
(1:50,000) of the distance on map (1 inch) compared to the
distance on the ground (usually 50,000 inches).
b.Convert a straight-line map distance to miles, meters or
yards using the map's bar scale.
c.Convert a road map distance to miles, meters or yards
using the map's bar scale.
5. Determine a grid azimuth using a protractor.
a.Locate your points on the map and the north-south grid
lines. Position the coordinate scale of the protractor and
read the azimuth in degrees or mils.
b.Azimuths are given in degrees or mils in a clockwise
direction from north, and all azimuths taken from the map
are grid azimuths.
6. Convert a magnetic azimuth to a grid azimuth and a grid
azimuth to magnetic azimuth.
a.Convert azimuths that have an easterly G-M angle. To
convert a magnetic azimuth to a grid azimuth, add the value
of the G-M angle to the magnetic azimuth. To convert a grid
azimuth, subtract the G-M angle from the grid azimuth.
b.Convert azimuths that have a westerly G-M angle. To
convert a magnetic azimuth to a grid azimuth, subtract the
value of the G-M angle from the magnetic azimuth. To
convert a grid azimuth to a magnetic azimuth, add the value
of the G-M angle to the grid azimuth.
4-4
Performance Steps
7. Locate an unknown point on a map and on the ground by
intersection.
a.Use the map and compass method. Determine the G-M
angle of the map you are using. Locate and mark your
position on the map. Convert the magnetic azimuth to a grid
azimuth. Place the protractor on the map and draw a line
from your position on the map along this grid azimuth. Move
to a second location and repeat these steps.
b.Use the straightedge method. Locate and mark your
position on the map. Lay a straightedge on the map with
one end at your position as a pivot point, and rotate the
straightedge until unknown point is sighted along the edge.
Draw a line along the straightedge.
8. Locate an unknown point on a map and on the ground by
resection.
a.Using the map and compass method. Determine the GM angle of the map you are using. Locate two known
positions on the ground and mark them on the map.
Measure the magnetic azimuth to one of the known
locations and change it to a grid azimuth. If it is a westerly
G-M angle subtract it, if easterly add the degrees to
magnetic azimuth.
b.Change this grid azimuth to a back azimuth and place
the protractor on the map. Place a tick mark at the degrees
you want to plot. Draw a line on the map from this position
on the grid back azimuth that you found in the direction of
your unknown position.
c. Repeat the above steps from a second position.
d. Perform resection without the use of a compass.
Orient your map as closely as you can. Look for some
terrain feature that you can find on the map. Put a
straightedge on the map and place it next to the feature on
the map. Then align the straightedge so it points directly at
the real feature and draw a line along the straightedge.
4-5
Performance Steps
Find another feature, such as a road junction and do the
same thing. Draw another line along the straightedge and
where the lines cross is your location.
e.To perform a modified resection you must be located on
a linear feature such as a road or stream. First orient your
map, then find some feature that you can also find on the
map. Put a straightedge through the feature on the map
and align the straightedge so that it points directly at the real
terrain feature. Draw a line along the straightedge. The
point where the line crosses the linear feature you are on is
your location.
9. Compute back azimuths to degrees or mils.
a.To determine a back azimuth using degrees you add
180 degrees if your azimuth is less than 180 degrees. If
your azimuth is more than 180 you subtract 180 degrees.
b.To determine a back azimuth using mils you add 3200
mils if your azimuth is less than 3200 mils. If your azimuth is
more than 3200 you subtract 3200 mils.
10.Determine a magnetic azimuth with a lensatic compass.
a. The floating dial is used to determine the direction in
which you are pointing your compass. The outer, black ring
of numbers and tick marks is used for finding direction in
mils. The inner, red ring of numbers and tick marks is used
for finding direction in degrees.
b. There are 360 degrees or 6400 mils in a circle. These
are marked with a tick mark every 5 degrees or 20 mils.
However, not every tick mark is numbered. You will have to
determine the number for these lines using the numbers that
are shown.
c. Use your compass to determine or follow an azimuth.
The arrow on the compass points toward magnetic north.
Any mass of metal; for example, a truck, your rifle, your
helmet, and even electrical power lines also attract the
arrow. Thus, be sure you use your compass away from
metal objects so it will not give a wrong reading.
4-6
Performance Steps
d.Use the compass-to-cheek method or the center-hold
method to determine your azimuth.
11. Determine the elevation of a point on the ground using a
map.
a.Determine the contour interval for your map.
b.Determine the elevation of a point to within half the
value of the contour interval.
12.Orient a map using a lensatic compass.
a.Determine if the G-M angle exceeds 3 degrees. If the
G-M angle is less than 3 degrees do not line up the north
arrow.
b.Align the side of the compass with a north-south grid
line and orient the map.
13.Orient a map to the ground by map-terrain association.
a.Match terrain e
f atures appearing on your map with
physical features on the ground.
b.Check orientations obtained by this method by placing a
compass along one of the north-south grid lines to keep
from orienting the map in the wrong direction (that is, 180
degrees out) or by aligning two or more features. Ensure
you incorporate the declination constant.
14.To determine your location on the ground by terrain
association:
a. Determine the type of terrain feature upon which you
are located.
b. Determine what types of terrain features surround your
location.
c. Orient your map.
d. Determine the four cardinal directions (North, South,
East, and West).
e. Determine your location.
4-7
Performance Steps
15.Select a movement route using a map. Your route must:
a.Take advantage of maximum cover and concealment.
b.Ensure observation and fields of fire for the overwatch
or fire support elements.
c.Allow positive control of all elements.
d.Accomplish the mission quickly without unnecessary or
prolonged exposure to enemy fire.
Evaluation Preparation: Select an area with varying terrain
& veg that is large enough to have two points, 1,000 to
2,000 meters apart. Each point will be on or near an
identifiable terrain feature & will be marked on the ground
with a sign containing a letter or number. Dummy signs
should be placed not less than 100 meters nor more than
200 meters to the left or right of the correct point. Clearly
mark all correct points on the map. Prepare a sheet of
paper giving the azimuth & distance for each leg of the
course to be covered. Have pencils for the tested soldier
Brief Soldier: Terrain association. Give the soldier the map
& tell him or her to identify the best route to take between
the two points that have been plotted on the map (1,000 to
2,000 meters apart). Note: The best route must be
determined by a SME before the test. Give the soldier the
map & tell him or her that he or she must move from point
A plotted on the map to point B (1,000 to 2,000 meters
apart ) using terrain association (no compass will be used).
Tell the soldier he or she has _ time to complete the
course. Dead reckoning. Give the soldier the sheet of
paper with the azimuth & the distance for each leg of the
course (three to five points, 200 - 500 meters apart), & the
compass (no map will be used). Tell the soldier to move
over the course shown by the azimuth & the distance on
the paper. Tell the soldier to record the letter or number at
the end of each leg of the course. Tell the soldier he or she
has _ time to complete the course. NOTE: Time standards
will be based on the average time it takes two SME to
4-8
complete the course plus 50 percent, exp: SME time, 1 hr.
1 hr added to 50% = course test Time of 1 hr 30 min.
Soldiers being tested will be given 10 min to study the map
& to determine their course of action. At the end of this test
time, the soldier will move to the start point & begin the
test. Time will start when soldiers leave the start point &
end when the finish point is crossed.
Performance Measures
Results
1.Terrain association.
a.Best route - Identified the best route
within 10 minutes and explained reason
for picking that route.
b.Wrote down the correct letter or
number at the end of each leg of the
course.
c.Arrived at correct destination within
the specified time.
2. Dead reckoning.
a.Wrote down the correct letter or
number of each leg of the course.
b.Arrived at correct destination within
the specified time.
GO / NO GO
GO / NO GO
Evaluation Guidance: Score the soldier GO if all
performance measures are passed. Score the soldier NO
GO if any performance measure is failed. If the soldier
scores NO GO, show what was done wrong and how to do
it correctly.
References
Required
Related
FM 21-26
4-9
Section III: Weapons
Operate an M16A1/M16A2 Rifle
071-990-0002
Conditions: Given an M16A1 or M16A2 rifle, M16
magazines with 5.56-mm ammunition, and a requirement to
use the rifle to place fire on targets in a tactical situation.
Standards: Load, unload, and fire the rifle as required to
zero and place effective fire on targets.
Use the
appropriate firing technique when delivering fire on targets
under various conditions. Correct malfunctions when they
occur so that the weapon continues to function correctly.
Performance Steps
1. Load the rifle.
a. Load the M16A1 rifle or the M16A2 rifle for
semiautomatic fire and the M16A1 rifle for automatic fire.
(1) Point the rifle muzzle in a safe direction.
(2) Cock the rifle to open the bolt and return the
charging handle to the forward position.
(3) Place the selector lever on SAFE.
(4) Check the chamber to ensure it is clear.
(5) Insert the magazine, pushing it upward until the
magazine catch engages and holds the magazine.
(6) Tap upward on the bottom of the magazine to
ensure it is seated.
b. Load the M16A2 rifle for burst fire.
(1) Point the rifle muzzle in a safe direction.
(2) Cock the rifle to open the bolt and return the
charging handle to the forward position.
(3) Check the chamber to ensure it is clear.
(4) Place the selector lever in the BURST position.
(5) Pull the trigger, holding it in the rear position.
4-10
Performance Steps
(6) Pull the charging handle to the rear and release it.
(7) Repeat the step 1.b.(6) above, three times.
(8) Pull the charging handle to the rear, holding it in
place, and release the trigger.
(9) Push in on the bottom portion of the bolt catch,
locking the bolt in the rear position.
(10) Slide the charging handle all the way forward.
(11) Place the selector on SAFE.
(12) Insert the magazine, pushing it upward until the
magazine catch engages and holds the magazine.
(13) Tap upward on the bottom of the magazine to
ensure it is seated.
c. Chamber a round.
(1) With the bolt open:
(a) Depress the upper portion of the bolt catch to
release the bolt.
(b) Tap the forward assist to ensure that the bolt is
fully forward and locked.
WARNING: The Rifle Is Loaded. Keep It Pointed In A
Safe Direction.
(c) Place the selector lever on SAFE.
(d) Close the ejection port cover if the rifle is not to
be fired immediately
(2) With the bolt closed:
(a) Pull the charging handle to the rear as far as it
will go.
(b)Release the charging handle. Do not ride the
charging handle; allow it to return on its own.
(c) Tap the forward assist to ensure the bolt is fully
forward and locked.
WARNING: The Rifle Is Loaded. Keep It Pointed In A
Safe Direction.
4-11
Performance Steps
(d) Place the selector lever on SAFE.
(e) Close the ejection port cover if the rifle is not to
be fired immediately.
2. Unload the rifle.
a. Point the muzzle in a safe direction.
b. Place the selector lever on SAFE.
c. Remove the magazine from the rifle.
Note: The selector lever cannot be turned to SAFE unless
the rifle is cocked.
d. Lock the bolt open.
(1) Pull the charging handle rearward and hold it.
(2) Press the bottom of the bolt catch and allow the
bolt to move forward until it engages the bolt catch.
(3) Return the charging handle to the forward position.
e. Check the receiver and chamber to ensure they do not
contain ammunition.
f. Press the upper portion of the bolt catch, allowing the
bolt to go forward.
g. Pull the trigger to release pressure on the firing pin
spring.
3. Correct malfunctions.
WARNING: If Your Rifle Malfunctions With A Live
Round In The Chamber Of A Hot Barrel, Quickly
Remove The Round. If You Can Not Remove The
Round Within 10 Seconds, Remove The Magazine And
Wait 15 Minutes With The Rifle Pointed In A Safe
Direction. Keep Your Face Away From The Ejection
Port While Clearing A Hot Chamber To Avoid Possible
Injury From A Cookoff.
a. Perform immediate action.
Note: If your rifle malfunctions, remember S-O-R-T-S.
This key word will help you remember these actions in
sequence: Slap, Pull, Observe, Release, Tap, Shoot.
4-12
Performance Steps
(1) Slap upward on the magazine to make sure it is
properly seated.
(2) Pull the charging handle all the way back.
(3) Observe the ejection of the case or cartridge.
Look into the chamber and check for obstructions.
(4) Release the charging handle to feed a new round
in the chamber. Do not ride the charging handle.
(5) Tap the forward assist.
(6) Shoot. If the rifle still does not fire, inspect it to
determine the cause of the stoppage or malfunction and
take appropriate remedial action.
b. Perform remedial action.
(1) If your rifle still fails to fire after performing steps
3.a. (1) through 3.a. (6), check again for a jammed
cartridge case in the chamber.
(2) If a cartridge case is in the chamber, tap it out with
a cleaning rod.
Note: If your rifle still fails to fire, you may have a
mechanical failure.
(3) Correct a mechanical malfunction.
(a) Clear the rifle.
(b) Disassemble the rifle.
(c) Inspect for dirty, corroded, missing, or broken
parts.
(d) Clean dirty or corroded parts.
(e) Replace missing or broken parts.
(f) Assemble the rifle.
(g) Perform a function check.
(h) Load and fire the rifle.
4. Zero the rifle.
a. Zero the M16A1 rifle.
(1) Place the rear sight on long range aperture (L).
(2) Establish a mechanical zero.
4-13
Performance Steps
(a) Set the front sight. Rotate the post up or down
so the notched disk is flush with the top of the front sight
post well. Rotate the front sight post 11 clicks in the
direction of the arrow marked UP.
(b) Center the rear sight. Move the rear sight all the
way to the left. Then move it 17 clicks to the right.
Note: The sight picture is obtained by aligning the rear
sight and the front sight with the proper aiming point for
your target. The sight picture depends on sight alignment
and placement of the aiming point.
(3) Using the correct sight picture and sight alignment,
fire a 3-round shot group at the target's center.
(4) Triangulate the shot group to determine if the
group is 4 centimeters or less in diameter.
(5) If the shot group is not 4 centimeter or less in
diameter, repeat subordinate actions 4.a.(3) and 4.a.(4)
above.
(6) Once you have an acceptable shot group, adjust
the sights to move the shot group within the zero circle at
the center of the target:
(a) Elevation. Locate the horizontal (right to left)
line nearest the center of the shot group and follow it to the
nearest edge of the target. Identify the number of clicks
and the direction of the adjustment shown at the edge of
the target. Adjust the front sight in the indicated direction
and number of clicks. Record adjustments made.
(b) Windage. Locate the vertical up and down line
nearest the center of the shot group and follow it to the
nearest edge of the target. Identify the number of clicks
and the direction of the adjustment shown at the edge of
the target. Adjust the rear sight in the indicated direction
and number of clicks. Record adjustments made.
(7) At the completion of zero, rotate the rear sight to
the unmarked aperture.
4-14
Performance Steps
(8) Determine the number of clicks up or down and left
or right the sights were moved from the base setting and
record this as the 250-meter zero.
NOTE:
Current doctrine of the United States Army
prescribes a fighting zero for 250 meters with the M16A1
rifle. That is, the sights of the rifle should be adjusted so
that the trajectory of the projectile and the line of sight
intersect at a range of 250 meters.
b.Zero the M16A2 rifle.
(1) Select the unmarked, long range aperture on the
rear sight.
(2) Establish a mechanical zero.
(a) Set the front sight by rotating the post up or
down so the notched disk is flush with the top of the front
sight post well.
(b) Center the rear sight. Align the index mark on
the 0-2 aperture with the center line on the windage scale
and the mark on the receiver. Rotate the elevation knob
down until the range scale mark "8/3" is aligned with the
mark on the left side of the receiver. Rotate the elevation
knob one click clockwise past the "8/3" mark.
NOTE: The sight picture is obtained by aligning the rear
sight and the front sight with the proper aiming point for
your target. The sight picture depends on sight alignment
and placement of the aiming point.
(3) Using the correct sight picture and sight alignment,
fire a 3-round shot group at the target.
(4) Triangulate the shot group. The shot group must
be 4 centimeters or less in diameter to be acceptable.
(5) If the shot group is not within 4 centimeters or less
in diameter, repeat steps 4.b.(3) and 4.b.(4) above.
(6) Adjust the sights to move the shot group to center
of target:
4-15
Performance Steps
(a) Elevation. Locate the horizontal (right to left)
line nearest the center of the shot group and follow it to the
nearest edge of the target. Identify the number of clicks
and the direction of the adjustment shown at the edge of
the target. Adjust the front sight in the indicated direction
and the number of clicks. Record adjustments made.
(b) Windage. Locate the vertical up and down line
nearest the center of the shot group and follow it to the
nearest edge of the target. Identify the number of clicks
and the direction of the adjustment shown at the edge of
the target. Adjust the rear sight in the indicated direction
and the number of clicks. Record adjustments made.
(7) At the completion of zero, determine the number of
clicks up or down and left or right the sights were moved
from the base setting and record this as the 300-meter
zero.
NOTE:
Current doctrine of the United States Army
prescribes a fighting zero for 300 meters with the M16A2
rifle. That is, the sights of the rifle should be adjusted so
that the trajectory of the projectile and the line of sight
intersect at a range of 300 meters.
5. Engage targets with an M16A1 or M16A2 rifle.
a.Engage targets at night.
(1) Detect targets (by sight or sound).
(2) Determine if the target should be engaged.
Consider the range to target, the type of target, the tactical
situation, unit standing operating procedure (SOP) on
engagement criteria, and instructions received from
leaders.
(3) If target is to be engaged:
4-16
Performance Steps
NOTE: Standard firing positions. A particular situation will
influence the use of a certain firing position. The position
used must allow you to observe the target area, utilize
available cover for protection, and place aimed fire on the
target. The standard firing positions are: Prone (supported,
unsupported), standing, kneeling (supported, unsupported),
and foxhole. NOTE: Assault fire. Walking rapidly and firing
from the underarm or the quick fire position - stopping
momentarily to take a well aimed, directed shot when
definite targets appear.
(a) Assume the best possible firing position.
(b) Determine the range.
(c) Place aimed fire on the target.
(d) If the target moves laterally, fire and track as
the target moves.
(e) Reload when necessary.
(f) Continue to place fire on the target until
destroyed, disabled, or an order to cease fire is received.
b. Engage targets during daylight.
(1) Perform subordinate actions 5.a.(1) thru 5.a.(3) for
"Engage targets at night".
(2) Use aimed fire to destroy targets at ranges beyond
75 meters.
(3) Use quick fire technique to destroy personnel
targets at close range.
(4) Reload when necessary.
(5) Continue to place fire on the target until destroyed,
disabled, or an order to cease fire is received.
c.Engage targets with suppressive fire.
(1) Perform subordinate actions 5.a.(1) thru 5.a.(3) for
"Engage targets at night".
(2) Place a high volume of aimed fire on the target
locations until destroyed, disabled, or an order to cease fire
is received.
(3) Reload when necessary.
4-17
Performance Steps
d.Engage targets with assault fire.
(1) Assume assault fire position (underarm position).
(2) Deliver a high volume of fire at known or
suspected enemy locations while advancing over the
objective area.
(3) If a definite target is presented, stop momentarily
and take a rapidly aimed shot at the target, then continue
moving.
(4) If necessary, reload rapidly while moving.
(5) Continue using assault fire until the objective is
secured or an order to cease fire is received.
Evaluation Preparation: Have soldiers use their own
assigned rifles and magazines. Provide each soldier blank
or dummy ammunition when evaluating the load, unload,
and correct malfunctions portions of this task. Provide a
25-meter firing range, sandbags for support, rifle shot
group analysis cards (GTA 21-1-4), and 18 rounds of 5.56mm ball ammunition for each soldier for the zero portion of
this task. Provide a live fire range and sufficient quantities
of ammunition to support the number of soldiers being
tested in the engage targets portion of this task
Brief Soldier: Tell the soldier to load and unload the rifle
using the steps appropriate for the model he or she has.
An M16A2 rifle must be loaded in both the semiautomatic
and BURST modes. After these performance measures
are complete, tell the soldier that the rifle has stopped
firing. Tell the soldier to correct malfunctions, that the
weapon is cool, and that he or she is to perform the
immediate and remedial actions on the rifle in the proper
sequence. On the 25-meter range, tell the soldier to
battlesight zero the rifle, using no more than 18 rounds.
After the soldier has zeroed his or her rifle, on a live fire
range, tell the soldier to detect and engage targets in his or
her sector and, when asked, state the range to the target.
4-18
Performance Measures
1. Loaded the rifle.
a.Prepared the M16A1 or M16A2 rifle
for semiautomatic fire and the M16A1 rifle
for automatic fire, ensuring the chamber is
clear and the magazine is seated.
b.Prepared the M16A2 rifle for burst
fire, ensuring the magazine is seated.
c. Pointed the weapon in a safe
direction.
d.Chambered a round, ensuring the bolt
is fully forward and locked.
e.Placed the selector lever in the SAFE
position.
2. Unloaded the rifle.
a.Pointed the rifle muzzle in a safe
direction.
b.Placed the selector lever on SAFE.
c.Removed the magazine from the rifle.
d.Locked the bolt open and return the
charging handle to the forward position.
e.Removed any ammunition from the
receiver and chamber.
f.Pressed the upper portion of the bolt
catch, allowing the bolt to go forward.
g.Pulled the trigger to release the
pressure on the firing pin spring.
3. Corrected malfunctions of the rifle
a. Immediate action.
(1) Slapped
upward
on
the
magazine.
(2) Pulled the charging handle all the
way to the rear.
(3) Observed the ejection port for
ejection of the case or cartridge. Checked
the chamber for obstructions and removed
if any are present.
Results
GO / NO-GO
GO / NO-GO
GO / NO-GO
4-19
Performance Measures
(4)Released the charging handle to
feed a new round in the chamber.
(5)Tapped the forward assist.
(6)Shot the rifle.
(7)Performed the steps in sequence.
b.Remedial action.
(1)Checked for jammed ammunition
and removed, if present.
(2)Cleared and disassembled the
rifle.
(3)Inspected for dirty, corroded,
missing, or broken parts.
(4)Cleaned dirty or corroded parts.
(5)Replaced missing or broken parts.
(6)Assembled the rifle.
(7)Performed a function check.
(8)Loaded and fired the rifle.
4. Zeroed the rifle.
a. M16A1 rifle.
(1) Selected the long range aperture
"L."
(2) Established the mechanical zero,
if necessary.
(3) Established a correct sight
picture.
(4) Fired a three-round shot group.
(5) Triangulated the shot group.
(6) Repeated steps 4.a.(3) and (4)
until the shot group fell within 4
centimeters.
(7) Adjusted the sights to move the
shot group to within the zero circle, if
necessary.
(8) Determined and recorded the
250-meter battlesight zero.
4-20
Results
GO / NO-GO
Performance Measures
Results
b.M16A2 rifle.
(1)Selected the unmarked long range
aperture.
(2)Established the mechanical zero,
if necessary.
(3)Established a correct sight picture.
(4)Fired a three-round shot group.
(5)Triangulated the shot group.
(6)Repeated steps 4.b.(3) and (4)
until the shot group fell within 4
centimeters.
(7)Adjusted the sights to move the
shot group to within the zero circle, if
necessary.
(8)Determined and recorded the 300
meter-battlesight zero.
5. Engaged targets.
a.Assumed a position that provided
cover and concealment and good
observation.
b.Detected and determined if targets
should be engaged.
c.Placed fire on the targets using the
appropriate firing techniques.
GO / NO-GO
Evaluation Guidance: Score the soldier GO if all
performance measures are passed. Score the soldier NO
GO if any performance measure is failed. If the soldier
scores NO GO, show the soldier what was done wrong and
how to do it correctly.
References
Required
Related
FM 23-9
TM 9-1005-319-10
4-21
Operate An M60 Machine Gun
071-990-0001
Conditions: Given an M60 machine gun, traversing and
elevating (T&E) mechanism, M122 tripod, linked 7.62-mm
ammunition, spare parts case with basic issue items,
cleaner lubricant and preservative (CLP), zeroing targets,
and a requirement to use the weapon to place fire on
targets in a tactical situation.
Standards: Load, unload, and fire the weapon as required
to zero and place effective fire on targets. Use the
appropriate firing technique when delivering fire on targets
under various conditions. Correct malfunctions when they
occur so that the weapon continues to function correctly.
Performance Steps
1. Mount the M60 machine gun.
(See Performance
Measures for detailed steps.)
2. Load the M60 machine gun.
3. Unload the M60 machine gun.
4. Correct malfunctions of the M60 machine gun.
5. Zero an M60.
6. Engage targets with an M60 machine gun.
Evaluation Preparation: At the test site, provide the
equipment and materials listed in the conditions. For
standardization of the load performance measure, have the
bolt and cocking handle forward, the safety on S, and the
belt of ammunition on top of the cover. Ensure the
ammunition is clean and linked properly.
For
standardization of the unload performance measure, begin
with the bolt forward and the safety on F. For the correct
malfunctions performance measure, provide an assistant
gunner, set up the weapon so that it is loaded and the
safety is on S, and insert an expended round in the belt to
cause a stoppage.
Conduct the engage targets
4-22
performance measure on a live-fire range and provide the
soldier with area targets and point targets.
Brief Soldier: Tell the soldier to mount, load, and unload the
M60 Machine gun. On the live-fire range, tell the soldier to
zero the M60 Machine gun, engage area and point targets,
and correct malfunctions.
Performance Measures
1. Mounted the M60 machine gun.
a. Emplaced the M122 tripod.
(1) Pulled open the front and rear
legs and locked them in position
(2) Placed the tripod in position with
the front leg pointing in the direction that
the muzzle of the gun will be pointing.
b.Installed the machine gun on the
tripod.
(1) Locked the pintle assembly into
the pintle bushing
(2) Lowered the M60 machine gun
receiver so that the rear-mounting pin
snaps into the pintle latch.
c. Attached the T&E mechanism to the
M60 machine gun. Placed the traversing
slide on the traversing bar and lock it in
position.
2. Loaded the M60 machine gun.
a. Placed safety lever on FIRE.
b. With your palm up, pulled the
cocking handle to the rear, locking the bolt
in the rear position.
c. Returned the cocking handle to the
forward position and placed the safety
lever on the S (SAFE) position.
Results
GO / NO-GO
GO / NO-GO
4-23
Performance Measures
Results
d. Raised the feed tray cover and
ensured that the feed tray, receiver, and
chamber are clear.
e. Placed the first round of the belt in
the tray groove, double link leading, open
side of the links down.
f. Closed the cover, ensuring the round
remains in the tray groove.
WARNING: The Weapon Is Loaded. Keep It Pointed In
A Safe Direction.
3. Unloaded the M60 machine gun.
GO / NO-GO
a. Pulled the cocking handle to the rear,
ensuring that the bolt is locked to the rear.
b. Placed the safety lever on S (SAFE)
and manually returned the cocking handle
to its forward position.
c. Raised the cover and removed any
ammunition or links from the tray.
d. Raised the feed tray, inspected, and
confirmed that no ammunition is in the
chamber.
e. Closed the cover.
f. Placed the safety on F (FIRE)
g. Pulled the cocking handle to the rear,
and pulled the trigger while manually
easing the bolt forward.
h. Placed the safety on S(SAFE).
4. Corrected malfunctions of the M60
machine gun.
a. Took actions for Failure to fire/
misfire. Steps for immediate action are as
follows:
(1) Pulled the cocking handle to the
rear.
4-24
GO / NO-GO
Performance Measures
Results
(2) Looked at the ejection port to see
if a cartridge case, belt link, or round is
ejected.
(a) If a cartridge case, belt link, or
round is ejected, return the cocking
handle to the forward position. Aim the
weapon at the target and attempt to fire
the weapon. If the weapon fires, continue
firing. If not, take remedial action.
WARNING:
If The Cover Is Opened On A Hot
Cartridge (Hot Barrel), An Open-Cover Cookoff Could
Occur And Result In Serious Injury Or Death. Close
The Cover And Wait Until The Barrel Cools. At Least
15 Minutes.
(b) If nothing is ejected and the
barrel is hot enough to cause a
COOKOFF (200 rounds fired within 2
minutes), wait at least 15 minutes then
apply immediate action.
Ensure the
cocking handle is forward.
Aim the
weapon at the target and attempt to fire
the weapon. If the weapon fires, continue
firing. If the weapon does not fire, take
remedial action.
NOTE: During combat, if a cartridge is stuck in the
chamber change barrels, reload, and continue to fire.
b. Took actions for Failure to
fire/misfire. Steps for remedial action are
as follows:
(1) Kept the muzzle of the weapon
pointed in a safe direction.
(2) Ensured the bolt is locked to the
rear and the cocking handle is forward.
4-25
Performance Measures
Results
(3) Placed the safety lever on S
(SAFE) and raise the cover.
(4) Removed the belt of ammunition
and raise the feed tray.
(5) Inspected receiver and chamber.
WARNING:
When Removing A Stuck Unfired
Cartridge Stay Clear Of The Muzzle. Do Not Allow A
Cartridge To Contact Any Hard Surface. A Cartridge
May Fire On Contact.
(6) If a Round is in the chamber:
(a) A stuck cartridge case or
unfired cartridge. Removed the barrel.
Inserted a cleaning rod in the muzzle end
and lightly tapped out the case/cartridge.
(b) A ruptured cartridge case.
Removed the barrel. Pushed the ruptured
cartridge extractor inside the ruptured
case in the chamber until it seats.
Inserted a cleaning rod in the muzzle end
and lightly tapped out the ruptured case.
Removed the extractor from the ruptured
case and reassemble the extractor tool.
(7) Disassembled and inspected the
weapon and ammunition for deficiencies.
(8) Corrected the deficiencies.
(9) Assembled the weapon, reloaded
and continued firing.
c. Took actions for a runaway gun (the
machine gun keeps firing after releasing
the trigger).
WARNING: Keep The Gun Oriented On The Target.
4-26
Performance Measures
Results
(1) Held the weapon on the target.
(2) Broke the ammunition link belt by
twisting it in either direction, or let the gun
continue to fire if near the end of the link
belt.
(3) Allowed the weapon to fire the
remaining ammunition at the target.
(4) Cleared the weapon.
WARNING: Never Reload A Runaway Machinegun
Until It Has Been Inspected and Repaired By
Organizational Maintenance.
(5) Notified
your
immediate
supervisor.
d. Corrected sluggish operation.
(1) Cleared the weapon, placed the
safety lever on S (SAFE).
(2) Disassembled, cleaned, and
inspected the weapon for deficiencies.
(3) Corrected deficiencies.
(4) Lubricated the weapon.
(5) Assembled the weapon.
5. Zeroed an M60.
GO / NO-GO
a. Zeroed the M60 on a 10-meter
range.
(1) Set the windage scale for zero
windage.
(2) Set the range scale at 500meters.
(3) Fired three single rounds to
establish a shot group.
(4) Assessed the shot group. The
shot group should be small enough to
show where the center of the group is in
relation to the point of aim.
4-27
Performance Measures
Results
(5) Adjusted the sights to move the
center of the shot group to the point of
aim.
NOTE: To correct for deflection (left or right), turn the
windage knob to move the rear sight in the direction of the
desired change. A 1 click or 1-mil adjustment moves the
point of aim 1 centimeter. Note: To Correct for elevation
(up or down), turn the elevation knob to move the rear
sight slide in the direction of the desired change. A 1 click
adjustment on the elevation knob equals a 1/4 mil change,
or 4 clicks equal a 1 mil change. A 4 click adjustment
moves the point of aim 1 centimeter.
(6) Fired a round to confirm the
adjustments. If necessary, continue to
make adjustments and fire rounds until
you hit the point of aim.
(7) Adjusted the range scale for 500meters and record the deflection.
b. Field zeroed the M60.
NOTE: Range graduations on the M60 sight assembly
begin at 300 meters, making it impossible to place a lesser
range setting on the sight. At ranges greater than 700
meters, it would be difficult to determine where the center
of the beaten zone is falling in relation to the target.
(1) Selected a target between 300
and 700 meters.
(2) Set the range scale at the range
you selected to zero the weapon.
(3) Set the windage scale to zero
windage.
(4) Fired a six-to nine-round shot
group at the center base of the target and
observe where the burst hits.
4-28
Performance Measures
Results
(5) Adjusted the sights so that the
burst hits the center of the target to move
the center of the shot group to the point of
aim.
NOTE: To correct for deflection (left or right), turn the
windage knob to move the rear sight in the direction of the
desired change. 1 click will move the point of aim 1 meter
at 1,000 meters. Note: To correct for elevation (up or
down), estimate how high or low the center of the beaten
zone is in relation to the target and make elevation
changes accordingly.
Because determining that
relationship is difficult, you may have to fire several bursts
and keep making adjustments until that burst hits the
center of the target.
(6) Fired a burst to confirm the
adjustments. If necessary fire additional
bursts and make sight adjustments until
the bursts hit the center of the target.
(7) Adjusted the range scale if
necessary to reflect the range to the
target.
6. Engaged targets with an M60 machine GO / NO-GO
gun.
a. Assumed the best possible firing
position (see note on positions).
b. Estimated the range to the target and
adjust range plate scale on rear sights to
show the estimated range.
c. Aimed the weapon using correct
sight alignment and correct sight picture.
d. Used the following engagement
techniques:
4-29
Performance Measures
Results
NOTE: Apply the following M60 machine gun fire
adjustment techniques when engaging targets: TraverseThis is moving the muzzle of the gun left or right to
distribute fire laterally. 1. With the bipod-mounted gun,
this is done by selecting successive aiming points in the
target area. The gunner makes minor changes in direction
by shifting his or her shoulders slightly left or right. To
make major changes in direction, the gunner moves his or
her elbows and realigns his or her body to remain directly
behind the gun. 2. With the tripod-mounted gun, this is
done by turning the traversing hand wheel to move the
muzzle of the gun left or right. Search- This is moving the
muzzle of the gun up or down to distribute fire in depth. 1.
With the bipod-mounted gun, this is done by selecting
successive aiming points in the target area. To make
changes in elevation, the gunner moves his or her elbows
closer together to lower the muzzle or farther apart to raise
the muzzle. 2. With the tripod-mounted gun, this is done
by turning the elevating hand wheel to move the muzzle of
the gun up or down.
(1) Area targets:
(a) Linear targets - Initially lay and
adjust the gun on the midpoint.
(b) Deep targets - Initially lay and
adjust the gun on the midpoint of the
target, unless another portion of the target
presents a greater threat. Then search
down to one aiming point in front of the
near end and back up to one aiming point
beyond the far end.
4-30
Performance Measures
Results
(c) Linear targets with depth
Initially lay and adjust the gun on the
midpoint of the target, unless some other
part of the target presents a greater
threat. Traverse and search to the near
flank then back to the far flank.
(2) Point targets: Engage by initially
laying and adjusting the gun on the
midpoint.
(3) Assault fire:
(a) Assumed a s uitable assault fire
position (see the note on positions).
(b) Fired on known or suspected
enemy locations without aligning sights.
(c) Moved rapidly while firing.
(d) Kept the fire down and
distribute the fire over the objective.
(4)Suppressive fire: Used engagement
techniques for area targets.
NOTE: 1. The best possible position is a position that
allows you to place effective fire on the target area and
gives you the most protection from enemy return fire. 2.
Assault fire positions are used when assaulting in a line
during a night attack or during the final stages of a day
assault when fire superiority has been gained. a. Hip
firing position - use when a high volume of fire is desired
on the target area, and rapid movement is not essential.
b. Shoulder position - use when fire is to be placed on
specific points in the target area and rapid movement is
not essential. c. Underarm position - use on closing with
the enemy when a high volume of fire and rapid
movement are required.
Evaluation Guidance: Score the soldier GO if all
performance measures are passed. Score the soldier NO
GO if any performance measure is failed. If the soldier
4-31
scores NO GO, show the soldier what was done wrong and
how to do it correctly.
References
Required
Related
FM 23-67
TM 9-1005-224-10
Employ Hand Grenades
071-325-4407
Conditions: Given any standard issue U.S. hand grenade
with extra safety clips, load carrying equipment (LCE), and
a requirement to use hand grenades during a unit mission.
Standards: Identified each grenade by type to ensure you
had the appropriate grenades required to accomplish your
assigned tasks based on the capabilities of the grenades.
Inspect the grenades for defects. Report and turn in
grenades that had defects. Correctly attached grenades to
your ammunition pouch. Used the grenades against
intended targets to accomplish your assigned tasks by
applying proper grip, throwing technique, and safety
precautions. Take cover within 4 seconds after throwing a
fragmentation or white phosphorous grenade to avoid the
effects of the grenade.
Performance Steps
1. Identify grenades you have been issued by type, color,
markings, and usage to ensure they are appropriate for
accomplishment of the specific tasks assigned to you.
a. M61 and M67 fragmentation used to kill enemy
soldiers.
(1) Olive drab body with a single yellow band at the top.
4-32
Performance Steps
(2) Nomenclature and/or lot numbers are in yellow.
b.M15 white phosphorus (WP) used for signaling,
screening and incendiary purposes.
(1) Gray body with one yellow band and yellow
markings.
c. AN-M8 HC white smoke used for signaling and
screening.
(1) Light green body with black markings and a white
top.
d. M18 colored used as a ground-to-ground smoke or
ground-to-air signaling device, a target or landing zone
marking device, or a screening device for night movements.
(1) Olive drab body with the top indicating the smoke
color.
e. ABC-M25A2 CS riot control to control riots or disable
personnel without serious injury.
(1) Gray body with a red band and red markings.
f.AN-M14 TH3 incendiary to destroy equipment and start
fires.
(1) Light red with black markings.
2. Inspect hand grenades for defects.
WARNING: Never Make Unauthorized Modifications To
Hand Grenades. A Safety Clip Can Be Removed And
Reattached To A Grenade If The Safety Pin Is Still In
Place. Never Attempt To Reinsert A Safety Pin. Once
The Safety Pin Has Been Pulled, The Grenade Must Be
Thrown.
a. Check for, and turn in grenades with the following
deficiencies:
(1) Missing safety clip and/or safety pin. (If the safety
pin is mispositioned, carefully push it into place. If bent,
bend it back into position while holding the safety lever
down).
4-33
Performance Steps
(2) Cracked body.
(3) Broken fuse lugs.
(4) Bent or broken safety lever.
(5) Cracked pull ring.
(6) Loose fuse.
b. Check for dirt and wipe the grenade clean if it is dirty.
3. Attach the grenade to an ammunition pouch.
a.Attach the grenade to the new style pouch.
(1) Open the web carrying sleeve on the side of the
ammunition pouch.
(2) Slip the grenade safety lever over the small strap
that is sewn into the web carrying sleeve and push the
grenade down until it is fully seated in the web carrying
sleeve.
(3) Ensure the pull ring is in the downward position.
(4) Wrap the carrying strap around the neck of the fuse
and snap the carrying strap to the carrying sleeve.
b. Attach the grenade to the old style pouch.
(1)Slip the grenade safety lever over the small strap
that is sewn to the side of the ammunition pouch and push
the grenade down until it is fully seated.
(2) Ensure the pull ring is in the downward position,
wrap the carrying strap around the fuse, and snap the
carrying strap.
c. Check grenades periodically to ensure the fuse is tight
and the carrying strap is secure.
4. Use grenades against designated targets. Throwing
positions are dictated by particular situations. Use the
appropriate throwing position. The positions listed here are
standard for throwing U.S. Army issue grenades:
4-34
Performance Steps
WARNING: Chemical Smoke Hand Grenades Have
Casualty-Producing
And
Incendiary
Capabilities.
Therefore, Ensure These Grenades Are Not Used Near
Friendly Personnel For Signaling Or For Laying Down A
Smoke Screen Which Friendly Personnel Will Have To
Move Through.
a. Standing: Most desirable and natural one from which to
throw grenades. Use when you are occupying a fighting
position or during operations in fortified positions or urban
terrain.
(1) Assume a natural stance with weight balanced
equally on both feet. Use the proper grip and hold the
grenade shoulder high.
(2) Remove the safety clip and safety pin.
(3) Throw the grenade, using the overhand method so
that the grenade arcs, landing on or near the target.
(4) Seek cover immediately to avoid being hit by
fragments. If no cover is available, drop to the ground in the
prone position with your helmet facing the direction of the
grenade's detonation.
b. Kneeling: Reduces the distance a grenade can be
thrown. Use when you have only a low wall, shallow ditch,
or similar cover for protection.
(1) Assume a kneeling position. Use the proper grip
and hold the grenade shoulder high.
(2) Remove the safety clip and safety pin.
(3) Throw the grenade with a natural throwing motion,
pushing off with your trailing foot to give added force to your
throw.
(4) When the grenade is released, drop to the ground
behind available cover. If no cover is available, drop to the
ground in the prone position with your helmet facing the
direction of the grenade's detonation.
4-35
Performance Steps
c. Prone: Reduces both distance and accuracy. Use only
when you are pinned down and unable to rise to engage the
target.
(1) Lie on your back with your body perpendicular to
the grenade's intended line of flight. Use the proper grip
and hold the grenade at shoulder level.
(2) Remove the safety clip and safety pin.
(3) Cock your right leg (left leg for a left-handed
thrower) with your foot braced firmly against the ground.
With your free hand, grasp any object capable of giving you
added leverage to increase throwing distance.
(4) Throw the grenade with a natural throwing motion,
pushing off with your rearward foot to give added force to
your throw.
(5) When the grenade is released, roll over onto your
stomach and press yourself flat against the ground.
d. Position yourself in a covered position that will allow
you to throw the grenade effectively, protect you from
enemy fire, and from the effects of the detonating grenade.
e. Quickly observe the target to determine the distance
between the throwing position and the target area.
f. Grip the grenade with the throwing hand.
(1) Right-handed: Hold the grenade upright in the palm
of your hand. Place your thumb over the safety lever with
the safety clip and pull ring-away from the palm of the
throwing hand so that it can be easily removed.
(2) Left-handed: Hold the grenade upside down in the
palm of your hand. Place your thumb over the safety lever
with the safety clip and pull-ring away from the palm of the
throwing hand so that it can be easily removed.
g. Remove the safety clip and safety pin.
h. Quickly look at the target and toss the grenade using
an overhand throw so that the grenade arcs, landing on or
near the target.
4-36
Performance Steps
i. Take cover immediately, exposing yourself to enemy
fire and the effects of the detonating grenade for no more
than three seconds.
Evaluation Preparation: For the grenade identification
portion of this task, provide the following six inert hand
grenades: M67 fragmentation grenade, M18 colored smoke
grenade, M34 WP smoke grenade, AN-M8 HC smoke
grenade, AN-M14 TH3 incendiary grenade, and the ABCM25A2 CS riot-control grenade. The soldier being tested
will not be required to identify the grenades' alphanumeric
nomenclature. Secure a number of inert hand grenades
that contain at least two of the following defects: - The fuse
is unscrewed from the body of the grenade. - A loose
safety pin. - A partially removed and/or bent safety pin. - A
cracked safety pin. - A broken safety lever. - A dirty
grenade. Ensure the defects present in each grenade are
known before testing each soldier. For the use of grenades
against targets portion of this task, provide the soldier with
five dummy grenades to engage the targets. Provide
targets of troops in the open, troops with overhead cover,
or troops dug in without overhead cover.
Brief Soldier: For grenade identification, tell the soldier that
he or she must identify each hand grenade. Tell the soldier
to inspect the grenade and to correct the defects where
possible. If the soldier discovers a defect that cannot be
corrected, he or she must tell you the defect and that the
grenade should be turned in. Tell the soldier to attach a
grenade to his or her ammunition pouch. For the use of
grenades against targets, tell the soldier to fasten four of
the grenades to the ammunition pouches on his or her LCE
and to hold one in hand. Tell the soldier that at least one
grenade must detonate within the effective bursting radius
of the target. Tell the soldier not to expose themselves for
more than five seconds at any one time.
4-37
Performance Measures
1. Identified each of the following hand
grenades.
a. Fragmentation grenade.
b. Riot control grenade.
c. White phosphorus (WP) grenade.
d. HC (white) smoke grenade.
e. Colored smoke grenade.
f. Incendiary grenade.
2. Inspected hand grenade for defects.
a. Checked that the safety clip and
safety pin are present and properly
positioned.
b. Checked for cracked grenade body.
c. Checked for broken fuse lugs.
d. Checked for bent or broken safety
lever.
e. Checked the safety pull ring for
cracking.
f. Checked that the fuse is screwed in
tightly on the body of the grenade.
g. Checked for dirt and wipe the
grenade clean if it is dirty.
h. Turned in defective grenades.
3. Attached the grenade to the
ammunition pouch.
a. Slipped the grenade's safety lever
over the strap in web carrying sleeve on
new style pouch, or the strap on the side
of the old ammunition pouch with the pull
ring in the downward position.
b. Wrapped the carrying strap around
the neck of the fuse and secured it to the
snap on the pouch.
4-38
Results
GO / NO-GO
GO / NO-GO
GO / NO-GO
Performance Measures
Results
4. Used grenades against designated
targets.
a. Positioned yourself in a covered
position that will allow you to throw the
grenade effectively, protected you from
enemy fire, and from the effects of the
detonating grenade.
b. Observed the target and determined
the distance between the throwing
position and the target area.
c. Gripped the hand grenade with the
throwing hand, placed your thumb over
the safety lever, with the safety clip and
pulled ring away from the palm of the
throwing hand.
d. Removed the safety clip and safety
pin.
e. Quickly looked at the target and
tossed the grenade using an overhand
throw so that the grenade arcs, landed on
or near the target.
f. Took cover immediately, exposed
yourself to enemy fire and the effects of
the detonating grenade for no more than
three seconds.
GO / NO-GO
Evaluation Guidance: Score the soldier GO if all
performance measures are passed. Score the soldier NOGO if any performance measure is failed. If the soldier
scores NO-GO, show the soldier what was done wrong and
how to do it correctly.
References
Required
Related
FM 23-30
4-39
Employ An M18a1 Claymore
071-325-4425
Conditions: Given an M18A1 Claymore mine in a bandoleer
with all accessories (M57 firing device, M40 test set, firing
wire with electrical blasting cap and insulation tape); a
sandbag; and two wooden stakes. You must employ the
M18A1 Claymore mine against enemy targets, and when
not fired, recover the mine.
Standards: Checked the bandoleer to ensure all
accessories were present. Conducted a circuit test of the
firing device. Emplaced the M18A1 Claymore mine so that
the front of the mine was centered on the intended kill
zone. Selected and prepared a covered position from
which you will fire the mine; it must be at least 16 meters to
the rear or side of the mine. Camouflaged the mine, firing
wire, and the position from which you will fire the mine.
Fired the mine by actuating the firing device handle with a
firm, quick squeeze when the target was in the kill zone.
When not fired, disarmed the mine and stowed it and all
accessories in the bandoleer.
Followed all safety
precautions that pertain to the M18A1 Claymore mine.
Performance Steps
1. Check items in the M7 bandoleer.
2. Select a location to install mine.
3. Conduct a circuit test of the firing system at the firing
position.
4. Install the M18A1 Claymore mine.
5. Arm the mine.
6. Camouflage the mine and firing position.
7. Retest the circuit.
8. Fire the mine from the covered firing position on order, or
when the intended target is in the kill zone.
9. Recover the M18A1 Claymore mine.
4-40
Evaluation Preparation: During training and testing, use
only inert blasting caps and mines. At the test site, place
one M7 bandoleer containing an inert M18A1 Claymore
mine, an M57 firing device, and an M40 test set. Check to
make sure each mine is complete and serviceable. Place
one wooden stake in the ground at the test position and
another at the mine emplacement point. The distance
between the emplacement point and firing point must be no
less than 16 meters. The stake at the aiming point should
be painted red or some other distinguishable color. Once
the soldier has emplaced the mine and completed the
circuit test, assume a prone position and visually confirm
that the mine is correctly aimed. To assist you, place stakes
1 meter on each side of the aiming point stake. The height
of the stakes should not exceed 1 foot above the ground.
During the circuit test, do not attempt to observe the flash
on the M40 test set since it may interfere with the soldier's
performance. Throughout the evaluation, if the soldier
states that he or she cannot see the flashing light, tell him
or her to continue with the test.
Brief Soldier: Tell the soldier to perform a circuit check on
the firing wire and then install the mine.
Performance Measures
Results
1. Checked to ensure that the following
items are in the M7 bandoleer:
a. M18A1 antipersonnel mine.
b. M57 firing device.
c. M40 test set.
d. Insulation tape.
e. M4 electric blasting cap with firing
wire.
GO / NO-GO
4-41
Performance Measures
Results
2. Selected a location to install mine.
GO / NO-GO
a. Selected a position to emplace the
mine so that when detonated it will cover
the intended kill zone.
b. Selected a covered firing position
from which to fire the mine that is at least
16 meters to the rear or side of the
emplaced mine.
WARNING: During Installation, Keep The M57 Firing
Device In Your Possession To Prevent Accidental
Firing By Someone Else.
3. Conducted a circuit test of the firing GO / NO-GO
system at the firing position.
a. Removed all accessories from the
bandoleer; left the mine in the bandoleer.
b. Performed circuit test of M57 firing
device and M40 test set.
(1) Removed the dust cover from the
connector of the M57 firing device and
from the female connector of the M40 test
set.
(2) Plugged the test set into the firing
device.
(3) Positioned the firing device bail to
the FIRE position.
(4) Actuated the handle of the firing
device with a firm, quick squeeze,
observing the flash of light through the
window of the test set. The flashing light
indicates that the M57 firing device and
M40 test set are functioning correctly.
4-42
Performance Measures
Results
WARNING: The Blasting Cap That Is Attached To The
Firing Wire Must Be Placed Under A Sandbag, Behind
A Tree, Or In A Hole In The Ground To Protect The
Person Performing The Circuit Check In Case The
Blasting Cap Detonates.
c. Performed a circuit test of the firing
wire.
(1) Placed the blasting cap that is
attached to the firing device under a
sandbag, behind a tree, or in a hole in the
ground to protect yourself in case the
blasting cap detonates during the test.
(2) Removed the shorting plug cover
from the connector of the firing wire and
from the end of the test set.
(3) Plugged the connector of the
firing wire into the test set.
(4) Placed the M57 firing device bail
in the FIRE position and actuated the
firing handle. The lamp in the window of
the M40 test set should flash.
(5) Placed the M57 firing device bail
on SAFE; removed the M57 firing device
and M40 test set.
(6) Placed the shorting plug cover on
the firing wire.
4. Installed the M18A1 Claymore mine.
GO / NO-GO
a. Laid the firing wire.
(1) Tied the shorting plug end of the
firing wire to a fixed object, such as a
stake or tree at the firing position.
4-43
Performance Measures
Results
(2) Placed the bandoleer on your
shoulder, and unrolled the firing wire to
the position selected for emplacing the
mine. The firing wire is laid from the firing
position to the mine site because the
blasting cap is on the inside of the firing
wire spool.
b. Emplaced the mine.
(1) Removed the mine from the
bandoleer.
(2) Opened both pairs of legs to a
45-degree angle with two legs facing to
the front and two legs facing to the rear of
the mine.
WARNING: Ensure That The Face Of The Mine
Marked "Front Toward Enemy" And The Arrows On
Top Of The Mine Point In The Direction Of The Enemy.
(3) Positioned the mine with the
surface marked FRONT TOWARD
ENEMY and the arrows on top of the mine
pointing in the direction of the enemy.
(4) Pushed the legs about one-third
of the way into the ground. In windy areas
or when the legs cannot be pushed into
the ground, spread the legs as far as they
will go (about 180 degrees) so that the
legs are to the front and rear of the mine
and the mine will not tip over.
(5) Aimed the mine.
(a) Selected an aiming point at
ground level about 50 meters (150 feet) in
front of the mine.
4-44
Performance Measures
Results
(b) Positioned one eye about six
inches to the rear of the sight. On a knifeedge-sight aligned the two edges of the
sight with the aiming point at ground level.
On a slit-type peep sight, aligned the
groove of the sight in line with the aiming
point that is 2.5 meters (eight feet) off the
ground.
NOTE: The aiming point should be in the center of the
desired area of coverage with the bottom edge of the
peep sight parallel to the ground that is to be covered with
the fragment spray.
5. Armed the mine.
GO / NO-GO
a. Secured the firing wire to a stake or
tree about one meter to the rear of the
mine so the mine will not become misaligned if the firing wire is disturbed.
b. Unscrewed one of the shipping plug
priming adapters from the mine.
c. Slid the slotted end of the shipping
plug priming adapter onto the firing wires
of the blasting cap between the crimped
connections and the blasting cap.
d. Pulled the excess wire through the
slotted end of the adapter until the top of
the blasting cap was firmly seated in the
bottom portion of the shipping plug
priming adapter.
e. Screwed the adapter, with the
blasting cap, into the detonator well.
f. Rechecked the aim of the mine.
4-45
Performance Measures
Results
6. Camouflaged the mine and firing GO / NO-GO
position.
a. Camouflaged the mine.
(1) Camouflaged the front and rear of
the mine to blend with its surroundings.
(2) Used only lightweight foliage,
such as leaves and grass.
(3) Buried the firing wire (if possible)
from the mine back to the firing position or
camouflage it with foliage.
b. Camouflaged the firing position to
blend with the surroundings.
7. Re-tested the circuit.
GO / NO-GO
a. Removed the blasting cap from the
mine.
b. Repeated step 3 above.
NOTE: If an extended period of time lapses between the
circuit test and firing of the mine, or if the area is subjected
to artillery or mortar fire, another test should be
conducted.
WARNING:
If An Abbreviated Circuit Test Is
Conducted (Blasting Cap Inserted In The Detonating
Well), Friendly Troops Within 250 Meters To The Front
And Sides And 100 Meters To The Rear Of The Mine
Must Be Under Cover.
8. Fired the mine from the covered firing GO / NO-GO
position on order, or when the intended
target is in the kill zone.
a. Removed the dust cover from the
firing device and firing wire.
b. Connected the firing wire to the firing
device.
c. Positioned the firing device safety
bail in the FIRE position.
4-46
Performance Measures
Results
d. Actuated the firing device handle with
a firm, quick squeeze.
9. Recovered the M18A1 Claymore mine.
GO / NO-GO
a. Placed the M57 firing device safety
bail on SAFE.
b. Disconnected the M57 firing device
from the firing wire
c. Replaced the shorting plug dust
cover on the firing wire connector.
d. Replaced the dust cover on the M57
firing device connector.
WARNING: During Disarming And Recovery Of The
M18a1 Claymore Mine, Keep The M57 Firing Device In
Your Possession.
e. Kept possession of the M57 firing
device.
f. Untied the firing wire from the stake at
the firing site.
g. Removed the shipping plug priming
adapter containing the blasting cap from
the mine and separated the blasting cap
and firing wire from the shipping plug
priming adapter.
h. Reversed the shipping plug and
screwed the shipping plug end of the
adapter into the detonator well.
i. Removed the firing wire from the
stake at the mine site.
j. Placed the blasting cap into hole at
the end of the firing wire spool.
k. Lifted the M18A1 Claymore mine
from its emplacement and secured the
folding legs.
L. Repacked the mine and all the
accessories into the M7 bandoleer.
4-47
Evaluation Guidance: Score the soldier GO if all
performance measures are passed. Score the soldier NOGO if any performance measure is failed. If the soldier
scores NO-GO, show the soldier what was done wrong and
how to do it correctly.
References
Required
Related
FM 23-23
Load An M203 Grenade Launcher
071-311-2127
Conditions:
ammunition.
Given an M203 grenade launcher and
Standards: Load the M203 using correct procedures while
observing all safety precautions.
Performance Steps:
1. Load the M203 (Figure 4-1
a. Press the barrel latch and slide the barrel forward (A,
Figure 4-1).
b. Place the weapon on SAFE and keep it on SAFE until
ready to fire (B. Figure 4-1).
4-48
Figure 4-1. Loading the M203.
WARNING: Keep The Muzle Pointed Downrange And
Clear Of All Troops.
2. Insert the ammunition into the chamber (C, Figure 4-1).
3. Slide the barrel rearward until it locks (D, Figure 4-1).
Figure 4-1. Loading the M203 (continued).
4-49
Performance Measures
Results
1. Slide the barrel forward.
GO / NO GO
2. Place the launcher on SAFE.
3. Load the launcher.
a. Insert the round into the chamber.
b. Slide the barrel to the rear and locks
the breech.
GO / NO GO
GO / NO GO
Evaluation Guidance: Score the soldier GO if all
performance measures are passed. Score the soldier NO
GO if any performance measure is failed. If the soldier
scores NO-GO, show the soldier what was done wrong and
how to do it correctly. Allow the soldier time to retrain and
retest.
Unload An M203 Grenade Launcher
071-311-2128
Conditions: Given a loaded M203 grenade launcher.
Standards: Unload the M203 using the correct procedures
while observing all safety precautions.
Performance Steps:
CAUTION: If The Weapon Was Not Fired, Use Extreme
Caution
During
Unloading
Procedures.
Where
Circumstances Permit, Either Catch The Ejected Round Or
Reduce The Distance It Falls By Holding The Weapon
Close To The Ground.
1. Depress the barrel latch and move the barrel forward.
The casing or the round should automatically eject.
2. Place the weapon on SAFE.
4-50
NOTE: If the casing is stuck, remove it by tapping it with a
cleaning rod.
3. Slide the barrel rearward, locking it to the breech.
Performance Measures
Results
1. Depress the barrel latch.
GO / NO GO
2. Slide the barrel forward.
GO / NO GO
3. Catch the ejected round.
GO / NO GO
Evaluation Guidance: Score the soldier GO if all
performance measures are passed. Score the soldier NO
GO if any performance measure is failed. If the soldier
scores NO-GO, show the soldier what was done wrong and
how to do it correctly. Allow the soldier time to retrain and
retest.
Prepare An M136 AT4 Light Anti-armor
Weapon for Firing
071-054-0001
Conditions:
Given an M136 launcher (AT4) and a
requirement to prepare it for firing.
Standards: Pre-fire checks are performed and the M136 is
prepared for firing.
Performance Steps:
1. Perform the pre-fire checks. Because the M136 launcher
is issued as a round of ammunition rather than as a
weapon, the launcher is completely sealed. Therefore,
inspection is limited to visual examination of the external
components. The overall condition of the launcher should
be inspected before it is used (Figure 4-2). The firer should
ensure—
4-51
a. The transport safety pin is in place and fully seated,
and the lanyard is attached.
b. The cocking lever is in the SAFE position and is folded
down.
c. The fire-through muzzle cover is intact. If the seal is
torn, it should be removed to ensure that no foreign objects
have gotten into the launcher.
d. The launcher’s color-coded band is the correct color:
black with yellow band for high explosive antitank; gold for
target-practice tracer; and blue for field handling trainer.
Figure 4-2. Inspecting the M136 launcher.
e. The sights function properly. Open the sight covers to
ensure the sights pop up and are not damaged.
f. The red safety catch does not move when depressed.
g. The rear seal is not damaged.
h. The shoulder stop is not broken or damaged and
it unsnaps and folds down.
i. The carrying sling is not frayed and is attached
to the launcher.
4-52
J. The launcher body has no cracks, dents, or bulges.
WARNING: Be Sure Personnel Are Wearing Earplugs.
Keep The Weapon Pointed Toward The Target. Keep
The Backblast Area Clear.
2. Prepare the launcher for firing. Preparation procedures
are:
a. Remove the launcher from the carrying position and
cradle it with the left arm (Figure 4-3).
b. While carrying the launcher, pull the transport safety
pin with the right hand and release it (Figure 4-4)
Figure 4-3. Using the cradle position
4-53
Figure 4-4. Removing the transport safety pin.
NOTE: Ensure the transport safety pin is attached to the
launcher by its lanyard. If there is no lanyard, place the
transport safety pin in your pocket. If the launcher is not
fired, the transport safety pin must be reinserted.
c. Unsnap and unfold the shoulder stop (Figure 4-5).
d. With the shoulder stop in position, place the launcher
on the right shoulder.
e. With the launcher on the right shoulder and supported
with the right hand, release the front sight by pressing
down on the sight cover and sliding it to the rear. Release
the rear sight by pressing down on the cover and sliding it
forward. Each sight will pop up when the covers are slid off.
4-54
Figure 4-5. Unsnapping the shoulder stop.
f. Cock the launcher by unfolding the cocking lever with
the right hand. Place the thumb of the right hand under the
cocking lever. Grip the front of the firing mechanism for
support. Push the cocking lever forward and down to the
right. Let the cocking lever slide back (Figure 4-6).
CAUTION: Do Not Refold The Cocking Lever. This V\/Ill
Interfere With The Function Of The Firing Mechanism.
Figure 4-6. Cocking the launcher
4-55
g. Adjust the rear sight for the required range.
(1) Before closing the rear sight cover, set the sight
on a range of 200 meters. When the rear sight is
uncovered, the battlesight setting is 200 meters. If the
range to the target is more than 250 meters, adjust the
sight to the range. When the range is 250 meters or less,
no sight adjustment is required (Figure 4-7).
(2) To adjust the rear sight range setting to more than
200 meters, turn the range knob clockwise (toward the
muzzle). To decrease the range, turn the range knob
counterclockwise (toward the gunner). There is a click at
each 50-meter increment; the sound aids the gunner during
limited visibility (Figure 4-7).
Figure 4-7. Adjusting the rear sight range setting.
Performance Measures
1. Perform the pre-fire checks
a. Check the transport safety pin.
b. Ensure the cocking lever is on SAFE.
c. Check the fire-through muzzle cover.
d. Check the color-coded band.
e. Check the front and rear sights.
f. Check the red safety catch.
g. Check the rear seal.
4-56
Results
GO / NO GO
h. Check the shoulder stop.
I. Check the carrying sling.
j. Check the body of the launcher.
2. Prepare the launcher for firing.
a. Remove the transport safety pin.
b. Unsnap and unfolds the shoulder
stop.
c. Place the launcher on the right
shoulder.
d. Release the front and rear sights.
e. Cock the lever.
f. Adjust the rear sight.
GO / NO GO
Evaluation Guidance: Score the soldier GO if all
performance measures are passed. Score the soldier NO
GO if any performance measure is failed. If the soldier
scores NO-GO, show the soldier what was done wrong and
how to do it correctly. Allow the soldier time to retrain and
retest.
Restore An M136 AT4 Light Anti-armor
Weapon To Carrying Condition
071-054-0002
Conditions: Given an Ml36 launcher (AT4) prepared
for firing and the requirement to restore the launcher
to carrying configuration.
Standards: The launcher is prepared in such a manner
that it is not damaged and is in a safe carrying
configuration.
Performance Steps:
1. When the launcher is prepared for immediate firing but is
not fired, it is taken out of operation as follows:
a. If the gunner is to remain in the same position—
4-57
(1) He releases the red safety catch (this step applies
only if the firing sequence has proceeded to this point).
(2) He returns the cocking lever to the SAFE
(uncocked) position by pushing it up and to the left, then
pulling it rearward. He folds the cocking lever down.
(3) Keeping the launcher pointed at the target area,
he removes the launcher from his shoulder.
(4) With the launcher cradled by his left arm, he
replaces the transporter safety pin.
b. If the gunner is to move to another position, he must
also—
(1) Return the rear sight to the battlesight setting of
200 meters, fold down the front and rear sights, and close
the sight covers.
(2) Fold the shoulder stop and snap it back into
position.
CAUTION: The Rear Sight May Be Damaged If It Is Not
Returned To A Battlesight Setting Of 200 Meters Before
The Sight Cover Is Closed.
2. The launcher is now in the carrying configuration and is
safe and ready to transport.
Performance Measures
Results
1. Release the red safety catch.
2. Return the cocking lever to the SAFE
position.
3. Remove the launcher from the shoulder
and cradles it with the left arm.
4. Replace the transport safety pin.
5. Return the rear sight to the battlesight
setting.
6. Fold and covers the sights.
GO / NO GO
7. Fold the shoulder stop and snaps it in
place.
GO / NO GO
4-58
GO / NO GO
GO / NO GO
GO / NO GO
GO / NO GO
GO / NO GO
8. Complete all performance measures in
the correct sequence.
GO / NO GO
Evaluation Guidance: Score the soldier GO if all
performance measures are passed. Score the soldier NO
GO if any performance measure is failed. If the soldier
scores NO-GO, show the soldier what was done wrong and
how to do it correctly. Allow the soldier time to retrain and
retest.
Perform Misfire Procedures On An
M136 AT4 Light Anti-armor Weapon
071-054-0003
Conditions: Given an armed Ml36 launcher (AT4) that has
misfired.
Standards: Misfire procedures are applied so that the AT4
is fired, or safety mechanisms are put in place and the
supervisor is informed of a misfire.
Performance Steps :
1. Perform misfire procedures.
a. When the launcher fails to fire, continue to hold the
launcher pointed toward the target area.
NOTE: In training situations only, immediately shout
“Misfire.”
b. Release the red safety catch.
c. Immediately recock the cocking lever, check the
backblast area, aim, fully depress and hold down the red
safety catch, and press the red trigger button.
NOTE: If the launcher still fails to fire, repeat steps a
through c
4-59
d. If the launcher again fails to fire, release the red safety
catch and return the cocking lever to the SAFE, uncocked
position.
e. Remove the launcher from the shoulder while keeping
the muzzle pointed toward the target area.
f. While cradling the launcher with the left arm, reinsert
the transport safety pin
NOTE: In a training situation only, after inserting the
transport safety pin, wait two minutes. Keep the launcher
pointed toward the target area.
g. Carefully lay the launcher on the ground, muzzle
pointed toward the target area.
2. Immediately use another launcher to engage the target.
Performance Measures
Results
1. Release the red safety catch.
GO / NO GO
2. Recock the cocking lever.
GO / NO GO
3. Attempt to fire after checking the
backblast area.
4. Repeat steps 1 through 3 when the
launcher fails to fire.
5. Return the red safety lever to the
SAFE, uncocked position.
6. Remove the launcher from the shoulder
while keeping the muzzle pointed at the
target area
7. Replace the transport safety pin.
GO / NO GO
8. Place the launcher on the ground with
the muzzle pointed toward the target area
GO / NO GO
GO / NO GO
GO / NO GO
GO / NO GO
GO / NO GO
Evaluation Guidance: Score the soldier GO if all
performance measures are passed. Score the soldier NO
GO if any performance measure is failed. If the soldier
scores NO-GO, show the soldier what was done wrong and
4-60
how to do it correctly. Allow the soldier time to retrain and
retest.
Section IV: Tactics
React To Direct and Indirect Fire
071-326-0510
Conditions: Given a tactical situation where you and your
unit are participating in combat operations against enemy
forces, you are armed with your assigned weapon
(M16A1/A2 rifle; M203 grenade launcher; M249 Machine
gun), and wearing load carrying equipment (LCE).
Standards: During the course of operations you must; take
position in covered positions when fired upon by the enemy
and return fire, use the low/high crawl or rush movement
technique to move under enemy direct fire, warn unit
members of indirect fire attacks and move out of the impact
area as directed by your leader or as prescribed in your
unit standing operating procedure (SOP).
Negotiate
obstacles without injury to yourself and without setting off
booby traps.
Performance Steps
1. Move under direct fire. (See Performance Measures for
detailed steps.)
2. React to indirect fire.
3. Select temporary fighting positions.
4. Mover over, through and around obstacles.
Evaluation Preparation: Take soldiers on a simulated
march or field exercise in battle dress with LCE and
weapons. Select areas with varying cover types and
heights. Select a site about 300 meters away to serve as
4-61
an enemy position. Point out the site to the soldiers. Pair
up soldier's being tested.
Brief Soldier: Tell the soldiers to pretend they are under
direct or indirect fire. Tell them they must move from their
present position to within 100 meters of the enemy position
using the buddy system. Tell the soldiers to use the
appropriate movement techniques as appropriate for the
scenario and terrain.
Performance Measures
1. Moved under direct fire.
a.Taking cover immediately.
b.Watching and listening to your leader
for instructions to fire and move.
(1)Selecting an individual movement
route within your unit's route of axis or
advance.
(2)Searching the terrain to your front
for the following:
(a) A gully, ravine, ditch, or wall at
a slight angle to your direction of
movement. These features provide cover
and concealment when using the low or
high crawl.
(b) Hedgerows or a line of thick
vegetation. These features provide only
concealment when using the low or high
crawl.
(c)
Large trees, rocks,
stumps, fallen timber, rubble, vehicle
hulks, folds or creases in the ground.
These features provide cover and
concealment for use as temporary
positions.
Use the rush if the area
between them has no concealment.
4-62
Results
GO / NO GO
Performance Measures
Results
(d) High grass or weeds. These
features provide only partial concealment.
You can use the rush since the use of the
high or low crawl could reveal your
location by the movement of vegetation.
(3) Selecting your next position (and
the route to it) as one that:
(a) Exposes you to the least
enemy fire.
(b) Does not require you to cross
in front of other members of your element,
masking their fires.
c. Performing the individual movement
technique required to reach your next
position.
(1) Using the high crawl when?
(a) The route provides cover and
concealment.
(b) Poor visibility reduces enemy
observation.
(c) Speed is required but the
terrain and vegetation are suitable only for
the low crawl.
(2) Using the low crawl when?
(a) The route provides cover or
concealment less than one foot high.
(b) Visibility provides the enemy
good observation.
(c) Speed is not required.
(3) Using the rush when?
(a) You must cross open areas.
(b) Time is critical.
4-63
Performance Measures
d. Executing
individual
movement
techniques in the following manner:
(1) High crawl.
(a) Keeping your body off of the
ground.
(b) Resting your weight on your
forearms and lower legs.
(c) Cradling your weapon in your
arms, keeping its muzzle off the ground.
(d) Keeping your knees well
behind your buttocks so it stays low.
Moving forward by alternately advancing
your right elbow and left knee, and left
elbow and right knee.
(2) Low crawl.
(a) Keeping your body as flat as
possible to the ground.
(b) Holding your weapon by
grasping the sling at the upper sling
swivel, letting the hand guard rest on your
forearm and the butt of the weapon drag
on the ground, thus keeping the muzzle
off the ground.
(c) Moving forward by: Pushing
both arms forward while pulling your right
leg forward; Pulling with both arms while
pushing with your right leg; Continuing this
push-pull movement until you reach your
next position, changing your pushing leg
frequently to avoid fatigue.
(3) Rush.
(a) Moving from your firing position
by rolling or crawling.
(b) Starting from the prone
position.
4-64
Results
Performance Measures
Results
(c) Selecting your next position by
slowly raising your head.
(d) Lowering your head while
drawing your arms into your body,
keeping your elbows down, and pulling
your right leg forward.
(e) Raising your body in one
movement by straightening your arms.
(f) Springing to your feet, stepping
off with either foot.
(g) Running to the next position.
Keeping the distance short to avoid
accurate enemy fire. Trying not to stay up
any longer than three to five seconds so
that the enemy does not have time to
track you with automatic fire.
(h) Planting both feet just before
hitting the ground.
(I) Falling forward by: Sliding your
right hand down to the heel of the butt of
your weapon. Breaking your fall with the
butt of your weapon. Assuming a firing
position. Rolling on your side. Placing
the butt of your weapon in the hollow of
your shoulder. Rolling or crawling to a
covered or concealed firing position.
e. Coordinating movement with your
team leader and other team members
using arm and hand signals so that the
soldier not moving can cover by fire any
movement by the other soldier.
4-65
Performance Measures
Results
f. Staying with your team leader and
follow his or her example or instructions.
When he or she moves to the left, you
should move to the left. When he or she
gets down, you should get down. When
he or she fires, you should fire.
2. Reacted to indirect fire.
GO / NO GO
a. Shouting "incoming" in a loud, easily
recognizable voice.
b. Performing immediate action for
indirect fire per your unit SOP. If you
have no other instructions, take the
following actions:
(1) Looking to your leader for
additional instructions. If you cannot see
your leader, but can see other team
members, follow them.
(2) If alone, or if you cannot see your
leader or the other team members, run out
of the impact area away from the
incoming fire.
(3) Remaining in your defensive
position if it has protection from indirect
fire, making no unnecessary movements
that could alert the enemy to your
location.
NOTE: Cover gives protection from bullets, fragments of
exploding rounds, flame, nuclear effects, and biological
and chemical agents. Cover can also conceal you from
enemy observation. Cover can be natural or man-made.
Concealment is anything that hides you from enemy
observation.
4-66
Performance Measures
Results
NOTE: Concealment DOES NOT protect you from enemy
fire. DO NOT think that you are protected from the
enemy's fire just
because you are concealed.
Concealment, like cover, can also be natural or manmade.
3. Selected temporary fighting positions.
GO / NO GO
a.Choosing a position that takes
advantage of available cover and
concealment.
b.Choosing a position that will allow you
to observe and fire around the side of an
object while concealing most of your head
and body.
c.Choosing a position that will allow you
to stay low when observing and firing,
whenever possible.
d.Choosing
a
position
with
a
background that does not silhouette you
against the surrounding environment.
NOTE: If possible, never cross obstacles without someone
covering you.
4. Moved over, through and around GO / NO GO
obstacles.
a. Crossing wire obstacles.
(1) Checking wire obstacles for
booby traps and early warning devices.
Removing or avoiding them by selecting
another site to cross the wire.
(2) Cutting through the wire;
(a) Barbed wire: Cut only the lower
strands and leave the top strand in place.
Cut the wire near a picket. To reduce the
noise of a cut, wrap cloth around the wire.
4-67
Performance Measures
(b) Concertina: Cut the lower
wires that will provide a gap. Stake the
wire back far enough to allow room to
crawl through or under the wire.
(3) Crossing under a wire obstacle.
(a) Sliding headfirst on your back
under the bottom strands.
(b) Pushing yourself forward with
your heels.
(c) Grasping the first strand and lift
one leg over the wire and lower your foot
to the ground, lift your other foot over the
wire and lower it to the ground.
(d) Releasing the wire and feel for
the next strand. Continue until you cross
the wire obstacle.
b. Crossing exposed danger areas such
as roads, trails, or small streams.
(1) Selecting a point at or near a
bend in the road or stream. If possible,
select a bend that has cover and
concealment on both sides.
(2)Crawling up to the edge of the
open area.
(3)Observing the other side for signs
of enemy presence before crossing.
(4)Moving rapidly but quietly across
the exposed area.
(5)Taking cover immediately on the
other side and check the area around you
for enemy activity.
4-68
Results
Performance Measures
Results
c. Crossing over a wall.
(1) Selecting a low spot to cross the
wall.
(2) Observing the other side of the
wall to ensure it is clear of obstacles and
enemy.
(3) Rolling quickly over the top of the
wall, keeping a low silhouette.
(4) Taking cover immediately and
observe for enemy activity.
Evaluation Guidance: Score the soldier GO if all
performance measures are passed. Score the soldier NOGO if any performance measure is failed. If the soldier
scores NO-GO, show the soldier what was done wrong and
how to do it correctly.
References
Required
Related
FM 21-75
React to Flares
071-326-0511
Conditions: Given a tactical situation at night, upon hearing a
flare rising or when suddenly illuminated by a ground or
overhead flare.
Standards: React to a ground or an overhead flare without
being seen by the enemy or losing your night vision.
Performance Steps:
1. Respond to ground flares.
a. Move out of the illuminated area.
4-69
b. Reorient yourself when alone or in a group by standard
operating procedure (SOP), or as instructed.
c. Continue the mission.
2. Respond to an overhead flare with warning (i.e., the sound
of a rising flare).
a. Assume the prone position (behind concealment when
available) before the flare bursts.
b. Protect your night vision by closing one eye and
observing with the other.
c. Use your night vision eye to reorient yourself or rejoin
your group when the flare burns out.
d. Continue the mission.
3. Respond to an overhead flare without warning.
a. Assume the prone position behind concealment (when
available) until the flare burns out.
b. Protect your night vision by closing one eye and
observing with the other.
c. Crouch low until the flare burns out when crossing wire
obstacles where the prone position is not possible.
d. Use your night vision eye to reorient yourself or rejoin
your group when the flare burns out.
e. Continue the mission.
Evaluation Preparation: Have ground flares set so that you
can ignite them when you are ready. Have hand-held flares
to use to simulate the overhead flares.
Brief Soldier: Tell the soldier that he or she is to react to the
flares as they appear. After grading the soldier on the ground
flare and the overhead flare with warning, tell him or her that
the next flare should be acted on only after the flare has burst
(simulate "without warning").
Performance Measures
1. Respond to a ground flare:
a. Move out of the illuminated area.
b. Reorient yourself alone or in a group.
4-70
Results
GO / NO GO
c. Continue the mission.
2. Respond to an overhead flare with
warning:
a. Assume the prone position before the
flare bursts.
b. Protect your night vision by closing
one eye and observing with the other eye.
c. Reorient yourself or rejoin your group
when the flare burns out.
d. Continue the mission.
3. Respond to an overhead flare without
warning
a. Assume the prone position until the
flare burns out.
b. Protect your night vision by closing
one eye and observing with the other eye.
c. Crouch low until the flare burns out
when crossing wire obstacles where the
prone position is not possible.
d. Use your night vision eye to reorient
yourself or rejoin your group when the flare
burns out.
e. Continue the mission.
GO / NO GO
GO / NO GO
Evaluation Guidance: Score the soldier GO if all
performance measures are passed. Score the soldier NO
GO if any performance measure is failed. If the soldier
scores NO GO, show the soldier what was done wrong and
how to do it correctly.
Related Reference: FM 21-75
4-71
Control Entry Into A Restricted Area
071-990-0003
Conditions: Given the current challenge and password and
a defensive position with a designated sector of fire, your
individual weapon and load carrying equipment (LCE).
Enemy and friendly personnel may enter your sector.
Standards: Detect and halt all personnel in your sector and
challenge them, using the correct challenge.
Allow
personnel with the correct password to pass and detain
(capture) personnel without the password. Do not allow the
enemy to overhear the password.
Performance Steps
1. Challenge a single person desiring access to your area of
responsibility. (See Performance Measures for detailed
steps.)
2. Challenge a group desiring access to your area of
responsibility.
Evaluation Preparation: Simulate a situation in which
soldiers can use the challenge and password. Issue the
challenge and password to those who will play the role of
friendly troops and the correct and incorrect password to
those who will play the role of unidentified troops. The
person playing the part of the intruder will vary responses
upon being challenged.
Brief Soldier: Tell the soldier to challenge all those who
approach the defensive position.
4-72
Performance Measures
1. Challenged a single person desiring
access to your area of responsibility.
a. Commanding the person to halt
before that person gets close enough to
pose a threat using a clear voice, just loud
enough to be heard.
b. Keeping the person covered.
c. Asking "Who is there?" Again, using
a clear voice just loud enough to be heard
so the enemy will not overhear if nearby.
d. Having the person identify himself or
herself, such as "Private Willard,
messenger."
e. Ordering the person to "Advance to
be recognized."
f. Maintaining your concealed position
and keeping the person covered with your
weapon. When the stranger gets within
two or three meters of you, again ordering
him or her to halt.
g. Issuing the challenge in a soft voice
and get the password in reply.
h. Giving permission to pass on hearing
the correct password, if you have no
reason for doubt.
i. Disarming and detaining any
person(s) not able to identify themselves
or give the correct password.
Then
notifying your immediate supervisor.
Results
GO / NO GO
4-73
Performance Measures
2. Challenged a group desiring access to
your area of responsibility.
a. Commanding the group to halt before
they are close enough to pose a threat,
using a clear voice, just loud enough to be
heard.
b. Keeping the group covered.
c. Giving the order "Advance one
person to be recognized." This should be
the leader of the group.
d. Maintaining your concealed position
and keeping the person covered with your
weapon. When the person gets within two
or three meters of you, again ordering him
or her to halt.
e. Asking "Who is there?" Again, using
a clear voice just loud enough to be heard
so the enemy will not overhear if nearby.
f. Having the person identify the group
such as "friendly patrol."
g. Issuing the challenge in a soft voice
and get the password in reply.
h. Ordering the rest of the patrol to
advance one by one and ensuring the
leader identifies each person.
i. Disarming and detaining any
person(s) not able to identify themselves
to the leader's satisfaction. Then notifying
your immediate supervisor.
Results
GO / NO GO
Evaluation Guidance: Score the soldier GO if all
performance measures are passed. Score the soldier NO
GO if any performance measure is failed. If the soldier
scores NO GO, show the soldier what was done wrong and
how to do it correctly.
4-74
References
Required
Related
FM 22-6
Report Intelligence Information
301-371-1000
Conditions: You have observed enemy activity, significant
terrain and weather features and must immediately report
the activity to your chain of command via radio, wire, cable,
or messenger.
Standards: Submit your observations in a spot report, using
the S-A-L-U-T-E format, to your chain of command, within
five minutes of observing enemy activity. You will correctly
identify six out of six S-A-L-U-T-E items.
Performance Steps
1. Identify enemy activity. Determine whether observed
activity is friendly or enemy.
If unable to make
determination, report activity as unknown.
2. Record information in a spot report, using the S-A-L-U-TE format.
a.The spot report is a report containing information for
which speed of transmission is essential. A spot report does
not have a prescribed format, but use of the S-A-L-U-T-E
format will ensure reporting of essential information.
b.Define S-A-L-U-T-E acronym.
(1) S - Size. Report the number of personnel, vehicles,
aircraft, or size of an object.
(2) A - Activity. Report detailed account of actions, i.e.,
direction of movement, troops digging in, artillery fire, type of
attack, nuclear, biological, chemical activity, etc.
4-75
Performance Steps
(3) L - Location. Report where you saw the activity.
Include grid coordinates or reference from a known point
including the distance and direction from the known point.
(4) U - Unit. Report the enemy's unit. If the unit is
unknown, report any distinctive features, such as uniforms,
patches or colored tabs, headgear, vehicle identification
markings, etc.
(5) T - Time. Report the time the activity was
observed, not the time you report it. Always report local or
Zulu time.
(6) E - Equipment. Report all equipment associated
with the activity, such as weapons, vehicles, tools. If unable
to identify the equipment, provide as much detail as you can
so an identification can be made by higher headquarters.
(7) Remarks. Include any information not included in
the S-A-L-U-T-E format.
3. Provide the spot report to the chain of command.
Evaluation Preparation: Position two to four personnel
(dressed in aggressor uniforms if available) where they are
observable with the naked eye (or binoculars if available).
Direct the aggressors to perform some type of activity such
as setting up camp, cleaning weapons, working on a
vehicle, or studying maps. Provide the soldier with a
1:50,000 scale topographic map of the test area. If you
require the soldier to write the report, provide paper and a
pen or pencil. If you require the soldier to radio the report
to someone else, provide two radios and a signal operating
instruction.
Brief Soldier: Tell the soldier that he or she will correctly
identify six out of six S-A-L-U-T-E items and submit their
observations in a spot report, using the S-A-L-U-T-E
format, to their chain of command, within five minutes of
observing enemy activity.
4-76
Performance Measures
Results
1. Recorded observations of enemy
activity in a spot report which includes:
a. Size.
b. Activity.
c. Location.
d. Unit.
e. Time.
f. Equipment.
2. Reported all information to the chain of
command within five minutes of
observation.
GO / NO GO
GO / NO GO
Evaluation Guidance: Score the soldier GO if all
performance measures are passed within 5 minutes.
Score the soldier NO GO if any performance measure is
failed. If the soldier scores NO GO, show the soldier what
was done wrong and how to do it correctly.
References
Required
Related
FM 21-75
Section V: Nuclear, Biological, and Chemical
Decontaminate Yourself And Individual Equipment
Using Chemical Decontamination Kits
031-503-1013
Conditions: You are at Mission Oriented Protective Posture
(MOPP) level 2 with remaining MOPP gear available. You
have a full canteen of water, a poncho, load carrying
equipment (LCE), and assigned decontamination kit(s) and
applicable technical manuals (TMs 3-4230-216-10, 3-4230229-10, 3-4230-235-10). Your skin is contaminated or has
4-77
been exposed to chemical agents, or you passed through a
chemically contaminated area.
Standards : 1.Started the steps to decontaminate your skin
and eyes within 1 minute after you found they were
contaminated. 2.Decontaminated all exposed skin and
your eyes as necessary before chemical agent symptoms
occur. 3.Decontaminated all personal equipment for liquid
contamination after decontaminating your skin, face, and
eyes.
Performance Steps
1. Assume MOPP level 3.
WARNING: The M258a1 Decontamination Kit (Olive Drab
Case And Wipe Packets) Will Only Be Used For Actual
Chemical Decontamination. Do Not Use Wipes On Your
Eyes, Mouth, Or Open Wounds; Use Water To Wash
Toxic Agent Out Of Your Eyes, Cuts Or Wounds. For
Decontamination Of Blisters, See The Task 081-8311007, Perform First Aid For Burns.
2. Decontaminate your skin and personal equipment IAW
TM 3-4230-216-10, para 2-3, if you have the M258A1
Decontaminating Kit (go to Step 3 if you don't). Go to Step
5 after decontamination is complete.
CAUTION: For External Use Only. May Be Slightly
Irritating To The Skin Or Eyes. Keep Decontaminating
Powder Out Of Your Eyes, Cuts And Wounds. Use Water
To Wash Toxic Agent Out Of Your Eyes, Cuts Or Wounds.
For Decontamination Of Blisters, See The Task 081-8311007, Perform First Aid For Burns.
4-78
Performance Steps
WARNING: Death Or Injury May Result If You Breathe
Toxic Agents While Decontaminating The Face. If You
Need To Breathe Before You Finish, Reseal Your Mask,
Clear It, And Check It. Get Your Breath, Then Resume
The Decontaminating Procedure. Caution:
Cover
Exposed Cuts Or Wounds After Decon With Appropriate
First Aid Wrap Or Bandage Prior To Handling The
Decon Package.
3. Decontaminate your skin IAW TM 3-4230-229-10, para 23, if you have the M291 Skin Decontaminating Kit,. Go to
step 4 after skin decontamination is complete.
CAUTION: Keep The Decon Powder Out Of Your Eyes,
Cuts, And Wounds. Don't: A. Handle Or Hold Leaking
Packets Above The Head. B. Touch Or Rub Your Eyes
With Anything That Has Been In Contact With The
Decontaminating Powder. C. Touch Your Lips Or Inside
Your Mouth With Anything That Has Been In Contact With
The Decontaminating Powder.
CAUTION: Never Attempt To Decontaminate A Loaded
Weapon. Always Unload, Clear, And Place Weapons On
Safe Before Starting Decontaminating Procedures. Caution:
Immediate Decon Techniques Remove Only The Liquid
Hazard. Certain Items may Still Present A Vapor Hazard.
See Supervisor For Unmasking Procedures.
4. Decontaminate your individual equipment IAW TM 34230-235-10, para 2-3, if you have the M295 Individual
Equipment Decontaminating Kit.
Do this step after
completing step 3.
5. Dispose of hazardous waste.
a.Dispose of `UNCONTAMINATED' materials.
(1) Dispose of expended or unserviceable materials
IAW: federal, state, and local laws; military regulations and
publications; host nation laws (if more restrictive than U.S.
laws); and local Standard Operating Procedures.
4-79
Performance Steps
(2)Place used decontaminating materials in a sealed
plastic bag (example: `ziploc' bag), and label the bag with its
contents (as a minimum). Give the bag to your supervisor.
b.Dispose of CONTAMINATED hazardous waste
materials in accordance with FM 3-5 NBC Decontamination.
Inform your supervisor of the status of contaminated waste.
Evaluation Preparation: A good time to evaluate this task is
while in a field environment. Gather materials for disposal
of hazardous waste IAW federal, state, and local
rules/regulations.
Brief Soldier: Tell the soldier what body parts and
equipment are contaminated.
Performance Measures
1. Donned the mask and hood without
zipping the hood, pulling the draw strings,
or fastening the shoulder straps.
2. Sought overhead cover or used a
poncho for protection against further
contamination (if operational conditions
permitted).
3. Started the steps to decontaminate skin
and eyes within 1 minute after they are
contaminated.
Results
GO / NO GO
GO / NO GO
GO / NO GO
NOTE: Complete Step 4 or Steps 5 and 6.
4. Decontaminated using M258A1 Decon
Kit.
a. Decontaminated hands, eyes, face,
neck, ears, and redid hands using one
Wipe 1 and one Wipe 2.
b. Assumed MOPP4.
4-80
GO / NO GO
Performance Measures
Results
c. Decontaminated weapons, gloves,
helmet, and handtools using additional
Wipes 1 and 2.
d. Decontaminated exterior of hood and
mask (used Wipe 2 then Wipe 1 on mask
outserts).
5. Decontaminated skin using M291 GO / NO GO
Decon Kit.
a. Decontaminated hands, face, and
inside of mask.
b. Assumed MOPP4.
c. Removed decon powder with soap
and water when operational conditions
permitted.
6. Decontaminated equipment using M295 GO / NO GO
Decon Kit.
a. Decontaminated gloves, exposed
areas of mask and hood, weapon, and
helmet using the first mitt.
b.
Decontaminated
LCE
and
accessories, mask carrier, over-boots,
and redid gloves using second mitt.
c. Removed decon powder when
operational conditions permitted.
NOTE: Soldier complied with all federal, state, and local
laws/regulations regarding disposal of hazardous waste
disposal.
7. Placed expended uncontaminated GO / NO GO
materials in plastic bag and turned into
supervisor.
References
Required
Related
FM 3-5
FM 3-4
4-81
References
Required
Related
TM 3-4230-216-10
TM 3-4230-229-10
TM 3-4230-235-10
React To A Nuclear Hazard Or Attack
031-503-1018
Conditions: Given an area where nuclear weapons have
been or may have been used. You have a piece of cloth or
similar item, a brush or broom, and shielding material. You
must respond to one of the following situations where you:
1. See a brilliant flash of light. 2. Find a standard
radiological contamination marker or an enemy marker. 3.
Are told that fallout is in your area. 4. Receive instructions
to respond to a nuclear attack. 5. Come across a
suspected Depleted Uranium (DU)/Low Level Radioactive
(LLR) Material (DULLRAM) hazard.
Standards: 1. Did not become a casualty of a nuclear
attack with or without warning. 2. Identified radiological
contamination markers with 100 percent accuracy and
notified your supervisor. 3. Started the steps to
decontaminate yourself within 1 minute of finding
radiological contamination. Decontaminated your individual
equipment after you completely decontaminated yourself.
4-82
Performance Steps
1. React to a nuclear attack with no warning.
a. Close your eyes immediately.
b. Drop to the ground in a prone, head-on position. If in
the hatch of an armored vehicle, immediately drop down
inside the vehicle.
c. Keep your head and face down and your helmet on.
d. Stay down until the blast wave passes and debris stops
falling.
e. Cover your mouth with a cloth or similar item to protect
against inhalation of dust particles.
f. Check for casualties and damaged equipment.
2. React to nuclear attack with warning.
a. Select and use the best available shelter (FM 3-3-1,
appendix B).
(1) Move into a fighting position, bunker, or ditch.
(2) Take protective actions if inside a shelter.
(3) Remain in place if you are in an armored vehicle.
b. Keep clothes loosely fitted, and headgear on at all
times.
c. Protect your eyes.
d. Minimize exposed skin areas.
e. Cover your mouth with a cloth or similar item to protect
against inhalation of dust particles.
3. React if you see a standard radiological contamination
marker or any enemy radiological contamination marker.
a. Avoid the area if possible.
b. Cross the area quickly by the shortest route that
exposes you to the least amount of radiation based on
METT-T.
(1) Request crossing instructions if you must cross.
(2) Make maximum use of shielding.
(3) Cover your mouth with a cloth or similar item to
protect against inhalation of dust particles.
c. Report the discovery of a marker to your supervisor.
4-83
Performance Steps
4. Remove radiological contamination (including DULLRAM)
from your clothing, equipment, and exposed skin.
a. Shake or brush contaminated dust (all dust is
considered to be radioactive) from your clothing, equipment,
and exposed skin with a brush, broom, or your hands (if a
brush or broom is not available).
b. Wash your body as soon as possible, giving special
attention to the hairy areas and underneath your fingernails.
c. Conduct MOPP Gear Exchange if you are
contaminated with wet radioactive contamination. See task
Protect Yourself from NBC Injury/Contamination when
Changing Mission-Oriented Protective Posture (MOPP)
Gear, task number 031-503-1023.
Evaluation Preparation: If possible, evaluate this task
during a normal unit operation. Select an area that
provides several shelters from which the soldier can
choose. Examples are in an open area, a shallow ditch or
depression, or a foxhole with overhead cover. 1. Evaluate
the soldier's reaction to a nuclear attack: a. Without
warning (brilliant flash of light), by having the soldier stand
in an open area with the nearest possible shelter no closer
than 12 feet. You may simulate the attack by saying
"Brilliant flash," or by using the flash attachment of a
camera. b. With warning, by having the soldier stand in an
open area with the nearest possible shelter no closer than
12 feet. Tell the soldier there will be a nuclear detonation
within 2 minutes and to take the best available shelter. 2.
Evaluate the soldier's ability to react to radiological
contamination markers by telling the soldier to walk through
the area (where a standard marker and a former Warsaw
Pact marker have been placed) and take appropriate
action.
3.
Evaluate the soldier's ability to remove
radiological contamination.
Brief Soldier: Tell the soldier a nuclear attack is imminent
and he/she must react to a nuclear attack with and without
4-84
warning. Tell the soldier he/she must also react to nuclear
contamination markers. Tell the soldier that after being
exposed to radiation, he/she must take the steps for
decontamination.
Performance Measures
1. Reacted to a nuclear attack without
warning.
a. Closed eyes immediately.
b. Dropped to the ground in a prone,
head-on position; or if in the hatch of an
armored vehicle, immediately dropped
down inside the vehicle.
c. Kept head and face down, and
helmet on.
d. Stayed down until the blast wave
passed and debris stopped falling.
e. Covered mouth with a cloth or similar
item to protect against inhalation of dust
particles.
f. Checked for casualties and damaged
equipment.
2. Reacted to a nuclear attack with
warning.
a. Selected and used the best available
shelter.
b. Kept clothes loosely fitted, and
headgear on at all times.
c. Protected eyes.
d. Minimized exposed skin areas.
e. Covered mouth with a cloth or similar
item to protect against inhalation of dust
particles.
Results
GO / NO GO
GO / NO GO
4-85
Performance Measures
Results
3. Reacted to radiological markers.
a. Avoided the area if possible.
b. Crossed the area quickly by the
shortest route that gave the least amount
of exposure to radiation based on METTT.
c. Reported the discovery of a marker
to supervisor.
4. Removed radiological contamination
from clothing, equipment, and exposed
skin.
a. Shook or brushed contaminated dust
(all dust is considered to be radioactive)
from clothing, equipment, and exposed
skin with a brush, broom, or hands (if a
brush or broom was not available).
b. Washed body as soon as possible,
giving special attention to the hairy areas
and underneath fingernails.
c. Conducted MOPP Gear Exchange if
contaminated
with
wet
radioactive
contamination.
GO / NO GO
GO / NO GO
References
Required
Related
FM 3-4
React To A Chemical Or Biological Hazard Or Attack
031-503-1019
Conditions: Given a tactical environment in which chemical
or biological (CB) weapons have been or may be used by
the enemy. You are in Mission-Oriented Protective Posture
4-86
(MOPP) level 1 and one or more of the following Automatic
Masking Criteria happens: 1. A chemical alarm sounds. 2.
A positive reading is obtained on detector paper.
3.
Individuals exhibit symptoms of chemical or biological
agent poisoning. 4. You observe a contamination marker.
5. Supervisor tells you to mask. 6. You see personnel
wearing protective masks. 7. You observe other signs of
possible chemical or biological attack.
Standards: 1. Did not become a casualty.2. Identified
chemical contamination markers with 100 percent accuracy
and notified your supervisor.3. Started the steps to
decontaminate yourself within 1 minute of finding chemical
contamination. Decontaminated your individual equipment
after you completely decontaminated yourself.
Performance Steps
1. Identify chemical or biological hazard Automatic Masking
Criteria.
a. Don protective mask when there is a high probability of
a chemical attack such as:
(1) A chemical alarm sounds.
(2) A positive reading is obtained on detector paper.
(3) Individuals exhibit symptoms of chemical or
biological agent poisoning.
(4) You observe a contamination marker.
(5) Supervisor tells you to mask.
(6) You see personnel wearing protective masks.
(7) You observe other signs of possible chemical or
biological attack.
b. Respond to commander's policy of automatic masking.
NOTE: Commanders at all levels may establish a modified
policy, when chemical weapons have been employed, by
designating additional events as automatic masking criteria.
4-87
Performance Steps
2. Protect Yourself from Chemical/Biological Contamination
Using Your Assigned Protective Mask, (see task number
031-503-1035), without fastening the hood.
NOTE: The mask gives immediate protection against
inhalation of agent vapors. Do not fasten the hood, but go
immediately to the next step.
3. Give the alarm.
a. Yell "gas."
b. Give hand and arm signal.
4. Take cover using whatever cover is readily available to
decrease the amount of agent contact.
5. Decontaminate exposed skin as necessary (see task
Decontaminate Your Skin And Personal Equipment Using
Chemical Decontamination Kit, task number 031-503-1013).
6. Assume MOPP level 4 (see task Protect Yourself from
Chemical/Biological Injury/Contamination with MissionOriented Protective Posture, task number 031-503-1015).
The idea is to cover all skin; the mask and over-garment
already protect the head and shoulders.
a. Put on your gloves with liners.
b. Zip and fasten over-garment jacket.
c. Secure the hood; then secure the over-garment to
increase protection.
d. Put on your over-boots.
Combat boots provide
protection but should be covered because they absorb
chemicals. It takes a long time to put on the over-boots, so
put them on last in an emergency.
7. Decontaminate personal equipment as necessary (see
task Decontaminate Your Skin and Personal Equipment
Using Decontamination Kits, task number 031-503-1013).
8. Notify your supervisor of any CB hazard markers or other
CB hazard indicators.
9. Continue the mission.
4-88
Evaluation Preparation: A good time to evaluate this task is
during a normal unit operation. Select a site with adequate
cover with soldiers in MOPP level 1.
Brief Soldier: Tell the soldier there will be an encounter with
simulated CB contamination and/or a CB alarm will be
given. The task is to recognize the hazard and/or alarm
and take appropriate action to protect self and warn other
soldiers by giving the appropriate alarm.
Performance Measures
Results
1. Protected self by:
GO / NO GO
a. Stopped breathing.
b. Put on mask with hood.
c. Cleared mask.
d. Checked mask.
e. Did not fasten the hood.
f. Went immediately to the next step.
2. Gave the alarm.
GO / NO GO
a.Vocally.
b.Used arm and hand signals.
3. Took cover using whatever means were GO / NO GO
readily available to reduce exposure.
4. Decontaminated skin if necessary.
GO / NO GO
NOTE: Only the fact that the soldier decontaminates
himself is evaluated.
The actual conduct of
decontamination is evaluated in task 031-503-1013.
5. Assumed MOPP level 4.
GO / NO GO
NOTE: Only the fact that the soldier assumes MOPP level
4 is evaluated. The actual donning of MOPP gear is
evaluated in task 031-503-1015.
6. Reported presence of chemical or GO / NO GO
biological hazards indicators to supervisor
if present.
Evaluation Guidance: Score the soldier GO if all
performance measures are passed. Score the soldier NO-
4-89
GO if any performance measure is failed. If the soldier
scores NO-GO, show the soldier what was done wrong and
how to do it correctly. Allow the soldier time to retrain and
retest.
References
Required
Related
FM 3-4
Protect Yourself from Chemical/Biological
Contamination Using Your Assigned Protective Mask
031-503-1035
Conditions: Given your assigned protective mask with hood
and carrier, canteen with the M1 canteen cap, an M258A1
decontamination kit or M291 and M295 decontamination
kits, M8 detector paper, and applicable technical manuals:
M17 Mask (TM 3-4240-279-10)M24, M25 Mask (TM 34240-280-10) M42 Mask (TM 3-4240-300-10-2) M43 Mask
(TM 3-4240-312-12&P) M40 Mask (TM 3-4240-339-10)
M42, M42A1, M42A2 Mask (TM 3-4240-343-10). Remove
eyeglasses and contact lenses prior to performing this task.
You find yourself in one of the following situations: 1. Hear
or see a chemical or biological attack. 2. Realize through
other means that you are under a chemical or biological
attack. 3. Are ordered to mask. 4 Must enter a
contaminated area. After having donned your protective
mask you need to drink from your canteen.
Standards: NOTE: All time standards are for administrative
(non-combat) evaluation purposes only. 1. Donned,
cleared, and checked your mask before chemical agent
symptoms occurred. 2. Drank through your protective
mask from your canteen without becoming a casualty.
4-90
Performance Steps
1. Stop breathing.
NOTE: All time standards are for administrative (noncombat) evaluation purposes only.
2. Don your mask to include clearing and checking:
a.If you have the M17-series protective mask: within 9
seconds IAW TM 3-4240-279-10, paragraph 2-14.
b.If you have the M24 protective mask: within 9 seconds
IAW TM 3-4240-280-10, paragraph 2-13 after removing your
flight helmet.
c.If you have the M25-series protective mask: within 9
seconds IAW TM 3-4240-280-10, paragraph 2-13 after
removing your Combat Vehicle Crewman (CVC) helmet.
d.If you have the M40-series protective mask: within 9
seconds by taking the following actions:
NOTE: Use the procedures below until TM 3-4240-339-10,
dated Feb 94, is updated.
(1) Stop breathing.
(a) Close your eyes.
(b) Remove your helmet and do one of the following:
Store it between your legs above the knees, or hold your
rifle between your legs and place the helmet on the flash
suppressor.
(2) Take off your glasses if you are wearing them.
(3) Open the carrier with your left hand holding the
carrier open.
(4) Remove the mask from the carrier by grasping the
mask with your right hand.
(5) Put your chin in the chin pocket.
NOTE: The straps should lie flat against your head.
(6) Grasp the head harness and pull the head harness
over your head. Be sure your ears are between the temple
straps and the cheek straps.
4-91
Performance Steps
(7) Use the other hand to tighten the cheek straps one
at a time while holding the head pad centered on the back of
your head.
(8) Clear your mask.
(a) Seal the outlet valve by pushing in on the center
of the outlet valve cover with one hand.
(b) Blow hard so that air escapes around the edges
of the mask.
(c) Cover the inlet port of the canister with the palm
of your hand.
NOTE: The facepiece should collapse against your face
and remain so while you hold your breath. If it does
collapse, the facepiece is airtight. If the facepiece does not
collapse, check for hair, clothing, or other matter between
the facepiece and your face.
(d) Breathe in.
(e) Remove anything preventing a seal from forming
between your face and the mask.
(9) Resume breathing.
NOTE: Use the procedures below until TM 3-4240-300-102, dated Aug 88, is updated.
e. If you have the M42 or M42A1 protective mask: Don
your mask within 9 seconds after removing your Combat
Vehicle Crewman (CVC) helmet.
(1) Stop breathing.
(2) Close your eyes.
(3) Remove your helmet, placing it in a convenient
location, while avoiding contaminated surfaces if possible.
(4) Remove glasses if you are wearing them.
(5) Open the carrier with your left hand by grasping the
flap at the hook-and-pile fastener and pulling it.
(6) Grasp the mask facepiece with your right hand,
withdrawing the mask from the carrier.
(7) Put your chin in the chin pocket.
(8) Press the facepiece snugly against your face.
4-92
Performance Steps
(9) Grasp the tab and pull the head harness over your
head, making sure that your ears are between the temple
straps and the cheek straps.
(10) Use the other hand to tighten the cheek straps one
at a time, ensuring that the straps lie flat against your head
while holding the head pad.
(11) Clear your mask.
(a) Seal the outlet valve by pushing in on the center
of the outlet valve cover with one hand.
(b) Breathe out hard so that air escapes around the
edges of the mask.
NOTE: At this time the mask is clear and it is safe to open
your eyes.
(c) Open your eyes.
NOTE: The facepiece should collapse against your face and
remain so while you hold your breath. If it does collapse,
the facepiece is airtight. If the facepiece does not collapse,
check for hair, clothing, or other matter between the
facepiece and your face.
(d) With palm of hand cover the inlet port of the
armor quick disconnect.
(e) Breathe in.
(12) Check for any foreign material around the
facepiece if the mask does not seal.
(13) Resume breathing.
f. If you have the M42A2 protective mask: don your mask
within 9 seconds IAW TM 3-4240-343-10, paragraph 2-8
after removing your Combat Vehicle Crewman (CVC)
helmet.
g. If you have the M43-series protective mask: don your
mask IAW TM 3-4240-312-12&P, paragraph 2-8.
NOTE: There are no time standards for donning the hood.
4-93
Performance Steps
3. Complete securing your mask with hood:
a. If you have the M17-series protective mask: pull the
hood over your head and zip the front closed to cover all
bare skin.
b. If you have the M24 protective mask: pull the M7 hood
over your helmet and head so that it covers your shoulders.
c. If you have the M25-series protective mask: pull the
hood over your head and zip the front closed to cover all
bare skin.
d. If you have the M40-series protective mask: don the
hood so that it lies smoothly on your head
NOTE: There are no time standards for donning the hood.
NOTE: Use the procedures below until TM 3-4240-339-10,
dated Feb 94, is updated. CAUTION: Be Very Careful
When Pulling On The Hood. The Hood Could Snag On The
Buckles Of The Head Harness And Tear.
(1) For masks equipped with the regular hood.
(a) Grasp the back edge of the hood skirt.
(b) Pull the hood completely over your head so that it
covers the back of your neck, head, and shoulders.
(c) Zip the front of the hood closed by pulling the
zipper slider downward.
(d) Tighten the draw cord.
(e) Secure the underarm straps by fastening and
adjusting them.
(f) Put on your helmet.
(g) Close your mask carrier.
(h) Continue the mission.
(2) For masks equipped with the Quick Doff hood.
(a) With hands inside the hood, expand the elastic
gathering around the neck of the hood.
(b) Stretch and carefully pull the hood over your
head so that the hood covers the head, neck, and
shoulders.
4-94
Performance Steps
(c) Fasten and adjust the underarm straps.
(d) Put on your helmet.
(e) Close your mask carrier.
(f) Continue the mission.
NOTE: There are no time standards for donning the hood.
e. If you have the M42 or M42A1 protective mask: pull the
hood over your head and zip the front closed to cover all
bare skin.
NOTE: Use the procedures below until TM 3-4240-300-102, dated Aug 88, is updated. CAUTION: Be Very Careful
When Pulling On The Hood. The Hood Could Snag On The
Buckles Of The Head Harness And Tear.
(1) For masks equipped with the regular hood.
(a) Grasp the back edge of the hood skirt.
(b) Pull the hood completely over your head so that it
covers the back of your neck, head, and shoulders.
(c) Zip the front of the hood closed by pulling the
zipper slider downward.
(d) Tighten the draw cord.
(e) Secure the underarm straps by a
f stening and
adjusting them.
(f) Put on your helmet.
(g) Close your mask carrier.
(h) Go to (3)
(2) For masks equipped with the Quick Doff hood.
(a) With hands inside the hood, expand the elastic
gathering around the neck of the hood.
(b) Stretch and carefully pull the hood over your
head so that the hood covers the head, neck, and
shoulders.
(c) Fasten and adjust the underarm straps.
(d) Put on your helmet.
(e) Close your mask carrier.
(f) Go to (3).
4-95
Performance Steps
(3) Put on your helmet.
(a) Disconnect the boom microphone from the
helmet.
(b) Connect the mask microphone to the receptacle
in the helmet.
(c) Grasp the helmet next to the earcups with your
hand spread as far as possible.
(d) Place the helmet over your head, tilting the
helmet forward slightly so the first contact when putting it on
is with the forehead surface of the mask.
(e) Rotate the helmet back and down over your head
until it is seated in position.
f. If you have the M42A2 protective mask: Pull the hood
over your head and zip the front closed to cover all bare
skin.
g. If you have the M43-series protective mask: pull the
hood over your head and zip the front closed to cover all
bare skin.
NOTE: There are no time standards for donning the hood.
CAUTION: The M291 Decontamination Kit Is For External
Use Only. It May Be Slightly Irritating To The Skin Or Eyes.
Keep Decontaminating Powder Out Of Your Eyes, Cuts,
And Wounds.Warning: Use The M291 Decon Kit To Decon
Your Canteen. Do Not Use The M295 Decon Kit For This
Purpose.Warning: The M258a1 Decontamination Kit (Olive
Drab Case And Wipe Packets) Will Only Be Used For Actual
Chemical Decontamination. Do Not Use Wipes On Your
Eyes, Mouth, Or Open Wounds.Warning: Do Not Connect
The Quick Disconnect Coupling Half To Your Canteen Until
All Surfaces Have Been Checked. Chemical Contamination
Could Enter Your Mouth Resulting In Your Becoming A
Casualty.
4-96
Performance Steps
4. Drink water while wearing your assigned protective mask
IAW the applicable technical manual. M17A1/M17A2 Mask
(TM 3-4240-279-10), Paragraphs 2-15, 2-16;M40-series (TM
3-4240-339-10), Paragraphs 2-15, 2-16, 2-17; M42 or
M42A1 Mask (TM 3-4240-300-10-2), Paragraphs 2-13, 214, 2-15; M42A2 Mask (TM 3-4240-343-10), Paragraphs 28g , 2-8h; M43-series (TM 3-4240-312-12&P), Paragraphs
2-8g, 2-8h.
5. Use the following actions if you have an M24/M25-series
protective mask, or if your mask's drinking apparatus is not
operational:
NOTE: There are no procedures for drinking when wearing
the M7 hood over the flight helmet.
a.Prepare your hood.
(1) Unfasten your hood straps.
(2) Loosen the draw cord.
b.Prepare the canteen.
(1) Take out the canteen by pushing up on the bottom
of the canteen cover until you can grasp the canteen by its
body.
(2) Check the canteen for liquid contamination using
M8 detector paper.
(a) If the canteen is contaminated, seek an
uncontaminated canteen.
(b) If an uncontaminated canteen is not available,
attempt to decontaminate the canteen with your
decontamination kit.
(3) Loosen the canteen cap without removing it.
(4) Turn canteen upside down to let some water from
the canteen wash the threads.
(5) Move the canteen under your hood.
c. Take a few breaths, holding the last one.
d. Grasp the chin part of the mask.
4-97
Performance Steps
e. Close your eyes.
f. Pull your mask down, out, and up away from your face,
so that you can get the canteen to your mouth.
g. Push the cap off the threads immediately, putting the
mouth of the canteen to your lips, being careful to touch as
little of the canteen mouth with your lips as possible.
h. Tilt your head back, pouring water into your mouth
while holding your breath.
i. If using the buddy system, hand the canteen to your
buddy to hold. If you are alone, you must set the canteen
down.
j. Reseat the mask on your face.
k. Swallow the water.
L. Clear your mask.
m. Check your mask.
n. Breathe.
o. Repeat steps d through m until you are no longer
thirsty.
p. Reseal the canteen.
q. Tighten the draw cord.
r. Fasten the hood straps.
s. Secure your equipment.
t. Continue the mission.
6. Remove and store the mask (following the steps in the
applicable technical manual) after the "all clear" order is
issued M17A1/M17A2 Mask
(TM 3-4240-279-10),
Paragraph
2-17;M24-series
(TM
3-4240-280-10),
Paragraphs 2-15, 2-16, 2-17; M25-series (TM 3-4240-28010-2), Paragraphs 2-14, 2-16, 2-17; M40-series Paragraph,
Go to Step 6a;M42 0r M42A1Paragraph, Go to Step
6b;M42A2 (TM 3-4240-343-10), Paragraph 2-8; M43-series
(TM 3-4240-312-12&P), Paragraph 2-8.
a. M40-series:
(1) Remove your helmet.
(2) Unfasten the underarm straps.
4-98
Performance Steps
(3) Loosen the draw cord.
(4) Unzip the zipper on the hood.
(5) Remove the hood.
(a) Place both hands on the back edge of the hood
skirt.
(b) Raise the hood over your head.
(c) Pull the hood over the front of the mask.
(6) Loosen the cheek straps.
(7) Remove the mask.
(a) Place one hand on the front of the voicemitter to
hold the facepiece to your face.
(b) Grasp the head harness tab with your other
hand.
(c) Pull the head harness over the front of the mask.
(d) Remove the mask from your head.
(8) Replace the helmet on your head.
(9) Remove any moisture from the hood and mask.
(a) Shake off any moisture.
(b) Wipe any moisture from the hood and mask.
(10) Store your mask with hood.
(a) Hold the front of the mask in a horizontal position.
(b) Smooth the hood over the mask.
(c) Pull the head harness over the front of the mask.
(d) Fold the two edges of the hood over the outlet
valve to create a V in the front of the hood.
(e) Store the underarm straps and cord in the V.
(f) Fold the V upward to cover the eye lenses without
letting the hood cover the chin opening.
(g) Put the mask with hood in the carrier while
holding the facepiece upright with the lenses facing away
from your body.
(h) Close the carrier opening.
4-99
Performance Steps
(i) Store the mask with hood in the closed carrier in a
cool, dry, dark place.
(j) Hang the carrier by the hook on the short strap.
NOTE: This step is not timed and will begin after the "all
clear" order is issued. NOTE: Use the actions listed below
until TM 3-4240-300-10-2, dated Aug 88, is updated.
b.M42 or M42A1:
(1) Disconnect the microphone plug from the helmet
receptacle.
(2) Remove your helmet.
(3) Remove the hood without damaging it.
(a) Unfasten the underarm straps.
(b) Loosen the neck cord.
(c) Unzip the zipper by holding the lower part of the
zipper and pulling the zipper upward.
(d) Place both hands on the back edge of the hood
skirt.
(e) Raise the hood over your head, pulling it over the
front of the facepiece.
(4) Loosen the cheek straps.
(5) Place one hand on the front voicemitter to hold the
facepiece to your face.
(6) Grasp the head harness tab with the other hand.
(7) Pull the head harness over the front of the
facepiece, removing the facepiece.
(8) Reconnect the microphone to the helmet.
(9) Replace the helmet.
(10) Store your mask with hood.
(a) Install the canister and canister carrier in the
carrier pocket with the quick disconnect coupling through the
side opening in the carrier.
(b) Ensure that the hose is pointing toward the
opening.
(c) Fold the canister carrier straps.
4-100
Performance Steps
(d) Place the straps in the pocket with the canister.
(e) Close the canister carrier pocket.
(f) Hold the front of the facepiece in a horizontal
position, smoothing the hood over it.
(g) Fold the two edges of the hood over the outlet
valve to create a V in the front of the hood.
(h) Store the ends of the underarm straps and cord
in the V.
CAUTION: To Prevent Crushing The Microphone, Do Not
Apply Force To The Microphone Connection When Stowing
The Facepiece.
(i) Grasp the bottom of the hood around the hose,
tucking it into the space beneath the canister carrier pocket.
(j) Continue to feed as much as possible of the hood
and hose into the carrier.
NOTE: At this point, the facepiece is upside down.
(k) Place the facepiece over the canister carrier
pocket with the eye lens facing towards the carrier opening.
(l) Close the carrier.
(m) Close the outside canister pocket.
(n) Store your mask with hood in the closed carrier in
a cool, dry, dark place, hanging the carrier by the shoulder
strap or the hook on the short strap.
c. If you have the M42A2 protective mask: use
procedures in TM 3-4240-343-10.
d. If you have the M43-series protective mask: use
procedures in TM 3-4240-312-12&P, paragraph 2-8.
Evaluation Preparation: Evaluate this task during a normal
unit operation. Use a mask previously fitted to the soldier's
face. The soldier will bring his or her flight or CVC helmet.
Drinking: The soldier should be in MOPP level 4. Do not
use a new decon kit for every soldier. Use the kit as long
as possible. Ensure that the soldier has M8 detector paper
in the protective mask carrier prior to testing. If the soldier
4-101
has not made adequate progress towards drinking from the
canteen after 2 minutes, stop him or her and give him or
her a NO-GO. This time standard is administrative.
Brief Soldier: Tell the soldier to stand while wearing his/her
mask carrier containing his/her assigned protective mask
(with the hood attached. Tell the soldier to remove
eyeglasses and contact lenses before starting the
evaluation. Provide the soldier with one of the scenarios
described in the conditions statement (cue to begin
masking). Tell the soldier to keep the mask on until you
issue the "all clear" order. Tell the soldier that all time
standards are for administrative (non-combat) evaluation
purposes only. Drinking: Tell the soldier to drink water while
wearing his/her assigned mask. Tell the soldier there are
no time standards for this task, but for testing purposes,
he/she should be able to drink within 2 minutes.
Performance Measures
Results
1. Stopped breathing.
GO / NO-GO
NOTE: All time standards are for administrative (noncombat) evaluation purposes only.
2. Donned mask within 9 seconds.
GO / NO-GO
3. Cleared mask.
GO / NO-GO
a. Sealed outlet valve.
b. Breathed out.
4. Checked mask.
GO / NO-GO
a. Breathed in.
b. Facepiece collapsed to face.
5. Resumed breathing.
GO / NO-GO
6. Completed securing of mask.
GO / NO-GO
a. Pulled hood over head.
b. Zipped (if so equipped) front closed
to cover all bare skin.
7. Completed steps 1 through 6 in
GO / NO-GO
sequence.
4-102
Performance Measures
Results
NOTE: All time standards are for administrative (noncombat) evaluation purposes only.
8. Drank water while wearing assigned
GO / NO-GO
protective mask within 2 minutes without
becoming a casualty.
9. Removed mask.
GO / NO-GO
a. Disconnected microphone (if so
equipped).
b. Unfastened straps.
c. Loosened draw cord.
d. Unzipped the zipper (if so equipped).
e. Pulled hood off the head.
f. Loosened cheek straps.
g. Held facepiece to face with one
hand.
h. Pulled head harness over the head.
i. Pulled facepiece away from face.
10. Stored mask.
GO / NO-GO
a.Put mask in mask carrier.
b.Closed mask carrier.
c.Stored mask in cool, dry place.
d.Hung carrier by the hook on the short
strap.
Evaluation Guidance: Score the soldier GO if all
performance measures are passed. Score the soldier NOGO if any performance measure is failed. If the soldier
scores NO-GO, show the soldier what was done wrong and
how to do it correctly. Allow the soldier time to retrain and
retest.
References
Required
SB 3-30-2
TM 3-4240-279-10
TM 3-4240-280-10
Related
4-103
References
Required
TM 3-4240-300-10-2
TM 3-4240-312-12&P
TM 3-4240-339-10
TM 3-4240-343-10
Related
Maintain Your Assigned Protective Mask
031-503-1036
Conditions: You have used your assigned protective mask
or must conduct your scheduled mask inspection. You
have your assigned protective mask (with authorized
accessories and components); a container of warm, soapy
water; a container of warm, clear water; clean rags; small
cleaning brush; optical lens cleaning compound (NSN
6850-00-592-3283); the applicable technical manual; DA
Form 2404; and a set of replacement filters (for M17-series
mask) or a replacement canister. This task cannot be
performed in MOPP4. Use the following to identify the
applicable technical manual: M17 (TM 3-4240-279-10);
M24, M25 (TM 3-4240-280-10);M42 (TM 3-4240-300-10-2);
M43 (TM 3-4240-312-12&P); M40 (TM 3-4240-339-10);
M42, M42A1,M42A2 (TM 3-4240-343-10).
Standards : 1. Cleaned and dried mask. 2. Did not damage
mask. 3. Recorded all deficiencies and shortcomings on
DA Form 2404.
Performance Steps
WARNING: Do Not Attempt To Remove The Hose On
The M42 Protective Mask From The Facepiece. This May
Cause Leakage Of Toxic Agents Into The Facepiece
Caution: Do Not Dunk The Mask Or Carrier In Water.
Wash The Mask Carefully So That The Canister And The
4-104
Performance Steps
Microphone Do Not Get Wet. Ensure All Components Are
Entirely Dry Before Reassembling The Mask And Storing It.
NOTE: Each soldier, under the supervision of qualified
personnel, must care for and maintain his/her protective
mask. Keep water away from inlet valve connectors.
1. Inspect the mask and hood IAW applicable TM.
a. Identify all deficiencies and shortcomings.
b. Correct all operator correctable deficiencies.
c. Report uncorrected deficiencies and shortcomings on
DA Form 2404 to your supervisor.
2. Clean the mask, hood, and all authorized accessories and
components IAW applicable TM.
3. Replace defective filter elements or canisters as
necessary IAW applicable TM.
4. Store your protective mask IAW applicable TM.
Evaluation Preparation: A good time to evaluate this task
is during normal care and cleaning of the mask. Place all
of the required equipment on a field table or another
suitable surface. Simulate defects in the mask by removing
components from the mask or using a defective mask not
issued to the soldier. During training and evaluation
sessions, use an old set of filters or canister several times
to avoid expending a new set each time. If the soldier has
not made adequate progress towards completing the task
within 30 minutes, stop him or her and give him or her a
NO-GO. This time standard is administrative.
Brief Soldier: Tell the soldier there is no time standard for
this task on the job, but for testing purposes he or she must
perform the task within 30 minutes. Tell the soldier to
perform operator preventive maintenance checks and
services (PMCS), clean, and condition his or her assigned
protective mask, and replace the filters in the mask. Tell
the soldier that completing a DA Form 2404 or M10 is not
part of this task.
4-105
Performance Measures
Results
1. Inspected the mask and hood IAW
applicable TM.
a. Identified
all
deficiencies
and
shortcomings.
b. Corrected all operator correctable
deficiencies.
c. Reported uncorrected deficiencies
and shortcomings on DA Form 2404 to
supervisor.
2. Cleaned the mask, hood, and all
authorized accessories and components)
IAW applicable TM.
3. Replaced defective filter elements or
canisters as necessary IAW applicable
TM.
4. Stored the protective mask IAW
applicable TM.
5. Did not damage the mask.
GO / NO GO
GO / NO GO
GO / NO GO
GO / NO GO
GO / NO GO
Evaluation Guidance: Score the soldier GO if all
performance measures are passed (P). Score the soldier
NO GO if any performance measures are failed (F). If any
step is failed, show the soldier what was done wrong and
how to do it correctly.
References
Required
SB 3-30-2
TM 3-4240-279-10
TM 3-4240-280-10
TM 3-4240-300-10-2
TM 3-4240-312-12&P
4-106
Related
References
Required
Related
TM 3-4240-339-10
TM 3-4240-343-10
Detect Chemical Agents Using M8 Or M9 Detector
Paper
031-503-1037
Conditions: You are in an area where there is a chemical
threat and are in mission-oriented protective posture
(MOPP) level 2. You have a booklet of M8 detector paper,
a dispenser of M9 detector paper, assigned
decontaminating kits (M258A1 or M291/M295), and a
complete set of MOPP gear.
Standards: 1. Attached M9 detector paper in places likely
to come into contact with liquid chemical agents. 2.
Detected all liquid chemical agents in your area without
becoming a chemical casualty.
3. Identified all liquid chemical agents within the capability
of M8 detector paper. NOTE: There is no degradation of
standards if performed in MOPP level 4.
Performance Steps
WARNING: The M9 Detector Paper Dye May Cause
Cancer, But Because Very Little Dye Is Used, The Risk
Is Small.
Always Wear Protective Gloves When
Touching M9 Detector Paper. Do Not Place M9 Detector
Paper In Or Near Your Mouth Or On Your Skin.
1. Use M9 Detector Paper.
NOTE: M9 and M8 detector paper will NOT detect chemical
agent vapors.
4-107
Performance Steps
a. Attach M9 paper to MOPP gear and equipment while
wearing chemical protective gloves.
(1) Place the M9 detector paper on MOPP gear on
opposite sides of the body.
(a) If you are right handed, place a strip of M9 paper
around your right upper arm, left wrist, and around your right
ankle.
(b) If you are left handed, place a strip of M9 paper
around your left upper arm, right wrist, and around your left
ankle.
NOTE: These are the places where a moving soldier will
most likely brush against a surface (undergrowth, etc.) that
is contaminated with a liquid chemical agent.
(2) Place M9 detector paper on equipment where it will
come in contact with contaminated objects and is visible to
the operator.
NOTE: Do not attach M9 detector paper to hot, dirty, oily, or
greasy surfaces since it may give a false positive reading.
b.Constantly monitor the M9 detector paper for any color
change. If you observe a color change:
(1) Mask.
(2) Give the alarm.
(3) Decon as necessary and assume MOPP Level 4.
WARNING: Some Decontaminates Give False Positive
Results On The M8 Detector Paper. The M8 Detector
Paper May Indicate Positive Results If Used In An Area
Where Decontaminates Have Been Used.
2. Use M8 Detector Paper if you see a liquid that might be a
chemical agent or you observe a color change on the M9
detector paper.
a. Immediately assume MOPP level 4.
4-108
Performance Steps
b.Prepare M8 detector paper. Tear out a sheet from the
book (use one-half sheet if the M8 detector paper is
perforated).
c.Blot (DO NOT RUB) the M8 detector paper on the
suspected liquid agent without touching the liquid with your
protective glove.
NOTE: You may want to put the paper on the end of a stick
or another object; then blot the paper on the suspected
liquid agent.
d.Observe the M8 paper for a color change. Identify
contamination by comparing any color change on the M8
paper to the color chart on the inside front cover of the
booklet:
(1) A yellow-gold color indicates the presence of G
(nerve) agent.
(2) A red-pink color indicates the presence of H (blister)
agent.
(3) A dark green color indicates the presence of V
(nerve) agent.
(4) If any other color is present or if there is no color
change, the liquid cannot be identified using M8 detector
paper.
e. Store the booklet of M8 detector paper.
f. Remain in MOPP 4 even if the liquid cannot be
identified. Use other types of chemical agent detectors
(example: M256 Detector Kit, Chemical Agent Monitor) to
verify test results.
g. Notify your supervisor of the test results.
Evaluation Preparation: Simulate an unknown liquid
chemical agent by using expedient training aids (for
example: brake fluid, cleaning compound, gasoline, insect
repellent, or antifreeze). Place drops of simulant on M9
detector paper to obtain a reading. For M8 detector paper,
place the simulant on a non-porous material (for example:
entrenching tool).
4-109
CAUTION: Ensure Simulant Is Placed Only On The
Detector Paper, Not On The Protective Clothing
Brief Soldier: Tell the soldier that he/she will be entering an
area where chemical agents have been used. Tell him/her
to attach M9 detector paper to MOPP gear and equipment.
Tell him/her that if you observe any unsafe acts or acts that
could produce false reading, you will stop the test and the
soldier will be scored NO GO.
Performance Measures
Results
1. Attached M9 paper to MOPP gear on
upper arm, the opposite wrist, and around
the ankle while wearing chemical
protective gloves.
2. Detected the presence of liquid
chemical agents by color change on M9
detector paper (if any).
3. Identified nerve (G or V type) and
blister (H type)liquid chemical agents
using M8 detector paper.
4. Notified supervisor of any color change,
or lack of color change, on M9 or M8
detector paper.
GO / NO-GO
GO / NO-GO
GO / NO-GO
GO / NO-GO
Evaluation Guidance: Score the soldier GO if all
performance measures are passed. Score the soldier a
NO GO if any performance measure is failed. If the soldier
scores NO GO, show the soldier what was done wrong and
how to do it correctly. Allow the soldier time to retrain and
retest.
References
Required
Related
FM 3-3
4-110
References
Required
Related
FM 3-4
TM 3-6665-307-10
TM 3-6665-311-10
Section VI: First Aid
Evaluate A Casualty
081-831-1000
Conditions: You have a casualty who has signs and/or
symptoms of an injury.
Standards: Correctly evaluated the casualty following the
correct sequence. Identified all injuries and/or conditions.
Immobilized the casualty if a neck or back injury was
suspected.
Performance Steps
NOTE: When Evaluating and/or Treating A Casualty, Seek
Medical Aid As Soon As Possible. Do Not Stop Treatment,
But, If The Situation Allows, Send Another Person To Find
Medical Aid.
WARNING:
If There Are Signs Of Chemical Or
Biological Agent Poisoning, Immediately Mask The
Casualty. If It Is Not Nerve Agent Poisoning,
Decontaminate Exposed Skin And Gross Contamination
(Large Wet Or Oily Spots) Of The Clothing Or OverGarments. If Nerve Agent Poisoning, Administer The
Antidote Before Decontamination. (See Task Perform
First Aid For Nerve Agent Injury, Task Number 081-8311044.) Warning: If A Broken Neck Or Back Is Suspected,
4-111
Performance Steps
Do Not Move The Casualty Unless To Save a Life.
1. Check for responsiveness.
a. Ask in a loud, but calm voice, "Are you okay?"
b. Gently shake or tap the casualty on the shoulder.
c. Watch for a response. If the casualty does not respond,
go to step 2.
d. If the casualty is conscious, ask where he or she feels
different than usual or where it hurts. Go to step 3. If the
casualty is conscious but is choking and cannot talk, stop
the evaluation and begin treatment. (See task Perform First
Aid To Clear An Object Stuck In The Throat Of A Conscious
Casualty, task number 081-831-1003.)
2. Check for breathing.
a. Look for rise and fall of the casualty's chest.
b. Listen for breathing by placing your ear about 1 inch
above the casualty's mouth and nose.
c.Feel for breathing by placing your hand or cheek about
1 inch above the casualty's mouth and nose. If the casualty
is not breathing, stop the evaluation and begin treatment.
(See task Perform mouth-to-mouth Resuscitation, task
number 081-831-1042.)
NOTE:
Checking for pulse is accomplished during
performance of mouth-to-mouth resuscitation as necessary.
3. Check for bleeding.
a. Look for spurts of blood or blood-soaked clothes.
b. Look for entry and exit wounds.
c. If bleeding is present, stop the evaluation and begin
treatment as appropriate.
(1) Arm or leg wound. (See task Perform First Aid for
Bleeding of an Extremity, task number 081-831-1032.)
(2) Partial or complete amputation. (See task Perform
First Aid for Bleeding of an Extremity, task number 081-8311032.)
4-112
Performance Steps
(3)Open head wound. (See task Perform First Aid for
an Open Head Wound, task number 081-831-1033.)
(4)Open abdominal wound. (See task Perform First
Aid for an Open Abdominal Wound, task number 081-8311025.)
(5)Open chest wound. (See task Perform First Aid for
an Open Chest Wound, task number 081-831-1026.)
4. Check for shock.
a. Look for any of the following signs and/or symptoms.
(1) Sweaty but cool skin (clammy skin).
(2) Paleness of the skin.
(3) Restlessness or nervousness.
(4) Thirst.
(5) Loss of blood (bleeding).
(6) Confusion.
(7) Faster than normal breathing rate.
(8) Blotchy or bluish skin, especially around the mouth.
(9) Nausea and/or vomiting
b. If signs or symptoms of shock are present, stop the
evaluation and begin treatment. (See task Perform First Aid
to Prevent or Control Shock, task number 081-831-1005.)
WARNING: Leg Fractures Must Be Splinted Before
Elevating The Legs As A Treatment For Shock (See
Task Perform First Aid For A Suspected Fracture, Task
Number 081-831-1034.)
5. Check for fractures.
a. Look for the following signs and symptoms of a back or
neck injury:
(1) Pain or tenderness of the neck or back area.
(2) Cuts or bruises in the neck or back area.
(3) Inability of a casualty to move (paralysis or
numbness).
4-113
Performance Steps
(a) Ask about the ability to move (paralysis).
(b) Touch the casualty's arms and legs; ask whether
he or she can feel your hand (numbness).
(4) Unusual body or limb position.
WARNING: Unless There Is Immediate Life-Threatening
Danger, Do Not Move A Casualty Who Has A Suspected
Back Or Neck Injury.
b. Immobilize any casualty suspected of having a neck or
back injury by doing the following:
(1) Tell the casualty not to move.
(2) If a back injury is suspected, place padding under
the natural arch of the casualty's back.
(3) If a neck injury is suspected, place a roll of cloth
under the casualty's neck and put boots (filled with dirt,
sand, etc.) or rocks on both sides of the head.
c. Check the casualty's arms and legs for open or closed
fractures.
(1) Check for open fractures.
(a) Look for bleeding.
(b) Look for bone sticking through the skin.
(2) Check for closed fractures.
(a) Look for swelling.
(b) Look for discoloration.
(c) Look for deformity.
(d) Look for unusual body position.
d. If a fracture to an arm or leg is suspected, stop the
evaluation and begin treatment. (See task Perform First Aid
for Suspected Fracture, task number 081-831-1034.)
6. Check for burns.
a. Look carefully for reddened, blistered, or charred skin.
Also check for singed clothes.
b. If burns are found, stop the evaluation and begin
treatment. (See task Perform First Aid For Burns, task
number 081-831-1007.)
4-114
Performance Steps
7. Check for head injury.
a.Look for the following signs and symptoms:
(1) Unequal pupils.
(2) Fluid from the ear(s), nose, mouth, or injury site.
(3) Slurred speech.
(4) Confusion.
(5) Sleepiness.
(6) Loss of memory or consciousness.
(7) Staggering in walking.
(8) Headache.
(9) Dizziness.
(10) Vomiting.
(11) Paralysis.
(12) Convulsions or twitches.
b. If a head injury is suspected, continue to watch for
signs which would require performance of mouth-to-mouth
resuscitation
(see
task
Perform
mouth-to-mouth
Resuscitation, task number 081-831-1042), treatment for
shock (see task Perform First Aid To Prevent or Control
Shock, task number 081-831-1005), or control of bleeding
(see task Perform First Aid for an Open Head Wound, task
number 081-831-1033.)
8. Seek medical aid. Seek medical assistance as soon as
possible, but you must not interrupt treatment. If possible
send another person to find medical aid.
Evaluation Preparation: Prepare a "casualty" for the soldier
to evaluate by simulating one or more wounds or
conditions. Simulate the wounds using a war wounds
moulage set, casualty simulation kit, or other available
materials. You can coach a "conscious casualty" to show
signs of such conditions as shock or head injury and to
respond to the soldier's questions about location of pain or
other symptoms of injury. However, you will have to cue
the soldier during evaluation of an "unconscious casualty"
as to whether the casualty is breathing and describe the
4-115
signs or conditions, such as shock, as the soldier is making
the checks.
Brief Soldier: Tell the soldier to do, in order, all necessary
steps to evaluate the casualty and identify all wounds
and/or conditions. Tell the soldier to tell you what first aid
action (give mouth-to-mouth resuscitation, bandage the
wound, etc.) he or she would take but that first aid is not to
be performed unless a neck or back injury is found.
Performance Measures
Results
1. Checked for responsiveness.
2. Checked for breathing, if necessary.
3. Checked for bleeding.
4. Checked for shock.
5. Checked for fractures and immobilize
neck or back injuries if found.
6. Checked for burns.
7. Checked for a head injury.
8. Sought medical aid.
9. Performed all necessary steps in
sequence.
GO / NO-GO
GO / NO-GO
GO / NO-GO
GO / NO-GO
GO / NO-GO
GO / NO-GO
GO / NO-GO
GO / NO-GO
GO / NO-GO
Evaluation Guidance: Score the soldier GO if all
performance measures are passed. Score the soldier NOGO if any performance measure is failed. If the soldier
scores NO-GO, show the soldier what was done wrong and
how to do it correctly.
References
Required
FM 21-11
4-116
Related
Perform First Aid To Clear An Object Stuck In The
Throat Of A Conscious Casualty
081-831-1003
Conditions: You see a conscious casualty who is having a
hard time breathing because something is stuck in his or
her throat.
Standards: Cleared the object from the casualty's throat.
Gave abdominal or chest thrusts until the casualty could
talk and breathe normally and you were relieved by a
qualified person. Performed mouth-to-mouth resuscitation if
the casualty lost consciousness.
Performance Steps
1. Determine if the casualty needs help.
a. If the casualty has good air exchange (able to speak or
cough forcefully - may be wheezing between coughs), do
not interfere except to encourage the casualty.
b. If the casualty has poor air exchange (weak coughing
with high-pitched noise between coughs and signs of
shock), continue with step 2.
c. If the casualty has a complete airway obstruction
(cannot speak, breathe, or cough at all and may be clutching
his or her neck and moving erratically), continue with step 2.
NOTE: Abdominal thrusts should be used unless the victim
is in the advanced stages of pregnancy, is very obese, or
has a significant abdominal wound.
2. Perform abdominal or chest thrusts.
a. Abdominal thrusts.
(1) Stand behind the casualty.
(2) Wrap your arms around the casualty's waist.
(3) Make a fist with one hand.
(4) Place the thumb side of the fist against the
abdomen slightly above the navel and well below the tip of
the breastbone.
4-117
Performance Steps
(5) Grasp the fist with the other hand.
(6) Give quick backward and upward thrusts.
NOTE:
Each thrust should be a separate, distinct
movement.
Thrusts should be continued until the
obstruction is expelled or the casualty becomes
unconscious.
b. Chest thrusts.
(1) Stand behind the casualty.
(2) Wrap your arms under the casualty's armpits and
around the chest.
(3) Make a fist with one hand.
(4) Place the thumb side of the fist on the middle of the
breastbone.
(5) Grasp the fist with the other hand.
(6) Give backward thrusts.
NOTE: Each thrust should be performed slowly and
distinctly, and with the intent of relieving the obstruction.
3. Continue to give abdominal or chest thrusts as required.
Give abdominal or chest thrusts until the obstruction is clear,
a qualified person relieves you, or the casualty becomes
unconscious.
NOTE: If the casualty becomes unconscious, perform a
finger sweep and then start mouth-to-mouth resuscitation
procedures. NOTE: If the obstruction is cleared, watch the
casualty closely and check for other injuries if necessary.
Evaluation Preparation: You need another soldier to play
the part of the casualty.
Brief Soldier: Describe the symptoms of a casualty with
good air exchange, poor air exchange, or a complete
airway obstruction. Inform the soldier that you will ask the
soldier what should be done. Score for step 1 will be
based upon the answer. Then tell the soldier he will do all
of the first aid steps required to clear an object from the
4-118
casualty's throat and have to demonstrate where to stand,
how to position his or her hands, and how to position the
casualty for the thrusts. The soldier will tell you how the
thrusts should be done.
Ensure that the soldier
understands that he or she must not actually do the thrusts.
Do not evaluate step 3 in the simulated mode.
Performance Measures
Results
1. Determined if the casualty needs help.
2. Performed abdominal or chest thrusts
as required.
3. Continued abdominal or chest thrusts
as required.
GO /NO-GO
GO /NO-GO
GO /NO-GO
Evaluation Guidance: Score the soldier GO if all
performance measures are passed. Score the soldier NOGO if any performance measure is failed. If the soldier
scores NO-GO, show the soldier what was done wrong and
how to do it correctly.
References
Required
Related
FM 21-11
Perform First Aid to Prevent Or Control Shock
081-831-1005
Conditions: You see a casualty who is breathing. There is
no uncontrolled bleeding. The casualty has one or more of
the symptoms of shock. Given necessary equipment and
materials, a field jacket, blanket or poncho.
Standards: Attempted to prevent the casualty from going
into shock by: positioning the casualty correctly, loosened
binding clothes, calmed and reassured casualty, provided
shade from direct sunlight during hot weather, and covered
4-119
casualty to prevent body heat loss during cold weather. No
further injury was caused to the casualty.
Performance Steps
1. Position the casualty.
a. Move the casualty to cover if cover is available and the
situation permits.
b. Lay the casualty on his or her back unless a sitting
position will allow the casualty to breathe easier.
c. Elevate the casualty's feet higher than the heart using a
stable object so the feet will not fall.
WARNING: Do Not Elevate The Casualty's Legs. If The
Casualty Has A Fractured Or Broken Leg, An Abdominal
Wound, Or A Head Wound.
2. Loosen clothing at the neck, waist, or anywhere it is
binding.
WARNING: Do Not Loosen Clothing If In A Chemical
Area.
3. Prevent the casualty from chilling or overheating.
a. Cover the casualty to avoid loss of body heat and, in
cold weather, place cover under as well as over the
casualty. Use a blanket or clothing, or improvise a cover.
b. Place the casualty under permanent or improvised
shelter in hot weather to shade him or her from direct
sunlight.
WARNING: Do Not Give The Casualty Anything To Eat
Or Drink.
4. Calm and reassure the casualty.
a. Take charge and show self-confidence.
b. Assure the casualty that he or she is being taken care
of.
4-120
Performance Steps
WARNING: If You Must Leave The Casualty, Turn His
Or Her Head To The Side To Prevent Choking If
Vomiting Occurs.
5. Seek medical aid.
NOTE:
Watch the casualty closely for life-threatening
conditions, check for other injuries, and seek medical aid.
Evaluation Preparation: You will need another soldier to
play the part of the casualty. Have the casualty lie down.
You can have a canteen of water available and have the
casualty say that he or she is thirsty while testing step 3.
Brief Soldier: Tell the soldier to do all necessary first aid
steps to prevent shock. You can vary the test by telling the
soldier whether it is hot or cold or that the casualty has a
broken leg or abdominal wound to see if the soldier knows
what to do. Do not evaluate step 5 in the simulated mode.
Performance Measures
Results
1. Positioned the casualty correctly.
2. Loosened tight/binding clothes.
3. Prevented the casualty from chilling or
overheating.
4. Reassured the casualty.
5. Sought medical aid.
GO / NO-GO
GO / NO-GO
GO / NO-GO
GO / NO-GO
GO / NO-GO
Evaluation Guidance:
Score the soldier GO if all
performance measures are passed. Score the soldier NOGO if any performance measure is failed. If the soldier
scores NO-GO, show the soldier what was done wrong and
how to do it correctly.
References
Required
Related
FM 21-11
4-121
Perform First Aid for Heat Injuries
081-831-1008
Conditions: You see a casualty who has signs and
symptoms of a heat injury. The casualty has a full canteen
of cool water.
Standards: Recognized the type of heat injury and
administered appropriate first aid.
Performance Steps
1. Identify the three types of heat injury.
2. Perform first aid for the heat injuries.
Evaluation Preparation: N/A
Brief Soldier: Describe to the soldier the signs and/or
symptoms of heat cramps, heat exhaustion, and heat
stroke, and tell the soldier you will ask him what type of
heat injury is indicated and what should be done to treat
the heat injury described.
Performance Measures
1. Identified the three types of heat injury.
a. Heat cramps symptoms.
(1) Muscle cramps of the arms, legs,
or abdomen.
(2) Excessive sweating.
(3) Thirst.
b. Heat exhaustion symptoms. (The first
five symptoms occur often. The others
occur sometimes.)
(1) Profuse sweating with pale,
moist, cool skin.
(2) Headache.
(3) Weakness.
(4) Dizziness.
4-122
Results
GO / NO-GO
Performance Measures
Results
(5) Loss of appetite.
(6) Heat cramps.
(7) Nausea with or without vomiting.
(8) Urge to defecate.
(9) Chills (goose flesh).
(10) Rapid breathing.
(11) Tingling of the hands and/or
feet.
(12) Confusion.
c. Heatstroke symptoms.
(1) Flushed, hot, dry skin.
(2) Headache.
(3) Dizziness.
(4) Nausea.
(5) Confusion.
(6) Weakness.
(7) Loss of consciousness.
(8) Seizures.
(9) Weak and rapid pulse and
breathing.
2. Performed first aid for the heat injuries.
a. Heat cramps.
(1) Moved the casualty to a cool or
shady area or improvised shade.
(2) Loosened the casualty's clothing
unless in a chemical environment.
(3) Made the casualty slowly drink at
least one canteen of cool water.
(4) Sought medical aid if the cramps
continue.
b. Heat exhaustion.
(1) Moved the casualty to a cool or
shady area or improvised shade.
GO / NO-GO
4-123
Performance Measures
Results
(2) Loosened or removed the
casualty's clothing and boots unless in a
chemical environment.
(3) Poured water on the casualty and
fanned him or her unless in a chemical
environment.
(4) Have the casualty slowly drink at
least one canteen of cool water.
(5) Elevated the casualty's legs.
(6) Monitored the casualty until the
symptoms were gone or medical aid
arrives.
NOTE: If possible, the casualty should not participate in
strenuous activity for the rest of the day.
WARNING:
Heat Stroke Must Be Considered A
Medical Emergency Which May Result In Death If
Treatment Is Delayed. Cooling Measures Will Be
Started Immediately And Will Be Continued While
Waiting For Transportation And During Evacuation.
c. Heatstroke.
(1) Moved the casualty to a cool or
shady area or improvised shade.
(2) Loosened or removed the
casualty's clothing unless in a chemical
environment.
(3) Sprayed or poured water on the
casualty and fanned him or her unless in a
chemical environment.
(4) Massaged the casualty's arms
and legs unless in a chemical
environment.
(5) Elevated the casualty's legs.
4-124
Performance Measures
Results
(6) If the casualty was conscious,
made him or her slowly drink at least one
canteen of cool water.
Note: Watch the casualty closely for life-threatening
conditions, check for other injuries, and seek medical aid.
Evaluation Guidance: Score the soldier GO if all
performance measures are passed. Score the soldier NOGO if any performance measure is failed. If the soldier
scores NO-GO, show the soldier what was done wrong and
how to do it correctly.
References
Required
Related
FM 21-11
Perform First Aid For Bleeding Of An Extremity
081-831-1032
Conditions: You have a casualty who has a bleeding
wound of the arm or leg. Given the casualty's first aid
packet, materials to improvise a pressure dressing
(wadding and cravat or strip of cloth), and materials to
elevate the extremity (blanket, shelter half, poncho, log, or
any available material), rigid object (stick, tent peg or
similar object) and a strip of cloth.
Standards: Controlled bleeding from the wound following
the correct sequence. Placed a field dressing over the
wound with the sides of dressing sealed and so that it did
not slip. The field and pressure dressings did not have a
tourniquet-like effect. Applied a tourniquet to stop profuse
bleeding not stopped by the dressings or for missing arms
and legs.
4-125
Performance Steps
1. Uncover the wound unless the clothing is stuck to the
wound or a chemical environment exists.
WARNING: Do Not Remove Protective Clothing In A
Chemical Environment. Apply Dressings Over The
Protective Clothing.
NOTE: If an arm or leg has been cut off go to step 5.
2. Apply the casualty's field dressing.
a.Apply the dressing, white side down, directly over the
wound.
b. Wrap each tail, one at a time, in opposite directions
around the wound so that the dressing is covered and both
sides are sealed.
c. Tie the tails into a non-slip knot over the outer edge of
the dressing, not over the wound.
d. Check the dressing to make sure that it is tied firmly
enough to prevent slipping without causing a tourniquet-like
effect.
WARNING: Field And Pressure Dressings Should Not
Have A Tourniquet-Like Effect. The Dressing Must Be
Loosened If The Skin Beyond The Injury Becomes Cool,
Blue, Or Numb.
3. Apply manual pressure and elevate the arm or leg to
reduce bleeding ,if necessary.
a. Apply firm manual pressure over the dressing for 5 to
10 minutes.
b. Elevate the injured part above the level of the heart
unless a fracture is suspected and has not been splinted.
4. Apply a pressure dressing if the bleeding continues.
a. Keep the arm or leg elevated.
b. Place a wad of padding directly over the wound.
c. Place an improvised dressing over the wad of padding
and wrap it tightly around the limb.
4-126
Performance Steps
d.Tie the ends in a non-slip knot directly over the wound.
e.Check the dressing to make sure that it does not have a
tourniquet-like effect.
NOTE: If the bleeding stops, watch the casualty closely,
and check for other injuries. If heavy bleeding continues,
apply a tourniquet.
WARNING: The Only Time That A Tourniquet Should Be
Applied Is When An Arm Or Leg Has Been Cut Off Or
When Heavy Bleeding Cannot Be Stopped By A
Pressure Dressing. If Only Part Of A Hand Or Foot Has
Been Cut Off, The Bleeding Should Be Stopped Using A
Pressure Dressing.
5. Make a tourniquet at least 2 inches wide.
6. Position the tourniquet.
a. Place the tourniquet over the smoothed sleeve or
trouser leg if possible.
b. Place the tourniquet around the limb two to four inches
above the wound between the wound and the heart but not
on a joint or directly over a wound or a fracture.
c. Place the tourniquet just above and as close to the joint
as possible, when wounds are just below a joint.
7. Apply the tourniquet.
a. Tie a half knot.
b. Place a stick (or similar object) on top of the half knot.
c. Tie a full knot over the stick.
d. Twist the stick until the tourniquet is tight around the
limb and bright red bleeding has stopped.
NOTE: In the case of an amputation, dark oozing blood
may continue for a short time.
8. Secure the tourniquet. The tourniquet can be secured
using the ends of the tourniquet band or with another piece
of cloth as long as the stick does not unwind.
4-127
Performance Steps
NOTE: If a limb is completely amputated, the stump should
be padded and bandaged (do not cover the tourniquet). If
possible, severed limbs or body parts should be saved and
transported with, but out of sight of, the casualty. The body
parts should be wrapped in dry, sterile dressing and placed
in a dry, plastic bag and in turn placed in a cool container
(do not soak in water or saline or allow to freeze). It is
entirely possible that your location in the field/combat may
not allow for the correct preserving of parts; do what you
can. WARNING:
Do Not Loosen Or Release A
Tourniquet Once It Has Been Applied.
9. Mark the casualty's forehead with a letter T using a pen,
mud, the casualty's blood or whatever is available.
10. Watch the casualty closely for life-threatening
conditions, check for other injuries, if necessary and treat for
shock.
Evaluation Preparation: Use the same field dressing
repeatedly.
Have materials available for a pressure
dressing (wadding and cravat or a strip of cloth). Have one
soldier play the part of the casualty and another apply the
field and pressing dressing. Use a moulage or mark a
place on the casualty's arm or leg to simulate a wound. For
applying a tourniquet, use a mannequin or simulated arm
or leg (padded length of 2 by 4 inch wood with a glove or
boot on one end) with a field dressing appropriately placed
on the arm or leg. Under no circumstances will a live
simulated casualty be used to evaluate the application of a
tourniquet. Place the tourniquet materials (a stick and one
or two pieces of cloth) nearby.
Brief Soldier: Tell the soldier to do, in order, the first aid
steps required to put on a field dressing and, if necessary,
a pressure dressing on the casualty's wound. When testing
step 1, you can vary the test by telling the soldier that
clothing is stuck to the wound or that a chemical
4-128
environment exists. After step 2 and 3, tell the soldier that
the bleeding has not stopped. After step 4, tell the soldier
the bleeding is continuing and ask the soldier to describe
and perform the first aid on the simulated arm or leg
provided.
Performance Measures
Results
1. Uncovered the wound.
2. Applied a field dressing.
3. Applied manual pressure and elevate
the arm or leg, if necessary.
4. Applied a pressure dressing, if
necessary.
5. Applied a tourniquet, if necessary.
6. Performed steps 1-5, as necessary, in
sequence.
GO / NO-GO
GO / NO-GO
GO / NO-GO
GO / NO-GO
GO / NO-GO
GO / NO-GO
Evaluation Guidance:
Score the soldier GO if all
performance measures are passed. Score the soldier NO
GO if any performance measure is failed. If the soldier
scores NO GO, show what was done wrong and how to do
it correctly.
References
Required
Related
FM 21-11
Perform First Aid for A Suspected Fracture
081-831-1034
Conditions: You see a casualty who has an arm or leg,
which you think, is broken. The casualty has no more
serious wounds or conditions that have not been treated.
Given splint material (boards, poles, tree branches);
4-129
padding material (clothing, blanket, field dressing, leafy
vegetation); and tie material (strips of cloth, belts).
Standards: Splinted the suspected broken arm or leg so
the arm or leg did not move and circulation was not
impaired.
Performance Steps
1. Prepare the casualty for splinting.
a. Reassure the casualty if he or she is conscious and
able to understand. Tell the casualty that you will be taking
care of him or her.
b. Loosen any tight or binding clothing.
c. Remove all jewelry from the affected limb and place it
in the casualty's pocket. Tell the casualty that you are doing
this to prevent further injury if swelling occurs later.
WARNING: Do Not Remove Any Protective Clothing Or
Boots In A Chemical Environment. Apply The Splint
Over The Clothing. Do Not Remove Boots From The
Casualty Unless They Are Needed To Stabilize A Neck
Injury Or There Is Actual Bleeding From The Foot.
2. Get splinting materials.
a. Get splints (boards, tree branches, poles, an unloaded
rifle) long enough to reach beyond the joints above and
below the broken part.
b. Get materials to pad the splints, such as a jacket,
blanket, poncho, shelter half, or leafy vegetation.
c. Get tie materials, such as strips of cloth or belts, to tie
the splints.
Note: If splinting materials are not available, use the chest
wall to immobilize a suspected fracture of the arm and an
uninjured leg to immobilize the fractured leg. Continue with
steps 7 and 8.
3. Pad the splints. Apply padding between the splint and the
bony areas of the body. Suggested sights for padding are,
wrist, elbow, ankle, knee, crotch, and the arm pit.
4-130
Performance Steps
4. Check for signs of blood circulation problems below the
injury.
a. Check light-skinned persons for color of skin ( skin
may be pale, white, or a bluish gray color).
b. Check dark-skinned persons by depressing the toenail
or fingernail beds and seeing how fast the color returns. A
slower return of color to the injured side indicates a
circulation problem.
c. Check to see if the injured arm or leg feels colder than
the uninjured one.
d. Ask the casualty about the presence of numbness,
tightness, or a cold sensation.
WARNING:
Evacuate The Casualty As Soon As
Possible If Blood Circulation Problems Are Found.
5. Put on the splint.
a. Splint the broken arm or leg in the position you find it.
WARNING: If The Fracture Is Open, Do Not Attempt To
Push Bones Back Under The Skin. Apply A Field
Dressing To Protect The Area.
NOTE: Do not try to reposition or straighten the fracture.
b. Place one splint on each side of the arm or leg. Make
sure the splints reach beyond the joints above and below
the fracture.
c. Tie the splints with improvised (or actual) cravats.
(1) Gently place the cravats at a minimum of two points
above and two points below the fracture, if possible.
(2) Tie non-slip knots on the splint away from the injury.
WARNING: Do Not Tie Any Cravats Directly Over The
Fracture.
6. Check the splint for tightness.
a. Make sure that the cravats are tight enough to securely
hold the splinting materials in place.
4-131
Performance Steps
b. Recheck circulation below the injury to make sure that
circulation is not impaired.
c. Make any adjustments without allowing the splint to
become ineffective.
7. Apply a sling, if applicable.
NOTE: A sling can be used to further immobilize an arm
and to provide support by the uninjured side.
a. Make a sling from any non-stretching material, such as
a strip of clothing or blanket, poncho, shelter half, belt, or
shirttail.
b. Apply the sling so that the supporting pressure is on
the casualty's uninjured side.
c. Make sure that the hand of the supported arm is slightly
higher than the elbow.
8. Apply swathes, if applicable.
NOTE: Apply swathes when the casualty has a splinted,
suspected fracture of the elbow or leg, or when a suspected
fracture cannot be splinted. (Improvise swaths from large
pieces of cloth or belts.) WARNING Place Swathes Above
And/Or Below The Fracture--Not Over It.
a. Apply swathes to an injured arm by wrapping the
swathes over the injured arm, around the casualty's back,
and under the arm on the uninjured side. Tie the ends on
the uninjured side.
b. Apply swathes to an injured leg by wrapping the
swathes around both legs and tying the swathes on the
uninjured side.
NOTE: Watch the casualty closely for life-threatening
conditions, check for other injuries and seek medical aid.
Evaluation Preparation: You will need another soldier to
play the part of the casualty. Have the casualty lie down or
sit. Place splinting materials nearby. Have splints, padding,
and materials for ties, slings, and swathes available which
4-132
are appropriate to the fracture location on the arm or leg. If
available, have two or more pairs of splints of varying
lengths to help in scoring step 1.
Brief Soldier: Tell the soldier that the casualty has a
suspected closed fracture and where it is located (lower
arm, elbow, upper leg, lower leg). Tell the soldier to splint
the suspected fracture. Do not evaluate step 8 in the
simulated mode.
Performance Measures
Results
1. Used splints that reach beyond the
points above and below the fracture.
2. Checked the blood circulation below the
fracture before and after applying the
splints.
3. Applied padding between the splints
and all bony areas.
4. Used at least four ties (two above and
two below the fracture) to secure the
splints, if possible.
5. Tied non-slip knots on the splint which
are away from the injury.
6. Immobilized the splinted arm or leg
using a sling and/or swathes, as required,
to prevent easy movement.
7. Checked the splint for tightness.
8. Watched the casualty
for lifethreatening conditions and check for other
injuries.
GO / NO-GO
GO / NO-GO
GO / NO-GO
GO / NO-GO
GO / NO-GO
GO / NO-GO
GO / NO-GO
GO / NO-GO
Evaluation Guidance:
Score the soldier GO if all
performance measures are passed. Score the soldier NOGO if any performance measure is failed. If the soldier
scores NO-GO, show the soldier what was done wrong and
how to do it correctly.
4-133
References
Required
Related
FM 21-11
Perform mouth To mouth Resuscitation
081-831-1042
Conditions: You see an adult casualty who is unconscious
and does not appear to be breathing. You are not in a
chemical environment.
Standards: Administered mouth-to-mouth resuscitation
following the correct sequence and at the rate of about 10
to 12 breaths per minute until the casualty started to
breathe on his or her own, or you were relieved by a
qualified person, or you were too tired to go on.
NOTE:
The standard is based on American Heart
Association information.
Performance Steps
1. Roll the casualty onto his or her back if necessary.
WARNING: The Casualty Should Be Carefully Rolled As
A Unit So That The Body Does Not Twist.
NOTE: If foreign material or vomit is seen in the mouth, it
should be removed as quickly as possible (see step 7).
2. Open the airway using the head-tilt/chin-lift method.
a. Kneel at the level of the casualty's shoulders.
b. Place one hand on the casualty's forehead and apply
firm, backward pressure with the palm to tilt the head back.
c. Place the fingertips of the other hand under the bony
part of the lower jaw and lift, bringing the chin forward.
4-134
Performance Steps
NOTE: Do not use the thumb to lift. Do not press deeply
into the soft tissue under the chin with the fingers.
3. Check for Breathing.
a. Check for breathing within 3 to 5 seconds by placing an
ear over the casualty's mouth and looking toward his or her
chest.
b. Look for the chest to rise and fall.
c. Listen for sounds of breathing.
d. Feel for breath on your cheek.
NOTE: If the casualty resumes breathing at any time during
this procedure, the airway should be maintained open and
the casualty should be monitored. If the casualty continues
to breathe, he or she should be transported to medical aid.
Otherwise, the procedure should be continued.
4. Give breaths to ensure an open airway.
NOTE:
When mouth-to-mouth resuscitation breathing
cannot be performed because the casualty has jaw injuries
or spasms, the mouth-to-nose method may be more
effective. The mouth-to-nose method is performed by
blowing into the nose while holding the lips closed. Let air
escape by removing your mouth and, in some cases,
removing your mouth and separating the casualty's lips.
a. Maintain the airway and gently pinch the nose closed,
using the hand on the casualty's forehead.
b. Take a deep breath and place your mouth, in an airtight
seal, around the casualty's mouth.
c. Give two full breaths (one and one half to two seconds
each), taking a breath between them, while watching for the
chest to rise and fall and listening and/or feeling for air to
escape during exhalation.
NOTE: If chest rises, go to step 8. If chest does not rise,
continue with step 5.
4-135
Performance Steps
5. Reposition the casualty's head slightly farther backward
and repeat the breaths.
NOTE: If chest rises, go to step 8. If chest does not rise,
continue with step 6.
NOTE: Abdominal thrusts should be used unless the
casualty is in the advanced stages of pregnancy, is very
obese, or has a significant abdominal wound.
6. Perform abdominal or chest thrusts.
a. Abdominal thrusts.
(1) Kneel astride the casualty's thighs.
(2) Place the heel of one hand against the casualty's
abdomen, slightly above the navel but well below the tip of
the breastbone, with the fingers pointing toward the
casualty's head.
(3) Place the other hand on top of the first.
(4) Press into the abdomen with a quick forward and
upward thrust
(5) Give several thrusts (up to five).
NOTE:
Each thrust should be a separate, distinct
movement.
b. Chest thrusts.
(1) Kneel close to the side of the casualty's body.
(2) Locate the lower edge of the casualty's ribs and run
the fingers up along the rib cage to the notch where the ribs
meet the breastbone.
(3) Place the middle finger on the notch with the index
finger just above it on the lower end of the breastbone.
(4) Place the heel of the other hand on the lower half of
the breastbone next to the two fingers.
(5) Remove the fingers from the notch and place that
hand on top of the other hand extending or interlacing the
fingers.
4-136
Performance Steps
(6) Straighten and lock the elbows with the shoulders
directly above the hands.
(7) Without bending the elbows, rocking, or allowing the
shoulders to sag, apply enough pressure to depress the
breastbone 1 to 2 inches.
(8) Give several thrusts (up to five).
NOTE: Each thrust should be given slowly, distinctly, and
with the intent of relieving the obstruction.
7. Perform a finger sweep and repeat breaths.
a. Open the mouth by grasping the tongue and lower jaw
to lift the jaw open or crossing the fingers and thumb to push
the teeth apart.
b. Insert the index finger of the other hand down along the
cheek to the base of the tongue.
c. Use a hooking motion from the side of the mouth
toward the center to dislodge the object.
d. Reopen the airway and repeat the breaths.
WARNING: Take Care Not To Force The Object Deeper
Into The Airway.
NOTE: If chest rises, go to step 8. If chest does not rise,
repeat steps 6 and 7 until the airway is clear.
8. Check for a pulse for 5 to 10 seconds.
a. If a pulse is found but the casualty is not breathing,
continue with step 9.
b. If no pulse is found, qualified personnel must perform
cardiopulmonary resuscitation (CPR). Send for qualified
medical personnel.
NOTE: Use the first two fingers in the groove in the
casualty's throat beside the Adam's apple. The thumb will
not be used.
9. Continue mouth-to-mouth resuscitation, at the rate of
about 10 to 12 breaths per minute.
4-137
Performance Steps
10. Recheck for pulse and breathing for 3 to 5 seconds after
every 12 breaths.
NOTE: Once breathing is restored watch the casualty
closely, maintain an open airway and check for other
injuries.
Evaluation Preparation: For training and testing, you must
use a resuscitation training mannequin (DVC 08-15). Have
a bottle of alcohol and swabs or cotton available. Place the
mannequin on the floor and alcohol and cotton balls on the
table. Clean the mannequin's nose and mouth before each
soldier is evaluated
Brief Soldier: Tell the soldier to do, in order, all necessary
steps to restore breathing. After step 3, tell the soldier that
the casualty is not breathing. When testing steps 4 and 5,
you can vary the test by indicating whether the chest rises
or not. If step 7 is tested, tell the soldier that the airway is
open. You can stop the evaluation when the soldier
rechecks for the pulse in step 10.
Note: Reference made to the mouth-to-nose method within
the task presents information on an alternate procedure,
which must be used under some circumstances. This
method will not be evaluated.
Performance Measures
1. Positioned the casualty.
2. Opened the airway using the head
tilt/chin lift method
3. Checked for breathing
4. Gave breaths to ensure an open airway
5. Repositioned the casualty and repeated
breaths, if necessary
4-138
Results
GO / NO-GO
GO / NO-GO
GO / NO-GO
GO / NO-GO
GO / NO-GO
Performance Measures
Results
6. Performed abdominal thrusts or chest
thrusts, if necessary
7. Performed finger sweep and repeated
breaths if necessary
8. Checked for pulse.
9. Continued mouth-to-mouth or mouth-tonose resuscitation.
10. Rechecked for pulse and breathing
after every 12 breaths.
11. Performed all necessary steps in the
correct sequence.
GO / NO-GO
GO / NO-GO
GO / NO-GO
GO / NO-GO
GO / NO-GO
GO / NO-GO
Evaluation Guidance:
Score the soldier GO if all
performance measures are passed. Score the soldier NOGO if any performance measure is failed. If the soldier
scores NO-GO, show the soldier what was done wrong and
how to do it correctly.
References
Required
FM 21-11
Related
Perform First Aid for Nerve Agent Injury
081-831-1044
Conditions: You and your unit have come under a chemical
attack. You are wearing protective over-garments and or
mask, or they are immediately available. There are
casualties with nerve agent injuries. Given chemical
protective gloves, over-garments, over-boots, protective
mask and hood, mask carrier, and nerve agent antidote
auto-injectors. The casualty has three nerve agent antidote
auto-injectors and one convulsant antidote for nerve agents
(CANA) auto-injector.
4-139
Standards: Correctly administered the antidote to yourself
and administered three sets of nerve agent antidote autoinjectors followed by the CANA to a buddy following the
correct sequence.
Performance Steps
NOTE: When performing first aid on a casualty, seek
medical aid as soon as possible. Do not stop the first aid,
but, if the situation allows, send another person to find
medical aid.
1. Identify mild signs and symptoms of nerve agent
poisoning.
a. Unexplained runny nose.
b. Unexplained sudden headache.
c. Excessive flow of saliva (drooling).
d. Tightness of the chest causing breathing difficulties.
e. Difficulty seeing (blurred vision).
f. Muscular twitching around area of exposed or
contaminated skin.
g. Stomach cramps.
h. Nausea.
NOTE: For the above signs and symptoms first aid is
considered to be self-aid.
2. React to the Chemical Hazard.
a. Put on your protective mask.
b. Give the alarm.
NOTE: Do not put on additional protective clothing at this
time. Give yourself the nerve agent antidote first. Then,
decontaminate exposed skin areas and put on remaining
protective clothing.
3. Administer nerve agent antidote to self (Self-Aid), if
necessary.
a. Prepare to administer one atropine injection.
(1)Obtain one set of your auto-injectors.
4-140
Performance Steps
NOTE: If you have the M17-series protective mask, the
auto-injectors will normally be stored in the mask carrier.
The M40 Series mask carrier does not have room for
storage of auto-injectors; unit SOP dictates storage location,
usually the BDU pocket.
(2) With one hand, hold the set of injectors by the
plastic clip with the big injector on top.
(3) With the other hand, check the injection site in order
to avoid buttons and objects in pockets where injecting.
(4) Grasp the small injector without covering or holding
the needle (green) end, and pull it out of the clip with a
smooth motion.
(5) Hold the injector between the thumb and first two
fingers without covering or holding the needle (green) end.
NOTE: If the injection is accidentally given in the hand,
another small injector must be obtained and the injection
given in the proper site.
(6) Place the needle end of the injector against the
outer thigh muscle.
NOTE: The injection can be given in any part of the lateral
thigh muscle from about a hand's width above the knee to a
hand's width below the hip joint. NOTE: Very thin soldiers
should give the injection in the upper outer part of the
buttocks.
CAUTION: When Injecting Antidote In The Buttocks, Be
Very Careful To Inject Only Into The Upper, Outer Quarter
Of The Buttocks To Avoid Hitting The Major Nerve Which
Crosses The Buttocks. Hitting The Nerve May Cause
Paralysis.
b. Administer the atropine injection.
(1) Push the injector into the muscle with firm, even
pressure until it functions.
4-141
Performance Steps
NOTE: A jabbing motion is not necessary to trigger the
activating mechanism.
(2) Hold the injector firmly in place for at least 10
seconds.
(3) Remove the injector from your muscle and carefully
place this used injector between two fingers of the hand
holding the plastic clip.
c. Prepare to administer one 2 PAM Cl injection.
(1) Pull the large injector out of the clip and hold it
between the thumb and first two fingers as you did with the
small injector.
(2) Place the needle (black) end of the injector against
the injection site.
d.Administer the 2 Pam Cl injection.
(1) Push the injector into the muscle with firm, even
pressure until it functions.
(2) Hold the injector firmly in place for at least 10
seconds.
4. Secure the used injectors.
a. Drop the plastic clip without dropping the used
injectors.
b. Push the needle of each used injector (one at a time)
through one of the pocket flaps of the protective overgarment.
c. Bend each needle to form a hook without tearing
protective gloves or clothing.
5. Decontaminate skin if necessary.
NOTE: Information on this step is provided in task
Decontaminate Yourself and Individual Equipment Using
Chemical Decontamination Kits, task number 031-503-1013.
6. Put on remaining protective clothing.
4-142
Performance Steps
NOTE: Information on this step is covered in task Protect
Yourself From NBC Injury/Contamination With the
Appropriate Mission-Oriented Protective Posture (MOPP)
Gear, task number 031-503-1015.
WARNING:
If, Within 5 To 10 Minutes After
Administering The First Set Of Injections, Your Heart
Begins Beating Rapidly And Your Mouth Becomes Very
Dry, Do Not Administer Another Set Of Injections.
7. Seek buddy-aid or medical aid.
NOTE: After you have given yourself the first set of
injections, you most likely will not need additional antidote if
you are ambulatory and know who and where you are. If
needed, second and third sets of injections will be given only
by a buddy or by medical personnel.
8. Identify severe signs and symptoms of nerve agent
poisoning.
a.Strange and confused behavior.
b.Gurgling sounds made when breathing.
c.Severely pinpointed pupils.
d.Red eyes with tearing.
e.Vomiting.
f.Severe muscular twitching.
g.Loss of bladder and/or bowel control.
h.Convulsions.
i.Unconsciousness or stoppage of breathing.
NOTE: If the casualty is exhibiting severe symptoms,
assistance (buddy-aid) is required by the individual to
complete first aid treatment.
WARNING: Do Not Kneel At Any Time While Providing
Aid To The Casualty. Contact With The Ground Could
Force The Chemical Into Or Through The Protective
Clothing.
4-143
Performance Steps
NOTE: Reposition the casualty on his or her back if
necessary to mask the individual.
9. Mask the casualty if necessary.
a. Place the mask on the casualty.
b. If the casualty can follow directions, have him or her
clear the mask.
c. Check for a complete mask seal by covering the inlet
valves of the mask.
d. Pull the protective hood over the head, neck, and
shoulders of the casualty.
e. Position the casualty on the right side, similar to a
swimmer position, with head slanted down so that the
casualty will not roll back over.
10. Administer first aid to a nerve agent casualty (BuddyAid).
a. Prepare to administer one atropine injection.
(1) Remove all three sets of auto-injectors and the
single CANA auto-injector from the casualty's mask carrier
or BDU pocket.
(2) With one hand, hold the set of injectors by the
plastic clip with the big injector on top.
(3) With the other hand, check the injection site to
avoid buttons and objects in pockets.
(4) Grasp the small injector and pull it out of the clip
with a smooth motion.
(5) Hold the injector between the thumb and first two
fingers without covering or holding the needle (green) end.
(6) Place the needle end of the injector against the
casualty's outer (lateral) thigh muscle.
NOTE: The injection can be given in any part of the lateral
thigh muscle from about a hand's width above the knee to a
hand's width below the hip joint. Very thin soldiers should
be given the injections in the upper outer part of the
buttocks.
4-144
Performance Steps
WARNING: When Injecting Antidote In The Buttocks,
Be Vary Careful To Inject Only Into The Upper, Outer
Quarter Of The Buttocks To Avoid Hitting The Major
Nerve Which Crosses The Buttocks. Hitting The Nerve
May Cause Paralysis.
b. Administer the atropine injection.
(1) Push the injector into the muscle with firm, even
pressure until it functions.
(2) Hold the injector in place for at least 10 seconds.
(3) Carefully place the used injector between two
fingers of the hand holding the clip.
c. Prepare to administer one 2 PAM Cl injection.
(1) Pull the large injector out of the clip and hold it
between the thumb and first two fingers as you did with the
small injector.
(2) Place the needle (black) end of the injector against
the injection site.
d. Administer the 2 Pam Cl injection.
(1) Push the injector into the muscle with firm, even
pressure until it functions.
(2) Hold the injector in place for at least 10 s econds.
(3) Drop the clip without dropping injectors.
(4) Lay the used injectors on the casualty's side.
NOTE: Repeat steps 10a through 10d until the casualty has
received a total (including self-administered) of three sets of
antidote injections.
e. Prepare to administer the CANA injection.
(1) Tear open the protective plastic packet and remove
the injector.
(2) Grasp the injector with the needle (black) end
extending beyond the thumb and two fingers (index plus
next finger).
(3) With the other hand, pull the safety cap off the
injector base to arm the injector.
4-145
Performance Steps
(4)Place the black end of the injector against the
casualty's injection site.
CAUTION: Do Not Touch The Black (Needle). You
Could Accidentally Inject Yourself.
f. Administer the CANA injection.
(1) Push the injector into the muscle with firm, even
pressure until it functions.
(2) Hold the injector in place for at least 10 seconds.
11. Secure the used injectors.
a. Push the needle of each used injector (one at a time)
through one of the pocket flaps of the casualty's protective
over-garment.
b. Bend each needle to form a hook without tearing
protective gloves or clothing.
12. Decontaminate the casualty's skin if necessary.
NOTE: This information is covered in task Decontaminate
Yourself and Individual Equipment Using Chemical
Decontamination Kits, task number 031-503-1013.
13. Seek Medical Aid.
Evaluation Preparation: You must use nerve agent antidote
injection training aid to train and evaluate this task. Actual
auto-injectors will not be used. For self-aid, have the
soldier dress in MOPP level 2. Have the soldier wear a
mask carrier containing a mask and the training nerve
agent auto-injectors. For buddy-aid, have the soldier being
tested and the casualty dress in MOPP level 2. Have the
casualty lie on the ground wearing the mask carrier
containing a mask and the training nerve agent autoinjectors.
Brief Soldier: For self-aid, tell the soldier to state, in any
order the mild symptoms of nerve agent poisoning. The
soldier must state seven of the eight symptoms to be
scored GO. Then, tell the soldier that he or she has mild
4-146
symptoms and to take appropriate action. After the soldier
completes step 4, ask what should be done next. Then ask
what he or she should do after putting on all protective
clothing. Score steps 5 through 7 based upon the soldier's
responses. For buddy-aid, tell the soldier to state, in any
order, the severe symptoms of nerve agent poisoning. The
soldier must state eight of the nine symptoms to be scored
GO. Tell the soldier to treat the casualty for nerve agent
poisoning. After the soldier completes step 11, ask what
else he or she should do. Score steps 12 and 13 based
upon the soldier's responses.
Performance Measures
1. Identified mild signs of nerve agent
poisoning.
2. Reacted to the chemical hazard.
3. Correctly administered the nerve agent
antidote to self.
4. Secured the used injectors.
5. Decontaminated skin if necessary.
6. Put on remaining protective clothing.
7. Sought help (Buddy-Aid).
8. Identified severe signs of nerve agent
poisoning.
9. Masked the casualty.
10. Correctly administered nerve agent
antidotes to the casualty.
11. Secured the used injectors.
12. Decontaminated the casualty's skin if
necessary.
13. Sought medical aid.
14. Performed steps 1 through 12 in the
correct sequence.
Results
GO / NO-GO
GO / NO-GO
GO / NO-GO
GO / NO-GO
GO / NO-GO
GO / NO-GO
GO / NO-GO
GO / NO-GO
GO / NO-GO
GO / NO-GO
GO / NO-GO
GO / NO-GO
GO / NO-GO
GO / NO-GO
Evaluation Guidance: Score the soldier GO if all the
performance measures are passed. Score the soldier NO
GO if any performance measure is failed. If the soldier
4-147
scores NO GO, show what was done wrong and how to do
it correctly.
References
Required
Related
FM 21-11
FM 8-285
Perform First Aid for Cold Injuries
081-831-1045
Conditions: You see a casualty who has signs and
symptoms of a cold injury. Necessary equipment and
materials: Canteen of potable water, blanket or similar item
to use for warmth, dry clothing.
Standards: Recognized the type of cold injury and
administered appropriate first aid.
Performance Steps
NOTE: When Performing First Aid On A Casualty, Seek
Medical Aid As Soon As Possible. Do Not Stop The First
Aid, But, If The Situation Allows, Send Another Person To
Find Medical Aid.
1. Identify the type of cold injury.
a. Chilblain/frostnip. If the signs and symptoms are as
follows go to step 2a.
(1) Prolonged exposure of bare skin at temperatures of
60ºF, to 32ºF.
(2) Redness or pallor of affected areas.
(3) Absence of pain (numb).
(4) May have ulcerated bleeding skin lesions.
4-148
Performance Steps
NOTE: Freezing of superficial skin tissue may occur with
frostnip; however, there is no freezing of the deeper tissues.
b.Frostbite. If the signs and symptoms are as follows go
to step 2b.
(1) Superficial.
(a) Loss of sensation or numb feeling in any part of
the body.
(b) Sudden whitening of the skin in the affected area
followed by momentary tingling feeling.
(c) Redness of skin in light-skinned soldiers, grayish
coloring in dark-skinned soldiers.
(2) Deep.
(a) Blisters.
(b) Swelling or tender areas.
(c) Loss of previous feeling of pain in the affected
area.
(d)Pale, yellowish, waxy-looking skin.
(e) Frozen area feels solid or wooden to the touch.
c. Immersion foot/trench foot. If the signs and symptoms
are as follows go to step 2c.
(1) Long exposure of feet to wet conditions at
temperatures from 50ºF down to 32ºF.
(2) Early stage/first phase.
(a) Affected area feels cold.
(b) Number and painless.
(3) Later stage/advanced phase.
(a) Limbs feel hot and burning.
(b) Shooting pains.
(c) Affected area is pale with bluish cast.
(d) Pulse strength decreased.
(e) Other signs that may follow: Blisters, swelling,
redness, heat, hemorrhages or gangrene.
4-149
Performance Steps
d. Snow blindness. If the signs and symptoms are as
follows go to step 2d.
(1) Scratchy feeling in eyes, as if from sand or dirt.
(2) Watery eyes.
(3) Redness.
(4) Headache.
(5) Increased pain with exposure to light.
e. Hypothermia. If the signs and symptoms are as follows
go to step 2e.
NOTE: This condition should be suspected in any
chronically ill person who is found in an environment of less
then 50ºF.
CAUTION: With generalized hypothermia the entire
body has cooled with the core temperature below 95º F
(Temperature is provided as guide; the common soldier
probably would not have a thermometer to use). This is
a medical emergency.
(1) Mild hypothermia (Body temperature 90º-95ºF).
(a) Conscious, but usually apathetic or lethargic.
(b) Shivering.
(c) Pale cold skin.
(d) Slurred speech.
(e) Poor muscle coordination.
(f) Faint Pulse
(2) Severe hypothermia (Body temperature 90ºF or
lower).
(a) Breathing slow and shallow.
(b) Irregular heart action
(c) Pulse weaker or absent.
(d) Stupor or unconsciousness.
(e) Ice cold skin.
(f) Rigid muscles.
(g) Glassy eyed.
4-150
Performance Steps
CAUTION:
Hypothermia is a medical emergency.
Prompt medical treatment is necessary.
Casualty
should be evacuated to medical treatment facility
immediately.
f. Dehydration (cold weather). If the signs and symptoms
are as follows go to step 2f.
(1) Mouth, tongue, and throat are parched and dry.
(2) Swallowing is difficult.
(3) Nausea and dizziness.
(4) Fainting.
(5) Tired and weak.
(6) Muscle cramps especially in the legs.
(7) Focusing eyes may be difficult.
2. Perform first aid for the cold injury.
a. Chilblain/frostnip.
(1) Apply rewarming (body heat).
(a) Apply warmth with casualties bare hands.
(b) Blow warm air on the affected area.
(c) For hands and fingertips place hands in armpits.
(2) Protect lesions (if present) with dry sterile dressing.
(3) Seek medical aid.
CAUTION: Do Not Rub Or Massage Area.
NOTE: If the condition does not respond to simple care
begin first aid for frostbite.
CAUTION: Do Not: Rub Snow On The Frostbitten Part;
Massage Or Rub The Frostbitten Part; Use Dry Or
Radiant Heat To Rewarm; Rupture Blister; Use
Ointments Or Other Medications On The Part; Handle A
Frostbitten Extremity Roughly; Allow A Thawed
Extremity To Refreeze; Or Allow The Casualty To Use
Alcohol Or Tobacco Products.
4-151
Performance Steps
b. Frostbite.
(1) Warm the area using firm, steady pressure of
hands, underarm or abdomen.
(2) Face, ears, nose--cover with hands (casualty's or a
buddy's).
(3) Hands--open casualty's field jacket an place against
the body (under armpits if possible), then close the jacket.
(4)Feet--remove boots, socks, and place feet under
clothing and against the body of another soldier.
CAUTION: Do Not Remove Clothing In A Chemical
Environment.
WARNING: Do Not Attempt To Thaw The Casualty's Feet
Or Other Seriously Frozen Areas If The Soldier Will Be
Required To Walk Or Travel To A Medical Center In
Order To Receive Medical Treatment. The Possibility Of
Injury From Walking Is Less When The Feet Are Froze
Than After They Have Been Thawed (If Possible, Avoid
Walking).
Thawing In The Field Increases The
Possibility Of Infection, Gangrene, Or Injury.
(5) Loosen or remove constricting clothing and remove
any jewelry.
(6) Increase insulation (cover with blanket or something
similar and dry).
(7) Have the casualty exercise as much as possible,
avoiding trauma to injured part(s).
(8) Seek medical aid (Evacuate the casualty).
WARNING: Monitor The Casualty For Life Threatening
Conditions And Apply Appropriate First Aid As
Necessary.
c. Immersion foot/trench foot.
(1) Gradually rewarm by exposing to warm air.
(2) Protect affected parts from trauma.
(3) Dry feet thoroughly and avoid walking.
4-152
Performance Steps
(4) Elevate the affected part.
(5) Seek medical treatment (evacuate casualty).
d. Snow Blindness.
(1) Cover the eyes with a dark cloth.
(2) Seek medical treatment (evacuate casualty).
CAUTION: This Is A Medical Emergency! Prompt
Medical Treatment Is Necessary.
e. Hypothermia.
(1) Mild.
(a) Re-warm body evenly.
(Must provide heat
source--campfire or other soldier's body.)
NOTE: Merely placing the casualty in a sleeping bag or
covering with a blanket is not enough since the casualty is
unable to generate his or her own body heat.
(b) Keep dry and protect from the elements.
(c) Give warm liquids gradually if the casualty is
conscious.
(d) Seek medical treatment immediately.
(2) Severe.
(a) Stabilize the temperature.
(b) Attempt to avoid further heat loss.
(c) Evacuate to the nearest medical treatment facility
as soon as possible.
NOTE: Re-warming a severely hypothermic casualty is
extremely dangerous in the field due to the great possibility
of such complications as re-warming shock and disturbance
in the rhythm of the heartbeat.
WARNING: Monitor The Casualty For Life Threatening
Conditions.
f. Dehydration.
(1) Keep warm.
(2) Loosen clothes to improve circulation.
(3) Give fluids for fluid replacement.
4-153
Performance Steps
(4) Rest.
(5) Seek medical assistance.
NOTE: Medical personnel will determine the need for salt
replacement.
Evaluation Preparation: Have a soldier play the part of the
cold injury casualty. Select one of the types of cold injuries
to evaluate the soldier on. Coach the simulated casualty
on how to answer questions about symptoms. Physical
signs and symptoms that the casualty cannot readily
simulate, for example, blisters, must be described to the
soldier.
Brief Soldier: Tell the soldier being evaluated to determine
what cold injury the casualty has. After the cold injury has
been identified, ask the soldier to describe the proper
treatment.
Performance Measures
Results
1. Identified the type of cold injury.
2. Provided the proper first aid for cold
injuries.
GO / NO-GO
GO / NO-GO
Evaluation Guidance: Score the soldier GO if all
performance measures are passed. Score the soldier NO
GO if any performance measure is failed. If the soldier
scores NO GO, show what was done wrong and how to do
it correctly.
References
Required
FM 21-11
4-154
Related
GLOSSARY
ACES—Army Continuing Education System
ACP—Allied Communication Publication
ACS—Army Community Service
ADAPCP—alcohol and drug abuse prevention and control
program
AEC—Army Education Center
AER—Army Emergency Relief
AFTB—Army Family Team Building
AIT—advanced individual training
ALICE—all-purpose lightweight carrying equipment
AMCS—Army Management Staff College
ANCOC—Advanced Individual Training
APFT—Army Physical Fitness Test
AR—Army Regulation
ARNG—Army National Guard
BAQ/OR—basic allowance for quarters/own right
BAQ/W—basic allowance for quarters/with dependents
BCT—basic combat training
BNCOC—Basic Noncommissioned Officers Course
CANA—Convulsant Antidote for Nerve Agents
CB—chemical biological
CGSC—Command General Staff College
CHAMPUS—Civilian Health and Medical Program of the
Uniformed Services
CONUS—continental United States
CLP—cleaner lubricant preservative
CTT—Common Task Test
cpl—corporal
CPR—cardiopulmonary resuscitation
CW2—Chief Warrant Officer, W2
CW3—Chief Warrant Officer, W3
CW4—Chief Warrant Officer, W4
CW5—Chief Warrant Officer, W5
GLOSSARY-1
DA—Department of the Army
DEERS—Defense Enrollment Eligibility Reporting System
DIC—dependency and indemnity compensation
DS—direct support
EO—equal opportunity
EOA—equal opportunity advisor
EOR—equal opportunity representative
EQ—enlisted quarters
F—fail
FITT—frequency, intensity, time, type
FM—field manual
FSA—family separation allowance
FSBAQ—family separation basic allowance for quarters
FTX—field training exercise
GED—general education development
GS—general support
GTA—graphic training aid
IAW—in accordance with
ID—identification
IEDK—individual equipment decontaminating kit
IET—initial entry training
IG—inspector general
JAG—judge advocate general
LAW—light antitank weapon
LCE—load-carrying equipment
LES—leave and earnings statement
MIJI—meaconing, intrusion, jamming, and interference
mm—millimeter
MOPP—mission-oriented protective posture
MOS—military occupational specialty
NCO—noncommissioned officer
NSN—national stock number
GLOSSARY-2
OAC—Officer Advanced Course
OBC—Officers Basic Course
OQ—officer quarters
OSUT—one-station unit training
P—pass
pam—pamphlet
para—paragraph
PL—preservative lubricant
PLDC—Primary Leadership Development Course
POST—program on sexual harassment
PM—Provost Marshal
PMCS—preventive maintenance checks and services
PT—physical training
PW—prisoner of war
PX—post exchange
RBC—rifle bore cleaner
S—safe
SALUTE—size, activity, location, unit, time, equipment
SAM—statement, act, and marriage
SBP—Survivor Benefit Plan
SDK—skin decontamination kit
semi—semiautomatic
SEQ—senior enlisted quarters
SGLI—Servicemen's Group Life Insurance
SJA—Staff Judge Advocate
SOCAD—Servicemembers Opportunity College
Associate's Degree
SOI—Signal Operating Instructions
SOP—standing operating procedure
SOQ—senior officer quarters
SPORTS—slap, pull, observe, release, tap, shoot
TC—training circular
TM—technical manual
TRADOC—(United States Army) Training and Doctrine
Command
GLOSSARY-3
UCMJ—Uniformed Code of Military Justice
US—United States
USAR—United States Army Reserve
VD—venereal disease
VGLI—Veteran's Group Life Insurance
VHA—variable housing allowance
WO1—warrant officer, W1
WOAC—Warrant Officers Advance Course
WOBC—Warrant Officers Basic Course
WOSC—Warrant Officers Staff College
WP—white phosphorus
GLOSSARY-4
REFERENCES
ALLIED COMMUNICATION PUBLICATION (ACP)
ACP 125(D).
Communication Instruction—Radiotelephone Procedures
ARMY REGULATIONS (AR)
AR 350-30.
Code of Conduct/Survival, Evasion,
Resistance, Escape (SERE) Training.
10 December 1985.
AR 525-13.
The Army Combatting
Program. 26 June 1992.
Terrorism
AR 600-25.
Salutes, Honors, and
Courtesy. 16 May 1970.
Visits
AR 670-1.
Wear and Appearance of Army
Uniforms
and
Insignia.
1 September 1992.
of
DEPARTMENT OF THE ARMY PAMPHLET (DA PAM)
DA Pam 738-750.
Functional User's Manual for The
Army Maintenance Management
System (TAMMS). 27 September
1991.
FIELD MANUALS (FM)
FM 3-3.
Chemical
and
Biological
Contamination
Avoidance.
16
November 1992.
FM 3-4.
NBC Protection. 29 May 1992.
FM 7-7.
The Mechanized Infantry Platoon and
Squad. 15 March 1985.
FM 21-10.
Field Hygiene and Sanitation. 22
November 1988.
REFERENCE-1
FM 21-11.
First
Aid
27 October 1988.
FM 21-20.
Physical
Fitness
September 1992.
FM 21-26.
Map Reading and Land Navigation.
7 May 1993
FM 21-60.
Visual Signals. 30 September 1997.
FM 21-75.
Combat Skills of the Soldier. 3 August
1984
FM 22-5.
Drill
and
8 December 1986.
FM 22-6.
Guard Duty. 17 September 1971.
FM 23-9.
M16A1 Rifle and Rifle Marksmanship.
3 July 1989.
FM 23-23.
Antipersonnel Mine, M18A1 and M18
(Claymore). 6 January 1996.
FM 23-30.
Grenades and Pyrotechnic Signals.
27 December 1988.
FM 23-67.
Machine Gun, 7.62-mm,
29 February 1984.
FM 24-1.
Signal Support in the Airland Battle.
15 October 1990.
FM 24-18.
Tactical
Single-Channel
Radio
Communications Techniques. 30
September 1987.
FM 34-3.
Intelligence Analysis. 15 March 1990.
FM 34-130.
Intelligence Preparation
Battlefield. 8 July 1994.
REFERENCE-2
for
Soldiers.
Training.
30
Ceremonies.
of
M60.
the
GRAPHIC TRAINING AIDS (GTA)
GTA 5-2-12.
Coordinate Scale and Protractor.
GTA 21-1-3.
M16A1 Rifle Maintenance Card.
GTA 21-1-4.
Rifle Shot Group Analysis Card.
SOLDIER'S TRAINING PUBLICATION (STP)
STP 21-1-SMCT.
Soldier's Manual of Common Tasks,
Skill Level 1. 1 October 1994.
TECHNICAL MANUALS (TM)
TM 3-4230-229-10.
Operator's Manual for Decontaminating Kit, Skin: M291. 2 October
1989.
TM 3-4240-300-10-2.Operator's Manual for Chemical-Biological Mask: Combat Vehicle, M42.
TM 3-6665-311-10.
Operator's
Manual
for
Paper,
Chemical Agent Detector, M9. 27 April
1982.
TM 9-1005-224-10.
Operator's Manual for Machine Gun,
7.62-mm, M60 W/E. 30 July 1985.
TM 9-1005-249-10.
Operator's Manual for Rifle, 5.56-mm,
M16A1. 11 February 1985.
TM 9-1005-319-10.
Operator's Manual w/Components List
for Rifle, 5.56-mm, M16A2. August
1986.
TM
9-1330-200-12. Operator's
and
Organizational
Maintenance Manual for Grenades.
17 September 1971.
REFERENCE-3
TRADOC PAM 600-4
1 October 1999
The proponent of this publication is HQ TRADOC.
Users are invited to send comments and suggested
improvements on DA Form 2028 (Recommended
Changes to Publications and Blank Forms) to
Commandant, USAIS, ATTN: ATSH-OTT-F, Fort
Benning, GA 31905-5593
FOR THE COMMANDER:
OFFICIAL:
DISTRIBUTION:
Special