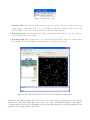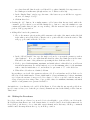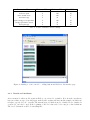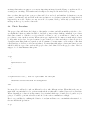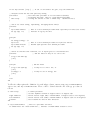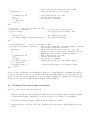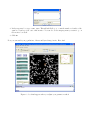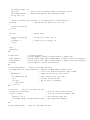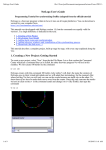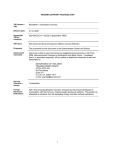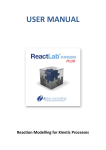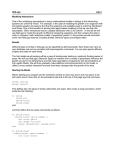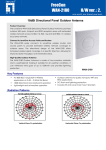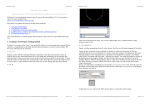
1
Individual (Agent) - Based Modeling with NetLogo
A Predator-Prey Example
Differential equations in biology are most commonly associated with aggregate models. Aggregate models
consider a population as a collective group, and capture the change in the size of a population over time.
Consider for example, the classic Lotka-Volterra predator prey equations:
dA
dt
dB
dt
= rA − αAB
(1)
= −δB + βAB
(2)
where A(t) represents the size of the prey population at time t, and B(t) represents the size of the predator
population at time t. Without the presence
(i.e. when B(t) = 0), the prey population is
of predators
dA
assumed to experience exponential growth
= rA . Similarly, if no prey are present (when A(t) = 0),
dt
dB
= −δB . The interaction of predators and prey,
the predator population will decrease exponentially
dt
represented by the AB terms, have a negative impact on the prey and a positive impact on the predators.
This system of differential equations models the change in the size of the prey and predator populations,
collectively, over time.
Individual (agent) based models, however, look at population dynamics from an individual’s perspective.
Rather than modeling the aggregate change to the entire population, individual based models track the
behavior and number of a collection of individuals in a population. Individuals move and interact with
their environment based on a set of rules and probabilities, and are thus stochastic in nature. NetLogo
is a freely available individual-based modeling environment created by Uri Wilensky at the Center for
Connected Learning and Computer-Based Modeling, Northwestern University, Evanston, Illinois. 1
1
NetLogo Models
NetLogo comes with a very nice set of built-in sample models from a variety of disciplines. Perhaps the best
way to become familiar with NetLogo is by investigating one of the models in its Models Library. Go to
the File -> Models Library menu option and select a sample model in the discipline of your choice. For
the purposes of this introduction, we will use the “Rabbits Grass Weeds” model in the Biology subfolder.
Before exploring the “Rabbits Grass Weeds” model, an introduction to vocabulary and concepts associated
with agent-based modeling and NetLogo would be helpful:
Definition 1 (Agents) The individuals or organisms in the model. The behavior of a class of agents is
determined by a modeler-defined set of rules. In NetLogo there are two types of agents: the mobile agents
called “turtles” and the stationary/background agents known as patches.
Definition 2 (NetLogo Tabs) NetLogo has three tabs at the top of its window. An Interface tab, an
Information tab, and a Procedures tab.
1
Wilensky, U. 1999. NetLogo. http://ccl.northwestern.edu/netlogo/. Center for Connected Learning and ComputerBased Modeling, Northwestern University. Evanston, IL
Figure 1: The NetLogo Tabs
• Interface Tab: The Interface is the main tab where you interact with your model and see your
agents behavior and visualize data. It can contain buttons, slider bars, switches, monitor boxes, and
plots in addition to the “world” the agents live in (the larger black window).
• Information Tab: The Information tab simply contains textual information for the user on how to
best understand and use the model.
• Procedures Tab: The Procedures tab is also a textual environment that contains the code the defines
the rules that determine the behavior and attributes of the agents in the model.
Figure 2: The “Rabbits Grass Weeds” model after clicking the setup button.
Returning to the “Rabbits Grass Weeds” model, in order to get ready to investigate the model click the
setup button. This adds rabbits, grass, and weeds to our “world,” as illustrated in Figure 2. The number
of agents in this world is based on the number of rabbits, the grass-grow-rate, and the weeds-grow-rate
specified by the user through the slider bars.
Hitting the go button sets the model in motion with rabbits moving randomly through the world and
eating, and rabbits and grass reproducing and dying. The arrows ( ) on the bottom right hand corner of
the go button indicate that this button toggles off and on. To stop or pause the simulation, simply click
on the go button again.
Stop or pause the simulation and right click on one of the rabbits in the world and select the inspect
rabbit option. This will bring up a window that displays the information on that rabbit agent. In the
example in Figure 3(a), we can tell we right clicked on “rabbit 619”. Each agent has its own identification
number, so it’s possible to send instructions to an individual agent. The information presented also gives
the rabbits (x, y)-coordinates in the world (which defaults to a two dimensional coordinate system with
−10 ≤ x ≤ 10 and −10 ≤ y ≤ 10). Values of any attributes (default or user-defined) are also presented in
this information. For instance, rabbit 619 has 7.285 units of energy associated with it at the instance we
paused the simulation.
(a) Inspecting An Agent
(b) Interacting through Command Center. Example: The Observer
asks a rabbit to change its color.
Figure 3: Inspecting and Communicating with Agents
The user, as “the observer”, can directly interact with the agents through the command window. For
example, with the simulation stopped, we can ask rabbit 619 to change it’s color by typing the appropriate
commands in the Command Center at the bottom of the NetLogo window. Figure 3(b) illustrates the result
of typing ask rabbit 619 [set color red].
The Procedures tab gives the collection of commands and procedures that define the rules for behavior
and attributes of each agent in relation to the buttons, sliders, graphs, etc. that are found on the Interface
tab. This is where the modeling takes place and it will be the focus of building your own predator-prey
model in the next section.
2
Building a Simple Predator-Prey Model
Let’s suppose we would like to model the Canadian lynx and snowshoe hare predator-prey dynamics with
NetLogo. Note we are making the simplifying assumption that the snowshoe hare is the only food source
for the Canadian lynx in keeping with the Lotka-Volterra predator-prey system dynamics. Before starting
our model, we must identify the “rules” that determine the behavior of the lynx and hares, outlined in
Table 1.
Agent
Hare
Rules
• Move randomly in the world.
• Check to see if you should reproduce this time.
• Check to see if you’ve reached maximum age.
Lynx
• Move randomly in the world.
• Check to see if you landed on a hare to eat.
• Check to see if you should reproduce this time (do you
have enough energy to have a kitten).
• Check to see if you’ve reached maximum age.
• Check to see if you’re out of energy.
Table 1: Outlining the Behavior of Our Hares and Lynx
Based upon these rules, we immediately identify some parameter values we’ll need the user to specify: hare
birth rates, minimum energy needs for a lynx to reproduce, and maximum ages for each animal. We’ll also
need to know how many of each type of animal we’ll need to start our simulation (i.e. upon setup).
2.1
Setting Up the Interface
Start by opening a new model in NetLogo (go to the File menu and select New). We can now add some
of our needed buttons and slider bars. We can start by adding the two buttons common to most every
NetLogo model, the “setup” and “go” buttons.
• Creating the “Set Up” Button:
1. Choose the button option from the pull-down menu and then left click in the white portion
of the NetLogo Interface tab to position the new button in the window. This will pop open a
window like the one below:
2. In the “Commands” window, type the single word “setup”. This will be the name of the
procedure that will define how the world should be populated initially. It is important not to
use blank spaces in this name (though underscores or dashes would work).
3. In the “Display Name” window, type the name of the button as you would like it to appear to
the user, for example “Set Up”.
4. Click OK when done.
• Creating the “Go” Button: In a similar manner, add a button that has associated with it the
command: go Note that if you would like hitting the go button to cause the simulation to run
continuously (rather than for just one step in time), click the Forever button at the top right
portion of the pop-up window.
• Adding slider bars for the parameters:
1. Choose the slider option from the pull-down menu to the right of the Add icon then left click
in the white portion of the NetLogo Interface tab to position the slider bar in the window. This
will pop open a window like the one below:
2. In the “Global Variable” line, type the single word used to represent the parameter, such as
“hare-birth-rate”. Note once again that this should not have any blank spaces in the name.
This will be the name of the parameter representing the hare birth rate in the code.
3. NetLogo gives default minimum, maximum, and initial values for this slider bar, as well as an
increment measurement. For rabbit birth rate, we’ve set the minimum value to 0, the maximum
value to 200, the initial value to 35, and indicated to put a unit of “%” on the slider bar.
4. When all needed values are identified, click OK.
Repeat this process for all of the parameter values needed. For our lynx-hare model we’ll also need a
slider bar for the initial number of hares, initial number of lynx, maximum age for hares, maximum
age for lynx, the amount of energy needed for a lynx to be able to reproduce, and the amount of
energy a lynx gets from eating a hare. Some possible values for minimum, maximum, and initial
values for each parameter are presented in Table 2.
An initial view of our Interface tab could look like Figure 4. Notice that the Set Up and go labels are
in red because we have yet to define the procedures/commands associated with clicking on these buttons.
That’s next!
2.2
Writing the Procedures
In order to write the procedures for your model, it is often helpful to open a NetLogo model from the
Models Library that shares some of the characteristics of your model and look at it’s Procedures tab for
ideas. NetLogo also has a good set of tutorials, a user’s manual, and a dictionary of NetLogo commands
available under the Help menu at the top of your NetLogo window.
Parameter Name
initial-hares
initial-lynx
hare-birth-rate
max-hare-age
lynx-energy-to-reproduce
energy-per-hare-eaten
max-lynx-age
Minimum Value
0
0
0
0
0
0
0
Maximum Value
1000
100
200
20
100
30
50
Initial Value
100
20
35
6
30
10
20
Table 2: Possible Parameter Slider Settings
Figure 4: Starting to create a model ... adding buttons and sliders to the interface page.
2.2.1
Breeds and Attributes
As we mentioned earlier, mobile agents in NetLogo are referred to as turtles. It is often the case that we
have more than one type of moving agent, such as with our lynx and hares in this example, in which case
it helps to specify “breeds” of agents. The breeds keyword, which is used to identify breeds of turtles for
your model, can only be used at the beginning of the Procedures tab, before any procedure definitions.
The breed declaration would look something like:
breed [plural-name-of-breed singular-name-of-breed ]
such as breed [mice mouse].
In addition to specifying different breeds of turtles, we can also specify attributes associated with our
turtles. This is accomplished through the use of the turtles-own or breed-name -own declaration, also
placed before any procedure definitions. Attributes are helpful when we need to keep track of a quantity
associated with or the status of a turtle at any point in time. As each turtle is handled individually, it is
possible that two different turtles can have different attribute values. For instance, we’ve mentioned that
our lynx need to have a certain amount of energy to have a kitten. Thus, we need to know how much
energy each individual lynx has, which will depend on the amount of hares it’s eaten (again, not all lynx
will have eaten the same number of hares). We can declare the attributes named energy and age to be
associated with each lynx by the following command: lynx-own [ energy age ]. If all turtles will have
the same attribute, it can be declared using the turtles-own [attribute-name ] rather than specifying
the same attribute for each breed.
The code needed to start our lynx-hare model could look like this:
breed [hares hare]
breed [lynx a-lynx]
hares-own [ age ]
lynx-own [ energy age ]
2.3
The setup Procedure
After defining our turtles/breeds and their attributes, we can write the code that will define the actions
NetLogo will carry out when the setup button is pushed. As with all user-defined procedures, the setup
procedure will have the form:
to procedure-name
code for actions to take
..
.
end
We want our setup procedure to populate our world with the desired number of hares and lynx, placed
randomly in the coordinate plane. We’d also like to set up any attributes associated with each hare or
lynx when it is created. In addition to the user-defined attributes we noted above with our hares-own or
lynx-own, there are color attributes, size attributes, shape attributes, and location associated with each
turtle. We will make use of some of the built in NetLogo commands:
Command
clear-all
set-default-shape breed ‘‘shape-name ’’
create-breed-name number
setxy random-xcor random-ycor
set attribute value
random pos-max-value
random-float pos-max-value
Action
Clears the world of any previous turtles and patches.
Changes the default shape for turtle of breed breed
to be portrayed using the shape shape-name found in
the Turtle Shapes Editor.
NetLogo creates number turtles of the type breedname with default color (blue), size (100% normal
value), shape (turtle), and location (0,0).
Sets the coordinates of a turtle to a randomly generated x and y coordinate.
Sets the value of the attribute named attribute to have
the value value.
Provides a randomly generated integer value between
0 and pos-max-value
Provides a randomly generated floating point value
between 0 and pos-max-value
To accomplish what we want from our setup procedure we could use the following code:
to setup
clear-all
set-default-shape hares "rabbit"
create-hares initial-hares
[
set color white
set size 1.5
setxy random-xcor random-ycor
set age 0
]
;; create the initial number of hares
;;
;;
;;
;;
set their color to white
set their size to 150% times the default size
place them at a random (x,y) position in the world
set their age, at birth, to 0 units
set-default-shape lynx "cat"
create-lynx initial-lynx
;; create the initial number of lynx
[
set color brown
;; set their color to white
set size 1.5
;; set their size to 150% times the default size
setxy random-xcor random-ycor ;; place them at a random (x,y) position in the world
set age 0
;; set their age, at birth, to 0 units
;; set their intial energy level to a random value between 0 and 3*(energy per hare eaten)
set energy random (3 * energy-per-hare-eaten) ;; Note parenthesis and spaces important here!
]
end
Note that actions that have more than one line of code are grouped using square brackets and the semicolon
is used to indicate the start of line of comments. Carefully commented code can be a great help to the
user who chooses to adjust some of the rules in your model, and it helps you remember why you may have
chosen to include certain commands or procedures!
Also note that not all turtle shapes are loaded to the default library of the Turtle Shapes Editor. To see
what shapes are available, go to the Tools menu and select Turtle Shapes Editor. If you can’t find
an image that suits your purpose you can try importing an image from the library or another model or
creating your own image. The rabbit and cat shapes were imported from the NetLogo library.
Once you have this typed into your procedures tab below our breed and attribute declarations, you can
return to your Interface tab and click on the Set Up button to see if what you intended to happen indeed
happens in your world. If there are any errors in code syntax, NetLogo will notify you with an error
message at the top of your Procedures tab.
2.4
The Go Procedure
The go procedure will dictate the behavior of the turtles over time, and will essentially specify the code to
accomplish the behaviors outlined in Table 1. As NetLogo may not have built-in commands or procedures
that cause a turtle to “Check to see if you landed on a hare to eat”, you will have to define your own
procedures to carry out these actions. When actions get complicated it is common to make subprocedures
to help make steps clear. Accepted syntax for user defined procedures and subprocedures is give it a
descriptive name using dashes to separate words. For instance, you may want to create a subprocedure that
tells a lynx how to check to see if it can eat (a hare). You may name that subprocedure lynx-tries-to-eat
which is called in a procedure, such as the go procedure, and defined below the go procedure. Here’s a
snippet of code that illustrates this point:
:
to go
:
:
lynx-tries-to-eat
:
:
end
:
to lynx-tries-to-eat ;; this is a procedure for the lynx
:
<describe actions involved in eating here>
:
end
In our model we will need to ask our different breeds to take different actions. When this is the case, we
must ASK our particular breed to perform a task and those tasks will be outlined between closed brackets.
When designing procedures, it is important to keep in mind which type of turtle (breed, patch, etc.) is
going to be asked to perform each action, and choose the action commands accordingly.
Here’s one possibility for outlining the behavior of our lynx and hares once our simulation has started, i.e.
the user has hit the go button:
to go
if not any? turtles [ stop ]
;; If all of our turtles are gone, stop the simulation.
;; Everyone starts the new time period by moving.
ask turtles
;; Note that this procedure is for all turtles (breeds),
[
;; both hares and lynx. This is a user-defined procedure
take-a-step
;; telling the turtles to take a random step. (Defined below.)
]
;; Now we see about eating, reproducing, and aging (hares first).
ask hares
[
try-to-make-bunnies
;; This is a user defined procedure made especially for hares (see below).
set age (age + 1)
;; Increase in age by one unit
]
ask lynx
[
set energy (energy - 1)
try-to-eat
;; This is a user defined procedure for lynx (see below).
try-to-make-kittens
;; Another lynx-specific user defined procedure
set age (age + 1)
]
;; Before we end this time iteration, see if anyone grew too old and must die.
ask hares
;; Ask the hares if they’re too old to die.
[
if age > max-hare-age
[ die ]
]
ask lynx
[
if age > max-lynx-age
[ die ]
if energy < 0
[ die ]
]
;; Ask the hares
;; if they’re too old to die, or
;; if they’re out of energy, die.
tick
end
You’ll notice this requires the definition of several subprocedures: take-a-step, try-to-make-bunnies,
try-to-eat, and try-to-make-kittens. Those could be defined after the end of the go procedure as
follows:
to take-a-step
right random 50
left random 50
forward 1
end
;;
;;
;;
;;
;;
A turtle procedure
(rotate anywhere between 50 degrees CCW to 50 degrees CW)
Turtle rotates right (CW) a random number of degrees (b/w 0 & 50 degrees)
Turtle rotates left (CCW) a randome number of degrees (b/w 0 & 50 degrees)
Move forward one unit in that direction.
to try-to-make-bunnies
;; This is a procedure for hares
if random-float 200 < hare-birth-rate ;; Generate a random number between 0 & 200.
[
hatch-hares 1
[
rt random-float 360
fd 1
set age 0
] ;; end "hatch"
] ;; end "if"
end
;; If it’s less than the birth rate, have a bunny.
;; Hatch one new hare at your location.
;; Pick a direction for it to take.
;; It moves forward one unit.
;; Set its age to 0 (newborn)
to try-to-eat
;; This is a procedure for lynx
let prey one-of hares-here
if prey != nobody
[
ask prey [ die ]
set energy energy + energy-per-hare-eaten
]
end
;; Look for a hare at this location
;; If you got one (not a nobody), then
;; kill the hare (prey) and
;; get energy from eating it.
to try-to-make-kittens
;; This is a procedure for lynx
if energy > lynx-energy-to-reproduce ;; Check to see if energy level is high enough to reproduce
[
;; If it’s high enough, have a kitten.
hatch-lynx 1
;; Hatch one new kitten at your location. Note, each
[
;; kitten is identical to its parent, attributes and all..
;; Everything in here refers to kitten attributes.
rt random-float 360
;; Pick a direction for it to take.
fd 1
;; It moves forward one unit.
set age 0
;; Set its age to 0 (newborn)
set energy energy / 2
;; Kitten starts with 1/2 of the parents energy
] ;; end "hatch"
set energy energy / 2
;; Set the parents energy to 1/2 original energy
] ;; end "if"
end
Now go back to your Interface tab and hit the go button to see what happens. If everything was typed in
correctly, you should be able to see movement of the turtles (though it’s hard to spot when new ones are
added or others die). Because it’s hard to notice the change in numbers of our turtles, we use plots and
monitor boxes to provide us with a graphical display of this information.
2.5
Presenting Data with Graphs and Monitors
In order to create a plot, follow the steps below:
1. First go to the Interface tab and under the pull-down tab, select the Plot option and click on a blank
location in the Interface. This will pop open a plot editor box. See Figure 5 for an example.
2. You will need specify the name of the plot, and the labels for your axes.
3. Next you’ll need to add your “Plot Pens” (each plot pen corresponds to a different curve/line on the
plot):
Figure 5: The Plot Editor
(a) When the plot editor first opens, the “Choose Pen to Edit” is set to “default”. Select the
“Rename” option and change this name to something meaningful to your model, such as Hares.
(b) Choose a color for that pen type.
(c) Next select to “Create” a new Plot Pen for the lynx population. Give it an appropriate name
and choose another color for that pen.
4. Once you’ve defined all of your needed Plot Pens, click OK.
5. Now you must adjust your setup and go procedures to update your plots.
(a) Just before the end of your setup procedure, add the line: update-plot. This will be a userdefined function that tells the plot how to update.
(b) Similarly, just before the end of your go procedure, add the line: update-plot.
(c) At the end of your code, add the subprocedure given below:
to update-plot
set-current-plot "hare-lynx"
set-current-plot-pen "hares"
plot count hares
set-current-plot-pen "lynx"
plot count lynx
end
;;
;;
;;
;;
;;
Note, this is the name you gave your plot on the interface
and this is the name for one of your plot pens.
With that pen, plot the number of hares in the world now.
Switch to the lynx plot pen.
With that pen, plot the number of lynx in the world now.
To display the number of lynx and hares present at each iteration, you can use monitor boxes. To do this:
1. Go to the Interface tab and select the Monitor option to add. Place the monitor in the white space
of your Interface tab and a Monitor Editor pops up.
2. In the reporter box, type count lynx. This will ask NetLogo to count the number of turtles of the
lynx breed and report it out to that monitor. You can choose the display name you want to go on
the monitor box itself.
3. Click OK.
Now you can watch your populations of hares and lynx change in size. Have fun!
Figure 6: See what happens when you adjust your parameter values!
A
Appendix of Completed Procedures Code
breed [hares hare]
breed [lynx a-lynx]
hares-own [ age ]
lynx-own [ energy age ]
to setup
clear-all
set-default-shape hares "rabbit"
create-hares initial-hares
[
set color white
set size 1.5
setxy random-xcor random-ycor
set age 0
]
;; create the initial number of hares
;;
;;
;;
;;
set their color to white
set their size to 150% times the default size
place them at a random (x,y) position in the world
set their age, at birth, to 0 units
set-default-shape lynx "cat"
create-lynx initial-lynx
;; create the initial number of lynx
[
set color brown
;; set their color to white
set size 1.5
;; set their size to 150% times the default size
setxy random-xcor random-ycor ;; place them at a random (x,y) position in the world
set age 0
;; set their age, at birth, to 0 units
;; set their intial energy level to a random value between 0 and 3*(energy per hare eaten)
set energy random (3 * energy-per-hare-eaten) ;; Note parenthesis and spaces important here!
]
update-plot
end
to go
if not any? turtles [ stop ]
;; If all of our turtles are gone, stop the simulation.
;; Everyone starts the new time period by moving.
ask turtles
;; Note that this procedure is for all turtles (breeds),
[
;; both hares and lynx. This is a user-defined procedure
take-a-step
;; telling the turtles to take a random step. (Defined below.)
]
;; Now we see about eating, reproducing, and aging (hares first).
ask hares
[
try-to-make-bunnies
;; This is a user defined procedure made especially for hares (see below).
set age (age + 1)
;; Increase in age by one unit
]
ask lynx
[
set energy (energy - 1)
try-to-eat
;; This is a user defined procedure for lynx (see below).
try-to-make-kittens
;; Another lynx-specific user defined procedure
set age (age + 1)
]
;; Before we end this time iteration, see if anyone grew too old and must die.
ask hares
;; Ask the hares if they’re too old to die.
[
if age > max-hare-age
[ die ]
]
ask lynx
[
if age > max-lynx-age
[ die ]
if energy < 0
[ die ]
]
;; Ask the hares
;; if they’re too old to die, or
;; if they’re out of energy, die.
tick
update-plot
end
to take-a-step
right random 50
left random 50
forward 1
end
;;
;;
;;
;;
;;
A turtle procedure
(rotate anywhere between 50 degrees CCW to 50 degrees CW)
Turtle rotates right (CW) a random number of degrees (b/w 0 & 50 degrees)
Turtle rotates left (CCW) a randome number of degrees (b/w 0 & 50 degrees)
Move forward one unit in that direction.
to try-to-make-bunnies
;; This is a procedure for hares
if random-float 200 < hare-birth-rate ;; Generate a random number between 0 & 200.
[
;; If it’s less than the birth rate, have a bunny.
hatch-hares 1
;; Hatch one new hare at your location.
[
rt random-float 360
;; Pick a direction for it to take.
fd 1
;; It moves forward one unit.
set age 0
;; Set its age to 0 (newborn)
] ;; end "hatch"
] ;; end "if"
end
to try-to-eat
;; This is a procedure for lynx
let prey one-of hares-here
if prey != nobody
[
ask prey [ die ]
set energy energy + energy-per-hare-eaten
]
end
to try-to-make-kittens
;; Look for a hare at this location
;; If you got one (not a nobody), then
;; kill the hare (prey) and
;; get energy from eating it.
;; This is a procedure for lynx
if energy > lynx-energy-to-reproduce
[
hatch-lynx 1
[
rt random-float 360
fd 1
set age 0
set energy energy / 2
] ;; end "hatch"
set energy energy / 2
] ;; end "if"
end
to update-plot
set-current-plot "hare-lynx"
set-current-plot-pen "hares"
plot count hares
set-current-plot-pen "lynx"
plot count lynx
end
;; Check to see if energy level is high enough to reproduce
;; If it’s high enough, have a kitten.
;; Hatch one new kitten at your location. Note, each
;; kitten is identical to its parent, attributes and all..
;; Everything in here refers to kitten attributes.
;; Pick a direction for it to take.
;; It moves forward one unit.
;; Set its age to 0 (newborn)
;; Kitten starts with 1/2 of the parents energy
;; Set the parents energy to 1/2 original energy
;;
;;
;;
;;
;;
Note, this is the name you gave your plot on the interface
and this is the name for one of your plot pens.
With that pen, plot the number of hares in the world now.
Switch to the lynx plot pen.
With that pen, plot the number of lynx in the world now.