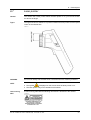
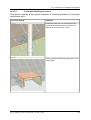
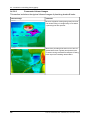
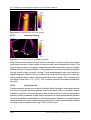
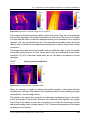
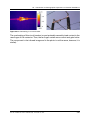
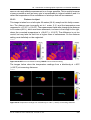
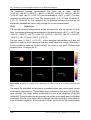
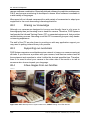
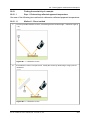
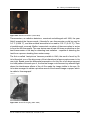
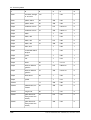
1
User’s manual
FLIR Exx series
Publ. No.
Revision
Language
Issue date
T559597
a500
English (EN)
December 10, 2010
User’s manual
Publ. No. T559597 Rev. a500 – ENGLISH (EN) – December 10, 2010
Legal disclaimer
All products manufactured by FLIR Systems are warranted against defective materials and workmanship for a period of one (1) year from the
delivery date of the original purchase, provided such products have been under normal storage, use and service, and in accordance with
FLIR Systems instruction.
Products which are not manufactured by FLIR Systems but included in systems delivered by FLIR Systems to the original purchaser, carry
the warranty, if any, of the particular supplier only. FLIR Systems has no responsibility whatsoever for such products.
The warranty extends only to the original purchaser and is not transferable. It is not applicable to any product which has been subjected to
misuse, neglect, accident or abnormal conditions of operation. Expendable parts are excluded from the warranty.
In the case of a defect in a product covered by this warranty the product must not be further used in order to prevent additional damage. The
purchaser shall promptly report any defect to FLIR Systems or this warranty will not apply.
FLIR Systems will, at its option, repair or replace any such defective product free of charge if, upon inspection, it proves to be defective in
material or workmanship and provided that it is returned to FLIR Systems within the said one-year period.
FLIR Systems has no other obligation or liability for defects than those set forth above.
No other warranty is expressed or implied. FLIR Systems specifically disclaims the implied warranties of merchantability and fitness for a
particular purpose.
FLIR Systems shall not be liable for any direct, indirect, special, incidental or consequential loss or damage, whether based on contract, tort
or any other legal theory.
This warranty shall be governed by Swedish law.
Any dispute, controversy or claim arising out of or in connection with this warranty, shall be finally settled by arbitration in accordance with
the Rules of the Arbitration Institute of the Stockholm Chamber of Commerce. The place of arbitration shall be Stockholm. The language to
be used in the arbitral proceedings shall be English.
U.S. Government Regulations
■
The products described in the user documentation may require government authorization for export/re-export, or transfer. Contact FLIR
Systems for details.
■
Depending on license and export procedures, lenses may be permanently fixed to cameras shipped to customers outside United States.
Interchangeable lenses fall under U.S. Department of State jurisdiction.
Copyright
© 2010, FLIR Systems. All rights reserved worldwide. No parts of the software including source code may be reproduced, transmitted, transcribed
or translated into any language or computer language in any form or by any means, electronic, magnetic, optical, manual or otherwise,
without the prior written permission of FLIR Systems.
This documentation must not, in whole or part, be copied, photocopied, reproduced, translated or transmitted to any electronic medium or
machine readable form without prior consent, in writing, from FLIR Systems.
Names and marks appearing on the products herein are either registered trademarks or trademarks of FLIR Systems and/or its subsidiaries.
All other trademarks, trade names or company names referenced herein are used for identification only and are the property of their respective
owners.
Quality assurance
The Quality Management System under which these products are developed and manufactured has been certified in accordance with the
ISO 9001 standard.
FLIR Systems is committed to a policy of continuous development; therefore we reserve the right to make changes and improvements on
any of the products described in this manual without prior notice.
Patents
One or several of the following patents or design patents apply to the products and/or features described in this manual:
0002258-2; 000279476-0001; 000439161; 000499579-0001; 000653423; 000726344; 000859020; 000889290; 001106306-0001; 0101577-5;
0102150-0; 0200629-4; 0300911-5; 0302837-0; 1144833; 1182246; 1182620; 1188086; 1263438; 1285345; 1287138; 1299699; 1325808;
1336775; 1365299; 1678485; 1732314; 200530018812.0; 200830143636.7; 2106017; 235308; 3006596; 3006597; 466540; 483782; 484155;
518836; 60004227.8; 60122153.2; 602004011681.5-08; 6707044; 68657; 7034300; 7110035; 7154093; 7157705; 7237946; 7312822; 7332716;
7336823; 7544944; 75530; 7667198; 7809258; 7826736; D540838; D549758; D579475; D584755; D599,392; DI6702302-9; DI6703574-4;
DI6803572-1; DI6803853-4; DM/057692; DM/061609; ZL00809178.1; ZL01823221.3; ZL01823226.4; ZL02331553.9; ZL02331554.7;
ZL200480034894.0; ZL200530120994.2; ZL200630130114.4; ZL200730151141.4; ZL200730339504.7; ZL200830128581.2.
EULA Terms
■
iv
You have acquired a device (“INFRARED CAMERA”) that includes software licensed by FLIR Systems AB from Microsoft Licensing, GP
or its affiliates (“MS”). Those installed software products of MS origin, as well as associated media, printed materials, and “online” or
electronic documentation (“SOFTWARE”) are protected by international intellectual property laws and treaties. The SOFTWARE is licensed,
not sold. All rights reserved.
Publ. No. T559597 Rev. a500 – ENGLISH (EN) – December 10, 2010
■
IF YOU DO NOT AGREE TO THIS END USER LICENSE AGREEMENT (“EULA”), DO NOT USE THE DEVICE OR COPY THE SOFTWARE.
INSTEAD, PROMPTLY CONTACT FLIR Systems AB FOR INSTRUCTIONS ON RETURN OF THE UNUSED DEVICE(S) FOR A REFUND.
ANY USE OF THE SOFTWARE, INCLUDING BUT NOT LIMITED TO USE ON THE DEVICE, WILL CONSTITUTE YOUR AGREEMENT
TO THIS EULA (OR RATIFICATION OF ANY PREVIOUS CONSENT).
■
GRANT OF SOFTWARE LICENSE. This EULA grants you the following license:
■
You may use the SOFTWARE only on the DEVICE.
■
NOT FAULT TOLERANT. THE SOFTWARE IS NOT FAULT TOLERANT. FLIR Systems AB HAS INDEPENDENTLY DETERMINED
HOW TO USE THE SOFTWARE IN THE DEVICE, AND MS HAS RELIED UPON FLIR Systems AB TO CONDUCT SUFFICIENT TESTING
TO DETERMINE THAT THE SOFTWARE IS SUITABLE FOR SUCH USE.
■
NO WARRANTIES FOR THE SOFTWARE. THE SOFTWARE is provided “AS IS” and with all faults. THE ENTIRE RISK AS TO SATISFACTORY QUALITY, PERFORMANCE, ACCURACY, AND EFFORT (INCLUDING LACK OF NEGLIGENCE) IS WITH YOU. ALSO,
THERE IS NO WARRANTY AGAINST INTERFERENCE WITH YOUR ENJOYMENT OF THE SOFTWARE OR AGAINST INFRINGEMENT.
IF YOU HAVE RECEIVED ANY WARRANTIES REGARDING THE DEVICE OR THE SOFTWARE, THOSE WARRANTIES DO NOT
ORIGINATE FROM, AND ARE NOT BINDING ON, MS.
■
No Liability for Certain Damages. EXCEPT AS PROHIBITED BY LAW, MS SHALL HAVE NO LIABILITY FOR ANY INDIRECT,
SPECIAL, CONSEQUENTIAL OR INCIDENTAL DAMAGES ARISING FROM OR IN CONNECTION WITH THE USE OR PERFORMANCE OF THE SOFTWARE. THIS LIMITATION SHALL APPLY EVEN IF ANY REMEDY FAILS OF ITS ESSENTIAL PURPOSE.
IN NO EVENT SHALL MS BE LIABLE FOR ANY AMOUNT IN EXCESS OF U.S. TWO HUNDRED FIFTY DOLLARS (U.S.$250.00).
■
Limitations on Reverse Engineering, Decompilation, and Disassembly. You may not reverse engineer, decompile, or disassemble
the SOFTWARE, except and only to the extent that such activity is expressly permitted by applicable law notwithstanding this limitation.
■
SOFTWARE TRANSFER ALLOWED BUT WITH RESTRICTIONS. You may permanently transfer rights under this EULA only as part
of a permanent sale or transfer of the Device, and only if the recipient agrees to this EULA. If the SOFTWARE is an upgrade, any
transfer must also include all prior versions of the SOFTWARE.
■
EXPORT RESTRICTIONS. You acknowledge that SOFTWARE is subject to U.S. export jurisdiction. You agree to comply with all
applicable international and national laws that apply to the SOFTWARE, including the U.S. Export Administration Regulations, as well
as end-user, end-use and destination restrictions issued by U.S. and other governments. For additional information see
http://www.microsoft.com/exporting/.
TAT The Astonishing Tribe powers the user interface of this FLIR product. TAT Cascades (UI Framework) is
recognized for its graphics capabilities, time-to-market savings, resource efficiency and platform independence,
providing a more dynamic, faster and richer user experience.
TAT - The Astonishing Tribe™, the TAT logo, TAT Cascades™, TAT Motion Lab™, TAT Kastor™, the Design ♥
Technology tagline and the TAT product logos are either registered trademarks or trademarks of TAT - The
Astonishing Tribe AB in Sweden and/or other countries.
Publ. No. T559597 Rev. a500 – ENGLISH (EN) – December 10, 2010
vi
Publ. No. T559597 Rev. a500 – ENGLISH (EN) – December 10, 2010
Table of contents
1
Warnings & Cautions .....................................................................................................................
1
2
Notice to user ..................................................................................................................................
3
3
Customer help ................................................................................................................................
4
4
Documentation updates .................................................................................................................
5
5
Important note about this manual .................................................................................................
6
6
Parts lists .........................................................................................................................................
6.1
Scope of delivery ..................................................................................................................
6.2
List of accessories and services ...........................................................................................
7
7
8
7
Quick Start Guide ...........................................................................................................................
9
8
Camera parts ...................................................................................................................................
8.1
View from the right ................................................................................................................
8.2
View from the left ..................................................................................................................
8.3
Keypad ..................................................................................................................................
8.4
View from the bottom ...........................................................................................................
8.5
Battery condition LED indicator ............................................................................................
8.6
Power LED indicator .............................................................................................................
8.7
Laser pointer .........................................................................................................................
10
10
11
12
14
15
16
17
9
Screen elements ............................................................................................................................. 19
10 Navigating the menu system ......................................................................................................... 20
11 Connecting external devices and storage media ....................................................................... 21
12 Pairing Bluetooth devices .............................................................................................................. 23
13 Handling the camera ......................................................................................................................
13.1 Turning on the camera .........................................................................................................
13.2 Turning off the camera ..........................................................................................................
13.3 Adjusting the infrared camera focus manually ....................................................................
13.4 Operating the laser pointer ...................................................................................................
24
24
24
25
26
14 Working with images ......................................................................................................................
14.1 Previewing an image ............................................................................................................
14.2 Saving an image ...................................................................................................................
14.3 Opening an image ................................................................................................................
14.4 Adjusting an image ...............................................................................................................
14.5 Changing the palette ............................................................................................................
14.6 Deleting an image .................................................................................................................
14.7 Deleting all images ...............................................................................................................
14.8 Creating a PDF report in the camera ...................................................................................
27
27
28
29
30
33
34
35
36
15 Working with measurement tools ................................................................................................. 37
15.1 Laying out a measurement tool ............................................................................................ 37
15.2 Moving or resizing a measurement tool ............................................................................... 38
Publ. No. T559597 Rev. a500 – ENGLISH (EN) – December 10, 2010
vii
15.3
15.4
Creating and setting up a difference calculation ................................................................. 39
Changing object parameters ................................................................................................ 40
16 Fetching data from external Extech meters ................................................................................. 42
16.1 Typical moisture measurement and documentation procedure .......................................... 44
17 Working with alarms ....................................................................................................................... 45
17.1 Building alarms ..................................................................................................................... 45
18 Annotating images .......................................................................................................................... 46
18.1 Taking a digital photo ........................................................................................................... 47
18.2 Creating a text annotation .................................................................................................... 48
19 Changing settings .......................................................................................................................... 49
20 Cleaning the camera ......................................................................................................................
20.1 Camera housing, cables, and other items ...........................................................................
20.2 Infrared lens ..........................................................................................................................
20.3 Infrared detector ...................................................................................................................
50
50
51
52
21 Technical data ................................................................................................................................. 53
21.1 Additional data ...................................................................................................................... 54
22 Dimensional drawings ...................................................................................................................
22.1 Camera dimensions, front view (1) ......................................................................................
22.2 Camera dimensions, front view (2) ......................................................................................
22.3 Camera dimensions, side view (1) .......................................................................................
22.4 Camera dimensions, side view (2) .......................................................................................
22.5 Camera dimensions, side view (3) .......................................................................................
22.6 Infrared lens (30 mm/15°) .....................................................................................................
22.7 Infrared lens (10 mm/45°) .....................................................................................................
22.8 Battery (1) .............................................................................................................................
22.9 Battery (2) .............................................................................................................................
22.10 Battery (3) .............................................................................................................................
22.11 Battery charger (1) ................................................................................................................
22.12 Battery charger (2) ................................................................................................................
22.13 Battery charger (3) ................................................................................................................
22.14 Battery charger (4) ................................................................................................................
55
55
56
57
58
59
60
61
62
63
64
65
66
67
68
23 Application examples .....................................................................................................................
23.1 Moisture & water damage ....................................................................................................
23.2 Faulty contact in socket ........................................................................................................
23.3 Oxidized socket ....................................................................................................................
23.4 Insulation deficiencies ..........................................................................................................
23.5 Draft ......................................................................................................................................
69
69
70
71
72
73
24 Introduction to building thermography ........................................................................................
24.1 Disclaimer .............................................................................................................................
24.1.1 Copyright notice ...................................................................................................
24.1.2 Training & certification ..........................................................................................
24.1.3 National or regional building codes .....................................................................
24.2 Important note ......................................................................................................................
24.3 Typical field investigations ....................................................................................................
24.3.1 Guidelines .............................................................................................................
24.3.1.1
General guidelines ............................................................................
74
74
74
74
74
74
75
75
75
viii
Publ. No. T559597 Rev. a500 – ENGLISH (EN) – December 10, 2010
24.3.1.2
24.3.2
24.3.3
24.3.4
24.3.5
24.3.6
24.3.7
24.3.8
24.4
Theory
24.4.1
24.4.2
24.4.3
24.4.4
24.4.5
24.4.6
24.4.7
24.4.8
Guidelines for moisture detection, mold detection & detection of
water damages .................................................................................. 75
24.3.1.3
Guidelines for detection of air infiltration & insulation deficiencies ... 76
About moisture detection ..................................................................................... 77
Moisture detection (1): Low-slope commercial roofs .......................................... 77
24.3.3.1
General information ........................................................................... 77
24.3.3.2
Safety precautions ............................................................................ 78
24.3.3.3
Commented building structures ....................................................... 79
24.3.3.4
Commented infrared images ............................................................ 80
Moisture detection (2): Commercial & residential façades .................................. 82
24.3.4.1
General information ........................................................................... 82
24.3.4.2
Commented building structures ....................................................... 82
24.3.4.3
Commented infrared images ............................................................ 84
Moisture detection (3): Decks & balconies .......................................................... 84
24.3.5.1
General information ........................................................................... 84
24.3.5.2
Commented building structures ....................................................... 85
24.3.5.3
Commented infrared images ............................................................ 87
Moisture detection (4): Plumbing breaks & leaks ................................................ 87
24.3.6.1
General information ........................................................................... 87
24.3.6.2
Commented infrared images ............................................................ 88
Air infiltration ......................................................................................................... 90
24.3.7.1
General information ........................................................................... 90
24.3.7.2
Commented building structures ....................................................... 90
24.3.7.3
Commented infrared images ............................................................ 92
Insulation deficiencies .......................................................................................... 93
24.3.8.1
General information ........................................................................... 93
24.3.8.2
Commented building structures ....................................................... 93
24.3.8.3
Commented infrared images ............................................................ 95
of building science ................................................................................................... 97
General information .............................................................................................. 97
The effects of testing and checking ..................................................................... 98
Sources of disruption in thermography ................................................................ 99
Surface temperature and air leaks ....................................................................... 101
24.4.4.1
Pressure conditions in a building ..................................................... 101
Measuring conditions & measuring season ......................................................... 107
Interpretation of infrared images .......................................................................... 107
Humidity & dew point ........................................................................................... 109
24.4.7.1
Relative & absolute humidity ............................................................ 109
24.4.7.2
Definition of dew point ...................................................................... 109
Excerpt from Technical Note ‘Assessing thermal bridging and insulation
continuity’ (UK example) ...................................................................................... 109
24.4.8.1
Credits ............................................................................................... 109
24.4.8.2
Introduction ....................................................................................... 110
24.4.8.3
Background information ................................................................... 110
24.4.8.4
Quantitative appraisal of thermal anomalies .................................... 111
24.4.8.5
Conditions and equipment ............................................................... 114
24.4.8.6
Survey and analysis .......................................................................... 115
24.4.8.7
Reporting ........................................................................................... 116
25 Introduction to thermographic inspections of electrical installations ...................................... 118
25.1 Important note ...................................................................................................................... 118
25.2 General information .............................................................................................................. 118
25.2.1 Introduction ........................................................................................................... 118
Publ. No. T559597 Rev. a500 – ENGLISH (EN) – December 10, 2010
ix
25.3
25.4
25.5
25.6
25.7
25.2.2 General equipment data ....................................................................................... 119
25.2.3 Inspection ............................................................................................................. 120
25.2.4 Classification & reporting ...................................................................................... 120
25.2.5 Priority ................................................................................................................... 121
25.2.6 Repair .................................................................................................................... 121
25.2.7 Control .................................................................................................................. 122
Measurement technique for thermographic inspection of electrical installations ............... 123
25.3.1 How to correctly set the equipment ..................................................................... 123
25.3.2 Temperature measurement ................................................................................... 123
25.3.3 Comparative measurement .................................................................................. 125
25.3.4 Normal operating temperature ............................................................................. 126
25.3.5 Classification of faults ........................................................................................... 127
Reporting .............................................................................................................................. 129
Different types of hot spots in electrical installations ........................................................... 131
25.5.1 Reflections ............................................................................................................ 131
25.5.2 Solar heating ......................................................................................................... 131
25.5.3 Inductive heating ................................................................................................... 132
25.5.4 Load variations ...................................................................................................... 132
25.5.5 Varying cooling conditions ................................................................................... 133
25.5.6 Resistance variations ............................................................................................ 134
25.5.7 Overheating in one part as a result of a fault in another ...................................... 134
Disturbance factors at thermographic inspection of electrical installations ........................ 136
25.6.1 Wind ...................................................................................................................... 136
25.6.2 Rain and snow ...................................................................................................... 136
25.6.3 Distance to object ................................................................................................. 137
25.6.4 Object size ............................................................................................................ 138
Practical advice for the thermographer ................................................................................ 140
25.7.1 From cold to hot ................................................................................................... 140
25.7.2 Rain showers ........................................................................................................ 140
25.7.3 Emissivity .............................................................................................................. 140
25.7.4 Reflected apparent temperature ........................................................................... 141
25.7.5 Object too far away ............................................................................................... 141
26 About FLIR Systems ....................................................................................................................... 142
26.1 More than just an infrared camera ....................................................................................... 143
26.2 Sharing our knowledge ........................................................................................................ 144
26.3 Supporting our customers ................................................................................................... 144
26.4 A few images from our facilities ........................................................................................... 144
27 Glossary ........................................................................................................................................... 146
28 Thermographic measurement techniques ................................................................................... 150
28.1 Introduction .......................................................................................................................... 150
28.2 Emissivity .............................................................................................................................. 150
28.2.1 Finding the emissivity of a sample ....................................................................... 151
28.2.1.1
Step 1: Determining reflected apparent temperature ....................... 151
28.2.1.2
Step 2: Determining the emissivity ................................................... 153
28.3 Reflected apparent temperature .......................................................................................... 154
28.4 Distance ................................................................................................................................ 154
28.5 Relative humidity .................................................................................................................. 154
28.6 Other parameters .................................................................................................................. 154
29 History of infrared technology ...................................................................................................... 155
x
Publ. No. T559597 Rev. a500 – ENGLISH (EN) – December 10, 2010
30 Theory of thermography ................................................................................................................ 159
30.1 Introduction ........................................................................................................................... 159
30.2 The electromagnetic spectrum ............................................................................................ 159
30.3 Blackbody radiation .............................................................................................................. 160
30.3.1 Planck’s law .......................................................................................................... 161
30.3.2 Wien’s displacement law ...................................................................................... 162
30.3.3 Stefan-Boltzmann's law ......................................................................................... 164
30.3.4 Non-blackbody emitters ....................................................................................... 165
30.4 Infrared semi-transparent materials ..................................................................................... 167
31 The measurement formula ............................................................................................................. 169
32 Emissivity tables ............................................................................................................................. 175
32.1 References ............................................................................................................................ 175
32.2 Important note about the emissivity tables .......................................................................... 175
32.3 Tables .................................................................................................................................... 176
Publ. No. T559597 Rev. a500 – ENGLISH (EN) – December 10, 2010
xi
xii
Publ. No. T559597 Rev. a500 – ENGLISH (EN) – December 10, 2010
1
Warnings & Cautions
WARNING
■
■
■
This equipment generates, uses, and can radiate radio frequency energy and if
not installed and used in accordance with the instruction manual, may cause interference to radio communications. It has been tested and found to comply with
the limits for a Class A computing device pursuant to Subpart J of Part 15 of FCC
Rules, which are designed to provide reasonable protection against such interference when operated in a commercial environment. Operation of this equipment
in a residential area is likely to cause interference in which case the user at his
own expense will be required to take whatever measures may be required to
correct the interference.
(Applies only to cameras with laser pointer:) Do not look directly into the laser
beam. The laser beam can cause eye irritation.
Applies only to cameras with battery:
■
■
■
■
CAUTION
Do not disassemble or do a modification to the battery. The battery contains
safety and protection devices which, if they become damaged, can cause the
battery to become hot, or cause an explosion or an ignition.
If there is a leak from the battery and the fluid gets into your eyes, do not rub
your eyes. Flush well with water and immediately get medical care. The battery
fluid can cause injury to your eyes if you do not do this.
Do not continue to charge the battery if it does not become charged in the
specified charging time. If you continue to charge the battery, it can become
hot and cause an explosion or ignition.
Only use the correct equipment to discharge the battery. If you do not use the
correct equipment, you can decrease the performance or the life cycle of the
battery. If you do not use the correct equipment, an incorrect flow of current
to the battery can occur. This can cause the battery to become hot, or cause
an explosion and injury to persons.
■
Make sure that you read all applicable MSDS (Material Safety Data Sheets) and
warning labels on containers before you use a liquid: the liquids can be dangerous.
■
Do not point the infrared camera (with or without the lens cover) at intensive energy
sources, for example devices that emit laser radiation, or the sun. This can have
an unwanted effect on the accuracy of the camera. It can also cause damage to
the detector in the camera.
Do not use the camera in a temperature higher than +50°C (+122°F), unless
specified otherwise in the user documentation. High temperatures can cause
damage to the camera.
(Applies only to cameras with laser pointer:) Protect the laser pointer with the
protective cap when you do not operate the laser pointer.
Applies only to cameras with battery:
■
■
■
■
■
■
Do not attach the batteries directly to a car’s cigarette lighter socket, unless a
specific adapter for connecting the batteries to a cigarette lighter socket is
provided by FLIR Systems.
Do not connect the positive terminal and the negative terminal of the battery
to each other with a metal object (such as wire).
Do not get water or salt water on the battery, or permit the battery to get wet.
Publ. No. T559597 Rev. a500 – ENGLISH (EN) – December 10, 2010
1
1 – Warnings & Cautions
■
■
■
■
■
■
■
■
■
■
■
■
■
■
■
■
■
2
Do not make holes in the battery with objects. Do not hit the battery with a
hammer. Do not step on the battery, or apply strong impacts or shocks to it.
Do not put the batteries in or near a fire, or into direct sunlight. When the battery
becomes hot, the built-in safety equipment becomes energized and can stop
the battery charging process. If the battery becomes hot, damage can occur
to the safety equipment and this can cause more heat, damage or ignition of
the battery.
Do not put the battery on a fire or increase the temperature of the battery with
heat.
Do not put the battery on or near fires, stoves, or other high-temperature locations.
Do not solder directly onto the battery.
Do not use the battery if, when you use, charge, or store the battery, there is
an unusual smell from the battery, the battery feels hot, changes color, changes
shape, or is in an unusual condition. Contact your sales office if one or more
of these problems occurs.
Only use a specified battery charger when you charge the battery.
The temperature range through which you can charge the battery is ±0°C to
+45°C (+32°F to +113°F), unless specified otherwise in the user documentation. If you charge the battery at temperatures out of this range, it can cause
the battery to become hot or to break. It can also decrease the performance
or the life cycle of the battery.
The temperature range through which you can discharge the battery is −15°C
to +50°C (+5°F to +122°F), unless specified otherwise in the user documentation. Use of the battery out of this temperature range can decrease the performance or the life cycle of the battery.
When the battery is worn, apply insulation to the terminals with adhesive tape
or similar materials before you discard it.
Remove any water or moisture on the battery before you install it.
Do not apply solvents or similar liquids to the camera, the cables, or other items.
This can cause damage.
Be careful when you clean the infrared lens. The lens has a delicate anti-reflective
coating.
Do not clean the infrared lens too vigorously. This can damage the anti-reflective
coating.
In furnace and other high-temperature applications, you must mount a heatshield
on the camera. Using the camera in furnace and other high-temperature applications without a heatshield can cause damage to the camera.
(Applies only to cameras with an automatic shutter that can be disabled.) Do not
disable the automatic shutter in the camera for a prolonged time period (typically
max. 30 minutes). Disabling the shutter for a longer time period may harm, or irreparably damage, the detector.
The encapsulation rating is valid only when all openings on the camera are sealed
with their designated covers, hatches, or caps. This includes, but is not limited
to, compartments for data storage, batteries, and connectors.
Publ. No. T559597 Rev. a500 – ENGLISH (EN) – December 10, 2010
2
Notice to user
Typographical
conventions
This manual uses the following typographical conventions:
■
■
■
■
User-to-user
forums
Semibold is used for menu names, menu commands and labels, and buttons in
dialog boxes.
Italic is used for important information.
Monospace is used for code samples.
UPPER CASE is used for names on keys and buttons.
Exchange ideas, problems, and infrared solutions with fellow thermographers around
the world in our user-to-user forums. To go to the forums, visit:
http://www.infraredtraining.com/community/boards/
Calibration
(This notice only applies to cameras with measurement capabilities.)
We recommend that you send in the camera for calibration once a year. Contact
your local sales office for instructions on where to send the camera.
Accuracy
(This notice only applies to cameras with measurement capabilities.)
For very accurate results, we recommend that you wait 5 minutes after you have
started the camera before measuring a temperature.
For cameras where the detector is cooled by a mechanical cooler, this time period
excludes the time it takes to cool down the detector.
Disposal of
electronic waste
10742803;a1
As with most electronic products, this equipment must be disposed of in an environmentally friendly way, and in accordance with existing regulations for electronic waste.
Please contact your FLIR Systems representative for more details.
Training
To read about infrared training, visit:
■
■
■
http://www.infraredtraining.com
http://www.irtraining.com
http://www.irtraining.eu
Publ. No. T559597 Rev. a500 – ENGLISH (EN) – December 10, 2010
3
3
Customer help
General
For customer help, visit:
http://support.flir.com
Submitting a
question
To submit a question to the customer help team, you must be a registered user. It
only takes a few minutes to register online. If you only want to search the knowledgebase for existing questions and answers, you do not need to be a registered user.
When you want to submit a question, make sure that you have the following information to hand:
■
■
■
■
■
■
Downloads
On the customer help site you can also download the following:
■
■
■
■
■
4
The camera model
The camera serial number
The communication protocol, or method, between the camera and your PC (for
example, HDMI, Ethernet, USB™, or FireWire™)
Operating system on your PC
Microsoft® Office version
Full name, publication number, and revision number of the manual
Firmware updates for your infrared camera
Program updates for your PC software
User documentation
Application stories
Technical publications
Publ. No. T559597 Rev. a500 – ENGLISH (EN) – December 10, 2010
4
Documentation updates
General
Our manuals are updated several times per year, and we also issue product-critical
notifications of changes on a regular basis.
To access the latest manuals and notifications, go to the Download tab at:
http://support.flir.com
It only takes a few minutes to register online. In the download area you will also find
the latest releases of manuals for our other products, as well as manuals for our
historical and obsolete products.
Publ. No. T559597 Rev. a500 – ENGLISH (EN) – December 10, 2010
5
5
Important note about this manual
General
FLIR Systems issues generic manuals that cover several cameras within a model
line.
This means that this manual may contain descriptions and explanations that do not
apply to your particular camera model.
NOTE
6
FLIR Systems reserves the right to discontinue models, software, parts or accessories,
and other items, or to change specifications and/or functionality at any time without
prior notice.
Publ. No. T559597 Rev. a500 – ENGLISH (EN) – December 10, 2010
6
Parts lists
6.1
Scope of delivery
Contents
■
■
■
■
■
■
■
■
■
■
■
■
■
■
■
■
Infrared camera with lens
Hard transport case
Battery (2*)
Bluetooth headset*
Calibration certificate
FLIR Tools PC software CD-ROM
Handstrap
Lens cap
Memory card
Power supply, including multi-plugs
Printed Getting Started Guide
Printed Important Information Guide
USB cable
User documentation CD-ROM
Video cable
Warranty extension card or Registration card
* Dependent on the camera model/customer configuration.
NOTE
FLIR Systems reserves the right to discontinue models, parts or accessories, and
other items, or to change specifications at any time without prior notice.
Publ. No. T559597 Rev. a500 – ENGLISH (EN) – December 10, 2010
7
6 – Parts lists
6.2
List of accessories and services
General
This section contains a list of accessories and services that you can purchase for
your camera.
Accessories
■
■
■
■
■
■
■
■
■
■
■
■
■
■
■
■
■
■
■
■
■
■
■
■
■
■
■
■
■
NOTE
8
1196497 Cigarette lighter adapter kit, 12 VDC, 1.2 m/3.9 ft.
1196960 IR lens f = 10 mm, 45° including case
1196961 IR lens f = 30 mm, 15° including case
1910423 USB cable Std A to Mini-B
1910582 Video cable
ITC-ADV-3011 ITC Advanced Building—attendance 1 person
ITC-ADV-3019 ITC Advanced Building—group of 10 persons
ITC-ADV-3021 ITC Advanced General Thermography Course—attendance, 1
person
ITC-ADV-3029 ITC Advanced General Thermography Course—group of 10 persons
ITC-CER-5101 ITC Level 1 Thermography Course—attendance, 1 person
ITC-CER-5109 ITC Level 1 Thermography Course—group of 10 persons
ITC-CER-5201 ITC Level 2 Thermography Course—attendance, 1 person
ITC-CER-5209 ITC Level 2 Thermography Course—group of 10 persons
T197453 FLIR ResearchIR 1.2
T197453L10 FLIR ResearchIR 1.2, 10 user licenses
T197453L5 FLIR ResearchIR 1.2, 5 user licenses
T197454 FLIR QuickPlot 1.2
T197454L10 FLIR QuickPlot 1.2, 10 user licenses
T197454L5 FLIR QuickPlot 1.2, 5 user licenses
T197717 FLIR Reporter 8.5 SP2, Professional
T197717L10 FLIR Reporter 8.5 SP2, Professional, 10 user licenses
T197717L5 FLIR Reporter 8.5 SP2, Professional, 5 user licenses
T197771 Bluetooth headset
T197778 FLIR BuildIR 2.1
T197778L10 FLIR BuildIR 2.1, 10 user licenses
T197778L5 FLIR BuildIR 2.1, 5 user licenses
T910737 Memory card micro-SD with adapters
T910972 EX845: Clamp meter + IR therm TRMS 1000A AC/DC
T910973 MO297: Moisture meter, pinless with memory
FLIR Systems reserves the right to discontinue models, parts or accessories, and
other items, or to change specifications at any time without prior notice.
Publ. No. T559597 Rev. a500 – ENGLISH (EN) – December 10, 2010
7
Quick Start Guide
Procedure
Follow this procedure to get started right away:
1
Put a battery into the battery compartment.
2
Charge the battery for 4 hours before starting the camera for the first time,
or until the green battery condition LED glows continuously.
3
Insert a memory card into a card slot.
4
Push the
Aim the camera towards the object of interest.
6
Focus the camera by rotating the focus ring.
7
Pull and hold the trigger for more than 1 second to save an image directly.
8
Move the image to a computer by doing one of the following:
■
■
9
NOTE
button to turn on the camera.
5
Remove the memory card and insert it in a card reader connected to a
computer.
Connect a computer to the camera using a USB mini-B cable.
Move the image from the card or camera, using a drag-and-drop operation.
You can also move the images to the computer using FLIR Tools, which comes with
your camera.
Publ. No. T559597 Rev. a500 – ENGLISH (EN) – December 10, 2010
9
8
Camera parts
8.1
View from the right
Figure
T638786;a1
Explanation
This table explains the figure above:
1
Cover for the right-hand connectors compartment:
■
■
■
10
USB-A
USB mini-B
Power
2
Trigger to preview/save images
3
Tripod mount. Requires an adapter (extra accessory)
4
Focus ring
5
Infrared lens
Publ. No. T559597 Rev. a500 – ENGLISH (EN) – December 10, 2010
8 – Camera parts
8.2
View from the left
Figure
T638790;a1
Explanation
This table explains the figure above:
1
Laser pointer
2
Lamp for the digital camera
3
Digital camera
4
Cover for connectors and storage media:
■
■
Memory card
Video out
Publ. No. T559597 Rev. a500 – ENGLISH (EN) – December 10, 2010
11
8 – Camera parts
8.3
Keypad
Figure
T638787;a1
Explanation
This explains the figure above:
1
Touch-screen LCD
2
Navigation pad
3
■
■
12
Button to confirm choice
Button to go between automatic and manual adjustment modes
4
Image archive
5
Button to operate the laser pointer
6
Power indicator
7
On/off button
Publ. No. T559597 Rev. a500 – ENGLISH (EN) – December 10, 2010
8 – Camera parts
8
■
■
Button to display the menu system
Back button
Publ. No. T559597 Rev. a500 – ENGLISH (EN) – December 10, 2010
13
8 – Camera parts
8.4
View from the bottom
Figure
T638785;a3
Explanation
This table explains the figure above:
1
14
Latch to open the cover for the battery compartment. Push to open
Publ. No. T559597 Rev. a500 – ENGLISH (EN) – December 10, 2010
8 – Camera parts
8.5
Battery condition LED indicator
Figure
T638791;a1
Explanation
This table explains the battery condition LED indicator:
Type of signal
Explanation
The green LED flashes two times per
second.
The battery is being charged.
The green LED glows continuously.
The battery is fully charged.
Publ. No. T559597 Rev. a500 – ENGLISH (EN) – December 10, 2010
15
8 – Camera parts
8.6
Power LED indicator
Figure
T638781;a1
Explanation
This table explains the power LED indicator:
16
Type of signal
Explanation
The LED is off.
The camera is off.
The LED is blue.
The camera is on.
Publ. No. T559597 Rev. a500 – ENGLISH (EN) – December 10, 2010
8 – Camera parts
8.7
Laser pointer
General
The camera has a laser pointer. When the laser pointer is on, you can see a laser
dot above the target.
Figure
This figure shows the difference in position between the laser pointer and the optical
center of the infrared lens:
T638771;a1
WARNING
Do not look directly into the laser beam. The laser beam can cause eye irritation.
NOTE
■
■
Laser warning
label
The symbol
is displayed on the screen when the laser pointer is on.
The laser pointer may not be enabled in all markets.
A laser warning label with the following information is attached to the camera:
10743603;a2
Publ. No. T559597 Rev. a500 – ENGLISH (EN) – December 10, 2010
17
8 – Camera parts
Laser rules and
regulations
18
Wavelength: 635 nm. Maximum output power: 1 mW.
This product complies with 21 CFR 1040.10 and 1040.11 except for deviations pursuant to Laser Notice No. 50, dated June 24, 2007.
Publ. No. T559597 Rev. a500 – ENGLISH (EN) – December 10, 2010
9
Screen elements
Figure
T638713;a2
Explanation
This table gives an explanation to the figure above:
1
Measurement result table
2
Measurement tools (e.g., area and spotmeter)
3
Status and mode icons
4
Tooltip for the currently selected menu item
5
Temperature scale
6
Setup
7
Video clips recording
8
Camera mode/live image mode
9
Object parameters
10
Measurement tools
11
Color palettes
Publ. No. T559597 Rev. a500 – ENGLISH (EN) – December 10, 2010
19
10
Navigating the menu system
Figure
T638777;a1
Explanation
The figure above shows the two ways to navigate the menu system in the camera:
■
■
20
T638780;a1
Using the index finger to navigate the menu system (left).
Using the navigation pad to navigate the menu system (right).
Publ. No. T559597 Rev. a500 – ENGLISH (EN) – December 10, 2010
11
Connecting external devices and
storage media
Figure
T638789;a4
Explanation
This table explains the figure above:
1
Indicator showing that the memory card is busy. Note: Do not remove the
memory card when this indicator glows
2
Memory card
3
Headset cable
Publ. No. T559597 Rev. a500 – ENGLISH (EN) – December 10, 2010
21
11 – Connecting external devices and storage media
Figure
T638788;a1
Explanation
This table explains the figure above:
22
1
Power cable
2
USB mini-B cable
3
USB-A cable
Publ. No. T559597 Rev. a500 – ENGLISH (EN) – December 10, 2010
12
Pairing Bluetooth devices
General
Before you can use a Bluetooth device with the camera, you need to pair the devices.
Procedure
Follow this procedure:
1
Go to
NOTE
■
■
■
■
(Setup) .
2
Go to the Connectivity tab.
3
Activate Bluetooth.
4
Select Add Bluetooth device.
5
Select Scan for Bluetooth device and wait until a list of available devices
is displayed.
6
When a Bluetooth device is found, select the device to add it. Now the device
is ready to be used.
You can add several devices.
You can remove an added device by selecting it and then selecting Remove.
After adding a MeterLink device, such as the Extech MO297 or EX845, the result
from the meter will be visible in the measurement result table.
After adding a Bluetooth-enabled headset, it is ready to be used in camera preview
mode.
Publ. No. T559597 Rev. a500 – ENGLISH (EN) – December 10, 2010
23
13
Handling the camera
13.1
Turning on the camera
Procedure
13.2
Procedure
24
To turn on the camera, push and release the
button.
Turning off the camera
To turn on the camera, push and hold the
button for more than 0.2 second.
Publ. No. T559597 Rev. a500 – ENGLISH (EN) – December 10, 2010
13 – Handling the camera
13.3
Adjusting the infrared camera focus manually
NOTE
■
■
Do not touch the lens surface when you adjust the infrared camera focus manually.
If this happens, clean the lens according to the instructions in section 20.2 – Infrared lens on page 51.
The focus ring can be rotated infinitely, but only a certain amount of rotation is
needed when focusing.
Figure
T638779;a1
Procedure
Do one of the following:
■
■
For far focus, rotate the focus ring counter-clockwise (looking at the touch-screen
LCD side).
For near focus, rotate the focus ring clockwise (looking at the touch-screen LCD
side).
Publ. No. T559597 Rev. a500 – ENGLISH (EN) – December 10, 2010
25
13 – Handling the camera
13.4
Operating the laser pointer
Figure
T638778;a1
Procedure
Follow this procedure to operate the laser pointer:
26
1
To turn on the laser pointer, push and hold the laser button.
2
To turn off the laser pointer, release the laser button.
Publ. No. T559597 Rev. a500 – ENGLISH (EN) – December 10, 2010
14
Working with images
14.1
Previewing an image
General
You can preview an infrared image or digital photo before you save it to a memory
card. This enables you to see if the image or photo contains the information you want
before you save it.
In preview mode, you can also manipulate the image before you save it, and add
annotations.
Procedure
To preview an image, briefly pull and release the trigger.
Publ. No. T559597 Rev. a500 – ENGLISH (EN) – December 10, 2010
27
14 – Working with images
14.2
Saving an image
General
You can save an image directly, without previewing the image first.
Image capacity
This table gives information on the approximate number of infrared (IR) and digital
camera (DC) images that can be saved on memory cards:
Card size
IR only
IR + DC
IR + DC + 30
seconds voice
annotation
1 GB
5500
850
600
2 GB
11 000
1700
1200
Naming
convention
The naming convention for images is IR_xxxx.jpg, where xxxx is a unique counter.
Procedure
To save an image directly, pull and hold down the trigger for more than 1 second.
28
Publ. No. T559597 Rev. a500 – ENGLISH (EN) – December 10, 2010
14 – Working with images
14.3
Opening an image
General
When you save an image, the image is stored on a memory card. To display the image
again, open it from the memory card.
Procedure
Follow this procedure to open an image:
1
Push
2
.
Push the navigation pad up/down or left/right to select the image you want
to view.
3
Push
4
. This will display the image at full size.
(Optional step)
Push
again to go to edit mode.
Publ. No. T559597 Rev. a500 – ENGLISH (EN) – December 10, 2010
29
14 – Working with images
14.4
General
Example 1
Adjusting an image
An image can be adjusted automatically or manually. You use the
button
to switch between these two modes. Note that this only works in live mode and not
in preview/archive mode.
This figure shows two infrared images of cable connection points. In the left image
a correct analysis of the left cable is difficult to do if you only auto-adjust the image.
You can analyze the left cable in more detail if you
■
■
change the temperature scale level
change the temperature scale span.
The image on the left ihas been auto-adjusted. In the right image the maximum and
minimum temperature levels have been changed to temperature levels near the object.
On the temperature scale to the right of each image you can see how the temperature
levels were changed.
10577503;a2
30
Publ. No. T559597 Rev. a500 – ENGLISH (EN) – December 10, 2010
14 – Working with images
Example 2
This figure shows two infrared images of an isolator in a power line.
In the image on the left the cold sky and the power line structure have been recorded
at a minimum temperature of –26.0°C (–14.8°F). In the right image the maximum and
minimum temperature levels have been changed to temperature levels near the isolator. This makes it easier to analyze the temperature variations in the isolator.
10742503;a3
Publ. No. T559597 Rev. a500 – ENGLISH (EN) – December 10, 2010
31
14 – Working with images
Changing
temperature scale
level
Follow this procedure to change the temperature scale level:
1
Push
.
2
Use the navigation pad to select
3
Changing
temperature scale
span
(Manual).
To change the scale level, push the navigation pad up/down.
Follow this procedure to change the temperature scale span:
1
Push
.
2
Use the navigation pad to select
3
32
(Manual).
To change the scale span, push the navigation pad left/right.
Publ. No. T559597 Rev. a500 – ENGLISH (EN) – December 10, 2010
14 – Working with images
14.5
Changing the palette
General
You can change the color palette that the camera uses to display different temperatures. A different palette can make it easier to analyze an image.
Procedure
Follow this procedure to change the palette:
1
Push
to display the menu system.
2
Use the navigation pad to go to
.
3
Push
4
to display a submenu.
Use the navigation pad to select a different palette.
5
Push
.
Publ. No. T559597 Rev. a500 – ENGLISH (EN) – December 10, 2010
33
14 – Working with images
14.6
Deleting an image
General
You can delete one or more images in a folder.
Procedure
Follow this procedure to delete an image:
1
Push
2
.
Push the navigation pad up/down or left/right to select the image you want
to delete.
3
Push
to display the menu system.
4
Use the navigation pad to select
.
5
Push
34
and confirm that you want to delete the image.
Publ. No. T559597 Rev. a500 – ENGLISH (EN) – December 10, 2010
14 – Working with images
14.7
Deleting all images
General
You can delete all images in a folder.
Procedure
Follow this procedure to delete all images:
1
Push
.
2
Push
to display the menu system.
3
Use the navigation pad to select
.
Select Delete all.
4
Push
and confirm that you want to delete the images.
Publ. No. T559597 Rev. a500 – ENGLISH (EN) – December 10, 2010
35
14 – Working with images
14.8
Creating a PDF report in the camera
General
You can create a PDF report in the camera. You can then move the PDF report to a
computer, using a USB memory stick, or via Bluetooth, and send the report to a
customer.
Procedure
Follow this procedure to create a PDF report in the camera:
1
Push
.
2
Use the navigation pad to select
.
3
Push
4
to open a submenu.
On the submenu, select Create report.
A PDF report is now being created and will be displayed on the screen.
You can zoom into the report by using the controls in the top right corner
of the screen.
36
Publ. No. T559597 Rev. a500 – ENGLISH (EN) – December 10, 2010
15
Working with measurement tools
15.1
Laying out a measurement tool
General
To measure a temperature, you use one or several measurement tools, such as a
spotmeter, a box, etc.
Procedure
Follow this procedure to lay out a measurement tool:
1
Push
to display the menu system.
2
Use the navigation pad to go to
.
3
Push
4
to display a submenu.
Use the navigation pad to go to a measurement tool.
5
Push
. This will display the measurement tool on the screen.
Publ. No. T559597 Rev. a500 – ENGLISH (EN) – December 10, 2010
37
15 – Working with measurement tools
15.2
Moving or resizing a measurement tool
General
You can move and resize a measurement tool.
NOTE
This procedure assumes that you have previously laid out a measurement tool on
the screen.
Procedure
Follow this procedure to move or resize a measurement tool:
1
Push
to display the menu system.
2
Use the navigation pad to go to
(Tools).
3
Push
to display a submenu.
4
Use the navigation pad to go to
(Adjust tools).
5
Push
resize.
6
38
and select the measurement tool that you want to move or
Use the navigation pad to move or resize the measurement tool.
Publ. No. T559597 Rev. a500 – ENGLISH (EN) – December 10, 2010
15 – Working with measurement tools
15.3
Creating and setting up a difference calculation
General
A difference calculation gives the difference between the values of two known measurement results.
NOTE
This procedure assumes that you have previously laid out at least two measurement
tools on the screen.
Procedure
Follow this procedure to create and set up a difference calculation:
1
Push
to display the menu system.
2
Use the navigation pad to go to
(Tools).
3
Push
to display a submenu.
4
Use the navigation pad to select
(Add difference).
5
Push
. This will display a dialog box where you can select the
measurement tools that you want to use in the difference calculation.
6
Push
. The result of the difference calculation is now displayed in
the result table.
Publ. No. T559597 Rev. a500 – ENGLISH (EN) – December 10, 2010
39
15 – Working with measurement tools
15.4
Changing object parameters
General
For accurate measurements, you must set the object parameters.
Types of
parameters
The camera can use these object parameters:
■
■
■
■
■
■
Recommended
values
40
Emissivity, i.e., how much radiation an object emits, compared with the radiation
of a theoretical reference object of the same temperature (called a “blackbody”).
The opposite of emissivity is reflectivity. The emissivity determines how much of
the radiation originates from the object as opposed to being reflected by it.
Reflected apparent temperature, which is used when compensating for the radiation from the surroundings reflected by the object into the camera. This property
of the object is called reflectivity.
Object distance, i.e., the distance between the camera and the object of interest.
Atmospheric temperature, i.e., the temperature of the air between the camera
and the object of interest.
Relative humidity, i.e., the relative humidity of the air between the camera and
the object of interest.
External IR window compensation, i.e., the temperature of any protective windows,
etc., that are set up between the camera and the object of interest. If no protective
window or protective shield is used, this value is irrelevant and should be left inactive.
If you are unsure about the values, the following are recommended:
Atmospheric temperature
+20°C (+69°F)
Emissivity
0.95
Object distance
1.0 m (3.3 ft.)
Reflected apparent temperature
+20°C (+69°F)
Relative humidity
50%
Publ. No. T559597 Rev. a500 – ENGLISH (EN) – December 10, 2010
15 – Working with measurement tools
Procedure
Follow this procedure to change the object parameters:
1
Push
to display the menu system.
2
Use the navigation pad to go to
.
3
Push
4
to display a dialog box.
Use the navigation pad to select and change an object parameter.
5
Push
. This will close the dialog box.
NOTE
Of the parameters above, emissivity and reflected apparent temperature are the two
most important to set correctly in the camera.
Related topics
For in-depth information about parameters, and how to correctly set the emissivity
and reflected apparent temperature, see section 28 – Thermographic measurement
techniques on page 150.
Publ. No. T559597 Rev. a500 – ENGLISH (EN) – December 10, 2010
41
16
Fetching data from external
Extech meters
General
You can fetch data from an external Extech meter and merge this data into the result
table in the infrared image.
Figure
T638370;a1
Supported Extech
meters
■
Technical support
for Extech meters
[email protected]
NOTE
■
■
This support is for Extech meters only. For technical support for infrared cameras,
go to http://support.flir.com.
■
Procedure
42
Extech Moisture Meter MO297
Extech Clamp Meter EX845
This procedure assumes that you have paired the Bluetooth devices.
For more information about products from Extech Instruments, go to
http://www.extech.com/instruments/.
Follow this procedure:
1
Turn on the camera.
2
Turn on the Extech meter.
Publ. No. T559597 Rev. a500 – ENGLISH (EN) – December 10, 2010
16 – Fetching data from external Extech meters
3
On the meter, enable Bluetooth mode. Refer to the user documentation for
the meter for information on how to do this.
4
On the meter, choose the quantity that you want to use (voltage, current,
resistance, etc.). Refer to the user documentation for the meter for information on how to do this.
Results from the meter will now automatically be displayed in the result table
in the top left corner of the infrared camera screen.
5
Do one of the following:
■
■
■
To preview an image, push the Preview/Save button. At this stage, you
can add additional values. To do so, take a new measurement with the
meter and select Add on the infrared camera screen.
To save an image without previewing, push and hold down the Preview/Save button.
To add a value to a recalled image, turn on the meter after you have recalled the image, then select Add on the infrared camera screen. A
maximum of eight values can be added, but note that some values are
broken into two lines.
Publ. No. T559597 Rev. a500 – ENGLISH (EN) – December 10, 2010
43
16 – Fetching data from external Extech meters
16.1
Typical moisture measurement and documentation
procedure
General
The following procedure can form the basis for other procedures using Extech meters
and infrared cameras.
Procedure
Follow this procedure:
44
1
Use the infrared camera to identify any potential damp areas behind walls
and ceilings.
2
Use the moisture meter to measure the moisture levels at various suspect
locations that may have been found.
3
When a spot of particular interest is located, store the moisture reading in
the moisture meter’s memory and identify the measurement spot with a
handprint or other thermal identifying marker.
4
Recall the reading from the meter memory. The moisture meter will now
continuously transmit this reading to the infrared camera.
5
Use the camera to take a thermal image of the area with the identifying
marker. The stored data from the moisture meter will also be saved on the
image.
Publ. No. T559597 Rev. a500 – ENGLISH (EN) – December 10, 2010
17
Working with alarms
17.1
Building alarms
General
The camera features alarm types that are specific to the building trade. You can make
the camera trigger the following types of alarms:
■
■
Humidity alarm: Triggers when a measurement tool detects a surface where the
relative humidity exceeds a preset value.
Insulation alarm: Triggers when there is an insulation deficiency in a wall.
About the
Humidity alarm
To detect areas where the relative humidity is less than 100% you can use the Humidity alarm, where you can set the relative humidity above which the alarm will
trigger.
About the
Insulation alarm
The Insulation alarm can detect areas where there may be an insulation deficiency
in the building. It will trigger when the insulation level falls below a preset value of
the energy leakage through the wall.
Different building codes recommend different values, but typical values for the insulation level are 0.6–0.8 for new buildings. Refer to your national building code for
recommendations.
Alarm signals
When an alarm is triggered, an isotherm will be displayed.
Procedure
Follow this procedure to set up an alarm:
1
Push
to display the menu system.
2
Use the navigation pad to go to
.
3
Push
to display a submenu.
4
Use the navigation pad to go to
.
5
Push
6
. This will display a submenu.
In the submenu, select Humidity or Insulation. This will display a dialog
box where you can set the necessary parameters.
7
Push
.
The alarm is now set, and an isotherm will be displayed when the alarm is
triggered.
NOTE
For this alarm to be meaningful, the parameters must be set with some care.
Publ. No. T559597 Rev. a500 – ENGLISH (EN) – December 10, 2010
45
18
Annotating images
General
This section describes how to save additional information to an infrared image by
using annotations.
The reason for using annotations is to make reporting and post-processing more
efficient by providing essential information about the image, such as conditions,
photos, information about where an image is taken, and so on.
You can set the camera to automatically add an annotation to your images.
46
Publ. No. T559597 Rev. a500 – ENGLISH (EN) – December 10, 2010
18 – Annotating images
18.1
Taking a digital photo
General
When you save an infrared image you can also take a digital photo of the object of
interest. This digital photo will automatically be grouped together with the infrared
image, which will simplify post-processing and reporting.
NOTE
This procedure assumes that you have not set the camera to automatically add a
digital photo.
Procedure
Follow this procedure to take a digital photo:
1
To preview an infrared image, briefly pull and release the trigger.
2
Use the navigation pad to select Add photo.
3
Push
4
to display a submenu.
Use the navigation pad to select Add digital camera photo.
Push
to take the digital photo.
The digital photo will now be added to the IR image to what is called an
“infrared inspection group,” and will be grouped together in the image
archive, and also when moving files from the camera to reporting software
on the computer.
Publ. No. T559597 Rev. a500 – ENGLISH (EN) – December 10, 2010
47
18 – Annotating images
18.2
Creating a text annotation
General
A text annotation is grouped with an image file. Using this feature, you can annotate
images. This text can be revised later.
This feature is very efficient when saving information on an image when you are inspecting a large number of similar objects. The idea behind using text annotations
is to avoid filling out forms or inspection protocols manually.
NOTE
This procedure assumes that you have not set the camera to automatically add a
text annotation.
Procedure
Follow this procedure to create a text annotation:
1
To preview an image, pull the trigger.
2
Use the navigation pad to select
.
3
Push
4
to display a submenu.
Use the navigation pad to select Text annotation.
Push
to display a dialog box.
In this dialog box you can do one of the following:
■
■
Use an existing text annotation template.
Create a new field.
The text annotation will now be added to the IR image to what is called an
"infrared inspection group," and will be grouped together in the image
archive, and also when moving files from the camera to reporting software
on the computer.
48
Publ. No. T559597 Rev. a500 – ENGLISH (EN) – December 10, 2010
19
Changing settings
General
You can change a variety of settings for the camera:
■
■
■
■
Camera settings, such as the display intensity, power management, touch-screen
calibration, default settings, etc.
Preferences, such as settings for annotations, overlay, etc.
Connectivity, such as settings for Wi-Fi, Bluetooth, etc.
Regional settings, such as the language, date and time, date and time format,
temperature and distance units, etc.
This area also contains uneditable camera information, such as the serial number,
firmware version, battery level, etc.
Procedure
Follow this procedure to change settings:
1
Push
to display the menu system.
2
Use the navigation pad to go to
(Setup) .
3
Push
4
. This will display a dialog box.
Do the following:
■
Use the navigation pad to go between tabs and up/down on tabs.
■
Use the
button to confirm choices.
Publ. No. T559597 Rev. a500 – ENGLISH (EN) – December 10, 2010
49
20
Cleaning the camera
20.1
Camera housing, cables, and other items
Liquids
Use one of these liquids:
■
■
Warm water
A weak detergent solution
Equipment
A soft cloth
Procedure
Follow this procedure:
CAUTION
50
1
Soak the cloth in the liquid.
2
Twist the cloth to remove excess liquid.
3
Clean the part with the cloth.
Do not apply solvents or similar liquids to the camera, the cables, or other items.
This can cause damage.
Publ. No. T559597 Rev. a500 – ENGLISH (EN) – December 10, 2010
20 – Cleaning the camera
20.2
Infrared lens
Liquids
Use one of these liquids:
■
■
96% isopropyl alcohol.
A commercial lens cleaning liquid with more than 30% isopropyl alcohol.
Equipment
Cotton wool
Procedure
Follow this procedure:
1
Soak the cotton wool in the liquid.
2
Twist the cotton wool to remove excess liquid.
3
Clean the lens one time only and discard the cotton wool.
WARNING
Make sure that you read all applicable MSDS (Material Safety Data Sheets) and
warning labels on containers before you use a liquid: the liquids can be dangerous.
CAUTION
■
■
Be careful when you clean the infrared lens. The lens has a delicate anti-reflective
coating.
Do not clean the infrared lens too vigorously. This can damage the anti-reflective
coating.
Publ. No. T559597 Rev. a500 – ENGLISH (EN) – December 10, 2010
51
20 – Cleaning the camera
20.3
Infrared detector
General
Even small amounts of dust on the infrared detector can result in major blemishes
in the image. To remove any dust from the detector, follow the procedure below.
NOTE
■
■
This section only applies to cameras where removing the lens exposes the infrared
detector.
In some cases the dust cannot be removed by following this procedure: the infrared
detector must be cleaned mechanically. This mechanical cleaning must be carried
out by an authorized service partner.
CAUTION
In Step 2 below, do not use pressurized air from pneumatic air circuits in a workshop,
etc., as this air usually contains oil mist to lubricate pneumatic tools.
Procedure
Follow this procedure:
52
1
Remove the lens from the camera.
2
Use pressurized air from a compressed air canister to blow off the dust.
Publ. No. T559597 Rev. a500 – ENGLISH (EN) – December 10, 2010
21
Technical data
For technical data, refer to the datasheets on the user documentation CD-ROM that
comes with the camera.
Technical data is also available at http://support.flir.com.
Publ. No. T559597 Rev. a500 – ENGLISH (EN) – December 10, 2010
53
21 – Technical data
21.1
Field of view and
distance, 18
mm/25° lens
Additional data
T638855;a1
Figure 21.1 Relationship between field of view and distance. 1: Distance to target;
2: VFOV = vertical field of view; 3: HFOV = horizontal field of view, 4: IFOV = instantaneous field of view (size of one detector element).
This table gives the field of view at certain distances to targets. D = distance to target.
T638825;a1
54
Publ. No. T559597 Rev. a500 – ENGLISH (EN) – December 10, 2010
22
Dimensional drawings
22.1
Camera dimensions, front view (1)
Figure
T638765;a1
Publ. No. T559597 Rev. a500 – ENGLISH (EN) – December 10, 2010
55
22 – Dimensional drawings
22.2
Figure
56
Camera dimensions, front view (2)
T638766;a1
Publ. No. T559597 Rev. a500 – ENGLISH (EN) – December 10, 2010
22 – Dimensional drawings
22.3
Figure
Camera dimensions, side view (1)
T638772;a1
Publ. No. T559597 Rev. a500 – ENGLISH (EN) – December 10, 2010
57
22 – Dimensional drawings
22.4
Figure
58
Camera dimensions, side view (2)
T638773;a1
Publ. No. T559597 Rev. a500 – ENGLISH (EN) – December 10, 2010
22 – Dimensional drawings
22.5
Figure
Camera dimensions, side view (3)
T638774;a1
Publ. No. T559597 Rev. a500 – ENGLISH (EN) – December 10, 2010
59
22 – Dimensional drawings
22.6
Figure
60
Infrared lens (30 mm/15°)
10762503;a1
Publ. No. T559597 Rev. a500 – ENGLISH (EN) – December 10, 2010
22 – Dimensional drawings
22.7
Figure
Infrared lens (10 mm/45°)
10762403;a1
Publ. No. T559597 Rev. a500 – ENGLISH (EN) – December 10, 2010
61
22 – Dimensional drawings
22.8
Battery (1)
Figure
T638782;a1
NOTE
Use a clean, dry cloth to remove any water or moisture on the battery before you install
it.
62
Publ. No. T559597 Rev. a500 – ENGLISH (EN) – December 10, 2010
22 – Dimensional drawings
22.9
Battery (2)
Figure
T638783;a1
NOTE
Use a clean, dry cloth to remove any water or moisture on the battery before you install
it.
Publ. No. T559597 Rev. a500 – ENGLISH (EN) – December 10, 2010
63
22 – Dimensional drawings
22.10
Battery (3)
Figure
T638784;a1
NOTE
Use a clean, dry cloth to remove any water or moisture on the battery before you install
it.
64
Publ. No. T559597 Rev. a500 – ENGLISH (EN) – December 10, 2010
22 – Dimensional drawings
22.11
Battery charger (1)
Figure
T638767;a1
NOTE
Use a clean, dry cloth to remove any water or moisture on the battery before you put
it in the battery charger.
Publ. No. T559597 Rev. a500 – ENGLISH (EN) – December 10, 2010
65
22 – Dimensional drawings
22.12
Battery charger (2)
Figure
T638768;a1
NOTE
Use a clean, dry cloth to remove any water or moisture on the battery before you put
it in the battery charger.
66
Publ. No. T559597 Rev. a500 – ENGLISH (EN) – December 10, 2010
22 – Dimensional drawings
22.13
Battery charger (3)
Figure
T638769;a1
NOTE
Use a clean, dry cloth to remove any water or moisture on the battery before you put
it in the battery charger.
Publ. No. T559597 Rev. a500 – ENGLISH (EN) – December 10, 2010
67
22 – Dimensional drawings
22.14
Battery charger (4)
Figure
T638770;a1
NOTE
Use a clean, dry cloth to remove any water or moisture on the battery before you put
it in the battery charger.
68
Publ. No. T559597 Rev. a500 – ENGLISH (EN) – December 10, 2010
23
Application examples
23.1
Moisture & water damage
General
It is often possible to detect moisture and water damage in a house by using an infrared camera. This is partly because the damaged area has a different heat conduction property and partly because it has a different thermal capacity to store heat than
the surrounding material.
NOTE
Many factors can come into play as to how moisture or water damage will appear in
an infrared image.
For example, heating and cooling of these parts takes place at different rates depending on the material and the time of day. For this reason, it is important that other
methods are used as well to check for moisture or water damage.
Figure
The image below shows extensive water damage on an external wall where the water
has penetrated the outer facing because of an incorrectly installed window ledge.
10739503;a1
Publ. No. T559597 Rev. a500 – ENGLISH (EN) – December 10, 2010
69
23 – Application examples
23.2
Faulty contact in socket
General
Depending on the type of connection a socket has, an improperly connected wire
can result in local temperature increase. This temperature increase is caused by the
reduced contact area between the connection point of the incoming wire and the
socket , and can result in an electrical fire.
NOTE
A socket’s construction may differ dramatically from one manufacturer to another.
For this reason, different faults in a socket can lead to the same typical appearance
in an infrared image.
Local temperature increase can also result from improper contact between wire and
socket, or from difference in load.
Figure
The image below shows a connection of a cable to a socket where improper contact
in the connection has resulted in local temperature increase.
10739603;a1
70
Publ. No. T559597 Rev. a500 – ENGLISH (EN) – December 10, 2010
23 – Application examples
23.3
Oxidized socket
General
Depending on the type of socket and the environment in which the socket is installed,
oxides may occur on the socket's contact surfaces. These oxides can lead to locally
increased resistance when the socket is loaded, which can be seen in an infrared
image as local temperature increase.
NOTE
A socket’s construction may differ dramatically from one manufacturer to another.
For this reason, different faults in a socket can lead to the same typical appearance
in an infrared image.
Local temperature increase can also result from improper contact between a wire
and socket, or from difference in load.
Figure
The image below shows a series of fuses where one fuse has a raised temperature
on the contact surfaces against the fuse holder. Because of the fuse holder’s blank
metal, the temperature increase is not visible there, while it is visible on the fuse’s
ceramic material.
10739703;a1
Publ. No. T559597 Rev. a500 – ENGLISH (EN) – December 10, 2010
71
23 – Application examples
23.4
Insulation deficiencies
General
Insulation deficiencies may result from insulation losing volume over the course of
time and thereby not entirely filling the cavity in a frame wall.
An infrared camera allows you to see these insulation deficiencies because they either
have a different heat conduction property than sections with correctly installed insulation, and/or show the area where air is penetrating the frame of the building.
NOTE
When you are inspecting a building, the temperature difference between the inside
and outside should be at least 10°C (18°F). Studs, water pipes, concrete columns,
and similar components may resemble an insulation deficiency in an infrared image.
Minor differences may also occur naturally.
Figure
In the image below, insulation in the roof framing is lacking.. Due to the absence of
insulation, air has forced its way into the roof structure, which thus takes on a different
characteristic appearance in the infrared image.
10739803;a1
72
Publ. No. T559597 Rev. a500 – ENGLISH (EN) – December 10, 2010
23 – Application examples
23.5
Draft
General
Draft can be found under baseboards, around door and window casings, and above
ceiling trim. This type of draft is often possible to see with an infrared camera, as a
cooler airstream cools down the surrounding surface.
NOTE
When you are investigating draft in a house, there should be sub-atmospheric pressure
in the house. Close all doors, windows, and ventilation ducts, and allow the kitchen
fan to run for a while before you take the infrared images.
An infrared image of draft often shows a typical stream pattern. You can see this
stream pattern clearly in the picture below.
Also keep in mind that drafts can be concealed by heat from floor heating circuits.
Figure
The image below shows a ceiling hatch where faulty installation has resulted in a
strong draft.
10739903;a1
Publ. No. T559597 Rev. a500 – ENGLISH (EN) – December 10, 2010
73
24
Introduction to building
thermography
24.1
Disclaimer
24.1.1
Copyright notice
Some sections and/or images appearing in this chapter are copyrighted to the following organizations and companies:
■
■
■
■
■
FORMAS—The Swedish Research Council for Environment, Agricultural Sciences
and Spatial Planning, Stockholm, Sweden
ITC—Infrared Training Center, Boston, MA, United States
Stockton Infrared Thermographic Services, Inc., Randleman, NC, United States
Professional Investigative Engineers, Westminster, CO, United States
United Kingdom Thermography Association (UKTA)
24.1.2
Training & certification
Carrying out building thermography inspections requires substantial training
and experience, and may require certification from a national or regional standardization body. This section is provided only as an introduction to building
thermography. The user is strongly recommended to attend relevant training
courses.
For more information about infrared training, visit the following website:
http://www.infraredtraining.com
24.1.3
National or regional building codes
The commented building structures in this chapter may differ in construction from
country to country. For more information about construction details and standards
of procedure, always consult national or regional building codes.
24.2
Important note
All camera functions and features that are described in this section may not be supported by your particular camera configuration.
74
Publ. No. T559597 Rev. a500 – ENGLISH (EN) – December 10, 2010
24 – Introduction to building thermography
24.3
Typical field investigations
24.3.1
Guidelines
As will be noted in subsequent sections there are a number of general guidelines the
user should take heed of when carrying out building thermography inspection. This
section gives a summary of these guidelines.
24.3.1.1
■
■
■
General guidelines
The emissivity of the majority of building materials fall between 0.85 and 0.95.
Setting the emissivity value in the camera to 0.90 can be regarded as a good
starting point.
An infrared inspection alone should never be used as a decision point for further
actions. Always verify suspicions and findings using other methods, such as construction drawings, moisture meters, humidity & temperature datalogging, tracer
gas testing etc.
Change level and span to thermally tune the infrared image and reveal more details.
The figure below shows the difference between a thermally untuned and a thermally
tuned infrared image.
10552103;a2
Figure 24.1 LEFT: A thermally untuned infrared image; RIGHT: A thermally tuned infrared image, after
having changed level and span.
24.3.1.2
■
■
Guidelines for moisture detection, mold detection & detection of
water damages
Building defects related to moisture and water damages may only show up when
heat has been applied to the surface, e.g. from the sun.
The presence of water changes the thermal conductivity and the thermal mass of
the building material. It may also change the surface temperature of building material due to evaporative cooling. Thermal conductivity is a material’s ability to conduct
heat, while thermal mass is its ability to store heat.
Publ. No. T559597 Rev. a500 – ENGLISH (EN) – December 10, 2010
75
24 – Introduction to building thermography
■
Infrared inspection does not directly detect the presence of mold, rather it may be
used to find moisture where mold may develop or has already developed. Mold
requires temperatures between +4°C to +38°C (+40°F to +100°F), nutrients and
moisture to grow. Humidity levels above 50% can provide sufficient moisture to
enable mold to grow.
10556003;a1
Figure 24.2 Microscopic view of mold spore
24.3.1.3
■
■
■
■
Guidelines for detection of air infiltration & insulation deficiencies
For very accurate camera measurements, take measurements of the temperature
and enter this value in the camera.
It is recommended that there is a difference in pressure between the outside and
the inside of the building structure. This facilitates the analysis of the infrared images
and reveals deficiencies that would not be visible otherwise. Although a negative
pressure of between 10 and 50 Pa is recommended, carrying out the inspection
at a lower negative pressure may be acceptable. To do this, close all windows,
doors and ventilation ducts and then run the kitchen exhaust fan for some time to
reach a negative pressure of 5–10 Pa (applies to residential houses only).
A difference in temperature between the inside and the outside of 10–15°C (18–27°F)
is recommended. Inspections can be carried out at a lower temperature difference,
but will make the analysis of the infrared images somewhat more difficult.
Avoid direct sunlight on a part of a building structure—e.g. a façade—that is to be
inspected from the inside. The sunlight will heat the façade which will equalize the
temperature differences on the inside and mask deficiencies in the building structure.
Spring seasons with low nighttime temperatures (±0°C (+32°F)) and high daytime
temperatures (+14°C (+57°F)) are especially risky.
76
Publ. No. T559597 Rev. a500 – ENGLISH (EN) – December 10, 2010
24 – Introduction to building thermography
24.3.2
About moisture detection
Moisture in a building structure can originate from several different sources, e.g.:
External leaks, such as floods, leaking fire hydrants etc.
Internal leaks, such as freshwater piping, waste water piping etc.
Condensation, which is humidity in the air falling out as liquid water due to condensation on cold surfaces.
Building moisture, which is any moisture in the building material prior to erecting
the building structure.
Water remaining from firefighting.
■
■
■
■
■
As a non-destructive detection method, using an infrared camera has a number of
advantages over other methods, and a few disadvantages:
Advantage
■
■
■
■
■
Disadvantage
The method is quick.
The method is a non-intrusive means of investigation.
The method does not require relocation of the
occupants.
The method features an illustrative visual presentation of findings.
The method confirms failure points and moisture migration paths.
■
■
The method only detects surface temperature
differentials and can not see through walls.
The method can not detect subsurface damage,
i.e. mold or structural damage.
24.3.3
Moisture detection (1): Low-slope commercial roofs
24.3.3.1
General information
Low-slope commercial roofing is one of the most common roof types for industrial
building, such as warehouses, industrial plants, machinery shops etc. Its major advantages over a pitched roof is the lower cost in material and building. However, due
to its design where snow and ice will not fall off by itself—as is the case for the majority of pitched roofs—it must be strongly built to support the accumulated weight of
both roof structure and any snow, ice and rain.
Although a basic understanding of the construction of low-slope commercial roofs is
desirable when carrying out a roof thermography inspection, expert knowledge is not
necessary. There is a large number of different design principles for low-slope commercial roofs—both when it comes to material and design—and it would be impossible
for the infrared inspection person to know them all. If additional information about a
certain roof is needed, the architect or contractor of the building can usually supply
the relevant information.
Common causes of roof failure are outlined in the table below (from SPIE Thermosense
Proceedings Vol. 371 (1982), p. 177).
Publ. No. T559597 Rev. a500 – ENGLISH (EN) – December 10, 2010
77
24 – Introduction to building thermography
Cause
%
Poor workmanship
47.6
Roof traffic
2.6
Poor design
16.7
Trapped moisture
7.8
Materials
8.0
Age & weathering
8.4
Potential leak locations include the following:
■
■
■
■
■
Flashing
Drains
Penetrations
Seams
Blisters
24.3.3.2
■
■
■
■
■
Safety precautions
Recommend a minimum of two people on a roof, preferably three or more.
Inspect the underside of the roof for structural integrity prior to walking on it.
Avoid stepping on blisters that are common on built up bitumen and gravel roofs.
Have a cell phone or radio available in case of emergency.
Inform local police and plant security prior to doing nighttime roof survey.
78
Publ. No. T559597 Rev. a500 – ENGLISH (EN) – December 10, 2010
24 – Introduction to building thermography
24.3.3.3
Commented building structures
This section includes a few typical examples of moisture problems on low-slope
commercial roofs.
Structural drawing
Comment
10553603;a2
Inadequate sealing of roof membrane around
conduit and ventilation ducts leading to local
leakage around the conduit or duct.
10553703;a2
Roof membrane inadequately sealed around roof
access hatch.
Publ. No. T559597 Rev. a500 – ENGLISH (EN) – December 10, 2010
79
24 – Introduction to building thermography
Structural drawing
Comment
10553803;a2
Drainage channels located too high and with too
low an inclination. Some water will remain in the
drainage channel after rain, which may lead to local
leakage around the channel.
10553903;a2
Inadequate sealing between roof membrane and
roof outlet leading to local leakage around the roof
outlet.
24.3.3.4
Commented infrared images
How do you find wet insulation below the surface of the roof? When the surface itself
is dry, including any gravel or ballast, a sunny day will warm the entire roof. Early in
the evening, if the sky is clear, the roof will begin to cool down by radiation. Because
of its higher thermal capacity the wet insulation will stay warmer longer than the dry
and will be visible in the infrared camera (see photos below). The technique is particularly effective on roofs having absorbent insulation—such as wood fiber, fiberglass,
and perlite—where thermal patterns correlate almost perfectly with moisture.
80
Publ. No. T559597 Rev. a500 – ENGLISH (EN) – December 10, 2010
24 – Introduction to building thermography
Infrared inspections of roofs with nonabsorbent insulations, common in many singleply systems, are more difficult to diagnose because patterns are more diffuse.
This section includes a few typical infrared images of moisture problems on low-slope
commercial roofs:
Infrared image
Comment
10554003;a1
Moisture detection on a roof, recorded during the
evening.
Since the building material affected by moisture
has a higher thermal mass, its temperature decreases slower than surrounding areas.
10554103;a1
Water-damaged roofing components and insulation identified from infrared scan from the underside of the built-up roof on a structural concrete
tee deck.
Affected areas are cooler than the surrounding
sound areas, due to conductive and/or thermal
capacitive effect.
10554203;a1
Daytime survey of built-up low-slope commercial
roof.
Affected areas are cooler than the surrounding dry
areas, due to conductive and/or thermal capacitive
effect.
Publ. No. T559597 Rev. a500 – ENGLISH (EN) – December 10, 2010
81
24 – Introduction to building thermography
24.3.4
Moisture detection (2): Commercial & residential façades
24.3.4.1
General information
Thermography has proven to be invaluable in the assessment of moisture infiltration
into commercial and residential façades. Being able to provide a physical illustration
of the moisture migration paths is more conclusive than extrapolating moisture meter
probe locations and more cost-effective than large intrusive test cuts.
24.3.4.2
Commented building structures
This section includes a few typical examples of moisture problems on commercial
and residential façades.
Structural drawing
Comment
10554303;a2
Pelting rain penetrates the façade due to badly
executed bed joints. Moisture builds up in the
masonry above the window.
10554403;a2
Pelting rain hits the window at an angle. Most of
the rain runs off the window edge flashing but
some finds its way into the masonry where the
plaster meets the underside of the flashing.
82
Publ. No. T559597 Rev. a500 – ENGLISH (EN) – December 10, 2010
24 – Introduction to building thermography
Structural drawing
Comment
10554503;a2
Rain hits the façade at an angle and penetrates
the plaster through cracks. The water then follows
the inside of the plaster and leads to frost erosion.
10554603;a2
Rain splashes on the façade and penetrates the
plaster and masonry by absorption, which eventually leads to frost erosion.
Publ. No. T559597 Rev. a500 – ENGLISH (EN) – December 10, 2010
83
24 – Introduction to building thermography
24.3.4.3
Commented infrared images
This section includes a few typical infrared images of moisture problems on commercial
& residential façades.
Infrared image
Comment
10554703;a1
Improperly terminated and sealed stone veneer to
window frame and missing flashings has resulted
in moisture infiltration into the wall cavity and interior living space.
10554803;a1
Moisture migration into drywall from capillary drive
and interior finish components from inadequate
clearance and slope of grade from vinyl siding
façade on an apartment complex.
24.3.5
Moisture detection (3): Decks & balconies
24.3.5.1
General information
Although there are differences in design, materials and construction, decks—plaza
decks, courtyard decks etc—suffer from the same moisture and leaking problems as
low-slope commercial roofs. Improper flashing, inadequately sealed membranes,
and insufficient drainage may lead to substantial damage in the building structures
below.
Balconies, although smaller in size, require the same care in design, choice of material, and workmanship as any other building structure. Since balconies are usually
supported on one side only, moisture leading to corrosion of struts and concrete reinforcement can cause problems and lead to hazardous situations.
84
Publ. No. T559597 Rev. a500 – ENGLISH (EN) – December 10, 2010
24 – Introduction to building thermography
24.3.5.2
Commented building structures
This section includes a few typical examples of moisture problems on decks and
balconies.
Structural drawing
Comment
10555203;a2
Improper sealing of paving and membrane to roof
outlet, leading to leakage during rain.
10555103;a2
No flashing at deck-to-wall connection, leading to
rain penetrating the concrete and insulation.
Publ. No. T559597 Rev. a500 – ENGLISH (EN) – December 10, 2010
85
24 – Introduction to building thermography
Structural drawing
Comment
10555003;a2
Water has penetrated the concrete due to inadequately sized drop apron and has led to concrete
disintegration and corrosion of reinforcement.
SECURITY RISK!
10554903;a2
Water has penetrated the plaster and underlying
masonry at the point where the handrail is fastened
to the wall.
SECURITY RISK!
86
Publ. No. T559597 Rev. a500 – ENGLISH (EN) – December 10, 2010
24 – Introduction to building thermography
24.3.5.3
Commented infrared images
This section includes a few typical infrared images of moisture problems on decks
and balconies.
Infrared image
Comment
10555303;a1
Improper flashing at balcony-to-wall connections
and missing perimeter drainage system resulted
in moisture intrusion into the wood framing support
structure of the exterior walkway balcony of a loft
complex.
10555403;a1
A missing composite drainage plane or medium
on a below-grade parking garage plaza deck
structure resulted in standing water between the
structural concrete deck and the plaza wearing
surface.
24.3.6
Moisture detection (4): Plumbing breaks & leaks
24.3.6.1
General information
Water from plumbing leaks can often lead to severe damage on a building structure.
Small leaks may be difficult to detect, but can—over the years—penetrate structural
walls and foundations to a degree where the building structure is beyond repair.
Using building thermography at an early stage when plumbing breaks and leaks are
suspected can lead to substantial savings on material and labor.
Publ. No. T559597 Rev. a500 – ENGLISH (EN) – December 10, 2010
87
24 – Introduction to building thermography
24.3.6.2
Commented infrared images
This section includes a few typical infrared images of plumbing breaks & leaks.
Infrared image
Comment
10555503;a1
Moisture migration tracking along steel joist channels inside ceiling of a single family home where
a plumbing line had ruptured.
10555603;a1
Water from plumbing leak was found to have migrated farther than originally anticipated by the
contractor during remediation techniques of cutting
back carpet and installing dehumidifiers.
88
Publ. No. T559597 Rev. a500 – ENGLISH (EN) – December 10, 2010
24 – Introduction to building thermography
Infrared image
Comment
10555703;a1
The infrared image of this vinyl-sided 3-floor
apartment house clearly shows the path of a serious leak from a washing machine on the third floor,
which is completely hidden within the wall.
10555803;a1
Water leak due to improper sealing between floor
drain and tiles.
Publ. No. T559597 Rev. a500 – ENGLISH (EN) – December 10, 2010
89
24 – Introduction to building thermography
24.3.7
Air infiltration
24.3.7.1
General information
Due to the wind pressure on a building, temperature differences between the inside
and the outside of the building, and the fact that most buildings use exhaust air terminal
devices to extract used air from the building, a negative pressure of 2–5 Pa can be
expected. When this negative pressure leads to cold air entering the building structure
due to deficiencies in building insulation and/or building sealing, we have what is
called air infiltration. Air infiltration can be expected at joints and seams in the building
structure.
Due to the fact that air infiltration creates an air flow of cool air into e.g. a room, it can
lead to substantial deterioration of the indoor climate. Air flows as small as 0.15 m/s
(0.49 ft./s) are usually noticed by inhabitants, although these air flows may be difficult
to detect using ordinary measurement devices.
On an infrared image air infiltration can be identified by its typical ray pattern, which
emanates from the point of exit in the building structure—e.g. from behind a skirting
strip. Furthermore, areas of air infiltration typically have a lower detected temperature
than areas where there is only an insulation deficiency. This is due to the chill factor
of the air flow.
24.3.7.2
Commented building structures
This section includes a few typical examples of details of building structures where
air infiltration may occur.
Structural drawing
Comment
10552503;a2
Insulation deficiencies at the eaves of a brickwall
house due to improperly installed fiberglass insulation batts.
The air infiltration enters the room from behind the
cornice.
90
Publ. No. T559597 Rev. a500 – ENGLISH (EN) – December 10, 2010
24 – Introduction to building thermography
Structural drawing
Comment
10552303;a2
Insulation deficiencies in an intermediate flow due
to improperly installed fiberglass insulation batts.
The air infiltration enters the room from behind the
cornice.
10552603;a2
Air infiltration in a concrete floor-over-crawl-space
due to cracks in the brick wall façade.
The air infiltration enters the room beneath the
skirting strip.
Publ. No. T559597 Rev. a500 – ENGLISH (EN) – December 10, 2010
91
24 – Introduction to building thermography
24.3.7.3
Commented infrared images
This section includes a few typical infrared images of details of building structures
where air infiltration has occurred.
Infrared image
Comment
10552703;a1
Air infiltration from behind a skirting strip. Note the
typical ray pattern.
10552803;a1
Air infiltration from behind a skirting strip. Note the
typical ray pattern.
The white area to the left is a radiator.
10552903;a1
92
Air infiltration from behind a skirting strip. Note the
typical ray pattern.
Publ. No. T559597 Rev. a500 – ENGLISH (EN) – December 10, 2010
24 – Introduction to building thermography
24.3.8
Insulation deficiencies
24.3.8.1
General information
Insulation deficiencies do not necessarily lead to air infiltration. If fiberglass insulation
batts are improperly installed air pockets will form in the building structure. Since
these air pockets have a different thermal conductivity than areas where the insulation
batts are properly installed, the air pockets can be detected during a building thermography inspection.
As a rule of thumb, areas with insulation deficiencies typically have higher temperatures
than where there is only an air infiltration.
When carrying out building thermography inspections aimed at detecting insulation
deficiencies, be aware of the following parts in a building structure, which may look
like insulation deficiencies on the infrared image:
■
■
■
■
■
■
Wooden joists, studs, rafter, beams
Steel girders and steel beams
Water piping inside walls, ceilings, floors
Electrical installations inside walls, ceilings, floors—such as trunking, piping etc.
Concrete columns inside timber framed walls
Ventilation ducts & air ducts
24.3.8.2
Commented building structures
This section includes a few typical examples of details of building structures with insulation deficiencies:
Structural drawing
Comment
10553203;a2
Insulation deficiencies (and air infiltration) due to
improper installation of insulation batts around an
electrical mains supply.
This kind of insulation deficiency will show up as
dark areas on an infrared image.
Publ. No. T559597 Rev. a500 – ENGLISH (EN) – December 10, 2010
93
24 – Introduction to building thermography
Structural drawing
Comment
10553103;a2
Insulation deficiencies due to improper installation
of insulation batts around an attic floor beam. Cool
air infiltrates the structure and cools down the inside of the ceiling.
This kind of insulation deficiency will show up as
dark areas on an infrared image.
10553003;a2
Insulation deficiencies due to improper installation
of insulation batts creating an air pocket on the
outside of an inclined ceiling.
This kind of insulation deficiency will show up as
dark areas on an infrared image.
94
Publ. No. T559597 Rev. a500 – ENGLISH (EN) – December 10, 2010
24 – Introduction to building thermography
24.3.8.3
Commented infrared images
This section includes a few typical infrared images of insulation deficiencies.
Infrared image
Comment
10553303;a1
Insulation deficiencies in an intermediate floor
structure. The deficiency may be due to either
missing insulation batts or improperly installed insulations batts (air pockets).
10553403;a1
Improperly installed fiberglass batts in a suspended ceiling.
Publ. No. T559597 Rev. a500 – ENGLISH (EN) – December 10, 2010
95
24 – Introduction to building thermography
Infrared image
Comment
10553503;a1
Insulation deficiencies in an intermediate floor
structure. The deficiency may be due to either
missing insulation batts or improperly installed insulations batts (air pockets).
96
Publ. No. T559597 Rev. a500 – ENGLISH (EN) – December 10, 2010
24 – Introduction to building thermography
24.4
Theory of building science
24.4.1
General information
The demand for energy-efficient constructions has increased significantly in recent
times. Developments in the field of energy, together with the demand for pleasant
indoor environments, have resulted in ever-greater significance having to be attached
to both the function of a building’s thermal insulation and airtightness and the efficiency
of its heating and ventilation systems.
Defective insulation and tightness in highly insulated and airtight structures can have
a great impact on energy losses. Defects in a building’s thermal insulation and airtightness do not merely entail risk of excessive heating and maintenance costs, they also
create the conditions for a poor indoor climate.
A building’s degree of insulation is often stated in the form of a thermal resistance or
a coefficient of thermal transmittance (U value) for the various parts of the building.
However, the stated thermal resistance values rarely provide a measure of the actual
energy losses in a building. Air leakage from joints and connections that are not airtight
and insufficiently filled with insulation often gives rise to considerable deviations from
the designed and expected values.
Verification that individual materials and building elements have the promised properties is provided by means of laboratory tests. Completed buildings have to be
checked and inspected in order to ensure that their intended insulation and airtightness
functions are actually achieved.
In its structural engineering application, thermography is used to study temperature
variations over the surfaces of a structure. Variations in the structure’s thermal resistance can, under certain conditions, produce temperature variations on its surfaces.
Leakage of cold (or warm) air through the structure also affects the variation in surface
temperature. This means that insulation defects, thermal bridges and air leaks in a
building’s enclosing structural components can be located and surveyed.
Thermography itself does not directly show the structure’s thermal resistance or airtightness. Where quantification of thermal resistance or airtightness is required, additional measurements have also to be taken. Thermographic analysis of buildings relies
on certain prerequisites in terms of temperature and pressure conditions across the
structure.
Details, shapes and contrasts in the thermal image can vary quite clearly with changes
in any of these parameters. The in-depth analysis and interpretation of thermal images
therefore requires thorough knowledge of such aspects as material and structural
properties, the effects of climate and the latest measuring techniques. For assessing
Publ. No. T559597 Rev. a500 – ENGLISH (EN) – December 10, 2010
97
24 – Introduction to building thermography
the results of measurements, there are special requirements in terms of the skills and
experience of those taking the measurements, e.g. by means of authorization by a
national or regional standardization body.
24.4.2
The effects of testing and checking
It can be difficult to anticipate how well the thermal insulation and airtightness of a
completed building will work. There are certain factors involved in assembling the
various components and building elements that can have a considerable impact on
the final result. The effects of transport, handling and storage at the site and the way
the work is done cannot be calculated in advance. To ensure that the intended function
is actually achieved, verification by testing and checking the completed building is
required.
Modern insulation technology has reduced the theoretical heat requirement. This
does mean, however, that defects that are relatively minor, but at important locations,
e.g. leaking joints or incorrectly installed insulation, can have considerable consequences in terms both of heat and comfort. Verification tests, e.g. by means of thermography, have proved their value, from the point of view both of the designer and
the contractor and of the developer, the property manager and the user.
■
■
■
For the designer, the important thing is to find out about the function of various
types of structures, so that they can be designed to take into account both working
methods and functional requirements. The designer must also know how different
materials and combinations of materials function in practice. Effective testing and
checking, as well as experiential feedback, can be used to achieve the required
development in this area.
The contractor is keen on more testing and inspection in order to ensure that the
structures keep to an expected function that corresponds to established requirements in the regulations issued by authorities and in contractual documents. The
contractor wants to know at an early stage of construction about any changes that
may be necessary so that systematic defects can be prevented. During construction,
a check should therefore be carried out on the first apartments completed in a
mass production project. Similar checking then follows as production continues.
In this way systematic defects can be prevented and unnecessary costs and future
problems can be avoided. This check is of benefit both to manufacturers and to
users.
For the developer and the property manager it is essential that buildings are checked
with reference to heat economy, maintenance (damage from moisture or moisture
infiltration) and comfort for the occupants (e.g. cooled surfaces and air movements
in occupied zones).
98
Publ. No. T559597 Rev. a500 – ENGLISH (EN) – December 10, 2010
24 – Introduction to building thermography
■
For the user the important thing is that the finished product fulfills the promised
requirements in terms of the building’s thermal insulation and airtightness. For the
individual, buying a house involves a considerable financial commitment, and the
purchaser therefore wants to know that any defects in the construction will not involve serious financial consequences or hygiene problems.
The effects of testing and checking a building’s insulation and airtightness are partly
physiological and partly financial.
The physiological experience of an indoor climatic environment is very subjective,
varying according to the particular human body’s heat balance and the way the individual experiences temperature. The experience of climate depends on both the indoor
air temperature and that of the surrounding surfaces. The speed of movement and
moisture content of indoor air are also of some significance. Physiologically, a draft
produces the sensation of local cooling of the body’s surface caused by
■
■
■
excessive air movements in the occupied zone with normal air temperature;
normal air movements in the occupied zone but a room temperature that is too
low;
substantial radiated heat exchange with a cold surface.
It is difficult to assess the quantitative effects of testing and checking a building’s
thermal insulation.
Investigations have shown that defects found in the thermal insulation and airtightness
of buildings cause heat losses that are about 20–30% more than was expected.
Monitoring energy consumption before and after remedial measures in relatively large
complexes of small houses and in multi-dwelling blocks has also demonstrated this.
The figures quoted are probably not representative of buildings in general, since the
investigation data cannot be said to be significant for the entire building stock. A
cautious assessment however would be that effectively testing and checking a
building’s thermal insulation and airtightness can result in a reduction in energy
consumption of about 10%.
Research has also shown that increased energy consumption associated with defects
is often caused by occupants increasing the indoor temperature by one or a few degrees above normal to compensate for the effect of annoying thermal radiation towards
cooled surfaces or a sensation of disturbing air movements in a room.
24.4.3
Sources of disruption in thermography
During a thermographic survey, the risk of confusing temperature variations caused
by insulation defects with those associated with the natural variation in U values along
warm surfaces of a structure is considered slight under normal conditions.
Publ. No. T559597 Rev. a500 – ENGLISH (EN) – December 10, 2010
99
24 – Introduction to building thermography
The temperature changes associated with variations in the U value are generally
gradual and symmetrically distributed across the surface. Variations of this kind do
of course occur at the angles formed by roofs and floors and at the corners of walls.
Temperature changes associated with air leaks or insulation defects are in most
cases more evident with characteristically shaped sharp contours. The temperature
pattern is usually asymmetrical.
During thermography and when interpreting an infrared image, comparison infrared
images can provide valuable information for assessment.
The sources of disruption in thermography that occur most commonly in practice are
■
■
■
■
■
the effect of the sun on the surface being thermographed (sunlight shining in
through a window);
hot radiators with pipes;
lights directed at, or placed near, the surface being measured;
air flows (e.g. from air intakes) directed at the surface;
the effect of moisture deposits on the surface.
Surfaces on which the sun is shining should not be subjected to thermography. If
there is a risk of an effect by sunlight, windows should be covered up (closing Venetian
blinds). However, be aware that there are building defects or problems (typically
moisture problems) that only show up when heat has been applied to the surface,
e.g. from the sun.
For more information about moisture detection, see section 24.3.2 – About moisture
detection on page 77.
A hot radiator appears as a bright light surface in an infrared image. The surface
temperature of a wall next to a radiator is raised, which may conceal any defects
present.
For maximum prevention of disruptive effects from hot radiators, these may be shut
off a short while before the measurement is taken. However, depending on the construction of the building (low or high mass), these may need to be shut off several
hours before a thermographic survey. The room air temperature must not fall so much
as to affect the surface temperature distribution on the structure’s surfaces. There is
little timelag with electric radiators, so they cool down relatively quickly once they
have been switched off (20–30 minutes).
Lights placed against walls should be switched off when the infrared image is taken.
During a thermographic survey there should not be any disruptive air flows (e.g. open
windows, open valves, fans directed at the surface being measured) that could affect
the surfaces being thermographed.
100
Publ. No. T559597 Rev. a500 – ENGLISH (EN) – December 10, 2010
24 – Introduction to building thermography
Any wet surfaces, e.g. as a result of surface condensation, have a definite effect on
heat transfer at the surface and the surface temperature. Where there is moisture on
a surface, there is usually some evaporation which draws off heat, thus lowering the
temperature of the surface by several degrees. There is risk of surface condensation
at major thermal bridges and insulation defects.
Significant disruptions of the kind described here can normally be detected and
eliminated before measuring.
If during thermography it is not possible to shield surfaces being measured from
disruptive factors, these must be taken into account when interpreting and evaluating
the results. The conditions in which the thermography was carried out should be
recorded in detail when each measurement is taken.
24.4.4
Surface temperature and air leaks
Defects in building airtightness due to small gaps in the structure can be detected
by measuring the surface temperature. If there is a negative pressure in the building
under investigation, air flows into the space through leaks in the building. Cold air
flowing in through small gaps in a wall usually lowers the temperature in adjacent
areas of the wall. The result is that a cooled surface area with a characteristic shape
develops on the inside surface of the wall. Thermography can be used to detect
cooled surface areas. Air movements at the wall surface can be measured using an
air velocity indicator. If there is a positive pressure inside the building being investigated, warm room air will leak out through gaps in the wall, resulting in locally warm
surface areas around the locations of the leaks.
The amount of leakage depends partly on gaps and partly on the differential pressure
across the structure.
24.4.4.1
Pressure conditions in a building
The most important causes of differential pressure across a structural element in a
building are
■
■
■
wind conditions around the building;
the effects of the ventilation system;
temperature differences between air inside and outside (thermal differential pressure).
The actual pressure conditions inside a building are usually caused by a combination
of these factors.
The resultant pressure gradient across the various structural elements can be illustrated
by the figure on page 103. The irregular effects of wind on a building means that in
practice the pressure conditions may be relatively variable and complicated.
Publ. No. T559597 Rev. a500 – ENGLISH (EN) – December 10, 2010
101
24 – Introduction to building thermography
In a steady wind flow, Bernoulli’s Law applies:
where:
ρ
Air density in kg/m3
v
Wind velocity in m/s
p
Static pressure in Pa
and where:
denotes the dynamic pressure and p the static pressure. The total of these pressures
gives the total pressure.
Wind load against a surface makes the dynamic pressure become a static pressure
against the surface. The magnitude of this static pressure is determined by, amongst
other things, the shape of the surface and its angle to the wind direction.
The portion of the dynamic pressure that becomes a static pressure on the surface
(pstat) is determined by what is known as a stress concentration factor:
If ρ is 1.23 kg/m3 (density of air at +15°C (+59°F)), this gives the following local
pressures in the wind flow:
102
Publ. No. T559597 Rev. a500 – ENGLISH (EN) – December 10, 2010
24 – Introduction to building thermography
10551803;a1
Figure 24.3 Distribution of resultant pressures on a building’s enclosing surfaces depending on wind effects,
ventilation and internal/external temperature difference. 1: Wind direction; Tu: Thermodynamic air temperature outdoors in K; Ti: Thermodynamic air temperature indoors in K.
If the whole of the dynamic pressure becomes static pressure, then C = 1. Examples
of stress concentration factor distributions for a building with various wind directions
are shown in the figure on page 104.
The wind therefore causes an internal negative pressure on the windward side and
an internal positive pressure on the leeward side. The air pressure indoors depends
on the wind conditions, leaks in the building and how these are distributed in relation
to the wind direction. If the leaks in the building are evenly distributed, the internal
pressure may vary by ±0.2 pstat. If most of the leaks are on the windward side, the
internal pressure increases somewhat. In the opposite case, with most of the leaks
on the leeward side, the internal pressure falls.
Publ. No. T559597 Rev. a500 – ENGLISH (EN) – December 10, 2010
103
24 – Introduction to building thermography
10551903;a1
Figure 24.4 Stress concentration factor (C) distributions for various wind directions and wind velocities
(v) relative to a building.
Wind conditions can vary substantially over time and between relatively closely situated locations. In thermography, such variations can have a clear effect on the measurement results.
It has been demonstrated experimentally that the differential pressure on a façade
exposed to an average wind force of about 5 m/s (16.3 ft/s) will be about 10 Pa.
Mechanical ventilation results in a constant internal negative or positive pressure
(depending on the direction of the ventilation). Research has showed that the negative
pressure caused by mechanical extraction (kitchen fans) in small houses is usually
between 5 and 10 Pa. Where there is mechanical extraction of ventilation air, e.g. in
multi-dwelling blocks, the negative pressure is somewhat greater, 10–50 Pa. Where
there is so-called balanced ventilation (mechanically controlled supply and extract
air), this is normally adjusted to produce a slight negative pressure inside (3–5 Pa).
The differential pressure caused by temperature differences, the so-called chimney
effect (airtightness differences of air at different temperatures) means that there is a
negative pressure in the building’s lower part and a positive pressure in the upper
104
Publ. No. T559597 Rev. a500 – ENGLISH (EN) – December 10, 2010
24 – Introduction to building thermography
part. At a certain height there is a neutral zone where the pressures on the inside and
outside are the same, see the figure on page 106. This differential pressure may be
described by the relationship:
Δp
Air pressure differential within the structure in Pa
g
9.81 m/s2
ρu
Air density in kg/m3
Tu
Thermodynamic air temperature outdoors in K
Ti
Thermodynamic air temperature indoors in K
h
Distance from the neutral zone in meters
If ρu = 1.29 kg/m3 (density of air at a temperature of 273 K and ≈100 kPa), this produces:
With a difference of +25°C (+77°F) between the ambient internal and external temperatures, the result is a differential pressure difference within the structure of about
1 Pa/m difference in height (= 3.28 Pa/ft.).
Publ. No. T559597 Rev. a500 – ENGLISH (EN) – December 10, 2010
105
24 – Introduction to building thermography
10552003;a1
Figure 24.5 Distribution of pressures on a building with two openings and where the external temperature
is lower than the internal temperature. 1: Neutral zone; 2: Positive pressure; 3: Negative pressure;
h: Distance from the neutral zone in meters.
The position of the neutral zone may vary, depending on any leaks in the building. If
the leaks are evenly distributed vertically, this zone will be about halfway up the
building. If more of the leaks are in the lower part of the building, the neutral zone will
move downwards. If more of the leaks are in the upper part, it will move upwards.
Where a chimney opens above the roof, this has a considerable effect on the position
of the neutral zone, and the result may be a negative pressure throughout the building.
This situation most commonly occurs in small buildings.
In a larger building, such as a tall industrial building, with leaks at doors and any
windows in the lower part of the building, the neutral zone is about one-third of the
way up the building.
106
Publ. No. T559597 Rev. a500 – ENGLISH (EN) – December 10, 2010
24 – Introduction to building thermography
24.4.5
Measuring conditions & measuring season
The foregoing may be summarized as follows as to the requirements with regard to
measuring conditions when carrying out thermographic imaging of buildings.
Thermographic imaging is done in such a way that the disruptive influence from external climatic factors is as slight as possible. The imaging process is therefore carried
out indoors, i.e. where a building is heated, the structure’s warm surfaces are examined.
Outdoor thermography is only used to obtain reference measurements of larger
façade surfaces. In certain cases, e.g. where the thermal insulation is very bad or
where there is an internal positive pressure, outdoor measurements may be useful.
Even when investigating the effects of installations located within the building’s climatic
envelope, there may be justification for thermographic imaging from outside the
building.
The following conditions are recommended:
■
■
■
■
The air temperature difference within the relevant part of the building must be at
least +10°C (+18°F) for a number of hours before thermographic imaging and for
as long as the procedure takes. For the same period, the ambient temperature
difference must not vary by more than ±30% of the difference when the thermographic imaging starts. During the thermographic imaging, the indoor ambient
temperature should not change by more than ±2°C (±3.6°F).
For a number of hours prior before thermographic imaging and as long as it continues, no influencing sunlight may fall upon the relevant part of the building.
Negative pressure within the structure ≈ 10–50 Pa.
When conducting thermographic imaging in order to locate only air leaks in the
building’s enclosing sections, the requirements in terms of measuring conditions
may be lower. A difference of 5°C (9°F) between the inside and outside ambient
temperatures ought to be sufficient for detecting such defects. To be able to detect
air leaks, certain requirements must however be made with regard to the differential
pressure; about 10 Pa should be sufficient.
24.4.6
Interpretation of infrared images
The main purpose of thermography is to locate faults and defects in thermal insulation
in exterior walls and floor structures and to determine their nature and extent. The
measuring task can also be formulated in such a way that the aim of the thermography
is to confirm whether or not the wall examined has the promised insulation and airtightness characteristics. The ‘promised thermal insulation characteristics’ for the wall
according to the design can be converted into an expected surface temperature distribution for the surface under investigation if the measuring conditions at the time
when the measurements are taken are known.
Publ. No. T559597 Rev. a500 – ENGLISH (EN) – December 10, 2010
107
24 – Introduction to building thermography
In practice the method involves the following:
Laboratory or field tests are used to produce an expected temperature distribution in
the form of typical or comparative infrared images for common wall structures, comprising both defect-free structures and structures with in-built defects.
Examples of typical infrared images are shown in section 24.3 – Typical field investigations on page 75.
If infrared images of structural sections taken during field measurements are intended
for use as comparison infrared images, then the structure’s composition, the way it
was built, and the measurement conditions at the time the infrared image was taken
must be known in detail and documented.
In order, during thermography, to be able to comment on the causes of deviations
from the expected results, the physical, metrological and structural engineering prerequisites must be known.
The interpretation of infrared images taken during field measurements may be described in brief as follows:
A comparison infrared image for a defect-free structure is selected on the basis of
the wall structure under investigation and the conditions under which the field measurement was taken. An infrared image of the building element under investigation
is then compared with the selected infrared image. Any deviation that cannot be explained by the design of the structure or the measurement conditions is noted as a
suspected insulation defect. The nature and extent of the defect is normally determined
using comparison infrared images showing various defects.
If no suitable comparison infrared image is available, evaluation and assessment are
done on the basis of experience. This requires more precise reasoning during the
analysis.
When assessing an infrared image, the following should be looked at:
■
■
■
■
■
Uniformity of brightness in infrared images of surface areas where there are no
thermal bridges
Regularity and occurrence of cooled surface areas, e.g. at studding and corners
Contours and characteristic shapes in the cooled surface area
Measured temperature differences between the structure’s normal surface temperature and the selected cooled surface area
Continuity and uniformity of the isotherm curve on the surface of the structure. In
the camera software the isotherm function is called Isotherm or Color alarm, depending on camera model.
108
Publ. No. T559597 Rev. a500 – ENGLISH (EN) – December 10, 2010
24 – Introduction to building thermography
Deviations and irregularities in the appearance of the infrared image often indicate
insulation defects. There may obviously be considerable variations in the appearance
of infrared images of structures with insulation defects. Certain types of insulation
defects have a characteristic shape on the infrared image.
Section 24.3 – Typical field investigations on page 75 shows examples of interpretations of infrared images.
When taking infrared images of the same building, the infrared images from different
areas should be taken with the same settings on the infrared camera, as this makes
comparison of the various surface areas easier.
24.4.7
Humidity & dew point
24.4.7.1
Relative & absolute humidity
Humidity can be expressed in two different ways—either as relative humidity or as
absolute humidity. Relative humidity is expressed in percent of how much water a
certain volume of air can hold at a certain temperature, while absolute humidity is
expressed in percent water by weight of material. The latter way to express humidity
is common when measuring humidity in wood and other building materials.
The higher the temperature of air, the larger the amount of water this certain volume
of air can hold.
24.4.7.2
Definition of dew point
Dew point is the temperature at which the humidity in a certain volume of air will
condense as liquid water.
24.4.8
Excerpt from Technical Note ‘Assessing thermal bridging and
insulation continuity’ (UK example)
24.4.8.1
Credits
This Technical Note was produced by a working group including expert thermographers, and research consultants. Additional consultation with other persons and organisations results in this document being widely accepted by all sides of industries.
The contents of this Technical Note is reproduced with kind permission from, and
fully copyrighted to, United Kingdom Thermography Association (UKTA).
UK Thermography Association
c/o British Institute of Nondestructive Testing
1 Spencer Parade
Northampton NN1 5AA
United Kingdom
Tel: +44 (0)1604 630124
Publ. No. T559597 Rev. a500 – ENGLISH (EN) – December 10, 2010
109
24 – Introduction to building thermography
Fax: +44 (0)1604 231489
24.4.8.2
Introduction
Over the last few years the equipment, applications, software, and understanding
connected with thermography have all developed at an astonishing rate. As the
technology has gradually become integrated into mainstream practises, a corresponding demand for application guides, standards and thermography training has arisen.
The UKTA is publishing this technical note in order to establish a consistent approach
to quantifying the results for a ‘Continuity of Thermal Insulation’ examination. It is intended that specifiers should refer to this document as a guide to satisfying the requirement in the Building Regulations, therefore enabling the qualified thermographer
to issue a pass or fail report.
24.4.8.3
Background information
Thermography can detect surface temperature variations as small as 0.1 K and
graphic images can be produced that visibly illustrate the distribution of temperature
on building surfaces.
Variations in the thermal properties of building structures, such as poorly fitted or
missing sections of insulation, cause variations in surface temperature on both sides
of the structure. They are therefore visible to the thermographer. However, many
other factors such as local heat sources, reflections and air leakage can also cause
surface temperature variations.
The professional judgement of the thermographer is usually required to differentiate
between real faults and other sources of temperature variation. Increasingly, thermographers are asked to justify their assessment of building structures and, in the absence of adequate guidance, it can be difficult to set definite levels for acceptable or
unacceptable variation in temperature.
The current Standard for thermal iamging of building fabric in the UK is BS EN
13187:1999 (BS EN 13187:1999, Thermal Performance of Buildings—Qualitative detection of thermal properties in building envelopes—Infrared method (ISO 6781:1983
modified). However, this leaves interpretation of the thermal image to the professional
expertise of of the thermographer and provides little guidance on the demarcation
between acceptable and unacceptable variations. Guidance on the appearance of a
range of thermal anomalies can be found in BINDT Guides to thermal imaging (Infrared
Thermography Handbook; Volume 1, Principles and Practise, Norman Walker, ISBN
0903132338, Volume 2, Applications, A. N. Nowicki, ISBN 090313232X, BINDT, 2005).
24.4.8.3.1
Requirements
A thermographic survey to demonstrate continuity of insulation, areas of thermal
bridging and compliance with Building Regulations should include the following:
110
Publ. No. T559597 Rev. a500 – ENGLISH (EN) – December 10, 2010
24 – Introduction to building thermography
■
■
■
■
Thermal anomalies.
Differentiate between real thermal anomalies, where temperature differences are
caused by deficiencies in thermal insulation, and those that occur through confounding factors such as localised differences in air movement, reflection and
emissivity.
Quantify affected areas in relation to the total insulated areas.
State whether the anomalies and the building thermal insulation as a whole are
acceptable.
24.4.8.4
Quantitative appraisal of thermal anomalies
A thermographic survey will show differences in apparent temperature of areas within
the field of view. To be useful, however, it must systematically detect all the apparent
defects; assess them against a predetermined set of criteria; reliably discount those
anomalies that are not real defects; evaluate those that are real defects, and report
the results to the client.
24.4.8.4.1
Selection of critical temperature parameter
The BRE information Paper IP17/01 (Information Paper IP17/01, Assessing the Effects
of Thermal Bridging at Junctions and Around Openings. Tim Ward, BRE, 2001) provides useful guidance on minimum acceptable internal surface temperatures and
appropriate values of Critical Surface Temperature Factor, fCRsi. The use of a surface
temperature factor allows surveys under any thermal conditions to show areas that
are at risk of condensation or mould growth under design conditions.
The actual surface temperature will depend greatly on the temperatures inside and
outside at the time of the survey, but a ‘Surface Temperature Factor’ (fRsi) has been
devised that is independent of the absolute conditions. It is a ratio of temperature
drop across the building fabric to the total temperature drop between inside and
outside air.
For internal surveys: fRsi = (Tsi – Te)/(Ti – Te)
Tsi = internal surface temperature
Ti = internal air temperature
Te = external air temperature
A value for fCRsi of 0.75 is considered appropriate across new building as the upper
end usage is not a factor considered in testing for ‘Continuity of Insulation’, or ‘Thermal
Bridging’. However, when considering refurbished or extended buildings, for example
swimming pools, internal surveys may need to account for unusal circumstances.
Publ. No. T559597 Rev. a500 – ENGLISH (EN) – December 10, 2010
111
24 – Introduction to building thermography
24.4.8.4.2
Alternative method using only surface temperatures
There are strong arguments for basing thermographic surveys on surface temperatures
alone, with no need to measure air temperature.
■
■
■
■
■
■
■
■
■
■
Stratification inside the building makes reference to air internal temperatures very
difficult. Is it mean air temperature, low level, high level or temperature at the level
of the anomaly and how far from the wall should it be measured?
Radiation effects, such as radiation to the night sky, make use of of external air
temperature difficult. It is not unusual for the outside surface of building fabric to
be below air temperature because of radiation to the sky which may be as low as
–50℃ (–58℉). This can be seen with the naked eye by the fact that dew and frost
often appear on building surfaces even when the air temperature does not drop
below the dewpoint.
It should be noted that the concept of U values is based on ‘environmental temperatures’ on each side of the structure. This is neglected by many inexperienced
analysts.
The two temperatures that are firmly related to the transfer of heat through building
fabric (and any solid) are the surface temperatures on each side.
Therefore, by referring to surface temperatures the survey is more repeatable.
The surface temperatures used are the averages of surface temperatures on the
same material in an area near the anomaly on the inside and the outside of the
fabric. Together with the temperature of the anomaly, a threshold level can be set
dependent on these temperatures using the critical surface temperature factor.
These arguments do not obviate the need for the thermographer to beware of reflections of objects at unusual temperatures in the background facing the building
fabric surfaces.
The thermographer should also use a comparison between external faces facing
different directions to determine whether there is residual heat from solar gain affecting the external surfaces.
External surveys should not be conducted on a surface where Tsi – Tso on the face
is more than 10% greater than Tsi – Tso on the north or nearest to north face.
For a defect that causes a failure under the 0.75 condition of IP17/01 the critical
surface factors are 0.78 on the inside surface and 0.93 on the outside surface.
The table below shows the internal and external surface temperatures at an anomaly
which would lead to failure under IP17/01. It also shows the deterioration in thermal
insulation that is necessary to cause this.
Example for lightweight built-up cladding with defective
insulation
Good area
Failing area
Outside temperature in ℃
0
0
Inside surface temperature in ℃
19.1
15.0
112
Publ. No. T559597 Rev. a500 – ENGLISH (EN) – December 10, 2010
24 – Introduction to building thermography
Example for lightweight built-up cladding with defective
insulation
Good area
Failing area
Outside surface temperature in ℃
0.3
1.5
Surface factor from IP17/01
0.95
0.75
Critical external surface temperature factor, after IP17/01
Insulation thickness to give this level of performance, mm
Local U value
W/m2K
0.92
80
5.1
0.35
1.92
UKTA TN1 surface factor
0.78
UKTA TN1 surface factor outside
0.93
Notes to the table
1 Values of surface resistances taken from ADL2 2001, are:
■
■
2
3
4
5
Inside surface 0.13 m2K/W
Outside surface 0.04 m2K/W
These originate from BS EN ISO 6946 (BN EN ISO 6946:1997 Building components
and building elements - Thermal resistance and thermal transmittance - Calculation
method).
Thermal insulation used here is assumed to have a conductivity of 0.03 W/m K.
The difference in temperature between an anomaly and the good areas is 1.2 degrees on the outside and 4.1 degrees on the inside.
The UKTA TN1 surface temperature factor for internal surveys is:
Fsi = (Tsia – Tso)/(Tsi – Tso)
where:
Tsia = internal surface temperature at anomaly
Tso = external surface temperature (good area)
Tsi = internal surface temperature (good area)
The UKTA TN1 surface temperature factor for external surveys is:
Fso = (Tsoa – Tsi)/(Tso – Tsi)
where Tsoa = external surface temperature at anomaly
24.4.8.4.3
Selecting maximum acceptable defect area
The allowable area of defect is a quality control issue. It can be argued that there
should be no area on which condensation, mould growth or defective insulation will
occur and any such anomalies should be included in the report. However, a commonly
used value of 0.1% of the building exposed surface area is generally accepted as the
maximum combined defect area allowable to comply with the Building Regulations.
This represents one square metre in every thousand.
Publ. No. T559597 Rev. a500 – ENGLISH (EN) – December 10, 2010
113
24 – Introduction to building thermography
24.4.8.4.4
Measuring surface temperature
Measurement of surface temperature is the function of the infrared imaging system.
The trained thermographer will recognise, account for and report on the variation of
emissivity and reflectivity of the surfaces under consideration.
24.4.8.4.5
Measuring area of the defects
Measurement of defect area can be performed by pixel counting in the thermal analysis software or most spreadhseet packages provided that:
■
■
■
the distance from camera to object is accurately measured probably using a laser
measurement system,
the target distance should take into account the IFOV of the imaging system,
any angular change between the camera and the object surface from the perpendicular is accounted for.
Buildings consist of numerous construction features that are not conducive to quantitative surveys including windows, roof lights, luminaries, heat emitters, cooling
equipment, service pipes and electrical conductors. However, the joints and connections between these objects and the building envelope should be considered as part
of the survey.
24.4.8.5
Conditions and equipment
To achieve best results from a thermal insulation survey it is important to consider
the environmental conditions and to use the most appropriate thermographic technique
for the task.
Thermal anomalies will only present themselves to the thermographer where temperature differences exist and environmental phenomena are accounted for. As a minimum, the following conditions should be complied with:
■
■
■
■
Temperature differences across the building fabric to be greater than 10℃ (18℉).
Internal air to ambient air temperature difference to be greater than 5℃ (9℉) for
the last twentyfour hours before survey.
External air temperature to be within ±3℃ (±5.4℉) for duration of survey and for
the previous hour.
External air temperature to be within ±10℃ (±18℉) for the preceding twentyfour
hours.
In addition, external surveys should also comply with the following:
■
■
■
Necessary surfaces free from direct solar radiation and the residual effects of past
solar radiation. This can be checked by comparing the surface temperatures of
opposite sides of the building.
No precipitation either just prior to or during the survey.
Ensure all building surfaces to be inspected are dry.
114
Publ. No. T559597 Rev. a500 – ENGLISH (EN) – December 10, 2010
24 – Introduction to building thermography
■
Wind speed to be less than 10 metres / second (19.5 kn.).
As well as temperature, there are other environmental conditions that should also be
taken into account when planning a thermographic building survey. External inspections, for example, may be influenced by radiation emissions and reflections from
adjacent buildings or a cold clear sky, and even more significantly the heating effect
that the sun may have on surface.
Additionally, where background temperatures differ from air temperatures either internally or externally by more than 5 K, then background temperatures should be measured on all effected surfaces to allow surface temperature to be measured with sufficient accuracy.
24.4.8.6
Survey and analysis
The following provides some operational guidance to the thermographic operator.
The survey must collect sufficient thermographic information to demonstrate that all
surfaces have been inspected in order that all thermal anomalies are reported and
evaluated.
Initially, environmental data must be collected, as with any thermographic survey including:
■
■
■
■
■
Internal temperature in the region of the anomaly.
External temperature in the region of the anomaly.
Emissivity of the surface.
Background temperature.
Distance from the surface.
By interpolation, determine the threshold temperature to be used.
■
■
For internal surveys the threshold surface temperature (Tsia) is Tsia = fsi(Tsi – Tso)
+ Tso. The thermographer will be looking for evidence of surface temperature below
this threshold.
For external surveys the threshold temperature (Tsoa) is Tsoa = fso(Tso – Tsi) + Tsi.
The thermographer will be looking for evidence of surface temperature above this
threshold.
Images of anomalies must be captured in such a way that they are suitable for analysis:
■
■
The image is square to any features of the wall or roof.
The viewing angle is nearly perpendicular to the surface being imaged. Interfering
sources of infrared radiation such as lights, heat emitters, electric conductors, reflective elements are minimised.
The method of analysis will depend somewhat on analysis software used, but the key
stages are as follows:
Publ. No. T559597 Rev. a500 – ENGLISH (EN) – December 10, 2010
115
24 – Introduction to building thermography
Produce an image of each anomaly or cluster of anomalies.
■
■
■
■
■
■
Use a software analysis tool to enclose the anomalous area within the image, taking
care not to include construction details that are to be excluded.
Calculate the area below the threshold temperature for internal surveys or above
the threshold temperature for external surveys. This is the defect area. Some
anomalies that appeared to be defects at the time of the survey may not show defect
areas at this stage.
Add the defect areas from all the images ∑Ad.
Calculate the total area of exposed building fabric. This is the surface area of all
the walls and roof. It is conventional to use the external surface area. For a simple
shape building this is calculated from overall width, length and height.
At = (2h(L + w)) + (Lw)
Identify the critical defect area Ac. Provisionally this is set at one thousandth or
0.1% of the total surface area.
Ac = At/1000
If ∑Ad < Ac the building as a whole can be considered to have ‘reasonably continuous’ insulation.
24.4.8.7
Reporting
Reports should certificate a pass/fail result, comply with customers requirements and
as a minimum include the information required by BSEN 13187. The following data
is normally required so that survey can be repeated following remedial action.
■
■
■
■
■
■
■
■
■
■
■
■
■
Background to the objective and principles of the test.
Location, orientation, date and time of survey.
A unique identifying reference.
Thermographer’s name and qualifications.
Type of construction.
Weather conditions, wind speed and direction, last precipitation, sunshine, degree
of cloud cover.
Ambient temperatures inside and outside before, at the beginning of survey and
the time of each image. Air temperature and radiant temperature should be
recorded.
Statement of any deviation from relevant test requirements.
Equipment used, last calibration date, any knows defects.
Name, affiliation and qualifications of tester.
Type, extent and position of each observed defect.
Results of any supplementary measurements and investigations.
Reports should be indexed and archived by thermographers.
24.4.8.7.1
Considerations and limitations
The choice between internal and external surveys will depend on:
116
Publ. No. T559597 Rev. a500 – ENGLISH (EN) – December 10, 2010
24 – Introduction to building thermography
■
■
■
■
■
■
Access to the surface. Buildings where both the internal and the external surfaces
are obscured, e.g., by false ceilings racking or materials stacked against walls may
not be amenable to this type of survey.
Location of the thermal insulation. Surveys are usually more effective from the side
nearest to the thermal insulation.
Location of heavyweight materials. Surveys are usually less effective from the side
nearest to the heavyweight material.
The purpose of the survey. If the survey aims to show risk of condensation and
mould growth it should be internal.
Location of glass, bare metal or other materials that may be highly reflective. Surveys
are usually less effective on highly reflective surfaces.
A defect will usually produce a smaller temperature difference on the outside of a
wall exposed to external air movement. However, missing or defective insulation
near the external surface can often be more readily indentified externally.
Publ. No. T559597 Rev. a500 – ENGLISH (EN) – December 10, 2010
117
25
Introduction to thermographic
inspections of electrical
installations
25.1
Important note
All camera functions and features that are described in this section may not be supported by your particular camera configuration.
Electrical regulations differ from country to country. For that reason, the electrical
procedures described in this section may not be the standard of procedure in your
particular country. Also, in many countries carrying out electrical inspections requires
formal qualification. Always consult national or regional electrical regulations.
25.2
General information
25.2.1
Introduction
Today, thermography is a well-established technique for the inspection of electrical
installations. This was the first and still is the largest. the largest application of thermography. The infrared camera itself has gone through an explosive development
and we can say that today, the 8th generation of thermographic systems is available.
It all began in 1964, more than 40 years ago. The technique is now established
throughout the whole world. Industrialized countries as well as developing countries
have adopted this technique.
Thermography, in conjunction with vibration analysis, has over the latest decades
been the main method for fault diagnostics in the industry as a part of the preventive
maintenance program. The great advantage with these methods is that it is not only
possible to carry out the inspection on installations in operation; normal working
condition is in fact a prerequisite for a correct measurement result, so the ongoing
production process is not disturbed. Thermographic inspection of electrical installations
are used in three main areas:
■
■
■
Power generation
Power transmission
Power distribution, that is, industrial use of electrical energy.
The fact that these controls are carried out under normal operation conditions has
created a natural division between these groups. The power generation companies
measure during the periods of high load. These periods vary from country to country
118
Publ. No. T559597 Rev. a500 – ENGLISH (EN) – December 10, 2010
25 – Introduction to thermographic inspections of electrical installations
and for the climatic zones. The measurement periods may also differ depending on
the type of plant to be inspected, whether they are hydroelectric, nuclear, coal-based
or oil-based plants.
In the industry the inspections are—at least in Nordic countries with clear seasonal
differences—carried out during spring or autumn or before longer stops in the operation. Thus, repairs are made when the operation is stopped anyway. However, this
seems to be the rule less and less, which has led to inspections of the plants under
varying load and operating conditions.
25.2.2
General equipment data
The equipment to be inspected has a certain temperature behavior that should be
known to the thermographer before the inspection takes place. In the case of electrical
equipment, the physical principle of why faults show a different temperature pattern
because of increased resistance or increased electrical current is well known.
However, it is useful to remember that, in some cases, for example solenoids, ‘overheating’ is natural and does not correspond to a developing defect. In other cases,
like the connections in electrical motors, the overheating might depend on the fact
that the healthy part is taking the entire load and therefore becomes overheated.
A similar example is shown in section 25.5.7 – Overheating in one part as a result of
a fault in another on page 134.
Defective parts of electrical equipment can therefore both indicate overheating and
be cooler than the normal ‘healthy’ components. It is necessary to be aware of what
to expect by getting as much information as possible about the equipment before it
is inspected.
The general rule is, however, that a hot spot is caused by a probable defect. The
temperature and the load of that specific component at the moment of inspection will
give an indication of how serious the fault is and can become in other conditions.
Correct assessment in each specific case demands detailed information about the
thermal behavior of the components, that is, we need to know the maximum allowed
temperature of the materials involved and the role the component plays in the system.
Cable insulations, for example, lose their insulation properties above a certain temperature, which increases the risk of fire.
In the case of breakers, where the temperature is too high, parts can melt and make
it impossible to open the breaker, thereby destroying its functionality.
Publ. No. T559597 Rev. a500 – ENGLISH (EN) – December 10, 2010
119
25 – Introduction to thermographic inspections of electrical installations
The more the IR camera operator knows about the equipment that he or she is about
to inspect, the higher the quality of the inspection. But it is virtually impossible for an
IR thermographer to have detailed knowledge about all the different types of equipment
that can be controlled. It is therefore common practice that a person responsible for
the equipment is present during the inspection.
25.2.3
Inspection
The preparation of the inspection should include the choice of the right type of report.
It is often necessary to use complementary equipment such as ampere meters in order
to measure the current in the circuits where defects were found. An anemometer is
necessary if you want to measure the wind speed at inspection of outdoor equipment.
Automatic functions help the IR operator to visualize an IR image of the components
with the right contrast to allow easy identification of a fault or a hot spot. It is almost
impossible to miss a hot spot on a scanned component. A measurement function will
also automatically display the hottest spot within an area in the image or the difference
between the maximum temperature in the chosen area and a reference, which can
be chosen by the operator, for example the ambient temperature.
10712703;a3
Figure 25.1 An infrared and a visual image of a power line isolator
When the fault is clearly identified and the IR thermographer has made sure that it is
not a reflection or a naturally occurring hot spot, the collection of the data starts, which
will allow the correct reporting of the fault. The emissivity, the identification of the
component, and the actual working conditions, together with the measured temperature, will be used in the report. In order to make it easy to identify the component a
visual photo of the defect is often taken.
25.2.4
Classification & reporting
Reporting has traditionally been the most time-consuming part of the IR survey. A
one-day inspection could result in one or two days’ work to report and classify the
found defects. This is still the case for many thermographers, who have chosen not
to use the advantages that computers and modern reporting software have brought
to IR condition monitoring.
120
Publ. No. T559597 Rev. a500 – ENGLISH (EN) – December 10, 2010
25 – Introduction to thermographic inspections of electrical installations
The classification of the defects gives a more detailed meaning that not only takes
into account the situation at the time of inspection (which is certainly of great importance), but also the possibility to normalize the over-temperature to standard load
and ambient temperature conditions.
An over-temperature of +30°C (+86°F) is certainly a significant fault. But if that overtemperature is valid for one component working at 100% load and for another at 50%
load, it is obvious that the latter will reach a much higher temperature should its load
increase from 50% to 100%. Such a standard can be chosen by the plant’s circumstances. Very often, however, temperatures are predicted for 100% load. A standard
makes it easier to compare the faults over time and thus to make a more complete
classification.
25.2.5
Priority
Based on the classification of the defects, the maintenance manager gives the defects
a repair priority. Very often, the information gathered during the infrared survey is put
together with complementary information on the equipment collected by other means
such as vibration monitoring, ultrasound or the preventive maintenance scheduled.
Even if the IR inspection is quickly becoming the most used method of collecting information about electrical components safely with the equipment under normal operating conditions, there are many other sources of information the maintenance or the
production manager has to consider.
The priority of repair should therefore not be a task for the IR camera operator in the
normal case. If a critical situation is detected during the inspection or during the
classification of the defects, the attention of the maintenance manager should of
course be drawn to it, but the responsibility for determining the urgency of the repair
should be his.
25.2.6
Repair
To repair the known defects is the most important function of preventive maintenance.
However, to assure production at the right time or at the right cost can also be important goals for a maintenance group. The information provided by the infrared survey
can be used to improve the repair efficiency as well as to reach the other goals with
a calculated risk.
To monitor the temperature of a known defect that can not be repaired immediately
for instance because spare parts are not available, can often pay for the cost of inspection a thousandfold and sometimes even for the IR camera. To decide not to
repair known defects to save on maintenance costs and avoid unnecessary downtime
is also another way of using the information from the IR survey in a productive way.
Publ. No. T559597 Rev. a500 – ENGLISH (EN) – December 10, 2010
121
25 – Introduction to thermographic inspections of electrical installations
However, the most common result of the identification and classification of the detected
faults is a recommendation to repair immediately or as soon as it is practically possible.
It is important that the repair crew is aware of the physical principles for the identification of defects. If a defect shows a high temperature and is in a critical situation, it is
very common that the repair personnel expect to find a highly corroded component.
It should also come as no surprise to the repair crew that a connection, which is
usually healthy, can give the same high temperatures as a corroded one if it has come
loose. These misinterpretations are quite common and risk putting in doubt the reliability of the infrared survey.
25.2.7
Control
A repaired component should be controlled as soon as possible after the repair. It is
not efficient to wait for the next scheduled IR survey in order to combine a new inspection with the control of the repaired defects. The statistics on the effect of the repair
show that up to a third of the repaired defects still show overheating. That is the same
as saying that those defects present a potential risk of failure.
To wait until the next scheduled IR survey represents an unnecessary risk for the
plant.
Besides increasing the efficiency of the maintenance cycle (measured in terms of
lower risk for the plant) the immediate control of the repair work brings other advantages to the performance of the repair crew itself.
When a defect still shows overheating after the repair, the determination of the cause
of overheating improves the repair procedure, helps choose the best component
suppliers and detect design shortcomings on the electrical installation. The crew
rapidly sees the effect of the work and can learn quickly both from successful repairs
and from mistakes.
Another reason to provide the repair crew with an IR instrument is that many of the
defects detected during the IR survey are of low gravity. Instead of repairing them,
which consumes maintenance and production time, it can be decided to keep these
defects under control. Therefore the maintenance personnel should have access to
their own IR equipment.
It is common to note on the report form the type of fault observed during the repair
as well as the action taken. These observations make an important source of experience that can be used to reduce stock, choose the best suppliers or to train new
maintenance personnel.
122
Publ. No. T559597 Rev. a500 – ENGLISH (EN) – December 10, 2010
25 – Introduction to thermographic inspections of electrical installations
25.3
Measurement technique for thermographic inspection
of electrical installations
25.3.1
How to correctly set the equipment
A thermal image may show high temperature variations:
10712803;a4
Figure 25.2 Temperature variations in a fusebox
In the images above, the fuse to the right has a maximum temperature of +61°C
(+142°F), whereas the one to the left is maximum +32°C (+90°F) and the one in the
middle somewhere in between. The three images are different inasmuch as the temperature scale enhances only one fuse in each image. However, it is the same image
and all the information about all three fuses is there. It is only a matter of setting the
temperature scale values.
25.3.2
Temperature measurement
Some cameras today can automatically find the highest temperature in the image.
The image below shows how it looks to the operator.
10712903;a3
Figure 25.3 An infrared image of a fusebox where the maximum temperature is displayed
The maximum temperature in the area is +62.2°C (+144.0°F). The spot meter shows
the exact location of the hot spot. The image can easily be stored in the camera
memory.
The correct temperature measurement depends, however, not only on the function
of the evaluation software or the camera. It may happen that the actual fault is, for
example, a connection, which is hidden from the camera in the position it happens
Publ. No. T559597 Rev. a500 – ENGLISH (EN) – December 10, 2010
123
25 – Introduction to thermographic inspections of electrical installations
to be in for the moment. It might be so that you measure heat, which has been conducted over some distance, whereas the ‘real’ hot spot is hidden from you. An example
is shown in the image below.
10717603;a3
Figure 25.4 A hidden hot spot inside a box
Try to choose different angles and make sure that the hot area is seen in its full size,
that is, that it is not disappearing behind something that might hide the hottest spot.
In this image, the hottest spot of what the camera can ‘see’, is +83°C (+181°F), where
the operating temperature on the cables below the box is +60°C (+140°F). However,
the real hot spot is most probably hidden inside the box, see the in yellow encircled
area. This fault is reported as a +23.0°C (+41.4°F) excess temperature, but the real
problem is probably essentially hotter.
Another reason for underestimating the temperature of an object is bad focusing. It
is very important that the hot spot found is in focus. See the example below.
10717403;a2
Figure 25.5 LEFT: A hot spot in focus; RIGHT: A hot spot out of focus
In the left image, the lamp is in focus. Its average temperature is +64°C (+147°F). In
the right image, the lamp is out of focus, which will result in only +51°C (+124°F) as
the average temperature.
124
Publ. No. T559597 Rev. a500 – ENGLISH (EN) – December 10, 2010
25 – Introduction to thermographic inspections of electrical installations
25.3.3
Comparative measurement
For thermographic inspections of electrical installations a special method is used,
which is based on comparison of different objects, so-called measurement with a
reference. This simply means that you compare the three phases with each other.
This method needs systematic scanning of the three phases in parallel in order to
assess whether a point differs from the normal temperature pattern.
A normal temperature pattern means that current carrying components have a given
operation temperature shown in a certain color (or gray tone) on the display, which
is usually identical for all three phases under symmetrical load. Minor differences in
the color might occur in the current path, for example, at the junction of two different
materials, at increasing or decreasing conductor areas or on circuit breakers where
the current path is encapsulated.
The image below shows three fuses, the temperatures of which are very close to each
other. The inserted isotherm actually shows less than +2°C (+3.6°F) temperature
difference between the phases.
Different colors are usually the result if the phases are carrying an unsymmetrical
load. This difference in colors does not represent any overheating since this does not
occur locally but is spread along the whole phase.
10713203;a3
Figure 25.6 An isotherm in an infrared image of a fusebox
A ‘real’ hot spot, on the other hand, shows a rising temperature as you look closer
to the source of the heat. See the image below, where the profile (line) shows a
steadily increasing temperature up to about +93°C (+199°F) at the hot spot.
Publ. No. T559597 Rev. a500 – ENGLISH (EN) – December 10, 2010
125
25 – Introduction to thermographic inspections of electrical installations
10713303;a4
Figure 25.7 A profile (line) in an infrared image and a graph displaying the increasing temperature
25.3.4
Normal operating temperature
Temperature measurement with thermography usually gives the absolute temperature
of the object. In order to correctly assess whether the component is too hot, it is
necessary to know its operating temperature, that is, its normal temperature if we
consider the load and the temperature of its environment.
As the direct measurement will give the absolute temperature—which must be considered as well (as most components have an upper limit to their absolute temperatures)—it is necessary to calculate the expected operating temperature given the load
and the ambient temperature. Consider the following definitions:
■
■
Operating temperature: the absolute temperature of the component. It depends
on the current load and the ambient temperature. It is always higher than the ambient temperature.
Excess temperature (overheating): the temperature difference between a properly
working component and a faulty one.
The excess temperature is found as the difference between the temperature of a
‘normal’ component and the temperature of its neighbor. It is important to compare
the same points on the different phases with each other.
As an example, see the following image taken from indoor equipment:
10713403;a4
Figure 25.8 An infrared image of indoor electrical equipment (1).
126
Publ. No. T559597 Rev. a500 – ENGLISH (EN) – December 10, 2010
25 – Introduction to thermographic inspections of electrical installations
The two left phases are considered as normal, whereas the right phase shows a very
clear excess temperature. Actually, the operating temperature of the left phase is
+68°C (+154°F), that is, quite a substantial temperature, whereas the faulty phase
to the right shows a temperature of +86°C (+187°F). This means an excess temperature of +18°C (+33°F), that is, a fault that has to be attended to quickly.
For practical reasons, the (normal, expected) operating temperature of a component
is taken as the temperature of the components in at least two out of three phases,
provided that you consider them to be working normally.. The ‘most normal’ case is
of course that all three phases have the same or at least almost the same temperature.
The operating temperature of outdoor components in substations or power lines is
usually only 1°C or 2°C above the air temperature (1.8°F or 3.6°F). In indoor substations, the operating temperatures vary a lot more.
This fact is clearly shown by the image below as well. Here the left phase is the one,
which shows an excess temperature. The operating temperature, taken from the two
‘cold’ phases, is +66°C (+151°F). The faulty phase shows a temperature of +127°C
(+261°F), which has to be attended to without delay.
10713503;a5
Figure 25.9 An infrared image of indoor electrical equipment (2).
25.3.5
Classification of faults
Once a faulty connection is detected, corrective measures may be necessary—or
may not be necessary for the time being. In order to recommend the most appropriate
action the following criteria should be evaluated:
■
■
■
■
■
Load during the measurement
Even or varying load
Position of the faulty part in the electrical installation
Expected future load situation
Is the excess temperature measured directly on the faulty spot or indirectly through
conducted heat caused by some fault inside the apparatus?
Publ. No. T559597 Rev. a500 – ENGLISH (EN) – December 10, 2010
127
25 – Introduction to thermographic inspections of electrical installations
Excess temperatures measured directly on the faulty part are usually divided into
three categories relating to 100% of the maximum load.
I
< 5°C (9°F)
The start of the overheat condition. This must be carefully
monitored.
II
5–30°C (9–54°F)
Developed overheating. It must
be repaired as soon as possible
(but think about the load situation before a decision is made).
III
>30°C (54°F)
Acute overheating. Must be repaired immediately (but think
about the load situation before
a decision is made).
128
Publ. No. T559597 Rev. a500 – ENGLISH (EN) – December 10, 2010
25 – Introduction to thermographic inspections of electrical installations
25.4
Reporting
Nowadays, thermographic inspections of electrical installations are probably, without
exception, documented and reported by the use of a report program. These programs,
which differ from one manufacturer to another, are usually directly adapted to the
cameras and will thus make reporting very quick and easy.
The program, which has been used for creating the report page shown below, is
called FLIR Reporter. It is adapted to several types of infrared cameras from FLIR
Systems.
A professional report is often divided into two sections:
■
Front pages, with facts about the inspection, such as:
■
■
■
■
■
■
■
■
Who the client is, for example, customer’s company name and contact person
Location of the inspection: site address, city, and so on
Date of inspection
Date of report
Name of thermographer
Signature of thermographer
Summary or table of contents
Inspection pages containing IR images to document and analyze thermal properties
or anomalies.
■
Identification of the inspected object:
■
■
■
IR image. When collecting IR images there are some details to consider:
■
■
■
■
What is the object: designation, name, number, and so on
Photo
Optical focus
Thermal adjustment of the scene or the problem (level & span)
Composition: proper observation distance and viewing angle.
Comment
■
■
■
Is there an anomaly or not?
Is there a reflection or not?
Use a measurement tool—spot, area or isotherm—to quantify the problem.
Use the simplest tool possible; a profile graph is almost never needed in
electrical reports.
Publ. No. T559597 Rev. a500 – ENGLISH (EN) – December 10, 2010
129
25 – Introduction to thermographic inspections of electrical installations
10713603;a3
Figure 25.10 A report example
130
Publ. No. T559597 Rev. a500 – ENGLISH (EN) – December 10, 2010
25 – Introduction to thermographic inspections of electrical installations
25.5
Different types of hot spots in electrical installations
25.5.1
Reflections
The thermographic camera sees any radiation that enters the lens, not only originating
from the object that you are looking at, but also radiation that comes from other
sources and has been reflected by the target. Most of the time, electrical components
are like mirrors to the infrared radiation, even if it is not obvious to the eye. Bare
metal parts are particularly shiny, whereas painted, plastic or rubber insulated parts
are mostly not. In the image below, you can clearly see a reflection from the thermographer. This is of course not a hot spot on the object. A good way to find out if what
you see is a reflection or not, is for you to move. Look at the target from a different
angle and watch the ‘hot spot.’ If it moves when you do, it is a reflection.
Measuring temperature of mirror like details is not possible. The object in the images
below has painted areas which are well suited for temperature measurement. The
material is copper, which is a very good heat conductor. This means that temperature
variation over the surface is small.
10717503;a2
Figure 25.11 Reflections in an object
25.5.2
Solar heating
The surface of a component with a high emissivity, for example, a breaker, can on a
hot summer day be heated up to quite considerable temperatures by irradiation from
the sun. The image shows a circuit breaker, which has been heated by the sun.
Publ. No. T559597 Rev. a500 – ENGLISH (EN) – December 10, 2010
131
25 – Introduction to thermographic inspections of electrical installations
10713803;a3
Figure 25.12 An infrared image of a circuit breaker
25.5.3
Inductive heating
10713903;a3
Figure 25.13 An infrared image of hot stabilizing weights
Eddy currents can cause a hot spot in the current path. In cases of very high currents
and close proximity of other metals, this has in some cases caused serious fires. This
type of heating occurs in magnetic material around the current path, such as metallic
bottom plates for bushing insulators. In the image above, there are stabilizing weights,
through which a high current is running. These metal weights, which are made of a
slightly magnetic material, will not conduct any current but are exposed to the alternating magnetic fields, which will eventually heat up the weight. The overheating in
the image is less than +5°C (+9°F). This, however, need not necessarily always be
the case.
25.5.4
Load variations
3-phase systems are the norm in electric utilities. When looking for overheated places,
it is easy to compare the three phases directly with each other, for example, cables,
breakers, insulators. An even load per phase should result in a uniform temperature
pattern for all three phases. A fault may be suspected in cases where the temperature
of one phase differs considerably from the remaining two. However, you should always
make sure that the load is indeed evenly distributed. Looking at fixed ampere meters
or using a clip-on ampere meter (up to 600 A) will tell you.
132
Publ. No. T559597 Rev. a500 – ENGLISH (EN) – December 10, 2010
25 – Introduction to thermographic inspections of electrical installations
10714003;a3
Figure 25.14 Examples of infrared images of load variations
The image to the left shows three cables next to each other. They are so far apart that
they can be regarded as thermally insulated from each other. The one in the middle
is colder than the others. Unless two phases are faulty and overheated, this is a typical
example of a very unsymmetrical load. The temperature spreads evenly along the
cables, which indicates a load-dependent temperature increase rather than a faulty
connection.
The image to the right shows two bundles with very different loads. In fact, the bundle
to the right carries next to no load. Those which carry a considerable current load,
are about 5°C (9°F) hotter than those which do not. No fault to be reported in these
examples.
25.5.5
Varying cooling conditions
10714103;a3
Figure 25.15 An infrared image of bundled cables
When, for example, a number of cables are bundled together it can happen that the
resulting poor cooling of the cables in the middle can lead to them reaching very high
temperatures. See the image above.
The cables to the right in the image do not show any overheating close to the bolts.
In the vertical part of the bundle, however, the cables are held together very tightly,
the cooling of the cables is poor, the convection can not take the heat away, and the
cables are notably hotter, actually about 5°C (9°F) above the temperature of the better
cooled part of the cables.
Publ. No. T559597 Rev. a500 – ENGLISH (EN) – December 10, 2010
133
25 – Introduction to thermographic inspections of electrical installations
25.5.6
Resistance variations
Overheating can have many origins. Some common reasons are described below.
Low contact pressure can occur when mounting a joint, or through wear of the material, for example, decreasing spring tension, worn threads in nuts and bolts, even too
much force applied at mounting. With increasing loads and temperatures, the yield
point of the material is exceeded and the tension weakens.
The image to the left below shows a bad contact due to a loose bolt. Since the bad
contact is of very limited dimensions, it causes overheating only in a very small spot
from which the heat is spread evenly along the connecting cable. Note the lower
emissivity of the screw itself, which makes it look slightly colder than the insulated—and
thereby it has a high emissivity—cable insulation.
The image to the right shows another overheating situation, this time again due to a
loose connection. It is an outdoor connection, hence it is exposed to the cooling effect
of the wind and it is likely that the overheating would have shown a higher temperature,
if mounted indoors.
10714203;a3
Figure 25.16 LEFT: An infrared image showing bad contact due to a loose bolt; RIGHT: A loose outdoor
connection, exposed to the wind cooling effect.
25.5.7
Overheating in one part as a result of a fault in another
Sometimes, overheating can appear in a component although that component is OK.
The reason is that two conductors share the load. One of the conductors has an increased resistance, but the other is OK. Thus, the faulty component carries a lower
load, whereas the fresh one has to take a higher load, which may be too high and
which causes the increased temperature. See the image.
134
Publ. No. T559597 Rev. a500 – ENGLISH (EN) – December 10, 2010
25 – Introduction to thermographic inspections of electrical installations
10714303;a3
Figure 25.17 Overheating in a circuit breaker
The overheating of this circuit breaker is most probably caused by bad contact in the
near finger of the contactor. Thus, the far finger carries more current and gets hotter.
The component in the infrared image and in the photo is not the same, however, it is
similar).
Publ. No. T559597 Rev. a500 – ENGLISH (EN) – December 10, 2010
135
25 – Introduction to thermographic inspections of electrical installations
25.6
Disturbance factors at thermographic inspection of
electrical installations
During thermographic inspections of different types of electrical installations, disturbance factors such as wind, distance to object, rain or snow often influence the
measurement result.
25.6.1
Wind
During outdoor inspection, the cooling effect of the wind should be taken into account.
An overheating measured at a wind velocity of 5 m/s (10 knots) will be approximately
twice as high at 1 m/s (2 knots). An excess temperature measured at 8 m/s (16 knots)
will be 2.5 times as high at 1 m/s (2 knots). This correction factor, which is based on
empirical measurements, is usually applicable up to 8 m/s (16 knots).
There are, however, cases when you have to inspect even if the wind is stronger than
8 m/s (16 knots). There are many windy places in the world, islands, mountains, and
so on but it is important to know that overheated components found would have
shown a considerably higher temperature at a lower wind speed. The empirical correction factor can be listed.
Wind speed (m/s)
Wind speed (knots)
Correction factor
1
2
1
2
4
1.36
3
6
1.64
4
8
1.86
5
10
2.06
6
12
2.23
7
14
2.40
8
16
2.54
The measured overheating multiplied by the correction factor gives the excess temperature with no wind, that is, at 1 m/s (2 knots).
25.6.2
Rain and snow
Rain and snow also have a cooling effect on electrical equipment. Thermographic
measurement can still be conducted with satisfactory results during light snowfall
with dry snow and light drizzle, respectively. The image quality will deteriorate in heavy
136
Publ. No. T559597 Rev. a500 – ENGLISH (EN) – December 10, 2010
25 – Introduction to thermographic inspections of electrical installations
snow or rain and reliable measurement is no longer possible. This is mainly because
a heavy snowfall as well as heavy rain is impenetrable to infrared radiation and it is
rather the temperature of the snowflakes or raindrops that will be measured.
25.6.3
Distance to object
This image is taken from a helicopter 20 meters (66 ft.) away from this faulty connection. The distance was incorrectly set to 1 meter (3 ft.) and the temperature was
measured to +37.9°C (+100.2°F). The measurement value after changing the distance
to 20 meters (66 ft.), which was done afterwards, is shown in the image to the right,
where the corrected temperature is +38.8°C (+101.8°F). The difference is not too
crucial, but may take the fault into a higher class of seriousness. So the distance
setting must definitely not be neglected.
10714403;a3
Figure 25.18 LEFT: Incorrect distance setting; RIGHT: Correct distance setting
The images below show the temperature readings from a blackbody at +85°C
(+185°F) at increasing distances.
10714503;a3
Figure 25.19 Temperature readings from a blackbody at +85°C (+185°F) at increasing distances
Publ. No. T559597 Rev. a500 – ENGLISH (EN) – December 10, 2010
137
25 – Introduction to thermographic inspections of electrical installations
The measured average temperatures are, from left to right, +85.3°C
(+185.5°F),+85.3°C (+185.5°F), +84.8°C (+184.6°F), +84.8°C (+184.6°F), +84.8°C
(+184.6°F) and +84.3°C (+183.7°F) from a blackbody at +85°C (+185°F). The thermograms are taken with a 12° lens. The distances are 1, 2, 3, 4, 5 and 10 meters (3,
7, 10, 13, 16 and 33 ft.). The correction for the distance has been meticulously set
and works, because the object is big enough for correct measurement.
25.6.4
Object size
The second series of images below shows the same but with the normal 24° lens.
Here, the measured average temperatures of the blackbody at +85°C (+185°F) are:
+84.2°C (+183.6°F), +83.7°C (+182.7°F), +83.3°C (+181.9°F), +83.3°C (+181.9°F),
+83.4°C (+181.1°F) and +78.4°C (+173.1°F).
The last value, (+78.4°C (+173.1°F)), is the maximum temperature as it was not
possible to place a circle inside the now very small blackbody image. Obviously, it
is not possible to measure correct values if the object is too small. Distance was
properly set to 10 meters (33 ft.).
10714603;a3
Figure 25.20 Temperature readings from a blackbody at +85°C (+185°F) at increasing distances (24°
lens)
The reason for this effect is that there is a smallest object size, which gives correct
temperature measurement. This smallest size is indicated to the user in all FLIR Systems cameras. The image below shows what you see in the viewfinder of camera
model 695. The spot meter has an opening in its middle, more easily seen in the detail
to the right. The size of the object has to be bigger than that opening or some radiation
from its closest neighbors, which are much colder, will come into the measurement
138
Publ. No. T559597 Rev. a500 – ENGLISH (EN) – December 10, 2010
25 – Introduction to thermographic inspections of electrical installations
as well, strongly lowering the reading. In the above case, where we have a pointshaped object, which is much hotter than the surroundings, the temperature reading
will be too low.
10714703;a3
Figure 25.21 Image from the viewfinder of a ThermaCAM 695
This effect is due to imperfections in the optics and to the size of the detector elements.
It is typical for all infrared cameras and can not be avoided.
Publ. No. T559597 Rev. a500 – ENGLISH (EN) – December 10, 2010
139
25 – Introduction to thermographic inspections of electrical installations
25.7
Practical advice for the thermographer
Working in a practical way with a camera, you will discover small things that make
your job easier. Here are five of them to start with.
25.7.1
From cold to hot
You have been out with the camera at +5°C (+41°F). To continue your work, you
now have to perform the inspection indoors. If you wear glasses, you are used to
having to wipe off condensed water, or you will not be able to see anything. The same
thing happens with the camera. To measure correctly, you should wait until the
camera has become warm enough for the condensation to evaporate. This will also
allow for the internal temperature compensation system to adjust to the changed
condition.
25.7.2
Rain showers
If it starts raining you should not perform the inspection because the water will drastically change the surface temperature of the object that you are measuring. Nevertheless, sometimes you need to use the camera even under rain showers or splashes.
Protect your camera with a simple transparent polyethylene plastic bag. Correction
for the attenuation which is caused by the plastic bag can be made by adjusting the
object distance until the temperature reading is the same as without the plastic cover.
Some camera models have a separate External optics transmission entry.
25.7.3
Emissivity
You have to determine the emissivity for the material, which you are measuring.
Mostly, you will not find the value in tables. Use optical black paint, that is, Nextel
Black Velvet. Paint a small piece of the material you are working with. The emissivity
of the optical paint is normally 0.94. Remember that the object has to have a temperature, which is different—usually higher—than the ambient temperature. The larger
the difference the better the accuracy in the emissivity calculation. The difference
should be at least 20°C (36°F). Remember that there are other paints that support
very high temperatures up to +800°C (+1472°F). The emissivity may, however, be
lower than that of optical black.
Sometimes you can not paint the object that you are measuring. In this case you can
use a tape. A thin tape for which you have previously determined the emissivity will
work in most cases and you can remove it afterwards without damaging the object
of your study. Pay attention to the fact that some tapes are semi-transparent and thus
are not very good for this purpose. One of the best tapes for this purpose is Scotch
electrical tape for outdoor and sub-zero conditions.
140
Publ. No. T559597 Rev. a500 – ENGLISH (EN) – December 10, 2010
25 – Introduction to thermographic inspections of electrical installations
25.7.4
Reflected apparent temperature
You are in a measurement situation where there are several hot sources that influence
your measurement. You need to have the right value for the reflected apparent temperature to input into the camera and thus get the best possible correction. Do it in
this way: set the emissivity to 1.0. Adjust the camera lens to near focus and, looking
in the opposite direction away from the object, save one image. With the area or the
isotherm, determine the most probable value of the average of the image and use
that value for your input of reflected apparent temperature.
25.7.5
Object too far away
Are you in doubt that the camera you have is measuring correctly at the actual distance? A rule of thumb for your lens is to multiply the IFOV by 3. (IFOV is the detail
of the object seen by one single element of the detector). Example: 25 degrees correspond to about 437 mrad. If your camera has a 120 × 120 pixel image, IFOV becomes 437/120 = 3.6 mrad (3.6 mm/m) and your spot size ratio is about
1000/(3 × 3.6)=92:1. This means that at a distance of 9.2 meters (30.2 ft.), your target
has to be at least about 0.1 meter or 100 mm wide (3.9"). Try to work on the safe side
by coming closer than 9 meters (30 ft.). At 7–8 meters (23–26 ft.), your measurement
should be correct.
Publ. No. T559597 Rev. a500 – ENGLISH (EN) – December 10, 2010
141
26
About FLIR Systems
FLIR Systems was established in 1978 to pioneer the development of high-performance
infrared imaging systems, and is the world leader in the design, manufacture, and
marketing of thermal imaging systems for a wide variety of commercial, industrial,
and government applications. Today, FLIR Systems embraces five major companies
with outstanding achievements in infrared technology since 1958—the Swedish
AGEMA Infrared Systems (formerly AGA Infrared Systems), the three United States
companies Indigo Systems, FSI, and Inframetrics, and the French company Cedip.
In November 2007, Extech Instruments was acquired by FLIR Systems.
T638608;a1
Figure 26.1 Patent documents from the early 1960s
The company has sold more than 128 298 infrared cameras worldwide for applications
such as predictive maintenance, R & D, non-destructive testing, process control and
automation, and machine vision, among many others.
FLIR Systems has three manufacturing plants in the United States (Portland, OR,
Boston, MA, Santa Barbara, CA) and one in Sweden (Stockholm). Since 2007 there
is also a manufacturing plant in Tallinn, Estonia. Direct sales offices in Belgium, Brazil,
142
Publ. No. T559597 Rev. a500 – ENGLISH (EN) – December 10, 2010
26 – About FLIR Systems
China, France, Germany, Great Britain, Hong Kong, Italy, Japan, Korea, Sweden, and
the USA—together with a worldwide network of agents and distributors—support our
international customer base.
FLIR Systems is at the forefront of innovation in the infrared camera industry. We anticipate market demand by constantly improving our existing cameras and developing
new ones. The company has set milestones in product design and development such
as the introduction of the first battery-operated portable camera for industrial inspections, and the first uncooled infrared camera, to mention just two innovations.
10722703;a2
Figure 26.2 LEFT: Thermovision® Model 661 from 1969. The camera weighed approximately 25 kg
(55 lb.), the oscilloscope 20 kg (44 lb.), and the tripod 15 kg (33 lb.). The operator also needed a 220 VAC
generator set, and a 10 L (2.6 US gallon) jar with liquid nitrogen. To the left of the oscilloscope the Polaroid
attachment (6 kg/13 lb.) can be seen. RIGHT: FLIR i7 from 2009. Weight: 0.34 kg (0.75 lb.), including the
battery.
FLIR Systems manufactures all vital mechanical and electronic components of the
camera systems itself. From detector design and manufacturing, to lenses and system
electronics, to final testing and calibration, all production steps are carried out and
supervised by our own engineers. The in-depth expertise of these infrared specialists
ensures the accuracy and reliability of all vital components that are assembled into
your infrared camera.
26.1
More than just an infrared camera
At FLIR Systems we recognize that our job is to go beyond just producing the best
infrared camera systems. We are committed to enabling all users of our infrared
camera systems to work more productively by providing them with the most powerful
Publ. No. T559597 Rev. a500 – ENGLISH (EN) – December 10, 2010
143
26 – About FLIR Systems
camera–software combination. Especially tailored software for predictive maintenance,
R & D, and process monitoring is developed in-house. Most software is available in
a wide variety of languages.
We support all our infrared cameras with a wide variety of accessories to adapt your
equipment to the most demanding infrared applications.
26.2
Sharing our knowledge
Although our cameras are designed to be very user-friendly, there is a lot more to
thermography than just knowing how to handle a camera. Therefore, FLIR Systems
has founded the Infrared Training Center (ITC), a separate business unit, that provides
certified training courses. Attending one of the ITC courses will give you a truly handson learning experience.
The staff of the ITC are also there to provide you with any application support you
may need in putting infrared theory into practice.
26.3
Supporting our customers
FLIR Systems operates a worldwide service network to keep your camera running at
all times. If you discover a problem with your camera, local service centers have all
the equipment and expertise to solve it within the shortest possible time. Therefore,
there is no need to send your camera to the other side of the world or to talk to
someone who does not speak your language.
26.4
A few images from our facilities
10401303;a1
Figure 26.3 LEFT: Development of system electronics; RIGHT: Testing of an FPA detector
144
Publ. No. T559597 Rev. a500 – ENGLISH (EN) – December 10, 2010
26 – About FLIR Systems
10401403;a1
Figure 26.4 LEFT: Diamond turning machine; RIGHT: Lens polishing
10401503;a1
Figure 26.5 LEFT: Testing of infrared cameras in the climatic chamber; RIGHT: Robot used for camera
testing and calibration
Publ. No. T559597 Rev. a500 – ENGLISH (EN) – December 10, 2010
145
27
Glossary
Term or expression
Explanation
absorption (absorption factor)
The amount of radiation absorbed by an object relative to the
received radiation. A number between 0 and 1.
atmosphere
The gases between the object being measured and the camera,
normally air.
autoadjust
A function making a camera perform an internal image correction.
autopalette
The IR image is shown with an uneven spread of colors, displaying cold objects as well as hot ones at the same time.
blackbody
Totally non-reflective object. All its radiation is due to its own
temperature.
blackbody radiator
An IR radiating equipment with blackbody properties used to
calibrate IR cameras.
calculated atmospheric transmission
A transmission value computed from the temperature, the relative
humidity of air and the distance to the object.
cavity radiator
A bottle shaped radiator with an absorbing inside, viewed
through the bottleneck.
color temperature
The temperature for which the color of a blackbody matches a
specific color.
conduction
The process that makes heat diffuse into a material.
continuous adjust
A function that adjusts the image. The function works all the
time, continuously adjusting brightness and contrast according
to the image content.
convection
Convection is a heat transfer mode where a fluid is brought into
motion, either by gravity or another force, thereby transferring
heat from one place to another.
dual isotherm
An isotherm with two color bands, instead of one.
emissivity (emissivity factor)
The amount of radiation coming from an object, compared to
that of a blackbody. A number between 0 and 1.
emittance
Amount of energy emitted from an object per unit of time and
area (W/m2)
environment
Objects and gases that emit radiation towards the object being
measured.
estimated atmospheric transmission
A transmission value, supplied by a user, replacing a calculated
one
146
Publ. No. T559597 Rev. a500 – ENGLISH (EN) – December 10, 2010
27 – Glossary
Term or expression
Explanation
external optics
Extra lenses, filters, heat shields etc. that can be put between
the camera and the object being measured.
filter
A material transparent only to some of the infrared wavelengths.
FOV
Field of view: The horizontal angle that can be viewed through
an IR lens.
FPA
Focal plane array: A type of IR detector.
graybody
An object that emits a fixed fraction of the amount of energy of
a blackbody for each wavelength.
IFOV
Instantaneous field of view: A measure of the geometrical resolution of an IR camera.
image correction (internal or external)
A way of compensating for sensitivity differences in various parts
of live images and also of stabilizing the camera.
infrared
Non-visible radiation, having a wavelength from about 2–13 μm.
IR
infrared
isotherm
A function highlighting those parts of an image that fall above,
below or between one or more temperature intervals.
isothermal cavity
A bottle-shaped radiator with a uniform temperature viewed
through the bottleneck.
Laser LocatIR
An electrically powered light source on the camera that emits
laser radiation in a thin, concentrated beam to point at certain
parts of the object in front of the camera.
laser pointer
An electrically powered light source on the camera that emits
laser radiation in a thin, concentrated beam to point at certain
parts of the object in front of the camera.
level
The center value of the temperature scale, usually expressed
as a signal value.
manual adjust
A way to adjust the image by manually changing certain parameters.
NETD
Noise equivalent temperature difference. A measure of the image
noise level of an IR camera.
noise
Undesired small disturbance in the infrared image
object parameters
A set of values describing the circumstances under which the
measurement of an object was made, and the object itself (such
as emissivity, reflected apparent temperature, distance etc.)
object signal
A non-calibrated value related to the amount of radiation received by the camera from the object.
Publ. No. T559597 Rev. a500 – ENGLISH (EN) – December 10, 2010
147
27 – Glossary
Term or expression
Explanation
palette
The set of colors used to display an IR image.
pixel
Stands for picture element. One single spot in an image.
radiance
Amount of energy emitted from an object per unit of time, area
and angle (W/m2/sr)
radiant power
Amount of energy emitted from an object per unit of time (W)
radiation
The process by which electromagnetic energy, is emitted by an
object or a gas.
radiator
A piece of IR radiating equipment.
range
The current overall temperature measurement limitation of an
IR camera. Cameras can have several ranges. Expressed as
two blackbody temperatures that limit the current calibration.
reference temperature
A temperature which the ordinary measured values can be
compared with.
reflection
The amount of radiation reflected by an object relative to the
received radiation. A number between 0 and 1.
relative humidity
Relative humidity represents the ratio between the current water
vapour mass in the air and the maximum it may contain in saturation conditions.
saturation color
The areas that contain temperatures outside the present level/span settings are colored with the saturation colors. The saturation colors contain an ‘overflow’ color and an ‘underflow’
color. There is also a third red saturation color that marks everything saturated by the detector indicating that the range should
probably be changed.
span
The interval of the temperature scale, usually expressed as a
signal value.
spectral (radiant) emittance
Amount of energy emitted from an object per unit of time, area
and wavelength (W/m2/μm)
temperature difference, or difference
of temperature.
A value which is the result of a subtraction between two temperature values.
temperature range
The current overall temperature measurement limitation of an
IR camera. Cameras can have several ranges. Expressed as
two blackbody temperatures that limit the current calibration.
temperature scale
The way in which an IR image currently is displayed. Expressed
as two temperature values limiting the colors.
thermogram
infrared image
148
Publ. No. T559597 Rev. a500 – ENGLISH (EN) – December 10, 2010
27 – Glossary
Term or expression
Explanation
transmission (or transmittance) factor
Gases and materials can be more or less transparent. Transmission is the amount of IR radiation passing through them. A
number between 0 and 1.
transparent isotherm
An isotherm showing a linear spread of colors, instead of covering the highlighted parts of the image.
visual
Refers to the video mode of a IR camera, as opposed to the
normal, thermographic mode. When a camera is in video mode
it captures ordinary video images, while thermographic images
are captured when the camera is in IR mode.
Publ. No. T559597 Rev. a500 – ENGLISH (EN) – December 10, 2010
149
28
Thermographic measurement
techniques
28.1
Introduction
An infrared camera measures and images the emitted infrared radiation from an object.
The fact that radiation is a function of object surface temperature makes it possible
for the camera to calculate and display this temperature.
However, the radiation measured by the camera does not only depend on the temperature of the object but is also a function of the emissivity. Radiation also originates
from the surroundings and is reflected in the object. The radiation from the object
and the reflected radiation will also be influenced by the absorption of the atmosphere.
To measure temperature accurately, it is therefore necessary to compensate for the
effects of a number of different radiation sources. This is done on-line automatically
by the camera. The following object parameters must, however, be supplied for the
camera:
■
■
■
■
■
The emissivity of the object
The reflected apparent temperature
The distance between the object and the camera
The relative humidity
Temperature of the atmosphere
28.2
Emissivity
The most important object parameter to set correctly is the emissivity which, in short,
is a measure of how much radiation is emitted from the object, compared to that from
a perfect blackbody of the same temperature.
Normally, object materials and surface treatments exhibit emissivity ranging from
approximately 0.1 to 0.95. A highly polished (mirror) surface falls below 0.1, while an
oxidized or painted surface has a higher emissivity. Oil-based paint, regardless of
color in the visible spectrum, has an emissivity over 0.9 in the infrared. Human skin
exhibits an emissivity 0.97 to 0.98.
Non-oxidized metals represent an extreme case of perfect opacity and high reflexivity,
which does not vary greatly with wavelength. Consequently, the emissivity of metals
is low – only increasing with temperature. For non-metals, emissivity tends to be high,
and decreases with temperature.
150
Publ. No. T559597 Rev. a500 – ENGLISH (EN) – December 10, 2010
28 – Thermographic measurement techniques
28.2.1
Finding the emissivity of a sample
28.2.1.1
Step 1: Determining reflected apparent temperature
Use one of the following two methods to determine reflected apparent temperature:
28.2.1.1.1
1
Method 1: Direct method
Look for possible reflection sources, considering that the incident angle = reflection angle (a
= b).
10588903;a1
Figure 28.1 1 = Reflection source
2
If the reflection source is a spot source, modify the source by obstructing it using a piece if
cardboard.
10589103;a2
Figure 28.2 1 = Reflection source
Publ. No. T559597 Rev. a500 – ENGLISH (EN) – December 10, 2010
151
28 – Thermographic measurement techniques
3
Measure the radiation intensity (= apparent temperature) from the reflecting source using the
following settings:
■
■
Emissivity: 1.0
Dobj: 0
You can measure the radiation intensity using one of the following two methods:
10589003;a2
Figure 28.3 1 = Reflection source
Note: Using a thermocouple to measure reflected apparent temperature is not recommended for two important reasons:
■
■
A thermocouple does not measure radiation intensity
A thermocouple requires a very good thermal contact to the surface, usually by
gluing and covering the sensor by a thermal isolator.
28.2.1.1.2
Method 2: Reflector method
1
Crumble up a large piece of aluminum foil.
2
Uncrumble the aluminum foil and attach it to a piece of cardboard of the same size.
3
Put the piece of cardboard in front of the object you want to measure. Make sure that the side
with aluminum foil points to the camera.
4
Set the emissivity to 1.0.
152
Publ. No. T559597 Rev. a500 – ENGLISH (EN) – December 10, 2010
28 – Thermographic measurement techniques
5
Measure the apparent temperature of the aluminum foil and write it down.
10727003;a2
Figure 28.4 Measuring the apparent temperature of the aluminum foil
28.2.1.2
Step 2: Determining the emissivity
1
Select a place to put the sample.
2
Determine and set reflected apparent temperature according to the previous procedure.
3
Put a piece of electrical tape with known high emissivity on the sample.
4
Heat the sample at least 20 K above room temperature. Heating must be reasonably even.
5
Focus and auto-adjust the camera, and freeze the image.
6
Adjust Level and Span for best image brightness and contrast.
7
Set emissivity to that of the tape (usually 0.97).
8
Measure the temperature of the tape using one of the following measurement functions:
■
■
■
Isotherm (helps you to determine both the temperature and how evenly you have heated
the sample)
Spot (simpler)
Box Avg (good for surfaces with varying emissivity).
9
Write down the temperature.
10
Move your measurement function to the sample surface.
11
Change the emissivity setting until you read the same temperature as your previous measurement.
12
Write down the emissivity.
Note:
Publ. No. T559597 Rev. a500 – ENGLISH (EN) – December 10, 2010
153
28 – Thermographic measurement techniques
■
■
■
■
Avoid forced convection
Look for a thermally stable surrounding that will not generate spot reflections
Use high quality tape that you know is not transparent, and has a high emissivity
you are certain of
This method assumes that the temperature of your tape and the sample surface
are the same. If they are not, your emissivity measurement will be wrong.
28.3
Reflected apparent temperature
This parameter is used to compensate for the radiation reflected in the object. If the
emissivity is low and the object temperature relatively far from that of the reflected it
will be important to set and compensate for the reflected apparent temperature correctly.
28.4
Distance
The distance is the distance between the object and the front lens of the camera. This
parameter is used to compensate for the following two facts:
■
■
That radiation from the target is absorbed by the athmosphere between the object
and the camera.
That radiation from the atmosphere itself is detected by the camera.
28.5
Relative humidity
The camera can also compensate for the fact that the transmittance is also dependent
on the relative humidity of the atmosphere. To do this set the relative humidity to the
correct value. For short distances and normal humidity the relative humidity can normally be left at a default value of 50%.
28.6
Other parameters
In addition, some cameras and analysis programs from FLIR Systems allow you to
compensate for the following parameters:
■
■
■
Atmospheric temperature – i.e. the temperature of the atmosphere between the
camera and the target
External optics temperature – i.e. the temperature of any external lenses or windows
used in front of the camera
External optics transmittance – i.e. the transmission of any external lenses or windows used in front of the camera
154
Publ. No. T559597 Rev. a500 – ENGLISH (EN) – December 10, 2010
29
History of infrared technology
Before the year 1800, the existence of the infrared portion of the electromagnetic
spectrum wasn't even suspected. The original significance of the infrared spectrum,
or simply ‘the infrared’ as it is often called, as a form of heat radiation is perhaps less
obvious today than it was at the time of its discovery by Herschel in 1800.
10398703;a1
Figure 29.1 Sir William Herschel (1738–1822)
The discovery was made accidentally during the search for a new optical material.
Sir William Herschel – Royal Astronomer to King George III of England, and already
famous for his discovery of the planet Uranus – was searching for an optical filter
material to reduce the brightness of the sun’s image in telescopes during solar observations. While testing different samples of colored glass which gave similar reductions
in brightness he was intrigued to find that some of the samples passed very little of
the sun’s heat, while others passed so much heat that he risked eye damage after
only a few seconds’ observation.
Herschel was soon convinced of the necessity of setting up a systematic experiment,
with the objective of finding a single material that would give the desired reduction in
brightness as well as the maximum reduction in heat. He began the experiment by
actually repeating Newton’s prism experiment, but looking for the heating effect rather
than the visual distribution of intensity in the spectrum. He first blackened the bulb of
a sensitive mercury-in-glass thermometer with ink, and with this as his radiation detector he proceeded to test the heating effect of the various colors of the spectrum
formed on the top of a table by passing sunlight through a glass prism. Other thermometers, placed outside the sun’s rays, served as controls.
As the blackened thermometer was moved slowly along the colors of the spectrum,
the temperature readings showed a steady increase from the violet end to the red
end. This was not entirely unexpected, since the Italian researcher, Landriani, in a
similar experiment in 1777 had observed much the same effect. It was Herschel,
Publ. No. T559597 Rev. a500 – ENGLISH (EN) – December 10, 2010
155
29 – History of infrared technology
however, who was the first to recognize that there must be a point where the heating
effect reaches a maximum, and that measurements confined to the visible portion of
the spectrum failed to locate this point.
10398903;a1
Figure 29.2 Marsilio Landriani (1746–1815)
Moving the thermometer into the dark region beyond the red end of the spectrum,
Herschel confirmed that the heating continued to increase. The maximum point, when
he found it, lay well beyond the red end – in what is known today as the ‘infrared
wavelengths’.
When Herschel revealed his discovery, he referred to this new portion of the electromagnetic spectrum as the ‘thermometrical spectrum’. The radiation itself he sometimes
referred to as ‘dark heat’, or simply ‘the invisible rays’. Ironically, and contrary to
popular opinion, it wasn't Herschel who originated the term ‘infrared’. The word only
began to appear in print around 75 years later, and it is still unclear who should receive
credit as the originator.
Herschel’s use of glass in the prism of his original experiment led to some early
controversies with his contemporaries about the actual existence of the infrared
wavelengths. Different investigators, in attempting to confirm his work, used various
types of glass indiscriminately, having different transparencies in the infrared. Through
his later experiments, Herschel was aware of the limited transparency of glass to the
newly-discovered thermal radiation, and he was forced to conclude that optics for
the infrared would probably be doomed to the use of reflective elements exclusively
(i.e. plane and curved mirrors). Fortunately, this proved to be true only until 1830,
when the Italian investigator, Melloni, made his great discovery that naturally occurring
rock salt (NaCl) – which was available in large enough natural crystals to be made
into lenses and prisms – is remarkably transparent to the infrared. The result was that
rock salt became the principal infrared optical material, and remained so for the next
hundred years, until the art of synthetic crystal growing was mastered in the 1930’s.
156
Publ. No. T559597 Rev. a500 – ENGLISH (EN) – December 10, 2010
29 – History of infrared technology
10399103;a1
Figure 29.3 Macedonio Melloni (1798–1854)
Thermometers, as radiation detectors, remained unchallenged until 1829, the year
Nobili invented the thermocouple. (Herschel’s own thermometer could be read to
0.2 °C (0.036 °F), and later models were able to be read to 0.05 °C (0.09 °F)). Then
a breakthrough occurred; Melloni connected a number of thermocouples in series
to form the first thermopile. The new device was at least 40 times as sensitive as the
best thermometer of the day for detecting heat radiation – capable of detecting the
heat from a person standing three meters away.
The first so-called ‘heat-picture’ became possible in 1840, the result of work by Sir
John Herschel, son of the discoverer of the infrared and a famous astronomer in his
own right. Based upon the differential evaporation of a thin film of oil when exposed
to a heat pattern focused upon it, the thermal image could be seen by reflected light
where the interference effects of the oil film made the image visible to the eye. Sir
John also managed to obtain a primitive record of the thermal image on paper, which
he called a ‘thermograph’.
10399003;a2
Figure 29.4 Samuel P. Langley (1834–1906)
Publ. No. T559597 Rev. a500 – ENGLISH (EN) – December 10, 2010
157
29 – History of infrared technology
The improvement of infrared-detector sensitivity progressed slowly. Another major
breakthrough, made by Langley in 1880, was the invention of the bolometer. This
consisted of a thin blackened strip of platinum connected in one arm of a Wheatstone
bridge circuit upon which the infrared radiation was focused and to which a sensitive
galvanometer responded. This instrument is said to have been able to detect the heat
from a cow at a distance of 400 meters.
An English scientist, Sir James Dewar, first introduced the use of liquefied gases as
cooling agents (such as liquid nitrogen with a temperature of -196 °C (-320.8 °F)) in
low temperature research. In 1892 he invented a unique vacuum insulating container
in which it is possible to store liquefied gases for entire days. The common ‘thermos
bottle’, used for storing hot and cold drinks, is based upon his invention.
Between the years 1900 and 1920, the inventors of the world ‘discovered’ the infrared.
Many patents were issued for devices to detect personnel, artillery, aircraft, ships –
and even icebergs. The first operating systems, in the modern sense, began to be
developed during the 1914–18 war, when both sides had research programs devoted
to the military exploitation of the infrared. These programs included experimental
systems for enemy intrusion/detection, remote temperature sensing, secure communications, and ‘flying torpedo’ guidance. An infrared search system tested during this
period was able to detect an approaching airplane at a distance of 1.5 km (0.94 miles),
or a person more than 300 meters (984 ft.) away.
The most sensitive systems up to this time were all based upon variations of the
bolometer idea, but the period between the two wars saw the development of two
revolutionary new infrared detectors: the image converter and the photon detector.
At first, the image converter received the greatest attention by the military, because
it enabled an observer for the first time in history to literally ‘see in the dark’. However,
the sensitivity of the image converter was limited to the near infrared wavelengths,
and the most interesting military targets (i.e. enemy soldiers) had to be illuminated
by infrared search beams. Since this involved the risk of giving away the observer’s
position to a similarly-equipped enemy observer, it is understandable that military
interest in the image converter eventually faded.
The tactical military disadvantages of so-called 'active’ (i.e. search beam-equipped)
thermal imaging systems provided impetus following the 1939–45 war for extensive
secret military infrared-research programs into the possibilities of developing ‘passive’
(no search beam) systems around the extremely sensitive photon detector. During
this period, military secrecy regulations completely prevented disclosure of the status
of infrared-imaging technology. This secrecy only began to be lifted in the middle of
the 1950’s, and from that time adequate thermal-imaging devices finally began to be
available to civilian science and industry.
158
Publ. No. T559597 Rev. a500 – ENGLISH (EN) – December 10, 2010
30
Theory of thermography
30.1
Introduction
The subjects of infrared radiation and the related technique of thermography are still
new to many who will use an infrared camera. In this section the theory behind thermography will be given.
30.2
The electromagnetic spectrum
The electromagnetic spectrum is divided arbitrarily into a number of wavelength regions, called bands, distinguished by the methods used to produce and detect the
radiation. There is no fundamental difference between radiation in the different bands
of the electromagnetic spectrum. They are all governed by the same laws and the
only differences are those due to differences in wavelength.
10067803;a1
Figure 30.1 The electromagnetic spectrum. 1: X-ray; 2: UV; 3: Visible; 4: IR; 5: Microwaves; 6: Radiowaves.
Thermography makes use of the infrared spectral band. At the short-wavelength end
the boundary lies at the limit of visual perception, in the deep red. At the long-wavelength end it merges with the microwave radio wavelengths, in the millimeter range.
The infrared band is often further subdivided into four smaller bands, the boundaries
of which are also arbitrarily chosen. They include: the near infrared (0.75–3 μm), the
middle infrared (3–6 μm), the far infrared (6–15 μm) and the extreme infrared (15–100
Publ. No. T559597 Rev. a500 – ENGLISH (EN) – December 10, 2010
159
30 – Theory of thermography
μm). Although the wavelengths are given in μm (micrometers), other units are often
still used to measure wavelength in this spectral region, e.g. nanometer (nm) and
Ångström (Å).
The relationships between the different wavelength measurements is:
30.3
Blackbody radiation
A blackbody is defined as an object which absorbs all radiation that impinges on it
at any wavelength. The apparent misnomer black relating to an object emitting radiation is explained by Kirchhoff’s Law (after Gustav Robert Kirchhoff, 1824–1887), which
states that a body capable of absorbing all radiation at any wavelength is equally
capable in the emission of radiation.
10398803;a1
Figure 30.2 Gustav Robert Kirchhoff (1824–1887)
The construction of a blackbody source is, in principle, very simple. The radiation
characteristics of an aperture in an isotherm cavity made of an opaque absorbing
material represents almost exactly the properties of a blackbody. A practical application
of the principle to the construction of a perfect absorber of radiation consists of a box
that is light tight except for an aperture in one of the sides. Any radiation which then
enters the hole is scattered and absorbed by repeated reflections so only an infinitesimal fraction can possibly escape. The blackness which is obtained at the aperture
is nearly equal to a blackbody and almost perfect for all wavelengths.
By providing such an isothermal cavity with a suitable heater it becomes what is
termed a cavity radiator. An isothermal cavity heated to a uniform temperature generates blackbody radiation, the characteristics of which are determined solely by the
temperature of the cavity. Such cavity radiators are commonly used as sources of
radiation in temperature reference standards in the laboratory for calibrating thermographic instruments, such as a FLIR Systems camera for example.
160
Publ. No. T559597 Rev. a500 – ENGLISH (EN) – December 10, 2010
30 – Theory of thermography
If the temperature of blackbody radiation increases to more than 525°C (977°F), the
source begins to be visible so that it appears to the eye no longer black. This is the
incipient red heat temperature of the radiator, which then becomes orange or yellow
as the temperature increases further. In fact, the definition of the so-called color
temperature of an object is the temperature to which a blackbody would have to be
heated to have the same appearance.
Now consider three expressions that describe the radiation emitted from a blackbody.
30.3.1
Planck’s law
10399203;a1
Figure 30.3 Max Planck (1858–1947)
Max Planck (1858–1947) was able to describe the spectral distribution of the radiation
from a blackbody by means of the following formula:
where:
Wλb
Blackbody spectral radiant emittance at wavelength λ.
c
Velocity of light = 3 × 10⁸ m/s
h
Planck’s constant = 6.6 × 10⁻³⁴ Joule sec.
k
Boltzmann’s constant = 1.4 × 10⁻²³ Joule/K.
T
Absolute temperature (K) of a blackbody.
λ
Wavelength (μm).
Publ. No. T559597 Rev. a500 – ENGLISH (EN) – December 10, 2010
161
30 – Theory of thermography
➲ The factor 10-6 is used since spectral emittance in the curves is expressed in
Watt/m2, μm.
Planck’s formula, when plotted graphically for various temperatures, produces a
family of curves. Following any particular Planck curve, the spectral emittance is zero
at λ = 0, then increases rapidly to a maximum at a wavelength λmax and after passing
it approaches zero again at very long wavelengths. The higher the temperature, the
shorter the wavelength at which maximum occurs.
10327103;a4
Figure 30.4 Blackbody spectral radiant emittance according to Planck’s law, plotted for various absolute
temperatures. 1: Spectral radiant emittance (W/cm2 × 103(μm)); 2: Wavelength (μm)
30.3.2
Wien’s displacement law
By differentiating Planck’s formula with respect to λ, and finding the maximum, we
have:
This is Wien’s formula (after Wilhelm Wien, 1864–1928), which expresses mathematically the common observation that colors vary from red to orange or yellow as the
temperature of a thermal radiator increases. The wavelength of the color is the same
as the wavelength calculated for λmax. A good approximation of the value of λmax for
a given blackbody temperature is obtained by applying the rule-of-thumb 3 000/T
162
Publ. No. T559597 Rev. a500 – ENGLISH (EN) – December 10, 2010
30 – Theory of thermography
μm. Thus, a very hot star such as Sirius (11 000 K), emitting bluish-white light, radiates
with the peak of spectral radiant emittance occurring within the invisible ultraviolet
spectrum, at wavelength 0.27 μm.
10399403;a1
Figure 30.5 Wilhelm Wien (1864–1928)
The sun (approx. 6 000 K) emits yellow light, peaking at about 0.5 μm in the middle
of the visible light spectrum.
At room temperature (300 K) the peak of radiant emittance lies at 9.7 μm, in the far
infrared, while at the temperature of liquid nitrogen (77 K) the maximum of the almost
insignificant amount of radiant emittance occurs at 38 μm, in the extreme infrared
wavelengths.
Publ. No. T559597 Rev. a500 – ENGLISH (EN) – December 10, 2010
163
30 – Theory of thermography
10327203;a4
Figure 30.6 Planckian curves plotted on semi-log scales from 100 K to 1000 K. The dotted line represents
the locus of maximum radiant emittance at each temperature as described by Wien's displacement law.
1: Spectral radiant emittance (W/cm2 (μm)); 2: Wavelength (μm).
30.3.3
Stefan-Boltzmann's law
By integrating Planck’s formula from λ = 0 to λ = ∞, we obtain the total radiant
emittance (Wb) of a blackbody:
This is the Stefan-Boltzmann formula (after Josef Stefan, 1835–1893, and Ludwig
Boltzmann, 1844–1906), which states that the total emissive power of a blackbody is
proportional to the fourth power of its absolute temperature. Graphically, Wb represents
the area below the Planck curve for a particular temperature. It can be shown that the
radiant emittance in the interval λ = 0 to λmax is only 25% of the total, which represents
about the amount of the sun’s radiation which lies inside the visible light spectrum.
164
Publ. No. T559597 Rev. a500 – ENGLISH (EN) – December 10, 2010
30 – Theory of thermography
10399303;a1
Figure 30.7 Josef Stefan (1835–1893), and Ludwig Boltzmann (1844–1906)
Using the Stefan-Boltzmann formula to calculate the power radiated by the human
body, at a temperature of 300 K and an external surface area of approx. 2 m2, we
obtain 1 kW. This power loss could not be sustained if it were not for the compensating
absorption of radiation from surrounding surfaces, at room temperatures which do
not vary too drastically from the temperature of the body – or, of course, the addition
of clothing.
30.3.4
Non-blackbody emitters
So far, only blackbody radiators and blackbody radiation have been discussed.
However, real objects almost never comply with these laws over an extended wavelength region – although they may approach the blackbody behavior in certain
spectral intervals. For example, a certain type of white paint may appear perfectly
white in the visible light spectrum, but becomes distinctly gray at about 2 μm, and
beyond 3 μm it is almost black.
There are three processes which can occur that prevent a real object from acting like
a blackbody: a fraction of the incident radiation α may be absorbed, a fraction ρ may
be reflected, and a fraction τ may be transmitted. Since all of these factors are more
or less wavelength dependent, the subscript λ is used to imply the spectral dependence of their definitions. Thus:
■
■
■
The spectral absorptance αλ= the ratio of the spectral radiant power absorbed by
an object to that incident upon it.
The spectral reflectance ρλ = the ratio of the spectral radiant power reflected by
an object to that incident upon it.
The spectral transmittance τλ = the ratio of the spectral radiant power transmitted
through an object to that incident upon it.
The sum of these three factors must always add up to the whole at any wavelength,
so we have the relation:
Publ. No. T559597 Rev. a500 – ENGLISH (EN) – December 10, 2010
165
30 – Theory of thermography
For opaque materials τλ = 0 and the relation simplifies to:
Another factor, called the emissivity, is required to describe the fraction ε of the radiant
emittance of a blackbody produced by an object at a specific temperature. Thus, we
have the definition:
The spectral emissivity ελ= the ratio of the spectral radiant power from an object to
that from a blackbody at the same temperature and wavelength.
Expressed mathematically, this can be written as the ratio of the spectral emittance
of the object to that of a blackbody as follows:
Generally speaking, there are three types of radiation source, distinguished by the
ways in which the spectral emittance of each varies with wavelength.
■
■
■
A blackbody, for which ελ = ε = 1
A graybody, for which ελ = ε = constant less than 1
A selective radiator, for which ε varies with wavelength
According to Kirchhoff’s law, for any material the spectral emissivity and spectral absorptance of a body are equal at any specified temperature and wavelength. That is:
From this we obtain, for an opaque material (since αλ + ρλ = 1):
For highly polished materials ελ approaches zero, so that for a perfectly reflecting
material (i.e. a perfect mirror) we have:
For a graybody radiator, the Stefan-Boltzmann formula becomes:
This states that the total emissive power of a graybody is the same as a blackbody
at the same temperature reduced in proportion to the value of ε from the graybody.
166
Publ. No. T559597 Rev. a500 – ENGLISH (EN) – December 10, 2010
30 – Theory of thermography
10401203;a2
Figure 30.8 Spectral radiant emittance of three types of radiators. 1: Spectral radiant emittance; 2:
Wavelength; 3: Blackbody; 4: Selective radiator; 5: Graybody.
10327303;a4
Figure 30.9 Spectral emissivity of three types of radiators. 1: Spectral emissivity; 2: Wavelength; 3:
Blackbody; 4: Graybody; 5: Selective radiator.
30.4
Infrared semi-transparent materials
Consider now a non-metallic, semi-transparent body – let us say, in the form of a thick
flat plate of plastic material. When the plate is heated, radiation generated within its
volume must work its way toward the surfaces through the material in which it is
partially absorbed. Moreover, when it arrives at the surface, some of it is reflected
back into the interior. The back-reflected radiation is again partially absorbed, but
Publ. No. T559597 Rev. a500 – ENGLISH (EN) – December 10, 2010
167
30 – Theory of thermography
some of it arrives at the other surface, through which most of it escapes; part of it is
reflected back again. Although the progressive reflections become weaker and
weaker they must all be added up when the total emittance of the plate is sought.
When the resulting geometrical series is summed, the effective emissivity of a semitransparent plate is obtained as:
When the plate becomes opaque this formula is reduced to the single formula:
This last relation is a particularly convenient one, because it is often easier to measure
reflectance than to measure emissivity directly.
168
Publ. No. T559597 Rev. a500 – ENGLISH (EN) – December 10, 2010
31
The measurement formula
As already mentioned, when viewing an object, the camera receives radiation not
only from the object itself. It also collects radiation from the surroundings reflected
via the object surface. Both these radiation contributions become attenuated to some
extent by the atmosphere in the measurement path. To this comes a third radiation
contribution from the atmosphere itself.
This description of the measurement situation, as illustrated in the figure below, is so
far a fairly true description of the real conditions. What has been neglected could for
instance be sun light scattering in the atmosphere or stray radiation from intense radiation sources outside the field of view. Such disturbances are difficult to quantify,
however, in most cases they are fortunately small enough to be neglected. In case
they are not negligible, the measurement configuration is likely to be such that the
risk for disturbance is obvious, at least to a trained operator. It is then his responsibility to modify the measurement situation to avoid the disturbance e.g. by changing
the viewing direction, shielding off intense radiation sources etc.
Accepting the description above, we can use the figure below to derive a formula for
the calculation of the object temperature from the calibrated camera output.
10400503;a1
Figure 31.1 A schematic representation of the general thermographic measurement situation.1: Surroundings; 2: Object; 3: Atmosphere; 4: Camera
Assume that the received radiation power W from a blackbody source of temperature
Tsource on short distance generates a camera output signal Usource that is proportional
to the power input (power linear camera). We can then write (Equation 1):
Publ. No. T559597 Rev. a500 – ENGLISH (EN) – December 10, 2010
169
31 – The measurement formula
or, with simplified notation:
where C is a constant.
Should the source be a graybody with emittance ε, the received radiation would
consequently be εWsource.
We are now ready to write the three collected radiation power terms:
1 – Emission from the object = ετWobj, where ε is the emittance of the object and τ
is the transmittance of the atmosphere. The object temperature is Tobj.
2 – Reflected emission from ambient sources = (1 – ε)τWrefl, where (1 – ε) is the reflectance of the object. The ambient sources have the temperature Trefl.
It has here been assumed that the temperature Trefl is the same for all emitting surfaces
within the halfsphere seen from a point on the object surface. This is of course
sometimes a simplification of the true situation. It is, however, a necessary simplification
in order to derive a workable formula, and Trefl can – at least theoretically – be given
a value that represents an efficient temperature of a complex surrounding.
Note also that we have assumed that the emittance for the surroundings = 1. This is
correct in accordance with Kirchhoff’s law: All radiation impinging on the surrounding
surfaces will eventually be absorbed by the same surfaces. Thus the emittance = 1.
(Note though that the latest discussion requires the complete sphere around the object
to be considered.)
3 – Emission from the atmosphere = (1 – τ)τWatm, where (1 – τ) is the emittance of
the atmosphere. The temperature of the atmosphere is Tatm.
The total received radiation power can now be written (Equation 2):
We multiply each term by the constant C of Equation 1 and replace the CW products
by the corresponding U according to the same equation, and get (Equation 3):
Solve Equation 3 for Uobj (Equation 4):
170
Publ. No. T559597 Rev. a500 – ENGLISH (EN) – December 10, 2010
31 – The measurement formula
This is the general measurement formula used in all the FLIR Systems thermographic
equipment. The voltages of the formula are:
Figure 31.2 Voltages
Uobj
Calculated camera output voltage for a blackbody of temperature
Tobj i.e. a voltage that can be directly converted into true requested
object temperature.
Utot
Measured camera output voltage for the actual case.
Urefl
Theoretical camera output voltage for a blackbody of temperature
Trefl according to the calibration.
Uatm
Theoretical camera output voltage for a blackbody of temperature
Tatm according to the calibration.
The operator has to supply a number of parameter values for the calculation:
■
■
■
■
■
■
the object emittance ε,
the relative humidity,
Tatm
object distance (Dobj)
the (effective) temperature of the object surroundings, or the reflected ambient
temperature Trefl, and
the temperature of the atmosphere Tatm
This task could sometimes be a heavy burden for the operator since there are normally
no easy ways to find accurate values of emittance and atmospheric transmittance for
the actual case. The two temperatures are normally less of a problem provided the
surroundings do not contain large and intense radiation sources.
A natural question in this connection is: How important is it to know the right values
of these parameters? It could though be of interest to get a feeling for this problem
already here by looking into some different measurement cases and compare the
relative magnitudes of the three radiation terms. This will give indications about when
it is important to use correct values of which parameters.
The figures below illustrates the relative magnitudes of the three radiation contributions
for three different object temperatures, two emittances, and two spectral ranges: SW
and LW. Remaining parameters have the following fixed values:
■
■
■
τ = 0.88
Trefl = +20°C (+68°F)
Tatm = +20°C (+68°F)
Publ. No. T559597 Rev. a500 – ENGLISH (EN) – December 10, 2010
171
31 – The measurement formula
It is obvious that measurement of low object temperatures are more critical than
measuring high temperatures since the ‘disturbing’ radiation sources are relatively
much stronger in the first case. Should also the object emittance be low, the situation
would be still more difficult.
We have finally to answer a question about the importance of being allowed to use
the calibration curve above the highest calibration point, what we call extrapolation.
Imagine that we in a certain case measure Utot = 4.5 volts. The highest calibration
point for the camera was in the order of 4.1 volts, a value unknown to the operator.
Thus, even if the object happened to be a blackbody, i.e. Uobj = Utot, we are actually
performing extrapolation of the calibration curve when converting 4.5 volts into temperature.
Let us now assume that the object is not black, it has an emittance of 0.75, and the
transmittance is 0.92. We also assume that the two second terms of Equation 4 amount
to 0.5 volts together. Computation of Uobj by means of Equation 4 then results in Uobj
= 4.5 / 0.75 / 0.92 – 0.5 = 6.0. This is a rather extreme extrapolation, particularly when
considering that the video amplifier might limit the output to 5 volts! Note, though,
that the application of the calibration curve is a theoretical procedure where no electronic or other limitations exist. We trust that if there had been no signal limitations in
the camera, and if it had been calibrated far beyond 5 volts, the resulting curve would
have been very much the same as our real curve extrapolated beyond 4.1 volts, provided the calibration algorithm is based on radiation physics, like the FLIR Systems
algorithm. Of course there must be a limit to such extrapolations.
172
Publ. No. T559597 Rev. a500 – ENGLISH (EN) – December 10, 2010
31 – The measurement formula
10400603;a2
Figure 31.3 Relative magnitudes of radiation sources under varying measurement conditions (SW camera).
1: Object temperature; 2: Emittance; Obj: Object radiation; Refl: Reflected radiation; Atm: atmosphere
radiation. Fixed parameters: τ = 0.88; Trefl = 20°C (+68°F); Tatm = 20°C (+68°F).
Publ. No. T559597 Rev. a500 – ENGLISH (EN) – December 10, 2010
173
31 – The measurement formula
10400703;a2
Figure 31.4 Relative magnitudes of radiation sources under varying measurement conditions (LW camera).
1: Object temperature; 2: Emittance; Obj: Object radiation; Refl: Reflected radiation; Atm: atmosphere
radiation. Fixed parameters: τ = 0.88; Trefl = 20°C (+68°F); Tatm = 20°C (+68°F).
174
Publ. No. T559597 Rev. a500 – ENGLISH (EN) – December 10, 2010
32
Emissivity tables
This section presents a compilation of emissivity data from the infrared literature and
measurements made by FLIR Systems.
32.1
References
1
Mikaél A. Bramson: Infrared Radiation, A Handbook for Applications, Plenum press,
N.Y.
2
William L. Wolfe, George J. Zissis: The Infrared Handbook, Office of Naval Research,
Department of Navy, Washington, D.C.
3
Madding, R. P.: Thermographic Instruments and systems. Madison, Wisconsin: University of Wisconsin – Extension, Department of Engineering and Applied Science.
4
William L. Wolfe: Handbook of Military Infrared Technology, Office of Naval Research,
Department of Navy, Washington, D.C.
5
Jones, Smith, Probert: External thermography of buildings..., Proc. of the Society of
Photo-Optical Instrumentation Engineers, vol.110, Industrial and Civil Applications of
Infrared Technology, June 1977 London.
6
Paljak, Pettersson: Thermography of Buildings, Swedish Building Research Institute,
Stockholm 1972.
7
Vlcek, J: Determination of emissivity with imaging radiometers and some emissivities
at λ = 5 µm. Photogrammetric Engineering and Remote Sensing.
8
Kern: Evaluation of infrared emission of clouds and ground as measured by weather
satellites, Defence Documentation Center, AD 617 417.
9
Öhman, Claes: Emittansmätningar med AGEMA E-Box. Teknisk rapport, AGEMA 1999.
(Emittance measurements using AGEMA E-Box. Technical report, AGEMA 1999.)
10
Matteï, S., Tang-Kwor, E: Emissivity measurements for Nextel Velvet coating 811-21
between –36°C AND 82°C.
11
Lohrengel & Todtenhaupt (1996)
12
ITC Technical publication 32.
13
ITC Technical publication 29.
32.2
Important note about the emissivity tables
The emissivity values in the table below are recorded using a shortwave (SW) camera.
The values should be regarded as recommendations only and used with caution.
Publ. No. T559597 Rev. a500 – ENGLISH (EN) – December 10, 2010
175
32 – Emissivity tables
32.3
Tables
Figure 32.1 T: Total spectrum; SW: 2–5 µm; LW: 8–14 µm, LLW: 6.5–20 µm; 1: Material; 2: Specification;
3: Temperature in °C; 4: Spectrum; 5: Emissivity: 6: Reference
1
2
3
4
5
6
3M type 35
Vinyl electrical
tape (several colors)
< 80
LW
Ca. 0.96
13
3M type 88
Black vinyl electrical tape
< 105
LW
Ca. 0.96
13
3M type 88
Black vinyl electrical tape
< 105
MW
< 0.96
13
3M type Super
33+
Black vinyl electrical tape
< 80
LW
Ca. 0.96
13
Aluminum
anodized, black,
dull
70
LW
0.95
9
Aluminum
anodized, black,
dull
70
SW
0.67
9
Aluminum
anodized, light
gray, dull
70
LW
0.97
9
Aluminum
anodized, light
gray, dull
70
SW
0.61
9
Aluminum
anodized sheet
100
T
0.55
2
Aluminum
as received, plate
100
T
0.09
4
Aluminum
as received, sheet
100
T
0.09
2
Aluminum
cast, blast cleaned
70
LW
0.46
9
Aluminum
cast, blast cleaned
70
SW
0.47
9
Aluminum
dipped in HNO3,
plate
100
T
0.05
4
Aluminum
foil
27
3 µm
0.09
3
Aluminum
foil
27
10 µm
0.04
3
Aluminum
oxidized, strongly
50–500
T
0.2–0.3
1
Aluminum
polished
50–100
T
0.04–0.06
1
Aluminum
polished, sheet
100
T
0.05
2
Aluminum
polished plate
100
T
0.05
4
176
Publ. No. T559597 Rev. a500 – ENGLISH (EN) – December 10, 2010
32 – Emissivity tables
1
2
3
4
5
6
Aluminum
roughened
27
3 µm
0.28
3
Aluminum
roughened
27
10 µm
0.18
3
Aluminum
rough surface
20–50
T
0.06–0.07
1
Aluminum
sheet, 4 samples
differently
scratched
70
LW
0.03–0.06
9
Aluminum
sheet, 4 samples
differently
scratched
70
SW
0.05–0.08
9
Aluminum
vacuum deposited
20
T
0.04
2
Aluminum
weathered, heavily
17
SW
0.83–0.94
5
20
T
0.60
1
Aluminum bronze
Aluminum hydroxide
powder
T
0.28
1
Aluminum oxide
activated, powder
T
0.46
1
Aluminum oxide
pure, powder (alumina)
T
0.16
1
Asbestos
board
T
0.96
1
Asbestos
fabric
T
0.78
1
Asbestos
floor tile
35
SW
0.94
7
Asbestos
paper
40–400
T
0.93–0.95
1
Asbestos
powder
T
0.40–0.60
1
Asbestos
slate
20
T
0.96
1
4
LLW
0.967
8
Asphalt paving
20
Brass
dull, tarnished
20–350
T
0.22
1
Brass
oxidized
70
SW
0.04–0.09
9
Brass
oxidized
70
LW
0.03–0.07
9
Brass
oxidized
100
T
0.61
2
Brass
oxidized at 600°C
200–600
T
0.59–0.61
1
Brass
polished
200
T
0.03
1
Brass
polished, highly
100
T
0.03
2
Publ. No. T559597 Rev. a500 – ENGLISH (EN) – December 10, 2010
177
32 – Emissivity tables
1
2
3
4
5
6
Brass
rubbed with 80grit emery
20
T
0.20
2
Brass
sheet, rolled
20
T
0.06
1
Brass
sheet, worked with
emery
20
T
0.2
1
Brick
alumina
17
SW
0.68
5
Brick
common
17
SW
0.86–0.81
5
Brick
Dinas silica,
glazed, rough
1100
T
0.85
1
Brick
Dinas silica, refractory
1000
T
0.66
1
Brick
Dinas silica,
unglazed, rough
1000
T
0.80
1
Brick
firebrick
17
SW
0.68
5
Brick
fireclay
20
T
0.85
1
Brick
fireclay
1000
T
0.75
1
Brick
fireclay
1200
T
0.59
1
Brick
masonry
35
SW
0.94
7
Brick
masonry, plastered
20
T
0.94
1
Brick
red, common
20
T
0.93
2
Brick
red, rough
20
T
0.88–0.93
1
Brick
refractory, corundum
1000
T
0.46
1
Brick
refractory, magnesite
1000–1300
T
0.38
1
Brick
refractory, strongly
radiating
500–1000
T
0.8–0.9
1
Brick
refractory, weakly
radiating
500–1000
T
0.65–0.75
1
Brick
silica, 95% SiO2
1230
T
0.66
1
Brick
sillimanite, 33%
SiO2, 64% Al2O3
1500
T
0.29
1
178
Publ. No. T559597 Rev. a500 – ENGLISH (EN) – December 10, 2010
32 – Emissivity tables
1
2
3
4
5
6
Brick
waterproof
17
SW
0.87
5
Bronze
phosphor bronze
70
LW
0.06
9
Bronze
phosphor bronze
70
SW
0.08
9
Bronze
polished
50
T
0.1
1
Bronze
porous, rough
50–150
T
0.55
1
Bronze
powder
T
0.76–0.80
1
Carbon
candle soot
T
0.95
2
Carbon
charcoal powder
T
0.96
1
Carbon
graphite, filed surface
T
0.98
2
Carbon
graphite powder
T
0.97
1
Carbon
lampblack
20–400
T
0.95–0.97
1
Chipboard
untreated
20
SW
0.90
6
Chromium
polished
50
T
0.10
1
Chromium
polished
500–1000
T
0.28–0.38
1
Clay
fired
70
T
0.91
1
Cloth
black
20
T
0.98
1
20
T
0.92
2
Concrete
20
20
Concrete
dry
36
SW
0.95
7
Concrete
rough
17
SW
0.97
5
Concrete
walkway
5
LLW
0.974
8
Copper
commercial, burnished
20
T
0.07
1
Copper
electrolytic, carefully polished
80
T
0.018
1
Copper
electrolytic, polished
–34
T
0.006
4
Copper
molten
1100–1300
T
0.13–0.15
1
Copper
oxidized
50
T
0.6–0.7
1
Copper
oxidized, black
27
T
0.78
4
Publ. No. T559597 Rev. a500 – ENGLISH (EN) – December 10, 2010
179
32 – Emissivity tables
1
2
3
4
5
6
Copper
oxidized, heavily
20
T
0.78
2
Copper
oxidized to blackness
T
0.88
1
Copper
polished
50–100
T
0.02
1
Copper
polished
100
T
0.03
2
Copper
polished, commercial
27
T
0.03
4
Copper
polished, mechanical
22
T
0.015
4
Copper
pure, carefully
prepared surface
22
T
0.008
4
Copper
scraped
27
T
0.07
4
Copper dioxide
powder
T
0.84
1
Copper oxide
red, powder
T
0.70
1
T
0.89
1
80
T
0.85
1
20
T
0.9
1
Ebonite
Emery
coarse
Enamel
Enamel
lacquer
20
T
0.85–0.95
1
Fiber board
hard, untreated
20
SW
0.85
6
Fiber board
masonite
70
LW
0.88
9
Fiber board
masonite
70
SW
0.75
9
Fiber board
particle board
70
LW
0.89
9
Fiber board
particle board
70
SW
0.77
9
Fiber board
porous, untreated
20
SW
0.85
6
Gold
polished
130
T
0.018
1
Gold
polished, carefully
200–600
T
0.02–0.03
1
Gold
polished, highly
100
T
0.02
2
Granite
polished
20
LLW
0.849
8
Granite
rough
21
LLW
0.879
8
Granite
rough, 4 different
samples
70
LW
0.77–0.87
9
180
Publ. No. T559597 Rev. a500 – ENGLISH (EN) – December 10, 2010
32 – Emissivity tables
1
2
3
4
5
6
Granite
rough, 4 different
samples
70
SW
0.95–0.97
9
20
T
0.8–0.9
1
Gypsum
Ice: See Water
Iron, cast
casting
50
T
0.81
1
Iron, cast
ingots
1000
T
0.95
1
Iron, cast
liquid
1300
T
0.28
1
Iron, cast
machined
800–1000
T
0.60–0.70
1
Iron, cast
oxidized
38
T
0.63
4
Iron, cast
oxidized
100
T
0.64
2
Iron, cast
oxidized
260
T
0.66
4
Iron, cast
oxidized
538
T
0.76
4
Iron, cast
oxidized at 600°C
200–600
T
0.64–0.78
1
Iron, cast
polished
38
T
0.21
4
Iron, cast
polished
40
T
0.21
2
Iron, cast
polished
200
T
0.21
1
Iron, cast
unworked
900–1100
T
0.87–0.95
1
Iron and steel
cold rolled
70
LW
0.09
9
Iron and steel
cold rolled
70
SW
0.20
9
Iron and steel
covered with red
rust
20
T
0.61–0.85
1
Iron and steel
electrolytic
22
T
0.05
4
Iron and steel
electrolytic
100
T
0.05
4
Iron and steel
electrolytic
260
T
0.07
4
Iron and steel
electrolytic, carefully polished
175–225
T
0.05–0.06
1
Iron and steel
freshly worked
with emery
20
T
0.24
1
Iron and steel
ground sheet
950–1100
T
0.55–0.61
1
Iron and steel
heavily rusted
sheet
20
T
0.69
2
Publ. No. T559597 Rev. a500 – ENGLISH (EN) – December 10, 2010
181
32 – Emissivity tables
1
2
3
4
5
6
Iron and steel
hot rolled
20
T
0.77
1
Iron and steel
hot rolled
130
T
0.60
1
Iron and steel
oxidized
100
T
0.74
1
Iron and steel
oxidized
100
T
0.74
4
Iron and steel
oxidized
125–525
T
0.78–0.82
1
Iron and steel
oxidized
200
T
0.79
2
Iron and steel
oxidized
1227
T
0.89
4
Iron and steel
oxidized
200–600
T
0.80
1
Iron and steel
oxidized strongly
50
T
0.88
1
Iron and steel
oxidized strongly
500
T
0.98
1
Iron and steel
polished
100
T
0.07
2
Iron and steel
polished
400–1000
T
0.14–0.38
1
Iron and steel
polished sheet
750–1050
T
0.52–0.56
1
Iron and steel
rolled, freshly
20
T
0.24
1
Iron and steel
rolled sheet
50
T
0.56
1
Iron and steel
rough, plane surface
50
T
0.95–0.98
1
Iron and steel
rusted, heavily
17
SW
0.96
5
Iron and steel
rusted red, sheet
22
T
0.69
4
Iron and steel
rusty, red
20
T
0.69
1
Iron and steel
shiny, etched
150
T
0.16
1
Iron and steel
shiny oxide layer,
sheet,
20
T
0.82
1
Iron and steel
wrought, carefully
polished
40–250
T
0.28
1
Iron galvanized
heavily oxidized
70
LW
0.85
9
Iron galvanized
heavily oxidized
70
SW
0.64
9
Iron galvanized
sheet
92
T
0.07
4
Iron galvanized
sheet, burnished
30
T
0.23
1
Iron galvanized
sheet, oxidized
20
T
0.28
1
182
Publ. No. T559597 Rev. a500 – ENGLISH (EN) – December 10, 2010
32 – Emissivity tables
1
2
3
4
5
6
Iron tinned
sheet
24
T
0.064
4
Krylon Ultra-flat
black 1602
Flat black
Room temperature
up to 175
LW
Ca. 0.96
12
Krylon Ultra-flat
black 1602
Flat black
Room temperature
up to 175
MW
Ca. 0.97
12
Lacquer
3 colors sprayed
on Aluminum
70
LW
0.92–0.94
9
Lacquer
3 colors sprayed
on Aluminum
70
SW
0.50–0.53
9
Lacquer
Aluminum on
rough surface
20
T
0.4
1
Lacquer
bakelite
80
T
0.83
1
Lacquer
black, dull
40–100
T
0.96–0.98
1
Lacquer
black, matte
100
T
0.97
2
Lacquer
black, shiny,
sprayed on iron
20
T
0.87
1
Lacquer
heat–resistant
100
T
0.92
1
Lacquer
white
40–100
T
0.8–0.95
1
Lacquer
white
100
T
0.92
2
Lead
oxidized, gray
20
T
0.28
1
Lead
oxidized, gray
22
T
0.28
4
Lead
oxidized at 200°C
200
T
0.63
1
Lead
shiny
250
T
0.08
1
Lead
unoxidized, polished
100
T
0.05
4
Lead red
100
T
0.93
4
Lead red, powder
100
T
0.93
1
T
0.75–0.80
1
T
0.3–0.4
1
Leather
tanned
Lime
Magnesium
22
T
0.07
4
Magnesium
260
T
0.13
4
Publ. No. T559597 Rev. a500 – ENGLISH (EN) – December 10, 2010
183
32 – Emissivity tables
1
2
Magnesium
Magnesium
polished
3
4
5
6
538
T
0.18
4
20
T
0.07
2
T
0.86
1
Magnesium powder
Molybdenum
600–1000
T
0.08–0.13
1
Molybdenum
1500–2200
T
0.19–0.26
1
700–2500
T
0.1–0.3
1
17
SW
0.87
5
Molybdenum
filament
Mortar
Mortar
dry
36
SW
0.94
7
Nextel Velvet 81121 Black
Flat black
–60–150
LW
> 0.97
10 and
11
Nichrome
rolled
700
T
0.25
1
Nichrome
sandblasted
700
T
0.70
1
Nichrome
wire, clean
50
T
0.65
1
Nichrome
wire, clean
500–1000
T
0.71–0.79
1
Nichrome
wire, oxidized
50–500
T
0.95–0.98
1
Nickel
bright matte
122
T
0.041
4
Nickel
commercially
pure, polished
100
T
0.045
1
Nickel
commercially
pure, polished
200–400
T
0.07–0.09
1
Nickel
electrolytic
22
T
0.04
4
Nickel
electrolytic
38
T
0.06
4
Nickel
electrolytic
260
T
0.07
4
Nickel
electrolytic
538
T
0.10
4
Nickel
electroplated, polished
20
T
0.05
2
Nickel
electroplated on
iron, polished
22
T
0.045
4
Nickel
electroplated on
iron, unpolished
20
T
0.11–0.40
1
184
Publ. No. T559597 Rev. a500 – ENGLISH (EN) – December 10, 2010
32 – Emissivity tables
1
2
3
4
5
6
Nickel
electroplated on
iron, unpolished
22
T
0.11
4
Nickel
oxidized
200
T
0.37
2
Nickel
oxidized
227
T
0.37
4
Nickel
oxidized
1227
T
0.85
4
Nickel
oxidized at 600°C
200–600
T
0.37–0.48
1
Nickel
polished
122
T
0.045
4
Nickel
wire
200–1000
T
0.1–0.2
1
Nickel oxide
500–650
T
0.52–0.59
1
Nickel oxide
1000–1250
T
0.75–0.86
1
Oil, lubricating
0.025 mm film
20
T
0.27
2
Oil, lubricating
0.050 mm film
20
T
0.46
2
Oil, lubricating
0.125 mm film
20
T
0.72
2
Oil, lubricating
film on Ni base: Ni
base only
20
T
0.05
2
Oil, lubricating
thick coating
20
T
0.82
2
Paint
8 different colors
and qualities
70
LW
0.92–0.94
9
Paint
8 different colors
and qualities
70
SW
0.88–0.96
9
Paint
Aluminum, various
ages
50–100
T
0.27–0.67
1
Paint
cadmium yellow
T
0.28–0.33
1
Paint
chrome green
T
0.65–0.70
1
Paint
cobalt blue
T
0.7–0.8
1
Paint
oil
17
SW
0.87
5
Paint
oil, black flat
20
SW
0.94
6
Paint
oil, black gloss
20
SW
0.92
6
Paint
oil, gray flat
20
SW
0.97
6
Paint
oil, gray gloss
20
SW
0.96
6
Paint
oil, various colors
100
T
0.92–0.96
1
Publ. No. T559597 Rev. a500 – ENGLISH (EN) – December 10, 2010
185
32 – Emissivity tables
1
2
3
4
5
6
Paint
oil based, average
of 16 colors
100
T
0.94
2
Paint
plastic, black
20
SW
0.95
6
Paint
plastic, white
20
SW
0.84
6
Paper
4 different colors
70
LW
0.92–0.94
9
Paper
4 different colors
70
SW
0.68–0.74
9
Paper
black
T
0.90
1
Paper
black, dull
T
0.94
1
Paper
black, dull
70
LW
0.89
9
Paper
black, dull
70
SW
0.86
9
Paper
blue, dark
T
0.84
1
Paper
coated with black
lacquer
T
0.93
1
Paper
green
T
0.85
1
Paper
red
T
0.76
1
Paper
white
20
T
0.7–0.9
1
Paper
white, 3 different
glosses
70
LW
0.88–0.90
9
Paper
white, 3 different
glosses
70
SW
0.76–0.78
9
Paper
white bond
20
T
0.93
2
Paper
yellow
T
0.72
1
17
SW
0.86
5
Plaster
Plaster
plasterboard, untreated
20
SW
0.90
6
Plaster
rough coat
20
T
0.91
2
Plastic
glass fibre laminate (printed circ.
board)
70
LW
0.91
9
Plastic
glass fibre laminate (printed circ.
board)
70
SW
0.94
9
186
Publ. No. T559597 Rev. a500 – ENGLISH (EN) – December 10, 2010
32 – Emissivity tables
1
2
3
4
5
6
Plastic
polyurethane isolation board
70
LW
0.55
9
Plastic
polyurethane isolation board
70
SW
0.29
9
Plastic
PVC, plastic floor,
dull, structured
70
LW
0.93
9
Plastic
PVC, plastic floor,
dull, structured
70
SW
0.94
9
Platinum
17
T
0.016
4
Platinum
22
T
0.03
4
Platinum
100
T
0.05
4
Platinum
260
T
0.06
4
Platinum
538
T
0.10
4
Platinum
1000–1500
T
0.14–0.18
1
Platinum
1094
T
0.18
4
Platinum
pure, polished
200–600
T
0.05–0.10
1
Platinum
ribbon
900–1100
T
0.12–0.17
1
Platinum
wire
50–200
T
0.06–0.07
1
Platinum
wire
500–1000
T
0.10–0.16
1
Platinum
wire
1400
T
0.18
1
Porcelain
glazed
20
T
0.92
1
Porcelain
white, shiny
T
0.70–0.75
1
Rubber
hard
20
T
0.95
1
Rubber
soft, gray, rough
20
T
0.95
1
T
0.60
1
20
T
0.90
2
Sand
Sand
Sandstone
polished
19
LLW
0.909
8
Sandstone
rough
19
LLW
0.935
8
Silver
polished
100
T
0.03
2
Silver
pure, polished
200–600
T
0.02–0.03
1
Publ. No. T559597 Rev. a500 – ENGLISH (EN) – December 10, 2010
187
32 – Emissivity tables
1
2
3
4
5
6
Skin
human
32
T
0.98
2
Slag
boiler
0–100
T
0.97–0.93
1
Slag
boiler
200–500
T
0.89–0.78
1
Slag
boiler
600–1200
T
0.76–0.70
1
Slag
boiler
1400–1800
T
0.69–0.67
1
Soil
dry
20
T
0.92
2
Soil
saturated with water
20
T
0.95
2
Stainless steel
alloy, 8% Ni, 18%
Cr
500
T
0.35
1
Stainless steel
rolled
700
T
0.45
1
Stainless steel
sandblasted
700
T
0.70
1
Stainless steel
sheet, polished
70
LW
0.14
9
Stainless steel
sheet, polished
70
SW
0.18
9
Stainless steel
sheet, untreated,
somewhat
scratched
70
LW
0.28
9
Stainless steel
sheet, untreated,
somewhat
scratched
70
SW
0.30
9
Stainless steel
type 18-8, buffed
20
T
0.16
2
Stainless steel
type 18-8, oxidized at 800°C
60
T
0.85
2
Stucco
rough, lime
10–90
T
0.91
1
Styrofoam
insulation
37
SW
0.60
7
T
0.79–0.84
1
Snow: See Water
Tar
Tar
paper
20
T
0.91–0.93
1
Tile
glazed
17
SW
0.94
5
Tin
burnished
20–50
T
0.04–0.06
1
Tin
tin–plated sheet
iron
100
T
0.07
2
188
Publ. No. T559597 Rev. a500 – ENGLISH (EN) – December 10, 2010
32 – Emissivity tables
1
2
3
4
5
6
Titanium
oxidized at 540°C
200
T
0.40
1
Titanium
oxidized at 540°C
500
T
0.50
1
Titanium
oxidized at 540°C
1000
T
0.60
1
Titanium
polished
200
T
0.15
1
Titanium
polished
500
T
0.20
1
Titanium
polished
1000
T
0.36
1
Tungsten
200
T
0.05
1
Tungsten
600–1000
T
0.1–0.16
1
Tungsten
1500–2200
T
0.24–0.31
1
Tungsten
filament
3300
T
0.39
1
Varnish
flat
20
SW
0.93
6
Varnish
on oak parquet
floor
70
LW
0.90–0.93
9
Varnish
on oak parquet
floor
70
SW
0.90
9
Wallpaper
slight pattern, light
gray
20
SW
0.85
6
Wallpaper
slight pattern, red
20
SW
0.90
6
Water
distilled
20
T
0.96
2
Water
frost crystals
–10
T
0.98
2
Water
ice, covered with
heavy frost
0
T
0.98
1
Water
ice, smooth
–10
T
0.96
2
Water
ice, smooth
0
T
0.97
1
Water
layer >0.1 mm
thick
0–100
T
0.95–0.98
1
Water
snow
T
0.8
1
Water
snow
–10
T
0.85
2
Wood
17
SW
0.98
5
Wood
19
LLW
0.962
8
T
0.5–0.7
1
Wood
ground
Publ. No. T559597 Rev. a500 – ENGLISH (EN) – December 10, 2010
189
32 – Emissivity tables
1
2
3
4
5
6
Wood
pine, 4 different
samples
70
LW
0.81–0.89
9
Wood
pine, 4 different
samples
70
SW
0.67–0.75
9
Wood
planed
20
T
0.8–0.9
1
Wood
planed oak
20
T
0.90
2
Wood
planed oak
70
LW
0.88
9
Wood
planed oak
70
SW
0.77
9
Wood
plywood, smooth,
dry
36
SW
0.82
7
Wood
plywood, untreated
20
SW
0.83
6
Wood
white, damp
20
T
0.7–0.8
1
Zinc
oxidized at 400°C
400
T
0.11
1
Zinc
oxidized surface
1000–1200
T
0.50–0.60
1
Zinc
polished
200–300
T
0.04–0.05
1
Zinc
sheet
50
T
0.20
1
190
Publ. No. T559597 Rev. a500 – ENGLISH (EN) – December 10, 2010
A note on the technical production of this publication
This publication was produced using XML—the eXtensible Markup Language. For more information about XML, please visit
http://www.w3.org/XML/
A note on the typeface used in this publication
This publication was typeset using Swiss 721, which is Bitstream’s pan-European version of the Helvetica™ typeface. Helvetica™ was designed
by Max Miedinger (1910–1980).
List of effective files
20235103.xml a24
20235203.xml a21
20235303.xml a18
20236703.xml a54
20237103.xml a10
20238503.xml a9
20238703.xml b8
20250403.xml a21
20254903.xml a65
20257003.xml a40
20257103.xml a17
20257303.xml a32
20273203.xml a13
20275203.xml a14
20279803.xml a7
20281003.xml a1
20287303.xml a9
20292403.xml a5
20295003.xml a12
20295703.xml a4
20295803.xml a5
20295903.xml a5
20296103.xml a6
20296203.xml a6
20296303.xml a6
20296403.xml a6
20296503.xml a5
20296603.xml a6
20296803.xml a6
20296903.xml a6
20297003.xml a6
20297303.xml a4
20297403.xml a6
20297503.xml a3
20297603.xml a2
R133.rcp a3
config.xml a5
Publ. No. T559597 Rev. a500 – ENGLISH (EN) – December 10, 2010
191
192
Publ. No. T559597 Rev. a500 – ENGLISH (EN) – December 10, 2010
Corporate Headquarters
FLIR Systems, Inc.
27700 SW Parkway Avenue
Wilsonville, OR 97070
USA
Telephone: +1-800-727-3547
Website: http://www.flir.com