1
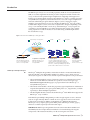
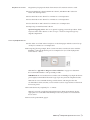
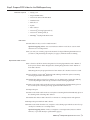
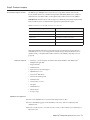
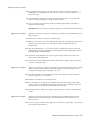
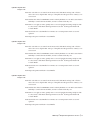
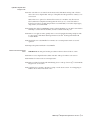
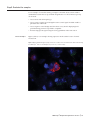
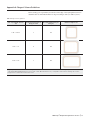
RNAScope® Multiplex Reagent Kit For Tissues Catalog no. R26963 Table 1 Contents and storage Component Amount* Storage** Pretreat 2 reagent, 10× 4 × 70 mL Room temperature Pretreat 3 reagent 1 × 4.5 mL Pretreat 4 reagent 2 × 4.5 mL Pretreatment Module 2–8°C Wash Buffer Module Washing Buffer, 50× 4 × 60 mL Room temperature Detection–FL Module Amplification Reagent 1-FL 1 × 3 mL Amplification Reagent 2-FL 1 × 4.5 mL Amplification Reagent 3-FL 1 × 3 mL Amplification Reagent 4-FL—Alt A Display module 1 × 4.5 mL Amplification Reagent 4-FL—Alt B Display module 1 × 4.5 mL Amplification Reagent 4-FL—Alt C Display module 1 × 4.5 mL DAPI 2–8°C 1 × 3 mL * Each RNAScope Reagent Kit provides enough reagents to stain ~20 tissue sections of approximately 20 mm × 20 mm in size. ® Larger tissue sections will result in fewer tests. ** When stored as directed, the reagents are stable at least until the expiration date printed on the product label. Table 2 Gene-specific RNAScope® Probes (not included)* Component Amount Ready-To-Use (RTU) probe for color channel 1 1 × 3 mL 50× probe for color channel 2 1 × 60 μL 50× probe for color channel 3 1 × 60 μL Storage 2–8°C * Gene-specific custom RNAScope® Probes are required for the RNAScope® Assay, but are not included in the RNAScope® Multiplex Reagent Kit. Based on the gene of interest, they can be ordered separately from Life Technologies, which offers over 27,000 pre-designed probes. If the required probe for the RNA of interest can not be found among the pre-designed probes, then a design fee will be charged. Positive and negative probes for common housekeeping are also available for ordering. For Research Use Only. Not for use in diagnostic procedures. MAN0009813 | MP26963 Revision A.0 Introduction The RNAScope® Assays use a novel and proprietary method of in situ hybridization (ISH) to visualize single RNA molecules per cell in samples mounted on slides. The assays are based on the patented signal amplification and background suppression technology. Proprietary RNA-specific probes (RNAScope® Probes; available separately) are hybridized to target RNA, and are then bound to a cascade of signal amplification molecules culminating in signal detection (Figure 1, below). Single-plex, 2-plex, multiplex, and automated assays are all available. The RNAScope® Assay procedure is illustrated in Figure 1, below, and can be completed in 6–10 hours depending on the assay, or conveniently divided over two days. Most RNAScope® Assay reagents are available in convenient Ready-To-Use (RTU) dropper bottles and provide a simple, nearly pipette-free workflow. Results are observable using standard bright field or fluorescent microscopy. Figure 1 Overview of the RNAScope® Assay procedure Target RNA-specific oligo probes PreAMP AMP Label probes 1. Tissue section 2. Hybridize to target RNA 3. Amplify signal 4. Image Start with properly prepared tissue sections and prereat to allow access to target RNA. Hybridize multiple sets of gene-specific probe pairs to target mRNAs. Use up to 4 signal amplification systems to detect multiple target RNAs. Probes are hybridized to a cascade of signal amplification molecules, culminating in binding of dye-labeled probes visible in different fluorescent channels. Visualize target RNA using standard fluorescent microscope. RNAScope® Multiplex Reagent Kit RNAScope® Multiplex Reagent Kits contain three modules: a Pretreatment Module, a Detection Module, and a Wash Buffer Module (see Table 1, page 1). When stored as directed, the reagents are stable at least until the expiration date printed on the product label. • The Pretreatment Module consists of Pretreat 2, Pretreat 3, and Pretreat 4 reagents, which are used in different combinations to pretreat various tissue types (see Pretreatment reagent selection, page 9) to prepare them for the RNAScope® in situ hybridization protocol. • The Detection–FL Module contains the propriatery signal amplification and detection reagents that hybridize to the gene-specific RNA probes (i.e., Target Probes; available separately) to detect multiple target RNAs. • The Wash Buffer Module contains the 50× RNAScope® Wash Buffer that supports the RNAScope® assay workflow. Each RNAScope® Multiplex Reagent Kit provides enough reagents to stain ~20 tissue sections of approximately 20 mm × 20 mm in size. Larger tissue sections will result in fewer tests. Note that, in addition to the RNAScope® Multiplex Reagent Kit, RNAScope® Assays require gene-specific RNA probes (RNAScope® Probes, page 3), which are available separately from Life Technologies. IMPORTANT! RNAScope® Reagent Kits share the same Pretreatment Module and Wash Buffer, but have unique Detection Modules. Do not interchange the reagent components of the Detection Modules, even those having the same name. RNAScope® Multiplex Reagent Kit for Tissues | 2 Sample types To perform the RNAScope® Assay, you must start with properly prepared and pretreated samples. Multiple sample types are compatible with RNAScope® Assays and include: formalin-fixed, paraffin-embedded (FFPE) tissues, fresh, frozen tissues, fixed, frozen tissues, tissue microarray (TMA), and cell samples. RNAScope® Probes RNAScope® Probes are gene-specific RNA probes that are required for RNAScope® Assay, but are not included in the RNAScope® Reagent Kit. Based on the gene of interest, these probes can be ordered separately from Life Technologies. Contact us to find a gene-specific probe from a searchable catalog of >27,000 pre‑designed Target Probes, or order a custom probe. Note that pre-designed control probes are also available for housekeeping genes. Each probe is sufficient for staining ~20 sections, each with an area of approximately 20 mm × 20 mm (0.75” × 0.75”). Larger tissue sections will result in fewer tests. The probes have a shelf life of six months from the shipment date when stored at 2–8°C. The RNAScope® Probes consist of user-specified Target Probes and Positive and Negative Control Probes. Each Target Probe contains a mixture of short oligonucleotides designed to bind to a specific target RNA and is detectable in one of three color channels, C1, C2, and C3, using the Amp 4 amplification step. Channel C1 target probes are Ready-To-Use (RTU), while channel C2 and C3 probes are shipped as a 50× concentrated stock. To independently detect different target RNAs in a multiplex assay, each target probe must be in a different color channel and there must be a C1 probe in the mixture. If no specific C1 probe is used, then a “Blank Probe – C1” can be used in place of a specific target probe. Different colors are assigned to the C1 and C2 color channels depending on the particular RNAScope® Assay. You can select any combination based on your imaging instrument configuration. For example, a higher expression gene on a lower wavelength (i.e., green channel). The color channels for the RNAScope® Multiplex Fluorescent Assay are shown in Table 3, below. There are 3 options for alternate fluorescent color modules. Any fluorescent label combination (Amplification Reagent 4 Alt A, B, or C) can be selected based on your experiment design. Table 3 Color module options for the RNAScope® Multiplex Fluorescent Assay Fluorescent label C1 (Color - Ex/Em) C2 (Color - Ex/Em) C3 (Color - Ex/Em) Amplification Reagent 4 Alt A-FL Green – 488/540 nm Orange – 550/580 nm Far red – 647/690 nm Amplification Reagent 4 Alt B-FL Orange – 550/580 nm Green – 488/540 nm Far red – 647/690 nm Amplification Reagent 4 Alt C-FL Orange – 550/580 nm Far red – 647/690 nm Green – 488/540 nm RNAScope® Multiplex Reagent Kit for Tissues | 3 Before starting Important guidelines • Start with properly prepared sections. Refer to the sample preparation and pretreatment sections of this user guide. • Use only samples mounted on SuperFrost Plus® Slides (Fisher Scientific; Cat. no. 12-550-15). • Always run positive and negative control probes on your sample to assess sample RNA quality and optimal permeabilization. • Do not substitute required materials. RNAScope® Assays have been validated with these materials only. • Follow the protocol exactly for best results. • Do not let your sections dry out during the procedure. • Use good laboratory practices and follow all necessary safety procedures. Step 1. Prepare fresh frozen (FF) sections Prepare fresh frozen (FF) sections as described below. For formalin‑fixed paraffinembedded (FFPE) sample preparation and pretreatment, see page 7. For the latest protocols and guidelines using other sample types and preparation methods, contact Technical Support. IMPORTANT! We highly recommend following these guidelines. We cannot guarantee assay results with other preparation methods. Materials required • Scalpel • Forceps • Cryo-embedding medium (OCT) • Dry ice, liquid nitrogen, or isopentane • Cryostat • Slide boxes • SuperFrost® Plus slides • Aluminum foil or zip-lock bags Prepare the block 1.1 Remove tissue and cut to fit into cryomolds. CAUTION! Handle biological specimens appropriately. 1.2 Freeze the specimen on dry ice or in liquid nitrogen within 5 minutes of tissue harvest. RNAScope® Multiplex Reagent Kit for Tissues | 4 1.3 Embed frozen tissue in cryo-embedding medium (OCT): a. Add two drops of OCT into a cryomold. b. Place the frozen tissue on the OCT in the correct orientation for cutting. c. Add more OCT to fill the cryomold. Do not allow any air bubbles to form. d. Hold the block with forceps on the surface of liquid nitrogen or isopentane cooled by dry ice or liquid nitrogen, or place the cryomold on dry ice. 1.4 Store the frozen block in an air-tight container at –80°C prior to sectioning. Embedded tissue may be stored for at least 3 months. Section the block 1.5 Equilibrate block to –20°C in a cryostat for ~1 hour. 1.6 Cut 10–20 μm sections and mount onto SuperFrost® Plus slides. 1.7 Keep the sections at –20°C to dry. 1.8 Store the sections in slide boxes wrapped air-tight with aluminum foil or zip-lock bags at –80°C until use. Sections may be stored for at least 3 months. IMPORTANT! Do not fix the slides prior to this step. Optional Stopping Point 1: This is an optional stopping point in the procedure. Use the sectioned tissue within 3 months. Step 2. Prepare FF slides for the RNAScope® Assay Materials required • 1× PBS • 10% neutral buffered formalin (NBF) • 100% ethanol • Tissue-Tek® Vertical 24 Slide Rack • Tissue-Tek® Staining Dishes (5 required) • ImmEdge™ Hydrophobic Barrier Pen Fix the sections 2.1 Chill 200 mL 10% NBF (fresh 10% NBF or 4% paraformaldehyde in 1X PBS) to 4°C in a Tissue-Tek® Staining Dish. 2.2 Remove slides from –80°C, and place in a Tissue-Tek® Slide Rack. 2.3 Immediately immerse slides in the pre-chilled fixative. Fix for 15 minutes at 4°C. Note: Formalin that has been stored for more than 6 months, exposed to air for more than a week, or used repeatedly may result in suboptimal tissue fixation. RNAScope® Multiplex Reagent Kit for Tissues | 5 Dehydrate the sections Reagents may be prepared ahead of time. Ensure all containers remain covered. 2.4 Prepare 200 mL 50% ethanol, 200 mL 70% ethanol, and 600 mL 100% ethanol in Tissue‑Tek® Staining Dishes. 2.5 Place the slides in 50% ethanol for 5 minutes at room temperature. 2.6 Place the slides in 70% ethanol for 5 minutes at room temperature. 2.7 Place the slides in 100% ethanol for 5 minutes at room temperature. 2.8 Repeat step 2.7 with fresh 100% ethanol. Optional Stopping Point 2: This is an optional stopping point in the procedure. Slides may be stored in 100% ethanol at –20°C for up to 1 week. Prolonged storage may degrade sample RNA. Create a hydrophobic barrier 2.9 Take slides out of 100% ethanol and place on absorbent paper with the section face-up. Air dry for 5 minutes at room temperature. 2.10 Using the following example, draw a barrier 2–4 times around each section with the ImmEdge™ hydrophobic barrier pen. See example below (size of this hydrophobic barrier is 0.75” × 0.75”). Note: Refer to Appendix A: Reagent Volume Guidelines on page 16 to determine the recommended number of drops needed per slide. IMPORTANT! Do not let the barrier touch the section. ImmEdge™ hydrophobic barrier pen is highly recommended. Alternative type of pen may result in suboptimal results. Note: We do not recommend drawing a smaller barrier and using less than the recommended volume amounts, even for smaller sections. Larger barriers will result in fewer tests per kit. 2.11 Let the barrier dry completely for ~ 1 minute. Note: If you need to reapply the hydrophobic barrier during pretreatment, dry the appropriate area of the slide with a Kimwipes® laboratory tissues. Do not touch the tissue section. 2.12 Proceed to pretreatment, page 9. RNAScope® Multiplex Reagent Kit for Tissues | 6 Step 1. Prepare formalin-fixed, paraffin-embedded (FFPE) sections Prepare formalin‑fixed paraffin-embedded (FFPE) sections as described below. For fresh frozen (FF) sample preparation and pretreatment, see page 4. For the latest protocols and guidelines using other sample types and preparation methods, contact Technical Support. IMPORTANT! We highly recommend following these guidelines. We cannot guarantee assay results with other preparation methods. Materials required • 10% neutral buffered formalin (NBF) • 1× PBS • Paraffin wax • 100% ethanol, ACS grade or equivalent • Xylene • Microtome • Water bath • SuperFrost® Plus slides Fix the sample 1.1 Remove sample and cut 3–4 mm pieces prior to fixing. CAUTION! Handle biological specimens appropriately. 1.2 Fix sample in fresh 10% NBF for 16–32 hours at room temperature. Fixation time will vary depending on tissue type. IMPORTANT! Under-fixation will result in significant signal loss when performing the RNAScope® Assay. Dehydrate, embed, and cut the sample IMPORTANT! Use fresh reagents. 1.3 Wash sample with 1× PBS. 1.4 Dehydrate the sample using a standard ethanol series, followed by xylene. 1.5 Embed the sample in paraffin. Note: Embedded samples may be stored at room temperature for years. 1.6 Trim paraffin blocks as needed, and cut embedded tissue into 5 μm ± 1 μm sections using a microtome. 1.7 Place paraffin ribbon in water bath at room temperature, and mount sections on SuperFrost® Plus slides. IMPORTANT! Place sections in the center of the slide. 1.8 Air dry the slides overnight at room temperature. Do not bake slides unless they will be used within 1 week. Optional Stopping Point 1: This is an optional stopping point in the procedure. Use the sectioned tissue within 3 months. Store sections with dessicants at room temperature. RNAScope® Multiplex Reagent Kit for Tissues | 7 Step 2. Prepare FFPE slides for the RNAScope® Assay Materials required • Drying oven • Prepared FFPE slides • Tissue-Tek® Vertical 24 Slide Rack • Distilled water • Fume hood • Xylene • 100% ethanol • Tissue-Tek® Clearing Agent Dish (2) • Tissue-Tek® Staining Dish (2) • ImmEdge™ Hydrophobic Barrier Pen Bake slides 2.1 Bake slides in a dry oven for 1 HOUR at 60°C. Optional Stopping Point 2: Use sectioned tissue within 1 week. Store sections with dessicants at room temperature. 2.2 If you wish you continue, prepare the materials for deparaffinizing the FFPE sections (see below) and pretreating the samples (see page 9) while the slides are baking. Deparaffinize FFPE sections 2.3 In a fume hood, fill two dishes designated as Clearing Agent Dishes with ~200 mL of fresh xylene and two dishes designated as Staining Reagent Dishes with ~200 mL of fresh 100% ethanol. Note: Reagents may be prepared ahead of time. Ensure all containers remain covered. 2.4 Place slides in a Tissue-Tek® Slide Rack and submerge in the first xylene-containing Clearing Agent Dish in the fume hood. 2.5 Incubate the slides in xylene for 5 minutes at room temperature. Agitate the slides by occasionally lifting the slide rack up and down in the Clearing Agent Dish. 2.6 Remove the slide rack from the first xylene-containing dish and immediately place in the second xylene-containing Clearing Agent Dish in the fume hood. 2.7 Repeat Step 2.5. 2.8 Remove the slide rack from the second xylene-containing dish and immediately place in the Staining Dish containing 100% ethanol. 2.9 Incubate the slides in 100% ethanol for 1 minute at room temperature with agitation. 2.10 Repeat Step 2.9 with fresh 100% ethanol. 2.11 Remove the slides from the rack, and place on absorbent paper with the section face-up. Air dry for 5 minutes at room temperature. Optional Stopping Point 3: Air dry overnight at room temperature (must use within 24 hours) or proceed directly to pretreatment (page 9). RNAScope® Multiplex Reagent Kit for Tissues | 8 Step 3. Pretreat samples Pretreatment reagent selection The RNAScope® Multiplex Fluorescent Assay is compatible with fresh frozen (FF) tissue, fixed frozen tissue, formalin-fixed paraffin-embedded (FFPE) tissue, cultured adherent cells on chamber slides, and Peripheral Blood Mononuclear Cells (PBMC). IMPORTANT! Different tissue and cell types have different pretreatment requirements. Refer to Table 4, below, to determine the appropriate pretreatment reagent. Table 4 Pretreatment selection guide for fluorescence detection Tissue type Pretreatment reagent Fresh frozen tissue Pretreatment 4 only Fixed frozen tissue Pretreatment 2 and Pretreatment 4 FFPE tissue Pretreatment 2 and Pretreatment 4 Cultured adherent cells Pretreatment 3 only Peripheral Blood Mononuclear Cells (PBMC) Pretreatment 3 only Note: Pretreatment with Pretreat 2 reagent reagent is required only for fixed frozen and FFPE tissues. If you are using fresh frozen (FF) tissue, cultured adherent cells on chamber slides, or Peripheral Blood Mononuclear Cells (PBMC), skip Steps 3.5–3.12 (page 10). Materials required • Pretreat 2, 3, and 4 reagents (from the Pretreatment Module of the RNAScope® Multiplex Reagent Kit) • Prepared slides • Distilled water • Paper towel or absorbent paper • Hybridization oven • Tissue-Tek® Slide Rack • Tissue-Tek® Staining Dish • Distilled water • Glass beaker (1 or 2 L) • Hot plate • Aluminum foil • Thermometer • Forceps, large Equilibrate the equipment 3.1 Turn on the hybridization oven and set the temperature to 40°C. 3.2 Place a humidifying paper in the humidity control tray and wet completely with distilled water. 3.3 Insert covered tray into oven and close the oven door. Warm the tray for 30 minutes at 40°C before use. RNAScope® Multiplex Reagent Kit for Tissues | 9 Prepare 1× Pretreat 2 reagent 3.5 If required (see Table 4, page 9), prepare 700 mL of fresh 1× Pretreat 2 reagent by adding 630 mL of distilled water to 1 bottle of 10× Pretreat 2 solution (70 mL) in a 1 L beaker. Mix well. 3.6 Place the beaker containing 1× Pretreat 2 reagent on the hot plate. Cover the beaker with foil and turn the hot plate on high for 10–15 minutes. 3.7 Once 1× Pretreat 2 reagent reaches boiling, turn the hot plate knob to 100–104°C to maintain uniform boiling. IMPORTANT! Do not boil the 1× Pretreat 2 reagent for more than 30 minutes before use. Apply Pretreat 2 reagent Application of Pretreat 2 reagent is required only for fixed frozen and FFPE tissues (see Table 4, page 9). 3.8 Ensure that 1× Pretreat 2 solution is at mild boiling. 3.9 With a pair of forceps very slowly submerge the slide rack containing the slides into the boiling 1× Pretreat 2 solution. Cover the beaker with foil and boil the slides for 10–30 minutes. 3.10 After pretreatment time is over, use the forceps to immediately transfer the hot slide rack from the 1× Pretreat 2 solution to the Staining Dish containing distilled water. Do not let the slides cool in Pretreat 2. 3.11 Wash slides in the distilled water by moving the rack up and down 3–5 times and repeat with fresh distilled water. 3.12 Wash slides in a dish filled with fresh 100% ethanol by moving the rack up and down 3–5 times. Air dry the slides. Apply Pretreat 3 reagent Application of Pretreat 3 reagent is required only for cultured adherent cells on chamber slides, or Peripheral Blood Mononuclear Cells (PBMC) (see Table 4, page 9). If you are using other sample types, skip Steps 3.13–3.16. 3.13 Place the dried slides on the hybridization slide rack, and add ~5 drops of Pretreat 2 reagent to entirely cover each section. 3.14 Incubate for 30 minutes at room temperature. 3.15 Take each slide one at a time from the hybridization slide rack and tap and/or flick to remove the excess liquid. Immediately place each slide in a Tissue-Tek® Slide Rack submerged in a Tissue-Tek® Staining Dish filled with 1× PBS. 3.16 Wash slides with 1× PBS by moving the rack up and down 3–5 times and repeat with 1× PBS. Apply Pretreat 4 reagent Application of Pretreat 4 reagent is required fixed frozen and FFPE tissues already pretreated with 1× Pretreat 2 reagent or for untreated fresh frozen (FF) tissues (see Table 4, page 9). 3.17 Follow the same procedure as the application of Pretreat 3 reagent (Steps 3.13–3.16), but use Pretreat 4 reagent instead. RNAScope® Multiplex Reagent Kit for Tissues | 10 Step 4. Run the RNAScope® Fluorescent Multiplex Assay This procedure flows directly from sample preparation and pretreatment. Refer to the appropriate sample preparation and pretreatment sections of this user guide for your specific sample type. IMPORTANT! Do not let sections dry out between incubation steps. Work quickly and fill barrier with solutions. Note: We recommend running controls before running any of your samples to optimize the protocol. Materials required Materials provided by the RNAScope® Fluorescent Multiplex Kit • 50× Wash Buffer • Amp 1-FL • Amp 2-FL • Amp 3-FL • Amp 4 Alt A-FL, Amp 4 Alt B-FL, or Amp 4 Alt C-FL • DAPI Materials provided by RNAScope® Probes • C1 Target Probe • 50× C2 Target Probe • 50× C3 Target Probe • 3-Plex Positive Control Probe • Negative Control Probe Other materials and equipment • Prepared sections • Distilled water • Carboy (>3L) • Tissue-Tek® Staining Dish • Tissue-Tek® Clearing Agent Dish, xylene-resistant • Hybridization oven • Water bath or incubator • Tissue-Tek® Vertical 24 Slide Rack • Tubes (various sizes) • Paper towel or absorbent paper • ProLong® Gold Antifade Reagent • Cover Glass, 24 mm × 50 mm Prepare the materials You may prepare the reagents at the same time you prepare pretreatment reagents. Refer to the appropriate sample preparation and pretreatment sections of this user guide. Some of the materials may be prepared in advance and stored at room temperature. RNAScope® Multiplex Reagent Kit for Tissues | 11 Prepare 1× Wash Buffer 4.1 Prepare 3 L of 1× Wash Buffer by adding 2.94 L distilled water and 1 bottle (60 mL) of 50× Wash Buffer to a large carboy. Mix well. Note: Warm 50× Wash Buffer up to 40°C for 10–20 minutes before diluting it to prepare 1× Wash Buffer. 1× Wash Buffer may be prepared ahead of time and stored at room temperature for up to one month. Prepare RNAScope® Probes 4.2 Warm the RNAScope® Probes for 10 minutes at 40°C in a water bath or incubator, then cool to room temperature. 4.3 Briefly spin the C2 and C3 probes to collect the liquid at the bottom of the tubes. 4.4 Mix the C2, C3, and C1 probes at a ratio of 1:1:50 by pipetting 1 volume of C2 and 1 volume of C3 probes into 50 volumes of C1 probe in a sterile tube. Invert the tube several times. Note: Do not mix probes of the same channel. Mixed Target Probes can be stored at 4°C for up to 6 months. Equilibrate reagents 4.5 Place AMP 1–4 FL reagents at RT. 4.6 Make sure that the hybridization oven and the prepared humidity control tray are at 40°C. Hybridize probe IMPORTANT! Make sure that RNAScope® Probes are prewarmed and cooled to room temperature prior to use. 4.7 Tap and/or flick to remove excess liquid from slides and add ~4 drops of the appropriate probe to entirely cover each section. Note: Refer to Appendix A: Reagent Volume Guidelines on page 16 to determine the recommended number of drops needed per slide. For example, for a 0.75” × 0.75” barrier, add 4 drops of the appropriate probe. 4.8 Place slides in the hybridization oven and incubate for 2 hours at 40°C. Make sure that the humidity is controled in the chamber, and do not let the slides dry out. 4.9 Remove one slide at a time, quickly remove excess liquid by decanting and place slide in a Tissue-Tek® Slide Rack submerged in the Tissue-Tek® Staining Dish filled with 1× Wash Buffer. 4.10 Wash slides in 1× Wash Buffer for 2 minutes at room temperature. Agitate slides by moving the Slide Rack up and down in the dish. 4.11 Repeat Step 4.10 with fresh 1× Wash Buffer. RNAScope® Multiplex Reagent Kit for Tissues | 12 Hybridize Amplification Reagent 1-FL 4.12 Take each slide one at a time from the Tissue-Tek® Slide Rack and tap/and or flick to remove the excess liquid. Add ~4 drops of Amplification Reagent 1-FL to entirely cover each section. 4.13 Incubate the slides for 30 minutes at 40°C in the hybridization oven. Make sure that the humidity is controled in the chamber, and do not let the slides dry out. 4.14 Remove one slide at a time, quickly remove excess liquid by decanting and place slide in a Tissue-Tek® Slide Rack submerged in the Tissue-Tek® Staining Dish filled with 1× Wash Buffer. 4.15 Wash slides in 1× Wash Buffer for 2 minutes at room temperature with occassional agitation. 4.16 Repeat Step 4.15 with fresh 1× Wash Buffer. Hybridize Amplification Reagent 2-FL 4.17 Take each slide one at a time from the Tissue-Tek® Slide Rack and tap/and or flick to remove the excess liquid. Add ~4 drops of Amplification Reagent 2-FL to entirely cover each section. 4.18 Incubate the slides for 15 minutes at 40°C in the hybridization oven. Make sure that the humidity is controled in the chamber, and do not let the slides dry out. 4.19 Remove one slide at a time, quickly remove excess liquid by decanting and place slide in a Tissue-Tek® Slide Rack submerged in the Tissue-Tek® Staining Dish filled with 1× Wash Buffer. 4.20 Wash slides in 1× Wash Buffer for 2 minutes at room temperature with occassional agitation. 4.21 Repeat Step 4.20 with fresh 1× Wash Buffer. Hybridize Amplification Reagent 3-FL 4.22 Take each slide one at a time from the Tissue-Tek® Slide Rack and tap/and or flick to remove the excess liquid. Add ~4 drops of Amplification Reagent 3-FL to entirely cover each section. 4.23 Incubate the slides for 30 minutes at 40°C in the hybridization oven. Make sure that the humidity is controled in the chamber, and do not let the slides dry out. 4.24 Remove one slide at a time, quickly remove excess liquid by decanting and place slide in a Tissue-Tek® Slide Rack submerged in the Tissue-Tek® Staining Dish filled with 1× Wash Buffer. 4.25 Wash slides in 1× Wash Buffer for 2 minutes at room temperature with occassional agitation. 4.26 Repeat Step 4.25 with fresh 1× Wash Buffer. RNAScope® Multiplex Reagent Kit for Tissues | 13 Hybridize Amplification Reagent 4-FL 4.27 Take each slide one at a time from the Tissue-Tek® Slide Rack and tap/and or flick to remove the excess liquid. Add ~4 drops of Amplification Reagent 4-FL to entirely cover each section. Note: There are 3 options for alternate fluorescent color modules. Any fluorescent label combination (Amplification Reagent 4-FL Alt A, B, or C) can be selected. For fresh frozen sections, module Amp 4 Alt B is recommended; for all other sample types, Amp 4 Alt A, is recommended.. 4.28 Incubate the slides for 30 minutes at 40°C in the hybridization oven. Make sure that the humidity is controled in the chamber, and do not let the slides dry out. 4.29 Remove one slide at a time, quickly remove excess liquid by decanting and place slide in a Tissue-Tek® Slide Rack submerged in the Tissue-Tek® Staining Dish filled with 1× Wash Buffer. 4.30 Wash slides in 1× Wash Buffer for 2 minutes at room temperature with occassional agitation. 4.31 Repeat Step 4.30 with fresh 1× Wash Buffer. Counterstain and mount the slides IMPORTANT! Do not perform this procedure with more than 5 slides at a time. 4.32 Remove excess liquid from the slides and add ~4 drops of DAPI to each section. 4.33 Incubate for 30 seconds at room temperature. 4.34 Remove DAPI from slides and immediately place 1–2 drops of ProLong® Gold Antifade Reagent onto each section. 4.35 Carefully place a 24 mm × 50 mm coverslip over the tissue section. Avoid trapping air bubbles. Store slides in the dark at 4°C. RNAScope® Multiplex Reagent Kit for Tissues | 14 Step 5. Evaluate the samples For an example of successful staining, see Figure 2. Examine tissue sections under a standard fluorescent microscope at 20–40× magnification. A confocal microscope may also be used: • Assess tissue and cell morphology. • Assess positive control signal strength. Positive control signal should be visible as punctuate dots within cell. • Assess negative control background. One dot in every 10 cells displaying background staining per microscope field is acceptable. • Evaluate target probe signal using the scoring guidelines in the next section. Control examples Figure 2, below, is an example showing expression in the cerebral cortex of normal mouse brain. Figure 2 Npy (red) and Fezf2 (green) expression in the cerebral cortex of normal mouse brain stained using the RNAScope® Fluorescent Multiplex Kit; 63× oil lens, confocal image. RNAScope® Multiplex Reagent Kit for Tissues | 15 Appendix A: Reagent Volume Guidelines Before starting your experiment, measure the inner edge of the hydrophobic barrier to determine the recommended number of drops needed per slide (see Table 5, below). Table 5 Reagent volume guidelines Size of hyrophobic barrier* (in) Recommended number of drops per slide Recommended volume per slide (μL) 0.75" × 0.75” † 4 120 0.75” × 1.0” 5 150 0.75” × 1.25” 6 180 Relative template size * Hydrophobic barrier measured at inner edge. References in this user manual are for the 0.75” x 0.75” hydrophobic barrier size. † Recommended hydrophobic barrier size is 0.75” × 0.75”. With this barrier size, each probe is sufficient for staining ~20 sections. Larger tissue sections will result in fewer tests. RNAScope® Multiplex Reagent Kit for Tissues | 16 Purchaser Notification Corporate Headquarters 5791 Van Allen Way Carlsbad, CA 92008 USA Phone: +1 760 603 7200 Fax: +1 760 602 6500 Email: [email protected] European Headquarters Inchinnan Business Park 3 Fountain Drive Paisley PA4 9RF UK Phone: +44 141 814 6100 Toll-Free Phone: 0800 269 210 Toll-Free Tech: 0800 838 380 Fax: +44 141 814 6260 Tech Fax: +44 141 814 6117 Email: [email protected] Email Tech: [email protected] Japanese Headquarters LOOP-X Bldg. 6F 3-9-15, Kaigan Minato-ku, Tokyo 108-0022 Japan Phone: +81 3 5730 6509 Fax: +81 3 5730 6519 Email: [email protected] Additional international offices are listed at www.lifetechnologies.com These high-quality reagents and materials must be used by, or directly under the supervision of, a technically qualified individual experienced in handling potentially hazardous chemicals. Read the Safety Data Sheet provided for each product; other regulatory considerations may apply. Obtaining Support For the latest services and support information for all locations, go to www.lifetechnologies.com. At the website, you can: • Access worldwide telephone and fax numbers to contact Technical Support and Sales facilities • Search through frequently asked questions (FAQs) • Submit a question directly to Technical Support ([email protected]) • Search for user documents, SDSs, vector maps and sequences, application notes, formulations, handbooks, certificates of analysis, citations, and other product support documents • Obtain information about customer training • Download software updates and patches SDS Safety Data Sheets (SDSs) are available at www.lifetechnologies.com/sds. Certificate of Analysis The Certificate of Analysis provides detailed quality control and product qualification information for each product. Certificates of Analysis are available on our website. Go to www.lifetechnologies.com/support and search for the Certificate of Analysis by product lot number, which is printed on the product packaging (tube, pouch, or box). Limited Product Warranty Life Technologies Corporation and/or its affiliate(s) warrant their products as set forth in the Life Technologies’ General Terms and Conditions of Sale found on Life Technologies’ website at www.lifetechnologies.com/termsandconditions. If you have any questions, please contact Life Technologies at www.lifetechnologies.com/support. Disclaimer LIFE TECHNOLOGIES CORPORATION AND/OR ITS AFFILIATE(S) DISCLAIM ALL WARRANTIES WITH RESPECT TO THIS DOCUMENT, EXPRESSED OR IMPLIED, INCLUDING BUT NOT LIMITED TO THOSE OF MERCHANTABILITY, FITNESS FOR A PARTICULAR PURPOSE, OR NON-INFRINGEMENT. TO THE EXTENT ALLOWED BY LAW, IN NO EVENT SHALL LIFE TECHNOLOGIES AND/OR ITS AFFILIATE(S) BE LIABLE, WHETHER IN CONTRACT, TORT, WARRANTY, OR UNDER ANY STATUTE OR ON ANY OTHER BASIS FOR SPECIAL, INCIDENTAL, INDIRECT, PUNITIVE, MULTIPLE OR CONSEQUENTIAL DAMAGES IN CONNECTION WITH OR ARISING FROM THIS DOCUMENT, INCLUDING BUT NOT LIMITED TO THE USE THEREOF. Important Licensing Information These products may be covered by one or more Limited Use Label Licenses. By use of these products, you accept the terms and conditions of all applicable Limited Use Label Licenses. The trademarks mentioned herein are the property of Life Technologies Corporation and/or its affiliate(s) or their respective owners. RNAScope is a registered trademark of Advanced Cell Diagnostics, Inc. ImmEdge is a trademark of Vector Laboratories, Ltd. SuperFrost and SuperFrost Plus are registered trademarks of Liebherr-International AG. Tissue-Tek is a registered trademark of Sakura Finetek Kabushiki Kaisha. Parafilm is a registered trademark of Bemis Company, Inc. Kimwipes is a registered trademark of Kimberly-Clark Corporation. ©2013 Life Technologies Corporation. All rights reserved. 20 November 2013