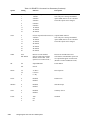
1
Point 510
Technical
Reference
Guide
Point 510
Technical
Reference
Guide
Fujitsu Personal Systems, Inc., has made every effort to ensure the accuracy and completeness of this document.
However, because ongoing development efforts are continually improving the capabilities of our products, we cannot
guarantee the accuracy of the contents of this document. We disclaim liability for errors, omissions, or future changes
herein.
Point 510 is a trademark of Fujitsu Personal Systems, Inc.
The following are registered trademarks of IBM Corporation: IBM, IBM PC AT, IBM PS/2.
The following are registered trademarks of Microsoft Corporation: MS, MS-DOS, Microsoft. The following are
trademarks of Microsoft Corporation: Windows for Workgroups, Windows 95, and Windows for Pen Computing.
PCMCIA is a trademark of the Personal Computer Memory Card International Association.
Phoenix is a trademark of Phoenix Technologies, Ltd.
Advanced Power Management is a registered trademark of Intel Corporation and Microsoft Corporation.
All other products are trademarks or registered trademarks of their respective companies.
Copyright 1998
Fujitsu Personal Systems, Inc.
No part of this publication may be copied, reproduced, or translated, without the prior written consent of Fujitsu Personal
Systems, Inc. No part of this publication may be stored or transmitted in any electronic form without the prior written consent of
Fujitsu Personal Systems, Inc.
Table of Contents
About This Guide ..............................................................................................................................
Revision History ................................................................................................................................................
Organization.......................................................................................................................................................
Related Documentation......................................................................................................................................
Technical Support ..............................................................................................................................................
xi
xi
xi
xii
xiv
Chapter 1
System Software ................................................................................................................................
1-1
Supported Operating Systems............................................................................................................................
Pen Support........................................................................................................................................................
Windows for Workgroups Pen Support.................................................................................................
Windows 95 Pen Support ......................................................................................................................
PCMCIA and PC Card Support .........................................................................................................................
Windows 95 PC Card Support...............................................................................................................
Windows for Workgroups PC Card Support .........................................................................................
Wireless LAN Support.......................................................................................................................................
Overview of System Configuration Tools and Utilities ....................................................................................
1-1
1-1
1-1
1-2
1-2
1-2
1-2
1-3
1-4
Chapter 2
Configuring the Point 510 Pen Tablet System ...............................................................................
About BIOS Settings .........................................................................................................................................
Windows 95 Audit Mode...................................................................................................................................
BIOS Setup ........................................................................................................................................................
Starting BIOS Setup...............................................................................................................................
Using BIOS Setup..................................................................................................................................
Exiting BIOS Setup ...............................................................................................................................
BIOS Setup Main Menu Options...........................................................................................................
IDE Hard Disk Drive Submenu Options ...............................................................................................
Integrated Peripherals Submenu Options (Accessed Through the Advanced Menu) ...........................
Audio Features Submenu Options (Accessed Through the Advanced Menu) ......................................
Security Menu Options ..........................................................................................................................
Power Savings Menu Options................................................................................................................
Boot Menu Options................................................................................................................................
BIOS Setup Exit Menu Options.............................................................................................................
Using Point 510 Setup .......................................................................................................................................
Using PM Setup .................................................................................................................................................
Using PENSET51 ..............................................................................................................................................
Running PENSET51 in Menu Mode .....................................................................................................
Running PENSET51 in Command Line Mode......................................................................................
Running MFG510 ..............................................................................................................................................
2-1
2-1
2-1
2-2
2-3
2-3
2-4
2-5
2-6
2-7
2-9
2-9
2-11
2-12
2-13
2-14
2-14
2-17
2-17
2-18
2-23
Chapter 3
Pen Tablet Hardware Features .......................................................................................................
3-1
Pen Tablet Features............................................................................................................................................
Connectivity Peripherals....................................................................................................................................
3-1
3-1
Chapter 4
Installing System Components ........................................................................................................
4-1
Installing a PC Card...........................................................................................................................................
Removing a PC Card .........................................................................................................................................
Installing DIMM Cards......................................................................................................................................
Removing DIMM Cards ....................................................................................................................................
Replacing the Hard Disk Drive..........................................................................................................................
4-1
4-2
4-2
4-4
4-5
iii
Chapter 5
Specifications ................................................................................................................ .....................
5-1
Main System Logic Specifications ............................................................................................... .....................
Display Specifications ......................................................................................................... ..............................
External Video Capabilities .................................................................................................... ...........................
Digitizer Specifications ...................................................................................................... ...............................
Wireless LAN Adapter Specifications............................................................................................ ...................
Pen Tablet Peripheral Interface Specifications................................................................................. .................
Connectivity Peripherals Interface Specifications .............................................................................................
Power System Specifications.................................................................................................... .........................
Environmental Specifications ................................................................................................... .........................
Physical Specifications ........................................................................................................ ..............................
Agency Approval Specifications ................................................................................................. ......................
5-1
5-2
5-2
5-3
5-3
5-4
5-5
5-6
5-7
5-7
5-8
Chapter 6
Peripheral Interfaces ......................................................................................................... ...............
6-1
Mouse Port ..................................................................................................................... ....................................
Keyboard Port .................................................................................................................. ..................................
DC Power Input ................................................................................................................ ................................
Serial Ports ................................................................................................................... ......................................
Floppy Disk Drive Port......................................................................................................... .............................
Parallel Port.................................................................................................................. ......................................
Video Port ..................................................................................................................... .....................................
High-Usage Contacts ............................................................................................................ .............................
System Interface Port.......................................................................................................... ...............................
6-1
6-2
6-2
6-3
6-4
6-5
6-5
6-6
6-8
Chapter 7
System Power .................................................................................................................. ..................
7-1
Power System Controls.......................................................................................................... ............................
Power System Overview.......................................................................................................... ..........................
External DC Power .............................................................................................................. ..............................
Power Management ............................................................................................................... ............................
System Power States............................................................................................................ ..............................
Power Management States and BIOS Configuration Options......................................................................... ..
Timeouts ....................................................................................................................... .........................
Full On State .................................................................................................................. ........................
CPU Activity in Idle Mode and APM Enabled Mode ...........................................................................
Standby Mode ................................................................................................................... .....................
Suspend Mode................................................................................................................... .....................
Off State...................................................................................................................... ...........................
Other Power Management Issues .................................................................................................. ....................
System Temperature and Power Management ......................................................................................
Battery Charge and Power Management ...............................................................................................
7-1
7-2
7-2
7-2
7-3
7-5
7-5
7-5
7-6
7-6
7-7
7-7
7-8
7- 8
7-8
Chapter 8
BIOS Configuration Application Programming Interfaces ..........................................................
Summary of Functions.......................................................................................................................................
Functions Specific to the DLL...........................................................................................................................
BiosSetupStart .......................................................................................................................................
BiosSetupEnd.........................................................................................................................................
BiosSetupGetVersion.............................................................................................................................
Functions for Retrieving and Setting BIOS Settings .........................................................................................
BiosSetupGetPermanent ........................................................................................................................
BiosSetupSetPermanent.........................................................................................................................
BiosSetupGetCurrent .............................................................................................................................
BiosSetupSetCurrent..............................................................................................................................
Option and Setting Parameters ..............................................................................................................
Resume Time .....................................................................................................................................................
BiosSetupSetResumeTime.....................................................................................................................
BiosSetupGetResumeTime....................................................................................................................
iv
8-1
8-2
8-3
8-3
8-3
8-4
8-4
8-4
8-4
8-5
8-5
8-6
8-11
8-11
8-11
Chapter 9
APM-Aware Application Design ...................................................................................................
9-1
Windows for Workgroups Power Management Interface ...............................................................................
Windows 95 Power Management Interface ......................................................................................... .............
Windows 95 Power Message ...................................................................................................... ......................
9-1
9-1
9-2
Appendix A
Memory Space for Hardware Identification ..................................................................................
A-1
Index ..................................................................................................................................................
Index-1
v
vi
List of Figures
Figure
Figure 2-1
Figure 4-1
Figure 4-2
Figure 4-3
Figure 4-4
Figure 4-5
Figure 4-6
Figure 6-1
Figure 6-2
Figure 7-1
Figure 7-2
Page
BIOS Setup Screen ..............................................................................................................................
PC Card Slot ........................................................................................................................................
DIMM Cover Plate ..............................................................................................................................
Installing DIMM Cards .......................................................................................................................
Hard Disk Drive Cover Plate ..............................................................................................................
Hard Disk Drive Latch ........................................................................................................................
Removing Hard Disk Drive ................................................................................................................
High Usage Contacts ...........................................................................................................................
System Interface Connector Pin Assignments ....................................................................................
Reset and Power Buttons ....................................................................................................................
Power Management State Transitions .................................................................................................
0
2-3
4-1
4-3
4-4
4-5
4-6
4-6
6-7
6-8
7-1
7-4
vii
viii
List of Tables
Table
Table 2-1
Table 2-2
Table 2-3
Table 2-4
Table 2-5
Table 2-6
Table 2-7
Table 2-8
Table 2-9
Table 2-10
Table 4-1
Table 5-1
Table 5-2
Table 5-3
Table 5-4
Table 5-5
Table 5-6
Table 5-7
Table 5-8
Table 5-9
Table 5-10
Table 5-11
Table 6-1
Table 6-2
Table 6-3
Table 6-4
Table 6-5
Table 6-6
Table 6-7
Table 6-8
Table 6-9
Table 6-10
Table 7-1
Table 7-2
Table 7-3
Table 7-4
Table 7-5
Table 7-6
Table 8-1
Table A-1
Page
Main Menu Options .............................................................................................................................
IDE Hard Disk Drive Configuration Options .....................................................................................
Integrated Peripherals Submenu Options ............................................................................................
Audio Features Options .......................................................................................................................
Security Menu Options .......................................................................................................................
Power Savings Options .......................................................................................................................
Boot Menu Options ..............................................................................................................................
Exit Menu Options ...............................................................................................................................
PENSET51 Command Line Parameters .............................................................................................
MFG510 Parameters ...........................................................................................................................
DIMM Configurations .........................................................................................................................
Logic System Specifications ..............................................................................................................
Display Specifications ........................................................................................................................
Video Modes for External Monitor......................................................................................................
Digitizer Specifications ........................................................................................................................
Wireless LAN Adapter Specifications .................................................................................................
Pen Tablet Peripheral Interface Specifications ..................................................................................
Connectivity Peripherals Interface Specifications .............................................................................
Power System Specifications .............................................................................................................
Environmental Specifications ............................................................................................................
Point 510 Pen Tablet Specifications ..................................................................................................
Agency Approval Specifications ........................................................................................................
Mouse Port Connector Pin Assignments..............................................................................................
Keyboard Port Connector Pin Assignments.........................................................................................
DC Power Input Connector Pin Assignments ......................................................................................
Serial Port Connector Pin Assignments ...............................................................................................
Floppy Disk Drive Connector Pin Assignments ..................................................................................
Parallel Port Connector Pin Assignments ............................................................................................
Video Port Connector Pin Assignments...............................................................................................
High-Usage Contacts Signal Assignments...........................................................................................
System Interface Port Connector Specifications..................................................................................
System Interface Port Connector Pin Assignments .........................................................................
Power Button Operation.......................................................................................................................
System Power States ............................................................................................................................
CPU Activity in Idle Mode and APM Enabled Mode .........................................................................
CPU Activity in Standby Mode ...........................................................................................................
Thermal System Modes........................................................................................................................
Low Battery Modes (System Running on Battery Power)...................................................................
Option and Setting Parameters and Return Values .............................................................................
Hardware Identification Address Space...............................................................................................
0
2-5
2-6
2-7
2-9
2-9
2-11
2-12
2-13
2-18
2-23
4-2
5-1
5-2
5-2
5-3
5-3
5-4
5-5
5-6
5-7
5-7
5-8
6-1
6-2
6-2
6-3
6-4
6-5
6-5
6-6
6-8
6-9
7-1
7-5
7-6
7-6
7-8
7-8
8-6
A-1
ix
x
About This Guide
This guide provides technical information on the Point 510 pen tablet system hardware and software.
Revision History
0
This guide is a compilation of the following three previously released documents. All information in
these three documents relating to the Point 510 pen tablet system is reproduced in this guide.
Point 510 System Software and Configuration Utilities Guide (FMW26TRG1)
Point 510 Hardware Technical Reference Guide (FMW26TRG2)
Point 510 Software Developer’s Reference Guide (FMW26TRG3)
Organization
0
This guide is organized as follows:
• Chapter 1 System Software
This chapter gives an overview of system software and utilities preinstalled on the Point 510 pen
tablet.
• Chapter 2 Configuring the Point 510 Pen Tablet System
This chapter provides details on using configuration utilities to configure the Point 510 pen tablet.
• Chapter 3 Pen Tablet Hardware Features
This chapter gives an overview of the Point 510 pen tablet system and discusses some of the system’s
newer features and technology.
• Chapter 4 Installing System Components
This chapter gives detailed instructions on installing PC Cards, adding memory, and replacing the
hard disk drive.
• Chapter 5 Specifications
This chapter gives specifications on the pen tablet system’s components and interfaces. Industry
standards supported by the Point 510 pen tablet are also covered.
• Chapter 6 Peripheral Interfaces
This chapter provides details on peripheral interfaces provided by the Point 510 pen tablet and port
replicator.
• Chapter 7 System Power
This chapter gives details on the pen tablet’s power system. Power management and implementation
of the Advanced Power Management standard is discussed.
• Chapter 8 BIOS Configuration Application Programming Interfaces
This chapter gives details on using DLLs which allow your application to configure the Point 510
BIOS.
• Chapter 9 APM-Aware Application Design
This chapter gives a brief overview of advanced power management (APM) interfaces for Windows
for Workgroups and Windows 95 applications.
• Appendix A Memory Space for Hardware Identification
This appendix gives details on some of the pen tablet’s programmable I/O registers.
xi
Related Documentation
0
The following documents contain information on using the Point 510 pen tablet and Point 510
connectivity peripherals.
Point 510 User’s Guide (Fujitsu part number 58-0498-00)
This manual covers operation of the Point 510 pen tablet for the end user.
Point 510 Connectivity Peripherals Installation Guide (Fujitsu order number FMW26TRG6)
This manual provides instruction on assembling and installing Point 510 connectivity peripherals such
as the high-connectivity cradle and wall-mount cradle.
Point 510 Connectivity Peripherals User’s Guide (Fujitsu order number FMW26TRG5)
This manual provides instruction on using Point 510 connectivity peripherals.
The following documents provide additional information about software preinstalled on the Point 510
pen tablet:
Tranxit Quick Reference Guide (Fujitsu part number 58-0542-00)
This manual provides information on using Tranxit software from Puma Technology. This manual is
included with the Point 510 pen tablet.
PCMPlus User’s Manual and Technical Reference
(Fujitsu order number: FMWRM1)
This manual provides information on using PCMPlus software. PCMPlus software is included when
you purchase Windows for Workgroups with your system. It provides drivers and configuration
utilities for using PC Cards.
PhoenixCard Manager User’s Manual (Fujitsu order number: FMWRM2)
This manual provides information on using PhoenixCard Manager version 4.0 software. PhoenixCard
Manager software is preinstalled on Windows for Workgroups systems to provide drivers and
configuration utilities for PC Cards.
Inside the Registry for Microsoft Windows 95
This manual provides information on the Windows 95 registry and is published by Microsoft Press,
<http://www.microsoft.com/mspress/> or call 1-800-MSPRESS in the U.S. (in Canada:
1-800-667-1115 or 416-293-8464).
Microsoft Windows 95 Resource Kit
This manual is a technical guide for installing, configuring, and supporting Windows 95 and is
published by Microsoft Press, <http://www.microsoft.com/mspress/> or call 1-800-MSPRESS in the
U.S. (in Canada: 1-800-667-1115 or 416-293-8464).
Windows 95 Registry Troubleshooting, ISBN: 1562055569
This manual provides information on the Windows 95 registry and is published by New Riders
Publishing.
xii
About This Guide
The following contain information on software development tools for Windows:
Programmers Guide to Pen Services for Microsoft Windows 95
This manual is currently out of print, however the on-line version of this manual is included with the
on-line documentation for Microsoft Visual C++ and with the Microsoft Developer’s Network
CD-ROM. This manual provides details on pen support for Microsoft Windows 95. Note that
Microsoft Windows for Workgroups and Windows 95 use the same API to provide pen support, so
you can refer to this manual for details on application design for Windows for Workgroups as well as
Windows 95.
Microsoft Developers Network CD-ROM
This CD-ROM provides details on application programming interfaces (APIs) used with Microsoft
Windows and Windows 95. To order a copy of this CD-ROM, please call the Microsoft Developers
Network at 800-759-5474 or send e-mail to [email protected].
The following documents are industry standard specifications supported by the Point 510 pen tablet
system.
Advanced Power Management (APM) BIOS Interface Specification Revision 1.2
The Point 510 pen tablet is an APM 1.2 compliant system as defined in this specification. Application
developers should refer to this specification for details on designing APM compliant software. This
specification is available on the Microsoft Corporation web site <http://www.microsoft.com/>. You
can also order a copy of this specification from one of the following:
• Intel Corporation
Literature Distribution Center
P.O. Box 7641
Mt. Prospect, IL 60056-7641
1-800-879-4683
• Microsoft Corporation
Hardware Vendor Relations Group
1 Microsoft Way
Redmond, WA 98052
1-206-882-8080
PC Card Standards
The Point 510 pen tablet and supporting system software comply with the PC Card standards
specifications up to and including PC Card Standard Release 3.0. PC Card standards are published by:
Personal Computer Memory Card International Association, 1030 East Duane Avenue, Suite G,
Sunnyvale, CA 94086, 408-720-0107, <http://www.pc-card.com/>.
IrDA Standards
The IrDA port on the Point 510 pen tablet is compliant with IrDA (Infrared Data Association) Standard
Version 1.1 published by: Infrared Data Association, 1776 Ygnacio Valley Road, Suite 212, Walnut
Creek, CA 94598, 510-943-6546, <http://www.irda.org>.
Universal Serial Bus Specification
The Universal Serial Bus (USB) port on the Point 510 port replicator is compliant with the Universal
Serial Bus Specification Version 1.0. Refer to this specification for USB details including: cable
requirements, topology, and USB power distribution. This specification and other technical documents
regarding USB are available on the Universal Serial Bus Implementer’s Forum home page at
<http://www.usb.org>.
Related Documentation
xiii
Technical Support
0
The individual you contact for technical support on the Point 510 pen tablet system depends on whether
you are a reseller or an end user/customer.
End users/customers: contact your Fujitsu reseller.
Fujitsu resellers (VARs): contact your assigned FPSI Systems Engineer or contact Fujitsu Personal
Systems Technical Support at 408-764-9388 during normal business days from 7:30 to 5:00 Pacific
Time. (Voice mail is available at this number during nonbusiness hours.) Technical support can also be
reached by Fax at 408-764-9418.
xiv
About This Guide
Chapter 1
System Software
This chapter outlines system software supported on the Point 510 pen tablet including operating system
software, drivers, and utilities.
Supported Operating Systems
1
The Point 510 pen tablet is distributed with one of the following operating systems preinstalled:
• Windows for Workgroups 3.11
• Windows 95 (Service Release 2)
Licensing and user documentation for the operating system installed on your system is also included
with the pen tablet. For details on the operating system, refer to the documentation provided, or refer to
the documents listed in “Related Documentation” in the About This Manual section of this guide.
Pen Support
1
Drivers developed by Fujitsu Personal Systems to support the pen tablet system under each supported
operating system are preinstalled on the Point 510 pen tablet. Pen drivers for each operating system are
discussed in the following sections.
Windows for Workgroups Pen Support
1
Pen drivers for Windows for Workgroups are included in Microsoft Pen Extensions 1.0. Pen Extensions
1.0 as provided with the Point 510 pen tablet includes the following files, developed by Fujistu Personal
Systems Inc., to support the Point 510 pen tablet specifically:
• VKPEND.386
This file is a virtual device driver for the pen.
• KPEN.DRV
This file is a pen device driver installed during system initialization.
Note:
• Drivers for Windows for Workgroups should not be used with Windows 95.
• MS-DOS drivers and MS-DOS applications for the Point 510 pen tablet are limited to configuration
utilities and drivers to support Windows for Workgroups. MS-DOS is not supported on the Point 510
pen tablet as a stand-alone operating system and user environment.
The following handwriting recognition software is preinstalled on Windows for Workgroups systems:
• CIC US Recognition Handwriter version 4 from Communication Intelligence Corporation (CIC)
This is the default handwriting recognition system selected for US English language systems.
• Microsoft Alphanumeric Recognition System
This is the default handwriting recognition system selected for French, German, Italian, and Spanish
language systems.
You can select either of these recognition systems, however, the default for your system’s language
version is recommended.
1-1
Windows 95 Pen Support
1
Pen drivers for Windows 95 are included in Microsoft Pen Services 2.0. Pen Services 2.0 as provided with
the Point 510 pen tablet includes several files developed by Microsoft plus the following files, developed
by Fujitsu Personal Systems Inc., to support the Point 510 pen tablet specifically:
• VPENDC.VXD
A virtual device driver for the pen.
• PENC.DRV
A pen device driver installed during system initialization.
• PENSAFE.DRV
A Safe Mode pen driver.
Note:
Drivers for Windows 95 should not be used with Windows for Workgroups.
Handwriting recognition software, HRS version 5 for Windows 95 from Communication Intelligence
Corporation (CIC), is preinstalled on Windows 95 systems.
PCMCIA and PC Card Support
1
PCMCIA and PC Cards are supported up to PCMCIA Standard release 2.1 for use with the Point 510 pen
tablet. Features designed to standards beyond this release level, such as CardBus, are not supported on
the Point 510 pen tablet.
Note:
Although your PC Card may be capable of using features designed to later standards, it might still
function satisfactorily at the PCMCIA Standard 2.1 release level. Contact your PC Card vendor and
refer to the documentation provided with your PC Card for specific details on your PC Card.
Windows 95 PC Card Support
1
System resources for PC Cards should be automatically configured by Windows 95.
Windows for Workgroups PC Card Support
PhoenixCard Manager version 4 card and socket services software from Phoenix Technologies, Ltd., is
preinstalled on Windows for Workgroups systems to enable the features of the system’s PC Card
controller and manage system resources for PC Cards such as ATA cards, flash memory, or SRAM cards
installed in the system’s PC Card slot.
When installing a PC Card in your system:
• Install the drivers and any desired application software that the PC Card manufacturer provides.
• Do not install any card and socket services software provided with your PC Card. (PhoenixCard
Manager card and socket services as preinstalled on the system will provide the necessary card and
socket services.)
Refer to the PhoenixCard Manager User’s Manual, described in “About This Manual,” for details on
PhoenixCard Manager.
1-2
System Software
1
Wireless LAN Support
1
Point 510 pen tablet systems equipped with an optional built-in wireless LAN adapter can be used in a
wireless LAN (local area network). Drivers and utilities required to support the wireless LAN adapter in
the Point 510 are shipped from the factory (on the pen tablet hard disk drive) in compressed format.
Before you can use your system in a wireless network, you must run the self-extracting file RF.EXE. To do
so,
1. Attach an external keyboard to your Point 510 pen tablet.
2. Restart your system in MS-DOS mode (or open an MS-DOS Prompt window).
3. Change the current directory to C:\WIRELESS.
4. Type the following command at the MS-DOS prompt. (You must use the -d option as shown below to
recreate the subdirectory structure.)
RF -d
5. Press Enter.
6. Read the file README.DOC in the C:\WIRELESS directory. This file contains information on the files
created in this procedure.
After the file expands, the following subdirectories are present in your C:\WIRELESS directory:
• WIN95NT
This directory contains the drivers needed to use your system in a wireless network if you are running
Windows 95 on your Point 510 pen tablet. Refer to the file README.DOC in this directory for details
on configuring your system for use in a wireless network. (Note that Windows NT is not supported on
the Point 510 pen tablet.)
• DOSOEM
This directory contains the drivers needed to use your system in a wireless network if you are running
Windows for Workgroups on your pen tablet. Refer to the file README.DOC in this directory for
details on configuring your system for use in a wireless network.
• WFWTCP
This directory contains the drivers needed to use TCP/IP over your wireless network if you are
running Windows for Workgroups on your pen tablet system. (These files are also available on the
Microsoft web site. Refer to the Microsoft web site for the latest information on these drivers.)
For more details on configuring your system for use in a wireless network, refer to the files referenced
above and refer to the system administration documentation for your wireless network server.
Wireless LAN Support
1-3
Overview of System Configuration Tools and Utilities
1
An overview of the configuration tools and utilities available for configuring the Point 510 is given in the
following. Unless otherwise noted, all of these utilities are preinstalled on the Point 510 pen tablet.
Instructions on using most of these programs are given later in this manual. (Related documentation is
referenced for utilities that are beyond the scope of this manual.)
• BIOS Setup
A BIOS configuration utility stored in the system’s ROM. (BIOS Setup is also referred to as PenSetup in
some related documentation.)
• Point 510 Setup
A Windows control panel application that allows you to configure BIOS options. This utility is
preinstalled on the Point 510 pen tablet and is also distributed with the Point 510 Developer Utilities
diskette in the following directory: \UTIL\POINT510.
• PM Setup
A power management configuration utility program for Windows. This utility is preinstalled on the
Point 510 pen tablet and is also distributed with the Point 510 Developer Utilities diskette in the
following directory: \UTIL\PMSET.
• PENSET51
A configuration utility that runs under MS-DOS with a command line interface or with it’s own
pen-aware user interface. This utility is preinstalled on the Point 510 pen tablet and is also distributed
with the Point 510 Developer Utilities diskette in the following directory: \UTIL\PENSET51.
• TranXit
A data transfer utility from Puma Technology provided primarily for transferring data over the
system’s IrDA, serial, and parallel ports. For details on using TranXit, refer to the TranXit Quick
Reference Guide included with the Point 510 pen tablet, TranXit Help, and the TranXit Readme file
C:\TRANXIT\RI\README.TXT. Note that the system’s IrDA port supports the Standard IR (SIR)
protocol. The Fast IR (FIR) protocol is not supported by the Point 510 pen tablet.
• MFG510
A configuration utility that runs under MS-DOS with a command line interface. This utility is often
run as part of a batch file to configure the system automatically using preselected parameters. This
utility is not preinstalled on the Point 510 pen tablet and is distributed with the Point 510 Developer
Utilities diskette in the following directory: \UTIL\MFGCONF. Note that this utility only affects
permanent BIOS settings.
1-4
System Software
Chapter 2
Configuring the Point 510 Pen Tablet System
This chapter provides instructions on how to use various configuration utilities developed to support the
Point 510 pen tablet.
About BIOS Settings
2
Some BIOS configuration utilities allow you to select permanent or current settings when configuring
some BIOS options. BIOS settings reside in the system’s CMOS memory. When the system is powered on,
BIOS settings are copied into the system’s dynamic memory and the system runs using BIOS parameters
stored in dynamic memory. Settings in dynamic memory are referred to as “current” settings and settings
stored in CMOS memory are referred to as “permanent” settings.
When you change a permanent setting, BIOS parameters stored in CMOS memory are changed and the
new setting is applied after the system is restarted. When you change a current setting, BIOS parameters
stored in dynamic memory are changed and the new setting is applied for the duration of the current
session. (A change to the current setting only remains in effect until the system is rebooted.)
Windows 95 Audit Mode
2
Windows 95 (as preinstalled on the Point 510 pen tablet) is preconfigured for the pen tablet system. The
first time the system is started, the User Information screen is displayed along with a series of “first-run”
screens for the end user to perform such tasks as entering User/Company name, Certificate of
Authenticity, and End User License Acceptance information. After this information is entered and the
system is shut down, the User Information and first-run screens are not displayed when the system is
started in subsequent sessions. Windows 95 allows you to bypass the first-run screens and run the system
in audit mode. In audit mode, you can change system configuration settings, perform additional system
checks and tests, and install hardware and software without altering the Windows 95 license agreement
and registration process that is performed only once when the system is started for the first time by the
end user.
2-1
To invoke audit mode, attach a keyboard to your system and perform the following steps:
1. Boot the system. When the User Information screen is displayed, press the key combination
CTRL-SHIFT-F3 on the keyboard. This displays a License screen. Choose Accept to continue. After you
accept the license, a menu of auditing options appears. The following auditing modes are available:
• Nonrestorative Auditing
In this mode, any changes you make to Windows during your audit session are retained after you
end your audit session. (Key system files such as the registry and AUTOEXEC.BAT are not
restored to their pre-audit state.) This is the auditing mode that you will most commonly use to
preconfigure the system before it reaches the end user.
• Partial Restorative Auditing
In this mode, key system files such as the registry and AUTOEXEC.BAT are restored to their
pre-audit state after you end your audit session. New files that you copy to the system remain on
the system after you end your audit session. This mode is useful for demonstration and test
purposes.
Note:
Your system must have an AUTOEXEC.BAT file in the C:\ (root) directory on the hard disk
drive to use Partial Restorative auditing mode. If this file does not exist on your system, an
error message indicating “The disk labeled root directory is now required...” will be displayed
when you attempt to use Partial Restorative auditing mode. If this occurs, you can shut down
and restart your system, perform this procedure again, and choose Nonrestorative Auditing.
Once you are in nonrestorative auditing mode, you can create an AUTOEXEC.BAT file if
desired to allow partial restorative auditing in your next audit session. (The AUTOEXEC.BAT
file can be an empty file.)
• Simulate End User Experience (Full Restorative Auditing)
In this mode, the entire system is fully restored to its pre-audit state after you end your audit
session. Any changes that you make to system files and any new files copied to the system are not
retained. This mode is most useful for performing extensive system checks including testing
software and hardware installation procedures.
2. Choose the desired auditing mode and tap OK. (Changes you make to Windows during the audit
session will be retained when you choose non-restorative auditing.)
3. When the Enter Windows Password screen is displayed, press Esc. (Do not enter a password.)
4. The system is now in audit mode. You can now make any desired changes to the system configuration,
install hardware, software, or perform system tests.
5. When you are finished auditing the system, tap the Shutdown button in the OEM Reset Reminder
dialog box.
The system is now shut down and Windows 95 software licensing screens will appear in their
first-time-run state when the system is started. Note that you can invoke audit mode as many times as
desired, however, once the Certificate of Authenticity information is entered, you can no longer invoke
audit mode. For further details on configuring Windows 95, refer to the documents listed in “Related
Documentation” in the About This Manual section of this guide.
BIOS Setup
2
BIOS Setup is a configuration utility that you can use to change your system’s permanent BIOS settings.
The BIOS Setup application is stored in ROM. Instructions for starting and running BIOS Setup are given
in the following discussions. (Note that BIOS Setup is also referred to as PenSetup in some related
documentation.)
2-2
Configuring the Point 510 Pen Tablet System
Starting BIOS Setup
2
To start BIOS Setup, restart your system and double-tap on the display screen or press F2 on an external
keyboard when the following message is displayed:
Double tap the pen (or press <F2>) to enter SETUP
When BIOS Setup starts, the Main menu is displayed.
Note that the system can be configured to start without displaying the messages described above. If this
is the case, you must attach an external keyboard and hold down the F2 key while you start your system
until the BIOS Setup screen is displayed.
Using BIOS Setup
2
Once BIOS Setup is started, you can use BIOS Setup to change your system’s BIOS settings. The BIOS
Setup screen consists of a menu bar, menu items, a command bar, and a window for item specific help as
shown in Figure 2-1.
BIOS Configuration Options
BIOS Configuration Settings
Item Specific Help Window
Menu Bar
(Triangle symbol indicates
submenu is available)
Command Bar
(Highlighted text indicates equivalent keyboard command)
Figure 2-1 BIOS Setup Screen
BIOS Setup
2-3
Instructions for selecting and changing BIOS options and navigating BIOS Setup menus using the pen or
external keyboard are given below:
• To select a BIOS Setup menu from the menu bar, tap on the right or left side of the Select Menu field
in the command bar, tap on the menu name in the menu bar, or use the right or left arrow keys on an
external keyboard to highlight the menu and display a list of menu options.
• To select a BIOS option, tap on the right or left side of the Select Item field in the command bar, tap on
the field for the BIOS setting (directly to the right of the BIOS configuration option name), or use the
up and down arrow keys on an external keyboard to highlight the option in the list of items for a given
menu.
• To change the setting of a selected BIOS option, tap on the right or left side of the Change Value field
in the command bar or tap directly on the setting field. You can also use the minus (-), plus (+), or
space keys on an external keyboard (as indicated by highlighted text in the command bar) to cycle
through the list of possible settings when the option is selected.
• To select and enter a submenu, tap twice on the submenu name or select the submenu using the up
and down arrow keys on an external keyboard and press Enter. (The Main and Advanced menus
contain submenus.)
• To exit submenus, tap Exit Submenu or press ESC on an external keyboard attached to your system.
• To view Item Specific Help for a BIOS option, select the option (as described previously) from the
options listed. Option specific help is displayed in the window on the right-hand side of the display
screen.
• To view the BIOS Setup Help screen, tap on Help in the command bar or press F1 on your external
keyboard. The BIOS Setup help screen is displayed giving general instructions for using BIOS Setup.
• To exit BIOS Setup, tap on Exit in the command bar or menu bar, or press the Esc key on an external
keyboard to select the Exit menu. From the Exit menu, choose the appropriate option. See “Exiting
BIOS Setup” later in this chapter for details.
• To load default settings for the currently selected menu, tap on Page Defaults in the command bar or
press F9 on an external keyboard.
• To load the last settings saved for a selected menu, tap on Last Page Saved in the command bar or
press F10 on an external keyboard.
• To load factory default settings for all BIOS options, select Load All Default Values in the Exit menu.
• To load the last settings saved for all BIOS options, select Load All Previous Values in the Exit menu.
Exiting BIOS Setup
Once you are finished making changes in BIOS Setup, you must save your changes and exit BIOS Setup
to apply your configuration changes. After you exit BIOS Setup, the system will restart using your new
BIOS settings.
To exit BIOS Setup, exit any submenu you are currently in, then select the Exit menu and choose the
appropriate option. The Exit menu includes options that allow you to load default BIOS settings,
previously saved BIOS settings, discard your changes, save your changes, and exit BIOS Setup. For
details on Exit menu options, see “BIOS Setup Exit Menu Options” later in this section.
Note:
2-4
Allow the system to boot after exiting BIOS Setup. If you turn the system off before the system boots,
your BIOS changes will not be loaded and you will need to run BIOS Setup again and configure the
system.
Configuring the Point 510 Pen Tablet System
2
BIOS Setup Main Menu Options
2
BIOS Setup Main menu options are given in Table 2-1. (Options and settings for other BIOS Setup menus
are described in the tables that follow. The default setting for each option is listed first when applicable.)
Table 2-1 Main Menu Options
Option
Settings
Description
System Time
00:00:00 to 23:59:59
Real Time Clock (RTC) setting in hours, minutes,
and seconds. Tap on the setting field to edit this
value. Note that the system time option uses a 24
hour format.
System Date
01/01/1980 to 12/31/2099
RTC calendar setting in month/day/year format. Tap
on the setting field to edit this value.
Diskette A:
1.44 MB, 3 1/2”
Not Installed
Floppy disk drive type for external floppy drive.
Selecting Not Installed will disable the floppy disk
drive port on your Point 510 connectivity peripheral.
IDE Hard Disk Drive
Submenu
(See “IDE Hard Disk Drive
Options” later in this section.)
Select this field to access IDE hard disk drive
submenu.
Expansion-slot1 Memory
EDO
Fast Page
Type of memory installed in expansion slot 1.
Expansion-slot2 Memory
EDO
Fast Page
Type of memory installed in expansion slot 2.
System Memory
XXX KB
Size of system memory. (The value displayed in this
field cannot be edited. This information is given to
provided information on the system’s configuration.)
Extended Memory
XXXX KB
Amount of extended memory. (The value displayed in
this field cannot be edited. This information is given
to provided information on the system’s
configuration.)
BIOS Setup
2-5
IDE Hard Disk Drive Submenu Options
2
Options and settings for the IDE Hard Disk Drive submenu are given in Table 2-2.
Table 2-2 IDE Hard Disk Drive Configuration Options
Option
Settings
Description
Show HDD Parameters
[Press Enter]
Tap [Press Enter] to display the hard disk drive’s
factory configuration settings.
HDD Configuration
Auto Detect
Disable HDD
User Defined
IDE hard disk drive configuration method.
Select Auto Detect to load configuration parameters
from the hard disk drive automatically.
Selecting User Defined allows you to manually enter
parameter values for the remaining options listed in
this table. (The size of the hard disk drive is also
displayed on this line when the hard disk drive is not
disabled.)
Note that Auto Detect is the recommended setting.
Entering incorrect geometry data in this menu can
cause your hard disk drive to be incorrectly formatted
and can cause data loss.
Cylinders
0 to 65535
Number of cylinders.
Heads
1 to 16
Number of read/write heads.
Sectors Per Track
0 to 63
Number of sectors per track.
Write Precomp
0 to 65534
None
Cylinder number at which write timing changes.
Multisector Transfers
Disabled
2 Sectors
4 Sectors
8 Sectors
16 Sectors
Number of sectors used in multisector transfers.
LBA Mode Control
Enabled
Disabled
Logical block address mode control.
Transfer Mode
Standard
Fast PIO 1
Fast PIO 2
Fast PIO 3
Determines the method for data transfers between
the hard disk drive and system memory.
2-6
Configuring the Point 510 Pen Tablet System
Integrated Peripherals Submenu Options (Accessed Through the Advanced Menu)
2
The Integrated Peripherals submenu is accessed through the Advanced menu. Configuration options for
the Integrated Peripherals submenu are given in Table 2-3. Note that some peripheral interfaces are only
available when using Point 510 connectivity peripherals.
Table 2-3 Integrated Peripherals Submenu Options
Option
Settings
Description
Serial Port A
3F8, IRQ 4
2F8, IRQ 3
3E8, IRQ 4
2E8, IRQ 3
3F8, IRQ 11
2F8, IRQ 10
3E8, IRQ 11
2E8, IRQ 10
Auto
Disabled
I/O address and IRQ setting for serial port A.
Choose Auto to configure the system to select the
I/O address and IRQ.
Serial Port B Device
IrDA
System Interface Port
I/O device for serial port B.
Select IrDA to assign serial port B to the IrDA port on
the system unit. Select System Interface Port to
assign serial port B to a peripheral device via the
System Interface Port.
Serial Port B
Disabled
3F8, IRQ 4
2F8, IRQ 3
3E8, IRQ 4
2E8, IRQ 3
3F8, IRQ 11
2F8, IRQ 10
3E8, IRQ 11
2E8, IRQ 10
Auto
I/O address and IRQ setting for serial port B.
Setting this option to Disabled will disable
serial port B.
Choose Auto to configure the system to select the
I/O address and IRQ.
(The setting selected for this option applies to serial
port B regardless of the Serial Port B Device setting.)
LPT Port
378, IRQ 7
3BC, IRQ 7
278, IRQ 5
378, IRQ 5
3BC, IRQ 5
Auto
Disabled
278, IRQ 7
I/O address and IRQ assignment for parallel port.
Choose Auto to allow the system to select the
I/O address and IRQ.
LPT Mode
ECP
Output Only
Bidirectional
Operational mode for parallel port.
Select ECP (Extended Capabilities Port), Output
Only (one-way communication from system to
parallel device), or Bidirectional (two-way
communication).
PC Card Controller Address
3E0
Auto
Disabled
I/O port address used by the PC Card (PCMCIA)
controller.
Choose Auto to configure the system to select the
I/O port address automatically.
BIOS Setup
2-7
Table 2-3 Integrated Peripherals Submenu Options (Continued)
Option
Settings
Description
Wireless LAN Base Address
Disabled
270
280
290
2A0
358
360
368
I/O port address assigned to the system’s built-in
wireless LAN adapter.
Note that this option applies only to systems
equipped with a wireless LAN adapter. Choose
Disabled if your system does not have a wireless
LAN adapter.
Wireless LAN IRQ
None
10
11
5
7
Interrupt Request (IRQ) level assigned to the
system’s built-in wireless LAN adapter. Select None
if your system is not equipped with a built-in wireless
LAN adapter.
Note that this option applies only to systems
equipped with a wireless LAN adapter. Choose None
if your system does not have a wireless LAN adapter.
Keyboard Hot Plug
Enabled
Disabled
Determines whether hot-plug capability is enabled
for the keyboard port. (Only Fujitsu low-power
keyboards are supported for hot-plug capability.)
Note that some devices that use the keyboard port,
such as bar-code scanners may require this option to
be set to Disabled.
Display
LCD
External Monitor
Selected display device.
Select the desired option: LCD (system unit display
screen) or External Monitor.
Note that using the Display Select hotpad will change
this setting.
Also note that simultaneous video (video displayed
on the LCD and an external monitor at the same
time) is not supported.
Expand VGA Screen
Disabled
Expanded Text
Enhanced Graphics/Text
This setting determines the screen area used in text
or graphics video mode. When Expanded Text is
selected, text mode screens are displayed using the
full screen. When Enhanced Graphics/Text is
chosen, text mode screens are displayed using
slightly less than the full screen area and graphics
mode screens using the full vertical screen area.
Note that this option only applies to your system if
your Windows display driver is set to 640X480 (VGA)
screen size.
2-8
Configuring the Point 510 Pen Tablet System
Audio Features Submenu Options (Accessed Through the Advanced Menu)
2
The Audio Features submenu is accessed through the Advanced menu in BIOS Setup. Options for the
Audio Features submenu are given in Table 2-4.
Table 2-4 Audio Features Options
Option
Settings
Description
Audio Base Address
220
230
240
250
Disabled
Base system address for audio controller. Select
Disabled to turn the audio controller off.
Audio FM Base Address
388
398
3A8
3B8
I/O port address for audio FM synthesizer.
Audio IRQ
5
7
9
10
IRQ assignment for audio system.
Audio DMA Channel
0
1
3
DMA channel assignment for audio system.
Speaker
On
Mute
System unit speaker setting.
Select Mute to turn the system unit speaker off. Note
that this setting also determines whether the head
phone or line out audio outputs are on or mute.
Security Menu Options
2
Security menu options for the Point 510 pen tablet are described in Table 2-5. Note that settings for some
security options determine whether other options are available.
Table 2-5 Security Menu Options
Option
Settings
Description
Set Supervisor Password
Press Enter
Specifying a supervisor password grants access to
all password protected Security menu options.
When a supervisor password is enabled and a user
password is used to enter BIOS Setup, the user
cannot access the following Security menu options:
Set Supervisor Password, Diskette Access, Fixed
Disk Boot Sector.
When enabled, a supervisor password (or user
password if used) is required to run BIOS Setup.
To disable the password, if one has been specified,
select Press Enter and enter a blank line when
prompted to type the new password.
Supervisor Password is
Enabled
Disabled
Indicates whether a supervisor password has been
specified. (This field cannot be changed directly. To
enable or disable the supervisor password, enter a
new password or clear the old password using the
Set Supervisor Password option.)
BIOS Setup
2-9
Table 2-5 Security Menu Options (Continued)
Option
Settings
Description
Set User Password
Press Enter
Specifying a user password grants access to the
following Security menu options only: User
Password, Password On Boot.
(When a supervisor password is enabled and a user
password is used to enter BIOS Setup, the user
cannot access the following Security menu options:
Set Supervisor Password, Diskette Access, Fixed
Disk Boot Sector.)
When enabled, a user (or supervisor) password is
required to run BIOS Setup.
Note that a supervisor password must be enabled
before a user password can be specified.
To disable the password, if one has been specified,
select Press Enter and enter a blank line when
prompted to type the new password.
User Password is
Enabled
Disabled
Indicates whether a user password has been
specified. (This field cannot be changed directly. To
enable or disable the user password, enter a new
password or clear the old password using the Set
User Password option.)
Password On Boot
Disabled
Enabled
Select Enabled to require a user or supervisor
password to boot the system. Note that a user or
supervisor password must be specified before this
option can be enabled. (When enabled, either a
supervisor or user password can be used to boot the
system.)
Diskette Access
All
Supervisor Only
Determines whether the external floppy disk drive is
accessible. Select Supervisor Only to allow diskette
access only after the system is started by entering a
supervisor password when the Password On Boot
option is enabled. If the Password On Boot option is
disabled, the floppy drive is not accessible when you
select Supervisor Only.
Fixed Disk Boot Sector
Normal
Write Protect
Determines whether the hard disk’s boot sector is
write protected. Note that this option is not
accessible if a user password is used to enter BIOS
Setup.
Caution
Do not select Write Protect on systems running
Windows 95. The Windows 95 operating system
must occasionally write to the boot sector. Select
Normal if your system runs Windows 95.
2-10
Configuring the Point 510 Pen Tablet System
Power Savings Menu Options
2
Options for the Power Savings menu are described in Table 2-6. Default settings for most options in the
this menu differ depending on the setting selected for the Power Savings option. The Option column in
Table 2-6 calls out the default setting for each option when the Max Performance and Max Battery Life
settings are selected.
Windows 95 users: Note that activity generated by disk drive timeout settings in Windows 95 Power
Properties may be detected by the BIOS as system activity and prevent the Suspend Timeout option from
working properly. To ensure proper operation, disable the disk drive timeouts in Windows 95 Power
Properties. To do so, open Power in Control Panel, select the Disk Drives tab in the Power Properties
window, and ensure that all disk drive low power mode options are disabled (unchecked).
Table 2-6 Power Savings Options
Option
Settings
Description
Power Savings
Max Performance
Max Battery Life
Off
Customize
Select Max Performance to configure the system to
use a power management profile designed for
maximum system performance. Select Max Battery
Life to use a power management profile designed to
maximize battery life. Select Customize to edit power
management BIOS options directly and create a
custom power management profile. Select Off to use
no power management (all devices remain fully on).
HDD Spin-down Timeout
(Max Performance default: 30
Seconds. Max Battery Life
default: 30 Seconds.)
5, 10, 30 Seconds
1, 2, 4, 6, 8, 10,
15, 20 minutes
Off
Determines the amount of time elapsed with no hard
disk drive activity before the hard disk drive is spun
down. Select Off to keep the hard disk fully powered
(always spinning) when the system is running. Note
that the hard disk drive is more vulnerable to shock
and vibration damage when it is spinning.
Video Timeout
(Max Performance default:
Off. Max Battery Life default:
30 Seconds.)
Off
30 seconds
1, 2, 4, 6, 8, 10,
15, or 20 minutes
When this timeout occurs, the display system
(including the backlight) is turned off.
Idle Mode Timeout
(Max Performance default:
Off. Max Battery Life default:
1/2 Second.)
Off
1/2 second
Enables or disables Idle mode. Select Off to Disable
Idle mode. Select 1/2 Second to enable idle mode.
When in idle mode, the CPU speed drops to the idle
mode CPU speed.
Standby Mode Timeout
(Max Performance default:
Off. Max Battery Life default: 1
Minute.)
Off
1, 2, 4, 6, 8, 12, 16, 20
minutes
Determines the amount of time elapsed with no
system activity before the system enters standby
mode.
Suspend Mode Timeout
(Max Performance default: 30
Minutes. Max Battery Life
default: 5 Minutes.)
5, 10, 15, 20, 30,
40, 60 Minutes
Off
Determines the amount of time elapsed with no
system activity before system operation is
suspended automatically.
Resume On Time
Off
On
Select On to configure your system to resume
operation at the time of day specified in the Resume
Time field.
Resume Time
XX:XX:XX
Determines time of day system will resume when the
Resume On Time option is On. Enter the time of day
in HH:MM:SS format. Note that the system uses a
24-hour clock.
BIOS Setup
2-11
Table 2-6 Power Savings Options (Continued)
Option
Power Button
Settings
Suspend/Resume
Power On/Off
Description
This setting determines the function of the Power
button on the system. Select Suspend/Resume to
configure the system to suspend or resume
operation when the Power button is pressed. Select
Power On/Off to configure the system to turn off or
on when the Power button is pressed.
Caution
To avoid accidental data loss from accidentally
pressing the Power button while the system is
running, choose Suspend/Resume for this option.
Boot Menu Options
2
Boot menu options are described in Table 2-7.
Table 2-7 Boot Menu Options
Option
Settings
Description
Boot Sequence
A: then C:
C: then A:
C: only
Determines the order that the systems searches
drives for a bootable image.
POST Errors
Enabled
Disabled
This setting determines whether the system stops
booting in the event of a Power On Self Test (POST)
error. Select Enabled to configure the system to stop
if a POST error occurs and display a message
prompting you to enter BIOS Setup. Select Disabled
to configure the system to continue attempting to
boot in the event of a POST error.
Setup Prompt
Enabled
Disabled
Determines whether the BIOS Setup prompt
messages are displayed when you start the system.
Select Enabled to display the messages. If Disabled
is selected, messages are not displayed.
Summary Screen
Enabled
Disabled
Determines whether a summary of the system’s
hardware configuration is displayed when you start
the system.
Numlock
Off
Auto
On
Determines the initial state of the keyboard Numlock.
Select Auto to turn on Numlock automatically if a
keyboard is connected when you start the system.
2-12
Configuring the Point 510 Pen Tablet System
BIOS Setup Exit Menu Options
2
Exit menu options are described in Table 2-8.
Table 2-8 Exit Menu Options
Option
Description
Save Changes and Exit
Exit after writing all changed BIOS Setup settings to
CMOS memory.
Discard Changes and Exit
Exit without saving changes to BIOS Setup settings
to CMOS memory.
Load All Default Values
Load default settings for all BIOS Setup options.
Load All Previous Values
Read previous settings from CMOS memory and
load in all BIOS Setup options.
Save Changes
Save BIOS changes to CMOS.
BIOS Setup
2-13
Using Point 510 Setup
2
Point 510 Setup is a control panel application that allows you to configure several BIOS options. To run
Point 510 Setup,
1. Open the Control Panel and double-tap on the Point 510 Setup icon shown here.
A series of tab property sheets listing options that you can configure is displayed.
2. Configure options on each property sheet as desired. Unless otherwise indicated on the property
sheet, all settings that you configure using Point 510 Setup affect permanent BIOS settings. For details
on options and settings on each property sheet, tap the Help button on the property sheet. Also note
that possible settings for these options are the same as the corresponding options in BIOS Setup. Refer
to the BIOS Setup options described earlier in this chapter for details on how settings for these options
affect your system.
3. Tap OK to apply your changes and exit Point 510 Setup when you are finished making changes. (You
can also tap Apply to apply your changes without exiting Point 510 Setup.)
4. Shutdown and restart the system to activate changes to permanent BIOS settings.
The system is now configured using changes you made with Point 510 Setup.
Using PM Setup
2
PM Setup is a power management application that runs under Windows. You use PM Setup to create
power management “profiles” that the system will use under different power conditions. You can create
a separate profile for each of the following power conditions:
• AC Mode
The system is connected to an external power source such as the AC adapter or auto adapter.
• Normal Battery Mode
The system is operating on battery power with greater than 10%* battery charge remaining.
• Low Battery Mode
The system is operating on battery power with 10%* or lower battery charge remaining.
*
The actual threshold (in terms of a percentage of battery charge) at which the system changes from
Normal to Low Battery mode may vary slightly.
If you create power management profiles using PM Setup, the profiles you create are used only while PM
Setup is running.
2-14
Configuring the Point 510 Pen Tablet System
Note:
• Windows for Workgroups users: Your system’s power settings must be set to Advanced or Standard
mode before power management profiles created in PM Setup are utilized. To do so, double-tap the
Power icon in the Control Panel and select Advanced or Standard in the Power Management field.
(If Standard is selected, the Suspend button in PM Setup is disabled and cannot be used to suspend
system operation. Suspend timeout features and the Suspend button on the pen tablet still function
normally however.)
• Windows 95 users: Activity generated by disk drive settings in Windows 95 Power Properties may be
detected by the BIOS as system activity and prevent the Suspend Timeout from working properly. To
ensure proper operation, disable the disk drive timeouts in Windows 95 Power Properties. To do so,
open Power in Control Panel, select the Disk Drives tab in the Power Properties window, and ensure
that all disk drive low power mode options are disabled (unchecked). Apply your changes and close the
Power Properties window when finished.
• Windows 95 users: Before power management settings in PM Setup can be utilized, Windows power
management must be enabled. To do so, ensure that the Allow Windows to manage power use on
this computer option is selected in the Power Properties Control Panel applet.
• The initialization file for PM Setup is PMSET51.INI. This file contains the initialization strings for
settings used in low battery mode and AC mode. (This file does not affect settings for normal mode as
settings for normal mode are stored directly in the BIOS. Also, this file is not designed to be edited
directly, however, it can be copied to a given system for the purpose of configuring the system.)
To use PM Setup,
1. Start PM Setup. To do so, choose one of the following:
• Windows 95 users: Double-tap the PM Setup icon (shown below) on your system desktop.
• Windows for Workgroups users: Open the Point 510 program group and double-tap the PM
Setup icon (shown below).
This runs the PM Setup program file PMSET51.EXE. (Note that this icon may be named Pmset51 or
Power Management depending on the version preinstalled on your system.)
When PM Setup is running, the PM Setup program bar is displayed. The PM Setup program bar
(shown here) is displayed as a Gauge icon that indicates the battery pack charge level remaining. A
Power Plug icon is displayed in the PM Setup program bar to indicate when the system is connected to
AC power.
(Less) Charge Remaining (More)
Gauge Icon
Power Plug Icon
2. To see the percent of full battery charge remaining displayed numerically, tap the Gauge icon to
position the cursor over the program bar.
Using PM Setup
2-15
3. Buttons that you can tap to perform various functions are hidden below the program bar. To see the
buttons, position the cursor just below the program bar. The buttons appear as shown here.
Help
Normal Battery Mode Settings
Low Battery Mode Settings
AC Mode Settings
Shutdown
Suspend
From left to right, these buttons perform the following functions and commands.
• Suspend
Tap on this button to suspend system operation. (Windows for Workgroups users: Note that if
Standard mode is selected in the Control Panel Power application, this button is disabled.)
• Shutdown
Tap on this button to shutdown and power off the system.
• AC Mode Settings
Tap on this button to display the AC Power Savings window. This window allows you to define
the power management profile used when an external power source is connected to the system.
• Low Battery Mode Settings
Tap on this button to display the Low Battery Power Savings window. This window allows you to
define the power management profile used when the system is running on battery power (no
external power is connected) and the battery charge is below 10%.
• Normal Battery Mode Settings
Tap on this button to display the Normal Battery Power Savings window. This window allows
you to define the power management profile used when the system is running on battery power
(no external power is connected) and the battery charge is 10% or higher.
• Help
Opens the PM Setup Help window.
4. Tap on the appropriate PM Setup button to perform the desired function or configure power
management settings.
For more details on how to use these functions and commands, see the appropriate topic in the PM Setup
Help window or tap the Help button in the PM Setup window that is currently displayed.
2-16
Configuring the Point 510 Pen Tablet System
Using PENSET51
2
PENSET51 is an MS-DOS program that allows you to configure BIOS settings using the command
PENSET51. You can run PENSET51 in one of two modes: menu mode or command line mode. Running
PENSET51 in menu mode displays options and settings in pen-active menu screens (nearly identical to
BIOS Setup).
To run PENSET51 in command line mode, you type the command PENSET51 followed by command line
options that specify the BIOS settings that you want to configure. When you press Enter, PENSET51
configures the BIOS settings and exits, returning you to the MS-DOS command line. (You can also create
a batch file containing PENSET51 commands that configures BIOS settings.)
PENSET51 supports the pen as an input device in menu mode. A keyboard is required to run PENSET51
from the MS-DOS command line. (Note that if a keyboard is unavailable, you can use the Windows
control panel applet Point 510 Setup to configure BIOS settings. See “Using Point 510 Setup” earlier in this
manual for details.)
Running PENSET51 in Menu Mode
2
To run PENSET51 in menu mode,
1. Start your system in MS-DOS mode. (Note that PENSET51 can be run in menu mode in an MS-DOS
box, however when you do so, you will not be able to use the pen. It is recommended that you restart
your system in MS-DOS mode to run PENSET51.)
2. Set the path to the directory C:\WINDOWS\COMMAND\POINT510.
3. Type PENSET51 and press Enter.
The Setup Program for Point 510 screen is displayed.
4. Tap on the menu bar at the top of the screen to navigate to the desired menus and change BIOS
settings.
Options for permanent and current settings are listed in separate columns. Most options are only
available for permanent BIOS settings. Note that changes to current settings will not take affect until
you exit PENSET51. Tap once directly on the settings to select the desired option. Tap again on the
selected setting to change the setting to the next value.
You can also use the arrow keys on an external keyboard to navigate to the desired option and press
the Space key or plus (+) key to increase the setting, or minus (-) key to decrease the setting.
Note that the command line syntax for the selected option is displayed at the bottom of the screen. For
more details on command line options, see “Running PENSET51 in Command Line Mode” later in this
section.
5. When you are finished making changes to the BIOS, choose Exit from the menu bar and tap on the
appropriate command (or select the command using the arrow keys on your keyboard and press
Enter).
Using PENSET51
2-17
Running PENSET51 in Command Line Mode
2
To run PENSET51 in command line mode,
1. Start your system in MS-DOS mode.
2. Set the path to the directory C:\WINDOWS\COMMAND\POINT510.
3. Type the command PENSET51 followed by the desired parameters using the following syntax,
PENSET51 [option=setting] [/P] [/C]
where option and setting are the mnemonic symbols for the desired PENSET51 parameters listed in
Table 2-9. (Brackets indicate that the parameter is optional.) Switches /P and /C allow you to specify
permanent or current BIOS settings respectively. You can specify several parameters on the same
command line. To do so, place a comma between each parameter. (Do not exceed the maximum
MS-DOS command length of 127 characters, including spaces.) For example, the following command
sets the display device to LCD for the current session and turns the speaker off in permanent BIOS
settings.
PENSET51 DISP=L/C, SPK=N
The /P or /C switch applies only to the immediately preceding setting in the command line. If you do
not type the /P or /C switch, the permanent BIOS setting is changed. (Note that the /P and /C
switches are mutually exclusive. Only one of these switches can be used per setting. Also, note that
some BIOS options can only be applied to permanent settings.)
4. When all desired options and settings are typed on the command line, press Enter to run PENSET51.
When the PENSET51 command is complete, the following message is displayed.
Configuration complete.
The following table lists PENSET51 parameters and the BIOS settings that they configure. These BIOS
options are the same as those for BIOS Setup. Refer to “BIOS Setup” earlier in this chapter for detailed
descriptions of corresponding BIOS options listed in this table.
Table 2-9 PENSET51 Command Line Parameters
2-18
Option
Setting
Function
Description
SEA
OFF
3F4
2F3
3E4
2E3
3F11
2F10
3E11
2E10
A
Disabled
3F8, IRQ4
2F8, IRQ3
3E8, IRQ4
2E8, IRQ3
3F8, IRQ11
2F8, IRQ10
3E8, IRQ11
2E8, IRQ10
Auto
Serial port A I/O address and interrupt
request (IRQ) setting. Specify A (Auto)
to configure the system to assign the I/O
address and IRQ automatically.
SPD
I
P
IrDA port
System interface port
Serial port B device
Configuring the Point 510 Pen Tablet System
Table 2-9 PENSET51 Command Line Parameters (Continued)
Option
Setting
Function
Description
SEB
OFF
3F4
2F3
3E4
2E3
3F11
2F10
3E11
2E10
A
Disabled
3F8, IRQ4
2F8, IRQ3
3E8, IRQ4
2E8, IRQ3
3F8, IRQ11
2F8, IRQ10
3E8, IRQ11
2E8, IRQ10
Auto
Serial port B I/O address and interrupt
request (IRQ) setting.
LPTP
OFF
377
277
377
3B7
275
375
3B5
A
Disabled
378, IRQ7
278, IRQ7
378, IRQ7
3BC, IRQ7
278, IRQ5
378, IRQ5
3BC, IRQ5
Auto
LPT port (Parallel port) I/O address and
interrupt request (IRQ) setting.
Select Auto to configure the system to
assign the I/O Address and IRQ
automatically.
LPTM
O
B
E
Output only
Bidirectional
ECP
LPT Mode
Determines operational mode for LPT
(parallel) port. Choose ECP (Extended
Capabilities Port), Output Only, or
Bidirectional depending on the mode
required for your peripheral device.
PCA
3
N
A
3E0
Disabled
Auto
PC Card Address
Determines the address assigned to the
PC Card slot. Select Auto to configure
the system to assign the address
automatically.
LADD
OFF
270
280
290
2A0
358
360
368
Disabled
270
280
290
2A0
358
360
368
LAN Address
Determines the I/O port address used for
the interface between the wireless LAN
adapter and the CPU. (This option
applies only to systems equipped with a
built-in wireless LAN adapter. Select
OFF if no wireless LAN adapter is
installed.)
Using PENSET51
2-19
Table 2-9 PENSET51 Command Line Parameters (Continued)
2-20
Option
Setting
Function
Description
LIRQ
N
10
11
5
7
None
10
11
5
7
LAN IRQ
Determines the IRQ assigned to the
wireless LAN adapter. (This option
applies only to systems equipped with a
built-in wireless LAN adapter.)
KB
Y
N
Enabled
Disabled
Keyboard Hot Plug
Enables hot-plug capability for the
keyboard port. When enabled, allows
the keyboard to be connected and
disconnected while the system is on.
(Only Fujitsu low-power (3-volt)
keyboards are supported for hot-plug
capability. Select Disabled if you are
using a 5-volt keyboard or a device other
than a low-power keyboard such as a bar
code scanner.
DISP
L
M
LCD
Monitor
Display Select (Video)
Determines whether the pen tablet LCD
or an external monitor is used as the
display device.
Note that using the Display Select
hotpad will change this setting.
EXP
D
T
EGT
Disabled
Expanded Text
Expanded Graphics and Text
Expand VGA Screen
ABA
220
230
240
250
N
I/O address 220
I/O address 230
I/O address 240
I/O address 250
Disabled
Audio Base Address
FMBA
388
398
3AB
3B8
I/O address 388
I/O address 398
I/O address 3AB
I/O address 3B8
Audio FM Base Address
AIRQ
5
7
9
10
IRQ 5
IRQ 7
IRQ 9
IRQ 10
Audio IRQ
ADMA
0
1
3
DMA Channel 0
DMA Channel 1
DMA Channel 3
Audio DMA Channel
Configuring the Point 510 Pen Tablet System
Table 2-9 PENSET51 Command Line Parameters (Continued)
Option
Setting
Function
Description
SPK
Y
N
On
Off (Mute)
Speaker
This parameter determines the speaker
setting at start up. Note that using the
Speaker hotpad will change this setting.
WPRT
N
W
Normal
Write Protect
Fixed Disk Boot Sector
PSM
O
C
P
B
Power management off
Customize
Maximum performance
Maximum battery life
Power Savings Mode
HDT
N
5S
10S
30S
1
2
4
6
8
10
15
20
Off (HDD does not spin down.)
5 seconds
10 seconds
30 seconds
1 minute
2 minutes
4 minutes
6 minutes
8 minutes
10 minutes
15 minutes
20 minutes
HDD Spin-Down Timeout
Note: The Power Savings Mode BIOS
option (PSM) must be set to Customize
before this option can be changed.
VDT
N
30S
1
2
4
6
8
10
15
20
Off (No video timeout set.)
30 seconds
1 minute
2 minutes
4 minutes
6 minutes
8 minutes
10 minutes
15 minutes
20 minutes
Video Timeout
Note: The power savings mode BIOS
option (PSM) must be set to Customize
before this option can be changed.
IDLE
N
Y
Off (No idle mode timeout set.)
1/2 second
Idle mode timeout
Note: The power savings mode BIOS
option (PSM) must be set to Customize
before this option can be changed.
Using PENSET51
2-21
Table 2-9 PENSET51 Command Line Parameters (Continued)
2-22
Option
Setting
Function
Description
SDY
N
1
2
4
6
8
12
16
20
Off (No standby timeout set.)
1 minute
2 minutes
4 minutes
6 minutes
8 minutes
12 minutes
16 minutes
20 minutes
Standby Mode Timeout
Note: The power savings mode BIOS
option (PSM) must be set to Customize
before this option can be changed.
SUST
N
5
10
15
20
30
40
60
Off (No suspend mode timeout set.)
5 minutes
10 minutes
15 minutes
20 minutes
30 minutes
40 minutes
60 minutes
Suspend Mode Timeout
Note: The power savings mode BIOS
option (PSM) must be set to Customize
before this option can be changed.
TIME
OFF
HH:MM:SS
Resume on time disabled.
Specify resume time in hours,
minutes, and seconds. (Note:
System uses a 24 hour clock.)
Resume On Time/Resume Time
Note that this command line option sets
two options that appear in menu mode
(Resume on Time and Resume Time).
PB
SR
OO
Suspend/Resume
On/Off
Power Button
BOOT
AC
CA
C
A: then C:
C: then A:
C: only
Boot Sequence
POST
N
Y
Disabled
Enabled
POST Errors
PRMPT
N
Y
Disabled
Enabled
SETUP Prompt
SUM
N
Y
Disabled
Enabled
Summary Screen
LOCK
A
N
Y
Auto
Off
On
Numlock
Configuring the Point 510 Pen Tablet System
Running MFG510
2
MFG510 is a BIOS configuration program for the Point 510 pen tablet that runs from the MS-DOS
command line. You run MFG510 by executing commands at the MS-DOS prompt. (You can also create a
batch file containing MFG510 commands that configures BIOS settings.)
Note that MFG510 is not preinstalled on the pen tablet system and is distributed with Point 510 Developer
Utilities software. MFG510 can only be used to change permanent BIOS settings.
To run MFG510,
1. Start your system in MS-DOS mode. (In most cases, you should run MFG510 from an MS-DOS
bootable diskette.)
2. Type the command MFG510 followed by the desired parameters using the following syntax,
MFG510 [option=setting]
where option and setting are the mnemonic symbols for the desired MFG510 parameters listed in Table
2-10. (Brackets indicate that the parameter is optional.) You can specify several parameters on the same
command line. To do so, place a comma between each parameter. (Do not exceed the maximum
MS-DOS command line length of 127 characters, including spaces.) For example, the following
command sets the display device to LCD and turns the speaker off.
MFG510 DISP=L, SPK=N
3. When all desired options and settings are typed on the command line, press Enter to run MFG510.
When the MFG510 command is complete, the following message is displayed:
Configuration complete.
Table 2-10 lists MFG510 parameters and the BIOS settings that they configure. To see a list of MFG510
parameters displayed on your system, type the command MFG510 and press Return (without specifying
any parameters). These BIOS options are the same as those described earlier for BIOS Setup. Refer to
“BIOS Setup” earlier in this chapter for detailed descriptions of corresponding BIOS options listed in this
table. (You may notice that some of these parameters are the same as those for PENSET51.)
Table 2-10 MFG510 Parameters
Option
Setting
Function
Description
DSKA
OFF
144
Disabled
1.44MB, 3.5” disk drive enabled
Diskette A:
SEA
OFF
3F4
2F3
3E4
2E3
3F11
2F10
3E11
2E10
A
Disabled
3F8, IRQ4
2F8, IRQ3
3E8, IRQ4
2E8, IRQ3
3F8, IRQ11
2F8, IRQ10
3E8, IRQ11
2E8, IRQ10
Auto
Serial port A I/O address and interrupt
request (IRQ) setting. Specify A (Auto)
to configure the system to assign the I/O
address and IRQ automatically.
Running MFG510
2-23
Table 2-10 MFG510 Parameters (Continued)
2-24
Option
Setting
Function
Description
SPD
I
P
IrDA port
System interface port
Serial port B device
SEB
OFF
3F4
2F3
3E4
2E3
3F11
2F10
3E11
2E10
A
Disabled
3F8, IRQ4
2F8, IRQ3
3E8, IRQ4
2E8, IRQ3
3F8, IRQ11
2F8, IRQ10
3E8, IRQ11
2E8, IRQ10
Auto
Serial port B I/O address and interrupt
request (IRQ) setting.
LPTP
OFF
377
277
377
3B7
275
375
3B5
A
Disabled
378, IRQ7
278, IRQ7
378, IRQ7
3BC, IRQ7
278, IRQ5
378, IRQ5
3BC, IRQ5
Auto
LPT port (Parallel port) I/O address and
interrupt request (IRQ) setting.
Select Auto to configure the system to
assign the I/O Address and IRQ
automatically.
LPTM
O
B
E
Output only
Bidirectional
ECP
LPT Mode
Determines operational mode for LPT
(parallel) port. Choose ECP (Extended
Capabilities Port), Output Only, or
Bidirectional depending on the mode
required for your peripheral device.
PCA
3
N
A
3E0
Disabled
Auto
PC Card Address
Determines the address assigned to the
PC Card slot. Select Auto to configure
the system to assign the address
automatically.
LADD
OFF
270
280
290
2A0
358
360
368
Disabled
270
280
290
2A0
358
360
368
LAN Address
Determines the I/O port address used
for the interface between the wireless
LAN adapter and the CPU. (This option
applies only to systems equipped with a
built-in wireless LAN adapter. Select
Disabled if your system is not equipped
with a built-in wireless LAN adapter.)
Configuring the Point 510 Pen Tablet System
Table 2-10 MFG510 Parameters (Continued)
Option
Setting
Function
Description
LIRQ
N
10
11
5
7
None
10
11
5
7
LAN IRQ
Determines the IRQ assigned to the
wireless LAN adapter. (This option
applies only to systems equipped with a
built-in wireless LAN adapter.)
KB
Y
N
Enabled
Disabled
Keyboard Hot Plug
Enables hot-plug capability for the
keyboard port. When enabled, allows
the keyboard to be connected and
disconnected while the system is on.
(Only Fujitsu low-power (3-volt)
keyboards are supported for hot-plug
capability.)
DISP
L
M
LCD
Monitor
Display select (Video)
Determines whether the pen tablet LCD
or an external monitor is used as the
display device.
Note that using the Display Select
hotpad will change this setting.
EXP
D
T
EGT
Disabled
Expanded Text
Expanded Graphics and Text
Expand VGA Screen
MEM1
F
E
Fast Page
EDO
Expansion Slot 1 Memory Type
MEM2
F
E
Fast Page
EDO
Expansion Slot 2 Memory Type
ABA
220
230
240
250
N
I/O address 220
I/O address 230
I/O address 240
I/O address 250
Disabled
Audio Base Address
FMBA
388
398
3AB
3B8
I/O address 388
I/O address 398
I/O address 3AB
I/O address 3B8
Audio FM Base Address
AIRQ
5
7
9
10
IRQ 5
IRQ 7
IRQ 9
IRQ 10
Audio IRQ
Running MFG510
2-25
Table 2-10 MFG510 Parameters (Continued)
2-26
Option
Setting
Function
Description
ADMA
0
1
3
DMA Channel 0
DMA Channel 1
DMA Channel 3
Audio DMA Channel
SPK
Y
N
On
Off (Mute)
Speaker
This parameter determines the speaker
setting at start up. Note that using the
Speaker hotpad will change this setting.
WPRT
N
W
Normal
Write Protect
Fixed Disk Boot Sector
PSM
O
C
P
B
Power management off
Customize
Maximum performance
Maximum battery life
Power Savings Mode
HDT
N
5S
10S
30S
1
2
4
6
8
10
15
20
Off (HDD does not spin down.)
5 seconds
10 seconds
30 seconds
1 minute
2 minutes
4 minutes
6 minutes
8 minutes
10 minutes
15 minutes
20 minutes
HDD Spin-Down Timeout
Note: The Power Savings Mode BIOS
option (PSM) must be set to Customize
before this option can be changed.
VDT
N
30S
1
2
4
6
8
10
15
20
Off (No video timeout set.)
30 seconds
1 minute
2 minutes
4 minutes
6 minutes
8 minutes
10 minutes
15 minutes
20 minutes
Video Timeout
Note: The power savings mode BIOS
option (PSM) must be set to Customize
before this option can be changed.
IDLE
N
Y
Off (No idle mode timeout set.)
1/2 second
Idle mode timeout
Note: The power savings mode BIOS
option (PSM) must be set to Customize
before this option can be changed.
Configuring the Point 510 Pen Tablet System
Table 2-10 MFG510 Parameters (Continued)
Option
Setting
Function
Description
SDY
N
1
2
4
6
8
12
16
20
Off (No standby timeout set.)
1 minute
2 minutes
4 minutes
6 minutes
8 minutes
12 minutes
16 minutes
20 minutes
Standby Mode Timeout
Note: The power savings mode BIOS
option (PSM) must be set to Customize
before this option can be changed.
SUST
N
5
10
15
20
30
40
60
Off (No suspend mode timeout set.)
5 minutes
10 minutes
15 minutes
20 minutes
30 minutes
40 minutes
60 minutes
Suspend Mode Timeout
Note: The power savings mode BIOS
option (PSM) must be set to Customize
before this option can be changed.
TIME
OFF
HH:MM:SS
Resume on time disabled.
Specify resume time in hours,
minutes, and seconds. (Note:
System uses a 24 hour clock.)
Resume On Time/Resume Time
Note that this command line option sets
two options that appear in menu mode
(Resume on Time and Resume Time).
PB
SR
OO
Suspend/Resume
On/Off
Power Button
BOOT
AC
CA
C
A: then C:
C: then A:
C: only
Boot Sequence
POST
N
Y
Disabled
Enabled
POST Errors
PRMPT
N
Y
Disabled
Enabled
SETUP Prompt
SUM
N
Y
Disabled
Enabled
Summary Screen
Running MFG510
2-27
Table 2-10 MFG510 Parameters (Continued)
2-28
Option
Setting
Function
Description
LOCK
A
N
Y
Auto
Off
On
Numlock
DSKC
N
A
Disable hard disk drive
Auto detect hard disk drive
HDD Configuration
Note that hard disk drive geometry
parameters cannot be specified directly
using MFG510.
Configuring the Point 510 Pen Tablet System
Chapter 3
Pen Tablet Hardware Features
This chapter provides an introduction to the Point 510 pen tablet system hardware and gives an overview
on some of the pen tablet system’s features. For detailed information on the features introduced in this
chapter, refer to the other chapters of this guide.
Pen Tablet Features
3
The Point 510 pen tablet computer is designed for the Windows 95 operating system using IBM-AT
compatible architecture and also supports Windows for Workgroups. Some hardware features of the pen
tablet system include:
•
•
•
•
•
•
Resistive digitizer
SVGA DSTN Color display
Lithium ion battery pack
Optional built-in wireless LAN adapter
One Type II/III PC Card slot which supports the PC Card Standard Release 2.1
Soundblaster Pro compatible audio with built-in microphone and speaker
Connectivity Peripherals
3
A number of peripherals are available for use with the Point 510 pen tablet system. Peripherals designed
specifically for the Point 510 pen tablet are grouped under the term Point 510 connectivity peripherals. The
following list describes each connectivity peripheral available for use with the Point 510 pen tablet.
Components that comprise Point 510 connectivity peripherals are shipped unassembled. Refer to the
Point 510 Connectivity Peripherals Installation Guide for directions on assembling and installing these
components.
• Portable Port Expander
This connectivity peripheral provides the following ports: floppy disk drive port, video port, parallel
port, serial port A, serial port B (Rx/Tx only), and PS/2-style mouse port.
• Wall-Mount Cradle
The wall-mount cradle provides a convenient place to store the pen tablet or input data with a
keyboard and connect to DC power. This cradle provides a PS/2-style keyboard port and DC power.
• High-Usage Cradle
This cradle is designed for use on a desk or counter top and provides the following ports: PS/2-style
keyboard port, PS/2-style mouse port, and DC power input.
• High-Connectivity Cradle
This cradle is designed for use on a desk or counter top and provides the following ports: PS/2-style
keyboard port, PS/2-style mouse port, DC power input, floppy disk drive port, video port, parallel
port, serial port A, serial port B (Rx/Tx only).
3-1
• Port Replicator
This connectivity peripheral provides the following ports: PS/2-style keyboard port, PS/2-style
mouse port, DC power input, floppy disk drive port, video port, parallel port, serial port A, serial port
B (Rx/Tx only).
• Charge-Only Cradle
This connectivity peripheral is a desktop cradle that provides external DC power via the pen tablet’s
high-usage contacts.
3-2
Pen Tablet Hardware Features
Chapter 4
Installing System Components
This chapter provides procedures on installing PC Cards, DIMM cards, and replacing the system’s hard
disk drive.
Installing a PC Card
4
The Point 510 pen tablet has a PC Card slot that allows you to install a Type II or Type III PC Card. You
can install a PC Card while the system is running, when the system is off, or when system operation is
suspended. To install a PC Card,
1. Choose one of the following:
• If your PC Card has external connectors, cables, or antennas, close the PC Card door and insert
the PC card into the desired slot by inserting it through the shutters in the PC Card door.
• If your PC Card does not have any external attachments, open the PC Card door and insert the
PC Card into the PC Card slot. Figure 4-1 shows the location of the PC Card slot and PC Card
Door.
PC Card Slot
Eject Button
PC Card Door
Figure 4-1 PC Card Slot
2. Push the PC Card into the slot until it is seated. The PC Card is recognized by the system when (or if)
the system is running.
3. If necessary, close the PC Card door.
4. If necessary, install any driver or application software necessary to use your PC Card. Do not,
however, install any Card Services or Socket Services software provided with your PC Card. Card and
Socket Services software is preinstalled on the pen tablet system.
The PC Card is now installed and you should be able to use the PC Card with your system.
4-1
Removing a PC Card
4
To remove a PC Card,
1. Stop the PC Card using the appropriate features of your operating system.
2. Ensure that the system is either running or has been shut down.
Note:
Removing a PC Card while system operation is suspended is not recommended as the system may hang
when operation is resumed.
3. Choose one of the following:
• If your PC Card does not have any external attachments, or such attachments can be removed,
remove any external cables or other attachments from the PC Card, open the PC Card door and
press the Eject button for the PC Card slot.
• If your PC Card has external attachments such as connectors, cables, or antennas which cannot be
removed and prevent you from opening the PC Card door, remove the PC Card by pulling the
card out by whatever external attachment is available.
4. Pull the PC Card all the way out of the slot.
5. If necessary, close the PC Card door.
Installing DIMM Cards
4
The Point 510 pen tablet has 2 DIMM slots that allow you to install up to 48 MB additional memory for a
total of 56 MB (including 8 MB built-in memory on the system board). Table 4-1 shows the possible
configurations for DIMMs installed in slots 1 and 2, and the amount of additional memory for each.
Note:
Two 32 MB DIMMs can be installed, however, only a total of 56 MB will be recognized and used by the
system.
Table 4-1 DIMM Configurations
System Board
(Built In)
DIMM Slot 1
DIMM Slot 2
Total Memory
8 MB
none
none
8 MB
8 MB
8 MB
none
16 MB
8 MB
8 MB
8 MB
24 MB
8 MB
16 MB
none
24 MB
8 MB
16 MB
8 MB
32 MB
8 MB
16 MB
16 MB
40 MB
8 MB
32 MB
none
40 MB
8 MB
32 MB
8 MB
48 MB
8 MB
32 MB
16 MB
56 MB
This table is intended to show the DIMMs required to install the desired
amount of additional memory. Either DIMM slot can be used to install a single
DIMM. Also, the larger of two DIMMs can be installed in either slot 1 or slot 2.
4-2
Installing System Components
To install DIMMs in the Point 510 pen tablet,
1. Run BIOS Setup and configure the system for the type of memory you intend to install. To do so, in the
BIOS Setup Main menu, choose either EDO or Fast Page for the Expansion-slot 1 Memory option and
Expansion-slot 2 Memory option. You can install either EDO- or Fast Page-type memory in either slot.
(A combination of EDO- and Fast Page-type memory is allowable as long as the appropriate type is
selected for the respective slot.)
2. Shut down the pen tablet. To do so, choose one of the following:
• Windows for Workgroups users: Close Program Manager and choose Power Down from the
Exit Windows dialog box.
• Windows 95 users: Choose Shut Down from the Start menu and carry out the Shut Down
command.
Caution
Follow ESD handling precautions when performing this
procedure.
• Handle DIMM cards by the edges.
• Avoid touching components or connectors on the DIMM
card or the pen tablet’s circuit board.
3. Remove the screw from the cover plate on the back of the pen tablet and remove the cover plate shown
in Figure 4-2.
DIMM Cover Plate
Screw
Figure 4-2 DIMM Cover Plate
Installing DIMM Cards
4-3
4. Insert your DIMM card (or cards) in the desired DIMM slot. To do so, insert the DIMM at an angle and
push it down until it locks into place. Note that the DIMM card is keyed to prevent it from being
inserted backwards. Figure 4-3 shows the location of the DIMM slots.
DIMM Slot 1
DIMM Slot 2
Figure 4-3 Installing DIMM Cards
If you are installing a combination of EDO- and Fast Page-type DIMMs, ensure that you are installing
the correct type in each slot (as configured in step 1).
5. Reinstall the cover and screw that you removed in step 2 of this procedure.
6. Confirm that the additional memory is recognized by the system. To do so, run BIOS Setup. The sum
of the two amounts displayed for System Memory and Extended Memory in the Main menu is the
total amount of memory installed (including the 8 MB built into the system).
You can now use the system.
Removing DIMM Cards
4
To remove a DIMM card,
1. Shut down the pen tablet. To do so, choose one of the following:
• Windows for Workgroups users: Close Program Manager and choose Power Down from the
Exit Windows dialog box.
• Windows 95 users: Choose Shut Down from the Start menu and carry out the Shut Down
command.
Caution
Follow ESD handling precautions when performing this
procedure.
• Handle DIMM cards by the edges.
• Avoid touching components or connectors on the DIMM
card or the pen tablet’s circuit board.
2. Remove the screw from the cover plate on the back of the pen tablet and remove the cover plate as
shown in Figure 4-2.
3. Spread the fingers on the socket that lock the DIMM card in place until the DIMM card is loose.
4. Remove the DIMM card from the slot.
4-4
Installing System Components
5. Reinstall the cover plate and screw. (See “Installing DIMM Cards” earlier in this chapter if you are
installing a new DIMM card.)
Replacing the Hard Disk Drive
4
The hard disk drive in the Point 510 pen tablet can be removed and replaced if necessary. The following
instructions provide details on removing and installing the hard disk drive assembly in the Point 510 pen
tablet.
Caution
The hard disk drive is enclosed in the hard disk drive
assembly. Do not attempt to disassemble the hard disk drive
assembly. Doing so voids the warranty and may damage
sensitive components in the assembly.
1. Shut down the pen tablet. To do so, choose one of the following:
• Windows for Workgroups users: Close Program Manager and choose Power Down from the
Exit Windows dialog box.
• Windows 95 users: Choose Shut Down from the Start menu and carry out the Shut Down
command.
2. Remove the screw from the hard disk drive cover plate as shown in Figure 4-4. Remove the hard disk
drive cover plate by sliding the cover up as shown in Figure 4-5.
Screw
Hard Disk Drive
Cover Plate
Figure 4-4 Hard Disk Drive Cover Plate
Replacing the Hard Disk Drive
4-5
3. Open the latch lever on the hard disk drive assembly in the pen tablet by unsnapping it and folding it
away from the hard disk drive assembly as shown in Figure 4-5. (The latch lever is designed to snap
into the closed or detained position to prevent the drive from vibrating.)
Latch Lever
Unlock
Slide latch to
lock or unlock
hard disk drive
assembly.
Lock
Latch
Figure 4-5 Hard Disk Drive Latch
4. Using the latch lever, slide the latch to the unlocked position.
5. Grasp the latch lever and pull the hard disk drive out of the pen tablet as shown in Figure 4-6.
Figure 4-6 Removing Hard Disk Drive
To install the new hard disk drive assembly, ensure that the latch on the new assembly is in the unlocked
position, and perform this procedure in reverse. (Note that the metal cover on the hard disk drive
assembly must be facing towards the display. Also, the latch must be in the locked position to install the
cover plate.)
4-6
Installing System Components
Chapter 5
Specifications
Specifications for the Point 510 pen tablet are given in this chapter. Note that several of the features listed
in this chapter are further described elsewhere in this manual.
Main System Logic Specifications
5
Specifications for the core system and logic components are given in Table 5-1.
Table 5-1 Logic System Specifications
Feature
Specification
Comments
Microprocessor
AMD 5x86 100 MHz
16 KB write-back cache
Cache
Level 1 (L1) cache: 16 KB, built into CPU
Cache is always enabled.
ROM
256 KB
Flash BIOS
RAM
8 MB on main PCB.
3.3-Volts EDO DRAM
DIMM Slots
(2) 72-pin DIMM slots
The following EDO DIMMs are available from
Fujitsu Personal Systems:
Up to 48 MB can be installed in the DIMM
slots for a total of 56 MB system memory.
DIMMs must meet the following requirements:
•
•
•
•
VGA Controller*
Type: EDO or Fast Page Mode
Access speed: 70 ns or faster
Voltage: 3.3 Volts
Refresh: Slow refresh
65548, Chips and Technologies
• 8 MB EDO DIMM (FMW26EM8)
• 16 MB EDO DIMM (FMW26EM16)
• 32 MB EDO DIMM (FMW26EM32)
See “Installing DIMM Cards” in Chapter 4 of
this manual for details on adding memory.
VGA compatible controller with graphics
accelerator.
VESA local bus.
I/O Controller*
PC87336, National Semiconductor
Controller for: serial ports, parallel port, IrDA
port, and floppy disk drive.
PCMCIA Controller*
RF5C296, Ricoh
Supports PCMCIA Standard Revision 2.1
Audio Controller*
ES1688Q, ESS Technology, Inc.
16-bit stereo up to 44.1 KHz sampling rate.
Full Plug and Play (PnP) capability.
* To order specifications on integrated circuits used in the Point 510 pen tablet, contact the manufacturer of the
specific IC. See “Other Related Specifications” in the “About This Guide” section of this manual for a list of IC
manufacturers’ addresses and phone numbers.
5-1
Display Specifications
5
Specifications for the Point 510 pen tablet display are given in Table 5-2.
Table 5-2 Display Specifications
Feature
Specification
Comments
Display Type
SVGA DSTN color LCD
Backlit
Size
10.4 in (264 mm) diagonal
Usable display area.
Resolution
0.26 mm dot pitch
1:1 aspect ratio
800 x 600 SVGA resolution
Up to 256 Colors
Compatible with 640 x 480 VGA resolution.
External Video Capabilities
5
The Point 510 pen tablet can drive an external video monitor (with the use of a connectivity peripheral
that provides a video port). You can select an external monitor or the pen tablet display screen as the
active video display, however, simultaneous external monitor operation with the pen tablet display is not
supported.
The pen tablet supports VGA, SVGA, and XGA video modes with external monitors. Screen resolutions
supported for external video monitors are given in Table 5-3. For pin assignments on the video port
connector, see “Video Port” in Chapter 6 of this manual.
Table 5-3 Video Modes for External Monitor
Resolution
Colors
640 x 480 (VGA)
Up to 16M
800 x 600 (SVGA)
Up to 64K
1024 x 768 (XGA)
Up to 256
The video controller supports fixed frequency and variable frequency analog monitors in interlaced and
non-interlaced modes of operation.
Note:
5-2
The pen digitizer does not map to resolutions higher than 800 x 600. If the system’s display resolution
has been changed to use an external monitor and you now want to use the pen as an input device, you
must change the resolution back to 800 x 600 (or 640 x 480 for VGA mode) for proper operation. A
mouse can be used as an alternate input device at any selected display resolution.
Specifications
Digitizer Specifications
5
The Point 510 pen tablet uses a resistive digitizer. When the pen touches the screen, a conductive
membrane contacts another conductive plane and determines the location of the pen. Table 5-4 shows the
digitizer specifications.
Note:
The digitizer system is designed for use with the pen. Although you can use your finger nail in the same
manner as a pen, the digitizer system is not intended to be used as a “touch screen”.
Table 5-4 Digitizer Specifications
Feature
Description
Surface
Non-glare
Resolution
493 DPI (horizontal)
657 DPI (vertical)
Sampling Rate
100 points per second
Wireless LAN Adapter Specifications
5
Specifications for the optional wireless LAN adapter in the Point 510 pen tablet are shown in Table 5-5.
Table 5-5 Wireless LAN Adapter Specifications
Feature
Description
Radio Module
Proxim RangeLAN2 mini ISA card
System Range*
Up to 500 feet in offices and up to 1000 feet
in open spaces.
Frequency Range
2.4 - 2.4835 GHz
Data Rate
1.6 Mbps (main)
800 Kbps (backoff mode)
Antenna
1.9 in (48 mm) flexible rubber
LAN Software Compatibility
Novell NetWare 2.x, 3.x, or 4.x
Personal NetWare
Microsoft Peer-to-Peer and Client/Server
Drivers
ODI, NDIS (including support for
Windows 95)
* Range will vary depending on the physical characteristics of the environment.
Digitizer Specifications
5-3
Pen Tablet Peripheral Interface Specifications
5
Specifications for peripheral interfaces on the Point 510 pen tablet are given in Table 5-6.
For pin assignments on these connectors refer to Chapter 6. (Connectors on the pen tablet have the same
pin assignments as corresponding connectors on connectivity peripherals.)
Note:
Table 5-6 Pen Tablet Peripheral Interface Specifications
Feature
PCMCIA Slot
Specification
One PCMCIA slot
Comments
System accepts one Type I, Type II, or Type
III PC Card.
Compliant with PCMCIA Standard Rev. 2.1
Hard Disk Drive Slot
Supports 1 IDE hard disk drive
IDE hard disk drive is enclosed in removable
module.
Keyboard Port
6-pin PS/2-style
Supports Fujitsu low-power 3.3-Volt
keyboard and most PS/2-style keyboards.
Serial Port A
RS-232C, female 9-pin D connector.
NS 16C550 compatible, fully functional
RS-232C serial port.
IrDA Port
Infrared LED built into pen tablet.
Compliant with IrDA Standard Revision 1.0
Data rate: up to 115 Kbps
Range: approximately 1 M
DC power input
16 VDC ± 10%, 2.7 A
Connector type: EIAJ RC-5320A Type 5
power connector
Serial port B can be assigned to either the
IrDA port on pen tablet or the 9-pin RS-232C
serial port B connector (Rx/Tx only) on the
port replicator. The IrDA port is disabled
when 9-pin connector is selected for the
serial port B device.
For use with FMWAC4A, FMWAC4B, and
FMWAC4C AC adapters (AC adapter
module CA01007-0520) or FMWCB2 auto
adapter (CA01007-0360).
Connector vendor: Hosiden (part number
HEC3900-01-010)
Headphone Jack
3.5 mm 3-pole miniature jack for stereo
headphone
For use with headphones meeting the
following specifications:
• Impedance: 16 ohms
• Power rating: 100 mW (or higher)
• Plug: 3.5 mm mini stereo
Microphone Jack
3.5 mm 2-pole mini jack for use with mono
microphone
For use with microphone meeting the
following recommended specifications:
•
•
•
•
Type: dynamic or electret condenser
Sensitivity: -60 dB per octave
Impedance: 600 ohm or higher
Plug: 3.5 mm mini mono
High-Usage
Contacts
11 metal surface contacts provide: DC power
input, PS/2-style keyboard port signals, PS/
2-style mouse port signals.
For use with connectivity peripherals.
System Interface
Port
120-pin, 4-row, shielded plug
Mates with connector (Molex part number
52758-1200) on connectivity peripherals.
Connector: Molex part number 52755-1200
5-4
Specifications
Connectivity Peripherals Interface Specifications
5
Specifications for interfaces on connectivity peripherals designed for use with the Point 510 pen tablet are
given in Table 5-7. For pin assignments on peripheral interfaces provided by Point 510 connectivity
peripherals, refer to Chapter 6. Note that not all connectivity peripherals are equipped with all of these
interfaces. Refer to the Point 510 Connectivity Peripherals Installation Guide for details as to which interfaces
your connectivity peripheral provides.
Table 5-7 Connectivity Peripherals Interface Specifications
Feature
Specification
Keyboard Port
6-pin PS/2-style keyboard port
Mouse Port*
6-pin PS/2-style mouse port
DC power input
16 VDC ±10%, 2.7 A
Connector type: EIAJ RC-5320A Type 5
power connector
Comments
Supports Fujitsu low-power 3.3-Volt
keyboard and most PS/2-style keyboards.
For use with FMWAC4A, FMWAC4B, and
FMWAC4C AC adapters (AC adapter
module CA01007-0520) or FMWCB2 auto
adapter (CA01007-0360).
Connector vendor: Hosiden (part number
HEC3900-01-010)
Serial Port A
RS-232C, female 9-pin D connector
NS 16C550 compatible, fully functional
RS-232C serial port
Serial Port B*
RS-232C, female 9-pin D connector
Rx/Tx only
The Serial Port B Device option must be set
to System Interface Port and the Serial Port
B option must be enabled in BIOS Setup to
use Serial Port B on connectivity peripherals.
Floppy Disk Drive
Port*
26-pin connector for use with Fujitsu
FMWFD2 floppy disk drive
Parallel Port*
25-pin D connector, female
Operational modes: ECP, output only,
bidirectional.
Video Port*
Standard 15-pin video connector for use with
external monitor
External monitor and pen tablet LCD
simultaneous operation not supported.
* These ports are not built into the pen tablet.
Connectivity Peripherals Interface Specifications
5-5
Power System Specifications
5
Specifications for the Point 510 pen tablet power system are given in Table 5-8. The power system and
power management characteristics are further described in Chapter 7.
Table 5-8 Power System Specifications
Feature
Specification
Power management
Supports Intel and Microsoft APM (Advanced
Power Management) Revision 1.2
Battery pack
FMW26BP1
Capacity: 2700 mAh
Comments
Battery life will vary depending upon usage.
Type: lithium ion
Number of cells: 6
Nominal operating voltage: 10.8 V
Battery life: 4 hours typical
Charge time (battery pack in pen tablet with
AC adapter connected):
3 hours (in suspend or off mode)
3 hours (system running)
Bridge battery
Type: nickel metal hydride
Bridge battery is not field replaceable.
Number of cells: 3 cells
The bridge battery is charged when external
power is supplied to the system or when the
system is running on battery power. (The
bridge battery is not charged when the
system is suspended and external power is
not supplied.)
Battery voltage: 3.6 V
Capacity: 70 mAh
Bridge battery life: 3 minutes minimum (with
bridge battery fully charged, battery pack
removed, and no external power connected)
Charge time:
8 hours (external power connected)
10 hours (system running on battery power)
CMOS battery
Type: lithium (rechargeable)
Powers CMOS and real-time clock.
Capacity: 50 mAh
CMOS battery is not field replaceable.
Voltage: 3 V
Charge time: 50-60 hours
AC adapter
Input: autosensing 100-240 VAC, 50/60 Hz
Output: 16 VDC, 2.7 A
Fujitsu order number: FMWAC4A,
FMWAC4B, and FMWAC4C (AC adapter
module CA01007-0520)
5-6
Specifications
There are power cables available for North
American, United Kingdom, and European
power standards.
Environmental Specifications
5
Environmental specifications for the Point 510 pen tablet are given in Table 5-9.
Table 5-9 Environmental Specifications
Feature
Specification
Temperature
Operating: 0° to 40°C (32° to 104°F)
Nonoperating: -20° to 60°C (-4° to 140°F)
Humidity
Operating: 20% to 85% RH noncondensing
Nonoperating: 8% to 95% RH noncondensing
Altitude
Operating: -200 ft. to 10,000 ft.
(-61m to 3,047m)
Nonoperating: 40,000 ft. (12,189m) maximum
Physical Specifications
5
Physical specifications for the Point 510 pen tablet are given in Table 5-10.
Table 5-10 Point 510 Pen Tablet Specifications
Feature
Dimensions
Specification
11.7 x 8.7 x 1.4 in
296 x 222 x 36 mm
Pen Tablet Weight
3.8 lbs (1.7 Kg) without wireless LAN adapter
3.9 lbs (1.8 Kg) with wireless LAN adapter
Environmental Specifications
5-7
Agency Approval Specifications
5
Specifications for government agency approvals are given in Table 5-11.
Table 5-11 Agency Approval Specifications
Feature
Specification
Emissions
(without optional
wireless LAN
adapter)
FCC Part 15 Subpart J Class B
CISPR 22 Class B (EN55022 Class B)
DOC Class B
Emissions
(with optional
wireless LAN
adapter)
FCC Class B Intentional Radiator and Digital
Computing Device
DOC Class B Intentional Radiator and Digital
Computing Device
ETSI 300 328 European regulations covering
spread spectrum devices operating at 2.4
GHz
Immunity
EN61000-4-2 (ESD, Level A)
ENV50140 (Radiated RF Field, Level A)
CN61000-4-4 (EFT, Level A)
Safety
5-8
Specifications
UL 1950, CSA 950, IEC950
Chapter 6
Peripheral Interfaces
This chapter provides pin assignments for peripheral connectors found on the Point 510 pen tablet and
Point 510 connectivity peripherals. Note that some of these connectors are not built into the pen tablet
and your connectivity peripheral may not provide all of these connectors. Refer to the Point 510
Connectivity Peripherals Installation Guide to determine which peripheral interfaces your specific Point 510
connectivity peripheral provides.
Mouse Port
6
The mouse port is a PS/2-style mouse connector. Pin assignments are shown in Table 6-1. Note that the
keyboard and mouse ports are not interchangeable.
Table 6-1 Mouse Port Connector Pin Assignments
Connector Pin Locations
Pin
Signal
1
Serial data
2
No connection
3
Ground
4
+5-volt power
(Maximum current draw for keyboard
and mouse +5-Volt power is 400 mA.)
5
Clock
6
No connection
Sleeve
Ground
6-1
Keyboard Port
6
The keyboard port is a PS/2-style keyboard connector. This keyboard port is compatible with most
PS/2-style keyboards. Note however, that signals on pins 2 and 6 are not used by standard PS/2-style
keyboards. The Fujitsu low-power keyboard is powered by 3.3 Volts on pin 6. Conventional PS/2-style
keyboards are powered by 5 Volts on pin 4. Keyboard port pin assignments are shown in Table 6-2.
Table 6-2 Keyboard Port Connector Pin Assignments
Connector Pin Locations
Pin
Signal
1
Serial data
2
SMI request
(This signal used with Fujitsu 3.3-Volt
low-power keyboards only.)
3
Ground
4
+5-Volt power
(Maximum current draw for keyboard and
mouse +5-Volt power is 400 mA.)
5
Clock
6
+3.3-Volt power
Sleeve
Ground
DC Power Input
6
The DC power input connector connects to the AC adapter or auto adapter to power the pen tablet. The
DC power input connector is a two conductor connector with a center pin and sleeve. The DC power
input connector on the pen tablet and port replicator is manufactured by Hosiden (Hosiden part number
HEC3900-01-010). Pin assignments for this connector are given in Table 6-3.
Table 6-3 DC Power Input Connector Pin Assignments
Conductor
Description
Center Pin
+16 Volts DC
Sleeve
GND
When a DC power source is connected to the port replicator or cradle module, the port replicator filters
DC power and provides protection against reverse polarity at the DC input before DC power is supplied
to the pen tablet via the system interface port. A fuse built into the port replicator provides circuit
overload protection. This fuse is not user serviceable. (Circuitry built into the pen tablet provides
protection against reverse polarity.)
6-2
Peripheral Interfaces
Serial Ports
6
Serial port A is a fully functional RS-232-C serial port. Serial port B provides receive and transmit (Rx/Tx)
functionality only. Note the following with respect to using the serial ports:
• The serial port A connector on the pen tablet is duplicated by the serial port A connector on
connectivity peripherals. Do not use the connector on the pen tablet while using the connector on your
connectivity peripheral.
• To enable the serial port B connector, the Serial Port B Device option in BIOS Setup must be set to
System Interface Port and the Serial Port B option must be enabled.
Both serial port connectors are male 9-pin D connectors. Pin assignments for the serial port connectors are
shown in Table 6-4.
Table 6-4 Serial Port Connector Pin Assignments
Connector Pin Locations
Pin
Signal
1
Carrier detect
2
Receive data*
3
Transmit data*
4
Data terminal ready
5
Ground*
6
Data set ready
7
Request to send
8
Clear to send
9
Ring indicator
* Serial port B provides only these signals.
Serial Ports
6-3
Floppy Disk Drive Port
6
The floppy disk drive port is compatible with the Fujitsu FMWFD2 floppy disk drive. Pin assignments for
the floppy disk drive connector are given in Table 6-5.
Table 6-5 Floppy Disk Drive Connector Pin Assignments
Connector Pin Locations
25 23 21 19 17 15 13 11
6-4
9
7
5
3
26 24 22 20 18 16 14 12 10
8
6
4
Peripheral Interfaces
Pin
1
Signal Name
1
Ground
2
Ground
3
Head select
4
Read disk data
5
Floppy disk drive attached
6
Write data
7
Mode select
8
No connection
9
Drive select
10
+5-Volt power
11
+5-Volt power
12
+5-Volt power
13
Index
14
Write protected
15
Track 00
16
Ground
17
Write gate
18
Ground
19
No connection
20
Step pulse
21
Direction control
22
Motor on
23
No connection
24
Disk change
25
GND
26
No connection
2
Parallel Port
6
The parallel port connector is a 25-pin female D connector. This connector provides a fully functional
parallel port. Pin assignments are shown in Table 6-6.
Table 6-6 Parallel Port Connector Pin Assignments
Connector Pin Locations
Pin
Signal Name
1
Strobe
2–9
Data bits 0 – 7, respectively
10
Acknowledge
11
Busy
12
Paper out
13
Select
14
Auto feed
15
Error
16
Initialize
17
Select input
18 – 25
Ground
Video Port
6
The video port provides a standard VGA connector that allows you to use the system with an external
VGA or SVGA monitor. Pin assignments for the video port connector are shown in Table 6-7.
Table 6-7 Video Port Connector Pin Assignments
Connector Pin Locations
Pin
Signal
1
Red analog video output
2
Green analog video output
3
Blue analog video output
4
Not used
5–8
Ground
9
Not used
10
Ground
11
Not used
12
Not used
13
Horizontal sync
14
Vertical sync
15
Not used
Parallel Port
6-5
High-Usage Contacts
6
The point 510 has a row of “high-usage” contacts on the bottom edge that provide signals for the mouse
port, keyboard port, and DC input. Figure 6-1 shows the position locations for the high-usage contacts.
Table 6-8 shows the signal assignments for the contacts. Note the following with respect to this table:
• Signal names given are not industry standard names, but are included in this table as an aid for
cross-referencing when they appear elsewhere.
• Signal names designated with the “pound” (#) symbol are active low.
• This table indicates which signals are outputs from the pen tablet (Out) and which signals are inputs to
the pen tablet (In).
Table 6-8 High-Usage Contacts Signal Assignments
Position
Input/Output
Signal Name
Signal Description
1
V16SMETAL
In
+16 VDC power input
2
V5SMETAL
Out
+5 VDC power supply for keyboard and mouse.
(Maximum current draw: 400 mA.)
3
V3SMETAL
Out
+3.3 VDC power supply for low-power 3.3-Volt
keyboard
4
MSDATA
In/Out
Mouse data
5
MSCLK
In/Out
Mouse clock
6
METALDET#
In
Device detect
This signal must be driven low (grounded) by any
peripheral that connects to the high-usage
contacts to indicate to the pen tablet that the
peripheral device is connected. When the pen
tablet detects this signal, the following high usage
contact signals are activated by the pen tablet:
V5SMETAL, V3SMETAL, MSDATA, MSCLK,
KBDATA, and KBCLK.
6-6
7
MAINDET#
Out
Main unit detect.
This signal is grounded inside the pen tablet to
inform a peripheral device connected to the
high-usage contacts that the pen tablet is
connected.
8
KBDATA
In
Keyboard data
9
KBCLK
Out
Keyboard clock
10
KBFNSMI
In
Keyboard function key SMI (System
Management Interrupt)
This is a special signal used by the Fujitsu
low-power 3.3-Volt keyboard to indicate when the
“Fn” key is pressed in combination with keys F1
through F10.
11
GND
NA
Ground
Peripheral Interfaces
Position 1
Position 11
High-Usage
Contacts
IrDA Port
System Interface
Connector
Figure 6-1 High Usage Contacts
High-Usage Contacts
6-7
System Interface Port
6
The system interface port on the Point 510 pen tablet allows you to attach various connectivity
peripherals. Table 6-9 shows the vendor and part number for the system interface port connector used in
the Point 510.
Table 6-9 System Interface Port Connector Specifications
Feature
Connector vendor
Specification
Molex Incorporated
2222 Wellington Court
Lisle, Illinois 60532 U.S.A.
(In US) Tel: 1-800-78MOLEX (1-800-786-6539)
(Outside US) Tel: 1-630-969-4550
Fax: 1-630-968-8356
E-mail: [email protected]
Molex Services GmbH
Dingolfinger Strasse 4
81673 Munich, Germany
Tel: 49-89-413092-0
Fax: 49-89-401527
E-mail: [email protected]
Vendor part number
Connector on pen tablet: 52755-1200
(Mating connector used on connectivity
peripherals: 52758-1200)
Description
120-pin connector
Figure 6-2 shows the pin locations for the system interface connector.
Position 59
Position 1
Position 60
Position 2
Position 119
Position 61
Position 120
Position 62
Figure 6-2 System Interface Connector Pin Assignments
6-8
Peripheral Interfaces
The pin assignments for the system interface port connector on the pen tablet are given in Table 6-10.
Note the following with respect to this table:
• Signal names given are not industry standard names, but are included in this table as an aid for
cross-referencing when they appear elsewhere.
• Signal names designated with the “pound” (#) symbol are active low.
• This table indicates which signals are outputs from the pen tablet (Out) and which signals are inputs to
the pen tablet (In).
• The last column indicates the port or connector on the port replicator or other connectivity peripherals
that the signal belongs to.
Also note that the system interface port connector is not a “hot pluggable” connector. You must power
down the pen tablet or put it in suspend mode before connecting peripherals to the system interface port.
The system interface port is disabled when system operation is suspended.
Table 6-10 System Interface Port Connector Pin Assignments
Pin
1-6,
61-66
Input/
Output
Signal Name
VOUT
In
Level
+16 VDC
Description
+16 VDC power input for
external power.
(External power source must
supply 16 VDC ± 10%, 2.7 A.)
Note to peripheral designer: To
prevent shock hazard and
damage to equipment, power to
these pins on your peripheral
must be turned off when the pen
tablet is not attached.
69-72
V5SPORT
Out
+5 VDC
+5 VDC power output from pen
tablet. (Turned off in suspend
and fully off modes.)
These outputs supply +5 VDC
± 10%, 800 mA (maximum for
pins 69-72 combined). These
outputs must not be connected
to other power supply lines on
the system interface port.)
73, 74
V3SPORT
Out
+3.3 VDC
+3.3 VDC power output from
pen tablet for low-power
keyboard power.
(Turned off in suspend and fully
off modes.)
Port or Connector
DC power input
Note: The MAINDET#
signal allows you to
determine whether the
pen tablet is attached.
See the signal
description for
MAINDET# in this
table for details.
Pin 96 (PORTDET#)
must be driven low
(grounded) by the
peripheral device
attached to this port to
enable this output.
Pin 96 (PORTDET#)
must be driven low
(grounded) by the
peripheral device
attached to this port to
enable this output.
These outputs supply 3.3 VDC
± 10%, 500 mA (maximum for
pins 73 and 74 combined).
These outputs must not be
connected to other power
supply lines on the system
interface port.)
System Interface Port
6-9
Table 6-10 System Interface Port Connector Pin Assignments (Continued)
Pin
105
Input/
Output
Signal Name
VDDAPORT
Out
Level
+5 VDC
Description
Port or Connector
+5 V power output for analog
components, such as an audio
headphone amp.
(Turned off in suspend and fully
off modes.)
Pin 96 (PORTDET#)
must be driven low
(grounded) by the
peripheral device
attached to this port to
enable this output.
This output can supply 5 VDC
± 10%, 40 mA (maximum). This
output must not be connected to
other power supply lines on the
system interface port.)
9-16
LPT_D0-7
In/Out
+5 V
Data bits 0 through 7
respectively
Parallel port
18
LPT_ERROR#
In
+5 V
Error
Parallel port
19
LPT_SLCT
Out
+5 V
Select
Parallel port
20
LPT_PE
In
+5 V
Paper out
Parallel port
21
LPT_ACK#
In
+5 V
Acknowledge
Parallel port
22
LPT_BUSY
In
+5 V
Busy
Parallel port
23
LPT_STROBE#
Out
+5 V
Strobe
Parallel port
24
LPT_AUTOFD#
Out
+5 V
Auto feed
Parallel port
25
LPT_INIT#
Out
+5 V
Initialize
Parallel port
26
LPT_SLCTIN#
Out
+5 V
Select input
Parallel port
28
FD_INDEX#
+5 V
Index
Floppy disk drive port
29
FD_DSEL#
+5 V
Drive select
Floppy disk drive port
30
FD_DSKCHG#
+5 V
Disk change
Floppy disk drive port
31
FD_MEDIA
+5 V
Media
Floppy disk drive port
32
FD_MTR#
+5 V
Motor select 0
Floppy disk drive port
33
FD_DENSEL
+5 V
Density select
Floppy disk drive port
34
FD_DIR#
+5 V
Direction control
Floppy disk drive port
36
FD_STEP#
+5 V
Step pulse
Floppy disk drive port
38
FD_WDATA#
+5 V
Write data
Floppy disk drive port
40
FD_WGATE#
+5 V
Write gate
Floppy disk drive port
42
FD_TRK0#
+5 V
Track 0
Floppy disk drive port
44
FD_WP#
+5 V
Write protect
Floppy disk drive port
46
FD_RDATA#
+5 V
Read data
Floppy disk drive port
48
FD_SIDE#
+5 V
Head select
Floppy disk drive port
6-10
Peripheral Interfaces
Table 6-10 System Interface Port Connector Pin Assignments (Continued)
Pin
Input/
Output
Signal Name
97
FD_ATCH#
51
CRT_HSYNC
52
Level
Description
Port or Connector
+5 V
Drive attached
This signal is pulled low
(grounded at the floppy disk
drive) when the floppy drive is
attached.
Floppy disk drive port
Out
Analog
Horizontal sync
Video port
CRT_VSYNC
Out
Analog
Vertical sync
Video port
54
CRT_RED
Out
Analog
Red analog video out
Video port
56
CRT_GRN
Out
Analog
Green analog video out
Video port
120
CRT_BLUE
Out
Analog
Blue analog video out
Video port
76
MSDATA
In
+5 V
Data
Mouse port
77
MSCLK
Out
+5 V
Clock
Mouse port
78
KBDATA
In
+5 V
Data
Keyboard
79
KBCLK
Out
+5 V
Clock
Keyboard
80
KBFNSMI
In
+5 V
Keyboard function SMI
Keyboard
This signal is used with Fujitsu
low-power keyboards. When the
Fn key is pressed in
combination with keys F0
through F9, this input is driven
low.
83
COM1_RI
In
+5 V
Ring indicator
Serial port A
This input is driven low when a
telephone ring signal is received
by the modem.
84
COM1_DCD
In
+5 V
Data carrier detect
Serial port A
This input is driven low when
the modem or data set has
detected the data carrier.
85
COM1_DSR
In
+5 V
Data set ready
Serial port A
This input is driven low when
the modem or data set is ready
to establish a communications
link.
86
COM1_CTS
In
+5 V
Clear to send
Serial port A
This input is driven low when
the modem or data set is ready
to exchange data.
87
COM1_RXD#
In
+5 V
Receive data
Serial port A
This input receives serial data.
System Interface Port
6-11
Table 6-10 System Interface Port Connector Pin Assignments (Continued)
Pin
88
Input/
Output
Signal Name
COM1_DTR
Out
Level
+5 V
Description
Data terminal ready
Port or Connector
Serial port A
This output is driven low when
the UART in the pen tablet is
ready to establish a connection.
89
COM1_TXD#
Out
+5 V
Transmit data
Serial port A
This output transmits serial
data.
90
COM1_RTS
Out
+5 V
Request to send
Serial port A
This output is driven low when
the UART in the pen tablet is
ready to exchange data.
93
COM2_RXD#
In
+5 V
Receive data
Serial port B
This input receives serial data.
94
COM2_TXD#
Out
+5 V
Transmit data
Serial port B
This output transmits serial
data.
112
L_PORT
Out
Analog
Left channel audio output
signal.
For use with headphones
meeting the following
specifications:
• Impedance: 16 ohms
• Power rating: 100 mW (or
higher)
114
R_PORT
Out
Analog
Right channel audio output
signal.
For use with headphones
meeting the following
specifications:
• Impedance: 16 ohms
• Power rating: 100 mW (or
higher)
6-12
Peripheral Interfaces
Headphone
See “Pen Tablet
Peripheral
Specifications”
Chapter 5 for
headphone
specifications for
headphone output on
pen tablet.
Headphone
Table 6-10 System Interface Port Connector Pin Assignments (Continued)
Pin
110
Input/
Output
Signal Name
PORTMIC
In
Level
Analog
Description
Microphone audio input
Microphone
For use with microphone
meeting the following
recommended specifications:
See “Pen Tablet
Peripheral
Specifications”
Chapter 5 for
recommended
microphone
specifications for
microphone input on
pen tablet.
• Type: dynamic or electret
condenser
• Sensitivity: -60 dB per
octave
• Impedance: 600 ohm or
higher
107
SPKMUTE#
In
+5 V
Port or Connector
Speaker mute
This signal is pulled low
(grounded) when headphones
are plugged into the headphone
jack on the port replicator.
When this input is pulled low
(grounded), the speaker on the
pen tablet is turned off.
108
PORTMICEN#
In
+5 V
Port replicator microphone
enable
This signal is pulled low
(grounded) when a microphone
is plugged into the microphone
jack on the port replicator.
When this input is pulled low
(grounded), the microphone on
the pen tablet is turned off.
75
MAINDET#
Out
GND
Main unit detect
This line is tied to ground inside
the pen tablet. This line
indicates to a peripheral device
connected to the system
interface port that the system is
attached.
System Interface Port
6-13
Table 6-10 System Interface Port Connector Pin Assignments (Continued)
Pin
98
Input/
Output
Signal Name
PORTONLY#
In
Level
+5 V
Description
Port replicator (with no
high-usage contacts) detect.
This signal is driven low
(grounded) to indicate to the
pen tablet that a device, which
does not use the high-usage
contacts, is connected to the
system interface port.
When the pen tablet detects this
signal, the following signals on
the system interface port are
activated by the pen tablet:
MSDATA, MSCLK, KBDATA,
and KBCLK.
96
PORTDET#
In
+5 V
Port replicator detect.
This signal is driven low
(grounded) to indicate to the
pen tablet that a device is
connected to the system
interface port.
When the pen tablet detects this
signal, the following outputs
(from the pen tablet) are turned
on: V5SPORT, V3SPORT, and
VDDAPORT.
17, 27,
35, 37,
39, 41,
43, 45,
47, 49,
50, 53,
55, 57,
58, 59,
60, 109,
111, 113,
115, 116,
117, 118,
119
GND
7, 8, 67,
68, 81,
82, 91,
92, 95,
99, 100,
101, 102,
103, 104,
106
NC
6-14
Peripheral Interfaces
GND
Ground
No Connection
Port or Connector
System Interface
See “High-Usage
Contacts” earlier in this
chapter for details on
related signals for the
high-usage contacts.
This signal is tied to
ground inside
connectivity
peripherals which
connect to the system
interface port.
This signal is tied to
ground inside
connectivity
peripherals which
connect to the system
interface port.
Chapter 7
System Power
This chapter covers the Point 510 pen tablet power system hardware, power management states, and state
transitions.
Power System Controls
7
The Power button on the pen tablet allows the user to suspend and resume system operation or turn the
system on and off depending on the Power Button setting in BIOS Setup. The table below shows the
system power state changes caused by pressing the Power button for each BIOS setting.
Table 7-1 Power Button Operation
BIOS Power
Button Setting
Suspend/
Resume*
Power On/Off
System Power State Before
Pressing Power Button
System Power State After Pressing
Power Button
Off
Full On (system boots)
Full On
Suspend mode
Suspend mode
Full On (system operation resumes)
Off
Full On
Full On
Off
Suspend mode
Full On (system operation resumes)
* Default setting (recommended).
The Reset button on the Point 510 pen tablet is located inside the PC Card door next to the Eject button.
Pressing the Reset button reboots the system (the equivalent of issuing a hard reset on a desk-top system).
Reset Button
Power Button
Figure 7-1 Reset and Power Buttons
7-1
Power System Overview
7
The Point 510 pen tablet can be powered by the system’s battery pack or by an external DC power source
such as the AC adapter. When the system is not connected to external power, system power is provided
by the battery pack.
In Suspend mode, a built-in bridge battery maintains power to RAM if the battery pack is removed. Note
that the bridge battery can only provide power in suspend mode. The bridge battery is charged when
external power is supplied to the system or when the system is running on battery power. (The bridge
battery is not charged when the system is suspended and external power is not supplied.) Refer to the
Point 510 User’s Guide for details on charging the battery pack and battery charge status indicated by the
Status lights on the pen tablet.
External DC Power
7
External DC power can be supplied to the pen tablet via the following locations:
• The DC power connector on the pen tablet
• The high-usage contacts on the pen tablet
• A third-party peripheral which supplies DC power via the system interface port
A DC power source connected to any of these inputs must provide a minimum of 2.7 amps and a
continuous DC voltage of 16 volts.
Power Management
Power management features relating to system hardware are discussed in the following section. For
details on using BIOS Setup and other system configuration utilities, refer to Chapter 2.
The Point 510 pen tablet is compliant with them Advanced Power Management (APM) BIOS Interface
Specification Revision 1.2. The following discussions describe the implementation of this specification on
the Point 510 pen tablet system and assumes some familiarity with this specification. Refer to the APM
BIOS Interface Specification for details on the specification not covered here.
The system manages power consumption by performing transitions between different system power
states or modes. State transitions can be triggered by timeouts and other types of system activity. Figure
7-2 shows system power states, transition paths and events that trigger a transition from one state to the
next. You can configure the Point 510 pen tablet to utilize some or all of these states by setting power
management options in BIOS Setup or by changing your Windows system power settings.
7-2
System Power
7
System Power States
7
At any given time, the system operates in one of the following five general system power states:
• Full On
• Idle or APM Enabled
• Standby or APM Standby
• Suspend or APM Suspend
• Off
State transitions and power managed devices are controlled by either the BIOS or the APM driver. Power
management features that are not controlled by the APM driver remain under the control of the BIOS.
Also, note that power usage for individual devices, such as the hard disk drive, can vary within these
general states depending on timeout settings for the device.
System operation in Standby and APM Standby states is essentially the same (as is system operation in
Suspend and APM Suspend). CPU operation differs, however, between the Idle and APM Enabled states
depending on whether the BIOS or the APM driver is controlling state transitions. See “CPU Activity in
Idle Mode and APM Enabled Mode” later in this chapter for more details.
System Power States
7-3
Figure 7-2 illustrates power management modes during typical operation. Low battery charge levels and
system temperature (conditions which are not called out in this illustration) also affect power
management states and are explained later in this chapter.
• CPU Idle request (APM driver)
• Idle Mode Timeout (BIOS)
CPU
full speed
BIOS control: 1/4 speed
APM Enabled: Stop Grant
CPU Control
• System activity (IRQ, SMI)
Full On,
Idle, and
APM Enabled
States
• Video Timeout
Display on,
backlight on
Display off,
backlight off
Video Control
• System activity (IRQ, SMI)
• HDD Spin-down Timeout
Hard disk
drive on
Hard Disk Drive
Control
Hard disk drive
spun down
• Hard disk accessed
• Power
button
pressed
Off
State
• System
shutdown
(power off)
• Power
button
(when set
to Power
On/Off in
BIOS)
• Power button
pressed
• Resume On
Time
• Suspend Mode
Timeout
• Suspend
request
• Power button
(when set to
Suspend/
Resume in
BIOS)
• System
activity
(IRQ, SMI)
Standby
State
Real-time clock remains
powered. All other
components powered off.
System Power
CPU in Stop Grant mode.
Display off, backlight off.
RAM refreshed, logic
components in “standby”
mode.
CPU stopped (Stop
Clock), other components
powered off.
Figure 7-2 Power Management State Transitions
7-4
Hard disk drive spun
down.
• Suspend
Mode
Timeout
Suspend
State
• Standby
Mode
Timeout
Table 7-2 shows the state of individual components for different system power states when state
transitions are controlled by the BIOS. Note that state transitions for some of these devices can be set
independently in the Power Savings menu in BIOS Setup.
Table 7-2 System Power States
Component
Full On Mode
Standby Mode
Suspend Mode
Off Mode
CPU
On
Stop grant
Stop clock
Off
Core logic
On
On
Standby
Off
DRAM
On
On
On (refresh)
Off
Real-time clock
On
On
On
On
PC Card controller
On
On
Standby
Off
Keyboard controller
On
On
Standby
Off
Video controller
On
On
Standby
Off
Video memory
On
On
On (refresh)
Off
Display
On
Off
Off
Off
Backlight
On
Off
Off
Off
Hard disk drive
On
Spin down
Off
Off
I/O controller
On
On
Standby
Off
Wireless LAN adapter*
On
Off
Off
Off
* Optional
Power Management States and BIOS Configuration Options
7
When the BIOS controls state transitions, the system power states utilized depend on how power
management options are configured in the BIOS. BIOS options that affect each state are described in the
following sections. For a comprehensive listing of BIOS configuration options and details on using BIOS
Setup and other configuration utilities, refer to Chapter 2.
Timeouts
7
Transitions to the Idle, Standby, and Suspend states are configured through timeouts in the BIOS. (A
timeout is the period of time that elapses with no activity before the transition occurs.) In addition to
overall system power states, power for some devices can be individually managed through timeouts
configured in the BIOS such as the hard disk drive spin-down timeout.
Full On State
7
In the Full On state, all devices are fully powered and the CPU runs at full speed. The system is in the
Full On state whenever user activity is detected. The system will remain in the Full On state until an
event such as the idle mode timeout or a suspend request occurs. Note that if idle and standby modes are
not utilized (timeouts not selected in BIOS Setup), the system will remain in the Full On state until an
event such as a suspend request causes a transition out of the Full On state.
Power Management States and BIOS Configuration Options
7-5
CPU Activity in Idle Mode and APM Enabled Mode
7
CPU activity differs in the BIOS controlled Idle mode compared to the APM Enabled mode. When the
BIOS is controlling power management, the CPU speed is reduced to 1/4 of full speed when the Idle
Mode Timeout occurs. In APM Enabled mode, the CPU is stopped when a CPU-idle request is issued by
the APM driver.
In Idle mode, the internal CPU clock is “throttled” or periodically switched on and off to achieve a slower
CPU speed. This is done by switching the Stop Grant signal on and off. Table 7-3 shows the activity of
these signals in Idle mode and APM Enabled mode. (The first dotted line in each column of this table
indicates when the timeout occurs and the mode is entered.) If user activity generates an interrupt, the
system returns to the Full On state (CPU running at full speed) until all pending instructions are
executed. If the Idle Mode option is disabled in the BIOS, the CPU will not enter Idle mode.
Table 7-3 CPU Activity in Idle Mode and APM Enabled Mode
System Activity
Idle Mode
(BIOS Control)
APM Enabled Mode
(APM Driver Control)
Stop Grant
(STPCLK#)
Internal CPU Clock
External Clock
(CLK)
This table does not depict a precise timing diagram. The illustrations given
in this table are intended to show the relative characteristic activity of these
signals.
Standby Mode
7
Standby mode is entered when the Standby Mode Timeout (configured in BIOS Setup) occurs. In Standby
mode, the CPU’s internal clock is stopped (stopping the CPU) as indicated in Table 7-4. Any user activity
that generates an interrupt will cause a transition out of the Standby state to the Full On state. The hard
disk drive is forced into standby mode (spun down) and the display is turned off when the standby mode
timeout occurs.
Table 7-4 CPU Activity in Standby Mode
System Activity
Stop Grant
(STPCLK#)
Internal CPU Clock
External Clock
(CLK)
7-6
System Power
Standby
Suspend Mode
7
In Suspend mode, power is maintained to RAM, video memory, and resume circuitry while other system
circuitry and power managed devices are turned off. In normal operation, system operation is suspended
when the Suspend Timeout expires, the Power button is pressed, or a suspend request is generated by a
software application or the APM driver. Pressing the Power button will cause the system to resume
operation and enter the Full On state.
Note:
A critically low battery or the system temperature reaching the critical thermal limit will also force the
system into Suspend mode. In these situations, pressing the Power button will not resume the system.
Connect external power or install a charged battery pack in the event of a critically low battery. Allow the
system to cool if the system has reached the critical thermal limit.
Off State
7
In the Off state, the system is fully powered off (with the exception of the real-time clock). Note that the
system will continue to draw a very small amount of battery power when the system is off. For this
reason, the pen tablet should be stored with a fully charged battery pack if the system will not be in use
for more than a few days.
Power Management States and BIOS Configuration Options
7-7
Other Power Management Issues
7
Issues described up to this point in this chapter deal with the APM driver and BIOS settings that control
system performance and power consumption. Other power management features, described in the
following section, are built into the system to prevent heat damage and data loss.
System Temperature and Power Management
7
The system has a built-in thermal detection circuit that monitors the CPU temperature. If the temperature
reaches excessive levels, performance is reduced to allow the system to cool. Table 7-5 lists the different
thermal system modes and gives a description of system operation for each mode.
Table 7-5 Thermal System Modes
Mode
Description
Normal operating temperature
Power management features operate normally.
High temperature
CPU speed reduced to 1/2 full speed.
Critical temperature
System is forced to suspend.
Battery Charge and Power Management
7
The system monitors the status of the battery pack. When the system is running on battery power and the
battery voltage level drops, performance is reduced to increase battery life and prevent data loss. Table
7-6 describes system operation for the different battery voltage levels.
Table 7-6 Low Battery Modes (System Running on Battery Power)
Battery
Voltage
Low Battery
(Amber) LED
Description
System Beep
9.8 to 13.2 V
Normal operation
Off
None
9.1 to 9.8 V
Low battery warning. CPU speed
reduced to 1/2 of full speed.
Flashing slowly: one
second on, one
second off.
System beeps once
every 15 seconds.
8.5 to 9.1 V
Very low battery. CPU speed 1/2
of full speed.
Flashing quickly: 1/2
second on, 1/2
second off.
System beeps once
every 15 seconds.
8.5 V or lower
Critically low battery. System
forced into Suspend mode.
(External power source must be
connected or charged battery
pack must be installed to resume.)
Very slow flash:
flashing once every 4
seconds.
None
System performance is not reduced when external power is connected. Refer to the Point 510 User’s Guide
for details on battery charge status indicated by the Charge Status LED.
7-8
System Power
Chapter 8
BIOS Configuration Application Programming Interfaces
This chapter describes BIOS configuration application programming interfaces (APIs) for Windows for
Workgroups and Windows 95. Functions included in the following dynamic-link libraries (DLLs) are
discussed in this chapter: STSETUP.DLL, STSET16.DLL, STSET32.DLL. These DLLs include functions that
can be called from 16-bit and 32-bit Windows applications to configure BIOS parameters for the Point 510
pen tablet.
The files discussed in this chapter are distributed on the Point 510 Developer Utilities disk in the
\DLL\STSETUP directory.
Functions, as described in this chapter, are the same for all of these DLLs. To use these functions with
your 16-bit application:
• Include the file STSETUP.H in your program source code. Note that parameters and return values for
these functions are symbols which are defined in this header file.
• Ensure that the file STSETUP.DLL is in the C:\WINDOWS\SYSTEM directory on your system at run
time.
To use these functions with your 32-bit application:
• Include the file STSET32.H in your program source code. Note that parameters and return values for
these functions are symbols which are defined in this header file.
• Ensure that the files STSETUP.DLL, STSET16.DLL, and STSET32.DLL are in the
C:\WINDOWS\SYSTEM directory on your system at run time.
Note:
Although some file names for these DLLs are the same as those for the Stylistic 1200 pen tablet, these files
are unique and were developed specifically for the Point 510 pen tablet system.
Function prototypes for these APIs are written in the C programming language and are described in this
guide using C programming language syntax. Although ideally suited for program development using a
compiler that supports the ANSI C or C++ standard, these functions can be called from applications
developed in other programming languages, such as Microsoft Visual Basic, which allow you to use
DLLs. Refer to the documentation for your programming language for details on calling functions in
DLLs.
8-1
Summary of Functions
8
This section gives a summary of functions included in this API. See the discussions on each of these
functions later in this chapter for details on each function.
The following functions perform tasks specific to the DLL:
• BiosSetupStart
This function initializes the DLL. This function must be called before any other functions in this DLL
can be called.
• BiosSetupEnd
Applications must call this function to close the DLL before the application exits.
• BiosSetupGetVersion
This function returns the version number of the DLL.
Settings for BIOS options can be retrieved or set using the following functions:
• BiosSetupGetPermanent
This function retrieves permanent BIOS settings.
• BiosSetupSetPermanent
This function sets permanent BIOS settings.
• BiosSetupGetCurrent
This function retrieves current BIOS settings.
• BiosSetupSetCurrent
This function sets current BIOS settings.
• BiosSetupSetResumeTime
This function sets the resume time for the Resume On Time BIOS option.
• BiosSetupGetResumeTime
This function returns the resume time.
8-2
BIOS Configuration Application Programming Interfaces
Functions Specific to the DLL
8
Functions which perform tasks specific to these DLLs are discussed in the following section.
BiosSetupStart
8
This function initializes the DLL. This function must be called before any other functions in this API can
be called. This function,
• Opens the DLL.
• Loads the kernel mode driver FPSIDRV.SYS to allow BIOS configuration by the DLL.
• Loads the APM driver for the BIOS.
A prototype of this function is shown below:
int BiosSetupStart ( )
This function and returns one of the following values.
Return Value
Description
SETUP_API_SUCCESS
Returned on success.
SETUP_API_APMDRVERROR
Returned if the power management setup driver is not installed.
SETUP_API_NOAPM
Returned if APM support is disabled.
SETUP_API_APMERROR
Returned if APM function call failed.
BiosSetupEnd
8
Applications that initialize this DLL using BiosSetupStart must call this function before the application
exits. This function performs the following tasks:
• Updates the CMOS checksum and CRC values.
• Closes and unloads the kernel mode driver FPSIDRV.SYS if other applications are not using the driver.
• Disconnects the BIOS-APM driver interface and unloads the driver.
A prototype of this function is shown below:
int BiosSetupEnd ( )
This function accepts no arguments and returns one of the following values.
Return Value
Description
SETUP_API_SUCCESS
Returned on success.
SETUP_API_APMERROR
Returned if APM function call failed.
SETUP_API_APMDRVERROR
Returned if the power management setup driver failed to close.
Functions Specific to the DLL
8-3
BiosSetupGetVersion
8
This function returns the version number of the DLL. A prototype of the function is shown below:
WORD BiosSetupGetVersion ( )
This function accepts no arguments and returns the version number in the following format:
Return Value
Description
Bits 15-8
Major version number.
Bits 7-0
Minor version number.
For example, a return value of 00000000 000000012 represents version 0.1.
Functions for Retrieving and Setting BIOS Settings
8
Functions that retrieve and set BIOS options and settings are described in the following sections.
Parameters used in these functions are defined in the header file setupnt.h. See “Option and Setting
Parameters” later in this chapter for a listing of these parameters.
BiosSetupGetPermanent
8
This function retrieves the permanent setting for a given BIOS option. A prototype of this function is
shown below:
int BiosSetupGetPermanent ( int Option )
The Option parameter defines the BIOS option you want to retrieve. Definitions for the Option parameter
are listed in Table 8-1 later in this section.
On success, this function returns the Setting for the given BIOS option. Return values, including values
returned in the event of an error, are as follows:
Return Value
Description
Setting
Returned on success. See the definitions listed in Table 8-1 for the Setting
return value defined for each Option parameter.
SETUP_API_INVALIDOPTION
Returned if the Option parameter is not a valid permanent BIOS option.
SETUP_API_APMERROR
Returned if APM function call failed.
BiosSetupSetPermanent
8
This function sets a permanent BIOS option to the given setting. A prototype of this function is shown
below:
int WINAPI BiosSetupSetPermanent ( int Option, int Setting )
The Option parameter defines the BIOS option you want to set. The Setting parameter determines the
setting for the BIOS option. Definitions for these parameters are listed in Table 8-1 later in this section.
Return values for this function, including errors, are as follows:
8-4
Return Value
Description
SETUP_API_SUCCESS
Returned on success.
SETUP_API_INVALIDOPTION
Returned if the Setting parameter is not a valid permanent setting.
SETUP_API_APMERROR
Returned if APM function call failed.
BIOS Configuration Application Programming Interfaces
BiosSetupGetCurrent
8
This function retrieves the current setting for a given BIOS option. A prototype of this function is shown
below:
int WINAPI BiosSetupGetCurrent ( int Option )
The Option parameter defines the BIOS option you want to retrieve. Definitions for the Option parameter
are listed in Table 8-1 later in this section.
On success, this function returns the Setting for the given BIOS option. Return values, including errors,
are as follows:
Return Value
Description
Setting
Returned on success. See the definitions listed in Table 8-1 for the Setting
return value defined for each Option parameter.
SETUP_API_INVALIDOPTION
Returned if the Option parameter is not a valid current option.
SETUP_API_APMERROR
Returned if APM function call failed.
BiosSetupSetCurrent
8
This function sets a current BIOS option to the given setting. A prototype of this function is shown below:
int WINAPI BiosSetupSetCurrent ( int Option, int Setting )
The Option parameter defines the BIOS option you want to set. The Setting parameter determines the
setting for the BIOS option. Definitions for these parameters are listed in Table 8-1 later in this section.
Return values for this function, including errors, are as follows:
Return Value
Description
SETUP_API_SUCCESS
Returned on success.
SETUP_API_INVALIDOPTION
Returned if the Setting parameter is not a valid current setting.
SETUP_API_APMERROR
Returned if APM function call failed.
Functions for Retrieving and Setting BIOS Settings
8-5
Option and Setting Parameters
8
Option and Setting parameters accepted by functions described earlier in this section are defined in the
header file for the DLL. Table 8-1 lists the Option parameter and corresponding Setting parameters for
each BIOS option. Setting parameters are also used as return values for functions that retrieve BIOS
settings. Some of these parameters can only be used to change or retrieve permanent settings as noted in
the first column of this table.
Table 8-1 Option and Setting Parameters and Return Values
8-6
Option Parameter / Description
Setting Parameter
Setting Description
BIOS_SERIALA
SETUP_SERIALA_DISABLE
Disabled
Serial Port A Address
and IRQ
(permanent only)
SETUP_SERIALA_3F8_IRQ4
I/O Address 3F8, IRQ 4
SETUP_SERIALA_2F8_IRQ3
I/O Address 2F8, IRQ 3
SETUP_SERIALA_3E8_IRQ4
I/O Address 3E8, IRQ 4
SETUP_SERIALA_2E8_IRQ3
I/O Address 2E8, IRQ 3
SETUP_SERIALA_3F8_IRQ11
I/O Address 3F8, IRQ 11
SETUP_SERIALA_2F8_IRQ10
I/O Address 2F8, IRQ 10
SETUP_SERIALA_3E8_IRQ11
I/O Address 3E8, IRQ 11
SETUP_SERIALA_2E8_IRQ10
I/O Address 2E8, IRQ 10
SETUP_SERIALA_AUTO
Auto
BIOS_SERIALB
SETUP_SERIALB_DISABLE
Disabled
Serial Port B Address
and IRQ
(permanent only)
SETUP_SERIALB_3F8_IRQ4
I/O Address 3F8, IRQ 4
SETUP_SERIALB_2F8_IRQ3
I/O Address 2F8, IRQ 3
SETUP_SERIALB_3E8_IRQ4
I/O Address 3E8, IRQ 4
SETUP_SERIALB_2E8_IRQ3
I/O Address 2E8, IRQ 3
SETUP_SERIALB_3F8_IRQ11
I/O Address 3F8, IRQ 11
SETUP_SERIALB_2F8_IRQ10
I/O Address 2F8, IRQ 10
SETUP_SERIALB_3E8_IRQ11
I/O Address 3E8, IRQ 11
SETUP_SERIALB_2E8_IRQ10
I/O Address 2E8, IRQ 10
SETUP_SERIALB_AUTO
Auto
BIOS_SERIALB_DEV
SETUP_SERIALB_INFRARED
IrDA Port (on pen tablet)
Serial Port B Device
(permanent only)
SETUP_SERIALB_SYSINTERFACE
System Interface Port
BIOS_LPT_PORT
SETUP_LPT_DISABLE
Disabled
LPT Port Address and IRQ
(permanent only)
SETUP_LPT_278_IRQ7
I/O Address 278, IRQ 7
SETUP_LPT_378_IRQ7
I/O Address 378, IRQ 7
SETUP_LPT_3BC_IRQ7
I/O Address 3BC, IRQ 7
SETUP_LPT_278_IRQ5
I/O Address 278, IRQ 5
SETUP_LPT_378_IRQ5
I/O Address 378, IRQ 5
SETUP_LPT_3BC_IRQ5
I/O Address 3BC, IRQ 5
SETUP_LPT_AUTO
Auto
BIOS_LPT_MODE
SETUP_LPT_OUTPUT
Output only
LPT Mode
(permanent only)
SETUP_LPT_BIDIRECTIONAL
Bidirectional
SETUP_LPT_ECP
Extended Capabilities Port
BIOS Configuration Application Programming Interfaces
Table 8-1 Option and Setting Parameters and Return Values (Continued)
Option Parameter / Description
Setting Parameter
Setting Description
BIOS_PCCARD_ADDR
SETUP_PCCARD_DISABLE
Disabled
PC Card Controller Address
(permanent only)
SETUP_PCCARD_3E0
3E0
SETUP_PCCARD_AUTO
Auto
BIOS_WLESS_LANADDR
SETUP_WLESS_LANBASE_270
270
Wireless LAN Base Address
(permanent only)
SETUP_WLESS_LANBASE_280
280
SETUP_WLESS_LANBASE_290
290
SETUP_WLESS_LANBASE_2A0
2A0
SETUP_WLESS_LANBASE_358
358
SETUP_WLESS_LANBASE_360
360
SETUP_WLESS_LANBASE_368
368
SETUP_WLESS_DISABLED
Disabled
BIOS_WLESS_LANIRQ
SETUP_WLESS_IRQ10
IRQ 10
Wireless LAN IRQ
(permanent only)
SETUP_WLESS_IRQ11
IRQ 11
SETUP_WLESS_IRQ05
IRQ 5
SETUP_WLESS_IRQ07
IRQ 7
SETUP_WLESS_IRQNONE
None
BIOS_KEYBOARD_HOTPLUG
SETUP_KBHOTPLUG_DISABLE
Disabled
Keyboard Hot Plug
(permanent only)
SETUP_KBHOTPLUG_ENABLE
Enabled
BIOS_AUDIO_ADDRESS
SETUP_AUDIO_220
I/O Address 220
Audio Base Address
(permanent only)
SETUP_AUDIO_230
I/O Address 230
SETUP_AUDIO_240
I/O Address 240
SETUP_AUDIO_250
I/O Address 250
SETUP_AUDIO_DISABLE
Disabled
BIOS_AUDIO_FM_ADDRESS
SETUP_AUDIO_FM_388
I/O Address 388
Audio FM Base Address
(permanent only)
SETUP_AUDIO_FM_398
I/O Address 398
SETUP_AUDIO_FM_3A8
I/O Address 3A8
SETUP_AUDIO_FM_3B8
I/O Address 3B8
SETUP_AUDIO_FM_NONE
Disabled
BIOS_AUDIO_IRQ
SETUP_AUDIO_IRQ5
IRQ 5
Audio IRQ Channel
(permanent only)
SETUP_AUDIO_IRQ7
IRQ 7
SETUP_AUDIO_IRQ9
IRQ 9
SETUP_AUDIO_IRQ10
IRQ 10
SETUP_AUDIO_IRQNONE
Disabled
BIOS_AUDIO_DMA
SETUP_AUDIO_DMA0
DMA Channel 0
Audio DMA Channel
(permanent only)
SETUP_AUDIO_DMA1
DMA Channel 1
SETUP_AUDIO_DMA3
DMA Channel 3
SETUP_AUDIO_DMANONE
Disabled
Functions for Retrieving and Setting BIOS Settings
8-7
Table 8-1 Option and Setting Parameters and Return Values (Continued)
8-8
Option Parameter / Description
Setting Parameter
Setting Description
BIOS_FDISK_BOOT_SECTOR
SETUP_FDISK_NORMAL
Normal
Fixed Disk Boot Sector
(permanent only)
SETUP_FDISK_WRITEPROTECT
Write protect
BIOS_BOOT_SEQUENCE
SETUP_BOOT_A_THEN_C
A: then C:
Boot Sequence
(permanent only)
SETUP_BOOT_C_THEN_A
C: then A:
SETUP_BOOT_C_ONLY
C: only
BIOS_POST_ERRORS
SETUP_POSTERROR_DISABLE
Disabled
POST Errors
(permanent only)
SETUP_POSTERROR_ENABLE
Enabled
BIOS_SETUP_PROMPT
SETUP_SETUPPROMPT_DISABLE
Disabled
Setup Prompt
(permanent only)
SETUP_SETUPPROMPT_ENABLE
Enabled
BIOS_SUMMARY_SCREEN
SETUP_SUMMSCREEN_DISABLE
Disabled
Summary Screen
(permanent only)
SETUP_SUMMSCREEN_ENABLE
Enabled
BIOS_NUMLOCK
SETUP_NUMLOCK_AUTO
Auto
Numlock
(permanent only)
SETUP_NUMLOCK_ON
On
SETUP_NUMLOCK_OFF
Off
BIOS_SPEAKER
SETUP_SPEAKER_MUTE
Mute
Speaker
(permanent only)
SETUP_SPEAKER_ON
On
BIOS_POWER_BUTTON
SETUP_POWERBUTTON_ONOFF
Power On/Off
Power Button
(permanent only)
SETUP_POWERBUTTON_SUSPRESUME
Suspend/Resume
BIOS_SPEAKER_VOL
SETUP_SPKVOL_MAX
Maximum
Speaker Volume
(permanent only)
SETUP_SPKVOL_MED
Medium
SETUP_SPKVOL_MIN
Minimum
SETUP_SPKVOL_OFF
Off
BIOS_DISPLAY_TYPE
SETUP_DISPTYPE_EXTMONITOR
External Monitor
Display
(permanent or current)
SETUP_DISPTYPE_LCD
LCD
BIOS_EXPAND_VGA
SETUP_EXPANDVGA_DISABLED
Disabled
Expand VGA Screen
(permanent or current)
SETUP_EXPANDVGA_TEXT
Expanded Text
SETUP_EXPANDVGA_ENHANCED
Enhanced Graphics/Text
BIOS Configuration Application Programming Interfaces
Table 8-1 Option and Setting Parameters and Return Values (Continued)
Option Parameter / Description
Setting Parameter
Setting Description
BIOS_POWER_SAVINGS
SETUP_POWERSAVINGS_OFF
Off
Power Savings
(permanent or current)
SETUP_POWERSAVINGS_CUSTOMIZE
Customize
SETUP_POWERSAVINGS_MAXPERFORM
Maximum performance
SETUP_POWERSAVINGS_MAXBATTERY
Maximum battery life
BIOS_HDD_TIMEOUT
SETUP_HDDTIMEOUT_OFF
Off
HDD Spin-down Timeout*
(permanent or current)
SETUP_HDDTIMEOUT_05_SEC
5 seconds
SETUP_HDDTIMEOUT_10_SEC
10 seconds
Note: This option must be set to
Customize before the following
options, marked with (*), can be
changed.
SETUP_HDDTIMEOUT_30_SEC
30 seconds
SETUP_HDDTIMEOUT_01_MIN
1 minute
SETUP_HDDTIMEOUT_02_MIN
2 minutes
SETUP_HDDTIMEOUT_04_MIN
4 minutes
SETUP_HDDTIMEOUT_06_MIN
6 minutes
SETUP_HDDTIMEOUT_08_MIN
8 minutes
SETUP_HDDTIMEOUT_10_MIN
10 minutes
SETUP_HDDTIMEOUT_15_MIN
15 minutes
SETUP_HDDTIMEOUT_20_MIN
20 minutes
BIOS_VIDEO_TIMEOUT
SETUP_VIDEOTIMEOUT_OFF
Off
Video Timeout*
(permanent or current)
SETUP_VIDEOTIMEOUT_30_SEC
30 seconds
SETUP_VIDEOTIMEOUT_01_MIN
1 minute
SETUP_VIDEOTIMEOUT_02_MIN
2 minutes
SETUP_VIDEOTIMEOUT_04_MIN
4 minutes
SETUP_VIDEOTIMEOUT_06_MIN
6 minutes
SETUP_VIDEOTIMEOUT_08_MIN
8 minutes
SETUP_VIDEOTIMEOUT_10_MIN
10 minutes
SETUP_VIDEOTIMEOUT_15_MIN
15 minutes
SETUP_VIDEOTIMEOUT_20_MIN
20 minutes
BIOS_IDLE_TIMEOUT
SETUP_IDLETIMEOUT_OFF
Off
Idle Mode Timeout*
(permanent or current)
SETUP_IDLETIMEOUT_HALFSEC
1/2 second
BIOS_STANDBY_TIMEOUT
SETUP_STANDBYTIMEOUT_OFF
Off
Standby Mode Timeout*
(permanent or current)
SETUP_STANDBYTIMEOUT_01_MIN
1 minute
SETUP_STANDBYTIMEOUT_02_MIN
2 minutes
SETUP_STANDBYTIMEOUT_04_MIN
4 minutes
SETUP_STANDBYTIMEOUT_06_MIN
6 minutes
SETUP_STANDBYTIMEOUT_08_MIN
8 minutes
SETUP_STANDBYTIMEOUT_12_MIN
12 minutes
SETUP_STANDBYTIMEOUT_16_MIN
16 minutes
Functions for Retrieving and Setting BIOS Settings
8-9
Table 8-1 Option and Setting Parameters and Return Values (Continued)
Option Parameter / Description
Setting Parameter
Setting Description
BIOS_SUSPEND_TIMEOUT
SETUP_SUSPENDTIMEOUT_OFF
Off
Suspend Mode Timeout*
(permanent or current)
SETUP_SUSPENDTIMEOUT_05_MIN
5 minutes
SETUP_SUSPENDTIMEOUT_10_MIN
10 minutes
SETUP_SUSPENDTIMEOUT_15_MIN
15 minutes
SETUP_SUSPENDTIMEOUT_20_MIN
20 minutes
SETUP_SUSPENDTIMEOUT_30_MIN
30 minutes
SETUP_SUSPENDTIMEOUT_40_MIN
40 minutes
SETUP_SUSPENDTIMEOUT_60_MIN
60 minutes
BIOS_RESUME_ONTIME
SETUP_RESUMEONTIME_OFF
Off
Resume On Time
(permanent or current)
SETUP_RESUMEONTIME_ON
On
See “Resume Time” later in this
chapter for details on setting the
resume time.
8-10
BIOS Configuration Application Programming Interfaces
Resume Time
8
This section describes functions which allow you to set or retrieve settings for the Resume On Time BIOS
option.
BiosSetupSetResumeTime
8
This function sets the resume time and enables (or disables) the Resume On Time BIOS option. A
prototype of this function is shown below:
int BiosSetupSetResumeTime ( BYTE cBCDHour,
BYTE cBCDMin,
BYTE cBCDSec,
BOOL bPermanent,
BOOL bEnableIt )
This function accepts three byte values that determine the resume time in hours, minutes, and seconds
and also accepts two Boolean values which specify whether the permanent or current setting is to be set
and whether the Resume On Time option is enabled. Details on these parameters are given in the
following:
Parameter
Description
cBCDHour
Byte value that specifies hour setting in BCD format.
Acceptable values: 0 to 23 (must be in BCD format)
cBCDMin
Byte value that specifies minutes setting in BCD format.
Acceptable values: 0 to 59 (must be in BCD format)
cBCDSec
Byte value that specifies seconds setting in BCD format.
Acceptable values: 0 to 59 (must be in BCD format)
bPermanent
TRUE = Permanent setting
FALSE = Current setting
bEnableIt
TRUE = Enable Resume On Time option.
FALSE = Disable Resume On Time option.
Note that you must specify all parameters when calling this function. You cannot use this function to
enable or disable the Resume On Time option without passing the other parameters this function accepts.
BiosSetupGetResumeTime
8
This function retrieves settings for the Resume On Time BIOS option. A prototype of this function is
given below:
DWORD BiosSetupGetResumeTime ( BOOL bPermanent )
This function accepts a Boolean value which determines whether the permanent or current settings are
retrieved. This function returns a double word (32-bit value) which contains the Resume On Time option
settings as follows.
Return Value
Description
Byte 3 (bits 31-24)
Hour setting in BCD format.
Byte 2 (bits 23-16)
Minutes setting in BCD format.
Byte 1 (bits 15-8)
Seconds setting in BCD format.
Byte 0 (bits 7-0)
0000 00002 = Resume On Time option disabled.
0000 00012 = Resume On Time option enabled.
Resume Time
8-11
8-12
BIOS Configuration Application Programming Interfaces
Chapter 9
APM-Aware Application Design
The Point 510 pen tablet complies with the APM (Advanced Power Management) model for power
management events by allowing applications to issue and respond to the suspend request and other APM
broadcast messages. To incorporate APM broadcast messages in your application design, use the
operating system’s power management interface.
The APM BIOS allows application developers to gain control over system state transitions by designing
APM-aware applications. APM-aware applications are applications that monitor or respond to power
management events or request power management state transitions.
For example, when the suspend timeout expires or the suspend button is pressed, a suspend request is
generated by the BIOS. An APM-aware application can block the suspend request and prevent the system
from entering suspend mode or allow the suspend operation to be executed (provided no other
applications block the suspend request). This is useful if your application performs critical tasks such as
data transfers that should not be interrupted. Note that a critical suspend event, which occurs when the
battery reaches a critically low level, cannot be blocked by applications.
The Windows for Workgroups and Windows 95 operating systems use different methods to
communicate power management messages between applications, the operating system, and the BIOS.
The APM interface for each operating system supported with the Point 510 pen tablet is described below.
Windows for Workgroups Power Management Interface
9
The APM driver for Windows for Workgroups is POWER.DRV. To enable the power management
interface, POWER.DRV must be listed in the drivers= entry in your SYSTEM.INI file. This driver allows
Windows applications to receive power event notification through the WM_POWER message.
When a suspend or resume event occurs, the message WM_POWER is sent to all top-level windows.
APM-aware applications can respond to this message and prepare for or block the system from entering
suspend mode. See your Windows programming documentation for details on the WM_POWER
message.
Windows 95 Power Management Interface
9
The APM driver for Windows 95 is POWER.DRV. (Note that, although this file name is the same as the
APM driver for Windows for Workgroups, this is a different file.) Windows 95 allows 32-bit applications
to submit a suspend request using the Win32 API function SetSystemPowerState. Refer to the Microsoft
Developers Network CD-ROM for details on the Win32 API.
9-1
Windows 95 Power Message
9
Windows 95 sends information on power management events to all applications via the
WM_POWERBROADCAST message. Parameters for the WM_POWERBROADCAST message that
indicate various power management events are listed below.
9-2
Parameter
Description
PBT_APMPOWERSTATUSCHANGE
Sent to indicate system power status change.
PBT_APMQUERYSUSPEND
Sent to request permission to suspend.
PBT_APMSUSPEND
Sent immediately before the system enters suspend.
PBT_APMQUERYSUSPENDFAILED
Sent when a suspend request is denied.
PBT_APMRESUMESUSPEND
Sent when system operation is restored (resume) after a suspend
operation.
PBT_APMRESUMECRITICAL
Sent when system operation is restored (resume) after a critical
suspend operation.
APM-Aware Application Design
Appendix A
Memory Space for Hardware Identification
The Point 510 pen tablet provides programmable areas of the system’s flash memory for storing hardware
identification numbers. Table A-1 shows the physical address of these programmable areas. Each of these
areas can hold 32 bytes of data.
Table A-1 Hardware Identification Address Space
Physical Address
Suggested Use
F000:DF60H
Asset tracking number
F000:DF40H
Serial number
Note the following regarding these memory areas:
• Since these memory areas are in the system’s flash memory, you must use a special utility to write to
them.
• Although values stored in these memory areas are referred to as asset tracking number and serial number,
these areas hold zeros as factory default values and can be programmed to hold any value.
Caution
If you update your system’s BIOS, you will need to rewrite data
(asset tracking number and serial number) stored in the
hardware identification address space.
A-1
A-2
Memory Space for Hardware Identification
Index
A
D
AC adapter, 5-6
advanced power management (APM), 7-2
specification, xiii
supported revision level, 5-6
APM-aware application design, 9-1
Audio Base Address, 8-7
Audio DMA Channel, 8-7
Audio FM Base Address, 8-7
Audio IRQ Channel, 8-7
audit mode, Windows 95, 2-1
DC power input, 6-2
digitizer specifications, 5-3
DIMM card, installing, 4-2
DIMM card, removing, 4-4
Display, 8-8
DLL version number, 8-2, 8-4
dynamic-link libraries (DLLs) for BIOS configuration, 8-1
B
battery pack, 5-6, 7-2
BIOS configuration application programming interfaces, 8-1
BIOS settings, about, 2-1
BIOS Setup, 2-2
Audio Features submenu, 2-9
Boot menu options, 2-12
Exit menu options, 2-13
IDE Hard Disk Drive submenu, 2-6
Integrated Peripherals submenu, 2-7
Main menu options, 2-5
Power Savings menu, 2-11
Security menu options, 2-9
BiosSetupEnd, 8-3
BiosSetupGetCurrent, 8-5
BiosSetupGetPermanent, 8-4
BiosSetupGetResumeTime, 8-11
BiosSetupGetVersion, 8-4
BiosSetupSetCurrent, 8-5
BiosSetupSetPermanent, 8-4
BiosSetupSetResumeTime, 8-11
BiosSetupStart, 8-3
Boot Sequence, 8-8
E
Expand VGA Screen, 8-8
external video monitor, 5-2
F
Fixed Disk Boot Sector, 8-8
floppy disk drive port, 6-4
H
handwriting recognition software, 1-1–1-2
hard disk drive, replacing, 4-5
HDD Spin-down Timeout, 8-9
header files for 16-bit applications, 8-1
header files for 32-bit application, 8-1
high-connectivity cradle, 3-1
high-usage contacts, 6-6
high-usage cradle, 3-1
I
Idle Mode Timeout, 8-9
IrDA data communication software, 1-4
K
C
charge-only cradle, 3-2
connectivity peripherals, 3-1
connectors
DC power input, 6-2
keyboard port, 6-2
mouse, 6-1
parallel port, 6-5
system interface port pin assignments, 6-9
video port, 6-5
current BIOS settings, 2-1
keyboard connector, 6-2
Keyboard Hot Plug, 8-7
L
LPT Mode, 8-6
LPT Port Address and IRQ, 8-6
M
memory
adding, 4-2
EDO- or fast page-type, 4-3
specifications, 5-1
Index-1
MFG510, 2-23
mouse connector, 6-1
MS-DOS, limited support, 1-1
N
Numlock, 8-8
O
operating systems, supported, 1-1
Option and Setting parameters, 8-6
P
parallel port, 6-5
PC Card
installing, 4-1
removing, 4-2
standards, xiii
PC Card Controller Address, 8-7
PC Card support
PCMCIA support, 1-2
pen support, 1-1
pen, device drivers, 1-1–1-2
PENSET51, 2-17
command line mode, 2-18
menu mode, 2-17
parameters, 2-18
PenSetup, 2-2
peripheral interfaces, 6-1–6-2
permanent BIOS settings, 2-1
PM Setup, 2-14–2-15
Help, 2-16
initialization file, 2-15
Windows for Workgroups power settings, 2-15
Point 510 Setup, 2-14
port replicator, 3-2
portable port expander, 3-1
POST Errors, 8-8
Power Button, 8-8
power button, 7-1
power management, 7-2
system power states, 7-3
Windows 95 interface, 9-1
Windows 95 messages, 9-2
Windows 95 Power Properties, 2-15
Windows for Workgroups interface, 9-1
power management, PM Setup, 2-14
Power Savings, 8-9
power system, 7-1
R
radio, 5-3
Resume On Time, 8-10
resume time, 8-11
retrieving and setting BIOS options and settings, 8-4
retrieving current settings, 8-5
retrieving permanent settings, 8-4
Index-2
S
Serial Port A Address and IRQ, 8-6
Serial Port B Address and IRQ, 8-6
Serial Port B Device, 8-6
serial ports, 6-3
setting current settings, 8-5
setting permanent settings, 8-4
Setup Prompt, 8-8
Speaker, 8-8
Speaker Volume, 8-8
specifications
AC adapter, 5-6
advanced power management, 5-6
battery pack, 5-6
connectivity peripherals, 5-5
digitizer, 5-3
display, 5-2
environmental, 5-7
main system logic, 5-1
memory, 5-1
peripheral interfaces, 5-4–5-5
physical, 5-7
power system, 5-6
processor, 5-1
video controller, 5-1
wireless LAN adapter, 5-3
Standby Mode Timeout, 8-9
summary of functions, 8-2
Summary Screen, 8-8
suspend mode, 7-1
Suspend Mode Timeout, 8-10
system interface port, 6-8–6-9
system power, 7-1
system software, supported, 1-1
T
TranXit, 1-4
V
video controller, 5-1
video port, 5-2
video port connector, 6-5
Video Timeout, 8-9
W
wall-mount cradle, 3-1
weight specification, 5-7
Windows 95
power management interface, 9-1
power messages, 9-2
Windows 95 audit mode, 2-1
Windows 95 registry, xii, 2-1
Windows for Workgroups
power management interface, 9-1
Windows for Workgroups, pen support, 1-1
wireless LAN adapter, 5-3
Wireless LAN Base Address, 8-7
Wireless LAN IRQ, 8-7
Index-3
Index-4
6/98
58-0594-00A