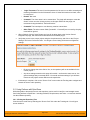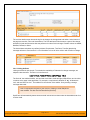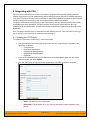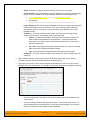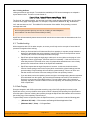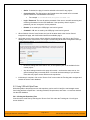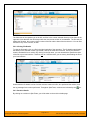
1
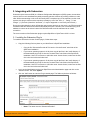
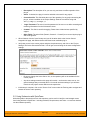
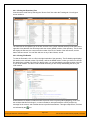
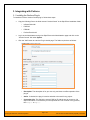
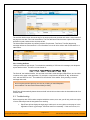
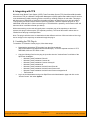
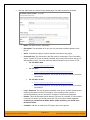
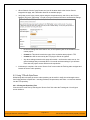
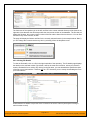
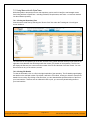
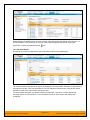
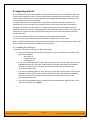
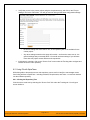
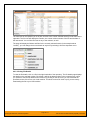
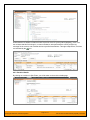
SpiraPlan & SpiraTeam | Version Control Integration User Guide Inflectra Corporation Date: November 19th, 2014 Contents 1. Introduction 1. Introduction ..................................... 1 SpiraPlan is a complete Agile Project Management System in one package, that manages your project's requirements, releases, iterations, tasks and bugs/issues. ® 2. Integrating with Subversion .......... 2 3. Integrating with Perforce ............... 7 4. Integrating with CVS .................... 12 5. Integrating with VSS ..................... 18 Designed specifically to support agile methodologies such as Extreme Programming (XP), Scrum, DSDM and Agile Unified Process (AUP) it allows teams to manage all their information in one environment. ® 6. Integrating with TFS ..................... 23 7. Integrating with Mercurial ............ 31 8. Integrating with Git ....................... 37 SpiraTeam is an integrated Application Lifecycle Management (ALM) system that manages your project's requirements, releases, test cases, issues and tasks in one unified ® environment. SpiraTeam contains all of the ® features provided by SpiraTest - our highly acclaimed quality assurance system and ® SpiraPlan . ® This guide outlines how to use either SpiraPlan ® or SpiraTeam in conjunction with a variety of Version Control / Software Configuration Management tools. This guide assumes that the reader is familiar with both SpiraPlan/SpiraTeam and the appropriate version control tool. For information regarding how to use the Source Code management features of SpiraPlan/Team, please refer to the SpiraPlan User Manual or the SpiraTeam User Manual. Each of the sections in this document covers a different version control system so we recommend using the table of contents on the left to locate the version control system you’re looking to integrate, then read the installation and usage instructions. © Copyright 2006-2014, Inflectra Corporation Page 1 of 45 This document contains Inflectra proprietary information 2. Integrating with Subversion Subversion (also known as SVN) is a Software Configuration Management (SCM) system, that enables users to work on code simultaneously while preserving previous versions by avoiding collisions in code edits. While users working on the code will usually have a complete copy of the repository on their local systems, this plug-in will access the repository remotely by use of the “svn://” , “http://” and “https://” protocols. (Note that “svn+ssh://” may be supported on a server by server basis.) Due to the methodologies in which IIS handles web requests and runs on the server, any SSH connection certificates that have trust issues will be automatically accepted. Therefore, we recommend using an IP address to connect to the server instead of a DNS name that could be redirected to an unsafe connection. The current version of the Subversion plugin requires SpiraPlan or SpiraTeam v4.2.0.2 or later. 2.1. Installing the Subversion Plug-In To install the Subversion Version Control plug-in, follow these steps: • Copy the following files into place on your Web Server’s SpiraTeam installation: o Copy the file “SubversionProvider.dll” file into the “VersionControl” sub-folder of the SpiraTeam installation. o If your server operating system is 64-bit, then copy all the files in the “x64” directory of the downloaded plug-in zip file into the “VersionControl” sub-folder of the SpiraTeam installation. Note: Do not create an x64 folder under VersionControl, make sure the files live in the VersionControl folder itself. o If your server operating system is 32-bit, then copy all the files in the “x32” directory of the downloaded plug-in zip file into the “VersionControl” sub-folder of the SpiraTeam installation. Note: Do not create an x32 folder under VersionControl, make sure the files live in the VersionControl folder itself. • Log in as the Administrator and go into SpiraTeam main Administration page and click on the “Version Control” link under System. • Click the “Add” button to enter the Plug-in details page. The fields required are as follows: o Name: The name must be “SubversionProvider”. © Copyright 2006-2014, Inflectra Corporation Page 2 of 3 This document contains Inflectra proprietary information o Description: The description is for your use only, and does not affect operation of the plug-in. o Active: If checked, the plug-in is active and able to be used for any project. o Connection Info: This field holds the root of the repository for any project accessing the plug-in, unless overridden in the Project Settings. Start the connection string with svn://, http://, or https://. o Login / Password: The user id and the password of the user to use while accessing and retrieving information from the Subversion server. o Custom1: This field is used for deugging. Please leave it blank unless specified by support. o Other Fields: The other fields (Domain, Custom2 – Custom5) are not used by the plug-in and will be ignored. • When finished, click the “Insert” button and you will be taken back to the Version Control integration list page, with SubversionProvider listed as an available plug-in. • Verify that you are in the correct project using the drop-down at top, and click on the “Project Settings” link for the SubversionProvider. You will get a screen listing all the same configuration settings: • o Be sure to change the Active field to Yes, or the repository will not be available for the current project. o Any other settings entered on this page will override - and have the same use as - the general settings that you created above. You would use these settings if you will have more than one project access different code repositories. Initial setup is complete, click on the “Source Code” menu under the Tracking tab to navigate and browse the source code repository. 2.2. Using Subversion with SpiraTeam While being able to browse the source code repository can be useful in itself, the real strength comes from linking artifacts in SpiraTeam - including Incidents, Requirements, and Tasks - to revisions checked into the software repository. © Copyright 2006-2014, Inflectra Corporation Page 3 of 3 This document contains Inflectra proprietary information 2.2.1. Viewing the Repository Tree View the source code tree by selecting the “Source Code” link under the Tracking tab. You will get a screen similar to: The folder tree of the repository is on the left, and files in the current selected directory will be listed in the right table. Note that this view will always show the current (HEAD) revision of the repository. The file view will display the filename, the current revision number of the file, the author of the last commit, and the date of the last commit. You can filter and sort on any of the columns, as well. 2.2.2. Viewing File Details To view the file details, click on a file in the right-hand side of the repository. The file details page displays the details on the selected revision. By default, it will be the HEAD revision, unless you clicked to view the file details from a revision. By clicking on the file name, you can download the specified revision of the file to your local machine. This does not do an SVN checkout; you are merely downloading the file to your local machine. Underneath the file details are tabs that show a preview of the file (with syntax highlighting), a list of all the revisions that this file belongs in, or was committed to, who performed the commit, and the log message for the commit, and a tab that shows any artifact associations. Throughout SpiraTeam, revisions are indicated by the © Copyright 2006-2014, Inflectra Corporation icon: Page 4 of 3 This document contains Inflectra proprietary information 2.2.3. Revision Details By clicking on a revision in SpiraTeam, you will be taken to the revision details page. The revision details screen shows the log for the Commit, the commit date and author. At the bottom of the page are two tabs, Files and Associations. The Files tab lists all files that were a part of this commit, with their full path and the action that was performed on them for this commit. Possible values are Added, Modified, or Deleted. The Associations tab shows any artifact (Incident, Task, Requirement, Test Case, Test Set, etc.) that the log message references. See section 2.2.4 for information on how to link a revision with a Subversion Commit: © Copyright 2006-2014, Inflectra Corporation Page 5 of 3 This document contains Inflectra proprietary information 2.2.4. Linking Artifacts Linking an artifact is quite simple. To maintain the readability of Subversion’s commit messages, we adopted a bracket token. The token is in the format of: [<artifact identifier>:<artifact id>] The first half, the Artifact Identifier, is a two-letter code that is used throughout SpiraTeam, and is visible on almost every page in the application. For example, a requirement’s identifier is “RQ”. Incidents are “IN”, and test cases are “TC”. The artifact ID is the number of the artifact. So by creating a commit message that reads: Due to requirement #12 [RQ:12], the code for .toString in class XMLparser was modified. This also fixed Incident #1034 [IN:1034]. SpiraTeam will automatically detect tokens and will include links to them under the Associations tab for a revision detail. If you forget to add the association during the commit, you can use the ‘Add Association’ option within SpiraTeam to add the association after the fact. 2.3. Troubleshooting While integration with Subversion is rather complex, as a user you will only receive a couple of errors that will prevent the integration from working: • SpiraTeam will not display the login page, and there is an error (either on the page or in the Application Event Log) that says “Could not load file or assembly.” Subversion control and library files come in both 32-bit and 64-bit (“Win32” or “x64”) versions. If this error occurs, it is most likely that the wrong version of the files were installed. Download the correct version from the Inflectra website, and overwrite the files in the VersionControl folder. • SpiraTeam reports that the login information is incorrect. In this case, double check the Version Control settings, both for the Project (which overrides the general settings) and the general settings. Project settings will over-ride the general settings. Be sure to use a user that has access to all nodes in the tree starting from the root repository location. • If you are taken back to the repository screen and given a message saying that the requested file was deleted from the system, this means that an attempt was made to view details on a file that is no longer part of the HEAD revision. This can happen when a file is deleted or renamed, and this is a normal condition in the code repository, not necessarily an error with Subversion or SpiraTeam. © Copyright 2006-2014, Inflectra Corporation Page 6 of 3 This document contains Inflectra proprietary information 3. Integrating with Perforce 3.1. Installing the Perforce Plug-In To install the Perforce Version Control plug-in, follow these steps: • Copy the following files to the folder named “VersionControl” in the SpiraTeam installation folder: o Inflectra.Global.dll o P4API.dll o P4DN.dll o PerforceProvider.dll • Log in as the Administrator and go into SpiraTeam main Administration page and click on the “Version Control” link under System. • Click the “Add” button to enter the Plug-in details page. The fields required are as follows: o Name: The name must be “PerforceProvider”. o Description: The description is for your use only, and does not affect operation of the plug-in. o Active: If checked, the plug-in is active and able to be used for any project. o Connection Info: This field is the server’s DNS or IP with the port to connect to. No depot information or root directory is to be specified here. Do not enter in any protocol, like http:// or ftp://. © Copyright 2006-2014, Inflectra Corporation Page 7 of 3 This document contains Inflectra proprietary information o Login / Password: The user id and the password of the user to use while accessing and retrieving information from the Subversion server. If either field needs to be blank, enter in ‘anonymous’. o Domain: Not used. o Custom01: The client name is to be entered here. The plugin will attempt to create the client if it does not exist. Unless you have a client pre-defined for the plugin, we recommend using the default, “PerforceProvider”. o Custom02: The base depot or root directory must be entered here. o Other Fields: The other custom fields (Custom03 – Custom05) are not used by the plugin and will be ignored. • When finished, click the “Insert” button and you will be taken back to the Version Control integration list page, with PerforceProvider listed as an available plug-in. • Verify that you are in the correct project using the drop-down at top, and click on the “Project Settings” link for the PerforceProvider. You will get a screen listing all the same configuration settings: • o Be sure to change the Active field to Yes, or the repository will not be available for the current project. o Any other settings entered on this page will override - and have the same use as - the general settings that you created above. You would use these settings if you will have more than one project access different code repositories. Initial setup is complete, click on the “Source Code” menu under the Tracking tab to navigate and browse the source code repository. 3.2. Using Perforce with SpiraTeam While being able to browse the source code repository can be useful in itself, the real strength comes from linking artifacts in SpiraTeam - including Incidents, Requirements, and Tasks - to revisions checked into the software repository. 3.2.1. Viewing the Repository Tree View the source code tree by selecting the “Source Code” link under the Tracking tab. You will get a screen similar to: © Copyright 2006-2014, Inflectra Corporation Page 8 of 3 This document contains Inflectra proprietary information The folder tree of the repository is on the left, and files in the current selected directory will be listed in the right table. Note that this view will always show the current (HEAD) changelist of the depot. The file view will display the filename, the current change number of the file, the author of the last change, and the date of the last change. You can filter and sort on any of the columns, as well. 3.2.2. Viewing File Details To view the file details, click on a file in the right-hand side of the screen. The file details page displays the details on the selected file. By default, it will be the HEAD change, unless you clicked to view the file details from a change. By clicking on the file name, you can download the specified change version of the file to your local machine. This does not open the file on the depot; you are merely downloading the file to your local machine. Underneath the file’s details is a list of all the changes that this file was changed in, who performed the change, and the log message for the change. Throughout SpiraTeam, changes are indicated by the icon. 3.2.3. Change Details By clicking on a change in SpiraTeam, you will be taken to the changelist details page: © Copyright 2006-2014, Inflectra Corporation Page 9 of 3 This document contains Inflectra proprietary information The revision details screen shows the log for the change, the change date and author. At the bottom of the page are two tabs, Files and Associations. The Files tab lists all files that were a part of this change, with their full path and the action that was performed on them for this change. Possible values are Added, Modified, Deleted, or Other. The Associations tab shows any artifact (Incident, Requirement, Test Case, Test Set) that the log message references. See section 2.2.4 for information on how to link a revision with a Perforce change: 3.2.4. Linking Artifacts Linking an artifact is quite simple. To maintain the readability of Subversion’s change messages, we adopted a bracket token. The token is in the format of: [<artifact identifier>:<artifact id>] The first half, the Artifact Identifier, is a two-letter code that is used throughout SpiraTeam, and is visible on almost every page in the application. For example, a requirement’s identifier is “RQ”. Incidents are “IN”, and test cases are “TC”. The artifact ID is the number of the artifact. So by creating a change message that reads: Due to requirement #12 [RQ:12], the code for .toString in class XMLparser was modified. This also fixed Incident #1034 [IN:1034]. SpiraTeam will automatically detect tokens and will include links to them under the Associations tab for a revision detail. © Copyright 2006-2014, Inflectra Corporation Page 10 of 3 This document contains Inflectra proprietary information 3.3. Troubleshooting While integration with Perforce is rather complex, as a user you will only receive a couple of errors that will prevent the integration from working: • SpiraTeam will not display the login page, and there is an error (either on the page or in the Application Event Log) that says “Could not load file or assembly.” This simply means that not all of the required DLL libraries (listed above in 3.1) are present in the \VersionControl directory inside of the installation. It could also mean that the IIS Application Pool is not set to allow 32-bit applications. (At this time, there are no 64-bit DLLs available for the Perforce Provider.) • SpiraTeam reports that the login information is incorrect. In this case, double check the Version Control settings, both for the Project (which overrides the general settings) and the general settings. Project settings will over-ride the general settings. Be sure to use a user that has access to all nodes in the tree starting from the root repository location. • If you are taken back to the repository screen and given a message saying that the requested file was deleted from the system, this means that an attempt was made to view details on a file that is no longer part of the HEAD revision. This can happen when a file is deleted or renamed, and this is a normal condition in the code repository, not necessarily an error with Subversion or SpiraTeam. • Any other errors about not being able to load the version control provider will have the error messages logged in the web server’s (that hosts SpiraTeam) Application Event Log. When conotacting support, be sure to have the event logs ready. © Copyright 2006-2014, Inflectra Corporation Page 11 of 3 This document contains Inflectra proprietary information 4. Integrating with CVS The Concurrent Versions System (CVS) is a Software Configuration Management (SCM) system that enables users to work on code simultaneously while preserving previous versions by avoiding collisions in code edits. This plug-in will allow users of SpiraPlan or SpiraTeam (hereafter referred to as SpiraTeam) to be able to browse a CVS repository and view revisions linked to SpiraTeam artifacts. The plug-in will download a working-copy of the CVS repository onto the SpiraTeam server and use that for displaying the list of files/folders. The list of revisions will be queries dynamically from the CVS repository on an as-needed basis. The rest of this section outlines how to install and use the plug-in with SpiraTeam. Note: The plug-in will allow users to download and view different revisions of files and view revision logs, but no changes to the repository are allowed through the plug-in. 4.1. Installing the CVS Plug-In To install the CVS Version Control plug-in, follow these steps: • • • Copy the following files from the plug-in zip-archive into the “VersionControl” sub-folder of the SpiraTeam installation: o CvsProvider.dll o DocsVision.Remoting.dll o ICSharpCode.SharpCvsLib.dll o ICSharpCode.SharpZipLib.dll o log4net.dll Log in as the Administrator and go into SpiraTeam main Administration page and click on the “Version Control” link under System. Click the “Add” button to enter the Plug-in details page. The fields required are as follows: o Name: The name must be “CvsProvider”. o Description: The description is for your use only, and does not affect operation of the plug-in. © Copyright 2006-2014, Inflectra Corporation Page 12 of 3 This document contains Inflectra proprietary information o Active: If checked, the plug-in is active and able to be used for any project. o Connection Info: This field holds the root of the repository for any project accessing the plug-in, unless overridden in the Project Settings. Please use the following format: <cvs repository url>:/cvsroot/<repository path> For example: sharpcvslib.cvs.sourceforge.net:/cvsroot/sharpcvslib o Login / Password: The user id and the password of the user to use while accessing and retrieving information from the CVS server. If you are accessing a public repository anonymously, just use “anonymous” for both username and password and it will be handled correctly. o Custom 01 – This must contain the name of the connection protocol being used to access the CVS server. The following protocols are supported: pserver - the first access protocol according to the client-server scheme, the most simple and the fastest one. Its imperfection - it transfers all the data unsecured. If you need to secure codes and user passwords, do not use this protocol in public nets. o ext or ssh - access protocol using SSH (Secure Shell). It is used for accessing UNIX servers and it supports all data encodings. sspi - access protocol for Windows server with data encoding support. Custom 02 – This must contain the name of the module you wish to access in the CVS repository. • When finished, click the “Insert” button and you will be taken back to the Version Control integration list page, with CvsProvider listed as an available plug-in. • Verify that you are in the correct project using the drop-down at top, and click on the “Project Settings” link for the CvsProvider. You will get a screen listing all the same configuration settings: o Be sure to change the Active field to Yes, or the repository will not be available for the current project. o Any other settings entered on this page will override - and have the same use as - the general settings that you created above. You would use these settings if you will have more than one project access different code repositories. © Copyright 2006-2014, Inflectra Corporation Page 13 of 3 This document contains Inflectra proprietary information • Initial setup is complete, click on the “Source Code” menu under the Tracking tab to navigate and browse the source code repository. 4.2. Using CVS with SpiraTeam While being able to browse the source code repository can be useful in itself, the real strength comes from linking artifacts in SpiraTeam - including Incidents, Requirements, and Tasks - to revisions checked into the software repository. 4.2.1. Viewing the Repository Tree View the source code tree by selecting the “Source Code” link under the Tracking tab. You will get a screen similar to: The folder tree of the repository is on the left, and files in the current selected directory will be listed in the right table. Note that this view will always show the current (HEAD) revision of the repository. The file view will display the filename, the current revision number of the file and the date of the last commit. You can filter and sort on any of the columns, as well. 4.2.2. Viewing File Details To view the file details, click on a file in the right-hand side of the repository. The file details page displays the details on the selected revision. By default, it will be the HEAD revision, unless you clicked to view the file details from a revision. By clicking on the file name, you can download the specified revision of the file to your local machine. This does not do an CVS checkout; you are merely downloading the file to your local machine. © Copyright 2006-2014, Inflectra Corporation Page 14 of 3 This document contains Inflectra proprietary information Underneath the file details is a list of all the revisions that this file belongs in, or was committed to, who performed the commit, and the log message for the commit. Throughout SpiraTeam, revisions are indicated by the icon. 4.2.3. Revision Details By clicking on a revision in SpiraTeam, you will be taken to the revision details page. The revision details screen shows the log for the Commit, the commit date and author. At the bottom of the page are two tabs, Files and Associations. The Files tab lists all files that were a part of this commit, with their full path, size, latest revision and date of edit. The Associations tab shows any artifact (Incident, Requirement, Test Case, Test Set) that the log message references. See section 3.2.4 for information on how to link a revision with a CVS Commit: © Copyright 2006-2014, Inflectra Corporation Page 15 of 3 This document contains Inflectra proprietary information 4.2.4. Linking Artifacts Linking an artifact is quite simple. To maintain the readability of CVS commit messages, we adopted a square bracket token. The token is in the format of: [<artifact identifier>:<artifact id>] The first half, the Artifact Identifier, is a two-letter code that is used throughout SpiraTeam, and is visible on almost every page in the application. For example, a requirement’s identifier is “RQ”. Incidents are “IN”, and test cases are “TC”. The artifact ID is the number of the artifact. So by creating a commit message that reads: Due to requirement #12 [RQ:12], the code for .toString in class XMLparser was modified. This also fixed Incident #1034 [IN:1034]. SpiraTeam will automatically detect tokens and will include links to them under the Associations tab for a revision detail. 4.3. Troubleshooting While integration with CVS is rather complex, as a user you will only receive a couple of errors that will prevent the integration from working: • When you first load the list of folders and files for a repository it may take several minutes to load as it’s downloading the entire repository from the CVS server to the SpiraTeam server. This delay will not occur on subsequent views of the page. • SpiraTeam will not display the login page, and there is an error (either on the page or in the Application Event Log) that says “Could not load file or assembly.”. If this error occurs, it is most likely that the CvsProvider.dll or some of its dependent assemblies were not correctly placed in the VersionControl folder of the SpiraTeam installation. • SpiraTeam reports that the login information is incorrect. In this case, double check the Version Control settings, both for the Project (which overrides the general settings) and the general settings. Project settings will over-ride the general settings. Be sure to use a user that has access to all nodes in the tree starting from the root repository location. • If you are taken back to the repository screen and given a message saying that the requested file was deleted from the system, this means that an attempt was made to view details on a file that is no longer part of the HEAD revision. This can happen when a file is deleted or renamed, and this is a normal condition in the code repository, not necessarily an error with CVS or SpiraTeam. 3.4. Data Purging Since the integration with CVS requires that a working copy of the CVS repository be stored on the SpiraTeam server, you may decide at some point to unlink a disused CVS repository from SpiraTeam to save disk-space. However unlinking the repository through the SpiraTeam web interface will not remove the working copy of the repository from the server. To permanently remove a repository from the SpiraTeam server, you need to locate the following path: o (Windows XP, 2003) - C:\Documents and Settings\All Users\Application Data o (Windows 2008, 7, Vista) – C:\ProgramData © Copyright 2006-2014, Inflectra Corporation Page 16 of 3 This document contains Inflectra proprietary information If you look inside this folder, you will see a subfolder called “Inflectra”, and under that will be a subfolder called “CvsProvider”. If you open up this subfolder, you will see a list of all the CVS modules that have been accessed through SpiraTeam. To purge a module, just select it and choose the Delete Folder option in Windows. © Copyright 2006-2014, Inflectra Corporation Page 17 of 3 This document contains Inflectra proprietary information 5. Integrating with VSS Visual SourceSafe® (VSS) from Microsoft® is a Software Configuration Management (SCM) system that enables users to work on code simultaneously while preserving previous versions by avoiding collisions in code edits. This plug-in will allow users of SpiraPlan or SpiraTeam (hereafter referred to as SpiraTeam) to be able to browse a VSS database and view revisions linked to SpiraTeam artifacts. While users working on the code will usually have a complete copy of the repository on their local systems, this plug-in will access the VSS database remotely.The rest of this section outlines how to install and use the plug-in with SpiraTeam. Note: The plug-in will allow users to download and view different revisions of files and view revision logs, but no changes to the repository are allowed through the plug-in. 5.1. Installing the VSS Plug-In To install the VSS Version Control plug-in, follow these steps: • Install a copy of Visual SourceSafe on the same server that is running SpiraTeam (if it is already installed on the server, you can disregard this step). • Copy the following files from the plug-in zip-archive into the “VersionControl” sub-folder of the SpiraTeam installation: • • o VssProvider.dll o SourceSafe.Interop.dll Log in as the Administrator and go into SpiraTeam main Administration page and click on the “Version Control” link under System. Click the “Add” button to enter the Plug-in details page. The fields required are as follows: o Name: The name must be “VssProvider”. o Description: The description is for your use only, and does not affect operation of the plug-in. © Copyright 2006-2014, Inflectra Corporation Page 18 of 3 This document contains Inflectra proprietary information o Active: If checked, the plug-in is active and able to be used for any project. o Connection Info: This field points to the filepath where the srcsafe.ini file is located (which contains the VSS database information). For example: C:\VssDatabases\Project1\srcsafe.ini o Login / Password: The user id and the password of the user to use while accessing and retrieving information from the VSS database. If the repository doesn’t require a password, just use “anonymous” as the password. o Domain: is not used by the VSS plug-in and can be ignored o Custom01 – 05: are not used by the VSS plug-in and can be ignored • When finished, click the “Insert” button and you will be taken back to the Version Control integration list page, with VssProvider listed as an available plug-in. • Verify that you are in the correct project using the drop-down at top, and click on the “Project Settings” link for the VssProvider. You will get a screen listing all the same configuration settings: • o Be sure to change the Active field to Yes, or the repository will not be available for the current project. o Any other settings entered on this page will override - and have the same use as - the general settings that you created above. You would use these settings if you will have more than one project access different code repositories. Initial setup is complete, click on the “Source Code” menu under the Tracking tab to navigate and browse the source code database. 5.2. Using VSS with SpiraTeam While being able to browse the source code repository can be useful in itself, the real strength comes from linking artifacts in SpiraTeam - including Incidents, Requirements, and Tasks - to revisions checked into the VSS database. 5.2.1. Viewing the Repository Tree View the source code tree by selecting the “Source Code” link under the Tracking tab. You will get a screen similar to: © Copyright 2006-2014, Inflectra Corporation Page 19 of 3 This document contains Inflectra proprietary information The folder tree of the repository is on the left, and files in the current selected directory will be listed in the right table. Note that this view will always show the most recent revision of the database. The file view will display the filename, the current revision number of the file and the date of the last check-in. You can filter and sort on any of the columns, as well. 5.2.2. Viewing File Details To view the file details, click on a file in the right-hand side of the repository. The file details page displays the details on the selected revision. By default, it will be the most recent revision, unless you clicked to view the file details from a revision. By clicking on the file name, you can download the specified revision of the file to your local machine. This does not do a VSS checkout; you are merely downloading the file to your local machine. Underneath the file details is a list of all the revisions made to this file, who performed the revision, and the log message for the action performed. Throughout SpiraTeam, revisions are indicated by the icon. 5.2.3. Revision Details By clicking on a revision in SpiraTeam, you will be taken to the revision details page. © Copyright 2006-2014, Inflectra Corporation Page 20 of 3 This document contains Inflectra proprietary information The revision details screen shows the log for the action performed, the date and author. At the bottom of the page are two tabs, Files and Associations. The Files tab lists all files that were a part of this revision, with their full path, latest revision and date of edit. The Associations tab shows any artifact (Incident, Requirement, Test Case, Test Set) that the log message references. See section 4.2.4 for information on how to link a revision with a VSS check-in or other action: 5.2.4. Linking Artifacts Linking an artifact is quite simple. To maintain the readability of VSS check-in messages, we adopted a square bracket token. The token is in the format of: [<artifact identifier>:<artifact id>] The first half, the Artifact Identifier, is a two-letter code that is used throughout SpiraTeam, and is visible on almost every page in the application. For example, a requirement’s identifier is “RQ”. Incidents are “IN”, and test cases are “TC”. The artifact ID is the number of the artifact. So by creating a commit message that reads: Due to requirement #12 [RQ:12], the code for .toString in class XMLparser was modified. This also fixed Incident #1034 [IN:1034]. SpiraTeam will automatically detect tokens and will include links to them under the Associations tab for a revision detail. 5.3. Troubleshooting While integration with VSS is rather complex behind the scenes, as a user you will only receive a couple of errors that will prevent the integration from working: • SpiraTeam will not display the login page, and there is an error (either on the page or in the Application Event Log) that says “Could not load file or assembly.”. If this error occurs, it is © Copyright 2006-2014, Inflectra Corporation Page 21 of 3 This document contains Inflectra proprietary information most likely that the VssProvider.dll or some of its dependent assemblies were not correctly placed in the VersionControl folder of the SpiraTeam installation. • SpiraTeam reports that the login information is incorrect. In this case, double check the Version Control settings, both for the Project (which overrides the general settings) and the general settings. Project settings will over-ride the general settings. Be sure to use a user that has access to all nodes in the tree starting from the root repository location. • If you are taken back to the repository screen and given a message saying that the requested file was deleted from the system, this means that an attempt was made to view details on a file that was deleted or destroyed in VSS. This is a normal condition in the code repository, not necessarily an error with VSS or SpiraTeam. • If you have the VSS database located on a remote file-share on a separate server to SpiraTeam, you will need to modify the identify used by the IIS Application Pool running SpiraTeam. By default the IIS Application Pool will run as the special Windows user “NETWORK SERVICE”. Whilst this is a secure account with low privileges for normal use of the system, it may not have sufficient permissions to access the VSS repository over your Local Area Network (LAN). We recommend changing the IIS Application Pool to instead run as a Windows Domain user that has permissions to access the remote file-share containing the VSS database. © Copyright 2006-2014, Inflectra Corporation Page 22 of 3 This document contains Inflectra proprietary information 6. Integrating with TFS Microsoft Visual Studio Team System (VSTS) Team Foundation Server (TFS) from Microsoft® (hereafter referred to as TFS) is a Software Configuration Management (SCM) system that enables users to work on code simultaneously while preserving previous versions by avoiding collisions in code edits. This plug-in will allow users of SpiraPlan or SpiraTeam (hereafter referred to as SpiraTeam) to be able to browse a TFS repository and view revisions linked to SpiraTeam artifacts. There are separate plug-ins for TFS 2005/2008, 2010 and 2012+. When connecting to a TFS 2010/2012+ repository, the connection URL will also need to be in a different format (see below). While users working on the code will usually have a complete copy of the repository on their local systems, this plug-in will access the TFS repository remotely. The rest of this section outlines how to install and use the plug-in with SpiraTeam. Note: The plug-in will allow users to download and view different revisions of files and view revision logs, but no changes to the repository are allowed through the plug-in. 6.1. Installing the TFS Plug-In To install the TFS Version Control plug-in, follow these steps: • Download the appropriate TFS provider from the Inflectra website (http://www.inflectra.com/SpiraTeam/Downloads.aspx) – there are separate versions for TFS 2005/2008, 2010 and TFS 2012 or later. • Copy the following files from the plug-in zip-archive into the “VersionControl” sub-folder of the SpiraTeam installation: • o Microsoft.TeamFoundation.Client.dll o Microsoft.TeamFoundation.Common.dll o Microsoft.TeamFoundation.Common.Library.dll o Microsoft.TeamFoundation.dll o Microsoft.TeamFoundation.VersionControl.Client.dll o Microsoft.TeamFoundation.VersionControl.Common.dll o Microsoft.TeamFoundation.VersionControl.Common.Integration.dll o TfsProvider.dll Log in as the Administrator and go into SpiraTeam main Administration page and click on the “Version Control” link under System. © Copyright 2006-2014, Inflectra Corporation Page 23 of 3 This document contains Inflectra proprietary information • Click the “Add” button to enter the Plug-in details page. The fields required are as follows: o Name: The name must be “TfsProvider”. o Description: The description is for your use only, and does not affect operation of the plug-in. o Active: If checked, the plug-in is active and able to be used for any project. o Connection Info: This field points to the URL used for accessing the Team Foundation Server. Typically TFS runs on website port 8080, but you may need to check with your IT administrator to verify. The exact connection URL will depend on your version of TFS: For TFS 2005 / 2008: • http://myservname:8080 For TFS 2010 • http://myservname:8080/tfs/projectcollection • Where “projectcollection” is the name of the project collection you will be connecting to For TFS 2012 or later • http://myservname:8080/tfs/projectcollection • Where “projectcollection” is the name of the project collection you will be connecting to o Login / Password: The user id and the password of the user to use while accessing and retrieving information from the TFS repository. If the repository doesn’t require a username/password, just use “anonymous” as both the username and password. o Domain: This is the Windows Domain that the TFS server is a member of. If the machine is not part of a domain, you should just use the TFS server name instead. If you are connecting to a hosted Visual Studio Online (VSO) repository, you should leave the Domain blank. o Custom01 – 05: are not used by the TFS plug-in and can be ignored © Copyright 2006-2014, Inflectra Corporation Page 24 of 3 This document contains Inflectra proprietary information • When finished, click the “Insert” button and you will be taken back to the Version Control integration list page, with TfsProvider listed as an available plug-in. • Verify that you are in the correct project using the drop-down at top, and click on the “Project Settings” link for the TfsProvider. You will get a screen listing all the same configuration settings: • o Be sure to change the Active field to Yes, or the repository will not be available for the current project. o Custom 01: This should contain the name of the equivalent team project in TFS. o Custom 02 – 05: are not used by the TFS plug-in and can be ignored o Any other settings entered on this page will override - and have the same use as - the general settings that you created above. You would use these settings if you will have more than one project access different code repositories. Initial setup is complete, click on the “Source Code” menu under the Tracking tab to navigate and browse the source code repository. 6.2. Using TFS with SpiraTeam Whilst being able to browse the source code repository can be useful in itself, the real strength comes from linking artifacts in SpiraTeam - including Incidents, Requirements, and Tasks - to revisions checked into the TFS repository. 6.2.1. Viewing the Repository Tree View the source code tree by selecting the “Source Code” link under the Tracking tab. You will get a screen similar to: © Copyright 2006-2014, Inflectra Corporation Page 25 of 3 This document contains Inflectra proprietary information The folder tree of the repository is on the left, and files in the current selected directory will be listed in the right table. Note that this view will always show the most recent revision of the database. The file view will display the filename, the current revision number of the file and the date of the last check-in. You can filter and sort on any of the columns, as well. The page will display the folders and files for the currently selected branch (in the example above “Main”), you can change the current branch at any time by selecting it from the dropdown menu: 6.2.2. Viewing File Details To view the file details, click on a file in the right-hand side of the repository. The file details page displays the details on the selected revision. By default, it will be the most recent revision, unless you clicked to view the file details from a revision. By clicking on the file name, you can download the specified revision of the file to your local machine. This does not do a TFS checkout; you are merely downloading the file to your local machine. Underneath the file details is a preview of the contents of the source code file (with syntax coloring to make it easier to read). © Copyright 2006-2014, Inflectra Corporation Page 26 of 3 This document contains Inflectra proprietary information In addition, there are two other tabs that display the list of all the revisions made to this file and any associations with other SpiraTeam artifacts: The revision list will display the name of the revision, who performed the revision, and the log message for the action performed. Throughout SpiraTeam, revisions are indicated by the icon. The association list will display the list of SpiraTeam artifacts that are linked to this specific source code file. You can add a new association by clicking on the ‘Add Association’ hyperlink. 6.2.3. Revision Details By clicking on a revision in SpiraTeam, you will be taken to the revision details page. The revision details screen shows the log for the action performed, the date and author. At the bottom of the page are two tabs, Files and Associations. The Files tab lists all files that were a part of this revision, with their full path, latest revision and date of edit. The Associations tab shows any artifact (Incident, Requirement, Test Case, Test Set) that the log message references. See section 5.2.4 for information on how to link a revision with a TFS check-in or other action: © Copyright 2006-2014, Inflectra Corporation Page 27 of 3 This document contains Inflectra proprietary information 6.2.4. Linking Artifacts Linking an artifact is quite simple. To maintain the readability of TFS check-in messages, we adopted a square bracket token. The token is in the format of: [<artifact identifier>:<artifact id>] The first half, the Artifact Identifier, is a two-letter code that is used throughout SpiraTeam, and is visible on almost every page in the application. For example, a requirement’s identifier is “RQ”. Incidents are “IN”, and test cases are “TC”. The artifact ID is the number of the artifact. So by creating a commit message that reads: Due to requirement #12 [RQ:12], the code for .toString in class XMLparser was modified. This also fixed Incident #1034 [IN:1034]. SpiraTeam will automatically detect tokens and will include links to them under the Associations tab for a revision detail. If you forget to add the association during the commit, you can use the ‘Add Association’ option within SpiraTeam to add the association after the fact. 6.3. Troubleshooting While integration with TFS is rather sophisticated behind the scenes, as a user you will only receive a couple of errors that will prevent the integration from working: • SpiraTeam will not display the login page, and there is an error (either on the page or in the Application Event Log) that says “Could not load file or assembly.”. If this error occurs, it is most likely that the TfsProvider.dll or some of its dependent assemblies were not correctly placed in the VersionControl folder of the SpiraTeam installation. • SpiraTeam reports that the login information is incorrect. In this case, double check the Version Control settings, both for the Project (which overrides the general settings) and the general settings. Project settings will over-ride the general settings. Be sure to use a user that has access to all nodes in the tree starting from the root repository location. • If you are taken back to the repository screen and given a message saying that the requested file was deleted from the system, this means that an attempt was made to view details on a file that was deleted in TFS. This is a normal condition in the code repository, not necessarily an error with TFS or SpiraTeam. 6.4. Enforcing Associations with a Custom Policy As described in section 5.2.4 above, you can easily associate check-ins of code in TFS with relevant SpiraTeam artifacts by adding the appropriate artifact identifier in the commit messages. In order to enforce this process, one of our customers has written a custom Visual Studio 2008 and 2010/2012+ Team System check-in policy that will force users to enter at least one SpiraTeam artifact in each of the check-in comments. This policy will also check the IDs of the supplied artifacts to make sure they exist in the appropriate SpiraTeam installation. To install the custom check-in policy, you should download the SpiraPolicySetup.msi (for 2008) or SpiraPolicy.vsix (for 2010+) installation package from the Add-Ons/Downloads section of the Inflectra website (http://www.inflectra.com/SpiraTeam/Downloads.aspx) and run the installation package on each workstation that has Visual Studio installed. Once this installation has been completed, you need to tell Visual Studio to add the custom check-in policy: © Copyright 2006-2014, Inflectra Corporation Page 28 of 3 This document contains Inflectra proprietary information 1. Inside Visual Studio, go to Team > Team Project Settings > Source Control to open up the Source Code extensions dialog box: 2. Click on the Check-in Policy tab to list the various check-in policies: 3. Click on the [Add…] button to add a new check-in policy: © Copyright 2006-2014, Inflectra Corporation Page 29 of 3 This document contains Inflectra proprietary information 4. Select the SpiraTeam/Plan TFS check-in Policy and click [OK]. This will bring up the SpiraTeam custom policy configuration dialog box: 5. Enter the URL for the SpiraTeam server (you only need the server name and virtual directory portion) as well as a valid login and password. Then click [Connect] to get the list of projects. 6. Select the checkboxes for which artifact types you want to be included in the artifact enforcement and click the [OK] button to confirm the settings. 7. Now when a user checks-in a change to the TFS source code repository, they will be required to enter at least one SpiraTeam artifact, and the system will check to make sure that artifact actually exists in the specified project. © Copyright 2006-2014, Inflectra Corporation Page 30 of 3 This document contains Inflectra proprietary information 7. Integrating with Mercurial Mercurial is a Distributed Version Control System (DVCS) system that keeps track of software revisions and allows many developers to work on a given project without necessarily being connected to a common network since it doesn’t rely on a central repository, but instead distributes copies of the entire source code repository to each user’s workstation. The SpiraTeam plug-in for Mercurial allows users of SpiraPlan or SpiraTeam (hereafter referred to as SpiraTeam) to be able to browse a Mercurial repository and view revisions linked to SpiraTeam artifacts. The plug-in will download a read-only working-copy of the Mercurial repository onto the SpiraTeam server and use that for displaying the list of files/folders. The list of revisions will be queried dynamically from this local repository on an as-needed basis. The plug-in also performs ‘pull’ requests from the specified remote repository to ensure that the local repository remains up to date. The rest of this section outlines how to install and use the plug-in with SpiraTeam. Note: The plug-in will allow users to download and view different revisions of files and view revision logs, but no changes to the repository are allowed through the plug-in. 7.1. Installing the Mercurial Plug-In To install the Mercurial Version Control plug-in, follow these steps: • • • Copy the following files from the plug-in zip-archive into the “VersionControl” sub-folder of the SpiraTeam installation: o MercurialProvider.dll o Mercurial.Net.dll Log in as the Administrator and go into SpiraTeam main Administration page and click on the “Version Control” link under System. Click the “Add” button to enter the Plug-in details page. The fields required are as follows: o Name: The name must be “MercurialProvider”. o Description: The description is for your use only, and does not affect operation of the plug-in. © Copyright 2006-2014, Inflectra Corporation Page 31 of 3 This document contains Inflectra proprietary information o Active: If checked, the plug-in is active and able to be used for any project. o Connection Info: This field holds the clone URL of the repository for any project accessing the plug-in, unless overridden in the Project Settings: For example: https://bitbucket.org/aragost/javahg ssh://example.com/hg/ o Login / Password: The user id and the password of the user to use while accessing and retrieving information from the remote Mercurial repository. If you are accessing a public repository anonymously, just use “anonymous” for both username and password and it will be handled correctly. o Custom 01 – This needs to contain the path on the SpiraTeam server where the Mercurial executable (Hg.exe) can be found. If left blank, it will attempt to automatically discover Mercurial from the Windows %PATH% environment variable. Custom 02 – Custom 05 – Not used by this plugin. o • When finished, click the “Insert” button and you will be taken back to the Version Control integration list page, with MercurialProvider listed as an available plug-in. • Verify that you are in the correct project using the drop-down at top, and click on the “Project Settings” link for the MercurialProvider. You will get a screen listing all the same configuration settings: • o Be sure to change the Active field to Yes, or the repository will not be available for the current project. o Any other settings entered on this page will override - and have the same use as - the general settings that you created above. You would use these settings if you will have more than one project access different code repositories. Initial setup is complete, click on the “Source Code” menu under the Tracking tab to navigate and browse the source code repository. © Copyright 2006-2014, Inflectra Corporation Page 32 of 3 This document contains Inflectra proprietary information 7.2. Using Mercurial with SpiraTeam While being able to browse the source code repository can be useful in itself, the real strength comes from linking artifacts in SpiraTeam - including Incidents, Requirements, and Tasks - to revisions checked into the software repository. 7.2.1. Viewing the Repository Tree View the source code tree by selecting the “Source Code” link under the Tracking tab. You will get a screen similar to: The folder tree of the repository is on the left, and files in the current selected directory will be listed in the right table. Note that this view will always show the current (TIP) branch of the repository. The file view will display the filename, the current revision number of the file and the date of the last commit. You can filter and sort on any of the columns, as well. 7.2.2. Viewing File Details To view the file details, click on a file in the right-hand side of the repository. The file details page displays the details on the selected revision. By default, it will be the TIP branch, unless you clicked to view the file details from a revision. By clicking on the file name, you can download the specified revision of the file to your local machine. This does not do a Mercurial clone or pull; you are merely downloading the file to your local machine. © Copyright 2006-2014, Inflectra Corporation Page 33 of 3 This document contains Inflectra proprietary information Underneath the file details is a list of all the revisions (Mercurial changesets) that this file belongs in, or was committed to, who performed the commit, and the log message for the commit. Throughout SpiraTeam, revisions are indicated by the icon. 7.2.3. Revision Details By clicking on a revision in SpiraTeam, you will be taken to the revision details page. The revision details screen shows the log for the changeset, the commit date and author. At the bottom of the page are two tabs, Files and Associations. The Files tab lists all files that were a part of this commit, with their full path, size, latest revision and date of edit. The Associations tab shows any artifact (Incident, Requirement, Test Case, Test Set) that the log message references. See section 7.2.4 for information on how to link a revision with a Mercurial changeset: © Copyright 2006-2014, Inflectra Corporation Page 34 of 3 This document contains Inflectra proprietary information 7.2.4. Linking Artifacts Linking an artifact is quite simple. To maintain the readability of Mercurial changeset messages, we adopted a square bracket token. The token is in the format of: [<artifact identifier>:<artifact id>] The first half, the Artifact Identifier, is a two-letter code that is used throughout SpiraTeam, and is visible on almost every page in the application. For example, a requirement’s identifier is “RQ”. Incidents are “IN”, and test cases are “TC”. The artifact ID is the number of the artifact. So by creating a commit message that reads: Due to requirement #12 [RQ:12], the code for .toString in class XMLparser was modified. This also fixed Incident #1034 [IN:1034]. SpiraTeam will automatically detect tokens and will include links to them under the Associations tab for a revision detail. 7.3. Troubleshooting While integration with Mercurial is sophisticated behind the scenes, as a user you will only receive a couple of errors that will prevent the integration from working: • When you first load the list of folders and files for a repository it may take several minutes to load as it’s cloning the entire repository from the remote Mercurial server to the SpiraTeam server. This delay will not occur on subsequent views of the page. • SpiraTeam will not display the login page, and there is an error (either on the page or in the Application Event Log) that says “Could not load file or assembly.”. If this error occurs, it is most likely that the MercurialProvider.dll or some of its dependent assemblies were not correctly placed in the VersionControl folder of the SpiraTeam installation. • SpiraTeam reports that the login information is incorrect. In this case, double check the Version Control settings, both for the Project (which overrides the general settings) and the general settings. Project settings will over-ride the general settings. Be sure to use a user that has access to all nodes in the tree starting from the root repository location. • If you are taken back to the repository screen and given a message saying that the requested file was deleted from the system, this means that an attempt was made to view details on a file that is no longer part of the TIP branch. This can happen when a file is deleted or renamed, and this is a normal condition in the code repository, not necessarily an error with Mercurial or SpiraTeam. 7.4. Data Purging Since the integration with Mercurial requires that a working copy of the Mercurial repository be stored on the SpiraTeam server, you may decide at some point to unlink a disused Mercurial repository from © Copyright 2006-2014, Inflectra Corporation Page 35 of 3 This document contains Inflectra proprietary information SpiraTeam to save disk-space. However unlinking the repository through the SpiraTeam web interface will not remove the working copy of the repository from the server. To permanently remove a repository from the SpiraTeam server, you need to locate the following path: o (Windows XP, 2003) - C:\Documents and Settings\All Users\Application Data o (Windows 2008, 7, Vista) – C:\ProgramData If you look inside this folder, you will see a subfolder called “Inflectra”, and under that will be a subfolder called “MercurialProvider”. If you open up this subfolder, you will see a list of all the Mercurial repositories that have been accessed through SpiraTeam. To purge a module, just select it and choose the Delete Folder option in Windows. © Copyright 2006-2014, Inflectra Corporation Page 36 of 3 This document contains Inflectra proprietary information 8. Integrating with Git Git is a Distributed Version Control System (DVCS) system that keeps track of software revisions and allows many developers to work on a given project without necessarily being connected to a common network since it doesn’t rely on a central repository, but instead distributes copies of the entire source code repository to each user’s workstation. The SpiraTeam plug-in for Git allows users of SpiraPlan or SpiraTeam (hereafter referred to as SpiraTeam) to be able to browse a Git repository and view revisions linked to SpiraTeam artifacts. The plug-in will clone a read-only “bare” (i.e. no working folder) copy of the Git repository onto the SpiraTeam server and use that for displaying the list of branches/files/folders/revisions. The plug-in also performs ‘pull’ requests from the specified remote repository to ensure that the local bare repository remains up to date. The rest of this section outlines how to install and use the plug-in with SpiraTeam. The current version of the Git plugin requires SpiraPlan or SpiraTeam v4.2.0.2 or later. Note: The plug-in will allow users to download and view different revisions of files and view revision logs, but no changes to the repository are allowed through the plug-in. 8.1. Installing the Git Plug-In To install the Git Version Control plug-in, follow these steps: • • Copy the following files from the plug-in zip-archive into the “VersionControl” sub-folder of the SpiraTeam installation: o GitProvider.dll o Inflectra.Global.dll o LibGit2Sharp.dll If your server operating system is 64-bit, then copy “git2.dll” from the “x64” directory of the downloaded plug-in zip file into the “VersionControl” sub-folder of the SpiraTeam installation. Note: Do not create an x64 folder under VersionControl, make sure the file lives in the VersionControl folder itself. • If your server operating system is 32-bit, then copy “git2.dll” from the “x32” directory of the downloaded plug-in zip file into the “VersionControl” sub-folder of the SpiraTeam installation. Note: Do not create an x32 folder under VersionControl, make sure the file lives in the VersionControl folder itself. • Log in as the Administrator and go into SpiraTeam main Administration page and click on the “Version Control” link under System. © Copyright 2006-2014, Inflectra Corporation Page 37 of 3 This document contains Inflectra proprietary information • Click the “Add” button to enter the Plug-in details page. The fields required are as follows: o Name: The name must be “GitProvider”. o Description: The description is for your use only, and does not affect operation of the plug-in. o Active: If checked, the plug-in is active and able to be used for any project. o Connection Info: This field holds the clone URL of the repository for any project accessing the plug-in, unless overridden in the Project Settings: • For example: git://github.com/henon/GitSharp.git http://github.com/user/repo.git o Login / Password: The user id and the password of the user to use while accessing and retrieving information from the remote Git repository. If you are accessing a public repository anonymously, just use “anonymous” for both username and password and it will be handled correctly. o Custom 01 – By default, SpiraTeam will store a copy of the Git working directory in the C:\ProgramData\Inflectra\Spira\GitProvider\URL folder (where URL is the Git connection URL). If you would like to use an override location for the Git repository, you should specify it in this setting (e.g. C:\Git\Repositories) o Custom 02 – Custom 05 – Not used by this plugin. When finished, click the “Insert” button and you will be taken back to the Version Control integration list page, with GitProvider listed as an available plug-in. © Copyright 2006-2014, Inflectra Corporation Page 38 of 3 This document contains Inflectra proprietary information • • Verify that you are in the correct project using the drop-down at top, and click on the “Project Settings” link for the GitProvider. You will get a screen listing all the same configuration settings: o Be sure to change the Active field to Yes, or the repository will not be available for the current project. o Any other settings entered on this page will override - and have the same use as - the general settings that you created above. You would use these settings if you will have more than one project access different code repositories. Initial setup is complete, click on the “Source Code” menu under the Tracking tab to navigate and browse the source code repository. 8.2. Using Git with SpiraTeam While being able to browse the source code repository can be useful in itself, the real strength comes from linking artifacts in SpiraTeam - including Incidents, Requirements, and Tasks - to revisions checked into the software repository. 8.2.1. Viewing the Repository Tree View the source code tree by selecting the “Source Code” link under the Tracking tab. You will get a screen similar to: © Copyright 2006-2014, Inflectra Corporation Page 39 of 3 This document contains Inflectra proprietary information The folder tree of the repository is on the left, and files in the current selected directory will be listed in the right table. The file view will display the filename, the current revision number of the file and the date of the last commit. You can filter and sort on any of the columns, as well. The page will display the folders and files for the currently selected branch (in the example above “master”), you can change the current branch at any time by selecting it from the dropdown menu: 8.2.2. Viewing File Details To view the file details, click on a file in the right-hand side of the repository. The file details page displays the details on the selected revision. By default, it will be the latest revision in the current branch, unless you clicked to view the file details from a revision. By clicking on the file name, you can download the specified revision of the file to your local machine. This does not do a Git clone or pull; you are merely downloading the file to your local machine. © Copyright 2006-2014, Inflectra Corporation Page 40 of 3 This document contains Inflectra proprietary information Underneath the file details are tabs that show a preview of the file (with syntax highlighting), a list of all the revisions that this file belongs in, or was committed to, who performed the commit, and the log message for the commit, and a tab that shows any artifact associations. Throughout SpiraTeam, revisions are indicated by the icon: 8.2.3. Revision Details By clicking on a revision in SpiraTeam, you will be taken to the revision details page. © Copyright 2006-2014, Inflectra Corporation Page 41 of 3 This document contains Inflectra proprietary information The revision details screen shows the log for the commit, the commit date and author. At the bottom of the page are two tabs, Files and Associations. The Files tab lists all files that were a part of this commit, with their full path, size, latest revision and date of edit. The Associations tab shows any artifact (Incident, Requirement, Test Case, Test Set) that the log message references. See section 8.2.4 for information on how to link a revision with a Git commit: 8.2.4. Linking Artifacts Linking an artifact is quite simple. To maintain the readability of Git commit messages, we adopted a square bracket token. The token is in the format of: [<artifact identifier>:<artifact id>] The first half, the Artifact Identifier, is a two-letter code that is used throughout SpiraTeam, and is visible on almost every page in the application. For example, a requirement’s identifier is “RQ”. Incidents are “IN”, and test cases are “TC”. The artifact ID is the number of the artifact. So by creating a commit message that reads: Due to requirement #12 [RQ:12], the code for .toString in class XMLparser was modified. This also fixed Incident #1034 [IN:1034]. SpiraTeam will automatically detect tokens and will include links to them under the Associations tab for a revision detail. If you forget to add the association during the commit, you can use the ‘Add Association’ option within SpiraTeam to add the association after the fact. 8.3. Troubleshooting While integration with Git is sophisticated behind the scenes, as a user you will only receive a couple of errors that will prevent the integration from working: • When you first load the list of folders and files for a repository it may take several minutes to load as it’s cloning the entire ‘bare’ repository from the remote Git server to the SpiraTeam server. This delay will not occur on subsequent views of the page. • SpiraTeam will not display the login page, and there is an error (either on the page or in the Application Event Log) that says “Could not load file or assembly.”. If this error occurs, it is most likely that the GitProvider.dll or some of its dependent assemblies were not correctly placed in the VersionControl folder of the SpiraTeam installation. • SpiraTeam reports that the login information is incorrect. In this case, double check the Version Control settings, both for the Project (which overrides the general settings) and the © Copyright 2006-2014, Inflectra Corporation Page 42 of 3 This document contains Inflectra proprietary information general settings. Project settings will over-ride the general settings. Be sure to use a user that has access to all nodes in the tree starting from the root repository location. • If you are taken back to the repository screen and given a message saying that the requested file was deleted from the system, this means that an attempt was made to view details on a file that is no longer part of the current branch. This can happen when a file is deleted or renamed, and this is a normal condition in the code repository, not necessarily an error with Git or SpiraTeam. 8.4. Data Purging Since the integration with Git requires that a bare copy of the Git repository be stored on the SpiraTeam server, you may decide at some point to unlink a disused Git repository from SpiraTeam to save diskspace. However unlinking the repository through the SpiraTeam web interface will not remove the bare copy of the repository from the server. To permanently remove a repository from the SpiraTeam server, you need to locate the following path: o (Windows XP, 2003) - C:\Documents and Settings\All Users\Application Data\Inflectra o (Windows 2008, 7, Vista) – C:\ProgramData\Inflectra If you look inside this folder, you will see a subfolder called “Spira”, and under that will be a subfolder called “GitProvider”. If you open up this subfolder, you will see a list of all the Git repositories that have been accessed through SpiraTeam. To purge a module, just select it and choose the Delete Folder option in Windows. © Copyright 2006-2014, Inflectra Corporation Page 43 of 3 This document contains Inflectra proprietary information Legal Notices This publication is provided as is without warranty of any kind, either express or implied, including, but not limited to, the implied warranties of merchantability, fitness for a particular purpose, or non-infringement. This publication could include technical inaccuracies or typographical errors. Changes are periodically added to the information contained herein; these changes will be incorporated in new editions of the publication. Inflectra Corporation may make improvements and/or changes in the product(s) and/or program(s) and/or service(s) described in this publication at any time. The sections in this guide that discuss internet web security are provided as suggestions and guidelines. Internet security is constantly evolving field, and our suggestions are no substitute for an up-to-date understanding of the vulnerabilities inherent in deploying internet or web applications, and Inflectra cannot be held liable for any losses due to breaches of security, compromise of data or other cyber-attacks that may result from following our recommendations. ® ® ® ® SpiraTest , SpiraPlan , SpiraTeam and Inflectra are registered trademarks of Inflectra Corporation in ® ® ® the United States of America and other countries. Microsoft , Windows , Visual Studio, Explorer and ® ® Visual SourceSafe are registered trademarks of Microsoft Corporation. Subversion is a registered trademark of Collabnet, Inc. All other trademarks and product names are property of their respective holders. Please send comments and questions to: Technical Publications Inflectra Corporation 8121 Georgia Ave, Suite 504 Silver Spring, MD 20910-4957 U.S.A. [email protected] © Copyright 2006-2014, Inflectra Corporation Page 44 of 3 This document contains Inflectra proprietary information