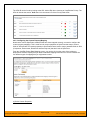
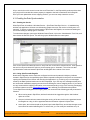
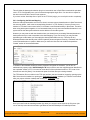
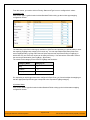
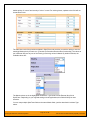
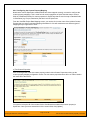
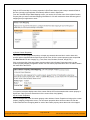
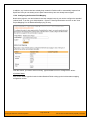
1
t c/ SpiraTeam® | External Bug-Tracking Integration Guide Inflectra Corporation Date: October 7th, 2015 Contents 1. Introduction ....................................... 1 2. Using SpiraTeam with JIRA 5+ ........ 2 3. Using SpiraTeam with JIRA 3 / 4.... 22 4. Using SpiraTest with Bugzilla ......... 39 5. Using SpiraTest with MS-TFS ........ 53 6. Using SpiraTest with FogBugz ....... 77 7. Using SpiraTeam with Mantis ......... 92 8. Using SpiraTeam with ClearQuest 105 9. Using SpiraTeam with IBM RTC... 117 10. Using Spira with Axosoft 14+ ..... 127 11. Using SpiraTeam with Redmine . 140 12. Using Spira with OnTime 11 ....... 152 Appendix 1 – Desktop Data Sync ..... 165 1. Introduction SpiraTeam® is an integrated Application Lifecycle Management (ALM) system that manages your project's requirements, releases, test cases, issues and tasks in one unified environment: SpiraTeam® contains all of the features ® provided by SpiraTest - our highly acclaimed quality assurance system and SpiraPlan® - our agile-enabled project management solution. With integrated customizable dashboards of key project information, SpiraTeam® allows you to take control of your entire project lifecycle and synchronize the hitherto separate worlds of development and testing. However many organizations may be already using other bug-tracking systems and not want to have to migrate all their users over to SpiraTeam. Therefore SpiraPlan, SpiraTest and SpiraTeam are capable of integrating with a variety of commercial and open-source bugtracking systems. This guide outlines how to integrate and use SpiraTest, SpiraPlan and SpiraTeam in conjunction with other external Bug/Issue Tracking systems. This guide assumes that the reader is familiar with both SpiraTeam and the appropriate tool being discussed. For information regarding how to use SpiraTeam, please refer to the SpiraTeam User Manual. Each of the sections covers a different tool so we recommend using the table of contents on the left to locate the tool you’re looking to either integrate or migrate from, then read the installation and usage instructions. © Copyright 2006-2014, Inflectra Corporation Page 1 of 168 This document contains Inflectra proprietary information 2. Using SpiraTeam with JIRA 5+ This section outlines how to use SpiraTest, SpiraPlan or SpiraTeam (hereafter referred to as SpiraTeam) in conjunction with the JIRA issue/bug tracking system version 5.0 and later. The built-in integration service allows the quality assurance team to manage their requirements and test cases in SpiraTeam, execute test runs in SpiraTest, and then have the new incidents generated during the run be automatically loaded into JIRA. Once the incidents are loaded into JIRA as issues, the development team can then manage the lifecycle of these issues in JIRA, and have the status changes in JIRA be reflected back in SpiraTeam. In addition, any issues logged directly into JIRA will get imported into SpiraTeam as either new incidents or new requirements (depending on their type) so that they can be used as part of the planning and testing lifecycle. 2.1. Configuring the Integration Service This section outlines how to configure the integration service to export incidents into JIRA, import new issues from JIRA and pick up subsequent status changes in JIRA and have them update SpiraTeam. It assumes that you already have a working installation of SpiraTest, SpiraPlan or SpiraTeam and a working installation of JIRA. The following versions of SpiraTeam and JIRA are supported: The JIRA 5.x plugin supports JIRA 5.0 or later and SpiraTeam v4.0 or later The JIRA 4.x plugin supports JIRA 4.0 or later and SpiraTeam v3.0 or later (see section 3) The JIRA 3.x plugin supports JIRA 3.0 or later and SpiraTeam v2.3 or later (see section 3) If you have an earlier version of SpiraTeam, you will need to upgrade to at least v2.3 before trying to integrate with JIRA. The steps that need to be performed to configure integration with JIRA are as follows: Download the latest JIRA Data-Sync 5.x plug-in for SpiraTeam from our website Setup the plug-in in SpiraTeam to point to the correct instance of JIRA Configure the data field mappings between SpiraTeam and JIRA Start the service and verify data transfer 2.1.1. Download the JIRA Plug-In Go to the Inflectra website and open up the page that lists the various downloads available for SpiraTeam (http://www.inflectra.com/SpiraTeam/Downloads.aspx). Listed on this page will be the JIRA 5.x Plug-In for SpiraTeam. Right-click on this link and save the Zip compressed folder to the hard-drive of the server where SpiraTeam is installed. Note: There are older plug-ins for JIRA 3.x and JIRA 4.x that are described separately in Section 3. Open up the compressed folder and extract the JiraDataSync.dll and Newtonsoft.Json.dll files and place them in the C:\Program Files\SpiraTeam\Bin folder (it may be SpiraTest or SpiraPlan depending on which product you’re running). This folder should already contain the DataSyncService.exe and DataSyncService.exe.config files that are the primary files used for managing the data synchronization between SpiraTeam and other systems. If you do not have an on-premise installation of SpiraTeam, but instead are using a hosted subscription provided by Inflectra (or a third party company) you will not have access to the DataSyncService © Copyright 2006-2015, Inflectra Corporation Page 2 of 168 This document contains Inflectra proprietary information background service. In such situations, you should use the Desktop DataSync application instead. This application is described in Appendix 1 and can be used instead of the server-based DataSyncService. 2.1.2. Configuring the Service To configure the integration service, please open up the DataSyncService.exe.config file located in C:\Program Files\SpiraTeam\Bin with a text editor such as Notepad. Once open, it should look like: <?xml version="1.0" encoding="utf-8"?> <configuration> <configSections> <sectionGroup name="applicationSettings" type="System.Configuration.ApplicationSettingsGroup, System, Version=2.0.0.0, Culture=neutral, PublicKeyToken=b77a5c561934e089" > <section name="Inflectra.SpiraTest.DataSyncService.Properties.Settings" type="System.Configuration.ClientSettingsSection, System, Version=2.0.0.0, Culture=neutral, PublicKeyToken=b77a5c561934e089" requirePermission="false" /> </sectionGroup> </configSections> <applicationSettings> <Inflectra.SpiraTest.DataSyncService.Properties.Settings> <setting name="PollingInterval" serializeAs="String"> <value>600000</value> </setting> <setting name="WebServiceUrl" serializeAs="String"> <value>http://localhost/SpiraTeam</value> </setting> <setting name="Login" serializeAs="String"> <value>fredbloggs</value> </setting> <setting name="Password" serializeAs="String"> <value>fredbloggs</value> </setting> <setting name="EventLogSource" serializeAs="String"> <value>SpiraTeam Data Sync Service</value> </setting> <setting name="TraceLogging" serializeAs="String"> <value>False</value> </setting> </Inflectra.SpiraTest.DataSyncService.Properties.Settings> </applicationSettings> </configuration> The sections that need to be verified and possibly changed are marked in yellow above. You need to check the following information: The polling interval allows you to specify how frequently the data-synchronization service will ask SpiraTeam and the external system for new data updates. The value is specified in milliseconds and we recommend a value no smaller than 5 minutes (i.e. 300,000ms). The larger the number, the longer it will take for data to be synchronized, but the lower the network and server overhead. The base URL to your instance SpiraTeam. It is typically of the form http://<server name>/SpiraTeam. Make sure that when you enter this URL on a browser on the server itself, the application login page appears. A valid login name and password to your instance of SpiraTeam. This user needs to be a member of the project(s) that will be synchronized with JIRA and needs to have at least Incident create/modify/view permissions and Release create/modify/view permissions in these projects. Once you have made these changes, save the file and proceed to the next stage. © Copyright 2006-2015, Inflectra Corporation Page 3 of 168 This document contains Inflectra proprietary information 2.1.3. Configuring the Plug-In The next step is to configure the plug-in within SpiraTeam so that the system knows how to access the JIRA server. To start the configuration, please open up SpiraTeam in a web browser, log in using a valid account that has System-Administration level privileges and click on the System > Data Synchronization administration option from the left-hand navigation: This screen lists all the plug-ins already configured in the system. Depending on whether you chose the option to include sample data in your installation or not, you will see either an empty screen or a list of sample data-synchronization plug-ins. If you already see an entry for JiraDataSync you should click on its “Edit” link. If you don’t see such an entry in the list, please click on the [Add] button instead. In either case you will be taken to the following screen where you can enter or modify the JIRA Data-Synchronization plug-in: You need to fill out the following fields for the JIRA Plug-in to operate correctly: Name – this needs to be set to JiraDataSync. This needs to match the name of the plug-in DLL assembly that was copied into the C:\Program Files\SpiraTeam\Bin folder (minus the .dll file extension). If you renamed the JiraDataSync.dll file for any reason, then you need to change the name here to match. Description – this should be set to a description of the plug-in. This is an optional field that is used for documentation purposes and is not actually used by the system. © Copyright 2006-2015, Inflectra Corporation Page 4 of 168 This document contains Inflectra proprietary information Connection Info – this should the full URL to the JIRA installation being connected to (including any custom port numbers). Entering this URL into a web browser should bring up the JIRA login page. Login – this should be set to a valid login to the JIRA installation. The login needs to have permissions to create and view issues and versions within JIRA. Password – this should be set to the password of the login specified above. Time Offset – normally this should be set to zero, but if you find that issues being changed in JIRA are not being updated in SpiraTeam, try increasing the value as this will tell the datasynchronization plug-in to add on the time offset (in hours) when comparing date-time stamps. Also if your JIRA installation is running on a server set to a different time-zone, then you should add in the number of hours difference between the servers’ time-zones here. Auto-Map Users – This changes the way that the plugin maps users in SpiraTeam to those in JIRA: Auto-Map = True With this setting, all users in SpiraTeam need to have the same username as those in JIRA. If this is the case then you do not need to perform the user-mapping task outlined in section 2.2.2. This is a big time-saver if you can guarantee that all usernames are the same in both systems. Auto-Map = False With this setting, users in SpiraTeam and JIRA are free to have different usernames because you specify the corresponding JIRA name for each user as outlined in section 2.2.2. Custom 01 – This is used to specify a JIRA custom property that should be mapped to the builtin SpiraTeam Incident Severity field (which does not exist in JIRA). This can be left empty for now and will be discussed below in section 2.2. Custom 02 – This should be set to the word “True” if you want to have the new issues submitted to JIRA be submitted using a specified SecurityLevel. If you’re not using the security level feature of JIRA, leave the field blank. Custom 03 – This should be set to the word “True” if you want to have the plugin restrict synchronization to only loading new incidents from SpiraTeam > JIRA and updating existing items. This is useful if you want to prevent existing issues in JIRA from being loaded into SpiraTeam. Leave blank if you want the plugin to synchronize normally. Custom 04 – This should be set to a comma-separated list of IDs of any JIRA issue types that you want to be synchronized with SpiraTeam requirements instead of incidents. If you leave this blank, all JIRA issue types will be synchronized with incidents. Custom 05 – This should be set to the name of the JIRA issue link type that you want SpiraTeam incident associations to use. If you leave this blank, incident associations in SpiraTeam will not be imported into JIRA. You can get the list of issue link types from the following screen in JIRA: © Copyright 2006-2015, Inflectra Corporation Page 5 of 168 This document contains Inflectra proprietary information Note: For most users, we recommend leaving Custom 01 – Custom 04 blank. 2.2. Configuring the Data Mapping Next, you need to configure the data mapping between SpiraTeam and JIRA. This allows the various projects, users, releases, incident types, statuses, priorities and custom property values used in the two applications to be related to each other. This is important, as without a correct mapping, there is no way for the integration service to know that an “Enhancement” in SpiraTeam is the same as a “New Feature” in JIRA (for example). The following mapping information needs to be setup in SpiraTeam: The mapping of the project identifiers for the projects that need to be synchronized The mapping of users in the system The mapping of releases (equivalent to JIRA versions) in the system The mapping of the various standard fields in the system The mapping of the various custom properties in the system Each of these is explained in turn below: 2.2.1. Configuring the Project Mapping From the data synchronization administration page, you need to click on the “View Project Mappings” hyperlink next to the JIRA plug-in name. This will take you to the data-mapping home page for the currently selected project: If the project name does not match the name of the project you want to configure the data-mapping for, click on the “(Change Project)” hyperlink to change the current project. To enable this project for data-synchronization with JIRA, you need to enter: © Copyright 2006-2015, Inflectra Corporation Page 6 of 168 This document contains Inflectra proprietary information External Key – This should be set to the name of the project Key in JIRA. Typically this is a short acronym for the project: Active Flag – Set this to ‘Yes’ so that SpiraTeam knows that you want to synchronize data for this project. Once the project has been completed, setting the value to “No” will stop data synchronization, reducing network utilization. Click [Update] to confirm these settings. Once you have enabled the project for data-synchronization, you can now enter the other data mapping values outlined below. Note: Once you have successfully configured the project, when creating a new project, you should choose the option to “Create Project from Existing Project” rather than “Use Default Template” so that all the project mappings get copied across to the new project. 2.2.2. Configuring the User Mapping To configure the mapping of users in the two systems, you need to go to Administration > Users > View Edit Users, which will bring up the list of users in the system. Then click on the “Edit” button for a particular user that will be editing issues in JIRA: Click on the ‘Data Mapping’ tab to list all the configured data-synchronization plug-ins for this user. In the text box next to the JIRA Data-Sync plug-in you need to enter the login for this username in JIRA. This will allow the data-synchronization plug-in to know which user in SpiraTeam match which equivalent user in JIRA. Click [Update] once you’ve entered the appropriate login name. You should now repeat for the other users who will be active in both systems. If you have set the “Auto-Map Users” option in the JIRA plugin, you can skip this section completely. © Copyright 2006-2015, Inflectra Corporation Page 7 of 168 This document contains Inflectra proprietary information 2.2.3. Configuring the Release Mapping When the data-synchronization service runs, when it comes across a release/iteration in SpiraTeam that it has not seen before, it will create a corresponding “Version” in JIRA. Similarly if it comes across a new Version in JIRA that it has not seen before, it will create a new Release in SpiraTeam. Therefore when using both systems together, it is recommended that you only enter new Releases/Versions in one system and let the data-synchronization service add them to the other system. However you may start out with the situation where you already have pre-existing Releases/Version in both systems that you need to associate in the data-mapping. If you don’t do this, you may find that duplicates get created when you first enable the data-synchronization service. Therefore for any Releases/Iterations that already exist in BOTH systems please navigate to Planning > Releases and click on the Release/Iteration in question. Make sure you have the ‘Overview’ tab visible and expand the “Details” section of the release/iteration: In addition to the standard fields and custom properties, you will see an additional text property called “JiraDataSync ID” that is used to store the mapped external identifier for the equivalent Version in JIRA. You need to locate the ID of the equivalent version in JIRA, enter it into this text-box and click [Save]. You should now repeat for all the other pre-existing releases. The JIRA ID can be found by looking at the URL inside JIRA when choosing to Edit the version’s “Build and Release”. The URL will include the numeric ID of the version inside JIRA in the URL (in the example below, the ID would be 10001. 2.2.4. Configuring the Standard Field Mapping Now that the projects, user and releases have been mapped correctly, we need to configure the standard incident and requirement fields. To do this, go to Administration > System > Data Synchronization and click on the “View Project Mappings” for the JiraDataSync plug-in entry: © Copyright 2006-2015, Inflectra Corporation Page 8 of 168 This document contains Inflectra proprietary information From this screen, you need to click on Priority, Severity, Status and Type in turn to configure the incident field mappings. If you’re using the option to have JIRA also synchronize some issue types as requirements, then you’ll need to also configure the Requirement Importance and Status fields. a) Incident Type Click on the “Type” hyperlink under Incident Standard Fields to bring up the Incident type mapping configuration screen: The table lists each of the incident types available in SpiraTeam and provides you with the ability to enter the matching JIRA issue type ID for each one. You can map multiple SpiraTeam fields to the same JIRA © Copyright 2006-2015, Inflectra Corporation Page 9 of 168 This document contains Inflectra proprietary information fields (e.g. Bug and Incident in SpiraTeam are both equivalent to Bug in JIRA), in which case only one of the two values can be listed as Primary = Yes as that’s the value that’s used on the reverse synchronization (from JIRA > SpiraTeam). The JIRA ID can be found by looking at the URL inside JIRA when choosing to View/Edit the Issue Type. The URL will include the section: id=X where X is the numeric ID of the Issue Type inside JIRA. b) Incident Status Click on the “Status” hyperlink under Incident Standard Fields to bring up the Incident status mapping configuration screen: The table lists each of the incident statuses available in SpiraTeam and provides you with the ability to enter the matching JIRA issue status ID for each one. You can map multiple SpiraTeam fields to the same JIRA fields (e.g. New and Open in SpiraTeam are both equivalent to Open in JIRA), in which case only one of the two values can be listed as Primary = Yes as that’s the value that’s used on the reverse synchronization (from JIRA > SpiraTeam). We recommend that you always point the New and Open statuses inside SpiraTeam to point to the ID for “Open” inside JIRA and make Open in SpiraTeam the Primary status of the two. This is recommended so that as new incidents in SpiraTeam get synched over to JIRA, they will get switched to the Open status in © Copyright 2006-2015, Inflectra Corporation Page 10 of 168 This document contains Inflectra proprietary information JIRA which will then be synched back to “Open” in SpiraTeam. That way you’ll be able to see at a glance which incidents have been synched with JIRA and those that haven’t. The JIRA ID can be found by looking at the URL inside JIRA when choosing to View/Edit the Issue Status. The URL will include the section: id=X where X is the numeric ID of the Issue Status inside JIRA. c) Incident Priority Click on the “Priority” hyperlink under Incident Standard Fields to bring up the Incident Priority mapping configuration screen: The table lists each of the incident priorities available in SpiraTeam and provides you with the ability to enter the matching JIRA priority ID for each one. You can map multiple SpiraTeam fields to the same JIRA fields, in which case only one of the two values can be listed as Primary = Yes as that’s the value that’s used on the reverse synchronization (from JIRA > SpiraTeam). The JIRA ID can be found by looking at the URL inside JIRA when choosing to View/Edit the Priority. The URL will include the section: id=X where X is the numeric ID of the Priority inside JIRA: d) Incident Severity (Optional) © Copyright 2006-2015, Inflectra Corporation Page 11 of 168 This document contains Inflectra proprietary information Click on the “Severity” hyperlink under Incident Standard Fields to bring up the Incident severity mapping configuration screen: Unlike the other incident standard fields, JIRA doesn’t actually have a built-in field for storing the severity of an issue, so if you want to be able to see the SpiraTeam incident severity in JIRA, you’ll need to create a JIRA custom list field to store the different severity values. If you don’t want to synchronize severity values with JIRA, you can skip the rest of this section. Once you have created a custom field in JIRA to contain the list of severity values, you need to now populate the above table with the name (Not the ID) of the severity custom property values inside JIRA and click Update. Secondly you need to go to the Plug-in configuration screen: On this screen you need to enter the ID of the custom field that you’re using to store severities in JIRA and populate the Custom 01 property with this value (see above). The ID can be found by looking at the URL inside JIRA when choosing to View/Edit the Custom Field. The URL will include the section: id=X where X is the numeric ID of the Custom Field inside JIRA: e) Requirement Status (Optional) Click on the “Status” hyperlink under Requirement Standard Fields to bring up the Requirement status mapping configuration screen: © Copyright 2006-2015, Inflectra Corporation Page 12 of 168 This document contains Inflectra proprietary information The table lists each of the requirement statuses available in SpiraTeam and provides you with the ability to enter the matching JIRA issue status ID for each one. You can map multiple SpiraTeam fields to the same JIRA fields, in which case only one of the two values can be listed as Primary = Yes as that’s the value that’s used on the reverse synchronization (from JIRA > SpiraTeam). The JIRA ID can be found by looking at the URL inside JIRA when choosing to View/Edit the Issue Status. The URL will include the section: id=X where X is the numeric ID of the Issue Status inside JIRA. f) Requirement Importance (Optional) Click on the “Importance” hyperlink under Requirement Standard Fields to bring up the Requirement Importance mapping configuration screen: The table lists each of the requirement importances available in SpiraTeam and provides you with the ability to enter the matching JIRA priority ID for each one. You can map multiple SpiraTeam fields to the same JIRA fields, in which case only one of the two values can be listed as Primary = Yes as that’s the value that’s used on the reverse synchronization (from JIRA > SpiraTeam). © Copyright 2006-2015, Inflectra Corporation Page 13 of 168 This document contains Inflectra proprietary information The JIRA ID can be found by looking at the URL inside JIRA when choosing to View/Edit the Priority. The URL will include the section: id=X where X is the numeric ID of the Priority inside JIRA: 2.2.5. Configuring the Custom Property Mapping Now that the various SpiraTeam standard fields have been mapped correctly, we need to configure the custom property mappings. This is used for both custom properties in SpiraTeam that map to custom fields in JIRA and also for custom properties in SpiraTeam that are used to map to standard fields in JIRA (Component, Environment, Resolution and SecurityLevel) that don’t exist in SpiraTeam. From the View/Edit Project Data Mapping screen, you need to click on the name of the Incident or Requirement Custom Property that you want to add data-mapping information for. We will consider the four different types of mapping that you might want to enter: a) Scalar Custom Properties © Copyright 2006-2015, Inflectra Corporation Page 14 of 168 This document contains Inflectra proprietary information This refers to custom properties that have a simple user-entered value and don’t need to have their specific options mapped between SpiraTeam and JIRA. All of the custom property types except List and Multi-List fall into this category (e.g. Text, Date, User, Boolean, Decimal, Integer, etc.) Click on the hyperlink of the scalar custom property under Incident/Requirement Custom Properties to bring up the custom property mapping configuration screen. For scalar custom properties there will be no values listed in the lower half of the screen. You need to lookup the ID of the custom field in JIRA that matches this custom property in SpiraTeam. Once you have entered the id of the custom field, click [Update]. The ID can be found by looking at the URL inside JIRA when choosing to View/Edit the Custom Field. The URL will include the section: id=X where X is the numeric ID of the Custom Field inside JIRA: b) List Custom Properties This refers to custom properties that are either of type List or Multi-List. Click on the hyperlink of the list custom property under Incident/Requirement Custom Properties to bring up the custom property mapping configuration screen. For list custom properties there will be a textbox for both the custom field itself and a mapping table for each of the custom property values that need to be mapped: © Copyright 2006-2015, Inflectra Corporation Page 15 of 168 This document contains Inflectra proprietary information First you need to lookup the ID of the custom field in JIRA that matches this custom property in SpiraTeam. This should be entered in the ‘External Key’ field below the name of the custom property. The ID can be found by looking at the URL inside JIRA when choosing to View/Edit the Custom Field. The URL will include the section: id=X where X is the numeric ID of the Custom Field inside JIRA. Next for each of the Property Values in the table (in the lower half of the page) you need to enter the full name (not the id this time) of the custom field value as specified in JIRA: c) JIRA’s Component Field © Copyright 2006-2015, Inflectra Corporation Page 16 of 168 This document contains Inflectra proprietary information If your instance of JIRA requires that all new issues are submitted with a ‘Component’ then you will need to fill out this section. You first need to create an incident custom property in SpiraTeam of type ‘Multi-List’ that contains the various component names that exist inside JIRA. Then click on the hyperlink of this new list custom property under Incident Custom Properties to bring up the custom property mapping configuration screen: First you need to enter the word “Component” as the External Key of the custom property. This tells the data-sync plug-in that the custom property in SpiraTeam should be mapped to built-in Component field in JIRA. Next for each of the Property Values in the table (in the lower half of the page) you need to enter the JIRA Name (not ID) of the various Components that are configured in JIRA: d) JIRA’s Resolution Field If you would like the values of the JIRA ‘Resolution’ field to be synchronized back to SpiraTeam, then you will need to fill out this section. You first need to create an incident custom property in SpiraTeam of type ‘LIST’ that contains the various resolution names that exist inside JIRA. Then click on the hyperlink of this new list custom property under Incident Custom Properties to bring up the custom property mapping configuration screen: © Copyright 2006-2015, Inflectra Corporation Page 17 of 168 This document contains Inflectra proprietary information First you need to enter the word “Resolution” as the External Key of the custom property. This tells the data-sync plug-in that the custom property in SpiraTeam should be mapped to built-in Resolution field in JIRA. Next for each of the Property Values in the table (in the lower half of the page) you need to enter the JIRA ID of the various Resolutions that are configured in JIRA. The external ID can be found by looking at the URL inside JIRA which choosing to View/Edit the resolution name/description. e) JIRA’s Environment Field If your instance of JIRA requires that all new issues are submitted with an ‘Environment’ description specified, then you will need to fill out this section. You first need to create an incident custom property in SpiraTeam of type ‘TEXT’ that will be used to store the environment description within SpiraTeam. Then click on the hyperlink of this new list custom property under Incident Custom Properties to bring up the custom property mapping configuration screen: All you need to do on this screen is enter the word “Environment” in the External Key textbox and the data-sync plug-in will know that this custom property is mapped to the built-in Environment field in JIRA. f) JIRA’s Security Level Field © Copyright 2006-2015, Inflectra Corporation Page 18 of 168 This document contains Inflectra proprietary information If your instance of JIRA requires that all new issues are submitted with a ‘Security Level’ then you will need to fill out this section. You first need to create an incident custom property in SpiraTeam of type ‘LIST’ that contains the various security levels that exist inside JIRA. Then click on the hyperlink of this new list custom property under Incident Custom Properties to bring up the custom property mapping configuration screen. First you need to enter the word “SecurityLevel” as the External Key of the custom property. This tells the data-sync plug-in that the custom property in SpiraTeam should be mapped to built-in Security Level field in JIRA. Next for each of the Property Values in the table (in the lower half of the page) you need to enter the JIRA ID of the various Security Levels that are configured in JIRA. The external ID can be found by looking at the URL inside JIRA which choosing to View/Edit the security level name/description. g) JIRA’s Issue Key Field It can be convenient to create a SpiraTeam custom property to store the JIRA Issue Key (the ID used to identify an issue in JIRA). This allows you to display a list of incients in SpiraTest and see the corresponding JIRA ID in the same list. You first need to create an incident custom property in SpiraTeam of type ‘TEXT’ that will be used to store the JIRA issue key within SpiraTeam. Then click on the hyperlink of this new list custom property under Incident Custom Properties to bring up the custom property mapping configuration screen: All you need to do on this screen is enter the word “JiraIssueKey” in the External Key textbox and the data-sync plug-in will know that this custom property is mapped to the built-in Issue Key field in JIRA. Once you have updated the various mapping sections, you are now ready to start the service. © Copyright 2006-2015, Inflectra Corporation Page 19 of 168 This document contains Inflectra proprietary information 2.3. Enabling the Data-Synchronization 2.3.1. Starting the Service When SpiraTeam is installed, a Windows Service – SpiraTeam Data Sync Service – is installed along with the web application. However to avoid wasting system resources, this service is initially set to run manually. To ensure continued synchronization of SpiraTeam with JIRA, we recommend starting the service and setting its startup-type to Automatic. To make these changes, open up the Windows Control Panel, click on the “Administrative Tools” link, and then choose the Services option. This will bring up the Windows Service control panel: Click on the ‘SpiraTeam Data Sync Service’ entry and click on the link to start the service. Then right-click the service entry and choose the option to set the startup type to ‘Automatic’. This will ensure that synchronization continues between SpiraTeam and JIRA after a reboot of the server. 2.3.2. Using SpiraTeam with JIRA Now that the integration service has been configured and the service started, initially any incidents created in SpiraTeam for the specified projects will be imported into JIRA and any existing issues in JIRA will get loaded into SpiraTeam as either incidents or requirements (depending on your configuration). At this point we recommend opening the Windows Event Viewer and choosing the Application Log. In this log any error messages raised by the SpiraTeam Data Sync Service will be displayed. If you see any error messages at this point, we recommend immediately stopping the SpiraTeam service and checking the various mapping entries. If you cannot see any issues with the mapping information, we recommend sending a copy of the event log message(s) to Inflectra customer services ([email protected]) who will help you troubleshoot the problem. To use SpiraTeam with JIRA on an ongoing basis, we recommend the following general processes be followed: When running tests in SpiraTest or SpiraTeam, defects found should be logged through the Test Execution Wizard as normal. Developers can log new defects into either SpiraTeam or JIRA. In either case they will get loaded into the other system. Once created in one of the systems and successfully replicated to the other system, the incident should not be modified again inside SpiraTeam At this point, the incident should not be acted upon inside SpiraTeam and all data changes to the issue should be made inside JIRA. To enforce this, you should modify the workflows set up in © Copyright 2006-2015, Inflectra Corporation Page 20 of 168 This document contains Inflectra proprietary information SpiraTeam so that the various fields are marked as inactive for all the incident statuses other than the “New” status. This will allow someone to submit an incident in SpiraTeam, but will prevent them making changes in conflict with JIRA after that point. As the issue progresses through the customized JIRA workflow, changes to the type of issue, changes to its status, priority, description and resolution will be updated automatically in SpiraTeam. In essence, SpiraTeam acts as a read-only viewer of these incidents. You are now able to perform test coverage and incident reporting inside SpiraTest/SpiraTeam using the test cases managed by SpiraTest/SpiraTeam and the incidents managed on behalf of SpiraTest/SpiraTeam inside JIRA. © Copyright 2006-2015, Inflectra Corporation Page 21 of 168 This document contains Inflectra proprietary information 3. Using SpiraTeam with JIRA 3 / 4 This section outlines how to use SpiraTest, SpiraPlan or SpiraTeam (hereafter referred to as SpiraTeam) in conjunction with the JIRA issue/bug tracking system versions 3.0 – 4.0. The built-in integration service allows the quality assurance team to manage their requirements and test cases in SpiraTeam, execute test runs in SpiraTest, and then have the new incidents generated during the run be automatically loaded into JIRA. Once the incidents are loaded into JIRA as issues, the development team can then manage the lifecycle of these issues in JIRA, and have the status changes in JIRA be reflected back in SpiraTeam. In addition, if you are using JIRA 4.x or higher, any issues logged directly into JIRA will get imported into SpiraTeam so that they can be linked to test cases and requirements. 3.1. Configuring the Integration Service This section outlines how to configure the integration service to export incidents into JIRA and pick up subsequent status changes in JIRA and have them update SpiraTeam. It assumes that you already have a working installation of SpiraTest, SpiraPlan or SpiraTeam and a working installation of JIRA. The following versions of SpiraTeam and JIRA are supported: The JIRA 5.x plugin supports JIRA 5.0 or later and SpiraTeam v4.0 or later (see section 2) The JIRA 4.x plugin supports JIRA 4.0 or later and SpiraTeam v3.0 or later The JIRA 3.x plugin supports JIRA 3.0 or later and SpiraTeam v2.3 or later If you have an earlier version of SpiraTeam, you will need to upgrade to at least v2.3 before trying to integrate with JIRA. The steps that need to be performed to configure integration with JIRA are as follows: Download the latest JIRA Data-Sync plug-in for SpiraTeam from our website There are separate plug-ins for JIRA 3.x and JIRA 4.x so please make sure you download the correct version. Setup the plug-in in SpiraTeam to point to the correct instance of JIRA Configure the data field mappings between SpiraTeam and JIRA Start the service and verify data transfer 3.1.1. Download the JIRA Plug-In Go to the Inflectra website and open up the page that lists the various downloads available for SpiraTeam (http://www.inflectra.com/SpiraTeam/Downloads.aspx). Listed on this page will be the JIRA Plug-In for SpiraTeam. Right-click on this link and save the Zip compressed folder to the hard-drive of the server where SpiraTeam is installed. Note: There are separate plug-ins for JIRA 3.x and JIRA 4.x so please make sure you download the correct version. Open up the compressed folder and extract the JiraDataSync.dll file and place it in the C:\Program Files\SpiraTeam\Bin folder (it may be SpiraTest or SpiraPlan depending on which product you’re running). This folder should already contain the DataSyncService.exe and DataSyncService.exe.config files that are the primary files used for managing the data synchronization between SpiraTeam and other systems. If you do not have an on-premise installation of SpiraTeam, but instead are using a hosted subscription provided by Inflectra (or a third party company) you will not have access to the DataSyncService © Copyright 2006-2015, Inflectra Corporation Page 22 of 168 This document contains Inflectra proprietary information background service. In such situations, you should use the Desktop DataSync application instead. This application is described in Appendix 1 and can be used instead of the server-based DataSyncService. 3.1.2. Configuring the Service To configure the integration service, please open up the DataSyncService.exe.config file located in C:\Program Files\SpiraTeam\Bin with a text editor such as Notepad. Once open, it should look like: <?xml version="1.0" encoding="utf-8"?> <configuration> <configSections> <sectionGroup name="applicationSettings" type="System.Configuration.ApplicationSettingsGroup, System, Version=2.0.0.0, Culture=neutral, PublicKeyToken=b77a5c561934e089" > <section name="Inflectra.SpiraTest.DataSyncService.Properties.Settings" type="System.Configuration.ClientSettingsSection, System, Version=2.0.0.0, Culture=neutral, PublicKeyToken=b77a5c561934e089" requirePermission="false" /> </sectionGroup> </configSections> <applicationSettings> <Inflectra.SpiraTest.DataSyncService.Properties.Settings> <setting name="PollingInterval" serializeAs="String"> <value>600000</value> </setting> <setting name="WebServiceUrl" serializeAs="String"> <value>http://localhost/SpiraTeam</value> </setting> <setting name="Login" serializeAs="String"> <value>fredbloggs</value> </setting> <setting name="Password" serializeAs="String"> <value>fredbloggs</value> </setting> <setting name="EventLogSource" serializeAs="String"> <value>SpiraTeam Data Sync Service</value> </setting> <setting name="TraceLogging" serializeAs="String"> <value>False</value> </setting> </Inflectra.SpiraTest.DataSyncService.Properties.Settings> </applicationSettings> </configuration> The sections that need to be verified and possibly changed are marked in yellow above. You need to check the following information: The polling interval allows you to specify how frequently the data-synchronization service will ask SpiraTeam and the external system for new data updates. The value is specified in milliseconds and we recommend a value no smaller than 5 minutes (i.e. 300,000ms). The larger the number, the longer it will take for data to be synchronized, but the lower the network and server overhead. The base URL to your instance SpiraTeam. It is typically of the form http://<server name>/SpiraTeam. Make sure that when you enter this URL on a browser on the server itself, the application login page appears. A valid login name and password to your instance of SpiraTeam. This user needs to be a member of the project(s) that will be synchronized with JIRA and needs to have at least Incident create/modify/view permissions and Release create/modify/view permissions in these projects. Once you have made these changes, save the file and proceed to the next stage. © Copyright 2006-2015, Inflectra Corporation Page 23 of 168 This document contains Inflectra proprietary information 3.1.3. Configuring the Plug-In The next step is to configure the plug-in within SpiraTeam so that the system knows how to access the JIRA server. To start the configuration, please open up SpiraTeam in a web browser, log in using a valid account that has System-Administration level privileges and click on the System > Data Synchronization administration option from the left-hand navigation: This screen lists all the plug-ins already configured in the system. Depending on whether you chose the option to include sample data in your installation or not, you will see either an empty screen or a list of sample data-synchronization plug-ins. If you already see an entry for JiraDataSync you should click on its “Edit” link. If you don’t see such an entry in the list, please click on the [Add] button instead. In either case you will be taken to the following screen where you can enter or modify the JIRA Data-Synchronization plug-in: You need to fill out the following fields for the JIRA Plug-in to operate correctly: © Copyright 2006-2015, Inflectra Corporation Page 24 of 168 This document contains Inflectra proprietary information Name – this needs to be set to JiraDataSync. This needs to match the name of the plug-in DLL assembly that was copied into the C:\Program Files\SpiraTeam\Bin folder (minus the .dll file extension). If you renamed the JiraDataSync.dll file for any reason, then you need to change the name here to match. Description – this should be set to a description of the plug-in. This is an optional field that is used for documentation purposes and is not actually used by the system. Connection Info – this should the full URL to the JIRA installation’s web-service API. This is typically http://<jira server name>/rpc/soap/jirasoapservice-v2. Login – this should be set to a valid login to the JIRA installation. The login needs to have permissions to create and view issues and versions within JIRA. Password – this should be set to the password of the login specified above. Time Offset – normally this should be set to zero, but if you find that issues being changed in JIRA are not being updated in SpiraTeam, try increasing the value as this will tell the datasynchronization plug-in to add on the time offset (in hours) when comparing date-time stamps. Also if your JIRA installation is running on a server set to a different time-zone, then you should add in the number of hours difference between the servers’ time-zones here. The remaining fields work differently depending on which version of the plugin you are using (JIRA 3.x or JIRA 4.x): a) JIRA 3.x Plugin Please fill out the fields as follows: Auto-Map Users – this is not currently used and can be ignored. Custom 01 – This is used to specify a JIRA custom property that should be mapped to the builtin SpiraTeam Incident Severity field (which does not exist in JIRA). This can be left empty for now and will be discussed below in section 3.2. Custom 02 – 05 – these are not currently used by the plug-in and should be left blank. b) JIRA 4.x Plugin Please fill out the fields as follows: Auto-Map Users – This changes the way that the plugin maps users in SpiraTeam to those in JIRA: Auto-Map = True With this setting, all users in SpiraTeam need to have the same username as those in JIRA. If this is the case then you do not need to perform the user-mapping task outlined in section 3.2.2. This is a big time-saver if you can guarantee that all usernames are the same in both systems. Auto-Map = False With this setting, users in SpiraTeam and JIRA are free to have different usernames because you specify the corresponding JIRA name for each user as outlined in section 3.2.2. Custom 01 – This is used to specify a JIRA custom property that should be mapped to the builtin SpiraTeam Incident Severity field (which does not exist in JIRA). This can be left empty for now and will be discussed below in section 3.2. Custom 02 – This should be set to the word “True” if you want to have the new issues submitted to JIRA be submitted using a specified SecurityLevel. If you’re not using the security level feature of JIRA, leave the field blank. Custom 03 – This should be set to the word “True” if you want to have the plugin restrict synchronization to only loading new incidents from SpiraTeam > JIRA and updating existing © Copyright 2006-2015, Inflectra Corporation Page 25 of 168 This document contains Inflectra proprietary information items. This is useful if you want to prevent existing issues in JIRA from being loaded into SpiraTeam. Leave blank if you want the plugin to synchronize normally. Custom 04 – This should be set to the word “True” if you want to have the plugin copy file attachments from SpiraTeam > JIRA. This can use additional system resources and may fail if the files are too large for JIRA’s API to handle. Leave the field blank if you want the default behavior – which is to not synchronize attachments. Custom 05 - When you click “Force Resync” inside SpiraTeam it will attempt to resynchronize all incidents/issues from 1/1/1900. Sometimes that causes the JIRA API to timeout or exceed the maximum allowed number of results if there are a large number of existing issues in JIRA. You can set this field to a specific year (e.g. 1995) or year and month (e.g. 2010-11) to restrict how far back the system will look for existing issues. If you leave this field blank it will use the default value of “1900-01”. Note: For most users, we recommend leaving Custom 01 – Custom 05 blank. 3.2. Configuring the Data Mapping Next, you need to configure the data mapping between SpiraTeam and JIRA. This allows the various projects, users, releases, incident types, statuses, priorities and custom property values used in the two applications to be related to each other. This is important, as without a correct mapping, there is no way for the integration service to know that an “Enhancement” in SpiraTeam is the same as a “New Feature” in JIRA (for example). The following mapping information needs to be setup in SpiraTeam: The mapping of the project identifiers for the projects that need to be synchronized The mapping of users in the system The mapping of releases (equivalent to JIRA versions) in the system The mapping of the various standard fields in the system The mapping of the various custom properties in the system Each of these is explained in turn below: 3.2.1. Configuring the Project Mapping From the data synchronization administration page, you need to click on the “View Project Mappings” hyperlink next to the JIRA plug-in name. This will take you to the data-mapping home page for the currently selected project: © Copyright 2006-2015, Inflectra Corporation Page 26 of 168 This document contains Inflectra proprietary information If the project name does not match the name of the project you want to configure the data-mapping for, click on the “(Change Project)” hyperlink to change the current project. To enable this project for data-synchronization with JIRA, you need to enter: External Key – This should be set to the name of the project token in JIRA. Typically this is a three-letter acronym for the project. Active Flag – Set this to ‘Yes’ so that SpiraTeam knows that you want to synchronize data for this project. Once the project has been completed, setting the value to “No” will stop data synchronization, reducing network utilization. Click [Update] to confirm these settings. Once you have enabled the project for data-synchronization, you can now enter the other data mapping values outlined below. Note: Once you have successfully configured the project, when creating a new project, you should choose the option to “Create Project from Existing Project” rather than “Use Default Template” so that all the project mappings get copied across to the new project. 3.2.2. Configuring the User Mapping To configure the mapping of users in the two systems, you need to go to Administration > Users > View Edit Users, which will bring up the list of users in the system. Then click on the “Edit” button for a particular user that will be editing issues in JIRA: © Copyright 2006-2015, Inflectra Corporation Page 27 of 168 This document contains Inflectra proprietary information You will notice that below the Active flag for the user is a list of all the configured data-synchronization plug-ins. In the text box next to the JIRA Data-Sync plug-in you need to enter the login for this username in JIRA. This will allow the data-synchronization plug-in to know which user in SpiraTeam match which equivalent user in JIRA. Click [Update] once you’ve entered the appropriate login name. You should now repeat for the other users who will be active in both systems. 3.2.3. Configuring the Release Mapping When the data-synchronization service runs, when it comes across a release/iteration in SpiraTeam that it has not seen before, it will create a corresponding “Version” in JIRA. Similarly if it comes across a new Version in JIRA that it has not seen before, it will create a new Release in SpiraTeam. Therefore when using both systems together, it is recommended that you only enter new Releases/Versions in one system and let the data-synchronization service add them to the other system. However you may start out with the situation where you already have pre-existing Releases/Version in both systems that you need to associate in the data-mapping. If you don’t do this, you may find that duplicates get created when you first enable the data-synchronization service. Therefore for any Releases/Iterations that already exist in BOTH systems please navigate to Planning > Releases and click on the Release/Iteration in question. Make sure you have the ‘Overview’ tab visible and expand the “Details” section of the release/iteration: © Copyright 2006-2015, Inflectra Corporation Page 28 of 168 This document contains Inflectra proprietary information In addition to the standard fields custom properties configured for Releases, you will see an additional text property called “JiraDataSync ID” that is used to store the mapped external identifier for the equivalent Version in JIRA. You need to locate the ID of the equivalent version in JIRA, enter it into this text-box and click [Save]. You should now repeat for all the other pre-existing releases. Note: The JIRA ID can be found by looking at the URL inside JIRA when choosing to View/Edit the version name/description. The URL will include the section: id=X where X is the numeric ID of the version inside JIRA. 3.2.4. Configuring the Standard Field Mapping Now that the projects, user and releases have been mapped correctly, we need to configure the standard incident fields. To do this, go to Administration > System > Data Synchronization and click on the “View Project Mappings” for the JiraDataSync plug-in entry: From this screen, you need to click on Priority, Severity, Status and Type in turn to configure their values: a) Incident Type Click on the “Type” hyperlink under Incident Standard Fields to bring up the Incident type mapping configuration screen: © Copyright 2006-2015, Inflectra Corporation Page 29 of 168 This document contains Inflectra proprietary information The table lists each of the incident types available in SpiraTeam and provides you with the ability to enter the matching JIRA issue type ID for each one. You can map multiple SpiraTeam fields to the same JIRA fields (e.g. Bug and Incident in SpiraTeam are both equivalent to Bug in JIRA), in which case only one of the two values can be listed as Primary = Yes as that’s the value that’s used on the reverse synchronization (from JIRA > SpiraTeam). Note: The JIRA ID can be found by looking at the URL inside JIRA when choosing to View/Edit the Issue Type. The URL will include the section: id=X where X is the numeric ID of the Issue Type inside JIRA. b) Incident Status Click on the “Status” hyperlink under Incident Standard Fields to bring up the Incident status mapping configuration screen: The table lists each of the incident statuses available in SpiraTeam and provides you with the ability to enter the matching JIRA issue status ID for each one. You can map multiple SpiraTeam fields to the same JIRA fields (e.g. New and Open in SpiraTeam are both equivalent to Open in JIRA), in which case only one of the two values can be listed as Primary = Yes as that’s the value that’s used on the reverse synchronization (from JIRA > SpiraTeam). © Copyright 2006-2015, Inflectra Corporation Page 30 of 168 This document contains Inflectra proprietary information We recommend that you always point the New and Open statuses inside SpiraTeam to point to the ID for “Open” inside JIRA and make Open in SpiraTeam the Primary status of the two. This is recommended so that as new incidents in SpiraTeam get synched over to JIRA, they will get switched to the Open status in JIRA which will then be synched back to “Open” in SpiraTeam. That way you’ll be able to see at a glance which incidents have been synched with JIRA and those that haven’t. Note: The JIRA ID can be found by looking at the URL inside JIRA when choosing to View/Edit the Issue Status. The URL will include the section: id=X where X is the numeric ID of the Issue Status inside JIRA. c) Incident Priority Click on the “Priority” hyperlink under Incident Standard Fields to bring up the Incident Priority mapping configuration screen: The table lists each of the incident priorities available in SpiraTeam and provides you with the ability to enter the matching JIRA priority ID for each one. You can map multiple SpiraTeam fields to the same JIRA fields, in which case only one of the two values can be listed as Primary = Yes as that’s the value that’s used on the reverse synchronization (from JIRA > SpiraTeam). Note: The JIRA ID can be found by looking at the URL inside JIRA when choosing to View/Edit the Priority. The URL will include the section: id=X where X is the numeric ID of the Priority inside JIRA. d) Incident Severity (Optional) Click on the “Severity” hyperlink under Incident Standard Fields to bring up the Incident severity mapping configuration screen: Unlike the other incident standard fields, JIRA doesn’t actually have a built-in field for storing the severity of an issue, so if you want to be able to see the SpiraTeam incident severity in JIRA, you’ll need to create a JIRA custom list field to store the different severity values. If you don’t want to synchronize severity values with JIRA, you can skip the rest of this section. © Copyright 2006-2015, Inflectra Corporation Page 31 of 168 This document contains Inflectra proprietary information Once you have created a custom field in JIRA to contain the list of severity values, you need to now populate the above table with the name (Not the ID) of the severity custom property values inside JIRA and click Update. Secondly you need to go to the Plug-in configuration screen: On this screen you need to enter the ID of the custom field that you’re using to store severities in JIRA and populate the Custom 01 property with this value (see above). Note: The ID can be found by looking at the URL inside JIRA when choosing to View/Edit the Custom Field. The URL will include the section: id=X where X is the numeric ID of the Custom Field inside JIRA. 3.2.5. Configuring the Custom Property Mapping Now that the various SpiraTeam standard fields have been mapped correctly, we need to configure the custom property mappings. This is used for both custom properties in SpiraTeam that map to custom fields in JIRA and also for custom properties in SpiraTeam that are used to map to standard fields in JIRA (Component, Environment, Resolution and SecurityLevel) that don’t exist in SpiraTeam. From the View/Edit Project Data Mapping screen, you need to click on the name of the Incident Custom Property that you want to add data-mapping information for. We will consider the four different types of mapping that you might want to enter: © Copyright 2006-2015, Inflectra Corporation Page 32 of 168 This document contains Inflectra proprietary information a) Text Custom Properties Click on the hyperlink of the text custom property under Incident Custom Properties to bring up the custom property mapping configuration screen. For text custom properties there will be no values listed in the lower half of the screen. You need to lookup the ID of the custom field in JIRA that matches this custom property in SpiraTeam. Once you have entered the id of the custom field, click [Update]. Note: The ID can be found by looking at the URL inside JIRA when choosing to View/Edit the Custom Field. The URL will include the section: id=X where X is the numeric ID of the Custom Field inside JIRA. b) List Custom Properties © Copyright 2006-2015, Inflectra Corporation Page 33 of 168 This document contains Inflectra proprietary information Click on the hyperlink of the list custom property under Incident Custom Properties to bring up the custom property mapping configuration screen. For list custom properties there will be a textbox for both the custom field itself and a mapping table for each of the custom property values that need to be mapped: First you need to lookup the ID of the custom field in JIRA that matches this custom property in SpiraTeam. This should be entered in the ‘External Key’ field below the name of the custom property. Note: The ID can be found by looking at the URL inside JIRA when choosing to View/Edit the Custom Field. The URL will include the section: id=X where X is the numeric ID of the Custom Field inside JIRA. Next for each of the Property Values in the table (in the lower half of the page) you need to enter the full name (not the id this time) of the custom field value as specified in JIRA. c) JIRA’s Component Field If your instance of JIRA requires that all new issues are submitted with a ‘Component’ then you will need to fill out this section. You first need to create an incident custom property in SpiraTeam of type ‘LIST’ that contains the various component names that exist inside JIRA. Then click on the hyperlink of this new list custom property under Incident Custom Properties to bring up the custom property mapping configuration screen: © Copyright 2006-2015, Inflectra Corporation Page 34 of 168 This document contains Inflectra proprietary information First you need to enter the word “Component” as the External Key of the custom property. This tells the data-sync plug-in that the custom property in SpiraTeam should be mapped to built-in Component field in JIRA. Next for each of the Property Values in the table (in the lower half of the page) you need to enter the JIRA ID of the various Components that are configured in JIRA. The external ID can be found by looking at the URL inside JIRA which choosing to View/Edit the component name/description. d) JIRA’s Resolution Field If you would like the values of the JIRA ‘Resolution’ field to be synchronized back to SpiraTeam, then you will need to fill out this section. You first need to create an incident custom property in SpiraTeam of type ‘LIST’ that contains the various resolution names that exist inside JIRA. Then click on the hyperlink of this new list custom property under Incident Custom Properties to bring up the custom property mapping configuration screen: First you need to enter the word “Resolution” as the External Key of the custom property. This tells the data-sync plug-in that the custom property in SpiraTeam should be mapped to built-in Resolution field in JIRA. © Copyright 2006-2015, Inflectra Corporation Page 35 of 168 This document contains Inflectra proprietary information Next for each of the Property Values in the table (in the lower half of the page) you need to enter the JIRA ID of the various Resolutions that are configured in JIRA. The external ID can be found by looking at the URL inside JIRA which choosing to View/Edit the resolution name/description. e) JIRA’s Environment Field If your instance of JIRA requires that all new issues are submitted with an ‘Environment’ description specified, then you will need to fill out this section. You first need to create an incident custom property in SpiraTeam of type ‘TEXT’ that will be used to store the environment description within SpiraTeam. Then click on the hyperlink of this new list custom property under Incident Custom Properties to bring up the custom property mapping configuration screen: All you need to do on this screen is enter the word “Environment” in the External Key textbox and the data-sync plug-in will know that this custom property is mapped to the built-in Environment field in JIRA. f) JIRA’s Security Level Field (JIRA 4.x Plug-In Only) If your instance of JIRA requires that all new issues are submitted with a ‘Security Level’ then you will need to fill out this section. You first need to create an incident custom property in SpiraTeam of type ‘LIST’ that contains the various security levels that exist inside JIRA. Then click on the hyperlink of this new list custom property under Incident Custom Properties to bring up the custom property mapping configuration screen. First you need to enter the word “SecurityLevel” as the External Key of the custom property. This tells the data-sync plug-in that the custom property in SpiraTeam should be mapped to built-in Security Level field in JIRA. Next for each of the Property Values in the table (in the lower half of the page) you need to enter the JIRA ID of the various Security Levels that are configured in JIRA. The external ID can be found by looking at the URL inside JIRA which choosing to View/Edit the security level name/description. g) JIRA’s Issue Key Field (JIRA 4.x Plug-In Only) It can be convenient to create a SpiraTeam custom property to store the JIRA Issue Key (the ID used to identify an issue in JIRA). This allows you to display a list of incients in SpiraTest and see the corresponding JIRA ID in the same list. You first need to create an incident custom property in SpiraTeam of type ‘TEXT’ that will be used to store the JIRA issue key within SpiraTeam. Then click on the hyperlink of this new list custom property under Incident Custom Properties to bring up the custom property mapping configuration screen: © Copyright 2006-2015, Inflectra Corporation Page 36 of 168 This document contains Inflectra proprietary information All you need to do on this screen is enter the word “JiraIssueKey” in the External Key textbox and the data-sync plug-in will know that this custom property is mapped to the built-in Issue Key field in JIRA. Once you have updated the various mapping sections, you are now ready to start the service. 3.3. Enabling the Data-Synchronization 3.3.1. Starting the Service When SpiraTeam is installed, a Windows Service – SpiraTeam Data Sync Service – is installed along with the web application. However to avoid wasting system resources, this service is initially set to run manually. To ensure continued synchronization of SpiraTeam with JIRA, we recommend starting the service and setting its startup-type to Automatic. To make these changes, open up the Windows Control Panel, click on the “Administrative Tools” link, and then choose the Services option. This will bring up the Windows Service control panel: Click on the ‘SpiraTeam Data Sync Service’ entry and click on the link to start the service. Then right-click the service entry and choose the option to set the startup type to ‘Automatic’. This will ensure that synchronization continues between SpiraTeam and JIRA after a reboot of the server. 3.3.2. Using SpiraTeam with JIRA Now that the integration service has been configured and the service started, initially any incidents created in SpiraTeam for the specified projects will be imported into JIRA and if using JIRA 4.x, any existing issues in JIRA will get loaded into SpiraTeam © Copyright 2006-2015, Inflectra Corporation Page 37 of 168 This document contains Inflectra proprietary information At this point we recommend opening the Windows Event Viewer and choosing the Application Log. In this log any error messages raised by the SpiraTeam Data Sync Service will be displayed. If you see any error messages at this point, we recommend immediately stopping the SpiraTeam service and checking the various mapping entries. If you cannot see any issues with the mapping information, we recommend sending a copy of the event log message(s) to Inflectra customer services ([email protected]) who will help you troubleshoot the problem. To use SpiraTeam with JIRA on an ongoing basis, we recommend the following general processes be followed: When running tests in SpiraTest or SpiraTeam, defects found should be logged through the Test Execution Wizard as normal. Developers using JIRA 4.x can log new defects into either SpiraTeam or JIRA. In either case they will get loaded into the other system. Once created in one of the systems and successfully replicated to the other system, the incident should not be modified again inside SpiraTeam At this point, the incident should not be acted upon inside SpiraTeam and all data changes to the issue should be made inside JIRA. To enforce this, you should modify the workflows set up in SpiraTeam so that the various fields are marked as inactive for all the incident statuses other than the “New” status. This will allow someone to submit an incident in SpiraTeam, but will prevent them making changes in conflict with JIRA after that point. As the issue progresses through the customized JIRA workflow, changes to the type of issue, changes to its status, priority, description and resolution will be updated automatically in SpiraTeam. In essence, SpiraTeam acts as a read-only viewer of these incidents. You are now able to perform test coverage and incident reporting inside SpiraTest/SpiraTeam using the test cases managed by SpiraTest/SpiraTeam and the incidents managed on behalf of SpiraTest/SpiraTeam inside JIRA. © Copyright 2006-2015, Inflectra Corporation Page 38 of 168 This document contains Inflectra proprietary information 4. Using SpiraTest with Bugzilla This section outlines how to use SpiraTest in conjunction with the open-source Bugzilla bug tracking system. The built-in integration service allows the quality assurance team to manage their requirements and test cases in SpiraTest, execute test runs in SpiraTest, and then have the new incidents generated during the run be automatically loaded into Bugzilla. Once the incidents are loaded into Bugzilla as bugs, the development team can then manage the lifecycle of these bugs in Bugzilla, and have the status changes in Bugzilla be reflected back in SpiraTest. In addition, if you are using Bugzilla 4.x or higher, any issues logged directly into Bugzilla will get imported into SpiraTeam so that they can be linked to test cases and requirements. 4.1. Configuring the Integration Service This section outlines how to configure the integration service to export incidents into Bugzilla and pick up subsequent status changes made in Bugzilla and have them update SpiraTeam. It assumes that you already have a working installation of SpiraTest, SpiraPlan or SpiraTeam v2.2 or later and a working installation of Bugzilla v3.0 or later. If you have an earlier version of SpiraTeam, you will need to upgrade to at least v2.2 before trying to integrate with Bugzilla. The steps that need to be performed to configure integration with Bugzilla are as follows: Download the latest Bugzilla Data-Sync plug-in for SpiraTeam from our website There are separate plug-ins for Bugzilla 3.x and Bugzilla 4.x so please make sure you download the correct version. Setup the plug-in in SpiraTeam to point to the correct instance of Bugzilla Configure the data field mappings between SpiraTeam and Bugzilla Start the service and verify data transfer 4.1.1. Download the Bugzilla Plug-In Go to the Inflectra website and open up the page that lists the various downloads available for SpiraTeam (http://www.inflectra.com/SpiraTeam/Downloads.aspx). Listed on this page will be the Bugzilla Plug-In for SpiraTeam. Right-click on this link and save the Zip compressed folder to the hard-drive of the server where SpiraTeam is installed. Note: There are separate plug-ins for Bugzilla 3.x and Bugzilla 4.x so please make sure you download the correct version. Open up the compressed folder and extract the BugzillaDataSync.dll file and place it in the C:\Program Files\SpiraTeam\Bin folder (it may be SpiraTest or SpiraPlan depending on which product you’re running). This folder should already contain the DataSyncService.exe and DataSyncService.exe.config files that are the primary files used for managing the data synchronization between SpiraTeam and other systems. If you do not have an on-premise installation of SpiraTeam, but instead are using a hosted subscription provided by Inflectra (or a third party company) you will not have access to the DataSyncService background service. In such situations, you should use the Desktop DataSync application instead. This application is described in Appendix 1 and can be used instead of the server-based DataSyncService. 4.1.2. Configuring the Service To configure the integration service, please open up the DataSyncService.exe.config file located in C:\Program Files\SpiraTeam\Bin with a text editor such as Notepad. Once open, it should look like: © Copyright 2006-2015, Inflectra Corporation Page 39 of 168 This document contains Inflectra proprietary information <?xml version="1.0" encoding="utf-8"?> <configuration> <configSections> <sectionGroup name="applicationSettings" type="System.Configuration.ApplicationSettingsGroup, System, Version=2.0.0.0, Culture=neutral, PublicKeyToken=b77a5c561934e089" > <section name="Inflectra.SpiraTest.DataSyncService.Properties.Settings" type="System.Configuration.ClientSettingsSection, System, Version=2.0.0.0, Culture=neutral, PublicKeyToken=b77a5c561934e089" requirePermission="false" /> </sectionGroup> </configSections> <applicationSettings> <Inflectra.SpiraTest.DataSyncService.Properties.Settings> <setting name="PollingInterval" serializeAs="String"> <value>600000</value> </setting> <setting name="WebServiceUrl" serializeAs="String"> <value>http://localhost/SpiraTeam</value> </setting> <setting name="Login" serializeAs="String"> <value>fredbloggs</value> </setting> <setting name="Password" serializeAs="String"> <value>fredbloggs</value> </setting> <setting name="EventLogSource" serializeAs="String"> <value>SpiraTeam Data Sync Service</value> </setting> <setting name="TraceLogging" serializeAs="String"> <value>False</value> </setting> </Inflectra.SpiraTest.DataSyncService.Properties.Settings> </applicationSettings> </configuration> The sections that need to be verified and possibly changed are marked in yellow above. You need to check the following information: The polling interval allows you to specify how frequently the data-synchronization service will ask SpiraTeam and the external system for new data updates. The value is specified in milliseconds and we recommend a value no smaller than 5 minutes (i.e. 300,000ms). The larger the number, the longer it will take for data to be synchronized, but the lower the network and server overhead. The base URL to your instance SpiraTeam. It is typically of the form http://<server name>/SpiraTeam. Make sure that when you enter this URL on a browser on the server itself, the application login page appears. A valid login name and password to your instance of SpiraTeam. This user needs to be a member of the project(s) that will be synchronized with Bugzilla and needs to have at least Incident create/modify/view permissions and Release create/modify/view permissions in these projects. Once you have made these changes, save the file and proceed to the next stage. 4.1.3. Configuring the Plug-In The next step is to configure the plug-in within SpiraTeam so that the system knows how to access the Bugzilla server. To start the configuration, please open up SpiraTeam in a web browser, log in using a valid account that has System-Administration level privileges and click on the System > Data Synchronization administration option from the left-hand navigation: © Copyright 2006-2015, Inflectra Corporation Page 40 of 168 This document contains Inflectra proprietary information This screen lists all the plug-ins already configured in the system. Depending on whether you chose the option to include sample data in your installation or not, you will see either an empty screen or a list of sample data-synchronization plug-ins. If you already see an entry for BugzillaDataSync you should click on its “Edit” link. If you don’t see such an entry in the list, please click on the [Add] button instead. In either case you will be taken to the following screen where you can enter or modify the Bugzilla Data-Synchronization plug-in: You need to fill out the following fields for the Bugzilla Plug-in to operate correctly: © Copyright 2006-2015, Inflectra Corporation Page 41 of 168 This document contains Inflectra proprietary information Name – this needs to be set to BugzillaDataSync. This needs to match the name of the plug-in DLL assembly that was copied into the C:\Program Files\SpiraTeam\Bin folder (minus the .dll file extension). If you renamed the BugzillaDataSync.dll file for any reason, then you need to change the name here to match. Description – this should be set to a description of the plug-in. This is an optional field that is used for documentation purposes and is not actually used by the system. Connection Info – this should the full URL to the Bugzilla installation’s web-service API. This is typically http://<Bugzilla server name>/xmlrpc.cgi Login – this should be set to a valid login to the Bugzilla installation – typically an email address. The login needs to have permissions to create and view bugs within Bugzilla. Password – this should be set to the password of the login specified above. Time Offset – normally this should be set to zero, but if you find that issues being changed in Bugzilla are not being updated in SpiraTeam, try increasing the value as this will tell the datasynchronization plug-in to add on the time offset (in hours) when comparing date-time stamps. Also if your Bugzilla installation is running on a server set to a different time-zone, then you should add in the number of hours difference between the servers’ time-zones here. Auto-Map Users – this is not currently used by the Bugzilla data-sync plug-in and can be ignored. Custom 01 – When connecting to Bugzilla, sometimes the connection gets dropped by the server without notifying the plug-in. This happens when using HTTP 1.1 Keep-Alive connections. If you set this property to “False”, it will tell the plug-in to not-use HTTP keep-alives when connecting to Bugzilla, otherwise set it to “True”. Custom 02 – When connecting to a Bugzilla instance that is running under HTTPS (SSL) this custom property can be set to determine if the plug-in should verify that the SSL certificate is a trusted root certificate. Set to “True” if you are using an SSL certificate that was issued by a trusted Certification Authority, and set to “False” if you are using a self-signed certificate. Custom 03 – 05 – these are not currently used by the Bugzilla data-sync plug-in and can be left blank. 4.2. Configuring the Data Mapping Next, you need to configure the data mapping between SpiraTeam and Bugzilla. This allows the various projects, users, releases, incident types, statuses, priorities and custom property values used in the two applications to be related to each other. This is important, as without a correct mapping, there is no way for the integration service to know that an “Duplicate” incident in SpiraTeam is the same as an “UNCONFIRMED” bug in Bugzilla (for example). The following mapping information needs to be setup in SpiraTeam: The mapping of the project identifiers for the projects that need to be synchronized The mapping of users in the system The mapping of releases (equivalent to Bugzilla versions) in the system The mapping of the various standard fields in the system The mapping of the various custom properties in the system Each of these is explained in turn below: 4.2.1. Configuring the Project Mapping From the data synchronization administration page, you need to click on the “View Project Mappings” hyperlink next to the Bugzilla plug-in name. This will take you to the data-mapping home page for the currently selected project: © Copyright 2006-2015, Inflectra Corporation Page 42 of 168 This document contains Inflectra proprietary information If the project name does not match the name of the project you want to configure the data-mapping for, click on the “(Change Project)” hyperlink to change the current project. To enable this project for data-synchronization with Bugzilla, you need to enter: External Key – This should be set to the name of the equivalent Product in Bugzilla. Active Flag – Set this to ‘Yes’ so that SpiraTeam knows that you want to synchronize data for this project. Once the project has been completed, setting the value to “No” will stop data synchronization, reducing network utilization. Click [Update] to confirm these settings. Once you have enabled the project for data-synchronization, you can now enter the other data mapping values outlined below. Note: Once you have successfully configured the project, when creating a new project, you should choose the option to “Create Project from Existing Project” rather than “Use Default Template” so that all the project mappings get copied across to the new project. 4.2.2. Configuring the User Mapping To configure the mapping of users in the two systems, you need to go to Administration > Users > View Edit Users, which will bring up the list of users in the system. Then click on the “Edit” button for a particular user that will be editing issues in Bugzilla: © Copyright 2006-2015, Inflectra Corporation Page 43 of 168 This document contains Inflectra proprietary information You will notice that below the Active flag for the user is a list of all the configured data-synchronization plug-ins. In the text box next to the Bugzilla Data-Sync plug-in you need to enter the login for this username in Bugzilla. This will allow the data-synchronization plug-in to know which user in SpiraTeam match which equivalent user in Bugzilla. Click [Update] once you’ve entered the appropriate login name. You should now repeat for the other users who will be active in both systems. 4.2.3. Configuring the Release Mapping Now that the projects and users have been mapped correctly, we need to configure the mapping between Releases/Iterations in SpiraTeam and Versions in Bugzilla. To do this, please navigate to Planning > Releases and click on the Release/Iteration in question. Make sure you have the ‘Overview’ tab visible and expand the “Details” section of the release/iteration: In addition to the standard fields and custom properties configured for Releases, you will see an additional text property called “BugzillaDataSync ID” that is used to store the mapped external identifier for the equivalent Version in Bugzilla. You need to enter the name of the equivalent version in Bugzilla, enter it into this text-box and click [Save]. You should now repeat for all the other releases and iterations in the project. If you are using the plugin for Bugzilla 4.x then any Versions that have already been created in Bugzilla will be automatically imported into SpiraTeam if they do not already exist in SpiraTeam and they have not already been mapped. © Copyright 2006-2015, Inflectra Corporation Page 44 of 168 This document contains Inflectra proprietary information 4.2.4. Configuring the Standard Field Mapping Now that the projects, user and releases have been mapped correctly, we need to configure the standard incident fields. To do this, go to Administration > System > Data Synchronization and click on the “View Project Mappings” for the BugzillaDataSync plug-in entry: From this screen, you need to click on Priority, Severity and Status in turn to configure their values: a) Incident Status Click on the “Status” hyperlink under Incident Standard Fields to bring up the Incident status mapping configuration screen: © Copyright 2006-2015, Inflectra Corporation Page 45 of 168 This document contains Inflectra proprietary information The table lists each of the incident statuses available in SpiraTeam and provides you with the ability to enter the matching Bugzilla bug status for each one. You can map multiple SpiraTeam fields to the same Bugzilla fields (e.g. New and Open in SpiraTeam are both equivalent to NEW in Bugzilla), in which case only one of the two values can be listed as Primary = Yes as that’s the value that’s used on the reverse synchronization (from Bugzilla > SpiraTeam). We recommend that you always point the New and Open statuses inside SpiraTeam to point to the NEW status inside Bugzilla and make Open in SpiraTeam the Primary status of the two. This is recommended so that as new incidents in SpiraTeam get synched over to Bugzilla, they will get switched to the NEW status in Bugzilla which will then be synched back to “Open” in SpiraTeam. That way you’ll be able to see at a glance which incidents have been synched with Bugzilla and those that haven’t. b) Incident Priority Click on the “Priority” hyperlink under Incident Standard Fields to bring up the Incident Priority mapping configuration screen: The table lists each of the incident priorities available in SpiraTeam and provides you with the ability to enter the matching Bugzilla priority for each one. You can map multiple SpiraTeam fields to the same Bugzilla fields, in which case only one of the two values can be listed as Primary = Yes as that’s the value that’s used on the reverse synchronization (from Bugzilla > SpiraTeam). c) Incident Severity Click on the “Severity” hyperlink under Incident Standard Fields to bring up the Incident severity mapping configuration screen: © Copyright 2006-2015, Inflectra Corporation Page 46 of 168 This document contains Inflectra proprietary information The table lists each of the incident severities available in SpiraTeam and provides you with the ability to enter the matching Bugzilla severity for each one. You can map multiple SpiraTeam fields to the same Bugzilla fields, in which case only one of the two values can be listed as Primary = Yes as that’s the value that’s used on the reverse synchronization (from Bugzilla > SpiraTeam). 4.2.5. Configuring the Custom Property Mapping Now that the various SpiraTeam standard fields have been mapped correctly, we need to configure the custom property mappings. This is used for custom properties in SpiraTeam that are used to map to standard fields in Bugzilla (Component, Hardware, Operating System and Resolution) that don’t exist in SpiraTeam. You need to make sure that you have first added custom lists in SpiraTeam that contain the list of Components, Hardware platforms and Operating Systems used in Bugzilla and that you have setup those lists as Custom Properties on the Incident artifact type. Once that’s done, from the View/Edit Project Data Mapping screen, you need to click on the name of the Incident Custom Property that you want to add data-mapping information for. We will consider the four different types of mapping that you might want to enter in turn: © Copyright 2006-2015, Inflectra Corporation Page 47 of 168 This document contains Inflectra proprietary information a) Bugzilla’s Component Field If your instance of Bugzilla requires that all new bugs are submitted with a ‘Component’ then you will need to fill out this section. You first need to create an incident custom property in SpiraTeam of type ‘LIST’ that contains the various component names that exist inside Bugzilla. Then click on the hyperlink of this new list custom property under Incident Custom Properties to bring up the custom property mapping configuration screen: First you need to enter the word “Component” as the External Key of the custom property. This tells the data-sync plug-in that the custom property in SpiraTeam should be mapped to built-in Component field in Bugzilla. © Copyright 2006-2015, Inflectra Corporation Page 48 of 168 This document contains Inflectra proprietary information Next for each of the Property Values in the table (in the lower half of the page) you need to enter the Bugzilla name of the various Components that are configured in Bugzilla. b) Bugzilla’s Operating System Field If your instance of Bugzilla requires that all new issues are submitted with an ‘Operating System’ then you will need to fill out this section. You first need to create an incident custom property in SpiraTeam of type ‘LIST’ that contains the various operating system names that exist inside Bugzilla. Then click on the hyperlink of this new list custom property under Incident Custom Properties to bring up the custom property mapping configuration screen: First you need to enter the word “OperatingSystem” as the External Key of the custom property. This tells the data-sync plug-in that the custom property in SpiraTeam should be mapped to built-in Operating System field in Bugzilla. Next for each of the Property Values in the table (in the lower half of the page) you need to enter the Bugzilla name of the various Operating System values that are configured in Bugzilla. c) Bugzilla’s Hardware Field If your instance of Bugzilla requires that all new issues are submitted with a ‘Hardware’ value then you will need to fill out this section. You first need to create an incident custom property in SpiraTeam of type ‘LIST’ that contains the various hardware platform names that exist inside Bugzilla. Then click on the hyperlink of this new list custom property under Incident Custom Properties to bring up the custom property mapping configuration screen: © Copyright 2006-2015, Inflectra Corporation Page 49 of 168 This document contains Inflectra proprietary information First you need to enter the word “Hardware” as the External Key of the custom property. This tells the data-sync plug-in that the custom property in SpiraTeam should be mapped to built-in Hardware field in Bugzilla. Next for each of the Property Values in the table (in the lower half of the page) you need to enter the Bugzilla name of the various Hardware platforms that are configured in Bugzilla. d) Bugzilla’s Resolution Field (Optional) When incidents in SpiraTeam are updated with changes made in Bugzilla, the value of the Bugzilla resolution field (FIXED, INVALID, WONTFIX, LATER, REMIND, DUPLICATE, WORKSFORME, MOVED, DEPLOY) is used to populate the Resolution/Comments text box within SpiraTeam. However the Resolution/Comments field in SpiraTeam cannot be displayed in the incident list page as it’s a long text-field, so if you would like to be able to see the list of Bugzilla Resolution codes displayed in a list, it is necessary to add a TEXT custom property to Incidents that can be used to store this returned value and then be filtered in the list. The rest of this section describes how to map this text custom property so that it picks up the Resolution field values from Bugzilla. To configure the mapping, click on the hyperlink of this new text custom property under Incident Custom Properties to bring up the custom property mapping configuration screen: © Copyright 2006-2015, Inflectra Corporation Page 50 of 168 This document contains Inflectra proprietary information All you need to do on this screen is enter the word “Resolution” in the External Key textbox and the datasync plug-in will know that this custom property is mapped to the built-in Resolution field in Bugzilla. Once you have updated the various mapping sections, you are now ready to start the service. 4.3. Enabling the Data-Synchronization 4.3.1. Starting the Service When SpiraTeam is installed, a Windows Service – SpiraTeam Data Sync Service – is installed along with the web application. However to avoid wasting system resources, this service is initially set to run manually. To ensure continued synchronization of SpiraTeam with Bugzilla, we recommend starting the service and setting its startup-type to Automatic. To make these changes, open up the Windows Control Panel, click on the “Administrative Tools” link, and then choose the Services option. This will bring up the Windows Service control panel: Click on the ‘SpiraTeam Data Sync Service’ entry and click on the link to start the service. Then right-click the service entry and choose the option to set the startup type to ‘Automatic’. This will ensure that synchronization continues between SpiraTeam and Bugzilla after a reboot of the server. 4.3.2. Using SpiraTest with Bugzilla Now that the integration service has been configured and the service started, initially any incidents created in SpiraTeam for the specified projects will be imported into Bugzilla. At this point we recommend opening the Windows Event Viewer and choosing the Application Log. In this log any error messages raised by the Data Synchronization service will be displayed. If you see any error messages at this point, we recommend immediately stopping the service and checking the various mapping entries. If you cannot see any issues with the mapping information, we recommend sending a copy of the event log message(s) to Inflectra customer services ([email protected]) who will help you troubleshoot the problem. To use SpiraTeam with Bugzilla on an ongoing basis, we recommend the following general processes be followed: When running tests in SpiraTeam, defects found should be logged through the ‘Add Incident’ option as normal. Once an incident has been created during the running of the test, it will now be populated across into Bugzilla as a bug. It will be populated with the information captured in SpiraTeam. At this point, the incident should not be acted upon inside SpiraTeam, and all data changes to the issue should be made inside Bugzilla. To enforce this, you can modify the workflows set up in © Copyright 2006-2015, Inflectra Corporation Page 51 of 168 This document contains Inflectra proprietary information SpiraTeam so that the various fields are marked as inactive for all the incident statuses other than the “New” status. This will allow someone to submit an incident in SpiraTeam, but will prevent them making changes in conflict with Bugzilla after that point. As the issue progresses through the Bugzilla workflow, changes to the status, priority, severity, and resolution will be updated automatically in SpiraTeam. In essence, SpiraTeam acts as a read-only viewer of these incidents. If you are using the plugin for Bugzilla 4.x, changes to the hardware, operating system and component will also be synchronized back into SpiraTeam. In addition, any comments added to the bug in Bugzilla 4.x will get added to the corresponding incident in SpiraTeam You are now able to perform test coverage and incident reporting inside SpiraTeam using the test cases managed by SpiraTeam and the incidents managed on behalf of SpiraTeam inside Bugzilla. © Copyright 2006-2015, Inflectra Corporation Page 52 of 168 This document contains Inflectra proprietary information 5. Using SpiraTest with MS-TFS This section outlines how to use SpiraTest, SpiraPlan or SpiraTeam (hereafter referred to as SpiraTeam) in conjunction with the work item tracking functionality of Microsoft Visual Studio Team System (MSVSTS) Team Foundation Server (TFS) hereafter referred to as TFS. The built-in integration service allows the quality assurance team to manage their requirements and test cases in SpiraTeam, execute test runs in SpiraTest, and then have the new incidents generated during the run be automatically loaded into TFS. Once the incidents are loaded into TFS as work items, the development team can then manage the lifecycle of these work items in TFS, and have the status changes in TFS be reflected back in SpiraTeam. Similarly as the requirements are decomposed into discrete project tasks in SpiraPlan, the integration service will automatically load these new tasks into TFS as task work items where the development team can manage their lifecycle, with schedule and progress changes in TFS being reflected back in SpiraTeam. 5.1. Configuring the Integration Service This section outlines how to configure the integration service to export incidents and tasks into TFS and pick up subsequent status changes in TFS and have them update SpiraTeam. It assumes that you already have a working installation of SpiraTest, SpiraPlan or SpiraTeam and a working installation of TFS. There are different plugins on the Inflectra website that are compatible with different version of SpiraTeam and TFS: • The MS-TFS 2005/2008 plugin is compatible with SpiraTeam v2.2+ and TFS 2005 or 2008 • The MS-TFS 2010 plugin is compatible with SpiraTeam v3.0+ and TFS 2010+ • The MS-TFS 2012 plugin is compatible with SpiraTeam v4.0+ and TFS 2012+ In general, to get the most functionality, we recommend using the latest version of the plugin that is compatible with your installed versions of SpiraTeam and TFS. If you have a version of SpiraTeam that predates v2.2, you will need to upgrade to at least v2.2 before trying to integrate with TFS. The steps that need to be performed to configure integration with TFS are as follows: Download the latest TFS Data-Sync plug-in for SpiraTeam from our website Setup the plug-in in SpiraTeam to point to the correct instance of TFS Configure the data field mappings between SpiraTeam and TFS Start the service and verify data transfer 5.1.1. Download the TFS Plug-In Go to the Inflectra website and open up the page that lists the various downloads available for SpiraTeam (http://www.inflectra.com/SpiraTeam/Downloads.aspx). Listed on this page will be the TFS Plug-Ins for SpiraTeam. Right-click on the link for the appropriate version (2005/2008, 2010 or 2012) and save the Zip compressed folder to the hard-drive of the server where SpiraTeam is installed. Open up the compressed folder and extract the MsTfsDataSync.dll file and place in the C:\Program Files\SpiraTeam\Bin folder (it may be SpiraTest or SpiraPlan depending on which product you’re running). This folder should already contain the DataSyncService.exe and DataSyncService.exe.config files that are the primary files used for managing the data synchronization between SpiraTeam and other systems. © Copyright 2006-2015, Inflectra Corporation Page 53 of 168 This document contains Inflectra proprietary information If you do not have an on-premise installation of SpiraTeam, but instead are using a hosted subscription provided by Inflectra (or a third party company) you will not have access to the DataSyncService background service. In such situations, you should use the Desktop DataSync application instead. This application is described in Appendix 1 and can be used instead of the server-based DataSyncService. If you have a 64-bit server, you will need to also download from our website the specially compiled 32-bit version of the DataSyncService.exe file since TFS is a 32-bit application whereas the standard DataSyncService executable is 64-bit. Please see KB14 in the Inflectra Support Knowledge Base (http://www.inflectra.com/Support/KnowledgeBase/KB14.aspx) for details. 5.1.2. Configuring the Service To configure the integration service, please open up the DataSyncService.exe.config file located in C:\Program Files\SpiraTeam\Bin with a text editor such as Notepad. Once open, it should look like: <?xml version="1.0" encoding="utf-8"?> <configuration> <configSections> <sectionGroup name="applicationSettings" type="System.Configuration.ApplicationSettingsGroup, System, Version=2.0.0.0, Culture=neutral, PublicKeyToken=b77a5c561934e089" > <section name="Inflectra.SpiraTest.DataSyncService.Properties.Settings" type="System.Configuration.ClientSettingsSection, System, Version=2.0.0.0, Culture=neutral, PublicKeyToken=b77a5c561934e089" requirePermission="false" /> </sectionGroup> </configSections> <applicationSettings> <Inflectra.SpiraTest.DataSyncService.Properties.Settings> <setting name="PollingInterval" serializeAs="String"> <value>600000</value> </setting> <setting name="WebServiceUrl" serializeAs="String"> <value>http://localhost/SpiraTeam</value> </setting> <setting name="Login" serializeAs="String"> <value>fredbloggs</value> </setting> <setting name="Password" serializeAs="String"> <value>fredbloggs</value> </setting> <setting name="EventLogSource" serializeAs="String"> <value>SpiraTeam Data Sync Service</value> </setting> <setting name="TraceLogging" serializeAs="String"> <value>False</value> </setting> </Inflectra.SpiraTest.DataSyncService.Properties.Settings> </applicationSettings> </configuration> The sections that need to be verified and possibly changed are marked in yellow above. You need to check the following information: The polling interval allows you to specify how frequently the data-synchronization service will ask SpiraTeam and the external system for new data updates. The value is specified in milliseconds and we recommend a value no smaller than 5 minutes (i.e. 300,000ms). The larger the number, the longer it will take for data to be synchronized, but the lower the network and server overhead. The base URL to your instance of SpiraTeam. It is typically of the form http://<server name>/SpiraTeam. Make sure that when you enter this URL on a browser on the server itself, the application login page appears. A valid login name and password to your instance of SpiraTeam. This user needs to be a member of the project(s) that will be synchronized with TFS and needs to have at least Incident © Copyright 2006-2015, Inflectra Corporation Page 54 of 168 This document contains Inflectra proprietary information create/modify/view permissions and Release create/modify/view permissions in these projects. Once you have made these changes, save the file and proceed to the next stage. 5.1.3. Configuring the Plug-In The next step is to configure the plug-in within SpiraTeam so that the system knows how to access the TFS server. To start the configuration, please open up SpiraTeam in a web browser, log in using a valid account that has System-Administration level privileges and click on the System > Data Synchronization administration option from the left-hand navigation: This screen lists all the plug-ins already configured in the system. Depending on whether you chose the option to include sample data in your installation or not, you will see either an empty screen or a list of sample data-synchronization plug-ins. If you already see an entry for MsTfsDataSync you should click on its “Edit” link. If you don’t see such an entry in the list, please click on the [Add] button instead. In either case you will be taken to the following screen where you can enter or modify the TFS Data-Synchronization plug-in: You need to fill out the following fields for the TFS Plug-in to operate correctly: Name – this needs to be set to MsTfsDataSync. This needs to match the name of the plug-in DLL assembly that was copied into the C:\Program Files\SpiraTeam\Bin folder (minus the .dll file © Copyright 2006-2015, Inflectra Corporation Page 55 of 168 This document contains Inflectra proprietary information extension). If you renamed the MsTfsDataSync.dll file for any reason, then you need to change the name here to match. Description – this should be set to a description of the plug-in. This is an optional field that is used for documentation purposes and is not actually used by the system. Connection Info – this should the URL that you use for connecting Visual Studio to the Team Foundation Server. For TFS 2005/2008 it is of the format http://servername:8080. For TFS 2010+ it is of the format http://servername:8080/tfs/collectionname where “collectionname” is the name of the project collection you’re integrating with. Login – this should be set to a valid user that has permissions to access the TFS installation. The login needs to have permissions to create and view work items and iterations within TFS. Note: Do not include the Windows Active Directory Domain in this field if you are using a Windows domain user. Password – this should be set to the password of the user specified above. Time Offset – normally this should be set to zero, but if you find that work items being changed in TFS are not being updated in SpiraTeam, try increasing the value as this will tell the datasynchronization plug-in to add on the time offset (in hours) when comparing date-time stamps. Also if your TFS installation is running on a server set to a different time-zone, then you should add in the number of hours difference between the servers’ time-zones here. The remaining fields work differently depending on which version of the TFS plugin you are using (2012, 2010 or 2005/2008): a) TFS 2012 Plugin Please fill out the fields as follows: Auto-Map Users – This changes the way the plugin maps users in SpiraTeam to those in TFS: Auto-Map = True With this setting, all users in SpiraTeam need to have the same username as those in TFS. If this is the case then you do not need to perform the user-mapping task outlined in section 5.2.2. This is a big time-saver if you can guarantee that all usernames are the same in both systems. Auto-Map = False With this setting, users in SpiraTeam and TFS are free to have different usernames because you specify the corresponding TFS name for each user as outlined in 5.2.2. Custom 01 – This is used to specify the Windows Active Directory Domain that the Windows user specified above is a member of. If you are running TFS on a Windows workgroup, just use the server name and make sure that the Windows user above is a user on that server itself. If you are using a Window Live ID, just leave this field blank Custom 02 – This field should contain a comma-separated list of work item types that you want to synchronize as SpiraTeam Tasks as opposed to Incidents. Normally you would want to list at least the TFS “Task” work item type in this field. Custom 03 – If you would like the system to display the SpiraTeam artifact ID (e.g. IN5 for incidents or TK36 for tasks) in a custom field inside TFS, you should just enter the name of the appropriate TFS field from your process template (e.g. Spira.IncidentId) and then when the incident or task is added to TFS, the corresponding SpiraTeam ID will be added to that field of the work item. Custom 04 - Depending on your TFS process template, the data-synchronization plugin may not be allowed to set the detector of the incident inside TFS. If you would like the system to display the detector of the incident (as recorded in SpiraTeam) in a custom field inside TFS, you should just enter the name of the appropriate TFS field from your process template (e.g. © Copyright 2006-2015, Inflectra Corporation Page 56 of 168 This document contains Inflectra proprietary information Spira.Detector) and then when the incident is added to TFS, the corresponding detector’s name will be added to that field of the work item. Custom 05 – This field should contain a comma-separated list of work item types that you want to synchronize as SpiraTeam Requirements as opposed to Incidents. Normally you would want to list at least the TFS “User Story” work item type in this field. b) TFS 2010 Plugin Please fill out the fields as follows: Auto-Map Users – this is not used by this version of the plugin and can be ignored. Custom 01 – This is used to specify the Windows Active Directory Domain that the Windows user specified above is a member of. If you are running TFS on a Windows workgroup, just use the server name and make sure that the Windows user above is a user on that server itself. Custom 02 – This is used to specify if you want to synchronize Incidents, Tasks or Both. By default this field is blank, meaning synchronize both types of artifact. However if you enter in “Incidents” into this field it will tell the system to only synchronize incidents, and if you enter “Tasks” it will tell the system to only synchronize tasks. Custom 03 – If you would like the system to display the SpiraTeam artifact ID (e.g. IN5 for incidents or TK36 for tasks) in a custom field inside TFS, you should just enter the name of the appropriate TFS field from your process template (e.g. Spira.IncidentId) and then when the incident or task is added to TFS, the corresponding SpiraTeam ID will be added to that field of the work item. Custom 04 - Depending on your TFS process template, the data-synchronization plugin may not be allowed to set the detector of the incident inside TFS. If you would like the system to display the detector of the incident (as recorded in SpiraTeam) in a custom field inside TFS, you should just enter the name of the appropriate TFS field from your process template (e.g. Spira.Detector) and then when the incident is added to TFS, the corresponding detector’s name will be added to that field of the work item. Custom 05 – this is not used by this version of the plugin and can be ignored. c) TFS 2005/2008 Plugin Please fill out the fields as follows: Auto-Map Users – this is not used by this version of the plugin and can be ignored. Custom 01 – This is used to specify the Windows Active Directory Domain that the Windows user specified above is a member of. If you are running TFS on a Windows workgroup, just use the server name and make sure that the Windows user above is a user on that server itself. Custom 02 – This is used to specify if you want to synchronize Incidents, Tasks or Both. By default this field is blank, meaning synchronize both types of artifact. However if you enter in “Incidents” into this field it will tell the system to only synchronize incidents, and if you enter “Tasks” it will tell the system to only synchronize tasks. Custom 03 – this is not used by this version of the plugin and can be ignored. Custom 04 – this is not used by this version of the plugin and can be ignored. Custom 05 – this is not used by this version of the plugin and can be ignored. 5.2. Configuring the Data Mapping Next, you need to configure the data mapping between SpiraTeam and TFS. This allows the various projects, users, releases, incident types, statuses, priorities and custom property values used in the two applications to be related to each other. This is important, as without a correct mapping, there is no way for the integration service to know that a “Not Reproducible” incident in SpiraTeam is the same as a “Closed + Cannot Reproduce” bug work item in TFS (for example). © Copyright 2006-2015, Inflectra Corporation Page 57 of 168 This document contains Inflectra proprietary information The following mapping information needs to be setup in SpiraTeam: The mapping of the project identifiers for the projects that need to be synchronized The mapping of users in the system The mapping of releases (equivalent to TFS iterations) in the system The mapping of the various standard incident fields in the system The mapping of the various custom incident properties in the system The mapping of the various standard requirement fields in the system (if synching requirements) The mapping of the various custom requirement properties in the system (if synching requirements) The mapping of the various standard task fields in the system (if synching tasks) The mapping of the various custom task properties in the system (if synching tasks) Note: If using SpiraTest, you do not need to setup the last two sets of mappings as Tasks are not available in SpiraTest. 5.2.1. Configuring the Project Mapping From the data synchronization administration page, you need to click on the “View Project Mappings” hyperlink next to the TFS plug-in name. This will take you to the data-mapping home page for the currently selected project: If the project name does not match the name of the project you want to configure the data-mapping for, click on the “(Change Project)” hyperlink to change the current project. To enable this project for data-synchronization with TFS, you need to enter: External Key – This should be set to the name of the project in TFS as visible from the Visual Studio Team Explorer: © Copyright 2006-2015, Inflectra Corporation Page 58 of 168 This document contains Inflectra proprietary information Active Flag – Set this to ‘Yes’ so that SpiraTeam knows that you want to synchronize data for this project. Once the project has been completed, setting the value to “No” will stop data synchronization, reducing network utilization. Click [Update] to confirm these settings. Once you have enabled the project for data-synchronization, you can now enter the other data mapping values outlined below. Note: Once you have successfully configured the project, when creating a new project, you should choose the option to “Create Project from Existing Project” rather than “Use Default Template” so that all the project mappings get copied across to the new project. 5.2.2. Configuring the User Mapping To configure the mapping of users in the two systems, you need to go to Administration > Users > View Edit Users, which will bring up the list of users in the system. Then click on the “Edit” button for a particular user that will be editing work items in TFS: You will notice that below the Active flag for the user is a list of all the configured data-synchronization plug-ins. In the text box next to the TFS Data-Sync plug-in you need to enter the full name of this Windows User (not the login). This is the name of the user as they appear inside work items within TFS: © Copyright 2006-2015, Inflectra Corporation Page 59 of 168 This document contains Inflectra proprietary information This will allow the data-synchronization plug-in to know which user in SpiraTeam match which equivalent user in TFS. Click [Update] once you’ve entered the appropriate login name. You should now repeat for the other users who will be active in both systems. If you have set the “Auto-Map Users” option in the TFS 2012 plugin, you can skip this section completely. 5.2.3. Configuring the Release Mapping When the data-synchronization service runs, when it comes across a release/iteration in SpiraTeam that it has not seen before, it will create a corresponding “Iteration” in TFS. Similarly if it comes across a new Iteration in TFS that it has not seen before, it will create a new Release/Iteration in SpiraTeam. Therefore when using both systems together, it is recommended that you only enter new Releases/Iterations in one system and let the data-synchronization service add them to the other system. However you may start out with the situation where you already have pre-existing Releases/Iterations in both systems that you need to associate in the data-mapping. If you don’t do this, you may find that duplicates get created when you first enable the data-synchronization service. Therefore for any Releases/Iterations that already exist in BOTH systems please navigate to Planning > Releases and click on the Release/Iteration in question. Make sure you have the ‘Overview’ tab visible and expand the “Details” section of the release/iteration: In addition to the standard fields and custom properties configured for Releases, you will see an additional text property called “MsTfsDataSync ID” that is used to store the mapped external identifier for the equivalent Version in TFS. You need to locate the ID of the equivalent Iteration in TFS, enter it into this text-box and click [Save]. You should now repeat for all the other pre-existing releases. The TFS Iteration ID is not visible in the TFS user interface, but can instead be located by opening up the SQL Server that it’s installed on, opening the ‘TfsWorkItemTracking’ database (in TFS 2010 it will named after your project collection instead) and locating the ‘TreeNodes’ table: Once you have found the matching Iteration (by name), the numeric value stored in the ID column (the one on the left) is the value that needs to get added as the MsTfsDataSync ID inside SpiraTeam. © Copyright 2006-2015, Inflectra Corporation Page 60 of 168 This document contains Inflectra proprietary information 5.2.4. Configuring the Standard Incident Field Mapping Now that the projects, user and releases have been mapped correctly, we need to configure the standard incident fields. To do this, go to Administration > System > Data Synchronization and click on the “View Project Mappings” for the MsTfsDataSync plug-in entry: From this screen, you need to click on Priority, Severity, Status and Type in turn to configure their values: a) Incident Type Click on the “Type” hyperlink under Incident Standard Fields to bring up the Incident type mapping configuration screen: The table lists each of the incident types available in SpiraTeam and provides you with the ability to enter the matching TFS work item type name for each one. To make this easier, we recommend that inside the Administration > Edit Incident Statuses screen you first make all incident types inactive except Risk, Issue and Bug since only those types make sense to synchronize with TFS. b) Incident Status Click on the “Status” hyperlink under Incident Standard Fields to bring up the Incident status mapping configuration screen: © Copyright 2006-2015, Inflectra Corporation Page 61 of 168 This document contains Inflectra proprietary information The table lists each of the incident statuses available in SpiraTeam and provides you with the ability to enter the matching TFS work item State + Reason for each one. Since TFS uses separate State (Active, Resolved, Closed) and Reason (Fixed, Duplicate, Not Fixed, etc.) codes and SpiraTeam uses a single status code, you need to concatenate the TFS State and Reason together with a ‘plus’ (+) sign so that the system knows that the incident status in SpiraTeam corresponds to that specific combination. You can map multiple SpiraTeam fields to the same TFS fields (e.g. New and Open in SpiraTeam are both equivalent to ‘Active+New’ in TFS), in which case only one of the two values can be listed as Primary = Yes as that’s the value that’s used on the reverse synchronization (from TFS > SpiraTeam). We recommend that you always point the New and Open statuses inside SpiraTeam to point to the “Active+New” TFS state+reason, and make Open in SpiraTeam the Primary status of the two. This is recommended so that as new incidents in SpiraTeam get synched over to TFS, they will get switched to the “Active+New” status in TFS which will then be synched back to “Open” in SpiraTeam. That way you’ll be able to see at a glance which incidents have been synched with TFS and those that haven’t. c) Incident Priority Click on the “Priority” hyperlink under Incident Standard Fields to bring up the Incident Priority mapping configuration screen: The table lists each of the incident priorities available in SpiraTeam and provides you with the ability to enter the matching TFS priority value for each one. To make this easier, we recommend that inside the Administration > Edit Incident Priorities screen you first make any statuses not used in TFS inactive in SpiraTeam. d) Incident Severity (TFS 2012 plugin only) Click on the “Severity” hyperlink under Incident Standard Fields to bring up the Incident Severity mapping configuration screen: © Copyright 2006-2015, Inflectra Corporation Page 62 of 168 This document contains Inflectra proprietary information The table lists each of the incident severities available in SpiraTeam and provides you with the ability to enter the matching TFS severity value for each one. To make this easier, we recommend that inside the Administration > Edit Incident Severities screen you first make any statuses not used in TFS inactive in SpiraTeam. 5.2.5. Configuring the Incident Custom Property Mapping Now that the various SpiraTeam standard incident fields have been mapped correctly, we need to configure the custom property mappings. This is used for both custom properties in SpiraTeam that map to custom fields in TFS and also for custom properties in SpiraTeam that are used to map to standard fields in TFS (e.g. Area) that don’t exist in SpiraTeam. From the View/Edit Project Data Mapping screen, you need to click on the name of the Incident Custom Property that you want to add data-mapping information for: a) TFS’s Area Field First you need to go to Administration > Edit Custom Lists and create a new custom list that contains all the different Areas that are being used in TFS. Then you need to go to Administration > Edit Custom Properties and add a new list custom property onto the Incident artifact type called ‘Area’ and link it to the Area custom list you created in the previous step. This will now be available for mapping. Now, back in the data-mapping page, click on the ‘Area’ hyperlink under Incident Custom Properties to bring up the custom property mapping configuration screen: © Copyright 2006-2015, Inflectra Corporation Page 63 of 168 This document contains Inflectra proprietary information First you need to enter the word “Area” as the External Key of the custom property. This tells the datasync plug-in that the custom property in SpiraTeam should be mapped to built-in Area field in TFS. Next for each of the Property Values in the table (in the lower half of the page) you need to enter the ID of the various Areas that are configured in TFS. The TFS Area ID is not visible in the TFS user interface, but can instead be located by opening up the SQL Server that it’s installed on, opening the ‘TfsWorkItemTracking’ database (in TFS 2010 and later it will named after your project collection instead) and locating the ‘TreeNodes’ table: Once you have found the matching Area (by name), the numeric value stored in the ID column (the one on the left) is the value that needs to get added as the External Key inside SpiraTeam. b) TFS Custom Fields If the custom field in TFS is a list field, first you need to go to Administration > Edit Custom Lists in SpiraTeam and create a new custom list that contains all the different values that are being used in TFS. Then for both list-fields and value-fields you need to go to Administration > Edit Custom Properties and add a new custom property onto the Incident artifact type with the name of the appropriate TFS field (e.g. Triage, Rank, etc.) and if a list-field, link it to the custom list you created in the previous step. The custom property will now be available for data-mapping. Now, back in the data-synchronization data-mapping page, click on the hyperlink under Incident Custom Properties that corresponds to the custom property to bring up the custom property mapping configuration screen: © Copyright 2006-2015, Inflectra Corporation Page 64 of 168 This document contains Inflectra proprietary information First you need to enter the full Reference Name of the TFS field as the External Key of the custom property. This tells the data-sync plug-in that the custom property in SpiraTeam should be mapped to this specific field in TFS. To see a list of fields and their reference names, you can run the following SQL query against your TFS database: SELECT Name, ReferenceName FROM Fields ORDER BY Name We have included a list of fields in the Agile process template in section 5.5 of this guide as a helpful reference. Next for each of the Property Values in the table (in the lower half of the page) you need to enter the name of the field values as they appear in TFS as the External Key. 5.2.6. Configuring the Standard Task Field Mapping Now that the projects, user, releases and incident fields have been mapped correctly, we need to configure the standard task fields. To do this, go to Administration > System > Data Synchronization and click on the “View Project Mappings” for the MsTfsDataSync plug-in entry: From this screen, you need to click on Priority and Status in turn to configure their values: a) Task Status © Copyright 2006-2015, Inflectra Corporation Page 65 of 168 This document contains Inflectra proprietary information Click on the “Status” hyperlink under Task Standard Fields to bring up the Task status mapping configuration screen: The table lists each of the task statuses available in SpiraTeam and provides you with the ability to enter the matching TFS work item State for each one. Unlike the mapping for incidents (see above) SpiraTeam does not track the reason codes associated with the tasks in MS TFS, so you only need to map the State names from TFS with the task status names. You can map multiple SpiraTeam fields to the same TFS fields (e.g. Blocked, Completed and Deferred in SpiraTeam are all equivalent to State = Closed in TFS), in which case only one of the values can be listed as Primary = Yes as that’s the value that’s used on the reverse synchronization (from TFS > SpiraTeam). b) Task Priority (TFS 2012 Plugin Only) Click on the “Priority” hyperlink under Task Standard Fields to bring up the Task Priority mapping configuration screen: The table lists each of the task priorities available in SpiraTeam and provides you with the ability to enter the matching TFS priority value for each one. 5.2.7. Configuring the Task Custom Property Mapping Now that the various SpiraTeam standard task fields have been mapped correctly, we need to configure the custom property mappings. This is used for both custom properties in SpiraTeam that map to custom fields in TFS and also for custom properties in SpiraTeam that are used to map to standard fields in TFS (e.g. Area) that don’t exist in SpiraTeam. From the View/Edit Project Data Mapping screen, you need to click on the name of the Task Custom Property that you want to add data-mapping information for: © Copyright 2006-2015, Inflectra Corporation Page 66 of 168 This document contains Inflectra proprietary information a) TFS’s Area Field First you need to go to Administration > Edit Custom Lists and create a new custom list that contains all the different Areas that are being used in TFS. Then you need to go to Administration > Edit Custom Properties and add a new list custom property onto the Task artifact type called ‘Area’ and link it to the Area custom list you created in the previous step. This will now be available for mapping. Now, back in the data-mapping page, click on the ‘Area’ hyperlink under Task Custom Properties to bring up the custom property mapping configuration screen: First you need to enter the word “Area” as the External Key of the custom property. This tells the datasync plug-in that the custom property in SpiraTeam should be mapped to built-in Area field in TFS. Next for each of the Property Values in the table (in the lower half of the page) you need to enter the ID of the various Areas that are configured in TFS. The TFS Area ID is not visible in the TFS user interface, but can instead be located by opening up the SQL Server that it’s installed on, opening the ‘TfsWorkItemTracking’ database (in TFS 2010 and later it will named after your project collection instead) and locating the ‘TreeNodes’ table: © Copyright 2006-2015, Inflectra Corporation Page 67 of 168 This document contains Inflectra proprietary information Once you have found the matching Area (by name), the numeric value stored in the ID column (the one on the left) is the value that needs to get added as the External Key inside SpiraTeam. b) TFS Custom Fields If the custom field in TFS is a list field, first you need to go to Administration > Edit Custom Lists in SpiraTeam and create a new custom list that contains all the different values that are being used in TFS. Then for both list-fields and value-fields you need to go to Administration > Edit Custom Properties and add a new custom property onto the Task artifact type with the name of the appropriate TFS field (e.g. Discipline, Stack Rank, etc.) and if a list-field, link it to the custom list you created in the previous step. The custom property will now be available for data-mapping. Now, back in the data-synchronization data-mapping page, click on the hyperlink under Task Custom Properties that corresponds to the custom property to bring up the custom property mapping configuration screen: First you need to enter the full Reference Name of the TFS field as the External Key of the custom property. This tells the data-sync plug-in that the custom property in SpiraTeam should be mapped to this specific field in TFS. To see a list of fields and their reference names, you can run the following SQL query against your TFS database: SELECT Name, ReferenceName FROM Fields ORDER BY Name We have included a list of fields in the Agile process template in section 5.5 of this guide as a helpful reference. Next for each of the Property Values in the table (in the lower half of the page) you need to enter the name of the field values as they appear in TFS as the External Key. © Copyright 2006-2015, Inflectra Corporation Page 68 of 168 This document contains Inflectra proprietary information 5.2.8. Configuring the Standard Requirement Field Mapping (2012 Plugin Only) Now that the projects, user, releases, incident and task fields have been mapped correctly, we need to configure the standard requirement fields. To do this, go to Administration > System > Data Synchronization and click on the “View Project Mappings” for the MsTfsDataSync plug-in entry: From this screen, you need to click on Importance and Status in turn to configure their values: a) Requirement Status Click on the “Status” hyperlink under Requirement Standard Fields to bring up the Requirement status mapping configuration screen: The table lists each of the requirement statuses available in SpiraTeam and provides you with the ability to enter the matching TFS work item State for each one. Unlike the mapping for incidents (see above) SpiraTeam does not track the reason codes associated with the requirements in MS TFS, so you only need to map the State names from TFS with the requirement status names. You can map multiple SpiraTeam fields to the same TFS fields, in which case only one of the values can be listed as Primary = Yes as that’s the value that’s used on the reverse synchronization (from TFS > SpiraTeam). b) Requirement Importance © Copyright 2006-2015, Inflectra Corporation Page 69 of 168 This document contains Inflectra proprietary information Click on the “Importance” hyperlink under Requirement Standard Fields to bring up the Requirement Importance mapping configuration screen: The table lists each of the requirement importance values available in SpiraTeam and provides you with the ability to enter the matching TFS work item priority value for each one. 5.2.9. Configuring the Requirement Custom Property Mapping (2012 Plugin Only) Now that the various SpiraTeam standard requirement fields have been mapped correctly, we need to configure the custom property mappings. This is used for both custom properties in SpiraTeam that map to custom fields in TFS and also for custom properties in SpiraTeam that are used to map to standard fields in TFS (e.g. Area) that don’t exist in SpiraTeam. From the View/Edit Project Data Mapping screen, you need to click on the name of the Requirement Custom Property that you want to add data-mapping information for: a) TFS’s Area Field First you need to go to Administration > Edit Custom Lists and create a new custom list that contains all the different Areas that are being used in TFS. Then you need to go to Administration > Edit Custom Properties and add a new list custom property onto the Requirement artifact type called ‘Area’ and link it to the Area custom list you created in the previous step. This will now be available for mapping. Now, back in the data-mapping page, click on the ‘Area’ hyperlink under Requirement Custom Properties to bring up the custom property mapping configuration screen: © Copyright 2006-2015, Inflectra Corporation Page 70 of 168 This document contains Inflectra proprietary information First you need to enter the word “Area” as the External Key of the custom property. This tells the datasync plug-in that the custom property in SpiraTeam should be mapped to built-in Area field in TFS. Next for each of the Property Values in the table (in the lower half of the page) you need to enter the ID of the various Areas that are configured in TFS. The TFS Area ID is not visible in the TFS user interface, but can instead be located by opening up the SQL Server that it’s installed on, opening the ‘TfsWorkItemTracking’ database (in TFS 2010 and later it will named after your project collection instead) and locating the ‘TreeNodes’ table: Once you have found the matching Area (by name), the numeric value stored in the ID column (the one on the left) is the value that needs to get added as the External Key inside SpiraTeam. b) TFS Custom Fields If the custom field in TFS is a list field, first you need to go to Administration > Edit Custom Lists in SpiraTeam and create a new custom list that contains all the different values that are being used in TFS. Then for both list-fields and value-fields you need to go to Administration > Edit Custom Properties and add a new custom property onto the Requirement artifact type with the name of the appropriate TFS field (e.g. Risk, Stack Rank, etc.) and if a list-field, link it to the custom list you created in the previous step. The custom property will now be available for data-mapping. Now, back in the data-synchronization data-mapping page, click on the hyperlink under Requirement Custom Properties that corresponds to the custom property to bring up the custom property mapping configuration screen: © Copyright 2006-2015, Inflectra Corporation Page 71 of 168 This document contains Inflectra proprietary information First you need to enter the full Reference Name of the TFS field as the External Key of the custom property. This tells the data-sync plug-in that the custom property in SpiraTeam should be mapped to this specific field in TFS. To see a list of fields and their reference names, you can run the following SQL query against your TFS database: SELECT Name, ReferenceName FROM Fields ORDER BY Name We have included a list of fields in the Agile process template in section 5.5 of this guide as a helpful reference. Next for each of the Property Values in the table (in the lower half of the page) you need to enter the name of the field values as they appear in TFS as the External Key. Once you have updated the various mapping sections, you are now ready to start the service. © Copyright 2006-2015, Inflectra Corporation Page 72 of 168 This document contains Inflectra proprietary information 5.3. Enabling the Data-Synchronization 5.3.1. Starting the Service When SpiraTeam is installed, a Windows Service – SpiraTeam Data Sync Service – is installed along with the web application. However to avoid wasting system resources, this service is initially set to run manually. To ensure continued synchronization of SpiraTeam with TFS, we recommend starting the service and setting its startup-type to Automatic. To make these changes, open up the Windows Control Panel, click on the “Administrative Tools” link, and then choose the Services option. This will bring up the Windows Service control panel: Click on the ‘SpiraTeam Data Sync Service’ entry and click on the link to start the service. Then right-click the service entry and choose the option to set the startup type to ‘Automatic’. This will ensure that synchronization continues between SpiraTeam and TFS after a reboot of the server. 5.3.2. Using SpiraTeam with TFS Now that the integration service has been configured and the service started, initially any incidents already created in SpiraTeam for the specified projects will be imported into TFS and any requirements, tasks or bugs already created in TFS will be imported into SpiraTeam. At this point we recommend opening the Windows Event Viewer and choosing the Application Log. In this log any error messages raised by the SpiraTeam Data Sync Service will be displayed. If you see any error messages at this point, we recommend immediately stopping the SpiraTeam service and checking the various mapping entries. If you cannot see any work items with the mapping information, we recommend sending a copy of the event log message(s) to Inflectra customer services ([email protected]) who will help you troubleshoot the problem. To use SpiraTeam with TFS on an ongoing basis, we recommend the following general processes be followed: When running tests in SpiraTest or SpiraTeam, defects found should be logged through the Test Execution Wizard as normal. Once an incident has been created during the running of the test, it will now be populated across into TFS as a work item of type corresponding to the types setup in the incident type mappings. At this point, the incident can be worked on in either system, with changes being synchronized to the other system. However in general we recommend that the QA/Testing team use SpiraTeam and the development team use TFS. E.g. the developers will mark the bugs as resolved in MSTS once they have completed fixing © Copyright 2006-2015, Inflectra Corporation Page 73 of 168 This document contains Inflectra proprietary information them and the QA team will either reopen or close then in SpiraTeam once they have had a change to verify the resolution. You are now able to perform test coverage and incident reporting inside SpiraTest/SpiraTeam using the test cases managed by SpiraTest/SpiraTeam and the incidents managed collaboratively between SpiraTest/SpiraTeam and TFS. You can create project requirements and associated tasks in either SpiraTeam or TFS, however the synchronization service is only unidirectional for requirements and tasks, so when you create or update a requirement or task in TFS, the change will be reflected in SpiraTeam, but not the other way around. 5.4. Troubleshooting In most cases once you have started the service, once it’s up and running you will not see any error or warning messages from the Data-Sync service. However if you have new users created in SpiraTeam that have not been mapped to users in TFS, when you assign incidents, requirements or tasks to those items, you may see warning messages in the Event Viewer letting you know which users needs to be mapped. 5.5. TFS Field Reference The following fields are available in TFS for data-mapping when using the TFS agile process template: Display Name Accepted By Accepted Date Activated By Activated Date Activity Application Launch Instructions Application Start Information Application Type Area ID Area Level 1 Area Level 2 Area Level 3 Area Level 4 Area Level 5 Area Level 6 Area Level 7 Area Path Assigned To Associated Context Associated Context Code Associated Context Owner Associated Context Type Attached File Count Attached Files Authorized As Authorized Date Automated Test Id © Copyright 2006-2015, Inflectra Corporation Reference Name Microsoft.VSTS.CodeReview.AcceptedBy Microsoft.VSTS.CodeReview.AcceptedDate Microsoft.VSTS.Common.ActivatedBy Microsoft.VSTS.Common.ActivatedDate Microsoft.VSTS.Common.Activity Microsoft.VSTS.Feedback.ApplicationLaunchInstructions Microsoft.VSTS.Feedback.ApplicationStartInformation Microsoft.VSTS.Feedback.ApplicationType System.AreaId System.AreaLevel1 System.AreaLevel2 System.AreaLevel3 System.AreaLevel4 System.AreaLevel5 System.AreaLevel6 System.AreaLevel7 System.AreaPath System.AssignedTo Microsoft.VSTS.CodeReview.Context Microsoft.VSTS.CodeReview.ContextCode Microsoft.VSTS.CodeReview.ContextOwner Microsoft.VSTS.CodeReview.ContextType System.AttachedFileCount System.AttachedFiles System.AuthorizedAs System.AuthorizedDate Microsoft.VSTS.TCM.AutomatedTestId Page 74 of 168 This document contains Inflectra proprietary information Automated Test Name Automated Test Storage Automated Test Type Automation status BIS Links Changed By Changed Date Changed Set Closed By Closed Date Closed Status Closed Status Code Closing Comment Completed Work Created By Created Date Description Due Date External Link Count Finish Date Found In History Hyperlink Count ID InAdminOnlyTreeFlag InDeletedTreeFlag Integration Build Issue Iteration ID Iteration Level 1 Iteration Level 2 Iteration Level 3 Iteration Level 4 Iteration Level 5 Iteration Level 6 Iteration Level 7 Iteration Path Link Type Linked Files Local Data Source Node Name Node Type Not a field Original Estimate Parameters PersonID Priority ProjectID © Copyright 2006-2015, Inflectra Corporation Microsoft.VSTS.TCM.AutomatedTestName Microsoft.VSTS.TCM.AutomatedTestStorage Microsoft.VSTS.TCM.AutomatedTestType Microsoft.VSTS.TCM.AutomationStatus System.BISLinks System.ChangedBy System.ChangedDate System.ChangedSet Microsoft.VSTS.Common.ClosedBy Microsoft.VSTS.Common.ClosedDate Microsoft.VSTS.CodeReview.ClosedStatus Microsoft.VSTS.CodeReview.ClosedStatusCode Microsoft.VSTS.CodeReview.ClosingComment Microsoft.VSTS.Scheduling.CompletedWork System.CreatedBy System.CreatedDate System.Description Microsoft.VSTS.Scheduling.DueDate System.ExternalLinkCount Microsoft.VSTS.Scheduling.FinishDate Microsoft.VSTS.Build.FoundIn System.History System.HyperLinkCount System.Id System.InAdminOnlyTreeFlag System.InDeletedTreeFlag Microsoft.VSTS.Build.IntegrationBuild Microsoft.VSTS.Common.Issue System.IterationId System.IterationLevel1 System.IterationLevel2 System.IterationLevel3 System.IterationLevel4 System.IterationLevel5 System.IterationLevel6 System.IterationLevel7 System.IterationPath System.Links.LinkType System.LinkedFiles Microsoft.VSTS.TCM.LocalDataSource System.NodeName System.NodeType System.NotAField Microsoft.VSTS.Scheduling.OriginalEstimate Microsoft.VSTS.TCM.Parameters System.PersonId Microsoft.VSTS.Common.Priority System.ProjectId Page 75 of 168 This document contains Inflectra proprietary information Rating Reason Related Link Count Related Links Remaining Work Repro Steps Resolved By Resolved Date Resolved Reason Rev Reviewed By Revised Date Risk Severity Stack Rank Start Date State State Change Date State Code Steps Story Points System Info Tags Team Project TF Server Title Tree Watermark WEF_BD66C4E18FB54884A18B2299E91AD E1B_Extension Marker WEF_BD66C4E18FB54884A18B2299E91AD E1B_Kanban Column Work Item Form Work Item FormID Work Item Type WorkItem WorkItemLink WorkItemTypeExtension Microsoft.VSTS.Common.Rating System.Reason System.RelatedLinkCount System.RelatedLinks Microsoft.VSTS.Scheduling.RemainingWork Microsoft.VSTS.TCM.ReproSteps Microsoft.VSTS.Common.ResolvedBy Microsoft.VSTS.Common.ResolvedDate Microsoft.VSTS.Common.ResolvedReason System.Rev Microsoft.VSTS.Common.ReviewedBy System.RevisedDate Microsoft.VSTS.Common.Risk Microsoft.VSTS.Common.Severity Microsoft.VSTS.Common.StackRank Microsoft.VSTS.Scheduling.StartDate System.State Microsoft.VSTS.Common.StateChangeDate Microsoft.VSTS.Common.StateCode Microsoft.VSTS.TCM.Steps Microsoft.VSTS.Scheduling.StoryPoints Microsoft.VSTS.TCM.SystemInfo System.Tags System.TeamProject System.TFServer System.Title System.Tree System.Watermark WEF_BD66C4E18FB54884A18B2299E91ADE1B_Syste m.ExtensionMarker WEF_BD66C4E18FB54884A18B2299E91ADE1B_Kanba n.Column System.WorkItemForm System.WorkItemFormId System.WorkItemType System.WorkItem System.WorkItemLink System.WorkItemTypeExtension For a full list of the available TFS fields in the different process templates, please refer to: http://msdn.microsoft.com/en-us/library/vstudio/dd997792.aspx © Copyright 2006-2015, Inflectra Corporation Page 76 of 168 This document contains Inflectra proprietary information 6. Using SpiraTest with FogBugz This section outlines how to use SpiraTest, SpiraPlan or SpiraTeam (hereafter referred to as SpiraTeam) in conjunction with the FogBugz issue/bug tracking system. The built-in integration service allows the quality assurance team to manage their requirements and test cases in SpiraTeam, execute test runs in SpiraTest, and then have the new incidents generated during the run be automatically loaded into FogBugz. Once the incidents are loaded into FogBugz as cases, the development team can then manage the lifecycle of these cases in FogBugz, and have the status changes in FogBugz be reflected back in SpiraTeam. In addition, any cases logged into FogBugz will get imported into SpiraTeam so that they can be linked to test cases and requirements. 6.1. Configuring the Integration Service This section outlines how to configure the integration service to export incidents into FogBugz and pick up new cases and changes to existing cases in FogBugz and have them update SpiraTeam. It assumes that you already have a working installation of SpiraTest, SpiraPlan or SpiraTeam v2.2 or later and a working installation of FogBugz v6.1 or later. If you have an earlier version of SpiraTeam, you will need to upgrade to at least v2.2 before trying to integrate with FogBugz. The steps that need to be performed to configure integration with FogBugz are as follows: Download the latest FogBugz Data-Sync plug-in for SpiraTeam from our website Setup the plug-in in SpiraTeam to point to the correct instance of FogBugz Configure the data field mappings between SpiraTeam and FogBugz Start the service and verify data transfer 6.1.1. Download the FogBugz Plug-In Go to the Inflectra website and open up the page that lists the various downloads available for SpiraTeam (http://www.inflectra.com/SpiraTeam/Downloads.aspx). Listed on this page will be the FogBugz Plug-In for SpiraTeam. Right-click on this link and save the Zip compressed folder to the hard-drive of the server where SpiraTeam is installed. Open up the compressed folder and extract the FogBugzDataSync.dll file and place it in the C:\Program Files\SpiraTeam\Bin folder (it may be SpiraTest or SpiraPlan depending on which product you’re running). This folder should already contain the DataSyncService.exe and DataSyncService.exe.config files that are the primary files used for managing the data synchronization between SpiraTeam and other systems. If you do not have an on-premise installation of SpiraTeam, but instead are using a hosted subscription provided by Inflectra (or a third party company) you will not have access to the DataSyncService background service. In such situations, you should use the Desktop DataSync application instead. This application is described in Appendix 1 and can be used instead of the server-based DataSyncService. 6.1.2. Configuring the Service To configure the integration service, please open up the DataSyncService.exe.config file located in C:\Program Files\SpiraTeam\Bin with a text editor such as Notepad. Once open, it should look like: <?xml version="1.0" encoding="utf-8"?> <configuration> <configSections> <sectionGroup name="applicationSettings" type="System.Configuration.ApplicationSettingsGroup, System, Version=2.0.0.0, Culture=neutral, PublicKeyToken=b77a5c561934e089" > © Copyright 2006-2015, Inflectra Corporation Page 77 of 168 This document contains Inflectra proprietary information <section name="Inflectra.SpiraTest.DataSyncService.Properties.Settings" type="System.Configuration.ClientSettingsSection, System, Version=2.0.0.0, Culture=neutral, PublicKeyToken=b77a5c561934e089" requirePermission="false" /> </sectionGroup> </configSections> <applicationSettings> <Inflectra.SpiraTest.DataSyncService.Properties.Settings> <setting name="PollingInterval" serializeAs="String"> <value>600000</value> </setting> <setting name="WebServiceUrl" serializeAs="String"> <value>http://localhost/SpiraTeam</value> </setting> <setting name="Login" serializeAs="String"> <value>fredbloggs</value> </setting> <setting name="Password" serializeAs="String"> <value>fredbloggs</value> </setting> <setting name="EventLogSource" serializeAs="String"> <value>SpiraTeam Data Sync Service</value> </setting> <setting name="TraceLogging" serializeAs="String"> <value>False</value> </setting> </Inflectra.SpiraTest.DataSyncService.Properties.Settings> </applicationSettings> </configuration> The sections that need to be verified and possibly changed are marked in yellow above. You need to check the following information: The polling interval allows you to specify how frequently the data-synchronization service will ask SpiraTeam and the external system for new data updates. The value is specified in milliseconds and we recommend a value no smaller than 5 minutes (i.e. 300,000ms). The larger the number, the longer it will take for data to be synchronized, but the lower the network and server overhead. The base URL to your instance SpiraTeam. It is typically of the form http://<server name>/SpiraTeam. Make sure that when you enter this URL on a browser on the server itself, the application login page appears. A valid login name and password to your instance of SpiraTeam. This user needs to be a member of the project(s) that will be synchronized with FogBugz and needs to have at least Incident create/modify/view permissions and Release create/modify/view permissions in these projects. Once you have made these changes, save the file and proceed to the next stage. 6.1.3. Configuring the Plug-In The next step is to configure the plug-in within SpiraTeam so that the system knows how to access the FogBugz server. To start the configuration, please open up SpiraTeam in a web browser, log in using a valid account that has System-Administration level privileges and click on the System > Data Synchronization administration option from the left-hand navigation: © Copyright 2006-2015, Inflectra Corporation Page 78 of 168 This document contains Inflectra proprietary information This screen lists all the plug-ins already configured in the system. Depending on whether you chose the option to include sample data in your installation or not, you will see either an empty screen or a list of sample data-synchronization plug-ins. If you already see an entry for FogBugzDataSync you should click on its “Edit” link. If you don’t see such an entry in the list, please click on the [Add] button instead. In either case you will be taken to the following screen where you can enter or modify the FogBugz Data-Synchronization plug-in: You need to fill out the following fields for the FogBugz Plug-in to operate correctly: Name – this needs to be set to FogBugzDataSync. This needs to match the name of the plug-in DLL assembly that was copied into the C:\Program Files\SpiraTeam\Bin folder (minus the .dll file extension). If you renamed the FogBugzDataSync.dll file for any reason, then you need to change the name here to match. Description – this should be set to a description of the plug-in. This is an optional field that is used for documentation purposes and is not actually used by the system. Connection Info – this should the URL that you use to access your instance of FogBugz (e.g. https://mycompany.fogbugz.com) Login – this should be set to a valid login to the FogBugz installation. The login needs to have permissions to create and view cases and versions within FogBugz. © Copyright 2006-2015, Inflectra Corporation Page 79 of 168 This document contains Inflectra proprietary information Password – this should be set to the password of the login specified above. Time Offset – normally this should be set to zero, but if you find that cases being changed in FogBugz are not being updated in SpiraTeam, try increasing the value as this will tell the datasynchronization plug-in to add on the time offset (in hours) when comparing date-time stamps. Also if your FogBugz installation is running on a server set to a different time-zone, then you should add in the number of hours difference between the servers’ time-zones here. Auto-Map Users – this is not currently used by the FogBugz data-sync plug-in and can be ignored. Custom 01 – When connecting to FogBugz, sometimes the connection gets dropped by the server without notifying the plug-in. This happens when using HTTP 1.1 Keep-Alive connections. If you set this property to “False”, it will tell the plug-in to not-use HTTP keep-alives when connecting to FogBugz, otherwise set it to “True”. Custom 02 – When connecting to a FogBugz instance that is running under HTTPS (SSL) this custom property can be set to determine if the plug-in should verify that the SSL certificate is a trusted root certificate. Set to “True” if you are using an SSL certificate that was issued by a trusted Certification Authority, and set to “False” if you are using a self-signed certificate. Custom 03 – Normally all rich text (HTML) descriptions in SpiraTeam are converted into plain text when added to FogBugz. However, more recent version of FogBugz can now support rich text. So if you have rich-text enabled in your instance of FogBugz, you should enter the world “True” in Custom 03 to enable rich text description transfer. Custom 04 – 05 – these are not currently used by the FogBugz data-sync plug-in and can be left blank. 6.2. Configuring the Data Mapping Next, you need to configure the data mapping between SpiraTeam and FogBugz. This allows the various projects, users, releases, incident types, statuses, priorities and custom property values used in the two applications to be related to each other. This is important, as without a correct mapping, there is no way for the integration service to know that an “Enhancement” in SpiraTeam is the same as a “Feature” in FogBugz (for example). The following mapping information needs to be setup in SpiraTeam: The mapping of the project identifiers for the projects that need to be synchronized The mapping of users in the system The mapping of releases (equivalent to FogBugz releases/fix-fors) in the system The mapping of the various standard fields in the system The mapping of the various custom properties in the system Each of these is explained in turn below: 6.2.1. Configuring the Project Mapping From the data synchronization administration page, you need to click on the “View Project Mappings” hyperlink next to the FogBugz plug-in name. This will take you to the data-mapping home page for the currently selected project: © Copyright 2006-2015, Inflectra Corporation Page 80 of 168 This document contains Inflectra proprietary information If the project name does not match the name of the project you want to configure the data-mapping for, click on the “(Change Project)” hyperlink to change the current project. To enable this project for data-synchronization with FogBugz, you need to enter: External Key – This should be set to the ID of the project in FogBugz. This can be found by navigating to Settings > Projects in FogBugz: Then hover the mouse over the project name. The project ID will be displayed in the URL line as ixProject=X where X is the numeric ID of the project. Active Flag – Set this to ‘Yes’ so that SpiraTeam knows that you want to synchronize data for this project. Once the project has been completed, setting the value to “No” will stop data synchronization, reducing network utilization. Click [Update] to confirm these settings. Once you have enabled the project for data-synchronization, you can now enter the other data mapping values outlined below. Note: Once you have successfully configured the project, when creating a new project, you should choose the option to “Create Project from Existing Project” rather than “Use Default Template” so that all the project mappings get copied across to the new project. © Copyright 2006-2015, Inflectra Corporation Page 81 of 168 This document contains Inflectra proprietary information 6.2.2. Configuring the User Mapping To configure the mapping of users in the two systems, you need to go to Administration > Users > View Edit Users, which will bring up the list of users in the system. Then click on the “Edit” button for a particular user that will be editing cases in FogBugz: You will notice that below the Active flag for the user is a list of all the configured data-synchronization plug-ins. In the text box next to the FogBugz Data-Sync plug-in you need to enter the ID of this user in FogBugz. This will allow the data-synchronization plug-in to know which user in SpiraTeam match which equivalent user in FogBugz. The ID can be found in FogBugz by going to Settings > Users: Then hover the mouse over the user’s name. The user ID will be displayed in the URL line as ixPerson=X where X is the numeric ID of the user. Back in SpiraTeam, click [Update] once you’ve entered the appropriate user ID in the mapping box. You should now repeat for the other users who will be active in both systems. 6.2.3. Configuring the Release Mapping When the data-synchronization service runs, when it comes across a release/iteration in SpiraTeam that it has not seen before, it will create a corresponding Release/Fix-For in FogBugz. Similarly if it comes across a new Release/Fix-For in FogBugz that it has not seen before, it will create a new Release in SpiraTeam. Therefore when using both systems together, it is recommended that you only enter new Releases/Versions in one system and let the data-synchronization service add them to the other system. However you may start out with the situation where you already have pre-existing Releases/Versions in both systems that you need to associate in the data-mapping. If you don’t do this, you may find that duplicates get created when you first enable the data-synchronization service. Therefore for any Releases/Iterations that already exist in BOTH systems please navigate to Planning > Releases and click © Copyright 2006-2015, Inflectra Corporation Page 82 of 168 This document contains Inflectra proprietary information on the Release/Iteration in question. Make sure you have the ‘Overview’ tab visible and expand the “Details” section of the release/iteration: In addition to the standard fields and custom properties configured for Releases, you will see an additional text property called “FogBugzDataSync ID” that is used to store the mapped external identifier for the equivalent Release in FogBugz. You need to locate the ID of the equivalent Release in FogBugz, enter it into this text-box and click [Save]. You should now repeat for all the other pre-existing releases. The FogBugz Release ID can be found by going to Settings > Projects and viewing the releases: Then hover the mouse over the release name. The release ID will be displayed in the URL line as ixFixFor=X where X is the numeric ID of the release. 6.2.4. Configuring the Standard Field Mapping Now that the projects, user and releases have been mapped correctly, we need to configure the standard incident fields. To do this, go to Administration > System > Data Synchronization and click on the “View Project Mappings” for the FogBugzDataSync plug-in entry: © Copyright 2006-2015, Inflectra Corporation Page 83 of 168 This document contains Inflectra proprietary information From this screen, you need to click on Priority, Status and Type in turn to configure their values: a) Incident Type Click on the “Type” hyperlink under Incident Standard Fields to bring up the Incident type mapping configuration screen: The table lists each of the incident types available in SpiraTeam and provides you with the ability to enter the matching FogBugz case category ID for each one. You can map multiple SpiraTeam fields to the same FogBugz fields (e.g. Bug and Incident in SpiraTeam are both equivalent to Bug in FogBugz), in which case only one of the two values can be listed as Primary = Yes as that’s the value that’s used on the reverse synchronization (from FogBugz > SpiraTeam). The values for the category ID are fixed for FogBugz and should be: Category Name Category ID Bug 1 Feature 2 Inquiry 3 So, depending on which types have been configured in SpiraTeam, you’ll need to adjust the mapping so that the appropriate SpiraTeam types correspond to the equivalent FogBugz category. b) Incident Status Click on the “Status” hyperlink under Incident Standard Fields to bring up the Incident status mapping configuration screen: © Copyright 2006-2015, Inflectra Corporation Page 84 of 168 This document contains Inflectra proprietary information The table lists each of the incident statuses available in SpiraTeam and provides you with the ability to enter the matching FogBugz case status ID for each one. You can map multiple SpiraTeam fields to the same FogBugz fields (e.g. New, Open, Assigned, and Reopen in SpiraTeam are all equivalent to Active in FogBugz), in which case only one of the four values can be listed as Primary = Yes as that’s the value that’s used on the reverse synchronization (from FogBugz > SpiraTeam). We recommend that you always point the New, Open, Assigned and Reopen statuses inside SpiraTeam to point to the ID for “Assigned” inside FogBugz and make Assigned in SpiraTeam the Primary status of the four. This is recommended so that as new incidents in SpiraTeam get synched over to FogBugz, they will get switched to the Active status in FogBugz which will then be synched back to “Assigned” in SpiraTeam. That way you’ll be able to see at a glance which incidents have been synched with FogBugz and those that haven’t. You also might want to consider changing the statuses in SpiraTeam to match the 16 discrete statuses in FogBugz to make things easier for your users. In which case you’ll need to create the new statuses and configure the workflow (as described in the SpiraTeam Administration Guide). The status IDs in FogBugz are fixed and should be: Status ID 1 2 3 4 5 6 7 8 9 10 11 12 13 14 15 16 © Copyright 2006-2015, Inflectra Corporation Status Name Active Resolved (Fixed) Resolved (Not Reproducible) Resolved (Duplicate) Resolved (Postponed) Resolved (Won't Fix) Resolved (By Design) Resolved (Implemented) Resolved (Won't Implement) Resolved (Already Exists) Resolved (Responded) Resolved (Won't Respond) Resolved (SPAM) Resolved (Waiting For Info) Resolved (Completed) Resolved (Canceled) Page 85 of 168 This document contains Inflectra proprietary information In addition to these statuses, FogBugz also has the concept of a ‘Closed’ case which is one where the case has been assigned to the special Closed user (user id 1). If you want to map a SpiraTeam status to this special closed status, for the external key just enter ‘Closed’ instead of a numeric ID and that will tell the plug-in to associate that SpiraTest status with the special condition of a FogBugz case that is assigned to the ‘closed’ user. c) Incident Priority Click on the “Priority” hyperlink under Incident Standard Fields to bring up the Incident Priority mapping configuration screen: The table lists each of the incident priorities available in SpiraTeam and provides you with the ability to enter the matching FogBugz priority ID for each one. You can map multiple SpiraTeam fields to the same FogBugz fields, in which case only one of the two values can be listed as Primary = Yes as that’s the value that’s used on the reverse synchronization (from FogBugz > SpiraTeam). Since both applications allow you to customize the priority list, we recommend that you modify the list in both systems to be the same and then map them one to one as this will be easier for users to understand. In the example above, we have switched over SpiraTeam to match the priorities in FogBugz, but you could do it the other way around as well. The FogBugz Priority IDs can be found by going to Settings > Priorities and viewing the priorities: © Copyright 2006-2015, Inflectra Corporation Page 86 of 168 This document contains Inflectra proprietary information The priority ID is the “priority number” value displayed in the left hand column. 6.2.5. Configuring the Custom Property Mapping Now that the various SpiraTeam standard fields have been mapped correctly, we need to configure the custom property mappings. This is used for custom properties in SpiraTeam that are used to map to standard fields in FogBugz (Computer, Version and Area) that don’t exist in SpiraTeam. From the View/Edit Project Data Mapping screen, you need to click on the name of the Incident Custom Property that you want to add data-mapping information for. We will consider the three different types of mapping that you typically will want to enter: a) FogBugz’s Computer Field You first need to create an incident custom property in SpiraTeam of type ‘TEXT’ that will be used to store the Computer description within SpiraTeam. Then click on the hyperlink of this new text custom property under Incident Custom Properties to bring up the custom property mapping configuration screen: © Copyright 2006-2015, Inflectra Corporation Page 87 of 168 This document contains Inflectra proprietary information All you need to do on this screen is enter the word “Computer” in the External Key textbox and the datasync plug-in will know that this custom property is mapped to the built-in Computer field in FogBugz. b) FogBugz’s Version Field You first need to create an incident custom property in SpiraTeam of type ‘TEXT’ that will be used to store the Version description within SpiraTeam. Then click on the hyperlink of this new text custom property under Incident Custom Properties to bring up the custom property mapping configuration screen: All you need to do on this screen is enter the word “Version” in the External Key textbox and the datasync plug-in will know that this custom property is mapped to the built-in Version field in FogBugz. c) FogBugz’s Area Field You first need to create an incident custom property in SpiraTeam of type ‘LIST’ that will be used to store the list of project areas within SpiraTeam. You will need to create a new custom list to store the different possible values of area and then use that list when creating the new custom property. Then back on the Data Mapping page, click on the hyperlink of this new list custom property under Incident Custom Properties to bring up the custom property mapping configuration screen: © Copyright 2006-2015, Inflectra Corporation Page 88 of 168 This document contains Inflectra proprietary information First you need to enter the word “Area” as the External Key of the custom property. This tells the datasync plug-in that the custom property in SpiraTeam should be mapped to built-in Area field in FogBugz. Next for each of the Property Values in the table (in the lower half of the page) you need to enter the FogBugz ID of the various Areas that are configured in FogBugz. The FogBugz Area ID can be found by going to Settings > Projects and viewing the areas in the project: Then hover the mouse over the area name. The area ID will be displayed in the URL line as ixArea=X where X is the numeric ID of the area. Once you have updated the various mapping sections, you are now ready to start the service. © Copyright 2006-2015, Inflectra Corporation Page 89 of 168 This document contains Inflectra proprietary information 6.3. Enabling the Data-Synchronization 6.3.1. Starting the Service When SpiraTeam is installed, a Windows Service – SpiraTeam Data Sync Service – is installed along with the web application. However to avoid wasting system resources, this service is initially set to run manually. To ensure continued synchronization of SpiraTeam with FogBugz, we recommend starting the service and setting its startup-type to Automatic. To make these changes, open up the Windows Control Panel, click on the “Administrative Tools” link, and then choose the Services option. This will bring up the Windows Service control panel: Click on the ‘SpiraTeam Data Sync Service’ entry and click on the link to start the service. Then right-click the service entry and choose the option to set the startup type to ‘Automatic’. This will ensure that synchronization continues between SpiraTeam and FogBugz after a reboot of the server. 6.3.2. Using SpiraTeam with FogBugz Now that the integration service has been configured and the service started, initially any incidents created in SpiraTeam for the specified projects will be imported into FogBugz and any existing cases in FogBugz will get loaded into SpiraTeam. At this point we recommend opening the Windows Event Viewer and choosing the Application Log. In this log any error messages raised by the SpiraTeam Data Sync Service will be displayed. If you see any error messages at this point, we recommend immediately stopping the SpiraTeam service and checking the various mapping entries. If you cannot see any cases with the mapping information, we recommend sending a copy of the event log message(s) to Inflectra customer services ([email protected]) who will help you troubleshoot the problem. To use SpiraTeam with FogBugz on an ongoing basis, we recommend the following general processes be followed: When running tests in SpiraTest or SpiraTeam, defects found should be logged through the Test Execution Wizard as normal. Developers using FogBugz can log new defects into either SpiraTeam or FogBugz. In either case they will get loaded into the other system. Once created in one of the systems and successfully replicated to the other system, the incident should not be modified again inside SpiraTeam. Since FogBugz is considered the master system for incidents/cases, all data changes to the case should be made inside FogBugz. To enforce this, you should modify the workflows set up in SpiraTeam so that the various fields are marked as inactive for all the incident statuses other than the “New” status. This will allow someone to © Copyright 2006-2015, Inflectra Corporation Page 90 of 168 This document contains Inflectra proprietary information submit an incident in SpiraTeam, but will prevent them making changes in conflict with FogBugz after that point. As the case progresses through the FogBugz workflow, changes to the type of case, changes to its status, priority, description and resolution will be updated automatically in SpiraTeam. In essence, SpiraTeam acts as a read-only viewer of these incidents. You are now able to perform test coverage and incident reporting inside SpiraTest/SpiraTeam using the test cases managed by SpiraTest/SpiraTeam and the incidents managed on behalf of SpiraTest/SpiraTeam inside FogBugz. © Copyright 2006-2015, Inflectra Corporation Page 91 of 168 This document contains Inflectra proprietary information 7. Using SpiraTeam with Mantis This section outlines how to use SpiraTest, SpiraPlan or SpiraTeam (hereafter referred to as SpiraTeam) in conjunction with the Mantis issue tracking system. The built-in integration service allows the quality assurance team to manage their requirements and test cases in SpiraTeam, execute test runs in SpiraTest, and then have the new incidents generated during the run be automatically loaded into Mantis. Once the incidents are synchronized into Mantis, the development team can then manage the issues in Mantis and have the status changes and additional notes entered in Mantis be reflected back in SpiraTeam. In addition, any new issues logged into mantis will get imported into SpiraTeam so that they can be linked to test cases and requirements. 7.1. Configuring the Integration Service This section outlines how to configure the Data Sync service to export incidents into Mantis and pick up new issues and changes to existing issues in Mantis and have them update SpiraTeam. It assumes that you already have a working installation of SpiraTest, SpiraPlan or SpiraTeam v2.3 or later and a working installation of Mantis v1.1.8 or later. If you have an earlier version of SpiraTeam, you will need to upgrade to at least v2.3 before trying to integrate with Mantis. If you have an earlier version of Mantis, you will need to upgrade it to at least v1.1.8, or the Data Sync will report an error. The steps that need to be performed to configure integration with Mantis are as follows: Download the latest Mantis Data-Sync plug-in for SpiraTeam from our website Setup the plug-in in SpiraTeam to point to the correct instance of Mantis Configure the data field mappings between SpiraTeam and Mantis Start the service and verify data transfer 7.1.1. Download the Mantis Plug-In Go to the Inflectra website and open up the page that lists the various downloads available for SpiraTeam (http://www.inflectra.com/SpiraTeam/Downloads.aspx). Listed on this page will be the Mantis Plug-In for SpiraTeam. Right-click on this link and save the Zip compressed folder to the hard-drive of the server where SpiraTeam is installed. Open up the compressed folder and extract the MantisDataSync.dll file and place it in the C:\Program Files\SpiraTeam\Bin folder (it may be SpiraTest or SpiraPlan depending on which product you’re running). This folder should already contain the DataSyncService.exe and DataSyncService.exe.config files that are the primary files used for managing the data synchronization between SpiraTeam and other systems. If you do not have an on-premise installation of SpiraTeam, but instead are using a hosted subscription provided by Inflectra (or a third party company) you will not have access to the DataSyncService background service. In such situations, you should use the Desktop DataSync application instead. This application is described in Appendix 1 and can be used instead of the server-based DataSyncService. 7.1.2. Configuring the Service To configure the integration service, please open up the DataSyncService.exe.config file located in C:\Program Files\SpiraTeam\Bin with a text editor such as Notepad. Once open, it should look like: <?xml version="1.0" encoding="utf-8"?> <configuration> <configSections> <sectionGroup name="applicationSettings" type="System.Configuration.ApplicationSettingsGroup, System, Version=2.0.0.0, Culture=neutral, PublicKeyToken=b77a5c561934e089" > © Copyright 2006-2015, Inflectra Corporation Page 92 of 168 This document contains Inflectra proprietary information <section name="Inflectra.SpiraTest.DataSyncService.Properties.Settings" type="System.Configuration.ClientSettingsSection, System, Version=2.0.0.0, Culture=neutral, PublicKeyToken=b77a5c561934e089" requirePermission="false" /> </sectionGroup> </configSections> <applicationSettings> <Inflectra.SpiraTest.DataSyncService.Properties.Settings> <setting name="PollingInterval" serializeAs="String"> <value>600000</value> </setting> <setting name="WebServiceUrl" serializeAs="String"> <value>http://localhost/SpiraTeam</value> </setting> <setting name="Login" serializeAs="String"> <value>fredbloggs</value> </setting> <setting name="Password" serializeAs="String"> <value>fredbloggs</value> </setting> <setting name="EventLogSource" serializeAs="String"> <value>SpiraTeam Data Sync Service</value> </setting> <setting name="TraceLogging" serializeAs="String"> <value>False</value> </setting> </Inflectra.SpiraTest.DataSyncService.Properties.Settings> </applicationSettings> </configuration> The sections that need to be verified and possibly changed are marked in yellow above. You need to check the following information: The polling interval allows you to specify how frequently the data-synchronization service will ask SpiraTeam and the external system for new data updates. The value is specified in milliseconds and we recommend a value no smaller than 5 minutes (i.e. 300,000ms). The larger the number, the longer it will take for data to be synchronized, but the lower the network and server overhead. The base URL to your instance SpiraTeam. It is typically of the form http://<server name>/SpiraTeam. Make sure that when you enter this URL on a browser on the server itself, the application login page appears. Do not include the Login.aspx or any other page in this URL. A valid login name and password to your instance of SpiraTeam. This user needs to be a member of the project(s) that will be synchronized with Mantis and needs to have at least Incident create/modify/view permissions and Release create/modify/view permissions in these projects. Once you have made these changes, save the file and proceed to the next stage. 7.1.3. Configuring the Plug-In The next step is to configure the plug-in within SpiraTeam so that the system knows how to access the Mantis server. To start the configuration, open up SpiraTeam in a web browser, log in using a valid account that has System-Administration level privileges and click on the System > Data Synchronization administration option from the left-hand navigation: © Copyright 2006-2015, Inflectra Corporation Page 93 of 168 This document contains Inflectra proprietary information This screen lists all the plug-ins already configured in the system. Depending on whether you chose the option to include sample data in your installation or not, you will see either an empty screen or a list of sample data-synchronization plug-ins. If you already see an entry for MantisDataSync you should click on its “Edit” link. If you don’t see such an entry in the list, please click on the [Add] button instead. In either case you will be taken to the following screen where you can enter or modify the Mantis Data-Synchronization plug-in: You need to fill out the following fields for the Mantis Plug-in to operate correctly: Name – this needs to be set to MantisDataSync. This needs to match the name of the plug-in DLL assembly that was copied into the C:\Program Files\SpiraTeam\Bin folder (minus the .dll file extension). If you renamed the MantisDataSync.dll file for any reason, then you need to change the name here to match. Description – this should be set to a description of the plug-in. This is an optional field that is used for documentation purposes and is not actually used by the system. Connection Info – this should the URL that you use to access your instance of Mantis (e.g. https://www.mycompany.com/bugs) Login – this should be set to a valid login to the Mantis installation. The login needs to have permissions to create and view issues and versions within Mantis for the projects that you will be syncing to SpiraTeam. © Copyright 2006-2015, Inflectra Corporation Page 94 of 168 This document contains Inflectra proprietary information Password – this should be set to the password of the login specified above. Time Offset – The time offset between the two servers, if the Mantis server is on a different server than SpiraTeam. For example, if the Mantis server’s clock is set to Pacific Standard Time (PST) and the SpiraTeam server is set to Eastern Standard Time (EST), the Mantis server would be three hours behind SpiraTeam, so you would need to put -3 into this field. Auto-Map Users – If enabled and a mapped user is not found between the two systems, a search will be made comparing logins between SpiraTeam and Mantis for matching UserIDs. If one is found, than that user will be used. If not enabled and a match is not found, then the UserID used will be the connecting user for the Data Sync. (The SpiraTeam User for issues coming into SpiraTeam, and the Mantis Login for issues imported into Mantis.) Custom 01 – This field specifies whether or not a Resolution item in SpiraTeam, or a Note item in Mantis will be created when an issue is created in either system for a new issue. Valid values are True or False. Default (or blank) is True. Custom 02 – This field indicates whether or not to convert Carriage Returns and spaces in Mantis issues when synchronizing them into SpiraTeam. If enabled, then carriage returns will be converted to HTML breaks, and multiple spaces will be converted to non-breaking spaces to preserve formatting when importing into SpiraTeam. If disabled, then carriage returns and spaces will be left as-is. Valid values are True or False. Default (or blank) is True. Custom 03 – This field is only used when ‘Auto-Map Users’ is enabled and for Incidents synchronized from SpiraTeam into Mantis. If enabled, and the Auto-Map User did not find a user with a matching Login ID, then the Login ID will be set to the User in Spira, even if that user may not exist in Mantis. Depending on Mantis configuration, the user may be accepted, or it may default back to the Mantis UserID that the Data Sync runs under. Valid values are True or False. Default (or blank) is False. Custom 04 – If enabled, this option specifies whether or not to append the “Additional Information” and “Steps To Reproduce” fields to the end of the Description field in Spira. During transfer of new issues from Mantis to SpiraTeam, the Description field in SpiraTeam will consist of the Description field in Mantis appended by the Additional Information field in Mantis, and finally the Steps To Reproduce field in Mantis. If this option is disabled, only the Description will be transferred over. Valid values are True or False. Default (or blank) is False. Custom 05 – This is not currently used by the MantisDataSync, and can be left blank. 7.2. Configuring the Data Mapping Next, you need to configure the data mapping between SpiraTeam and Mantis. This allows the various projects, users, releases, incident types, statuses, priorities and custom property values used in the two applications to be related to each other. This is important, as without a correct mapping, there is no way for the integration service to know that an “Enhancement” in SpiraTeam is the same as a “Feature” in Mantis (for example). The following mapping information needs to be setup in SpiraTeam: The linking between the project in SpiraTeam and the project in Mantis. The linking of users between the two systems. The linking of releases between the two systems. The linking of standard SpiraTeam fields to Mantis fields. The linking of custom SpiraTeam fields to Mantis custom fields. Each of these is explained in turn below: © Copyright 2006-2015, Inflectra Corporation Page 95 of 168 This document contains Inflectra proprietary information 7.2.1. Configuring the Project Mapping While working in the project you want to map, from the data synchronization administration page you need to click on the “View Project Mappings” hyperlink next to the Mantis plug-in name. This will take you to the data-mapping overview page: If the project name does not match the name of the project you want to configure the data-mapping for, click on the “(Change Project)” hyperlink to change the current project. To enable this project for data-synchronization with Mantis, you need to enter: External Key – This should be set to the ID of the project in Mantis. To get the ID of the Project in Mantis, log in as an administrator and go to Manage -> Manage Projects: Then hover the mouse over the project name. The project ID will be displayed in the URL line as project_id=X where X is the numeric ID of the project. Active Flag – Set this to ‘Yes’ so that SpiraTeam knows that you want to synchronize data for this project. Once the project has been completed, setting the value to “No” will stop data synchronization, reducing network utilization. Click [Update] to confirm these settings. Once you have enabled the project for data-synchronization, you can now enter the other data mapping values outlined below. Note: Once you have successfully configured the project, when creating a new project, you should choose the option to “Create Project from Existing Project” rather than “Use Default Template” so that all the project mappings get copied across to the new project, if you are going to want to Sync the new project up to Mantis. © Copyright 2006-2015, Inflectra Corporation Page 96 of 168 This document contains Inflectra proprietary information 7.2.2. Configuring the User Mapping To configure the mapping of users in the two systems, you need to go to Administration > Users > View Edit Users, which will bring up the list of users in the system. Then click on the “Edit” button for a particular user that will be editing issues in Mantis: You will notice that below the Active flag for the user is a list of all the configured data-synchronization plug-ins. In the text box next to the MantisDataSync ID you need to enter the Login ID of this user in Mantis. If you have the “Automap Users” checkbox enabled in the MantisDataSync plugin, then if no link is created, the system will scan for a matching Login ID from both systems and use a match. (If you then do not have Custom3 set to “False”, then for data going into Mantis the User ID will be forced to that of the User ID in SpiraTeam.) Once you have entered the Mantis Login ID in, click [Update]. You should now repeat for the other users who will be active in both systems. 7.2.3. Configuring the Release Mapping When the data-synchronization service runs and it comes across a release in SpiraTeam (or a Version in Mantis) that it has not linked before, it will create a corresponding entry in the other system. When starting out a new project, it is recommended that you let the MantisDataSync handle creation of the releases/versions in either system, and then edit the information once the link is made. In cases where you are syncing up two existing projects in both systems, it is advised that you link any existing releases that exist in both systems manually, and then only create new releases in one system. To link a release in SpiraTeam up to a version in Mantis, please navigate to Planning > Releases and click on the Release/Iteration in question. Make sure you have the ‘Overview’ tab visible and expand the “Details” section of the release/iteration: © Copyright 2006-2015, Inflectra Corporation Page 97 of 168 This document contains Inflectra proprietary information In addition to the standard fields and custom properties configured for Releases, you will see an additional text property called “MantisDataSync ID” that is used to store the mapped external identifier for the equivalent Release in Mantis. The Mantis ID of a version is the string that is in the The Mantis Release ID can be found by going to Manage -> Manage Projects -> Versions and viewing a release’s details: The Mantis Release ID is the highlighted text field. Copy and paste this into the field in SpiraTeam. Depending on your regional settings in both applications, this field will likely be case-sensitive. For versions imported into Mantis from SpiraTeam, the Version will have an “(S)” appended to the name, and for versions in SpiraTeam imported from Mantis the version field of the Release will have “(M)” appended to the name. 7.2.4. Configuring the Standard Field Mapping Now that the projects, user and releases have been mapped correctly, we need to configure the standard incident fields. To do this, go to Administration > System > Data Synchronization and click on the “View Project Mappings” for the MantisDataSync plug-in entry: © Copyright 2006-2015, Inflectra Corporation Page 98 of 168 This document contains Inflectra proprietary information From this screen, you need to set up the Priority, Severity, Status, and Type fields: a) Incident Type The Incident Type field is optional and can be linked to the Mantis Category selection. If you do not link values, then all issues being imported into SpiraTeam from Mantis will be set to the Default Type (as specified in the “View/Edit Types” screen), and issues going from SpiraTeam into Mantis will be assigned to the first Category in the list. (Usually Mantis orders them alphabetically, but this may change depending on your installation. If you do not have any Categories set-up, then issues will not transfer over and error messages will be logged.) For existing issues, updates to this field will not be transferred. The table lists each of the incident types available in SpiraTeam and provides you with the ability to enter the matching Mantis Category for each one. The value to put in External ID is the Category text: The Mantis Release ID is the highlighted text field. Copy and paste this into the field in SpiraTeam. Depending on your regional settings in both applications, this field will likely be case-sensitive. © Copyright 2006-2015, Inflectra Corporation Page 99 of 168 This document contains Inflectra proprietary information You can map multiple SpiraTeam fields to the same Mantis fields (e.g. Bug and Incident in SpiraTeam are both equivalent to category “development” in Mantis). In a situation like this, enter in the Mantis category in both Big and Incident external keys, and decide which one will be primary. For issues coming from Mantis into SpiraTeam, the one marked Primary will be used, and for issues being created in Mantis, the same category will be used to create the issue. b) Incident Status The Incident Status is an optional field to be linked to the Mantis field by the same name. If you do not link values, then defaults will be used. For issues coming from Mantis into SpiraTeam, incidents will be marked as ‘New’ (as defined by the “View/Edit Status” in Administration), and for issues being transferred to Mantis, the default is ‘new’. Note that if an issue has an Owner in SpiraTeam, then the default for the new issue in Mantis is ‘assigned’. For existing issues, updates to the field will not be transferred over. The table lists each of the incident types available in SpiraTeam and provides you with the ability to enter the matching Mantis Category for each one. The values to put in External Key is any one of the Status values in Mantis. By default in Mantis, the available statuses are: The Mantis values are in the highlighted text field. Type these into the External Key field in SpiraTeam. Depending on your regional settings in both applications, this field will likely be case-sensitive. You can map multiple SpiraTeam fields to the same Mantis fields, just like the Incident Type above. c) Incident Priority & Severity The Incident Priority and Severity are optional fields that are linked to Mantis fields by the same name. If you do not link values, then defaults will be used. For issues coming from Mantis into SpiraTeam, incidents will leave those fields undefined (unset). For issues coming from SpiraTeam into Mantis, the © Copyright 2006-2015, Inflectra Corporation Page 100 of 168 This document contains Inflectra proprietary information default priority of ‘normal’ and severity of ‘minor’ is used. For existing issues, updates to the field will not be transferred over. The table lists each of the priorities available in SpiraTeam and provides you with the ability to enter the matching Mantis priority for each one. (The table for Severities has the same functionality.) The values to put in External Key are any one of the Priority (or Severity) values in Mantis. By default in Mantis, the available values are: The Mantis values are in the highlighted fields above. Type these into the External Key field in SpiraTeam. Depending on your regional settings in both applications, this field will likely be casesensitive. You can map multiple SpiraTeam fields to the same Mantis fields, just like described in Incident Type above. © Copyright 2006-2015, Inflectra Corporation Page 101 of 168 This document contains Inflectra proprietary information 7.2.5. Configuring the Custom Property Mapping Now that the various SpiraTeam standard fields have been mapped correctly, we need to configure the custom property mappings. At the moment, only custom fields in Mantis can be linked to custom fields in SpiraTeam. From the View/Edit Project Data Mapping screen, you need to click on the name of the Incident Custom Property that you want to add data-mapping information for. Both field types in SpiraTeam can be linked up to any of the supported field types in Mantis. Linking between the two systems is done in text values only – that means that if you have a SpiraTeam custom list, then the values that will be put into Mantis will be the strings of the list. The same works for moving fields back from Mantis. Rules for linking different field types up are as follows: SpiraTeam ‘List’ to Mantis ‘Enum’, ‘List’, or ‘Multiselection’: For linking these types of fields together, the available values must match. For example, if you have “Windows” as an item in your list in SpiraTeam, then in the associated field in Mantis, “Windows” must be an available item as well. In instances where there is no match, then the default will be used in either system. On a Multiselection-type field, for importing back into SpiraTeam, only the first (top) selected value will be stored. SpiraTeam ‘List’ to Mantis ‘Numeric’, ‘Float’, ‘Date’, ‘Text’, or ‘Email’: In this case, the text value of the SpiraTeam list will be assigned to the Mantis field, and values must be exact. For example, if you linked a SpiraTeam List to a Mantis Date field, the value for the List must be a valid date, like “1/1/2010”. If any value fails the Mantis validation, the value will be ignored and the custom field will be set blank or to default. When transferring a value back from Mantis into SpiraTeam, the text must equal an available item in the custom list, or the field will be left blank. SpiraTeam ‘Text’ to Mantis ‘Numeric’, ‘Float’, ‘Date’, ‘Text’, or ‘Email’: In this case, text will be copied over as-is. Note that in some special cases, like the number, date, and e-mail fields, Mantis may apply formatting or verification on values transferred over. SpiraTeam ‘Text’ to Mantis ‘Enum’, ‘List’, or ‘Multiselection’: When pulling data from Mantis, the SpiraTeam custom field will be translated as the field in Mantis displays. However, when transferring data to Mantis, if the text in the SpiraTeam field does not match an available item in the lists, then Mantis may leave the field blank or set it to the default value. a) Mapping custom fields For a SpiraTeam test field, all you need to do is link the custom field to the custom field in Mantis. To do this, click on the name of the custom field under the “Custom Properties” header in the MantisDataSync Project Mappings, and you will see a screen allowing you to enter the External Key: [insert screenshot of custom map text prop screen with mapping for below] In the External Key field, put the name of your custom field in Mantis: Once you have updated the various mapping sections, you are now ready to start the service. © Copyright 2006-2015, Inflectra Corporation Page 102 of 168 This document contains Inflectra proprietary information 7.3. Enabling the Data-Synchronization 7.3.1. Starting the Service When SpiraTeam is installed, a Windows Service – SpiraTeam Data Sync Service – is installed along with the web application. However to avoid wasting system resources, this service is initially set to run manually. To ensure continued synchronization of SpiraTeam with Mantis, we recommend starting the service and setting its startup-type to “Automatic (Delayed)” or “Automatic”. To make these changes, open up the Windows Control Panel, click on the “Administrative Tools” link, and then choose the Services option. This will bring up the Windows Service control panel: Click on the ‘SpiraTeam Data Sync Service’ entry and click on the link to start the service. Then right-click the service entry and choose the option to set the startup type to “Automatic (Delayed)” or “Automatic”. This will ensure that synchronization continues between SpiraTeam and Mantis after a reboot of the server. 7.3.2. Using SpiraTeam with Mantis Now that the integration service has been configured and the service started, initially any incidents created in SpiraTeam for the specified projects will be imported into Mantis and any existing issues in Mantis will get loaded into SpiraTeam. After the first sync, we recommend opening the Windows Event Viewer and viewing the Application Log. Any errors (unable to connect messages, invalid required field mappings) and warnings (incomplete field mappings) will be displayed. If on Server 2008/Vista or later, you can filter by the Application name “MantisDataSync”. If you see any error messages (or warning messages that you want to correct before continuing) at this point, we recommend immediately stopping the SpiraTeam service and checking the various mapping entries. If you cannot see any issues with the mapping information, we recommend sending a copy of the event log message(s) to Inflectra customer services ([email protected]) who will help you troubleshoot the problem. To use SpiraTeam with Mantis on an ongoing basis, we recommend the following general processes be followed: When running tests in SpiraTest or SpiraTeam, defects found should be logged through the Test Execution Wizard as normal. Developers using Mantis can log new defects into either SpiraTeam or Mantis. In either case they will get loaded into the other system. Once created in one of the systems and successfully replicated to the other system, the incident should not be modified again inside SpiraTeam. Since Mantis is considered the master system for incidents/issues, all data changes to the issue should be made inside Mantis. To enforce this, © Copyright 2006-2015, Inflectra Corporation Page 103 of 168 This document contains Inflectra proprietary information you should modify the workflows set up in SpiraTeam so that the various fields are marked as inactive for all the incident statuses other than the “New” status. This will allow someone to submit an incident in SpiraTeam, but will prevent them from making changes in conflict with Mantis after that point. As the issue progresses in Mantis, changes to the type of issue, changes to its status, priority, description and resolution will be updated automatically in SpiraTeam. In essence, SpiraTeam acts as a read-only viewer of these incidents. You are now able to perform test coverage and incident reporting inside SpiraTeam using the test cases managed by SpiraTeam and the incidents managed on behalf of SpiraTeam inside Mantis. © Copyright 2006-2015, Inflectra Corporation Page 104 of 168 This document contains Inflectra proprietary information 8. Using SpiraTeam with ClearQuest This section outlines how to use SpiraTest, SpiraPlan or SpiraTeam (hereafter referred to as SpiraTeam) in conjunction with the ClearQuest defect tracking system. The built-in integration service allows the quality assurance team to manage their requirements and test cases in SpiraTeam, execute test runs in SpiraTest, and then have the new incidents generated during the run be automatically loaded into ClearQuest. Once the incidents are loaded into ClearQuest as defects, the development team can then manage the lifecycle of these defects in ClearQuest, and have the status changes in ClearQuest be reflected back in SpiraTeam. In addition, any issues logged directly into ClearQuest will get imported into SpiraTeam so that they can be linked to test cases and requirements. 8.1. Configuring the Integration Service This section outlines how to configure the integration service to export incidents into ClearQuest and pick up subsequent status changes in ClearQuest and have them be updated in SpiraTeam. It assumes that you already have a working installation of SpiraTest, SpiraPlan or SpiraTeam (v3.0 or higher) and a working installation of IBM Rational ClearQuest 7.0 or higher. If you have an earlier version of SpiraTeam, you will need to upgrade to at least v3.0 before trying to integrate with ClearQuest. The steps that need to be performed to configure integration with ClearQuest are as follows: Download the latest ClearQuest Data-Sync plug-in for SpiraTeam from our website Setup the plug-in in SpiraTeam to point to the correct instance of ClearQuest Configure the data field mappings between SpiraTeam and ClearQuest Start the service and verify data transfer 8.1.1. Download the ClearQuest Plug-In Go to the Inflectra website and open up the page that lists the various downloads available for SpiraTeam (http://www.inflectra.com/SpiraTeam/Downloads.aspx). Listed on this page will be the ClearQuest Plug-In for SpiraTeam. Right-click on this link and save the Zip compressed folder to the hard-drive of the server where SpiraTeam is installed. Open up the compressed folder and extract the ClearQuestDataSync.dll file and place it in the C:\Program Files\SpiraTeam\Bin folder (it may be SpiraTest or SpiraPlan depending on which product you’re running). This folder should already contain the DataSyncService.exe and DataSyncService.exe.config files that are the primary files used for managing the data synchronization between SpiraTeam and other systems. You will then need to install the ClearQuest client application itself onto the SpiraTeam server. This is needed because the ClearQuest plugin communicates with the ClearQuest API which is part of the ClearQuest client installation. The SpiraTeam plugin will use a single ClearQuest user license when it connects to ClearQuest. If you do not have an on-premise installation of SpiraTeam, but instead are using a hosted subscription provided by Inflectra (or a third party company) you will not have access to the DataSyncService background service. In such situations, you should use the Desktop DataSync application instead. This application is described in Appendix 1 and can be used instead of the server-based DataSyncService. 8.1.2. Configuring the Service To configure the integration service, please open up the DataSyncService.exe.config file located in C:\Program Files\SpiraTeam\Bin with a text editor such as Notepad. Once open, it should look like: © Copyright 2006-2015, Inflectra Corporation Page 105 of 168 This document contains Inflectra proprietary information <?xml version="1.0" encoding="utf-8"?> <configuration> <configSections> <sectionGroup name="applicationSettings" type="System.Configuration.ApplicationSettingsGroup, System, Version=2.0.0.0, Culture=neutral, PublicKeyToken=b77a5c561934e089" > <section name="Inflectra.SpiraTest.DataSyncService.Properties.Settings" type="System.Configuration.ClientSettingsSection, System, Version=2.0.0.0, Culture=neutral, PublicKeyToken=b77a5c561934e089" requirePermission="false" /> </sectionGroup> </configSections> <applicationSettings> <Inflectra.SpiraTest.DataSyncService.Properties.Settings> <setting name="PollingInterval" serializeAs="String"> <value>600000</value> </setting> <setting name="WebServiceUrl" serializeAs="String"> <value>http://localhost/SpiraTeam</value> </setting> <setting name="Login" serializeAs="String"> <value>fredbloggs</value> </setting> <setting name="Password" serializeAs="String"> <value>fredbloggs</value> </setting> <setting name="EventLogSource" serializeAs="String"> <value>SpiraTeam Data Sync Service</value> </setting> <setting name="TraceLogging" serializeAs="String"> <value>False</value> </setting> </Inflectra.SpiraTest.DataSyncService.Properties.Settings> </applicationSettings> </configuration> The sections that need to be verified and possibly changed are marked in yellow above. You need to check the following information: The polling interval allows you to specify how frequently the data-synchronization service will ask SpiraTeam and the external system for new data updates. The value is specified in milliseconds and we recommend a value no smaller than 5 minutes (i.e. 300,000ms). The larger the number, the longer it will take for data to be synchronized, but the lower the network and server overhead. The base URL to your instance SpiraTeam. It is typically of the form http://<server name>/SpiraTeam. Make sure that when you enter this URL on a browser on the server itself, the application login page appears. A valid login name and password to your instance of SpiraTeam. This user needs to be a member of the project(s) that will be synchronized with ClearQuest and needs to have at least Incident create/modify/view permissions and Release create/modify/view permissions in these projects. Once you have made these changes, save the file and proceed to the next stage. 8.1.3. Configuring the Plug-In The next step is to configure the plug-in within SpiraTeam so that the system knows how to access the ClearQuest server. To start the configuration, please open up SpiraTeam in a web browser, log in using a valid account that has System-Administration level privileges and click on the System > Data Synchronization administration option from the left-hand navigation: © Copyright 2006-2015, Inflectra Corporation Page 106 of 168 This document contains Inflectra proprietary information This screen lists all the plug-ins already configured in the system. Depending on whether you chose the option to include sample data in your installation or not, you will see either an empty screen or a list of sample data-synchronization plug-ins. If you already see an entry for ClearQuestDataSync you should click on its “Edit” link. If you don’t see such an entry in the list, please click on the [Add] button instead. In either case you will be taken to the following screen where you can enter or modify the ClearQuest Data-Synchronization plug-in: You need to fill out the following fields for the ClearQuest Plug-in to operate correctly: Name – this needs to be set to ClearQuestDataSync. This needs to match the name of the plugin DLL assembly that was copied into the C:\Program Files\SpiraTeam\Bin folder (minus the .dll file extension). If you renamed the ClearQuestDataSync.dll file for any reason, then you need to change the name here to match. Description – this should be set to a description of the plug-in. This is an optional field that is used for documentation purposes and is not actually used by the system. Connection Info – this should the name of the ClearQuest master database. In most installations this is simply called “MASTR”. Login – this should be set to a valid login for your ClearQuest installation. The login needs to have permissions to create and view defects within ClearQuest. Password – this should be set to the password of the login specified above. Time Offset – normally this should be set to zero, but if you find that issues being changed in ClearQuest are not being updated in SpiraTeam, try increasing the value as this will tell the datasynchronization plug-in to add on the time offset (in hours) when comparing date-time stamps. Also if your ClearQuest installation is running on a server set to a different time-zone, then you should add in the number of hours difference between the servers’ time-zones here. Auto-Map Users – this is not currently used and can be ignored. © Copyright 2006-2015, Inflectra Corporation Page 107 of 168 This document contains Inflectra proprietary information Custom 01 – This should be set to the word “True” if you want to have the plugin restrict synchronization to only loading new incidents from SpiraTeam > ClearQuest and updating existing items. This is useful if you want to prevent existing issues in ClearQuest from being loaded into SpiraTeam. Leave blank if you want the plugin to synchronize normally. Custom 02 – Sometimes you don’t want all the incidents in SpiraTeam to be added to ClearQuest. You can optionally enter a filter definition in this box to restrict the incidents that get synchronized. The filter uses the following syntax: [Property]=[Value|*]:[Property]=[Value|*] For example, to limit the incidents to only have those where List01 = 5 and Text08 = “Hello” and Text05 is not blank you would use: List01=5:Text08=Hello:Text05=* Custom 03 – ClearQuest doesn’t have a built-in Detected in Release field. If you would like to map a custom ClearQuest field to the SpiraTeam Detected in Release, simply enter in the name of the ClearQuest field here. Custom 04 – ClearQuest doesn’t have a built-in Resolved in Release field. If you would like to map a custom ClearQuest field to the SpiraTeam Resolved in Release, simply enter in the name of the ClearQuest field here. Custom 05 – This is the optional “DBset” value, when you have installations with more than one database set. If you have a single database set you can just leave this blank. If you enter a field name in either Custom 03 or Custom 04, you will need to also map the various releases in SpiraTeam to their corresponding equivalent field value in ClearQuest. To do that, click on Planning > Releases and choose a specific release. Then in the “ClearQuest DataSync ID” field under the “Custom Properties” tab you need to enter the name of the equivalent ClearQuest release. 8.2. Configuring the Data Mapping Next, you need to configure the data mapping between SpiraTeam and ClearQuest. This allows the various projects, users, incident statuses, priorities, severities and custom property values used in the two applications to be related to each other. This is important, as without a correct mapping, there is no way for the integration service to know that a “New” item in SpiraTeam is equivalent to a “Submitted” item in ClearQuest (for example). The following mapping information needs to be setup in SpiraTeam: The mapping of the project identifiers for the projects that need to be synchronized The mapping of users in the system The mapping of the various standard fields in the system The mapping of the various custom properties in the system Each of these is explained in turn below: 8.2.1. Configuring the Project Mapping From the data synchronization administration page, you need to click on the “View Project Mappings” hyperlink next to the ClearQuest plug-in name. This will take you to the data-mapping home page for the currently selected project: © Copyright 2006-2015, Inflectra Corporation Page 108 of 168 This document contains Inflectra proprietary information If the project name does not match the name of the project you want to configure the data-mapping for, click on the “(Change Project)” hyperlink to change the current project. To enable this project for data-synchronization with ClearQuest, you need to enter: External Key – This should be set to the name of the project database in ClearQuest that will be mapped to the specific SpiraTeam project. Active Flag – Set this to ‘Yes’ so that SpiraTeam knows that you want to synchronize data for this project. Once the project has been completed, setting the value to “No” will stop data synchronization, reducing network utilization. Click [Update] to confirm these settings. Once you have enabled the project for data-synchronization, you can now enter the other data mapping values outlined below. Note: Once you have successfully configured the project, when creating a new project, you should choose the option to “Create Project from Existing Project” rather than “Use Default Template” so that all the project mappings get copied across to the new project. 8.2.2. Configuring the User Mapping To configure the mapping of users in the two systems, you need to go to Administration > Users > View Edit Users, which will bring up the list of users in the system. Then click on the “Edit” button for a particular user that will be editing issues in ClearQuest: © Copyright 2006-2015, Inflectra Corporation Page 109 of 168 This document contains Inflectra proprietary information You will notice that in the Data Mapping tab for the user, there is a list of all the configured datasynchronization plug-ins. In the text box next to the ClearQuest Data-Sync plug-in you need to enter the login for this username in ClearQuest. This will allow the data-synchronization plug-in to know which user in SpiraTeam match which equivalent user in ClearQuest. Click [Update] once you’ve entered the appropriate login name. You should now repeat for the other users who will be active in both systems. 8.2.3. Configuring the Standard Field Mapping Now that the projects, user and releases have been mapped correctly, we need to configure the standard incident fields. To do this, go to Administration > System > Data Synchronization and click on the “View Project Mappings” for the ClearQuestDataSync plug-in entry: © Copyright 2006-2015, Inflectra Corporation Page 110 of 168 This document contains Inflectra proprietary information From this screen, you need to click on Priority, Severity and Status in turn to configure their values: a) Incident Status Click on the “Status” hyperlink under Incident Standard Fields to bring up the Incident status mapping configuration screen: The table lists each of the incident statuses available in SpiraTeam and provides you with the ability to enter the matching ClearQuest issue status name for each one. You can map multiple SpiraTeam fields to the same ClearQuest fields (e.g. Open and Reopen in SpiraTeam are both equivalent to Opened in ClearQuest), in which case only one of the two values can be listed as Primary = Yes as that’s the value that’s used on the reverse synchronization (from ClearQuest > SpiraTeam). b) Incident Priority © Copyright 2006-2015, Inflectra Corporation Page 111 of 168 This document contains Inflectra proprietary information Click on the “Priority” hyperlink under Incident Standard Fields to bring up the Incident Priority mapping configuration screen: The table lists each of the incident priorities available in SpiraTeam and provides you with the ability to enter the matching ClearQuest priority name for each one. You can map multiple SpiraTeam fields to the same ClearQuest fields, in which case only one of the two values can be listed as Primary = Yes as that’s the value that’s used on the reverse synchronization (from ClearQuest > SpiraTeam). c) Incident Severity Click on the “Severity” hyperlink under Incident Standard Fields to bring up the Incident severity mapping configuration screen: The table lists each of the incident severities available in SpiraTeam and provides you with the ability to enter the matching ClearQuest severity name for each one. You can map multiple SpiraTeam fields to the same ClearQuest fields, in which case only one of the two values can be listed as Primary = Yes as that’s the value that’s used on the reverse synchronization (from ClearQuest > SpiraTeam). © Copyright 2006-2015, Inflectra Corporation Page 112 of 168 This document contains Inflectra proprietary information 8.2.4. Configuring the Custom Property Mapping Now that the various SpiraTeam standard fields have been mapped correctly, we need to configure the custom property mappings. This is used for both custom properties in SpiraTeam that map to custom fields in ClearQuest and also for custom properties in SpiraTeam that are used to map to standard fields in ClearQuest (e.g. Project, Resolution) that don’t exist in SpiraTeam. From the View/Edit Project Data Mapping screen, you need to click on the name of the Incident Custom Property that you want to add data-mapping information for. We will consider the two different types of mapping that you might want to enter: a) Text Custom Properties Click on the hyperlink of the text custom property under Incident Custom Properties to bring up the custom property mapping configuration screen. For text custom properties there will be no values listed in the lower half of the screen. You need to lookup the ID of the custom field in ClearQuest that matches this custom property in SpiraTeam. Once you have entered the id of the custom field, click [Update]. © Copyright 2006-2015, Inflectra Corporation Page 113 of 168 This document contains Inflectra proprietary information Note: The ID can be found by looking at the URL inside ClearQuest when choosing to View/Edit the Custom Field. The URL will include the section: id=X where X is the numeric ID of the Custom Field inside ClearQuest. b) List Custom Properties Click on the hyperlink of the list custom property under Incident Custom Properties to bring up the custom property mapping configuration screen. For list custom properties there will be a textbox for both the custom field itself and a mapping table for each of the custom property values that need to be mapped: First you need to lookup the name of the field in ClearQuest that matches this custom property in SpiraTeam. This should be entered in the ‘External Key’ field below the name of the custom property. The easiest way to determine this is to use the ClearQuest Designer which lets you see all the fields associated with a ClearQuest defect: Next for each of the Property Values in the table (in the lower half of the page) you need to enter the full name of the possible field values as displayed in the ClearQuest client application. Once you have updated the various mapping sections, you are now ready to start the service. © Copyright 2006-2015, Inflectra Corporation Page 114 of 168 This document contains Inflectra proprietary information 8.3. Enabling the Data-Synchronization 8.3.1. Starting the Service When SpiraTeam is installed, a Windows Service – SpiraTeam Data Sync Service – is installed along with the web application. However to avoid wasting system resources, this service is initially set to run manually. To ensure continued synchronization of SpiraTeam with ClearQuest, we recommend starting the service and setting its startup-type to Automatic. To make these changes, open up the Windows Control Panel, click on the “Administrative Tools” link, and then choose the Services option. This will bring up the Windows Service control panel: Click on the ‘SpiraTeam Data Sync Service’ entry and click on the link to start the service. Then right-click the service entry and choose the option to set the startup type to ‘Automatic’. This will ensure that synchronization continues between SpiraTeam and ClearQuest after a reboot of the server. 8.3.2. Using SpiraTeam with ClearQuest Now that the integration service has been configured and the service started, initially any incidents created in SpiraTeam for the specified projects will be imported into ClearQuest and any existing defects in ClearQuest will get loaded into SpiraTeam At this point we recommend opening the Windows Event Viewer and choosing the Application Log. In this log any error messages raised by the SpiraTeam Data Sync Service will be displayed. If you see any error messages at this point, we recommend immediately stopping the SpiraTeam service and checking the various mapping entries. If you cannot see any issues with the mapping information, we recommend sending a copy of the event log message(s) to Inflectra customer services ([email protected]) who will help you troubleshoot the problem. To use SpiraTeam with ClearQuest on an ongoing basis, we recommend the following general processes be followed: When running tests in SpiraTest or SpiraTeam, defects found should be logged through the Test Execution Wizard as normal. Developers using ClearQuest can log new defects into either SpiraTeam or ClearQuest. In either case they will get loaded into the other system. Once created in one of the systems and successfully replicated to the other system, the incident should not be modified again inside SpiraTeam At this point, the incident should not be acted upon inside SpiraTeam and all data changes to the issue should be made inside ClearQuest. To enforce this, you should modify the workflows set up © Copyright 2006-2015, Inflectra Corporation Page 115 of 168 This document contains Inflectra proprietary information in SpiraTeam so that the various fields are marked as inactive for all the incident statuses other than the “New” status. This will allow someone to submit an incident in SpiraTeam, but will prevent them making changes in conflict with ClearQuest after that point. As the issue progresses through the customized ClearQuest workflow, changes to the type of issue, changes to its status, priority, description and resolution will be updated automatically in SpiraTeam. In essence, SpiraTeam acts as a read-only viewer of these incidents. You are now able to perform test coverage and incident reporting inside SpiraTest/SpiraTeam using the test cases managed by SpiraTest/SpiraTeam and the incidents managed on behalf of SpiraTest/SpiraTeam inside ClearQuest. © Copyright 2006-2015, Inflectra Corporation Page 116 of 168 This document contains Inflectra proprietary information 9. Using SpiraTeam with IBM RTC This section outlines how to use SpiraTest, SpiraPlan or SpiraTeam (hereafter referred to as SpiraTeam) in conjunction with the IBM Rational Team Concert (hereafter referred to as RTC) work item tracking system. The built-in integration service allows the quality assurance team to manage their requirements and test cases in SpiraTeam, execute test runs in SpiraTest, and then have the new incidents generated during the run be automatically loaded into RTC. Once the incidents are loaded into RTC as work items, the development team can then manage the lifecycle of these work items in RTC, and have the status changes in RTC be reflected back in SpiraTeam. In addition, any issues logged directly into RTC will get imported into SpiraTeam so that they can be linked to test cases and requirements. 9.1. Configuring the Integration Service This section outlines how to configure the integration service to export incidents into RTC and pick up subsequent status changes in RTC and have them be updated in SpiraTeam. It assumes that you already have a working installation of SpiraTest, SpiraPlan or SpiraTeam (v3.0 or higher) and a working installation of RTC 2.0 or higher. If you have an earlier version of SpiraTeam, you will need to upgrade to at least v3.0 before trying to integrate with RTC. The steps that need to be performed to configure integration with RTC are as follows: Download the latest RTC Data-Sync plug-in for SpiraTeam from our website Setup the plug-in in SpiraTeam to point to the RTC application server. Configure the data field mappings between SpiraTeam and RTC Start the service and verify data transfer 9.1.1. Download the RTC Plug-In Go to the Inflectra website and open up the page that lists the various downloads available for SpiraTeam (http://www.inflectra.com/SpiraTeam/Downloads.aspx). Listed on this page will be the RTC Plug-In for SpiraTeam. Right-click on this link and save the Zip compressed folder to the hard-drive of the server where SpiraTeam is installed. Open up the compressed folder and extract the RtcDataSync.dll file and place it in the C:\Program Files\SpiraTeam\Bin folder (it may be SpiraTest or SpiraPlan depending on which product you’re running). This folder should already contain the DataSyncService.exe and DataSyncService.exe.config files that are the primary files used for managing the data synchronization between SpiraTeam and other systems. If you do not have an on-premise installation of SpiraTeam, but instead are using a hosted subscription provided by Inflectra (or a third party company) you will not have access to the DataSyncService background service. In such situations, you should use the Desktop DataSync application instead. This application is described in Appendix 1 and can be used instead of the server-based DataSyncService. 9.1.2. Configuring the Service To configure the integration service, please open up the DataSyncService.exe.config file located in C:\Program Files\SpiraTeam\Bin with a text editor such as Notepad. Once open, it should look like: <?xml version="1.0" encoding="utf-8"?> <configuration> <configSections> <sectionGroup name="applicationSettings" type="System.Configuration.ApplicationSettingsGroup, System, Version=2.0.0.0, Culture=neutral, PublicKeyToken=b77a5c561934e089" > © Copyright 2006-2015, Inflectra Corporation Page 117 of 168 This document contains Inflectra proprietary information <section name="Inflectra.SpiraTest.DataSyncService.Properties.Settings" type="System.Configuration.ClientSettingsSection, System, Version=2.0.0.0, Culture=neutral, PublicKeyToken=b77a5c561934e089" requirePermission="false" /> </sectionGroup> </configSections> <applicationSettings> <Inflectra.SpiraTest.DataSyncService.Properties.Settings> <setting name="PollingInterval" serializeAs="String"> <value>600000</value> </setting> <setting name="WebServiceUrl" serializeAs="String"> <value>http://localhost/SpiraTeam</value> </setting> <setting name="Login" serializeAs="String"> <value>fredbloggs</value> </setting> <setting name="Password" serializeAs="String"> <value>fredbloggs</value> </setting> <setting name="EventLogSource" serializeAs="String"> <value>SpiraTeam Data Sync Service</value> </setting> <setting name="TraceLogging" serializeAs="String"> <value>False</value> </setting> </Inflectra.SpiraTest.DataSyncService.Properties.Settings> </applicationSettings> </configuration> The sections that need to be verified and possibly changed are marked in yellow above. You need to check the following information: The polling interval allows you to specify how frequently the data-synchronization service will ask SpiraTeam and the external system for new data updates. The value is specified in milliseconds and we recommend a value no smaller than 5 minutes (i.e. 300,000ms). The larger the number, the longer it will take for data to be synchronized, but the lower the network and server overhead. The base URL to your instance SpiraTeam. It is typically of the form http://<server name>/SpiraTeam. Make sure that when you enter this URL on a browser on the server itself, the application login page appears. A valid login name and password to your instance of SpiraTeam. This user needs to be a member of the project(s) that will be synchronized with RTC and needs to have at least Incident create/modify/view permissions and Release create/modify/view permissions in these projects. Once you have made these changes, save the file and proceed to the next stage. 9.1.3. Configuring the Plug-In The next step is to configure the plug-in within SpiraTeam so that the system knows how to access the RTC server. To start the configuration, please open up SpiraTeam in a web browser, log in using a valid account that has System-Administration level privileges and click on the System > Data Synchronization administration option from the left-hand navigation: © Copyright 2006-2015, Inflectra Corporation Page 118 of 168 This document contains Inflectra proprietary information This screen lists all the plug-ins already configured in the system. Depending on whether you chose the option to include sample data in your installation or not, you will see either an empty screen or a list of sample data-synchronization plug-ins. If you already see an entry for RtcDataSync you should click on its “Edit” link. If you don’t see such an entry in the list, please click on the [Add] button instead. In either case you will be taken to the following screen where you can enter or modify the RTC Data-Synchronization plug-in: You need to fill out the following fields for the RTC Plug-in to operate correctly: Name – this needs to be set to RtcDataSync. This needs to match the name of the plug-in DLL assembly that was copied into the C:\Program Files\SpiraTeam\Bin folder (minus the .dll file extension). If you renamed the RtcDataSync.dll file for any reason, then you need to change the name here to match. Description – this should be set to a description of the plug-in. This is an optional field that is used for documentation purposes and is not actually used by the system. © Copyright 2006-2015, Inflectra Corporation Page 119 of 168 This document contains Inflectra proprietary information Connection Info – this should be the base URL for connecting to your instance of RTC (for example https://servername:9443/ccm). Login – this should be set to a valid login for your RTC installation. The login needs to have permissions to create and view work items within RTC. Password – this should be set to the password of the login specified above. Time Offset – normally this should be set to zero, but if you find that issues being changed in RTC are not being updated in SpiraTeam, try increasing the value as this will tell the datasynchronization plug-in to add on the time offset (in hours) when comparing date-time stamps. Also if your RTC installation is running on a server set to a different time-zone, then you should add in the number of hours difference between the servers’ time-zones here. Auto-Map Users – this is not currently used and can be ignored. Custom 01 – this is not currently used and can be ignored Custom 02 – this is not currently used and can be ignored Custom 03 – this is not currently used and can be ignored Custom 04 – this is not currently used and can be ignored Custom 05 – this is not currently used and can be ignored 9.2. Configuring the Data Mapping Next, you need to configure the data mapping between SpiraTeam and RTC. This allows the various projects, users, incident statuses, priorities, severities and custom property values used in the two applications to be related to each other. This is important, as without a correct mapping, there is no way for the integration service to know that a “New” item in SpiraTeam is equivalent to a “New” item in RTC (for example). The following mapping information needs to be setup in SpiraTeam: The mapping of the project identifiers for the projects that need to be synchronized The mapping of the various standard fields in the system The mapping of the various custom properties in the system Each of these is explained in turn below: 9.2.1. Configuring the Project Mapping From the data synchronization administration page, you need to click on the “View Project Mappings” hyperlink next to the RTC plug-in name. This will take you to the data-mapping home page for the currently selected project: © Copyright 2006-2015, Inflectra Corporation Page 120 of 168 This document contains Inflectra proprietary information If the project name does not match the name of the project you want to configure the data-mapping for, click on the “(Change Project)” hyperlink to change the current project. To enable this project for data-synchronization with RTC, you need to enter: External Key – This should be set to the display name of the project in RTC that will be mapped to the specific SpiraTeam project. Active Flag – Set this to ‘Yes’ so that SpiraTeam knows that you want to synchronize data for this project. Once the project has been completed, setting the value to “No” will stop data synchronization, reducing network utilization. Click [Update] to confirm these settings. Once you have enabled the project for data-synchronization, you can now enter the other data mapping values outlined below. Note: Once you have successfully configured the project, when creating a new project, you should choose the option to “Create Project from Existing Project” rather than “Use Default Template” so that all the project mappings get copied across to the new project. 9.2.2. Configuring the Standard Field Mapping Now that the projects, user and releases have been mapped correctly, we need to configure the standard incident fields. To do this, go to Administration > System > Data Synchronization and click on the “View Project Mappings” for the RtcDataSync plug-in entry: © Copyright 2006-2015, Inflectra Corporation Page 121 of 168 This document contains Inflectra proprietary information From this screen, you need to click on Status and Type in turn to configure their values: a) Incident Status Click on the “Status” hyperlink under Incident Standard Fields to bring up the Incident status mapping configuration screen: The table lists each of the incident statuses available in SpiraTeam and provides you with the ability to enter the matching RTC work item status name for each one. You can map multiple SpiraTeam fields to the same RTC fields (e.g. Closed and Resolved in SpiraTeam are both equivalent to Complete in RTC), in which case only one of the two values can be listed as Primary = Yes as that’s the value that’s used on the reverse synchronization (from RTC > SpiraTeam). b) Incident Type Click on the “Type” hyperlink under Incident Standard Fields to bring up the Incident type mapping configuration screen: © Copyright 2006-2015, Inflectra Corporation Page 122 of 168 This document contains Inflectra proprietary information The table lists each of the incident types available in SpiraTeam and provides you with the ability to enter the matching RTC work item type name for each one. You can map multiple SpiraTeam fields to the same RTC fields, in which case only one of the two values can be listed as Primary = Yes as that’s the value that’s used on the reverse synchronization (from RTC > SpiraTeam). 9.2.3. Configuring the Custom Property Mapping Now that the various SpiraTeam standard fields have been mapped correctly, we need to configure the custom property mappings. This is used to associate custom properties in SpiraTeam that map to custom fields in RTC. From the View/Edit Project Data Mapping screen, you need to click on the name of the Incident Custom Property that you want to add data-mapping information for. We will consider the two different types of mapping that you might want to enter: a) Text Custom Properties Click on the hyperlink of the text custom property under Incident Custom Properties to bring up the custom property mapping configuration screen. For text custom properties there will be no values listed in the lower half of the screen. © Copyright 2006-2015, Inflectra Corporation Page 123 of 168 This document contains Inflectra proprietary information You need to obtain the fully qualified XML name of the custom field in RTC that matches this custom property in SpiraTeam from the RTC documentation. Once you have entered the name of the custom field, click [Update]. b) List Custom Properties Click on the hyperlink of the list custom property under Incident Custom Properties to bring up the custom property mapping configuration screen. For list custom properties there will be a textbox for both the custom field itself and a mapping table for each of the custom property values that need to be mapped: First you need to obtain the fully qualified XML name of the field in RTC that matches this custom property in SpiraTeam. This should be entered in the ‘External Key’ field below the name of the custom property. Then you need enter the possible values in RTC for the custom property, mapping each one to the corresponding SpiraTeam custom property value. Once you have updated the various mapping sections, you are now ready to start the service. © Copyright 2006-2015, Inflectra Corporation Page 124 of 168 This document contains Inflectra proprietary information 9.3. Enabling the Data-Synchronization 9.3.1. Starting the Service When SpiraTeam is installed, a Windows Service – SpiraTeam Data Sync Service – is installed along with the web application. However to avoid wasting system resources, this service is initially set to run manually. To ensure continued synchronization of SpiraTeam with RTC, we recommend starting the service and setting its startup-type to Automatic. To make these changes, open up the Windows Control Panel, click on the “Administrative Tools” link, and then choose the Services option. This will bring up the Windows Service control panel: Click on the ‘SpiraTeam Data Sync Service’ entry and click on the link to start the service. Then right-click the service entry and choose the option to set the startup type to ‘Automatic’. This will ensure that synchronization continues between SpiraTeam and RTC after a reboot of the server. 9.3.2. Using SpiraTeam with ClearQuest Now that the integration service has been configured and the service started, initially any incidents created in SpiraTeam for the specified projects will be imported into RTC and any existing work items in RTC will get loaded into SpiraTeam At this point we recommend opening the Windows Event Viewer and choosing the Application Log. In this log any error messages raised by the SpiraTeam Data Sync Service will be displayed. If you see any error messages at this point, we recommend immediately stopping the SpiraTeam service and checking the various mapping entries. If you cannot see any issues with the mapping information, we recommend sending a copy of the event log message(s) to Inflectra customer services (http://www.inflectra.com/Support) who will help you troubleshoot the problem. To use SpiraTeam with RTC on an ongoing basis, we recommend the following general processes be followed: When running tests in SpiraTest or SpiraTeam, defects found should be logged through the Test Execution Wizard as normal. Developers using RTC can log new work items into either SpiraTeam or RTC. In either case they will get loaded into the other system. Once created in one of the systems and successfully replicated to the other system, the incident should not be modified again inside SpiraTeam At this point, the incident should not be acted upon inside SpiraTeam and all data changes to the issue should be made inside RTC. To enforce this, you should modify the workflows set up in © Copyright 2006-2015, Inflectra Corporation Page 125 of 168 This document contains Inflectra proprietary information SpiraTeam so that the various fields are marked as inactive for all the incident statuses other than the “New” status. This will allow someone to submit an incident in SpiraTeam, but will prevent them making changes in conflict with RTC after that point. As the issue progresses through the customized RTC workflow, changes to the type of work item, changes to its status, description and custom fields will be updated automatically in SpiraTeam. In essence, SpiraTeam acts as a read-only viewer of these incidents. You are now able to perform test coverage and incident reporting inside SpiraTest/SpiraTeam using the test cases managed by SpiraTest/SpiraTeam and the incidents managed on behalf of SpiraTest/SpiraTeam inside RTC. © Copyright 2006-2015, Inflectra Corporation Page 126 of 168 This document contains Inflectra proprietary information 10. Using Spira with Axosoft 14+ This section outlines how to use SpiraTest, SpiraPlan or SpiraTeam (hereafter referred to as SpiraTeam) in conjunction with the OnTime defect tracking system from AxoSoft (hereafter called OnTime). The builtin integration service allows the quality assurance team to manage their requirements and test cases in SpiraTeam, execute test runs in SpiraTest, and then have the new incidents generated during the run be automatically loaded into OnTime. Once the incidents are loaded into OnTime as defects, the development team can then manage the lifecycle of these defects in OnTime, and have the status changes in OnTime be reflected back in SpiraTeam. 10.1. Configuring the Integration Service This section outlines how to configure the integration service to export incidents into OnTime and pick up subsequent status changes in OnTime and have them update SpiraTeam. It assumes that you already have a working installation of SpiraTest, SpiraPlan or SpiraTeam v4.0 or later and a working installation of AxoSoft OnTime 14 or later (either hosted in the cloud or on-premise). If you have an earlier version of SpiraTeam, you will need to upgrade to at least v4.0 before trying to integrate with OnTime. The steps that need to be performed to configure integration with OnTime are as follows: Enable the REST API in OnTime Download the latest OnTime Data-Sync plug-in for SpiraTeam from our website Setup the plug-in in SpiraTeam to point to the correct instance of OnTime Configure the data field mappings between SpiraTeam and OnTime Start the service and verify data transfer 10.1.1. Enable the REST API in OnTime First you will need to login to your instance of OnTime and click on Tools > System Options. Then click on the ‘Axosoft API Settings’ section: Check the box to ‘Enable API’ and then click on the [Manage API Keys] button: © Copyright 2006-2015, Inflectra Corporation Page 127 of 168 This document contains Inflectra proprietary information On this screen you will need to enter the name of the application you are creating an API key for (e.g. “Spira”) and then record the following two pieces of information: • Client ID • Client Secret You will need these later on. Then click Save. The OnTime Client Secret is a long hash that will be of the form: ykk8WD3eYfMJ6WbV1HtkutJv_w9jS2ah1tSbwqs-408Gp0_cPh5wTnjwfqPLN3_oCSHPVG5tpFkETHBgxUBKbXaTzzVqYtKC9_S For SpiraTeam 4.2 and earlier there is a limitation on the length of client secret that can be accepted, so you need to break down the client secret into three parts of roughly equal length that you can enter into SpiraTeam. For example we could have used: • ykk8WD3eYfMJ6WbV1HtkutJv_w9jS2ah1tSbwqs- • 408Gp0_cPh5wTnjwfqPLN3- • _oCSHPVG5tpFkETHBgxUBKbXaTzzVqYtKC9_S 10.1.2. Download the OnTime Plug-In Go to the Inflectra website and open up the page that lists the various downloads available for SpiraTeam (http://www.inflectra.com/SpiraTeam/Downloads.aspx). Listed on this page will be the OnTime 14 Plug-In for SpiraTeam. Right-click on this link and save the Zip compressed folder to the hard-drive of the server where SpiraTeam is installed. Open up the compressed folder and extract the following files and place them in the C:\Program Files\SpiraTeam\Bin folder (it may be SpiraTest or SpiraPlan depending on which product you’re running): • • • AxosoftAPI.NET.dll OnTimeDataSync.dll Newtonsoft.Json.dll This folder should already contain the DataSyncService.exe and DataSyncService.exe.config files that are the primary files used for managing the data synchronization between SpiraTeam and other systems. © Copyright 2006-2015, Inflectra Corporation Page 128 of 168 This document contains Inflectra proprietary information If you do not have an on-premise installation of SpiraTeam, but instead are using a hosted subscription provided by Inflectra (or a third party company) you will not have access to the DataSyncService background service. In such situations, you should use the Desktop DataSync application instead. This application is described in Appendix 1 and can be used instead of the server-based DataSyncService. 10.1.3. Configuring the Service To configure the integration service, please open up the DataSyncService.exe.config file located in C:\Program Files\SpiraTeam\Bin with a text editor such as Notepad. Once open, it should look like: <?xml version="1.0" encoding="utf-8"?> <configuration> <configSections> <sectionGroup name="applicationSettings" type="System.Configuration.ApplicationSettingsGroup, System, Version=2.0.0.0, Culture=neutral, PublicKeyToken=b77a5c561934e089" > <section name="Inflectra.SpiraTest.DataSyncService.Properties.Settings" type="System.Configuration.ClientSettingsSection, System, Version=2.0.0.0, Culture=neutral, PublicKeyToken=b77a5c561934e089" requirePermission="false" /> </sectionGroup> </configSections> <applicationSettings> <Inflectra.SpiraTest.DataSyncService.Properties.Settings> <setting name="PollingInterval" serializeAs="String"> <value>600000</value> </setting> <setting name="WebServiceUrl" serializeAs="String"> <value>http://localhost/SpiraTeam</value> </setting> <setting name="Login" serializeAs="String"> <value>fredbloggs</value> </setting> <setting name="Password" serializeAs="String"> <value>fredbloggs</value> </setting> <setting name="EventLogSource" serializeAs="String"> <value>SpiraTeam Data Sync Service</value> </setting> <setting name="TraceLogging" serializeAs="String"> <value>False</value> </setting> </Inflectra.SpiraTest.DataSyncService.Properties.Settings> </applicationSettings> </configuration> The sections that need to be verified and possibly changed are marked in yellow above. You need to check the following information: The polling interval allows you to specify how frequently the data-synchronization service will ask SpiraTeam and the external system for new data updates. The value is specified in milliseconds and we recommend a value no smaller than 5 minutes (i.e. 300,000ms). The larger the number, the longer it will take for data to be synchronized, but the lower the network and server overhead. The base URL to your instance SpiraTeam. It is typically of the form http://<server name>/SpiraTeam. Make sure that when you enter this URL on a browser on the server itself, the application login page appears. A valid login name and password to your instance of SpiraTeam. This user needs to be a member of the project(s) that will be synchronized with OnTime and needs to have at least Incident create/modify/view permissions and Release create/modify/view permissions in these projects. Once you have made these changes, save the file and proceed to the next stage. © Copyright 2006-2015, Inflectra Corporation Page 129 of 168 This document contains Inflectra proprietary information 10.1.4. Configuring the Plug-In The next step is to configure the plug-in within SpiraTeam so that the system knows how to access the OnTime server. To start the configuration, please open up SpiraTeam in a web browser, log in using a valid account that has System-Administration level privileges and click on the System > Data Synchronization administration option from the left-hand navigation: This screen lists all the plug-ins already configured in the system. Depending on whether you chose the option to include sample data in your installation or not, you will see either an empty screen or a list of sample data-synchronization plug-ins. If you already see an entry for OnTimeDataSync you should click on its “Edit” link. If you don’t see such an entry in the list, please click on the [Add] button instead. In either case you will be taken to the following screen where you can enter or modify the OnTime Data-Synchronization plug-in: You need to fill out the following fields for the OnTime Plug-in to operate correctly: Name – this needs to be set to OnTimeDataSync. This needs to match the name of the plug-in DLL assembly that was copied into the C:\Program Files\SpiraTeam\Bin folder (minus the .dll file extension). If you renamed the OnTimeDataSync.dll file for any reason, then you need to change the name here to match. © Copyright 2006-2015, Inflectra Corporation Page 130 of 168 This document contains Inflectra proprietary information Description – this should be set to a description of the plug-in. This is an optional field that is used for documentation purposes and is not actually used by the system. Connection Info – this should the full URL to OnTime. This is typically something like: https://mysite.axosoft.com. Login – this should be set to the login that you use to access OnTime through its web interface Password – this should be set to the password that you use to access OnTime through its web interface Time Offset – normally this should be set to zero, but if you find that defects being changed in OnTime are not being updated in SpiraTeam, try increasing the value as this will tell the datasynchronization plug-in to add on the time offset (in hours) when comparing date-time stamps. Auto-Map Users – This changes the way that the plugin maps users in SpiraTeam to those in OnTime: Auto-Map = True With this setting, all users in SpiraTeam need to have the same username as those in OnTime. If this is the case then you do not need to perform the user-mapping task outlined in section 10.2.2. This is a big time-saver if you can guarantee that all usernames are the same in both systems. Auto-Map = False With this setting, users in SpiraTeam and OnTime are free to have different usernames because you specify the corresponding OnTime login for each user as outlined in section 10.2.2. Custom 01 – This should contain the Client ID value from the OnTime API Key screen Custom 02 – 04 – This should contain the three segments of the OnTime Client Secret that you obtained from the OnTime API Key Screen. Custom 05 – this is not currently used by the OnTime data-sync plug-in and can be left blank. 10.2. Configuring the Data Mapping Next, you need to configure the data mapping between SpiraTeam and OnTime. This allows the various projects, users, releases, incident statuses, priorities, severities and custom property values used in the two applications to be related to each other. This is important, as without a correct mapping, there is no way for the integration service to know that an “Open” incident in SpiraTeam is the same as an “Open” defect in OnTime (for example). The following mapping information needs to be setup in SpiraTeam: The mapping of the project identifiers for the projects that need to be synchronized The mapping of users in the system The mapping of releases in the system The mapping of the various standard fields in the system The mapping of the various custom properties in the system Each of these is explained in turn below: 10.2.1. Configuring the Project Mapping From the data synchronization administration page, you need to click on the “View Project Mappings” hyperlink next to the OnTime plug-in name. This will take you to the data-mapping home page for the currently selected project: © Copyright 2006-2015, Inflectra Corporation Page 131 of 168 This document contains Inflectra proprietary information If the project name does not match the name of the project you want to configure the data-mapping for, click on the “(Change Project)” hyperlink to change the current project. To enable this project for data-synchronization with OnTime, you need to enter: External Key – This should be set to the name of the project token in OnTime: If you have a sub-project, you need to include both the parent and sub-project names separated by a forward slash (/), e.g. MyProject/SubProject1. Active Flag – Set this to ‘Yes’ so that SpiraTeam knows that you want to synchronize data for this project. Once the project has been completed, setting the value to “No” will stop data synchronization, reducing network utilization. Click [Update] to confirm these settings. Once you have enabled the project for data-synchronization, you can now enter the other data mapping values outlined below. Note: Once you have successfully configured the project, when creating a new project, you should choose the option to “Create Project from Existing Project” rather than “Use Default Template” so that all the project mappings get copied across to the new project. 10.2.2. Configuring the User Mapping (This section can be skipped if you enabled the ‘AutoMap Users’ option earlier). To configure the mapping of users in the two systems, you need to go to Administration > Users > View Edit Users, which will bring up the list of users in the system. Then click on the “Edit” button for a particular user that will be editing defects in OnTime: © Copyright 2006-2015, Inflectra Corporation Page 132 of 168 This document contains Inflectra proprietary information You will notice that in the Data Mapping tab for the user is a list of all the configured data-synchronization plug-ins. In the text box next to the OnTime Data-Sync plug-in you need to enter the Login Name for this username in OnTime. This will allow the data-synchronization plug-in to know which user in SpiraTeam match which equivalent user in OnTime. Click [Update] once you’ve entered the appropriate login name. You should now repeat for the other users who will be active in both systems. 10.2.3. Configuring the Release Mapping When the data-synchronization service runs, when it comes across a release/iteration in SpiraTeam that it has not seen before, it will create a corresponding Release in OnTime. Similarly if it comes across a new Release in OnTime that it has not seen before, it will create a new Release in SpiraTeam. Therefore when using both systems together, it is recommended that you only enter new Releases in one system and let the data-synchronization service add them to the other system. To see this mapping, inside SpiraTeam, navigate to Planning > Releases and click on the Release/Iteration in question. Make sure you have the ‘Overview’ tab visible and expand the “Details” section of the release/iteration: In addition to the standard fields and custom properties configured for Releases, you will see an additional text property called “OnTimeDataSync ID” that is used to store the mapped external identifier for the equivalent Version in OnTime. 10.2.4. Configuring the Standard Field Mapping Now that the projects, user and releases have been mapped correctly, we need to configure the standard incident fields. To do this, go to Administration > System > Data Synchronization and click on the “View Project Mappings” for the OnTimeDataSync plug-in entry: © Copyright 2006-2015, Inflectra Corporation Page 133 of 168 This document contains Inflectra proprietary information From this screen, you need to click on Priority, Severity and Status in turn to configure their values (OnTime doesn’t support different defect types): a) Incident Status Click on the “Status” hyperlink under Incident Standard Fields to bring up the Incident status mapping configuration screen: The table lists each of the incident statuses available in SpiraTeam and provides you with the ability to enter the matching OnTime defect status names for each one. You can map multiple SpiraTeam fields to the same OnTime fields (e.g. New and Open in SpiraTeam are both equivalent to Open in OnTime), in which case only one of the two values can be listed as Primary = Yes as that’s the value that’s used on the reverse synchronization (from OnTime > SpiraTeam). We recommend that you always point the New and Open statuses inside SpiraTeam to point to the “Open” status inside OnTime and make Open in SpiraTeam the Primary status of the two. This is recommended so that as new incidents in SpiraTeam get synched over to OnTime, they will get switched to the Open status in OnTime which will then be synched back to “Open” in SpiraTeam. That way you’ll be able to see at a glance which incidents have been synched with OnTime and those that haven’t. Note: The OnTime external key needs to exactly match the display name of the status inside OnTime. If you change the name of a status in OnTime, you’ll need to update the value in the data-mapping configuration as well. b) Incident Priority Click on the “Priority” hyperlink under Incident Standard Fields to bring up the Incident Priority mapping configuration screen: © Copyright 2006-2015, Inflectra Corporation Page 134 of 168 This document contains Inflectra proprietary information The table lists each of the incident priorities available in SpiraTeam and provides you with the ability to enter the matching OnTime priority name for each one. You can map multiple SpiraTeam fields to the same OnTime fields, in which case only one of the two values can be listed as Primary = Yes as that’s the value that’s used on the reverse synchronization (from OnTime > SpiraTeam). Note: The OnTime external key needs to exactly match the display name of the priority inside OnTime. If you change the name of a priority in OnTime, you’ll need to update the value in the data-mapping configuration as well. c) Incident Severity Click on the “Severity” hyperlink under Incident Standard Fields to bring up the Incident severity mapping configuration screen: The table lists each of the incident severities available in SpiraTeam and provides you with the ability to enter the matching OnTime severity name for each one. You can map multiple SpiraTeam fields to the same OnTime fields, in which case only one of the two values can be listed as Primary = Yes as that’s the value that’s used on the reverse synchronization (from OnTime > SpiraTeam). Note: The OnTime external key needs to exactly match the display name of the severity inside OnTime. If you change the name of a severity in OnTime, you’ll need to update the value in the data-mapping configuration as well. 10.2.5. Configuring the Custom Property Mapping Now that the various SpiraTeam standard fields have been mapped correctly, we need to configure the custom property mappings. This is used for both custom properties in SpiraTeam that map to custom © Copyright 2006-2015, Inflectra Corporation Page 135 of 168 This document contains Inflectra proprietary information fields in OnTime and also for custom properties in SpiraTeam that are used to map to standard fields in OnTime (currently only Replication Procedures) that don’t exist in SpiraTeam. From the View/Edit Project Data Mapping screen, you need to click on the name of the Incident Custom Property that you want to add data-mapping information for. We will consider the three different types of mapping that you might want to enter: a) Scalar Custom Properties This refers to custom properties that have a simple user-entered value and don’t need to have their specific options mapped between SpiraTeam and OnTime. All of the custom property types except List and Multi-List fall into this category (e.g. Text, Date, User, Boolean, Decimal, Integer, etc.) Click on the hyperlink of the text custom property under Incident Custom Properties to bring up the custom property mapping configuration screen. For text custom properties there will be no values listed in the lower half of the screen. You need to lookup the display name of the custom field in OnTime that matches this custom property in SpiraTeam. Once you have entered the id of the custom field, click [Update]. b) List Custom Properties Click on the hyperlink of the list custom property under Incident Custom Properties to bring up the custom property mapping configuration screen. For list custom properties there will be a textbox for both the custom field itself and a mapping table for each of the custom property values that need to be mapped: © Copyright 2006-2015, Inflectra Corporation Page 136 of 168 This document contains Inflectra proprietary information First you need to lookup the display name of the custom field in OnTime that matches this custom property in SpiraTeam. This should be entered in the ‘External Key’ field below the name of the custom property. Next for each of the Property Values in the table (in the lower half of the page) you need to enter the full name of the custom field value as specified in OnTime. Once you have updated the various mapping sections, you are now ready to start the service. © Copyright 2006-2015, Inflectra Corporation Page 137 of 168 This document contains Inflectra proprietary information 10.3. Enabling the Data-Synchronization 10.3.1. Starting the Service When SpiraTeam is installed, a Windows Service – SpiraTeam Data Sync Service – is installed along with the web application. However to avoid wasting system resources, this service is initially set to run manually. To ensure continued synchronization of SpiraTeam with OnTime, we recommend starting the service and setting its startup-type to Automatic. To make these changes, open up the Windows Control Panel, click on the “Administrative Tools” link, and then choose the Services option. This will bring up the Windows Service control panel: Click on the ‘SpiraTeam Data Sync Service’ entry and click on the link to start the service. Then right-click the service entry and choose the option to set the startup type to ‘Automatic’. This will ensure that synchronization continues between SpiraTeam and OnTime after a reboot of the server. 10.3.2. Using SpiraTeam with OnTime Now that the integration service has been configured and the service started, initially any incidents created in SpiraTeam for the specified projects will be imported into OnTime and vice versa. At this point we recommend opening the Windows Event Viewer and choosing the Application Log. In this log any error messages raised by the SpiraTeam Data Sync Service will be displayed. If you see any error messages at this point, we recommend immediately stopping the SpiraTeam service and checking the various mapping entries. If you cannot see any defects with the mapping information, we recommend sending a copy of the event log message(s) to Inflectra customer services ([email protected]) who will help you troubleshoot the problem. To use SpiraTeam with OnTime on an ongoing basis, we recommend the following general processes be followed: When running tests in SpiraTeam, defects found should be logged through the ‘Add Incident’ option as normal. Developers can log new defects into either SpiraTeam or OnTime. In either case they will get loaded into the other system. Once created in one of the systems and successfully replicated to the other system, the incident should not be modified again inside SpiraTeam At this point, the incident should not be acted upon inside SpiraTeam, and all data changes to the defect should be made inside OnTime. To enforce this, you can modify the workflows set up in SpiraTeam so that the various fields are marked as inactive for all the incident statuses other than © Copyright 2006-2015, Inflectra Corporation Page 138 of 168 This document contains Inflectra proprietary information the “New” status. This will allow someone to submit an incident in SpiraTeam, but will prevent them making changes in conflict with OnTime after that point. As the defect progresses through the OnTime workflow, changes to the status, priority, severity, and resolution will be updated automatically in SpiraTeam. In essence, SpiraTeam acts as a read-only viewer of these incidents. You are now able to perform test coverage and incident reporting inside SpiraTeam using the test cases managed by SpiraTeam and the incidents managed on behalf of SpiraTeam inside OnTime. © Copyright 2006-2015, Inflectra Corporation Page 139 of 168 This document contains Inflectra proprietary information 11. Using SpiraTeam with Redmine This section outlines how to use SpiraTeam in conjunction with the open-source Redmine bug-tracking and project management system. The built-in integration service allows the quality assurance team to manage their requirements and test cases in SpiraTeam, execute test runs in SpiraTeam, and then have the new incidents generated during the run be automatically loaded into Redmine. Once the incidents are loaded into Redmine as issues, the development team can then manage the lifecycle of these issues in Redmine, and have the status changes in Redmine be reflected back in SpiraTeam. In addition, any issues logged directly into Redmine will get imported into SpiraTeam so that they can be linked to test cases and requirements. 11.1. Configuring the Integration Service This section outlines how to configure the integration service to export incidents into Redmine and pick up subsequent status changes made in Redmine and have them update SpiraTeam. It assumes that you already have a working installation of SpiraTest, SpiraPlan or SpiraTeam (hereafter referred to generically as SpiraTeam) v4.0 or later and a working installation of Redmine v2.0 or later. If you have an earlier version of SpiraTeam, you will need to upgrade to at least v4.0 before trying to integrate with Redmine. The steps that need to be performed to configure integration with Redmine are as follows: Download the latest Redmine Data-Sync plug-in for SpiraTeam from our website Setup the plug-in in SpiraTeam to point to the correct instance of Redmine Configure the data field mappings between SpiraTeam and Redmine Start the service and verify data transfer 11.1.1. Download the Redmine Plug-In Go to the Inflectra website and open up the page that lists the various downloads available for SpiraTeam (http://www.inflectra.com/SpiraTeam/Downloads.aspx). Listed on this page will be the Redmine Plug-In for SpiraTeam. Right-click on this link and save the Zip compressed folder to the hard-drive of the server where SpiraTeam is installed. Open up the compressed folder and extract the RedmineDataSync.dll file and place it in the C:\Program Files\SpiraTeam\Bin folder (it may be SpiraTest or SpiraPlan depending on which product you’re running). This folder should already contain the DataSyncService.exe and DataSyncService.exe.config files that are the primary files used for managing the data synchronization between SpiraTeam and other systems. If you do not have an on-premise installation of SpiraTeam, but instead are using a hosted subscription provided by Inflectra (or a third party company) you will not have access to the DataSyncService background service. In such situations, you should use the Desktop DataSync application instead. This application is described in Appendix 1 and can be used instead of the server-based DataSyncService. 11.1.2. Configuring the Service To configure the integration service, please open up the DataSyncService.exe.config file located in C:\Program Files\SpiraTeam\Bin with a text editor such as Notepad. Once open, it should look like: <?xml version="1.0" encoding="utf-8"?> <configuration> <configSections> <sectionGroup name="applicationSettings" type="System.Configuration.ApplicationSettingsGroup, System, Version=2.0.0.0, Culture=neutral, PublicKeyToken=b77a5c561934e089" > © Copyright 2006-2015, Inflectra Corporation Page 140 of 168 This document contains Inflectra proprietary information <section name="Inflectra.SpiraTest.DataSyncService.Properties.Settings" type="System.Configuration.ClientSettingsSection, System, Version=2.0.0.0, Culture=neutral, PublicKeyToken=b77a5c561934e089" requirePermission="false" /> </sectionGroup> </configSections> <applicationSettings> <Inflectra.SpiraTest.DataSyncService.Properties.Settings> <setting name="PollingInterval" serializeAs="String"> <value>600000</value> </setting> <setting name="WebServiceUrl" serializeAs="String"> <value>http://localhost/SpiraTeam</value> </setting> <setting name="Login" serializeAs="String"> <value>fredbloggs</value> </setting> <setting name="Password" serializeAs="String"> <value>fredbloggs</value> </setting> <setting name="EventLogSource" serializeAs="String"> <value>SpiraTeam Data Sync Service</value> </setting> <setting name="TraceLogging" serializeAs="String"> <value>False</value> </setting> </Inflectra.SpiraTest.DataSyncService.Properties.Settings> </applicationSettings> </configuration> The sections that need to be verified and possibly changed are marked in yellow above. You need to check the following information: The polling interval allows you to specify how frequently the data-synchronization service will ask SpiraTeam and the external system for new data updates. The value is specified in milliseconds and we recommend a value no smaller than 5 minutes (i.e. 300,000ms). The larger the number, the longer it will take for data to be synchronized, but the lower the network and server overhead. The base URL to your instance SpiraTeam. It is typically of the form http://<server name>/SpiraTeam. Make sure that when you enter this URL on a browser on the server itself, the application login page appears. A valid login name and password to your instance of SpiraTeam. This user needs to be a member of the project(s) that will be synchronized with Redmine and needs to have at least Incident create/modify/view permissions and Release create/modify/view permissions in these projects. The default “Manager” role would be an appropriate choice. Once you have made these changes, save the file and proceed to the next stage. 11.1.3. Configuring the Plug-In The next step is to configure the plug-in within SpiraTeam so that the system knows how to access the Redmine server. To start the configuration, please open up SpiraTeam in a web browser, log in using a valid account that has System-Administration level privileges and click on the System > Data Synchronization administration option from the left-hand navigation: © Copyright 2006-2015, Inflectra Corporation Page 141 of 168 This document contains Inflectra proprietary information This screen lists all the plug-ins already configured in the system. Depending on whether you chose the option to include sample data in your installation or not, you will see either an empty screen or a list of sample data-synchronization plug-ins. If you already see an entry for RedmineDataSync you should click on its “Edit” link. If you don’t see such an entry in the list, please click on the [Add] button instead. In either case you will be taken to the following screen where you can enter or modify the Redmine Data-Synchronization plug-in: You need to fill out the following fields for the Redmine Plug-in to operate correctly: Name – this needs to be set to RedmineDataSync. This needs to match the name of the plug-in DLL assembly that was copied into the C:\Program Files\SpiraTeam\Bin folder (minus the .dll file extension). If you renamed the RedmineDataSync.dll file for any reason, then you need to change the name here to match. Description – this should be set to a description of the plug-in. This is an optional field that is used for documentation purposes and is not actually used by the system. © Copyright 2006-2015, Inflectra Corporation Page 142 of 168 This document contains Inflectra proprietary information Connection Info – this should be the base URL of the Redmine installation. As an example, for the public demo installation of Redmine, it would be: http://demo.redmine.org Login – this should be set to a valid login to the Redmine installation – the login needs to have permissions to create and view bugs and versions within Redmine. Password – this should be set to the password of the login specified above. Time Offset – normally this should be set to zero, but if you find that issues being changed in Redmine are not being updated in SpiraTeam, try increasing the value as this will tell the datasynchronization plug-in to add on the time offset (in hours) when comparing date-time stamps. Also if your Redmine installation is running on a server set to a different time-zone, then you should add in the number of hours difference between the servers’ time-zones here. Auto-Map Users – This changes the way that the plugin maps users in SpiraTeam to those in Redmine: Auto-Map = True With this setting, all users in SpiraTeam need to have the same username as those in Redmine. If this is the case then you do not need to perform the user-mapping task outlined in section 11.2.2. This is a big time-saver if you can guarantee that all usernames are the same in both systems. Auto-Map = False With this setting, users in SpiraTeam and Redmine are free to have different usernames because you specify the corresponding Redmine name for each user as outlined in section 11.2.2. Custom 01 – 05 – these are not currently used by the Redmine data-sync plug-in and can be left blank. 11.2. Configuring the Data Mapping Next, you need to configure the data mapping between SpiraTeam and Redmine. This allows the various projects, users, releases, incident types, statuses, priorities and custom property values used in the two applications to be related to each other. This is important, as without a correct mapping, there is no way for the integration service to know that an “Duplicate” incident in SpiraTeam is the same as a “Rejected” bug in Redmine (for example). The following mapping information needs to be setup in SpiraTeam: The mapping of the project identifiers for the projects that need to be synchronized The mapping of users in the system The mapping of releases (equivalent to Redmine versions) in the system The mapping of the various standard fields in the system The mapping of the various custom properties in the system Each of these is explained in turn below: 11.2.1. Configuring the Project Mapping From the data synchronization administration page, you need to click on the “View Project Mappings” hyperlink next to the Redmine plug-in name. This will take you to the data-mapping home page for the currently selected project: © Copyright 2006-2015, Inflectra Corporation Page 143 of 168 This document contains Inflectra proprietary information If the project name does not match the name of the project you want to configure the data-mapping for, click on the “(Change Project)” hyperlink to change the current project. To enable this project for data-synchronization with Redmine, you need to enter: External Key – This should be set to the name of the equivalent project in Redmine. Active Flag – Set this to ‘Yes’ so that SpiraTeam knows that you want to synchronize data for this project. Once the project has been completed, setting the value to “No” will stop data synchronization, reducing network utilization. Click [Update] to confirm these settings. Once you have enabled the project for data-synchronization, you can now enter the other data mapping values outlined below. Note: Once you have successfully configured the project, when creating a new project, you should choose the option to “Create Project from Existing Project” rather than “Use Default Template” so that all the project mappings get copied across to the new project. 11.2.2. Configuring the User Mapping To configure the mapping of users in the two systems, you need to go to Administration > Users > View Edit Users, which will bring up the list of users in the system. Then click on the “Edit” button for a particular user that will be editing issues in Redmine: © Copyright 2006-2015, Inflectra Corporation Page 144 of 168 This document contains Inflectra proprietary information You will notice that in the special Data Mapping tab for the user is a list of all the configured datasynchronization plug-ins. In the text box next to the Redmine Data-Sync plug-in you need to enter the numeric ID for this user in Redmine. This will allow the data-synchronization plug-in to know which user in Redmine matches this SpiraTeam user. Click [Update] once you’ve entered the appropriate ID value. You should now repeat for the other users who will be active in both systems. 11.2.3. Configuring the Release Mapping Now that the projects and users have been mapped correctly, we need to configure the mapping between Releases/Iterations in SpiraTeam and Versions in Redmine. To do this, please navigate to Planning > Releases and click on the Release/Iteration in question. Make sure you have the ‘Overview’ tab visible and expand the “Details” section of the release/iteration: In addition to the standard fields and custom properties configured for Releases, you will see an additional text property called “RedmineDataSync ID” that is used to store the mapped external identifier for the equivalent Version in Redmine. You need to enter the numeric ID of the equivalent version in Redmine, enter it into this text-box and click [Save]. You should now repeat for all the other releases and iterations in the project. © Copyright 2006-2015, Inflectra Corporation Page 145 of 168 This document contains Inflectra proprietary information In addition, any Versions that have already been created in Redmine will be automatically imported into SpiraTeam if they do not already exist in SpiraTeam and they have not already been mapped. 11.2.4. Configuring the Standard Field Mapping Now that the projects, user and releases have been mapped correctly, we need to configure the standard incident fields. To do this, go to Administration > System > Data Synchronization and click on the “View Project Mappings” for the RedmineDataSync plug-in entry: From this screen, you need to click on Priority, Type and Status in turn to configure their values: a) Incident Status Click on the “Status” hyperlink under Incident Standard Fields to bring up the Incident status mapping configuration screen: © Copyright 2006-2015, Inflectra Corporation Page 146 of 168 This document contains Inflectra proprietary information The table lists each of the incident statuses available in SpiraTeam and provides you with the ability to enter the matching Redmine bug status ID for each one. You can map multiple SpiraTeam fields to the same Redmine fields (e.g. Open and Assigned in SpiraTeam are both equivalent to “In Progress” (ID=2) in Redmine), in which case only one of the two values can be listed as Primary = Yes as that’s the value that’s used on the reverse synchronization (from Redmine > SpiraTeam). b) Incident Priority Click on the “Priority” hyperlink under Incident Standard Fields to bring up the Incident Priority mapping configuration screen: The table lists each of the incident priorities available in SpiraTeam and provides you with the ability to enter the matching Redmine priority ID for each one. You can map multiple SpiraTeam fields to the same Redmine fields, in which case only one of the two values can be listed as Primary = Yes as that’s the value that’s used on the reverse synchronization (from Redmine > SpiraTeam). c) Incident Type Incident types in SpiraTeam are equivalent to Trackers in Redmine. Click on the “Type” hyperlink under Incident Standard Fields to bring up the Incident type mapping configuration screen: © Copyright 2006-2015, Inflectra Corporation Page 147 of 168 This document contains Inflectra proprietary information The table lists each of the incident types available in SpiraTeam and provides you with the ability to enter the matching Redmine Tracker ID for each one. You can map multiple SpiraTeam fields to the same Redmine tracker values, in which case only one of the two values can be listed as Primary = Yes as that’s the value that’s used on the reverse synchronization (from Redmine > SpiraTeam). 11.2.5. Configuring the Custom Property Mapping Now that the various SpiraTeam standard fields have been mapped correctly, we need to configure the custom property mappings. This is used for custom properties in SpiraTeam that map to custom fields in Redmine. You will need to first make sure that the custom properties and associated custom lists have been created in both systems: From the View/Edit Project Data Mapping screen, you need to click on the name of the Incident Custom Property that you want to add data-mapping information for: © Copyright 2006-2015, Inflectra Corporation Page 148 of 168 This document contains Inflectra proprietary information We will consider the two different types of mapping that you might want to enter. a) Scalar Custom Properties This refers to custom properties that have a simple user-entered value and don’t need to have their specific options mapped between SpiraTeam and Redmine. All of the custom property types except List and Multi-List fall into this category (e.g. Text, Date, Boolean, Decimal, Integer, etc.) Click on the hyperlink of the scalar custom property under Incident Custom Properties to bring up the custom property mapping configuration screen. For scalar custom properties there will be no values listed in the lower half of the screen. You need to enter the ID of the custom field in Redmine that matches this custom property in SpiraTeam. Once you have entered the id of the custom field, click [Update]. b) List Custom Properties This refers to custom properties that are either of type List or Multi-List. Click on the hyperlink of the list custom property under Incident Custom Properties to bring up the custom property mapping configuration screen. For list custom properties there will be a textbox for both the custom field itself and a mapping table for each of the custom property values that need to be mapped: © Copyright 2006-2015, Inflectra Corporation Page 149 of 168 This document contains Inflectra proprietary information First you need to find the ID of the custom field in Redmine that matches this custom property in SpiraTeam. This should be entered in the ‘External Key’ field below the name of the custom property. Next for each of the Property Values in the table (in the lower half of the page) you need to enter the full name (not the id this time) of the custom field value as specified in Redmine. Once you have updated the various mapping sections, you are now ready to start the service. 11.3. Enabling the Data-Synchronization 11.3.1. Starting the Service When SpiraTeam is installed, a Windows Service – SpiraTeam Data Sync Service – is installed along with the web application. However to avoid wasting system resources, this service is initially set to run manually. To ensure continued synchronization of SpiraTeam with Redmine, we recommend starting the service and setting its startup-type to Automatic. To make these changes, open up the Windows Control Panel, click on the “Administrative Tools” link, and then choose the Services option. This will bring up the Windows Service control panel: Click on the ‘SpiraTeam Data Sync Service’ entry and click on the link to start the service. Then right-click the service entry and choose the option to set the startup type to ‘Automatic’. This will ensure that synchronization continues between SpiraTeam and Redmine after a reboot of the server. © Copyright 2006-2015, Inflectra Corporation Page 150 of 168 This document contains Inflectra proprietary information 11.3.2. Using SpiraTest with Redmine Now that the integration service has been configured and the service started, initially any incidents created in SpiraTeam for the specified projects will be imported into Redmine. At this point we recommend opening the Windows Event Viewer and choosing the Application Log. In this log any error messages raised by the Data Synchronization service will be displayed. If you see any error messages at this point, we recommend immediately stopping the service and checking the various mapping entries. If you cannot see any issues with the mapping information, we recommend sending a copy of the event log message(s) to Inflectra customer services ([email protected]) who will help you troubleshoot the problem. To use SpiraTeam with Redmine on an ongoing basis, we recommend the following general processes be followed: When running tests in SpiraTeam, defects found should be logged through the Test Execution Wizard as normal. Developers can log new defects into either SpiraTeam or Redmine. In either case they will get loaded into the other system. Once created in one of the systems and successfully replicated to the other system, the incident should not be modified again inside SpiraTeam All data changes to the issue should be made inside Redmine. To enforce this, you can modify the workflows set up in SpiraTeam so that the various fields are marked as inactive for all the incident statuses other than the “New” status. This will allow someone to submit an incident in SpiraTeam, but will prevent them making changes in conflict with Redmine after that point. As the issue progresses through the Redmine workflow, changes to the status, priority, tracker, and target version will be updated automatically in SpiraTeam, and any notes added will be added to SpiraTeam as new comments. In essence, SpiraTeam acts as a read-only viewer of these incidents. You are now able to perform test coverage and incident reporting inside SpiraTeam using the test cases managed by SpiraTeam and the incidents managed on behalf of SpiraTeam inside Redmine. © Copyright 2006-2015, Inflectra Corporation Page 151 of 168 This document contains Inflectra proprietary information 12. Using Spira with OnTime 11 This section outlines how to use SpiraTest, SpiraPlan or SpiraTeam (hereafter referred to as SpiraTeam) in conjunction with the OnTime 11+ defect tracking system from AxoSoft. The built-in integration service allows the quality assurance team to manage their requirements and test cases in SpiraTeam, execute test runs in SpiraTest, and then have the new incidents generated during the run be automatically loaded into OnTime. Once the incidents are loaded into OnTime as defects, the development team can then manage the lifecycle of these defects in OnTime, and have the status changes in OnTime be reflected back in SpiraTeam. Note: This section refers to integrating with the older SOAP API that was available in AxoSoft OnTime 11 (2010). This API was removed from AxoSoft OnTime in 2012 and we recommend you use the AxoSoft OnTime 14 Plugin instead that is described in section 10 above if you are using OnTime 14 or later. 12.1. Configuring the Integration Service This section outlines how to configure the integration service to export incidents into OnTime and pick up subsequent status changes in OnTime and have them update SpiraTeam. It assumes that you already have a working installation of SpiraTest, SpiraPlan or SpiraTeam v2.3 or later and a working installation of OnTime 2010 or later. If you have an earlier version of SpiraTeam, you will need to upgrade to at least v2.3 before trying to integrate with OnTime. The steps that need to be performed to configure integration with OnTime are as follows: Install and configure the OnTime SDK if you have not already done so Download the OnTime11 Data-Sync plug-in for SpiraTeam from our website Setup the plug-in in SpiraTeam to point to the correct instance of OnTime Configure the data field mappings between SpiraTeam and OnTime Start the service and verify data transfer 12.1.1. Install and Configure the OnTime SDK The API for accessing OnTime remotely is a separate download from the main OnTime application, and should be downloaded and installed from AxoSoft’s website onto your OnTime server. It typically adds a separate IIS virtual directory (e.g. http://servername/OnTimeSdk) to the existing OnTime virtual directory (e.g. http://servername/OnTime). Please make sure you have both virtual directories listed in IIS before continuing. Once you have installed the OnTime SDK, you need to navigate to the location that it was installed (typically C:\inetpub\wwwroot\OnTimeSdk) and open up the Web.Config file in Notepad and locate the “appSettings” part of the file: <appSettings> <add key="ConnectionString" value="server=SERVER;database=OnTime;uid=USER;pwd=PASSWORD;"/> <add key="SecurityToken" value="{66ACD352-16C0-4485-8498-8C461BE7CE44}"/> <add key="WebServicesUser" value="1"/> <add key="EnableDataCache" value="False"/> </appSettings> You need to make sure that you fill out the ConnectionString that points to the Microsoft SQL Server database that OnTime is connecting to. Also for the SecurityToken field you need to generate a new © Copyright 2006-2015, Inflectra Corporation Page 152 of 168 This document contains Inflectra proprietary information GUID and add it to the file. This security token will be used by SpiraTeam when it connects to the OnTime API. Once you have made the necessary changes, save the file. 12.1.2. Download the OnTime Plug-In Go to the Inflectra website and open up the page that lists the various downloads available for SpiraTeam (http://www.inflectra.com/SpiraTeam/Downloads.aspx). Listed on this page will be the OnTime11 Plug-In for SpiraTeam. Right-click on this link and save the Zip compressed folder to the hard-drive of the server where SpiraTeam is installed. Open up the compressed folder and extract the OnTimeDataSync.dll file and place it in the C:\Program Files\SpiraTeam\Bin folder (it may be SpiraTest or SpiraPlan depending on which product you’re running). This folder should already contain the DataSyncService.exe and DataSyncService.exe.config files that are the primary files used for managing the data synchronization between SpiraTeam and other systems. If you do not have an on-premise installation of SpiraTeam, but instead are using a hosted subscription provided by Inflectra (or a third party company) you will not have access to the DataSyncService background service. In such situations, you should use the Desktop DataSync application instead. This application is described in Appendix 1 and can be used instead of the server-based DataSyncService. 12.1.3. Configuring the Service To configure the integration service, please open up the DataSyncService.exe.config file located in C:\Program Files\SpiraTeam\Bin with a text editor such as Notepad. Once open, it should look like: <?xml version="1.0" encoding="utf-8"?> <configuration> <configSections> <sectionGroup name="applicationSettings" type="System.Configuration.ApplicationSettingsGroup, System, Version=2.0.0.0, Culture=neutral, PublicKeyToken=b77a5c561934e089" > <section name="Inflectra.SpiraTest.DataSyncService.Properties.Settings" type="System.Configuration.ClientSettingsSection, System, Version=2.0.0.0, Culture=neutral, PublicKeyToken=b77a5c561934e089" requirePermission="false" /> </sectionGroup> </configSections> <applicationSettings> <Inflectra.SpiraTest.DataSyncService.Properties.Settings> <setting name="PollingInterval" serializeAs="String"> <value>600000</value> </setting> <setting name="WebServiceUrl" serializeAs="String"> <value>http://localhost/SpiraTeam</value> </setting> <setting name="Login" serializeAs="String"> <value>fredbloggs</value> </setting> <setting name="Password" serializeAs="String"> <value>fredbloggs</value> </setting> <setting name="EventLogSource" serializeAs="String"> <value>SpiraTeam Data Sync Service</value> </setting> <setting name="TraceLogging" serializeAs="String"> <value>False</value> </setting> </Inflectra.SpiraTest.DataSyncService.Properties.Settings> </applicationSettings> </configuration> The sections that need to be verified and possibly changed are marked in yellow above. You need to check the following information: © Copyright 2006-2015, Inflectra Corporation Page 153 of 168 This document contains Inflectra proprietary information The polling interval allows you to specify how frequently the data-synchronization service will ask SpiraTeam and the external system for new data updates. The value is specified in milliseconds and we recommend a value no smaller than 5 minutes (i.e. 300,000ms). The larger the number, the longer it will take for data to be synchronized, but the lower the network and server overhead. The base URL to your instance SpiraTeam. It is typically of the form http://<server name>/SpiraTeam. Make sure that when you enter this URL on a browser on the server itself, the application login page appears. A valid login name and password to your instance of SpiraTeam. This user needs to be a member of the project(s) that will be synchronized with OnTime and needs to have at least Incident create/modify/view permissions and Release create/modify/view permissions in these projects. Once you have made these changes, save the file and proceed to the next stage. 12.1.4. Configuring the Plug-In The next step is to configure the plug-in within SpiraTeam so that the system knows how to access the OnTime server. To start the configuration, please open up SpiraTeam in a web browser, log in using a valid account that has System-Administration level privileges and click on the System > Data Synchronization administration option from the left-hand navigation: This screen lists all the plug-ins already configured in the system. Depending on whether you chose the option to include sample data in your installation or not, you will see either an empty screen or a list of sample data-synchronization plug-ins. If you already see an entry for OnTimeDataSync you should click on its “Edit” link. If you don’t see such an entry in the list, please click on the [Add] button instead. In either case you will be taken to the following screen where you can enter or modify the OnTime Data-Synchronization plug-in: © Copyright 2006-2015, Inflectra Corporation Page 154 of 168 This document contains Inflectra proprietary information You need to fill out the following fields for the OnTime Plug-in to operate correctly: Name – this needs to be set to OnTimeDataSync. This needs to match the name of the plug-in DLL assembly that was copied into the C:\Program Files\SpiraTeam\Bin folder (minus the .dll file extension). If you renamed the OnTimeDataSync.dll file for any reason, then you need to change the name here to match. Description – this should be set to a description of the plug-in. This is an optional field that is used for documentation purposes and is not actually used by the system. Connection Info – this should the full URL to the OnTime SDK. This is typically something like: http://<OnTime server name>/OnTimeSdk. You may need to check in the IIS Management Console of the OnTime server to verify the virtual directory name. Login – this should be set to the GUID that you specified in the Web.Config file in step 2.1.1 above. Password – this should be left blank as it’s not used by the OnTime data-sync plug-in. Time Offset – normally this should be set to zero, but if you find that defects being changed in OnTime are not being updated in SpiraTeam, try increasing the value as this will tell the datasynchronization plug-in to add on the time offset (in hours) when comparing date-time stamps. Also if your OnTime installation is running on a server set to a different time-zone, then you should add in the number of hours difference between the servers’ time-zones here. Auto-Map Users – this is not currently used by the OnTime data-sync plug-in and can be ignored. Custom 01 – 05 – these are not currently used by the OnTime data-sync plug-in and can be left blank. 12.2. Configuring the Data Mapping Next, you need to configure the data mapping between SpiraTeam and OnTime. This allows the various projects, users, releases, incident statuses, priorities, severities and custom property values used in the two applications to be related to each other. This is important, as without a correct mapping, there is no © Copyright 2006-2015, Inflectra Corporation Page 155 of 168 This document contains Inflectra proprietary information way for the integration service to know that an “Open” incident in SpiraTeam is the same as an “Open” defect in OnTime (for example). The following mapping information needs to be setup in SpiraTeam: The mapping of the project identifiers for the projects that need to be synchronized The mapping of users in the system The mapping of releases in the system The mapping of the various standard fields in the system The mapping of the various custom properties in the system Each of these is explained in turn below: 12.2.1. Configuring the Project Mapping From the data synchronization administration page, you need to click on the “View Project Mappings” hyperlink next to the OnTime plug-in name. This will take you to the data-mapping home page for the currently selected project: If the project name does not match the name of the project you want to configure the data-mapping for, click on the “(Change Project)” hyperlink to change the current project. To enable this project for data-synchronization with OnTime, you need to enter: External Key – This should be set to the numeric ID of the project token in OnTime. You can find this in OnTime by selecting the project in the project explorer inside OnTime and then clicking the Edit icon. This brings up the project details screen: © Copyright 2006-2015, Inflectra Corporation Page 156 of 168 This document contains Inflectra proprietary information The ID of the project is the value listed in the browser URL directly after the “ProjectId=” text. In the example above, the project ID would be 3. Active Flag – Set this to ‘Yes’ so that SpiraTeam knows that you want to synchronize data for this project. Once the project has been completed, setting the value to “No” will stop data synchronization, reducing network utilization. Click [Update] to confirm these settings. Once you have enabled the project for data-synchronization, you can now enter the other data mapping values outlined below. Note: Once you have successfully configured the project, when creating a new project, you should choose the option to “Create Project from Existing Project” rather than “Use Default Template” so that all the project mappings get copied across to the new project. 12.2.2. Configuring the User Mapping To configure the mapping of users in the two systems, you need to go to Administration > Users > View Edit Users, which will bring up the list of users in the system. Then click on the “Edit” button for a particular user that will be editing defects in OnTime: You will notice that below the Active flag for the user is a list of all the configured data-synchronization plug-ins. In the text box next to the OnTime Data-Sync plug-in you need to enter the Login ID for this username in OnTime. This will allow the data-synchronization plug-in to know which user in SpiraTeam © Copyright 2006-2015, Inflectra Corporation Page 157 of 168 This document contains Inflectra proprietary information match which equivalent user in OnTime. Click [Update] once you’ve entered the appropriate login name. You should now repeat for the other users who will be active in both systems. 12.2.3. Configuring the Release Mapping When the data-synchronization service runs, when it comes across a release/iteration in SpiraTeam that it has not seen before, it will create a corresponding Release in OnTime. Similarly if it comes across a new Release in OnTime that it has not seen before, it will create a new Release in SpiraTeam. Therefore when using both systems together, it is recommended that you only enter new Releases in one system and let the data-synchronization service add them to the other system. However you may start out with the situation where you already have pre-existing Releases in both systems that you need to associate in the data-mapping. If you don’t do this, you may find that duplicates get created when you first enable the data-synchronization service. Therefore for any Releases/Iterations that already exist in BOTH systems please navigate to Planning > Releases and click on the Release/Iteration in question. Make sure you have the ‘Overview’ tab visible and expand the “Details” section of the release/iteration: In addition to the standard fields and custom properties configured for Releases, you will see an additional text property called “OnTimeDataSync ID” that is used to store the mapped external identifier for the equivalent Version in OnTime. You need to locate the ID of the equivalent version in OnTime, enter it into this text-box and click [Save]. You should now repeat for all the other pre-existing releases. Note: The OnTime ID can be found by looking at the URL inside OnTime when choosing to Edit the release in question. The URL will include the section: ReleaseId=X where X is the numeric ID of the version inside OnTime: © Copyright 2006-2015, Inflectra Corporation Page 158 of 168 This document contains Inflectra proprietary information 12.2.4. Configuring the Standard Field Mapping Now that the projects, user and releases have been mapped correctly, we need to configure the standard incident fields. To do this, go to Administration > System > Data Synchronization and click on the “View Project Mappings” for the OnTimeDataSync plug-in entry: From this screen, you need to click on Priority, Severity and Status in turn to configure their values (OnTime doesn’t support different defect types): a) Incident Status Click on the “Status” hyperlink under Incident Standard Fields to bring up the Incident status mapping configuration screen: The table lists each of the incident statuses available in SpiraTeam and provides you with the ability to enter the matching OnTime defect status names for each one. You can map multiple SpiraTeam fields to the same OnTime fields (e.g. New and Open in SpiraTeam are both equivalent to Open in OnTime), in which case only one of the two values can be listed as Primary = Yes as that’s the value that’s used on the reverse synchronization (from OnTime > SpiraTeam). © Copyright 2006-2015, Inflectra Corporation Page 159 of 168 This document contains Inflectra proprietary information We recommend that you always point the New and Open statuses inside SpiraTeam to point to the “Open” status inside OnTime and make Open in SpiraTeam the Primary status of the two. This is recommended so that as new incidents in SpiraTeam get synched over to OnTime, they will get switched to the Open status in OnTime which will then be synched back to “Open” in SpiraTeam. That way you’ll be able to see at a glance which incidents have been synched with OnTime and those that haven’t. Note: The OnTime external key needs to exactly match the display name of the status inside OnTime. If you change the name of a status in OnTime, you’ll need to update the value in the data-mapping configuration as well. b) Incident Priority Click on the “Priority” hyperlink under Incident Standard Fields to bring up the Incident Priority mapping configuration screen: The table lists each of the incident priorities available in SpiraTeam and provides you with the ability to enter the matching OnTime priority name for each one. You can map multiple SpiraTeam fields to the same OnTime fields, in which case only one of the two values can be listed as Primary = Yes as that’s the value that’s used on the reverse synchronization (from OnTime > SpiraTeam). Note: The OnTime external key needs to exactly match the display name of the priority inside OnTime. If you change the name of a priority in OnTime, you’ll need to update the value in the data-mapping configuration as well. c) Incident Severity Click on the “Severity” hyperlink under Incident Standard Fields to bring up the Incident severity mapping configuration screen: The table lists each of the incident severities available in SpiraTeam and provides you with the ability to enter the matching OnTime severity name for each one. You can map multiple SpiraTeam fields to the same OnTime fields, in which case only one of the two values can be listed as Primary = Yes as that’s the value that’s used on the reverse synchronization (from OnTime > SpiraTeam). © Copyright 2006-2015, Inflectra Corporation Page 160 of 168 This document contains Inflectra proprietary information Note: The OnTime external key needs to exactly match the display name of the severity inside OnTime. If you change the name of a severity in OnTime, you’ll need to update the value in the data-mapping configuration as well. 12.2.5. Configuring the Custom Property Mapping Now that the various SpiraTeam standard fields have been mapped correctly, we need to configure the custom property mappings. This is used for both custom properties in SpiraTeam that map to custom fields in OnTime and also for custom properties in SpiraTeam that are used to map to standard fields in OnTime (currently only Replication Procedures) that don’t exist in SpiraTeam. From the View/Edit Project Data Mapping screen, you need to click on the name of the Incident Custom Property that you want to add data-mapping information for. We will consider the three different types of mapping that you might want to enter: a) Text Custom Properties Click on the hyperlink of the text custom property under Incident Custom Properties to bring up the custom property mapping configuration screen. For text custom properties there will be no values listed in the lower half of the screen. © Copyright 2006-2015, Inflectra Corporation Page 161 of 168 This document contains Inflectra proprietary information You need to lookup the display name of the custom field in OnTime that matches this custom property in SpiraTeam. Once you have entered the id of the custom field, click [Update]. b) List Custom Properties Click on the hyperlink of the list custom property under Incident Custom Properties to bring up the custom property mapping configuration screen. For list custom properties there will be a textbox for both the custom field itself and a mapping table for each of the custom property values that need to be mapped: First you need to lookup the display name of the custom field in OnTime that matches this custom property in SpiraTeam. This should be entered in the ‘External Key’ field below the name of the custom property. Next for each of the Property Values in the table (in the lower half of the page) you need to enter the full name of the custom field value as specified in OnTime. c) OnTime’s Replication Procedures Field If you want new defects in OnTime to be loaded with the “replication prodcedures” standard text field populated, then you will need to fill out this section. You first need to create an incident custom property in SpiraTeam of type ‘TEXT’ that will be used to store the environment description within SpiraTeam. Then click on the hyperlink of this new list custom property under Incident Custom Properties to bring up the custom property mapping configuration screen: © Copyright 2006-2015, Inflectra Corporation Page 162 of 168 This document contains Inflectra proprietary information All you need to do on this screen is enter the word “ReplicationProcedures” in the External Key textbox and the data-sync plug-in will know that this custom property is mapped to the built-in Replication Procedures field in OnTime. Note that there is no space between the words Replication and Procedures!! Once you have updated the various mapping sections, you are now ready to start the service. 12.3. Enabling the Data-Synchronization 12.3.1. Starting the Service When SpiraTeam is installed, a Windows Service – SpiraTeam Data Sync Service – is installed along with the web application. However to avoid wasting system resources, this service is initially set to run manually. To ensure continued synchronization of SpiraTeam with OnTime, we recommend starting the service and setting its startup-type to Automatic. To make these changes, open up the Windows Control Panel, click on the “Administrative Tools” link, and then choose the Services option. This will bring up the Windows Service control panel: Click on the ‘SpiraTeam Data Sync Service’ entry and click on the link to start the service. Then right-click the service entry and choose the option to set the startup type to ‘Automatic’. This will ensure that synchronization continues between SpiraTeam and OnTime after a reboot of the server. 12.3.2. Using SpiraTeam with OnTime Now that the integration service has been configured and the service started, initially any incidents created in SpiraTeam for the specified projects will be imported into OnTime. At this point we recommend opening the Windows Event Viewer and choosing the Application Log. In this log any error messages raised by the SpiraTeam Data Sync Service will be displayed. If you see any error messages at this point, we recommend immediately stopping the SpiraTeam service and checking the various mapping entries. If you cannot see any defects with the mapping information, we recommend sending a copy of the event log message(s) to Inflectra customer services ([email protected]) who will help you troubleshoot the problem. To use SpiraTeam with OnTime on an ongoing basis, we recommend the following general processes be followed: When running tests in SpiraTeam, defects found should be logged through the ‘Add Incident’ option as normal. Once an incident has been created during the running of the test, it will now be populated across into OnTime as a defect. It will be populated with the information captured in SpiraTeam. © Copyright 2006-2015, Inflectra Corporation Page 163 of 168 This document contains Inflectra proprietary information At this point, the incident should not be acted upon inside SpiraTeam, and all data changes to the defect should be made inside OnTime. To enforce this, you can modify the workflows set up in SpiraTeam so that the various fields are marked as inactive for all the incident statuses other than the “New” status. This will allow someone to submit an incident in SpiraTeam, but will prevent them making changes in conflict with OnTime after that point. As the defect progresses through the OnTime workflow, changes to the status, priority, severity, and resolution will be updated automatically in SpiraTeam. In essence, SpiraTeam acts as a read-only viewer of these incidents. You are now able to perform test coverage and incident reporting inside SpiraTeam using the test cases managed by SpiraTeam and the incidents managed on behalf of SpiraTeam inside OnTime. © Copyright 2006-2015, Inflectra Corporation Page 164 of 168 This document contains Inflectra proprietary information Appendix 1 – Desktop Data Sync Overview The Desktop Data Synchronization utility (hereafter referred to as the “Desktop DataSync”) is a standalone utility than can be used to run the various Data Synchronization PlugIns without a server installation of SpiraTest, SpiraPlan or SpiraTeam (hereafter Spira). This is useful where you have the Spira instance hosted externally and do not have access to the server. Installation To obtain the Desktop DataSync, go to the Inflectra website and under the “Downloads and Add-Ons” section you will find a Windows Installation (MSI) package that will install the Desktop DataSync onto your computer. Next you need to download the appropriate plug-in(s) for the various bug-trackers (as described in the appropriate section of this document) and place the assemblies (DLL files) into the same folder that contains the DesktopDataSync.exe application. Usage Once you have downloaded and installed the application and appropriate plug-ins, go to Start > Programs > Inflectra > Desktop DataSync to launch the application. This will bring up the main options window of the application: You should then enter the URL, login and password to your Spira installation and click [Test]. Assuming that this information is correct, you will see a confirmation message: © Copyright 2006-2015, Inflectra Corporation Page 165 of 168 This document contains Inflectra proprietary information Now you should complete the configuation by setting the Polling Interval (how often the utility will synchronize data between Spira and the external system) and whether Trace Logging is enabled (useful when verifying your data mapping, but will fill up the application log, so leave unchecked for production use). Then click the [Update] button to save your settings or [Start] to save your settings and start synchronization immediately. Once the Options window closes, the application will remain active in the system tray of your computer: You can then use the right-click context menu to start synchronization, stop synchronization, view the status (if synchronization is running) or exit the application altogether. During synchronization, any errors will be logged to the Windows Application Event Log and you can use those logs to diagnose any issues connecting to the external bug-tracker or any data mapping configuration changes that need to be made. © Copyright 2006-2015, Inflectra Corporation Page 166 of 168 This document contains Inflectra proprietary information Legal Notices This publication is provided as is without warranty of any kind, either express or implied, including, but not limited to, the implied warranties of merchantability, fitness for a particular purpose, or non-infringement. This publication could include technical inaccuracies or typographical errors. Changes are periodically added to the information contained herein; these changes will be incorporated in new editions of the publication. Inflectra Corporation may make improvements and/or changes in the product(s) and/or program(s) and/or service(s) described in this publication at any time. The sections in this guide that discuss internet web security are provided as suggestions and guidelines. Internet security is constantly evolving field, and our suggestions are no substitute for an up-to-date understanding of the vulnerabilities inherent in deploying internet or web applications, and Inflectra cannot be held liable for any losses due to breaches of security, compromise of data or other cyber-attacks that may result from following our recommendations. SpiraTest®, SpiraPlan®, SpiraTeam® and Inflectra® are registered trademarks of Inflectra Corporation in ® ® ® ® the United States of America and other countries. Microsoft , Windows , Explorer and Microsoft Project are registered trademarks of Microsoft Corporation. All other trademarks and product names are property of their respective holders. Please send comments and questions to: Technical Publications Inflectra Corporation 8121 Georgia Ave, Suite 504 Silver Spring, MD 20910-4957 U.S.A. [email protected] © Copyright 2006-2015, Inflectra Corporation Page 167 of 168 This document contains Inflectra proprietary information