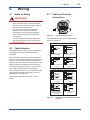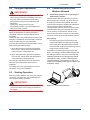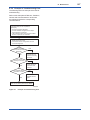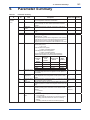
1
User’s Manual YTA510 Temperature Transmitter IM 01C50E01-01EN IM 01C50E01-01EN Yokogawa Electric Corporation 5th Edition i YTA510 Temperature Transmitter IM 01C50E01-01EN 5th Edition Contents 1. 2. Introduction................................................................................................ 1-1 1.1 Safe Use of This Product ................................................................................. 1-1 1.2 Radio Wave......................................................................................................... 1-2 1.3 Warranty.............................................................................................................. 1-3 1.4 ATEX Documentation........................................................................................ 1-4 Notes on Handling..................................................................................... 2-1 2.1 Check the Model Name and configuration...................................................... 2-1 2.2 Transport............................................................................................................. 2-1 2.3 Storage................................................................................................................ 2-1 2.4 Choosing the Installation Location . ............................................................... 2-2 2.5 Use of a Transceiver.......................................................................................... 2-2 2.6 Insulation Resistance Test and Withstand Voltage Test............................... 2-3 2.7 Installation of an Explosion-Protected Instrument........................................ 2-3 2.7.1 FM Approval........................................................................................ 2-4 2.7.2 CSA Certification................................................................................. 2-4 2.7.3 ATEX Certification............................................................................... 2-5 2.7.4 IECEx Certification.............................................................................. 2-7 2.8 EMC Conformity Standards.............................................................................. 2-8 2.9 Low Voltage Directive........................................................................................ 2-8 2.10 Regulatory Compliance for Radio and Telecommunication......................... 2-8 2.11 Radio and Telecommunications Terminal Equipment Directive (R&TTE).. 2-8 2.12 FCC compliance................................................................................................. 2-8 2.13 Industry Canada (IC) compliance..................................................................... 2-9 3. Part Names and Functions....................................................................... 3-1 4. Installation.................................................................................................. 4-1 5. 4.1 Precautions ....................................................................................................... 4-1 4.2 Mounting ............................................................................................................ 4-1 4.3 Changing the Direction of Integral Indicator ................................................. 4-2 4.4 Changing the Direction of the Antenna........................................................... 4-3 Wiring.......................................................................................................... 5-1 5.1 Notes on Wiring.................................................................................................. 5-1 5.2 Cable Selection.................................................................................................. 5-1 5.3 Cable and Terminal Connections..................................................................... 5-1 5th Edition: Aug. 2012 (YK) All Rights Reserved, Copyright © 2010, Yokogawa Electric Corporation IM 01C50E01-01EN ii 5.4 Wiring Cautions................................................................................................. 5-2 5.5 Mounting Antenna and Wiring.......................................................................... 5-2 5.5.1 Mounting the Antenna......................................................................... 5-2 5.5.2 Mounting External Antenna and Wiring Antenna Extension Cable.... 5-3 5.5.2.1 Mounting of External Antenna............................................................. 5-3 5.5.2.2 Wiring of Antenna Extension Cable.................................................... 5-4 5.5.2.3 Mounting of Arrester and Wiring......................................................... 5-5 5.6 6. 7. Grounding........................................................................................................... 5-5 Operation.................................................................................................... 6-1 6.1 Preparation for Starting Operation.................................................................. 6-1 6.2 Zero-gain Adjustment........................................................................................ 6-2 6.3 Starting Operation............................................................................................. 6-2 6.4 Connecting to the Field Wireless Network...................................................... 6-2 6.5 Shutting Down the Transmitter........................................................................ 6-4 Setting Parameters.................................................................................... 7-1 7.1 Environment for parameter setting.................................................................. 7-1 7.2 Preparing Software............................................................................................ 7-1 7.3 7.4 7.2.1 Softwares for the Field Wireless Configuration Tool and the Device Configuration Tool............................................................................... 7-1 7.2.2 Software Download............................................................................. 7-1 Setting Parameters............................................................................................ 7-2 7.3.1 Parameter Usage and Selection......................................................... 7-2 7.3.2 Function Block and Menu Tree........................................................... 7-3 7.3.3 Parameters for Wireless Communication......................................... 7-11 7.3.4 Tag and Device Information.............................................................. 7-12 7.3.5 Setup the Integral Indicator............................................................... 7-12 7.3.6 Power Saving Mode Setting............................................................. 7-12 7.3.7 Unit.................................................................................................... 7-12 7.3.8 Measurement Range........................................................................ 7-12 7.3.9 Input Sensor...................................................................................... 7-13 7.3.10 Assignment to AI Object.................................................................... 7-14 7.3.11 Burnout Setting................................................................................. 7-14 7.3.12 Write Protect..................................................................................... 7-14 7.3.13 Input Calibration................................................................................ 7-15 7.3.14 Switching to the Deep Sleep Mode................................................... 7-16 7.3.15 Switching to the Silence Mode.......................................................... 7-16 Self-Diagnostics............................................................................................... 7-17 7.4.1 Identify Problems by Using the Communicator................................ 7-17 7.4.2 Alert Report....................................................................................... 7-18 7.4.3 Checking with Integral Indicator........................................................ 7-19 IM 01C50E01-01EN iii 8. Maintenance............................................................................................... 8-1 8.1 General................................................................................................................ 8-1 8.2 Calibration Instruments Selection................................................................... 8-1 8.3 Calibration Procedure....................................................................................... 8-1 8.4 Disassembly and Assembly............................................................................. 8-2 8.5 8.4.1 Replacing the Integral Indicator.......................................................... 8-3 8.4.2 Replacing the RF Assembly................................................................ 8-3 8.4.3 Replacing the CPU Assembly............................................................. 8-4 8.4.4 Replacing the Battery Pack................................................................ 8-4 8.4.5 Replacing the Batteries....................................................................... 8-5 8.4.6 Handling Batteries............................................................................... 8-5 Troubleshooting................................................................................................. 8-6 8.5.1 Basic Troubleshooting Flow................................................................ 8-6 8.5.2 Example of Troubleshooting Flow...................................................... 8-7 8.5.3 Errors and Countermeasures............................................................. 8-8 9. Parameter Summary................................................................................. 9-1 10. General Specifications........................................................................... 10-1 10.1 General Specification...................................................................................... 10-1 10.2 Model and Suffix Codes.................................................................................. 10-4 10.3 Optional Specification..................................................................................... 10-4 10.4 Optional Specifications (For Explosion Protected type)............................. 10-5 10.5 Dimensions....................................................................................................... 10-6 Revision Information................................................................................................i IM 01C50E01-01EN 1. 1-1 <1. Introduction> Introduction Thank you for purchasing the YTA temperature transmitter. • Yokogawa assumes no responsibilities for this product except as stated in the warranty. Your YTA temperature transmitter was precisely calibrated at the factory before shipment. To ensure both safety and efficiency, please read this manual carefully before you operate the instrument. • If the customer or any third party is harmed by the use of this product, Yokogawa assumes no responsibility for any such harm owing to any defects in the product which were not predictable, or for any indirect damages. NOTE This manual covers and describes not only for the integral antenna type transmitters but also the detachable antenna ones. Unless otherwise stated, the illustrations in this manual are of the integral antenna type transmitter. Users of the detachable type and specifications should bear in mind that certain features of their instrument will differ from those shown in the illustrations of the integral antenna type. Regarding This Manual • This manual should be provided to the end user. • The contents of this manual are subject to change without prior notice. • All rights reserved. No part of this manual may be reproduced in any form without Yokogawa’s written permission. • Yokogawa makes no warranty of any kind with regard to this manual, including, but not limited to, implied warranty of merchantability and fitness for a particular purpose. • If any question arises or errors are found, or if any information is missing from this manual, please inform the nearest Yokogawa sales office. • The specifications covered by this manual are limited to those for the standard type under the specified model number break-down and do not cover custom-made instruments. • Please note that changes in the specifications, construction, or component parts of the instrument may not immediately be reflected in this manual at the time of change, provided that postponement of revisions will not cause difficulty to the user from a functional or performance standpoint. • The following safety symbols are used in this manual: WARNING Indicates a potentially hazardous situation which, if not avoided, could result in death or serious injury. CAUTION Indicates a potentially hazardous situation which, if not avoided, may result in minor or moderate injury or physical damage. It may also be used to alert against unsafe practices. IMPORTANT Indicates that operating the hardware or software in this manner may damage it or lead to system failure. NOTE Draws attention to information essential for understanding the operation and features. 1.1 Safe Use of This Product For the safety of the operator and to protect the instrument and the system, please be sure to follow this manual’s safety instructions when handling this instrument. If these instructions are not heeded, the protection provided by this instrument may be impaired. In this case, Yokogawa cannot guarantee that the instrument can be safely operated. Please pay special attention to the following points: IM 01C50E01-01EN (a) Installation • This instrument may only be installed by an engineer or technician who has an expert knowledge of this device. Operators are not allowed to carry out installation unless they meet this condition. • With high process temperatures, care must be taken not to burn yourself by touching the instrument or its casing. • All installation shall comply with local installation requirements and the local electrical code. <1. Introduction> 1.2 Radio Wave IMPORTANT - (c) Maintenance • Please carry out only the maintenance procedures described in this manual. If you require further assistance, please contact the nearest Yokogawa office. • Care should be taken to prevent the build up of dust or other materials on the display glass and the name plate. To clean these surfaces, use a soft, dry cloth. Due to the designated certification of construction type, users may be subject to legal punishment in case of: - Disassembling or modifying the wireless module or antenna in this instrument - Peeling off the certification label attached to the wireless module in this instrument - Preventing interference with other wireless stations The operating frequency bandwidth of this instrument may overlap the same range as industrial devices, scientific devices, medical devices, microwave ovens, licensed premises radio stations and non-licensed specified low-power radio stations for mobile object identification systems used in factory production lines. Before using this instrument, ensure that neither a premises radio station nor specified low power radio station for mobile object identification systems is in use nearby. If this instrument causes radio wave interference to a wireless station for mobile object identification systems, promptly change the frequency being used or turn off the source of radio wave emissions. Then, contact a Yokogawa office regarding countermeasures to prevent interference, such as setting up partitions. (d) Explosion Protected Type Instrument • Users of explosion proof instruments should refer first to section 2.7 (Installation of an Explosion Protected Instrument) of this manual. • The use of this instrument is restricted to those who have received appropriate training in the device. • Take care not to create sparks when accessing the instrument or peripheral devices in a hazardous location. This instrument is equipped with a wireless module which is designated as a certification of construction type as a wireless facility for 2.4 GHz band low-power data communication system of the Radio Act. Refer to 2.11 “Regulatory Compliance for Radio and Telecommunication” for detail. - (b) Wiring • The instrument must be installed by an engineer or technician who has an expert knowledge of this instrument. Operators are not permitted to carry out wiring unless they meet this condition. 1-2 • Repair or modification to this instrument by customer will cause malfunction of explosion protect function and hazardous situation. If you need to repair or modification, please contact the nearest Yokogawa office. (e) Modification • Yokogawa will not be liable for malfunctions or damage resulting from any modification made to this instrument by the customer. IM 01C50E01-01EN 1.3 Warranty • The warranty shall cover the period noted on the quotation presented to the purchaser at the time of purchase. Problems occurring during the warranty period shall basically be repaired free of charge. <1. Introduction> 1-3 Trademarks In this document, trademarks or registered trademarks are not marked with “™” or “®”. Product names and company names in this document are trademarks or registered trademarks of the respective companies. • If any problems are experienced with this instrument, the customer should contact the Yokogawa representative from which this instrument was purchased or the nearest Yokogawa office. • If a problem arises with this instrument, please inform us of the nature of the problem and the circumstances under which it developed, including the model specification and serial number. Any diagrams, data and other information you can include in your communication will also be helpful. • The party responsible for the cost of fixing the problem shall be determined by Yokogawa following an investigation conducted by Yokogawa. The purchaser shall bear the responsibility for repair costs, even during the warranty period, if the malfunction is due to: - Improper and/or inadequate maintenance by the purchaser. - Malfunction or damage due to a failure to handle, use, or store the instrument in accordance with the design specifications. - Use of the product in question in a location not conforming to the standards specified by Yokogawa, or due to improper maintenance of the installation location. - Failure or damage due to modification or repair by any party except Yokogawa or an approved representative of Yokogawa. - Malfunction or damage from improper relocation of the product in question after delivery. - Reason of force majeure such as fires, earthquakes, storms/floods, thunder/ lightening, or other natural disasters, or disturbances, riots, warfare, or radioactive contamination. IM 01C50E01-01EN <1. Introduction> 1-4 1.4 ATEX Documentation This is only applicable to the countries in European Union. GB DK SK CZ I LT E LV NL EST PL SF SLO P H F BG D RO S M GR IM 01C50E01-01EN 2-1 <2. Notes on Handling> 2. Notes on Handling The YTA temperature transmitter is fully factorytested upon shipment. When the YTA is delivered, check the appearance for damage, and also check that the transmitter mounting parts shown in Figure 2.1 are included with your shipment. If “No Mounting Bracket” is indicated, no transmitter mounting bracket is included. Antenna The antenna is a detachable type when Amplifier housing code 8 is selected, and no antenna is provided for Amplifier housing code 9. 2.1 Check the Model Name and configuration The model name and configuration are indicated on the nameplate. Verify that the configuration indicated in the “Model and Suffix Code” in Chapter 10 is in compliance with the specifications written on the order sheet. MODEL SUFFIX TEMPERATURE TRANSMITTER SUPPLY OUTPUT STYLE mA DC V DC CAL RNG NO. Made in Japan TOKYO 180-8750 JAPAN : Refer to USER'S MANUAL. F0202.ai Figure 2.2 Name Plate 2.2 Transport To prevent damage while in transit, leave the transmitter in the original shipping container until it reaches the installation site. Horizontal pipe mounting bracket Spring washer Transmitter fastening bolt 2.3 Storage U-bolt When an extended storage period is expected, observe the following precautions. Bracket fastening bolt Vertical pipe mounting bracket Spring washer Transmitter fastening bolt Spring washer Bracket fastening nut U-bolt 1. Choose a storage location that satisfies the following requirements. • A location that is not exposed to rain or water. • A location subject to a minimum of vibration or impact. • The following temperature and humidity range is recommended. Ordinary temperature and humidity (25°C, 65%) are preferable. Temperature: –40 to 85°C –30 to 80°C (LCD visible range) Humidity: 5 to 100% RH (at 40°C) 2. If at all possible, store the transmitter in factory-shipped condition, that is, in the original shipping container. 3. Preferably remove the batteries for storage. For maximum battery life, the storage temperature should not exceed 30°C U-bolt nut F0201.ai Figure 2.1 Transmitter Mounting Hardware IM 01C50E01-01EN NOTE When storing the instrument with a battery pack, it is recommended to put the instrument in Deep Sleep mode to conserve the batteries. For details on how to switch to Deep Sleep mode, refer to subsection 7.3.14 “Switching to the Deep Sleep Mode”. 2.4 Choosing the Installation Location Although the temperature transmitter is designed to operate in a vigorous environment, to maintain stability and accuracy, the following is recommended. 2-2 <2. Notes on Handling> Wireless Communication NOTE The installation location of this transmitter must meet the following conditions: - Adjust the direction of the antenna to be in the upright position regardless of the orientation of this transmitter. See section 4 for adjusting the antenna. - Install the transmitter at least 1.5 m above the ground or floor. - Confirm that each field wireless equipment compliant with ISA100.11a can see the antenna of other devices which locate within its own communication range. In the star topology network, the visibility to the antenna of gateway is a mandatory clause. Ambient Temperature It is preferable to not to expose the instrument to extreme temperatures or temperature fluctuations. If the instrument is exposed to radiation heat a thermal protection system and appropriate ventilation is recommended. Environmental Requirements Do not allow the instrument to be installed in a location that is exposed to corrosive atmospheric conditions. When using the instrument in a corrosive environment, ensure the location is well ventilated. The unit and its wiring should be protected from exposure to rainwater. Impact and Vibration It is recommended that the instrument be installed in a location that is subject to a minimum amount of impact and vibration. Installation of Explosion-protected Transmitters An explosion-protected transmitters is certified for installation in a hazardous area containing specific gas types. See subsection 2.7 “Installation of an Explosion-Protected Transmitters. 2.5 Use of a Transceiver 1.5m or more IMPORTANT F0203.ai - Ensure that there are no obstacles such as walls or pipes within a 30-cm radius of each antenna. Although the transmitter has been designed to resist high frequency electrical noise, if a radio transceiver is used near the transmitter or its external wiring, the transmitter may be affected by high frequency noise pickup. To test this, start out from a distance of several meters and slowly approach the transmitter with the transceiver while observing the measurement loop for noise effects. Thereafter use the transceiver outside the range where the noise effects were first observed. IM 01C50E01-01EN 2.6 Insulation Resistance Test and Withstand Voltage Test (1) Overvoltage of the test voltage that is so small that it does not cause an dielectric breakdown may in fact deteriorate insulation and lower the safety performance; to prevent this it is recommended that the amount of testing be kept to a minimum. (2) The voltage for the insulation resistance test must be 500 VDC or lower, and the voltage for the withstand voltage test must be 500 VAC (50Hz ~ 60Hz) or lower. Failure to heed these guidelines may cause faulty operation. (3) Follow the steps below to perform the test. Insulation resistance test procedure 1)Remove the battery pack. See subsection 8.4.4 for details on how to remove it. 2)Lay wiring across sensor terminals in the terminal box. 3)Turn OFF the insulation tester. Then connect the insulation tester plus (+) lead wire to the shorted battery connection terminals and the minus (-) lead wire to the grounding terminal. 4)Turn ON the insulation tester power and measure the insulation resistance. The voltage should be applied as briefly as possible to verify that the insulation resistance is at least 100 MΩ. 5)After completing the test and being very careful not to touch exposed conductors disconnect the insulation tester and connect a 100 kΩ resistor between the grounding terminal and the short-circuiting battery connection terminals. Leave this resistor connected at least one second to discharge any static potential. Do not touch the terminals while it is discharging. NOTE When storing the instrument with a battery pack, it is recommended to put the instrument in Deep Sleep mode to conserve the batteries. For details on how to switch to Deep Sleep mode, refer to subsection 7.3.14 "Switching to Deep the Sleep Mode". 2-3 <2. Notes on Handling> Withstand voltage test procedure 1)Remove the battery pack. See subsection 8.4.4 for details on how to remove it. 2)Lay wiring across sensor terminals in the terminal box. 3)Turn OFF the dielectric strength tester. Then connect the tester between the shorted battery connection terminals and the grounding terminal. Be sure to connect the grounding lead of the dielectric strength tester to the ground terminal. 4)Set the current limit on the dielectric strength tester to 10 mA, then turn ON the power and gradually increase the test voltage from ‘0’ to the specified voltage. 5)When the specified voltage is reached, hold it for one minute. 6)After completing this test, slowly decrease the voltage to avoid any voltage surges. NOTE When storing the instrument with a battery pack, it is recommended to put the instrument in Deep Sleep mode to conserve the batteries. For details on how to switch to Deep Sleep mode, refer to subsection 7.3.14 “Switching to Deep the Sleep Mode”. 2.7 Installation of an ExplosionProtected Instrument If a customer makes a repair or modification to an intrinsically safe instrument and the instrument is not restored to its original condition, its intrinsically safe construction may be compromised and the instrument may be hazardous to operate. Please contact Yokogawa before making any repair or modification to an instrument. CAUTION This instrument has been tested and certified as being intrinsically safe. Please note that severe restrictions apply to this instrument’s construction, installation, external wiring, Maintenance and repair. A failure to abide by these restrictions could make the instrument a hazard to operate. IM 01C50E01-01EN 2.7.1 FM Approval Caution for FM intrinsically safe type. (Following contents refer “DOC. No. IFM038-A20”) Note 1. Model YTA Series temperature transmitters with optional code /FS17 are applicable for use in hazardous locations. • Applicable Standard: FM3600, FM3610, FM3611, FM3810, ANSI/NEMA 250 • Intrinsically Safe for Class I, Division 1, Groups A, B, C & D. Class II, Division 1, Groups E, F & G and Class III, Division1, Class I, Zone 0 in Hazardous Locations, AEx ia IIC • Nonincendive for Class I, Division 2, Groups A, B, C & D. Class II, Division 2, Groups F & G and Class III, Division 1, Class I, Zone 2, Groups IIC, in Hazardous Locations. • Enclosure: NEMA 4X (Indoors and outdoors) • Temperature Class: T4 • Ambient temperature: –50 to 70°C Note 2. Output Parameters • Sensor Circuit ( 1 to 5 ) Voc: 6.6 V Isc: 48 mA Po: 78 mW Ca: 5 μF La: 30 mH • For the sensor input circuitry, these entity parameters must be taken into account when installed. • Installation Requirements between temperature transmitter and sensor: Voc ≤ Vsi, Isc ≤ Isi, Po ≤ Psi Ca ≥ Co + Ccable, La ≥Lo + Lcable Vsi, Isi, Psi, Co and Lo are parameters of the sensor. • Wiring for Nonincendive according to Nonincendive field wiring standard. Note 3. Installation • Installation should be in accordance with ANSI/ISA RP12.6 “Installation of Intrinsically Safe Systems for Hazardous (Classified) Locations” and the National Electric Code (ANSI/NFPA 70). • Dust-tight conduit seal must be used when installed in a Class II, III, Group E, F and G environments. • Note a warning label worded “SUBSTITUTION OF COMPONENTS MAY IMPAIR INTRINSIC SAFETY,” and “INSTALL IN ACCORDANCE WITH DOC. No. IFM038-A20”. 2-4 <2. Notes on Handling> Note 4. Maintenance and Repair • The instrument modification or parts replacement by other than authorized representative of Yokogawa Electric Corporation is prohibited and will void Factory Mutual Intrinsically safe and Nonincendive Approval. Hazardous Location 1. Sensor Input 2. 3. 4. 5. Transmitter Temperature Sensor F0204.ai Note 5. Battery Pack Use only YOKOGAWA battery pack F9915MA. Note 6. Special Conditions for safe use Potential electrostatic charging hazardsecure distance of 100mm from antenna. Do not open when CL II, III, DIV 1,2 atmosphere is present. 2.7.2 CSA Certification Caution for CSA intrinsically safe type. (Following contents refer “DOC. No. ICS031) Note 1. Model YTA Series temperature transmitters with optional code /CS17 are applicable for use in hazardous locations. Certificate: 2328785 [For CSA C22.2] • Applicable Standard: C22.2 No.0, C22.2 No.0.4, C22.2 No.25, C22.2 No.94, C22.2 No.157, C22.2 No.213, C22.2 No.61010-1 • Intrinsically Safe for Class I, Division 1, Groups A, B, C & D, Class II, Division 1, Groups E, F & G, Class III, Division 1 • Nonincendive for Class I, Division 2, Groups A, B, C&D, Class II, Division 2, Groups F&G, Class III, Division 1 • Enclosure: Type 4X, • Temp. Code: T4 • Amb. Temp.: –50 to 70°C IM 01C50E01-01EN [For CSA E60079] • Applicable Standard: CAN/CSA E60079-0, CAN/CSA E60079-11, IEC 60529 Edition 2.1: 2001-02 • Ex ia IIC T4 • Ambient Temperature: –50 to 70°C • Enclosure: IP66 and 67 Note 2. Entity Parameters • Intrinsically Safe Apparatus Parameters [Groups A, B, C, D, E, F and G] Uo = 6.6 V, Io = 48 mA, Po = 78 mW, Co = 5 μF, Lo = 30 mH • Installation Requirements between temperature transmitter and sensor: Uo ≤ Vs, Io ≤ Is, Po ≤ Ps Co ≥ Ca + Ccable, Lo ≥La + Lcable Vs, Is, Ps, Ca and La are parameters of the sensor. Note 3. Installation • Installation should be in accordance with Canadian Electrical Code Part I and Local Electrical Code. • The Hand Held Terminal must be CSA certified. • Do not alter drawing without authorization from CSA. • The instrument modification or parts replacement by other than authorized representative of Yokogawa Electric Corporation of America is prohibited and will void Canadian Standards Intrinsically safe and nonincendive Certification. Hazardous Location 2.7.3 ATEX Certification (1) Technical Data Caution for ATEX Intrinsically safe type.(Following contents refer to “Doc No. IKE038”) Note 1. Model YTA Series temperature transmitters with optional code /KS27 for potentially explosive atmospheres: • No. KEMA 10ATEX0163 X • Applicable Standard: EN 60079-0:2009, EN 60079-11:2007, EN 60079-26:2007 • Type of Protection and Marking code: Ex ia IIC T4 Ga • Group: II • Category: 1G • Ambient Temperature: –50°C to 70°C • Enclosure: IP66 and IP67 Note 2. Output Parameters • Sensor input circuit (Terminals 1 to 5 ) Uo: 6.6 V Io: 48 mA Po: 78 mW Co: 5 μF Lo: 30 mH • For the sensor input circuitry, these entity parameters must be taken into account when installed. • Installation requirements between temperature transmitter and sensor: Uo ≤ Vs, Io ≤ Is, Po ≤ Ps Co ≥ Ca + Ccable, Lo ≥La + Lcable Vs, Is, Ps, Ca and La are parameters of the sensor input. Note 3. Installation • Installation should be in accordance with local installation requirements. (Refer to the installation diagram) 1. Sensor Input 2-5 <2. Notes on Handling> 2. 3. 4. Hazardous Location 5. Transmitter Temperature Sensor F0205.ai Note 4. Battery Pack Use only YOKOGAWA battery pack F9915MA. Note 5. Special Conditions for safe use Potential electrostatic charging hazardsecure distance of 100mm from antenna. Do not open when CL II, III, DIV 1,2 atmosphere is present. 1. Sensor Input 2. 3. 4. 5. Transmitter Temperature Sensor F0206.ai IM 01C50E01-01EN Note 4. Battery Pack • Use only YOKOGAWA battery pack F9915MA. (4) Name Plate • Name Plate Note 5. Special conditions for Safe Use • In the case where the enclosure of the temperature Transmitter is made of aluminium, if it is mounted in an area where the use of category 1 G apparatus is required, it must be installed such, that, even in the event of rare incidents, ignition sources due to impact and friction sparks are excluded. • Avoid any actions that cause the generation of electrostatic charge on the non-metallic parts, such as rubbing with a dry cloth on coating face of product. CAL RNG STYLE SUPPLY OUTPUT MWP mA DC V DC NO. Made in Japan TOKYO 180-8750 JAPAN : Refer to USER'S MANUAL. F0207.ai • Tag plate for intrinsically safe type No. KEMA 10ATEX0163 X Ex ia IIC T4 Ga ENCLOSURE: IP66/IP67 Tamb.: -50 TO 70°C Sensor input circuit (Terminal 1 to 5) Uo = 6.6V, Io = 48mA, Po = 78mW, Co = 5μF, Lo = 30mH WARNING POTENTIAL ELECTROSTATIC CHARGING HAZARD - SECURE DISTANCE OF 100MM FROM ANTENNA. USE ONLY BATTERY PACK YOKOGAWA F9915MA OR F9915NS. POTENTIAL ELECTROSTATIC CHARGING HAZARD - SEE USER'S MANUAL. F0208.ai Potential electrostatic charging hazard - secure distance of 100mm from antenna. *1: WARNING Take care not to generate mechanical sparking when access to the instrument and peripheral devices in a hazardous location. TEMPERATURE TRANSMITTER MODEL SUFFIX WARNING (2) Operation 2-6 <2. Notes on Handling> MODEL: Specified model code. SUFFIX: Specified suffix code. STYLE: Style code. SUPPLY: Supply voltage. OUTPUT: Output signal. CAL RNG: Calibration range. NO.: Serial number and year of production *1. TOKYO 180-8750 JAPAN: The manufacturer name and the address *2. The first digit in the final three numbers of the serial number appearing after “NO.” on the nameplate indicates the year of production. The following is an example of a serial number for a product that was produced in 2010: 91K819857 032 ↑ The year 2010 *2: “180-8750” is a zip code which represents the following address. 2-9-32 Nakacho, Musashino-shi, Tokyo Japan (3) Maintenance and repair WARNING The instrument modification or parts replacement by other than an authorized Representative of Yokogawa Electric Corporation is prohibited and will void the certification. IM 01C50E01-01EN 2-7 <2. Notes on Handling> 2.7.4 IECEx Certification Note 4. Maintenance and Repair Caution for IECEx Intrinsically safe type. (Following contents refer to “Doc No. IKE038”) Note 1. Model YTA Series temperature transmitters with optional code /SS27 for potentially explosive atmospheres: • No. IECEx KEM 10.0073X • Applicable Standard: IEC 60079-0: 2007-10, IEC 60079-11: 2006, IEC 60079-26: 2006 • Type of Protection and Marking code: Ex ia IIC T4 Ga • Ambient Temperature: –50°C to 70°C • Enclosure: IP66 and IP67 Note 2. Output Parameters • Sensor input circuit (Terminals 1 to 5 ) Uo: 6.6 V Io: 48 mA Po: 78 mW Co: 5 μF Lo: 30 mH • For the sensor input circuitry, these entity parameters must be taken into account when installed. • Installation requirements between temperature transmitter and sensor: Uo ≤ Vs, Io ≤ Is, Po ≤ Ps Co ≥ Ca + Ccable, Lo ≥La + Lcable Vs, Is, Ps, Ca and La are parameters of the sensor input. Note 3. Installation • Installation should be in accordance with local installation requirements. (Refer to the installation diagram) WARNING The instrument modification or parts replacement by other than an authorized Representative of Yokogawa Electric Corporation is prohibited and will void IECEx Intrinsically safe Certification. Note 5. Battery Pack • Use only YOKOGAWA battery pack F9915MA. Note 6. Special conditions for Safe Use • In the case where the enclosure of the Temperature Transmitter is made of aluminium, if it is mounted in zone 0, it must be installed such, that, even in the event of rare incidents, ignition sources due to impact and friction sparks are excluded. • Avoid any actions that cause the generation of electrostatic charge such as rubbing with a dry cloth on coating face of product. WARNING • • Potential electrostatic charging hazard secure distance of 100mm from antenna. Take care not to generate mechanical sparking when access to the instrument and peripheral devices in a hazardous location. Hazardous Location 1. Sensor Input 2. 3. 4. 5. Transmitter Temperature Sensor F0209.ai IM 01C50E01-01EN 2.8 EMC Conformity Standards EN61326-1 Class A, Table 2 (For use in industrial locations), EN61326-2-3 CAUTION This instrument is a Class A product, and it is designed for use in the industrial environment. Please use this instrument in the industrial environment only. WARNING The potential for discharging static electricity should be minimized in mounting this transmitter. For example, do not generate static electricity as the surface of a battery pack or housing is rubbed with cloth. 2.9 Low Voltage Directive Applicable standard: EN61010-1 (1) Pollution Degree 2 "Pollution degree" describes the degree to which a solid, liquid, or gas which deteriorates dielectric strength or surface resistivity is adhering. " 2 " applies to normal indoor atmosphere. Normally, only non-conductive pollution occurs. Occasionally, however, temporary conductivity caused by condensation must be expected. (2) Installation Category I "Overvoltage category (Installation category)" describes a number which defines a transient overvoltage condition. It implies the regulation for impulse withstand voltage. " I " applies to electrical equipment which is supplied from the circuit when appropriate transient overvoltage control means (interfaces) are provided. 2-8 <2. Notes on Handling> 2.10 Regulatory Compliance for Radio and Telecommunication Please confirm that a installation region fulfills a standards, require additional regulatory information and approvals, contact to Yokogawa Electric Corporation. 2.11 Radio and Telecommunications Terminal Equipment Directive (R&TTE) We, Yokogawa Electric Corporation hereby declare that this equipment,model YTA510 series is in compliance with the essential requirements and other relevant provisions of Directive 1999/5/EC. The CE declaration of conformity for R&TTE for this product can be found at http://www.yokogawa.com/fld/ NOTE France restricts outdoor use to 10mW (10dBm) EIRP in the frequency range of 2,454 - 2,483.5MHz. Installation in France must configure the network with configuration tool not to use channel 10 to 14. To configure the network, refer to IM 01W01F01-01EN. 2.12 FCC compliance This device complies with Part 15 of FCCRules. Operation is subject to the following two conditions: (1) this device may not cause interference, and (2) this devicemust accept any interference, including interference that may cause undesired operation of this device. Co-located: This transmitter must not be co-located or operated in conjunction with any other antenna or transmitter. FCC WARNING: Changes or modifications not expressly approved by the party responsible for compliance could void the user’s authority to operate the equipment. IM 01C50E01-01EN <2. Notes on Handling> 2-9 NOTE This equipment has been tested and found to comply with the limits for a Class A digital device, pursuant to part 15 of he FCC Rules. These limits are designed to provide reasonable protection against harmful interference when the equipment is operated in a commercial environment. This equipment generates, uses, and can radiate radio frequency energy and, if not installed and used in accordance with the instruction manual,may cause harmful interference to radio communications. Operation of this equipment in a residential area is likely to cause harmful interference in which case the user will be required to correct the interference at his own expense. 2.13 Industry Canada (IC) compliance This Class A digital apparatus complies with Canadian ICES-003. French:Cet appareil numérique de la classe A est conforme à la norme NMB-003 du Canada. Operation is subject to the following two conditions: (1) this device may not cause interference, and (2) this device must accept any interference, including interference that may cause undesired operation of the device. IM 01C50E01-01EN 3. 3-1 <3. Component Names> Part Names and Functions Antenna (Note 4) Terminal cover Grounding terminal CPU assembly Built-in indicator display RF assembly Write protection switch Slide Lock screw switch Transmitter section Amp. cover D E WR L H BO Burnout switch Hardware write protection switch (WR) Write Protection Switch Position Burnout switch (BO) D E D E (Note1) L H L H Write Protection No (Write enabled) Yes (Note2) (Write disabled) Burnout Switch Position (Note3) Burnout D E D E L H L H HIGH LOW F0301.ai Note 1: Set the switch as shown in the figure above to set the write protection. The hardware write protection switch is set to E side (writable). Note 2: When the switch is D side (write protection setting), provisioning is acceptable. For details of provisioning, refer to section 6.4 “ Connecting to the Field Wireless Network “ Note 3: Set the switch as shown in the figure above to set the burnout. The burnout switch is set to H side (HIGH). For the integral antenna type, a burnout direction can be set by paramter setting. See subsection 7.3.11 Burnout Setting. Note 4: For Amplifier housing code 8 and 9, the antenaa is a detachable type. Figure 3.1 Component Names Table 3.1 Display Symbol Display Symbol Meaning of Display Symbol Write protect function is enabled. IM 01C50E01-01EN 4. <4. Installation> Installation 4.1 Precautions 4.2 Mounting • • • 4-1 Before installing the transmitter, read the cautionary notes in section 2.4, “Selecting the Installation Location.” For additional information on the ambient conditions allowed at the installation location, refer to subsection 10 “General Specifications.” NOTE • The mounting bracket shown in Figure 4.1 is used for the transmitter and is installed on 50A (2-inch) pipe. It can be installed either on a horizontal pipe and a vertical pipe or on a wall. To install the mounting bracket on the transmitter, torque the transmitter fastening bolt (1) to about 20 to 30 N m. To connect this transmitter to the Field Wireless Network, information for connecting to the field wireless devices needs to be set beforehand. Refer to subsection 6.4 “Connecting to the Field Wireless Network.” IMPORTANT • • When performing on-site pipe fitting work that involves welding, use care to prevent outflow of the welding current into the transmitter. Do not use the transmitter as a foothold for installation. IM 01C50E01-01EN 4-2 <4. Installation> Horizontal Pipe Mounting (When using a horizontal pipe mounting bracket) U-bolt nut Horizontal pipe mounting bracket Spring washer (When using a vertical pipe mounting bracket) Bracket fastening bolt Vertical pipe mounting bracket Spring washer Transmitter fastening bolt Transmitter fastening bolt U-bolt nut Spring washer U-bolt Vertical Pipe Mounting Bracket fastening bolt U-bolt Wall Mounting Note: Wall mounting bolts are user-supplied. F0401.ai Figure 4.1 Transmitter Mounting 4.3 Changing the Direction of Integral Indicator An integral indicator can be rotated in four positions at 90°. Follow the instructions in section 8.4.1 for removing and attaching the integral indicator. IMPORTANT Always turn OFF power, remove a transmitter to non-hazardous area before disassembling and reassmbling an indicator. IM 01C50E01-01EN <4. Installation> 4-3 4.4 Changing the Direction of the Antenna Adjust the direction of the antenna to be in the upright position. The direction of antenna is like Figure 4.2 at the factory setting. When adjust the electrical connection vertically, change the direction of the antenna. To change the installation angle, follow the procedure below. 1)Loosen the two mounting screws at the bottom of the antenna by using a 2.5 mm Allen wrench (see Figure 4.2). The screws might come off and be lost if loosened too much; loosen the screws by about three rotations. 2)Press forward and down 90 degrees by rotating the axis at the bottom of the antenna. 3)Tighten the two screws to a torque of 1.5 N·m by using a torque wrench. When doing this, be careful not leave a gap between the antenna and housing. F0402.ai Figure 4.2 Mounting Screw Position F0403.ai Figure 4.3 Adjusting Antenna Position IM 01C50E01-01EN 5. Wiring 5.1 Notes on Wiring IMPORTANT • • • • 5-1 <5. Wiring> Apply a waterproofing sealant to the threads of the connection port. (It is recommended that you use non-hardening sealant made of silicon resin for waterproofing.) Lay wiring as far away as possible from electrical noise sources such as large transformers, motors and power supplies. Remove the wiring connection dust-caps before wiring. To prevent electrical noise, the signal cable and the power cable must not be housed in the same conduit. 5.3 Cable and Terminal Connections F0501.ai Figure 5.1 Input Terminal Connections The temperature sensor is to be connected as shown in Figures 5.2. 1 input 5.2 Cable Selection A dedicated cable is used for connection between the temperature sensor and the temperature transmitter. When a thermocouple is used as the temperature sensor, a compensation wire that is appropriate for the type of thermocouple (refer to compensating cables for IEC584-3 thermocouples) must be used. When a resistance temperature sensor (RTD) is used as the temperature sensor, 2-core/3-core/4core cable must be used (refer to resistance thermometer sensor IEC751). In a place where the cable will be susceptible to the effect of noise, a shielded cable must be used. The terminal of the dedicated cable is a 4 mm screw. 1 2 3 4 5 1 2 3 4 5 (+) (–) Thermocouple and DC voltage (A) 1 2 3 4 5 (B) RTD and resistance (3-wire) (B) RTD and resistance (2-wire) 1 2 3 4 5 (B) (A) (A) (A) (B) (B) RTD and resistance (4-wire) 2 input (Amplifier housing code 8 and 9) 1 2 3 4 5 1 2 3 4 5 (+) (–) (+) Thermocouple and DC voltage 1 2 3 4 5 (+) (–) (B) (B) (A) Thermocouple + RTD and resistance (3-wire) (A1) (B1) (B1) (B2) (B2) (A2) RTD and resistance (3-wire) 1 2 3 4 5 (A1) (B1) (B2) (A2) RTD and resistance (2-wire) F0502.ai Figure 5.2 YTA510 Input Terminal Wire Connection Diagram IM 01C50E01-01EN 5.4 <5. Wiring> Wiring Cautions Use metal conduit wiring or a waterproof gland (metal wiring conduit JIS F 8801) for cable wiring. • Apply non-hardening sealant to the threads of the wiring tap and a flexible fitting for secure waterproofing. Flexible fitting Temperature sensor signal Apply a nonhardening sealant to the threads for waterproofing. Wiring conduit Tee CAUTION To maintain the ultimate conditions of radiofrequency signal, protect the connectors of antenna, extension antenna cable, and arrester from the corrosive atmosphere by the following treatment. 1. Clean the connection to be protected. 2. Wind the butyl rubber self-bonding tape around the connection. See the manual of the tape about the winding. 3. To protect the butyl rubber self-bonding tape from the environment such as ultraviolet rays and so on, wind vinyl tape (or a vinyl type self-bonding tape) on it. 5.5.1 Mounting the Antenna Drain plug F0503.ai Figure 5.3 5-2 Example of Wiring Using a Wiring Conduit 5.5 Mounting Antenna and Wiring For Amplifier housing code 8 and 9, an antenna is not attached to the transmitter. The following provides the instructions for mounting the antenna and installing the remote antenna and wiring using antenna extension cable. Screw the provided antenna into the antenna connector of the transmitter. The antenna may be sold as available accessories and supplied separately. 1.Unscrew the antenna connector cap on the antenna connector. 2.Screw the provided antenna into the antenna connector. Tighten the antenna connector with a torque of 2 to 3 N•m. IMPORTANT The antenna connector is covered with a cap at the time of delivery. Keep the cap attached until the installation of the antenna or antenna cables to protect the inside connection part. The unscrewed cap should be stored in order to replace it immediately after the antenna or antenna cables are removed. Antenna connector F0504.ai Figure 5.4 Mounting the Antenna IM 01C50E01-01EN 5-3 <5. Wiring> CAUTION When installing the antenna, screw the antenna by tightening the lower nut part. Screwing the antenna by holding the antenna body may cause failure such as cable disconnection. The same manner should be taken when unscrewing the antenna. Fixing of External Antenna Fix an external antenna appropriately using the bracket provided as the external antenna option to 50 mm (2-inch) pipe. 50 mm (2-inch) pipe Antenna Bracket Antenna body Antenna extension cable Nut part F0505.ai Figure 5.5 Antenna 50 mm (2-inch) pipe Antenna 5.5.2 Mounting External Antenna and Wiring Antenna Extension Cable U-bolt 5.5.2.1 Mounting of External Antenna Mount the external antenna at the proper location according to the wireless environment described in 2.4 Selecting the Installation Location. The mounting to the pipe such as 50 mm (2-inch) pipe needs to secure the enough strength to endure a strong wind, vibration and so on. The antenna must be mounted vertically. Nut Antenna extension cable Bracket 2 Bracket 1 Nut and washer Figure 5.6 F0506.ai Fixing the External Antenna IM 01C50E01-01EN 5-4 <5. Wiring> 5.5.2.2 Wiring of Antenna Extension Cable Mounting Procedure of External Antenna 1. Fix the bracket by U-bolt and nut to 50 mm (2inch) pipe. 2. Fix the antenna extension cable to the bracket 1 using the provided nut with a torque of 6 to 7 N∙m as shown in the Figure 5.6. Use the nut which is attached to the antenna extension cable. 3. Screw the antenna into the antenna connector of the antenna extension cable on the bracket 1. Tighten the antenna connector with a torque of 2 to 3 N∙m. 4. Protect the connection as necessary. For details of the protection, see “5.5 Mounting Antenna and Wiring.” 1. Use the provided antenna extension cable to connect the antenna connector with the external antenna. Tighten the connector of the antenna extension cable with a torque of 2 to 3 N∙m. The minimum bending radius while checking the wiring position should be more than 200 mm. 2. When using two extension cables, the provided arrester should be inserted between these cables. 3. Before the wiring work, confirm the polarities (male/female) of the connectors of antenna, extension antenna cable, and arrester. Tighten the connector of the antenna extension cable with a torque of 2 to 3 N∙m. 4. Protect the connectors of antenna, extension antenna cable, and arrester as necessary. See “6.1 Mounting Antenna and Wiring.” 5. Fix the extension antenna cable to the appropriate structure to protect the cable from the vibration, wind, and so on. The minimum bending radius for fixing in the state maintained for a long period should be more than 80 mm. Antenna Antenna extension cable 2: 10 m Antenna Protect by self-bonding tape Arrester Grounding cable Antenna extension cable 1: 3 m Protect by self-bonding tape Antenna extension cable 1: 3 m Transmitter body Transmitter body F0507.ai Figure 5.7 Wiring the Antenna Extension Cable IM 01C50E01-01EN 5-5 <5. Wiring> Antenna side CAUTION • Use the dedicated antenna extension cable provided by Yokogawa as accessories for the transmitters. • The antenna extension cable and temperature sensor cable should not be bundled together. Protect by self-bonding tape 5.5.2.3 Mounting of Arrester and Wiring Mount an arrester between the extension cables and connect the grounding cable to the grounding terminal of the arrester as required. Connect the grounding cable to the grounding terminal on the transmitter body. Class C grounding with the grounding resistance of 10 Ω or less is necessary. Do not share the ground with other devices. Antenna side Grounding cable Transmitter side Figure 5.9 F0509.ai Arrester Protection by Self-bonding Tape 5.6 Grounding When using the antenna extension cable with an arrestor, Class C grounding with the grounding resistance of 10 Ω is required. In other cases, always ground the transmitter case in accordance with national and local electrical codes. The most effective transmitter case grounding method is a direct connection to earth ground with minimal impedance. Antenna extension cable 2 Grounding cable Grounding terminals are located inside and outside of the terminal block respectively. Any of them may be used. Arrester Antenna extension cable 1 Transmitter side Figure 5.8 F0508.ai Connection of the Arrester and Antenna Extension Cable Grounding terminal F0510.ai Figure 5.10 Grounding Terminal Grounding terminal F0511.ai Figure 5.11 Grounding Terminal inside the Terminal Cover IM 01C50E01-01EN <5. Wiring> 5-6 CAUTION Grounding is required for safe operation. The temperature sensor cable sheild should be connected to grounding terminal inside of the housing. IM 01C50E01-01EN 6. 6-1 <6. Operation> Operation 6.1 Preparation for Starting Operation ■ Confirm that transmitter is operating properly by integral indicator. If the transmitter is faulty, an error code is displayed. NOTE Self-diagnostic error on the integral indicator (Faulty transmitter) It is required to set security and network information to enable the transmitter to be connected to the Field Wireless Network. For more details, refer to subsection 6.4 “Connecting to the Field Wireless Network”. 1) Checking Installation and Wiring Ensure that the transmitter is installed correctly and the temperature sensor is connected correctly according to the procedures described in section 4 “Installation”, and section 5 “Wiring”. When connecting the thermocouple, particular attention needs to be paid because the transmitter cannot detect a wrong polarity connection. 2) Insert batteries into the battery case, and install to the transmitter. To insert batteries into the battery case, be careful to polarity of batteries and battery case. For details of Installation of battery, refer to section 8.4.5 and 8.4.6. Battery case is installed in the transmitter when shipped from the factory, however, batteries are sold separately and not included. 3) Using the device configuration tool confirm that transmitter is operation properly. Check parameter values or change the setpoints as necessary. F0601.ai Figure 6.1 Integral Indicator with Error Code NOTE If any of the above errors are indicated on the display of the integral indicator or the device configuration tool, refer to subsection 8.5.3 for the corrective action. ■ Verify and Change Transmitter Parameter Setting and Values The parameters related to the following items are set at factory as specified in order. • Input sensor type • Connection of RTD • Measurement range (measurement lower/ upper limit, unit) If the transmitter is equipped with an integral indicator, its indication can be used to confirm that the transmitter is operating properly. For details on how to confirm this, refer to subsection 7.4 “Self-Diagnostics.” ISA100 devices display self-diagnostic information in an easy-to-understand manner using four categories (Check function, Maintenance required, Failure, and Off specification) according to NAMUR NE107* * NAMUR NE107 “Self-Monitoring and Diagnosis of Field Devices” IM 01C50E01-01EN 6.2 Zero-gain Adjustment IMPORTANT After performing zero-gain adjustment, do not power off the transmitter immediately. Turning off the power within 30 seconds resets the zerogain adjustment value to the value before the adjustment. Furthermore, setting the sensor type automatically resets the zero-gain adjustment value to the factory setting When the preparation for starting operation is completed, perform a zero-gain adjustment as necessary. This transmitter is fully calibrated at the factory and basically re-cablibration is not necessary; however, users can make the zero-gain adjustment. The zero-gain adjustment of this transmitter can be performed by the following steps. 1)Apply the lower limit of process temperature to the sensor. Set the lower limit temperature using the device configuration tool. 2)Apply the upper limit of process temperature to the sensor. Set the upper limit temperature using the device configuration tool. The zero-gain adjustment should be performed when the input to the temperature sensor is stabilized. For details on the zero-gain adjustment, refer to subsection 7.3.13 Input calibration. 6-2 <6. Operation> 6.4 Connecting to the Field Wireless Network ■ Preparation work prior to connecting to a field wireless network This transmitter does not need to be connected with a physical wire. Instead of physical wiring, it is necessary to set the field wireless devices to communicate with before installing the transmitter. This procedure is called a provisioning. This transmitter supports provisioning via infrared communication using a provisioning device and can be securely connected to a network. If the provisioning information is not set, the transmitter cannot be connected to the field wireless network. Provisioning: Provisioning is work to set the security and network information to enable the transmitter to be connected to the field wireless network. This transmitter supports a provisioning method using infrared communication. For details on provisioning using a provisioning device, connecting to a field wireless network and the setting procedure, refer to the User’s Manual, FieldMate Versatile Device Management Wizard (IM 01R01A01-01E), YFGW710 Field Wireless Integrated Gateway (IM 01W01F01-01EN), and YFGW410 Field Wireless Management Station (IM 01W02D01-01EN). n thi Wi 6.3 Starting Operation cm 30 Ensure that the installation, the wiring, the network connection, and the action of the transmitter are correct before starting operation. IMPORTANT Close the terminal box cover and the amplifier cover. Screw each cover in tightly until it will not turn further. F0602.ai Figure 6.2 Provisioning Example IM 01C50E01-01EN ■ Provisioning work This subsection describes provisioning work using FieldMate as the provisioning device. Provisioning work performs provisioning for each field wireless device using FieldMate and an infrared adapter. When using the Yokogawa recommended near infrared adapter for the provisioning device, the distance between the front glass of this instrument and the infrared surface of the near infrared adapter should be within 30 cm. For details on the Yokogawa recommended infrared adapter, refer to subsection 8.2 “Callibration Instruments Selection”. Perform the following provisioning tasks. • Setting provisioning information • Creating a provisioning information file 1)Setting provisioning information Set the device tag and Network ID using a FieldMate provisioning function. The device tag, Network ID, and join key are set in the field wireless device. It is not necessary to input a join key because FieldMate automatically generates it. • Setting device tag The device tag is used for the user to recognize the field wireless device. • Setting Network ID This is the Network ID for the field wireless network to which the field wireless device is connected. Set a value from 2 to 65535. The field wireless device is connected to the field wireless network corresponding to the Network ID set by provisioning work. 6-3 <6. Operation> ■ Connecting to a field wireless network The action after installing the battery pack varies depending on the silence setting. Mounting the battery pack automatically starts a search for the field wireless network and the transmitter goes into the join state when the field wireless gateway is found. If the field wireless gateway is not found and a specified time based on the silence mode has elapsed, a cycle of a 1-hour pause and 6-minute search is repeated until the transmitter can join the field wireless network. For details on the silence setting, refer to subsection 7.3.15 Switching to the Silence Mode. Mounting battery pack Boot Iinfrared communication Search failure for the specified time Pause (b) Iinfrared communication Search failure for 6 minutes Ready 1: Searching (b) Iinfrared communication Deep sleep (a) Deep sleep setting (Disconnect) (Disconnect) Operation (d) 1 hour passed Ready 2: Searching (b) (Connect) (Connect) Confirm connecting status: Join (c) (Publish) F0603.ai Figure 6.3 Wireless Status Transition 2)Creating a provisioning information file The following provisioned information is stored in the provisioning information file. • • • • • Network ID Device tag EUI64 Join key Provisioner (name of the user who performed provisioning work by FieldMate) • Date (Time and date when provisioning was performed by FieldMate) This provisioning information file is required to load from the field wireless configurator to the field wireless integrated gateway. Store the file carefully. IM 01C50E01-01EN <6. Operation> (a) Deep sleep 6-4 NOTE If the transmitter searches the Field wireless Network for long time ambient temperature condition, sometimes error "AL.20 LOWBAT" is displayed on the Integral Indicator. Even though using new batteries, it can occur. It occurs because of battery characteristics. After joining to the Field Wireless Network, this error will be cleared within one hour if battery has no failure. F0604.ai (b) Ready and pause 6.5 Shutting Down the Transmitter When shut down the transmitter, remove the battery pack or set the transmitter to deep sleep mode by the device configuration tool. NOTE F0605.ai (c) Confirm connecting status • Refer to subsection 8.4.4 “Replacing the Battery Pack” for the battery pack removing. • When storing the instrument with a battery pack inserted, it is recommended to put the instrument into deep sleep mode to conserve battery power. For details on how to switch to deep sleep mode, refer to subsection 7.3.14 “Switching to the Deep Sleep Mode." F0606.ai (d) Join F0607.ai IM 01C50E01-01EN 7. Setting Parameters This transmitter can remotely handle sensor type changes, range changes, Tag No. setup, monitoring of self-diagnostic results, according to communication with the field wireless configuration tool or the device configuration tool. 7.1 Environment for parameter setting After installing the battery pack, perform provisioning and have the instrument join the field wireless network. This transmitter supports the OOB (out-of-band) method using infrared communication. For details on how to provisioning, refer to section 6.4 “Connection to Field Wireless network” infrared port F0701.ai Figure 7.1 7-1 <7. Setting Parameters> Connecting the configuration Tool 7.2 Preparing Software 7.2.1 Softwares for the Field Wireless Configuration Tool and the Device Configuration Tool Before using the device configuration tool, confirm that CF/DD and DeviceDTM for your transmitter (wireless YTA) are installed in the device configuration tool. CF/DD and DeviceDTM are provided by DVD-ROM attached to YFGW710 Field Wireless Integrated Gateway. Refer to YFGW710 Field Wireless Integrated Gateway (IM 01W01F01-01EN) for details. CF (Capabilities File) / DD (Device Description) A CF file contains information, such as the vendor of the field device, its model and revision, available types of process data (flow rate, temperature, pressure, etc.), and number of data items. A DD file contains the information on parameters, such as data structures and attributes. DeviceDTM DeviceDTM, (Device Type Manager) is driver software for field devices provided based on the FDT (Field Device Tool) technology. The field wireless configuration tool or the device configuration tool allows confirming the device information. Refer to Subsection 8.2 “Calibration Instruments Selection” for the field wireless configuration tool or the device configuration tool of our recommendation. 7.2.2 Software Download Software download function permits to update wireless field device software via ISA100.11a wireless communication. For details, refer to YFGW710 Field Wireless Integrated Gateway (IM 01W01F01-01EN). IM 01C50E01-01EN 7.3 Setting Parameters 7.3.1 Parameter Usage and Selection Before setting a parameter, please see the following table for a summary of how and when each parameter is used. The integral antenna type is applicable only for a single sensor input which is assigned to AI1. The detachable antenna type is applicable for dual sensor input assigned to AI1/AI2 accordingly. Table 7.1 7-2 <7. Setting Parameters> IMPORTANT After setting and sending data with the field wireless configuration tool or the device configuration tool, wait 30 seconds before turning off the transmitter. If it is turned off too soon, the settings will not be stored in the transmitter. Parameter Usage and Selection Item Tag No Output mode Range Integral indicator display setting Display temperature unit setting Burnout setting Zero-gain adjustment setting Reset adjustment value Software write protect Adjustment information and memo field Operational mode Description Sets the tag No. for Device Tag (software tag). The tag No. can be set Sixteen characters (alphanumeric characters, including - and •). Allows outputting process value and self-diagnostic information via field wireless network. Either or all of temperature / voltage / resistance (AI1/AI2: Process Value), and self-diagnostic information (UAPMO: Diagnostic Status) can be set output data. Range corresponding for 0% to 100% signal is set with actual input applied. Sets the process value, bar graph to display on the LCD. Sets the temperature unit to display. Sets the output status when the input sensor has burned out. Sets the input adjustment function using two adjustment points.. Reset the trim adjustment to the factory setting. The zero-gain adjustment set by user can be returned to the factory setting. Prohibit writing the setting data. Memo field available to write the check date, checker and others (as an adjustment information ), or anything. Set the operational mode of the sensor and integral indicator, etc. NOTE Some of the parameter settings are in the dialogue form called method, the on-line instructions you can configure the parameters easily. IM 01C50E01-01EN 7-3 <7. Setting Parameters> 7.3.2 Function Block and Menu Tree (1) Function Block The function of this transmitter is shown below. A specific function might not be able to be used according to the field wireless configuration tool used. When the field wireless configuration tool of our recommendation is used, the software attached to the Field Wireless Integrated Gateway is necessary for setting the dotted line part. Refer to Subsection 8.2 “Calibration Instruments Selection” for the field wireless configuration tool of our recommendation. (a) Integral antenna type: single sensor input (Amplifier housing code 7) Online Menu • UAPMO • UDO • CO • TRANSDUCER • AI1 Temp (UAPMO) • Configuration • Diagnostics/Alerts • Power Status • Identification (Configuration) • UAP Option • Hardware Write Protect • Static Revision • Reset Energy Left • Radio Silence (Diagnostics/Alerts) • Diagnostic Status • Diagnostic Status Detail1, Diagnostic Status Detail2 • Diagnostic Switch • Diagnostic Configuration (Power Status) • Energy Left • Power Supply Status (Identification) • Version Revision • CTS Version • ITS Version • Identification Number (UDO) • APP Download (CO) • Configurationn • Others (APP Download) • DESCRIPTION • STATE • MAX_BLOCK_SIZE • LAST_BLOCK_DOWNLOADED • ERRER_CODE (Configuration) (COMM_ENDPOINT) • COMM_ENDPOINT • COMM_CONTRACT • PUB_ITEM_MAX • PUB_ITEM_NUM • PUB_ITEM • Network address of remote endpoint • Transport layer port at remote endpoint • Object ID at remote endpoint • Stale data limit • Data publication period • Ideal publication phase • PublishAutoRetransmit • Configuration status (COMM_CONTRACT) • ContractID • Contract_Status • Actual_Phase (PUB_ITEM) (Others) • REVISION • ObjectID • AttributeID • AttributeIndex • Size F0702-1.ai IM 01C50E01-01EN <7. Setting Parameters> Online Menu (Continued) (TRANSDUCER) • Block Info • Configuration /Calibration • Others 7-4 (Block Info) • Tag Description (Configuration/Calibration) • Model • Serial Number • Burn Out • Wireless Status • Display Selection • LCD Mode • YTA Option (Other) • Special Cmd (AI1 Temp) (Block Info) • Block Info • Block Mode • Dynamic Variables • Configuration • Others •Tag Description (Block Mode) • Mode.Target • Mode.Actual • Mode.Permitted • Mode.Normal (Dynamic Variables) • Process Value • Simulation • Reference Junction Temp (Process Value) • Process Value.Status • Process Value.Value ** (Simulation) • Simulate Switch • Transducer Value • Simulate Value (Configuration) • Block Mode • Concentrator OID • Scale * • Process Value Filter Time • Lin Type* • Sensor Connection * • Bias * • Selection of Reference Junction * • External Reference Junction Value * • Process Value Type* (Others) • Sensor Serial Number • Sensor Range * • Cal Point Lo/Hi * • Cal Point Clear * • Reference Junction Unit * (Transducer Value) • Transducer Value.Status • Transducer Value.Value (Simulate Value) • Simulate Value.Status • Simulate Value.Value (Block Mode) • Mode.Target • Mode.Actual • Mode.Permitted • Mode.Normal (Scale) • Scale.EU at 100% * • Scale.EU at 0% * • Scale.Units Index * • Scale.Decimal * (Sensor Range) • Sensor Range.EU at 100% • Sensor Range.EU at 0% • Sensor Range.Units Index * • Sensor Range.Decimal * F0702-2.ai *: **: When the data of these parameters is rewritten, it is necessary to set the operational mode of the block to O/S (Out of Service). When the data of these parameters is rewritten, it is necessary to set the operational mode of the block to Manual. IM 01C50E01-01EN 7-5 <7. Setting Parameters> (b) Detachable antenna type: dual sensor input (Amplifier housing code 8 and 9) Online Menu • UAPMO • UDO • CO • TRANSDUCER • AI1/AI2 Temp (UAPMO) • Configuration • Diagnostics • Alerts • Power Status • Identification (Configuration) • UAP Option • Hardware Write Protect • Static Revision • Reset Energy Left • Radio Silence • Energy Harvest Type (Diagnostics) • Diagnostic Status • Diagnostic Status Detail.1 • Diagnostic Status Detail.2 • Diagnostic Switch • Diagnostic Configuration (Alerts) • Other Faults Alert • Faults Non-compliance Alert • Faults Process Influence Alert • Simulation Active Alert • Soft Update Incomplete Alert • Power Low Alert • Power Critical Low Alert • Fault Prediction Alert • Environmental Conditions Alert • Outside Sensor Limits Alert • Out of Service Alert • Calibration Problem Alert • Faults Sensor or Actuator Alert • Faults Electronics Alert (Power Status) • Energy Left • Power Supply Status • Power Supply Voltage (Identification) • Version Revision • CTS Version • ITS Version • Identification Number (UDO) • APP Download (CO) • Configurationn • Others (APP Download) • DESCRIPTION • STATE • MAX_BLOCK_SIZE • LAST_BLOCK_DOWNLOADED • ERRER_CODE (Configuration) (COMM_ENDPOINT) • COMM_ENDPOINT • COMM_CONTRACT • PUB_ITEM_MAX • PUB_ITEM_NUM • PUB_ITEM • Network address of remote endpoint • Transport layer port at remote endpoint • Object ID at remote endpoint • Stale data limit • Data publication period • Ideal publication phase • PublishAutoRetransmit • Configuration status (COMM_CONTRACT) • ContractID • Contract_Status • Actual_Phase (PUB_ITEM) (Others) • REVISION • ObjectID • AttributeID • AttributeIndex • Size F0702-3.ai IM 01C50E01-01EN 7-6 <7. Setting Parameters> Online Menu (Continued) (TRANSDUCER) • Block Info • Configuration /Calibration • Others (Block Info) • Tag Description (Configuration/Calibration) • Model • Serial Number • Hardware Burn Out Switch • Wireless Status • Display Selection • LCD Mode • LCD Intermittent Time • YTA Option • Power Saving Mode • Measurement Rate (Other) • Special Cmd (AI1/AI2 Temp) (Block Info) • Block Info • Block Mode • Dynamic Variables • Configuration • Others •Tag Description (Block Mode) • Mode.Target • Mode.Actual • Mode.Permitted • Mode.Normal (Dynamic Variables) • Process Value • Simulation • Reference Junction Temp (Process Value) • Process Value.Status • Process Value.Value ** (Simulation) • Simulate Switch • Transducer Value • Simulate Value (Configuration) • Block Mode • Concentrator OID • Scale * • Process Value Filter Time • Lin Type* • Sensor Connection * • Bias * • Selection of Reference Junction * • External Reference Junction Value * • Process Value Type * • Burn Out Type * (Others) • Sensor Serial Number • Sensor Range * • Cal Point Lo/Hi * • Cal Point Clear * • Reference Junction Unit * (Transducer Value) • Transducer Value.Status • Transducer Value.Value (Simulate Value) • Simulate Value.Status • Simulate Value.Value (Block Mode) • Mode.Target • Mode.Actual • Mode.Permitted • Mode.Normal (Scale) • Scale.EU at 100% * • Scale.EU at 0% * • Scale.Units Index * • Scale.Decimal * (Sensor Range) • Sensor Range.EU at 100% • Sensor Range.EU at 0% • Sensor Range.Units Index * • Sensor Range.Decimal * F0702-4.ai *: **: When the data of these parameters is rewritten, it is necessary to set the operational mode of the block to O/S (Out of Service). When the data of these parameters is rewritten, it is necessary to set the operational mode of the block to Manual. IM 01C50E01-01EN 7-7 <7. Setting Parameters> (2) Menu Tree The menu tree of the device configuration tool of our recommendation is shown below. Refer to Subsection 8.2 “Calibration Instruments Selection” for the device configuration tool of our recommendation. (a) Integral antenna type: single sensor input (Amplifier housing code 7) Online Menu • Device Configuration • Diagnostic • Process Variable (Device Configuration) (UAPMO) • UAPMO • TRANSDUCER • AI1 Temp • Configure/Setup (Configuration) • UAP Option • Hardware Write Protect • Static Revision • Reset Energy Left • Radio Silence (Identification) • Version Revision • CTS Version • ITS Version • Identification Number (TRANSDUCER) • Configure/Setup (Block Info) • Tag Description (Configuration/Calibration) • Model • Serial Number • Burn Out • Wireless Status • Display Selection • LCD Mode • YTA Option (Other) • Special Cmd (AI1 Temp) • Configure/Setup (Block Info) • Tag Description (Block Mode) • Mode.Target • Mode.Actual • Mode.Permitted • Mode.Normal (Configuration) (Block Mode) • Block Mode • Mode.Target • Concentrator OID • Mode.Actual • Scale * • Mode.Permitted • Process Value Filter Time • Mode.Normal • Lin Type* • Sensor Connection * (Scale) • Bias * • Scale.EU at 100% * • Selection of Reference Junction * • Scale.EU at 0% * • External Reference Junction • Scale.Units Index * Value * • Scale.Decimal * • Process Value Type * (Others) • Sensor Serial Number • Sensor Range * • Cal Point Lo/Hi * • Cal Point Clear* • Reference Junction Unit * (Sensor Range) • Sensor Range.EU at 100% • Sensor Range.EU at 0% • Sensor Range.Units Index * • Sensor Range.Decimal * F0703-1.ai *: When the data of these parameters is rewritten, it is necessary to set the operational mode of the block to O/S (Out of Service). IM 01C50E01-01EN 7-8 <7. Setting Parameters> Online Menu (Continued) (Diagnostic) • UAPMO (UAPMO) • Device Diagnostics (Diagnostics/Alerts) • Diagnostic Status • Diagnostic Status Detail1, Diagnostic Status Detail2 • Diagnostic Switch • Diagnostic Configuration (Power Status) • Energy Left • Power Supply Status (Process Variable) (AI1 Temp) • AI1 Temp • Process Variable (Dynamic Variables) (Process Value) • Process Value • Simulation • Reference Junction Temp • Process Value.Status • Process Value.Value ** (Simulation) • Simulate Switch • Transducer Value • Simulate Value (Transducer Value) • Transducer Value Status • Transducer Value Value (Simulate Value) • Simulate Value. Status • Simulate Value. Value F0703-2.ai **: When the data of these parameters is rewritten, it is necessary to set the operational mode of the block to Manual. IM 01C50E01-01EN <7. Setting Parameters> 7-9 (b) Detachable antenna type: dual sensor input (Amplifier housing code 8 and 9) Menu (Online) • Device Configuration • Diagnostic • Process Variable (Device Configuration) (UAPMO) • UAPMO • TRANSDUCER • AI1/AI2 Temp • Configure/Setup (Configuration) • UAP Option • Hardware Write Protect • Static Revision • Reset Energy Left • Radio Silence • Energy Harvest Type (Identification) • Version Revision • CTS Version • ITS Version • Identification Number (Alerts) • Other Faults Alert • Faults Non-compliance Alert • Faults Process Influence Alert • Simulation Active Alert • Soft Update Incomplete Alert • Power Low Alert • Power Critical Low Alert • Fault Prediction Alert • Environmental Conditions Alert • Outside Sensor Limits Alert • Out of Service Alert • Calibration Problem Alert • Faults Sensor or Actuator Alert • Faults Electronics Alert (TRANSDUCER) • Configure/Setup (Block Info) • Tag Description (Configuration/Calibration) • Model • Serial Number • Hardware Burn Out Switch • Wireless Status • Display Selection • LCD Mode • LCD Intermittent Time • YTA Option • Power Saving Mode • Measurement Rate (Others) • Special Cmd F0703-3.ai IM 01C50E01-01EN 7-10 <7. Setting Parameters> Online Menu (Continued) (AI1/AI2 Temp) • Configure/Setup (Block Info) • Tag Description (Block Mode) • Mode.Target • Mode.Actual • Mode.Permitted • Mode.Normal (Configuration) (Block Mode) • Block Mode • Mode.Target • Concentrator OID • Mode.Actual • Scale * • Mode.Permitted • Process Value Filter Time • Mode.Normal • Lin Type* • Sensor Connection * (Scale) • Bias * • Selection of Reference Junction * • Scale.EU at 100% * • External Reference Junction Value * • Scale.EU at 0% * • Process Value Type * • Scale.Units Index * • Burn Out Type * • Scale.Decimal * (Others) • Sensor Serial Number • Sensor Range * • Cal Point Lo/Hi * • Cal Point Clear * • Reference Junction Unit * (Diagnostic) • UAPMO (UAPMO) • Device Diagnostics (Diagnostics) (Diagnostic Configuration) • Diagnostic Status • Diagnostic Status Detail.1 • Diagnostic Status Detail.2 • Diagnostic Switch • Diagnostic Configuration (Power Status) • Energy Left • Power Supply Status • Power Supply Voltage (Process Variable) (AI1/AI2 Temp) • AI1/AI2 Temp • Process Variable (Sensor Range) • Sensor Range.EU at 100% • Sensor Range.EU at 0% • Sensor Range.Units Index * • Sensor Range.Decimal * • Diagnostic.Other Faults • Diagnostic.Faults Non-Compliance • Diagnostic.Faults Process Influence • Diagnostic.Simulation Active • Diagnostic.Soft Update Incomplete • Diagnostic.Power Low • Diagnostic.Power Critical Low • Diagnostic.Fault Prediction • Diagnostic.Environmental Conditions • Diagnostic.Outside Sensor Limits • Diagnostic.Out of Service • Diagnostic.Calibration Problem • Diagnostic.Faults Sensor or Actuator • Diagnostic.Faults Electronics (Dynamic Variables) (Process Value) • Process Value • Simulation • Reference Junction Temp • Process Value.Status • Process Value.Value ** (Simulation) • Simulate Switch • Transducer Value • Simulate Value (Transducer Value) • Transducer Value. Status • Transducer Value. Value (Simulate Value) • Simulate Value. Status • Simulate Value. Value F0703-4.ai *: **: When the data of these parameters is rewritten, it is necessary to set the operational mode of the block to O/S (Out of Service). When the data of these parameters is rewritten, it is necessary to set the operational mode of the block to Manual. IM 01C50E01-01EN 7.3.3 Parameters for Wireless Communication (1) Network Information Concentrator object block: Configuration. The network-related information can be checked. (2) Update Time CO block: Data publication period Sets the update time value to 1 to 3,600 seconds. When using two temperature sensors for dual input type, the minimum update time is 2 seconds. The setting affects the battery life. When update time is set 0 seconds, the transmitter is stopped to update process variables by way of the field wireless network. And the transmitter continues to measure process variables with special interval time internally. (3) Remaining battery life UAPMO block: Energy Left The number of days of battery life remaining is indicated assuming ambient temperature condition as 23 degrees Celsius. It takes several days for the indicated value to be stabiilzed after the power on and initialization of the remaining battery life. UAPMO block : Reset Energy Left When changing batteries, the remaining battery life is initialized by Reset Energy Left parameter. (4) LCD display The following steps describe how to set LCD display. ● Integral antenna type (Amplifier housing code: 7) 1.On/Off of display When “LCD Intermittent” in LCD Mode is parameter is selected, the LCD first displays a set of screens to be shown and then turns off for a minute, and the display keeps the cycle repeatedly. Not selecting this parameter turns the LCD off. <7. Setting Parameters> 7-11 2.On/Off of continuous display mode When “LCD Continue” in LCD Mode is selected, the LCD displays for 5 minutes continuously then transits to the setting in the LCD Intermittent. When measurement mode is set as continuous mode, the LCD displays continuously regardless of display mode. When the update time is set to 1 second, the LCD display stays on regardless of the status in LCD Mode. 3.On/Off of bar graph Select “LCD Bargraph ON” in LCD Mode when the bar graph is required. ● Detachable antenna type (Amplifier housing code: 8 or 9) 1.On/Off of display When “Enable” in LCD Mode is selected, the LCD displays a set of screens to be shown and turns off for the specified time based on LCD Intermittent Time, and the display keeps the cycle repeatedly. Not selecting this parameter turns the LCD off. 2.On/Off of continuous display mode When “Enable” is set to LCD Mode and zero is set to LCD Intermittent Time, the LCD displays continuously. 3.On/Off of bar graph Select “LCD Bargraph ON” in LCD Mode when the bar graph is required. When the wireless connection process is in the status of “ready,” “pause,” or “join,” the LCD display stays on regardless of the status in LCD Mode. NOTE When the device detects AL02, AL03, AL10, AL11 and AL12 the LCD display stays on regardless of the status in LCD mode. See Table 8.4 Error Message Summary for details. IM 01C50E01-01EN 7-12 <7. Setting Parameters> 7.3.4 Tag and Device Information 7.3.6 Power Saving Mode Setting If these are specified when ordering, the designated Tag No. and device information are set and shipped. This function is applicable for dual input type with a detachable antenna, Amplifier housing code 8 and 9. Enabling the power saving mode on prolongs the battery life of the transmitter, in which the transmitter's measurement and calcutattion are suitable for general use with a gradual change in the process and ambient temperature. On the other hand, when the power saving mode is set to off, the transmitter is capable of a steep change in the process and ambient temperature wtih its high responsiveness trading off of the battery life. Tag No. and device information can be checked as follows. ■ Procedure to call up the tag No. and device information - Device Tag (Software Tag) This is specified when writing characters (up to 16 characters) that differ from those specified in Tag No. to the amplifier tag. For details on how to confirm this, refer to subsection 6.4. ”Connecting to the Field Wireless Network”. - Tag Description This is a universal parameter to store the comment that describes the content of the tag located in the TRANSDUCER and AI blocks. ■ Limitation of Device Information When changing the device information, input the information based on the following limitation on the number of characters. - Message function (up to 32 characters) TRANSDUCER block : Tag Description AI1/AI2 block : Tag Description 7.3.5 Setup the Integral Indicator As for the integral indicator display, either the temperature, voltage, resistance or the % value of the temperature, voltage, resistance can be selected and displayed. The display is in the output format of the process value. Specify AI block to display on the LCD. ■ LCD display parameter (Display Selection) Select AI block to display on the LCD from AI1 or AI2. ■ Call up the display parameter (Process Value Type) AI1 block: Configuration: Process Value Type Either actual target value (Direct) or % (Indirect) can be selected. ■ Procedure to call up the power saving mode TRANSDUCER block : Power Saving Mode Off: Disable On: Enable 7.3.7 Unit The unit for the process value is set at the factory. The specified unit of the input sensors set (°C if not specified). When the unit of the temperature, voltage, and resistance is displayed, set the Process Value Type parameter to actual target value (Direct). And sensor type set by the sensor type setting parameter (Lin Type) must be corresponded with the unit displayed. When using the resistance temperature sensor or the thermocouple sensor, unit displayed set °C or others, using voltage, set mV, and using resistance, set ohm. The unit can be set by following the procedure below. ■ Procedure to call up the unit parameter (Units Index) AI1/AI2 block: Scale : Units Index To change the unit, select the desired unit from the displayed unit list. 7.3.8 Measurement Range The unit parameter is set at the factory before shipment if specified at the time of order. To change the measurement range, follow the procedure below. ■ Procedure to call up the lower limit setting parameter (EU at 0%) AI1/AI2 block : Scale : EU at 0% IM 01C50E01-01EN 7-13 <7. Setting Parameters> ■ Procedure to call up the upper limit setting parameter (EU at 100%) AI1/AI2 block: Scale : EU at 100% Set the lower limit setting parameter (EU at 0%) and upper limit setting parameter (EU at 100%) to the unit specified in the unit parameter (Units Index). 7.3.9 Input Sensor When changing the sensor type, it is necessary to change the parameters related to the sensor type. The setting items are the sensor type and the number of cables. The input terminal of YTA supports the following sensor types. Thermocouple: TYPE B, E, J, K, N, R, S, T (IEC 584) Resistance thermometer (RTD): Pt100, Pt200, Pt500 (IEC 751) Resistance: 0 to 2000 ohm DC voltage mV: −10 to 100 mV (Single sensor input type) −10 to 220 mV (Dual sensor input type) Check the connections between the input terminals and temperature sensors and set the correct sensor type and the number of wire connections for the parameters. (Refer to Figure 7.2) 1-input model Thermocouple and DC voltage (TC & mV) (+) (–) 1 2 3 4 5 (B) 1 2 3 4 5 (B) (B) 1 2 3 4 5 (A) (B) (B) 1 2 3 4 5 1 2 3 4 5 (B1) (B2) (A2) Sensor1 Sensor2 Sensor1 Sensor2 Resistance thermometer(RTD) and resistance (3-wire type) (A1) Sensor1 1 2 3 4 5 Resistance thermometer(RTD) and resistance (2-wire type) (A1) Sensor1 (B1) (B1) (B2) (B2) (A2) Resistance thermometer(RTD) and resistance (4-wire type) (A) (–) (+) Resistance thermometer(RTD) and resistance (3-wire type) (A) Thermocouple and DC voltage (TC & mV) (+) Sensor1 Resistance thermometer(RTD) and resistance (2-wire type) (A) 2-input model, Amplifier housing code 8 and 9 1 2 3 4 5 Sensor1 Sensor2 Thermocouple(TC) & Resistance thermometer(RTD) and resistance (3-wire type) (+) Sensor1 (–) (B) (B) (A) 1 2 3 4 5 Sensor1 Sensor2 F0704.ai Figure 7.2 YTA510 Wire Connection Diagram IM 01C50E01-01EN 1) Setting the Sensor Type ■ Procedure to call up the sensor type setting parameter (Lin Type) AI1/AI2 block: Lin Type Set the sensor type. ■ Procedure to call up the sensor type information parameter (Sensor Range) AI1/AI2 block: Sensor Range : EU at 0% AI1/AI2 block: Sensor Range : EU at 100% Displays the lower and upper limit values that can be measured by the sensor type set in the sensor type setting parameter (Lin Type) as the lower limit information parameter (EU at 0%) and the upper limit information parameter (EU at 100%). 2) Setting the Temperature Sensor Connection This is set when using the resistance temperature sensor. ■ Procedure to call up the connection setting parameter (Sensor Connection) AI1 block: Sensor Connection Select and set any of the 2-, 3-, or 4-wire methods corresponding to the resistance temperature sensor. AI2 block: Sensor Connection Select and set either 2- or 3-wire methods corresponding to the resistance temperature sensor. NOTE In 4-wire connection for the dual sensor input type, first set "Not Used" to AI2: Lin Type, then set the AI1: Lin Type/Sensor Connection. 3) Setting the Cold Junction Compensation (CJC) of the Thermocouple Sensor This is set when using the thermocouple sensor. ■ Procedure to call up CJC function parameter(Selection of Reference Junction) AI1/AI2 block: Selection of Reference Junction Select the CJC function. To calibrate voltage for the thermocouple input, set the cold junction temperature to No Reference (0). 7-14 <7. Setting Parameters> ■ Procedure to call up external temperature Compensation parameter(External Reference Junction Value) AI1/AI2 block: External Reference Junction Value In the CJC function parameter (Selection of Reference Junction), the cold junction temperature value of the thermocouple is selected the external (2), set the external compensation temperature. The CJC is also called reference junction compensation. IMPORTANT Setting the sensor type automatically resets the zero-gain adjustment value to the factory setting. 7.3.10 Assignment to AI Object Output of the process value via field wireless network is set by AI1/AI2 block. Either actual target value or % value of the temperature, the voltage, and resistance is set as the output of process value from the AI1/AI2 block. 7.3.11 Burnout Setting This function is applicable for dual input type with a detachable antenna, Amplifier housing code 8 and 9. Specify the direction of PV value at the burnout. • AI1/AI2 block: Burn Out Type Enable Hard Switch: the direction specified by hardware switch Up: Higher side Down: Lower side Selecting Up and Down disables the setting of hardware switch 7.3.12 Write Protect Hardware write protection and software write protection functions are available for this transmitter. 1) Procedure to call up the protection setting parameter (UAP Option) The following settings can be configured in the UAP Option parameter. - Setting to enable or disable software write protection. IM 01C50E01-01EN - Setting to enable or disable the hardware write protection switch. - Setting to enable or disable changing the setting to the Diagnostic Switch and Diagnostic Configuration parameters. 2) Procedure to call up the protection setting display parameter (Hardware Write Protect) UAPMO block : Hardware Write Protect The Hardware Write Protect parameter enables the switch status of hardware write protection to be displayed. For the relationship between hardware write protection and software write protection, refer to section 9. "Parameter Summary". 7.3.13 Input Calibration The input calibration function is used to adjust to the transmitters internal interpretation of the input signal. Perform the calibration procedure for Sensor1 and Sensor2 separately. Two points, namely, the lower adjustment point called Zero point and the upper adjustment point called Gain, are adjusted, respectively. There are two adjustment methods. One method uses a reference signal generator (e.g. a voltage generator or variable resistor) and the other uses the signal from a temperature sensor immersed in the solution with a known temperature. Input adjustment is performed by inputting (writing) the signals (voltage, and resistance values) currently being input as the parameters. This instrument automatically corrects the error between the written data and the internally calculated value. Follow the procedure below for Sensor1 (AI1) for example. 1) Setting the Input Adjustment Value a)Setting the AI1 block write mode • AI1 block : Mode : Target Set the Target parameter to O/S. b)Setting the update period • CO block: Data publication period Set the data publication period parameter to 1 second. The computation period in the transmitter will also be synchronized to the update period and set to 1 second. 7-15 <7. Setting Parameters> c)Setting the sensor type • AI1 block: Lin Type Set the sensor type used in the Lin Type parameter. d)Setting the cold conjunction compensation • AI1 block: Selection of Reference Junction Set the Selection of Reference Junction parameter to No Reference (0) in order to remove the effect of the cold junction compensation when using the thermocouple for the sensor type. e)Perform Zero Point Adjustment using a reference input generator. The input value is adjusted near the zero point within the measurement range used. f) Set the Zero Point Adjustment value when the input is stabilized. • AI1 block: Cal Point Lo Set the Cal Point Lo parameter to the voltage value (unit: mV) when the temperature sensor is the thermocouple, and set the resistance value (unit: Ω) when the temperature sensor is the resistance temperature sensor. g)Perform gain-point adjustment using a reference input generator. The input value is adjusted near the gain point within the measurement range used. h)Set the gain-point adjustment value when the input is stabilized. • AI1 block: Cal Point Hi Set the Cal Point Hi parameter to the voltage value (unit: mV) when the temperature sensor is the thermocouple, and set the resistance value (unit: Ω) when the temperature sensor is the resistance temperature sensor. i) Setting the AI1 block write mode • AI1 block : Mode : Target Set the Target parameter to Auto and ensure that the setting error of the adjustment value has not occurred. IM 01C50E01-01EN ZERO GAIN Output Input Figure 7.3 7-16 <7. Setting Parameters> F0705.ai Trim function images IMPORTANT Setting the sensor type automatically resets the zero-gain adjustment value to the factory setting. 2) Clearing the Adjustment Value The adjustment value set with input adjustment can be cleared and reset to the factory setting. ■ Procedure to call up the adjustment value reset parameter (Cal Point Clear) AI1/AI2 block: Cal Point Clear Set the Cal Point Clear parameter to Clear. 7.3.14 Switching to the Deep Sleep Mode When the instrument will not be used for a long time, switch the instrument to the deep sleep mode to conserve battery power. To switch to deep sleep mode, follow the procedure below. ■ Procedure to call up the switch-to-deep-sleep parameter (Special Cmd) TRANSDUCER block : Special Cmd NOTE • This procedure to switch to deep sleep mode can only be use for wireless communication. • Transmitter becomes the stop state after setting deep sleep mode and cannot reply any request from Communication Tool. • For this reason, there is the case that an error is display on Communication Tool. • To wake up from deep sleep mode, please pull battery pack and wait more than 30 seconds before attaching battery pack. 7.3.15 Switching to the Silence Mode This is a function to pause the instrument when it cannot join the field wireless network after a specified time has elapsed. This function is effective in conserving battery power when, for example, the installation of the field wireless integrated gateway is delayed compared to that of field wireless devices. The default value is 28800 seconds (about 8 hours). Thereafter, a cycle of a one-hour pause and six-minute search is repeated until the instrument can join the field wireless network. • Procedure to call up the switch-to-silence parameter (Radio Silence) UAPMO block : Radio Silence Set 0 to 231 seconds for the Radio Silence parameter of the UAPMO block. If 0 is set, the Radio Silence parameter is invalid. To start from the silence mode, either remove and insert the battery pack, or use the configuration tool. Set deep sleep mode (Standby) to the Special Cmd parameter for the TRANSDUCER block. To start from deep sleep mode, either remove and insert the battery pack, or use the configuration tool. CAUTION After setting the deep sleep mode by infrared device configuration tool, keep the infrared port of device away from any other infrared signals. IM 01C50E01-01EN 7.4 Self-Diagnostics ■ Procedure to call up the self-diagnostic parameter 7.4.1 Identify Problems by Using the Communicator UAPMO block: Diagnostic Status The configuration tool allows checking the self-diagnosis results and setting errors of this instrument. First, check Diagnostic Status of the self-diagnostic result. Table 7.2 Bits Bit31(MSB) Bit30 Bit29 Bit28 Bit27 Bit26 Bit25 Bit24 Bit23 Bit22 Bit21 Bit20 Bit19 Bit18 Bit17 Bit16** Bit15** Bit14** Bit13-Bit08 Bit07-Bit01 Bit00 *: **: 7-17 <7. Setting Parameters> Any of the four categories (Check function, Maintenance required, Failure, and Off specification) according to NAMUR NE107* is supplied to Diagnostic Status of each diagnostic result. Diagnostic Status Contents F: Failure status C: Function check status O: Out of specification status M: Maintenance required status Faults in electronics Faults in sensor or actuator element Installation, calibration problem Out of service Outside sensor limits Environmental conditions out of device specification Fault prediction: Maintenance required Power is critical low: maintenance need short-term Power is low: maintenance need mid-term Software update incomplete Simulation is active Faults due to process influence Faults due to non-compliance with specified operating conditions Other faults reserved by WCI vendor specific area Detail information available 1: available 0: no available" Example NAMUR NE107 Categorization(*) --------F F C C O O M M M C C F F F ------- NAMUR NE107 "Self-Monitoring and Diagnosis of Field Devices" Applicable for dual input type with detachable antenna, Amplifier housing code 8 and 9. IM 01C50E01-01EN Checking the Diagnostic Status category allows taking the proper action. The Diagnostic Status contents are common for all ISA devices, and the setting for the Diagnostic Status category can be changed. For further details, refer to Diagnostic Status Detail. In Diagnostic Status Contents that can be diagnosed by the YTA, the alert category set in Out of Service can be changed to Check function. To do so, follow one of the two procedures below. a)UAPMO block: UAP Option select “enable”. b)UAPMO block: Diagnostic Configuration change Out of Service from “Failure” to Check function. c)UAPMO block: UAP Option select “disable“. The contents of diagnostic status are defined either valid or invalid at Diagnostic Switch parameter. Follow the example below to change “Out of Service” to invalid. a)UAPMO block: UAP Option select “enable“. b)UAPMO block: Diagnostic Switch turn “Off“ for Out of Service. c)UAPMO block: UAP Option select “disable“. Note: Be careful when changing the alert category and turning detection on and off as described above. Be sure to set UAP Option to disable again to prevent setting errors. * NAMUR NE107 “Self-Monitoring and Diagnosis of Field Devices” In Diagnostic Configuration setting, select one from the followings; F: Failure status, C: Function check status, O: Out of specification status, or M: Maintenance required status. <7. Setting Parameters> Table 7.3 7-18 Contents of Alert Report Parameter name Description DetectObjectTLPort Alert detection port UAP (0xF0B2) fixed DetectObject Alert detection block UAPMO (1) fixed DetectTime Time stamp AlertDirection 1: generated, 0: clear AlertPriority Alert priorities set by users AlertType Alert types, see 8.4 SelfDiagnostics AlertValue NAMUR107 category 0:Failure, 1:checkFunction, 2:OffSpec, 3:MaintenaceRequired CAUTION For a wireless gateway which does not support the alert report function, the alert setting in UAPMO block for the transmitter must be set to “Disable.” Note that YFGW710 field wireless integrated gateway does not have the alert report function. 7.4.2 Alert Report YTA generates alert information related to Diagnostic Status and automatically sends to a field wireless gateway. To use this function, the following alert setting is necessary. When “Out of Service” for Diagnostic Status alert is required, choose “FALSE” for [Out of Service.Alert Disable] in the UAPMO block. Refer to the field wireless gateway User’s Manual for the setting procedure to obtain the alert information from the gateway. The alert report consists of the list of parameter names as shown Table 7.3. IM 01C50E01-01EN Table 7.4 Diagnostic Results Summary Diagnostic Status Contents Alert Type NAMUR NE107 Categor Faults in electronics 127 F Faults in sensor or actuator element 126 F Diagnostic Status Detail AMP ERR MEMORY ERR FlashROM ERR ADC ERR SENSOR1 FAILURE SENSOR2 FAILURE ** TERM SNS FAILURE SENSOR1 SPAN ADJ ERR Installation, calibration problem 125 C SENSOR1 ZERO ADJ ERR SENSOR2 SPAN ADJ ERR ** SENSOR2 ZERO ADJ ERR ** Out of service 124 C Outside sensor limits 123 O AI1 O/S MODE AI2 O/S MODE ** --SENSOR1 TEMP HI SENSOR1 TEMP LO Environmental conditions out of device specification 122 O SENSOR2 TEMP HI ** SENSOR2 TEMP LO ** AMB TEMP HI AMB TEMP LO Fault prediction: Maintenance required Power is critical low: maintenance need shortterm Power is low: maintenance need mid-term Software update incomplete Simulation is active * : ** : 7-19 <7. Setting Parameters> 121 120 M M FIRMWARE CONDITION CHECK CRITICAL LOWBAT ** Description Amplifier failure Memory failure FlashROM failure ADC failure Sensor 1 burnout Sensor 2 burnout CJC sensor burnout Sensor 1 faulty input of span adjustment value Sensor 1 faulty input of zero adjustment value Sensor 2 faulty input of span adjustment value Sensor 2 faulty input of zero adjustment value AI1 O/S Mode AI2 O/S Mode --Sensor 1 temperature higher limit scale out Sensor 1 temperature lower limit scale out Sensor 2 temperature higher limit scale out Sensor 2 temperature lower limit scale out Ambient temperature higher limit scale out Ambient temperature lower limit scale out Firmware internal error Deep sleep due to low battery LOWBAT FOR DEEPSLEEP * Deep sleep due to low battery 119 M LOWBAT Low battery 118 C 117 C --AI1 SIMULATE MODE AI2 SIMULATE MODE ** --AI1 SIMULATE Mode AI2 SIMULATE Mode Applicable for single input type with integral antenna, Amplifier housing code 7. Applicable for dual input type with detachable antenna, Amplifier housing code 8 and 9. 7.4.3 Checking with Integral Indicator Self-diagnosis Error (Transmitter error) NOTE If an error is detected by running self-diagnostics, an error number is displayed on the integral indicator. If there is more than one error, the error number changes at three-second intervals. See table 8.4 regarding the alarm codes. F0706.ai Figure 7.4 Error Check with Integral Indicator IM 01C50E01-01EN 8. 8-1 <8. Maintenance> Maintenance 8.1 General Maintenance of the transmitter is easy due to its modular construction. This chapter describes the procedures for calibration, adjustment, and the disassembly and reassembly procedures required for component replacement. Transmitters are precision instruments. Please carefully and thoroughly read the following sections for information on how to properly handle them while performing maintenance. IMPORTANT • As a rule, maintenance of this transmitter should be done in a shop that has all the necessary tools. • The CPU assembly , RF assembly and LCD board assembly contain sensitive parts that can be damaged by static electricity. Take precautions such as using a grounded wrist strap when handling electronic parts or touching the board circuit patterns. Also be sure to place the removed CPU assembly , RF assembly or and LCD board assembly into a bag with an antistatic coating. Table 8.1 8.2 Calibration Instruments Selection Table 8.1 lists the instruments that can be used to calibrate a transmitter. When selecting an instrument, consider the required accuracy level. Exercise care when handling these instruments to ensure they maintain the specified accuracy 8.3 Calibration Procedure Use the procedure below to check instrument operation and accuracy during periodic maintenance or troubleshooting. 1) Insert the battery pack and then perform provisioning to have the transmitter join the Field Wireless Network or preparing the infrared communication for calibration. 2) Set the update period to 1 second using the field wireless configuration tool to set continuous for the transmitter. 3) Connect the devices as shown in Figure 8.1 and allow the transmitter to warm up for at least 5 minutes. Instruments Required for Calibration Name Provisioning device tool Field wireless configuration tool Universal calibrator Variable resistor • • • • • • • • Yokogawa-recommended Instrument FieldMate (R2.02.01 or later) Provisioning Device Tool Infrared Adapter certified by Yokogawa Supplier: ACTiSYS Product name: IrDA InfraRed USB Adaptor Product number: IR224UN Field Wireless Integrated Gateway attached Software Field Wireless Configurator Field Wireless Management Tool Field Wireless System related Product Plant Resource Manager (PRM) (R3.05 or later) Device Configuration Tool via ISA100.11a Wireless Communication FieldMate (R2.02.01 or later) DeviceFile (R3.01.01 or later) Device Configuration Tool via Infrared Communication FieldMate (R2.03.00 or later) DeviceFile (R3.02.01 or later) Model 9100 type • 279301 type 6-dial variable resistor (accuracy: ±0.005%) Remarks For calibration of DC voltage or thermocouple input) For calibration of resistance thermometer (RTD) input IM 01C50E01-01EN Example of wiring for thermocouple or DC voltage input YTA sensor input terminal 1 2 3 4 5 YTA sensor input terminal 1 2 3 4 5 DC voltage generator (A) (A) (B) (B) Variable resistor F0801.ai Example of wiring for calibration equipment 4) Calibration Procedure a)For DC voltage input With a voltage generator, deliver input signals corresponding to 0, 25, 75, or 100% of the input span to the temperature transmitter. b)For thermocouple input Since this instrument is equipped with a cold junction compensating function, use a cold junction compensating function in universal calibrator in order to compensate for this function upon calibration. According to the reference millivolt table for thermocouple, obtain millivolt corresponding to 0, 25, 50, 75, or 100% of the span, and use that power as the input value, then deliver it from the universal calibrator to the temperature transmitter. Check the output value for that input value. c)For resistance thermometer (RTD) input Using a thermometer resistor as input, calibration of the temperature transmitter is carried out via a 4-core wire connection. As defined in the reference resistor value table of the resistance thermometer (RTD), obtain resistance values corresponding to 0, 25, 50, 75 or 100% of the span, and use the obtained resistance as the input value, then deliver it to the temperature transmitter by means of a variable resistor. Check the output value for that input value. 8.4 Disassembly and Assembly CAUTION (+) (−) Example of wiring for RTD 4-wire type Figure 8.1 8-2 <8. Maintenance> Precautions for the intrinsic safety explosion prevention type instrument Intrinsic safe type transmitters must be, as a rule, removed to a non-hazardous area for maintenance and be disassembled and reassembled to the original state. Check the insulation, and execute Insulation Test, when it is disassembled and reassembled to the original state. Refer to section 2.7 “Insulation Resistance and Dielectric Strength Test” for details of Resistance Test. Refer to "Precautions for the intrinsic safety explosion prevention type instrument" in the end of this manual of details. IMPORTANT • Perform the provisioning when replacing the RF assembly. Refer to 6.4 Connecting to the Field Wireless Network for details. • Replace the batteries and perform the parameter settings when replacing the CPU assembly. Refer to 8.4.5 Replacing the Batteries. This section describes procedures for disassembly and reassembly for maintenance and component replacement. CAUTION Always remove the battery pack and shut off before disassembly. Use proper tools for all operations. Apply a specified input signal following steps a) to c) above. If the output signal is outside the accuracy range, perform output adjustment using the device configuration tool. For details on how to perform adjustment, refer to subsection 7.3.13 Input calibration. IM 01C50E01-01EN Table 8.2 8-3 <8. Maintenance> Tools for Disassembly and Reassembly Tool Phillips screwdriver Slotted screwdriver Allen wrenches Wrench Torque wrench Adjustable wrench Socket wrench Socket driver Tweezers Quantity Remarks 1 JIS B4633, No. 2 Press forward 1 3 1 1 1 1 1 1 Output terminal cable JIS B4648 One each, nominal 3, 4 and 2.5 mm Allen wrenches Width across flats, 17 mm Stud Integral Indicator Boss CPU assembly RF assembly Mounting screw Width across flats, 16 mm Width across flats, 5.5 mm 8.4.1 Replacing the Integral Indicator Amplifier Cover F0802.ai Figure 8.2 Removing and Attaching integral Indicator and CPU Assembly This subsection describes the procedure for replacing an integral indicator. (See figure 8.2) 8.4.2 Replacing the RF Assembly ■ This subsection describes how to replace the RF assembly (see Figure 8.2). Removing the Integral Indicator 1) Remove the cover. 2) While supporting the integral indicator with one hand, loosen its two mounting screws. 3) Dismount the LCD board assembly from the RF assembly. When doing this, carefully pull the LCD board assembly straight forward so as not to damage the connector pins between it and the RF assembly. ■ Attaching the Integral Indicator 1) Align both the LCD board assembly and RF assembly connectors and engage them. 2) Insert and tighten the two mounting screws. 3) Replace the cover. ■ Removing the RF assembly 1) Remove the cover. 2) Remove the Integral indicator (refer to subsection 8.4.1). 3) Remove the two stud bolts by using a socket driver (width across flats: 5.5 mm) 4) Disconnect the RF assembly from the CPU assembly. When doing this, carefully pull the RF assembly straight forward so as not to damage the connector pins between it and the CPU assembly. 5) Disconnect the antenna cable that connects the CPU assembly and the antenna. NOTE Be careful not to apply excessive force to the RF assembly and the connector of the antenna cable when removing it. ■ Mounting the RF assembly 1) Connect the antenna cable between the RF assembly and the antenna. 2) Align both the RF assembly and CPU assembly connectors and engage them. 3) Tighten the two stud bolts. 4) Mount the Integral indicator (refer to subsection 8.4.1). 5) Replace the cover. IM 01C50E01-01EN 8-4 <8. Maintenance> 8.4.3 Replacing the CPU Assembly 8.4.4 Replacing the Battery Pack This subsection describes how to replace the CPU assembly (see Figure 8.2). Regarding the transmitter with intrinsically safe approval, the battery pack can be replaced without removing the device in hazardous area. ■ Removing the CPU assembly 1) Remove the cover. Remove the Integral indicator and the RF assembly (refer to subsections 8.4.1 and 8.4.2). 2) Disconnect the power cable. When doing this, lightly press the side of the CPU assembly connector and pull the cable connector to disengage (see the upper left of Figure 8.2). 3) Use a socket driver (width across flats, 5.5 mm) to loosen the two bosses. 4) Carefully pull the CPU assembly straight forward to remove it. 5) Disconnect the flat cable (cable with white connector at the end) that connects the CPU assembly and the printed circuit assembly (fixed) in bottom of the amplifier case. ■ Removing 1) Remove the terminal box cover. 2) Loosen the two battery pack mounting screws (see Figure 8.3). 3) Pull the battery pack. The screw has the dropout prevention mechanism,it is not separated from the battery pack NOTE Be careful not to apply excessive force to the CPU assembly when removing it. ■ Mounting the CPU assembly 1) Connect the flat cable (with white connector) between the CPU assembly and the printed circuit assembly (fixed) in bottom of the amplifier case. 2) Connect the power cable to the CPU assembly. F0803.ai Figure 8.3 ■ Removing the Battery Pack Remounting 1) Insert the new battery pack lightly. 2) Push the center of the battery pack and insert it securely. 3) Tighten the two battery pack mounting screws to a torque of approximately 0.7 N•m. 4) Replace the terminal box cover. NOTE Insert the cable in the connector firmly. Make certain that the cables do not get pinched between the case and the edge of the CPU assembly. 3) Insert the CPU assembly straight onto the post in the amplifier case. 4) Tighten the two bosses. Mount the RF assembly, and the Integral indicator (refer to subsections 8.4.1 and 8.4.2). 5) Replace the cover. IM 01C50E01-01EN 8-5 <8. Maintenance> 8.4.5 Replacing the Batteries 8.4.6 Handling Batteries The batteries in the battery pack can be replaced. Batteries are not installed when shipped from the factory. Assemble the battery pack as follows. This battery pack uses two primary lithium/ thionyl chloride batteries. Each battery contains approximately 5 grams of lithium, for a total of 10 grams in each pack. Under normal conditions, the battery materials are self-contained and are not reactive as long as the batteries and the pack integrity are maintained. Care should be taken to prevent thermal, electrical or mechanical damage. Protect the electrode of the battery pack to avoid rapid electrical discharge. Discharged a battery may lead to fluid leakage and excessive heat. Batteries should be stored in a clean and dry area. For maximum battery life, storage temperature should not exceed 30°C. WARNING Be sure to replace the batteries or disassemble and assemble the battery pack in a nonhazardous area. Doing so in an hazardous area could cause an explosion. CAUTION When replacing the batteries, be sure to replace the two batteries at the same time and do not use an old and a new battery together.. ■ Disassembling 1) Loosen the two battery case mounting screws. 2) Separate the battery case into two parts. 3) Remove the old batteries. ■ Assembling 1) Insert new batteries into the battery case. 2) Attach the two parts of the battery case to each other. 3) Tighten the two battery case mounting screws to a torque of approximately 0.7 N•m. The screw has the dropout prevention mechanism,it is not separated from the battery pack WARNING Handling the battery pack The following precautions must be observed in order to safely and effectively use a battery pack. Improper use may lead to fluid leakage, excessive heat, ignition, or explosion. • Never charge it. • Do not short-circuit it. • Do not disassemble, transform, or modify it. • Do not heat it or throw it into a fire. • Do not soak it in fresh water or seawater. CAUTION Observe the following precautions for the safe disposal of batteries. • Do not incinerate the battery, and do not expose it to a high temperature of 100°C or more. This may lead to fluid leakage or explosion. • Dispose of the battery according to laws and regulations. F0804.ai Figure 8.4 Disassembling the Battery Pack Use the following dedicated parts for the battery pack and batteries. ■ Battery pack Part number: F9915NQ (with batteries) Part number: F9915NK (without batteries) ■ Batteries Part number: F9915NR Alternatively, Tadiran TL-5930/S batteries may be purchased and used. IM 01C50E01-01EN Transportation of products containing lithium batteries Batteries used for this transmitter contain lithium. Primary lithium batteries are regulated in transportation by the U.S. Department of Transportation, and are also covered by the International Air Transport Association (IATA), the International Civil Aviation Organization (ICAO), and the European Ground Transportation of Dangerous Goods (ARD). It is the responsibility of the shipper to ensure compliance with these or any other local requirements. Consult current regulations and requirements before shipping. When transporting this transmitter with the battery pack inserted, keep it in deep sleep mode in order to conserve battery power. For details on how to switch to deep sleep mode, refer to subsection 7.3.12 “Switching to Deep Sleep Mode.” Procedure to replace and dispose of the batteries of the product This is an explanation about the new EU Battery Directive(DIRECTIVE 2006/66/EC). This directive is only valid in the EU. Batteries are used for this product. When you remove batteries from this product and dispose them, discard them in accordance with domestic law concerning disposal. Take a right action on waste batteries, because the collection system in the EU on waste batteries are regulated. Battery type: Primary lithium-thionyl chloride battery 8.5 Troubleshooting If any abnormality appears in the measured values, use the troubleshooting flow chart below to isolate and remedy the problem. Since some problems have complex causes, these flow charts may not identify all. If you have difficulty isolating or correcting a problem, contact Yokogawa service personnel. 8.5.1 Basic Troubleshooting Flow First determine whether the process variable is actually abnormal or a problem exists in the measurement system. If the problem is in the measurement system, isolate the problem and decide what corrective action to take. This transmitter is equipped with a self-diagnostic function which will be useful in troubleshooting, and the transmitter equipped with an integral indicator will show an alarm code as a result of selfdiagnosis. See subsection 8.5.3 for the list of alarms. : Areas where self-diagnostic offers support Abnormalities appear in measurement YES Inspect the process system Is process variable itself abnormal? Error in measurement NO system Environmental condition NOTE Measurement system problem Isolate problem in measurement system Crossed-out dustbin symbol 8-6 <8. Maintenance> Check/correct environmental conditions Transmitter itself Check transmitter Operation conditions The symbol (see above), which is marked on the batteries, means they shall be sorted out and collected as ordained in ANNEXII in DIRECTIVE 2006/66/EC Check/correct operating conditions F0805.ai Procedure to remove the batteries safely Figure 8.5 Basic Troubleshooting Flow Refer to subsection 8.4.4 “Replacing the Battery Pack” and subsection 8.4.5 “Replacing the Batteries.” IM 01C50E01-01EN <8. Maintenance> 8-7 8.5.2 Example of Troubleshooting Flow The following shows an example of the flow for troubleshooting. Refer to this example and Table 8.3 “Problems, Causes and Countermeasures” and locate the problem and take the corresponding countermeasure. The following phenomena indicate that this instrument may be out of operation. [Example] • No output signal is delivered. • Process variable changes but the output signal remains unchanged. • The assessed value of the process variable and the output are not coincident. • If a built-in indicator is attached, check the display of the error code. • Connect the device configuration tool and check self-diagnosis. Was a faulty area found with selfdiagnosis? NO Is the sensor correctly connected? YES Is the wireless device connection correct? YES YES Refer to the error message list and check for recovery measures. NO Check the sensor connection and correct it. NO Connect the wireless devices again. Refer to our service personnel for details. F0806.ai Figure 8.6 Example of Troubleshooting Flow IM 01C50E01-01EN 8-8 <8. Maintenance> Table 8.3 Cause and Countermeasure Observed Problems Output fluctuates greatly. Possible Cause Countermeasure Related Parameter Input adjustment by user was Set or clear the user adjustment • Lin Type not correctly done. value. • Sensor Range Damping adjustment is not Set the damping adjustment to correct. 0. • P rocess Value Filter Time Transmitter outputs fixed Input adjustment by user was Set or clear the user adjustment • Lin Type current. not correctly done. value. • Sensor Range The simulation function is set Set the simulation function to • Simulate Switch to ON. OFF. Output is reversed. The lower limit value is greater Set the correct value to the • Lin Type than the upper limit value. upper limit value and the lower • Sensor Range limit value. • Cal Point Lo • Cal Point Hi Parameters cannot be The transmitter is in write Release write protect. changed. protect status. • UAP Option • Hardware Write Protect 8.5.3 Errors and Countermeasures Table 8.4 Integral indicator Error Message Summary Factory NAMUR category Bit Diagnostic Status Release/ recovery conditions (except restart) Output Operation Action Amplifier temperature sensor error None The output is fixed to ±99999°C. The sign is dependent on the burnout switch at the LCD board or Burn Out Type parameter*4. Replace the amplifier. MEMORY ERROR Amplifier memory failure None Same as above Replace the amplifier. ADC ERROR Amplifier AD converter failure None Same as above Replace the amplifier. Firmware update write error None ---- Replace the amplifier. Sensor 1 burnout None The output is fixed to ±99999°C. The sign is dependent on the burnout switch at the LCD board or Burn Out Type parameter*4. Replace the sensor 1. CJC sensor burnout None Operable at the CJC value (0°C). Replace the CJC sensor. Diagnostic Status Detail Cause AMP ERR AL.02 AMP. ERR*2 F Bit 27 Faults in electronics Firm Update ERR AL.03 FUP. ERR*2 SENSOR1 FAILURE AL.10 S1.FAIL*2 F AL.12 RJ.FAIL*2 Bit 26 Faults in sensor or actuator element TERM SNS FAILURE IM 01C50E01-01EN Integral indicator AL.20 LOWBAT *3 Factory NAMUR category M Bit Diagnostic Status Bit 19 Power is low: maintenance need mid-term LOWBAT Bit 20 Power is critical low: maintenance need short term CRITICAL LOWBAT Bit 20 Power is critical low: maintenance need short term Bit 21 Fault prediction: Maintenance required *4 *5 AL.23 FIRM.C M Diagnostic Status Detail LOWBAT FOR DEEPSLEEP FIRMWARE CONDITION CHECK SENSOR1 TEMP HI AL.40 S1.OVR SENSOR1 TEMP LO O Bit 22 Environmental conditions out of device specification AL.41 S2.OVR SENSOR2 TEMP HI SENSOR2 TEMP LO *4 AMB TEMP HI AL.45 AMB. OVR 8-9 <8. Maintenance> O Bit 22 Environmental conditions out of device specification AMB TEMP LO Release/ recovery conditions (except restart) Output Operation Action Low remaining battery voltage None Normal action Replace the batteries. Low remaining battery voltage None Normal action Replace the batteries. Low remaining battery voltage causes switching to deep-sleep mode. None Normal action, but power turns off 15 minutes after alarm is generated. Replace the batteries. Firmware internal error None Normal action Restart. The temperature of sensor 1 is higher than the temperature specified in the Sensor Range parameter. Recovers when the temperature falls within the range. Normal action Check the sensor type setting and connection method. The temperature of sensor 1 is lower than the temperature specified in the Sensor Range parameter. Recovers when the temperature rises within the range. Normal action Check the sensor type setting and connection method. The temperature of sensor 2 is higher than the temperature specified in the Sensor Range parameter. Recovers when the temperature falls within the range. Normal action Check the sensor type setting and connection method. The temperature of sensor 2 is lower than the temperature specified in the Sensor Range parameter. Recovers when the temperature falls within the range. Normal action Check the sensor type setting and connection method. The ambient temperature is higher than +85°C. Recovers when the temperature falls below +85°C. Normal action Check the temperature in the vicinity of the transmitter. The ambient temperature is lower than -40°C. Recovers when the temperature rises above -40°C. Normal action Check the temperature in the vicinity of the transmitter. Cause IM 01C50E01-01EN Integral indicator Factory NAMUR category Bit Diagnostic Status Diagnostic Status Detail SENSOR1 SPAN ADJ ERR AL.50 S1.SPAN SENSOR1 ZERO ADJ ERR AL.51 S1.ZERO Bit 25 Faults in sensor or actuator element *4 SENSOR2 SPAN ADJ ERR AL.53 S2.ZERO SENSOR2 ZERO ADJ ERR AL.52 S2.SPAN *4 AL.60 AI1.OS AI1 O/S MODE C Bit 24 Out of service AL.61 AI2.OS*4 AI2 O/S MODE AI1 SIMULATE MODE AL.64 AI1.SIM Bit 17 AL.65 AI2.SIM*4 8-10 <8. Maintenance> Simulation is active AI2 SIMULATE MODE Cause Release/ recovery conditions (except restart) Sensor 1 input adjustment range error Recovers when the input is within the range. Sensor 1 input adjustment value error Recovers when the input value is a normal value. Sensor 2 input adjustment range error Recovers when the input is within the range. Sensor 2 input adjustment value error Output Operation Action Normal action Check the input adjustment setting. Normal action Check the input adjustment setting. Normal action Check the input adjustment setting. Recovers when the input value is a normal value. Normal action Check the input adjustment setting. AI1 block is O/S mode. Recovers when the mode target of AI1 block is other than O/S. Hold Check the AI1 block setting. AI2 block is O/S mode. Recovers when the mode target of AI1 block is other than O/S. Hold Check the AI2 block setting. Simulate Switch of the AI1 block is enabled Recovers when the Simulate Switch of AI1 block is set to DISABLE. Normal action Check the AI1 block setting. Simulate Switch of the AI2 block is enabled Recovers when the Simulate Switch of AI2 block is set to DISABLE. Normal action Check the AI2 block setting. *1: “Factory NAMUR category” refers to the four categories (C: Check function, M: Maintenance required, F: Failure, and O: Off specification) according to NAMUR NE107*. * NAMUR NE107 “Self-Monitoring and Diagnosis of Field Devices” *2: When the device detects “AL02 AMP.ERR,” “AL03 FUP.ERR,” “AL10 S1.FAIL,” “AL11 S2.FAIL,” and “AL12 RJ.FAIL”, the LCD display stays on regardless of the status in LCD mode. When the ambient temperature is higher than 60°C, AL.70 may be generated despite the indication of Energy Left shows sufficiently remained. However, it does not affect the device operation. This is caused by the change of battery inner status with extremely low power consumption under high temperature environment. It is recommended to set the data updating period to 15 seconds or shorter. Applicable for dual input type with detachable antenna, Amplifier housing code 8 and 9. Applicable for single input type with integral antenna, Amplifier housing code 7. *3: *4: *5: IM 01C50E01-01EN 9. Parameter Summary Table 9.1 Parameter Summary Object ID 1. UAPMO block 9-1 <9. Parameter Summary> Attribute Label ID 1 Version Revision 10 Static Revision 64 Identification Number CTS Version 65 66 67 68 69 70 102 103 104 105 Description Default value Handling Indicates the application revision of YTA. This revision changes --when the application software is downloaded. Indicates the revision level of the fixed parameters of UAP. 0 Used, for example, to check whether parameters have been changed. Indicates the vendor ID, model ID, and revision of the device. --- Indicates the version of the communication stack test system (CTS). ITS Version Indicates the version of the interoperability test system (ITS). Diagnostic Status Indicates the diagnostic results of the device based on the NAMUR NE107*1 model. Setting Enable diagnostic status configuration in UAP Option to Enable allows turning OFF and ON the display of the diagnostic results for each summary, and changing Categorize. For Categorize at the time of shipment, refer to tables 8.3 and 10.2. UAP Option Allows setting the Diagnostic Status and write protection of UAP. Software write protect 1: On, 0: Off Enable hardware write protect 1: Enable, 0: Disable (default) Enable diagnostic status configuration 1: Enable, 0: Disable (default) The following table shows the relationship between the hardware write protection and software write protection. Enable hardware write protect Disable Off or On Off No Disable Enable Enable Off or On Off On On Off or On Off or On Protected No Protected Hardware write protect Software write protect R R R 0 R 0 --- R R 0 W On W Write protect Diagnostic Switch Allows setting On/Off for each summary of Diagnostic Status when Enable diagnostic status configuration in UAP Option is set to Enable. Diagnostic Allows Categorize for each summary of Diagnostic Status when Configuration Enable diagnostic status configuration in UAP Option is set to Enable. Diagnostic Status Detailed information on Diagnostic Status. For Categorize at the Detail time of shipment, refer to Table 9.2. Energy Left Indicates the number of days of remaining battery life assuming ambient temperature condition as 23 degrees Celsius. The unit is day. Reset Energy Left Resets the remaining battery power calculation to restore it to a remaining battery power calculation which is based on new batteries. 0 = Continue 1 = Reset Power Supply Indicates remaining battery life and power supply of device 0 – line powered Status 1 – battery powered, greater than 75% remaining capacity 2 – battery powered, between 25% and 75% remaining capacity 3 – battery powered, less than 25% remaining capacity Refer to Table W 9.2. Refer to Table R 9.2. --R 0 (reading value is always 0) W --- R Note: TSAP ID is 2. IM 01C50E01-01EN Object ID 1. UAPMO (continued) 9-2 <9. Parameter Summary> Attribute Label ID 106 EH Type *2 107 Power Supply Voltage *2 110 Hardware Write Protect 111 Radio Silence Description Available to write note into this parameter. Indicates the measured power supply voltage (V). Default value Handling ----- --Allows recognizing the status of the hardware write protection switch. 0: Switch OFF 1: Switch ON Repeats a cycle of a 1-hour pause and 6-minute search if the 28800 instrument cannot join the network after a time specified in Radio Silence has elapsed. When 0 is set, the Radio Silence is invalid. W R R W 112 Simulation Active Alert*2 The On/Off or priority for Simulation Active Alert can be set. 1.On/Off setting 0 = FALSE, 255 =TRUE 2.Alert report priority: 0 to 15 1. TRUE 2. 15 W 113 Soft Update incomplete Alert*2 The On/Off or priority for Soft Update incomplete Alert can be set. 1.On/Off setting 0 = FALSE, 255 =TRUE 2.Alert report priority: 0 to 15 Not available for YTA. 1. TRUE 2. 15 W 114 Power low Alert*2 The On/Off or priority for Power low Alert can be set. 1.On/Off setting 0 = FALSE, 255 =TRUE 2.Alert report priority: 0 to 15 1. TRUE 2. 15 W 115 Power Critical low Alert*2 The On/Off or priority for Power Critical low Alert can be set. 1.On/Off setting 0 = FALSE, 255 =TRUE 2.Alert report priority: 0 to 15 1. TRUE 2. 15 W 116 Fault prediction Alert*2 The On/Off or priority for Fault prediction Alert can be set. 1.On/Off setting 0 = FALSE, 255 =TRUE 2.Alert report priority: 0 to 15 Not available for YTA. 1. TRUE 2. 15 W 117 Environmental conditions Alert*2 The On/Off or priority for Environmental conditions Alert can be set. 1.On/Off setting 0 = FALSE, 255 =TRUE 2.Alert report priority: 0 to 15 1. TRUE 2. 15 W 118 Outside sensor limits Alert*2 The On/Off or priority for Outside sensor limits Alert can be set. 1.On/Off setting 0 = FALSE, 255 =TRUE 2.Alert report priority: 0 to 15 1. TRUE 2. 15 W 119 Out of service Alert*2 The On/Off or priority for Out of service Alert can be set. 1.On/Off setting 0 = FALSE, 255 =TRUE 2.Alert report priority: 0 to 15 1. TRUE 2. 15 W 120 Callibration problem Alert*2 The On/Off or priority for callibration problem Alert can be set. 1.On/Off setting 0 = FALSE, 255 =TRUE 2.Alert report priority: 0 to 15 1. TRUE 2. 15 W 121 Faults Sensor or actuator Alert*2 The On/Off or priority for Faults Sensor or actuator Alert can be set. 1.On/Off setting 0 = FALSE, 255 =TRUE 2.Alert report priority: 0 to 15 1. TRUE 2. 15 W 122 Faults Electronics Alert*2 The On/Off or priority for Faults Electronics Alert can be set. 1.On/Off setting 0 = FALSE, 255 =TRUE 2.Alert report priority: 0 to 1 1. TRUE 2. 15 W IM 01C50E01-01EN Object ID 1. UAPMO (continued) 2. UDO block Attribute ID Label Description Default value Handling 123 Faults process influence Alert*2 The On/Off or priority for Faults process influence Alert can be set. 1.On/Off setting 0 = FALSE, 255 =TRUE 2.Alert report priority: 0 to 15 Not available for YTA. 1. TRUE 2. 15 W 124 Faults noncompliance Alert*2 The On/Off or priority for Faults non-compliance Alert can be set. 1.On/Off setting 0 = FALSE, 255 =TRUE 2.Alert report priority: 0 to 15 Not available for YTA. 1. TRUE 2. 15 W 125 Other faults Alert*2 The On/Off or priority for Other faults Alert can be set. 1.On/Off setting 0 = FALSE, 255 =TRUE 2.Alert report priority: 0 to 15 Not available for YTA. 1. TRUE 2. 15 W 2 3 5 14 16 3. CO block 9-3 <9. Parameter Summary> 1 2 3 4 5 6 DESCRIPTION Indicates the version and model information of the downloaded data. STATE Indicates the present transition state. MAX_BLOCK_ Maximum block size. This value is smaller than the maximum SIZE data size of APDU. LAST_BLOCK_ Indicates the last downloaded block number. 0 means that no DOWNLOADED block has been downloaded. ERROR_CODE Indicates the error codes for DLError. 0 = noError 1 = Timeout 2 = ClientAbout 64 = Apply failure REVISION Indicates the version level of COMM_ENDPOINT, etc. COMM_ Indicates the Endpoint information. The following shows the ENDPOINT components. 1.Network address of remote endpoint 2.Transport layer port at remote endpoint 3.Object ID at remote endpoint 4.Stale data limit 5.Data publication period 6.Ideal publication phase 7.PublishAutoRetransmit 8.Configuration status COMM_ Indicates the Contract information. The following shows the CONTRACT components. 1.ContractID 2.Contract_Status 3.Actual_Phase PUB_ITEM_MAX Maximum PUB_ITEM value PUB_ITEM_NUM PUB_ITEM number PUB_ITEM Indicates the PUB_ITEM information. The following shows the components. 1.ObjectID 2.AttributeID 3.AttributeIndex 4.Size --- R ----- R R --- R --- R ----- R W --- R ------- R R W IM 01C50E01-01EN Object ID Attribute ID 4. 1 TRANSDUCER 2 block 3 4 5 6 7 8 9 11 12 14 5. AI1 block 6. AI2 block*2 9-4 <9. Parameter Summary> Label Tag Description Model Serial Number Burn Out*3 Hardware Burn Out Switch*2 Wireless Status Memo field available to write anything. Indicates the model name of the transmitter. Indicates the device number of the transmitter. Indicates the direction of the burnout switch on the integral indicator. (Burnout Low / Burnout High) Indicates the wireless communication status 1.Indicates either the initial Idle status or Join status. (Idle status / Join status) 2.Indicates whether Contract (Pub) has been established. (Not established / Established) 3.Indicates whether Contract (R/W) has been established. (Not established / Established) Display Selection Selects the LCD display 1.Indicates the display status of the AI1/AI2 PV value. (Displayed / Not displayed) LCD Mode Selects the LCD mode. 1.Indicates the On/Off mode. (Off / Intermittent) 2.Indicates whether or not Continue. ( Continuous Off / Continuous On) 3.Indicates the bar graph display (Bar graph: Not displayed / Bar graph: Displayed.) YTA Option Indicates the optional function supported by the device. This cannot be changed by the user.. 1.Indicates the unit system used. (SI system / Other) Special Cmd Special function parameter. 0.Initial value at the time of reading (None) 1.Squawk mode 2.Deep-sleep mode To start from the deep-sleep mode, either remove and reinsert the battery pack or use the provisioning device tool or the device configuration tool via infrared communication. Selects the power saving mode Power Saving 0.Off (Disable) Mode *2 1.On (Enable) Mesurement Rate Indicates the measurement period of process values. *2 1 LCD Intermittetnt Time *2 Process Value 2 Mode 3 Description Set the time to turn off display on the LCD indicator. Unit: second AI1/AI2 is a temperature output object. Indicates the primary analog value (or corresponding process value) and status used to execute this function. Allows updating data by specifying this for the Concentrator object. 1.Value: AI1/AI2 output value. 2.Status: Indicates the status of the AI1/AI2 output value. A universal parameter to indicate the block’s operation status. O/S, Auto, and Man can be selected. 1.Target: Specifies the AI1/AI2 mode. 2.Actual: Indicates the present AI1/AI2 mode. 3.Permitted: Indicates the mode that can be specified in Target. 4.Normal: Indicates the AI1/AI2 normal status mode. Default value Handling Transducer ----Burn out High W R R R 1. Idle status R 2. Not established 3. Not established Displayed W 1. Off W 2. Continuous Off 3. bar graph displayed Specify when R ordering 0 W 1 W 30 seconds R 60 seconds W 1. --2. --- W 1. Target = W Auto 2. Actual = Auto 3. Permitted = Auto | Manual | OOS 4. Normal = Auto Concentrator OID Indicates the Concentrator object value that corresponds to the --R data update of the PV value. IM 01C50E01-01EN Object ID 5. AI1 block 6. AI2 block*2 (continued) 9-5 <9. Parameter Summary> Attribute Label ID 4 Scale 26 27 28 29 30 51 52 53 57 58 59 61 102 Tag Description Description Allows specifying the upper or lower limit for the PV scaling, unit code, etc. 1.EU at 100%: Indicates the upper limit to the PV value. 2.EU at 0%: Indicates the lower limit to the PV value. 3.Units Index: Indicates the set unit used for the PV value. 4.Decimal: Indicates the number of digits after the decimal point to display on the LCD unit. A universal parameter to store the comment that describes the tag Process Value Allows adjusting the damping time constant for the PV value. Filter Time Damping time constant set longer than update Time. Setting unit: Second. Simulate Switch A simulation function switch for the AI1/AI2 object test (Disable/ Enable) Transducer Value When SIMULATE_SWITCH is set to Disable, this value is used as the input value for the AI object. The temperature value calculated from the physical value of the sensor. The Bias value is added to the temperature value Simulate Value When SIMULATE_SWITCH is set to Enable, this value is used as the input value for the AI1/AI2 object. The input value can be changed, but technical unit is not converted to output value of the AI1/AI2 object. Lin Type Sets the sensor type. Select any of Unused, Pt100 (IEC751), Pt200 (IEC751), Pt500 (IEC751), Type B (IEC584), Type E (IEC584), Type J (IEC584), Type K (IEC584), Type N (IEC584), Type R (IEC584), Type T (IEC584), mV, and Ohm. Bias Adds the BIAS temperature value to the temperature value. This is set as a temperature value to which a value converted to the unit set in the Units Index of Sensor Range is added. Sensor Range Indicates the basic information on the sensor used. 1.EU at 100%: Indicates the upper limit of the sensor set in Lin Type. 2.EU at 0%: Indicates the lower limit of the sensor set in Lin Type. 3.Units Index: Sets the unit for Transducer Value, Simulate Value, Bias, EU at 100%, EU at 0%, Reference Junction Temp and External Reference Junction Value. 4.Decimal: Unused in YTA. Reference Indicates the terminal block temperature value for the cold Junction Temp junction compensation. Selection of Sets the cold junction compensation when using the Reference thermocouple sensor. 0.No cold conjunction compensation (No Reference) Junction 1.Internal temperature value (Internal) 2.External temperature value (External) External Sets the external temperature Sets the external temperature Reference when setting the cold junction temperature value of the Junction Value thermocouple to the external temperature value in Selection of Reference Junction. Sensor Sets the number of connections when Lin Type is the resistance Connection temperature sensor. 0: 2Wire 1: 3Wire 2: 4Wire* *Not applicable for AI2. Sensor Serial Indicates the serial number of the sensor, which corresponds to Number the tag assigned to the temperature sensor. Default value Handling 1.EU at 100% W = --2.EU at 0% = --3.Units Index = °C 4.Decimal =1 AI1 : W Temperature 15 sec W Disable W --- R 0 W --- W 0 W 1. EU at W 100% = --2. EU at 0% = --3. Units Index = --4. Decimal =1 --- R 1 W 0 W --- W --- W IM 01C50E01-01EN Object ID 5. AI1 block 6. AI2 block*2 (continued) 9-6 <9. Parameter Summary> Attribute Label ID 103 Cal Point Lo 104 Cal Point Hi 105 Cal Point Clear 106 Process Value Type 107 Reference Junction Unit 108 Burn Out Type*2 Description Sets the zero-point adjustment for the input adjustment (zerogain adjustment ) of the sensor. Be sure to perform adjustment with Cal Point Lo (zero-point) first. Sets the gain-point adjustment for the input adjustment (zerogain adjustment) of the sensor. Resets the input adjustment value of the sensor to the factory setting. Selects data to output to PV.Value. 0.% value after the scaling process is performed 1.Actual target value after the filter process is performed Sets the unit for Reference Junction Temp and External Reference Junction Value. Select any of °C (Celsius), K (Kelvin), °F (Fahrenheit), and °R (Rankine). Sets the burnout of the PV value at the detection. 0: The direction specified by hard ware switch 1: Set to higher side 2: Set to lower side Default value Handling --- W --- W 0 W 0 W °C W 0 W (Note)R: Read only, W: Read and Write (Note)“Factory NAMUR category” refers to the four categories (C: Check function, M: Maintenance required, F: Failure, and O: Off specification) according to NAMUR NE107. *1: *2: *3: NAMUR NE107 “Self-Monitoring and Diagnosis of Field Devices” Applicable for dual input type with detachable antenna, Amplifier housing code 8 and 9. Applicable for single input type with integral antenna, Amplifier housing code 7. IM 01C50E01-01EN Table 9.2 Diagnostic Status Detail Bit Diagnostic Status Detail Bit22 Bit21 SENSOR1 ZERO ADJ ERR SENSOR2 SPAN ADJ ERR *1 Bit20 Bit15 Bit14 Bit13 Bit12 SENSOR2 ZERO ADJ ERR *1 AI1 O/S MODE AI2 O/S MODE *1 AI1 SIMULATE MODE AI2 SIMULATE MODE *1 Diagnostic status NAMUR assignment bit Description Diagnostic Status Detail.1 Bit31 AMP ERR Bit30 MEMORY ERR Bit27 Firm Update ERR Bit26 ADC ERR Bit23 SENSOR1 FAILURE Bit22 SENSOR2 FAILURE *1 Bit21 TERM SNS FAILURE Bit16 CRITICAL LOWBAT *1 Bit15 LOWBAT Bit14 LOWBAT FOR DEEPSLEEP *2 Bit11 FIRMWARE CONDITION CHECK Diagnostic Status Detail.2 Bit31 SENSOR1 TEMP HI Bit30 SENSOR1 TEMP LO Bit29 SENSOR2 TEMP HI *1 Bit28 SENSOR2 TEMP LO *1 Bit27 AMB TEMP HI Bit26 AMB TEMP LO Bit23 SENSOR1 SPAN ADJ ERR *1: *2: 9-7 <9. Parameter Summary> Amplifier failure Memory failure Firmware write error ADC failure Sensor 1 burnout Sensor 2 burnout CJC sensor burnout Deep sleep due to low battery Low battery Deep sleep due to low battery Internal control error detection Bit27 Bit27 Bit27 Bit27 Bit26 Bit26 Bit26 Bit20 Bit19 Bit20 Bit21 F F F F F F F M M M M Sensor 1 temperature higher limit scale out Sensor 1 temperature lower limit scale out Sensor 2 temperature higher limit scale out Sensor 2 temperature lower limit scale out Ambient temperature higher limit scale out Ambient temperature lower limit scale out Sensor 1 faulty input of span adjustment value Sensor 1 faulty input of zero adjustment value Sensor 2 faulty input of span adjustment value Sensor 2 faulty input of zero adjustment value AI1 O/S Mode AI2 O/S Mode AI1 Simulate Mode AI2 Simulate Mode Bit22 Bit22 Bit22 Bit22 Bit22 Bit22 Bit25 O O O O O O C Bit25 Bit25 C C Bit25 Bit24 Bit24 Bit17 Bit17 C C C C C Applicable for dual input type with detachable antenna, Amplifier housing code 8 and 9. Applicable for single input type with integral antenna, Amplifier housing code 7. AI algorithm Operator MODE and PV.Status handling MODE.Target RJ_TEMP RJ. RJ_TYPE Operator LIN_TYPE NO REF Input Sensor Signal Linearization + PV SIMULATE Switch EXT_RJ_VAL Linearization Simulate value + Filtering SCALE Transducer value Figure 9.1 BIAS PV AI publish Man PV_TYPE INPUT_RANGE SENSOR_CONNECTION O/S Auto PV PV_FTIME Data Publication Period PV Scale Operator F0901.ai Example schema of analog input object IM 01C50E01-01EN 10-1 <10. General Specifications> 10. General Specifications 10.1 General Specification Communication Protocol ISA100.11a protocol Data Rate 250 kbps Frequency 2400 - 2483.5 MHz license free ISM band Radio Security AES 128 bit codified RF Transmitter Power Max. 11.6 dBm (fixed) Antenna +2 dBi Omni directional monopole type Measurement Range See Table 10.1 Accuracy See Table 10.1 Cold Junction Compensation Accuracy ± 0.5°C Ambient Temperature Effect See Table 10.2 Battery Pack Refer to GS 01C50E01-01EN Update Time 1 to 3600 s selectable* * Minimum update time is 2 s at dual input sensor use. Input Single input: Amplifier housing code 7 Dual input: Amplifier housing code 8 and 9 Input type is selectable: Thermocouples, 2-, 3-, and 4-wire RTDs, ohms and DC milivolts. See Table 10.1. 4-wire is available for Sensor 1 input. See Table 10.1. Input Signal Source Resistance ( for T/C, mV ) 1 kΩ or lower Input Lead Wire Resistance ( for RTD, Ohm ) 10 Ω per wire or lower Power Supply Specifications Battery: Use the dedicated battery pack. Rated voltage: 7.2 V Rated capacity: 19 Ah Ambient Temperature Limits - 40 to 85°C ( - 40 to 185°F ) - 30 to 80°C ( - 22 to 176°F ) LCD visible range Ambient Humidity Limits 0 to 100% RH Zero-gain Adjustment Set the amount of zero-gain point adjustment Integral Indicator (LCD display) 5-digit numerical display, unit display and bar graph. The indicator is configurable to display the following variables periodically. °C, K, °F, °R, mV and Ω, 0 to 100 % bar graph, and alternate display of Sensor 1 and Sensor 2 process value Sensor Burnout Select either HIGH or LOW as the configuration. Self Diagnostics Amplifier failure, sensor failure, configuration error, battery alarm, wireless communication alarm and over-range error for process variables. EMC Conformity Standards EN61326-1 Class A, Table 2 (For use in industrial locations), EN61326-2-3 IM 01C50E01-01E <10. General Specifications> 10-2 R&TTE Conformity Standards ETSI EN 300 328, ETSI EN 301 489-17, EN61010-1 • Indoor/Outdoor use AT EE IE NL ES CH BE FI IT PL SE BG FR LV PT GB CY DE LT RO IS CZ GR LU SK LI DK HU MT SI NO Outdoor use limited to 10mW eirp within the band 2454-2483.5 MHz. Provided that the same shall not apply to use with 0 dBi antenna. Consult Yokogawa to obtain 0 dBi antenna. Regulation Conformity of the Wireless Module • FCC Approval • IC Approval Degrees of Protection IP66/IP67, NEMA4X Connections See Model and suffix codes Table Housing Low copper cast aluminum alloy with polyurethane, mint-green paint. (Munsell 5.6BG 3.3/2.9 or its equivalent) Name plate and tag 304 SST tag plate wired onto transmitter. Weight 2.8 kg (6.2 lb) Without battery pack and mounting bracket. IM 01C50E01-01E Table 10.1 10-3 <10. General Specifications> Sensor type, measurement range, and accuracy Sensor Type Standard B E J K N T/C IEC584 R S T Pt100 Pt200 Pt500 RTD IEC751 mV - Ohm - Measurement Range 100 to 300°C ( 212 to 572°F ) 300 to 400°C ( 572 to 752°F ) 400 to 1820°C ( 752 to 3308°F ) -200 to 1000°C ( -328 to 1832°F ) -200 to 1200°C ( -328 to 2192°F ) -200 to 1372°C ( -328 to 2502°F ) -200 to 1300°C ( -328 to 2372°F ) -50 to 100°C ( -58 to 212°F ) 100 to 1768°C ( 212 to 3214°F ) -50 to 100°C ( -58 to 212°F ) 100 to 1768°C ( 212 to 3214°F ) -200 to 400°C ( -328 to 752°F ) -200 to 850°C ( -328 to 1562°F ) -200 to 850°C ( -328 to 1562°F ) -200 to 850°C ( -328 to 1562°F ) -10 to 100 [mV]*1 -10 to 220 [mV]*2 0 to 2000 [Ω] Accuracy ± 5.0°C ( ± 9.0°F ) ± 2.0°C ( ± 3.6°F ) ± 1.5°C ( ± 2.7°F ) ± 0.4°C ( ± 0.8°F ) ± 0.5°C ( ± 0.9°F ) ± 0.6°C ( ± 1.1°F ) ± 0.6°C ( ± 1.1°F ) ± 1.7°C ( ± 3.1°F ) ± 0.8°C ( ± 1.5°F ) ± 1.7°C ( ± 3.1°F ) ± 0.8°C ( ± 1.5°F ) ± 0.5°C ( ± 0.9°F ) ± 0.3°C ( ± 0.6°F ) ± 0.6°C ( ± 1.1°F ) ± 0.5°C ( ± 0.9°F ) ± 0.03 [mV] ± 1 [Ω] Note: For T/C input, add Cold Junction Compensation Accuracy (± 0.5°C) to the total accuracy. For RTD input of the 2-wire connection, add a corrected value (± 0.1°C) to the total accuracy. *1: Applicable for amplifier housing code 7. *2: Applicable for amplifier housing code 8 and 9. Table 10.2 Effects of ambient temperature Sensor Type B E J K T/C N R, S T Pt100 Pt200 RTD Pt500 mV Ohm Note1: Note2: Temperature Effects per 1.0°C Change in Ambient Temperature 0.2°C - ( 0.066% of ( t - 100 ) ) 0.07°C - ( 0.0057% of ( t - 300 ) ) 0.037°C 0.0035°C - ( 0.00492% of t ) 100°C ≤ t < 300°C 300°C ≤ t < 1000°C t ≥ 1000°C t < 0°C 0.0035°C + ( 0.00146% of t ) 0.0039°C - ( 0.00529% of t ) 0.0039°C + ( 0.00149% of t ) 0.00521°C - ( 0.00707% of t ) 0.00521°C + ( 0.00182% of t ) 0.0077°C - ( 0.00918% of t ) 0.0077°C + ( 0.00136% of t ) 0.04°C - ( 0.057% of t ) 0.04°C + ( 0.0102% of t ) 0.0316°C - ( 0.001% of t ) 0.0175°C + ( 0.00173% of t ) 0.00513°C - ( 0.00631% of t ) 0.00513°C + ( 0.0008% of t ) 0.0048°C + ( 0.0016% of absolute value t ) 0.0038°C + ( 0.0015% of absolute value t ) 0.0028°C + ( 0.0016% of t ) 0.003°C + ( 0.0014% of absolute value t ) 0.002°C + ( 0.0016% of t ) 0.2μV + ( 0.0015% of reading ) 0.001Ω + ( 0.0011% of reading ) t ≥ 0°C t < 0°C t ≥ 0°C t < 0°C t ≥ 0°C t < 0°C t ≥ 0°C t < 0°C 0°C ≤ t < 100°C 100°C ≤ t < 600°C t ≥ 600°C t < 0°C t ≥ 0°C Entire Sensor Input Range t < 650°C t ≥ 650°C t < 650°C t ≥ 650°C Entire Sensor Input Range Entire Sensor Input Range Measurement Range The “t” on Table 10.2 means the value of the reading in °C. The “absolute value t” on Table 10.2 means the absolute value of the reading in °C. [ Example of absolute value t ] When the temperature value is 250 Kelvin, abs reading is 23.15, absolute (250 - 273.15). IM 01C50E01-01E <10. General Specifications> 10-4 10.2 Model and Suffix Codes Model Suffix Codes Descriptions YTA510 . . . . . . . . . . . . . . . . . . . . . . Temperature Transmitter Output Signal -L. . . . . . . . . . . . . . . . . . . . . Wireless communication (ISA100.11a) Amplifier Housing 7 . . . . . . . . . . . . . . . . . . . Single input type, cast aluminum alloy with integral antenna 8 . . . . . . . . . . . . . . . . . . . Dual input type, cast aluminum alloy with detachable antenna (2 dBi)*3 9 . . . . . . . . . . . . . . . . . . . Dual input type, cast aluminum alloy without antenna (N connector)*2*3 G 1/2 female, two electrical connections without bilnd plugs 0 . . . . . . . . . . . . . . . . 1/2 NPT female, two electrical connections without bilnd plugs 2 . . . . . . . . . . . . . . . . M20 female, two electrical connections without bilnd plugs 4 . . . . . . . . . . . . . . . . G 1/2 female, two electrical connections with a bilnd plug 5 . . . . . . . . . . . . . . . . 1/2 NPT female, two electrical connections with a bilnd plug Electrical Connection 7 . . . . . . . . . . . . . . . . M20 female, two electrical connections with a bilnd plug 9 . . . . . . . . . . . . . . . . G 1/2 female, two electrical connections with a SUS316 bilnd plug A. . . . . . . . . . . . . . . . 1/2 NPT female, two electrical connections with a SUS316 bilnd plug C. . . . . . . . . . . . . . . . M20 female, two electrical connections with a SUS316 bilnd plug D. . . . . . . . . . . . . . . . Integral Indicator D. . . . . . . . . . . . . . with digital indicator SUS304 stainless steel 2-inch horizontal pipe mounting bracket *1 B. . . . . . . . . . . D. . . . . . . . . . . SUS304 stainless steel 2-inch vertical pipe mounting bracket *1 Mounting Bracket J . . . . . . . . . . . SUS316 stainless steel 2-inch horizontal pipe mounting bracket *1 K. . . . . . . . . . . SUS316 stainless steel 2-inch vertical pipe mounting bracket *1 N. . . . . . . . . . . None --A. . . . . . . . . Always A --A. . . . . . Always A Option codes / Optional specifications *1: *2: *3: For flat-panel mounting, please prepare bolts and nuts. Order the antenna separately from accessary option. Remote antenna cables can be attached. Order separately from accessary option. 10.3 Optional Specification Item Painting Calibration unit Color change Coating change °F or °R Description Amplifier cover only Munsell code; N1.5, black High anti-corrosion coating Code P X2 D2 Table A. Settings upon shipment Tag No. Calibration range and unit “Blank” or as specified in order See Table 10.1. Measurement Range or as specified in order IM 01C50E01-01E 10-5 <10. General Specifications> 10.4 Optional Specifications (For Explosion Protected type) Item Factory Mutual (FM) Canadian Standards Association (CSA) ATEX IECEx Description FM Intrinsically safe,non-incendive Approval Intrinsically Safe for Class I, Division 1, Groups A, B, C & D, Class II, Division 1, Groups E, F & G and Class III, Division 1, Class I, Zone 0, in Hazardous Locations, AEx ia IIC Nonincendive for Class I, Division 2, Groups A, B, C & D, Class II, Division. 2, Groups F & G, and Class III, Division 1, Class I, Zone 2, Group IIC, in Hazardous Locations Sensor Circuit Parameter: Voc=6.6V, Isc=48mA, Po=78mW, Ca=5µF, La=30mH CSA Intrinsically safe Approval [For CSA C22.2] Intrinsically Safe for Class I, Division 1, Groups A, B, C & D, Class II, Division 1, Groups E, F & G, Class III, Division 1, Nonincendive for Class I, Division 2, Groups A, B, C & D, Class II, Division 2, Groups F & G, Class III, Division 1 [For CSA E60079] Ex ia II C T4 Sensor Circuit Parameter: Uo=6.6V, Io=48mA, Po=78mW, Co=5µF, Lo=30mH ATEX Intrinsically safe Approval II 1G Ex ia IIC T4 Ga Sensor Circuit Parameter: Uo=6.6V, Io=48mA, Po=78mW, Co=5µF, Lo=30mH IECEx Intrinsically safe Approval Ex ia IIC T4 Ga Sensor Circuit Parameter: Uo=6.6V, Io=48mA, Po=78mW, Co=5µF, Lo=30mH FS17 CS17 KS27 SS27 Optional Accessories Product Battery pack assembly Batteries*1 Battery case Remote antenna cable Antenna *1: *2: Code Part number F9915NQ F9915NR F9915NK F9915KU F9915KV F9915KW F9915KX F9915KY Specification Battery case, Lithium-thionyl chloride batteries 2 pieces Lithium-thionyl chloride batteries, 2 pieces Battery case only 3 m with mounting bracket 13 m (3 m+10 m), with arrester and mounting bracket 2 dBi standard antenna 0 dBi antenna 6 dBi high gain antenna*2 Alternatively, Tadiran SL-2780/S or TL-5930/S batteries can be purchased from your local distributer. Use of high gain antenna is limited by local regulation of radio and telecommunication law. Consult Yokogawa for details. High gain antenna must be connected to the transmitter by using remote antenna cables. IM 01C50E01-01E <10. General Specifications> 10-6 10.5 Dimensions 2-inch horizontal pipe mounting (Amplifier housing code 7) Unit: mm (approx. inch) 191 (7.52) 88 (3.46) 82*2 (3.23) 39 (1.54) Mounting bracket Ø110 (4.33) Ground terminal Electrical connection 56 (2.20) 2-inch pipe (O. D. 60mm) 40 (1.57) 15 (0.59) 35 (1.38) Ø110 (4.33) Electrical connection 188 (7.40) Terminal cover 128 (5.04) Integral indicator B 103 (4.06) 248*1 (9.76) A 24 (0.94) 70 (2.76) 90 (3.54) 140 (5.51) *1: When amplifier housing code 8 is selected, the value is 307 mm (12.09 inch). When amplifier housing code 9 is selected, the value is 187 mm (7.36 inch). In both cases, the figures are shown as A or B accordingly. *2: When ampilfier housing code 8 or 9 is selected, the value is 81 mm. F1001.ai 2-inch vertical pipe mounting (Amplifier housing code 7) 191 (7.52) 88 (3.46) 103 (4.06) 110 (4.33) 82*2 (3.23) 24 (0.94) Ø110 (4.33) Ø110 (4.33) 35 (1.38) 104 (4.09) 140 (5.51) 61 (2.40) 128 (5.04) Electrical connection 107 (4.21) B 39 (1.54) Terminal cover 248*1 (9.76) Integral indicator A Unit: mm (approx. inch) Mounting bracket 2-inch pipe (O. D. 60mm) 98 (3.86) 204 (8.03) Ground terminal Electrical connection *1: When amplifier housing code 8 is selected, the value is 307 mm (12.09 inch). When amplifier housing code 9 is selected, the value is 187 mm (7.36 inch). In both cases, the figures are shown as A or B accordingly. *2: When ampilfier housing code 8 or 9 is selected, the value is 81 mm (3.19 inch). F1002.ai IM 01C50E01-01E <10. General Specifications> 10-7 Terminal Configuration Infrared Configuration Ground terminal Infrared port F1003.ai F1004.ai Input Wiring Single input 1 2 (+) 3 (–) 4 5 1 2 3 (A) (B) 1 2 3 (A) (B) (B) 1 2 3 4 4 4 5 5 5 T/C or DC milivolts three-wire RTD or ohm two-wire RTD or ohm (A) (A) (B) (B) four-wire RTD Dual input (Amplifier housing code 8 and 9) 1 2 3 4 5 (+) 1 2 3 4 (–) (+) T/C or DC milivolts 5 (A1) (B1) (B1) (B2) (B2) (A2) three-wire RTD or ohm 1 2 3 4 5 (+) 1 (–) 2 (B) (B) (A) T/C and three-wire RTD or ohm 3 4 5 (A1) (B1) (B2) (A2) two-wire RTD or ohm F1005.ai IM 01C50E01-01E i Revision Information Title : YTA510 Temperature Transmitter Manual No. : IM 01C50E01-01EN Edition 1st 2nd Date Aug. 2010 Oct. 2010 3rd Apr. 2011 Page — 2-5 2-7 10 - 4 ― 4th 5th Dec. 2011 Aug. 2012 8-5 ― Revised Item New publication 2.7.3 Add CENELEC ATEX (KEMA) Certification 2.7.4 Add IECEx Certification 10.4 Add option code /KC27 and /SS27. • Adapted to device configuration tool with infrared communication function. • Part number change Battery pack: F9915MA à F9915NQ Delete F9915MX Battery: A1133EB à F9915NR Delete battery case part number 8.4.6 Add battery case part number of F9915NK. Release of amplifier housing code 8 and 9. IM 01C50E01-01EN