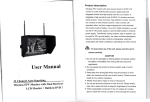
1
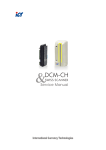
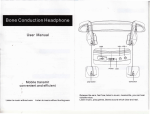
Thank you for purchasing our wireless colour Video door phone system
Before Carrying outthe insta"ation,please read this userls manuaI Carefu"y
and fo"ow aⅡ the guide"nes during the process of iρ sta"ation and
operation,
Contents
¨・
¨●
…1
…・
…・
¨・
¨・
¨ …・・
… …・・
¨・
¨・
¨・
¨・
¨・
…・
… …・・
… ¨●●
… …・・
Features… ・・
Co∷ mponents
checkⅡ
st・
… …・・
… …・1
… …・・
… ¨・・
… ¨・・
¨ ¨・・
¨・
¨ ¨・・
¨ ¨・・
… …・・
¨¨・・
… …・2
……・・
¨¨・・
¨ ¨・・
¨ ¨・¨・・
…¨・・
¨ ¨・・
… ¨・・
ProduCts descHption¨ ・・
Ca"un"¨ ・¨・¨・¨・¨・¨・¨・¨・¨・¨・¨・¨・…・…・¨・¨・¨・¨・¨・¨・…・¨・¨・¨・2
¨・
¨・
¨・
¨2
¨・
¨・
¨・
¨・
¨・
…・
¨・
¨・
¨・
¨・
¨・
¨・
¨・
¨・
¨・
…・
¨・
¨・
¨・
Handset・ ¨ ・
¨¨・3
¨¨・・
¨¨・・
…¨・¨・・
¨¨・・
¨¨・・
¨¨・・
……・・
……・・
¨¨・・
Handset cradIe・ …¨・・
¨ ¨・・
…4
¨ ¨・・
¨ ¨・¨・・
¨ ¨・・
¨ ¨・¨・・
・・
¨ ¨・・
… …・・
Charge nxing prOceduFe¨
¨・
¨・
¨・
¨・
¨・
¨5
¨・
¨・
¨・
…・
¨・
¨・
¨・
¨・
¨・
…・
…・
…・
…・
Handset button desc"ption… ・・
¨ ¨・¨・¨・¨・5
¨ ¨・¨・・
… …・…・…・…・¨・¨・¨・…・¨・・
Menu desCription¨ ・¨・・
COde description ,¨
.¨ .¨
¨・
¨・
¨・
…・
…・
…6
¨・
¨・
¨・
¨・
¨・
¨・
¨・
¨・
…・
・
¨・
¨・
…・
…・
…・
'氵
¨・
¨・
¨・
…・
…7
¨・
¨・
¨・
¨・
¨・
…・
…・
¨・
¨・
¨・
¨・
…・
…・
…・
¨・
¨・
…・
seuing… ・Ⅱ・・
…8
…・
…・
…¨・・
¨¨・・
…・
¨・
¨・
¨・
¨・
¨・
¨・
…・
…¨・¨・・
・¨・・
¨・
…・
…・
i
}
Bas;c Operation¨
—
¨・
¨ ¨・9
¨ ¨・¨・・
¨・
¨・
¨・
¨ ¨・・
¨・
¨ ¨・・
¨・
¨ …・・
…・
¨ ¨・・
…・
…・
surveⅢ ance¨ ・・
l丨
丨
Memory card¨ ・Ⅱ・¨・¨●¨●…・…・…・¨・¨・…・…・…・¨・¨・¨・¨・¨・¨・¨・…・¨・¨・9
LⅡ
… …・10
¨・¨・¨・¨・¨・¨・・
Insta"ation・ ¨ ¨・¨・¨・¨・…・…・…・¨・¨・¨・¨・…・
Ι
Unlocking tirne setung¨ ・¨・¨・…・…・…・…・…・…・¨・¨・¨・¨・¨・¨・…・…・¨・¨・¨・10
匚
匚
¨ 11
¨・
¨ ¨・・
¨・
…・
¨ ¨・・
¨・
…・
¨・
… …・・
…・
…・
… …・・
…・
¨・
…・
… …・・
¨・
Unlo0k¨ ・・
匚
Ⅰ
… …・・
… …・12
¨ ¨・・
… ¨・¨・・
¨ ¨・・
… …・・
… …・・
… …・・
TechniCal spe0ifications… ・・
l⒒
¨ ¨・・
¨…・13
……・・
… …・・
……・・
……・・
¨¨・・
……・・
……・・
¨ ¨・・
TroubIe shooting・ …・
F■
¨・
…・
…・
¨・
… …・14
…・
……・…・・
…¨・・
…・
…・
…・
…・
Propaga刂 on of ra洳 waves… ・・
■
Ⅱ
¨¨・…・…・・
… 14
……・・
…¨・・
……・・
…¨・¨・¨・・
Handset battery speCifications・ ¨…・・
■
FF:L’
¨・
…・
…・
…・
…・
…
¨・
¨・
¨・
…・
…・
…・
…・
…・
¨・
…●
¨●
¨●
…・
…・
¨・
NOtes… ・・
比
15
¨・
¨●
¨●
¨・
…・
…・
… 15
…・
…・
…・
…・
…・
…・
…・
…・
…・
¨・
¨・
…・
…・
¨・
rantee… ・・
丨
}
Features
Products description
HANDSET
● lA/ireIess colour Video doorphone
●
Mobile handset w"h24"TFT-LCD sCreen
● Iden刂 fy and screen callers
24G antenna
● Unlock doors remotely for visitors
● 12selectab丨 e ringtones
●
Handsetto handset communication
status indicator
oN/0FF
● lnfra red camera in outside ca"station to see Ca"ers at night
● Snap and recording function
24inch LCD
● PhotOs and recordings check and play
● BuⅡ t— in surve"lance function
Code cIearing
● EXpand to a2-way system by adding a ca"station&handset
Unlock
● ReGhargeable battery via rnini UsB inte汀ace of handset
● Easy to insta"
,ˇ
● Range in free field300meters★
Reset
1onitor
Ansvver
Brightness+
BHghtness-
,ˇ
Components checkⅡ st
NavigatiOn keys
Package contents:
0ne outdoor camera/ca"un", one handset rnonitor(including Li-ion
rechargeable
battery),one charger for handset mon"or,cradIe and screws for fiXing the ca"
CALL UN丨 T
station on the vva"
Handset mon"or
Charger
Ca"unk
POWer adaptor
Cradle
★
Please read importantinformauon° n page14
2
— ———
1iCrophone
Handset cradIe∶
Chargerfixing procedure
1.Desk mounted
2.WaH rnounted
(6)
—————
3
4
—
Handset button description
Code description
“
oN/(DFF” button∶
“]0冲 ”
∶ls
to povver
on/povver
off of vvireless
handset
rnonitor
used to∶ "is
a) used
answer
the ca"s
vvhen visitors
press the
ca" button
on the
outdoor ca"un";b)as the con】 rmauon button when performing the selec刂 on;c)as
the menu button when pressing at standby status;c)turn on/off the infrared"ghts
l/Vhen camera ls on
∶◆ I:犁 :俘 JF:∶
;::∶ r秽 %牦 :扌 %揣 舻滗;T泔 丫光:昆 :F∶ 涅瞥::g
“ 1” ∶
snap key at camera working status;EsC key at menu
“●>” ∶Recording key at camera working status;RlGHT key at menu(Time set)
<口
“宁0”
∶Ⅱis used to operate an electric Iock release
“ ”
日口 ∶ls used to switch on/offthe camera in outdoor ca"unitin orderto view Outside
in standby status(NOtfunction in some model)
“
+” ∶ltis used to increase brightness
“^ˉ ”
∶ltis used for reducing brightness
“(Φ ”
∶ls used to dear the preVious code and r(≥ selthe
Code securty password lo
defau"four0000 After this operation, you shou|d carry out the coding procedure
Note∶
When the system is purchased as a kit,the handset and ca"unit have
been coded together atthe factory.
Match Code
⑶ ”button to
1)Enter code menu and se丨 ect MatGh Gode submenu,press the“ 《
confirrn the operation,then it wi"enter the coding status
2)At this刂 me,press the call button in outdoor cam0ra when Ⅱis in standby status
untilthe red indicator remains lit and creates one sound“
D” ,then
reIease the button
and it VV"l enterthe coding status
3)lf the handset monitor shows the letters“ success” W"hin16s, the Coding is
suCcessfu丨 and the ca" station and handset monitor have successfu"y paired;
at this tirne,the outdoor Ca"station Ⅵ
`i"create3sounds“
DDD”
lf the handset
monitor shoⅥ /s the letters IIfaⅡ ed" VVithin 16S` then " means that the coding is
fa"ed and the outdoor station Vvi"have no response
After successful coding,the handset rnonitoris No.日
if Coding is fa"ed,you should do the coding again.
NOte∶
handset(default);
agaIn
“
0” ∶
Reset
Give cOde and Recelve code
ke≯
((DnIy required、 ″
hen adding one:η ore handset rnonito∴
Power On`off handset
Press and hoId the“
0N/0FF” button vvhen the handset rnonitoris in the OFF status,
“
‘
until the 24 inch TFT¨ LCD dispIays l/Velcome” and sounds ‘
E)i”
tone, then
release the button It means that the handset rnonitoris entering into the ON status
Left up of screen displays the strength of signal and handset no(defau"is 1),the
strength of signal e矸 eCtive only at communication Right above displays the e丨 ectric
quantity,it’
d be Gharged vvhen itlovv to leVe11 Red indicator
ghts vvh"e Charging and
Ⅱ
go out afterfu"y charged
Press and hold the“
0N/oFF” button when the handset rnonⅡ oris in ON status,then
the24inch TFT-LCEl w"l shovv“ Goodbye” and Greate one“ Dr tone,then release the
button This indiCates thatthe handset rnonitoris entering into oFF status
When the system is purchased as a kit,the handset and caⅡ unit haˇ e
q口
D)”
m⒛ d№ r汛
‰楸 苗蹄吒拢v溯 罗
VVithin16s,if you hearthe three“
the coding has been successfu丨
DDD”
c ea℃
d№ndset澜
press
tones and the sGreen shoVVs llsuCCess″
.otherwise you′ d code it again
2)After finishing code` you′ d manua"y press the EsC key of the giving
Code handset to exit Give Code status or vvait60s for the auto exit.
Note∶ Before coded,you’ d cIearthe code of handset which、 ″
"I be Coded。
ear Code
At ()lear code submenu`you can select Clear to cIear the Code of the
handset or select Back to escape c丨 ear code.
”
the“ ◎ butt。 n b carry outthe∞
%u can引 so町 ess
been coded together atthe factory.
Press the‘
1)Enter code menu ofthe coded handset and select Give code submenu,press the
“
】
0冲 ”key of coded handset toienter Give code status,use Navigation key to select
C丨
MENu descHption
Note∶
)
Adding one rn。 re handset rnonitor∶
dedea"ng
button at standby status then enter Main menu of handset,there are
瞿e杯 :F:;Tψ 亻
s:;丿 ;∶
:踪 ::u早:;::⒐
Cal
yE玳 则⑾蚓
Ⅲ
哎
“
猁
Code Menu:
Enter COde menu, screen disp丨 ay∶ lnput Passvvord∶ Password∶ 0000 The default
password are four0,you just press the幻 ⑾)” key to con】 rm and enter code submenu,
There are 6 "ems∶ Match Code,Give Code,ReceiVe code,Clear Code0Wn lD
set,PassⅥ /ord~setup
—
— r5
○wn lD set
By this submenu you can know the handsetiden刂 fy number and you can change
the number by∪ p/DOvvn key Defau"the first coded handsetis no1,the second
code¤ handsetis no2 The identify numberis dispIayed on Ieff up corner
Note:The2handsets can’ t havethe samelD no.in one system.
,
Password Setup
Photo Fnenu
By this submenu you can resetthe security password of Code Use Right key to
select the digit,use Up/DOvvn key to increase/decrease the number,press“
I〈
Enter Photo rnenu,the sCreen w"I display the fiIe names of photo already taken,
”
)” key
seIect one n丨 e and press the吓 ⑴ key w"I enter submenus of View,Delete,Delete
A",Ghoose the iten1you Ⅵ/antto operate and press‘ 、
⑾ key to confirm or press Left
key to escape
)”
to con】 rm The screen vv"I display“ success” ifthe old passwOrd is correct,if the old
passWord is Wrong the screen will display“
FaiIed”
)”
ESC key(Left key)can terminate
the setup and escape to previous rnenu
NOte汀 he defau"password offactory are four O Press the Clear code key踅
Video rnenu
D” ak
leI side wⅢ resetthe password to four o
Enter\/ideo rnenu,the screen w"l disp!ay the file names of video already recOrded,
select one f"e and press the“
I日
’
”
〉
key w"丨 enter submenu of Play,Delete,Delete
A",choose the"em you wantto operate and press“
setting
l
Ca"History fnenuy
Enter Ca"History menu the screen
Ⅵ
respond by handset,aIso you can play or`i"display
deIete it the auto
Ringing tone
1’
key to con币 rm or press Left
I
Auto REC and Version
∶
甘忠
)”
key to esCape
Enter set"ng menu,there are six submenus∶
Ringing tone,Ringing type,Time/Date set,Back"ghttime,
ptl)早
1u”
g凸
l:找 ,t;‖ 占
悍
吴
甘
苜
早
l引 ::男 社帚
甲;8:|瑟 刂
fFvJ∫
Exit menu
}丨 ;∶
f品
f丫
Bythis menu the screen wi"escape to standby status
Ringing type
Basic operation
There are fourringing types∶ Ring onIy,Vibrate0nly,Ring+Vibrate,siIence
、ou can seleGt by Up/Down key and press“ I⑴ )” to confirm
Time/Date set
即$辟 r跚 潲耀JP塥 蹴黾
甜
e by Left/购
m:i{{:丨
REC fiIe names not
Ca"operation
u引
"key and a叫
1)Jn standby status! , when a vis"or presses the ca" button on Ga" unⅡ , then the
Ⅱ
povver indicator vvi"
2),a,丨 f
Ⅱght;
not receiⅥ ng a response signaI wⅡ hin4s,then Ⅱ wil|sound“ DDDD”
and end
the calling,return to the standby status.
b lf any one handset(two or three handsets)receives the signal,the outdoor un"
BackⅡ ghttime
ght display time by Up/DOwn
l
key
,
By this submenu you can setthe screen backⅡ
sounds
“
Du Du”
,
then the power indicator of handset wi" "ght red and
ay the VisⅡ or’ s image
ρlay the seIected ring tone,meanwh"e the TFT-LCD w"I disp丨
3)a If no one answers the ca",the ca"、 ″IIast60s and return to the standby status
blf some one presses the“ 1〈 ”
)” button on anyone handset, then it w"l stop
playing the"ng tone】 and enter the“ talking” status(The indicatorin handset rnon"or
i丨
Auto REC
By this submenu you can seleCt auto REC On/o矸 by Up/DoWn key.At Auto
RE0 on status,if handset not respond the ca"ing from ca" stauon in 1o
secOnds,it VVi"start recording.
∞u耐
V”
md du济 b
4).In`aIking”
mode,
sta涮
Ⅱme is120s other handset(s)wⅢ
” statu⒏
pressing the“
饣
o”
button W"I Operate the relay atthe ca"unit(or
transmiuer)which be connected to operate an elect"c IOck release and a"ow the
Verslon
Check the version of softⅥ
wⅢ tum from red to c reen and stay I"),thi ,taIking
Vis"ors ente1the rnonⅡ or vvi"dispIay“ unIock”
5),ln`alking” mode, the user can press the“ 1⑾ 尸bu灶 on again to end the taIking,and
then handset rnon"or W"I enterthe standby status after sounding one“ D” tone
`are
6)In“ faIking”
mode, press snap key(LeR key)、 M"snap a picture and store in sD
card.
7)In
7
—————
ηalking” mode, press Record key(Right key)wⅢ
start reCording and press the
Insta"ation
surveⅡ Iance
1)Press the “[:E]
Back box
”button to seleCt the outdoOr carnera you want to
monitor(if there are 2 outdoor statiOns in the system)vvhen the handset
monitor is in standby status
2)lf the outdoor caⅡ station receives a signaI Within 4S, then it vv"I dispIay the
outdoor camera picture;if not receiving the signal
Ⅵ/ithin4s,then it VVi"auto-eX"the
monitor status
3)In monitor status, press the
“E□ ”
button again, and then it vvi" eXit the
monitoring of outdoor ca"stat∶ on The rnonitor tirne is20seconds After20S,it
wiII autoˉ exit
the rnon"or status
”can get a snap of outdoor camera
|> ”can get recOrding of outdoor
5)丨 n monitor status,press RecOrd key”
(
4)ln rnonitor status,press Snap key’ △
step1∶ lnsta"the back box
step2∶ lnsta"paneI
camera,press the key again to stop recording
6)In monitor status,press“
7)In rnonitor status,press‘
1)Release the ca"sta】 on from back box by remoVing the locking screW underthe
”key can turn on the infrared LED Of ca"unit
’
△
。un|ock key can reIease the electric丨
Iu)冲
front edge ofthe un"
ock.
2)DH"proper wire亠 hrough holes aCCording to the mounung units
3)Use four screws to
Ⅱ
x the
installa刂 on panel on the Wall
Handsetintercom
4)Connectthe cables from vvire-through holes and square holes of rear paneIin the
(If the system induding two orthere handsets)
ca"station
(VVhen an electric lock is not being connected,any unused cables ortern1inals
1)Jn standby status,press Up/Down key at handset to ca"another handset f the
user presses the“ ▲
”
key at one handset,Ⅱ
the“ V” key"wiII call small number handset,then the red indicators wⅢ
enterthe Ga"status the screen VVi"display“
should be protected and insulated to avoid the possib"ity of short circu"s)
WⅢ calI big number handset,f you press
talking”
2)a丨 fthere is no response signal w"hin4s,after“
DDDD”
5)Use screws to nx the door station on the rearinsta"ation panel
"ght and
tones,the handset wi"
eXit the ca"status and return to standby status
b If reGeiving a response signal within4s,then the ca"ing handset rnonⅡ
or W"l
play the seleGted ring tone and the ca"ed handset indicator Ⅵ
'i"lit red and sounds
selected ringtone
ng wi"ex"ifthe ca"ed handset notresponds w"hin30s
3)=a The caⅢ
b Ifthe Called handset ansWers the ca"ing then the tvvo handsets w"I stop playing
”
UnIocking tirne setting
1)The 1st unlocking 刂
me is 18S (In defau" status, this is the1st unlocking
method) VV"h power disconnected from the call sta"on,press and hold the CaIl
button in outdoor ca"station,atthis tirne connectthe poⅥ
/erto ca"station, when the
‘
‘’
unit sounds a sing丨 e D’ tone, reIease the ca"button and the unlocking tirne w"l
noVV be set at18seconds
2)The2nd unlOcking tlme is4s W"h power disconnected,press and hold the caⅡ
button on ca"station,and connect poⅥ
D
`er to this Ca"station When you heartⅥ `o“
D” tones,release the ca"button and the unlocking period WⅡ l be set at4seconds
"ngtoneseither
and entertaIking
talking
tirne
is60s
4)Press
10冲
key onstatus
handsetThe
WiⅡ
sounds“
D” and escape to standby status
3) The3rd unlocking刂 me is8s V¢ 1h power discOnnected,press and hold the ca"
UsB Port
button on ca"station,and connect povverto the Ca"station VVhen you hearthree“
DD” tones,release the ca"button and the unlOGking period W"I be set at8seconds
When you plug in UsB pod in standby status(handset w"h SD card),the screen wⅡ
dispIay“ ∪sB Charge mode” and“ UsB Storage mode” ,in Charge mode,the handset
onIy can be charged In storage rnode,the handset as a storage and the files in SD
card can be vievved or deIeted by PC
Memolγ Card
sD card MaXimum capacltyis16G
I
Note: The users can onIy unIock for the
communication mode.
In communication status, if either pa“
D
ˇisitors during the taIking and
is poweredˉ o矸 , then the other W"l
’
return back to standby status after one‘ ‘
D’ sound.
The1,8s unlocking ti:ne has2puIses,Wh"e the4s unIOcking t"ne and8s
unlocking ti1ne have only1 puIse.Chose the proper unIocking ti【
request。
—
ˉ
————
10
—
ne as your
LoCk conneCtion
1)。
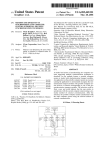
TechnicaI specifications
POwerTOn unIocking diagram
CaⅡ unit
0
罂
Ex"Iput胆
型嘤
1/0"CM0s
Min "Iun∩ ination
0Lu× (IR on)
POWer
DC5V/1A
Current
20ˉ 30mA(standby),300mA(opera刂 on)
t∫
5圄
4同
3同
2圄
Irnage sensor
Q
胃
Audio∶ nput
|
|
跷
囤
崮
12-digits dig"al audio signa1DAc interface,8Kbps
samp"ng speed rate
Irnage cOmpression
MJPEG compression
Transmission power
16~20dBm
Ringing tone
12options selectable
DimensIOn
127mm(H)× 95mmlw)× 45mm(D)
Weigh1
245g
Monitor
2).Powerˉ off unIocking diagram
scFeen
24"TFT LCD
E仟 eCtiVe pixeIs
320× 240
POWer source
DC45V/08A(rechargeable battery operated)
Battery charging ume
UsB port
Current
—
- 11
FOr the first time,it is7~10hours;
Later around4hours
FOr battery charge or"nkto PC
20mA~30mA/s。 7V(standby),
250mA(oρ era刂 0n)
Receiving sens"iV"y
-90dBm
DimensIOns
145mm(H)× 79mm(Wl× 21mm(D)
Weight
135g
————
12
————
Propagation of radio、 ″aves
TroubIe shooting
The radk)(x,vorflgo qua"ty,and therefore the perforrnance ofthe doorphone,may be
a"ered1)y ol)st:l(】 lOs loCated betⅥ /een the Ca"unit and the interior handset un"∶
Debug
Checking
Ma丨 funcuon
Ⅵ
pa""ions,s丨 abs,arrnoured doors or"竹 shaR Comprising meta"ic GOmponents
`a"s・
(Fu"herrnore・ radio coverage may also be affected by eleCtrical or electromagnetic
Check by pressing the
Press the0N/0FF button
0N/oFF button
fu"y
l/Vi"not
Check whetherthe power of
poWer on
Ⅱon battery is enough or not
Charge the battery
PropeHy seat the batteries
ca"unit
Check vvhetherthe socketin
povver adaptoris plugged into
Re-connectthe socket
and Mini-USB charging
the Mini-∪ sB charging interface
interface
asterboard
Concrete and
and wood
bu"ding b!ocks
10%to30%
50°/o
reduction
reduction
B"Ck
pˇ
to70%
ΗⅡ Η Η Η ■
charging
Itis imp° rtantto choose the proper site to instaⅡ ation the caⅡ unitto avoid the
obstacles which influence the radio range.
P丨
Check the batteries of
Battery not
interference)
门
etaI and rnetal
cIadding
Check whetherthe poWer
adaptoris plugged into the
AC110~240V Correcuy
Plug the po、 ″er adaptor
into AC110~240V socket
(e g armoured doorl
30o/o to50%
70%to90o/。
reduction
reduction
Cannot talk
between tvvo
handsets
Clearthe eXisting codes
Check the coding betⅥ
`een tvvo
handsets ortwo ca"stations
Check vvhetherthe handset/s or
lrnages is
flashing
ca"stations are loGated close
Keep handsets far away
interfering equipment such as
from the interfeHng
TV sets or microWave ovens
equipments
vvireless router,etc
Check the battery of ca"unit
and handset
No signa"n
the handset
monitors
Properly seat the batteries
Check the distance betWeen
Adlustthe outdoor
handset rnonitor and outdoor
ca mera
monitorinto proper
distance
Check vvhetherthere is nearby
interfering electrical equipment
such as mlcrovvave oven or
vvireless routers,etc
—
—
13
————
Handset Battery specifications:
and re-code them
Battery
Type
standby time
37V,1050mAh
Li-ion battery
72hour
Charg∶
The above marked time isin the specific situation and atmosphere
Use the authorized charger only
DO not disassembIe the batteries
Do not short-cirCuit the batteries
DO not eXpose the batteries to extreme hear,fire or Water
camera and handset
Keep aWayfrom
strong magnetic,radio
or electrical fields
14
ng
Iirnited vokage
42V
NOtes
~
1)Handset monitoFs should be situated away from heat sources and water
2)Products ohoj丨 d bo opened onIy by the professionaI personneI.If there
is a malfunction pIease contact us or our agents
3)Handset rnonitors shouId be IOcated Where there is a good ventilation,
d ry, dusuess and notin direCt sun"ght Don’ t use the chemicaI
irnpregnated or wet cloth to clean the products CIean,soft,dry cIoth can be
used tO clean the products
4)Please insta"the produCts acGOrding to this instruction manualto。
ofdamaging to the products.
void
Guarantee
one-year warranty.
l
{
|
l
————
15
————