1
FULL HD sPORTS CAMERA
User ManuaI
'
ˇ
~讠
'〓
COntents
Precau刂 on
DVR speciaI Features∶
DVR speoal Features
P卩 oductAccessoⅡ es
lnversion MOde
If need to invert dvrvvh"e using,you can set"inversion
DVR lnterface
mode"in the rnenu to0n,then the rnachine can rotate180
degrees,but characters and images on the screen can be
Bu廿on function
DVR0peraⅡ on
POweron/ofF
norrnal as a pos"ive direction
VViFi FunCtion
It w"I be rnore convenientto operate the rnachine at a
Ba廿 ery Charg∶ ng
Video Mode
NOrmaIrecording
Loop recOrding
distance of30rneters using a rnobⅡ
Hdure Mode
PIayback Mode
Menu se廿 ing
Remote ContrOI DescHp刂 on
InstalI and use V叫 Fi
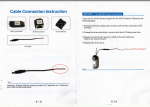
Connect HDMI
The video vvi"be pIayed in twice as slow as the video
ConnectTV
飞£瞅漤瞌
e ph° ne via the VViFi
connection
High speed Recording
The DVR has720P120fps and VGA240fps Video resulu】
sloW Motion
frame(60fps video)or4tirnes(120fps video)
Time Lapse
im
The DVR wil"ake pictures at a certern rate then make a
Video consisted by the pictures.
he dI唧 hg guddhes
雠 唰 蹬冉黜锻
・Pls referto rnanualinstruction to operate the camera
correcuy I"egal° peration may cause damage to internal
.栅
省
|・
{|∶ ii∶
components
・Do
hⅡ
the DvR,Ⅱ may damage theinternal
nota"er ordismanue the DvR,to aVoid the damage to
.竿 ΙLlt羊 早
Ume
;erature rise is norrnal Ⅵ
'hen D`/R in use for a long
・Do nottouCh the lens VVhen recording whichˇ
Video qual"y
Vi"afFeCt the
Capture Mode
Underrecording press Rllode buuon t° take a picture
2.4G wireless remote control
Waterproof wrlstremote contro"er
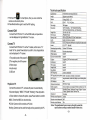
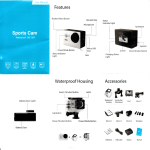
Produd AccessoΠ es
AccessoΓ y1
ACCessory2
USB Cable
AC Charger
Accessory8
Accessory5
Waterproof Case
Wrist Remote Contro"er
3M Pads
User Manual
Accessory7
Bauery
-2-
Accessory3
Accessory4
ACCessorv6
on
Γ
oι
≡
Ⅱ“ 黢
丨
鬯 卩 刂宙 亠
△〓
'
I叩
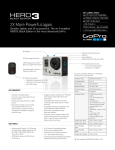
7Power button
8~Speaker
1WiFiindicator
2Mode button
3Up bu让 on
4Down button
6∪ sB pod
9~TF Card sIot
101/4” sCrew hole
5HDMIpod
11Working indicator
12Charging indicator
Button funcⅡ on
Power button: short press to turn on the DVR,丨 ong press
to turn offthe DVR;Understandby mode
short press to start/stop the recording;Under
Picture rnode short press to take a picture;
Under pIayback rnode short press to start/
pause the playback;Confirm the menu
setting;Con】 rm the tirne setting~
Up button: Understandby rnode to zoom in;long press to
enter/ex∶
I|
tthe rnenu;In the Menu setting or
Playback rnode choose the Iast opti°
Increase the dig"in the tirne setting
DVR Interface
n or fiIe;
Up button: Understandby rnodeto zoom ou1In the N门 enu
setting or PIayback rnode Choose the next
option or nIe;Decrease the dig"in the tirne
setting
Mode bu设 on: Understandby rnode sho吐 press to switch
V∶
deo/Picture/PIayback R/lode;Long press
to enter WiFi setting;During recording short
press to capture;ln tirne setting to switch
Year/Month/Date/Time
0
DVR0peraⅡ on
PoWeron'off
PoWeron: short press Povver button,thelcd screen shows
the startup picture,the bIue vvorking indicators
W"l"ght up,D`/R enters standby rnode.
POwer ofF: When camerais on,long press Power button,the
11
ICd sCreen shovvs the shutdovvn picture,the bIue
working indicators vvi"be off,DVR poWers off
-4-3-
嚣
瘛 懋
槲 搬 躜獬 涮 123456
了
Ⅵ deo σ
node
Ⅵdeo lnterface:
1.Record icon
⒊
||iiiii丨
}{|!{ii|苕
|∶
{iii貂
∞
a胛
5.Video resolution
晷
鳙
1
4F"e Preview
5.F"e length
m岬 d
仟
m伽 Ⅶ
猊喇 镙胃1\。 。
deo
t逶
piCture automatica"y
2
1PIaybaCk icon
2F"e number/total number of】 les
3selectthe f"e you wantto play
4
∶
∶胃
|;|{∶
press Mode button to enter picture mode,aim atthe oblect you
vvantto shoot and press Power button,DVR wi"save the
PlaybaGk Mode
pensatlm
4.Frame rate
The DVR defau"se⒒ ing is Video mode,Understandby mode,
e
mod赢 enu
POwer
button,DVR sta吐 s reCording tⅢ the card is fu"Press POwer
bu仗 on again to stop recording
Loop recording(referto menu seuing)
Understandby rnode,press POwer bu廿
on to sta吐 reCording,the
bIue indicator w"I】 ash When the video recorded up to the tirne
you setlsay1minute,3minutes or5minutes),DVR wⅢ
savethe
footage automatica"y and continue recording
When TF card isfu",DVR wⅢ oVem● te the Ⅱrstfootage by刂 me
sequence and continue recording.Press Power bu⒒ on again to
stop reCording,the remaining recording tirne is on the LCD
scEeen.
101112
5
6.7Date stamρ
13
1蓖
ln standby rnode,pressthe MOde bu⒒ on to sⅥ
`itch tO PlaybaCk
mode,press the UP/DOwn bu仗 on to seleCtthe video/piCture you
need,press the ρower bu⒒ on tO Preview/pIayback Press the
POwerbu廿 on to stop playing
Menu s硼 ng
ln standby rnode,long press Up bu⒒ on to enterthe menu rnode,
then pressthe Mode bu⒒ on can switch rnode menu and system
menu.Pressthe Down button to ρage down,ρ ress the Up button
to page up,pressthe Power buuonto connrm Long
ρressthe
Up bu仗on to exitthe menu
Video mode/Picture rnode/Playback rnode each have tˇ
Pidure MOde
Hd山田 interface∶
vo
menus∶ Mode menu and system menu The systems are a"the
10Pk义 ure iCon
same,
11EXposure Compensation
Ⅵdeo Menu∶
12.VVhite baIance
13.Pidure size
MOvie size∶
1080P25fps`1080P30fps/1o80P50fps/1080P60fps/
14Remain photos
720P60fps″ 20P50fps″ 20P30fps/720P2sfps/
15,Baueryicon
16,Year/Month/Day/Time
720P120fps/1440P30fpsA/GA240fps
-5-
-6ˉ
supernne/Ⅱ ne/normaI
Video quaI"y∶
oFF/1minute/3minutes/5minutes
seamless∶
sloW Mo刂
on∶
lnvert Mode∶
0仃 /Auto
Tirne zones∶ ˉ
12ˉ 11ˉ 10ˉ 9ˉ 8ˉ 7ˉ 6ˉ 5ˉ 4ˉ 3ˉ 2ˉ
White Balance∶ Auto/DayⅡ ght/CIOudy/Tungsten/Fluor
EXposure∶ ˉ
20 -刊
Mo刂 on deted∶
0FF/oN
1234567890
l/ViFi passvvord∶
Tirne Lapse∶ o矸 /05sec/1sec/3sec/5sec/10seC/30sec/1rnin
+7+8+9+10+11+12
0 +00 +10 +20
TV ou⒈
oFF/0N
1+0+1+243+4+5+6
Yes/No
Remote Pair0ff/0n
Date stamp∶ o矸 /Date/Date&Time
Forma⒈
Yes/No
system∶ Factory Reset/System Info/Card lnfo
pk兑 ure menu∶
Remote ControI DescHp刂 on
12M/8M/5M/3M
Resolu刂 on∶
There are tⅥ
`o buttons
the remote
the to
video
button to start/stop
the on
reCording
Presscontro"e1press
the picture button
、 h屺 Babnce∶ Auto/Da叨 勺ht/Cbudy/Tungsten/Fluor
Exposure∶ ˉ
20
`′
DHver Mode∶
-10 +00 +10 +20
take pictures press the picture button to capture under video
off/2s/10s/Double
mode
Perlodical snap∶ o仟 /5s/10S
Matching the remote contro"
Photo Burst o仟 /sfps/5fps/10fps
set"Remote Pair"in the rnenu to0n,keep pressing the two
bu钍 ons on the remote control,you can see blue light of Remote
control flashing,release the two buttons after3seconds press
PIayback mode menu∶
the power button ofthe E)VR to eX"the Remote Pair and return
PIease seIed FⅡ e type!
to preview mode,take video or pictures via the remote control
If you can operate itis suCCessfuI,if not,pIease repeat above
VIDE0
JPG
operation Please keep the camera and remote controlvvithin
1M when rnatching
Protect singIe/ProtectA"/UnprotectA"
Delete∶ single/A"
system monu∶
so叹 nds∶
Beep(on/offl/Volume(0/12/3)VOice Rec(on/o矸
InstaⅡ and use VViFi
1scan the QR code on the gift boxto getthe APP;
)
50Hz/60Hz/Auto
P° wer save∶ off/1min/3min/5min
Da1e&Time∶ 02/06/201219"7Year/MOnth/Day
PoWρ rfrequency∶
Language∶ EngⅡ sh/Traditional Chinese/sirnpⅡ ned Chinese/
German/French/spanish/Russian/ItaⅡ an厅 hai/
Japanese
-7-
2Insta"the APP in yoursmart phone
3setthe WiFipassword in the Menu(The defau"password
Ⅱ
1234567890)
4LOng press Mode Button to0pen llViFi function
5Find“ customer~10036f’ in the VViFi"st ofsmart phone,enterthe
passvvord to connectit
6When sma吐 phone connectto the Camera,the camera screen
ght lfthe
display“ Customer~10036F’ ,the VViFiindicator wiⅢ Ⅱ
`iⅡ
connection
does not sucCeed,the WiFiindicatorvvi"keep fIashing
Ⅵ
-8-
Technica|specification
★
45★ 25mm rNoIin。
"Jde{he Iens、
58g(NOtindude batteγ
)
3amera size
⒎跏
mhe APP■
im舳 mm屮
№
w⑾ can cm洌
6彳
″eiqht
阢
5Meqa CMOs1泛
camera via the smart phone
8Press MOde Buuon again to exitthe WiFisetting
雨eW
160degree
angle
ResOIu刂 on
Conned HDMI
1440p30fps, 1920*1080p60/sO/sα 2sfps,
1280*720o120/G0/50/sO/9sfos 640*480o240fDs
1920★
12M8M5M3M
na¤ e size
Connectthe DVR tothe TV viathe HDM丨 cable,a"opera刂 ons
JPG/MOV H264
△b fomats
ⅥemorV card
Can be dispIayed in highˉ defin"ion TV screen
7"
F=20仁 28mm
6G+lR
4GBto32GB(Micro sD Card C|ass6aboVe)
BlJl仁in n
`udiooo汁
JsB
Connect TV
Conned the DVR tothe TV Viathe TV cable,setthe menu“
USB20hi¤ hsoeedintefa∞
HD2’ T叮
TV
mode” to Yes,press Power button to confirm,then a"operations
can be dispIayed in冖 Γ
V screen
seambssloop reCording
丬DMl
forcharo n¤ and data transfe
960X080
opton创 1/s/s mhutes
outpu1
Ⅳhite b创 an∞
≡
Xposure Colη pensa刂 on
suppo没
2The negative pole ofthe power
3apture
DOnt nuous
3Video output
Πme Laose
Suooo"bV DVR and remote∞
suppon
suppoH
ma¤ e lnVe^
support
3Clw MOton
JV Fifre¤ uencV
supρ on
彳The positiVe pole ofthe power5v
4Audio output
5UsB pod
PIayback on PC
C0nned the camerato PC,Camera wⅢ poweron automa刂 ca丨 ly,
“
thO oCreen display∶ MsDC” PCCAM” ,ηorking∷ Press Up button
or DOwn button to choose the option,press POwer bu廿
on to conf∶
rm
PCCAM∶ Camera wⅢ be worked as PCCAM.
WOrking∶
Camera can be used Norma"y and be powered bythe PC
24GH-z24835GH7
lOs61and above Androd40and above
/ViFi funCtion
hagelansm怎 oon,remOle∞ nlrO|,sed丨 ngs,syncand sharng创 bums
/ViFi d⒗ tan∞
30m
/Virebss transmooon
lEEE80211b/q/n
3atlerv caoac tV
LRⅡ um孔 n
balenes∞ n be Changed10sOmAh,re∞ rdhg fOrOver3h阝
°
亡
ng
氵
措器 g裆 l蓄 ∫瑙IP涩湍:闹
sn`Kuss即
I讠
/Vaterproof
50meters
始
mote∞ ntrOI πeOuenCV
Remote∞ ntrol waterproof
24GHz
Remote control distance
15m
No血 The揣
螭拟茺
摞
£
J笛 δ
撬 斜船摞眦昌
-10-
-9-
ntrol
/V Fisupp° ft phone systerr
,”
MsDC∶ Enterthe MsDC to cheCkthe f丨 es
support