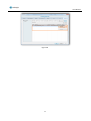
1
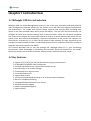
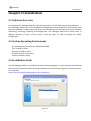
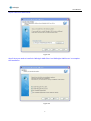
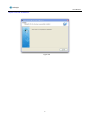
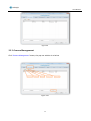
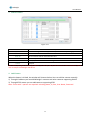
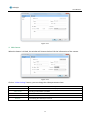
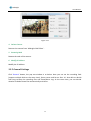
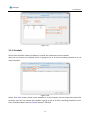
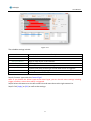
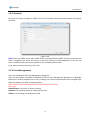
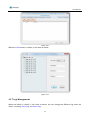
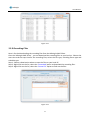
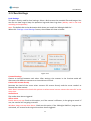
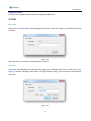
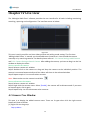
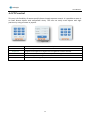
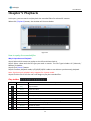
V2.07 User Manual Table of Contents Chapter I Introduction ..................................................................................................................... 2 1.1 Milesight VMS Pro Introduction .......................................................................................... 2 1.2 Key Features ....................................................................................................................... 2 Chapter II Installation ...................................................................................................................... 3 2.1 Software Overview ............................................................................................................. 3 2.2 System Operating Environment ........................................................................................... 3 2.3 Installation Guide ............................................................................................................... 3 Chapter III Operations and Settings ................................................................................................. 7 3.1 How to execute the Milesight VMS Pro ............................................................................... 7 3.2 Configration ....................................................................................................................... 8 3.2.1 Camera Management ............................................................................................. 12 3.2.2 General Settings ...................................................................................................... 15 3.2.3 Schedule ................................................................................................................. 16 3.2.4 Motion Detection .................................................................................................... 18 3.2.5 Network .................................................................................................................. 19 3.2.6 User Management .................................................................................................. 19 3.2.7 Log Management .................................................................................................... 20 3.2.8 Recording Files ........................................................................................................ 21 3.3 Client Settings ................................................................................................................... 22 3.4 File.................................................................................................................................... 23 3.5 Tool .................................................................................................................................. 24 3.5 Help .................................................................................................................................. 25 3.6 Toolbar ............................................................................................................................. 25 Chapter IV Live view ...................................................................................................................... 26 4.1 Camera Tree Window ....................................................................................................... 26 4.2 Live toolbar....................................................................................................................... 28 4.3 Live view workspace ......................................................................................................... 28 4.4 PTZ control ....................................................................................................................... 29 Chapter V Playback ....................................................................................................................... 30 Chapter VI Map ............................................................................................................................. 34 6.1 Toolbar ............................................................................................................................. 34 6.2 Pop-up Menu .................................................................................................................... 35 6.3 Add the hot....................................................................................................................... 35 Chapter VII Milesight VMS Server .................................................................................................. 36 Chapter Ⅷ Service ...................................................................................................................... 37 1 User Manual Chapter I Introduction 1.1 Milesight VMS Pro Introduction Milesight VMS Pro (Video Management System) is one of the most innovative and most powerful video management software systems on the market and it will fulfill your highest requirements and expectations. The simple and intuitive design requires little training while providing easy access to live and recorded video, facility maps and alarms. The user who has the authority can configure all server and cameras settings from a central location. Utilize the left panel navigation tree structure to navigate the server and cameras as well as to access features like search out the online server and cameras automatically, check the information of the server and camera. Use Client/Server architecture, it is a future-proof network video solution for large projects and can manage unlimited network cameras via unlimited working servers in different locations. It’s able to integrate with other cameras over ONVIF. This manual describes how to use and manage the ‘Milesight VMS Pro’ in your networking environment. Some knowledge of networking environments would be beneficial to the reader. Should you require any technical assistance, please contract authorized service center. 1.2 Key Features Support 1/ 2/ 4/ 6/ 9/ 13/ 16/ 36/ 64 channels playing synchronously H.264/MPEG-4 /MJPEG video compression Client/Server Architecture, support add multiple-server Record locally or to network storage Customizable User Access Levels E-mail Notification/FTP Support dual-stream 4 ch Synchronized Playback and up to 16 ch Asynchronous Playback Alarm or scheduled recording Integrated Motion-Detection from camera Multiple monitors support Human-oriented Milesight UI Support ONVIF 2 User Manual Chapter II Installation 2.1 Software Overview An installation of ‘Milesight VMS Pro’ has two components: server software and client software. The ‘Milesight VMS Server’ as the intelligence management system forward the RTSP stream. And the client software is used to log in the server and provides the user interface for all tasks including monitoring, searching, reporting and configuration. The ‘Milesight VMS Client’ allows users in different locations to log in to the server, if have the right, it’s able to change the system configuration. 2.2 System Operating Environment OS: Windows XP/7/Vista/Server 2000/Server 2008 CPU: 2.4GHZ or faster Memory: 2G MB or more Graphic memory: 1G or more Internet protocol: TCP/IP 2.3 Installation Guide Run the Milesight VMS Pro Installation file and install the programs on your computer by following the on-screen instructions. After finishing installation, you will find the programs on the start menu or on the desk. Step1: Select the preferred language for this installation. Figure 2.1 3 User Manual Step2: Click ‘Next’ to go on. Figure 2.2 Step3: Read the information to know about Milesight VMS Pro and go on. Figure 2.3 4 User Manual Step4: Choose the destination. Figure 2.4 Step5: Here you need to install the ‘Milesight VMS Client’ and ‘Milesight VMS Server’ to complete the installation. Figure 2.5 5 User Manual Step6: Finish the installation. Figure 2.6 6 User Manual Chapter III Operations and Settings 3.1 How to execute the Milesight VMS Pro (1) Start ‘Milesight VMS Server’ first After installation, you can find it on Go to ->Start All Programs-> Milesight VMS Pro -> Milesight VMS Server, then all the cameras on the server will load automatically. (2)Then, start ‘Milesight VMS Client’ After installation, you can find it on Go to ->Start All Programs-> Milesight VMS Pro -> Milesight VMS Client . When login ‘Milesight VMS Client’ , a window will pop up as below. Enter the Username, Password. The default user name and password is ’admin’ and ’password’. You can also choose which language to be used for the Client. If the [Auto Login] is selected, ‘Milesight VMS Client’ will login without keying in the Username and Password next time. Figure 3.1 After clicking on the ‘Login’ button, the window will pop up as follow. Please wait for a few seconds, when load the cameras successfully, the ‘Milesight VMS Client’ will come into view. Figure 3.2 7 User Manual 3.2 Configration Before using the ‘Milesight VMS Client’ for liveview, you need to add the server first. Then you are able to add the cameras via different servers. Only after adding the server and cameras, can you use functions like liveview, playback, E-map etc. How to add server? There are two ways to add servers via ‘Milesight VMS Client’: one way is searching online automatically, the other is adding manually. After adding successfully, you can see the name of the server under ‘Default Group’. Click on the menu, choose the ‘Settings’ menu, select the ‘Server Management’ option, windows will pop up as follow. Click on the ‘Search server’ button to search automatically, while click on the ‘Add Server’ button to add manually. Details will be showed in the following figures. Figure 3.3 8 User Manual 1. Search Server Click the button, the window will show as below. You can search servers automatically. Figure 3.4 Item Stop/Rescan Description When searching the servers, you can stop it and rescan by clicking again. Select All All the servers will be selected at a time. Clear All All the servers will be unchecked at a time. Set Password OK Cancel Enter the password at a time. Click [OK] button to confirm the settings. Exit quit. 2. Add Server When the button is clicked, the window will show as below. You can add the server manually. Figure 3.5 9 User Manual Item Server Type Name Port User Name IP Description Choose the NVR type you use The name of server. The port of the server. The user name of the server. IP address of the server. SQL port SQL port. Password Password of the server. Enable Enable or unable the server. 3. Edit Server When the button is clicked, the window will show as below. Edit the information of the camera. Figure 3.6 4. Delete Server Remove the server from ‘Milesight VMS Client’ . 5. Configure Server Here you can do the settings for the server. Including General Settings, Camera Management, Schedule Settings, Motion Detection, Network Settings, User Management, Log Management and Record File Management. For more details, please refer to the below option ‘How to add the IP camera’. 10 User Manual Figure 3.7 How to add IP camera? After adding the server successfully, you need to configure the server further. Including search cameras, add them to the live view window, set motion detections, set recording schedule, etc. Adding, modifying, removing users, SMTP for the server could be also set here. Details are as below. Figure 3.8 When click on the ‘Config Server’ button, window pops up as below. Including General Settings, Camera Management, Schedule Settings, Motion Detection, Network Settings, User Management, Log Management and Record File Management. 11 User Manual Figure 3.9 3.2.1 Camera Management Click ‘Camera Management’ button, the pop out window is as below. Figure 3.10 12 User Manual 1. Search Camera Figure 3.11 Item Stop/Rescan Description When searching the cameras, you can stop it and rescan by clicking again. Select All All the cameras will be selected at a time. Clear All All the cameras will be unchecked at a time. Set Password OK Cancel Enter the password at a time. Click [OK] button to confirm the settings. Exit quit. Note: Before you register the Milesight VMS Pro, you can only add up to 8 cameras. For more information, please refer to Chapter VII Milesight VMS Server. 2. Add Camera When the button is clicked, the window will show as below. You can add the camera manually. 1) Through IP address you can add Milesight's cameras and other cameras supporting ONVIF. 2) Through RTSP stream you can add cameras supporting RTSP. Note: Those with * options are required. Including Name, IP, Port, User Name, Password. 13 User Manual Figure 3.12 3. Edit Camera When the button is clicked, the window will show as below. Edit the information of the camera. Figure 3.13 Click on ‘Video Settings’ button, you can change the video parameters here. Item Description nd Video Stream Choose the main stream or 2 stream to play. Video Codec Including H.264, MPEG-4, MJPEG. Frame Size The resolution. Maximum Frame Rate Bit Rate Maximum refresh frame rate of per second Transmitting bits of data per second 14 User Manual Figure 3.14 4. Delete Camera Remove the camera from ‘Milesight CMS Client’ . 5. Browsing Web Browse the web of the camera. 6. Modify IP address Modify the IP address. 3.2.2 General Settings Click ‘General’ button, the pop out window is as below. Here you can set the recording Path (support multiple disks at the same time), Server name and Server Port. It’s also able to decide how long to keep the recording files and Event/Alarm Log. At the same time, you can decide whether to delete these files automatically and when. 15 User Manual Figure 3.15 3.2.3 Schedule Set the time schedule. When the button is clicked, the window will show as below. Here you can choose the schedule which is going to use as an auto recording schedule or as an alarm schedule. Figure 3.16 Step1: Click ‘Add’ button to add a new schedule as a time templet. You can draw the timeline for each day. Here you can choose the schedule is going to use as an auto recording schedule or as an alarm schedule. Make sure the [Enable] button is checked. 16 User Manual Figure 3.17 The schedule settings include: Item Name Enable Date from/Date to Record Type Trigger Capture Image Record Video SMTP Description The schedule name. Enable or disable the schedule. Begin or stop to put in the schedule. Including alarm or continuous Motion Detection from the ‘Milesight VMS Client’ or IPC itself. Capture how many pictures per second when alarm is triggered. The length of the recording file. Enable to use the SMTP. Step3: Choose a type under the ’Record Type’. Note: If you choose the ‘Alarm’ type as the record type, you can also do some settings including trigger condition, action when alarm is triggered. Step4: Select the cameras on the left camera list and move them to the right camera list. Step5: Click [Apply] or [OK] to confirm the settings. 17 User Manual 3.2.4 Motion Detection Do the alarm settings here. When the button is clicked, the window will show as below. Draw the areas where to be motion detection. Figure 3.18 Step 1: Select the camera on the left tree which you want to set as motion detection. Make sure the ‘Enable’ button is checked. Draw certain areas by mouse. Item Select All Clear All Level Detection Interval Description Select all the area to be detected Clear all the area Different levels to trigger alarm How often to trigger alarm Step 2: Select the cameras on the left camera list and move them to the right camera list. Step 3: Click [Apply] or [OK] to confirm the settings. 18 User Manual 3.2.5 Network Here you can do the settings for SMTP. Click on the ‘Network’ button and the window will pop up as below. Figure 3.19 SMTP: Enter the SMTP server, port, SMTP sender, password and the SMTP receiver, then when the alarm is triggered, the server will send u an email to inform you what happened. If you are not sure, contact with the connection provider or the network administrator. If you want to send a test email, click ‘Test’. 3.2.6 User Management Users are managed in the User Management dialog box. Users can be created, modified, and deleted from the User Management dialog box in ‘Milesight VMS Client’. Several properties for a user, including user name and password can be changed here. When the button is clicked, it shows as below. Note: Different users have different permission to access the server. User Type: Administrator: Full access to do any settings. Operator: Do anything except to creating a new user. Viewer: Can’t change any settings but view. 19 User Manual Figure 3.20 When the ‘Add’ button is clicked, it will show as below. Figure 3.21 3.2.7 Log Management When the button is clicked, it will show as below. You can change the different log under the option, including ‘Event Log’ and ‘Alarm Log’. 20 User Manual Figure 3.22 3.2.8 Recording Files Here is for the downloading the recording files from the Milesight VMS Client. Over the ‘Milesight VMS Client’ , you can download the recording files to your local pc. Choose the start time and the stop time for the recording files, select the file type, including alarm type and schedule type. Step 1: Choose a destination where to save the files on your local PC. Step 2: Right-Click on the list, select the ‘Download’ option to download the recording files. Step 3: Right-Click on the list, select the ‘Locate File’ option to find out the files. Figure 3.23 21 User Manual 3.3 Client Settings Local Settings This part is mainly used for local settings. Select a disk to store the recorded files and images. You can also set how long to keep the operation logs and alarm logs here. (Mainly used in the local recording and snapshoot) Note: The default disk is the destination disk where you install the ‘Milesight VMS Pro’ . When click ‘Settings->Local Settings’ button, the window will show as below. Figure 3.24 Carousel Settings Choose an interval between each other. After settings, the cameras in the liveview mode will alternates with different cameras at a time within an interval. Connect IPC stream directly Decrease the load of the server when connect IPC stream directly and the server needn’t to forward the video stream. Note: Don’t recommend to check this opinion on when several servers connect the same IPC at the same time. Audio Alarm Play audio when alarm triggered. Alarm action Enable alarm pop up: Check on this option, so If the camera is offscreen, it also going to record. If not, the camera will not going to record. Windows always on top when alarm: Check on this option, if the ‘Milesight VMS Pro’ program was minimized, it’ll restore to the original size when alarm triggered. 22 User Manual Change Password Here you can change the password of the ‘Milesight VMS Client’. 3.4 File File->Lock When click the [Lock] button, the GPI page will be locked. Then click it again, the window will show as below. Figure 3.25 You have to key in Username and Password to unlock it. File->Exit Username and Password are required when logging out ‘Milesight VMS Client’. And if the [Auto Login] is checked, ‘Milesight VMS Client’ will login without keying in the Username and Password next time. Figure 3.26 23 User Manual 3.5 Tool Tool-> Change Language Select the language for ‘Milesight VMS Client’. Tool-> Mutil Monitor Now the ‘Milesight VMS Client’ support multiple monitors. Here you can do these settings. When click on the ‘Mutil Monitor’ button, windows pop up as follow. ‘Milesight VMS Client’ support to use up to 4 monitors now. There are 3 modes you can choose to use in each monitor. Including Live screen mode, Fullscreen mode and alarm screen mode. What you need to do is to drag the cameras to the position of the monitor you want to show. Live screen mode: For this mode, you can add any cameras which you want to show on the screen. Just drag the camera and move it into the specified monitor. Fullscreen mode: Click on the main console monitor, double click on the individual position of the camera, then the livevideo will be showed with Fullscreen on the specified monitor. Alarm screen mode: When the camera is triggered, the livevideo will play on the monitor. (Now only support to display 16 channels at the same time) Figure 3.27 24 User Manual 3.5 Help Help->Online Help Here you can feedback any questions to Milesight and seek any help from Milesight. Help->About Milesight VMS Pro ‘Milesight VMS Client’ information can be checked here. Figure 3.28 3.6 Toolbar Add short cut icons for toolbar as below. Figure 3.23 Num Item Description 1 Server Settings 2 Lock/Unlock 3 Display play toolbar Display or hide play toolbar. 4 Hide the PTZ Display or hide PTZ interface. 5 Fullscreen You can view the live window in full screen mode. To return to the normal screen, press [Esc] button on the keyboard. 6 Live view modes Support 1/ 2/ 4/ 6/ 9/ 13/ 16/ 36 channels playing synchronously. 7 Synchronous Playback 8 Previous Page 9 Next Page 10 Start/Stop Carousel Please refer to 3.2.1 Server/Client Settings. Lock/Unlock the ‘Milesight VMS Client’. For details, please refer to 3.3File. In the playback mode, choose to playback 4 cameras synchronously. Switch to the previous group cameras when in carousel mode. Switch to the next group cameras when in carousel mode. Start or stop the carousel mode. 25 User Manual Chapter IV Live view The ‘Milesight VMS Client’ software provides the user interface for all tasks including monitoring, searching, reporting and configuration. The interface seems as below. Figure 4.1 This part is mainly used for real-time video preview and polling mode setting. The first time ‘Milesight VMS Client’ is started, you should add some cameras to it. You can add the camera manually or by searching cameras. For details please refer to 3.2.1 Camera Settings->Add Camera and 3.2.1 Camera Settings->Search Camera. After adding the camera, you have to drag it to the live window to display the video. How to connect the camera Step1: Select a camera at 1 window. Step2: Double-click on the camera or drag and drop the camera to the individual position. The camera is connected automatically and live videos will show in the selected window. Step3: Repeat step1 to 2 to connect other cameras. Note: Please make sure the camera is available . How to disconnect the camera Step1: Select a camera at 1 window. Step2: Right click the camera name. Select [Enable], the camera will be disconnected. If you want to connect again, click it again. Step3: Repeat step 1 to 3 to disconnect other cameras. 4.1 Camera Tree Window This part is to display the added camera name. There are 3 types when click the right mouse button will show as follow. (1) Right-click on the group Pop-up Menu: 26 User Manual Server Management Server Online Play All Stop All Manage the server. Search out the online-server Play all the livevideo. Stop all the livevideo. Figure 4.2 Note: The status of server like follow means the server is out of connection. Figure 4.3 (2) Right-click on the server Pop-up Menu: Config Server Search Camera Server Information Enable Enable All Unable All Play All Stop All Configure the server. Search out the online-camera. Server information. Enable/Unable the server. Enable all the cameras under the server. Unable all the cameras under the server. Play all the livevideo. Stop all the livevideo. Figure 4.4 (3) Right-click on the camera Pop-up Menu: Camera Information Browsing Web Enable Play Stop Please refer to 3.2.2 Camera Settings->Edit Camera. Please refer to 3.2.2 Camera Settings->Browsing Web. Connect or Disconnect the camera. Start the live video. Stop showing all the videos. Figure 4.5 Note: Item Description Item Description available unusable failed to connect alarm status When the camera is failed to connect successfully the first time, it will try to reconnect at an increasing intervals until it succeed. If it is failed to connect for a long time, drag it into the view to play again. You can also click the camera and enable it, and then enable it again, it will connect successfully again. 27 User Manual 4.2 Live toolbar Figure 4.6 Icon Item Description Record Audio Snapshot Display Stop Display Zoom In Fullscreen Record manually. And this icon will turn into . Play Audio or stop it.(Audio is unusable in the polling live view window) Take a snapshot when live-preview. Display. Stop showing the videos. Enable to zoom in on a specific area of video image with mouse wheel. You can view the live window in full screen mode. To return to the normal screen, press [Esc] button on the keyboard. 4.3 Live view workspace This part is use for displaying the live view. Click the right mouse button will show as follow. Pop-up Menu: Play Display. Stop Stop showing the videos. Remove Remove the camera from the live window. Remove All Remove all cameras from the live window. 16:9 The original screen size can adjust to 16:9. 4:3 The original screen size can adjust to 4:3. Resize The original screen size. Mute Stop audio. Mute All Stop playing all the audio. Mute Other Stop playing other audio. Exit Fullscreen Return to the normal screen. Fullscreen You can view the live window in fullscreen mode. Figure 4.7 28 User Manual 4.4 PTZ control This part is for flexibility of remote pan/tilt/zoom through operator control. It is possible to zoom in on small distant objects with exceptional clarity. The user can easily track objects with high precision by using a mouse or joystick. Figure 4.8 Item Speed Brightness Contrast Saturation Default Description PTZ rotation speed control. A brighter scene appears if a higher level of brightness has been selected. The difference in color and light between parts of an image. A vivid scene appears if a higher level of saturation has been selected. The default values of Brightness/Contrast/Saturation. 29 User Manual Chapter V Playback In this part, you can search and play back the recorded files of a selected IP camera. When click [Playback] button, the window will show as below. Figure 5.1 How to replay the recorded files Way1: Asynchronous Playback Step1: Select which camera to replay on the left, and then check it. Step2: Select a date and the file type you want to search. The File Type includes: All / Manual / Motion / Schedule. Step3: Click [Search] button. Step4: Choose a playback mode, 1/2/4/6/9/13/16 is able to use without synchronously playback. Note: Synchronously playback only supports for 4 panes mode. Step4: Click the file on the list and it will begin to play the recorded files. Play toolbar Icon Item Description Play Play the video. Pause Pause the video. Stop Stop the video. Slow Slow down to catch details. Fast Speed up to skip some details. Mute Play or stop audio.(The default state is to play audio) Zoom Enable to zoom in on a specific area of video image with mouse wheel. Capture Take a snapshot when playing the file. Record Record the video. Download Download the recording file. 30 User Manual FullScreen Fullscreen Color of recorded files on the list. Red Refer to those alarm type recorded files. Blue Refer to those schedules recorded files. Operative Skills Timelines will help you find the correct videos when there are too many files on the list. It's easy to zoom out the area by scrolling the mouse wheel to find exactly the incident you are looking for. Take a file near 10:00 for example, when the position of mouse is between 08:00 and 10:00, then scroll up the mouse wheel, the position of this file will show as follow. Scroll down to turn back. You can hold down the left mouse and drag the mouse left or right (between the intervals from 00:00 to 24:00) to get the exact recorded files. Begin: Figure 5.2 Scroll up 1: Figure 5.3 Scroll up 2: Figure 5.4 Scroll up 3: Figure 5.5 Scroll up 4: Figure 5.6 31 User Manual Method 2: Synchronous Playback Figure 5.7 Step1: Click on the ‘Sync palyback’ button. Step2: Select which camera to replay on the left, and then check it. Step3: Select a date and the file type you want to search. The File Type includes: All / Manual / Motion / Schedule. Step4: Click [Search] button. Step4: Click the file on the list and it will begin to play the recorded files. Note: Synchronously playback only supports for 4 panes mode. If you want to change the camera in different pane, just right click on the window and choose the ‘Remove’ option. Play toolbar Icon Item Description Stop Begin to play the video. Pause to play the video. Stop play the video. Slow Slow down to catch details. Fast Speed up to skip some details. Zoom Enable to zoom in on a specific area of video image with mouse wheel. Download Download the recording file. Fullscreen Fullscreen Play Pause How to download the recorded files Here is for the downloading the recording files from the ‘Milesight VMS Client’. Over the ‘Milesight VMS Client’, you can download the recording files to your local pc. Choose the start time and the stop time for the recording files, then select the file type, including alarm type and schedule type. Then choose a destination where to save the files on your local PC. Right-Click on the file list, select the ‘Download’ option to download the recording files. 32 User Manual Figure 5.8 33 User Manual Chapter VI Map In this part, you can add an electronic map and different cameras to the map. The display of map graphics in the Map window can be controlled. The size of the map can be selected, and the map moved in the window to show the required area. Use the zoom in / zoom out buttons or with the mouse wheel to adjust map size. Right-click on the map and choose the ‘Lock’ option, this would prevent the accidental deleting of the map. It is easy to navigate between different layers of maps, and to show the maps for cameras in various locations. Here you can add different maps for each server. Note: Only on the layers of the server, you can drag the cameras to the server map. When click [Map] button, the window will show as below. Figure 6.1 6.1 Toolbar Modify When [Modify] button is clicked, the window will show as below. Different image formats such as bmp / gif / png /jpg are supported. Figure 6.2 34 User Manual Icon Item Description Delete Map Remove the map from the ‘Milesight VMS Client’. Zoom In Enlarge the picture to see more details. Zoom Out Zoom out of the map. Reset Return the map to its original size. Delete Hot Remove the camera from the map. 6.2 Pop-up Menu Right-click the map (anywhere except the cameras). A menu will pop-up as figure 6.3. Lock If the map is locked, you can do nothing with the map but zoom in or zoom out. Unlock You can do anything if the map is unlocked. Figure 6.3 Right-click the camera. A menu will pop-up as figure 6.4. Delete Remove the camera from the map. Play Live preview. Figure 6.4 6.3 Add the hot Click the camera and drag it to the E-map, then it will be added successfully. After the camera has been added on the E-map, you can double click on the hot to play. Figure 6.5 35 User Manual Chapter VII Milesight VMS Server An installation of ‘Milesight VMS Pro’ has two components: server software and client software. The server functions as the intelligence management system forward the rtsp stream. After log on the ‘Milesight VMS Server’, it will appear on the right-button like this . Right-Click on the icon, the window shows as below. Figure 7.1 Item Description Stop/Start Help Online Help About Us Run When Startup Stop/Start running the ‘Milesight VMS Server’. Feedback any questions to Milesight. About ‘Milesight VMS Server’ version information. Running the program when computer startup. Register now Active the ‘Milesight VMS Pro’. Exit Exit the‘Milesight VMS Server’ Note: Before active the ‘Milesight VMS Pro’, you can add up to 8 cameras. If you want to use more cameras, please contact with Milesight to active the ‘Milesight VMS Pro’ via ‘Milesight VMS Server’. 36 User Manual Chapter Ⅷ Service Milesight Technology Co., Ltd provides customers with timely and comprehensive technical support services. End-users can contact your local dealer to obtain technical support. Distributors and resellers can contact directly with Milesight for technical support. Technical Support Mailbox: [email protected] Web: http://www.milesight.com Online Problem Submission System: http://www.milesight.com/service/feedback.asp Address: Room 606, No.23 Wanghai Road, 2nd Software Park, Xiamen, China Zip Code: 361006 TEL: +86-592-5922772 FAX: +86-592-5922775 Milesight More in Sight 37