1
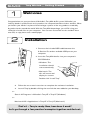
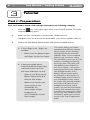
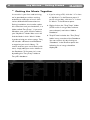
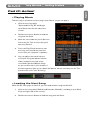
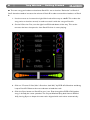
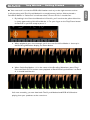
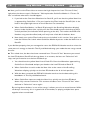
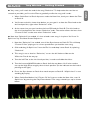
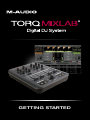
GETTING STARTED
1
|
Getting Started
|
1
Welcome
Congratulations on your purchase of M-Audio’s Torq MixLab DJ system! M-Audio is an
industry-leader in professional music products for computer-based musicians and DJs. What
you hold in your hands is a piece of that heritage—a piece of the very products used daily
by professionals around the world. With the Torq MixLab package, you will DJ using your
collection of audio files on your computer. You can even record the results and burn them
onto CD, or copy them onto a media player.
2
Installation
1. Connect the included USB cable between the
X-Session Pro and an available USB port on your
computer.
2. Insert the Torq MixLab disc into your computer’s
CD-ROM drive
• Windows: The
installation should
start automatically.
• Macintosh: The
disc will mount and
display its content.
Double-click “Install Torq”
3.
Follow the on-screen instructions to complete the software installation.
4.
Launch Torq by double-clicking the new link that was added to your desktop,
or...
Start > All Programs > M-Audio > Torq LE > Torq LE (Windows)
or...
Macintosh HD > Applications > Torq LE > Torq LE (Macintosh)
That’s it – Torq is ready. Now, how does it work?
Let’s go through a few practical examples together and find out:
English
Torq MixLab
|
2
Torq MixLab
3
|
Getting Started
Tutorial
Part I: Preparation
First, we’ll need to check a few settings required for the following examples
1.
Click the
icon in the upper right section of the Torq LE window. The Audio
Preferences dialog opens.
2.
Make sure your soundcard is selected under “Audio Interface”.
(Windows users: If a driver with the word “ASIO” in its name is available, select it)
3.
Click on the field labeled “Master Output” and check the available choices:
a. If “Left / Right / Left -- Right” are
available:
•
Select “Left” for Master Output
and “Right” for the Cue Output.
b. If there are multiple entries
listed in the Master Output field,
and some of them say 1/2 in
their name and others say 3/4:
•
Select a “1/2” driver for the
Master Output and a “3/4”
driver for Cue Output.
•
Make sure to connect your
sound system to your
soundcard’s first
stereo output and your
headphones to
your soundcard’s second
stereo output.
For serious DJing, you need a
soundcard that features separate
stereo outputs for pre-listening
(cueing) and for the sound the
audience hears. Your soundcard
features only one stereo output.
Torq still allows you to use all of its
features, including pre-listening,
by using a trick: Torq splits your
soundcard’s stereo output into
two mono outputs – one for prelistening and one for the audience
(the left/right choices in this
dialog). All you need to follow
the examples in this tutorial is a
Y-adapter cable that connects to
your soundcard’s stereo output
via a male 1/8” jack and provides
two female 1/8” jacks for your
headphones and your sound
system. You can find such cables
at every well stocked electronicsor music store. Please also check
the full Torq User Guide for more
information, which can be found
on the in the Torq LE application
folder.
|
Getting Started
|
3
Part II: Overview
Torq MixLab is composed of two parts:
the Torq LE DJ software and the M-Audio
X-Session Pro DJ controller. Torq LE is a
full-featured DJ application that has all the
functions you’d find on expensive DJ CD
players and turntables. It plays back music at
varying speeds and pitches and automatically
matches tempos of songs, creating smooth
transitions between tracks. You can also
perform remix tricks such as looping and
instant jumps to other locations in the song.
Lastly, Torq LE allows you to apply effects
to the music and fully control the mix of the
songs. The M-Audio X-Session Pro provides
you with hands-on control over Torq LE. After
plugging the X-Session Pro into one of your
computer’s USB ports, Torq LE instantly
recognizes it. Moving the controls on the
X-Session Pro results in the corresponding
on-screen controls moving in kind. This is
the best way to DJ since you can perform
multiple tasks at once on the controller, as
opposed to controlling only one thing at a
time with the mouse.
DJing is an art. As with any art, it takes
practice to become proficient. However,
there are many features in the Torq MixLab
package that will jump-start your learning
process. This manual describes the features
and use of the Torq MixLab system and offers
insight into the art of DJing. Once you are
proficient with Torq MixLab, the sky’s the
limit—you’ll be ready to take the step up to the
tools used by the pros!
>
Food For Thought
In some ways, DJing resembles the
circus tricks of spinning plates or
juggling objects. As the DJ, it is your
job to “keep everything up in the air”
in a smooth fashion, so that the music
never stops as you move from one song
to another. All of the tools available to
you merely influence and cajole the
playback of music that would normally
play straight through, uninterrupted
and independent from each other
from beginning to end. It is therefore
a necessity to think one step ahead
of where you are, since some DJ
techniques must be performed before
you actually want your audience to hear
them. This ability to anticipate changes
in the music directly relates to how well
you know the music in your library. If
you know the structure and patterns of
a song like the back of your hand, you’ll
know what sections are appropriate for
looping, interesting places to introduce
filters and other effects, and empty or
quiet areas where you might need to mix
in another song. Intimate knowledge of
your music library is also what helps you
select the right progression of songs, by
choosing songs of similar style and feel.
English
Torq MixLab
|
4
>
Torq MixLab
|
Getting Started
Getting the Music Together
In case this is your first stab at mixing,
we’ve provided you with an exciting
and diverse collection of music from
various M-Audio M-Powered artists.
During installation, the installer copies
this collection onto your hard drive, in a
folder called “Torq Traqs.” If you are a
Windows user, you’ll find this folder in
your “My Music” folder. Mac users will
find the folder in their “Music” folder.
In order to help you select songs, Torq
LE includes a Browser and Database
to organize your music library. To
search and sort your music library with
ease, simply add your music folders to
the Database. To illustrate, let’s start
by adding the “Torq Traqs” folder to
Torq LE’s database:
1. If you’re using a PC, click the “+” in front
of “My Music” in the Browser pane. If
you’re using a Mac, click the “+” in front
of “Music” in the Browser pane.
2. Right-click on the “Torq Traqs” folder
(CTRL+click if using a Mac with one
mouse button) and select “Add to
Database.”
3. Torq LE now includes the “Torq Traqs”
folder in any searches of the Database.
You can confirm this by clicking on
“Database” in the Browser pane—the
following list of songs should be
displayed:
|
Getting Started
|
5
Part III: Action!
>
Playing Music
The next step is to load one of the songs onto a Deck, so you can play it:
>
1.
Click on the song titled
“Somnambulist” by BT and drag it
up to Deck A on the left side of the
screen.
2.
Release the mouse button to load the
song into the Deck.
3.
Move the crossfader on your X-Session
Pro to the left. This ensures that you’ll
hear only Deck A.
4.
Press the Play/Pause button to start
the song. You should now hear the
music from you computer’s speakers.
5.
You can adjust the overall volume
of Torq LE using the Master Volume
slider, located to the right of the
crossfader (pictured below). Keep
an eye on the meter in this window—if
the top segments light up, turn down the Master Volume until they turn off. This
prevents the music from distorting.
Loading the Next Song
While the BT track plays on Deck A, you can load another song into Deck B:
1.
Click on the song titled “Gabriel and Dresden Club Mix,” and drag it up to Deck
B (on the right side of the screen).
2.
Release the mouse button to load the song onto the Deck.
English
Torq MixLab
|
6
>
Torq MixLab
|
Getting Started
Previewing the Next Song
1.
Put your headphones on and press the Right Headphone Button on the
X-Session Pro. You’ll see the PFL/Headphone icon light up on the right side of
the Mixer on screen.
2.
Turn down the headphone volume by moving the Headphone Volume slider to
the left with the mouse.
3.
Press the Play/Pause button on the right side of the X-Session Pro to start
playback of Deck B. You’ll hear the beginning of “Gabriel & Dresden Club Mix”
in your headphones.
4.
Turn up the Headphone Volume slider until the song is at a comfortable listening
level.
Now take off your headphones. Notice that you still hear the BT track over the
speakers and not “Gabriel & Dresden?” That is because you moved the Crossfader
all the way to the left. Pressing the headphone button on the right mixer channel
allows you to hear Gabriel & Dresden (Deck B) privately in your headphones.
>
Synchronizing the Songs
Put your headphones back on, but leave one of the earcups off. This way, you can hear
one song in your speakers, and the other in your headphones. Notice how the two
songs are completely out of sync with each other? It sounds pretty terrible. If you were
to try to mix Gabriel & Dresden into the speakers right now, it would result in what DJs
fondly call a “train wreck.”
In order to avoid a train wreck, you need to change both the speed and position of
Gabriel & Dresden so that it matches the speed and position of BT. Torq LE has a handy
Sync button to accomplish this task for you. Click the Sync button on Deck B and listen
to what happens.
The two songs now play at the same speed and are in sync with each other. You can
see that the BPM values for the two Decks are matched, indicating that the songs are
running at the same speed.
Torq MixLab
Getting Started
|
7
Mixing the Songs
Now that you have Deck B synchronized to Deck A, you can try mixing them together:
1.
Slowly move the crossfader on the X-Session Pro from the left towards the center.
You’ll hear the Gabriel and Dresden track fade in on top of BT.
2.
When the crossfader is at the middle, you’ll hear both songs at the same time.
Both songs are playing in sync so they almost sound like one.
3.
Continue moving the X-Session Pro crossfader towards the right. The BT track
on Deck A will start to fade away. When the crossfader is fully right, you’ll hear
only the Gabriel and Dresden track on Deck B.
Congratulations! You just performed your first DJ crossfade! It may not have sounded as
smooth as other DJ mixes you’ve heard, but this was only your first attempt—and you may
not have heard those songs before. Once you begin to work with familiar music, you’ll
find it easier to do clean crossfades.
Part IV: An Advanced Mix
So let’s take this up a notch. In this example, you’ll mix three songs together. You’ll start with
“Defective” by The Crystal Method, mix into “Picture Of You” by East Coast Boogiemen & DJ
Heather, and finally, you’ll mix into “A Spirit Lost” by The Nova Dream Sequence.
You won’t use the crossfader to mix this time—you’ll leave it right in the center. Instead, you’ll
use the EQs and Filters to create the mix. You’ll see how adjusting the frequencies of a song
can help create a subtle blend between songs.
This example also introduces you to QuickCue Markers. There are five assignable QuickCue
markers for every song. When placed in the song, they appear in the small Overview
Waveform in the Deck and in the larger Scrolling Waveform display in the middle of the
screen. They show up as white numbers with a white circle around them, and Torq LE saves
their locations with every song.
We have already placed the QuickCue Markers in the songs you’re about to use. During this
example, you’ll perform certain tasks when playback reaches these various markers. Let’s get
started:
1. Click on the song “Defective” by The Crystal Method and drag it over Deck A.
2. Replace “Somnambulist” with “Defective” by releasing the mouse button.
3. Move the Volume A slider on the X-Session Pro down 4 lines. This turns down the
volume of “Defective,” which happens to be a very loud song.
4. Press the left Play/Pause button on the X-Session Pro to start Deck A.
English
>
|
8
|
Torq MixLab
|
Getting Started
< The next song you’re about to load onto Deck B is not as loud as “Defective” on Deck A.
You’ll therefore need to increase the volume of Deck B in order to match the loudness of Deck
A:
1. Use the mouse to increase the right Gain knob all the way to +6dB. This makes the
song twice as loud as normal, in order to match it with the song on Deck A.
2. On the X-Session Pro, turn the right Low EQ knob down all the way. This action
removes the bass frequencies from Deck B when it starts playing.
3. Click on “Picture Of You (Ken’s Drunk on Jack Mix)” by ECB & DJ Heather and drag
it up to Deck B. Release the mouse button to load the track.
4. Click the Sync button on Deck B to turn it on. Even though the ECB & DJ Heather
song is already the same speed as The Crystal Method (they both have a BPM of
125), having Sync on keeps the two tracks aligned with each other automatically.
|
Getting Started
|
9
< Your next task is to start the ECB & DJ Heather track at just the right moment so that
it will play along with The Crystal Method in a complimentary fashion. We’ve placed a
QuickCue Marker in “Defective” to indicate where “Picture Of You” should start.
1. By looking in the Overview Waveform in Deck A, you’ll see that the yellow Now Line
is slowly approaching QuickCue Marker 1. Put your finger on the Play/Pause button
for Deck B so you’ll be ready to press it.
2. When playback gets close enough, you’ll also see QuickCue Marker 1 show up in
the Scrolling Waveform display, as shown below.
3. When QuickCue Marker 1 is in the center of the Scrolling Waveform, press Play/
Pause on Deck B. This action starts playback of Deck B and synchronizes it to Deck
A. It should look like this:
If all went smoothly, you now hear both The Crystal Method and ECB & DJ Heather
playing from your speakers at the same time.
English
Torq MixLab
10
|
Torq MixLab
|
Getting Started
< Next, you’ll use the Filter effect to remove the high frequencies from “Picture Of You,”
right when the drums stop in “Defective.” We’ve placed a QuickCue Marker in “Picture Of
You” to indicate where this should happen.
1. If you look at the Overview Waveform for Deck B, you’ll see that the yellow Now Line
is approaching QuickCue 1. Put your hand on the Filter knob for Deck B (this is the
knob in the upper-right corner on the X-Session Pro controller).
2. When QuickCue Marker 1 of Deck B (pictured in the Scrolling Waveform display)
passes under the Now Line, quickly turn the Filter knob counter-clockwise to the 9
o’clock position (the indicator will be pointing to the left). This makes the ECB & DJ
Heather song sound muffled, and you’ll only hear a little bit of the bass drum.
3. Now slowly turn up the Filter knob as the music builds in this section. Your goal is to
have the knob at 12 o’clock when QuickCue Marker 2 passes under the Now Line of
Deck B.
If you did that properly, then you managed to cause the ECB & DJ Heather track to mirror the
same pause in energy as heard in The Crystal Method song—you made the two songs sound
like one.
< This whole time, the bass has been removed from “Picture Of You” because you turned
the Low EQ knob on Deck B all the way down. In a moment, the bass on “Defective” will
stop, and you’ll need to turn the Low EQ back up:
1. You should see the yellow Now Line of Deck B’s Overview Waveform approaching
QuickCue 3. Go ahead and put your hand on the Low EQ knob of Deck B.
2. When QuickCue 3 scrolls under the Now Line at the center of the Scrolling
Waveform display, quickly turn the Low EQ knob to the 12 o’clock position.
3. With the bass restored, the ECB & DJ Heather track carries the beat during this
breakdown in The Crystal Method track.
4. When QuickCue 4 passes under the Now Line, quickly turn the Low EQ back
down—fully counter-clockwise. This removes the bass from “Picture Of You” when
the beat in “Defective” starts again.
By turning down the bass in one of the songs, it allows your mix to sound cleaner. While
not always necessary, this is a good trick to remember, as playing multiple bass parts
together often sounds bad.
|
Getting Started
|
11
< Very soon, you’ll reach the end of the song “Defective.” To help make the transition as
smooth as possible, you’ll use the Filter to gradually muffle the song until it ends.
1. When QuickCue 2 of Deck A passes under the Now Line, slowly turn down the Filter
on Deck A.
2. You’ll want to do this slower than before, as your goal is to have the Filter knob at the
9 o’clock position, right when “Defective” ends.
3. At the same time, put your hand on the Low EQ knob for Deck B. Turn this knob to
the 12 o’clock position the instant “Defective” ends. That action allows the bass from
“Picture Of You” to take over when “Defective” ends.
< Now that “Defective” has ended, it’s time to load a new song in its place. You’ll use “A
Spirit Lost” by The Nova Dream Sequence:
1. Now that “Defective” has ended, turn off the Sync button on Deck B. This will keep
“Picture Of You” playing at its current speed when you load the next song.
2. Click and drag “A Spirit Lost” from the File List and drop it onto Deck A, replacing
“Defective”.
3. This song is not as loud as “Defective,” so turn the left Volume slider on the
X-Session Pro all the way up.
4. Turn the left Filter to the 12 o’clock position, in order to disable the effect.
5. Turn the Low and Mid EQ knobs on Deck A all the way down. You’ll also need to
turn up the High EQ to roughly the 3 o’clock position (so the indicator on the knob is
pointing to the right).
6. Press the Sync button on Deck A to match tempos to Deck B. “A Spirit Lost” is now
standing by to play.
7. When QuickCue Marker 5 of “Picture Of You” passes under the Now Line, start “A
Spirit Lost” by pressing the Play/Pause button. The songs should sync up as shown
below:
English
Torq MixLab
12
|
Torq MixLab
|
Getting Started
< Unlike a moment ago, when you started “Picture Of You,” you won’t hear “A Spirit Lost”
when you first start playing it. This is because you removed the majority of the frequencies in
the song by turning down the Low and Mid EQ knobs. Therefore, to make the song audible,
you’ll need to turn up the EQ knobs.
1. When Deck A reaches QuickCue Marker 1, quickly turn up the left Mid EQ knob to
the 9 o’clock position.
2. Continue to slowly turn up the Mid EQ. Your goal is to have the knob set to the 11
o’clock position when “A Spirit Lost” reaches QuickCue Marker 2. You’ll hear the
synthesizer pattern from “A Spirit Lost” begin to fade in as you do this.
3. Once you’ve passed QuickCue Marker 2, play around with the Phaser effect on
Deck A. Slowly move the knob around and listen to the sound of the synthesizer
pattern change.
4. When playback of Deck A reaches QuickCue Marker 3, you’ll need to do two things
at once. First, turn the Phaser knob all the way down (to turn off the effect). Second,
turn the Low EQ of Deck A to 12 o’clock.
5. Immediately turn the Deck A Mid EQ the rest of the way to the 12 o’clock position. At
the same time, use your other hand to turn down the Mid EQ on Deck B by the same
amount. This action causes “A Spirit Lost” to become the dominant song in the mix.
6. Continue to turn down the Mid EQ on Deck B until it’s completely counter-clockwise.
You should do this before “A Spirit Lost” reaches QuickCue 4.
7. When “A Spirit Lost” reaches QuickCue Marker 4, the bass drum in the song stops,
but you’ll still hear the bass drum from “Picture Of You”. Slowly turn down the Low
EQ on Deck B during this breakdown, to make the bass drum fade away. The Low EQ
should be all the way down by the time “A Spirit Lost” reaches QuickCue Marker 5.
|
Getting Started
|
13
Part V: Keep Spinning
Give yourself a pat on the back—you’ve just performed a rather complex mix between three
songs! In case you didn’t perform everything just right, feel free to repeat this example until it
feels natural. Also feel free to experiment with other mixing techniques—try using the High EQ
knobs in addition to the others when blending between tracks. Try using the crossfader, too,
to add volume changes to the mix. In the end, it’s all about what you like to hear. Experiment!
These two examples offer only a glimpse of what is possible with Torq MixLab. Please
continue reading the complete Torq MixLab user guide on the included CD-ROM to learn
the specific details of the Torq LE program, or refer to the interactive manual (press the Help
button of Torq LE, located at the top right of the application, and choose “User Manual” from
the resultant dialog box). There are many features that you haven’t used yet. There are also
some troubleshooting tips for synchronizing tracks in the event that Torq LE doesn’t analyze
the song properly (some music can’t be analyzed due to variations and complexity in the
song). Read more and you’ll be ready to mix anything at your next party or podcast.
4
Additional Information
and Support
Help on the Web:
The M-Audio website (www.m-audio.com) contains the latest software updates as well as
useful links to news stories, FAQs, and technical support. We recommend checking this site
periodically to ensure you have the latest software version and most up-to-date information
about your M-Audio products.
English
Torq MixLab
14
|
Torq MixLab
5
|
Getting Started
Warranty
Warranty Terms
M-Audio warrants products to be free from defects in materials and workmanship, under
normal use and provided that the product is owned by the original, registered user. Visit
www.m-audio.com/warranty for terms and limitations applying to your specific product.
Warranty Registration
Immediately registering your new M-Audio product entitles you to full warranty coverage
and helps M-Audio develop and manufacture the finest quality products available. Register
online at www.m-audio.com/register to receive FREE product updates and for the chance to
win M-Audio giveaways.
© 2006 Avid Technology, Inc. All rights reserved. Product features, specifications,
system requirements and availability are subject to change without notice. Avid, M-Audio,
Torq, X-Session Pro, and MixLab are either trademarks or registered trademarks of Avid
Technology, Inc. All other trademarks contained herein are the property of their respective
owners.
Torq MixLab
Tested to comply with
FCC standards
FOR HOME OR STUDIO USE
WARNING: This product contains chemicals, including lead, known to the State of
California to cause cancer, and birth defects or other reproductive harm. Wash hands after
handling.
M-Audio USA
M-Audio Germany
5795 Martin Rd., Irwindale, CA 91706
Kuhallmand 34, D-74613 Ohringen, Germany
Technical Support
Technical Support
web:
www.m-audio.com/tech
e-mail:
[email protected]
tel (pro products):
(626) 633-9055
tel:
+49 (0)7941 - 9870030
tel (consumer products):
(626) 633-9066
fax:
+49 (0)7941 98 70070
fax (shipping):
(626) 633-9032
Sales
Sales
e-mail:
[email protected]
e-mail:
[email protected]
tel:
+49 (0)7941 98 7000
tel:
1-866-657-6434
fax:
+49 (0)7941 98 70070
fax:
(626) 633-9070
Web
www.m-audio.de
Web
www.m-audio.com
M-Audio U.K.
Floor 6, Gresham House, 53 Clarenden Road, Watford
WD17 1LA, United Kingdom
Technical Support
M-Audio Canada
1400 St-Jean Baptiste Ave. #150, Quebec City,
Quebec G2E 5B7, Canada
Technical Support
email:
[email protected]
e-mail:
[email protected]
phone:
(418) 872-0444
tel:(Mac support):
+44 (0)1765 650072
fax:
(418) 872-0034
tel: (PC support):
+44 (0)1309 671301
Sales
Sales
e-mail:
[email protected]
tel:
+44 (0)1923 204010
phone:
(866) 872-0444
fax:
+44 (0)1923 204039
fax:
(418) 872-0034
Web
www.maudio.co.uk
Web
www.m-audio.ca
M-Audio France
Floor 6, Gresham House, 53 Clarenden Road, Watford
WD17 1LA, United Kingdom
Renseignements Commerciaux
tel :
0 810 001 105
e-mail :
[email protected]
Assistance Technique
PC :
0 0820 000 731
MAC :
0 0820 391 191
Assistance Technique
e-mail :
[email protected]
[email protected]
fax :
+33 (0)01 72 72 90 52
Site Web
www.m-audio.fr
061212_TorqMLab_GS_EN01