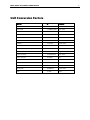
1
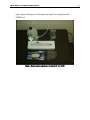
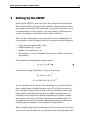
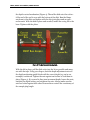
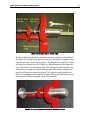
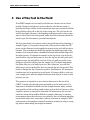
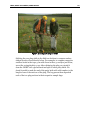
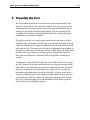
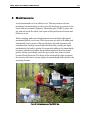
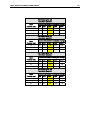
ERDC/CRREL SR-09-1
User’s Manual for the CRREL Multi-Increment
Sampling Tool
Cold Regions Research
and Engineering Laboratory
Michael R. Walsh
Approved for public release; distribution is unlimited.
June 2009r
Front cover photo: Characterization of a demolition range at Fort Richardson, Alaska, by a joint Canadian / U.S. research team using prototype CRREL multi-increment sampling tools.
ERDC/CRRELL SR-09-1
June 2009
User’s Manual for the CRREL Multi-Increment
Sampling Tool
Michael R. Walsh
Cold Regions Research and Engineering Laboratory
U.S. Army Engineer Research and Development Center
72 Lyme Road
Hanover, NH 03755-1290
Final report
Approved for public release; distribution is unlimited.
Prepared for
Under
Strategic Environmental Research and Development Program
Arlington VA 22203
Project ER-1481
ERDC/CRREL TN-09-2ERDC/CRREL SR-09-1
Abstract: The CRREL Multi-Increment Sampling Tool (CMIST) was developed to facilitate collecting multi-increment soil samples. The design is
simple yet flexible, enabling the investigator to configure the tool to meet
the collection needs of the sampling plan. This manual describes the tool,
how to use the tool, and how to maintain the tool in the field.
i
ERDC/CRREL TN-09-2ERDC/CRREL SR-09-1
Table of Contents
Figures and Tables................................................................................................................................ iii
Preface....................................................................................................................................................iv
Unit Conversion Factors.........................................................................................................................v
1
Introduction..................................................................................................................................... 1
2
Description...................................................................................................................................... 2
The CMIST tool.......................................................................................................................... 2
Supporting tools and equipment............................................................................................. 3
Cleaning equipment and supplies........................................................................................... 4
3
Setting Up the CMIST .................................................................................................................... 6
4
Use of the Tool in the Field............................................................................................................ 9
5
Cleaning the Tool..........................................................................................................................11
6
Maintenance.................................................................................................................................12
7
Conclusion.....................................................................................................................................14
Appendix A: Equipment and Supplies List ........................................................................................15
Appendix B: Sample Coring Device Set-Up Sheet............................................................................ 17
REPORT DOCUMENTATION PAGE.......................................................................................................19
ii
ERDC/CRREL TN-09-2ERDC/CRREL SR-09-1
Figures and Tables
Figures
Figure 1. The CRREL Multi-Increment Sampling Tool. Coring tips are 2-, 3-, and 4-cm
diameter (left to right). Corresponding disks are shown below the handle......................................... 2
Figure 2. Some supporting tools used with the CMIST........................................................................... 4
Figure 3. Some cleaning supplies and equipment for the CMIST. ........................................................ 5
Figure 4. The depth control mechanism.................................................................................................. 7
Figure 5. Setting the stop for sample depth. ........................................................................................... 8
Figure 6. Correct final position of the disk for increment ejection. ....................................................... 8
Figure 7. Sampling team using the CMIST. ............................................................................................ 10
Figure 8. Field maintenance of the CMIST tool. .................................................................................... 12
Tables
Table 1. CMIST component weights and dimensions............................................................................. 3
Table A1. Tools, equipment, and supplies for multi-increment sampling with the CMIST
tool; items in bold are minimum recommended................................................................................... 15
Table B1. CMIST tool set-up sheet for multi-increment sampling........................................................ 17
iii
ERDC/CRREL TN-09-2ERDC/CRREL SR-09-1
Preface
This work has been funded by the U.S. Department of Defense through the
Strategic Environmental Research and Development Program (Projects
CP-1155 and ER-1481) and the Environmental Security Technology Certification Program (Project ER-0628). Additional support has been provided
by the U.S. Army Alaska and the U.S. Army Garrison, Alaska, through the
Eagle River Flats Restoration Project and the Soil and Water Quality Program.
This technical note was prepared by Michael R. Walsh, Mechanical Engineer, Engineering Resources Branch (RV-E), U.S. Army Engineer Research and Development Center – Cold Regions Research and Engineering
Laboratory (ERDC-CRREL). At the time of publication, Thomas J. Tantillo
was Chief, CEERD-RV-E; Deputy Director of ERDC–CRREL was Dr.
Lance D. Hansen, and the Director was Dr. Robert E. Davis.
The Commander and Executive Director of ERDC was COL Gary E. Johnston and the Director was Dr. James R. Houston.
Acknowledgements
Multi-increment sampling is a new and innovative method to obtain representative soil samples from areas (decision units) suspected of contamination. Biasing of the sampling and the difficulty of obtaining hundreds of
increments was a hurdle to the acceptance of this method. With the help of
Mr. Chuck Ramsey of Envirostat and Dr. Tom Jenkins, formerly of
CRREL, we developed this tool over several years to be a simple, rugged,
and effective aid in the multi-increment sampling process. Many thanks to
all involved in this process, especially those who took up the tool in the
early years and provided much valuable feedback.
iv
ERDC/CRREL TN-09-2ERDC/CRREL SR-09-1
v
Unit Conversion Factors
Multiply
By
To Obtain
cubic feet
0.02831685
cubic meters
cubic inches
1.6387064 E-05
cubic meters
cubic yards
0.7645549
cubic meters
degrees Fahrenheit
(F-32)/1.8
degrees Celsius
feet
0.3048
meters
gallons (U.S. liquid)
3.785412 E-03
cubic meters
hectares
1.0 E+04
square meters
inches
0.0254
meters
miles (U.S. statute)
1,609.347
meters
ounces (mass)
0.02834952
kilograms
ounces (U.S. fluid)
2.957353 E-05
cubic meters
pints (U.S. liquid)
0.473176
liters
square feet
0.09290304
square meters
square inches
6.4516 E-04
square meters
square miles
2.589998 E+06
square meters
square yards
0.8361274
square meters
yards
0.9144
meters
ERDC/CRREL TN-09-2ERDC/CRREL SR-09-1
1
Introduction
The CRREL (Cold Regions Research and Engineering Laboratory) MultiIncrement Sampling Tool (CMIST) was developed to facilitate the collection of multi-increment soil samples. Multi-increment sampling requires
the collection of many increments that are combined to form a single sample. This sample, if collected properly, will enable the characterization of a
decision unit. Decision units (DU) can range from as small as a few square
meters to over a hectare. Typical DUs are on the order of 0.25 ha. The
number of increments required to properly characterize a DU will vary
from a minimum of 30 to over 100, depending on data quality objectives.
Fieldwork often occurs in remote areas. Tools need to be rugged, simple,
lightweight, easy to use, and flexible. In the case of a sampling tool, it also
needs to enable the acquisition of consistent samples. These are all design
criteria used to develop the CMIST. This manual will enable you, the user,
to get the most out of the tool and optimize your time in the field.
This manual addresses only the use of the CMIST tool and does not delve
into sampling theory or how to set up a sampling strategy. If you are interested in these topics, we recommend works by Pierre Gy, the U.S. Environmental Protection Agency (EPA), the U.S. Army Environmental Command (AEC), and Envirostat. This manual assumes that the general
outline for a sampling strategy (multi-increment sampling) has been established, with some leeway allowed for on-site adjustments of DU size
and shape as well as the number of increments per sample.
1
ERDC/CRREL TN-09-2ERDC/CRREL SR-09-1
2
Description
The CMIST tool
The CMIST sampling tool is designed to facilitate the collection of sample
increments of a given volume in cohesive soils. Its basic parts are a lightweight aluminum handle, a rugged carbon steel base with a combination
depth-control / increment-ejection pusher mechanism, and interchangeable stainless steel (SS) bits (Figure 1). It disassembles easily for packing
and transport and will fit in most 50-L (12-gal) coolers or a 36- x 56-cm
shipping container (Rubbermaid ActionPacker Model 1172). Component
sizes and weights are given in Table 1. (See Appendix A, Table A1, for a
parts list for both tool and supporting equipment.)
Figure 1. The CRREL Multi-Increment Sampling Tool.
Coring tips are 2-, 3-, and 4-cm diameter (left to right).
Corresponding disks are shown below the handle.
The handle is a lightweight aluminum weldment that attaches to the base
with an 8-mm (diameter) x 3.2-cm (5/16- x 1.25-in.) quick-release pin. The
standard length is 56 cm, but shorter lengths are possible through an easy
2
ERDC/CRREL TN-09-2ERDC/CRREL SR-09-1
3
modification of the existing handle, done by cutting it to length and then
cross-drilling with a 9-mm bit at 2 cm from the end.
Table 1. CMIST component weights and dimensions.
Component
Handle
Weight
0.43 kg
Base assembly 1.8 kg
Coring bits (3)
Dimensions (cm)
26 W x 56 L
26 W x 44 L
1.1 kg (≈350 g each) 5 x 8.5 L
The base assembly has attachment points for the handle and the interchangeable coring bits. The bits thread onto the lower end of the base. The
integral depth/pusher mechanism consists of an aluminum knob, a 23-cm
length of ⅜ in.–24 SS threaded rod, four ⅜-in.–24 SS hex nuts, and two
⅜-in.–24 SS serrated flange nuts. A depth-control disk attaches to the end
of the threaded rod opposite the knob. The disk size will depend on the
coring bit size.
Coring bits come in three standard sizes: 2-,3-, and 4-cm diameter. All bits
are stainless steel, machined from a solid blank. The thread size is 1 ⅞in.–12. The inside of the bit is tapered at a 1° angle to expedite removal of
the sample plug. The tips are double-beveled to provide a sharp cutting
edge as well as strength. The recommended usable length of the coring bits
is 5 cm. If the need arises, longer coring bits can be supplied to obtain
longer sample plugs, although longer plugs are more difficult to obtain and
extract, especially in more consolidated (hard-packed) soils.
Supporting tools and equipment
To ensure proper operation of the CMIST, we recommend the following
tools and equipment (shown in Figure 2). Two 9/16-in. open-end
wrenches are needed to assemble and adjust the pusher assembly. A set of
slip-joint pliers is used to install and remove the coring bits. These pliers
should have a range of 2.5 to 5 cm. A metric-graduations tape measure is
needed to set the depth of the pusher mechanism. A half-round metal file
is useful to maintain the edge of the bits, and a 0.5-kg dead-blow (leadshot-filled) hammer is indispensable when a sample gets stuck in the bit or
when sampling in compact soil.
If samples are to be split, such as with a surface/subsurface split, a modified putty knife works well. Sharpen both side edges of the putty knife. On
ERDC/CRREL TN-09-2ERDC/CRREL SR-09-1
one edge, use a metal file to file in serrations. The serrations are handy for
cutting through root material. We also recommend an AMS stainless #2
scoop (or two), to be used when sampling soils that are not cohesive
enough to stay in the coring bit.
Figure 2. Some supporting tools used with the CMIST.
Cleaning equipment and supplies
The tool must be cleaned between sampling locations to avoid crosscontamination and to ensure proper operation of the tool. To remove adhered soil, we use stainless steel wool pads and a parts-cleaning brush
with stainless bristles and a Delrin handle (Figure 3). The brush is very
useful to clean the threads of the bits, bit holder, and depth-adjustment
rod. To wash down the tool, we use both water and acetone. The final
rinses should be with distilled, deionized, or ultra-filtered water followed
by a light acetone rinse. A 16-oz (0.5-L) polyethylene spray bottle is useful
for the acetone. For water, we use either a 4-L spray bottle or a larger,
backpack compression sprayer. The compression sprayer works well when
samples are consolidated at a central field point. The tool can then be
cleaned when the sample is turned in. We use 4-L polyethylene jugs to
store water for the day’s use in the field. A 20-L pail is needed to collect
waste acetone from the cleaning process. Finally, a couple boxes of clean
4
ERDC/CRREL TN-09-2ERDC/CRREL SR-09-1
paper wipes (Kimwipes or Techwipes) are handy for wiping down the
CMIST tool.
Figure 3. Some cleaning supplies and equipment for the CMIST.
5
ERDC/CRREL TN-09-2ERDC/CRREL SR-09-1
3
6
Setting Up the CMIST
Setting up the CMIST is quite easy. First, the coring bit must be selected.
This is determined in large part by the number of increments to be taken
per sample or the depth of the increments. A good rule-of-thumb is to collect enough mass to end up with a 1- and 2-kg sample. To determine the
correct core diameter, work backwards from this as follows:
Note: The first three inputs are predetermined in the sampling plan. In
our example, we will use typical values for energetics residues sampling.
•
•
Target mass per sample (MS): 1.2 kg
Sampling depth (DS): 2.5 cm
•
•
Number of increments (n): 40
Soil density (ρ): 1.6 g/cc (standard soil density per ASCE, a good starting estimate)
The formula for determining the sample mass is:
MS = ρ n DS π (Ø /2)2
(1)
where Ø is the coring bit diameter. To solve for Ø, we get:
Ø = 2 (MS /n ρ DSπ)
0.5
Ø = 2 (1200/(40*1.6*2.5*π)
0.5
For our example, the best choice of core diameter is 3 cm, which will produce a sample mass of slightly less than 1.2 kg. This is the theoretical result. Vegetation, differences in density of the soil, moisture content, and
other variables will affect the final mass. In highly vegetated areas, we
sometimes set the depth of the sample a little deeper to obtain a sample
mass closer to that desired. We have developed several Microsoft Excel
spreadsheets to assist in setting the sampling parameters and thus assist
in setting up the sampling tool. An example is in Appendix B.
With a sampling depth and core diameter in hand, we now need to configure the tool. First, assemble the 3-cm-diameter disk to the threaded rod of
ERDC/CRREL TN-09-2ERDC/CRREL SR-09-1
the depth-control mechanism (Figure 4). Thread the disk onto the rod until the end of the rod is even with the bottom of the disk. Run the flange
nut down to the disk, and tighten with the slip-joint pliers and an openend wrench. With the disk in place and secured, install the coring bit to the
base. Tighten with the pliers.
Figure 4. The depth control mechanism.
With the bit in place, pull the disk as far into the bit as possible and measure with the tape. Using your fingers, back the depth adjustment nuts off
the depth mechanism guide block until the correct depth (2.5 cm in our
example) is achieved. Tighten the nuts against each other to lock them in
place (Figure 5). If you need to fine-tune increment depth, loosen the nuts,
readjust the depth setting, and retighten the nuts. Always make sure the
nuts are locked against each other because these control the consistency of
the sample plug length.
7
ERDC/CRREL TN-09-2ERDC/CRREL SR-09-1
Figure 5. Setting the stop for sample depth.
To adjust the disk position for increment ejection, push face of the disk all
the way to the coring bit tip. Run the nuts up to the guide and tighten them
against each other to lock them in place. The disk should be flush or a little
recessed into the end of the bit (Figure 6). Maladjustment of the disk position will result in an overhanging disk. This will catch on the coring bit tip
when taking a sample increment, damaging the disk and tip, and preventing the tip from penetrating the ground. The ejection setting should not
have to be readjusted if the depth is changed. This setting will only need to
be changed if a different length coring bit is installed.
Figure 6. Correct final position of the disk for increment ejection.
8
ERDC/CRREL TN-09-2ERDC/CRREL SR-09-1
4 Use of the Tool in the Field
The CMIST sampler is best used in soils that are cohesive but not hardpacked. We have used the tool in non-cohesive soils that are sandy or
gravelly with large cobbles, but the increment mass was consistent and the
large cobbles took a toll on the tip of the coring bits. The tool can also be
used in hard pack. However, the sampling technician needs to have some
mass to drive the bit into the ground, and a dead-blow hammer should be
used to eject the increment to prevent hand injuries.
We have found that a two-person team is most efficient when obtaining a
sample (Figure 7). One person keeps track of the position within the DU,
paces out the distance to each sample increment point, and collects the increment. The second person holds the sample bag and keeps track of the
number of increments taken; a handheld counter substantially helps with
the latter process. To take an increment, set the tip of the corer at the desired location, step on the footrest to force the tip into the soil, push until
progress stops, tip and pull the tool out of the soil, and now push on the
plunger to eject the soil plug into the sample bag. The depth mechanism
can either face you or be away from you. After some use, you will find
which way is most comfortable. Do not spear the tip into the ground. This
tends to damage the tip if stones are present. Furthermore, the increment
location need not be precisely at a grid point. If a large cobble or root is at
your sample point, take the sample increment from a point as near to that
point as you can.
The presence of vegetation is not a serious deterrent to the use of the
CMIST. It easily cuts through grass and small roots. In many cases, it is
important to include this matter with the sample because many contaminant particles reside on the ground surface and can be lost if moss or other
vegetative matter is removed or discarded. In brushy areas, the tool can
reach into areas that would be difficult to sample otherwise. In a desert
environment where the soils were non-cohesive, the tool allowed sampling
around and under cacti, areas that could not otherwise be sampled. With
some practice, the samplers obtained consistent samples by using a scooping motion when taking the sample increment.
9
ERDC/CRREL TN-09-2ERDC/CRREL SR-09-1
Figure 7. Sampling team using the CMIST.
Splitting the core plug while in the field can be done to compare surface
analyte levels to those directly below. For example, to compare energetics
residues levels in the top 2.5 cm with those in the 2.5-cm layer just below,
we set the coring depth to 5 cm. After obtaining the plug, we ejected it
from the CMIST into a gloved hand and split it with a putty knife. We
found it useful to mark the end of the putty knife with a felt marker to the
length of one of the sections of the plug. The bag person then deposited
each of the two plug sections in their respective sample bags.
10
ERDC/CRREL TN-09-2ERDC/CRREL SR-09-1
5 Cleaning the Tool
We recommend cleaning the tool with water between repetitions in the
same DU, especially in areas with very cohesive soils. Keep an eye on the
adjustment nuts to ensure that no soils are packing around them and affecting the operation of the depth mechanism. Soil and vegetation will
sometimes also build up around and behind the disk, causing the depth
mechanism to be harder to operate.
To quickly clean the tool, simply spray down the unit wherever soil has
adhered. If the soil remains, loosen it by using the steel wool pad or brush.
Check the threads on the depth mechanism and clean them with the brush
and water as well. It is important to check the adjustment nuts and disk at
this time to ensure they are still well secured. A final rinse with clean water
should be done as a final step. Cleaning of the tool generally takes less
than a minute and can be conducted while your partner is labeling the
sample.
At minimum, a thorough cleaning of the tool should be done when changing DUs. Repeat the process as outlined above, except use acetone for the
final rinse. Do the final rinse over a pail to contain the acetone. Very little
acetone is required for this operation, but it still is best to consider it a
hazardous waste and thus it should be controlled. A plastic bottle with a
screw top should be used for the collection and transport of the waste acetone at the end of the day. Always do a thorough cleaning before storing
the tool. A little lubricating oil on the threaded rod will help to preserve
the operation of the depth mechanism.
11
ERDC/CRREL TN-09-2ERDC/CRREL SR-09-1
6 Maintenance
A well-maintained tool is an efficient tool. This may seem an obvious
statement, but maintenance is often not at the forefront of concerns in the
hectic field environment (Figure 8). Maintaining the CMIST is quick, simple, and well worth the effort; time spent will be paid back in the ease and
efficiency of use.
While sampling, make sure the adjustment nuts and depth adjustment
mechanism disk do not loosen. Their status may not need to be addressed
immediately, but be aware of them at all times. Soil and vegetation will
sometimes also build up around and behind the disk, causing the depth
mechanism to be hard to operate. Be prepared to address this immediately
because it will adversely affect the increment mass and thus the sample
quality. Finally, periodically check the tip to make sure it has not been
loosened from the mount. The flange of the bit should be tight up against
the mount at all times to ensure proper increment depth and to protect the
mounting threads.
Figure 8. Field maintenance of the CMIST tool.
12
ERDC/CRREL TN-09-2ERDC/CRREL SR-09-1
After collecting a multi-increment sample and cleaning the tool, inspect
the tip of the coring bit. If the tip is damaged, and especially if it is bent
inward, you will need to straighten it with pliers and re-sharpen the tip
with the half-round file. A damaged coring bit can cause the disk to jam,
further damaging the unit and resulting in a loss in efficiency. Make sure
the tip is tightly secured against the flange before reuse of the tool.
13
ERDC/CRREL TN-09-2ERDC/CRREL SR-09-1
7
Conclusion
The CMIST device was developed by CRREL for sampling soil in areas
with non-homogeneous contaminants that are distributed as particles. It
has a simple, rugged design that is very easy to use and maintain. It is easily adjusted to fit most sampling requirements. It enables a sampling team
to collect consistent sample increments more efficiently than with a hand
scoop or spoon. Properly maintained and employed, it will greatly facilitate the collection of multi-increment samples in many types of soils and
through many types of vegetation.
14
ERDC/CRREL TN-09-2ERDC/CRREL SR-09-1
15
Appendix A: Equipment and Supplies List
Table A1 lists tools, equipment, and supplies that we at CRREL have found
to be helpful in taking multi-increment samples using the CMIST tool.
This list also includes some sample collection items not covered in the
body of this report. Items listed in bold type are considered essential.
Table A1. Tools, equipment, and supplies for multi-increment sampling with the CMIST tool.
Items in boldface type are the minimum recommended.
Item Description
Qty*
Purpose
Source/Part
Number**
Sampling Tools
Coring tools
Obtain soil sample increments
Coring tool
1
2-cm-diameter coring bit
1
3-cm-diameter coring bit
2
4-cm-diameter coring bit
1
†
†
†
Support tools and equipment
Wrench, 9/16-in.
File: metal, half-round
Hammer: dead-blow 1 lb.
Pliers: slip-joint, 2.25-in.
Pin: 5/16- x 1.25-in.
Tool: multi-purpose
Nuts: hex, 3/8-in.–24SS
Nuts: flange, serrated, 3/8-in.–
24SS
Tape measure: metric, 3-m
CRREL or GPL
Labs, LLLP
Adjust and repair coring
2
1
1
1
1
1
4
2
Adjust lock-nuts
Sharpen ID of coring bit
Eject stuck core
Install coring bits
Spare connecting pin
Handy for many tasks
Replacements
Replacements
2
Splitting tools
M-C #5400A18
M-C #6073A11
M-C #6051A31
M-C #5368A14
M-C #93750A402
(e.g., Leatherman)
M-C #68025A55
Used to subsample cores
Putty knife (modified)
1
Putty knife
1
Scoops
Sharpen one edge, tooth
the other
M-C #3658A13
M-C #3658A31
Used where corers do not work
Stainless #2
2
AMS #428.02 or
#427.82
Cleaning Equipment and Supplies
Equipment
OR
Durables
Stainless steel pads
Brush: parts-cleaning
Bottle: spray, 16-oz (0.47 L)
Bottle: spray, 4-L
Sprayer: compression
Bottle: HDPE, 4-L
Pail: 20-L, w/cover
6
1
1
2
1
2
1
For acetone
For water
For water
Extra water storage
Field waste storage
M-C #7364T75
M-C #7448T67
M-C #9864T52
M-C #9864T15
M-C # 9864T15
M-C # 7528T36
ERDC/CRREL TN-09-2ERDC/CRREL SR-09-1
Item Description
16
Qty*
Supplies
Purpose
Source/Part
Number**
Disposables
Kimwipes or Techwipes
Acetone
2
6
M-C # 7036T12
0.5–1 L should work
Sample Collection Materials
Decision unit demarcation
Flagging, PVC stake
Marking area to be sampled
24
Wrench: Allen, T-handle,
Stake: survey, 4-ft
2
6
Tape measure: 30-m
Tape measure: 8-m
Rangefinder: Nikon 1200 7 x 35
2
2
1
11–1200 yd
Flagging: roll, pink
2
Marking avoidance items
Collection
OR
Color, qty., size discretionary
Setting pin flags in hard soil
Marking corners and active
lanes
Lay out DU
FSI # 33702
M-C # 5374A55
FSI # 39941
FSI # 39415
Eagle Optic
# RAN-NK-8358
FSI # 57905
For field samples
Bags: clean, PE, 15- x 15-in.,
6 mil
Bags: clean, PE, 17- x 12-in.,
6-mil
Ty-wraps: black, SS tongue
Tags: 2.5- x 5-in. selflaminating
100
100
200
120
Counter: handheld, pushbutton
2
Personnel Protective Equipment
Gloves: latex, diamond-grip
EPA Level 100 clean
For bags and tags
Keeping track of increments
KNF # 300010-02
(LB 106:1515)
KNF #300010-02
(LB 106:1217)
M-C #6614K54
Brimar (Ref.
CRREL Invoice
#96886)
M-C #1707T5
Visibility and worker protection
20
Hand protection
(sized M, L, XL)
High-visibility orange
Depends on operation area
C-P # EW-8623131, 32, or 33
Book: recording, level
2
Marker: black, fine-point,
permanent
Marker: black, X-fine point
6
Field sample logging and
notes
Marking bags and tags
FSI #49496 (Ritein-the-Rain)
(Sharpie)
6
Field book and tags
Container: storage, lockable
2
To carry kit
Locks: keyed-alike
Water bottles
4
To lock the storage boxes
For personal use
Vest for each surveyor
Site-specific items (masks, etc.)
Documentation
Other
(Rubbermaid Action- Packer, 24gal)
M-C #1834A36
*Quantities shown are recommended for each tool.
**Sources: M-C is McMaster-Carr (www.mcmaster.com); AMS is Art's Mfg. & Supply Inc. (amssamplers.com); FSI is Forestry Suppliers, Inc. (www.forestry-suppliers.com); KNF is KNF Clean Room Products Corp. (www.knfcorporation.com); Bi is Brimar Industries Inc. (www.brimar.com); C-P is Cole-Parmer Inc.
(Cole-Parmer.com); GPL is GPL Laboratories, LLLP (gplab.com). Items where vendor is not given are locally
available.
†
Size and number depends on task; bring spares of commonly used tips.
ERDC/CRREL TN-09-2ERDC/CRREL SR-09-1
17
Appendix B: Sample Coring Device Set-Up
Sheet
Table B1 is an example of a set-up sheet for configuring a CMIST tool to
obtain a multi-increment sample with a target sample mass (g) and number of increments. In highly vegetated decision units, the core depth
should be set deeper to compensate for the vegetation.
The table is set up with the following notations:
•
•
•
The core depth is set and is the same over all.
Soil density is fixed.
Results give the rounded number of sample increments to reach a
given mass (g) in the field for a given core diameter.
The target mass is 1,000 g and that column is highlighted.
Table B1. CMIST tool set-up sheet for multi-increment sampling.
Soil Density (g/cc): 1.4
Core Depth (cm): 2.5
Corer
Diameter (cm)
Number of increments to reach given mass (g)
500
750
1000
1500
2000
2.0
45
68
91
136
182
3.0
20
30
40
61
81
4.0
11
17
23
34
45
Soil Density (g/cc): 1.5
Core Depth (cm): 2.5
Number of increments to reach given mass (g)
Corer
Diameter (cm)
500
750
1000
1500
2000
2.0
42
64
85
127
170
3.0
19
28
38
57
75
4.0
11
16
21
32
42
ERDC/CRREL TN-09-2ERDC/CRREL SR-09-1
18
Soil Density (g/cc): 1.6
Core Depth (cm): 2.5
Number of increments to reach given mass (g)
Corer
Diameter (cm)
500
750
1000
1500
2000
2.0
40
60
80
119
159
3.0
18
27
35
53
71
4.0
10
15
20
30
40
Soil Density (g/cc): 1.7
Core Depth (cm): 2.5
Corer
Diameter (cm)
Number of increments to reach given mass (g)
500
750
1000
1500
2000
2.0
37
56
75
112
150
3.0
17
25
33
50
67
4.0
9
14
19
28
37
Soil Density (g/cc): 1.8
Core Depth (cm): 2.5
Number of increments to reach given mass (g)
Corer
Diameter (cm)
500
750
1000
1500
2000
2.0
35
53
71
106
141
3.0
16
24
31
47
63
4.0
9
13
18
27
35
Soil Density (g/cc): 2.0
Core Depth (cm): 2.5
Number of increments to reach given mass (g)
Corer
Diameter (cm)
500
750
1000
1500
2000
2.0
32
48
64
95
127
3.0
14
21
28
42
57
4.0
8
12
16
24
32
Form Approved
REPORT DOCUMENTATION PAGE
OMB No. 0704-0188
Public reporting burden for this collection of information is estimated to average 1 hour per response, including the time for reviewing instructions, searching existing data sources, gathering and maintaining the
data needed, and completing and reviewing this collection of information. Send comments regarding this burden estimate or any other aspect of this collection of information, including suggestions for reducing
this burden to Department of Defense, Washington Headquarters Services, Directorate for Information Operations and Reports (0704-0188), 1215 Jefferson Davis Highway, Suite 1204, Arlington, VA 22202-4302.
Respondents should be aware that notwithstanding any other provision of law, no person shall be subject to any penalty for failing to comply with a collection of information if it does not display a currently valid
OMB control number. PLEASE DO NOT RETURN YOUR FORM TO THE ABOVE ADDRESS.
1. REPORT DATE (DD-MM-YYYY)
June 2009
4. TITLE AND SUBTITLE
2. REPORT TYPE
FINAL
3. DATES COVERED (From - To)
5a. CONTRACT NUMBER
User’s Manual for the CRREL Multi-Increment Sampling Tool
5b. GRANT NUMBER
5c. PROGRAM ELEMENT
6. AUTHOR(S)
5d. PROJECT NUMBER
ER-1481
Michael R. Walsh
5e. TASK NUMBER
5f. WORK UNIT NUMBER
7. PERFORMING ORGANIZATION NAME(S) AND ADDRESS(ES)
8. PERFORMING ORGANIZATION REPORT
NUMBER
U.S. Army Engineer Research and Development Center (ERDC)
Cold Regional Research and Engineering Laboratory (CRREL)
72 Lyme Road
Hanover, NH 03755-1290
ERDC/CRREL SR-09-1
9. SPONSORING / MONITORING AGENCY NAME(S) AND ADDRESS(ES)
10. SPONSOR/MONITOR’S ACRONYM(S)
Strategic Environmental Research and
Development Program/ Environmental Security
Technology Certification Program
901 N. Stuart St, Suite 303
ARLINGTON VA 22203
SERDP/ESTCP
11. SPONSOR/MONITOR’S REPORT
NUMBER(S)
12. DISTRIBUTION / AVAILABILITY STATEMENT
Approved for public release; distribution is unlimited.
13. SUPPLEMENTARY NOTES
14. ABSTRACT
The CRREL Multi-Increment Sampling Tool (CMIST) was developed to facilitate collecting multi-increment soil samples. The
design is simple yet flexible, enabling the investigator to configure the tool to meet the collection needs of the sampling plan.
This manual describes the tool, how to use the tool, and how to maintain the tool in the field.
15. SUBJECT TERMS
Multi-increment sampling; sampling design; sampling tools; soil samples
16. SECURITY CLASSIFICATION OF:
a. REPORT
Unclassified
NSN 7540-01-280-5500
b. ABSTRACT
Unclassified
17. LIMITATION
OF ABSTRACT
c. THIS PAGE
Unclassified
18. NUMBER
OF PAGES
29
19a. NAME OF RESPONSIBLE PERSON
19b. TELEPHONE NUMBER
(include area code)
Standard Form 298 (Rev. 8-98)
Prescribed by ANSI Std. 239.