1
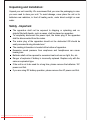
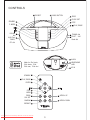
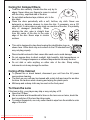
PCD400i
CD Boombox with Docking for iPod
USER MANUAL
IMPORTANT !
WARRANTY INFORMATION INSIDE. PLEASE READ
Downloaded From DvDPlayer-Manual.com TEAC Manuals
WARRANTY REGISTRATION
Please read this warranty card.
Keep your purchase receipt to enable you to proceed quickly in the event of a Warranty Service.
Warranty Terms & Conditions
1.
TEAC warrants to the original retail purchaser only, that this product is free from defects in material and
workmanship under normal domestic use and authorises free service during the warranty period at any TEAC
Authorised Service Centre only. TEAC warranty only applies to products purchased, used and serviced in
Australia.
2.
Subject to the terms herein, this warranty effectively covers the equipment as specified in the Warranty Periods
Table below from the date of purchase.
TEAC PRODUCT
Plasma TV 106 cm and above
LCD Televisions 80 cm and above
Televisions – 59cm and above
All Tel evisions under 59 cm
Digital Set Top Box es & Module
VCR
DVD & Module
DVD Recor der & PVR Module
Audio Systems
3.
WARRANTY PERIOD
1 Year (In-Home Service/ Pick up Available)*
1 Year (In-Home Service/Pick up Available)*
1 Year (In-Home Service/ Pick up Available)*
1 Year (No In-Home Service)
1 Year (No In-Home Service)
1 Year (No In-Home Service)
1 Year (No In-Home Service)
1 Year (No In-Home Service)
1 Year (No In-Home Service)
In Home Service/Pick up* will only be provided as part of this warranty if all the following conditions are met;
a) The product as indicated in the Warranty Period Table.
b) The product is within the warranty period.
c) The product is located within the normal service area of the local TEAC Authorised Service Centre.
In any other situation or circumstance, where an In Home Service/Pick up* call is made, a service fee will be
charged by the Service Provider including a travel fee if outside normal service area.
If TEAC determines that the product is not repairable on site, TEAC can complete the repair by taking the
product to a TEAC Authorised Service Centre.
Where In-Home service/Pick up* is not available, the purchaser is required to send the product to the nearest
TEAC Authorised Service Centre for repair. In this event, a copy of this warranty card and a copy of your receipt
of purchase must be enclosed to be a valid warranty. Such equipment or part must be sent freight prepaid to
your nearest TEAC Authorised Service Centre. After the repair, the product will be available for collection by or
return to the purchaser at purchaser s cost. The warranty does not cover freight or insurance. In all cases of
transit damage or lost, a claim must be filed against the carrier by the purchaser, even if shipment is arranged
by TEAC. TEAC in-home service may also be available at a fee upon request.
4.
Accessories, Remote, including power adaptors, AV box, TV tuners, etc, are warranted to be defect free for 1
year.
5.
Replacement of spare parts under normal usage; except cabinet, front panel, knob, removable accessories,
battery, consumable, AC cord, connecting cord and other accessories, are warranted as specified in Warranty
Periods Table, and will be repaired or replaced at the sole judgement of TEAC.
6.
The warranties hereby conferred do not extend to, and exclude, any cost associated with the installation, deinstallation or re-installation of a product (be it in-home or otherwise), including costs related to the mounting,
demounting or remounting of any screen, (and any other ancillary activities), delivery, handling, freighting,
transportation or insurance of the product or any part thereof or replacement of and do not extend to, and
exclude, any damage or loss occurring by reason of, during, associated with, or related to such installation, deinstallation, re-installation or transit.
7.
Normal customer maintenance as described in the owner s manual is not covered by this warranty (such as
cleaning VCR heads etc.)
8.
Service will be provided only during normal business hours and under safety conditions and circumstances.
9.
This warranty does not apply to equipment showing abuse, damage or that it may have been tampered with,
altered or repaired outside any TEAC Authorised Service Centre. If so, the warranty will be void.
*Your nearest Authorised TEAC Service Centre is listed in your Owner s Manual, please refer to TEAC
website for up to date list.
10. No one is authorised to assume any liability on behalf of TEAC or impose any obligation on it, in connection with
the sale of any equipment other than as stated in this warranty and outlined above.
11. In no event will TEAC be responsible or liable for indirect or consequential damages from interrupted operations
or other causes.
12. Warranty is not transferable to any subsequent purchaser if the product is sold during the warranty period.
13. LCD dead pixel policy, please contact TEAC Customer Care Centre on 1800 656 700 for assistance.
* Extended promotional warranty may apply to certain products
(for more info please contact: [email protected])
Downloaded From DvDPlayer-Manual.com TEAC Manuals
In home service administration fee is applied after 1st year of warranty.
WARRANTY PROCEDURES
Please keep this information for your own records.
Please refer to the owner s manual to ensure that you have followed the correct installation and operating
procedures.
1.
2.
3.
Read owner s manual carefully
If you require Warranty Service, please contact the TEAC Authorised Service Centre
Please have your purchase receipt as your proof of purchase and the following details completed for a valid
Warranty.
Owner s Name
Owner s Address
Postcode
Model Name/No.
Serial No.
Dealer s Name
Dealer s Address
Postcode
4.
Please ensure that your product is packed appropriately upon return to the service centre.
If you have any other queries regarding service or warranty please contact the TEAC Customer Care Centre below:
[email protected]
www.teac.com.au
1800 656 700
Downloaded From DvDPlayer-Manual.com TEAC Manuals
CAUTION
RISK OF ELECTRIC SHOCK
DO NOT OPEN
CAUTION: TO REDUCE THE RISK OF ELECTRIC SHOCK, DO NOT REMOVE
COVER (OR BACK). NO USER-SERVICEABLE PARTS INSIDE. REFER
SERVICING TO QUALIFIED SERVICE PERSONNEL.
WARNING: TO REDUCE THE RISK OF FIRE OR ELECTRIC SHOCK, DO NOT
EXPOSE THIS APPLIANCE TO RAIN OR MOISTURE.
DANGEROUS VOLTAGE:
The lightning flash with arrowhead symbol within an
equilateral triangle is intended to alert the user to the
presence of uninsulated dangerous voltage within the
product’s enclosure that may be of sufficient magnitude to
constitute a risk of electric shock to persons.
ATTENTION:
The exclamation point within an equilateral triangle is
intended to alert the user to the presence of important
operating and maintenance (servicing) instructions in the
literature accompanying the appliance.
DANGER:
Invisible and hazardous laser radiation when open and
interlock failed or defeated. Avoid direct exposure to beam.
LASER SAFETY: This unit employs a laser. Only qualified service
personnel should attempt to service this device due to possible eye
injury.
CAUTION: USE OF CONTROLS, ADJUSTMENTS OR PERFORMANCE
PROCEDURE HEREIN MAY RESULT IN HAZARDOUS RADIATION
EXPOSURE.
Downloaded From DvDPlayer-Manual.com TEAC Manuals
1
Unpacking and Installation:
Unpack your unit carefully. We recommend that you save the packaging in case
you ever need to store your unit. To avoid damage, never place the unit or its
batteries near radiators, in front of heating vents, under direct sunlight or near
water.
Safety - Important
The apparatus shall not be exposed to dripping or splashing and no
objects filled with liquids, such as vases, shall be placed on apparatus.
To completely disconnect the power input, the mains plug of the apparatus
shall be disconnected from the mains.
The mains plug of the apparatus should not be obstructed OR should be
easily accessed during intended use.”
The marking information is located at the bottom of apparatus.
Excessive sound pressure from earphones and headphones can cause
hearing loss.
Batteries shall not be exposed to excessive heat such as sun light, fire, etc.
Danger of explosion if battery is incorrectly replaced. Replace only with the
same or equivalent type.
If the unit is not to be used for a long time, please remove the batteries / AC
power cord first.
If you are using DC battery operation, please remove the AC power cord first.
Downloaded From DvDPlayer-Manual.com TEAC Manuals
2
CONTROLS
1
STANDBY
CD EJECT
2
X BASSBUTTON
14 PMODE 13
3
PROG
4
CLOCKSET
5
STOP
6
PLAYPAUSE
12 11
VOLUME 10
dial
AUXiPod 9
TUNER
CDdial
7
8
MadeforiPodtouch
iPodclassiciPod
iPodnanoiPodmini
STANDBY
1
PLAYPAUSE
2
ENTER
3
4
1
AUX IN
2
HEADPHONE
JACK
3
AC IN
12
STOP5
MENU
6
PROG/
CLKSET
RANDOM
7
11
SCROLL UP
8
10
SCROLL DOWN
REPEAET
9
PCD400i
Downloaded From DvDPlayer-Manual.com TEAC Manuals
3
TUNINGdial
FM STAM
Banddial
Compatible iPods chart
Model
Output
Charge
iPod 4th Gen
Audio
Yes
iPod 4th Gen Photo
Audio
Yes
iPod 4th Gen Color
Audio
Yes
iPod 5th Gen & iPod Classic
Audio
Yes
Mini 1st & 2nd Gen
Audio
Yes
Nano 1st & 2nd Gen
Audio
Yes
Nano 3rd Gen
Audio
Yes
Nano 4th Gen
Audio
Yes
iPod Touch 1st Gen
Audio
Yes
iPod Touch 2nd Gen
Audio
Yes
Downloaded From DvDPlayer-Manual.com TEAC Manuals
4
Box contents
ACpowercablewith SAAplug
Main unit
Usermanual
iPoddockadapters
USER
MANUAL
Remote control
PCD400i
Downloaded From DvDPlayer-Manual.com TEAC Manuals
5
Features:
CD player with 20 programmable preset tracks.
Universal iPod dock – see compatibility chart.
FM/AM radio.
LCD screen.
Bass Boost (X Bass).
Navigate iPod menus with remote control.
Auxiliary input for use with external audio devices.
Power from mains or 8 x C sized batteries (batteries not included).
Getting started:
Plug the AC power cable into the back of the unit and then into the mains
supply.
Press the STANDBY button on the unit or
on the remote control to power
on / off.
To select the mode, slide the switch on the side of the speaker to choose
between AUX / iPod / TUNER / CD.
To use with iPod:
Slide the AUX / iPod / TUNER / CD switch at the side of the unit to select
iPod mode.
Select and insert the correct iPod docking adapter to suit your iPod.
Carefully insert your iPod into the dock, playback will start automatically.
To play or pause a track – press
on the unit or remote control.
To stop a track – press
on the unit or remote control.
To scan through tracks – press
on the unit or remote control.
To adjust the volume – turn the VOLUME dial on the unit.
To navigate your iPod menus, you must use the remote control:
– Use the MENU button to navigate through the iPod menus.
– Use the arrow buttons to navigate the various options in the iPod menus.
– Use the ENTER button to confirm your selection.
– Use
buttons to activate repeat or random playing.
Downloaded From DvDPlayer-Manual.com TEAC Manuals
6
To use with CD:
Slide the AUX / iPod / TUNER / CD switch at the side of the unit to select CD
mode. And press the CD OPEN button.
Carefully insert your disc into the CD slot, the disc will automatically be read.
To play or pause a track – press
on the unit or remote control.
To stop a track – press
on the unit or remote control.
To scan through tracks – press
on the unit or remote control.
To adjust the volume – turn the VOLUME dial on the unit.
(a) Repeat / Random play:
Press either the
buttons on the remote control or P-MODE button on
the unit:
To repeat the current track – press
or P-MODE once, REPEAT will
appear on the screen.
To repeat the whole CD – press
or P-MODE twice, REPEAT ALL will
appear on the screen.
To play tracks at random – press
once or P-MODE three times,
RANDOM will appear on the screen.
To clear the function – press
or P-MODE until the REPEAT &
RANDOM icon disappear.
(b) To program specific tracks:
Load the CD you wish to program and make sure it is not playing.
Press the PROG button once, the display will flash.
Use
to find the track you wish to programme (Press PROG to store).
Repeat above step until you have stored all the tracks you wish to store.
To play the stored sequence, press
button.
To clear the memory, press the
button once.
Downloaded From DvDPlayer-Manual.com TEAC Manuals
7
To use as a Radio:
Slide the AUX / iPod / TUNER / CD switch at the side of the unit to select
TUNER mode.
Slide the FM ST / AM Band dial at the side of the unit to select either FM or
AM.
Use the TUNING dial at the unit to scan through radio frequencies.
To adjust the volume – turn the VOLUME dial on the unit.
Warning!
This unit has built-in AM ferrite bar antenna, which provides adequate reception in
most areas. If AM reception is weak, turn the unit to improve reception. If FM
reception is weak, adjust the length and the angle of the FM antenna.
Use with other audio devices:
Slide the AUX / iPod / TUNER / CD switch at the side of the unit to select
AUX mode.
Plug one end of a 3.5mm audio cable (not included) into the AUX port on the
rear of the PCD400i and connect the other end into your external audio
device’s headphone-out or line-out jack.
Activate your external audio device.
This will allow you to broadcast the external device’s sound through the
PCD400i speakers.
Warning!
The remote will not control devices connected via 3.5mm cable.
To set the clock:
In standby mode press and hold the CLK SET button on the main unit or remote
control and select either 24 hour or 12 hour setting using
buttons (Press
CLK SET button to save).
The hour display will start flashing, press
buttons to adjust the hour
(Press CLK SET to save).
The minute display will start flashing, press
buttons to adjust the minutes
(Press CLK SET to finish all clock setting)
Downloaded From DvDPlayer-Manual.com TEAC Manuals
8
Battery Operation
Before installing batteries (not included), ensure that the unit
is disconnected from the mains supply.
Remove the battery compartment cover on the back of the
unit by carefully pushing back the battery cover. The battery
cover can then be lifted away.
Fit 8 x 1 .5V C-size batteries (not included), referring to the
polarity markings inside the battery compartment. Never mix
old and new batteries. Finally, replace the cover. For battery
operation, switch off the mains supply and remove the cable
from the power socket, battery operation will be selected
automatically.
CAUTION!
Danger of explosion if batteries are incorrectly replaced. Replace only with the
equivalent type. If you are not going to use your unit for an extended period,
please remove the batteries to avoid damage.
Remote Control Operation
You must remove the spacer before using the remote for the
first time. To remove the spacer, pull off the small tab that is
extending outside the battery compartment as shown.
The main functions of this system can be operated by
pressing the controls on the front panel of the main unit, or by
pressing the corresponding buttons on the remote control.
You should point the remote control at the remote sensor on the front panel. The
effective operating range of the remote control is approximately 10 - 15 feet.
Please note that bright sunlight can interfere with the operation of the remote
control. If the remote operation is unsatisfactory, try darkening the room before
changing the remote battery. The battery should last at least 12 months or longer
under normal operating conditions.
Changing the Lithium Battery
When the operation of the remote becomes intermittent
or the main unit no longer responds to the remote 1
commands, it is probably time to change the remote
battery.
Open the battery compartment by squeezing the battery
compartment-locking tab as shown and slide the battery
holder out of the battery compartment.
Remove the exhausted battery and install a fresh
CR2025 battery in the battery holder with the “ + ” facing
up as shown, then slide the battery holder back into the
battery compartment.
Downloaded From DvDPlayer-Manual.com TEAC Manuals
9
2
Caring for Compact Discs
Treat the disc carefully. Handle the disc only by its
edges. Never allow your fingers to come in contact
with the shiny, unprinted side of the disc.
Do not attach adhesive tape, stickers, etc. to the
disc label.
Clean the discs periodically with a soft, lint-free, dry cloth. Never use
detergents or abrasive cleaners to clean the disc. If necessary, use a CD
cleaning kit. If a disc skips or gets stuck on a section of the disc, it is probably
dirty or damaged (scratched). When
cleaning the disc, wipe in straight lines
from the centre of the disc to the outer
edge of the disc. Never wipe in circular
motions.
This unit is designed to play discs bearing the identification logo as
shown here. Other discs may not conform to the CD standard and
may not play properly.
Discs should be stored in their cases after each use to avoid damage.
Do not expose discs to direct sunlight, high humidity, high temperatures, or
dust, etc. Prolonged exposure or extreme temperatures can warp the disc.
Do not stick or write anything on either side of the disc. Sharp writing
instruments or ink may damage the surface.
Caring of the Cabinet
To prevent fire or shock hazard, disconnect your unit from the AC power
source when cleaning.
The finish on your unit may be cleaned with a dust cloth and cared for as other
furniture. Be cautions when cleaning and wiping the plastic parts.
Mild soap and a damp cloth may be used on the front panel.
To Clean the Lens
If the lens is dirty, your player may skip or may not play a CD
Open the CD door.
Use a camera lens blower/brush to blow on the lens once or twice, brush the
dust or particles off the lens then blow again.
To remove fingerprints, use a dry cotton swab to wipe from the middle to outer
edge of the lens.
Downloaded From DvDPlayer-Manual.com TEAC Manuals
10
Specification
Voltage Rating:
Loud Speaker:
Power Output 10% THD:
Remote Battery:
DC Battery:
Frequency Range:
S/N Ratio:
Frequency Response:
Supported Disc Type:
Power Consumption:
Unit Weight:
Unit Dimensions
AC 240V 50Hz
DC 12V (UM-2 x 8pcs)
3 inch, 4 ohm, 5W
2.5W
CR2025 x1pcs
UM2 X 8pcs
FM 87.5 ~ 108 MHz
AM 522 ~ 1620 KHz
45 dB
100 ~ 10000 Hz +/– 6 dB
For CD, CD-R, CD-RW format only
25W
2.25 Kgs
390 mm(L) x 135mm (D) x 230mm (H)
NOTE: Specification is subject to change without prior notice. Weight and
dimensions are approximate.
Downloaded From DvDPlayer-Manual.com TEAC Manuals
11
TEAC CUSTOMER CARE CENTRE (TCCC)
Free call: 1800 656 700
Between Monday to Friday – EST 9AM to 5PM
Downloaded From DvDPlayer-Manual.com TEAC Manuals