1
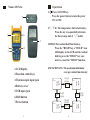
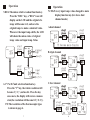
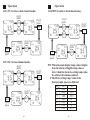
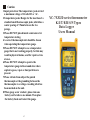
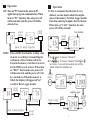
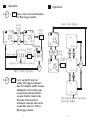
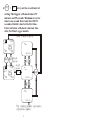
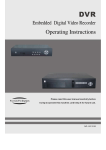
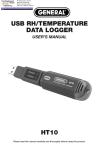
Table of Contents
YC-7XXUD series thermometer
K/J/T/E/R/S/N Types
Users Manual
Introduction
1
Features
2
General specifications
3
Electrical specifications
4
Names of parts
5
Operation
6
Battery replacement
16
Caution
17
Introduction
Features
Thank you for purchasing the temperature gauge
from us. Please take a few minutes to browse
through this user manual before you begin to
operate the unit to ensure that you are fully familiarized with how best to operate the temperature
as accurately and safely as possible.
The YC-7xx serial temperature gauges features a
microprocessor-ratsd digital temperature gauge,
which according to varied input configurations
and different thermocouple types, is divided into
48 modes, refer to the table below for a
concise summary of subtle distinctions in their
designed functions.
1
1.The maximum displays for four temp. values.
2. Resolution 0.1℃/0.1℉ ,1℃/1℉.
3.Swift response.
4.Setting alert temperature range.
5.With auto power off function.
6.With low battery indicator function.
7.With a perpetual calendar function.
8.With "COUNT"function.
9.With T1~T4 exchange to main display function.
(for above dual channel modes)
10.With T1-T2 function.(for dual channel modes),
T3-T4 function(for four channel).
11.Additional features include: HOLD, ℃ / ℉ /K,
REL,CHAN,MAX/MIN/AVG,1 ,TYPE,TIME
(CLOCK setting), LIMIT(Hi/Lo setting).
12.CE certified, according to ITS-90 law.
2
General Specifications
1.Display Mode: Four-digit liquid crystal display.
2.Polarity indicator: No indicator is shown when
readouts are in the positive value, while the
symbol"-" is prompted when readouts fall into
the negative value.
3.Overload indicator: The "OL"or"-OL"indicator.
4.Low-battery indicator: The symbol" B "is prompted on the LCD when the battery runs low.
5.Power source: Four DC-1.5V/UM-4 batteries.
6.Auto power off: The unit no operations are over
20-minute,the battery power will be turned off.
Press the "Shift" key for 3 seconds, the auto power off will be cancelled.
7.Sample rate:1time/sec.
8.Battery life: Approx. 550 hours.
9.Operating Temperature and Humidity:
0℃ ~50℃(32℉~122℉),0~80%RH.
10.Storage Temperature and Humidity:
-20℃~60℃ (-4℉~140℉),0~80%RH.
11.Dimension:164x76x32mm(LxWxH).
12.Weight: Approx. 415g(include batteries).
13.Accessories:
(A) DC-1.5V/UM-4(4pcs).
(B) Housing(1pcs).
(C) K-type thermocouple wire.
(single channel x1pcs,
for above dual channel x2pcs).
(D) Users manual(1pcs).
3
Electrical Specifications
1.Temp.unit: Celsius temp.(℃ ). Fahrenheit temp.
(℉).Absolute temp.( K ).
2.Measurement Range:( At 23 5℃ , 80%RH)
K-type:-100℃~1300℃(-148℉~2372℉)
J-type:-100℃~1000℃(-148℉~1832℉)
T-type:-100℃~400℃(-148℉~752℉)
E-type:-50℃~800℃(-58℉~1472℉)
R&S-type:0℃~1700℃(32℉~ 3092℉)
N-type:-100℃~1300℃(-148℉~2372℉)
3. Accuracy: The basic accuracy does not include
the error of the thermocouple.
K/J/T/E/-type:
(0.1% reading+0.7℃)-100℃~-1300℃
(0.1% reading+1.4℉)-148℉~2372℉
R/S-type:
(0.1% reading+2℃) 0℃~1700℃
(0.1% reading+4℉) 32℉~3092℉
N-type:
(0.1% reading+1.5℃)-100℃~1300℃
(0.1% reading+3℉ )-148℉~2372℉
4.Resolution:
0.1℃
1℃
-100℃~1300℃
-100℃~200℃
K
-100℃~150℃
-100℃~1000℃
J
-100℃~150℃
-100℃~400℃
T
-50℃~100℃
-50℃~800℃
E
0℃~1700℃
R
0℃~1700℃
S
℃~1300℃
-100
-100℃~150℃
N
4
Operation
Names Of Parts
1.
3
1
:Power ON/OFF key.
Press the power button to turn the power
ON or OFF.
2. C / F/K: The temperature Unit selection key.
Press the key to sequentially alternate
the three temp. unit of ℃ , ℉ and K.
5
4
7
2
6
1.LCD display
2.Function control key
3.Thermocouple input jack
3.HOLD:The readout hold function key.
Press the "HOLD"key, a "HOLD" icon
will display on the LCD and the readout
held in; press the "HOLD" key once
more to cancel the "HOLD" function.
4.MAX/MIN/AVG:The maximum/minimum/
average readout function key
T1
TYPE:K
4.Battery cover
25
5.USB input jack
6.Shift button
7.Power button
5
MAX
AVG MIN
T1
TYPE:K
℃
step1
press
Step4
press
AVG
25
MAX
T1
TYPE:K
25
MAX
AVG MIN
℃
MAX
AVG MIN
Step3
press
MAX
AVG MIN
6
T1
TYPE:K
℃
Step2
press
MIN
25
℃
Operation
Operation
5.REL:The minus relative readout function key.
Press the "REL" key, a "REL" icon will
display on the LCD and the original of a
temp. will become to 0, and save the
original temp. to make a standard value.
Whenever the input temp. shifts, the LCD
will shows the minus value of original
temp. value and input temp. Value.
T1
TYPE:K
25
℃
7.CHAN:every input temp. value changed to main
display function key.(for above dual
channel modes)
A.dual channel
T1
TYPE:K
T2
30
25
℃
step1
press
T2
TYPE:K
CHEN
25
T1
30
step2
press
℃
CHEN
T1 become main display
step1
press
T1
TYPE:K
REL
REL
25
℃
0.0
original
temp.
Save25
B.triple channel
T1
TYPE:K
T2
step2
press
T1
TYPE:K
REL
REL
30
℃
5.0
30
T3
50
25
℃
CHEN
step3
press
25
T3
TYPE:K
CHEN
T2
30
T3
30
T1
step2
press
30
℃
CHEN
25
50
℃
C.four channel
T1
TYPE:K
T2
30
T3
50
25
T4
℃
step1
press
T2
TYPE:K
CHEN
40
step4
press
T1
T4
TYPE:K
CHEN
T2
7
T2
TYPE:K
T1
input
temp.
30-25=5
6.1 :1 or 0.1 unit selection function key.
Press the "1 "key, the whole resolution will
become 1℃ / 1℉ ,and no dot. Press the key
once more, the display will restore common
state(the resolution will become 0.1℃/ 0.1℉).
P.S:The resolution of the thermocouple types
is shown in page 4.
step1
press
30
T3
25
50
40
T1
℃
25
8
T3
30
T4
step2
press
50
℃
CHEN
40
step3
press
T3
TYPE:K
CHEN
T2
30
T1
25
50
T4
℃
40
Operation
Operation
8.TYPE:select thermocouple type function key.
YC-7XXUD series according to different
modes, there are seven types in all. Other
modes can selected by users besides YC71XUD,YC-72XUD,YC-73XUD,
YC-74XUD. The method of operation
as follows:
T1
TYPE:K
T2
30
T3
50
25
T4
℃
40
press
9.COUNT: The count time setting function key.
The max count time is 99 hours and
59 minutes.
T1
TYPE:K
T2
30
T3
50
℃
2540
T4
step1
press
up key
T1
TYPE:K
T2
T3
50
25
℃
over 1 hour
30 00:00m:s
TYPE:KJ
TERSN
T1
TYPE:K
left key
T3
50
25
℃
Press up key back to main display. T230 1:00 h:m
A.Use
,
key to choose"type".
B.The word will flicker for the chosen"type".
C.To confirm it,then press "SHIFT"key.
10.TIME:To see the present time function key.
T3
T3
step1
T1
50
50
press
TYPE:K
℃
T2
T1
TYPE:J
The type became to
"J" type.
T2
30
T3
50
25
T4
30
2540
T4
right key
T2
30
T4
℃
40
step2
press
down
key
℃
40
Press right key back to
main display.
9
12:00
10
12:00
y
0101 2001
Operation
Operation
11.T1-T2: for above dual channel modes.
step1
press
T1
TYPE:K
T2
30
T3
50
℃
2540
T4
T1
TYPE:K
SHIFT
CHEN
T2
step4
press
30
T1
TYPE:K
SHIFT
SHIFT
SHIFT
T3
T2
T1-T2
step1
press
step2
press
℃
2540
CHEN
T1
TYPE:K
T4
step3
press
50
25
30
50
T3
13.LIMIT:To enforce alarm function key.
℃
T1
TYPE:K
SHIFT
T2
-5
30
T2
30
T3
50
℃
2540
T4
T1
TYPE:K
SHIFT
SHIFT
T2
SHIFT
50
T3
25
T1-T2
℃
-5
T1
TYPE:K
SHIFT
1
step4
press
T2
30
30
T3
50
℃
2540
SHIFT
T4
step2
press
℃
2540
step3
press
LIMIT T3
50
1
T4
T1
TYPE:K
T2
30
LIMIT T3
50
25
T4
℃
40
12.T3-T4: for four channel modes.
step1
press
T1
TYPE:K
T2
30
T3
50
℃
2540
T4
T1
TYPE:K
SHIFT
HOLD
step4
press
T3-T4
10
T1
TYPE:K
SHIFT
SHIFT
SHIFT
T3
T2
30
T3
℃
2540
SHIFT
℃
11
HOLD
T4
T1
TYPE:K
T3-T4
10
T4
step2
press
2540
step3
press
50
50
T3
50
25
T4
℃
40
P.S1:When the main display temp.value is higher
than the alarm setting Hi temp.value or
lower than the alarm Lo setting temp.value,
the alarm will continue send out.
2:The Hi/Lo setting temp. Value of the
thermocouple types are different.
Type Hi/Lo
Lo
Hi
-99.9
K
1300
1000
-99.9
J
-99.9
T
400
E
-50
800
R
1700
0
0
1700
S
N
1300
-99.9
12
Operation
14.Hi/Lo:The alarm Hi/Lo temp.value setting.
step1
press
T1
TYPE:K
T2
30
T3
50
℃
2540
T4
SHIFT
SHIFT
T1
TYPE:K
SHIFT
T2
30
T3
50
step2
press
℃
2540
MAX MIN
AVG
15.CLOCK:To enforce date setting function key.
step1
press
T3
T3
T1
T1
50
50 step2
press
SHIFT
TYPE:K
TYPE:K
℃
T2
30
2540
T4
SHIFT
T2
SHIFT
30
℃
2540
K
℃
F
T4
T4
A.Use
,
key to move place.
B.Use
,
key to set Hi temp.
value.
C.The flicker word is the adjustable
word.
LIMIT
Hi
1300
step3
press SHIFT
A.Use
,
key to move place.
B.Use
, key to set Lo temp.
value.
C.The flicker word is the adjustable
word.
LIMIT
Lo
-99.9
step4
press SHIFT
Back to main display.
Operation
A.Use
,
key to move place.
B.Use
,
key to set hour &
minute.
C.The flicker word is the adjustable 3003 2004y
word.
step3
press SHIFT
12:01
A.Use
,
key to move place.
B.Use
,
key to set date &
month.
y
C.The flicker word is the adjustable 3003 2004
word.
step4
press SHIFT
12:01
A.Use
,
key to move place.
B.Use
,
key to set year.
C.The flicker word is the adjustable
y
word.
3003 2004
12:01
step5
press SHIFT
Back to main display.
13
14
Battery replacement
Operation
16.perpetual calendar:
step1
power on
T1
TYPE:K
T2
30
T3
50
Step2
℃
2540
T4
+
1.Press right key
and hold on.
2.Press power key.
3.Set free two keys.
12:50
y
0503 2004
17.
:backlight.(for option)
A.Press the backlight button to turn the
backlight ON or OFF.
B.In no turn off backlight condition, the
backlight function can keep on 1 minute.
15
1.The symbol " B " that appears in the upper left
of the LCD display indicates that the unit's
battery is running low. Please replace the 1.5V
battery at once to ensure the test accuracy.
2.Remove the battery cover by one screwdriver.
3.Replace the old battery with four new 1.5V
batteries and lock the battery cover.
4.Prior to replacing the battery, please make
certain to remove the thermocouple from the
temperature gauge as a safety precaution.
5.When in extended idle, please remove the 1.5V
battery from the temperature gauge and store
the temperature gauge only in a cool and lowhumidity setting.
6.To avoid combustion, DO NOT dispose of
batteries in general into an open flame.
7.Caution the positive and negative polarity when
loading battery.
8.Please abide by pertinent laws and regulations
when disposing of used batteries.
16
Caution
1.Input protection: The temperature jack carried
a maximum voltage of 24 volts DC or AC .
2.Temperature jacks: Design for the insertion of a
standard small thermocouple jacks, which has a
center spacing of 7.9mm between the two
prongs.
3.Please DO NOT placed inside a microwave for
temperature testing.
4.A correct thermocouple slot should be chosen
when operating the temperature gauge.
5.Please DO NOT attempt to use a temperature
gauge that is not working properly, for this may
result in physical harms, send for repair service
at once.
6.Please DO NOT attempt to operate the
temperature gauge in the around sites where
explosive gases, vapor or dust particles are
present.
7.Please refrain from subject the paired
thermocouple or the grounding between the
thermocouples to a voltage exceeding what has
been marked on the unit.
8.When gauge occur crashed , please take one
battery out for above one minute. Then place
the battery back and restart the gauge.
17
YC-7XXUD series thermometer
K/J/T/E/R/S/N Types
Data Logger
Users Manual
C
Operation
Operation
1.PC:Turn on"PC"function,the meter &PC
application program communication. When
turn on "PC" function ,The auto power off
will be canceled, and the power off will be
canceled, too.
step1
press
A
T1
TYPE:K
25
℃
T1
PC
TYPE:K
25
PC
step2
press
℃
PC
℃
T2
back to main display
2.REC: Turn on REC function,the reading value
of meter, according to transmitting the
settlement of interval time,will write
down in the memory real time.Can write
down 10000 records at most. When turn
on "REC" function,the auto power off
will be canceled, and the power off will
be canceled,too.When the memory is
filled, the display will appeared"ou"
word.For Data Logger models.
A
T1
TYPE:K
25
℃
step1
press
REC
T1
REC
TYPE:K
25
℃
T1
REC
TYPE:K
30
2540
T4
date
REC
℃
time
2205 22:05 h:m
A.Use , key to choose "channel".
B.Use , key to choose "number".Hold or
key above 1 second, the readout rate will be
added. About 50 numbers/sec.
step2
press
T1
CALL
TYPE:K
SHIFT
SHIFT
1000
25
℃
step3
press
2205 22:05 h:m
CALL
BYTE
1293
2205
2004
y
surplus space
℃
step5
back to step1 press
BYTE
step4
press
1293
SHIFT
SHIFT
CALL
date
back to main display
25
CALL
OU
25
Memory is filled
1
3.CALL:Can inquire that the data of every
channel, can also inquire about the surplus
space of the memory. For Data Logger models.
Each time entering to inquire data by the last.
When turn on "CALL" function, the auto
power off will be canceled.
last number
step1 T1
A
T3
T1
CALL 1000
50
press
TYPE:K
TYPE:K
CALL
2205
step2
press
2
2004
y
year
Operation
4. SHIFT +
CALL
Operation
:remove the record of the memory.
For Data Logger models.
back to main display
step1
press
A
T1
TYPE:K
T2
30
T3
50
SHIFT
℃
2540
SHIFT
T4
A
T1
TYPE:K
SHIFT
T2
30
T3
50
℃
2540
step2
press
CALL
T4
T2
flickering
finish remove
CLEA
Step3
press
CALL
CALL
CLEA
SHIFT
back to main display
PC
:Carry out the PC interval
setting. The biggest settlement
time is 59 minutes and 59 seconds
.Minimum to set for time is one
second. Enter and show 00:01
seconds of initial value for the
first time. Enter and show
settlement value last time for the
second time after. For USB or
Data Logger models.
3
30
T3
50
℃
PC INTV
2540
T4
00:02 m:s
step1
SHIFT SHIFT
press
A
T1
TYPE:K
SHIFT
express it in movements by flickering
5. SHIFT +
A
T1
TYPE:K
T2
30
T3
50
℃
2540
step2
press
PC INTV
SHIFT
PC
T4
00:01 m:s
PC INTV
00: 0 1 m:s
The flashing number represents
adjustable number.
4
6. SHIFT +
REC
:carry out the record interval
setting. The biggest settlement time is 59
minutes and 59 seconds. Minimum to set for
time is one second. Enter and show 00:01
seconds of initial value for the first time.
Enter and show settlement value last time
after.For Data Logger models.
back to main display
A
T1
TYPE:K
T2
30
T3
50
REC
INTV
℃
2540
T4
00:02 m:s
step1
SHIFT SHIFT
press
A
T1
TYPE:K
SHIFT
T2
30
T3
50
℃
2540
step2
press
REC
INTV
SHIFT
REC
T4
00:01 m:s
REC
INTV
00: 0 1 m:s
The flashing number represents
adjustable number.
5