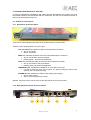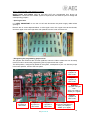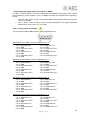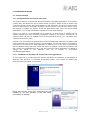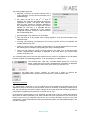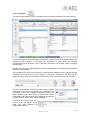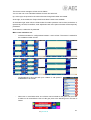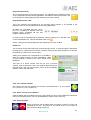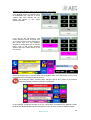
1
AEQ SYSTEL IP 4 AEQ SYSTEL IP 12 USER´S MANUAL ED. 01/15 V. 1.1 - 02/03/2015 Firmware Versions: Software Versions: CPU 1.01 / FPGA 1.00 / VoIP 1.00 or higher AEQ Systel IP Setup 1.0.1.20 or higher AEQ Systel IP Web Server 1.0.1.15 or higher CONTENTS 1. INTRODUCTION....................................................................................................................... 4 1.1. Applications of this product. ............................................................................................... 4 1.2. Description of the basic system: SYSTEL IP 4 - SYSTEL IP 12. ...................................... 4 1.3. Functional specifications.................................................................................................... 5 2. PHYSICAL DESCRIPTION OF THE UNIT............................................................................... 7 2.1. SYSTEL IP 4 description. .................................................................................................. 7 2.1.1. Description of the front panel. ................................................................................. 7 2.1.2. Back panel description and connections. ............................................................... 7 2.1.2.1. Ethernet ports (LAN & WAN). ................................................................... 8 2.1.2.2. General-purpose inputs and outputs (GPIO). ........................................... 8 2.1.2.3. Handset connectors 1 and 2. .................................................................... 9 2.1.2.4. Audio input and output 1. .......................................................................... 9 2.1.2.4.1. Input 1 jumpers configuration............................................................... 10 2.1.2.5. Audio inputs and outputs 2 & 3. .............................................................. 10 2.1.2.6. Power supply........................................................................................... 10 2.2. SYSTEL IP 12 description. .............................................................................................. 11 2.2.1. Description of the front panel. ............................................................................... 11 2.2.2. Back panel description and connections. ............................................................. 11 2.2.2.1. Ethernet ports (LAN & WAN). ................................................................. 12 2.2.2.2. General-purpose inputs and outputs (GPIO). ......................................... 12 2.2.2.3. Handset connectors 1 to 4. ..................................................................... 13 2.2.2.4. Digital inputs and outputs........................................................................ 14 2.2.2.4.1. Digital input programming jumpers. ..................................................... 14 2.2.2.5. Analog inputs and outputs. ..................................................................... 16 2.2.2.6. Power supply........................................................................................... 17 2.2.2.7. Notes about SYSTEL IP 12 audio wiring. ............................................... 17 3. SYSTEM INSTALLATION. ..................................................................................................... 18 3.1. Control elements.............................................................................................................. 18 3.1.1. Configuration PC and control web server. ............................................................ 18 3.1.1.1. Installation of the setup and control web server applications. ................ 18 3.1.2. Control terminals................................................................................................... 19 3.1.2.1. Installation and initial configuration of the control client in Windows. ..... 19 3.1.2.2. Installation and initial configuration of the control client in iOS............... 19 3.1.2.3. Installation of the handset or SYSTEL IP HS micro telephone............... 20 3.1.2.4. Installation of the SYSTEL IP ST supports. ............................................ 21 3.1.2.5. Installing IP phones as an alternative to the analog SYSTEL IP HS handset. .................................................................................................. 22 4. SETUP SOFTWARE............................................................................................................... 23 4.1. Preparing a computer for setup and control of the system. Starting the application. ...... 23 4.2. SYSTEL IP SETUP: Description of the screens in the Setup application. ...................... 24 4.2.1. Systel IP Units....................................................................................................... 25 4.2.1.1. Synchronize configurations..................................................................... 28 4.2.1.2. Updating the Systel IP unit firmware....................................................... 30 4.2.1.3. “Adjust Gain“ window. ............................................................................. 30 4.2.1.4. “VoIP Test“ window. ................................................................................ 31 4.2.2. Studio Wiring......................................................................................................... 35 4.2.2.1. SYSTEL IP 12 wiring configuration examples. ....................................... 38 4.2.2.2. SYSTEL IP 4 wiring configuration examples. ......................................... 40 4.2.3. VOIP...................................................................................................................... 42 4.2.4. Security Level........................................................................................................ 48 4.2.5. Users..................................................................................................................... 49 4.2.6. Programs............................................................................................................... 50 4.2.7. PhoneBook............................................................................................................ 51 4.2.8. Saving and restoring the database. ...................................................................... 54 2 AEQ SYSTEL IP 5. CONTROL TERMINAL BASED ON WEB BROWSER. ........................................................ 55 5.1. WEB CONTROL CLIENT FUNCTIONAL DESCRIPTION.................................................. 55 5.2. How to access:................................................................................................................. 55 5.3. Program operation window .............................................................................................. 56 5.4. Control screen right common area: general controls....................................................... 58 5.4.1. Call queue control window. ................................................................................... 58 5.4.2. Reject Calls and Menu buttons. ............................................................................ 58 5.4.3. General Chat......................................................................................................... 59 5.5. Control screen left area: Individual line control window................................................... 59 5.6. Detailed description of the line control windows: buttons, indicators and fields. ............. 60 5.6.1. Operator phone: Procedure to make and receive calls. ....................................... 60 5.6.2. Line number indicator. .......................................................................................... 61 5.6.3. Send / receive level indicators. ............................................................................. 61 5.6.4. Hang-up button. .................................................................................................... 61 5.6.5. Active indicators per line: line status..................................................................... 62 5.6.6. Other status indicators .......................................................................................... 63 5.6.7. Main buttons at the right of each line.................................................................... 63 5.6.7.1. WAIT / ON AIR / QUEUE button operation............................................. 63 5.6.7.2. Lock button operation.............................................................................. 64 5.6.8. Partner name editable field operation................................................................... 67 5.6.9. Partner observations editable field operation. ...................................................... 67 5. 7. Using an IP phone instead of an analog handset as the SYSTEL IP handset............... 67 6. TECHNICAL CHARACTERISTICS*....................................................................................... 68 7. A.E.Q. WARRANTY................................................................................................................ 69 APPENDIX A: INSTALLATION AND SETUP OF AN ASTERISK PBX FOR SYSTEL AND CONNECTION TO A SIP TRUNKING........................................................................................ 70 A.1 Benefits provided to Systel IP by Asterisk........................................................................ 70 A.2. Installing the Asterisk PBX. ............................................................................................. 70 A.3. Asterisk PBX configuration. ............................................................................................. 73 A.3.1. General Configuration (Settings menu)................................................................ 73 A.3.2. Extensions configuration ...................................................................................... 73 A.3.3. Telephony provider (SIP Trunk) configuration...................................................... 74 A.3.3.1. Incoming calls routing configuration ....................................................... 75 A.3.3.2. Outgoing calls routing configuration. ...................................................... 77 APPENDIX B1: CONFIGURING A GENERIC IP PHONE AS AN EXTERNAL EXTENSION COMPLEMENTARY TO THE SYSTEL IP INSTALLATION...................................................... 78 APPENDIX B2: SETTING UP AN IP PHONE TO BE USED AS A HANDSET FOR OFF AIR CONVERSATION WITH THE SYSTEL IP CORRESPONDENTS............................................. 80 APPENDIX C: INSTALLING AND CONFIGURING A GATEWAY............................................ 82 APPENDIX D: SETTING UP A WIFI ACCESS POINT FOR SYSTEL IP. ................................. 87 APPENDIX E: BASIC IP TELEPHONY CONCEPTS................................................................. 90 3 AEQ SYSTEL IP 1. INTRODUCTION. 1.1. Applications of this product. SYSTEL IP is a “call-in” system with multiconference capability that drastically reduces the costs for this type of communications. Further, it significantly improves the audio quality, increases the flexibility and integration with already existing telephone systems at the station. The investment required is very small and will be amortized very rapidly through simple saving of costs. Business telephone systems are rapidly migrating to VoIP technology, integrating IP switchboards, Asterisk or similar type distributed, or virtual, allowing access to new alternative telecommunication service providers. At the same time telephony or call-in systems for broadcast applications have so far been an isolated island with important operational costs and stagnant technology. SYSTEL IP allows for the integration of broadcast telephony with the existing corporative, IP based PBX, thus avoiding the need to keep conventional phone lines exclusively for broadcast use. 1.2. Description of the basic system: SYSTEL IP 4 - SYSTEL IP 12. The heart of the system is a 19” rack unit, in two versions: • Systel IP 4, one unit high rack for 4 simultaneous IP phone lines. Includes: voice and control IP connectors, 2 analog inputs and 2 analog outputs, 1 input and 1 output -both selectable as analog or digital-, a handset port, another port -which can be used as the second handset or the second analog input and output-, 4 GPI and 4 GPO. This should be enough to provide service to one or two studios. • Systel IP 12, two units high rack format, for 12 simultaneous IP phone lines. Includes voice and control IP connectors, 8 analog inputs and outputs, 4 digital inputs and 4 digital outputs, 4 handset ports, 12 GPI and 12 GPO. This should be enough to cover 4 studios. Both units behave like multi-line IP Phones with SIP signalling protocol. Compatible with Asterisk PBX, SIP Trunking and virtual PBX. Analogue and ISDN lines supported through gateways. Encryption algorithms include the proper ones in telephony: G726, G729 and low bit rate G711 with higher quality. G722 also incorporate coding with extended bandwidth to 7 kHz, which characterize them as "HD" and makes them compatible with N / ACIP AudioCodecs and SIPPhones (Any AEQ Phoenix AudioCodec and most PC telephony software). They are provided with configuration software, which can be run in several computers on a single system, web server and web client for an unlimited number of terminals. IMPORTANT NOTE: The default IP address, configured in the units as they leave the Factory, is 172.26.36.250 in the case of Systel IP 4 and 172.26.35.250 in the case of Systel IP 12. 4 AEQ SYSTEL IP 1.3. Functional specifications. GENERAL FEATURES. Operating Features. SIP communications protocol: compatible with VoIP trunkings, Asterisk PBX, SIP Phones such as Phoenix Pocket or Phoenix Lite, N/ACIP compliant Audiocodecs such as Phoenix Mercury, Phoenix Studio, Phoenix Venus or Phoenix Mobile and POTS, ISDN, E1 and T1 FXO. Based on non-blanking digital switching matrix, all lines (4 or 12 depending on the model) can be simultaneously live participating in a program with no loss of quality. GPI/O: programmable functions: RING, WAIT / ON AIR, CUE, PLAY. 4 GPI, 4 GPO and power supply on each DB15 female connector. All functions are replicated over TCP / IP in the control network. Audio specifications. - Analog inputs: input impedance: 20Kohm. Electronically balanced, professional line level. - Nominal input level: +4 dBu. Max. input level: +24 dBu. - Analog outputs: output impedance < 100 ohm. Electronically balanced, professional line level. - Nominal output level: +4 dBu. Max. output level: +24 dBu. - Digital inputs / outputs: AES / EBU interfaces, configurable as AES-3 or SPDIF. Inputs include SRC. - AES 1 input can be used for external AES-11 synchronization. Encoding Algorithms. - Phone audio in G.711, G.726, G.729, 50Hz - 3KHz High-Definition audio with G.722 algorithm: 50Hz – 7KHz. Echo cancellation Independent, digital gain control for all inputs and outputs with an adjustment range of +/- 12 dB and muting. - Automatic gain control for telephone returns. Configuration software and control web server. 32 and 64 bit Windows operating systems: Windows XP, Windows Vista, Windows 7 and Windows 8. Functionality: - Assigns audio, handset, IP phone and chat circuits to the different studios, univocally. Renames circuits Defines and manages phone books, allowing the user to share, edit and copy them. Manage a call scheduler and a “black list”. Configure the initial audio levels for each line and each study. Configures the format of the customer’s screen, defining the number of lines per program, and operation with one or several (up to 6) call queues. - SIP configuration for communication with an IP PBX, FXO gateway and external (Internet) or internal (LAN or WAN) service providers. - Multi-unit operation: shares resources between the different systems in a network. Web control client. There is at least one compatible web browser for each one of these operating systems: Windows and IOS for iPad Functionality: - Call establishment: by number dialing, with SIP identifiers, or from call book entries. Optical tally and acoustic RING signal. Caller identification. Accept incoming calls, either manual or automatically. Register new contacts in the call book. Talk by means of the headset or microphone / headphone with the people at the remote line end. - Put calls on hold, while the caller can listen to the program. 5 AEQ SYSTEL IP - Put calls on air, either individually or several calls simultaneously, so they can contribute to the program. - Assign the VIP function to one of the partners, putting it ON AIR using a dedicated fader. - Display and adjust of the input levels (manually or using an AGC), the return levels of each of the studio phone lines, or the headset itself. - Display the status of all the phone lines and where they are being routed to. - Distinguish between producer, operator and presenter roles: Label and comment calls, and chat among the different controllers assigned to the program. 6 AEQ SYSTEL IP 2. PHYSICAL DESCRIPTION OF THE UNIT. In order to understand the installation and cabling process associated to this system, first of all the installer needs to become familiar with the connectors and the rest of elements present at the front and back panels of the unit. 2.1. SYSTEL IP 4 description. 2.1.1. Description of the front panel. There are six LEDs indicating the status of the system and the communication. These are the indicating LEDs, from left to right: - HS1 and HS2 LEDs: indicate the status of the handset connections: • Off: no connection. • Green: connected - WAN LED: indicates the status of the IP Phone WAN network connection: • Off: not connected to a phone network. • Flashing green: physical link established. - LAN LED: indicates the status of the local control network connection: • Off: no connection to the local network. • Flashing green: physical link established. - HW ERROR LED: indicates the initialization or error status of the unit: • It is red lit during the boot of the system. If it doesn’t extinguish within some seconds, the unit needs servicing. - POWER ON LED: indicates the status of the system power supply: • Off: no power supply. • Green: the unit is powered correctly. Besides, the power switch can be found, at the right side of the unit’s front panel. 2.1.2. Back panel description and connections. A B C D E F 7 AEQ SYSTEL IP 2.1.2.1. Ethernet ports (LAN & WAN). A SYSTEL IP 4 includes two Ethernet ports. By using the LAN port, the unit can be connected via IP to a local network for its configuration and control from the application installed on a configuration PC and the web control server. It can also be controlled from different web clients installed in computers or tablets. By means of the WAN port, the unit can receive calls from a SIP proxy (Asterisk or similar), from Gateways, or from IP phone providers by means of SIP trunkings. Up to 2 IP phones can also be connected to the WAN port, in order to communicate off-air with the interlocutors, instead of using analog handsets. Physically, the connectors are RJ45 10/100 BT, with the following pinout: RJ45 connector pinout 2.1.2.2. General-purpose inputs and outputs (GPIO). B The connectors used are DB15 female, with the following pinout: DB15 connector pinout - Pin 1: GPI1 - Pin 2: GPI2 - Pin 3: GPI3 - Pin 4: GPI4 - Pin 5: GPO1 - Pin 6: GPO2 - Pin 7: GPO3 - Pin 8: GPO4 - Pin 9: GND_GPI 1-4 - Pin 10: GND_GPI 1-4 - Pin 11: GND_GPI 1-4 - Pin 12: +5V GPIO - Pin 13: GND_GPO 1-4 - Pin 14: GND_GPO 1-4 - Pin 15: GND_GPO 1-4 Highlights: please note that there is a common ground (GND) for inputs 1 to 4 and another one for outputs 1 to 4. There is also a +5V reference voltage at pin 12 to ease the wiring. 8 AEQ SYSTEL IP 2.1.2.3. Handset connectors 1 and 2. C SYSTEL IP 4 provides two 8-pin RJ45 connectors to connect remote powered analog handsets. Handset 1 port is located above handset 2. The only model that can be connected to them is the SYSTEL IP HS handset. If a wired or wireless operator handset is to be connected, it must be plugged in the 4-pin RJ9 handset connector provided by the SYSTEL IP HS (see section 3.1.2.4 in this manual). Physically, each pin carries the signals described below: RJ45 connector pinout - Pin 1: +48V DC - Pin 2: +48V DC - Pin 3: MIC + - Pin 4: SPK+ - Pin 5: SPK- Pin 6: MIC - Pin 7: CONTROL - Pin 8: 0V DC - Shield: 0V DC Highlights: The use of shielded cable is mandatory, and the shield must be properly connected to provide adequate power supply and interference suppression. The handsets can be installed up to 300m far from the SYSTEL by using CAT5E or superior cabling. Two LEDs can be found besides each connector. The yellow one indicates that there is power supply and the green one indicates that a SYSTEL IP HS handset is connected at the other end of the wire. Instead of using handsets 1 to 4, IP phones can be connected to the switch in the LAN port. In this case, each IP phone will take one of the twelve available IP lines away. 2.1.2.4. Audio input and output 1. D XLR-3 female and male connectors. Balanced connection. The connector at the left corresponds to the input, while the one at the right is the output. XLR-3 Female and male panel connectors’ pinout 9 AEQ SYSTEL IP Pin 1 Æ Ground Pin 2 Æ + Input or output Pin 3 Æ - Input or output Two operating modes can be selected by means of internal programming jumpers: • • Digital: Both audio input 1 and output 1 carry two digital audio channels each one, in AES/EBU or SPDIF format (handset 2 connector will remain available). Analog: Audio input 1 and output 1 carry analog input (handset 2 connector is not available in this mode). When input 1 is operating in digital mode, it synchronizes the SYSTEL IP 4 system with the signal it is connected to, no matter if it carries an AES3 or AES11 signal. On the other hand, when output 1 is operating in digital mode, it allows other pieces of equipment to synchronize to the SYSTEL by extracting the audio sync from the audio in AES3 format. 2.1.2.4.1. Input 1 jumpers configuration. IMPORTANT NOTE: Access and configuration to the programming jumpers requires previous experience with installation and configuration of electronic cards or computers. Don’t open the unit if you lack this experience at the risk of produce permanent damages or suffer electric shocks. Analog or digital mode selection jumpers. Audio input and output 1 (AUDIO 1) is programmed from factory as AES/EBU. If they need to be connected to an analog system, the unit must be open and the corresponding jumpers must be changed. Handset 2 port will become disabled. Ask Technical Support service if you need to perform this operation. AES or S/PDIF digital mode selection jumpers. Digital inputs and outputs (AES IN and AES OUT) are programmed from factory as AES/EBU. If connection to an S/PDIF system is required, the unit must be open to change the corresponding jumpers. Ask Technical Support service if you need to perform this operation. 2.1.2.5. Audio inputs and outputs 2 & 3. E F XLR-3 female and male connectors. Balanced connection. The connector at the left corresponds to the output, while the one at the right is the output. XLR-3 Female and male panel connectors’ pinout Pin 1 Æ Ground Pin 2 Æ + Input or output Pin 3 Æ - Input or output 2.1.2.6. Power supply. The power supply connector is located at the left side of the unit’s back panel. The power supply is of the universal auto range type: 100 - 240 V AC 50/60 Hz, 25 VA. 10 AEQ SYSTEL IP 2.2. SYSTEL IP 12 description. 2.2.1. Description of the front panel. There are eight LEDs indicating the status of the system and the communication. These are the indicating LEDs, from left to right: - HS1 to HS4 LEDs: indicate the status of the handset connections: • Off: no connection. • Green: connected - WAN LED: indicates the status of the IP Phone WAN network connection: • Off: not connected to a phone network. • Flashing green: physical link established. - LAN LED: indicates the status of the local control network connection: • Off: no connection to the local network. • Flashing green: physical link established. - HW ERROR LED: indicates the initialization or error status of the unit: • It is red lit during the boot of the system. If it doesn’t extinguish within some seconds, the unit needs servicing. - POWER ON LED: indicates the status of the system power supply: • Off: no power supply. • Green: the unit is powered correctly. Besides, the power switch can be found, in some versions, at the right side of the unit’s front panel. 2.2.2. Back panel description and connections. F A B C D E 11 AEQ SYSTEL IP 2.2.2.1. Ethernet ports (LAN & WAN). A SYSTEL IP 12 includes two Ethernet ports. By using the LAN port, the unit can be connected via IP to a local network for its configuration and control from the application installed on a configuration PC and the web control server. It can also be controlled from different web clients installed in computers or tablets. By means of the WAN port, the unit can receive calls from a SIP proxy (Asterisk or similar), from Gateways, or from IP phone providers by means of SIP trunkings. Up to 4 IP phones can also be connected to the WAN port, in order to communicate off-air with the interlocutors, instead of using analog handsets. Physically, the connectors are RJ45 10/100 BT, with the following pinout: RJ45 connector pinout 2.2.2.2. General-purpose inputs and outputs (GPIO). B The connectors used are DB15 female, with the following pinout: Identification of the DB15 connector GPIO 1-4 - Pin 1: GPI1 - Pin 2: GPI2 - Pin 3: GPI3 - Pin 4: GPI4 - Pin 5: GPO1 - Pin 6: GPO2 - Pin 7: GPO3 - Pin 8: GPO4 - Pin 9: GND_GPI 1-4 - Pin 10: GND_GPI 1-4 - Pin 11: GND_GPI 1-4 - Pin 12: +5V GPIO 1-4 - Pin 13: GND_GPO 1-4 - Pin 14: GND_GPO 1-4 - Pin 15: GND_GPO 1-4 Highlights: please note that there is a common ground (GND) for inputs 1 to 4 and another one for outputs 1 to 4. There is also a +5V reference voltage at pin 12 to ease the wiring. 12 AEQ SYSTEL IP Identification of the DB15 connector GPIO 5-8 - Pin 1: GPI5 - Pin 2: GPI6 - Pin 3: GPI7 - Pin 4: GPI8 - Pin 5: GPO5 - Pin 6: GPO6 - Pin 7: GPO7 - Pin 8: GPO8 - Pin 9: GND_GPI 5-8 - Pin 10: GND_GPI 5-8 - Pin 11: GND_GPI 5-8 - Pin 12: +5V GPIO 5-8 - Pin 13: GND_GPO 5-8 - Pin 14: GND_GPO 5-8 - Pin 15: GND_GPO 5-8 Highlights: please note that there is a common ground (GND) for inputs 5 to 8 and another one for outputs 5 to 8. There is also a +5V reference voltage at pin 12 to ease the wiring. Identification of the DB15 connector GPIO 9-12 - Pin 1: GPI9 - Pin 2: GPI10 - Pin 3: GPI11 - Pin 4: GPI12 - Pin 5: GPO9 - Pin 6: GPO10 - Pin 7: GPO11 - Pin 8: GPO12 - Pin 9: GND_GPI 9-12 - Pin 10: GND_GPI 9-12 - Pin 11: GND_GPI 9-12 - Pin 12: +5V GPIO 9-12 - Pin 13: GND_GPO 9-12 - Pin 14: GND_GPO 9-12 - Pin 15: GND_GPO 9-12 Highlights: please note that there is a common ground (GND) for inputs 9 to 12 and another one for outputs 9 to 12. There is also a +5V reference voltage at pin 12 to ease the wiring. 2.2.2.3. Handset connectors 1 to 4. C SYSTEL IP 12 provides 4 8-pin RJ45 connectors to connect remote powered headsets. The only model that can be connected to them is the SYSTEL IP HS handset. If a wired or wireless operator handset is to be connected, it must be plugged in the 4-pin RJ9 handset connector provided by the SYSTEL IP HS. Physically, each pin carries the signals described below: RJ45 connector pinout 13 AEQ SYSTEL IP - Pin 1: +48V DC - Pin 2: +48V DC - Pin 3: MIC + - Pin 4: SPK+ - Pin 5: SPK- Pin 6: MIC - Pin 7: CONTROL - Pin 8: 0V DC - Shield: 0V DC Highlights: The use of shielded cable is mandatory, and the shield must be properly connected to provide adequate power supply and interference suppression. The handsets can be installed up to 300m far from the SYSTEL by using CAT5E or superior cabling. Two LEDs can be found besides each connector. The yellow one indicates that there is power supply and the green one indicates that a SYSTEL IP HS handset is connected at the other end of the wire. Instead of using handsets 1 to 4, IP phones can be connected to the switch in the LAN port. In this case, each IP phone will take one of the twelve available IP lines away. 2.2.2.4. Digital inputs and outputs. D The connectors used are DB15 female, with the following pinout: Identification of the DB15 connector DIGITAL I/O 1-2 - Pin 1: AES1 IN + - Pin 2: GND - Pin 3: AES1 OUT + - Pin 4: GND - Pin 5: AES 2 IN + - Pin 6: GND - Pin 7: AES 2 OUT + - Pin 8: GND - Pin 9: AES1 IN - Pin 10: GND - Pin 11: AES1 OUT - Pin 12: GND - Pin 13: AES 2 IN - Pin 14: GND - Pin 15: AES 2 OUT - Identification of the DB15 connector DIGITAL I/O 3-4 - Pin 1: AES3 IN + - Pin 2: GND - Pin 3: AES3 OUT + - Pin 4: GND - Pin 5: AES 4 IN + - Pin 6: GND - Pin 7: AES 4 OUT + - Pin 8: GND - Pin 9: AES3 IN - Pin 10: GND - Pin 11: AES3 OUT - Pin 12: GND - Pin 13: AES 4 IN - Pin 14: GND - Pin 15: AES 4 OUT - Highlights: - Each of the four digital audio input and output includes two different audio channels, according to AES 3 or S/PDIF standards. AES 1 IN input provides synchronization to SYSTEL IP 12 with the source connected to it, no matter if it provides an AES3 or AES11 signal. Each output can provide sync to other pieces of equipment that are able to extract it from the AES 3 audio signal. 2.2.2.4.1. Digital input programming jumpers. IMPORTANT NOTE: Access and configuration to the programming jumpers requires previous experience with installation and configuration of electronic cards or computers. Don’t open the unit if you lack this experience at the risk of produce permanent damages or suffer electric shocks. 14 AEQ SYSTEL IP AES or S/PDIF digital mode selection jumpers Digital inputs and outputs (AES IN and AES OUT) are programmed from factory as AES/EBU. If connection to an S/PDIF system is required, the unit must be open to change the corresponding jumpers. - Opening the unit. It is VERY IMPORTANT to turn the unit off and disconnect the power supply cable before opening it. Remove the 10 screws depicted below: 4 at the upper cover, the 3 upper ones at the left side, and the 3 upper ones at the right side. Pull upwards from the cover and remove it. - Recognizing the programming jumpers area. The jumpers are located at the front left quadrant, below the ribbon cables that can be easily moved in order to access the programming. Each jumper blocks has 3 pins. The AES position, configured by default in the system, corresponds to pins 1-2, with the jumper in the lower position, closer to the front panel. Output 3 4 jumpers in AES mode Output 4 4 jumpers in AES mode Output 2 4 jumpers changed from AES (1-2, lower) to SPDIF (2-3, upper) Output 1 4 jumpers in AES mode Input 3 5 jumpers in AES mode Input 4 5 jumpers in AES mode Input 1 5 jumpers in AES mode Input 2 5 jumpers changed from AES (1-2, lower) to S/PDIF (2-3, upper) 15 AEQ SYSTEL IP - Programming the digital inputs and outputs as S/PDIF. In order to connect SYSTEL to pieces of equipment with S/PDIF format inputs and/or outputs, the programming of the jumpers in pos 2-3 adapts the levels and unbalances the signals by joining: o o IN1-, IN2-, IN3- & IN4- to their corresponding GND, so the signal is taken from each IN+ and IN- or its GND. OUT1-, OUT2-, OUT3- & OUT4- to their corresponding GND, so the signal is provided between each OUT+ and OUT- or its GND. 2.2.2.5. Analog inputs and outputs. E The connectors used are DB15 female, with the following pinout: Identification of the DB15 connector ANALOG I/O 1 - 2 - Pin 1: ANALOG1 IN + - Pin 2: GND - Pin 3: ANALOG 1 OUT + - Pin 4: GND - Pin 5: ANALOG 2 IN + - Pin 6: GND - Pin 7: ANALOG 2 OUT + - Pin 8: GND - Pin 9: ANALOG 1 IN - Pin 10: GND - Pin 11: ANALOG 1 OUT - Pin 12: GND - Pin 13: ANALOG 2 IN - Pin 14: GND - Pin 15: ANALOG 2 OUT - Identification of the DB15 connector ANALOG I/O 3 - 4 - Pin 1: ANALOG3 IN + - Pin 2: GND - Pin 3: ANALOG 3 OUT + - Pin 4: GND - Pin 5: ANALOG 4 IN + - Pin 6: GND - Pin 7: ANALOG 4 OUT + - Pin 8: GND - Pin 9: ANALOG 3 IN - Pin 10: GND - Pin 11: ANALOG 3 OUT - Pin 12: GND - Pin 13: ANALOG 4 IN - Pin 14: GND - Pin 15: ANALOG 4 OUT - Identification of the DB15 connector ANALOG I/O 5 - 6 - Pin 1: ANALOG5 IN + - Pin 2: GND - Pin 3: ANALOG 5 OUT + - Pin 4: GND - Pin 5: ANALOG 6 IN + - Pin 6: GND - Pin 7: ANALOG 6 OUT + - Pin 8: GND - Pin 9: ANALOG 5 IN - Pin 10: GND - Pin 11: ANALOG 5 OUT - Pin 12: GND - Pin 13: ANALOG 6 IN - Pin 14: GND - Pin 15: ANALOG 6 OUT - Identification of the DB15 connector ANALOG I/O 7 - 8 - Pin 1: ANALOG 7 IN + - Pin 2: GND - Pin 3: ANALOG 7 OUT + - Pin 4: GND - Pin 5: ANALOG 8 IN + - Pin 6: GND - Pin 7: ANALOG 8 OUT + - Pin 8: GND - Pin 9: ANALOG 7 IN - Pin 10: GND - Pin 11: ANALOG 7 OUT - Pin 12: GND - Pin 13: ANALOG 8 IN - Pin 14: GND - Pin 15: ANALOG 8 OUT 16 AEQ SYSTEL IP 2.2.2.6. Power supply. F The power supply connector is located at the left side of the unit’s back panel. The power supply is of the universal auto range type: 100 - 240 V AC 50/60 Hz, 50 VA. 2.2.2.7. Notes about SYSTEL IP 12 audio wiring. Note in paragraphs 2.2.2.4 and 2.2.2.5 that each connector provides two balanced audio inputs and two balanced audio outputs (mono in case they are analog signals, stereo for digital). This allows an easy audio installation when the system is shared by several (up to 4) studios. In most cases, a simple 4-pair wiring loom will carry the analog or digital audios between the system and each studio. AEQ can provide these looms, in bobbins or finished with connectors. If you already have enough radial wiring between the central control and the studios, we can also make the installation easier by providing the termination between the system and the radial cabling by means of the wiring Accessory FR CAB INP: DB15 male connector connected to four balanced and shielded pairs, 6m long without termination, to ease the wiring of 2 audio inputs and 2 audio outputs in SYSTEL IP 12. Max 6 per units per system are required. 17 AEQ SYSTEL IP 3. SYSTEM INSTALLATION. 3.1. Control elements. 3.1.1. Configuration PC and control web server. The system software comprises two Microsoft Windows compatible applications. On one hand, a setup utility, that allows the user to define studios, programs, assign circuits to studios, and control the agenda, among other functionalities. On the other hand, a web server that provides service to the producers’ and studio operators’ control terminals. They will only need to use a web browser to operate the system. These two applications make use of the same shared database file, so it is most reasonable to install them on the same machine. There is no need to use a dedicated PC for Systel IP, as both pieces of software can be installed together with other third-party applications external to the system. Furthermore, an internet browser can also be installed in this control and web server PC, so it can behave as a control terminal like any other. However, only one instance of the web server must be installed and executed. This instance will control each and every Systel IP system in the installation. On the other hand, it IS possible to install and use more than one setup application in different PCs. In this case, we recommend that the database folder where the control web server is installed is shared in the network, and then modify the SystelIpSetup.ini file in the PCs where the setup application is installed to change the PATH to the database. This file is located in “C:\Program Files\AEQ\SystelIP\Setup”. 3.1.1.1. Installation of the setup and control web server applications. An executable file is provided with each system that allows the installation of the software in Windows Vista, Windows 7 & Windows 8 operating systems. Just execute the installer and follow the steps that appear on the screen. During that process, some Ajax components are also installed for the right operation of the web server (confirmation is required): 18 AEQ SYSTEL IP 3.1.2. Control terminals. The control terminals can consist in one, two or three elements: • • • A web browser based application (essential element of the Systel IP) that runs on a PC, tablet or IPad, regardless of operating system. A phone “handset” that incorporates a pre-amplifier allowing to place it over 300 meters (327 yds.) from the equipment rack (highly recommended). A support for a tablet and handset (optional) If the control terminals are mounted on tablet, and that most probably won’t have an Ethernet connector, these can easily connect through WiFi router to the Web server control PC. If the installation is very large, it may be necessary to install several WiFi routers, amplifiers or repeaters in order to guarantee proper coverage to all WiFi linked control terminals. The control application works as a client of the server program within a web browser, so a proper web browser must be installed that is adequate for the operating system of the PC or tablet used as a client. At the moment of writing this manual, the homologated environments are Windows (by Microsoft) and iOS (for the iPad, by Apple). 3.1.2.1. Installation and initial configuration of the control client in Windows. Google Chrome web browser is homologated for use with Microsoft Windows Vista, Windows 7 and Windows 8. It can be downloaded at http://www.google.com/intl/es_es/chrome/. In order to access the control screen, the IP address and port (288 by default) of the computer where the web server is installed must be typed in the URL bar of the browser, for example: http://172.26.5.32:288. It is recommended that the application is run maximized on the screen, in order to have the maximum available space. Use F11 for this purpose. 3.1.2.2. Installation and initial configuration of the control client in iOS. The Safari Web browser that comes preinstalled in all iPad devices is homologated for Systel control. In order to access the control screen, the IP address and port (288 by default) of the device where the web server is installed must be typed in the URL bar of the browser, for example: http://172.26.5.32:288. The following steps must be followed in order to use the iPad browser exclusively for SYSTEL IP control client: 1) Disable multitask gestures, in order to avoid that the application disappears when touching the screen with several fingers at the same time. Settings Æ General Æ Multitask Gestures Æ Disable 2) Disable automatic screen lock, so it is not disabled when not used for a while. Settings Æ General Æ Auto-lock Æ Never Settings Æ General Æ Passcode lock Æ Off Settings Æ General Æ Lock/Unlock Æ Off 3) Disable Control Center, so it doesn’t show up when the edges of the screen are touched. Settings Æ Control Center Æ Access from applications Æ Off 4) Activate restrictions so the tablet cannot be used with other applications, what could interfere with proper SYSTEL system control and status display. Settings Æ General Æ Restrictions Æ Activate restrictions 19 AEQ SYSTEL IP In order to use an external keyboard (this is recommended, so the on-screen virtual keyboard doesn’t interfere with the system status display when trying to type texts in), the keyboard must be linked to the iPad. In order to do this, just activate Bluetooth and touch on the keyboard device found. Settings Æ Bluetooth Æ On When the keyboard is detected, the iPad will automatically stop using the on-screen virtual keyboard when text is to be typed in. In order to maximize the application on screen: Generate a link to the start screen in Safari, so the Safari screen appears maximized Safari Æ Export Æ Add to start screen 3.1.2.3. Installation of the handset or SYSTEL IP HS micro telephone. SYSTEL IP HS is a preamplified, remote powered handset, which must be connected to a special connector in SYSTEL IP 4 (see paragraph 2.1.2.3 in this manual) or SYSTEL IP 12 (see paragraph 2.2.2.3 in this manual). Use a continuous CAT5E FTP cable (or better), connecting wire by wire straight, including the screen. This way, the range will exceed 300 meters. If prolongations are required, make sure that shielded connectors are used and that all the screens are soldered in connectors and pigtails. Have in mind that the pinout is proprietary and is not compatible with hubs or Ethernet Switches, nor with PoE power supply. - Pin 1: +48V DC - Pin 2: +48V DC - Pin 3: MIC + - Pin 4: SPK+ - Pin 5: SPK- Pin 6: MIC - Pin 7: CONTROL - Pin 8: 0V DC - Shield: 0V DC RJ45 Handset Connector pinout This connector includes the electret microphone biasing. It is compatible with most professional headsets (operator micro-headphones), both wired and wireless, that have RJ9 connection interface. In order to connect one of those headsets, disconnect the micro-telephone 4-pin RJ9 connector from the SYSTEL IP HS body, and connect a RJ9 connection cable to the headset or its base. Then connect the SYSTEL IP HS micro telephone cable that was disconnected to the new headset or its base (check the manual of the device). 20 AEQ SYSTEL IP 3.1.2.4. Installation of the SYSTEL IP ST supports. It consists on a base for the SYSTEL IP HS micro-telephone and a 10” Tablet / iPad. It has been initially homologated for Apple iPad 2, iPad 3 and later. Please ask us about an updated list of homologated devices. If the Tablet / iPad is 10” sized but is not in this list, please check whether the connectors and controls position are compatible with the support, especially whether the connectors for power supply and speaker are free. The tablet can be tilted to avoid reflections in the screen. In order to assembly it, all we need to have is a 10” iPad, a Phillips screwdriver, a 3mm Allen key and a SYSTEL IP HS. The packaging includes the base, the tablet support, 2 black screws for the hinge and 5 small clear screws for the SYSTEL IP HS. Start by fixing the tablet support to the base by means of the two screws for the hinge. Next, turn the base upside down, supporting it on the tablet support, in order to fix the SYSTEL IP HS handset to the base by means of the 5 small screws. If the silicone feet provided with SYSTEL HS are there, they must be removed before installing the screws. They can be sticked again below the SYSTEL IP ST. In order to fix the tablet, just loose the Allen screw located at the rear of the support, slide the tablet below the claws until it is centered (make sure that the controls and connectors are clear) and then re-tight the Allen screw while tightly holding the tablet with the claws until it is properly tightened. In order to adjust the tablet tilt, just use the hinge. In order to guarantee that the selected position is held, use the lever in the hinge itself while it is pressed towards its axis. You will notice that, this way, you can adjust the tightness of the hinge and hence its ability to hold a position once set. If you need to change inclination again, just loose the hinge using the lever to tilt the tablet, change the angle and then lock it again. 21 AEQ SYSTEL IP 3.1.2.5. Installing IP phones as an alternative to the analog SYSTEL IP HS handset. Instead of using handsets Systel IP HS, IP phones can be connected to the switch in the WAN port. In this case, each IP phone will take one of the available IP lines away. A standard SIP phone can be used as a handset, so the off-air talking function is obtained. Also, the phone keyboard can be used to make and transfer calls, and in certain situations the line can also be hanged up when the micro-telephone is hung. It must be installed in the same WAN network as the SYSTEL IP equipment, registering it in the system itself or in an Asterisk PBX, using the default 5070 port. The SIP Phone model approved for this function is CISCO 303. Using the IP Handset. It is similar to an analog handset with the following improvements, which are available provided that the HANDSET status is configured in the software. If the phone is hung, it will ring, and if it is not unhooked in a certain time, it will change to the WAIT status. When the phone is hung, the HANDSET will change to the WAIT status if it has any line assigned. Dialing. When in idle mode, an user can dial from the phone itself and will call using the first available line, changing to the on_handset status. Making a call from a specific line is also allowed, by dialing the line number, followed by the * separator, and the number to call to. Dialing by software will first force the assigned IP handset to call, and when it unhooks, it will dial from the line being used. If it doesn’t respond in a given time or it is not unhooked, the call will be made, but passing to WAIT status. Sending tones. When an IP handset is assigned to a line and it is connected, tones can be sent to the receiver by using the telephone keyboard. 22 AEQ SYSTEL IP 4. SETUP SOFTWARE. In this chapter the main features of the Setup software and control web server will be described. It operates on 32 and 64 bit Windows operating systems: Windows XP, Windows Vista, Windows 7 and Windows 8. Purpose: Configuration of the system and management of the contacts and call phonebooks. This software allows you to: - Assign audio circuits, handsets, IP phones and chats to the different studios exclusively. Rename circuits. Define and manage phonebooks, allowing the user to share, edit and copy them. Manage a call scheduler and “black list”. Set up the initial audio levels for each of the lines and each of the studios. Set up the format of the client screens, defining the number of lines per program, operation with one or several (up to six) call queues. Configure SIP for the communication with the IP-PBX proxy, gateway FXO, external IP telephony provider (via Internet) or internal (within a LAN or WAN). Configure multi-equipment operation: shares resources between the different equipment within a network. 4.1. Preparing a computer for setup and control of the system. Starting the application. Connect a computer with “Systel Setup” installed to the network. Click on the icon: The start up screen will appear. By default, the user is set to ADMIN and the password is empty. The user is encouraged to change it as soon as he is familiar with the application. After the application is open, just click on the first tab at the left and go to the SYSTEL IP Units option. Check that the autodiscovery has found your SYSTEL IP unit (or units, if you have more than one in the same installation). Accept on the discovered system and, if you don’t find it, please check that the network parameters of both the unit and the computer belong to the same network having in mind that the default IP address of the unit is: 172.26.36.250 in the case of Systel IP 4 and 172.26.35.250 in the case of Systel IP 12. 23 AEQ SYSTEL IP 4.2. SYSTEL IP SETUP: Description of the screens in the Setup application. After logging in as the ADMIN user (who has no password by default until one is defined), Systel IP Setup main screen is accessed. You can find a menu at the left with all the configuration options, divided in several groups: 1.- Systel IP Units: Basic information about the Systel IP units registered. 2.- Studio Wiring: Assignment of resources to the configured studios. 3.- VoIP: SIP parameters and SIP extensions for the Systel units registered. 4.- Security Level: The user groups are created here and their level of use privileges is defined for the configuration and user applications. 5.- Users: Management of user profiles to access Systel IP software. 6.- Programs: List of programs with their lines and users. 7.- Phonebook: Management of contacts for a Systel IP system. 8.- Main Screen: By clicking on it, main screen is returned from a configuration option. You can find two keys at the lower part of this screen. They are used to generate backup copies of the database and to restore them in case of need. 24 AEQ SYSTEL IP Also, a status bar can be found at the bottom of the screen where information about the software version, as well as the nickname and user level current logged in. 4.2.1. Systel IP Units. Systel IP is ready to operate as a multi-equipment system, sharing the same configuration and phonebook database. This window shows basic information about the registered Systel IP units, such as: - Device ID: device identifier. It will be automatically filled-in the first time the application connects to it, and is not modifiable by the user. - Name: name of the equipment. This name can be given as desired and changed at any moment. - Model: model of the Systel IP equipment. Once created, this field is not modifiable. By hovering the mouse cursor over the different registered units (“Systel IP List” screen area) we will see how the right side of the window displays information about the selected unit. Apart from the previously described basic information, we will also be presented the network configuration (LAN, WAN and Internal Network) for each piece of equipment. - LAN / WAN: Local network where we can have both control and SIP signaling configured. In case we want to make the control and SIP signaling networks different so that voice traffic doesn’t interfere with the local network, we must enable the WAN port; this way, we will have control in the LAN and SIP signaling for the voice traffic in the WAN (ADSL in some cases). - INTERNAL NETWORK: Determines the range of internal IP addresses defined in the equipment (4 in the case of SYSTEL IP 12 or 2 for SYSTEL IP 4). They are automatically determined, but in case of interference with other IP addresses within the network, it can be manually established. When done automatically, all four (or two) IP addresses will be computed from the LAN IP, by means of an algorithm guaranteeing that IP addresses are not repeated for different Systel IP units. If the manual mode is selected, the IP from which the rest of addresses are calculated must be specified in the “IP Subnet” field. WARNING: It is recommended that “INTERNAL NETWORK” is set as “Auto”. We should use the “Manual” mode for assigning IP’s only if the automatic IP generation creates any IP addresses colliding with any other equipment within the network. Also, none of them must be equal to the WAN address. 25 AEQ SYSTEL IP You can add new units manually or automatically from the “Systel IP Units” window, as well as modify or delete existing equipment. In order to add a new System IP system manually, use the “Add” button: a new window will appear that allows you to create a system from the scratch. The fields that must be filled in are: “Name“, “Model“, the values of the “LAN“ and “WAN“ fields, as well as the “INTERNAL NETWORK” selection and the possibility to use external AES external sync. In order to modify an existing Systel IP unit, use the “Edit” button: this button shows up the same window as the Add button, but all fields are already filled in with the actual information corresponding to the Systel IP unit you want to modify. 26 AEQ SYSTEL IP All the parameters can be modified, except “Device ID”, “Model”, “DIGITAL AUDIO” Input and Output types and the “INTERNAL NETWORK” mask. In order to save changes, click on: To cancel any changes, click on: If you want to delete one of the existing units, use the “Delete” button: In order to automatically add a Systel IP unit, use the “Auto Discover” option: by using this option, the Systel IP Setup software performs a search of all possible Systel IP systems within the network. The status of this process will be displayed in a new window that indicates the search time by means of a progress bar that will be filled in green while the process is being completed. IMPORTANT NOTE: The IP addresses and subnet masks of the computer must be within the range of IP addresses of the units to be discovered. The unit’s default IP address is 172.26.36.250 in the case of Systel IP 4 and 172.26.35.250 in the case of Systel IP 12. 27 AEQ SYSTEL IP Once the end is reached, it will indicate that the search has been completed and will show up a list with all the Systel IP units found in the network. At this very moment, the user can decide whether to add one or more of the discovered units (“Add unit” button) or recognize that some of the discovered units correspond to already existing systems (“Link to existing unit” button). 4.2.1.1. Synchronize configurations. From the “Systel IP Units” main window we can connect to the different registered Systel IP equipment. After we select the desired one, by clicking on the “Sync Configuration” button a new window will be accessed: 28 AEQ SYSTEL IP This window displays IP address and the name of Systel IP system we have connected with. At the left “Network” area, we can check all the network parameters we can configure under the “Systel IP Units” option. The values actually set up in the Systel IP we have connected to (“Systel” column) that are different to what’s stored in the software database (“Setup-BBDD” column) are displayed in red. At the right “VOIP” area, all the voice traffic configuration parameters are displayed. The values actually set up in the Systel IP we have connected to (“Systel” column) that are different to what’s stored in the software database (“BBDD” column) are displayed in red. In order to send the parameters selected by the check boxes from the Systel IP Setup software database to the selected Systel IP system, we will use the “Send Configuration” button: In order to read the values selected by the check boxes from the Systel IP currently connected and copy them to the Systel IP Software database, we will use the “Update Setup” button: If each and every value in the database matches those in the system, the verification checkbox cannot be activated and these buttons will not be shown. In this example, IP configuration data for the discovered Systel IP 4 must prevail in order to keep connectivity, while we will accept the values in the database for the “Rtp TOS” (packet prioritization), as it is more adequate. When all is synchronized, all the values in red will change to black. 29 AEQ SYSTEL IP 4.2.1.2. Updating the Systel IP unit firmware. We can connect to the different registered Systel IP units from the main “Systel IP Units” screen in order to update their firmware to possibly newer versions containing improvements, etc. By selecting the desired piece of equipment and clicking on the “Firmware” button a new window will be accessed: This window offers information about the current Firmware versions of the Systel IP system, besides the option to upgrade CPU, FPGA and VoIP modules to possible future versions including some kind of improvement in the operation of our Systel IP system. We will have access to the File Explorer by clicking any of those three buttons, in order to choose the corresponding firmware file to update. Files are located by default inside: C:\Program Files\AEQ\SystelIP\Setup\Firmware And new ones can be received from AEQ post-sales service or one of the authorized dealers. 4.2.1.3. “Adjust Gain“ window. By clicking on the corresponding button, we can access the window that allows supervision and configuration of the audio levels of the input and output lines of each Systel IP system. It displays and allows adjustment of: - Lines INPUT - OUTPUT: Input and output of each of the 12 IP phone lines (or 4 in Systel IP 4): input gain, input AGC reference level and output gain (*). - Feedback INPUT (program without phone lines) of the consoles in the different Systel IP studios: input audio level, activation and AGC reference level (*). - Queue OUTPUT: Output queues (audio from each Systel IP system to each of the phone faders in each studio). - Intercom INPUT - OUTPUT: Input and output to the different intercoms configured in the studios (*). The audio levels indicated with (*) are managed in parallel from the different user screens within the web control applications. The screen representation of each line includes a tri-color audio presence indicator. It also has a VUmeter icon that, when clicked in, sends audio from that line to a precision VUmeter located at the right side of the top of the screen. 30 AEQ SYSTEL IP Also in that top side you can find a box to fix the AGCs nominal levels and a button for general adjustment that will set up all the AGCs to the selected level. There is also an adjustment for the VUmeters integrating period and the persistence of the audio presence indicators to adapt the application to the preferences of the signal control, thus allowing the user to observe incidences without paying a lot of attention. 4.2.1.4. “VoIP Test“ window. By touching the corresponding button, the “VoIP Test” window is accessed, where it is possible to check the VoIP configuration directly on a unit, the one that is selected. This way, the system installer or maintenance technician can make sure that the configuration is correct, calls are made and accepted properly and audio is available in both directions. 31 AEQ SYSTEL IP IMPORTANT NOTICE: this tool shouldn't be used while the web server is running, as interference between the user's and the web server's operations may happen. All the telephone lines in the system are shown in the window (either 12 or 4). Each line is represented in a row including 8 fields: The first field, that has no header, will show the pencil symbol when a line has been configured from this same window. This symbol will disappear when the line is left without configuration again. The second field, “Line”, corresponds to the equipment’s IP line number (from 1 to 4 for SYSTEL IP 4 and from 1 to 12 for SYSTEL IP 12). The label will have a blue background if the line has nothing assigned (neither an extension nor an IP handset) when the window is accessed. On the other hand, it will have red background when something is assigned to the line at that moment. The third field, “SIP Extension”, corresponds to the SIP extension configured for the line, according to the explanation to be provided in chapter 4.2.3 in this manual. Alternatively, a SIP Handset can be selected for the line instead of a SIP extension. The fourth field consists on a button that allows the user to apply the configuration selected in the former field (extension or handset) to the line. When this icon is colored, a new configuration is pending. After applying the configuration, the icon will turn transparent. The fifth field is the lock button, giving access to the extension authentication data configuration screen. Basically, the user and password for the selected extension can be modified in this screen, just in case they were not correctly configured. The sixth field, “Line Status”, represents the status of the line during the test process. 32 AEQ SYSTEL IP The main possible states are: • Extension connected to a phone number, with a coding algorithm, just as the first example of the attached image. • OK, ready to test as in the 2nd, 3rd and 4th example. The extension associated to the line is highlighted in green. This green label appears when the user selects an extension different to the configured one, but the change has not been applied yet. This way, it is indicated that the appearing status corresponds to the currently configured extension, and not to that selected in the corresponding field. • Not associated to any extension or IP handset. • Line connected to an IP handset, with a coding algorithm, as in the sixth example of the attached image. • Incoming call indicating, for extensions, the incoming number, and for IP handsets, the number dialed by the user. • Calling a phone number. The states corresponding to a number being dialed, and when the remote phone is already ringing waiting for reply, are distinguished. • Line error (the extension cannot correctly register in the PBX, etc). A field that might contain complementary information is displayed in the lower part of the screen when clicking on the blue icon. The complete states list for the test calls made from this screen is equivalent to the call states list from the Real Time Operating software. It can be looked up in chapter 5.6.2. The seventh field, “Last Call”, provides details about why a line test failed. A field that might contain complementary information is displayed in the lower part of the screen when clicking on the blue icon The eighth field, “Action”, displays, for each line, a button to execute the suggested action to be performed on that line to continue with the test. Operating procedure. Any SIP telephony extension or any IP handset from those registered in the data base can be selected for each of the lines by the technician. When an extension or handset is selected for a line, the user will see how the line status changes in the screen while the necessary operations are performed (registering the extension in the SIP server, etc.) In case that an authentication error is produced, the technician is able to modify the extension data (Auth. Id and/or Password), and check whether the issue gets solved or not. When other kinds of errors occur (no response from server, etc), it will be necessary to return to the VoIP configuration, check the parameters and synchronize the system with the database again if any of them is changed. 33 AEQ SYSTEL IP If the line status turns to OK, an outgoing call can be made by clicking on the “Call” button appearing on the line itself. A window that allows the user to select the intercom (handset) device to be used and dialing a destination number will show up. The intercoms list will contain those devices configured for the studios and created in the equipment we are testing with. On the other hand, the system will only list the studio IP handsets assigned to one of the system lines in this moment. Whenever an incoming call is received, the corresponding line status will change to “INCOMING CALL”, and the user can choose whether to accept or reject it. The call window allowing for the selection of the available intercom device and user will appear in the same way. The operations that can be carried out with IP handsets are: connect, disconnect and accept incoming call. When the user selects “connect”, the system will send the call to the IP handset according to the configuration present in the database. The system hangs the call to disconnect. 34 AEQ SYSTEL IP 4.2.2. Studio Wiring. Window that allows assigning resources to each studio configured in the Systel IP unit. Shows a list with the currently existing studios and the unit each one is assigned to, allowing for the creation of new studios (up to a maximum of 4 per Systel IP 12 or two for Systel IP 4), the modification of existing ones or the deletion of one or more studios previously configured. Every studio needs to have the following resources configured: - QUEUE: These are outputs from the Systel IP system to console inputs or faders. They can be analog or digital. We can have up to 6 queues per studio with Systel IP 12 or up to 2 with Systel IP 4. - FEEDBACK: These are inputs to the Systel IP system, coming from an auxiliary output (without phones) from the console. These inputs can be analog or digital and we can have only one per studio. - INTERCOMs: These are inputs/outputs to the system to be able to talk off-air with the calls, up to 4 per studio. We can use the inputs/outputs available in pairs for the Intercom. That is, if we for example select the Digital 1L input, that’s only because the partner lines (Digital 1R input, Digital 1L output and Digital 1R outputs) are free, as they have not been used for QUEUE or FEEDBACK. Whenever at least one of these signals is used for QUEUE or FEEDBACK, the other three won’t be available for INTERCOM. The Studio Name and Systel Name fields are located in the left area of the screen. Creation, deletion and modification (renaming) is allowed for studios corresponding to a Systel unit. You can find three units in this example: SYSTEL IP1, SYSTEL IP2 and SYSTEL IP 4 SMALL STUDIO. “Add” button has been clicked while SYSTEL IP1 was selected, and now we can create a 4th studio that we will name STUDIO_4. The right side of the screen shows the fields corresponding to the wiring assigned to the studio highlighted in the left list: “Name”, ”Mode”, ”Input-Name”, ”Output-Name” and ”Pos”. In case that the selected studio has resources that are pending configuration, warning messages will appear in that area: 35 AEQ SYSTEL IP In that area we can create, delete and modify the wiring to the corresponding studio. In the example, STUDIO_1 (DIGITAL WIRED) corresponding to the SYSTEL IP1 unit, contains seven circuits: In order to add new resources to the selected studio, the “Add” button should be used. This will show a new window up that shows us all the options to assign resources: If the “QUEUE” option is selected, only output selection will remain enabled. The drop-down menu shows us only the available outputs. We can choose the one we want and define by means of the “Position” field the number of queue or Fader within the studio. Once “QUEUE” resources, queues or outputs from the SYSTEL system to the studio, are configured, we need to configure “FEEDBACK”, in order to establish the input circuit to the SYSTEL unit from the studio being configured. 36 AEQ SYSTEL IP The drop-down menu will show in this case only the available inputs. We can choose the one we want. Last, we need to configure “INTERCOM“, in order to define the bidirectional intercom circuits between the different operators and studio producers and the SYSTEL system. In this section, we need to decide whether an intercom circuit is created on one of the 4 remotely-powered HANDSET terminals for the SYSTEL IP HS, or alternatively we want to use a pair of analog or digital input and output at the console to connect a generic intercom terminal with analog or digital audio input & output, or using IP phones as intercom terminals, renouncing to an external IP line for each intercom created on an IP phone. The drop-down menu will show the available input/output pairs. We can select the desired one. If the “Intercom” option is selected, both inputs and outputs will be enabled. The drop-down menus will show the available inputs/outputs for this resource, filtering those that are already being used. It makes no difference to select from the list of inputs or outputs, as both of them are configured simultaneously from any of these lists. 37 AEQ SYSTEL IP 4.2.2.1. SYSTEL IP 12 wiring configuration examples. Let’s assume that we have a 12-line unit called SYSTEL IP1 STUDIO_1 (DIGITAL WIRED) It contains two queues (QUEUE positions 1 & 2) being output by the SYSTEL IP1 system through the Digital Output 1 wire, that is sent doubled to the console input channels 1 and 2. The console will be setup so input 1 contains left channel and input 2 contains right channel. A console auxiliary output is sent to Systel’s Digital input 1, which will incorporate the program audio without telephones (FEEDBACK) through Digital Input 1L. HANDSET 1 & 2 are wired to provide Intercom to the producer and studio operator. STUDIO_2 (DIGITAL) It has two queues (QUEUE positions 1 & 2) being output by the SYSTEL IP1 system through the Digital Output 2 wire, that is sent doubled to the console input channels 1 and 2. The console will be setup so input 1 contains left channel and input 2 contains right channel. A console auxiliary output is sent to Systel’s Digital input 2, which will incorporate the program audio without telephones (FEEDBACK) through Digital Input 2L. HANDSET 3 and 4 are wired to provide intercom to the producer and studio operator. STUDIO_3 (ANALOG 6 QUEUES) It has six queues (QUEUE positions 1 to 6) being output by the SYSTEL IP1 system through six analog wires (Analog Outputs 1 to 6) to the input channels 1 to 6 of the console, that has these inputs configured in mono. A console mono auxiliary output is sent to Systel’s Analog input 1, which will incorporate the program audio without telephones (FEEDBACK) through Analog input 1. Analog inputs and outputs 7 and 8 of the SYSTEL unit are wired to provide Intercom to the producer and studio operator through generic intercom systems, that in the case of the operator, can be substituted by an analog input of the console, deviated to CUE, and an auxiliary output of the console connected to a talkback key. 38 AEQ SYSTEL IP Let’s assume that we have another 12-line system called SYSTEL IP2 STUDIO 21 It contains two queues (QUEUE positions 1 & 2) being output by the SYSTEL IP2 system through two analog wires (Analog Outputs 1 and 2) to the input connectors corresponding to channels 1 & 2 of the console, that uses these inputs as mono. A console auxiliary output is sent to Systel’s Analog input 1, which will incorporate the program audio without telephones (FEEDBACK) through Analog input 1L. Analog input and output 7 of the Systel are wired to provide Intercom to the producer and studio operator, wiring the input to a console input and the output to a talkback output. HANDSET 1 is wired to provide Intercom to the studio producer. STUDIO 22 It has four queues (QUEUE positions 1 to 4) being output by the SYSTEL IP2 system through Digital Outputs 1 and 2, sent doubled to audio inputs 1 & 2, and 3 & 4. The console is configured so inputs 1 & 3 carry left channel and 2 & 4 carry right channel. A console mono auxiliary output is sent to Systel’s Digital input 1, which will incorporate the program audio without telephones (FEEDBACK) through Digital input 1L. Analog inputs and output 3 of the SYSTEL unit are wired to provide Intercom to the studio operator, wiring the input to a console channel and the output to a talkback output. HANDSET 2 is wired to provide Intercom to the studio producer. STUDIO 23 Its resources are configured the same way as Studio 22: It has four queues (QUEUE positions 1 to 4) being output by the SYSTEL IP2 system through Digital Outputs 3 and 4, sent doubled to audio inputs 1 & 2, and 3 & 4. The console is configured so inputs 1 & 3 carry left channel and 2 & 4 carry right channel. A console mono auxiliary output is sent to Systel’s Digital input 3, which will incorporate the program audio without telephones (FEEDBACK) through Digital input 3L. Analog inputs and output 4 of the SYSTEL unit are wired to provide Intercom to the studio operator, wiring the input to a console channel and the output to a talkback output. 39 AEQ SYSTEL IP HANDSET 3 is wired to provide Intercom to the studio producer. STUDIO 24 It contains two queues (QUEUE positions 1 & 2) being output by the SYSTEL IP2 system through two analog wires (Analog Outputs 5 and 6) to the input connectors corresponding to channels 1 & 2 of the console, that uses these inputs as mono. A console auxiliary output is sent to Systel’s Analog input 5, which will incorporate the program audio without telephones (FEEDBACK) through Analog input 5L. Analog input and output 8 of the Systel are wired to provide Intercom to the producer and studio operator, wiring the input to a console input and the output to a talkback output. HANDSET 4 is wired to provide Intercom to the studio producer. 4.2.2.2. SYSTEL IP 4 wiring configuration examples. Equipment shared between two studios Have in mind the limitations stated in chapter 2.1.2.4 of this manual: “Audio input and output 1 (AUDIO 1) is programmed from factory as AES/EBU. If they need to be connected to an analog system, the unit must be open and the corresponding jumpers must be changed. Handset 2 port will become disabled”. We are going to program audio 1 inputs and outputs as Digital, what allows us to share the unit between two studios. STUDIO SMALL1 It has one queue (QUEUE 1) that is output by SYSTEL IP 4 through Output 1, internally programmed as Digital. It is routed to the input connector of Channel 1 in the console, which is configured to receive the left channel. A console auxiliary output is sent to Input 1 of the Systel, internally configured as Digital. It will contain audio program without telephones (FEEDBACK) in Digital Input 1L. HANDSET 1 is wired to provide Intercom to the studio operator. STUDIO SMALL 2 It has one queue (QUEUE 1) that is output by SYSTEL IP 4 through analog Output 3. It is routed to the input connector of Channel 1 in the console that is configured as mono. A console auxiliary output is sent to Input 3 of the Systel, internally configured as Digital. It will contain audio program without telephones (FEEDBACK) in analog format. HANDSET 2 is wired to provide Intercom to the studio operator. If desired, a 2nd queue can be added in the analog studio through output 2. 40 AEQ SYSTEL IP System used in a single studio. Digital console If the studio is digital, we can have 2 handsets and 2 queues as depicted in the previous figure. It contains two queues (QUEUE positions 1 & 2) being output by the SYSTEL IP 4 system through the Output 1 wire, programmed as digital. It is being sent doubled to channels 1 and 2 of the console, configured so that input 1 receives left channel and input 2 receives right channel. A console auxiliary output is sent to Systel’s input 1, configured as digital, which will incorporate the program audio without telephones (FEEDBACK) through Digital input 1L. HANDSET 1 and 2 are wired to provide Intercom to the studio producer and studio operator. System used in a single studio. Analog console, one or two queues, 2 handsets If the studio is analog, then we can have 2 handsets and a queue as depicted in the image above. It contains one queue (QUEUE position 1) being output by the SYSTEL IP 4 system through the Output 3 wire, that is sent to channel 1 of the console, configured so that input 1 receives mono audio. A console auxiliary output is sent to Systel’s input 3, configured as digital, which will incorporate the program audio without telephones (FEEDBACK) through Input 3. HANDSET 1 and 2 are wired to provide Intercom to the studio producer and studio operator. Also, a 2nd queue can be created using Analog 2. System used in a single studio. Analog console, up to three queues, 1 handset If the studio console is analog and we use only one handset, up to three queues can be created. Note that this is not practical as the system capacity is up to 4 simultaneous calls. 41 AEQ SYSTEL IP 4.2.3. VOIP. The VOIP (Voice over IP) menu allows the user to configure the parameters associated to the IP telephony system. These parameters will be directly applied on the Systel IP units. By default, the application will apply the same VoIP parameters to all the systems. If different parameters are required for some of the Systel IP units, then the “Customize Units” option must be used. This function allows unlocking the parameters of one unit and defining particular values for it. In order to correctly configure these parameters, that are provided pre-configured from factory, requires some knowledge of IP telephony. If changes are required, please consult your local support on IP telephony first. 42 AEQ SYSTEL IP The left area of the screen (“Common SIP Parameters”) presents the parameters that can be configured regarding both IP audio and SIP signaling: Audio Codecs Order: This allows the user to specify the priority applied to choose an audio codec, when a unit negotiates the coding with the other end of the call. This way, a coding scheme close to the user preferences will be selected. G.722 coding is the one providing the best voice quality, while G.729 uses the lowest bandwidth. The rest of audio coding algorithms provide an intermediate compromise between quality and bandwidth and are included to improve compatibility with equipment from different manufacturers. SIP Server Host: Name or IP address of the SIP server. The SIP server is an application or device from which we receive incoming calls and to which we will send outgoing ones. It is so called because it uses SIP call signaling protocol. Some examples are: SIP PBX (Asterisk or similar), gateways between traditional phone systems (analog, ISDN, GSM, etc.) and SIP telephone systems, and VoIP providers using SIP (either through Internet or dedicated networks). SIP server Port: Port the SIP server listens to waiting for SIP packets. The most commonly used port for SIP signaling is 5060. Register: This parameter specifies whether it is required or not that the system registers each telephone extensions into the SIP server in order to be able to send and receive calls to/from it. We will find the need to register extensions or not depending on how we want the SIP server and the equipment to interact: how does the SIP server know which IP and port is our system listening to waiting for calls? The system can either register its SIP IP and port, or alternatively the server will have our IP and port linked to the extension number/name by configuration. Do the systems within the network have dynamic or fixed IP addresses? If it is fixed, it is more practical and reliable to configure than to use registering. If they are dynamic, it is better to require registering. Registry expiration: Time, in seconds, that the registering will remain valid in the SIP server before expiring. The system must periodically refresh the registration before this time expires. A longer time allows for a reduction in used bandwidth, while a lower time provides the communication between system and server with better reliability (in case the server is rebooted for some reason and it loses registration information, the system will remain unregistered until it refreshes this registration). The typical value for the registration expiration time is 1 hour. Advanced settings. By clicking on this button, some advanced configuration parameters are accessed: - SIP Local Port: The most commonly used is 5060. - RTP Local Ports: Range of ports that the system can use for audio traffic, using RTP protocol. A total of 24 ports must be configured for Systel IP 12 and 8 for Systel IP 4. IMPORTANT NOTE: In case that NAT is used, the network administrator in the Systel side must configure a PORT FORWARDING from the router to the Systel IP private address, indicating the same port range that the Systel RTP ports range. - Call Transfer DTMF Tones: This option must be configured when the SIP server implements call transfer between extensions (typical in SIP PBX). The DTMF sequence to be sent to the SIP server as a prefix to indicate the call transfer from one line of the system to other extension is defined here. This sequence is *2 in Asterisk PBX. - Buffer Size: This is the max size, in milliseconds, of the audio receive buffer. This value directly influences the audio delay. If the network presents a large jitter value, the buffer size will need to be larger in order to avoid packet loss and hence audio cutouts. The better the network connection is (and so the lower the jitter), the smaller the buffer size can be, and as a result the delay in the reception of the voice will be shorter. - Packet Size: Determines the quantity of audio, in milliseconds, that is transmitter in each of the IP packets. The larger this size is, the longer audio cutouts will be in case a packet is lost, but the lower the overhead in consumed bandwidth is. In the end, it is a trade-off between audio cutout length and bandwidth overhead. 43 AEQ SYSTEL IP - QoS: This is a service-type field (DSCP) in the IPv4 header. That is, this is a value that is included in this IP header whose function is to distinguish between voice packets and the rest when QoS (Quality of Service) policies are to be applied. The recommended value for real time audio transmission is 46. - NAT Traversal: Establishes the mode the system works whenever a SIP server that is in Internet needs to be accessed from a local network. In that case, the SIP server must know the public IP address of the router the system is behind of, and the port the SIP calls must be sent to so they reach the Systel system. The NAT mode determines how to indicate the SIP server the equipment’s public IP and port. The admissible values are: • • • off: this is the value to be set when NAT is not used, that is, when both the system and the server can communicate with each other directly without a router in the middle that translates public addresses to private addresses. auto: this option should be activated when NAT can occur and the system is registering extensions in the SIP server. In this mode, the Systel will analyze the server’s replies to the register messages in order to get its public IP and ports. If the SIP server doesn’t have the keep-alive sending option enabled to the registered equipment, then the Keep Alive sending option must be activated in the Systel. static: this mode should be selected when NAT can occur and the system doesn’t register its extensions in the SIP server. In this case, the use must configure the SIP server’s public IP address and its local SIP port. IMPORTANT NOTE: In this case, the network administrator in the Systel side must configure a PORT FORWARDING from the router to the Systel IP private address, indicating the same ports that the equipment local SIP port. All these parameters are common for all the Systel IP equipment registered in the Systel IP Setup software. They are provided pre-configured from factory for the most common work situations. If a specific configuration is required for any of the Systel IP units, we must click on the “Customize Units” button. A new window will appear in the right area of the screen. This window offers the user the possibility to customize the parameters for the units selected in the lower right area of the screen; in addition to the previously described parameters, a new one appears: - Outbound Proxy Host: Optional field containing the name or IP address of the SIP signaling Proxy server, which allows the system to reach Internet in case the network administrator so decides. In general, Proxy servers act as mediators between clients and servers. Most typical Proxies are the ones used in HTTP to browse Internet and SIP for IP telephony. By means of the Proxy servers, network administrators have a better control on how Internet is accessed from the equipment within the network. The “Close Customize Units” button allows you to close this new window: 44 AEQ SYSTEL IP This new window shows the configuration for the selected Systel IP unit. This configuration will be as specified in “Common SIP Parameters” as long as the “Common Parameters SIP” checkbox is checked, showing all the information dimmed as it cannot be modified. In order to be able to modify and individually configure a Systel IP unit, we must uncheck that box: this will enable the modification of every configuration parameter, which we will be able to modify to the desired values. After the desired parameters have been modified, you can confirm those changes by means of button or cancel them by pressing the button (in that case the “Common the Parameters SIP” checkbox is activated again and all the parameters will return to the default values). SIP Extensions. The top right area of the initial window (you can access by pressing the “Close Customize Units” button) allows for the configuration of the system SIP. These extensions will be assigned and released in the different Systel IP system as the different programs start and end. At any given moment, a system will have the configured extensions for the programs currently running in the different studios the system provides service to. An extension can be available for a system during the morning, and for another one in the afternoon. We can create as many SIP extensions as required in this section, but have in mind that during operation up to 12 lines can be assigned simultaneously to one or more programs in each SYSTEL IP 12 unit, or up to 4 lines in SYSTEL IP 4. Also, have in mind that a SIP extension may have one or more assigned lines or simultaneous calls, up to 12 or 4 depending on the system model where the extension has been created. Each SIP extension corresponds with an individual line or line group identifier number in a SYSTEL unit. Depending on which SIP server the Systel extensions are registered in, a name and password may be necessary. 45 AEQ SYSTEL IP SIP Handsets. The SIP handsets in the system are configured in the lower right area of the window. These SIP handsets are standard SIP pones (or any other audio device implementing SIP) to be used as intercom devices, so that the system operators can communicate with the callers using them. Only those SIP phones registered in the Systel IP database will be allowed to make and receive calls. Systel IP equipment defines a specific SIP port for IP handsets, different to the SIP extensions SIP port. By default, this port is 5070. This way, any IP phone to be used as IP handset needs to use the following proxy server: <Systel IP “LAN” port IP address>: 5070 This means that each IP handset will be tied to a single Systel IP unit. The registration of the IP phones in the Systel IP as if it was a proxy is completely optional. If it is going to register, then it will be enough to configure its user name in the database. If, on the other hand, it won’t register, then its IP address and SIP port need to be configured in the database as well. Whenever the SIP phones can have a fixed IP address, it is recommended that they don’t register in the Systel IP system but then their IP addresses will have to be configured in the database. All the IP handsets to be used will be created one by one in this section. The “Studio Wiring” section will allow for the association of the IP handsets to the studios. These are the parameters that can be configured for each IP handset: - User name: User name configured in the SIP phone. This field will be commonly required. However, if the particular SIP phone admits calls simply directed to its IP address and SIP ports, without the name being specified, then it will be possible to leave this field blank. This field will be, however, necessary if the Host field is not filled in. - Host: SIP phone’s IP address or host name. If the SIP phone registers in Systel IP as if it was a proxy, then this field may be left blank, as the User Name will suffice. At this moment Systel IP doesn’t implement NAT traversal aids for the IP handset, so they won’t work properly when routers implementing NAT have to be crossed (this is common when accessing through Internet). 46 AEQ SYSTEL IP - Port: Telephone’s SIP port (only UDP is supported), through which the phone receives the IP messages. The standard SIP port, 5060, will be adequate in most cases (depending on the SIP phone). - Auth. Password: Password required to the SIP phone when it tries to register in Systel IP. This field is currently unused, as authentication of users registering in SIP is not implemented. - Auth. Id: User name associated with the password requested to the SIP phone when it tries to register in Systel IP. This field is currently unused, as authentication of users registering in SIP is not implemented. - Line Number: Line number, from the 4 or 12 available ones (depending on the Systel IP type) where the IP handset will be configured. This parameter is used to fix a certain IP handset to a given SIP line of the Systel IP system. If the value “0” is configured, then a line will be automatically selected among those free in the moment when the IP handset is used. The value “0” is recommended. 47 AEQ SYSTEL IP 4.2.4. Security Level. This screen allows the creation and management of the user groups. A user group is characterized by a set of restrictions to the rights giving access to some functions of the configuration and real time operation applications. The admin level has all the access rights and cannot be edited or deleted. All other user groups and security levels can be modified and/or deleted. The lower part of the screen shows the editing tools. By hovering the mouse cursor over each button, a label briefly indicating its function will appear: Allows you to insert a new user group. Allows you to delete a user group. Allows you to modify a user group. Allows you to save modifications to a user group. Allows you to discard modifications made to a user group. Allows you to refresh modified data. Confirmation is required in order to delete an existing user group: 48 AEQ SYSTEL IP 4.2.5. Users. This screen gives access to creation and management of users. An user is an individual person that takes part in a group and has a set of restrictions in his/her rights to access some parts of the configuration and real time operation applications defined by the groups it belongs to. The ADMINISTRATOR user, with ADMIN login, cannot be edited or deleted. All other uses can be modified and/or deleted. Confirmation is required in order to delete an existing user. Users can be created without filling in the password field. Consequently no password will be required in the application for this user. The lower part of the screen shows the editing tools. By hovering the mouse cursor over each button, a label briefly indicating its function will appear: Allows you to insert a new user. Allows you to delete a user. Allows you to modify a user. Allows you to save modifications to a user. Allows you to discard modifications made to a user. Allows you to refresh modified data. Confirmation is required in order to delete an existing user: 49 AEQ SYSTEL IP 4.2.6. Programs. This screen allows for the creation and management of the programs that are going to use certain shared Systel resources. From this Windows we can add, modify and delete programs. When selecting an already created program, we can see which users are authorized to operate it. Some users can be deleted and different users can be added from the general user list available in the lower left area of the window. In order to assign the different phone extensions each program will be able to use during its broadcasting, we will use the drop-down menus located in the “Extension” column (in “Incoming Calls” area), where all extensions present in the system are listed. We will define the number of audio lines (simultaneous calls) required in the program for each selected extension. The maximum simultaneous number of lines for a same call is 12 if our equipment is Systel IP 12, or 4 in case it is Systel IP 4. 50 AEQ SYSTEL IP 4.2.7. PhoneBook This menu option allows the user to manage the phone contacts and define the calls schedule. In order to manage the phone contacts of a Systel IP system, we rely on a general Phone book “General Phone Numbers”, a temporary call phonebook to make during the program “Programmed Phone Numbers” and a particular phonebook per program called “Programs Phone Books”. Besides, there are some tools available to ease the management of phonebooks and exchange information among them. The right side of the main screen shows the “General Phone Numbers” area, a general agenda containing all the telephones for all programs in the station. Numbers in the black list are displayed in grey (they can be hidden by means of the “View” tab located in the top right side). This same area displays some icons to add, modify or delete a telephone number from the general list. Modifications will take effect on the rest of agendas using this contact, too. Before deletion really takes effect, a window that requires confirmation and informs about which particular phonebooks for each program contain this contact is displayed. By placing the mouse cursor on a contact, a list will appear on the lower right area displaying all programs containing it. 51 AEQ SYSTEL IP In the Phonebook management main screen’s left area we can find a list including all the programs of the station. By clicking on each of them a list with all the contacts that his program includes is displayed at the bottom left area. We can always feed this list by passing contacts from the general agenda using the green arrows: Also, we can add contacts to a program phonebook massively by copying them from another program by using the option: We can find the “Show Phone Numbers Programmed” button at the top area of the “Programs Phone Books” window, next to the “Merge Phonebook” button. It displays a list with the contacts a program will call as it progresses during its broadcasting. We can add, modify or delete contacts from this list in the same way we could do with the general phonebook. This phonebook allows us to organize the calls schedule to be made during the program broadcasting. Each program will have its own programmed numbers list. This window shows us which contacts are in the program phonebook, as well as the name, number and precise time the call will be launched at. 52 AEQ SYSTEL IP We can change name, number and call time of a programmed contact: 53 AEQ SYSTEL IP 4.2.8. Saving and restoring the database. The software includes a tool designed to manage backup copies of the data base or copy systems during the deployment of a SYSTEL IP system in several production centers. This tool is accessed from the last menu option: By clicking on “Backup database” button a new window will open allowing you to choose the backup file name and the folder to be stored: By clicking on “Restore database” button you can load a backup file previously stored. Confirmation is required: 54 AEQ SYSTEL IP 5. CONTROL TERMINAL BASED ON WEB BROWSER. SYSTEL control includes a Web server that allows real time control and agenda creation remotely from different work places, with hierarchical organization, organized to achieve a high productivity and operation error prevention with the help of a standard web browser (we can guarantee compatibility with at least one browser for each of these operating systems: Microsoft Windows and Apple iOS). 5.1. Web Control Client functional description. - Make calls: by dialing numbers, SIP identifiers or phonebook entries. Send a visual and acoustical RING signal. Display call identifier/number for the incoming calls. Answer incoming calls both manually and automatically. Save new contacts to the phonebook. Talk by using a micro-earphone or micro-headphone to the person at the other end of the line. Place calls on-hold, while they can listen the program. Place calls on-air so they can contribute to the program. Send the signal to any of the PFL (pre-fader listen) circuits defined in the studio, in order to listen to the talker at the phone without putting him/her on air. Send the signal to any of the Auxiliary circuits defined in the studio, in order to make recordings on a device or make a “party line” with the lines connected to a same Auxiliary circuit. Change the input and return levels to any of the studio telephone lines. Display the status of any telephone line and where it is being routed to. Distinguish between the producer, operator and presenter roles: label calls, chat between the different controllers assigned to a program. 5.2. How to access: In order to access the control terminal, the IP address and port (288 by default) of the computer where the web server is installed must be typed in the URL bar of the browser, for example: http://172.26.5.32:288. If the server is installed the same machine where the browser is running (most likely if there is only a single studio) you can type localhost:288. The login screen will show up: By the fault, the user name is ADMIN, with an empty PASSWORD. You should add a password to the Administrator user (ADMIN) and create users and user groups depending on the roles of people in the station. As an example some users and user groups are already created, all of them without password. Once you have been given access, the system will inform about the active Systel system for the studio we are now, and allows us to choose the studio, program and intercom names: 55 AEQ SYSTEL IP If more than 30 seconds elapse before entering the studio, program and intercom name, the browser will disconnect from the system and it must be re-opened. Make sure to choose the intercom actually associated to the work place where the application is being open; otherwise you won’t be able to communicate with the studio partners. If the system doesn’t allow opening of the requested program, this may be because another studio is already using the lines we are specifying. We can then go to “Lines & Studio Ctrl” and close the program using those lines that could have been left open inadvertently: 5.3. Program operation window Programs are controlled in a work screen with several variants depending on the number of lines and console faders used: 56 AEQ SYSTEL IP The former screen manages 12 lines and six faders. You can see one or two individual windows for each line at the left. Up, at the right, the queues for the calls to be sent through each fader are located. At the right, in the middle, the “Reject Calls” and “Menu” buttons are available. At the bottom right, when idle, the Chat window for studio operators can be found, and above it, dynamically, the Call, Phonebook, level adjustment and menu option windows will be temporary presented. At the bottom, a status bar is presented. Main screen variations are: - Individual windows for configurations between 1 and 12 lines. The screen is resized for the available number of lines: - Configurations for one, two and up to 6 faders. A call queue is established on each fader. - When two or more faders exist, one of them can be locked as VIP (pink color) to make it stable on air meanwhile the rest of calls give pass to the following one in the rest of faders. 57 AEQ SYSTEL IP - The different variables are filled in by default or can be preconfigured by the Windows Setup application and can be called from the menu option “Change Program & Studio”. - From an operative point of view, there are sub-variations depending on the work role of each person involved in the system operation. For example: producer, controller and presenter. Their visualization and operation rights are preconfigured, although they can be changed using the Setup software. 5.4. Control screen right common area: general controls. 5.4.1. Call queue control window. It is possible to configure the audio outputs and application operative logic within the Setup Software in order to use 1, 2… or up to 6 faders where the queue-ordered calls will be distributed. Once calls are classified, the operator will queue them. By clicking on the red button with an arrow on it, the next call in the queue will be put on air in its corresponding fader. When a call is put on air, the former one is removed from the program and becomes on hold unless it is protected by a lock symbol. In this case, it won’t be removed from the program and the new call will interact on air with it. 5.4.2. Reject Calls and Menu buttons. Reject Calls: This button locks incoming calls in the system in order to choose a new program or avoid listeners to enter too early in a call program. When clicking on it, both the Reject Calls itself and the unhook buttons of the affected lines (depicted here) change to orange color. When clicking on it again, the system remains unlocked. Menu: Gives access to the complementary options of the operation window: • Chat Font Size: Adjusts the font size for both the general chat and the field that contains observation about the partner at each line. • Auto Answer: Puts the system in auto off-hook mode. 58 AEQ SYSTEL IP • Handset Level: Adjust the microphone and ear set level for the operator. Presents adjustment faders as well as input and output Vumeters and numbers representing the actual gain. When working with a mouse, the level can be adjusted by simply dragging the cursor over each volume potentiometer. When working on tactile screens, it may be more accurate to touch the “+” and “–“ buttons associated to each gain control. Click on “Back” to leave the “Change Level Handset” screen. • Change Program & Studio: Permite salir de la aplicación y reiniciarla en otro escenario de trabajo. Se solicita confirmación: • Close sesión: Permite salir de la aplicación. También se solicita confirmación. • Back: Permite volver a la pantalla de trabajo. 5.4.3. General Chat By clicking on the window located just below it, messages can be typed in. If the position is not equipped with a keyboard, an onscreen virtual keyboard will appear so the user can type with it. Everything that is written here will become available to all program users. There are also a scroll bar and an Accept button. 5.5. Control screen left area: Individual line control window. Each line is managed from this window. At the left, the operator’s line unhook and hang-up buttons, as well as the incoming or outgoing call, line number and send / receive levels indicators are presented. Below that, in the center, the main line status indicator together with a timer indicating how long that line has remained in that status, etc. can be found. Up in the middle the partner name editable field is displayed, and below it, the operator’s partner observations field is available. The four active line management buttons are located at the right: lock, “WAIT/ON AIR/QUEUE”, “LEVEL” and “Queue”. 59 AEQ SYSTEL IP 5.6. Detailed description of the line control windows: buttons, indicators and fields. 5.6.1. Operator phone: Procedure to make and receive calls. Operator phone ready to make or receive calls. When an incoming call is received, these two images appear alternately, meanwhile an acoustical warning is produced in the PC or tablet). Unhooked telephone, ready to talk to the partner. When a call is received, just click on the blue, intermittently star surrounded telephone icon and it will be passed to the operator’s handset or intercom. When the call is ON WAIT or ON AIR, the key will remain green, inviting the user to click on it to recover the call for the operator. When the call is established, the icon includes a small red, upwards pointing arrow indicating that the call is outgoing, or a downwards pointing green arrow when the call is incoming. Making a call: If a call is not present or being received, the icon will be blue: when clicking on it, a “Call Menu” window will be accessed in order to enter a phone number or URI. A common area at the top allows dialing numbers or URI that are not in the phone books: By composing the number or URI with the “Phone Number” window’s keyboard, or by clicking on the keyboard icon at the left so a numeric keyboard appears that allows the user to compose the phone numbers. After that, confirmation is provided by clicking on the green phone button. There are three different possible windows that allow to call phone numbers, URIs or contacts that are stored in the phone books, which can be changed by clicking on the lower tabs: Program Phone Book Programmed Phone Calls Redial List 60 AEQ SYSTEL IP Program Phone Book: This is the phone book for the active program. It is managed in the telephone menu of the configuration and scheduling application. Its fields are name and number. Call by clicking on the yellow telephone after selecting one of the contacts. Programmed Phone Calls: This is the planned call scheduling for the currently active program. It is managed in the telephone menu of the configuration and scheduling application. Its fields are: scheduled call time, name, lock icon (avoiding its deletion after the program ends), completed call icon and program agenda call icon. In order to mark a scheduled call as protected, select by clicking on it, and then click on the locked folder icon. This will activate the lock icon: Call by clicking on the yellow telephone after selecting one of the contacts. Redial list: This is the list of last calls made (red, upwards pointing arrow), or received (green, downwards pointing arrow). It performs two functions: recall by clicking on the yellow telephone, or feed the phonebook by means of the “Save” button. Adding new contacts to the phonebook: it is possible to store the numbers to/from we have called/being called as new contacts by means of the “save” button of the Redial list. Just click on a phone number from the list (not a previous contact), click on this button, and a new window opens that allows the user to fill in the new contact name, which can be immediately stored or sent to the “black list”. 5.6.2. Line number indicator. Also close to this key, the SYSTEL line number is presented (from 1 to 12 in Systel IP 12 and from 1 to 4 in Systel IP 4). 5.6.3. Send / receive level indicators. Another feature that is included in this key is the presence of two tri-color LEDs that indicate the line input and output levels. They can be adjusted by means of the LEVEL key. 5.6.4. Hang-up button. Hangs up the line call not matter what is its status, unless it is on air and protected by the lock. This button is only active when it is red. When in grey, there is nothing to hang-up. 61 AEQ SYSTEL IP 5.6.5. Active indicators per line: line status. This is a multi-message alternative indicator that informs about the line status, not only in what respects to the exterior communication but also regarding to the listen or internal communication. It also provides information about the particular errors of the communication established in that particular line: Next, we will explain the different possible call states. Note that some states include a counter that indicates the time elapsed from the last change. This counter is quite useful to know how long the person at the other end has been waiting in a given situation. - IDLE: the line is inactive, waiting.. - DIALING: an outgoing call has been dialed and the remote end is still not ringing. In most cases, this is a spurious status that is not even visible in the screen. - RINGING: outgoing call, remote end is ringing. - BUSY: remote end is busy. - NO ANSWER: this status disappears immediately. - INCOMING: incoming call. Systel telephone rings. - WAIT: on hold call, either attended or unattended, usually listening the program signal. - QUEUE: queued call waiting to be put on air. - ON AIR: call is being broadcast. - HANDSET ”X”: call communicating with operator of handset “X” (in the example the name is HANDSET 1). Error messages: In exceptional situations, the following errors states may appear: - BlackList: caller is banned by the black list. No response: no SIP messages have been received as a reply to the call request (either by the SIP server or the final destination). Unauthorized: Auth ID and/or password are not correct. Forbidden: no permission for calling. Not Found: call destination doesn’t exist. Not Acceptable: call destination cannot accept the call due to compatibility reasons (usually related to audio coding algorithms). Unsupported codec: call destination doesn’t support the indicated audio codecs. Unavailable: the called telephone has been ringing but nobody answered the call. Cancelled: the call has been cancelled before being established. Server Error: undetermined internal error. Connection Down: the call has been locally ended due to lack of incoming RTP traffic. No response in Registration: registration error. The server doesn’t respond. Registration Forbidden: registration error. The server indicates that authentication has failed (authentication ID and/or password). Error X: undetermined error. An error code is indicated so it can be provided to Tech. Support service. 62 AEQ SYSTEL IP 5.6.6. Other status indicators We can find these other status indicators at the right of the line status indicator: - NEXT TO AIR: when this indicator appears and the queue advance button is pressed, this call will be the next one to be put on air. - HD Quality: call is established using G.722 high-quality algorithm. 5.6.7. Main buttons at the right of each line. A set of 4 buttons can be seen at the right of each line. They manage most of the functionality of the SYSTEL line once the communication has been established: 5.6.7.1. WAIT / ON AIR / QUEUE button operation. The same button will give way to the WAIT, ON AIR and QUEUE states in a cyclic way. When the line is IDLE, the ON AIR button is represented in grey, meaning that a not-existing communication cannot be put on air. In the rest of states, when clicking on the button the call will pass to the status indicated in the alternative button. When a communication is established and both ends unhook, while an operator is talking with the partner by means of his handset, the button name changes to WAIT, as when clicking on the button, the call will be put on hold. In this case, if we click on the button when in the WAIT mode, the call will be put on hold, and the button function will change to ON AIR, in order to be able to put the call on air when clicking on it. This cannot happen if the Q button is blue with the “Q” legend, in this case, ON AIR will be displayed in gray, because no fader has been selected to send this call on air (more information can be found in paragraph 5.6.7.3). Once the legend in the Q button has changed to Q1, Q2… Q6 or VIP1, VP2… VIP6 (line is assigned to fader 1, 2 … 6), the ON AIR key will become active and the call can be transferred to the program directly (as a quick method to put a call on air without using the call queue button as explained in another part of this manual). We can check this by observing how the status bar changes to red color meaning ON AIR. If the call is waiting in a queue and we click on the operator’s telephone button, in order to give some indication to the interlocutor in the queue, the alternative button will display QUEUE in a deep pink color, meaning that, if the user clicks on it, the line will return to its position in the queue. 63 AEQ SYSTEL IP 5.6.7.2. Lock button operation. The lock button allows locking a call on air when the lock is activated (represented by a closed lock with a green tick). This avoids that the call is automatically put in WAIT when another call goes ON AIR, so both of them can interact simultaneously in the program. The lock button is deactivated by default (represented by an open lock with a red cross). Have in mind that, when the call is removed from air, by putting it in WAIT mode or alternatively by transferring it to a HANDSET, the lock will become open, remaining this way until the user “closes” it again. 5.6.7.3. QUEUE button operation (console fader or channel). This button allows the user to select which channel or fader will be used in the console to control each call. It is called QUEUE because in normal operation, the application allows “queuing” calls to be put on air by means of each fader. In order to be able to put a call on air, it is mandatory to assign it a queue. This means that we have to choose which input channel of the console will be used for it. So if for a given channel the queue button simply shows a Q, we must click on it to choose a queue. If the QUEUE button is drawn in black and the user clicks on it, the call is removed from the queue. If on the other hand it is blue and the call is active, it will be placed in the queue when the button is clicked. But if the button is blue and the call is inactive, a queue or fader will be pre-assigned for that line. By means of the setup program, the number of input channels in the console that are connected to the Systel outputs is determined for each studio. The system admits between 1 and 6 queues or SYSTEL outputs to each studio console. When clicking on the QUEUE button when the line is inactive, the queue selection window pops up, with a key for each queue previously created for that particular studio by means of the setup application. By clicking on a queue button (Q1 to Q6), a queue can be pre-assigned to a line, what’s reflected in the QUEUE button (queue 2 in the example): 64 AEQ SYSTEL IP QUEUE button operation when a call is established: VIP queues. If the QUEUE button is pressed during an established call, and two or more queues have been defined, the VIP button will appear in the queue selection window. If we click on the VIP button in the queue selection screen and after that on a queue, that line will be assigned to that queue with the VIP attribute, denoted by a deep pink color in the VIP button, both in the queue selection window and in the queue button of the line window. Note that the Q2 button in the line button has changed to pink color, and its text to VIP2, while the QUEUE 2 has changed its label to pink too. By clicking the “NEXT TO AIR” button, the call is put on air by means of an exclusive fader that remains locked until the call is terminated. In this example, Jonathan has been on air for 4:18 minutes, controlled by the QUEUE 5 fader, while PETER RODRIGUEZ has been waiting for his turn for 4:23 minutes in QUEUE 6 fader. 65 AEQ SYSTEL IP 5.6.7.4. Level button operation. When clicking on this button a window will pop up showing some faders and vumeters to adjust the input level for each line in the system as well as the general return level for that line to the line partner. When working with the mouse, each fader can be dragged to put it in the desired position. When working with tactile screens, it may be more accurate to touch the “+”and “–“ keys associated to each gain adjustment. The unit is adjusted from factory to unity gain (0 dB). The green color in the display indicates that the adjusted level corresponds to the basic adjustment. It may be necessary to alter it again, increasing or decreasing the gain. When the value is modified, it turns to red, indicating that this corresponds to a particular or momentary adjustment. If for special reasons we notice that there is a permanent gain mismatch in the line to get a correct level, we can click on the display when the correct value is visible and it will be validated and turn to green. This way, the adjustment is stored and will remain when another call is initiated in the same line. This way, if we have adjusted a line with, for example, 5dB gain, if for some reason we need to apply a lower gain, say 0dB in a subsequent call, the display will show 0dB in red warning that this is not the permanent adjustment for this line. When clicking on the “AGC” button, the input gains display window will show an “AUTO” legend while the level control fader disappears, as it becomes automatic. This way, the system will automatically adapt itself so the incoming levels for different calls are adjusted to the nominal operating level. The AGC adjustment is performed by means of the setup software. In order to leave the line LEVEL adjustment screen, click on “Back” button. Note that there are two small tri-color LEDs at the left of each line window indicating the presence of audio and its level, allowing for a general view of each line input and output levels at a glance, and adjustments can be made by going to the LEVEL screen of those lines presenting mismatches. 66 AEQ SYSTEL IP 5.6.8. Partner name editable field operation. The line name or URI indicator has 3 fields: 1. Telephone number or URI: 2. Agenda entry name for it. 3. Name given by the producer at that moment. If field “3” exists, this is the one displayed. When clicking on the right mid area of the field, it changes to field “2”, and when clicking again, to field “1”, cyclically. If field “3” doesn’t exist, field “2” will appear by default. By clicking on the left half, it can be edited to type the temporary name in. 5.6.9. Partner observations editable field operation. Comments about the partner can be typed in. Font size can be adjusted in the menu trying to find a compromise between readability and field capacity. If the comments don’t fit in the screen, a scroll bar appears. Edition mode is entered by clicking on the field. 5. 7. Using an IP phone instead of an analog handset as the SYSTEL IP handset. The use of an IP phone allows the user to perform some operations on it concurrently with the control software for convenience. In order to do this, the HANDSET status must be activated by using the software. Answering and hanging up a call. If the telephone is hung, it will ring when an incoming call is received. If it is not answered in a certain time, the call will automatically change its status to WAIT. When the telephone is hanged up, any line in communication with it will also be hanged up. Dialing. When in idle mode, the user can dial from the IP phone itself and will call to using the first available line, which will change to the HANDSET status. Making a call from a specific line is also allowed, by dialing its number, followed by the * separator, and the number to call to. If dialing is performed by means of the software, it will force that the assigned IP phone rings first, in order to warn the operator, and when he answers, the dialing will be performed from the line selected in the screen. If the IP phone doesn’t respond in a given time or it is not unhooked, the call will still be made, but once the interlocutor unhooks, he will be “parked” in WAIT status. Sending tones. When an IP handset is assigned to a line and it is connected, DTMF tones can be sent to the receiver by using the telephone keyboard. 67 AEQ SYSTEL IP 6. TECHNICAL CHARACTERISTICS* SYSTEL IP 4. “Engine“for 4 IP lines. Inputs and outputs XLR type connectors. SYSTEL IP HS handset RJ45 connector. 2 analog balanced inputs. 2 analog balanced outputs 1 selectable analog / digital AES-EBU (AES3 or SPDIF) input. 1 selectable analog / digital AES-EBU (AES3 or SPDIF) output. 1 IP port (WAN) for 4 VoIP lines. 1 IP port (LAN) for control. 1 DB15 connector for 4 optocoupled GPI + 4 GPO. Main characteristics Universal power supply: 100-240 V. 50/60 Hz. 25 VA. Quiet operation: natural convection cooling. Weight: 3,5 Kg (7,7 lbs). Width: 482 mm (19“), 1U rack height, 44 mm. (1,75”). Depth: 170 mm. (6,7”). SYSTEL IP 12. “Engine“for 12 IP lines. Inputs and outputs DB15 female type multiple pole connectors (two inputs and two outputs per connector). 4 SYSTEL IP HS handset RJ45 connectors. 8 analog balanced inputs. 8 analog balanced outputs. 4 digital AES-EBU (AES3 or SPDIF) inputs. 4 digital AES-EBU (AES3 or SPDIF) outputs. 1 IP port (WAN) for 12 VoIP lines. 1 IP port (LAN) for control. 3 DB15 connectors, each one includes 4 optocoupled GPI + 4 GPO. Main characteristics Universal power supply: 100-240 V. 50/60 Hz. 50 VA. Quiet operation: natural convection cooling. Weight: 5 Kg (11 lbs). Width: 482 mm (19“), 2U rack height, 89 mm. (3,5”). Depth: 330 mm. (13”). SYSTEL IP HS. Remote powered preamplifier Handset. Includes 48V remote powered preamplifier with electret micro powered output. RJ45 input connector for dedicated Cat 5 or better cable. RJ9 connector for included microtelephone or standard operator microtelephone (electret microphone). Dimensions and weight Weight: 0,5 Kg (1,1 lbs). Width: 85 mm (3,33“). Height: 44 mm. (1,75”). Depth: 220 mm. (8,66”). SYSTEL IP ST. Support for 10” Ipad. Adequate for most 10” Tablets / iPad. Homologated for Apple Ipad 2 and Ipad 3. Minimum tablet size: 22x15,5 cm ( 8,66 x 6,1”). Maximum tablet size: 28x18,5 cm (11 x 7,29”). Includes a support for SYSTEL IP HS in the left side. Adjustable tablet tilt. Nov 2014. Characteristics subject to evolutive changes. Download the latest version from www.aeq.es, www.aeq.eu or www.aeqbroadcast.com. 68 AEQ SYSTEL IP 7. A.E.Q. WARRANTY. AEQ guarantees that this product has been designed and manufactured under a Quality Assessment System. Thus we guarantee that all the necessary test protocols have been followed in order to ensure the correct functionality and that the specified technical characteristics are met. Both the general design and manufacturing protocols as well as those particular to this unit are properly documented. 1.- This warranty doesn’t exclude or limit any customer’s legally-recognized right. 2.- The warranty period extends for twelve months from the date of purchase by the first customer. In order to make use of this warranty the customer is required to inform of the problem to an authorized dealer, any AEQ sales office, or AEQ technical support department within thirty days from its appearance, and within the warranty period, as well as to provide a copy of the purchase invoice and product serial number. At the same time, AEQ Technical Assistance department’s previous and express acceptance is required for the substitution or repair of the product in application of the present warranty. As a consequence, returns not meeting these conditions will not be accepted. 3.- AEQ will repair or substitute failed the hardware dongles, which must be previously returned. This includes the labor cost necessary to undertake this repair, provided that the failure is caused by a defect in the materials, design or manufacturing. The repair will take place in the AEQ Technical Assistance Service installations. This warranty doesn’t include the shipping to the workshop nor the return. 4.- A warranty extension won’t be provided for repaired or replaced in application of this warranty. 5.- This warranty won’t be in force in the following cases: use not according to what’s indicated in the user manual; violent handling; exposure to humidity, extreme thermal or environmental conditions or sudden changes in those conditions; lightnings; oxidation; unauthorized modifications or connection; unauthorized repairs or product openings; misuse; liquid or chemical products pouring. 6.- AEQ will be under no circumstance responsible for any kind of damages or harms, direct or indirect, derived from the use or the impossibility to use the product. AEQ won’t be responsible for any loss of information in discs that have been altered or are inaccurate, nor any other accidental harm caused by the user or people handling the product. 69 AEQ SYSTEL IP APPENDIX A: INSTALLATION AND SETUP OF AN ASTERISK PBX FOR SYSTEL AND CONNECTION TO A SIP TRUNKING. A.1 Benefits provided to Systel IP by Asterisk. Systel IP based telephone systems can be enhanced by adding a voice over IP PBX, like Asterisk. New functions that an Asterisk PBX can provide include: • • • • • Call routing between different Systel IP units. One simply needs to associate an extension in the PBX to two extensions, each in one Systel IP unit so that the PBX can transfer the calls from one extension to another. Integration of the broadcast telephone system with the corporative phones, this way, it will be possible to transfer calls between Systel IP units and corporative extensions. A VoIP, Asterisk compatible phone, is required at each workplace. Pre-recorded message playback such as welcome messages for calls coming from outside the station. Interactive menu presentation, so the callers themselves can route their calls to the final destination within the station (dial ‘1’ to talk to a certain program, etc.). Voice messaging, where as many voice mails as necessary can be defined. Both voice mails associated to the corporative extensions (recording messages when the user is not available at its workplace, for example) and voice mails not associated no any extension (such as automatic recorders to store recordings, for example) can be defined. A.2. Installing the Asterisk PBX. It is strongly recommended that the latest official stable version is installed, among the many distributions based on Asterisk. There are free and also paid versions. The latter basically tend to include a PC with the installed PBX and technical support. During the redaction of this manual we have based on the installation of AsteriskNOW version 3.0, a free distribution including Asterisk v11.2.1 the free graphical user interface FreePBX in its version v2.11. The installation process is quite simple: Requirements: • A PC with Internet connection and a CD / DVD recorder to prepare the installation disk. 70 AEQ SYSTEL IP • • A PC to install the PBX on. Its hardware must be Linux compatible (most standard configurations are). Some PCs ready to host Asterisk PBX are available in the market. If you still want to choose your own system, we recommend that the investment is more focused on robustness than in performance. For example, with a good quality power supply, good cooling (a 4U rack unit with a good fan is usually enough) and a good maintenance (periodic fan filter cleaning, basically) a system can operate several years uninterruptedly. Other desirable features include: Removable SATA hard disks, to ease backups. Two network cards, in case we want to separate the access to IP telephony (WAN network) to the control and setup IP network (LAN network), mainly due to security reasons. A CPU with good performance / price ratio. The best or most expensive is simply not required. The determining factor is mainly the number of simultaneous calls to achieve. A VGA monitor, keyboard and mouse for the PBX PC, although they will probably be only necessary during the installation process. Configuration and management can be carried out by means of a web browser, remotely. Steps to follow: • • • • • • • Download the ISO image from the AsteriskNOW server: http://www.asterisk.org/downloads/asterisknow Record it on a CD or DVD. Insert the CD in the PC where we want to install the PBX. Start up the PC and follow the instructions appearing on screen. Choose the installation with Asterisk and FreePBX. The AsteriskNOW server also provides a detailed installation guide in the following URL: https://wiki.asterisk.org/wiki/display/AST/Installing+AsteriskNOW Once the installation process is finished, please extract the CD from the drive and reboot the PC. Once it has rebooted, assign it a static IP address. Connect the PBX PC to the LAN network and, if possible, provide it with Internet access. If everything has gone well, you will be able to access the PBX web panel by typing its IP address in the URL box of a web browser running on any other PC within the same network. User name is admin and password is also admin. 71 AEQ SYSTEL IP • It is recommended that the Module Admin from the Admin is selected and after that upgrade all the appearing modules with the latest available version (Upgrade All). It will also be possible to install new modules to provide the PBX with new functionalities. We recommend that the following modules are installed: Announcements: in order to playback pre-recorded messages (welcome, etc.) Asterisk Info: to have access to more info about the PBX status. Asterisk SIP Settings: allows advanced SIP configuration and also change the language of the voices. IVR: to be able to add interactive phone menus. 72 AEQ SYSTEL IP • • The language for voices installed by default is English. You can find voice packets in Spanish and other languages in Internet. For example, voices in Spanish can be downloaded for free at http://www.voipnovatos.es/voces/. The packet consists on a compressed file including the audio files. Those files need to be copied to the PBX hard disk in the “/var/lib/asterisk/sounds” folder. The display, keyboard and mouse can be disconnected from now on. WARNING: In order to provide the PBX with a higher degree of safety, it is recommended that all passwords are changed and that the web control panel is made visible only within the private LAN, not through Internet. A.3. Asterisk PBX configuration. A.3.1. General Configuration (Settings menu). Several parameters must be configured in the Advanced Options menu: SIP and IAX allow: g722&alaw&ulaw SIP and IAX disallow: all Several parameters must also be configured in the voicemail options submenu (Voicemail Admin): format: wav16 A.3.2. Extensions configuration Some SIP extensions must be configured in the PBX, including both the corporative extensions and those associated to the Systel IP units. Regarding the corporative ones, an extension will be defined for each IP phone. If required, voicemails can be activated for those extensions, so that a message can be left when the called person is not available at that moment. It is not within the scope of this manual to thoroughly explain how to properly configure the voice mail system (speech language, listening and deleting messages, etc.). In order to do this, please ask an expert or our technical support department. 73 AEQ SYSTEL IP Regarding extensions related to Systel IP units, no voicemail activation is required. Extensions are added within the Applications menu, under the Extensions option. The most basic parameters that must be configured for each extension are: User Extension: <extension number> Display Name: <name> secret: <password> dtmfmode: SIP INFO (application/dtmf-relay) (only for Systel IP extensions) Voicemail Status: enabled (only if voice mail is required) In order to configure the SIP phones, please check their user manual. Configuration of extensions for Systel IP was described in section 4.2.3. As a rule of thumb, it will only be necessary to configure the proxy and registrar with the Asterisk PBX IP Address, username with the extension number and password with the corresponding value. A.3.3. Telephony provider (SIP Trunk) configuration If external calls are provided by means of a SIP telephony provider, then the most adequate thing to do is to integrate the connection to that provider inside the PBX. This way, it will be easy to introduce welcome messages, interactive menus and route the received calls to either corporative extensions or Systel IP extensions. As san example, we will describe how to configure a connection to Netelip provider: In order to integrate the connection to the provider within the PBX, a SIP Trunk must be added. This option can be found in the Connectivity menu, under the Trunks section. The most basic parameters to configure are: 74 AEQ SYSTEL IP Trunk Name: Netelip Outbound CallerID: <number that will appear in the outgoing calls > PEER Details: type=friend username=<username> context=from-trunk host=sip.netelip.com canreinvite=no secret=<password> nat=yes fromdomain=sip.netelip.com insecure=very fromuser= Register String: <username>:<password>@sip.netelip.com/<username> It is possible to check whether the PBX has connectivity with the provider’s Server and whether it has been correctly registered by having a look at the system status option (FreeePBX System Status) within the Reports menu. The status of the defined Trunks should appear in this screen under the FreePBX Connections text: At this point, the only thing left is to define the routing rules for the outgoing calls so they are made through the provider, and the routing rules for the incoming calls coming through it. A.3.3.1. Incoming calls routing configuration A set of routing rules must be defined for calls coming from outside, so the PBX knows where to route each one. In this case, as an example, we will route calls coming through netelip provider to a special extension in Systel IP: 75 AEQ SYSTEL IP We will then proceed to select the Inbound Routes in the Connectivity menu. The inbound routes edition screen will appear. These are the fields to fill in: Description: DesdeNETELIP DID Number: <telephone number assigned to us by netelip> Set Destination: Extensions We consider that it is a good idea to present the caller a welcome message before he/she is being transferred to the corresponding extension. This option is very easy to configure. If the Announcements module has been previously installed then an option with the same name will appear in the Applications menu: The following parameters need to be configured in the screen that is shown: Description: Welcome1 Recording: <message name> Destination after playback: Extensions This way, if we return to the previously configured inbound route (DesdeNETELIP) and the welcome message is set as the destination… Set Destination: Announcements Welcome1 …we will have reached our goal. It is worthy to note that the message should be recorded before it can be associated to the welcome. In order to do that, go to the System Recordings option under the Admin menu. Just the same way, we could have routed the incoming calls to an interactive menu (V (IVR), and let the caller choose the destination of the call among the presented options by him/herself. 76 AEQ SYSTEL IP A.3.3.2. Outgoing calls routing configuration. In order to be able to call outside by means of a SIP telephony provider, a routing rule must be provided to the PBX for outgoing calls. We will select the Outbound Routes option from the Connectivity menu. The outgoing routes addition screen will appear. These are the fields we must fill in: Description: ToNETELIP Dial Patterns that will use this Route: XXXXXXXXX Trunk Sequence for Matched Routes: 0 Netelip In this case, the external SIP provider will be used whenever the dialed number has nine digits. 77 AEQ SYSTEL IP APPENDIX B1: CONFIGURING A GENERIC IP PHONE AS AN EXTERNAL EXTENSION COMPLEMENTARY TO THE SYSTEL IP INSTALLATION. (For example: Cisco SPA502G or similar) Next we will configure, step by step, a Cisco SPA502G IP phone so it gets integrated either into the Asterisk PBX or with a Systel IP system. What we basically need to configure are the SIP interface parameters at the phone. Step 1: Assignation of an IP address. The phone is configured from factory with DHCP activated. This means that, if there is a DHCP server active in the network, then the phone will automatically obtain its own IP address. If a fixed IP address wants to be assigned, then the following procedure must be followed: • • • • • • • • • • • Press the configuration menu key of the phone. The Setup menu will appear on the screen. Select option 9 for network configuration (Network) Select option 1 (WANConnectionType) by pressing the edit key Using the option key, select the Static IP option. Accept by means of the ok key Select option 8 (Non-DHCP IP Address) using the edit key Type the IP that you want to assign and then accept by means of the ok key. Repeat the same steps to configure the rest of parameters:: Non-DHCP Subnet Mask, Non-DHCP Default Gateway and, finally, Non-DHCP DNS1 Save network configuration by pressing the save key. Reboot the telephone by choosing option 12, Reboot Step 2: Accessing the telephone’s web server. Use your web browser to access the telephone’s web server by typing its IP in the browser’s URL BAR. The telephone main screen will then appear, with some basic configuration options (user mode). Step 3: Activating Administrator options. In order to be able to configure advanced parameters such as those related to the SIP interface, the Administrator mode must be activated first. In order to do that, click on the Admin Login link shown at the top right corner of the screen. 78 AEQ SYSTEL IP Step 4: Configure Proxy SIP registering parameters and user’s extension. In order to configure the Proxy SIP registering parameters, Ext 1 must be accessed in Administrator mode. Proxy and Registration sections will show these fields to be configured: • • • • • Proxy: enter the Asterisk or Systel IP address here. Register: decides whether register or not the phone in the SIP proxy. If we want to receive calls from it, just select Yes. Register Expires: leave the 3600 default value so the telephone registers once an hour. Make Call Without Reg: Select Yes if you decided not to register the telephone in the SIP Proxy. Ans Call Without Reg: Select Yes if you decided not to register the telephone in the SIP Proxy. In order to configure the telephone’s user extension data, check next section, Subscriber Information. The parameters to be configured are: • • • • • Display Name: name of the person that will use the telephone. User ID: name or number of the extension to assign to this telephone Password: password assigned to this extension in case that Asterisk PBX registering is activated. It is not necessary in case of registering is in a Systel IP. Use Auth ID: the usual value to fill in here is No. Auth ID: leave blank if the previous field was filled with No. Last, to make the telephone store the changed settings and reboot using them, click on the Submit All Changes button. 79 AEQ SYSTEL IP APPENDIX B2: SETTING UP AN IP PHONE TO BE USED AS A HANDSET FOR OFF AIR CONVERSATION WITH THE SYSTEL IP CORRESPONDENTS. (For example: Cisco SPA303G, SPA 502G or similar) Next we will configure, step by step, a Cisco SPA502G IP in order to use it as a handset, allowing for conversation using the micro-headphone and dialing with the keyboard. What we basically need to configure are the SIP interface parameters at the phone. It consists on the configuration of the telephone’s SIP interface parameters, and also its addition in the configuration software according to the procedure explained in section 4.2.3. Step 1: Assignation of an IP address. The phone is configured from factory with DHCP activated. This means that, if there is a DHCP server active in the network, then the phone will automatically obtain its own IP address. If a fixed IP address wants to be assigned, then the following procedure must be followed: • • • • • • • • • • • Press the configuration menu key of the phone. The Setup menu will appear on the screen. Select option 9 for network configuration (Network) Select option 1 (WANConnectionType) by pressing the edit key Using the option key, select the Static IP option. Accept by means of the ok key Select option 8 (Non-DHCP IP Address) using the edit key Type the IP that you want to assign and then accept by means of the ok key. Repeat the same steps to configure the rest of parameters:: Non-DHCP Subnet Mask, Non-DHCP Default Gateway and, finally, Non-DHCP DNS1 Save network configuration by pressing the save key. Reboot the telephone by choosing option 12, Reboot Step 2: Accessing the telephone’s web server. Use your web browser to access the telephone’s web server by typing its IP in the browser’s URL BAR. The telephone main screen will then appear, with some basic configuration options (user mode). Step 3: Activating Administrator options. In order to be able to configure advanced parameters such as those related to the SIP interface, the Administrator mode must be activated first. In order to do that, click on the Admin Login link shown at the top right corner of the screen. 80 AEQ SYSTEL IP Step 4: Configure Proxy SIP registering parameters and user’s extension. In order to configure the Proxy SIP registering parameters, Ext 1 must be accessed in Administrator mode. Proxy and Registration sections will show these fields to be configured: • • • • • Proxy: enter the Systel IP system IP address followed by the 5070 port, according to the [ip:port] format. Register: decides whether register or not the phone in the Systel IP. If the phone is going to have a fixed IP address, then activation of its registration is not recommended. Register Expires: Enter the value “60” so that the telephone refreshes its registration once every minute. Make Call Without Reg: Select Yes if you decided not to register the telephone in the SIP Proxy. Ans Call Without Reg: Select Yes if you decided not to register the telephone in the SIP Proxy. In order to configure the telephone’s user extension data, check next section, Subscriber Information. The parameters to be configured are: • • • • • • Display Name: Handset name, for descriptive purposes only User ID: Name or user name to assign to the telephone. It must match the User Name configured for the IP Handset in the Systel IP database. Password: It is not necessary in case of registering is in a Systel IP. Use Auth ID: the usual value to fill in here is No. Auth ID: leave blank if the previous field was filled with No. DTMF Tx method: select INFO option Last, to make the telephone store the changed settings and reboot using them, click on the Submit All Changes button. 81 AEQ SYSTEL IP APPENDIX C: INSTALLING AND CONFIGURING A GATEWAY. (For example, Patton SN4112 - 2FXO) Introduction. AEQ SYSTEL can communicate with PSTN lines through gateways that translate both the call control signaling and the audio from Telephone Company to IP messages and streams. As SYSTEL uses standard SIP messaging for cal control, and de-facto standard for audio transmission in VoIP is RTP, standard gateways can be used. Most of them will work properly, however we recommend the devices made by Patton. This document describes how to use a Patton gateway with SYSTEL IP. Have in mind that no gateways are required when the telephony service is a SIP trunking over IP. Compatible models Patton gives its family of VoIP gateways “SmartNodes”, and are readily available internationally and also from AEQ though our dealership network. Next, a list of specific Patton devices for the different telecom services is provided: • • • • SN4112/JO/EUI ( 2 analog FXO ports ) Configuration example http://patton.com/products/product_detail.asp?id=51 SN4940/1E24V/EUI (1 T1/E1/PRI port ) http://patton.com/products/product_detail.asp?id=437 SN4634/3BIS/EUI ( 3 ISDN BRI ports ) http://patton.com/products/product_detail.asp?id=329 SN4912/JO/RUI ( 12 FXS VoIP IAD ) http://patton.com/products/product_detail.asp?id=364 These models are the specific units recommended by AEQ. Other members of this family may be compatible, but its operation should be asserted to guarantee the interoperability. Configuration. The following instructions / example apply to Patton model no. SN4112, firmware version # R5.2 2009-01-14. They should be essentially the same for other Patton gateways. Gateway parameters to be configured: • • • • Gateway device IP address. For analog gateways, such as Patton model no. SN4112, tones, times, etc. for the telephone lines in use. Usually these details are clarified once the country is selected. For ISDN gateways, the used protocol. Number or text name to be shown in each line. This is transferred to SYSTEL via a SIP message, and is used to identify the calls and assign them to buttons, as configured with SYSTEL SetUp software. Patton gateways can be configured in several ways: • • • Manually, with a text-based command line interface (CLI), using the gateway’s user manual as a reference. This method is not recommended due to its inherent complexity and because it is error-prone. Manually, using a web interface. This is only recommended for true analog and SIP telephony experts. Obtaining a loadable file from AEQ. If you can provide data such as your number of lines / names, etc. we can provide a file to be loaded into the gateway in return. 82 AEQ SYSTEL IP • Creating your own loadable from a model provided by AEQ or Patton. More information about this option is provided below. You can ask a pre-configured gateway, AEQ offers this service. As a reference, these are the links to Patton user manuals: • • User’s Manual: http://www.patton.com/manuals/SCG_r57.pdf Quick-start guide: http://www.patton.com/manuals/SN4520-SN4110-QS.pdf Step 1: Configuring the IP address. The first step is to obtain an IP address in the gateway. This can be done by any of the above described methods. As any other IP device, in order to give it another IP an initial, temporary address must be known. Fortunately, this is a one-time task. IP configuration using DHCP. By default, the gateway accepts DHCP automatic IP configuration. If your network has a DHCP server, connect the SmartNode and turn it on. The CD provided together with the gateway contains a utility called SNDiscovery.exe. Copy it to your PC’s hard disk and run it (Note: under Windows 7, you must right-click on the file and choose the “Execute as administrator” option). A window showing all the Patton SmartNodes available in the network will appear. Just click on the IP address of the unit you want to configure to open a web browser where the configuration page will appear. Default login is “administrator”, without password. If you wish, you can change the DHCP-assigned IP to a static one, by clicking on Network->IP/DNS->Interfaces->eth0, typing the new IP address and subnet mask and then applying the changes with the Apply button at the bottom of the screen. 83 AEQ SYSTEL IP IP configuration using a serial cable. If you don’t have a DHCP server in your network, a new IP address can still be configured. In order to do this, just connect the serial ports of the gateway and PC using the cable provided by Patton, and then run any terminal application. Windows 7 doesn’t provide one, but you can download this free one, for instance: RealTerm, from: http://realterm.sourceforge.net/ • • Set baud rate to 9600 , No Parity None , no flow control The default login is: user: “administrator”, with an empty password. After that, type in the following sequence of commands at the prompt in order to configure the IP address 192.168.0.175 (as an example): login: administrator password: SN4112/JO/EUI>enable SN4112/JO/EUI#configure SN4112/JO/EUI(cfg)#context ip router SN4112/JO/EUI(ctx-ip)[router]#interface eth0 SN4112/JO/EUI(if-ip)[eth0]#ipaddress 192.168.0.175 255.255.255.0 SN4112/JO/EUI(if-ip)[eth0]#copy running-config startup-config SN4112/JO/EUI(if-ip)[eth0]# Now you are ready to continue with the additional configuration, either using text-based telnet interfaces or via web. Step 2: Generation of a configuration file. AEQ can provide a configuration file that you can use as a starting point to change your particular data yourself. The example file presented in this manual configures two FXO lines in the SN4112 as independent SIP lines, with UDP ports 5060 and 5061, respectively. This way, a line can be assigned to a studio, and the second line to a different one. The labels in the file that should be substituted by your system’s particular values are: • • • • • • $$$$IPADDRESS$$$$: gateway’s IP address. $$$$NETWORKMASK$$$$: gateway’s subnet mask. $$$$SIPREMOTEIP$$$$: IP address of the system that will receive the calls coming from the analog lines, that is: either a SYSTEL IP system or an Asterisk PBX. $$$$SIPREMOTEPORT$$$$: SIP port of the system that will receive the calls coming from the analog lines, that is: either a SYSTEL IP system or an Asterisk PBX. $$$$SIPREMOTENUMBER1$$$$: extension number that the gateway will pass as call destination to the remote SIP unit (either a SYSTEL IP or an Asterisk PBX), when passing a call received from FXO 1 port. $$$$SIPREMOTENUMBER2$$$$: extension number that the gateway will pass as call destination to the remote SIP unit (either a SYSTEL IP or an Asterisk PBX), when passing a call received from FXO 2 port. #----------------------------------------------------------------# # # # SN4112/JO/EUI # # R5.2 2009-01-14 H323 SIP FXS FXO # # 1970-01-01T02:09:36 # # SN/00A0BA0917B8 # # Generated configuration file # # # #----------------------------------------------------------------# cli version 3.20 webserver port 80 language en 84 AEQ SYSTEL IP sntp-client sntp-client server primary 129.132.2.21 port 123 version 4 system ic voice 0 low-bitrate-codec g729 profile ppp default profile tone-set default profile voip default codec 1 g711alaw64k rx-length 20 tx-length 20 codec 2 g711ulaw64k rx-length 20 tx-length 20 profile pstn default profile sip default profile aaa default method 1 local method 2 none context ip router interface eth0 ipaddress $$$$IPADDRESS$$$$ $$$$NETWORKMASK$$$$ tcp adjust-mss rx mtu tcp adjust-mss tx mtu context cs switch digit-collection timeout 2 interface sip IF_SIP_0 bind context sip-gateway GW_SIP_0 route call dest-interface IF_FXO_00 remote $$$$SIPREMOTEIP$$$$ $$$$SIPREMOTEPORT$$$$ address-translation outgoing-call to-header user-part fix $$$$SIPREMOTENUMBER1$$$$ host-part remote interface sip IF_SIP_1 bind context sip-gateway GW_SIP_1 route call dest-interface IF_FXO_01 remote 172.26.35.10 5060 address-translation outgoing-call to-header user-part fix $$$$SIPREMOTENUMBER2$$$$ host-part remote interface fxo IF_FXO_00 route call dest-interface IF_SIP_0 disconnect-signal battery-reversal disconnect-signal loop-break disconnect-signal busy-tone interface fxo IF_FXO_01 route call dest-interface IF_SIP_1 disconnect-signal battery-reversal disconnect-signal loop-break disconnect-signal busy-tone 85 AEQ SYSTEL IP context cs switch no shutdown context sip-gateway GW_SIP_0 interface IF_GWSIP_0 bind interface eth0 context router port 5060 context sip-gateway GW_SIP_0 no shutdown context sip-gateway GW_SIP_1 interface IF_GWSIP_1 bind interface eth0 context router port 5061 context sip-gateway GW_SIP_1 no shutdown port ethernet 0 0 medium auto encapsulation ip bind interface eth0 router no shutdown port fxo 0 0 encapsulation cc-fxo bind interface IF_FXO_00 switch no shutdown port fxo 0 1 encapsulation cc-fxo bind interface IF_FXO_01 switch no shutdown It’s worth noting that the FXO ports configuration will depend on the country the gateway is going to be used in. By default, if nothing is changed, the FXO ports will have the configuration recommended by ETSI, used in most countries in Europe. There are configurations available for other countries (au, ch, gb, mx, nl, nz, us, za). The way to indicate the desired configuration for a FXO port in the configuration file is to add the use profile fxo command, like in the following example corresponding to United States of America: port fxo 0 0 use profile fxo us encapsulation cc-fxo bind interface IF_FXO_00 switch no shutdown Step 3: Loading a configuration file. Once the gateway is connected to the network, open a web browser and type its IP in the URL bar. Click on the Import / Export options in the menu that appears. Import the configuration, select the previously created file and click on Import. Next, click on Reload and click on in again in the confirmation dialog to load the new configuration and reboot the gateway. Once the gateway reboots, it will be configured and ready to be used together with your AEQ SYSTEL IP system. Do you have additional questions or need further help? Please contact the Technical Support service of your AEQ dealer or directly with out central Technical Support. 86 AEQ SYSTEL IP APPENDIX D: SETTING UP A WiFi ACCESS POINT FOR SYSTEL IP. Included here the configuration example for the D-Link CLOUD ROUTER N300 wireless access point to provide access to the Systel IP control tables. Configuration is carried out with any web browser by connecting to the router’s IP address. In order to do that, just connect a network cable to any of the 4 LAN ports of the router (don’t use the yellow one, corresponding to the WAN network). The router’s default IP is 192.168.0.1 but the actual IP in this example was changed to 172.26.1.201. A screen similar to this one will be displayed: A user and password is prompted in this dialog. The default user is “admin” and the current password is “aeqaeq” (there is no password by default). Once successfully logged in, a screen like this will show up: 87 AEQ SYSTEL IP The basic router information is displayed in this screen. Click on “Manual configuration” to configure the router. After clicking on “Wireless Connection“ something like this should appear: The “Enabled“ status in WI-FI PROTECTED SETUP must be removed because it is relatively easy to gain unauthorized access. A name must be given to the WiFi network in the “SSID“ field. Select “Enable WPA/WPA2 Wireless Security (enhanced)“ in the “Security Mode“ field. Enter a proper WiFi password in the “Network Key“ field. To finish, just click on “Save Settings“ to store the changes made. Now, click on “LAN Setup“, where a screen like this will be displayed: 88 AEQ SYSTEL IP The only thing to do here is to select the router’s IP and subnet mask, in case we want do change them. 89 AEQ SYSTEL IP APPENDIX E: BASIC IP TELEPHONY CONCEPTS. IP vs VoIP telephony. Internet telephony or IP telephony is a telephone service based on VoIP. IP telephony is an immediate application of this technology, allowing us to make ordinary telephone calls over IP or other packet networks using PC, gateways and standard or IP telephones. The basic steps that take place during an Internet call are: conversion of the analog voice signal to a digital signal and compression of that signal to Internet protocol (IP) for its transmission. The inverse process is carried out in the receiving end, in order to finally recover the original analog voice signal. VoIP has been in the consumer and corporate markets for a long time, but it hasn’t been until very recently that its usage has been widespread, thanks to a better coverage, lower cost per bandwidth and the improvement in technologies that guarantee the availability of the service and a call quality equivalent to traditional phone. Voice and data convergence with IP or VoIP telephony. Network convergence is a topic very often commented, referring to integration within the same network of all kinds of communication: voice, data, video, etc. Voice and data convergence in IP telephony allows for the creation of applications with great added-value for the companies, which multiply the usage modes and functionalities so far offered by the conventional telephone networks. Advantages of IP or VoIP telephony for corporations. The benefits of VoIP telephony are all related to a reduction in communications costs. IP telephony allows for a reduction in the call costs or infrastructure costs. Besides, allows for a continuous grow of the material without obsolescence problems, productivity improvements and provide new functions with added value for the company and its workers. VoIP phones. The main device in IP telephony is the VoIP phone (or VoIP terminal), specifically designed for VoIP usage, that makes possible the establishment of a communication using an IP network, either using a local area network (LAN) or through Internet. The VoIP phone converts and compresses the voice signal into data packets ready to be sent through the IP network, instead of using a traditional telephone connection. A VoIP phone uses to be a device physically very similar to a normal phone. Peculiarities of SYSTEL IP as a VoIP phone. SYSTEL IP basically consists on a set of high-quality IP phones (4 or 12, depending on the model), digitally connected to a digital audio summing and distributing matrix, with analog, digital and special handset audio interfaces. It is controlled through a web server system, designed and configured to be managed from client applications specially adapted for utmost productivity in the radio and television broadcast stations environment. Softphone, VoIP adapter and IP audiocodec. An IP terminal can also be a software application available for PC or smartphone (Softphone) that interacts with microphones and headsets/speakers. AEQ presents three Softphones: Phoenix PC, Phoenix Pocket and Phoenix Lite, able to operate with IP audiocodecs, and capable of using the highest quality audio compression algorithms. Connecting an analog phone to a Gateway FXS or analog phone adapter is an alternative to a VoIP phone. However, a VoIP phone allows the user to make full use of VoIP technology, for example transmitting audio with high quality algorithms. 90 AEQ SYSTEL IP Some IP audiocodecs, as well as the mentioned Softphones, can also be used as IP telephony terminals, and hence become partners for Systel IP. In order to do that, they must incorporate SIP protocol that will allow them to signal and route the calls. AEQ Phoenix Studio, Phoenix Mobile, Phoenix Mercury, Phoenix Venus and Phoenix Stratos audiocodecs feature SIP and hence can be used as SYSTEL terminals. IP line or SIP Trunk. The IP line service (IP voice line or SIP Trunk) is a connection between an IP PBX (or Asterisk PBX) and the applications of a VoIP telephony operator (or Internet Telephone Service Provider, ITSP) allowing for the exchange of voice over IP (VoIP) traffic. Companies that want to make full use of their IP PBX (not only use IP to communicate internally but also outside the company) need an IP line or SIP Trunk. The IP telephony operator is responsible for the interconnection of the IP incoming or outgoing calls to the Public Switched Telephone Network (PSTN). Additionally, the operator can offer additional services such as the preservation of traditional geographic national / international numbering system. IP calls. Voice over IP, also called VoIP, is the technology that allows for transmission of voice through Internet in the form of data packets using an IP protocol. Generated IP or VoIP calls come through the Internet connection instead of the telephone network. The main advantage of this kind of services is that it avoids the costs charged by telephony companies, especially for international calls. The same way, it saves fees and maintenance of PSTN lines as it uses an existing data network. VoIP to VoIP calls are usually free between any providers, as opposed to VoIP to PSTN calls that are generally not free of charge for the user. An IP telephony operator provides the IP lines and is responsible for the interconnection of the incoming and outgoing IP calls to the IP or PSTN network. Converting digital calls from ISDN / RDSI to IP. There is a large number of digital ISDN / RDSI PBX in the market that don’t allow making IP calls. A VoIP/ISDN gateway is required t route the incoming calls to the digital PBX, as well as for taking the outgoing calls and sending them through Internet using the same gateway. VoIP Gateway. A VoIP Gateway is a network device that converts voice calls between an IP network and public switched telephone network (or its digital PBX) in real time. Routing calls from a non-IP PBX to SYSTEL. VoIP Gateways perform the conversion of calls from a conventional line or ISDN PBX to IP. This way, an existing installation can be used together with SYSTEL, either connecting both of them to a service provider by means of a SIP Trunking or to a new Asterisk PBX. Virtual VoIP PBX. In VoIP, a virtual PBX (Hosted PBX or IP Centrex) offers PBX functions such as internal calls, call transfer, voice mails or conference as if it was a public internet service and/or from the Public Service Telephone Network (PSTN). Using a SIP trunking on an internet access, calls are routed to an IP telephony company that provides the PBX service from their own facilities. 91 AEQ SYSTEL IP Virtual VoIP PBX and IP PBX. Virtual PBX functions are the same as “physical” IP PBX. The main difference is that virtual PBX are hosted in the web, so the user does NOT need to purchase, install and maintain a physical system. The user will simply hire the virtual PBX service from an external service provider, usually an IP telephony operator. Asterisk. Asterisk is a revolutionary open-source IP PBX that the Digium company provided for free to the community, and has become an industry reference. From the very first versions, it experienced an outstanding increase in installed software packages and user count. The key to success is simple… high flexibility free software. Many voice over IP operators use and recommend it for professional use. Configuration of SYSTEL and VoIP operators in Asterisk. If you are going to install SYSTEL, we recommend that the Asterisk environment is used. There are many technical and operators with a deep Asterisk understanding around the world that can provide the system a high added value. SIP Protocol. Session Initiation Protocol (SIP) is a protocol developed by the IETF MMUSIC Working Group with the aim to become the industry standard for initiation, modification and ending of interactive user sessions where multimedia elements such as video, video, voice and instant messaging take place. SIP is simply used to initiate and end voice and video calls. Once the communication is established, the information exchange is performed only with RTP. One of the SIP goals was to provide a set of functions for procession calls and some other capabilities currently present in the public switched telephone network. This way, it implemented typical functions in a conventional phone such as: dial a number, make a phone ring when it is called, listen to the tone or busy signal, etc. However, implementation and naming are different in SIP. SIP requires proxy and registration elements to provide a practical service. Although two SIP terminals can communicate to each other without the need of additional SIP infrastructure by means of <name>@<ip_address> type URIs (this is the reason why SIP is defined as a point to point protocol), this approach is not practical for a public service, due to the inherent problems to IP addressing, where getting fixed public IPs is almost impossible and anyway quite costly. SIP makes use of elements called proxy servers that help with the routing of request to the actual user location, authenticate and provide service to authorized users only, ease the establishment of call routing policies and provide the user with added capabilities. SIP also provides registration functions that allow the user to inform the Proxy server about its current location. For more detailed information about SIP protocol, checking this link is recommended: http://tools.ietf.org/html/rfc3261 92 AEQ SYSTEL IP