1
SDK Technical Manual
Version 1.0
XCI-SX1 SDK / SDK Technical Manual
Table of Contents
1
2
Overview ----------------------------------------------------------------------------------------------------------- 1
1.1
Dependencies ------------------------------------------------------------------------------------------------ 1
1.2
SDK Environment ------------------------------------------------------------------------------------------- 2
Environment ------------------------------------------------------------------------------------------------------ 3
2.1
Patches to kernel -------------------------------------------------------------------------------------------- 3
2.1.1 BigPhysArea Patch -------------------------------------------------------------------------------------- 3
2.1.2 Network Driver Patch ----------------------------------------------------------------------------------- 3
2.1.3 BootSplash Patch ---------------------------------------------------------------------------------------- 4
2.1.4 Keyboard Patch ------------------------------------------------------------------------------------------ 4
2.1.5 MVL Patches --------------------------------------------------------------------------------------------- 6
2.2
Kernel Configuration and Installation ------------------------------------------------------------------- 7
2.2.1 Kernel Configuration ------------------------------------------------------------------------------------ 7
2.2.2 Kernel Compilation-------------------------------------------------------------------------------------- 8
2.2.3 Kernel Installation --------------------------------------------------------------------------------------- 8
2.3
Environment System Configurations---------------------------------------------------------------------- 9
2.3.1 Kernel Files----------------------------------------------------------------------------------------------- 9
2.3.2 GRUB Configurations----------------------------------------------------------------------------------- 9
2.3.3 Required Modules --------------------------------------------------------------------------------------- 9
2.3.4 Network Configuration---------------------------------------------------------------------------------10
2.3.5 FTP Service----------------------------------------------------------------------------------------------11
2.3.6 User Accounts and their Capabilities-----------------------------------------------------------------11
2.4
Driver Installation -----------------------------------------------------------------------------------------12
2.4.1 Video for Linux 2---------------------------------------------------------------------------------------12
2.4.2 Camera Driver-------------------------------------------------------------------------------------------13
2.4.3 Flash Driver ---------------------------------------------------------------------------------------------13
2.5
Library Installation ----------------------------------------------------------------------------------------14
2.5.1 XFree86 --------------------------------------------------------------------------------------------------14
2.5.2 FLTK -----------------------------------------------------------------------------------------------------17
2.5.3 LibJPEG -------------------------------------------------------------------------------------------------18
2.6
Service Installation ----------------------------------------------------------------------------------------18
2.6.1 Apache Web Server ------------------------------------------------------------------------------------18
2.6.2 SNMP ----------------------------------------------------------------------------------------------------19
2.6.3 Pro-FTPD ------------------------------------------------------------------------------------------------21
2.6.4 GKermit --------------------------------------------------------------------------------------------------22
2.7
SmartCam Build Tree--------------------------------------------------------------------------------------22
2.8
SmartCam Files --------------------------------------------------------------------------------------------22
2.8.1 /usr/smartcam/bin Directory ------------------------------------------------------------------22
2.8.2 /usr/smartcam/include Directory-----------------------------------------------------------22
2.8.3 /usr/smartcam/lib Directory ------------------------------------------------------------------23
2.8.4 /usr/smartcam/gui Directory ------------------------------------------------------------------24
2.8.5 /usr/smartcam/src Directory ------------------------------------------------------------------24
2.8.6 /usr/smartcam/sample Directory-------------------------------------------------------------24
2.8.7 /sbin/ Directory--------------------------------------------------------------------------------------25
2.8.8 /etc/init.d/ Directory---------------------------------------------------------------------------25
ii
XCI-SX1 SDK / SDK Technical Manual
1 Overview
The Software Development Kit or SDK is provided to give the end
users an environment where they can develop their own
applications and images. This document is intended as a complete,
step-by-step guide to create the SDK environment on the 2GB CF
and does not contain instruction on how to create an application
using SDK. Please note that the SDK is also referred to as
development environment in this document.
Please also refer to UM_SDK.pdf (SDK User’s Manual) how to
setup/use SDK.
1.1 Dependencies
Other files required to develop the SDK needs to be downloaded.
The table below shows the said files and their license information.
List of Dependencies
Package Name
XFree86
FLTK
License
XFree86
License
LGPL
Download Path
http://www.xfree86.org/
www.fltk.org/software.php
NFS-Util
GPL
http://prdownloads.sourceforge.net/nfs
V4L2
GPL
http://www.thedirks.org/v4l2/
UPX
GPL
http://upx.sourceforge.net/
PHP
GKermit
PHP
License
Apache
License
GPL
Net-SNMP
ProFTPD
BSD
GPL
Apache
http://php.net/
http://httpd.apache.org/
http://www.columbia.edu/kermit/gkermit.html
http://net-snmp.sourceforge.net/
http://www.proftpd.org/
1
XCI-SX1 SDK / SDK Technical Manual
1.2 SDK Environment
This SDK is build with the following environments.
•
•
•
•
•
MontaVista Linux 3.0
Linux Kernel 2.4.18
gcc (GCC) 3.2.1 20020930 (MontaVista)
glibc 2.2.5
GNU gdb 5.2.1
2
XCI-SX1 SDK / SDK Technical Manual
2 Environment
This chapter explains kernels, programs, settings and so on.
The contents of this chapter have been applied to SDK.
2.1 Patches to kernel
Before kernel compilation, patches are first applied to the kernel. The
following sections lists the patches applied to the kernel.
Note: All patches have already been applied to /usr/src/linux on
SDK. The patch files are stored on
/buildtree/src/kernel/patches.
2.1.1 BigPhysArea Patch
Applying this patch allows the user to allocate a large area of contiguous
memory during boot up time which can be allocated or deallocated by
the kernel driver that needs it.
BigPhysArea
Patch Application: cd /usr/src/linux
patch –p1 < [source]/bigphysarea.diff
Where:
[source] – path where the exploded patch is
located
2.1.2 Network Driver Patch
The network driver has to be patched to enable a more stable Ethernet
device driver for the target hardware (RTL8100C).
Network Driver
Upgrade
cp 8139too.c
/usr/src/linux/drivers/net/
Patch Application:
NOTE:
This command must overwrite the existing
8139too.c in the MVL3.0 kernel tree.
3
XCI-SX1 SDK / SDK Technical Manual
2.1.3 BootSplash Patch
To display a boot logo and progress bar during boot-up, this patch
should be applied to the kernel. Applying this patch enables the user to
display the desired effect during boot up.
Bootsplash Patch
Patch Application: cd /usr/src/linux
patch -p1 < [source]/bootsplash-3.0.72.4.18-vanilla.diff
Where:
[source] – path where the exploded patch is
located
2.1.4 Keyboard Patch
The keyboard patch applied is to adjust the keyboard repeat interval and
delay. The other patch is a Kernel modification to avoid the occurrence
of “pc_keyb: controller jammed (0xFF)” error message.
Keyboard Patch
Patch Application:
Keyboard Repeat cd /usr/src/linux/drivers/input/
(edit the input.c file as shown below)
init_timer(&dev->timer);
dev->timer.data = (long) dev;
dev->timer.function = input_repeat_key;
//dev->rep[REP_DELAY] = HZ/4;
dev->rep[REP_DELAY] = HZ;
//dev->rep[REP_PERIOD] = HZ/33;
dev->rep[REP_PERIOD] = HZ/8;
“controller jammed”
error cd /usr/src/linux/include/asm-i386/
(edit the keyboard.h file as shown below)
#ifdef __KERNEL__
#include <linux/config.h>
#include <linux/kernel.h>
#include <linux/ioport.h>
4
XCI-SX1 SDK / SDK Technical Manual
#include <linux/kd.h>
#include <linux/pm.h>
#include <asm/io.h>
#ifndef CONFIG_PSKEYBOARD
#define kbd_controller_present()
#endif
0
#define KEYBOARD_IRQ
1
#define DISABLE_KBD_DURING_INTERRUPTS
0
.
.
.
/* How to access the keyboard macros on this
platform. */
+#ifdef CONFIG_PSKEYBOARD
#define kbd_read_input() inb(KBD_DATA_REG)
#define kbd_read_status() inb(KBD_STATUS_REG)
#define kbd_write_output(val) outb(val,
KBD_DATA_REG)
#define kbd_write_command(val) outb(val,
KBD_CNTL_REG)
+#else
+#define kbd_read_input()
0
+#define kbd_read_status()
0
+#define kbd_write_output(val)
+#define kbd_write_command(val)
+#endif
/* Some stoneage hardware needs delays after
some operations. */
#define kbd_pause() do { } while(0)
cd /usr/src/linux/drivers/char/
(edit the Config.in file as shown below)
bool 'PS/2 keyboard support (Off =
EXPERIMENTAL)' CONFIG_PSKEYBOARD
$CONFIG_EXPERIMENTAL
mainmenu_option next_comment
comment 'Mice'
tristate 'Bus Mouse Support' CONFIG_BUSMOUSE
cd /usr/src/linux/arch/i386/
(edit the defconfig file as shown below)
#
# CONFIG_I2C is not set
CONFIG_PSKEYBOARD=y
5
XCI-SX1 SDK / SDK Technical Manual
#
# Mice
#
cd /usr/src/linux/Documentations
(edit the Configure.help file as shown below)
it as a module, say M here and read
<file:Documentation/modules.txt>.
The module will be called i2c-proc.o.
PS/2 keyboard support
CONFIG_PSKEYBOARD
PS/2 keyboard support is optional and can be
omitted on some systems,
for example, some IA32 systems which use
IrDA keyboards.
If unsure, say Y.
Bus Mouse Support
CONFIG_BUSMOUSE
Say Y here if your machine has a bus mouse
as opposed to a serial
The CONFIG_PSKEYBOARD kernel option should be
disabled.
2.1.5 MVL Patches
In addition to applied kernel patches, below is the list of MVL3.0 updates
that were applied into our kernel:
MVL3.0 Updates
Patch Application:
real_time_fixes cd /usr/src/linux
patch -p1 [source]/mvl3.0.patch
CAN-2004-0077 cd /usr/src/linux
patch -p1 < [source]/CAN-20040077.patch
CAN-2003-0985 cd /usr/src/linux
patch -p1 < [source]/CAN-20030985.patch
6
XCI-SX1 SDK / SDK Technical Manual
CAN-2003-0961 cd /usr/src/linux
patch -p1 < [source]/CAN-20030961.patch
Where:
[source] – location of the exploded patch
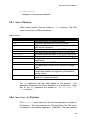
2.2 Kernel Configuration and Installation
2.2.1 Kernel Configuration
After applying the required patches to the kernel, it is time to set the
kernel configurations.
Please make sure that the following
configurations are set before building the kernel.
Kernel Configurations
Kernel Features
ext3 file system
Minix file system
romfs
tmpfs
USB input device support
Video4Linux
ATA/IDE
Network options’ UNIX
domain sockets
RAM disk and initrd
Loop back device
UNIX98 PTY,
Standard/Generic Serial,
and Virtual Terminal
supports
Remarks
To enable journaling on an IDE device such as a
CF. A journalized file system is required in order
to protect the CF’s XIP partition during abrupt
hardware on/off events.
Minix’s compact feature makes it ideal for readonly and load-on-boot-time-only partitions
Also known as cramfs. It is ideal for storing runtime, read-only data.
This dynamic ramdisk fs is used for storing
volatile data (such as contents of /tmp and the
like)
Used for USB I/O
Used for the camera module
Used to support IDE CF media
To allow network communication
Used to allow an initrd image load and act as
the embedded environment’s main file system
Used as mount device for cramfs images
Used for serial console terminal requirements
7
XCI-SX1 SDK / SDK Technical Manual
MSDOS
SCSI support
NFS support
Big Physical Area support
Required file system support for mass storage
devices
Required support for mass storage devices
Required support to enable the system to be
accessed through NFS mount
Used by the camera driver to reserve large
memory area at boot time
To apply the following configurations, go to /usr/src/linux and run
make menuconfig and start going through the options. After all the
configurations are set, exit from the configuration and make sure to save
the changes made. The .config file is now updated and contains the
new configurations made.
The pre-configured .config files are stored in the SDK
/buildtree/src/kernel/normal,fme, with which you can start
kernel configuration. The normal/.config is used for SDK kernel. Just
copy .config file to /usr/src/linux then proceed make
menuconfig.
2.2.2 Kernel Compilation
Run make dep in order to generate dependency information and cause
various build magic to occur. Occasionally, cleaning up the sources
before building from scratch is advisable. Run make clean to delete all
previously created object files. To build a compressed and ready to be
installed kernel image, run make bzImage. This command creates the
bzImage file in /usr/src/linux/arch/i386/boot/. Lastly, run
‘make modules’ to build the various components chosen to be built as
modules in the previous section.
2.2.3 Kernel Installation
If kernel compilation is successful, the built kernel is now ready to be
installed. Please copy bzImage to directory grub bootloader specify
(Refer to UM_SDK.pdf document). In the 2GB CF SDK itself, the kernel
is
installed
in
/boot
directory
(Refer
to
/boot,
/boot/grub/grub.conf).
8
XCI-SX1 SDK / SDK Technical Manual
And finally, run make modules_install to copy all build modules to
/lib/modules/2.4.18_mvl30-pc_target/ directory. Please copy
this directory to the target system directory.
2.3 Environment System Configurations
The SDK is installed some software and applied some settings.
2.3.1 Kernel Files
The target file system needs to be configured due to the kernel updates
made. To be sure, copy the following files to its proper destination.
bzImage
Source: /usr/src/linux/arch/i386/boot
Destination: /boot/k1
2.3.2 GRUB Configurations
This GRUB configuration file in /boot/grub/grub.conf should contain
settings as shown below:
----------------------------------------------------------default=0
timeout=3
title XCI-SX1 Smart Camera SDK (0.6)
root (hd0,0)
kernel /boot/k1 rw root=/dev/hda1 bigphysarea=1280
-----------------------------------------------------------
2.3.3 Required Modules
To load the proper modules during start up, the /etc/modules file
should be edited to look like the configuration below:
9
XCI-SX1 SDK / SDK Technical Manual
----------------------------------------------------------# /etc/modules: kernel modules to load at boot time.
#
# This file should contain the names of kernel modules that are
# to be loaded at boot time, one per line. Comments begin with
# a `#', and everything on the line after them are ignored.
usbcore
usb-ohci
hid
input
keybdev
mousedev
8139too
# For NFS
sunrpc
lockd
# Enable USB mass storage support (requires USB core support)
scsi_mod
sd_mod
usb-storage
# Enable FAT FS support
fat
vfat
nls_cp437
# FOR SMARTCAM DRIVER
videodevX
smartcam
skxflash
----------------------------------------------------------The order of the list is significant.
change the order of list.
So unless really required, never
2.3.4 Network Configuration
The network setting should be configured during boot up process. To be
able to enable IP address acquisition through DHCP service, add the
following lines below to /etc/init.d/networking:
Note: It’s not configured by this file on NFS boot, but by the setting on
128MB CF.
10
XCI-SX1 SDK / SDK Technical Manual
----------------------------------------------------------.
.
.
echo -n "Configuring network interfaces: "
/sbin/dhcpcd -t 30 > /dev/null 2>&1
/sbin/ifup -a
echo "done."
.
.
.
-----------------------------------------------------------
2.3.5 FTP Service
To enable file transfer from and to the system, edit the
/etc/inetd.conf to enable FTP service every time the system starts
up. This feature would be very helpful during installations of other files.
Please see the setting below.
----------------------------------------------------------.
.
.
# These are standard services.
#
# ftp stream
tcp
nowait
# ftp stream
tcp
nowait
ftp stream
tcp
nowait
root
root
root
/usr/sbin/tcpd
/usr/sbin/tcpd
/usr/sbin/tcpd
wu.ftpd -a
proftpd
in.ftpd.
.
.
.
----------------------------------------------------------
2.3.6 User Accounts and their Capabilities
By default, only the root user can access the system. During first boot
up, the root username still has no password. To give a password for the
<account_name> user, the command below can be executed:
passwd <account_name>
11
XCI-SX1 SDK / SDK Technical Manual
The user has to enter the password for the root user twice.
The system is also required to have at least a single non-root user. The
adduser command has been used to add another user. This is
friendlier front end than the useradd command, choosing Debian policy
conformant UID and GID values, creating a home directory with skeletal
configuration, running a custom script, and other features.
adduser admin
where:
admin – is the new username
This command automatically asks for the username’s password twice
and some information. The other information is optional. For this
system, the password given for the admin user is admin.
2.4 Driver Installation
2.4.1 Video for Linux 2
The Video4Linux (V4L) included in MontaVista version 3.0 Kernel should
be updated since the camera driver uses Video4Linux 2 (V4L2) module.
V4L2 can be downloaded from http://www.thedirks.org/v4l2/.
To update the Video4Linux module, go to the exploded path of the
/usr/src/videodevX directory and run make. If this command
outputs an error saying that the kernel has no support for loadable
modules, go to /usr/src/linux, make sure the support for the
loadable module is enabled, and save the configuration. Now return to
the exploded path of the V4L2 module and run make again. This should
proceed with the compilation and then make install can then be
issued. This command renames the old V4L modules and updates it
with the new videodevX.o and v4l_compat.o modules. The header
file /usr/include/linux/videodev.h is overwritten with the new
one. To test if the installation is successful, run modprobe videodevX
to insert the module to the kernel. The module should be listed if lsmod
command is issued.
To load the V4L2 modules during start up, append the videodevX line
in /etc/modules file.
12
XCI-SX1 SDK / SDK Technical Manual
2.4.2 Camera Driver
The camera driver (smartcam.o) can now be added to the system.
The
camera
driver
module
is
installed
in
/lib/modules/2.4.18_mvl30pc_target/kernel/driver/smartcam directory. Before using the
camera driver, make sure to invoke the following commands first:
1. mknod /dev/video0 c 81 0
- creates the special file node used by the camera driver
2. ln –s /dev/video0 /dev/video
- this command is optional; it simply creates a symbolic
link /dev/video0 to the /dev/video node
To add the camera driver to the kernel, run modprobe smartcam. The
module should also be listed if lsmod command is issued.
Appending the smartcam entry to the /etc/modules file enables the
module to be loaded automatically during system start up. Please note
that videodevX should be loaded first before the smartcam module.
The
camera
module
source
code
is
installed
in
/usr/smartcam/src/camera directory. Just make to build
smartcam.o.
2.4.3 Flash Driver
The flash driver (skxflash.o) has been created to provide a storage
media for CDS, pedestal, and serial number setting where such values
need to be stored in a non-volatile memory.
The flash driver has been installed in /lib/modules/2.4.18_mvl30pc_target/kernel/driver/smartcam directory. The flash driver
uses the /dev/flash0 special file. If initially not created, do the
following commands to make the said node available:
1.
mknod /dev/flash0 c 81 0
- creates the special file node used by the flash driver
2. ln –s /dev/flash0 /dev/flash
- this command is optional; it simply creates a symlink
/dev/flash0 to the /dev/flash node
13
XCI-SX1 SDK / SDK Technical Manual
Just like the camera driver, running modprobe skxflash inserts the
module to the kernel. Adding skxflash entry on the /etc/modules
file will also enable this module to be loaded at system boot up. The
source code of the flash driver is also installed in
/usr/smartcam/src/skxflash directory. Just make to build
skxflash.o.
2.5 Library Installation
2.5.1 XFree86
XFree86 is an open source X11-based desktop infrastructure that
provides a client/server interface between the display hardware (the
mouse, keyboard, and video displays) and the desktop environment
while also providing both the windowing infrastructure and a
standardized application interface (API). (http://www.xfree86.org/).
2.5.1.1 XFree86 Installation
The library version used for this system is version 4.4.0. The following
steps below describe how to compile and install the XFree86 application.
1. make World
- compiles the said application
2. make install
- copies the required files to where they needed to be
Before running startx, do the command below:
export PATH=$PATH:/usr/X11R6/bin
To export this path upon system start up, add this path in
/etc/profiles:
PATH=$PATH:/usr/local/sbin:/usr/sbin:/sbin:/usr/X11R6
/bin
An X11 configuration file is created in /etc/X11/XF86Config.
However configured XF86Config files are already installed on SDK.
XF86Config.en is for US keyboard layout, XF86Config.jp is for JP
keyboard layout.
14
XCI-SX1 SDK / SDK Technical Manual
Edit the /etc/ld.so.conf file and make sure the following lines exist
and run ‘ldconfig’ command afterwards:
• /lib
• /usr/local/lib
• /usr/X11R6/lib
• /usr/src/linux/lib
Make sure that the /dev/mouse node exists. If the said node does not
exist, invoke
mknod /dev/mouse c 13 63
Running ‘startx’ should be successful. To test if the mouse is
properly working on X11 environment, run ‘xev’ command.
Please note that the development environment has no copy of the
XFree86 source codes since it consumes a large amount of CF space.
2.5.1.2 XFree86 Locale Support
X11 is required to have support of locale settings. The following locale
environments should be added to the system:
•C
• ja
• ja_JP.UTF-8
• ja.SJIS
• en_US.UTF-8
• C.iso88591
The localedef command is required to create the locale environments.
The syntax for creating the environment is shown below:
localedef -i [locale] -f [charmap] [alias]
The table below shows the required values for each locale environment
to be supported. Please note that the C locale is the default locale
environment and does not need to be created.
Locale Requirements
Alias
ja
ja_JP.UTF-8
ja.SJIS
en_US.UTF-8
C.iso88591
Locale
ja_JP.eucJP
ja_JP.UTF-8
ja_JP.SJIS
en_US
en_US
Charmap
EUC-JP
UTF-8
SHIFT_JIS
UTF-8
ISO8859-1
15
XCI-SX1 SDK / SDK Technical Manual
Make sure that all the locale requirements are present in
/usr/share/i18n/locales
directory
and
the
charmap
requirements are in /usr/share/i18n/charmaps directory. The
created locale environments are created stored in /usr/lib/locale
directory. Sometimes, this directory still needs to be created.
One way to verify the support for locale environment is through the
xterm command. Running the LC_CTYPE=[locale env] exterm
command on the X11’s terminal should open a new terminal without any
warnings of the locale environment specified is supported.
If ja.SJIS environment still fails after creation of the said local
environment, add the line below to /etc/locale.alias to allow the
ja.SJIS locale environment support.
ja.SJIS
ja.sjis
2.5.1.3 XFree86 Customized Settings
The XFree86 settings have been customized so that it will have the
same environment as the 128MB CF image. Please refer below for the
altered configurations.
•
/etc/X11/XF86Config
The same configuration files are applied with target CF (128MB)
system.
•
/usr/X11R6/bin/XFree86
/usr/X11R6/bin/XFree86_smartcam
The XFree86_smartcam is used on the target CF (128MB) system
and linked to /usr/X11R6/bin/X.
•
/usr/X11R6/lib/fonts, font.org
/usr/X11R6/bin/locale, locale.org
The fonts and locale directory is link to ones in the target CF
(128MB) system.
The .org directory has full content. You can pick some if you need
one.
•
/usr/X11R6/lib/X11/xinit/xinitrc
Key repeat rate is set for efficiency of development.
16
XCI-SX1 SDK / SDK Technical Manual
----------------------------------------------------------#!/bin/sh
# xinitrc - X11 start-up script
#
- customized for the Sony Smart Camera Project
# 10/11/04 update
/usr/X11R6/bin/xsetroot -solid smartcolor &
/usr/X11R6/bin/xterm -bg black -fg white -cr yellow -geometry
120x45+0+0 -ls -display $DISPLAY &
/usr/X11R6/bin/xterm -bg black -fg white -cr yellow -geometry
120x45+50+50 -ls -display $DISPLAY &
/etc/init.d/launch_it launcher start &
# if you simulate the target system, uncomment the next line.
xset r rate 400 75
# launch Window Manager
/usr/X11R6/bin/twm
----------------------------------------------------------•
/usr/X11R6/lib/X11/twm/system.twmrc
Please refer to the installed files.
•
/usr/X11R6/lib/X11/rgb.txt
This line has been appended on the rgb.txt file.
----------------------------------------------------------30 35 51
smartcolor
-----------------------------------------------------------
2.5.2 FLTK
FLTK is a C++ graphical user interface toolkit that provides GUI
functionality without the bloat and supports 3D graphics. FLTK is
provided under the terms of the GNU Library Public License, Version 2
with exceptions that allow for static linking. (http://www.fltk.org/)
The minimum requirement for the system is version 1.1.4, which is also
the FLTK version installed in SDK. Make sure that the X11 library is
already installed before building the FLTK library. To start FLTK
installation, go to /usr/src/fltk-1.1.4. Listed below are the steps
taken to install the FLTK library.
1. ./configure -–enable-shared
17
XCI-SX1 SDK / SDK Technical Manual
- runs configuration scripts with generation of shared
libraries enabled
2. make clean
- automatically runs configure with the default (no) options
and then removes all the binary objects.
3. make
- compiles the FLTK library
4. make install
- copies the required files to where they should be located
(to /usr/local/lib)
2.5.3 LibJPEG
The JPEG library is used for converting raw images generated by the
camera into jpeg format. This functionality is used by the Web Monitor.
The JPEG library used is the same library provided by MVL in
/usr/lib directory.
2.6 Service Installation
2.6.1 Apache Web Server
To enable the user to develop Web applications, the Apache Web
version 1.3.31 server with PHP libraries version 4.3.5rc3 is installed on
the development environment. Apache is a public-domain open source
HTTP server. (http://httpd.apache.org/) PHP, on the other hand, is a
widely-used general-purpose scripting language that is especially suited
for Web development and can be embedded into HTML. (http://php.net/)
Please refer to steps listed below for the instructions on how to build the
Apache Web server and the PHP library.
1. cd /usr/src/apache_1.3.31
- changes directory to source directory of Apache (/usr/src)
2. ./configure
- runs configuration script of Apache
3. cd /usr/src/php-4.3.5RC3
18
XCI-SX1 SDK / SDK Technical Manual
- changes directory to source directory of PHP (/usr/src)
4.
./configure -–with-apache=/usr/src/apache_1.3.31
- runs configuration script of PHP with Apache support
5. make
- builds PHP source codes
6. make install
- installs required files to their proper locations
7. cd /usr/src/apache_1.3.31
- changes directory back to Apache source directory
8.
./configure -–activate-module=src/modules/php4/libphp4.a
- Reconfigures Apache with PHP support
9. make
- creates Apache binary files
10. make install
- installs required files to proper locations
The Apache root directory is located in /usr/local/apache. To start
the Apache web server, run /usr/local/apache/bin/httpd.
2.6.2 SNMP
The role of a Simple Network Management Protocol (SNMP) Service on
any computer-based product is to provide a means of remote network
management without having the need to log into the target system.
Additional system monitoring features such system event notifications,
and the like, is also made possible by means of an SNMP service.
On the SmartCam project, the Net-SNMP package (http://netsnmp.sourceforge.net/) is used to detect system ColdStart event and
provide an additional means to determine the product’s network settings.
The Net-SNMP package is installed in /usr/src directory. The steps
below show how to install the said service:
1. ./configure
- configures the build options
19
XCI-SX1 SDK / SDK Technical Manual
- SNMP server has been installed using 2c version
2. make
- builds the package
3. make install
- install the files
In /var/etc/snmp/snmpd.conf
----------------------------------------------------------###########################################################
# First, map the community name (COMMUNITY) into a security
name (local
# and mynetwork, depending on where the request is coming
from):
#---------------------------------------------------------#
sec.name source community
com2sec local 127.0.0.1 private
com2sec smartcam_network 0.0.0.0/0 public
###########################################################
# Second, map the security names into group names:
#---------------------------------------------------------#
group
group
group
group
group
group
group
sec.model
smartcamRWGroup
v1
smartcamRWGroup
v2c
smartcamRWGroup
usm
smartcamROGroup
v1
smartcamROGroup
v2c
smartcamROGroup
usm
sec.name
local
local
local
smartcam_network
smartcam_network
smartcam_network
###########################################################
# Third, create a view for us to let the groups have rights to:
#---------------------------------------------------------#
view all
incl/excl subtree
included .1
mask
80
###########################################################
# Finally, grant the 2 groups access to the 1 view with
different
# write permissions:
#----------------------------------------------------------
20
XCI-SX1 SDK / SDK Technical Manual
#
context model level match read write
notif
access smartcamROGroup ""
any
noauth exact all none
none
access smartcamRWGroup ""
any
noauth exact all all
none
###########################################################
# System contact information
#---------------------------------------------------------sysdescr Sony Smart Camera
###########################################################
# Trap destination
#---------------------------------------------------------trapcommunity public
trap2sink 127.0.0.1
#---------------------------------------------------------------------------------------------------------------------The provided interface library automatically sets trapcommunity item
to coincide with the server’s community name.
To start the SNMP service, run the command below:
snmpd –c /var/etc/snmp/snmpd.conf
To test if the SNMP service has been successfully started, run the
command shown below on the remote host.
snmpwalk -v2c -c public 192.168.63.150 .1.3
The snmpwalk command is included in the Net-SNMP package. The
result of this command should indicate the settings of the SDK
environment.
2.6.3 Pro-FTPD
The Pro-FTPD FTP server has been added in /usr/src directory. This
code has been edited to support 8.3 file naming convention. Please
refer to TM_CFImage.pdf for the modifications done on the said
application to achieve the said requirement.
21
XCI-SX1 SDK / SDK Technical Manual
2.6.4 GKermit
G-Kermit is a Unix program for transferring files with the Kermit
protocol. G-Kermit is a product of the Kermit Project at Columbia
University in New York City. G-Kermit is fast, small, portable, easy to
use, interoperable, low-maintenance, stable, and reliable. It features text
and binary file transfer on both 7-bit and 8-bit connections. Files can be
transferred singly or in groups. Automatic startup configuration is
available
via
the
GKERMIT
environment
variable.
(http://www.columbia.edu/kermit/gkermit.html)
G-Kermit is used to transfer the Look Up Table from a remote host to
the camera device through serial or telnet connection. The application’s
source code in /usr/src has been customized so that the transferred
data will be written to /tmp/.LUTbin.
2.7 SmartCam Build Tree
The build tree contains the development tree where CF images are
created. It’s installed on /usr/src/smartcam-build-tree directory
and linked to /buildtree. For more information on how to use the
build tree, please refer to UM_SDK.pdf document.
2.8 SmartCam Files
The files specifically created for the SmartCam project are also installed
in the development environment on different directories. These files and
their destinations are discussed below.
2.8.1 /usr/smartcam/bin Directory
This directory contains some symbolic links to run GUI setting
application on SDK environment.
2.8.2 /usr/smartcam/include Directory
22
XCI-SX1 SDK / SDK Technical Manual
This directory contains the header files of the drivers and libraries
created for this project. These file are grouped according to its purpose
as described below:
•
gpio
This folder contains the header files of the APIs provided for the
controlling the GPIO ports. Files provided include gpiolib.h
header file.
•
camera
The smartcam subdirectory contains the smartcam.h file. This file
is the header file of the camera driver.
•
flash
The header files needed to create an application using the flash
driver are located in this directory. The skxflash.h file is the
header file for the flash driver while the flash.h file is the header
file for the flash library.
•
smartcamlib
This directory contains the header files for the common libraries that
provides interface with the camera driver and with the configuration
file. These files are listed below:
o
o
o
o
fparser.h
comlib.h
config.h
err.h
2.8.3 /usr/smartcam/lib Directory
This directory contains the libraries and modules for the SmartCam
project. These files are grouped into the following subdirectories:
•
gpio
Files contained in this directory include gpiolib.a and gpiolib.o.
•
flash
Files contained in this directory include flash.o.
•
smartcamlib
This directory contains the following libraries:
o fparser.o
o comlib.o
23
XCI-SX1 SDK / SDK Technical Manual
o config.o
2.8.4 /usr/smartcam/gui Directory
This directory contains the symbolic-linked files used for the
smartcam.gui application. It contains the keyboard folder which
contains all the images for the software keyboard used on the GUI
application. It also contains the standard folder which in turn contains
the images used for displaying the GUI application.
2.8.5 /usr/smartcam/src Directory
This directory contains source code of drivers and libraries.
•
camera
Camera driver (GPL),
•
flash
Flash library .
•
skxflash
Flash driver (GPL).
•
smartcamlib
Commom library.
2.8.6 /usr/smartcam/sample Directory
The sample codes are located in this directory.
•
camera-register
Samples for setting camera registers.
•
camera-video
Samples for getting camera image.
•
gpio
A sample for read/write GPIO ports.
•
flash
A sample for reading flash content.
24
XCI-SX1 SDK / SDK Technical Manual
•
smartcamlib
Samples for using common libraries.
2.8.7 /sbin/ Directory
Some system specific files are added to /sbin directory. The SDK
users can try them on SDK environment.
/sbin File Listing
Filename
CamConfig
ledC
ledD
skxinport
skxled
skxoutport
skxswt
gpio
gpiodemo
atoi
char
htoi
Description
Sets and queries the camera registers
The client application for GPIO LED control.
The server daemon application that listens for GPIO
LED control command
Sets and queries the status of the GPIO input ports
Sets and queries the status of the GPIO input ports
Sets and queries the status of the GPIO output ports
Sets and queries the status of the GPIO switch ports
A script that provides a user interface of all the GPIO
applications.
An executable for all GPIO scripts.
This application converts ASCII string to its integer
value.
This application converts a string to uppercase,
checks and validates an argument type depending
on the options.
This application is used to convert hexadecimal
value to its integer equivalent.
The upx application has also been added on this directory. This
application compresses the binary application to a smaller size. Other
files for the upx application are installed in /usr/src/upx-1.25linux directory.
2.8.8 /etc/init.d/ Directory
The launch_it script required by the launcher application is added on
this directory. This script executes the GUI application if the GUI option
is selected on the launcher application. Otherwise, if the user chooses
25
XCI-SX1 SDK / SDK Technical Manual
the third party application on the launcher option and if a third party
application is present on the /var/etc/plugins directory, the third
party application will be launched.
Another configuration customized for this environment is the syslog file.
The option for the klogd setting has been changed to level 2 by adding
this line to the file:
KLOGD="-c 2"
26