1
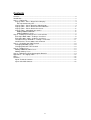
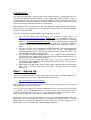
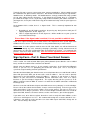
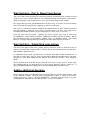
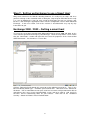
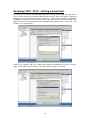
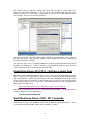
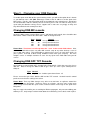
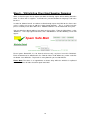
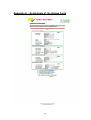
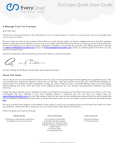
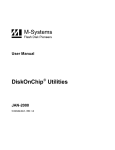
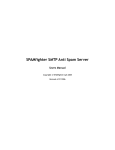
Document: Configuration Technical Manual
Version: 2.3
Author: Mark Andrew Smith
Date: 18th August 2014
Contents
Contents .................................................................................................................................... 2
Introduction ................................................................................................................................ 3
Step 1 – Signing Up................................................................................................................... 3
Sign Up Form - Part 1: About Your Company....................................................................... 4
EU Intra Community VAT.................................................................................................. 4
Sign Up Form - Part 2: About the Administrator ................................................................... 4
Sign Up Form - Part 3: About Your Email Domain................................................................ 5
Sign Up Form - Part 4: About Your Server............................................................................ 6
Sign Up Form - Submitting your entries ................................................................................ 6
Adding additional domains................................................................................................ 6
Adding additional servers.................................................................................................. 7
Step 2 - Setting up Exchange to use a Smart Host................................................................... 8
Exchange 2000 / 2003 – Setting a smart host ...................................................................... 8
Exchange 2007 / 2010 – Setting a smart host .................................................................... 10
Hosted Exchange 2010/2013 – Setting a smart host.......................................................... 11
Small Business Server 2008 / 2011 onwards ..................................................................... 11
Step 3 – Changing your DNS Records.................................................................................... 12
Changing DNS MX records ................................................................................................. 12
Changing DNS SPF TXT Records ...................................................................................... 12
Step 4 – Adding Users............................................................................................................. 13
Adding Additional Admin Users........................................................................................... 13
Adding Ordinary Users ........................................................................................................ 13
Step 5 – Whitelisting Client And Supplier Domains................................................................. 14
Appendix A – The Signup Form .............................................................................................. 15
Notes ....................................................................................................................................... 16
Contacts................................................................................................................................... 16
Agent Technical Contacts ................................................................................................... 16
Spam Safe Mail Contacts.................................................................................................... 16
2
Introduction
This getting started guide is aimed at those non technical business administrators who are
currently using Microsoft Exchange Server, versions, 2000, 2003, 2007 and 2010. If you are
using another type of server, then please feel free to follow this user manual, however, please
read this guide in conjunction with your own mail server’s technical user guide, with special
reference to using a smart host in which to send email via.
Spam filtering can be a tricky business, but, if you follow this getting started guide, all of the
work to achieve everything you need is already done for you, and most clients will find this
guide suits all of their needs.
There are essentially five simple to follow steps to complete, they are:
1. Sign up for Spam Safe Mail using the automated signup wizard at:
http://www.SpamSafeMail.com/signup Please note: The information entered is
actually used to set you up in real time, and not to capture your data in a marketing
database. A sales person will not call you. You are dealing with an automated
setup process that if successful, will have your account up and running within 60
seconds and your domain filtering within 15 minutes from clicking the “Signup...”
button.
2. Set your server to use our smart host for all outbound email. This will enable our mail
gateways to learn of the language used in your business, and additionally,
automatically white list your contacts from outbound email sent via the service. Full
easy to follow instructions are given below.
3. Alter your DNS records for both MX and SPF. This is slightly more complicated, but,
we will give you the settings below, and nearly all clients complete this themselves, or
with the help of their domain name company.
4. Set your users up to see their own spam sin bin. This can be setup for them to
automatically register and do this once we know your domain name. This step makes
user administration a doddle.
5. Inform Spam Safe Mail of your clients and/or suppliers domain names by white listing
them. This is because while Spam Safe Mail is learning, email can still flow
unhindered.
Step 1 – Signing Up
There are a number of ways to setup your company with Spam Safe Mail, however, the
simplest and quickest way is to use and complete the simple form at:http://www.SpamSafeMail.com/signup
This section will let you know which parts of the form achieve what you need. Please refer to
Appendix A for a view of the signup form.
There are quite a few fields that need to be completed to ensure that your mail system works
as it should. These are highlighted with a red spot. Please ensure that you pay special
attention to the fields with a red spot. In each section on the signup form, there is also a
“help” section offering you a quick help or reminder for each of the fields.
We suggest if you have two or more domains to set up, that you set up the domain that your
Exchange server uses for outbound email, ie, the primary email domain address. You can
always add the extra domain (or domains) later post signup, one you have logged in as the
administrator. See the section entitles “Adding additional domains”.
3
So, we will work through the setup of a fictitious company called ACME Limited, with a
domain name of www.ACME.com so that you can compare what is entered with your own
company, dealing with each section of the form in turn.
Sign Up Form - Part 1: About Your Company
In the top section, entitled “Part 1: About Your Company”, this is all about the billing
information, ie the name of your company, address, telephone number and importantly, email
address, as this is where your automated invoice email will be sent to. The first line of the
address and country is required.
You will notice that the telephone field is not a requirement, however, should you want to
complete it, we suggest in the international format, ie, +353 (0) 1 234 5678
You may be surprised that we do not need a postcode/ZIP code. This is because in some
countries, like here in Ireland, we do not rely on a postcode. Since we will email invoices to
you, we really do not need it except for printing it on the invoice for you.
If you are VAT registered, you will need to enter you VAT number here to obtain a VAT
invoice. Please see the next section regarding foreign VAT.
EU Intra Community VAT
Mark Andrew Smith Limited is a company registered in the Republic of Ireland. If you are a
company located in the EU and registered for VAT outside the Republic of Ireland, then by
entering your VAT number here, we will charge you VAT at 0%, and we will expect you to
follow the EU Intra Community VAT charging arrangements and account for, and reclaim, the
VAT yourselves. For more information on this, please see:http://www.revenue.ie/en/tax/vat/guide/intra-community-supplies.html
Companies registered outside the EU will not be charged VAT.
Sign Up Form - Part 2: About the Administrator
In Spam Safe Mail, there are four types of user. They are:
User Type
Role
Maintenance
Agents
Client Admin
End User
Spam Safe Mail staff
Agents technical staff
You
User in your company
As you can see, we need to be able to get you setup on Spam Safe Mail so that you can
administer your own domain(s) within the system.
Please note: an “Agent” is a reseller of Spam Safe Mail, who could be your IT support
company, ISP, web hosting company or another party. They will also offer you technical
advice if you have purchased Spam Safe Mail through them. We (the Spam Safe Mail staff)
will support your Agent fully with technical and maintenance advice. In the Spam Safe Mail
portal, agents are also referred to as “Partners”.
So, what do you need to enter? Simply your first name and last name. All Spam Safe Mail
administrator usernames are in the format “firstname.lastname@company”. Please notice
that it looks like an email address, but, it is not. It is simply because there might be two
Patrick Murphy’s in two different companies on Spam Safe Mail.
4
Typically, like most systems, you need to enter your password twice. All passwords need to
be a minimum of 6 alpha numeric characters. We do not recommend using car registrations,
football teams, or dictionary words. We would however, strongly recommend using a jumble
of 9 or more alpha numeric characters. If you forget the password, there is a “forgotten”
password on the login screen, so you only really need to remember your admin username. If
you forget this, check your email for the copy of the automated setup email, or your Agent can
assist.
At the bottom of this section, there is a “Agent Code”. This is extremely important for two
reasons:
1. By omitting it, we will invoice you direct, by-passing any deal you have with your IT
support department, or ISP, Agent, etc.
2. Your IT support department, or ISP, Agent etc., will be unable to see your system to
assist with technical help.
Please Note: If the Agent code is omitted, it is not possible to add this later.
If you are a registered charity, you need to call our sales department for a special Agent code
to obtain the free service. Technical advice is then provided direct by us from Ireland.
Please note: If reseller partners omit to enter the full client details, we will not know not to
contact them during any sales marketing campaigns, potentially causing embarrassment all
round, more so if we then accidentally quote and undercut the partner. It is important that
partners enter their client details fully. Our non-contact agreement will cover partners
from us calling them direct.
Sign Up Form - Part 3: About Your Email Domain
In this section, we need to know about your primary domain (more domains can be added
later), and where to deliver filter email for each domain.
Simply enter the domain name, ie, in our example “acme.com”, in the field named Domain
Name, as you can see, it is prompting you to omit the “www.” part. This is used by the
system to accept incoming email for your domain.
Now that we know about your domain name, we need to know where to send filtered email to.
Now, with Spam Safe Mail, you do not need a static IP address. You can enter a dynamic
DNS name in the field marked “Server IP Address”. However, if you do have a static IP
address on your leased line or broadband Internet connection, then, enter it in square
brackets as per the example in Appendix A. The square brackets tell the system it is an IP
address and not a numeric DNS “A” record. It is rather like the SMTP connectors in Microsoft
Exchange itself.
We have a version and flavour of Spam Safe Mail to meet every company’s needs or budget.
Please refer to the website for full details, features and current pricing. A license type needs
to be entered into. If you are unsure, choose “Free” to get started. You can use “Free” as a
demo license for as long as you want. There is no time length restriction to the free version of
Spam Safe Mail, however, to remove adverts, or take extra features, you need to upgrade.
If you want users to be able to register themselves and see only their own mailbox, set the
“Can Users Self Register?” to “Yes”. We recommend leaving this set to the default of “Yes”.
If however, you want to create you own users later within Spam Safe Mail, change this to
“No”. You can always alter it later.
5
Sign Up Form - Part 4: About Your Server
Your server will need to log onto our smart host gateway and identify itself, in which to send
email via our service, so that addresses are automatically white listed and the system learns
about the language used in your business, then, you need to complete this section.
We suggest that you enter your NetBIOS name of your server, as it makes it easier to identify
your server from our comprehensive logging system in case of faults.
Your servers smart host username should not be “Administrator” or “root”, and we will detect
this and disallow it. However, please pick a username that is sensible. We suggest here
something like ACME-smarthost, ie your company then a dash, then a username.
Enter the smart host password. Typically, like most systems, you need to enter your
password twice. All passwords need to be a minimum of 6 alpha numeric characters. We do
not recommend using car registrations, football teams, or dictionary words. We would
however, strongly recommend using a jumble of 7 or more alpha numeric characters.
Sign Up Form - Submitting your entries
You will need to agree to our terms, pricing, privacy statement, and let us know that you are
authorised to enter into a contract with us. Please click on the relevant links to view the terms
and conditions and privacy etc.
On completion of your entry, you will receive a welcome email with all your credentials on. If
not, and an error occurs, then an error message will be displayed and the process will stop.
Simply press your “Back” button on your browser and correct the mistake. Then simply try
again.
Please log in to Spam Safe Mail to check that you have access to the system. At this stage
you should be able to see what you have set up in Clients, Domains, Servers, and Users. If
you need additional domains adding, now is the ideal opportunity to add them now.
Adding additional domains
Please log in to Spam Safe Mail with your new client admin username and password. Click
on the “Domains” button. Click on your existing domain to open it. Make a note of the
settings, then press “Cancel.” Click on “Add Domain”. Complete all of the fields as per your
existing domain, albeit with the new domain name. Here is an example:-
6
Please Note: If you have an agent, please remember to add the agent code into the security
group followed by a space and your own security group, and set “Invoice/Charge Partner” to
st
“Yes”. Leave “Expiry” blank, the system will complete this as the 1 of the next month.
Adding additional servers
You can have domains delivered to different servers. Simply alter the IP address in the
domains screen for that domain. Also, don’t forget to add another smart host username into
the servers screen in the same manner as above. You can have as many servers as you
want.
7
Step 2 - Setting up Exchange to use a Smart Host
Many none technical users find this daunting, however, it is really easy to setup, and since
you have already set the credentials with us during the setup of Spam Safe Mail, then it really
is a case of following the steps for your version of Exchange that you are using in your
business, and entering the appropriate entries into the configuration screens within Microsoft
Exchange. In the next section, each of the versions is described with easy step by step
instructions for you.
Exchange 2000 / 2003 – Setting a smart host
To set up the “smart host” function within Microsoft Exchange Server 2000 and 2003, on the
server console go into the Exchange System Manager. Locate and expand the server section
then the “Connectors” section and right click and select the properties of the “Internet Mail
SMTP Connector”. You should see a screen like:-
Click on “Forward all mail through this connector to the following smart hosts”. Then, in the
box immediately below type:- “smarthost.spamsafemail.com”. Now click on the “Advanced”
tab above. You are now about to enter your smart host username and password to be able to
authenticate your server to our SpamSafeMail system and to be able to send email via
ourselves and to automatically white list your contacts. Now click on the “Outbound
Security...” button and choose “Basic Authentication”.
8
Now click the “Modify...” button to enter your SpamSafeMail username and Password as
follows:-
Please Note: Where it says user, is where you enter your smart host username.
Click “OK” three times and restart your Microsoft Exchange Server to reset the outgoing email
queues.
You can check your server is sending outbound via Spam Safe Mail by looking at the logs in
the Spam Safe Mail portal. If there is no traffic, send something, and please give your own
server a couple of minutes to adjust to the routing change.
9
Exchange 2007 / 2010 – Setting a smart host
To set up the “smart host” function within Microsoft Exchange Server 2007 and 2010, on the
server console go into the Exchange Management Console (Start, All Programs, Microsoft
Exchange Server 2010, Exchange Server Console). Locate and expand the Organisation
Configuration section, then the “Hub Transport” section and click the “Send Connector” tab.
Right click and select the properties of the “Windows SBS Internet Send...” connector. You
should see a screen like this:-
Click on the “Network” tab, then, “Route mail through the following smart host” and click
“Add”. The location to route mail to is “smarthost.spamsafemail.com”, like this:-
10
After clicking “OK” to apply the setting, your server will be trying to send email via us.
However, it will need to authenticate. The set this up, look slightly further down the screen
underneath where the smart host is displayed, where it says “Smart Host Authentication”.
Click “Change” and a screen like this will appear:-
Enter your smart host username and password using “Basic Authentication”. Press OK twice,
then right click on the send connector, disable it, and re-enable it to reset the connector and
force it to pick up these settings.
You can check your server is sending outbound via Spam Safe Mail by looking at the logs in
the Spam Safe Mail portal. If there is no traffic, send something, and please give your own
server a couple of minutes to adjust to the routing change.
Hosted Exchange 2010/2013 – Setting a smart host
Microsoft is soon to withdraw Small Business Server, and is offering hosted Exchange server
online. This has many advantages in that the servers are kept up to date with all software
and security patches. However, for clients that need to route outbound emails via our system
so that it learns from the language used in the body of the email, they will need to configure
the hosted Exchange to use a smart host. Full information on this can be found on the
Microsoft Technet website at:http://technet.microsoft.com/en-us/library/jj723128(v=exchg.150).aspx
Both SMTP and Opportunistic TLS are supported on SpamSafeMail. The location that the
smart host connector needs to point to is:smarthost.spamsafemail.com
Small Business Server 2008 / 2011 onwards
Small Business Server since 2008 has had Exchange 2007 or later bundled with it. Please
use the above Exchange 2007 / 2010 / 2013 instructions as above.
11
Step 3 – Changing your DNS Records
To enable Spam Safe Mail to filter your incoming emails, you will need to point what is known
as your domain name’s MX (Mail eXchange) records at the IP addresses of the Spam Safe
Mail service. For this, you will need to log on to your domain name control panel. Should you
run into difficulties with the control panel, or feel that you are not sure what to click, please
speak with your domain naming service support staff as most are very happy to help, and
they will know their own control panel best.
Changing DNS MX records
Locate the DNS settings (not the DNS servers), and look for mail records, there should be two
MX records. Make a note of the old records. Add, or change them to:Type
MX
MX
MX
MX
Priority
10
20
30
40
Record
mx1.spamsafemail.com.
mx2.spamsafemail.com.
mx3.spamsafemail.com.
mx4.spamsafemail.com.
Please Note: That there is a full stop after the “.com” in the record fields above. Also,
that it is not advisable to have any other MX records setup to any other “backup” server in
case a loop takes place. This would allow a spammer free access to send spam emails via
your systems, and lead to black listing outbound emails from your company. We have
multiple servers in multiple countries to cater for any Spam Safe Mail node being out of
service.
Changing DNS SPF TXT Records
Next, look for a record called “SPF” (Sender Policy Framework). If this does not exist, please
add one. Add, or change the DNS record of type “SPF” (or “TXT” if your control panel is
older) to.
Type
TXT
Record
v=spf1 a mx include:spamsafemail.com -all
Please ensure that you “Save” both the MX and the TXT records. Go back into this control
panel to ensure that the settings have taken.
Please Note: That any DNS changes may take 24 to 48 hours to replicate around the
Internet, so please be patient. However, after 6 to 12 hours, you may start seeing spam
emails being received into the spam sin bin, and transactions in the logs on the Spam Safe
Mail portal.
May we suggest that whilst you are waiting for DNS to propagate, why not start adding your
ordinary users, and perhaps let them know about the new filtering service that is now in place.
12
Step 4 – Adding Users
There are two ways that you can add ordinary users, however, administrators for your
business must be added manually.
Adding Additional Admin Users
The simplest way is to clone your self. Sign on with your admin account, and click on “Users”.
Then click on your own admin username. Make a note of all the settings. Then, click
“Cancel” to return to the Users list. Click “Add User”, and enter the new details of the new
administrator. Please keep the username in the same format as your own, ie ensure that
both usernames end in “@client” or “@domain”, as this will make it easy for identifying users
across different clients, for support staff.
For fine tuning user permissions, please see the main user manual, as this is a quick start
guide.
Adding Ordinary Users
Ordinary users sign on to Spam Safe Mail using their email address and a PIN. If you elect
for automatic signup, then this is already done for you. To enable this feature, look in the
“Domain” screen for the “Users Self Register” option. They can then self register from the
login page, receiving a username and PIN password securely by email.
To manually add an ordinary user, click on “Users”, then “Add User”.
following:Field
Username
Password
Permissions
Client Name
Filter
Security Group
Approved To Login
Please enter the
Enter
<users email address>
<4 or 5 digit PIN>
<leave blank>
<same as your own>
<users email address>
<same as your own>
Yes
In order to get started quickly, it is strongly recommended to allow users to take advantage of
the self registration process, as, only the correct end user will securely receive their own PIN.
13
Step 5 – Whitelisting Client And Supplier Domains
When a client first goes live on Spam Safe Mail, the filtering engine will no nothing about the
client, it’s clients nor it’s suppliers. It will not have yet learned about the language used in the
business.
In order for inbound emails to continue to flow through Spam Safe Mail to the clients own
server, it will be necessary to add these other known domains. This is a simple few click
process and only needs to be done once. Additional domains can be whitelisted at any time.
You can whitelist a domain within a few simple and easy clicks. From the “Main Menu”, select
“Whitelists”. In the top right hand corner, click “Add Whitelist” and the following screen will
appear.
Please ignore “DomainID”, it is for internal reference only, so please leave this field blank.
Enter the domain to be whitelisted in the “Domain Name” field without any “www.” and click
the button “Save Whitelist”. Repeat for as many domains you need to whitelist.
Please Note: That there is an approximate 5 minute delay whilst the whitelist is replicated
around the cluster of nodes that form Spam Safe Mail.
14
Appendix A – An Example of the Signup Form
15
Notes
Contacts
Your first port of call for technical support should be with your agent. However, should they
go out of business, we can transfer support to us direct. Please call our sales department
below to have this setup for you. Spam Safe Mail is a service owned and operated by Mark
Andrew Smith Limited in Ireland, company details below.
Agent Technical Contacts
(please complete)
Spam Safe Mail Contacts
Mark Andrew Smith Limited
22 Northumberland Road
Ballsbridge
Dublin 4
Ireland
Telephone:
ROI: +353 (0) 1 254 2801
US: +1 (508) 444 2801
UK: +44 (0) 844 412 5801
A company registered in Ireland
Company Number: 524245
VAT Number: IE2975751JH
Directors: MA Smith, FM Smith
16