1
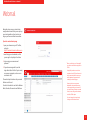
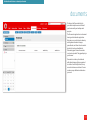
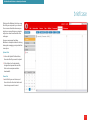
Vodafone Hosted Services
Getting
your email
User guide
Welcome.
This guide will show you how to get your email, now that it is
hosted by Vodafone Hosted Services.
Once you’ve set it up, you will be able to pick up and send email
through online webmail, or your desktop mail application.
And if you’re signed up as a Professional user, you will also be
able to access email from your mobile, and share your calendar,
address book, task manager and documents.
This guide assumes that you are already set up as a user through
Vodafone Hosted Services by your email administrator, and that
they have given you a username and password.
webmail
2
address book
7
calendar
8
professional users
9
documents
10
briefcase
11
desktop mail
12
mobile email
16
dealing with spam email
18
Vodafone Hosted Services – webmail
Webmail
Being able to access your email online
using webmail means that you can pick up
your mail regardless of your location, as
long as you have an internet connection.
Open the webmail main page
• open your browser on your PC or Mac,
and go to
https://webmail.vhsmail.vodafone.com
• save this page as a bookmark, so that
you can get to it quickly in the future
• log in using your username and
password
• if your browser supports it, save the
login details (don’t do this if you’re using
an unsecure computer, such as one in
an internet café).
The webmail portal is where all your email
folders can be found.
You will also be able to see tabs for Address
Book, Calendar, Documents and Briefcase.
1
When you first login you’ll be asked if
you want to view emails using AJAX or
HTML.
Using AJAX provides a much richer
experience than HTML, and because it
stays connected with the server your
email updates will appear without
needing to refresh the page.
However, this also uses up more
bandwidth, and some features may
not be supported by your browser. If
you want to keep your data use under
control, or are using an older browser,
select the HTML option.
You can change this at any time by
clicking on the Preferences tab.
2
Vodafone Hosted Services – webmail
view your mail
The Mail tab is where you view, create and
manage your email.
It works in very much the same way as a
desktop email program, so once you have
selected a message (or messages) you can
use the blue buttons to:
• delete it1
• move it to another folder
• print it
• reply to it
• forward it
• label it as junk
• tag it
Clicking on the name of the sender will
show their email address.
Syncing your email
Because your email is kept in sync, any
changes you make to your email in the
Webmail portal will also be made when
you view your desktop and mobile mail.
If you delete an email, it will not be lost – you can
find deleted emails in the Trash folder.
1
If you delete the emails in the Trash folder then you
won’t be able to restore them.
3
Vodafone Hosted Services – webmail
write a new email
To write a new email, just click on the New
Mail blue button.
• enter the email address to send it
to. If it’s in your address book it will
autocomplete.
• before you add another address, put a
semi-colon ; after the first address
• use the blue buttons to add
attachments, spell check or save it as a
draft
• then click on the Send blue button to
send it.
4
Vodafone Hosted Services – webmail
webmail folders
In the folders column you can view your
Inbox, sent mail, drafts and other email
collections.
You can make new folders to hold
emails related to specific projects or
people:
• click on the New Folder blue button
• enter the name of the new folder
• move related emails into that folder
using the Move blue button.
The Folders column can also contain other
collections, such as Tags (which will show
you emails that have been tagged).
5
Vodafone Hosted Services – webmail
webmail search
You can search through your email folders
just as you can in your desktop email.
Simple searches can be carried out by
entering a word, name or email address
into the Search field. This will look through
all your email messages looking for that
content.
More advanced searches can be carried
out by specifying a search operator – this is
a special keyword followed by a colon, e.g.
‘in:inbox’ returns messages which are in
the inbox folder, whereas ‘from:someone’
returns messages which have the word
“someone” in their email address.
If multiple search terms are entered,
separated by spaces, they are combined
together by default, e.g. ‘in:inbox house’
returns messages which are in the inbox
and which have the word ‘house’ in them.
If you delete an email, it will not be lost –
you can find deleted emails in the Trash
folder. Click on the Preferences tab to
change the Search settings to include the
Trash folder.
6
Vodafone Hosted Services – webmail
address book
Click on the Address Book tab to open your
address book.
This address book is synchronised with
your desktop and mobile Mail programs, so
be careful not to delete contacts you may
need in other situations.
You can enter a name in the top right
Search bar to find a contact or email
correspondent, or just click on the folder
you want to view in the Address Books
column.
Add a new contact
• to enter a new contact, click on the
[New] blue button, and add the details.
Emailed contacts
• this shows the email addresses of the
people who have emailed you.
7
Vodafone Hosted Services – webmail
calendar
Click on the Calendar tab to open your
calendar.
This calendar will be synchronised with
your desktop and some mobile Mail
programs, so any entries you make will
appear there as well.
Calendar views
• click the Day, Work Week, Week, Month,
or Schedule (appointment list) blue
buttons to change the way you view
your calendar entries
• click on the Today button to be taken to
today’s appointments, no matter which
view you’re in.
New entry
• click on the New blue button to choose
a type of new entry, and enter the
details
• you can set alarms, repeats and other
options.
New calendar
• to set up a new calendar – such as one
for personal appointments – click on
the New Calendar blue button.
8
Vodafone Hosted Services – webmail professional
professional users
If your email administrator has signed
up to the Professional Email service, you
may be able to see tabs for Documents
and Briefcase, as well as Address Book and
Calendar.
• if your email administrator has signed
up for the Professional Email service,
they may still have given you only Basic
privileges. Please check with them if you
want to find out if you can access the
Professional features.
9
Vodafone Hosted Services – webmail professional
documents
Clicking on the Documents tab lets
you create simple documents that will
synchronise with your desktop email
program.
The Documents application is a document
sharing and collaboration application
that gives you a central place to develop
and organise information. Images,
spreadsheets, and other rich web content
objects that can be embedded into
Document pages. External documents
can also be uploaded. The pages display in
your browser.
Documents is made up of notebooks
with individual pages that are organized
in a table of contents. By default, every
account includes one notebook. You can
create as many additional notebooks as
you need.
10
Vodafone Hosted Services – webmail professional
briefcase
Clicking on the Briefcase tab lets you copy
files from your computer to your account.
You can access these files whenever you
log into your account from any computer
and you can share these files with other
colleagues.
Like your own personal hard drive,
Briefcase is a complete solution for storing,
sharing and managing your important files
in one place.
Upload a file
• click on the Upload File blue button,
then select the file you want to upload
• if it is a folder, it will automatically
be zipped (compressed into one file,
that can be uncompressed when
downloaded).
View a file
• select the file you want to view, and
then click on the View blue button and
choose how you want to view it.
11
Vodafone Hosted Services – desktop mail
desktop mail
You can also send and receive your emails
from your usual PC or Mac mail program.
What is the difference between POP3
and IMAP?
Setting this up may be slightly more
complicated than for the webmail, but
we will go through the process for the
main email programs you’re likely to have
(Microsoft® Outlook Express®, Microsoft
Outlook 2007®, and Mac OS X Mail). If you
need help, then please contact the person
who sets up your company email.
Everyone using your account has a
mailbox which can receive and store
mail. Employees in your company or
members of your family can have separate
mailboxes.
Once set up, you can just use it like any
other email account.
You can connect to your mailbox using
POP3 or IMAP:
• POP3 – downloads and stores your
messages on your computer
• IMAP – stores your mail folders (inbox,
sent items, etc) on the server and this
means you can view them from any
location (home, office, etc).
Webmail uses IMAP to connect to the
mailbox. If your email client connects
using POP3, you can still use webmail
to view new messages in the inbox (you
won’t be able to see the messages in any
other folders which are stored on your
computer). However, you will only be able
to view the messages whilst your normal
email client is off and not downloading
mail.
12
Vodafone Hosted Services – desktop mail
set up Outlook Express
If you or your users are running Microsoft®
Outlook Express®, you can set it up using
the following steps:
Using IMAP
1 start up Outlook Express. This can be
found in your computer’s “Start” menu.
2 from the menu, click “Tools”, then
“Accounts”
6 type the email address you are
configuring (e.g. me@mydomain.
co.uk) then click the “Next” button
7 your incoming mail server type is IMAP
3 a pop-up window will appear, with
four tabs - “All”, “Mail”, “News” and
“Directory Service”. Click the “Add”
button.
8 your incoming mail server is: imap.
vhsmail. vodafone.com
4 click the “Mail” option
10 select ‘Outgoing server requires
authentication’, then choose ‘Use
same details as my incoming server’
5 the display name is the name that will
appear in the “From” field every time
you send an email. Type in your name,
then click the “Next” button.
9 your outgoing mail server is
mail.vhsmail.vodafone.com
11 Configure the server ports:
Incoming server (IMAP): Port 993
Outgoing server (IMAP): Port 465
Set both to ‘Encryption using SSL’
12 click the “Next” button
13 your “Account Name” is your mailbox
username
14 your “Password” is the mailbox
password
15 click the “Next” button
16 click “Finish”.
Using POP3
Follow steps 1 to 6 above, then:
7 your incoming mail server type is POP3
8 your incoming mail server is: pop.
vhsmail.vodafone.com
9 your outgoing mail server is
mail.vhsmail.vodafone.com
10 select ‘Outgoing server requires
authentication’, then choose ‘Use
same details as my incoming server’
11 Configure the server ports:
Incoming server (IMAP): Port 995
Outgoing server (IMAP): Port 465
Set both to ‘Encryption using SSL’
12 click the “Next” button
13 your “Account Name” is your mailbox
username
14 your “Password” is the mailbox
password
15 click the “Next” button
16 click “Finish”.
13
Vodafone Hosted Services – desktop mail
set up Outlook 2007
If you or your users are running Microsoft®
Outlook 2007®, you can set it up using the
following steps:
Using IMAP
1 start up Outlook 2007. This can be
found in your computer’s “Start” menu.
2 from the menu, click “Tools”, then
“Email Accounts” to start the setup
process
3 select “IMAP”, then click “Next”
4 enter your user information
5 Your Name: this is the name that will
appear in the “From” field every time
you send an email. Type in your name,
then click the “Next” button.
6 type the email address you are
configuring (e.g. me@mydomain.
co.uk) then click the “Next” button
7 your incoming mail server is: imap.
vhsmail.vodafone.com
8 your outgoing mail server is
mail.vhsmail.vodafone.com
9 select ‘Outgoing server requires
authentication’, then choose ‘Use
same details as my incoming server’
11 click the “Next” button
12 for logging on, your “User Name” is
your mailbox username
13 your “Password” is the mailbox
password
14 click the “Next” button
15 click “Finish”
16 close and restart Outlook 2007.
10 Configure the server ports:
Incoming server (IMAP): Port 993
Outgoing server (IMAP): Port 465
Set both to ‘Encryption using SSL’
Using POP3
1 start up Outlook 2007. This can be
found in your computer’s “Start” menu.
configuring (e.g. me@mydomain.
co.uk) then click the “Next” button
2 from the menu, click “Tools”, then
“Email Accounts” to start the setup
process
7 your incoming mail server type is POP3
3 select “POP3”, then click “Next”
9 your outgoing mail server is
mail.vhsmail.vodafone.com
4 enter your user information
5 Your Name: this is the name that will
appear in the “From” field every time
you send an email. Type in your name,
then click the “Next” button.
6 type the email address you are
8 your incoming mail server is: pop.
vhsmail.vodafone.com
10 select ‘Outgoing server requires
authentication’, then choose ‘Use
same details as my incoming server’
Set both to ‘Encryption using SSL’
12 click the “Next” button
13 for logging on, your “User Name” is
your mailbox username
14 your “Password” is the mailbox
password
15 click the “Next” button
16 click “Finish”
17 close and restart Outlook 2007.
11 Configure the server ports:
Incoming server (IMAP): Port 995
Outgoing server (IMAP): Port 465
14
Vodafone Hosted Services – desktop mail
set up Mac OS X Mail
If you or your users are working on an
Apple Macintosh, using OS X Mail, you can
set it up using the following steps:
Using IMAP
1 open Mail from the Applications folder
email address, up to the @ sign
2 from the menu, click “Mail”, then
“Preferences”
8 your password is the same as the one
you entered earlier
3 click on the “Accounts” tab, then click
on the + box under the list of accounts
– this starts the Add Account helper
9 click Continue
4 enter your name, full email address,
and password, then click Continue
5 set the account type to IMAP
6 your incoming mail server is: imap.
vhsmail.vodafone.com
7 your user name is the first part of your
13 click Continue – the helper will then
verify that your settings are correct – if
not, please contact your adminstrator
14 click Finish to end the set up process.
10 the helper will then verify that your
settings are correct – if not, please
contact your adminstrator
11 your outgoing mail server is
mail.vhsmail.vodafone.com
12 if asked, tick Use Secure Sockets
Layer (SSL), and choose Password
authentication – add your full
username and password
Using POP3
Follow steps 1 to 4 above, then:
5 set the account type to POP
6 your incoming mail server is: pop.
vhsmail.vodafone.com
7 your user name is the first part of your
email address, up to the @ sign
11 your outgoing mail server is
mail.vhsmail.vodafone.com
12 if asked, tick Use Secure Sockets
Layer (SSL), and choose Password
authentication – add your full
username and password
8 your password is the same as the one
you entered earlier
13 click Continue – the helper will then
verify that your settings are correct – if
not, please contact your adminstrator
9 click Continue
14 click Finish to end the set up process.
10 the helper will then verify that your
settings are correct – if not, please
contact your adminstrator
15
Vodafone Hosted Services – mobile email
mobile email
Now you can also send and receive your
emails on most modern models of mobile
phone – they don’t have to be Vodafone
ones.
Setting this up will be slightly different
for each phone operating system, but we
will show the process for the Nokia Series
60 and Apple iPhone. If your phone isn’t
mentioned, you should be able to see the
common information you need to put in.
Once set up, you may need to refer to your
phone’s documentation in order to receive
and send emails.
16
Vodafone Hosted Services – mobile email
access your email via a mobile browser
Use the following URL to access your email
via a mobile browser:
http://web.mail.vhsmail.vodafone.com/m
To access your email from a mobile
client using POP/IMAP, use the similar
configuration details to a standard desktop
email client:
@
1 IMAP hostname: imap.vhsmail.
vodafone.com with SSL enabled
2 POP hostname : pop.vhsmail.vodafone.
com with SSL enabled
3 SMTP hostname : mail.vhsmail.
vodafone.com with SSL enabled.
17
Vodafone Hosted Services – dealing with spam email
dealing with spam email
Your email administrator will decide
the overall anti-spam settings for your
company. However, if you find you are still
getting more spam than you’re happy with,
or important emails are being blocked,
you can make additional changes to your
account.
This allows you to add further filters to the
anti-spam, adjust how aggressive the spam
filtering is, and set their own whitelist and
blacklist.
Go to the user anti-spam settings
• Log in to the main Vodafone Hosted
Services portal with your user login, and
click on the Anti-spam tab.
Add new filters
Filters allow you to define what email gets
stopped, using many of different attributes
– what domain they are sent from, what
the subject is, etc.
• click on the Search tab, which will show
you all the emails that are being caught
by your anti-spam
• click on the Add filter menu bar, and
choose an option from the drop-down
menu, then click on Add filter
• as you add filters, new emails will be
added to the Search list as they are
caught by the filters.
Adjust the anti-spam aggressiveness
You can change the overall aggressiveness
which the anti-spam software applies to
your email. See Anti-spam settings for
more information on this.
• click on the Anti-Spam tab, adjust the
Spam threshold slider, then click Update
settings.
Add to your whitelist and blacklist
You can add email addresses and other
identifiers to a whitelist (which will
guarantee that email from there will get
through to your inbox) or a blacklist (which
makes sure that you never see mail from
there in your inbox).
For more information, see Blacklists and
whitelists.
• click on the Lists tab, which will show
you your existing whitelist and blacklist
settings
• add the email or IP addresses you want.
18
© 2010 Vodafone Group. VODAFONE, the VODAFONE logos are trade marks of Vodafone Group.
Other product names mentioned herein may be the trade marks of their respective owners.