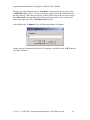
1
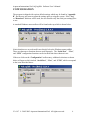
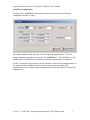
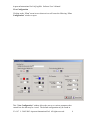
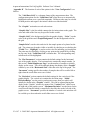
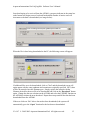
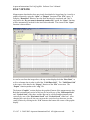
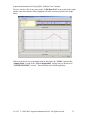
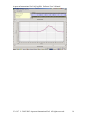
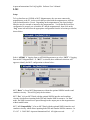
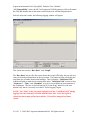
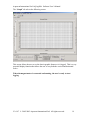
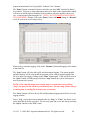
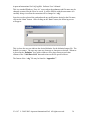
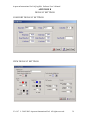
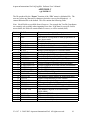
AQLogEdit
User Manual
DRAFT COPY
NOTE: THIS DRAFT COPY MANUAL IS CONFIDENTIAL PROPRIETARY
INFORMATION AND IS NOT TO BE COPIED OR DISTRIBUTED WITHOUT
THE EXRESS WRITTEN PERMISSION OF AQUASCAN INTERNATIONAL
LTD.
© 2002-2003 Aquascan International Ltd. All rights reserved.
V 1.0.4.7
Aquascan International Ltd. AQLogEdit Software User’s Manual
CONTENTS
Cover
...................................................................................................................1
Page of Contents.....................................................................................................2
Installation ..............................................................................................................3
Introduction............................................................................................................4
Program Startup ....................................................................................................5
Configuration .........................................................................................................6
Serial Port Configuration ..........................................................................7
View Configuration ..................................................................................8
UTM Configuration ................................................................................10
Download AX2000 ...............................................................................................11
File Viewing ..........................................................................................................14
Log
.................................................................................................................16
Setup .......................................................................................................16
Raw Data Tab .........................................................................................17
Graph Tab ...............................................................................................18
To Start Logging .....................................................................................19
Comment.................................................................................................21
Pause .......................................................................................................23
Stop .........................................................................................................23
Close .......................................................................................................23
Import .................................................................................................................24
Pnav.........................................................................................................24
Export .................................................................................................................29
Errors .................................................................................................................31
Appendix A (File Types and Extensions)...........................................................32
Appendix B (Default Settings) ............................................................................33
Appendix C (.vdg File Format)...........................................................................35
V1.0.4.7 © 2002-2003 Aquascan International Ltd. All rights reserved.
2
Aquascan International Ltd. AQLogEdit Software User’s Manual
INSTALLATION
AQLogEdit is written for execution on Microsoft Windows platforms. It should function
on systems withWindows98 or higher. Note: for very large amounts of data, a large
amount of RAM memory is used in the PC or Laptop. If the machine does not have
adequate RAM memory, memory paging will occur and the program performance will be
greatly reduced. A minimum of 128MB of RAM memory is recommended.
AQLogEdit is distributed on a CD and contains the following files:
AQLogEdit
AQLogEdit.exe
Lib
AquaScan.jpg
Download.ega
Files.ega
SerialPort.ega
UTM.ega
View.ega
Projects
AQLogEdit User Manual.pdf
Folder
Program file
Folder
Aquascan logo image
Program Control File
Program Control File
Program Control File
Program Control File
Program Control File
Folder
User Manual in pdf format
To install AQLogEdit, it is suggested that the user copy the AQLogEdit folder to the
Windows Desktop. It can be copied to other locations, but wherever it is copied, the
“Lib” folder must be in the same directory or folder as the AQLogEdit program file.
A shortcut may be established on the desktop if desired.
To execute AQLogEdit, simply double click on the AQLogEdit.exe icon.
V1.0.4.7 © 2002-2003 Aquascan International Ltd. All rights reserved.
3
Aquascan International Ltd. AQLogEdit Software User’s Manual
INTRODUCTION
AQLogEdit is a software tool provided to facilitate data logging from the Aquascan
AX2000 Proton Magnetometer and also any of the Aquascan MC5 Proton
Magnetometers which are equipped with a serial port output. The program also provides
the Download function for downloading data from the AX2000 Magnetometer memory.
Viewing functions are provided for data as it is being logged, or for previously logged or
downloaded data.
AQLogEdit uses several file types to facilitate data format identification and processing.
These file types are identified and explained in subsequent sections. A list of the file
types may be found in “Appendix A”.
The primary function of this program is to record and safeguard the data acquired by a
magnetometer so the precious time and effort spent in doing a survey is not lost. As part
of this function, all logged or downloaded data is saved in a “Raw” format exactly as it is
received from the magnetometer. It is recorded in a file with the appropriate file type
(see “Appendix A”), depending on the various user selections to indicate which
magnetometer and options the user has. An additional copy of the data may also
recorded by means of the “Export” function which has a “.vdg” extension added to the
file name. This is an AQLogEdit proprietary format which is described in “Appendix
C”.
The “Raw” data file is never altered by the AQLogEdit program and is available for use
as the user may see fit. Many magnetometer users have developed or acquired their own
software or methods of using this data and they can continue to do so by utilizing the
“Raw” data file.
If the user has previously recorded data files and wishes to view them with the
AQLogEdit program, they may do so. The program will open (using the “Open”
function of the “File” option in the Windows menu) “.log” files which have been
produced by the old DOS “Logger” program “Download file” function in either “data
string” or “graphic” format. The user may also open files which were previously
produced by the old DOS “Logger” program “Log to disc” function. The program will
assume that any “.log” file is in one of these formats and will attempt to process it. If it
cannot process the file, it will issue an error message and give the user an option to
specify the format of the data.
(NOTE: GRAPHIC FORMAT NOT SUPPORTED AT THIS TIME).
V1.0.4.7 © 2002-2003 Aquascan International Ltd. All rights reserved.
4
Aquascan International Ltd. AQLogEdit Software User’s Manual
PROGRAM STARTUP
When AQLogEdit is invoked, the user will see a welcome screen as shown below.
Clicking anywhere on the screen will remove the logo.
V1.0.4.7 © 2002-2003 Aquascan International Ltd. All rights reserved.
5
Aquascan International Ltd. AQLogEdit Software User’s Manual
CONFIGURATION
The program is shipped with various default settings which may be found in “Appendix
B”, but the user may want to adjust the settings prior to using the system. If the “Log”
or “Download” functions will be used, the user should verify the serial port settings prior
to use.
A standard Windows menu toolbar will be found at the top which is shown below:
Notice that there are several small icons directly below the Windows menu toolbar.
These are shortcuts to functions that are used frequently. The “Serial Port”, “View”,
and “UTM” configuration functions can be invoked from these shortcut icons.
If the user clicks on the “Configuration” toolbar entry, additional selections as shown
below will appear which include “Serial Port”, “View”, and “UTM”, which correspond
to the icons described above:
V1.0.4.7 © 2002-2003 Aquascan International Ltd. All rights reserved.
6
Aquascan International Ltd. AQLogEdit Software User’s Manual
Serial Port Configuration
Clicking on the “Serial Port” menu item or shortcut icon will cause the following
configuration window to open:
The default settings should generally work for Aquascan magnetometers. The only
change which may normally be required is the “COM Port #”. This should be set to the
number of the COM Port on the computer to which the magnetometer is connected.
NOTE: If using the “Log” function, the PC should be connected to the magnetometer via
the Aquascan Opto-Isolated Interface Circuit to insure proper operation of the
magnetometer. Newer model Aquascan magnetometers have this interface built into the
magnetometer.
V1.0.4.7 © 2002-2003 Aquascan International Ltd. All rights reserved.
7
Aquascan International Ltd. AQLogEdit Software User’s Manual
View Configuration
Clicking on the “View” menu item or shortcut icon will cause the following “View
Configuration” window to open:
This “View Configuration” window allows the user to set various parameters that
control how the data may be viewed. The default configuration may be found in
V1.0.4.7 © 2002-2003 Aquascan International Ltd. All rights reserved.
8
Aquascan International Ltd. AQLogEdit Software User’s Manual
“Appendix B”. The function of each of the options in the “View Configuration” is as
follows:
The “Valid Data Grid” is a columnar format of the magnetometer data. The
configuration options for the “Valid Data Grid” allow the user to automatically
highlight deviations over a specified magnitude. Different colors may be selected
for both positive and negative deviations which exceed the threshold.
The “Graphic” section has several sub-sections:
“Graphic Line” is the line which connects the deviation points on the graph. The
color and width of the line may be specified in this section.
“Graphic Grid” is the background grid for the graphic display. “Color” sets the
color of the grid lines and “Graph Background” sets the background color for
the grid.
“Sample Point” sets the color and size for the sample points to be plotted on the
grid. The points may be made visible or invisible by checking or un-checking the
“Visible” box. “Highlight” is used to set the color for indicating a selected point.
The point may be selected by clicking on any point on the graph OR by clicking
on any entry in the “Valid Data Grid” columnar data. The corresponding entry
in both areas will be highlighted.
The “Plot Parameters” section contains the default settings for the horizontal
axis of the graphic display. The horizontal axis contains the sample number. In
this section, “Initial Samples per Page” sets the number of samples to initially
display on the screen. This can be adjusted during data display in the “Graphic”
window by use of the “Horizontal Scale” slider bar at the top of the graph. The
“Increment” setting specifies the number of samples that will be scrolled left or
right when the scroll slider arrows are clicked.
The “Deviation” section contains the default settings for the vertical axis if the
graphic display. The vertical axis contains the deviation range. “Initial
Deviation Range” sets the positive and negative range from zero which will
initially be shown in the “Graphic” window. This can be adjusted during data
display in the “Graphic” window by means of the “Vertical Scale” slider bar on
the right side of the graphic screen. “Maximum Deviation” sets the limits for the
vertical scroll function which is controlled by the slider bar on the left side of the
graphic screen. “Increment” specifies the number of vertical scale units that will
be scrolled up or down when the scroll slider arrows are clicked.
V1.0.4.7 © 2002-2003 Aquascan International Ltd. All rights reserved.
9
Aquascan International Ltd. AQLogEdit Software User’s Manual
“UTM Configuration”
Clicking on the “UTM” menu item or shortcut icon will cause the following “UTM
Configuration” window to open:
Clicking on the down-arrow at the right of the “Map Datum” box will allow the user to
select from a group of standard map datums as shown below:
This “Map Datum” setting is utilized for the UTM conversion which takes place in the
“Export” function (described in another section). The user should make sure this “Map
Datum” setting matches the setting in the GPS used to obtain the coordinate data
recorded.
V1.0.4.7 © 2002-2003 Aquascan International Ltd. All rights reserved.
10
Aquascan International Ltd. AQLogEdit Software User’s Manual
DOWNLOAD
To download data from an AX2000 Magnetometer, the user must connect the
magnetometer to the PC via the serial cable provided with the magnetometer. Verify that
the Serial Port configuration is properly set, then click on the “Download” menu item.
The following menu selection will appear:
Select “AX2000”. The following window will appear:
FIRST choose the format to be used to download from the AX2000, either “Graphic” or
“Data String” (refer to AX2000 User’s Manual). This will set the file type
appropriately. NOTE: GRAPHIC DOWNLOAD NOT CURRENTLY
IMPLEMENTED.
Then select the icon to the right of the file name field to browse for the correct path
which will produce a window like this:
V1.0.4.7 © 2002-2003 Aquascan International Ltd. All rights reserved.
11
Aquascan International Ltd. AQLogEdit Software User’s Manual
Select the path desired and then fill in the name desired to use for the file to be
downloaded and click on “Save”, this will fill in the correct path, file name, and
extension in the previous window. In the sample below, the name “testfile” was filled in
before the “Save” button was clicked.
Now all is ready to Download data from the AX2000 Magnetometer. Click on the
“Download” button and the following screen will appear:
The “Reading” will remain on the screen until the download begins or until the user
clicks the “Cancel” button.
NOTE: Always initiate the “Download” function on the PC before initiating the
Export function on the AX2000. See the AX2000 operations manual for instructions
on how to initiate the AX2000Export and select the data set etc.
V1.0.4.7 © 2002-2003 Aquascan International Ltd. All rights reserved.
12
Aquascan International Ltd. AQLogEdit Software User’s Manual
Once data begins to be received from the AX2000, a progress indicator in the status bar
at the bottom will begin to move back and forth and the number of entries read will
increment as the data is downloaded (see image below):
When the file is done being downloaded to the PC, the following screen will appear:
If additional files are to be downloaded, click on “Yes” and the download screen will
again appear with the same pathname and extension as originally specified. BUT, there
will be an asterisk where the filename goes. Simply replace the asterisk with the
filename desired for the next file to be downloaded and click on the “Download” button
again. Change the data set selection on the AX2000 and select the EXPORT function on
the AX2000 to initiate the next download. Repeat these steps until all the data has been
downloaded from the AX2000.
If the user clicks on “No” after a data set has been downloaded, the system will
automatically go to the “Open” function for the last data set downloaded.
V1.0.4.7 © 2002-2003 Aquascan International Ltd. All rights reserved.
13
Aquascan International Ltd. AQLogEdit Software User’s Manual
FILE VIEWING
Magnetometer data that has been previously downloaded or logged may be viewed in a
graphical format by using the “Open” or “Reopen” functions of the “File” menu. If
using the “Download” function, once the final download is completed, and “No” is
selected for the “Do you want to download another file” option, the “Open” function
will be automatically invoked for the last file downloaded. The screen for the “Open”
function is shown below:
As can be seen from the image above, the top section displays both the “Raw Data”, as
well as columnar data in what is called the “Valid Data Grid”. The “Valid Data Grid”
is the source of the data for the “Export” function of the “File” menu item. The
“Export” function produces the “.vdg” file.
The bottom “Graphic” section displays the graphical format of the magnetometer data.
Both the horizontal and vertical scales may be varied by use of the “Horizontal Scale”
and “Vertical Scale” slider bars; and the data can be scrolled both horizontally and
vertically by user of the “Horizontal Scroll” and “Vertical Scroll” slider bars. After
changing the vertical scroll, the user can reset the vertical scale so that zero is at the
center position by clicking on the “Y=0” button at the bottom left corner of the graphic
display.
V1.0.4.7 © 2002-2003 Aquascan International Ltd. All rights reserved.
14
Aquascan International Ltd. AQLogEdit Software User’s Manual
The user can also click on any entry in the “Valid Data Grid” or any point on the graph
and the same data element will be highlighted in other section as shown in the image
below:
If the user desires to see each sample point on the graph, the “Visible” option in the
“Sample Point” section of the “View Configuration” settings may be checked (see
“CONFIGURATION” section). This will result in the following display.
V1.0.4.7 © 2002-2003 Aquascan International Ltd. All rights reserved.
15
Aquascan International Ltd. AQLogEdit Software User’s Manual
V1.0.4.7 © 2002-2003 Aquascan International Ltd. All rights reserved.
16
Aquascan International Ltd. AQLogEdit Software User’s Manual
LOG
Setup
To Log data from an AX2000 or MC5 Magnetometer, the user must connect the
magnetometer to the PC via the serial cable provided with the magnetometer AND an
Opto-Isolated Interface Circuit. Depending on the magnetometer, the Opto-Isolated
Interface may be external or internal to the magnetometer. Verify that the Serial Port
configuration is properly set on both the PC and the magnetometer, then click on the
“Log” menu item and select the appropriate configuration from the selections provided as
shown below:
Select “AX2000” if logging from an AX2000 Magnetometer or select “MC5” if logging
from an MC5 Magnetometer. If “MC5” is selected, three additional selections will
appear to identify the MC5 configuration as shown below:
MC5 “Basic” is for an MC5 Magnetometer without the optional NMEA interface and
combiner circuitry. This will log only the deviations.
MC5 “Pro” is for an MC5 fitted with the optional NMEA interface and combiner
circuitry which allows inputting both GPS and Sounder NMEA sentences. In “Pro”
mode, the NMEA sentences are passed through to the output port on the magnetometer
without modification.
MC5 “AX Compatibility” is for an MC5 fitted with the optional NMEA interface and
combiner circuitry which allows inputting both GPS and Sounder NMEA sentences. In
V1.0.4.7 © 2002-2003 Aquascan International Ltd. All rights reserved.
17
Aquascan International Ltd. AQLogEdit Software User’s Manual
“AX Compatibility” mode, the MC5 will output an AX2000 sentence which will contain
the GPS and Sounder data in the same record format as an AX2000 Magnetometer.
Once the selection is made, the following logging window will appear:
This screen has two tabs; “Raw Data”, and “Graph”.
The “Raw Data” tab provides the screen shown above and will display the raw data as it
comes in from the magnetometer in the top section. The bottom section will display the
same data in a columnar format with headings. This is titled the “Valid Data Grid”.
Additional fields are added to the original data in the “Valid Data Grid” section such as
“Sequence #”, “Time”, and “Comment”, as well as several different representations of
the coordinates. The time is derived from the PC in the “Log” function, so the user
should verify that it is correctly set in the PC before logging begins.
NOTE: The “Time” in the Log mode is displayed in the “Valid Data Grid” during
logging, but is not currently recorded with the other data. Once the log file is
closed, the time stamps will not be available. This will be changed in a future
release.
V1.0.4.7 © 2002-2003 Aquascan International Ltd. All rights reserved.
18
Aquascan International Ltd. AQLogEdit Software User’s Manual
The “Graph” tab selects the following screen:
This screen allows the user to see the data in graphic format as it is logged. This is a very
powerful display function that allows the user to vary both the vertical and horizontal
scales. .
When the magnetometer is connected and running, the user is ready to start
logging.
V1.0.4.7 © 2002-2003 Aquascan International Ltd. All rights reserved.
19
Aquascan International Ltd. AQLogEdit Software User’s Manual
To Start Logging
To begin logging once everything set in AQLogEdit as desired AND the magnetometer
is connected to the PC and running, simply click on the “Start” button from either the
“Graph” screen or the “Raw Data” screen. The following window will appear:
This is where the name and location for the log file is determined. This is a standard
Windows file selection and naming function. In the example above, the file name
“ax2000logtest” has been used in the “Projects” folder.
V1.0.4.7 © 2002-2003 Aquascan International Ltd. All rights reserved.
20
Aquascan International Ltd. AQLogEdit Software User’s Manual
Once these fields are filled in, just click on “Save” and the following screen will appear:
Note that the name of the file appears in the top banner of the window. Also note that
Function Keys are defined at the bottom of the screen for ease of use on a moving boat.
V1.0.4.7 © 2002-2003 Aquascan International Ltd. All rights reserved.
21
Aquascan International Ltd. AQLogEdit Software User’s Manual
Logging will begin and will continue until the user clicks on the “Pause”, the “Stop”, or
the “Close” button or corresponding Function Key. The “Raw Data” screen will show
the data as it is received from the magnetometer as can be seen below:
V1.0.4.7 © 2002-2003 Aquascan International Ltd. All rights reserved.
22
Aquascan International Ltd. AQLogEdit Software User’s Manual
V1.0.4.7 © 2002-2003 Aquascan International Ltd. All rights reserved.
23
Aquascan International Ltd. AQLogEdit Software User’s Manual
The user may enter comments in the “Comment” section next to any log entry in the
“Valid Data Grid” section. To enter a comment, simply click in the comment box for
the entry desired. If the entry has already scrolled off the screen, the user may deselect
the “Auto Scroll” function and position the desired entry on the screen via the scroll
slider at the right side of the “Valid Data Grid” section.
After clicking in a “Comment” box, the following window will appear:
Simply enter the comment desired up to 256 characters, and click on the “OK” button to
record the comment.
V1.0.4.7 © 2002-2003 Aquascan International Ltd. All rights reserved.
24
Aquascan International Ltd. AQLogEdit Software User’s Manual
Clicking on the “Graph” tab will take the user to the corresponding “Graph” screen will
represent the same data in a graphic plot format as shown below:
V1.0.4.7 © 2002-2003 Aquascan International Ltd. All rights reserved.
25
Aquascan International Ltd. AQLogEdit Software User’s Manual
V1.0.4.7 © 2002-2003 Aquascan International Ltd. All rights reserved.
26
Aquascan International Ltd. AQLogEdit Software User’s Manual
The “Graph” screen comes up in “Auto Scroll” mode which means the data will scroll to
the left as new data is logged, once the initial screen is full. During the logging process,
if the user desires to look at some data that has scrolled off the screen, simply deselect
the “Auto Scroll” by clicking on the box, and then manually scroll back and forth
through the data as desired. Going out of “Auto Scroll” mode does NOT stop the
logging. Data will continue to be logged while in “Manual Scroll” mode. To resume the
automatic scrolling, simply click on the “Auto Scroll” box again
V1.0.4.7 © 2002-2003 Aquascan International Ltd. All rights reserved.
27
Aquascan International Ltd. AQLogEdit Software User’s Manual
The “Pause” button is intended for times when the user does NOT want the log data to
be recorded. This may be when adjustments have to be made to the magnetometer which
will cause invalid deviations (bringing in the towfish to adjust the depth or check on it
etc.), or when passing known targets etc.. (NOTE: DATA IS NOT LOGGED WHILE
IN PAUSE MODE) Simply click on the “Pause” button which will change to “Resume”
as can be seen in the screen image below:
When ready to continue logging, click on the “Resume” button and logging will continue
to the same file.
The “Stop” button will close the log file and discontinue logging. The current graphic
and data displays will be cleared and the program will be ready to begin logging a new
file if so desired by simply clicking on the “Start” button again. If the user does click on
the “Start” button AFTER having clicked the “Stop” button, the system will require a
new file name to be entered.
NOTE: If the same file name as previously used is re-used after having clicked
“Stop”, the previous file will be overwritten and lost. The operating system will give
a warning that an existing file is about to be overwritten.
The “Close” button will close the log file and discontinue logging and will also close the
logging window.
Once a “Log” session has been terminated either by “Stop” or “Close”, the data is saved
on the hard disk in the file specified. The user may open and review the data by invoking
the “Open” function of the “File” menu.
V1.0.4.7 © 2002-2003 Aquascan International Ltd. All rights reserved.
28
Aquascan International Ltd. AQLogEdit Software User’s Manual
V1.0.4.7 © 2002-2003 Aquascan International Ltd. All rights reserved.
29
Aquascan International Ltd. AQLogEdit Software User’s Manual
IMPORT
The “Import” function of the “File” menu allows data from other logging or recording
systems to be imported into AQLogEdit. The supported formats will be shown in a dropdown menu as shown below:
Pnav
Pnav is proprietary software from Effective Solutions. Pnav is a very powerful survey
tool which supports multiple NMEA inputs and has flexible output parsing capabilities.
The great advantage of Pnav is that it can be configured to calculate the coordinates of
the towfish based on the length of the cable and the position of the GPS antenna on the
vessel. This makes locating a potential target from logged data much easier.
Please refer to the Pnav users manual for additional information on the log file
creation.
To “Import” a Pnav file, simply click on the “Pnav” selection of the “Import” dropdown menu. This will take the user to a screen as shown below:
V1.0.4.7 © 2002-2003 Aquascan International Ltd. All rights reserved.
30
Aquascan International Ltd. AQLogEdit Software User’s Manual
To import a Pnav file correctly, the first step is to locate the file by clicking on the folder
icon to the right of the “File” box in the window. This is a standard Windows function.
Once the correct file has been located and is in the “File” box, the next step is to define
the optional NMEA fields.
There are many optional fields that can be defined in Pnav via its powerful parsing
feature. The standard and optional Pnav fields that are used by AQLogEdit are as
follows:
@t
@p
@+
@1-@0
Time
Position (of the GPS antenna)
Position of the towed device (towfish position)
Optional parsed fields generally used to capture the Deviation,
Towfish Depth, and Sounder Depth readings.
When Pnav is configured for a magnetometer survey, the user should insure that the
standard fields are included in the output data. For AQLogEdit to process the data, the
minimum requirement is for at least one of the coordinate fields (@p or @+) and the
magnetometer deviation field as defined in one of the optional @# fields (@1-@0).
If @t is included, the “Time” field in the “Valid Data Grid” will be filled in with this
value.
If both @p and @+ are included in the data, the Towfish coordinates in the “Valid Data
Grid” will be derived from the @+ data, and the GPS coordinates in the “Valid Data
Grid” will be derived from the @p data. This is very useful if the user is recording
Sounder data since the sounder transducer is usually located on the vessel as is the GPS
antenna. Thus, the Sounder data can be associated with the GPS coordinates obtained
from the @p data and the magnetometer deviation data can be associated with the towfish
coordinates from the @+ data.
The user must know in advance which optional parsed Pnav fields correspond to the
“Deviation”, “Towfish Depth”, and “Sounder” data elements. To identify these to
AQLogEdit, the user must perform the following steps:
With the “Import” “Pnav” window open and the file selected in the “File” window as
shown below:
V1.0.4.7 © 2002-2003 Aquascan International Ltd. All rights reserved.
31
Aquascan International Ltd. AQLogEdit Software User’s Manual
Click on the down arrow to the right of the “NMEA Fields” box. This will display the
optional Pnav fields which have been defined in the selected dataset as shown below:
As stated above, the user must know in advance which fields contain which data. Select
one of the NMEA optional fields, and then click on the down arrow to the right of the
“Fixed Fields” box as shown below:
V1.0.4.7 © 2002-2003 Aquascan International Ltd. All rights reserved.
32
Aquascan International Ltd. AQLogEdit Software User’s Manual
This will display the fields which AQLogEdit can use. Select the “Fixed Fields” option
that corresponds to the “NMEA Fields” selection currently displayed. In this case “@3”
corresponds to the “Dev” or Deviation data from the magnetometer. Once the two
selection have been made, click on the “+” to the left of the “Links” box. This will add
the associated fields to the “Links” box as shown below.
Continue to perform the above association process until all defined “NMEA Fields” are
associated with ”Fixed Fields” as shown below:
Once all of the associations have been made, click on the “OK” button, and the Pnav data
will be imported into AQLogEdit. The screen will appear as shown below during the
import process:
V1.0.4.7 © 2002-2003 Aquascan International Ltd. All rights reserved.
33
Aquascan International Ltd. AQLogEdit Software User’s Manual
Once the data has been loaded into AQLogEdit, the user can view the data in a similar
fashion to that described in the “File Viewing” section. A sample view of an imported
Pnav file is shown below:
V1.0.4.7 © 2002-2003 Aquascan International Ltd. All rights reserved.
34
Aquascan International Ltd. AQLogEdit Software User’s Manual
EXPORT
The “Export” function of the “File” menu allows the data contained in the “Valid Data
Grid” to be exported to a delimited file. The delimiter can be selected by the user. A
delimited file is very useful for producing a variety of reports and for use by
commercially available analysis and survey software.
To utilize the “Export” function, the user must be in any of the file viewing screens
provided by the “Open” or “Import” functions.
After clicking on the “File” menu item and selecting “Export”, the following screen will
appear:
All supported export formats will appear in a drop down menu. At this time, the only
supported format is the delimited file which will have the “.vdg” extension (representing
“Valid Data Grid”).
If the “VDG” option is selected, the following screen will appear:
V1.0.4.7 © 2002-2003 Aquascan International Ltd. All rights reserved.
35
Aquascan International Ltd. AQLogEdit Software User’s Manual
This is a standard Windows “Save As” screen where the pathname and file name may be
changed or entered for the file to be saved. It will be filled in with the same name as is
currently being viewed but the extension will be changed to “.vdg”.
Once the user has selected the path and made any modifications desired to the file name,
click on the “Save” button. After clicking on the “Save” button, the following screen
will appear:
This is where the user can indicate the desired delimiter for the delimited output file. The
default is a comma. The user may enter any character or characters as desired. Whatever
is placed in the “Delimiter” box in this window will be placed between each data
element of the “Valid Data Grid” data and written to the file specified above.
The format of the “.vdg” file may be found in “Appendix C”.
V1.0.4.7 © 2002-2003 Aquascan International Ltd. All rights reserved.
36
Aquascan International Ltd. AQLogEdit Software User’s Manual
ERRORS
During any of the “Open”, “Import”, or “Log” functions, errors detected in the raw data
will be logged to a temporary error file. Note: records with errors are NOT included
in the “Valid Data Grid”, but ARE recorded in the “Raw Data”.
The number of errors will be displayed at the bottom of the screen next to the word
“Errors:”. There will also be an “Errors” button to the right of the error count. To view
and/or save the temporary error file, simply click on the “Errors” button and the
following screen will appear:
The user can scroll through the errors by utilizing the slide bar on the right side, and the
temporary error file may be saved by clicking on the “Save” button and specifying the
path and filename desired in a standard Windows “Save As” function.
The error messages will usually be self-explanatory, but may sometimes be a little
confusing. In the above example the message says “Deviation Field missing or wrong
length - expected length of: 5”. In reality, the Deviation field is expected to be either a
“+” or “-“ sign followed by 5 digits. Lines 1 and 2 are missing the sign, and line 3 is one
digit short, but they all have the same error message.
V1.0.4.7 © 2002-2003 Aquascan International Ltd. All rights reserved.
37
Aquascan International Ltd. AQLogEdit Software User’s Manual
APPENDIX A
DATA FILE TYPES AND EXTENSIONS
EXTENSION
.axs
.axg
.axl
.mcb
.mcp
.mcc
.vdg
.cmt
FILE DESCRIPTION
AX2000 download data in “data string” format
AX2000 download data in “graphic” format
AX2000 log data
MC5 Basic log data
MC5 Pro log data
MC5 in AX2000 compatibility mode log data
Valid Data Grid - produced by the Export function
Comment file associated with Raw Data file of same name
NOTE: The “.cmt” file contains the comments associated with the “Raw
Data” file of the same name. These comments are merged into the “Valid
Data Grid” when the file is opened via the ”Open” or “Reopen” options of
the “File” menu. If any Raw Data filename is changed by the user after
AQLogEdit has created it, the corresponding “.cmt” file (if any) must be
renamed to the same name in order for the comments to be associated with
the Raw Data.
V1.0.4.7 © 2002-2003 Aquascan International Ltd. All rights reserved.
38
Aquascan International Ltd. AQLogEdit Software User’s Manual
APPENDIX B
DEFAULT SETTINGS
COM PORT DEFAULT SETTINGS
VIEW DEFAULT SETTINGS
V1.0.4.7 © 2002-2003 Aquascan International Ltd. All rights reserved.
39
Aquascan International Ltd. AQLogEdit Software User’s Manual
UTM DEFAULT SETTING
V1.0.4.7 © 2002-2003 Aquascan International Ltd. All rights reserved.
40
Aquascan International Ltd. AQLogEdit Software User’s Manual
APPENDIX C
.vgd FORMAT
The file produced by the “Export” function of the “File” menu is a delimited file. The
user may select any character or characters desired to serve as the delimiter(s). A
comma-delimited file is the default. This file contains the following fields.
Note: Not all fields are available from all sources. For example the Towfish Coordinates
are currently only available when importing Pnav data. If the data for a specific field is
not available, the field will contain blanks or zeroes, or will be omitted (null).
Field # Field Name
1 #
2 Time
3
4
5
6
7
8
9
10
11
12
12
13
14
15
16
17
18
19
20
21
22
23
24
RD#
DEV
TF LAT D
TF LAT M
TF N/S
TF LON D
TF LON M
TF E/W
TF DEPTH
SOUNDER
TF DECIMAL Lat
TF DECIMAL Lon
TF UTM Z
TF UTM EAST
TF UTM NORTH
GPS LAT D
GPS LAT M
GPS N/S
GPS LON D
GPS LON M
GPS E/W
GPS DEC Lat
GPS DEC Lon
25
26
27
28
G UTM Z
GPS EAST
GPS NORTH
Comment
Contents
Sequence number of Valid Data Grid entries
Time from PC in Log mode or from @t parameter in
Pnav Import mode
Raw Data entry number
Deviation from the magnetometer including sign
Towfish Latitude Degrees
Towfish Latitude Minutes in format MM.mmm
North or South indicator for Towfish Latitude
Towfish Longitude Degrees
Towfish Longitude Minutes in format MM.mmm
East or West indicator for Towfish Longitude
Depth of the Towfish (if available) in Meters
Sounder depth reading in Meters (if available)
Towfish Latitude in Decimal Format (DD.ddddd)
Towfish Longitude in Decimal Format (DDD.ddddd)
Towfish UTM Zone
Towfish UTM Easting coordinate
Towfish UTM Northing coordinate
GPS antenna Latitude Degrees
GPS antenna Latitude Minutes in format MM.mmm
North or South indicator for GPS Latitude
GPS antenna Longitude Degrees
GPS antenna Longitude Minutes in format MM.mmm
East or West indicator for GPS Longitude
GPS antenna Latitude in Decimal Format (DD.ddddd)
GPS antenna Longitude in Decimal Format
(DDD.ddddd)
GPS antenna UTM Zone
GPS antenna Easting coordinate
GPS antenna Northing coordinate
Comment (entered by user)
V1.0.4.7 © 2002-2003 Aquascan International Ltd. All rights reserved.
41