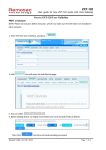
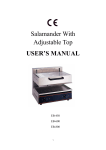
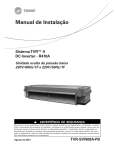
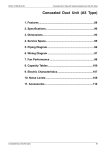
1
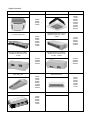
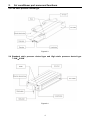
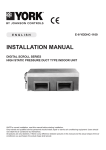
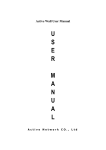
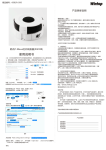
CMV DC Inverter Indoor Unit
Installation and User’s Manual
Applied models:
External appearance
Cooing capacity
Compact four-way cassette unit
External appearance
Cooing capacity
Four-way cassette unit
5600W
7100W
8000W
9000W
10000W
11200W
12500W
14000W
16000W
2200W
2800W
3600W
4500W
Low ESP ducted unit
2200W
2800W
3200W
3600W
4500W
5600W
7100W
Standard ESP ducted unit and
High ESP ducted unit 7.1kW~
9.0kW
7100W
8000W
9000W
10000W
12000W
15000W
High ESP ducted unit 20.0kW~
28.0kW and Full fresh air unit
22.4kW、28.0kW
High ESP ducted unit 10.0kW~
15.0kW and Full fresh air unit
14.0kW
10000W
12000W
14000W
15000W
Floor-ceiling unit
20000W
22400W
25000W
28000W
Wall-mounted unit
4500W
5600W
7100W
8000W
9000W
11200W
14000W
16000W
Short ducted unit
2200W
2800W
3600W
4500W
5600W
7100W
2200W
2800W
3600W
4500W
5100W
5600W
7100W
Thank you for choosing our company products!
Air conditioning facilities are valuable products. In order to protect your legitimate rights and interests,
please make sure that the installations are done by professional technicians. This manual is a
general-purpose version for the conditioning systems manufactured by our CO., the one that you have
chosen might be a little different in appearance from the ones described in the manual. But these
differences will not have any impacts upon your operation and use of the system.
Please read the manual carefully before you operate the system and check to see if the model is identical
to the one you have purchased, keep the manual properly in case you might refer to it in the future.
Addition to the user manual:
The appliance is not intended for use by persons (including children) with reduced physical, sensory or
mental capabilities, or lack of experience and knowledge, unless they have been given supervision or
instruction concerning use of the appliance by a person responsible for their safety. Children should be
supervised to ensure that they do not play with the appliance. The appliance shall be installed in
accordance with national wiring regulations .
Contents
1 Safety instructions
1
2 Air conditioner part name and functions
3
3 Use instructions
7
4 Installation
19
5 Service and maintenance
20
1.
Safety instructions
1. Before use, please read this Manual carefully, and correctly operate according to this Manual.
2. Special attention shall be paid to the meanings of the following two logos:
Warning: It means that disoperation may cause casualties or serious damage.
Attention: It means that disoperation may cause personal injuries or property damages.
Please read the host labels carefully. If any anomaly is found, such as abnormal noise, odor, smoke,
temperature rise, electricity leakage and fire, please cut off the power supply immediately and timely
contact the local service center or dealer of our company, but never attempt to any unauthorized repair. If
necessary, immediately contact your local fire protection and emergency services.
Correct Disposal of this product
This marking indicates that this product should not be disposed with other
household wastes throughout the EU. To prevent possible harm to the
environment or human health from uncontrolled waste disposal, recycle it
responsibly to promote the sustainable reuse of material resources. To return
your used device, please use the return and collection systems or contact the
retailer where the product was purchased. They can take this product for
environmental safe recycling.
!Attention
z
Before installation, check whether all power sources conform to the requirements on the
nameplate and make sure of the power supply safety.
z
Before use, check and confirm whether the electric wires, drain pipes and tubes are firmly
connected to prevent water leakage, refrigerant leakage, electric shock, fire or other
accidents.
z
The power supply socket must be equipped with ground wire to ensure the air conditioner
could be effectively grounded through the power socket and avoid electric shocks. Never
connect the ground wire onto the gas pipes, water pipes, lightning rods or phone wires.
z
Once started, never shut down the air conditioner within 5 minutes’ running, or it will affect
the compressor oil return.
z
Never let kids operate the air conditioner.
z
Never operate the air conditioner if your hand is wet.
z
While cleaning the air conditioner or replacing the air filter, please cut off the power supply at
first.
z
If idle for long, please cut off the power supply.
z
Never step on or place any object on the air conditioner.
z
Power on for leakage test after installation.
1
1.
Safety instructions
! Warning
z
Please contact our authorized service center for installation. Improper installation may result
in water leakage, electric shocks, fires and other accidents.
z
Never put sticks or other objects into the air inlet and outlet.
z
Do use within the required voltage and frequency with protection devices equipped
accordingly. Never use any copper wire to replace the fuse to avoid failures or fires.
z
The air conditioner shall have its ground wire firmly connected with that of the power source.
z
While cleaning, never splash water onto the air conditioner, in order to avoid failures or
electric shocks.
z
Never have the indoor or outdoor unit inlet or outlet blocked to avoid impact on the
performance of the air conditioner and prevent failures.
z
If idle for long, disconnect the power supply to ensure safety and save energy.
z
When restarted after a long-term shutdown, do carefully check whether the air conditioner
and its power lines are normal. If the power lines are damaged or need replacing due to other
reasons, please contact our after-sales service staff or authorized repair professionals to
avoid electric shocks, overheating, fires or other accidents.
z
Never place any water container on the air conditioner to avoid electric shocks due to water
immersion.
z
After a long-term use, please confirm whether the mounting platform is worn, and if worn, the
air conditioner may fall to cause casualties.
z
Never operate the switch if your hand is wet to avoid electric shocks.
z
In time of repair, stop the air conditioner with the power supply cut off, or the high-speed
rotation of the internal wind turbines may lead to injuries.
z
Never use any other fuse beyond the capacity regulated in this Manual. Never use any iron
or copper wire to avoid failures, fires and other consequences. Do use the special circuit
under the rated voltage for air conditioners.
1-1 Electrical safety requirements
1) Wiring work must be done by formally qualified electricians.
2) All wiring work must meet the electrical safety specifications.
3) The air conditioner must be well grounded, namely, the air conditioner must have its main switch
reliably grounded.
4) The air conditioner must be provided with separate power supply according with the rated
parameter value.
2
2.
Air conditioner part name and functions
2-1 Four-way cassette type
Figure 2.1
2-2 Short ducted type
Figure 2.2
3
2.
Air conditioner part name and functions
2-3 Low static pressure ducted type
Figure 2.3
2-4 Standard static pressure ducted type and High static pressure ducted type
7.1kW~9.0kW
Figure 2.4
4
2.
Air conditioner part name and functions
2-5 High static pressure ducted type 10.0kW~15.0kW
Figure 2.5
2-6 Full fresh air type 14.0kW
Figure 2.6
2-7 Full fresh air type 22.4kW、28.0kW and High static pressure ducted type 20.0kW~
28.0kW
Figure 2.7
5
2.
Air conditioner part name and functions
2-8 Wall-mounted type
Figure 2.8
2-9 Floor-ceiling type
Figure 2.9
6
3.
Use instructions
3-1 Use of remote controller
The frequency conversion Wall-mounted type (standard), Floor-ceiling type (standard), Four-way
cassette type (standard), Full fresh air type (optional) and ducted type (optional) have the remote
controller use (Specifications: smart universal type) introduced as follows:
The smart universal remote controllers (compatible to line controllers or lamp panels respectively)
The following remote controller “Swing” button, “High wind” button, “Lamp” button and “Purifier” button
apply to special new models but not to ordinary ones.
!Warning
z
Never put the remote controller close to such heat sources as electric blankets or heating
furnaces.
z
Never put the remote controller at the place subject to direct sunlight.
z
Be careful not to have it fall, or it may be damaged.
z
Never have any obstacle between the signal receiver and the remote controller of the air
conditioner to avoid impact on signal transmission and receiving.
z
Never have water and other liquids splashed on the remote controller.
7
3.
Use instructions
Attention: If the remote controller fails, please replace with new batteries and try again, but if it fails
again, please contact the seller or our authorized service center.
MODE key
It is used for selecting different
modes, such as automatic, cooling,
dehumidifying, heating and
ventilating.
AUTO
COOL
DRY
SLEE P
LAMP
HEAT
FAN
CLEAN
HOLD
Set TEMP key
Press▼ ▲
will decrease or increase
the set temperature and the rang is :
16℃~32
℃
SWING key
It is used for selecting swing and
stopping switching circularly.
ON/OFF key
It is used for starting or stopping AC.
AIR FLOW key
It is used for selecting swing , stable
wind, natural wind and circulating
wind.
FAN SPEED key
It is used for selecting wind speeds
(natural wind, high wind, middle
wind and low wind)
SLEEP key
It is used for selecting sleep mode
and canceling sleep mode.
TIMER key
It is used for setting timing ON/
OFF and regards hour as its union.
HOLD key
It is used for selecting hold mode and
canceling hold mode.
TURBO key
The key doesn’t indicate wind
speed and setting sleep mode or
changing modes will cancel TURBO
operation.
CLEAN key
It is used for selecting purification or
canceling purification.
LAMP key
It is used for selecting
lamp being on or being off.
!Attention
z
Let the remote controller directing at the air conditioner, press the buttons on the remote
controller and the command signal will be sent to the air conditioner.
z
If the signal is correctly received, the air conditioner will “beep”.
3-1-1 Meanings of remote controller symbols
1) This controller is applicable to: ordinary air conditioners except for high-end ones.
2) This controller has its appearance following ELF remote controllers equipped with 13 buttons, and
its LCD screen adopts that of the original ELF LCD screen, with the mask screen printing changed
from the original economic screen printing to the lamp button screen printing (The mask needs
changing due to elimination of the economic function).
3) The LCD displays and masks are introduced as follows: The “Function Options” button
corresponds to the masks below: “auto, refrigeration, dehumidification, heating and ventilation”; The
“Sleep, Lamp, High wind, Purification and Lock” buttons correspond to the masks below: “Sleep,
Lamp, High wind, Purification and Lock”; such functions as temperature regulation, speed regulation,
wind swing, wind direction and timing are displayed with the icons on the LCD screen, specifically as
shown below:
•Temperature display:
displays the temperature, with the temperature range of 16-32˚C.
8
3.
Use instructions
•Speed display:
displays the fan speed, the static
indicates the moderate fan speed, the static
indicates low fan speed, the static
indicates the high fan speed and the dynamic
indicates the automatic fan speed.
•Swing display:
displays the outward swing, the static
indicates the natural swing, and the dynamic
•Damper display:
indicates the fixed swing, the static
indicates the automatic swing.
Indicates the status of outward wind swing, the static
swing stop and the dynamic
indicates the wind swing. When
vertically and horizontally, it indicates the three-dimensional wind.
indicates the
is dynamically displayed
3-1-2 Remote controller functions
In time of initial power-on, the remote controller is in its idle state. Press the “On/Off” button to have the
remote controller into its automatic mode. Press the “Mode” button, and the remote controller will switch
“Auto” → “Refrigeration” → “Dehumidification” → “Heating” → “Air Ventilation” → “Auto”. If the remote
controller is in its “Off” state, only such buttons as “On/Off”, “TIMER”, “Purification”, “Lamp” and “Lock” are
valid, but if other buttons are pressed, there is no display. In case of the “Off” state, press the “On/Off” and
“TIMER” buttons to set the setting state of other buttons (based on the setting requirements in different
modes).
1. Auto mode
1) “Running On/Off” button: Press this button to switch “On” → “Off” → “On”. In time of initial power-on
from “Off” → “On”, other button settings will follow the default settings. If not initial power-on from “Off”
→ “On”, such functions as lamp, purification, sleep, high wind and timer will be canceled after
shutdown. Other button settings will follow the settings before “Off”.
2) “-” button: Press “-”, and the display screen still shows 25˚C unchanged.
3) “+” button: Press “+”, and the display screen still shows 25˚C unchanged.
4) “Swing” button: (Outer damper) it shall be in its “Swing” state by default. Press this button to switch
“Swing Wind”, “Fixed Wind”, “Natural Wind” and “Swing Wind”.
5) “Wind Direction” button: (Inner damper) it shall be in its “Swing” state by default. Press this button
to switch “Swing Wind”, “Stop” and “Swing Wind”.
6) “Fan Speed” button: It shall be in its “Automatic Wind” state by default. Press this button to switch
“Automatic Wind”, “High Wind”, “Moderate Wind”, “Low Wind” and “Automatic Wind”.
7) “TIMER” button: It shall be in its “No Timing” state by default. Press this button to set the timer by 1
hour, respectively 1H, 2H, ..., 24H, Cancel and 1H. In the “Off” state, press the “TIMER” button to set
the “On” time, the remote controller displays the running state before “Off” (In case of initial power-on,
it will enter the default state of the auto mode), and the timer displays 1H. Press the “TIMER” button
again to repeat 2H ... 24H, Cancel, 1H, ... in order. In the “On” state, press the “TIMER” button to set
the “Off” time, and the timer displays 1H. Press the “Off” button again to repeat 2H ... 24H, Cancel,
1H, ... in order. After the timer function is set, decrease every 1 hour until the “On” or “Off” time, and
simultaneously disables the timer display. If the “Mode” button is pressed in time of “Timing”, the
“Timing” will not be cancelled. (Note: When the “TIMER” is actuated, press any other button, for
example, the “Swing Wind” button, and the timing signal will be sent out.)
8) “High Wind” button: It shall be in the state of “No High Wind” by default, and in the “Auto” mode, the
“High Wind” button has no effect. (Press the “High Wind” button, and there is no display or code
sending)
9) “Sleep” button: It shall be in the “No Sleep” state by default, press the “Sleep” button to switch
“Sleep”→ “Sleep Cancel” → “Sleep”. If it is in the state of “Sleep”, the “Sleep” will not be cancelled
after the mode is switched. (Note: If the air conditioner is running in its low fan speed and the speed
can be adjustable, press the “Sleep” button again to cancel sleep and come back to the running state
9
3.
Use instructions
before sleep setting. The “Sleep” button can be used to shut off the screen, namely, shut off the
multiple-color screen in split air conditioners but the backlight in the package chillers.)
10) “Lock” button: It shall be in the “Unlocking” state by default, press this button and the remote
controller will switch “Lock” → “Unlock” → “Lock”. When the “Lock” button is actuated, all buttons
except for the “Lock” button on the remote controller have no effect. (Note: When the “Lock” button is
actuated, the package remote controller and air conditioner operation panel will have all the buttons
locked automatically, but automatically unlocked when this button is pressed again. In split air
conditioners, only remote controller will be locked, instead of the emergency button, but the main
board will have response.)
11) “Lamp” button: It shall be in the “No Lamp Display” state by
default, press this button and the remote controller will switch
“Lamp Display” → “Lamp Display Cancel” → “Lamp Display” . If
the “Lamp Display” is actuated, the “Lamp Display” will not be
cancelled after the “Mode” button is pressed. Press this button
when the remote controller is in its “Off” state, and the remote
controller will switch “Lamp Display” → “Lamp Display Cancel”
→“Lamp Display” .
12) “Purification” button: It shall be in the “No Purification” state by
default, press this button and the remote controller will switch
“Purification” → “Purification Cancel” → “Purification” . If the
“Purification” is actuated, the “Purification” will not be cancelled
after the “Mode” button is pressed. Press this button when the
remote controller is in its “Off” state, and the remote controller will
switch “Purification” → “Purification Cancel” →“Purification” .
!Attention
z Never use new and old batteries together.
z The remote controller should have its batteries taken out when idle for long.
z In general conditions, the dry batteries meeting the JIS or IES standard can have the service life
of 6-12 months, but if beyond the service time or not meeting the above specifications, the dry
batteries may be subject to leakage and may even disable the remote controller operations.
z The “recommended service life” is marked on batteries, but the actual service time may be
shorter.
2. “Cooling” mode
1) “Running On/ Off” button: Press this button and the remote controller will switch “On” → “Off” →
“On” . After shutdown, it will cancel such functions as “Lamp”, “Purification”, “Sleep”, “High Wind” or
“Timing”.
2) “-” button: The set temperature will have 1°C decreased once this button is pressed, and the
Celsius models will decrease progressively from “32°C → 31°C→…→17°C→16°C”;
3) “+” button: The set temperature will have 1°C increased once this button is pressed, and the
Celsius models will increase progressively from “16°C → 17°C→…→31°C→32°C”;
4) “Swing” button: Press this button to switch “Swing” → “Fixed Wind” → “Natural Wind” → “Swing” .
5) “Wind Direction” button: Press this button to switch “Swing” → “Stop” → “Swing” .
6) “Fan Speed” button: Press this button to switch “Auto Wind” → “High Wind” → “Moderate Wind” →
“Low Wind” → “Auto Wind” .
10
3.
Use instructions
7) “TIMER” button: Press this button to set the timer by 1 hour, respectively 1H, 2H, ..., 24H, Cancel
and 1H. In the “Off” state, press the “TIMER” button to set the “On” time, the remote controller
displays the running state before “Off” (In case of initial power-on, it will enter the default state of the
auto mode), and the timer displays 1H. Press the “TIMER” button again to repeat 2H ... 24H, Cancel,
1H, ... in order. In the “On” state, press the “TIMER” button to set the “Off” time, and the timer displays
1H. Press the “Off” button again to repeat 2H ... 24H, Cancel, 1H, ... in order. After the timer function
is set, decrease every 1 hour until the “On” or “Off” time, and simultaneously disables the timer
display. If the “Mode” button is pressed in time of “Timing”, the “Timing” will not be cancelled. (Note:
When the “TIMER” is actuated, press any other button, for example, the “Swing Wind” button, and the
timing signal will be sent out.)
8) “High Wind” button: Press this button, and the remote controller will switch “High Wind” →
“Cancel”→ “High Wind”. When the “High Wind” button is actuated, it will display the fan speed, but the
“High Wind” will be cancelled after the mode is converted and if it is set as sleep running, then the
“High Wind”running will be cancelled. ( Note: In the “High Wind”mode, the air conditioner has its fan
speed set as “High Wind”. At this time, the remote controller can have the fan speed set, but it will
have no effect on the air conditioner.)
9) “Sleep” button: Press the “Sleep” button to switch “Sleep”→ “Sleep Cancel” → “Sleep”. If it is in the
state of “Sleep”, the “Sleep” will not be cancelled after the mode is switched. Set the “High Wind”
running to cancel the “Sleep” running.
10) “Lock” button: Press this button and the remote controller will switch “Lock” → “Unlock” → “Lock”.
When the “Lock” button is actuated, all buttons except for the “Lock” button on the remote controller
have no effect. (Note: When the “Lock” button is actuated, the package remote controller and air
conditioner operation panel will have all the buttons locked automatically, but automatically unlocked
when this button is pressed again. In split air conditioners, only remote controller will be locked,
instead of the emergency button, but the main board will have response.)
11) “Lamp” button: Press this button and the remote controller will switch “Lamp Display” → “Lamp
Display Cancel” → “Lamp Display”. If the “Lamp Display” is actuated, the “Lamp Display” will not be
cancelled after the “Mode” button is pressed.
12) “Purification” button: Press this button and the remote controller will switch “Purification” →
“Purification Cancel” → “Purification”. If the “Purification” is actuated, the “Purification” will not be
cancelled after the “Mode” button is pressed.
3. “Dehumidification” mode:
1) “Running On/Off” button: Press this button and the remote controller will switch “On” → “Off” →
“On”. After shutdown, such functions as lamp, purification, sleep, high wind and timer will be canceled.
In time of “Off” → “On”, other button settings will follow the settings before “Off”.
2) “-” button: Press “-”, and the display screen still shows 25˚C unchanged.
3) “+” button: Press “+”, and the display screen still shows 25˚C unchanged.
4) “Swing” button: In the mode of dehumidification, the swing wind is set as “Fixed Wind” and can’t
be adjusted.
5) “Wind Direction” button: Press this button to switch “Swing Wind”→ “Stop” → “Swing Wind”.
6) “Fan Speed” button: In the mode of dehumidification, the fan speed is set as “Low Wind” and can’
t be adjusted.
7) “TIMER” button: Press this button to set the timer by 1 hour, respectively 1H, 2H, ..., 24H, Cancel
and 1H. In the “Off” state, press the “TIMER” button to set the “On” time, the remote controller
displays the running state before “Off” (In case of initial power-on, it will enter the default state of the
auto mode), and the timer displays 1H. Press the “TIMER” button again to repeat 2H ... 24H, Cancel,
1H, 2H ... in order. In the “On” state, press the “TIMER” button to set the “Off” time, and the timer
displays 1H. Press the “Off” button again to repeat 2H ... 24H, Cancel, 1H, 2H... in order. After the
timer function is set, decrease every 1 hour until the “On” or “Off” time, and simultaneously disable the
timer display. If the “Mode” button is pressed in time of “Timing”, the “Timing” will not be cancelled.
11
3.
Use instructions
8) “High Wind” button: In the mode of dehumidification, the “High Wind” button has no effect.
9) “Sleep” button: Press the “Sleep” button to switch “Sleep”→ “Sleep Cancel” → “Sleep”. If it is in the
state of “Sleep”, the “Sleep” will not be cancelled after the mode is switched.
10) “Lock” button: Press this button and the remote controller will switch “Lock” → “Unlock” → “Lock”.
When the “Lock” button is actuated, all buttons except for the “Lock” button on the remote controller
have no effect.
11) “Lamp” button: Press this button and the remote controller will switch “Lamp Display” → “Lamp
Display Cancel” → “Lamp Display”. If the “Lamp Display” is actuated, the “Lamp Display” will not be
cancelled after the “Mode” button is pressed.
12) “Purification” button: Press this button and the remote controller will switch “Purification” →
“Purification Cancel” → “Purification”. If the “Purification” is actuated, the “Purification” will not be
cancelled after the “Mode” button is pressed.
4. “Heating” mode:
1) “Running On/ Off” button: Press this button and the remote controller will switch “On” → “Off” →
“On”. After shutdown, it will cancel such functions as “Lamp”, “Purification”, “Sleep”, “High Wind” or
“Timing”. In time of “Off” → “On”, other button settings will follow the settings before “Off”.
2) “-” button: The set temperature will have 1°C decreased once this button is pressed, and the
Celsius models will decrease progressively from “32°C → 31°C→…→17°C→16°C”;
3) “+” button: The set temperature will have 1°C increased once this button is pressed, and the
Celsius models will increase progressively from “16°C → 17°C→…→31°C→32°C”;
4) “Swing” button: Press this button to switch “Swing” → “Fixed Wind” → “Natural Wind” → “Swing”.
5) “Wind Direction” button: Press this button to switch “Swing” → “Stop” → “Swing” .
6) “Fan Speed” button: Press this button to switch “Auto Wind” → “High Wind” → “Moderate Wind” →
“Low Wind” → “Auto Wind” .
7) “TIMER” button: Press this button to set the timer by 1 hour, respectively 1H, 2H, ..., 24H, Cancel
and 1H. In the “Off” state, press the “TIMER” button to set the “On” time, the remote controller
displays the running state before “Off” (In case of initial power-on, it will enter the default state of the
auto mode), and the timer displays 1H. Press the “TIMER” button again to repeat 2H ... 24H, Cancel,
1H, ... in order. In the “On” state, press the “TIMER” button to set the “Off” time, and the timer displays
1H. Press the “Off” button again to repeat 2H ... 24H, Cancel, 1H, ... in order. After the timer function
is set, decrease every 1 hour until the “On” or “Off” time, and simultaneously disable the timer display.
If the “Mode” button is pressed in time of “Timing”, the “Timing” will not be cancelled.
8) “High Wind” button: Press this button, and the remote controller will switch “High Wind” →
“Cancel”→ “High Wind”. When the “High Wind” button is actuated, it will not display the fan speed, but
the “High Wind” will be cancelled after the mode is converted and if it is set as sleep running, then the
“High Wind” running will be cancelled.
9) “Sleep” button: Press the “Sleep” button to switch “Sleep”→ “Sleep Cancel” → “Sleep”. If it is in the
state of “Sleep”, the “Sleep” will not be cancelled after the mode is switched. Set the “High Wind”
running to cancel the “Sleep” running.
10) “Lock” button: Press this button and the remote controller will switch “Lock” → “Unlock” → “Lock”.
When the “Lock” button is actuated, all buttons except for the “Lock” button on the remote controller
have no effect.
11) “Lamp” button: Press this button and the remote controller will switch “Lamp Display” → “Lamp
Display Cancel” → “Lamp Display”. If the “Lamp Display” is actuated, the “Lamp Display” will not be
cancelled after the “Mode” button is pressed.
12) “Purification” button: Press this button and the remote controller will switch “Purification” →
“Purification Cancel” → “Purification”. If the “Purification” is actuated, the “Purification” will not be
cancelled after the “Mode” button is pressed.
12
3.
Use instructions
5. “Ventilation” mode:
1) “Running On/ Off” button: Press this button and the remote controller will switch “On” → “Off” →
“On”. After shutdown, it will cancel such functions as “Lamp”, “Purification”, “Sleep”, “High Wind” or
“Timing”. In time of “Off” → “On”, other button settings will follow the settings before “Off”.
2) “-” button: The set temperature will have 1°C decreased once this button is pressed, and the
Celsius models will decrease progressively from “32°C → 31°C→…→17°C→16°C”;
3) “+” button: The set temperature will have 1°C increased once this button is pressed, and the
Celsius models will increase progressively from “16°C → 17°C→…→31°C→32°C”;
4) “Swing” button: Press this button to switch “Swing” → “Fixed Wind” → “Natural Wind” → “Swing”.
5) “Wind Direction” button: Press this button to switch “Swing” → “Stop” → “Swing” .
6) “Fan Speed” button: Press this button to switch “Auto Wind” → “High Wind” → “Moderate Wind” →
“Low Wind” → “Auto Wind” .
7) “TIMER” button: Press this button to set the timer by 1 hour, respectively 1H, 2H, ..., 24H, Cancel
and 1H. In the “Off” state, press the “TIMER” button to set the “On” time, the remote controller
displays the running state before “Off” (In case of initial power-on, it will enter the default state of the
auto mode), and the timer displays 1H. Press the “TIMER” button again to repeat 2H ... 24H, Cancel,
1H, ... in order. In the “On” state, press the “TIMER” button to set the “Off” time, and the timer displays
1H. Press the “Off” button again to repeat 2H ... 24H, Cancel, 1H, ... in order.
8) “High Wind” button: Press this button, and the “High Wind” button will have no effect.
9) “Sleep” button: Press the “Sleep” button to switch “Sleep”→ “Sleep Cancel” → “Sleep”. If it is in the
state of “Sleep”, the “Sleep” will not be cancelled after the mode is switched.
10) “Lock” button: Press this button and the remote controller will switch “Lock” → “Unlock” → “Lock”.
When the “Lock” button is actuated, all buttons except for the “Lock” button on the remote controller
have no effect.
11) “Lamp” button: Press this button and the remote controller will switch “Lamp Display” → “Lamp
Display Cancel” → “Lamp Display”. If the “Lamp Display” is actuated, the “Lamp Display” will not be
cancelled after the “Mode” button is pressed.
12) “Purification” button: Press this button and the remote controller will switch “Purification” →
“Purification Cancel” → “Purification”. If the “Purification” is actuated, the “Purification” will not be
cancelled after the “Mode” button is pressed.
3-1-3 Battery replacement
1) The air conditioner can’t receive the signals sent from the remote controller, and the remote
controller has its screen blurring. It indicates that the battery is depleted and needs replacing.
2) Remove the rear cover, and take out the old batteries. In time of battery replacement, please note
the “+” and “-” marks on the battery.
3) Close the rear cover and set the current time. Confirm whether it displays the information of 0:00
a.m.
3-2 Remote controller use
This remote controller undertakes to communicate with the system control main board by controlling the
system operation state through buttons and displaying the working status of the whole system on the LCD.
13
3.
Use instructions
(Standard)
(Optional)
Operation and Instruction:
"ON/OFF" Button:
Control the On/Off status of the system.
"MODE" Button:
When the air conditioning is powered on, every time you press mode button or the mode button of
remote controller, the mode will change in the following sequence.
Auto Mode → Refrigeration → Dehumidification →Heating →Ventilation →Auto Mode
“TEMP+” and “TEMP-” Button:
1) Boot state, press "TEMP+" and "TEMP-" Button, increase/decrease the setting temperature,
Refrigeration, Dehumidification, Ventilation and Heating mode Scope of temperature setting: 16 ℃ ~
32℃.The setting temperature do not adjust in Auto Mode.
2) Press the" TEMP+ "and " TEMP- " Button for 3s simultaneously to lock this button. At this time, It
will display the locking icon in LCD. Deactivate this button, and press the "TEMP+" and "TEMP-"
Button again simultaneously.
“TIMER” Button:
Set Timing On or Timing Off. The wire controller to set the time range as 1-24h.
1) Press the Timer button in the Off status to go into the Timing On for 1 hour, and then press the
Timer button plus 1 until it is timing on for 24h. At this time, if you press the Timer button, it will
deactivate Timing On.
2) Press the Timer button in the On status to go into the Timing Off for 1 hour, and then press the
Timer button plus 1 until it is timing off for 24h. At this time, if you press the Timer button, it will
deactivate Timing Off.
“FAN” Button:
1) The Fan Speed button is valid in the "Cooling mode", "Heating mode" and "Ventilation mode".
2) Press the Fan Speed button of the wire controller or the Volume button of the remote controller in
the Cooling mode、 Heating mode or Ventilation mode, and the volume changes as follows:
High speed
Medium speed
14
Low speed
Auto wind
3.
Use instructions
3) There is no Auto wind in the Ventilation mode, and the volume changes as follows:
High speed
Medium speed
Low speed
“SWING” Button:
1) Press it to display the Swing icon. The Swing icon will swing back and forth.
2) Press the Swing button, and the upper and lower wind deflectors will swing within the specified
range automatically, and the left and right wind deflectors will swing within the specified range
automatically, and press it again to stop the swing.
“26℃/CHECK” Button:
1) Short press this button , Enter a state of energy saving of 26 ℃, namely the setting temperature is
26℃.This function under the boot of Refrigeration and Heating mode is effective.
2) Long press this button, will enter the query condition. It will exit the query condition, when you press
this button again and do not operate for five seconds in the condition of the query.
By pressing "TEMP+" and "TEMP-" to check the current state of indoor unit in the query condition.
The first time is to display the address and model HP of the indoor unit, the second time is to display
the address and the power consumption of the indoor unit, the third time is to display the address of
the indoor unit and T1 temperature , the fourth time is to display the address of the indoor unit and T2
temperature, the fifth time is to display the address of the indoor unit and T2B temperature, the sixth
time is to display the address of the indoor unit and T2 average temperature, the seventh time is to
display the address of the indoor unit and opening of expansion valve, and recovery the main page
status for the eight time.
Description of DIP Switch:
4
ON
OFF
with power failure memory
without power failure memory
1) The first, second, third bit of the DIP Switch is no meaning. The factory all dial to the OFF state.
2) The fourth bit ON of the DIP switch indicates it is With Power Failure Memory function, and the
fourth bit OFF indicates it is Without Power Failure Memory function. The factory dials to the OFF
state.
3-3 Air direction adjustment
According to the characteristics of cold air sinking and hot air rising, please adjust the air-out direction of
the air guide in time of cooling and heating to improve the cooling and heating effects.
!Attention
z
In the horizontal air-out state, the heating operation will lead to larger temperature
difference in the room.
z
In case of the cooling operation, the air guide should have its horizontal air-out state
selected.
z
In the horizontal air-out state, the cooling operation will lead to condensation on the
Attention
surfaces of the air-outlet and air guide
3-3-1 Four-way cassette type
① In the cooling operation, the air guide should be
kept at horizontal air-out operation.
15
②In the heating operation, the air guide should be
kept at downward air-out operation.
3.
Use instructions
③ When using the panel equipped with automatic swing air guide, press the “Swing” button, and the
outlet air guide will automatically swing to get better cooling and heating effect.
3-3-2 Ducted type
When the air-outlet parts (optional) are used,
please adjust as follows.
① In the cooling operation (Figure a)
To have the whole room better cooled, please
adjust the air guide to the horizontal air-out
operation.
②In the heating operation (Figure b)
To have the whole room better heated, please
adjust the air guide to the downward air-out
operation.
Figure a
Figure b
3-3-3 Wall-mounted type
Up-down air adjustment:
① In the automatic swing state
② When automatic swing is not available.
Press the “Swing” button, and the horizontal
air guide will swing up and down to expand air
supply.
If the horizontal air guide is fixed in operation,
please adjust the air-out direction of the air
guide in time of cooling and heating to
improve the cooling and heating effects.
③In the cooling operation
④In the heating operation
To have the whole room better cooled, please
adjust the air guide to the horizontal air-out state.
To have the whole room better heated, please
adjust the air guide to the downward air-out state.
16
3.
Use instructions
!Attention
z
In time of cooling operation under the horizontal air-out state, the shell and the horizontal
air guide surface sometimes may have water dripping.
z
In time of heating operation under the horizontal air-out state, there may be larger indoor
temperature difference.
z
Never drive the horizontal air guide directly by hand to avoid failures, and the horizontal air
guide shall have its direction switched by the “Swing” switch on the remote controller.
3-3-4 Floor-ceiling type
Air direction adjustment:
① In time of auto swing
②When automatic swing wind is not available
Press the “Swing” button,
displays the state of
outward swing wind, the static indicates the fixed
swing wind, the static indicates the natural swing
wind, and the dynamic
swing wind.
If the horizontal air guide is fixed in operation,
please adjust the air-out direction of the air guide in
time of cooling and heating to improve the cooling
and heating effects.
indicates the automatic
③In the cooling operation
④In the heating operation
To have the whole room better cooled, please
adjust the air guide to the horizontal air-out state.
To have the whole room better heated, please
adjust the air guide to the downward air-out state.
3-4 Optimal operation
Pay attention to the following items to ensure the optimal operation of the system with the specific
operation methods referring to the corresponding contents.
1) Adjust the airflow direction appropriately to avoid directly blowing the persons in the room. In time
of cooling operation, please adjust the air guide to the horizontal air-out state in order to have the
whole room better cooled; and in the heating operation, please adjust the air guide to the downward
air-out state in order to have the room floor better heated.
17
3.
Use instructions
2) Set the temperature appropriately to obtain a comfortable environment and avoid excessive heat
or cold.
3) In the cooling operation, the curtains or blinds should be used to prevent direct sunlight indoors.
4) Please close the doors and windows to avoid the indoor-outdoor air convection and obtain a better
refrigerating or heating effect.
5) Please well set the predetermined running time via the “Timer” button on the remote controller.
6) Never put any object near the air inlet or outlet. Otherwise, it will reduce the efficiency of the air
conditioner and even have the system stop running.
7) If the air filter screen is blocked, the cooling or heating effect will be worsened, so it needs washing
once every two weeks.
8) For rational use of the air conditioner, it should be operating in the conditions as designated (See
the outdoor unit use instructions for details).
Periodic
Inspection
Ah! How cool!
Get it lower!
!Attention
z
The air conditioner installation shall comply with the local regulations of Room Air
Conditioner Installation.
z
While the air conditioner is remounted at a new place or moved to another place, it should
be mounted properly by professional installation technical personnel according to the
provided Installation Instructions and never by the user himself.
z
Inappropriate installation of the air conditioner may result in electric shocks or fires.
18
4.
Installation
4-1 User instructions
1) The user should provide the qualified power supply (with the voltage within 90%-110% of the
rated value) consistent with the nameplate label of this air conditioner.
2) The power supply line should be equipped with such protection devices as leakage protector or
air switch with the capacity 15 times greater than the maximum current value of the air conditioner.
3) Do use the special lines and the effective grounded socket matching the included plug of the air
conditioner. Such plug has been well grounded, so never change at will.
4) Please use the fuse or circuit breaker specified in the Installation Instructions.
5) Wiring work must be completed by qualified electricians and shall comply with the safety
requirements.
6) The air conditioner should be well grounded, namely, the air conditioner main switch should have
reliable grounding.
7) If necessay, the power line replacement should be completed by professionals from our local
customer service center or authorized service center.
8)The indoor units except floor and ceilong type shall be installed at the height of 2.5m above.
4-2 Mounting position
4-2-1 The air-conditioner shall not be mounted at the following places.
1) Never mount the air-conditioner only 1 meter away from the television, stereo record player or
radio, or the noise from the air conditioner will have impact on the operation of such electrical
equipment.
2) Never mount the air conditioner near the high-frequency machines (commercial sewing machines
or massage machines), or the air conditioner may fail.
3) Never mount the air conditioner at damp places greatly subject to heavy oil gas, vapor, soot or
corrosive gas.
4) Never mount the air conditioner at the places rich in salt, for example, the seaside.
5) Never mount the air conditioner at the places where a large amount of engine oil is being used.
6) Never mount the air conditioner at the places rich in sulfur gas, for example, hot springs.
7) Never mount the air conditioner in a vessel or mobile crane.
4-2-2 Refer to the Mounting Manual for specific requirements.
!Attention
z
Mount the air conditioner firmly, or
abnormal noise and vibration may
appear.
z
The outdoor units should be
mounted where the running noise
and exhausted air has no impact on
neighbors.
19
5.
Service and maintenance
5-1 Confirmation before operation
1) Confirm whether the grounding line is broken or shedding.
2) Confirm whether the air dust filter is mounted.
3) Turn on the power switch 12 hours before running.
5-2 Maintenance instructions
Before the repair and maintenance, the air conditioner must be shut down with the power plug
disconnected.
Note:
1) Never insolate the air filter in the sun or bake it beside the fire, or use hot water (40˚C above) for
cleaning in order to avoid deformation.
2) If the air filter is clogged by dust or other substances, the cooling / heating capacity may drop,
while the running noise and power consumption may increase, so the air filter should be regularly
cleaned every two weeks (as regulated).
5-2-1 Cleaning instructions
1) Disconnect the air conditioner power before cleaning.
2) Use soft cloth to wipe off the dust on the air conditioner.
3) Never clean the air conditioner with the volatile oil, gasoline, diluent or putty powder.
4) Please use household neutral detergent to clean the fingerprints or oil dirts.
5) Never flush with water.
1. Filter cleaning
Gently pat or use a vacuum cleaner for cleaning. If the filter is seriously contaminated, clean it with
water containing a small amount of neutral detergent and remount it after cleaned and dried.
2 Filter detachment
a. Wall-mounted air conditioner
Gently press the air return grille lower ends, and pull it sideway
towards you until you can feel the resistance; after the grille is
opened, push it downward, then press its lower ends, and it
can be closed. Seize the grille switch and pull out towards A,
then pull out the filter towards B, and the air filter can be
detached. The blower fan coil air conditioners also can follow
the same method to remove the air return outlets and filters for
cleaning according to the specific situations.
A
B
b. Roof-mounted air conditioners
Gently press the air return grille lower ends, seize the grille switch and pull out towards A, then pull
out the filter towards B, and the air filter can be detached for cleaning.
5-2-2 Before use seasons
1) Check whether the indoor and outdoor units have their air outlets blocked.
2) Check whether the mounting base is subject to corrosion or rust.
3) Check whether the power lines and ground lines are in
normal conditions.
4) Check whether the air filter is clean enough.
5) Connect the power supply.
6) Mount the battery in the remote controller.
Screening
20
5.
Service and maintenance
5-2-3 After use seasons
1) Please “disconnect” the air conditioner power and pull out the power plug.
After shutdown, the air conditioner will consume the power of about 5W. For safety and energy
saving, please pull out the power plug during non-use seasons.
2) Please properly clean, maintain and mount the air filter and other parts.
3) Clean the indoor and outdoor units.
!Attention
For the electric aided heating air conditioner, the electric heating elements are fixed between the
indoor unit fan and the heat exchanger with screws, with the minimum clearance of 12mm away
from the combustible surface. Users shall never disassemble and repair such parts to avoid fires
or other risks.
21
GZM03Eng-5
802000190078
Guangdong CHIGO Heating & Ventilation Equipment Co., Ltd.
Address: CHIGO Industrial Park, Lishui Town, Nanhai District, Foshan City, Guangdong
Postal code: 528244
Service hotline: 4006-757-555
Http://www.chigo-cac.com