1
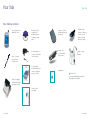
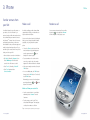
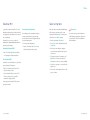
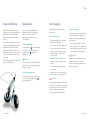
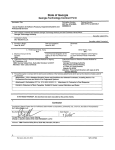
The Xda® – all you need for work or play
An Internet-ready pocket PC and state of the art mobile phone stylishly
combined to give you the best of both worlds.
You can surf
Fast and reliable full colour Internet access whilst mobile – with no wires or
messy add-ons. Your Xda* comes pre-built with everything under the bonnet.†
You can stay in touch
Use the Xda as a normal mobile to make and receive phone calls and text
messages. You can even send and receive Internet based emails with
attachments.†
You can work smarter
Manage your time and resource more effectively. Consult your calendar
and address book. Upload your new appointments when you return to
your office.
You can take the office with you
Make time away from the office work for you. Prepare for your meetings
while you are on the way to them, review documents, listen to messages,
review your appointments.
You can sort out your personal life
Shop online, book holidays, monitor your bank account, organise restaurants,
theatre tickets, gifts and accommodation. The possibilities are endless.
Above all, you can have some fun
With the time you have saved you can take a break and have fun. Chat in
your favourite online chat room, keep up-to-date on sports results, play
games on the go, watch trailers, listen to music or send instant messages to
friends currently online.
But this is just the start… dive right in and see what else you can do.
* Xda is a trademark of O2 Limited.
† A connection to O2 is required. Minimum term contract applies.
Contents
Your Xda
Your Xda box contains
Front panel components
Back panel components
Bottom edge components
Navigation bar
1
1
4
5
6
7
Get started
Insert your SIM card
Charge the battery
Set up
Enter PIN
Auto Config
8
8
8
9
10
10
Phone
Transfer contacts from your SIM
Make a call
Receive a call
Voicemail 901
Select a ring tone
Group Conferencing
Speakerphone
Text messaging
O2 InfoTxt
Be first with TXT Alerts
Trafficline 1200
11
11
11
12
13
14
15
15
16
17
18
19
Connect to the Internet
Enjoy the full Internet
Automatic set-up
To surf the Internet
To go back one page
To go forward one page
To refresh the current page
To go to the homepage
To set the homepage to the
present page
20
20
21
21
22
22
22
22
22
To add or delete a favourites page
To go to a favourites page
To send the current page link
to an email address
To copy text from a page
Turn images on/off
To fit the current PDA
formatted page to your PDA screen
To receive calls whilst surfing
O2 Xda friendly websites
22
22
22
22
23
23
23
WAP browser
24
26
Get in sync
Synchronise your contacts
Create a contact
Find a contact
Synchronise your email messages
27
28
28
28
29
Live email on the move
How to manage POP3 email
How to use POP3 email
30
31
35
Programs and applications
Action Update
Action Backup
myO2
MSN messenger
36
36
37
38
39
Other useful information
Roaming
Access the Internet abroad
Accessories
Removing your SIM card
41
41
41
42
42
Help and trouble shooting
Trouble shooting
43
43
Unleash the power of your Xda
Your Xda
Your Xda
Your Xda box contains
Xda – your phone and
handheld PC in one
Stylus – to operate
your Xda’s touch
sensitive screen
Microsoft Pocket PC
Companion CD
including ActiveSync
for linking your Xda
and PC
AC power adaptor – to
connect your Xda cradle
to a power source
O2 user guide (this
booklet) including a CD
from O2 to unleash the
power of your Xda
22 PIN DC power
connector – allows you
to connect your AC
adaptor to the Xda
without your cradle
Xda case – to protect
your Xda and connect to
your belt clip
Belt clip – for a
convenient place to
carry your Xda
Hands free stereo
headset
Warranty card
Please note
O2 may provide additional items with your
Xda as they become available.
Cradle – for charging
your Xda and physically
connecting to your PC
Pocket PC phone
user manual
1 O2 user guide
O2 user guide 2
Your Xda has hardware buttons and scroll functions that control actions,
and a stylus for selecting items and entering information.
Your Xda
Front panel components
2
1
2
3
Antenna
Power light
For further information please refer to your Pocket PC Phone User Manual.
1
3
4
Power button
Press to turn on/off your Xda.
6
Backlight
Press and hold to turn the backlight on/off.
7
4
Infrared port
Enables you to exchange file(s) or data with other devices without cables/wires.
5
5
Contacts
Press for quick access to your contacts.
9
8
6
Speaker
7
Calendar
Press for quick access to your calendar.
10
8
11
9
10
12
Navigation bar
Displays the active program, signal strength and time.
For a full list of icons please refer to page 7.
11
Start menu
Volume
Touch screen display
For handwriting, drawing or to make a selection with the stylus.
13
12
SIM card holder
13
Command bar
14
Call key
Press to take a call or take you to the phone key pad. Press and hold to
activate/de-activate speakerphone during a call.
15
Navigational pad
To scroll through drop down menus or programme instructions.
16
16
Cancel call key
Press to end a call or press and hold to turn on/off your Xda’s phone connection.
17
14
18
18
3 O2 user guide
15
17
Battery charger socket
Microphone
Speak here when making a call or voice recording.
O2 user guide 4
Your Xda
3
2
2
4
3
1
1
5
6
Back panel components
1
SIM card door
Open the rubber door to insert the SIM card. For further information on inserting your
SIM, please refer to page 8.
2
1
2
3
4
6
External battery clip
Before screwing the extended battery into position please secure the clip on the bottom
into this hole.
5 O2 user guide
Battery on/off switch
Press into the hole with the end of the top-half of your stylus to return the device to
factory settings.
Main battery unit
The main battery is housed permanently inside the device – it should only be changed
through an authorised sales centre. Please contact your service provider for more
information.
Earphone jack
Allows you to listen to audio media with the phone’s hands-free kit supplied with
your Xda.
Remove this to uncover the connection between your device and the optional
extended battery.
5
Sync connector
Use this connector when synchronising/transmitting data or recharging.
To secure external battery
External battery connector cover
Soft reset
Press into the hole with the end of your stylus to reset your device.
The optional extended battery should be fastened here.
4
4
Bottom edge components
Stylus slot and stylus
The antenna has a neatly hidden slot for housing the stylus.
3
5
Please note
Turning the battery off will wipe all the data from your device unless Permanent Save is
activated. Please refer to your Pocket PC Phone User Manual for further information.
5
MMC and SD card slot
Insert either MMC or SD cards in this slot. These cards, sold as accessories, are used to
back up important data and extend memory. Please refer to your Pocket PC Phone User
Manual for further information.
O2 user guide 6
2. Get started
Navigation bar
The navigation bar, located at the top of the
screen, displays the active program and current
time. Below are some of the icons you may see.
Please note
If there is not enough room to display all the
icons that are needed, the notification icon,
,
can be seen in the navigation bar. Tap to view
all icons.
Step one:
Insert your SIM card
Step two:
Charge the battery
• Use your stylus to open the rubber flap to the
SIM card compartment
Your Xda contains a rechargeable
Lithium-Polymer battery housed permanently
in your device.
• Insert the SIM card into the narrow horizontal
slot towards the top of the compartment with
the gold contacts facing down
• Once in place, clip the rubber flap down
making sure both corner catches are firmly
in place
Status icon
Meaning
Turns all sounds on and off
• To charge the battery, insert the AC adaptor
into the back of the cradle and connect to
an external power source. Place your Xda
in the cradle
• An amber light indicates charging and a
green light indicates your Xda is fully charged.
Wait until your Xda is fully charged. This will
take approximately 4 hours. The battery must
be fully charged before using your Xda for
the first time
Battery low
Battery very low
Data connection is active
Your Xda has been supplied with a cradle.
The cradle is used to hold your Xda when it is
charging or synchronising with your PC
(explained later).
• For help on removing your SIM card please
refer to page 42
Please note
Synchronisation is beginning or ending
Over the air synchronisation is occurring
Notification that one or more instant messages were received
Notification that one or more email/SMS messages were received
Please note
There is a micro switch that is only activated when
the cover is fully and firmly in place, otherwise
your Xda will not operate. This ensures that the
SIM cannot be removed while the Xda is on.
Remembering to charge your battery is
extremely important as in the event that all
power is lost all your data and any new
programs you have installed will be erased.
Only the default programs installed when you
bought the device will remain.
Please note
Indicates the phone connection is on and the strength of the signal is strong
Using your Xda whilst charging will significantly
increase charging time.
Indicates the phone connection is on and the strength of the signal is weak
Indicates the phone connection is switched off
7 O2 user guide
O2 user guide 8
Get started
Step three:
Set up
Step four:
Enter PIN
Step five:
Auto Config
• Switch on your Xda by pressing the power
button. (The Xda may have automatically
come on while charging)
Once you have completed the set up process
you will see the following screen:
• Once you have activated your SIM card an
Auto Configuration screen will appear
• Select ‘Yes’ to obtain the following screen:
• You will be presented with a welcome screen
which will prompt you to ‘Tap the screen to
set up your Pocket PC’. Do this and follow
the on-screen instructions
This gets your Xda’s screen aligned so that it can
respond accurately to touches of the stylus. You
will also be taken through a brief tutorial on
how to use the screen’s functions.
• Enter your pre-set SIM PIN followed
by ‘Enter’
Please note
• With ‘O2-UK’ selected in the drop down
menu, tap ‘Ok’ in the top right hand corner
You will then be prompted to restart you Xda.
If you enter the wrong PIN three times, the SIM
card will be blocked automatically. You will not
be able to make or receive calls until it has been
unblocked. To unblock your SIM card contact
your service provider.
9 O2 user guide
• Select ‘yes’
You have now finished setting up your Xda.
Time to put it to good use...
O2 user guide 10
3. Phone
Transfer contacts from
your SIM
Your Xda is designed to store all contacts on
your device, not on the SIM card. If you
previously used your SIM card in another device
we recommend that you transfer all contacts
into Microsoft® Contacts. Not only is it a more
sophisticated system where you can create
more detailed records, send text messages and
email, but by synchronising with your PC you
can back up your contacts in the event you lose
either your Xda or your SIM.
Phone
Make a call
Receive a call
As well as providing you with enhanced data
communication facilities, your Xda works as a
fully functional mobile phone.
You can answer an incoming call on your Xda
by pressing
, or by tapping the ‘Answer’
box which appears on the pop-up screen.
You can use the phone function by holding the
Xda to your ear, using the handsfree headset
(supplied), or by using the built in speaker
phone.
• Ensure the phone connection is switched on
• Choose the ‘Phone’ option from the Start
menu and a phone key pad will appear or
press the green answer key
to go
straight to the phone key pad
• Tap ‘Start’ followed by ‘Programs’, then
select ‘SIM Manager’ and wait a few
seconds for the SIM contents to load
• Tap out a number on the touch sensitive
screen. As you tap the keys, the number
appears in the white area above the dial pad
• Select ‘Tools’, followed by ‘Select All’
• When you are ready to start the call, tap the
‘Talk’ button
• Select ‘Tools’ again and then
‘Save to Contacts’
• As soon as dialling starts, the ‘Talk’ button
changes into the ‘End’ button. To end a call,
tap the ‘End’ button
Alternatively, you can use the red and green
preconfigured buttons,
and
at the
bottom of the handset.
Make a call from your contact list
• Press the contacts button* on your Xda or
alternatively select ‘Contacts’ from the
Start menu
• Tap the contact you wish to call. Their
contact details will appear. Then simply tap
on their phone number to call them
* Figure 5 on the front panel components key shown on page 3.
11 O2 user guide
O2 user guide 12
Phone
Voicemail 901
O2 provides you with Voicemail 901. A service
that takes messages when your Xda is switched
off, engaged, you don’t answer a call or you are
out of signal range.
Voicemail is free to set up – you are only
charged at the standard calling plan rate when
you pick up your messages.
Activating ‘Voicemail 901’
• Tap 1750 followed by ‘talk’ and follow the
voice prompts to activate Voicemail 901
Use ‘Voicemail 901’
Voicemail is secure and simple to use, just follow
your country specific instructions.
• Tap 901, followed by ‘talk’, then follow
the option menu you hear
• Your Voicemail 901 PIN is pre-set to 8705.
When you first access 901 you will be
prompted to change your PIN
Select a ring tone
Record a personal greeting
By recording your own personal greeting your
contacts are more likely to leave a message
because they will be sure that they are through
to your messaging service.
To record your personal greeting:
• Tap 901, followed by ‘talk’, then *3, then
follow the instructions that you hear
With your Xda you can quickly find and display
all the ring tones you have stored. You can
assign your favourite ring tone to the ring tone
selection box in the ‘Phone’ settings.
• From the Start menu select ‘Phone’
Please note
You can also use any sound recorded in a
.WAV format as your ring tone. Please refer
to your Pocket PC Phone User Manual for
more information.
• Tap on ‘Tools’ in the command bar, then tap
on ‘Options’
• From here you can change the ring type
e.g. from a ring to vibrate, and the ring tone
of your choice
• To change the ring tone for example, scroll
down the list of options, then tap on the
‘play’ arrow to listen to the choices available
• Select the one you want so it is viewed in the
ring tone box
• Then tap ‘OK’ in the right hand corner of the
screen to confirm
If you forget your Voicemail 901 PIN, contact
your service provider.
13 O2 user guide
O2 user guide 14
Phone
Group Conferencing
Speakerphone
Text messaging
Mobile conference calls that are easy to use
and simple to set up mean that making social
arrangements are more fun and business
telephone meetings can continue whilst on
the move.
You can use your Xda as a speakerphone,
allowing you and others to talk and listen
hands-free while on a call. This is a
particularly useful feature on an Group
Conferencing call.
Text messaging is a simple and fun way of
staying in touch.
There is no more phoning person after person,
as Group Conferencing allows twenty callers to
participate at the same time, from almost
anywhere in the world, from fixed-lines and
from any network’s mobile. There is no need to
book, there’s no subscription and it is hassle
free to set up.
For more information and how to register visit
www.o2.co.uk/conferencing
Activate speakerphone
Create a text message
To create a text message, use the Start menu
to launch the Inbox application.
• Choose the ‘Services’ option and tap SMS
Press and hold down
at any time during a
call or when the phone is ringing until the
speakerphone icon
appears in the
navigation bar.
Please note
Do not leave the phone in speakerphone mode
and hold it to your ear as the high volume may
damage your hearing.
De-activate speakerphone
The speakerphone will de-activate at the end of
a call, or you can press and hold down
at
any time during the call.
• Select ‘New’ and insert the number for the
contact you want to message or access the
number by using the contact icon at the
foot of the screen
• Now tap the ‘Subject field’ and use the
keyboard or character recogniser to enter
a subject
• Tap in the subject area and you can type
your message
Read a text message
Incoming text messages are listed in the Inbox
in their own folder area. You will also get
notification on the Today screen that you have
unread messages.
• To read incoming messages use the Start
menu to launch the ‘Inbox’ application and
tap on the message you want to read, or tap
on the envelope icon on the Today screen
Please note
You can create text messages via your email
Inbox and link these to your contact list.
However, incoming text messages will not be
linked to your contacts.
• When you have finished your text message,
tap ‘Send’ and the message will be sent
Please note
When creating a text message you will be able
to type up to 500 characters however, your Xda
can only send 158 at one time. Any additional
characters will be sent as a separate text
message and will be charged accordingly.
15 O2 user guide
O2 user guide 16
Phone
O2 InfoTxt – information
at your fingertips
Get the info you want when you want it with
O2 InfoTxt. There’s news, sport and plenty of fun
waiting for you.
Be first with TXT Alerts
You can access information on any of the topics
below by sending a text message, containing
the appropriate keywords, to 80202.
What information is available?
Keywords
Football
Premiership: Team name + NEWS
(or RESULT or FIXTURES or LEAGUE)
Non-Premiership: SPORT + Team name
+ NEWS (or RESULT or FIXTURES or LEAGUE)
Latest team news, results, fixtures and league position
for English and Scottish clubs (all divisions)
Football betting
TEAM + Premiership team name
(e.g. TEAM LEEDS UTD)
Lottery
The latest draw numbers
LOTTERY
Horoscopes
Find out what your stars say for the day
HORO + first three letters of starsign
(e.g. HORO LEO)
Ring tones
The latest ring tones available for your mobile. Search for
your favourite ring tone using our unique text search facility
TONEFIND + name of artist or track
(e.g. TONEFIND KYLIE)
Logos
Update your mobile with the latest cool logo
LOGOFIND + theme (e.g. LOGOFIND EYES)
or visit www.o2.co.uk for more information
Jokes
Amuse your friends and colleagues
JOKE
News
Latest national news or business news from ITN
NEWS or NEWS BUS
Shares
Taxis
Diet tips
Current buy and sell prices, last trade and volume
moved in a day
SHARE + stock code (e.g. SHARE IBM)
Numbers for local taxi companies
TAXI + town or postcode
(e.g. TAXI SLOUGH)
There’s a whole world of information that
you can get sent straight to your Xda, simply
send a text message to sign up for the alert
of your choice. Be first with the latest celebrity
gossip and breaking news. Follow the footy
goal-for-goal, and see what’s on TV or at
the movies.
• Choose your text alert
• Text ALERT, leave a space, then enter chosen
category
• Send to 80202
We will then send you the latest info as and
when it’s hot off the press.
Summary of TXT Alerts available
TXT Alerts
Keywords
Football
ALERT FOOTY
Horoscopes
ALERT + first 3 letters of star sign (e.g. ALERT LEO)
Lottery
ALERT LOTTERY
Jokes
ALERT JOKES
Soaps
ALERT SOAP
Celebrity Gossip
ALERT GOSSIP
Breaking News
REG NEWS
Weight Mate
ALERT DIET
Looking Good
ALERT LOOKGOOD
Healthy Recipe Tips
ALERT RECIPE
Singles Chart
ALERT CHART
Movie Review
ALERT FILM
DIET
Stress buster
STRESS
Recipe tips
RECIPE
Sex and
romance tips
SEX
Horse racing
RACING NEWS or RACING TIPS
For more information and details on how to register, please visit: www.o2.co.uk/o2infotxt
Available on any UK network. Terms and conditions apply.
For further information, including a full list of keywords visit: www.o2.co.uk/o2infotxt
Terms and Conditions apply. See www.o2.co.uk/terms for details. Ring tones and logos cost £1.50 to receive. All other content costs 20p
to receive except for Tonefind, Logofind and Menu requests which are free to receive. Standard rate to request information.
17 O2 user guide
O2 user guide 18
4. Connect to
the Internet
Internet
Trafficline™ 1200
Dodge the traffic jams
Find delays and problems on your journey,
before you hit them. Through a network of
roadside sensors, Trafficline* locates you and
gives up to the minute local traffic information
direct to your Xda, so you won't waste precious
time sitting in jams and at roadworks.
Prior to travelling or whilst on route:
• For an instant local report, key 1200 followed
by
• Trafficline can also give information further
afield. Press 1 for motorway information or 2
for trunk road information
Trafficline informs you of traffic congestion on
both motorways and A roads up to 15 miles
ahead and also 5 miles either side on
motorways. What’s more you can make as many
requests as you need for specific traffic
information for any number of roads in one go.
* Trafficline is a trademark of O2 (UK) Limited and provided in
Your Xda gives you instant, high-speed access
to the Internet.
Enjoy the full Internet –
anytime, anyplace*
Once your Xda has been set-up you can enjoy
full Internet access and email on the move with
GPRS, at speeds of up to five times faster than a
standard (GSM) mobile service.
You can surf any website†. You can download
information. You can send and receive Internet
based email with attachments. And you can
now do all this wherever you are – on a train
or in a café, between meetings or sitting in
the park, at work or at play.
* Subject to GSM/GPRS network coverage. You will need either
a Mobile Web subscription or connection to a Pay As You Use
data tariff to surf the Internet over the GPRS network.
† The Xda uses a version of Internet Explorer designed for Pocket
PC device – 'Pocket Internet Explorer'. Pocket Internet Explorer is
designed for the smaller screen of the Xda (1/4 VGA), and does
not support all features that are supported by web browsers for
PCs. If a website has been constructed with these limitations in
mind, it will be possible to have a good Internet experience on
the Xda – albeit on the smaller screen. Not all websites have
been built to support Pocket Internet Explorer browsers,
therefore they may not function in the same manner that they
will on a full sized PC. O2 cannot be held responsible for the
operation of such websites as they are outside our control.
Please note
When downloading software it is possible to
contract software viruses. The use of anti-virus
software is recommended.
association with Trafficmaster. Not available in Northern Ireland.
19 O2 user guide
O2 user guide 20
Internet
Automatic set-up
To surf the Internet
To go back one page
To add or delete a favourites page
Once you have subscribed to Mobile Web and
your SIM card has been enabled, you can get
online straight away.
• Ensure that the phone feature of your Xda is
turned on
• Tap
• Go to the page you want to add
to favourites
If you ever alter the settings and find that you
are unable to connect to the Internet it is
recommended that you run the ‘Auto
Configuration’ tool located under ‘Settings’
on the ‘System’ tab.
• Select the ‘Internet Explorer’ option from
the Start menu. The homepage supplies some
handy links
at the bottom of the display
To go forward one page
• Tap
at the bottom of the display
• Tap ‘View’
• Select the ‘Add/Delete’ tab, then ‘Add’.
• Tap ‘Forward’
• To delete a page simply tap ‘Delete’
To refresh the current page
To go to a favourites page
• Tap
• Tap
You can also enter a specific URL.
• Select ‘View’ (at the bottom of the screen)
then ‘Address Bar’. The address bar will then
appear towards the top of your screen
at the bottom of the display
To go to the homepage
• Select the page you wish to visit
• Tap
To send the current page link to an
email address
at the bottom of the display
This is the homepage stored in Internet Explorer.
To set the homepage to the
present page
• Tap ‘Tools’
• Tap ‘Options’
• Tap the address bar on-screen and a
keyboard will appear to assist you entering
a specific URL
• Then tap
this site
at the top of the display to go to
at the bottom of the display
• Tap ‘Tools’
• Tap ‘Send link via email’
• Enter the appropriate email address.
• Tap ‘Send’
• Tap ‘Use Current’
To copy text from a page
Your Pocket PC will still connect to the O2
homepage. This will change the homepage of
your Internet Explorer.
• Highlight the text you wish to copy (by
dragging the stylus over the relevant text)
• Tap ‘Tools’
• Select ‘Copy’
This text can now be pasted into another
application.
21 O2 user guide
O2 user guide 22
Internet
O2 Xda friendly websites
Turn images on/off
To receive calls whilst surfing
If you are looking at very large web pages with
very high graphic content, and you only want
to read the words, graphics are something you
can probably do without. To speed up this
process, your Xda always requests a page’s text
content before it uploads images. In addition
you have the option to turn off all image
uploads or select only the ones you want.
When connected to the Internet but not
downloading information you can receive an
incoming call. You have the option to ‘Answer’
or ‘Ignore’ the call.
• To do this tap
in the command bar at the
bottom of the screen
• To selectively view an image, tap and hold on
its placeholder and choose ‘Show Picture’
from the command bar
To fit the current PDA formatted page
to your PDA screen
• Tap ‘View’
• Tap ‘Fit to Screen’
23 O2 user guide
O2 has created an Xda friendly portal at
pda.o2.co.uk. You can reach this page by
launching ‘Internet Explorer’ under the ‘Start’
menu and selecting the O2 box on your Xda
default homepage.
Here’s a taste of what’s on offer.
This page provides quick access to key
information services. To assist you in finding
the vast and growing number of Xda friendly
websites select ‘Browse directory’.
Travel and directions
We’ve got…
News
• News at home or abroad from ITN
If you have set up voicemail you can choose to
ignore the call and your call will automatically
be transferred to your O2 Voicemail 901 service.
If you choose to answer a call, you can resume
surfing when you finish the call by returning to
Internet Explorer. When you attempt to
download new information, you will be
automatically re-connected to the Internet.
Whilst downloading files to your Xda (such as
web pages, emails, attachments, audio/video
files) your Xda will not receive incoming calls.
However, you can set up your O2 Voicemail 901
service so that your calls will automatically
be diverted and you won’t miss that
important message.
• Multimap.com offers street level maps, route
information and more
O2 user guide 24
Internet
WAP browser
Weather
Download software
• Check out the latest weather in your
location, or perhaps where you would
like to be
• In conjunction with Handango, O2
brings you a vast array of Pocket PC
software for your Xda, everything from
business and professional software to
games and entertainment
WAP is a quick way of accessing Internet
information which contains text and basic
images only. You can use your Xda to access.
To launch your WAP browser:
• Choose the ‘Programs’ option from the
Start menu and select ‘WAP’
• Tap ‘O2 WAP Portal’ and you will be
automatically connected
Sport
• Get the latest football news from
givemefootball.com. The official site of the
Professional Footballers Association
Business and finance
• The latest business news from ITN
• Trade shares while on the move in seven
international markets with IMIWeb
25 O2 user guide
O2 user guide 26
5. Get in sync
Get in sync
Synchronise your
contacts
You can now synchronise all information stored
in Microsoft® Outlook® between your desktop
computer and your Xda, using the Microsoft®
ActiveSync™ package supplied with your Xda.
ActiveSync™ works with Outlook® to ensure your
contacts, diary, task list and email files on
your Xda and desktop computer are in sync. You
can also use it to copy individual files between
devices such as documents, video clips or music
files you want to listen to through the Windows
Media™ Player.
To use ActiveSync you will need to install the
ActiveSync software on the CD supplied. Simply
insert the CD into the CD drive of your PC and
follow the on-screen instructions.
Contacts maintains a list of your friends and
colleagues so that you can easily find the
information you’re looking for whether at
home or on the road. And using ActiveSync™
you can automatically transfer contacts from
your desktop version of Outlook® to contacts
on your Xda.
Find a contact
• For quick access to contacts press the
contacts button detailed on the front panel
components key on pages 3 and 4.
Alternatively,
• Tap ‘Find’ from the Start menu.
• Enter the contact name, then select
Create a contact
• Select ‘Contacts’ from the Start menu.
• Tap ‘New’ and enter all relevant contact
information including email, phone numbers,
and addresses.
‘Contacts’ for the type and then tap ‘Go’.
For other ways of finding a contact on your
Xda, please refer to your Pocket PC Phone
User Manual.
• When details are complete, tap ‘OK’.
For further instructions on how to synchronise
information between your Xda and desktop
computer, please refer to the Microsoft® website
at www.microsoft.com and search for
‘ActiveSync’.
Please note
If you are a Windows NT® user you will need
to buy an Xda serial cradle and connector sold
as an accessory.
27 O2 user guide
O2 user guide 28
6. Live email
on the move
Synchronise your email
messages
With synchronisation, emails are synchronised
between your Xda Inbox and your PC Inbox by
using ActiveSync™ and Microsoft® Exchange or
Microsoft® Outlook®.
Emails between your Xda and PC are linked
when you synchronise. If you delete an email on
your Xda, it is deleted from your PC the next
time you synchronise.
So you can draft emails on your Xda whilst
you are on the move and save them in your
Xda’s outbox. When you get back to your PC
you can synchronise your Xda with your
PC and your emails will be transferred to
Microsoft® Exchange or Outlook® on your
PC and then sent.
For more information regarding ActiveSync™
and how to set up a connection, please refer to
your Pocket PC Phone User Manual.
At the same time, during synchronisation emails
are copied from the Inbox folder of Microsoft®
Exchange or Outlook® on your PC and
downloaded to the Inbox on your Xda*. So you
can read emails later whilst on the move and
draft a response.
* By default you will receive messages from the last three days
only, the first 100 lines of each new message, and file
attachments of less than 100KB in size. To amend the default
setting please refer to your Pocket PC Phone User Manual.
Make productive use of travel time, by sending
and receiving emails wherever you are.†
O2 can also help you to access Local Area
Network based, or ‘secure’ email on the move
using your Xda. Please contact your service
provider for more details of the services we
offer to businesses with LAN environments.
You can now send and receive Internet based
emails with attachments on your Xda, just like
you can on your work/home PC*. What’s more
GPRS technology ensures you’re only charged
for the data you have sent and received – not
the length of time you are connected – making
email on your Xda faster, more efficient and
highly cost effective.
MMIS from O2
Microsoft Mobile Information Server mobilises
corporate’s Microsoft Exchange 2000
infrastructure in a secure way that fully
integrates with the functionality of the Xda.
Web based email
You can access an existing email account, such
as Hotmail while you are connected to the web.
Simply connect to your web based email
provider’s website and ‘log in’. From here you
can send and receive emails on the move.
†
Subject to network coverage.
* You will need either a Mobile Web subscription or connection to
a Pay As You Use data tariff to surf the Internet over the GPRS
network. Internet access is subject to O2 terms and conditions.
Work email
Provided it’s Internet based, you’ll be able to
send and receive any email on your Xda*. You’ll
also be able to access work email if you have
Internet based means of accessing your company
email server, such as POP3 or IMAP4. You will
need to discuss this with your IT manager.
29 O2 user guide
O2 user guide 30
Email
How to manage
POP3 email
It can be quicker and more convenient to use
your Xda’s Inbox to manage your email. Most
email providers enable you to do this. This type
of email access is referred to as POP3.
• Tap ‘Inbox’
• Your Xda will attempt to download settings
• Choose the ‘Service Type’ (usually POP3)
• Tap ‘Services’
• Once the word ‘Completed’ appears
underneath ‘Status’, tap ‘Next’
• Enter a ‘Name’ for this email account (Note:
We recommend using your email provider’s
name. e.g. O2, Yahoo). This will be the name
shown in your inbox, so make it memorable
Before you start
Before you begin ensure that your email service
provider offer POP3. Do this by simply locating
your email provider on our ‘Email settings’ table
on pages 31 and 32.
Set up your Inbox to manage your
POP3 email
• Tap ‘New Service’
• Enter your ‘Email Address’
The following instructions show you the
set-up process for using your Xda’s Inbox for
POP3 email.
• Enter ‘Your Name, Username*
and Password’
• Tap ‘Next’
• Tap ‘Next’
• Enter ‘Incoming mail’ server address
• Tap ‘Start’
• Please double check your username and
password.
Note: Your screen may appear phased out below the words
‘enter email’ – your set up process will still work
so please continue to follow the instructions. Check our email
settings table for the correct way to enter your email address.
• Tick the ‘Save Password’ box if required
• Tap ‘Next’
*Note: It is important to check the email settings table
on the inside back cover for the correct way to enter
your username.
Note: Check our email settings table for the correct way to
enter your incoming mail server address.
• For ‘Outgoing mail’ server address, enter
‘smtp.o2.co.uk’
• Leave Domain empty – this is for company
email services, not personal email
• Tap ‘Finish’
Your set-up process is complete.
31 O2 user guide
O2 user guide 32
Email
Email settings
Email
service
Webmail
POP3
The settings shown in this table will help you
set up a POP3 email account or let you know
if your email provider allows POP3, Webmail
access, or both.
AOL
Y
N
Blueyonder
Y
BT Internet
Y
BT Openworld
Y
Important Notes
Email Address format
Step 4
Username format
Step 6
Incoming mail server
Step 8
Outgoing
mail server
Step 8
Y
[email protected]
username
pop3.blueyonder.co.uk
smtp.o2.co.uk
Y
[email protected]
username
mail.btinternet.com
smtp.o2.co.uk
Y
[email protected]
username
mail.btopenworld.com
smtp.o2.co.uk
POP3 email access is not provided by AOL. To use AOL email open Internet Explorer and
visit http://www.aol.co.uk (NOT www.aol.com) and login as usual.
Clara.net
Y
Y
[email protected]
username
pop.clara.net
smtp.o2.co.uk
Demon
Y
Y
A separate POP3 password is required. Visit www.demon.net, click on Web Password,
then a Web Password Service option,choose a security version, sign in, clickMail, click
Enabled in the ‘POP3 mail’ box, enter your new POP3 password, then click Apply.
[email protected]
hostname
pop3.demon.co.uk
smtp.o2.co.uk
Freeserve
Y
Y
Note that username is the part of the email address that follows the ‘@’
[email protected]
[email protected]
[email protected]
[email protected]
[email protected]
name.freeserve.co.uk
name.fslife.co.uk
name.fsworld.co.uk
name.fsnet.co.uk
name.fsbusiness.co.uk
pop.freeserve.com
smtp.o2.co.uk
Freeserve (FSmail)
Y
N
POP3 email access is not provided by FSmail. To use FSmail open Internet Explorer and
visit http://fsmail.freeserve.com and login as usual.
[email protected]
[email protected]
pop.ukgateway.net
smtp.o2.co.uk
smtp.o2.co.uk
Gateway
Y
Y
Use full email address for ‘username’
Hotmail
Y
N
POP3 email access is not provided by Hotmail. To use Hotmail open Internet Explorer and
visit http://mobile.msn.com and login as usual.
Lineone
Y **Y**
Use full email address for ‘username’
[email protected]
[email protected]
pop3.lineone.net
Lycos
Y
Y
Use full email address for ‘username’
[email protected]
[email protected]
pop.lycos.co.uk
smtp.o2.co.uk
Mail.com
Y
Y
You must enable POP3 access via the Mail.com website. Mail.com may charge for this service.
[email protected]
[email protected]
pop1.mail.com
smtp.o2.co.uk
Netscape
Y
N
POP3 email access is not provided by Netscape – To use email open Internet Explorer & visit
http://www.netscape.net and login as usual.
NTL
Y
Y
O2 email
Y
Y
[email protected]
username
pop.ntlworld.com
smtp.o2.co.uk
[email protected]
[email protected]
mail.o2.co.uk
smtp.o2.co.uk
Supanet
Y
Talk21
Y
Y
[email protected]
username
pop.supanet.com
smtp.o2.co.uk
Y
[email protected]
username
in.talk21.com
Tiscali
Y
Y
smtp.o2.co.uk
[email protected]
[email protected]
pop.tiscali.co.uk
smtp.o2.co.uk
UKOnline
Y
Virgin.net
Y
Y
[email protected]
username
pop3.ukonline.co.uk
smtp.o2.co.uk
Y
[email protected]
username
pop.virgin.net
Yahoo.co.uk
Y **Y**
smtp.o2.co.uk
** You may need to enable POP3 access via Yahoo.co.uk. Login to Yahoo mail, click options,
then Pop Access and Forwarding and select Web and POP Access.
[email protected]
username
pop.mail.yahoo.co.uk
smtp.o2.co.uk
Yahoo.com
Y **Y**
** You must enable POP3 access via Yahoo.com. Login to Yahoo mail, click options, then
Pop Access and Forwarding. Yahoo may charge for this service.
[email protected]
username
pop.mail.yahoo.com
smtp.o2.co.uk
Use full email address for ‘username’
Use full email address for ‘username’
** You must login to your account through a normal PC and enable POP3 access to use the Xda to send & receive your email.
33 O2 user guide
O2 user guide 34
7. Programs and
applications
How to use POP3 email
Now your inbox is set up, you can start using
your inbox to manage your POP3 email.
Getting to your inbox
Action Update
Creating email
When you compose, or reply, to emails, tap
‘Send’. Remember, this moves it to the outbox.
It won’t be sent until you ‘Send & receive’.
• Tap ‘Start’ then from the drop-down menu,
tap ‘Inbox’
Selecting your email service
The inbox can handle multiple POP3 email
accounts and text messages. If your PC is
synchronised with your Xda, it will be able to
handle text messages, too. To choose which
inbox service you would like to use
• Tap ‘Services’ and choose from the menu
Your Xda is pre-loaded with a variety of
software. Most of these applications can be
found by tapping ‘Start’ and then selecting
‘Programs’.
Action Update is a software service from O2.
Applications, games, ring tones and fixes will be
made available through Action Update as they
become available.
You will find a variety of Microsoft applications.
Instructions for these can be found in chapter six
of your user manual.
Check back frequently for updates by selecting
‘Action Update’.
Some additional applications brought to you by
O2 are detailed on the following pages.
Sending and receiving email
By tapping on the icon
, your Xda will
connect to the Mobile Web service and log on to
your POP3 mail server. Once logged on, it will
send any emails in your outbox and receive emails
from your POP3 mail provider. Once completed,
the Xda will disconnect from your POP3 mail
server and the Mobile Web service.
More detailed instructions on how to use
Action Update will be made available at
www.o2.co.uk/xda
These are online services that require registration.
By tapping on the icon
, your Xda will
connect to the Mobile Web service and log on to
your POP3 mail server. Once logged on, it will
send any emails in your outbox and receive emails
from your POP3 mail provider. Once completed,
you will stay connected to the Mobile Web service
and your POP3 mail server. By default the Xda will
then automatically check for new email every 15
minutes (this can be changed by editing your
email settings).
35 O2 user guide
O2 user guide 36
Programs and applications
Action Backup
myO2
You can use Action Backup to backup and
restore all of your personal files and data saved
on your Xda.
Exclusively on the Xda is myO2, a truly wireless
assistant, bringing you exciting interactive
services. If you’re looking for fast access to
useful information, then this service is for you.
You can do this when your Xda is connected to
your desktop PC, or when you are mobile.
AA route planner
You can find routes and maps between
locations in Great Britain, or get the
latest traffic news on major roads.
To access Action Backup:
• Choose the ‘Programs’ option from the
Start menu
• Tap on the ‘Action Backup’ icon
More services will be joining myO2 soon.
It saves you time
myO2 remembers your preferences so you spend
less time typing. Simply click and go, and
because it’s specially formatted for the Xda, you
don’t spend time scrolling around a website.
It lets you work smarter
Content becomes interactive and can integrate
with the Xda’s functions (phone, email, calendar
and contacts).
It’s flexible
Content can be requested when you’re
offline, then instantly processed later when
you’re online.
37 O2 user guide
O2 user guide 38
MSN messenger
Instant messaging is designed to allow text
based chat via the web to any of your contacts
who are online at the same time as you. You
can also have instant message conversations
with groups of contacts. Find out if someone is
free for lunch or how friends are on the other
side of the world – instantly.
To use MSN® Messenger you must have a
.NetPassport®. If you have a Hotmail or MSN®
account, you already have a .NetPassport®.
To get a free passport, visit www.passport.com.
For further information on using instant
messaging on your Xda, please refer to the
Microsoft® website at www.microsoft.com
or your Pocket PC Phone User Manual.
Please note
For information on standard text messaging see
the phone section of this user guide.
To use instant messaging on your Xda:
• Select the ‘Programs’ option from the Start
menu, then tap on ‘MSN Messenger’.
• Tap on ‘Tap here to sign in’, then enter
your .NetPassport® Sign in name in the
‘Sign in’ box e.g. [email protected].
• Enter your password, then tap on ‘Sign in’.
• If you already have a list of contacts, they’ll
appear as they do on your desktop computer.
Tap on any to start a conversation.
39 O2 user guide
O2 user guide 40
8. Other useful
information
Roaming
With your Xda you can be contacted virtually
anywhere in the world*, making and receiving
calls. So whatever you are up to abroad – don’t
wait, tell someone about it!
The Xda will operate on both GSM and
GPRS mobile phone networks, and will
operate in any country where O2 has a
roaming agreement. Where GPRS is not yet
available overseas, the GSM network can still
be used to provide voice and data services in
over 120 countries.
Whilst abroad contact International Customer
Services on: +44 870 521 4000
* Subject
to network coverage.
Access the Internet
abroad
Where GPRS is not yet available you will need
to access the Internet abroad over a GSM link.
To access the Internet over GSM:
• Select ‘Settings’ from the Start menu, then
tap on the ‘Connections’ tab
• Tap on the ‘Connections’ icon, then tap
the ‘Modify’ button under the first drop
down menu
Accessories
Removing your SIM card
A growing number of accessories are available
for your Xda. For further information visit
www.o2.co.uk and click on ‘Accessories’.
• Before removing your SIM card please ensure
that you have saved all of the data in open
programs. Opening the SIM door will turn
your device off
• Open the SIM card compartment as above
and then press the point of your stylus into
the hole marked B in the diagram below to
release the SIM card
• Press and hold the Mobile Web connection
with the number +44 7712 932932
• Then tap ‘Always Dial’ from the pop-up
window
X
• This will then reset your default connection
to GSM, allowing you to connect to the
Internet
A
B
Please note
When returning from abroad, you will need to
amend the settings on your Xda to access the
Internet over GPRS. Follow the same steps as
above, but choose the Mobile Web connection
with ‘GPRS’ next to it.
41 O2 user guide
Please note
Before progressing please pay particular
attention to the stylus position, as pressing A
(in the diagram above) will permanently
damage your device.
O2 user guide 42
9. Help and
trouble shooting
For the latest information on products and
services, tips and advice on using your Xda, as
well as the latest software upgrades;
• Visit pda.o2.co.uk (your Xda friendly website)
• Visit www.o2.co.uk/xda from your PC
• Telephone your service provider
Trouble shooting
Are you experiencing problems with your Xda
when trying to call someone? Do you continually
see the message ‘No answer at the number
dialled’? Then the following quick and easy
answers may be able to help.
Help
Connection settings
If it shows:
The phone is switched off. Tap
this icon and then tap ‘Turn
phone on’.
Step 1: Tap ‘Start’
Step 4: Tap ‘Auto Configuration’
Step 2: Tap ‘Settings’
Step 5: Tap ‘OK’ to launch the Auto
Configuration
You have sufficient signal
strength.
You have insufficient signal
strength. If insufficient bars are
shown, it’s unlikely that your
Xda will be able to connect.
Please move to an area with
a stronger signal strength
before continuing.
If your problems continue please refer the
Connection Settings steps on the
following page.
Signal
It’s important that the Xda is in an area with
sufficient signal strength so it can connect
properly. You can check the signal strength and
ensure that the phone is turned on by checking
the icon displayed in the navigation bar.
43 O2 user guide
Step 3: Tap ‘System’
Step 6: Tap ‘Yes’ to restart your device, and
finish the process
O2 user guide 44
Your Xda will now re-start with the factory
default settings restored.
Contact your service provider
If your problem persists please contact your
service provider to ensure that your account is
all up to date.
If this does not solve your problem your service
provider will be in a position to escalate the
concern to technical support and resolve the issue.
45 O2 User Guide