1
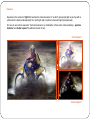
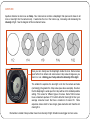
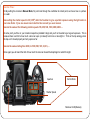
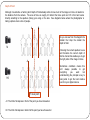
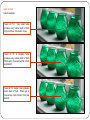
Fundamental Contents Exposure Aperture Shutter speed ISO/Sensitivity Depth of Field The following information is primarily to help you get to grips with some of the basic principles of photography before attending a personal tutorial with myself. It’s important to try and understand these principles as much as possible so in the time we have together we can shoot some working examples and concentrate on taking pictures. If you are struggling to get that ‘light-bulb’ moment when it all clicks into place, then don’t panic. Going through exercises on the day with working examples will really help. Likewise if you know all these principles already then that’s great. Exposure Exposure is the amount of light that reaches the camera's sensor. If we don't get enough light we end up with a photo which is dark (underexposed). Too much light and our photo comes out bright (overexposed). So how do we control exposure? It all comes down to a combination of two basic camera settings - aperture diameter and shutter speed. We will look at each in turn. Over Exposed Correct Exposure Under Exposed APERTURE Aperture diameter is also know as f-stop. Your camera lens contains a diaphragm that opens and closes to let more or less light into the camera body. It works like the iris in the human eye, increasing and decreasing the intensity of light. See the diagram of this mechanism below. Here you can clearly see the diaphragm inside the lens. Some lenses open further than others and some lenses f-stop value changes as you zoom in or out. Altering your f-stop alters the intensity of the light. The smaller the aperture the less light is let into the camera and also (confusingly) the greater the f-stop value (see above example). So when the this diaphragm is wide open the f-stop will be at it’s smallest possible setting. This varies for different types of lenses. Some 50mm lenses have a maximum aperture of f1.2 which will let far more light in than your average consumer zoom that has a maximum of around f4. More expensive lenses tend to have larger glass elements and therefore let more light in. Remember a smaller f-stop number mean more intensity of light. Smaller means bigger and vice versa. Shutter speed If the aperture controls light intensity then the shutter controls the duration of the sensors exposure to that intensity of light. A typical camera shutter is like a venation blind that opens to let the light hit the CCD (photo-sensor) which captures the image. It’s easiest to imagine the shutter as acting like an eyelid opening and closing for a specific duration. Shutter speed is simply a measure of how long the camera's shutter is open for. It typically ranges from anywhere around 1/4000th of a second (a fast shutter) to several hours (a slow shutter speed). Obviously, the longer the shutter is open for, the more light reaches the camera's sensor, and vice versa. So a one second exposure will let significantly more light in than say a 1/125th of a second which is 0.008 seconds (or one divided by 125). There is always a relationship between shutter speed, aperture and exposure. Often a small f-stop (high intensity) means a short time value (fast shutter speed), but the best way to visualize this is to think about filling a bucket with a tap. The full bucket represents a ideal amount of water and therefore an ideal amount of light for a perfect exposure. The tap represents the intensity of flow. Like the aperture diaphragm in the lens and remember an open tap is the smallest f-stop and a dribble would be the biggest f-stop value. Duration of flow is literally the time the hose pipe is on for and obviously this represents the exposure time or as we now call it shutter speed. It may not be much of a surprise but the more the tap is open the less time it takes to fill the bucket. Therefore using a smaller f-stop means you can use a faster shutter speed. Inversely using a higher f-stop means you will have to compensate for the less light intensity by using a longer shutter speed. Reasons for Confusion It can all seem a bit overwhelming but its no surprise that it can get confusing. If you can remember a few of the following points you’ll be well along the road towards that light-bulb moment when it all clicks into place. F-stop- smaller is bigger… f2 lets in far more light than f12 Shutter Speed- smaller is bigger… 20 (as appears on camera and actually means 20th of a second) is a far longer time expose that 200 (which means 200th of a second). Aperture Readout and actually means f14 Shutter speed and actually means one divided by 800 or 1/800th of a second. Exercise One Take your camera outside or into a well lit room. Turn it on and set the mode to Aperture Priority. ‘A’ mode for Nikon users and ‘Av’ for Canon. Now move the control dials to make the f-number as small as possible, opening up the diaphragm up as far as possible. OK, looking through the viewfinder change the f-number so it becomes as large as possible while watching what this does to the corresponding shutter speed value (which should also be in the viewfinder). Now, as your f-stop value goes from a small number to a large number what happens to the shutter speed? Does it get smaller or larger? Aperture Control Dials Shutter Speed Mode set to A (aperture priority) Exercise Two Now set the mode to Shutter Priority. ‘S’ mode for Nikon users and ‘Tv’ for Canon (Time Variable). Now move the control dials to make the shutter speed as fast as possible (largest number). Now looking through the viewfinder reduce the shutter speed right down. Watch what happens to the f-number. Now, as your Shutter Speed value goes from a large to a small numbers what happens to the f-stop numbers? Do they get smaller or larger? Aperture Control Dials Shutter Speed Mode set to S (shutter priority) Exercise Three : Finally setting the camera to Manual Mode, M, point look through the viewfinder at a fixed point, such as a tree or a picture on a wall. Now setting the shutter speed to 30 (1/30th) alter the f-number to give a perfect exposure using the light metre in your view finder. If you are unsure how to do this then consult you user manual. Now do the same at the following shutter speeds 125, 250, 500, 1000, 2000, 4000….. At some point you’ll be on your maximum aperture (smallest f-stop) and you’ll not be able to get a good exposure. This is because there is a limit to how much a lens can open (or closed) to let more or less light in. Think or the tap analogy when the tap won’t closed properly and only opens so far. Now do the same starting from 2000, to 1000, 500, 125, 30, 0.5,…. Once again you will reach the limit of how much the lens can closed the diaphragm to restrict the light. Aperture Control Dials Shutter Speed Mode set to M (Manual) ISO - Sensitivity ISO is just another term for the camera sensors sensitivity to light The higher the ISO the less light is needed to get a correct exposure. In the days of film a ‘fast film’ such as a1600 ISO film, used larger crystals of chemicals to capture the image than the standard 100 ISO films with small fine crystals. This caused ‘grain’ on the fast film giving the printed image a granular texture. The same effect still applies to digital images. As the image is boosted by the technical wizardry inside your camera it causes digital noise which makes the images grainy. As a working press photographer I have to work in varied environments. Even though sometimes its unavoidable I always try to keep the ISO as low as I can to ensure that my images have as little noise as possible. This means that if the shutter speed is so low that I cannot eliminate the risk of camera shake (1/20th to 1/60th depending on the lens) I’ll up the ISO. The only other time that I may increase the ISO is for photographing sport at night. For football matches you need a minimum of 1/400th of a second to freeze the action. Even in Premiership grounds this can mean an ISO of 1000 or more. Example : 200 ISO Example : 1600 ISO ISO - Sensitivity Your camera's ISO settings can be changed from as low as 100 to 3200 and higher on some advanced models. For well lit scenes such as a bright summers day or well lit rooms you can keep your ISO low to around the 100-200 range as there will be plenty of light to expose the photo correctly. If you're in low light conditions such as dull indoor areas or a overcast exteriors then you amy need to increase your ISO to get the required exposure. This of course is a compromise as higher ISO means more noise on the image. Try not to use the auto-ISO function on you digital camera as (like many auto functions) it will act as a massive handicap once you have acquired a little working knowledge. There are ways around having to increase the ISO. If your want to use a long shutter speed without getting camera shake you can use a tripod. If you want to use a high shutter speed but don’t have enough light then you can always add light with a flash. If your feeling very bold you can do both…. See examples below. Depth of Field Although it sounds like a farming term Depth of Field actually refers to how much of the image is in focus in relation to the distance from the camera. The area of focus is roughly 2/3 behind the focus point and 1/3 in front and varies directly according to the aperture (f-stop) your using on the lens. See diagrams below where the photographer is taking a picture down a line of people. A B As you can see from this diagram the smaller the f-stop the smaller the depth of field. f4 A B Choosing the correct aperture to use and therefore the correct depth of field is vital as this enables you to get the right parts of the image in focus. Sometimes conditions means this isn’t always possible to get everything you want but understanding the principle is key to being able to get the best creative use from your digital camera. f15 Focus point A = The limit of sharpness in front of the point you have focused on B = The limit of sharpness in behind of the point you have focused on Depth of Field real-life example. Taken at f1.8. Very small f-stop produces very narrow depth of field. Only front face of that pot in focus. Taken at f5. A smallish f-stop produces very narrow depth of field. Whole pot in focus and a little in front and behind. Taken at f14. Larger f-stop produces wider depth of field. Whole pot in focus and a most of pots in front and behind. Finally….. You should always be playing around with your camera. The best place to experiment is in the home photographing just random things. Try turning on/off lights, photographing near windows and under different lighting conditions. Try and keep the camera in manual mode and by using the light meter in the view finder and review screen try to get good accurate exposures. Fortunately it’s not like in the days of film where each picture cost you to get developed. If needs be keep your own notes of your experiments, successes and failures. Photography is a wonderful hobby that probably makes you study your world in a more critically than you would normally do but that doesn't mean it has to be a particular serious and overly worthy art form. Having fun with photography and enjoying the playful aspect of drawing with light is such a simple pleasure. So get out there and have fun. The Fundamental Basics of Photography END