1
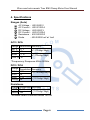
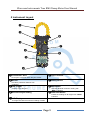
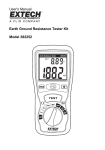
ET-3888
True RMS Clamp Meter
User Manual
Wavecom Instruments True RMS Clamp Meter User Manual
Index
Introduction……….......................................................
3
Safety Notes................................................................
4
Features.......................................................................
5
Specifications...............................................................
6-8
Instrument Layout........................................................
9
Measurement..............................................................
10
Maintenance...............................................................
11
Page 2
Wavecom Instruments True RMS Clamp Meter User Manual
1. Introduction
This meter has been designed and tested according to CE Safety
requirements for Electronic Measuring Apparatus, EN61010-1,
EN61010-2-32 and other safety standards. Following all warnings to
ensure safe operation.
WARNING
READ “SAFETY NOTES” (PAGE 4) BEFORE USING THIS METER
Page 3
Wavecom Instruments True RMS Clamp Meter User Manual
2. Safety Notes
Read the following safety information carefully before attempting to operate
or service the meter.
1. Use the meter only as specified in the manual, otherwise the
protection provided by the meter may be impaired.
2. Always keep finger grip away from the meter barrier.
3. Use extreme caution when clamping around uninstalled conductors
or bus bars.
4. Never clamp around any conductor carrying a voltage above 600v
R.M.S.
5. Rated environmental conditions:
1. Indoor use.
2. Installation Category Ⅲ
3. Pollution degree
4. Altitude up to 2000 Meter.
5. Relative Humidity 80% Max.
6. Ambient Temperature 0~40 C
6. Observe the international Electrical Symbols listed below:
Meter is protected throughout by double insulation or reinforced
insulation.
Warning! risk of electric shock.
Caution! refer to this manual before using the meter.
~
╧
Alternating current.
Earth (ground) terminal.
Page 4
Wavecom Instruments True RMS Clamp Meter User Manual
3. Features
This instrument provides a True RMS value.
Full auto-range for all functions.
“Data Hold” function freezes the reading.
“Max Hold” function holds the absolutely maximum of readings.
Low battery indication.
Safety design throughout with no exposed metal parts.
Shielded banana plugs and recessed input terminals.
“Ohm” function ideal for checking continuity of relays, transformers
and motor coils.
“Diode check “ function.
Page 5
Wavecom Instruments True RMS Clamp Meter User Manual
4. Specifications
Ranges (Auto)
AC Voltage
AC Current
DC Voltage
DC Current
Resistance
Diode
:
:
:
:
:
:
400.0/600 V
400.0/1000 A
400.0/600 V
400.0/1000 A
400.0/2000 Ω
400.0/2000 mV at 1mA
ACV / ACA
Range Resolution Accuracy
400
0.1
±(1.0%rdg+3dgt)
600
1
400A 0.1 A
±(1.5%rdg+3dgt)
1000 A 1 A
v
v
v
v
*Frequency Response 40Hz-500Hz
DCV / DCA
Range
400V
600V
400A
1000A
Resolution Accuracy
0.1V
±(0.75%rdg+3dgt)
1V
0.1A
±(1.5%rdg+3dgt)
1A
Resistance
Range Resolution Accuracy
400Ω 0.1Ω
±(1.0%rdg+3dgt)
2000Ω 1Ω
*Audible alarm sounds below 38.0Ω
Page 6
Wavecom Instruments True RMS Clamp Meter User Manual
Diode
Range
Resolution Accuracy
400 mV 0.1 mV
±(1.0%rdg+3dgt)
2000 mV 1 mV
*At 1mA current
Overload protection
ACV
DCV
Diode & Ohm
750V RMS
1000v
600V rms
Conductor Size
Approx. 40mm Max
Operating Principle
Dual slope integration
Over Range Indication
“O.L” indicated
Low Battery Indication
“
“ sign appears on the display
Response Time
Approx. 1 second
Sample Rate
Approx. 2 times per second
Page 7
Wavecom Instruments True RMS Clamp Meter User Manual
Temperature & Humidity
0°C ~ 40°C at 80% max. relative humidity
Storage Temperature & Humidity
-10°C ~ 50°C at 80% max. relative humidity
Dimensions
255(L) x 80(W) x 35(D) mm
Weight
Approx. 420g (battery included)
Power Source
9V (6F22) x 1
Accessories
Test Leads
Carrying Case
Instruction Manual
9V (6F22) x 1
Page 8
Wavecom Instruments True RMS Clamp Meter User Manual
5 Instrument Layout
❶
❷
❽
❸
❼
❹
❾
❺
❻
❶Transformer Jaws
❻Input Terminal
Pick up the conductor within the jaws center.
❷Barrier
❼Rotary Switch
Provide a protective distance from
conductor
❸Jaw Trigger
❽Max Button
Press to open the jaws
Hold the absolute maximum reading with
“MAX” indicated
❹DCA zero adjust setting
❾Data Hold Button
Freeze the reading for all ranges with “HOLD”
indicated
❺LCD Display
33/4 Digit LCD with the maximum reading of 3999
Page 9
Wavecom Instruments True RMS Clamp Meter User Manual
6 Measurement
Before proceeding with measurement, read the safety notes.
1. Voltage measurement
Insert the BLACK test lead to COM and the RED one to the other
terminal.
Switch to AC V range for AC voltage or DC V range for DC voltage.
Use the test lead tip to the circuit and read the reading of display
directly.
If the reading exceeds 600V, possible indicated value is incorrect
and dangerous.(refer to the safety notes)
2. Current measurement
Switch to AC A range for AC current or DC A for DC current.
If the initial reading of DC A is not zero, use the DC A zero adjust to
set to 000.0 Amps.
Make sure that the test lead is not connected to the Terminal.
Press the jaw trigger to open the transformer jaws and clamp onto
one conductor only.
Read the display reading
3. Ohm & Diode measurement
For Ohm test:
Switch to OHM range and make sure there is no power in the
circuit being measured.
Insert the BLACK lead to the COM and the RED one to another.
Connect the test leads to the circuit under test and read the display
directly.
For Diode test:
Connect the test leads to the Diode under test.
Read the forward voltage of Diode directly from display. If connect
reversely, the display shows O.L
Page 10
Wavecom Instruments True RMS Clamp Meter User Manual
7. Maintenance
Battery Replacement:
When low battery warning appears, change a new battery as follows:
Disconnect the test leads from the instrument and turn off power. Unscrew
the battery cover and replace a new battery.
Cleaning and Storage:
WARNING
To avoid electrical shock or damage to the
meter, avoid water contamination on this
instrument.
Periodically wipe the case with a damp cloth and detergent. Do not use
abrasives or solvents.
If the meter is not to be used for a long period over 60 days, please remove
the battery for storage.
Page 11