1
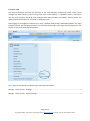
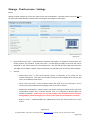
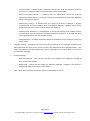
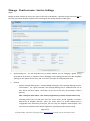
JAYEX HEALTHCARE ENLIGHTEN PROFESSIONAL TOUCH SCREEN USER MANUAL Associated manuals: ENLIGHTEN PROFESSIONAL – MAIN INTERFACE MANUAL ENLIGHTEN PROFESSIONAL – CLIENT CALLING USER MANUAL Page 1 of 7 Copyright © 2010 - 2011 Jayex Technology Limited. www.jayex.com All rights reserved. Dated 31 Oct 2011 INTRODUCTION This manual describes the Staff user Interface to the Jayex Enlighten Professional touch screen, which manages the client check-in process using Jayex touch screen devices. It should be used in conjunction with the main interface manual & Client Calling manual (where feature purchased). All user guides and update release information can be found on www.jayex.com After logging in to Enlighten Professional, by using a desktop web-browser method described in the main interface manual, the following operations are accessible by clicking on the large round blue button in the top left corner of the web-page (see below). Sample image (Ctrl + Click on the relevant line below to go to the required section) Manage - Touch screens - Settings .................................................................................................................... 3 Manage - Touch screens - Service Settings ....................................................................................................... 5 Page 2 of 7 Copyright © 2010 - 2011 Jayex Technology Limited. www.jayex.com All rights reserved. Dated 31 Oct 2011 Manage - Touch screens - Settings Notes: Change to these settings are sent to the Touch screen PCs via broadcast – therefore Touch screen PCs not on the same (local area network) LAN will need restarting for the changes to take effect. Sample image Date of Birth Input Style – select between Calendar and Keypad - if Keypad is selected then two further options are provided. If Hide Year with * is ticked then the digits of the year will not be displayed on the Touch screens for increased privacy. The year will be a four-digit year unless the Two digit Year checkbox is ticked. Jayex recommends the Calendar style as the most client friendly. General. o Screen Reset Time – if the touch screen(s) receive no responses to any actions for the number seconds set, then they will consider the Client to have walked away and they will revert to the default initial screen. o Touch screen Exit Code – enter an alpha-numeric Exit Code of up to 5 characters. This is used only by system administrators/support staff at the Touch screens. o Enable Auto Confirmation – When a Client self-checks in using any touch screen, the client confirmation prompt “YES” or NO will assume “YES”, if no response is detected after this number of seconds. Caution: do not use this prompt if any extended services (receipts, demographics, patient messages) are in force as the client will not be able to see them). o Beep on touch – enables/disables the audible beep when the Client touches any touch screen. Page 3 of 7 Copyright © 2010 - 2011 Jayex Technology Limited. www.jayex.com All rights reserved. Dated 31 Oct 2011 Sample image o Verify Postcode – enables/disables verification that the post-code (last 3 digits) entered by the Client is a valid post-code (using appointment system source data). o Enable Anonymous Surveys – if enabled offers an independent survey and reporting application independent the self-check in option and should only be used if the additional product has been purchased. o Enable Way Finding – if enabled then the image (as defined in Manage → Images) nominated for the Client’s Waiting Area (as defined in Manage → Waiting Areas) will be displayed on the touch screen when the Client self checks in. o Enable Call For Assistance – if enabled then all Touch screen displays will include a button to touch which will call someone to physically attend for assistance. A message will show on the appointment screen web browser refresh o Enable Receipts – if enabled then tickets will be printed when clients self check-in using any touch screen. Language Settings – if enabled then select from the pre-defined list of Languages available which will be offered at the Touch screen. Enter any text in the white box to filter Language-names – only names containing the text will be displayed. Select a Language from the drop-down list to be used as the default Language. Interface Settings. o Welcome Message – enter the text you wish to see displayed as a Welcome message at each Touch screen display. o Background – select from the Images (as defined in Manage background image in the Touch screen display. → Images) to be used as a Save – When done click Save or click the browser’s Back button to cancel. Page 4 of 7 Copyright © 2010 - 2011 Jayex Technology Limited. www.jayex.com All rights reserved. Dated 31 Oct 2011 Manage - Touch screens - Service Settings Notes: Change to these settings are sent to the Touch screen PCs via broadcast – therefore Touch screen PCs not on the same (local area network) LAN will need restarting for the setting changes to take effect. Sample image Apply Settings To – use the drop-down list to specify whether you are changing a global setting (that affects all Services), or whether you are changing a local setting (that will over-ride the global settings for the specific Service only). Nb. A service is a unique set of appointment data. General. o Display Average Waiting Time – enable/disable the display of the Average Waiting Time for all Consultors. For a given Consultor, the Average Waiting Time is undefined until one of their Clients has been called. Thereafter, for the rest of the day, the Consultor’s AWT is given by AWT = SUM (Time Client Called – Time of Client’s Appointment) / Number of Called Clients today excluding Clients who arrived later than the “Grace Time” period (typically 5 minutes) defined for all Enlighten Services. Note: the “Grace Time” is a system setting which is configurable with assistance from Jayex, but not using the Enlighten web interface. Also note that the calculated value will be subject to a cap defined by the system setting. Page 5 of 7 Copyright © 2010 - 2011 Jayex Technology Limited. www.jayex.com All rights reserved. Dated 31 Oct 2011 o Display Number of Clients Waiting - enable/disable the display of the Number of arrived Clients Waiting for all Consultors (and who have not yet been called). o Display Client Name in confirmation Screen – enable/disable the inclusion of the Client’s name in the confirmation prompt seen at the Touch screen. Auto Arrival Rules. These settings defined the number of minutes a Client will be considered to have arrived Early or Late for an Appointment. You should follow standard practice/department rules to set this time as thought a client arrived at reception. Consider Clients with multiple appointments in the same hour or so, (do you want them to check in for all appointments at the same time ?) Demographics – o Enable UK Residency Check – if enabled clients will be asked at check-in if they have lived in the UK for the past 12 months or Elsewhere. If they select Elsewhere they will fail check-in and be referred to the reception. o Enable Demographic questions - If enabled then a list of Demographic questions are offered for Client validation. Each question selected (enabled) can be mandatory (required) or optional (not required). See Important notes below on this feature use. Save - When done click Save or click the browser’s Back button to cancel. Nb. If any of the features described in this manual differ from your product you either have an older (or newer) version of Enlighten Professional and should view the relevant manual. Page 6 of 7 Copyright © 2010 - 2011 Jayex Technology Limited. www.jayex.com All rights reserved. Dated 31 Oct 2011 Notes on the use of Demographic review feature: The use of the demographic feature is a valuable extension of the Enlighten Professional check-in service. The purpose is allow clients to confirm (or not) if the information shown on the screen (e.g. their postcode) is correct. This will allow any service, where matching demographic information is being provided by the Appointments/PAS provider, to identify any required information which may assist in further communication with their client. The feature does not allow the client to update any information, only to agree “YES” or disagree “NO” with the information shown on the screen. For data protection purpose the information is presented on up to 3 separate screens. Demographic review information will only appear on the screen if the information is available and only after all other check-in rules have been observed. Nb. Not all appointments/PAS systems pass the data or hold the data, Jayex suggest you check your internal demographic information before setting up this feature. Any of these demographic questions can be set as “Enabled” or “Required”. “Enabled” will allow a successful Check-in. If the demographic information is not available at the time of check-in, or the client selects the “NO” button, the appointment row on the Enlighten Professional “Appointments” view will change colour (typically pink). Additionally an exclamation mark will show in a yellow circle to alert the staff user. By clicking on the exclamation mark the staff user will see a message to advise “Clients demographics information is incomplete”. Jayex recommend staff users are trained to recall the client to a private area, to update the required information in their appointment system/PAS. If “Required” is selected and the information is either not available (as above) at time of check-in or the touch screen user selects “NO”, then the check-in will stop and the user will be requested to go to reception. The staff user will be alerted with a RED row and a notification message which should be dealt with as above” and cleared to allow check-in manually”. Nb. If you wish to know what demographic information is provided by a given Appointment system/ PAS or wish to confirm which review features enable, please contact your Appointment system/ PAS provider. Auto-Confirmation Awareness If Auto-confirmation is enabled (and the client does not select Yes within the prescribed number of seconds) the client will be checked in automatically, without access to extended service questions such as demographics, UK residency, able to see auto arrival messages, receive a print receipt etc. You should not enable this feature if any other service is in use as it is for “fast check-in” only. Page 7 of 7 Copyright © 2010 - 2011 Jayex Technology Limited. www.jayex.com All rights reserved. Dated 31 Oct 2011