1
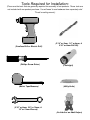
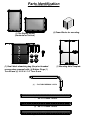
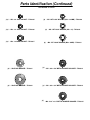
®
••
••
••
••
Owner's Manual
Frequently Asked Questions
Assembly Instructions
Warranty Information
Manufacturer: Protective Enclosures Company
385 CenterPointe Circle, Ste.#1319
Altamonte Springs, FL 32701
1-800-331-2628
E-mail: [email protected]
Check us out @ www.thedisplayshield.com.
Save this assembly manual for future reference in the event that
you need to order replacement parts.
INS-A-DISPLAYSHIELD-ENG 5/22/14
Made in the USA
FREQUENTLY ASKED QUESTIONS:
WHAT KIND OF MATERIALS ARE The Display Shield MADE OUT OF?
We researched and tested scores of materials (metals, coated wood/synthetic wood products, fiberglass, and many plastics)
until we found the perfect solution. The Display Shield™ outdoor weather and water resistant Display enclosure and cover is
crafted from a premium, flexible material because of its strong, water resistant, scratch resistant, and UV resistant properties.
The housing of the Display Shield is made from HMWP or High Molecular Weight Polyethylene. The front panel is made from
industry leading ultra clear Lexan polycarbonate.
HOW ARE YOUR DISPLAY SHIELD COVERS MADE?
The Display Shield™ outdoor display enclosure and cover is handcrafted in the U.S.A. in award winning manufacturing and
assembly facilities. All materials are water and UV resistant, protecting your display from the elements.
IS THERE A BEST PRACTICE OF PLACEMENT OF THE DISPLAY SHIELD?
Yes, please see "BEST OUTDOOR PRACTICES" after Step 12 of these instructions.
HOW DO I CLEAN MY DISPLAY COVER?
Your outdoor display cover will look its best when kept clean. The back housing can be cleaned with a mild soap and water,
however the front panel is a special material, which will look best if you use one of our APPROVED CLEANING PRODUCTS
listed in your owners manual in the “Cleaning Instructions” section.
WILL THE OUTDOOR DISPLAY COVER WORK WITH DIFFERENT KINDS OF WALL MOUNTS?
Yes, The Display Shield™ is engineered to be "universal", and is able to be used with all "standard" VESA mounting systems,
up to 400x600. The Display Shield is manufactured with a pre-measured and marked "divot" system, in which you can drill out
the back of the unit in pre-molded divots to fit your mount and configuration (this not only lets our Patent Pending Display Shield
be "universal", but also allows for the minimum number of holes or moisture entry points), using the provided instructions.
DO I NEED TO MEASURE MY DISPLAY?
YES, measuring is VERY important! Especially if you plan to use a larger display than our advertised primary sizes. You will
need to precisely measure your display if you plan to use The Display Shield™ for the upsize LED sizing. The Display Shield™
is manufactured to fit:
HORIZONTAL UNITS:
DIMENSIONS 19-29 - SMALL UNIT
SMALL: Fits Most 19" to 30" Displays
MAX INTERIOR DIMENSIONS: 27.75"W x 19.75"H x 4.75"D
EXTERIOR DIMENSIONS: 32.25"W x 23.75"H x 6.25"D
WEIGHT: 19 LBS
VERTICAL UNITS:
DIMENSIONS 19-29 - SMALL UNIT
SMALL: Fits Most 19" to 30" Displays
MAX INTERIOR DIMENSIONS: 19.75"W x 27.75"H x 4.75"D
EXTERIOR DIMENSIONS: 23.75"W x 32.25"H x 6.25"D
WEIGHT: 19 LBS
DIMENSIONS 30-50 - MEDIUM UNIT
MEDIUM: Fits Most 30" to 50" Displays
MAX INTERIOR DIMENSIONS: 45.25"W x 27.75"H x 4.60"D
EXTERIOR DIMENSIONS: 49.25"W x 31.75"H x 7.60"D
WEIGHT: 34 LBS
DIMENSIONS 30-50 - MEDIUM UNIT
MEDIUM: Fits Most 30" to 50" Displays
MAX INTERIOR DIMENSIONS: 27.75"W x 45.25"H x 4.60"D
EXTERIOR DIMENSIONS: 31.75"W x 49.25"H x 7.60"D
WEIGHT: 34 LBS
DIMENSIONS 50-60 - LARGE UNIT
LARGE: Fits Most 50" to 60" Displays
MAX INTERIOR DIMENSIONS: 55.50"W x 35.25"H x 4.10"D
EXTERIOR DIMENSIONS: 59.20"W x 39.40"H x 6.70"D
WEIGHT: 58 LBS
DIMENSIONS 50-60 - LARGE UNIT
LARGE: Fits Most 50" to 60" Displays
MAX INTERIOR DIMENSIONS: 35.25"W x 55.50"H x 4.10"D
EXTERIOR DIMENSIONS: 39.40"W x 59.20"H x 6.70"D
WEIGHT: 58 LBS
Helpful Tips:
• Please be advised that the seal around the back housing will settle over time and you may need to apply force to close and line
up the torx screws on the unit for 2 to 4 weeks.
• After mounting unit, it may be necessary when opening and closing to continue to align threaded screws into front panel until
unit completely settles which can take up to 2 to 4 weeks depending on climate. Please be advised that this “alignment” system is
integral to the structural rigidity and water tight sealing of The Display Shield.
• If the back of The Display Shield is drilled incorrectly, it is essential that the incorrect hole(s) be repaired. As a courtesy to our
customers, we provide rubber plugs to seal the holes.
• Use only approved cleaning products (sold on our website or in the cleaning instructions below) as regular household products
may cause streaking and reduction in optical clarity.
• The small black drawstring bag is provided to keep the black threaded bolts in when removed to open front panel.
VESA Mount Standards
What is VESA?
VESA (Video Electronics Standards Association) is a professional organization made up of a group
of video electronics industry professionals; their purpose is to review proposals and develop
standards to promote uniformity in the video electronics industry. Established in 1989, VESA
works to develop industry-wide interface standards for a large variety of products including Flat
Panel TVs and monitors.
What are VESA Mount Standards?
VESA has developed a set of standards for the manufacturing of flat screen televisions and PC monitors. Most
manufacturers comply with this standard by adhering to an industry wide hole pattern on the back of their displays for
mounting purposes. A typical VESA hole pattern for flat panel displays can be one of the following sizes:
• 75 mm x 75 mm (75 mm = 2.95 inches)
• 100 mm x 100 mm (100mm = 3.94 inches)
• 200 mm x 200 mm (200 mm = 7.87 inches)
• 400 mm x 400 mm (400 mm = 15.7 inches)
• 600 mm x 400mm (600 mm = 23.62 inches)
INSTALLATION INSTRUCTION TIPS - PLEASE READ:
Thank you for purchasing The Display Shield. Please read the following, before starting the installation process.
The Display Shield is designed to be used in conjunction with a TV wall mount, ceiling mount or any other mount using a VESA
standardized mounting pattern (sold separately). Upon successful installation, The Display Shield should be “sandwiched”
between
the back of the display, and the mount.
Please be advised that the “divots” are only to be used as guides to help with horizontal leveling during installation (if using the
divots). Please measure according to instructions. Divots are set at VESA standard mounting measurement widths - left to right.
To locate your display’s VESA hole patterns please refer to your display box, display manual or by doing an internet search for
your specific display.
You will need to unscrew the ten (10) black threaded bolts from the front panel to open The Display Shield.
Note: 50”-55” model includes sixteen (16) black threaded bolts.
• On the 19” to 26” Display Shield the VESA divots are 75X75, 100X100, and 200X200 - starting from inner set of divot lines to
outer
set of divot lines.
• On the 30” to 42” Display Shield the VESA divots are 100X100, 200X200, and 400X400 - starting from the inner set of divot
lines.
• On the 50” to 55” (up to 60”) Display Shield the VESA divots are 100X100, 200X200, 400X400, and 600X400 - starting from the
inner set of divot lines.
Do not drill the incorrect hole(s). I.E. If your display’s VESA mounting pattern is 200X200 and you are using the 19” to 29”
Display Shield you would drill your first hole in the very left divot line and when you drill your holes on the right side you should be
on the far right divot line. If you are using the 75X75 VESA pattern, you should drill your first hole on the left inner divot line and
find the measurement on the inner right divot line before drilling a hole.
19-29 Inch
40-50 Inch
50-60 Inch
Tools Required for Installation:
(These are the tools that are generally required for assembly of our products. These tools are
not included with our product purchase. You will need to use hardware from separately sold
TV wall or ceiling mount.)
(Cordless Drill or Electric Drill)
(Phillips Screw Driver)
(Metric Tape Measure)
(3/16" or 5mm, 1/4" or 6mm, &
5/16" or 8mm Drill Bit)
(Flashlight)
(Utility Knife)
(5/16" or 8mm, 3/8" or 10mm, &
1/2"or 13mm Wrench)
(An Adult w/ an Adult Helper)
Parts Identification
Included in Box
(1) The Display Shield
(Horizontal or Vertical)
(1) Small black drawstring bag (Keep for threaded
screws when removed) with: (4) Rubber Plugs (1)
Torx Bit and (4) 10-32 x 1-1/4" Torx Screw.
(4) Foam Blocks for mounting
(1) Mounting Hole Template
(1) - T-25 TORX WRENCH - AH774
(4) - M5 - 0.8 x 120MM - TH10002
(4) - M6 - 1.0 x 120MM - TH10003
(4) - M8 - 1.25 x 120MM - TH10004
Parts Identification (Continued)
Included in Box
(12) - M5 - 0.8 - HEX JAM NUT - TH10005
(8) - M5 - INT LOCK WASHER (M5 x 10.5MM) - TH10008
(12) - M6 - 1.0 - HEX JAM NUT - TH10006
(8) - M6 - INT LOCK WASHER (M6 x 13) - TH10009
(12) - M8 - 1.25 HEX JAM NUT - TH10007
(8) - M8 - INT LOCK WASHER (M8 x 16MM) - TH10010
(8) - M6 PLAIN WASHER - TH10011
(4) - M5 - #10 x 5/8" METAL-BONDED WASHER - TH10013
(8) - M8 PLAIN WASHER - TH10012
(4) - M6 - #12 x 3/4" METAL-BONDED WASHER - TH10014
(4) - M8 - 5/16" x 3/4" METAL-BONDED WASHER - TH10015
STEP 1
**Read all the assembly tips of each step thoroughly. The written tips may include important information not shown in
illustrations.
1. Remove torx screws, as shown.
10-32 x 1-1/4" SCREW TORX - FH-PIN-IN
(12 PLCS)
10-32 x 1-1/4" SCREW TORX - FH-PIN-IN
(12 PLCS)
VERTICAL DISPLAY SHIELD
HORIZONTAL DISPLAY SHIELD
STEP 2
1. Remove bottom grommets and make vertical and horizontal cuts, as shown.
GROMMET - BOTTOM - LG
(2 PLCS)
HORIZONTAL DISPLAY SHIELD
CUT 1 - VERTICAL
GROMMET - BOTTOM - LG
(2 PLCS)
VERTICAL DISPLAY SHIELD
CUT 2 - HORIZONTAL
**Grommets to be reinstalled in STEP 7.
NOTE: BE SURE TO CUT ALL THE WAY THROUGH
TO THE EDGE OF THE GROMMET, FOR VERTICAL
CUT.
STEP 3
1. Arrange foam blocks on ground and place display face down on blocks, as shown.
2. Pick the correct size screw your TV uses by either checking the owner's manual or by taking the provided threaded studs and
screwing them into the mounting holes located on the back of your television. Remove the screw after checking as you will need
this information for step 5 below.
Note: If using the small 19-29" unit, pick the correct screw fitment from your separately sold mount hardware.
**Position foam blocks under the outside frame of display (not on the screen).
STEP 4
1. Locate and mark horizontal and vertical centers on back side of display. Lay the provided template over the back of display and
align the template crosshairs with the previously located horizontal and vertical centers on the display. Mark mounting bracket hole
locations on template, as shown.
**Accuracy of measurements are highly important for proper assembly.
MEASURE TO CENTER
AND MARK
MEASURE
TO
CENTER
AND
MARK
Mark holes in
(4) places.
Paper Template
Display
STEP 5
1. Transfer the hole pattern to the back of your Display Shield by aligning the crosshairs etched into the surface of the Display
Shield with the crosshairs on the template.
**Accuracy of measurements are highly important for proper assembly.
2. Drill holes in back of Display Shield at location marked on template using drilling schedule below:
Drilling Schedule
Fastener Size:
STOP
Drilling Bit:
M5
3/16" or 5mm
M6
1/4" or 6mm
M8
5/16" or 8mm
If using the seperately sold
spacers for the 19-29" inch unit please
refer to the spacer kit instructions before
moving on to step 6.
Note: Incorrectly drilled holes can be plugged
using P/N: AH782 Rubber Hole Plug. Hole
diameter must be at least 5/16" or 8mm.
Drill through back
of Display Shield.
Paper Template
Paper Template
VERTICAL DISPLAY SHIELD
HORIZONTAL DISPLAY SHIELD
STEP 6
1. Insert studs into mounting holes located on back of
display. Lock studs into place using an external tooth lock
washer and hex jam nut, as shown.
2. Use the second jam nut and washer to level the Display
Shield over the display. (See step 7).
NOTE: Consumers using the "small" 19-29" The
Display Shield will not install any bolts or studs at
this time and will move on to Step 7.
PLAIN WASHER
(4 PLCS)
HEX JAM NUT
(8 PLCS)
INT LOCK WASHER
(4 PLCS)
THREADED STUD
(4 PLCS)
STEP 7
1. Install power cord and any HDMI/Coax Cable/Component Cables needed, into correct "port(s)" on the display.
2. If you are using a TV that is not flat or has a raised area on the mounting side, you may need to use the leveling hardware
provided so the TV sits level in the enclosure. I.E. if your TV has a speaker bar or thicker area above or below the 4 mounting
holes, you will need to set the leveling hardware at the same height as the raised area on your TV. If your TV does not have
any raised areas on the mounting side, the leveling hardware is not needed.
3. Place The Display Shield directly over the display (and foam blocks) aligning the previously drilled holes with the
studs. (if using the 19-29” small unit you will align the previously drilled holes with the mounting holes in your TV by
looking through the drilled hole and lining them up. Using a flashlight in this step may be helpful.
4. Pull all cords and wires through opening(s) where you removed the grommets and reinstall grommets around cords.
REINSTALL GROMMETS.
LEVELING HARDWARE
(Use and adjust as needed)
PLAIN WASHER
(4 PLCS)
HEIGHT OF RAISED AREA.
HEX JAM NUT
(4 PLCS)
DISPLAY
Use the leveling hardware if your display has
any raised areas like the example shown here.
You will need to place the hardware at the
same height as the raised area on your display.
STEP 8
1. Align mounting bracket (sold separately) with the
studs protruding from the back of your Display Shield
and secure using hardware, as shown. Metal-bonded
washer to be installed before mounting bracket to
prevent water intrusion. Tighten accordingly.
Note: If mounting a "Small" 19-29" Series The Display
Shield, you will use the the mounting screws provided
with your separately sold mount. You will run the
screws through the mount bracket, through the
metal-bonded washer, through The TV Shield and into
your TV's mounting holes. Tighten accordingly.
Mounting Bracket
(Sold Separately)
HEX JAM NUT
(4 PLCS)
INT LOCK WASHER
(4 PLCS)
PLAIN WASHER
(4 PLCS)
METAL-BONDED WASHER
(4 PLCS)
Mounting Bracket
(Sold Separately)
HORIZONTAL DISPLAY SHIELD
VERTICAL DISPLAY SHIELD
STEP 9
1. Remove protective covering from both sides of lens, as shown.
Note: As a precaution, washer your hands and have a clean work area before you remove the protective covering. This will
avoid any possible scratching of the lens that may occur during the wall mounting procedure. Also, it is advised to wipe clean
the inside of the shield before securing.
Peel here.
STEP 10
1. Replace cover and torx screws, as shown.
10-32 x 1-1/4" SCREW TORX - FH-PIN-IN
(12 PLCS)
10-32 x 1-1/4" SCREW TORX - FH-PIN-IN
(12 PLCS)
VERTICAL DISPLAY SHIELD
HORIZONTAL DISPLAY SHIELD
STEP 11
1. Remove the o-rings, located at the top of shield, to wash or replace filters, as shown.
3" VENT FILTER
(2 PLCS)
O-RING
(2 PLCS)
STEP 12
1. Mount the Display, enclosed within The Display Shield as one unit, according to the TV mount instructions provided with
your mount (sold separately).
BEST OUTDOOR MOUNTING PRACTICES
If you are mounting your unit in an outdoor environment, we have come up with some
best practices to reduce glare and to give you the best viewing of your TV or monitor.
• Installing our Energy Film will reduce glare to an extent but does not eliminate it.
• Mount The TV Shield in an area that does not get direct sun if possible.
• If mounting in direct sun or in an area that gets a lot sun, it is best if you have some type
of backdrop in front of The Display Shield. I.E. if you can mount the enclosure where there
is a wall in front of it, trees, bushes or any other darker objects it will help with reflection.
• Use a tilting and swiveling mount as you may be able to angle the enclosure in different
directions to reduce the amount of glare or reflection while watching.
• Depending on your TV's options, change the picture mode under setting to dynamic
and/or adjust the contrast, brightness, sharpness and color.
The Display Shield® Limited Product Warranty
This limited warranty is provided by The Protective Enclosures Company, LLC- for The Display Shield®
product(s) identified by the purchaser’s registrar on as indicated below, and there are no other
warranties, expressed or implied, except as required by law, including warranties of merchantability and
fitness for a specific purpose, that are provided for herein, however all such implied warranties, if any,
are limited to the duration of this specific limited product warranty. Some states do not allow limitations
on how long an implied warranty lasts, so the above limitations may not apply to you.
The Protective Enclosures Company, LLC, or any subsidiaries, shall not be liable, under any
circumstances, for incidental, indirect, special, and consequential or multiple damages as a result of the
sale or use of this The Display Shield® product. Some states/countries do not allow the exclusion or
limitation on of incidental or consequently damages, so the above limited on or exclusion may not apply
to you.
The Display Shield® Limited Product Warranty:
7 Year Limited Warranty on high molecular weight polyethylene plastic housing against cracking and
breaking with normal consumer use.
5 Year Limited Warranty on the polycarbonate front shield (cover/panel/window) against cracking or
breaking with normal consumer use. This warranty does not cover any scratches or damaged caused by
abuse or normal use, it only covers against discoloring, cracking, yellowing or breaking of the
polycarbonate front cover.
3 Year Limited Warranty on product failure or quality of workmanship and on all other components
against any manufactures defects.
This is a limited warranty, subject to the conditions, limitations and exclusions identified herein. The
Protective Enclosures Company, LLC warrants to the original purchaser of the registered or identified
product for a period of time listed above, from the date of purchase, that the product shall be free of
defects in design, material and workmanship, and subject to the limitations set forth below; The
Protective Enclosures Company, LLC will repair or replace, at its option, any defective unit. The
Protective Enclosures Company, LLC hereby warrants to the original retail purchaser of this product that
should this product or any part thereof, under normal use and conditions, prove to be defective in
material or workmanship within one (1) year from date of original purchase, such defect(s) will be
repaired or replaced with a reconditioned product (The Protective Enclosures Company, LLC’s option on)
without charge for parts and repair labor. Purchaser must return the product to The Protective
Enclosures Company, LLC, return receipt requested or by other means that confirms delivery and The
Protective Enclosures Company, LLC shall make the said repairs or replacement within 60 days of
receipt. In some instances the product may have been discontinued and cannot be replaced, or
repaired. In that instance The Protective Enclosures Company, LLC shall in its discretion attempt to
replace the product with a substantially similar product in a current model or design or pay the
purchaser a sum for the then fair market value of the product, considering the amount of depreciation
since sale, and the use of the product. This Limited Warranty is the original retail purchaser’s sole
remedy for any and all such defect(s).
Conditions and Limitations:
Proof of purchase is required (i.e. the sales receipt of other proof of payment).
Damage caused by accidents, abuse, misuse or modification of the product will render this warranty null
and void.
This warranty is applicable only to the original purchaser and is not assignable or transferable. To obtain
repairs or replacement under the terms of this warranty, please contact The Protective Enclosures
Company, LLC at 1-800-331-2628 or visit www.www.protectiveenclosures.com. You will need to provide
proof of purchase (dated receipt showing where purchased) and product part number in order to
receive warranty service. The purchaser is required to send the product back to The Protective
Enclosures Company or to a designated repair center and the purchaser is responsible for all charges for
shipping and handling.
This Limited Warranty does NOT cover:
Products which have been subject to abuse, accident, alteration, modification, tampering, negligence,
misuse, improper installation, lack of reasonable care, unauthorized repair or service, or if the model or
serial number has been altered, tampered with, defaced or removed.
Use of unauthorized cleaning products or methods will damage the product and void the warranty.
1. Initial installation or the removal and re-installation of product.
2. Cosmetic damage, damage that occurs in shipment, an act of God, or natural disaster.
3. Missing accessories or components.
4. Products modified or used for any purposes other than what the product is specifically designed
THE EXTENT OF PROTECTIVE ENCLOSURES COMPANY, LLC’S LIABILITY UNDER THIS WARRANTY IS
LIMITED TO THE REPAIR OR REPLACEMENT AS PROVIDED
ABOVE AND, IN NO EVENT SHALL THE PROTECTIVE ENCLOSURES COMPANY LIABILITY EXCEED THE
PURCHASE PRICE PAID BY THE ORIGINAL RETAIL PURCHASER FOR THE PRODUCT.
Any questions regarding this warranty should be addressed to:
The Protective Enclosures Company
Warranty Department
385 Center Pointe Circle, Suite 1319, Altamonte Springs, Florida 32701.
THIS WARRANTY IS IN LIEU OF ALL OTHER EXPRESS WARRANTIES OR LIABILITIES. ANY IMPLIED
WARRANTIES, INCLUDING ANY IMPLIED WARRANTY OF MERCHANTABILITY, SHALL BE LIMITED TO THE
DURATION OF THIS WRITTEN WARRANTY. IN NO EVENT SHALL THE PROTECTIVE ENCLOSURES
COMPNAY, LLC, OR ANY SUBSIDIARY, OWNER, OR PARTNER BE LIABLE FOR ANY CONSEQUENTIAL OR
INCIDENTAL DAMAGES FOR BREACH OF THIS OR ANY OTHER WARRANTY EXPRESS OR IMPLIED
WHATSOEVER.
No person or representative is authorized to assume for The Protective Enclosures Company, LLC any
liability other than expressed herein in connection with the sale of this product. Some jurisdictions do
not allow limitations on how long an implied warranty lasts or the exclusion or limitation of incidental or
consequential damages so the above limitations or exclusions may not apply to you. This warranty gives
you specific legal rights and you may also have other rights, which vary from jurisdiction to jurisdiction.
REFUND/RETURN POLICY
We offer a 30 Day Unconditional Money Back Guarantee on all unopened units. Unit box must be
unopened, unaltered and unit must have protective covering(s) on front panel and be undamaged and
in original condition. A 10% restocking fee applies, however refunds will be minus shipping charges.
Upon acceptance and processing of return/refund, all funds will be returned to the original method of
payment.
After 30 days, if you are not happy with The Display Shield® Enclosure, and have not opened it, you can
return it for a refund, less shipping charges. Unit must have protective covering(s) on front panel and be
undamaged and in original condition. Due to the nature, size and logistics in inventory management and
distribution, our restocking fee is currently 25% and applies to all unopened non defective The Display
Shield® Weather Resistant LCD/PLASMA/LED TV Enclosures. The company reserves the right to remedy
any minor defects in defective units by replacing defective/inoperable parts rather than offering a
refund or exchange. All refunds will be returned to the original method of payment and will be
processed on our end within 24 business hours (excluding weekends and holidays
The Display Shield® DOES NOT accept returns on units that have been drilled incorrectly, scratched,
damaged, abused or had the protective coverings taken off the front panel, as they cannot be resold. If
you have made a mistake when mounting The Display Shield, although we will not accept a return within
terms, we do have several remedies available to you to help you repair the “damaged” area and still be
able to use your unit.
LIMITED WARRANTY
Protective Enclosures Company, LLC – The Display Shield® Limited Warranty – Valid in the
United States and Canada
Protective Enclosures Company LLC,
Center Pointe Circle, Suite 1319,
Altamonte Springs, Florida 32701
1-800-331-2628
Specifications are subject to change without notice.
All trademarks are the property of their respective owners.
www.protectiveenclosures.com
NOTES:
QC
®
™
Protective Enclosures Company, LLC
385 CenterPointe Circle, Ste. # 1319, Altamonte Springs, FL 32701
Specifications are subject to change without notice.
All trademarks are the property of their respective owners.
www.thedisplayshield.com