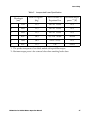
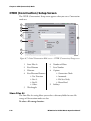
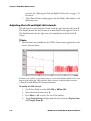
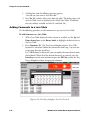
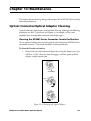
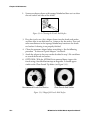
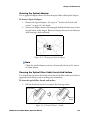
1
MT9083 Series ACCESS Master Operation Manual 12th Edition For safety and warning information, please read this manual before attempting to use the equipment. Keep this manual with the equipment. ANRITSU CORPORATION Document No.: M-W3634AE-12.0 29 June 2012 (First Edition) 1 April 2014 (12th Edition) Copyright 2012-2014, ANRITSU CORPORATION All rights reserved. This document and the product to which it relates are protected by copyright law from unauthorized reproduction. Notice to U.S. Government End Users The Software and Documentation are “Commercial Items,” as that term is defined at 48 C.F.R. 2.101, consisting of “Commercial Computer Software” and “Commercial Computer Software Documentation,” as such terms are used in 48 C.F.R. 12.212 or 48 C.F.R. 227.7202, as applicable. Consistent with 48 C.F.R. 12.212 or 48 C.F.R. 227.72021 through 227.7202-4, as applicable, the Commercial Computer Software and Commercial Computer Software Documentation are being licensed to the U.S. Government end users (a) only as Commercial Items and (b) with only those rights as are granted to all other end users pursuant to the terms and conditions herein. Unpublished rights reserved under the copyright laws of the United States. • • The contents of this manual may be changed without prior notice. No part of this manual may be reproduced without the prior written permission of the publisher. Windows is a registered trademark of Microsoft Corporation in the United States and other countries. ii MT9083 Series ACCESS Master Operation Manual Safety Symbols Safety Symbols To prevent the risk of personal injury or loss related to equipment malfunction, Anritsu Corporation uses the following safety symbols to indicate safety-related information. Ensure that you clearly understand the meanings of the symbols BEFORE using the equipment. Some or all of the following symbols may be used on all Anritsu equipment. In addition, there may be other labels attached to products that are not shown in the diagrams in this manual. Symbols used in manual DANGER This indicates a very dangerous procedure that could result in serious injury or death if not performed properly. WARNING This indicates a hazardous procedure that could result in serious injury or death if not performed properly. CAUTION This indicates a hazardous procedure or danger that could result in light-to-severe injury, or loss related to equipment malfunction, if proper precautions are not taken. MT9083 Series ACCESS Master Operation Manual iii For Safety Safety Symbols Used on Equipment and in Manual The following safety symbols are used inside or on the equipment near operation locations to provide information about safety items and operation precautions. Ensure that you clearly understand the meanings of the symbols and take the necessary precautions BEFORE using the equipment. This indicates a prohibited operation. The prohibited operation is indicated symbolically in or near the barred circle. This indicates an obligatory safety precaution. The obligatory operation is indicated symbolically in or near the circle. This indicates a warning or caution. The contents are indicated symbolically in or near the triangle. This indicates a note. The contents are described in the box. These indicate that the marked part should be recycled. For Safety ! iv WARNING • ALWAYS refer to the Operation Manual when working near locations at which the alert mark shown on the left is attached. If the advice in the Operation Manual is not followed there is a risk of personal injury or reduced equipment performance. The alert mark shown on the left may also be used with other marks and descriptions to indicate other dangers. MT9083 Series ACCESS Master Operation Manual For Safety • Overvoltage Category This instrument complies with overvoltage category II defined in IEC 61010. DO NOT connect this instrument to the power supply of overvoltage category III or IV. • Laser radiation warning • NEVER look directly into the cable connector on the equipment nor into the end of a cable connected to the equipment. There is a risk of injury if laser radiation enters the eye. • The Laser Safety label is attached to the equipment for safety use as indicated in “Laser Radiation Markings” on page xiii. Electric Shock • To ensure that the instrument is earthed, always use the supplied 3-pin power cord, and insert the plug into an outlet with a earth terminal. If power is supplied without earthing the equipment, there is a risk of receiving a severe or fatal electric shock or causing damage to the internal components. Repair • Only qualified service personnel with a knowledge of electrical fire and shock hazards should service this equipment. This equipment cannot be repaired by the operator. DO NOT attempt to remove the equipment covers or unit covers or to disassemble internal components. There are highvoltage parts in this equipment presenting a risk of severe injury or fatal electric shock to untrained personnel. In addition, there is a risk of damage to precision components. MT9083 Series ACCESS Master Operation Manual v For Safety vi Calibration • The performance-guarantee seal verifies the integrity of the equipment. To ensure the continued integrity of the equipment, only Anritsu service personnel, or service personnel of an Anritsu sales representative, should break this seal to repair or calibrate the equipment. Be careful not to break the seal by opening the equipment or unit covers. If the performance-guarantee seal is broken by you or a third party, the performance of the equipment cannot be guaranteed. Replacing Battery • When replacing the battery, use the specified battery and insert it with the correct polarity. If the wrong battery is used, or if the battery is inserted with reversed polarity, there is a risk of explosion causing severe injury or death. Battery Fluid • DO NOT short the battery terminals and never attempt to disassemble the battery or dispose of it in a fire. If the battery is damaged by any of these actions, the battery fluid may leak. This fluid is poisonous. DO NOT touch the battery fluid, ingest it, or get in your eyes. If it is accidentally ingested, spit it out immediately, rinse your mouth with water and seek medical help. If it enters your eyes accidentally, do not rub your eyes, rinse them with clean running water and seek medical help. If the liquid gets on your skin or clothes, wash it off carefully and thoroughly. Battery Disposal • DO NOT expose batteries to heat or fire. Do not expose batteries to fire. This is dangerous and can result in explosions or fire. Heating batteries may cause them to leak or explode. MT9083 Series ACCESS Master Operation Manual For Safety LCD • This instrument uses a Liquid Crystal Display (LCD). DO NOT subject the instrument to excessive force or drop it. If the LCD is subjected to strong mechanical shock, it may break and liquid may leak. This liquid is very caustic and poisonous. DO NOT touch it, ingest it, or get in your eyes. If it is ingested accidentally, spit it out immediately, rinse your mouth with water and seek medical help. If it enters your eyes accidentally, do not rub your eyes, rinse them with clean running water and seek medical help. If the liquid gets on your skin or clothes, wash it off carefully and thoroughly. MT9083 Series ACCESS Master Operation Manual vii Laser Safety Laser Safety Class 1, 1M, and 3R indicate the danger degree of the laser radiation specified below according to IEC 60825-1:2007. Class 1: Lasers that are safe under reasonably foreseeable conditions of operation, including the use of optical instruments for intrabeam viewing. Class 1M: Lasers emitting in the wavelength range from 302.5 to 4000 nm that are safe under reasonably foreseeable conditions of operation, but may be hazardous if the user employs optics within the beam. Two conditions apply: a. for diverging beams, if the user views the laser output with certain optical instruments (for example, eye loupes, magnifiers and microscopes) within a distance of 100 mm; or b. for collimated beams, if the user views the laser output with certain optical instruments (for example, telescopes and binoculars). Class 3R: Lasers that emit in the wavelength range from 302.5 to 106 nm where direct intrabeam viewing is potentially hazardous but the risk is lower than for Class 3B lasers. viii ! CAUTION Use of controls or adjustments or performance of procedures other than those specified herein may result in hazardous radiation exposure. ! WARNING The laser in this equipment is classified as Class 1, 1M, or 3R according to the IEC 60825-1:2007 standard. Never use optical instruments to directly view Class 1M laser products. Doing so may result in serious damage to the eyes. MT9083 Series ACCESS Master Operation Manual Laser Safety Table 1 Model Name MT9083B2/C2053 MT9083A2-073 MT9083A2/B2055 Laser Safety Classifications Based on IEC 60825-1:2007 Pulse Duration (s)/ Repetition Rate Emitted Wavelength (nm) 1M <0.15 20 x 10-6 /0.019 1310 a) [1] 1 <0.15 20 x 10-6 /0.019 1550 c) [1] 1M <0.15 20 x 10-6 /0.019 1310 a) [1] 1 <0.15 20 x 10-6 /0.019 1550 c) [1] 1M <0.15 20 x 10-6 /0.019 1310 a) [1] 1 <0.15 2.0 x 10⁻⁶ /0.019 1550 c) [1] 1 <0.15 2.0 x 10⁻⁶ /0.019 1650 e) [2] 1M <0.15 20 x 10-6 /0.019 1310 a) [1] 1 <0.15 2.0 x 10⁻⁶ /0.019 1490 b) [1] 1 <0.15 2.0 x 10⁻⁶ /0.019 1550 c) [1] 1M <0.15 20 x 10-6 /0.019 1310 a) [1] 1 <0.15 20 x 10-6 /0.019 1550 c) [1] 1 <0.15 20 x 10-6 /0.019 1625 d) [1] Class MT9083B2-056 MT9083A2/B2/C 2-057 Incorporated Laser Laser Aperture Specification in (Refer to Figure 1 Table 2) Max. Optical Output Power (W)* MT9083 Series ACCESS Master Operation Manual ix Laser Safety Table 1 Laser Safety Classifications Based on IEC 60825-1:2007 (Cont’d) Model Name MT9083B2-058 MT9083A2/B2063 MT9083A2/B2/C 2-002 (Visible LD) Incorporated Laser Laser Aperture Specification in (Refer to Figure 1 Table 2) Max. Optical Output Power (W)* Pulse Duration (s)/ Repetition Rate Emitted Wavelength (nm) 1M <0.15 2.0 x 10⁻⁶ /0.019 1310 a) [1] 1 <0.15 2.0 x 10⁻⁶ /0.019 1490 b) [1] 1 <0.15 2.0 x 10⁻⁶ /0.019 1550 c) [1] 1 <0.15 2.0 x 10⁻⁶ /0.019 1625 d) [1] 1M <0.012 0.5 x 10⁻⁶ /0.036 850 f) [2] 1 <0.15 4 x 10⁻⁶ /0.037 1300 g) [2] 1M <0.15 20 x 10-6 /0.019 1310 a) [1] 1 <0.15 20 x 10-6 /0.019 1550 c) [1] 3R <0.003 CW 650 Class h) [3] *: Indicates the possible optical output power when each and every reasonably foreseeable single-fault condition is included. Table 2 Wavelength [nm] x Incorporated Laser Specification Beam Divergence*1 [deg] Pulse Duration (s)/ Repetition Rate Maximum output power *2 [W] a) 1310 11.5 20 x 10-6/0.019 <0.3 b) 1490 11.5 20 x 10-6/0.019 <0.3 MT9083 Series ACCESS Master Operation Manual Laser Safety Table 2 Wavelength [nm] Incorporated Laser Specification Beam Divergence*1 [deg] Pulse Duration (s)/ Repetition Rate Maximum output power *2 [W] c) 1550 11.5 20 x 10-6/0.019 <0.3 d) 1625 11.5 20 x 10-6/0.019 <0.3 e) 1650 11.5 20 x 10-6/0.019 <0.3 f) 850 36.9 0.5 x 10⁻⁶/0.036 <0.024 g) 1300 36.9 4 x 10⁻⁶/0.037 <0.3 h) 650 11.5 CW <0.003 *1: This product incorporates a laser diode module with optical fiber output. *2: Maximum output power is the estimated value when something breaks down. MT9083 Series ACCESS Master Operation Manual xi Laser Safety Table 3 Type Indication Labels on Product Label Affixed to: Model Name 1 Class 1M Laser MT9083B2/C2-053 MT9083A2/B2-055 MT9083B2-056 MT9083A2/B2/C2Figure 2, A 057 MT9083A2/B2-063 MT9083B2-058 MT9083A2-073 2 Class 3R Laser Figure 2, B 3 Certification Figure 2, C All models 4 Identification 5 Warning Figure 2, E MT9083A2/B2/C2002 6 Aperture Figure 2, F MT9083A2/B2/C2002 xii Figure 2, D MT9083A2/B2/C2002 All models MT9083 Series ACCESS Master Operation Manual Laser Radiation Markings Laser Radiation Markings [3] [1] [2] Figure 1: Locations of Laser Beam Apertures C A B F E D [3] Figure 2: Locations of Affixed Labels MT9083 Series ACCESS Master Operation Manual xiii Electrical Safety Electrical Safety To reduce risk of equipment damage, injury, or death, adhere to the following warnings: • • • • • • xiv DO NOT use the MT9083 Series or its external power supply if case for either is cracked or damaged. Use the MT9083 Series only with an external power supply provided for the MT9083 Series by Anritsu. Anritsu does not guarantee the safety and functionality of other power supplies. The MT9083 Series external power supply requires a three-wire, grounded line cord. Do not use two wire line cords, ungrounded line cords, or damaged line cords. DO NOT use the MT9083 Series external power supply in outdoor or wet environments. Ensure that the AC input to the external power supply is within the voltages marked on the power supply case. DO NOT attempt to service the product in any way other than routine maintenance as described in this manual. MT9083 Series ACCESS Master Operation Manual For U.S. Customers For U.S. Customers Please Recycle The product that you have purchased contains a rechargeable battery. The battery is recyclable. At the end of its useful life, under various state and local laws, it may be illegal to dispose of this battery into the municipal waste stream. Check with your local solid waste officials for details in your area for recycling options or proper disposal. Li-ion Before disposing of this product, discharge the battery, and then mail the battery to your local recycling center. 1. 2. 3. 4. Attach the battery pack to the product. Disconnect the AC adapter, if used. Turn the power switch to on. Leave the product on until the power indicator goes off; the battery is now discharged. 5. Remove the battery. 6. Insulate the battery terminals with adhesive tape. 7. Mail it to your Anritsu Service or Sales office, or to the following address. ANRITSU COMPANY 490 Jarvis Drive, Morgan Hill, CA 95037-2809, U.S.A. MT9083 Series ACCESS Master Operation Manual xv For EU & EFTA Customers For EU & EFTA Customers Please Recycle Read the following when using products to which the marks shown to the left are attached. Li-ion The product that you have purchased contains a rechargeable battery. The battery is recyclable. At the end of its useful life, under various state and local laws, it may be illegal to dispose of this battery into the municipal waste. Check with your local solid-waste disposal officials for details of recycling options or proper disposal in your area. Before disposing of this product, discharge the battery, and then mail the battery to your local recycling center. 1. Disconnect the AC adapter, if used. 2. Turn the power switch to on. 3. Leave the product on until the power indicator goes off; the battery is now discharged. 4. Remove the battery. 5. Insulate the battery terminals with adhesive tape. 6. Please recycle in accordance with your national or regional legislation. Nach Gebrauch der Ver Kaufsstelle Zurückgeben. Après usage à rapporter au point de vente. xvi MT9083 Series ACCESS Master Operation Manual For Safety For Safety CAUTION This equipment uses a Poly-carbonmonofloride lithium battery to backup the memory. This battery must be replaced by service personnel when it has reached the end Replacing Memory of its useful life; contact the Anritsu sales section or your Back-up Battery nearest representative. ! Note The battery used in this equipment has a maximum useful life of 7 years. It should be replaced before this period has elapsed. External Storage Media This equipment uses USB memory as external storage media for storing data and programs. If this media is mishandled or becomes faulty, important data may be lost. To prevent this chance occurrence, all important data and programs should be backed-up. Anritsu will not be held responsible for lost data. Pay careful attention to the following points. • • Never remove the memory from the ACCESS master, while it is being accessed. The memory card may be damaged by static electric charges. Use in a residential This instrument is designed for an industrial environment environment. In a residential environment this instrument may cause radio interference in which case the user may be required to take adequate measures. Use in Corrosive Atmospheres Exposure to corrosive gases such as hydrogen sulfide, sulfurous acid, and hydrogen chloride will cause faults and failures. Note that some organic solvents release corrosive gases. MT9083 Series ACCESS Master Operation Manual xvii Equipment Certificate Equipment Certificate Anritsu Corporation certifies that this equipment was tested before shipment using calibrated measuring instruments with direct traceability to public testing organizations recognized by national research laboratories, including the National Institute of Advanced Industrial Science and Technology, and the National Institute of Information and Communications Technology, and was found to meet the published specifications. Anritsu Warranty Anritsu Corporation will repair this equipment free-of-charge if a malfunction occurs within one year after shipment due to a manufacturing fault. However, software fixes will be made in accordance with the separate Software End-User License Agreement. Moreover, Anritsu Corporation will deem this warranty is void when: xviii • The fault is outside the scope of the warranty conditions separately described in the operation manual. • The fault is due to mishandling, misuse, or unauthorized modification or repair of the equipment by the customer. • The fault is due to severe usage clearly exceeding normal usage. • The fault is due to improper or insufficient maintenance by the customer. • The fault is due to natural disaster, including fire, wind, flooding, earthquake, lightning strike, or volcanic ash, etc. • The fault is due to damage caused by acts of destruction, including civil disturbance, riot, or war, etc. • The fault is due to explosion, accident, or breakdown of any other machinery, facility, or plant, etc. • The fault is due to use of non-specified peripheral or applied equipment or parts, or consumables, etc. • The fault is due to use of a non-specified power supply or in a nonspecified installation location. • The fault is due to use in unusual environments(Note). • The fault is due to activities or ingress of living organisms, such as insects, spiders, fungus, pollen, or seeds. MT9083 Series ACCESS Master Operation Manual Anritsu Corporation Contact In addition, this warranty is valid only for the original equipment purchaser. It is not transferable if the equipment is resold. Anritsu Corporation shall assume no liability for injury or financial loss of the customer due to the use of or a failure to be able to use this equipment. Note For the purpose of this Warranty, “unusual environments” means use: • • • • • • • • • • In places of direct sunlight In dusty places In liquids, such as water, oil, or organic solvents, and medical fluids, or places where these liquids may adhere In salty air or in places where chemically active gases (sulfur dioxide, hydrogen sulfide, chlorine, ammonia, nitrogen dioxide, or hydrogen chloride etc.) are present In places where high-intensity static electric charges or electromagnetic fields are present In places where abnormal power voltages (high or low) or instantaneous power failures occur In places where condensation occurs In the presence of lubricating oil mists In places at an altitude of more than 2,000 m In the presence of frequent vibration or mechanical shock, such as in cars, ships, or airplanes Anritsu Corporation Contact In the event that this equipment malfunctions, contact an Anritsu Service and Sales office. Contact information can be found on the last page of the printed version of this manual, and is available in a separate file on the CD version. MT9083 Series ACCESS Master Operation Manual xix Software End-User License Agreement (EULA) Software End-User License Agreement (EULA) Please read this Software End-User License Agreement (hereafter this EULA) carefully before using (includes executing, copying, registering, etc.) this software (includes programs, databases, scenarios, etc., used to operate, set, etc., Anritsu electronic equipment). By reading this EULA and using this software, you are agreeing to be bound by the terms of its contents and Anritsu Corporation (hereafter Anritsu) hereby grants you the right to use this Software with the Anritsu-specified equipment (hereafter Equipment) for the purposes set out in this EULA. 1. Grant of License and Limitations 1. Regardless of whether this 2. Disclaimers To the extent not prohibited by law, in no event shall Anritsu be liable Software was purchased from or for personal injury, or any provided free-of-charge by Anritsu, incidental, special, indirect or you agree not to rent, lease, lend, or consequential damages otherwise distribute this Software whatsoever, including, without to third parties and further agree not to disassemble, recompile, reverse engineer, modify, or create derivative works of this Software. 2. You may make one copy of this Software for backup purposes only. 3. You are not permitted to reverse limitation, damages for loss of profits, loss of data, business interruption or any other commercial damages or losses, arising out of or related to your use or inability to use this Software. engineer this software. 4. This EULA allows you to install one copy of this Software on one piece of Equipment. xx MT9083 Series ACCESS Master Operation Manual Software End-User License Agreement (EULA) limited to, natural disasters, 3. Limitation of Liability software virus infections, etc. a. If a fault (bug) is discovered in this Software, preventing operation as b. Expenses incurred for transport, described in the operation manual hotel, daily allowance, etc., for on- or specifications whether or not the site repairs by Anritsu engineers customer uses this software as necessitated by the above faults described in the manual, Anritsu shall be borne by you. shall at its own discretion, fix the c. The warranty period for faults bug, or exchange the software, or listed in article 3a above covered by suggest a workaround, free-of- this EULA shall be either 6 months charge. However, notwithstanding from the date of purchase of this the above, the following items shall Software or 30 days after the date be excluded from repair and of repair, whichever is longer. warranty. 4. Export Restrictions i) If this Software is deemed to You may not use or otherwise be used for purposes not export or re-export directly or described in the operation indirectly this Software except as manual or specifications. authorized by Japanese and United ii) If this Software is used in States law. In particular, this conjunction with other non- software may not be exported or re- Anritsu-approved software. exported (a) into any Japanese or iii) Recovery of lost or damaged US embargoed countries or (b) to data. iv) If this Software or the anyone on the Japanese or US Treasury Department's list of Equipment has been modified, Specially Designated Nationals or repaired, or otherwise altered the US Department of Commerce without Anritsu's prior Denied Persons List or Entity List. approval. By using this Software, you v) For any other reasons out of warrant that you are not located in Anritsu's direct control and any such country or on any such responsibility, such as but not list. MT9083 Series ACCESS Master Operation Manual xxi Software End-User License Agreement (EULA) You also agree that you will not use 7. Responsibility after Termination this Software for any purposes Upon termination of this EULA in prohibited by Japanese and US accordance with item 5, you shall cease law, including, without limitation, all use of this Software immediately the development, design and and shall as directed by Anritsu either manufacture or production of missiles or nuclear, chemical or biological weapons of mass destruction. 5. Termination Anritsu shall deem this EULA terminated if you violate any conditions described herein. This EULA shall also be terminated if the conditions herein cannot be continued for any good reason, such as violation of copyrights, patents, or other laws and ordinances. 6. Reparations destroy or return this Software and any backup copies, full or partial, to Anritsu. 8. Dispute Resolution If matters of dispute or items not covered by this EULA arise, they shall be resolved by negotiations in good faith between you and Anritsu. 9. Court of Jurisdiction This EULA shall be interpreted in accordance with Japanese law and any disputes that cannot be resolved by negotiation described in Article 8 shall be settled by the Japanese courts. If Anritsu suffers any loss, financial or otherwise, due to your violation of the terms of this EULA, Anritsu shall have the right to seek proportional damages from you. xxii MT9083 Series ACCESS Master Operation Manual Protection Against Computer Virus Infections Protection Against Computer Virus Infections Prior to the software installation Before installing this software or any other software recommended or approved by Anritsu, run a virus scan on your computer, including removable media (e.g. USB memory stick and CF memory card) you want to connect to your computer. When using this software and connecting with the measuring instrument • Copying files and data On your computer, do not save any copies other than the following: • • • Files and data provided by Anritsu Files created by this software Files specified in this document Before copying these files and/or data, run a virus scan, including removable media (e.g. USB memory stick and CF memory card). • Connecting to network Connect your computer to the network that provides adequate protection against computer viruses. Cautions on Proper Operation of Software This software may not operate normally if any of the following operations are performed on your computer: • Simultaneously running any software other than that recommended or approved by Anritsu • Closing the lid (Laptop computer) • Turning on the screen saver function • Turning on the battery-power saving function (Laptop computer) For how to turn off the functions, refer to the operation manual that came with your computer. MT9083 Series ACCESS Master Operation Manual xxiii Notes On Export Management Notes On Export Management This product and its manuals may require an Export License/Approval by the Government of the product's country of origin for re-export from your country. Before re-exporting the product or manuals, please contact us to confirm whether they are export-controlled items or not. When you dispose of export-controlled items, the products/manuals need to be broken/shredded so as not to be unlawfully used for military purpose. Disposal Procedure The product that you have purchased contains a rechargeable battery. The battery is recyclable. At the end of its useful life, under various state and local laws, it may be illegal to dispose of this battery into the municipal waste stream. Check with your local solid waste officials for details in your area for recycling options or proper disposal. Reuse Parts Anritsu group promotes recycling activities in order to reuse available resources and save energy. This product may use recycled parts (mechanical components) that conform to Anritsu’s quality standards. Limited Life Span Parts The life span of certain parts used in this instrument is determined by the operating time or the power-on time. Due consideration should be given to the life spans of these parts when performing continuous operation over an extended period. These parts must be replaced at the customer's expense even if within the guaranteed period described in Warranty at the beginning of this manual. For details on life span, refer to the corresponding section in this manual. Display backlight: Refer to Appendix D, “Limited Life Span Parts” xxiv MT9083 Series ACCESS Master Operation Manual Caution for Transportation Caution for Transportation This equipment uses the lithium-ion battery (100 Wh or less per battery). When transporting this equipment by air (in a plane), follow the IATA Dangerous Goods Regulations (IATA DGR) established by the International Air Transport Association (IATA) and instructions from each airline company. When transporting this equipment by sea (in a ship), follow the International Maritime Dangerous Goods Code (IMDG CODE) established by the International Maritime Organization (IMO). MT9083 Series ACCESS Master Operation Manual xxv Crossed-out Wheeled Bin Symbol Crossed-out Wheeled Bin Symbol Equipment marked with the Crossed-out Wheeled Bin Symbol complies with council directive 2002/96/EC (the “WEEE Directive”) in European Union. For Products placed on the EU market after August 13, 2005, please contact your local Anritsu representative at the end of the product's useful life to arrange disposal in accordance with your initial contract and the local law. CE Conformity Marking Anritsu affixes the CE conformity marking on the following product(s) in accordance with the Council Directive 93/68/EEC to indicate that they conform to the EMC and LVD directive of the European Union (EU). CE marking 1. Product Model Model: MT9083A2/B2/C2 ACCESS Master 2. Applied Directive xxvi EMC: Directive 2004/108/EC LVD: Directive 2006/95/EC MT9083 Series ACCESS Master Operation Manual CE Conformity Marking 3. Applied Standards • EMC Emission: EN 61326-1 (Class A) Immunity: EN 61326-1 (Table 2) Performance Criteria* IEC 61000-4-2 (ESD) IEC 61000-4-3 (EMF) IEC 61000-4-4 (Burst) IEC 61000-4-5 (Surge) IEC 61000-4-6 (CRF) IEC 61000-4-11 (V dip/short) B A B B A B, C *Performance Criteria: A: During testing, normal performance within the specification limits. B: During testing, temporary degradation, or loss of function or performance which is self-recovering. C: During testing, temporary degradation, or loss of function or performance which requires operator intervention or system reset occurs. Harmonic current emissions: EN 61000-3-2: 2006 +A1:2009 A2:2009 (Class A equipment) : No limits apply for this equipment with an active input power under 75 W. • LVD: EN 61010-1: 2010 (Pollution Degree 2) MT9083 Series ACCESS Master Operation Manual xxvii CE Conformity Marking 4. Authorized Representative Name: Address, City: Country: xxviii Murray Coleman Head of Customer Service EMEA ANRITSU EMEA Ltd. 200 Capability Green, Luton Bedfordshire, LU1 3LU United Kingdom MT9083 Series ACCESS Master Operation Manual C-Tick Conformity Marking C-Tick Conformity Marking Anritsu affixes the C-Tick mark on the following product(s) in accordance with the regulation to indicate that they conform to the EMC framework of Australia/New Zealand. C-Tick marking 1. Product Model Model: MT9083A2/B2/C2 ACCESS Master 2. Applied Standards EMC: Emissions: EN 61326-1: 2006 (Class A equipment) MT9083 Series ACCESS Master Operation Manual xxix Technical Support, Services, and Repairs Technical Support, Services, and Repairs Our Technical Support Center is at your service to answer technical questions and provide return authorization for service, repairs, or other returns. Technical Support Center Phone: 1-800-ANRITSU or 972-761-4600 (Canada, U.S., Latin and South America) Fax: +1 972-671-1877 e-mail: [email protected] Web: www.anritsu.com All returns require a Return Materials Authorization (RMA) number. If possible, return the unit in its original shipping materials. If the original shipping materials are not available, please contact the Technical Support Center for instructions. Whether or not the warranty period of your Anritsu product has expired, the unit can be returned to Anritsu for repairs. Out-of-warranty repairs are billed for time and materials. Call our Technical Support Center for further information. Anritsu offers a performance verification service that extensively tests this product and documents its performance. All test equipment used in the verification process is traceable to NIST or NPL standards, and is calibrated annually. Anritsu recommends that you have your unit calibrated annually at our factory. xxx MT9083 Series ACCESS Master Operation Manual About this Manual The operation manuals for the MT9083 Series ACCESS Master (hereafter referred to as MT9083 Series or this equipment) are comprised of the operation manual for the MT9083 Series main frame. This operation manual describes the operations for the MT9083 Series ACCESS Master. To understand characteristic functions of the MT9083 Series ACCESS Master, carefully read Chapter 2 “Overview.” MT9083 Series ACCESS Master Operation Manual (this manual) Operations for the MT9083 Series ACCESS Master main frame are described. Operation manuals for MT9083 Series MT9083 Series ACCESS Master Quick User’s Guide A printed quick user’s guide that describes basic operation. MT9083 Series ACCESS Master Remote Control Operation Manual Operations for the Remote control function are described. MX900021A Remote Screen Software Operation Manual The software operation is explained by displaying the main unit operation screen on a PC. MT9083 Series ACCESS Master Operation Manual I Table of Contents .................................................................................................................i-xxii Chapter 1: Quick Start ................................................................1-1 Introduction .................................................................................................. 1-1 MT9083 Series Functions .......................................................................... 1-2 Basic Configuration ..................................................................................... 1-2 Powering Up the Unit.................................................................................. 1-2 Start Up Sequence .................................................................................... 1-2 Optical Time Domain Reflectometer (OTDR) Testing............................. 1-4 Fault Locate Testing.................................................................................. 1-5 Construction Mode Testing ...................................................................... 1-6 Loss Test Set Testing ................................................................................. 1-7 Optical Power Meter (OPM) Testing........................................................ 1-8 Optical Light Source (OLS) Testing .......................................................... 1-9 Visual Fault Locate (VFL) Option............................................................ 1-10 Video Inspection Probe (VIP) Option..................................................... 1-11 Chapter 2: Overview ..................................................................2-1 Front Panel .................................................................................................... 2-1 Power Key ................................................................................................. 2-2 Dedicated Function Keys .......................................................................... 2-2 Numeric Keypad........................................................................................ 2-3 Softkeys ..................................................................................................... 2-3 Rotary Knob .............................................................................................. 2-4 ESC (Escape) Key ....................................................................................... 2-4 Arrow Key Set ........................................................................................... 2-5 Enter Key ................................................................................................... 2-6 Start Key .................................................................................................... 2-7 Top Menu Key........................................................................................... 2-7 Softkeys ..................................................................................................... 2-7 Back Panel...................................................................................................... 2-8 Installing a Battery Pack ........................................................................... 2-8 Top Connector Panel.................................................................................. 2-10 AC Charger/Adapter ............................................................................... 2-11 AC Power Operation ........................................................................ 2-11 Charging the Battery Pack ............................................................... 2-11 Checking the Remaining Battery Power ......................................... 2-12 II MT9083 Series ACCESS Master Operation Manual Important Information about the Battery Pack ............................. 2-15 Measurement Ports................................................................................. 2-16 Optical Connector and Adapter ...................................................... 2-17 Cleaning the Optical Connector ...................................................... 2-17 Cleaning Optical Adapters............................................................... 2-17 Changing the Optical Adapter ........................................................ 2-17 Connecting Fiber to a Measurement Port ...................................... 2-18 Cautions on Handling Optical Fiber Cables .................................... 2-18 Visual Fault Locator Connection...................................................... 2-21 Connecting Peripheral Devices .............................................................. 2-22 USB Up (to PC) Port .......................................................................... 2-22 USB Down Port ................................................................................. 2-23 Basic Notes on Use..................................................................................... 2-24 Chapter 3: General Operation/System Setups..........................3-1 General Operation ....................................................................................... 3-1 Power On/Power Off ................................................................................ 3-2 Adjusting the Backlight............................................................................ 3-2 Top Menu Screen .......................................................................................... 3-3 Battery Status Area................................................................................... 3-4 Remaining Battery Charge Indication............................................... 3-5 System Setups .............................................................................................. 3-6 General Screen Settings............................................................................ 3-7 Date setting ........................................................................................ 3-8 Local Time setting .............................................................................. 3-8 Time Difference from UTC ................................................................. 3-8 Date Display Format........................................................................... 3-9 Auto Launch ....................................................................................... 3-9 Printer ................................................................................................. 3-9 Paper Feed ........................................................................................ 3-10 Color Theme ..................................................................................... 3-10 Language .......................................................................................... 3-10 USB Video Output................................................................................... 3-11 Power-saving Setting.............................................................................. 3-11 Auto Backlight Off ........................................................................... 3-11 Auto Power Off ................................................................................ 3-12 Instrument Power–Save Mode......................................................... 3-14 Password Settings ..................................................................................... 3-15 Password Protect..................................................................................... 3-17 Setting the Administrator Password...................................................... 3-18 Setting the User Password...................................................................... 3-21 Password Lifespan................................................................................... 3-22 MT9083 Series ACCESS Master Operation Manual III Viewing the access log file ..................................................................... 3-25 About Screen............................................................................................... 3-26 Updating Firmware................................................................................. 3-27 Loading Firmware Data ................................................................... 3-27 Updating Firmware Data ................................................................. 3-27 Restore Defaults...................................................................................... 3-28 Formatting Internal Memory ................................................................. 3-28 Erase Internal Memory ........................................................................... 3-29 Saving a Screen Image to a File.............................................................. 3-31 Renaming a File .......................................................................................... 3-32 Clearing Word Buttons........................................................................... 3-40 New Folder .................................................................................................. 3-40 Chapter 4: OTDR (Standard) Mode ............................................4-1 Overview ........................................................................................................ 4-1 Starting OTDR (Standard) Mode ............................................................... 4-1 Setups – OTDR (Standard) Mode............................................................... 4-2 Entering OTDR (Standard) Setups............................................................ 4-2 General Setups .......................................................................................... 4-2 Preferences (1-2) ....................................................................................... 4-3 Distance Display Units ........................................................................ 4-4 Connection Check............................................................................... 4-4 Active Fiber Check .............................................................................. 4-5 Auto Analysis ...................................................................................... 4-5 Auto Scale ........................................................................................... 4-6 Event Summary................................................................................... 4-6 Reflectance Calculation...................................................................... 4-6 ORL Calculation .................................................................................. 4-7 Trace Overview ................................................................................... 4-7 Real Time Averages ............................................................................ 4-8 Real Time Attenuation....................................................................... 4-8 Display Mode After Analysis.............................................................. 4-9 Preferences (2-2) ....................................................................................... 4-9 Auto Patch-cord Removal ................................................................ 4-11 Grid Display....................................................................................... 4-12 Force Total Loss ................................................................................ 4-12 Event Icon Movement ...................................................................... 4-13 End Event for ORL Calculation ........................................................ 4-13 Event Table Span Calculation .......................................................... 4-14 A-B Span Analysis ............................................................................. 4-14 Thresholds ............................................................................................... 4-15 IV MT9083 Series ACCESS Master Operation Manual Auto Detect Parameters................................................................... 4-15 Splice Loss ......................................................................................... 4-16 Reflectance ....................................................................................... 4-16 Fiber End ........................................................................................... 4-16 Macro Bend....................................................................................... 4-17 Splitter Loss....................................................................................... 4-17 Pass/Fail Thresholds Parameters ...................................................... 4-19 Non-Reflective Event Loss (fusion) .................................................. 4-19 Reflective Event Loss (connector, mechanical) ............................... 4-20 Reflectance ....................................................................................... 4-20 Fiber Loss (dB/km)............................................................................. 4-21 Total Loss .......................................................................................... 4-22 Splitter Loss....................................................................................... 4-23 AutoSave ................................................................................................. 4-24 Auto-Filename Parameters..................................................................... 4-24 Enabled (Auto-Filename) ................................................................. 4-24 AutoSave Directory .......................................................................... 4-25 Base Filename ................................................................................... 4-26 Start Number .................................................................................... 4-27 Enabled (AutoSave).......................................................................... 4-28 About Screen........................................................................................... 4-29 Trace Screen – OTDR (Standard) .............................................................. 4-30 Trace Graph ...................................................................................... 4-30 Laser On Icon .................................................................................... 4-31 Cursor Distance Information............................................................ 4-31 Loss Mode, Measurement, and Reflectance ................................... 4-31 Fiber Test Parameters....................................................................... 4-31 Trace Graph – OTDR (Standard) Mode .................................................. 4-32 Trace Waveform ............................................................................... 4-33 Cursors............................................................................................... 4-33 Horizontal/Vertical Offset................................................................ 4-33 Scale .................................................................................................. 4-33 dB Level Indicator............................................................................. 4-33 Trace Overview Window.................................................................. 4-34 Connection check Screen........................................................................ 4-34 GOOD connection –.......................................................................... 4-34 BAD connection – ............................................................................. 4-35 OTDR (Standard) Analysis Screen........................................................... 4-38 Event Table.............................................................................................. 4-39 Distance to Event.............................................................................. 4-40 Types of Events Reported ................................................................ 4-40 Loss (dB) ............................................................................................ 4-40 MT9083 Series ACCESS Master Operation Manual V Reflectance ....................................................................................... 4-41 dB/km ................................................................................................ 4-41 Cumulative Loss (dB) ........................................................................ 4-41 Pass/Fail Thresholds .......................................................................... 4-42 Editing Events – Overview ....................................................................... 4-43 Adding an Event ..................................................................................... 4-43 Editing an Event...................................................................................... 4-45 Moving an Event .............................................................................. 4-46 Pasting an Event ............................................................................... 4-47 Deleting an Event ................................................................................... 4-49 Softkeys – OTDR (Standard) Mode ......................................................... 4-50 Softkey Levels.......................................................................................... 4-50 Level One Softkeys ........................................................................... 4-50 Level Two Softkeys ........................................................................... 4-52 Level Three Softkeys......................................................................... 4-53 Level Four Softkeys........................................................................... 4-54 Cursor Softkeys ................................................................................. 4-55 Shift Mode Softkeys ......................................................................... 4-55 Template Mode Softkeys ................................................................. 4-56 Extension softkeys ............................................................................ 4-57 Selecting and Positioning Cursors.......................................................... 4-57 Setting the Active Cursor ................................................................. 4-57 Precise Positioning of the Active Cursor ......................................... 4-57 Locking and Unlocking Cursors ....................................................... 4-58 Horizontal and Vertical Expand and Contract ...................................... 4-58 Template Mode ........................................................................................... 4-60 Template soft key layer .......................................................................... 4-60 Template Settings Screen................................................................. 4-61 Event Determination........................................................................ 4-62 Trace Priority..................................................................................... 4-63 Distance and Absolute Distance ...................................................... 4-64 Distance Helix Factor........................................................................ 4-65 OTDR (Standard) Mode Measurement Parameters ............................ 4-68 Setting the Source Wavelength ............................................................. 4-68 Setting the Range, Resolution, and Pulse Width .................................. 4-68 Selecting the Dead-zone Mode ............................................................. 4-69 Setting the Standard Mode ............................................................. 4-69 Setting the Enhanced Range Mode ................................................ 4-70 Display From............................................................................................ 4-71 Setting the Average Time/Average Count ............................................ 4-71 Setting the IOR and BSC ......................................................................... 4-73 Dial IOR ............................................................................................. 4-73 VI MT9083 Series ACCESS Master Operation Manual Setting the Loss Mode ............................................................................ 4-74 Shifting Trace Data ................................................................................. 4-75 Resetting a Shifted Trace ................................................................. 4-76 Running Analysis on a Trace .................................................................. 4-76 Wavelength All Mode ............................................................................... 4-78 Wavelength All Test Parameters............................................................ 4-78 Setting the Source Wavelength to All ............................................ 4-78 Setting the Test Parameters............................................................. 4-78 Wavelength All Testing .......................................................................... 4-83 Trace Overlay Management..................................................................... 4-85 Trace Overlay Functions ......................................................................... 4-85 Drop Overlay..................................................................................... 4-85 Swap Overlay .................................................................................... 4-87 Hide/Show Overlays.......................................................................... 4-88 Align Overlays................................................................................... 4-89 Working with OTDR (Standard) Trace Files .......................................... 4-90 Displaying Trace Files.............................................................................. 4-90 Sorting Files ...................................................................................... 4-91 New Folder .............................................................................................. 4-92 Deleting Files........................................................................................... 4-94 Copying Files ........................................................................................... 4-95 Saving Files with AutoSave .................................................................... 4-97 Automatic File Save.......................................................................... 4-97 Verifying the AutoSave.................................................................... 4-98 Saving Files Manually ........................................................................... 4-100 Headers.................................................................................................. 4-102 Printing Trace Files................................................................................ 4-105 Connecting the Printer................................................................... 4-105 Printing a Trace File........................................................................ 4-105 Saving a Trace File as an Image File..................................................... 4-105 Chapter 5: Fiber Visualizer Mode ..............................................5-1 Overview ........................................................................................................ 5-1 Starting Fiber Visualizer Mode ................................................................. 5-1 Setups – Fiber Visualizer Mode................................................................. 5-2 Entering Fiber Visualizer Setups .............................................................. 5-2 General Setups .......................................................................................... 5-3 Preferences (1-2) ....................................................................................... 5-3 Distance Display Units ........................................................................ 5-4 Connection Check............................................................................... 5-5 Active Fiber Check .............................................................................. 5-5 Auto Analysis ...................................................................................... 5-5 MT9083 Series ACCESS Master Operation Manual VII Auto Scale ........................................................................................... 5-6 Event Summary................................................................................... 5-6 Reflectance Calculation...................................................................... 5-7 ORL Calculation .................................................................................. 5-7 Trace Overview ................................................................................... 5-8 Real Time Averages ............................................................................ 5-8 Real Time Attenuation....................................................................... 5-8 Display Mode After Analysis.............................................................. 5-9 Preferences (2-2) ....................................................................................... 5-9 Auto Patch-cord Removal ................................................................ 5-10 Grid Display....................................................................................... 5-12 Force Total Loss ................................................................................ 5-12 Event Icon Movement ...................................................................... 5-13 End Event for ORL Calculation ........................................................ 5-13 Event Table Span Calculation .......................................................... 5-14 A-B Span Analysis ............................................................................. 5-14 AutoSave ................................................................................................. 5-15 Auto-Filename Parameters..................................................................... 5-15 Enabled (Auto-Filename) ................................................................. 5-15 AutoSave Directory .......................................................................... 5-16 Base Filename ................................................................................... 5-17 Start Number .................................................................................... 5-18 Enabled (AutoSave).......................................................................... 5-19 About Screen........................................................................................... 5-19 Fiber Visualizer Screen.............................................................................. 5-20 Over view of the fiber under test.................................................... 5-20 Trace events ...................................................................................... 5-21 Test Results ....................................................................................... 5-21 Pass/Fail Thresholds .......................................................................... 5-21 Trace Screen................................................................................................. 5-23 Event Table ....................................................................................... 5-23 Reflectance ....................................................................................... 5-24 dB/km ................................................................................................ 5-24 Trace Graph ...................................................................................... 5-24 Trace Waveform ............................................................................... 5-25 Cursors............................................................................................... 5-26 Horizontal/Vertical Offset................................................................ 5-26 Scale .................................................................................................. 5-26 dB Level Indicator............................................................................. 5-26 Trace Overview Window.................................................................. 5-26 Cursor Distance Information............................................................ 5-27 Loss Mode, Measurement, and Reflectance ................................... 5-27 VIII MT9083 Series ACCESS Master Operation Manual Fiber Test Parameters....................................................................... 5-27 Softkeys – Fiber Visualizer Mode ........................................................... 5-28 Softkey Levels - Fiber Visualizer screen ................................................. 5-28 Softkey Levels - Trace screen.................................................................. 5-30 Level One Softkeys ........................................................................... 5-30 Level Two Softkeys ........................................................................... 5-31 Level Three Softkeys......................................................................... 5-32 Level Four Softkeys........................................................................... 5-33 Cursor Softkeys ................................................................................. 5-34 Shift Mode Softkeys ......................................................................... 5-35 Extension Softkeys............................................................................ 5-35 Selecting and Positioning Cursors.......................................................... 5-35 Setting the Active Cursor ................................................................. 5-35 Precise Positioning of the Active Cursor ......................................... 5-36 Locking and Unlocking Cursors ....................................................... 5-36 Horizontal and Vertical Expand and Contract ...................................... 5-36 Thresholds ............................................................................................... 5-37 Auto Detect Parameters................................................................... 5-38 Splice Loss ......................................................................................... 5-38 Reflectance ....................................................................................... 5-39 Fiber End ........................................................................................... 5-39 Macro Bend....................................................................................... 5-41 Splitter Loss....................................................................................... 5-41 Pass/Fail Thresholds Parameters ...................................................... 5-42 Non-Reflective Event Loss (fusion) .................................................. 5-43 Reflective Event Loss (connector, mechanical) ............................... 5-43 Reflectance ....................................................................................... 5-44 Fiber Loss (dB/km)............................................................................. 5-44 Total Loss .......................................................................................... 5-45 Splitter Loss....................................................................................... 5-45 ORL .................................................................................................... 5-45 Report Settings ....................................................................................... 5-46 Header............................................................................................... 5-46 Selecting Data to Output................................................................. 5-46 Fault Locate Testing................................................................................... 5-48 Running a Fault Locate Test................................................................... 5-48 Connection Check ................................................................................... 5-51 GOOD connection –.......................................................................... 5-51 BAD connection – ............................................................................. 5-52 Real Time Testing.................................................................................... 5-53 Fiber Visualizer Mode Measurement Parameters .............................. 5-54 Setting the Source Wavelength ............................................................. 5-54 MT9083 Series ACCESS Master Operation Manual IX Setting the Range, Resolution Pulse Width, and Average Time.......... 5-54 Selecting the Dead-zone Mode ............................................................. 5-55 Setting the Standard Mode ............................................................. 5-55 Setting the Enhanced Range Mode ................................................ 5-56 Setting the IOR and BSC ......................................................................... 5-57 Swap Overlay .......................................................................................... 5-58 Working with OTDR Trace Files ............................................................... 5-59 Deleting Files........................................................................................... 5-59 Copying Files ........................................................................................... 5-60 Saving Files with AutoSave .................................................................... 5-62 Automatic File Save.......................................................................... 5-62 Verifying the AutoSave.................................................................... 5-63 Saving Files Manually ............................................................................. 5-65 Headers.................................................................................................... 5-67 Sorting Files............................................................................................. 5-70 Printing Fault Locate Data Files ............................................................. 5-71 Connecting the Printer..................................................................... 5-71 Printing a Fault Locate Trace File .................................................... 5-71 Saving Fault Locate Data as an Image File ............................................ 5-72 Chapter 6: OTDR (Construction) Mode......................................6-1 Overview ........................................................................................................ 6-1 Starting OTDR (Construction) Mode........................................................ 6-1 Setups – OTDR (Construction) Mode ....................................................... 6-2 Entering OTDR (Construction) Setups ..................................................... 6-2 General Setups .......................................................................................... 6-2 Preferences (1-2) ....................................................................................... 6-3 Distance Display Units ........................................................................ 6-3 Connection Check............................................................................... 6-4 Active Fiber Check .............................................................................. 6-4 Auto Analysis ...................................................................................... 6-5 Auto Scale ........................................................................................... 6-5 Event Summary................................................................................... 6-5 Reflectance Calculation...................................................................... 6-6 ORL Calculation .................................................................................. 6-6 Trace Overview ................................................................................... 6-6 Real Time Averages ............................................................................ 6-7 Real Time Attenuation....................................................................... 6-7 Display Mode After Analysis.............................................................. 6-7 Preferences (2-2) ....................................................................................... 6-8 Auto Patch-cord Removal .................................................................. 6-8 Grid Display....................................................................................... 6-10 X MT9083 Series ACCESS Master Operation Manual Force Total Loss ................................................................................ 6-10 Event Icon Movement in Fiber Visualizer ....................................... 6-10 End Event for ORL Calculation ........................................................ 6-11 Event Table Span Calculation .......................................................... 6-11 A-B Span Analysis ............................................................................. 6-11 Thresholds ............................................................................................... 6-11 Auto Detect Parameters................................................................... 6-11 Splice Loss ......................................................................................... 6-12 Reflectance ....................................................................................... 6-12 Fiber End ........................................................................................... 6-13 Macro Bend....................................................................................... 6-13 Splitter Loss....................................................................................... 6-13 Pass/Fail Thresholds Parameters ...................................................... 6-14 Non-Reflective Event Loss (fusion) .................................................. 6-15 Reflective Event Loss (connector, mechanical) ............................... 6-15 Reflectance ....................................................................................... 6-16 Fiber Loss (dB/km)............................................................................. 6-17 Total Loss .......................................................................................... 6-18 Splitter Loss....................................................................................... 6-18 About Screen........................................................................................... 6-19 OTDR (Construction) Setup Screen ........................................................ 6-20 Store Files At ........................................................................................... 6-20 Base Filename ......................................................................................... 6-21 Filename .................................................................................................. 6-23 Filename Elements.................................................................................. 6-23 Test Direction.................................................................................... 6-23 Site A/Site B....................................................................................... 6-24 Other ................................................................................................. 6-24 Wavelengths ........................................................................................... 6-26 Number of Fibers .................................................................................... 6-26 Start Number........................................................................................... 6-27 Options .................................................................................................... 6-27 Connection Check............................................................................. 6-27 Automode......................................................................................... 6-27 File Save Verify ................................................................................. 6-28 Macro Bend....................................................................................... 6-28 OTDR (Construction) Setup Screen Softkeys ......................................... 6-29 OTDR (Construction) Parameters Screen .............................................. 6-30 Setting the OTDR (Construction) Test Parameters ............................. 6-31 Setting the Distance Range, Resolution, and Pulse Width................... 6-31 Selecting the Dead-zone Mode ............................................................. 6-32 Setting the Average Time/Average Count ............................................ 6-33 MT9083 Series ACCESS Master Operation Manual XI Setting the IOR and BSC ......................................................................... 6-35 Apply to All Wavelengths setting.......................................................... 6-36 OTDR (Construction) Parameters Screen Softkeys ................................ 6-36 Headers.................................................................................................... 6-37 Template....................................................................................................... 6-39 Selecting Template File .................................................................... 6-40 Event Determination........................................................................ 6-41 Trace Priority..................................................................................... 6-41 Distance and Absolute Distance ...................................................... 6-43 Distance Helix Factor........................................................................ 6-43 Template Settings Screen softkey ................................................... 6-46 OTDR (Construction) Connect Fiber Screen.......................................... 6-47 OTDR (Construction) Connect Fiber Screen Softkeys............................ 6-47 Changing the Connect Fiber Number ............................................. 6-48 Test In Progress Screen ............................................................................. 6-49 Laser On Icon........................................................................................... 6-49 Test in Progress Softkeys ........................................................................ 6-50 Test Results Screen – OTDR (Construction)........................................... 6-51 Event Table.............................................................................................. 6-51 Distance to Event.............................................................................. 6-52 Types of Events Reported ................................................................ 6-52 Loss (dB) ............................................................................................ 6-53 Reflectance ....................................................................................... 6-53 dB/km ................................................................................................ 6-54 Cumulative Loss (dB) ........................................................................ 6-54 Pass/Fail Thresholds .......................................................................... 6-54 Trace Graph – OTDR (Construction) Mode ............................................ 6-56 Trace Waveform ............................................................................... 6-56 Cursors............................................................................................... 6-57 Scale .................................................................................................. 6-57 dB Level Indicator............................................................................. 6-57 Trace Overview Window.................................................................. 6-57 Cursor Distance Information .................................................................. 6-57 Loss Mode, Measurement, and Reflectance.......................................... 6-58 Fiber Test Parameters ............................................................................. 6-58 Test Results Screen Softkeys................................................................... 6-58 OTDR (Construction) Mode Testing........................................................ 6-61 Running an OTDR (Construction) Test................................................... 6-61 Selecting and Positioning Cursors.......................................................... 6-64 Setting the Active Cursor ................................................................. 6-64 Precise Positioning of the Active Cursor ......................................... 6-64 Horizontal and Vertical Expand and Contract ...................................... 6-65 XII MT9083 Series ACCESS Master Operation Manual Display From............................................................................................ 6-65 Setting the Loss Mode ............................................................................ 6-66 Connection Check ................................................................................... 6-67 GOOD connection –.......................................................................... 6-67 BAD connection – ............................................................................. 6-68 Working with OTDR (Construction) Trace Files ................................... 6-70 Deleting Files........................................................................................... 6-70 Copying Files ........................................................................................... 6-72 Sorting Files............................................................................................. 6-74 Printing Trace Files.................................................................................. 6-75 Connecting the Printer..................................................................... 6-75 Printing a Trace File.......................................................................... 6-75 Saving a Trace File as an Image File....................................................... 6-76 Chapter 7: OTDR Mode Measurements .....................................7-1 Distance Measurement ............................................................................... 7-1 Fiber Length Measurement...................................................................... 7-1 Distance to a Break Measurement........................................................... 7-2 Loss Measurements ..................................................................................... 7-4 Loss Modes ................................................................................................ 7-4 Event Examples ......................................................................................... 7-4 2-Point Loss ............................................................................................... 7-5 dB/km Loss................................................................................................. 7-6 Splice Loss.................................................................................................. 7-7 Adjusting the LSA Intervals for Splice Loss Mode ................................... 7-9 Setting LSA Defaults ............................................................................... 7-10 2-Point LSA .............................................................................................. 7-10 Adjusting the Left and Right LSA Intervals ........................................... 7-12 dB/km LSA ............................................................................................... 7-13 ORL (Optical Return Loss)....................................................................... 7-15 2-Point & dB/km Loss .............................................................................. 7-16 Reflectance Measurements ..................................................................... 7-17 Overview ................................................................................................. 7-17 Auto Reflectance Mode.......................................................................... 7-18 Manual Reflectance Mode ..................................................................... 7-20 Real Time Testing ....................................................................................... 7-22 Chapter 8: Loss Test Set Mode ..................................................8-1 Overview ........................................................................................................ 8-1 Starting Loss Test Set Mode ...................................................................... 8-1 Setups – Loss Test Set mode ...................................................................... 8-2 Entering Loss Test Set Setups ................................................................... 8-2 MT9083 Series ACCESS Master Operation Manual XIII General Setups.................................................................................... 8-2 About Screen ...................................................................................... 8-2 Loss Test Set Screen..................................................................................... 8-3 Light Source Area ..................................................................................... 8-4 Light Source Wavelength Indicator................................................... 8-4 Light Source On/Off Indicator ........................................................... 8-4 Power Meter Area .................................................................................... 8-4 Power Meter Wavelength Indicator.................................................. 8-5 Absolute Power Reading ................................................................... 8-5 Range Indicator .................................................................................. 8-5 Average Field...................................................................................... 8-6 Reference Field ................................................................................... 8-6 Threshold Field ................................................................................... 8-6 Loss Reading ....................................................................................... 8-6 Port Connection Indicator ........................................................................ 8-6 Softkeys (Loss Test Set screen) ................................................................. 8-7 Loss Table Screen.......................................................................................... 8-8 Light Source Settings Area ....................................................................... 8-9 Power Meter Settings Area ...................................................................... 8-9 Loss Table .................................................................................................. 8-9 Loss Table Softkeys ................................................................................. 8-10 Setting Loss Test Set Measurement Parameters ................................ 8-11 Setting the Light Source Wavelength ................................................... 8-11 Setting the Power Meter Wavelength .................................................. 8-11 Setting the Modulation Mode ............................................................... 8-12 Setting the Average Time ...................................................................... 8-13 Setting the Power Meter Reference ...................................................... 8-13 Setting the Threshold value ................................................................... 8-15 Optical Power Meter Zero Offset .......................................................... 8-17 Loss Test Set Measurement Procedures ................................................ 8-18 Verifying Patch Cords ............................................................................. 8-18 Single MT9083 Series Method................................................................ 8-19 Reference Procedure: ....................................................................... 8-19 Test Procedure .................................................................................. 8-20 Single MT9083 Series with an External Light Source............................ 8-22 Reference Procedure: ....................................................................... 8-22 Test Procedure .................................................................................. 8-24 Dual MT9083 Series method .................................................................. 8-25 Reference Procedure: ....................................................................... 8-25 Modifying the Stored Reference ..................................................... 8-27 Test Procedure .................................................................................. 8-27 Editing the Loss Table ............................................................................... 8-30 XIV MT9083 Series ACCESS Master Operation Manual Adding Test Data to an Existing Loss Table .......................................... 8-30 Overwriting Test Data in an Existing Loss Table ................................... 8-30 Deleting Test Data from a Loss Table.................................................... 8-31 Deleting All Test Data from a Loss Table .............................................. 8-31 Adding Comments to a Loss Table ........................................................ 8-32 Working with Loss Test Set Files ............................................................ 8-34 Saving Loss Test Set Files ........................................................................ 8-34 Sorting Files............................................................................................. 8-35 Deleting Files........................................................................................... 8-35 Copying Files ........................................................................................... 8-37 Loading a Loss Table from Mass Storage .............................................. 8-39 Printing Loss Tables ................................................................................ 8-40 Connecting the Printer..................................................................... 8-40 Printing a Loss Table ........................................................................ 8-40 Chapter 9: Optical Power Meter (OPM) & Optical Light Source (OLS) ............................................................................................9-1 Optical Power Meter (OPM) Overview .................................................... 9-1 Accessing the Optical Power Meter......................................................... 9-1 Power Meter Screen ................................................................................. 9-2 Wavelength Indicator ........................................................................ 9-2 Power Reading ................................................................................... 9-3 Range Indicator .................................................................................. 9-3 Reference Field ................................................................................... 9-3 Threshold Field ................................................................................... 9-3 Loss Reading ....................................................................................... 9-4 Port Connection Indicator.................................................................. 9-4 Softkeys............................................................................................... 9-4 Loss Table Screen – Power Meter Mode.................................................. 9-5 Power Meter Settings Area ...................................................................... 9-5 Loss Table .................................................................................................. 9-5 Loss Table Softkeys ................................................................................... 9-6 Optical Power Meter Zero Offset ............................................................ 9-7 Setting Power Meter Measurement Parameters.................................. 9-9 Setting the Power Meter Reference ........................................................ 9-9 Setting the Threshold value ................................................................... 9-11 Optical Power Measurements ................................................................. 9-12 Optical Power Level Measurement........................................................ 9-12 Optical Power Loss Measurements ........................................................ 9-13 Reference Procedure ........................................................................ 9-13 Test Procedure .................................................................................. 9-14 Editing the Loss Table ............................................................................... 9-15 MT9083 Series ACCESS Master Operation Manual XV Adding Test Data to an Existing Loss Table .......................................... 9-15 Overwriting Test Data in an Existing Loss Table ................................... 9-15 Deleting Test Data from a Loss Table.................................................... 9-16 Deleting All Test Data from a Loss Table .............................................. 9-16 Adding Comments to a Loss Table ........................................................ 9-17 Working with the Loss Table ................................................................... 9-20 Saving Loss Table Data ........................................................................... 9-20 Sorting Files............................................................................................. 9-21 Deleting Files........................................................................................... 9-21 Copying Files ........................................................................................... 9-23 Loading a Loss Table from Mass Storage .............................................. 9-25 Printing Loss Tables ................................................................................ 9-25 Connecting the Printer..................................................................... 9-26 Printing a Loss Table ........................................................................ 9-26 Optical Light Source (OLS) Overview .................................................... 9-27 Accessing Optical Light Source Mode.................................................... 9-27 Optical Light Source Screen Elements ................................................... 9-28 Light Source On/Off Indicator ......................................................... 9-28 Port Connection Indicator................................................................ 9-28 Softkeys............................................................................................. 9-29 Turning the Light Source On/Off ........................................................... 9-29 Fiber Identification Measurement ......................................................... 9-30 Chapter 10: Visual Fault Locate (VFL) Mode ..........................10-1 Accessing the Visual Fault Locator......................................................... 10-1 Visual Fault Locate Screen Elements...................................................... 10-2 Visual Fault Locator On/Off Indicator ............................................. 10-2 Port Connection Indicator................................................................ 10-2 Softkeys............................................................................................. 10-3 Visible Fault Location ............................................................................. 10-4 Chapter 11: Video Inspection Probe (VIP) Option..................11-1 Video Inspection Probe (VIP)................................................................... 11-3 Probe Tips................................................................................................ 11-3 Standard Tips .................................................................................... 11-3 Universal Tips.................................................................................... 11-3 VIP Setup...................................................................................................... 11-4 Attaching a Probe Tip ...................................................................... 11-4 Probe Tips with Optics ..................................................................... 11-5 Connecting the VIP to the USB Converter ...................................... 11-6 Connecting the VIP to the MT9083 Series ...................................... 11-7 Accessing VIP Mode................................................................................... 11-8 XVI MT9083 Series ACCESS Master Operation Manual VIP Test Settings...................................................................................... 11-9 VIP Auto File Settings ........................................................................... 11-11 File Location.................................................................................... 11-11 Base Filename ................................................................................. 11-12 Auto Functions - Analysis............................................................... 11-12 Auto Functions – File Name ........................................................... 11-13 Start Number .................................................................................. 11-13 Captured a VIP image........................................................................... 11-14 Analyze a VIP image ............................................................................. 11-15 VIP Report Settings ............................................................................... 11-17 Headers ........................................................................................... 11-17 Include Analysis Results.................................................................. 11-19 Include Analysis Details.................................................................. 11-19 Current Results Only / Results in Folder ........................................ 11-20 Create a PDF file ............................................................................. 11-20 Working with VIP Image Files ............................................................... 11-21 Saving VIP Images........................................................................... 11-21 Loading a VIP Image ...................................................................... 11-23 Sorting Files........................................................................................... 11-23 New Folder ............................................................................................ 11-24 Deleting Files......................................................................................... 11-25 Copying Files ......................................................................................... 11-27 Chapter 12: Performance Test and Calibration ......................12-1 Performance Test........................................................................................ 12-1 Optical Output and Wavelength of OTDR .......................................... 12-14 Pulse Width ........................................................................................... 12-16 Dynamic Range (one-way back-scattered light dynamic range test) .............. 12-18 Distance Measurement Accuracy ......................................................... 12-20 Loss Measurement Accuracy (Linearity) .............................................. 12-22 Optical Output Level and Wavelength of Visual Fault Locator (VLD: option 002 or 102) ............................................................................... 12-24 Optical Output and Wavelength of Optical Light Source for Fiber Identification ........................................................................................ 12-25 Measurement Accuracy of the Optical Power Meter ......................... 12-26 Calibration ................................................................................................. 12-28 Backscatter Coefficient Level Calibration............................................ 12-28 Optical Power Meter Measurement Accuracy Calibration ................. 12-29 Performance Test Result Sheet ............................................................. 12-30 MT9083 Series ACCESS Master Operation Manual XVII Chapter 13: Maintenance.........................................................13-1 Optical Connector/Optical Adapter Cleaning ...................................... 13-1 Cleaning the MT9083 Series Connector Ferrule End Surface ........ 13-1 Cleaning the Optical Adapter.......................................................... 13-3 Cleaning the Optical Fiber Cable Ferrule End Surface ................... 13-3 General Notes on Cleaning.............................................................. 13-4 Notes On Storage ....................................................................................... 13-4 Recommended Storage Conditions................................................. 13-5 Transporting ................................................................................................ 13-6 Chapter 14: Remote GUI Function ...........................................14-1 Outline .......................................................................................................... 14-1 Preparation.................................................................................................. 14-3 Cable connection.............................................................................. 14-3 Network Setup on Main Unit .......................................................... 14-4 To set the IP Address, IP Netmask, and Default Gateway:............. 14-5 Network Setup on PC ....................................................................... 14-7 Connection...................................................................................... 14-10 Operation ................................................................................................... 14-12 Panel operation .............................................................................. 14-12 File operation ................................................................................. 14-13 File transfer from the main unit to PC .......................................... 14-14 File transfer from PC to the main unit .......................................... 14-14 Appendix A: Specifications....................................................... A-1 Appendix B: Sample Traces .......................................................B-1 Overview ........................................................................................................ B-1 2-Point Loss Measurements...................................................................... B-1 Panel-Splice Measurements...................................................................... B-2 Panel-Connector and Panel-Splice Measurements ................................. B-3 Bad Launch................................................................................................ B-3 End to End Loss ......................................................................................... B-4 Fiber Length Distance Measurements ..................................................... B-4 Set-Up Using a Bare Fiber Adapter.......................................................... B-5 Set-Up for Short Fibers ............................................................................. B-5 Determining the dB Loss .......................................................................... B-6 Appendix C: Software License...................................................C-1 Appendix D: Limited Life Span Parts ....................................... D-1 XVIII MT9083 Series ACCESS Master Operation Manual Chapter 1: Quick Start Chapter 1: Quick Start Introduction The MT9083 Series ACCESS Master Optical Time Domain Reflectometer (OTDR) reduces the time to install, commission and maintain fiber spans via high performance hardware and easy-to-use software. This chapter describes an overview of the MT9083 Series, detailing the characteristics of the unit and its basic operation. When the designation “MT9083 Series” appears in this manual, it encompasses the MT9083x. When the designation “MT9083x” appears, the descriptions pertain uniquely to each respective unit. Figure 1-1: MT9083 Series ACCESS Master OTDR MT9083 Series ACCESS Master Operation Manual 1-1 Chapter 1: Quick Start MT9083 Series Functions The MT9083 Series provide the functions required to perform diagnosis of optical fiber faults, especially in FTTx applications. In addition to Optical Time Domain Reflectometer (OTDR) testing, the MT9083 Series also include an Optical Power Meter (OPM) for power measurement testing and an Optical Light Source (OLS) for fiber identification. Units can also be equipped with an optional Visual Fault Locator (VFL) which provides a visual reference for locating fiber bends and breaks within the OTDR dead zone. Remote-controlled operation is made possible with the USB-Ethernet converter. Basic Configuration The basic configuration of the MT9083 Series includes: • • • • • TFT color LCD AC charger/adapter with line cord Rechargeable lithium-ion battery pack Simple menu-based operation User’s Manual Options for the MT9083 Series include: • • • Optical Power Meter Visual Fault Locator Printer Powering Up the Unit The MT9083 Series can be powered externally by using the AC charger/adapter (see “AC Charger/Adapter” on page 2-11 for details, or internally by using the rechargeable lithium-ion battery pack (see “Installing a Battery Pack” on page 2-8 for details). Note Note The AC charger/adapter used must be the one supplied by Anritsu with the MT9083 Series. Use of another charger/adapter may result in damage to the MT9083 Series and/or the battery pack. Start Up Sequence 1. Press the Power key 1-2 . MT9083 Series ACCESS Master Operation Manual Chapter 1: Quick Start 2. The unit performs a self-test during which the Anritsu splash screen appears briefly, followed by the MT9083 Series splash screen. 3. When the self-test is complete, the unit proceeds to the Top Menu screen (see Figure 1-2). 4. Select the desired test application, if not already highlighted, and press the Enter key Enter . Figure 1-2: Top Menu screen Note Note The selections available on the Top Menu will vary with the configuration of the given MT9083 Series. MT9083 Series ACCESS Master Operation Manual 1-3 Chapter 1: Quick Start Optical Time Domain Reflectometer (OTDR) Testing The OTDR function provides the capability for measuring connection loss, fiber loss, and distance of an optical fiber. You can locate defects and faults, and determine the amount of signal loss at any point in an optical fiber. The Analysis function automatically detects event positions such as splice points with loss exceeding the preset threshold or return loss, and lists the data in an event table. Remote-controlled measurement is possible in the OTDR (Standard) mode. Figure 1-3: OTDR (Standard) Screen with Event Table For further details on OTDR testing see Chapter 4,“OTDR (Standard) Mode” . For further details on remote control operation see “MT9083 Series ACCESS Master Remote Control Operation Manual”. 1-4 MT9083 Series ACCESS Master Operation Manual Chapter 1: Quick Start Fault Locate Testing Fiber Visualizer provides an easy method to determine the end/fault location of a fiber. Press the Start key to start a test. The test proceeds through the following steps: • • • Performs a connection check Runs the test Reports the test results. Figure 1-4: Fiber Visualizer screen For further details on Fault Locate testing see Chapter 5,“Fiber Visualizer Mode” . MT9083 Series ACCESS Master Operation Manual 1-5 Chapter 1: Quick Start Construction Mode Testing Construction mode simplifies and automates the testing required when installing fiber. Construction mode is used when many fibers in a cable need to be tested and documented before deployment. Depending on the setup selections made for Construction mode testing, you can: • Step through the test process and save the results without reviewing the trace data. OR – • Setup the application so that it displays a Summary screen allowing review of the test data before proceeding to the next test. Figure 1-5: OTDR (Construction) Summary screen For further details on Construction mode testing see Chapter 6,“OTDR (Construction) Mode” . 1-6 MT9083 Series ACCESS Master Operation Manual Chapter 1: Quick Start Loss Test Set Testing Loss Test Set mode is made available by equipping a MT9083 Series with one of the optional Power Meters (Options 004/005/007). This provides the ability to perform power meter/light source tests. The optical power measurement range varies depending on the specific optional power meter with which the MT9083 Series is equipped. See “MT9083A2/B2/C2 ACCESS Master Common” on page A-8 for details. Loss Test Set mode is accessed by highlighting the Loss Test Set selection on the Top Menu screen and then pressing the Enter key. Units not equipped with the power meter option will not display the Loss Test Set selection. Figure 1-6: Initial Loss Test Set screen For further details on Loss Test Set mode, see Chapter 8,“Loss Test Set Mode” . ! WARNING NEVER look directly into the cable connector on the MT9083 Series nor into the end of a cable connected to the MT9083 Series. If laser radiation enters the eye, there is a risk of injury. MT9083 Series ACCESS Master Operation Manual 1-7 Chapter 1: Quick Start Optical Power Meter (OPM) Testing The OPM function provides the capability for measuring optical power levels. By measuring the power level on the fiber under test, you can easily decide whether the fault point is on the fiber or on the network. Figure 1-7: Optical Power Meter screen For further details on Optical Power Meter testing see Chapter 9,“Optical Power Meter (OPM) & Optical Light Source (OLS)” . 1-8 MT9083 Series ACCESS Master Operation Manual Chapter 1: Quick Start Optical Light Source (OLS) Testing The OLS function provides a light source for use with fiber identification equipment (fiber identifiers). The light source can be set to output at the following modulation rates: CW (continuous wave) 270 Hz, 1 kHz, or 2 kHz. Figure 1-8: Optical Light Source Screen For further details on Optical Light Source testing see Chapter 9,“Optical Power Meter (OPM) & Optical Light Source (OLS)” . ! WARNING NEVER look directly into the cable connector on the MT9083 Series nor into the end of a cable connected to the MT9083 Series. If laser radiation enters the eye, there is a risk of injury. MT9083 Series ACCESS Master Operation Manual 1-9 Chapter 1: Quick Start Visual Fault Locate (VFL) Option The Visual Fault Locate (VFL) option provides a visual method of fiber and fault identification. The VFL works by means of a red laser diode which is visible to the human eye. Bends and/or breaks in the fiber under test are identified by the visible red glow at the event. This provides a method of locating faults within the OTDR dead zone, as well as a means of fiber identification. Figure 1-9: Visual Fault Locate Screen For further details on Visual Fault Locate testing see Chapter 10,“Visual Fault Locate (VFL) Mode” . ! 1-10 WARNING NEVER look directly into the cable connector on the MT9083 Series nor into the end of a cable connected to the MT9083 Series. If laser radiation enters the eye, there is a risk of injury. MT9083 Series ACCESS Master Operation Manual Chapter 1: Quick Start Video Inspection Probe (VIP) Option The Video Inspection Probe (VIP) option is used to inspect fiber optic terminations. Use the VIP to inspect installed connectors located inside hardware devices or on the “backside” of patch panels, eliminating the need to either disassemble hardware devices prior to inspection or access the backside of patch panels. The VIP option consists of the following: • • • • Video Inspection Probe (VIP) 5 probe tips (SC, ST, FC, Universal 1.25 mm, and Universal 2.5 mm) USB converter Software CD Figure 1-10: VIP Screen Images captured with the VIP can be saved as PNG or VIPI files which can be recalled for viewing on the MT9083 Series. Also captured images can be analyzed on MT9083 or using the VIP Analysis software on a PC. Note Note The Software CD contains the VIP Analysis software which is for PC use only. See the software’s help set for details on its use. MT9083 Series ACCESS Master Operation Manual 1-11 Chapter 1: Quick Start For further details on the Video Inspection Probe see Chapter 11,“Video Inspection Probe (VIP) Option” . 1-12 MT9083 Series ACCESS Master Operation Manual Chapter 2: Overview Chapter 2: Overview It is important to become familiar with the layout of the MT9083 Series. Three areas important to the use and function of the MT9083 Series are the front panel, back panel, and top connector panel. Front Panel The front panel contains the unit’s operating controls and its LCD display. 4 3 2 5 6 7 8 9 1 10 11 Figure 2-1: MT9083 Series – Front Panel 1 Power key 6 ESC (Escape) key 2 Dedicated function keys and Numeric keypad 7 Arrow key set 8 Enter key LCD display 9 Start key 3 MT9083 Series ACCESS Master Operation Manual 2-1 Chapter 2: Overview 4 Softkeys 10 Top Menu key 5 Rotary knob 11 Softkeys Power Key Power Press the Power key to power the unit up/down. Dedicated Function Keys VLD VLD key – this key is reserved for future expansion. 0 1 Save 3 File 4 Setup 5 Backlight key – this key is used to adjust the brightness of the backlight. See “Adjusting the Backlight” on page 3-2 for details. Save key – Press this key to access the Save screen. File key – Press this key to enter the Load screen to recall previously saved traces. See “Displaying Trace Files” on page 4-90 for details. Note The File key is only active at the Top Menu screen and in the OTDR (Standard) application. Setup key – Press this key to access the General setups at the Top Menu level and the various Application setups when in a Test Application mode. Note The Setup key is not active for some Test Applications, such as Optical Power Meter, Light Source, and Visual Fault Locate. 2-2 MT9083 Series ACCESS Master Operation Manual Chapter 2: Overview History key – This key is not active as of the current software release. History 6 Print key – Press this key to access the Print functions. See “Printing Trace Files” on page 4-105 for details. Print 7 Numeric Keypad The Numeric keypad can be used for the following: 1 2 Save File 3 4 Setup History 5 6 • Entering numeric values in the various System and Test Application menus. - Print 8 7 • As short cut keys to select the desired character groups when in the various Save screen functions. • When not being used for dialog input, keys 1 through 7 also have dedicated functions. See “Dedicated Function Keys” on page 2-2 for details. VLD 9 0 BS . Press the BS key when you need to backspace. Each press backspaces the text cursor one character space. Softkeys f1 f2 f3 The MT9083 Series have six softkeys on the front panel, located to the right of the LCD screen, and numbered f1 through f6. Each softkey’s function is designated by the current operating mode of the unit and is labeled on the screen to the left of the key. f4 f5 f6 MT9083 Series ACCESS Master Operation Manual 2-3 Chapter 2: Overview Rotary Knob The Rotary knob is used for the following: General Setups – • • Turn the Rotary knob to scroll through menu selections. Press the Rotary knob to make a selection. OTDR mode – Turn the Rotary knob to: • • Make precise cursor placements. Scroll through menu selections. Press the Rotary knob to: • • Switch the active cursor. Make selections. Loss Test Set mode – • Turn the Rotary knob to scroll the highlight up and down in the Loss Table. ESC (Escape) Key ESC The ESC (Escape) key is used for the following: General Setups – • • Close a currently open setup menu. Return to the previous screen. OTDR mode – 2-4 • Close a currently open setup menu. • Stop the current trace data collect that is in progress. MT9083 Series ACCESS Master Operation Manual Chapter 2: Overview Arrow Key Set The Arrow (Left/Right/Up/Down) key set is used for the following: Left Arrow key – • General Setups – - Press the Left Arrow key to move the cursor in a text box to the left. • OTDR mode – - Horizontally contracts a portion of the trace for wider examination. - Moves the cursor in a text box to the left. Right Arrow key – • General Setups - Press the Right Arrow key to move the cursor in a text box to the right. • OTDR mode – - Horizontally expands a portion of the trace for closer examination. - Moves the cursor in a text box to the right. Up Arrow key – • General Setups - Press the Up Arrow key to move to the next higher item in a pop-up menu. • OTDR mode – - Vertically expands a portion of the trace for closer examination. - Moves to the next higher item in a pop-up menu. • Loss Test Set mode – - Move the highlight to the next higher row in the Loss Table. MT9083 Series ACCESS Master Operation Manual 2-5 Chapter 2: Overview Down Arrow key – • General Setups - Press the Down Arrow key to move to the next lower item in a pop-up menu. • OTDR mode – - Vertically contracts a portion of the trace for wider examination. - Moves to the next lower item in a pop-up menu. • Loss Test Set mode – - Move the highlight to the next lower row in the Loss Table. Enter Key Enter The Enter key is used for the following: Setups (General and Application specific) – • • Press the Enter key to open the currently highlighted menu selection. Press the Enter key when in a pop-up menu to save any changes made and close the menu. OTDR mode – • 2-6 Press the Enter key to toggle the active cursor. MT9083 Series ACCESS Master Operation Manual Chapter 2: Overview Start Key Start Press the Start key, when in OTDR mode, and Fiber Visualizer mode and VIP mode, to start a one-key automated test. Note The Start key does not apply to the following applications: • • • • Loss Test Set Optical Power Meter Light Source Visual Fault Locate Top Menu Key Top Menu The Top Menu, which lists the functions of the MT9083 Series, is displayed whenever the Top Menu key is pressed. See “Top Menu Screen” on page 3-3 for further details. Softkeys F1 F2 F3 The MT9083 Series have four softkeys on the front panel, located to the under of the LCD screen, and numbered F1 through F4. Each softkey’s function is designated by the current operating mode of the unit and is labeled on the screen to the left of the key. F4 MT9083 Series ACCESS Master Operation Manual 2-7 Chapter 2: Overview Back Panel The back panel of the MT9083 Series contains the unit’s tilt bail and battery compartment as well as the various compliance and warning labels for the unit. In addition, the model/serial label is also located on the back panel (see item 2 in MT9083 Series – Back Panel, below). 1 2 3 4 Figure 2-2: MT9083 Series – Back Panel 1 Compliance and Warning labels 2 Model/Serial label 3 Tilt bail 4 Battery compartment Installing a Battery Pack To install a battery pack: 1. Power down the unit, if it is currently operating. ! 2-8 CAUTION Be sure to keep the power off when removing the battery pack. The battery pack and/or the MT9083 Series may be damaged if the power is on when you remove the pack. MT9083 Series ACCESS Master Operation Manual Chapter 2: Overview 2. Disconnect the AC adapter/charger, if currently operating the unit on AC power. 3. Lay the unit down on its front panel, to provide easy access to the battery compartment. 4. If the tilt bail is closed, lift the bail and place it in its upright position. You cannot access the battery compartment when the tilt bail is in its closed position. 5. There are two releases on the battery compartment cover which are denoted by recessed arrows. Push down on the arrows and slide the door off of the unit. 6. If a battery pack is currently installed, take hold of the pull strap and lift the battery pack out of the compartment. 7. Insert the new battery pack, making sure that the terminals on the battery pack are lined up with the connector in the battery compartment. Press down on the battery pack to insure that it is fully seated in the connector. 8. Replace the battery compartment cover. ! CAUTION Attach the battery compartment cover securely. Otherwise, the battery pack may fall out resulting in injury to the user, and/or damage to the battery pack. Note See “Charging the Battery Pack” on page 2-11 for details on charging the battery pack. MT9083 Series ACCESS Master Operation Manual 2-9 Chapter 2: Overview Top Connector Panel The top connector panel of the MT9083 Series contains the measurement ports used to connect optical fiber to the unit as well as USB ports for uploading and downloading files. The DC power connection is also located on the top panel along with LED indicators for the Battery Changing and External Power status. Figure 2-3 provides an example of a typical unit’s top panel. Note The configuration of the top panel will vary depending on the optics and options installed in a given unit. 3 1 4 5 6 7 8 9 2 Figure 2-3: MT9083 Series– Top Panel 2-10 1 OPM (Optical Power Meter port) 2 Battery Charging indicator 3 External Power indicator 4 External power - DC Power Connection 5 VLD port (Visual Fault Locate port) 6 Measurement port 2 7 Measurement port 1 8 USB port (down) 9 USB port (up) MT9083 Series ACCESS Master Operation Manual Chapter 2: Overview AC Charger/Adapter The MT9083 Series include an AC charger/adapter as standard equipment. The battery pack requires 5 hours to fully charge. The unit may be operated while recharging the battery pack, but doing so may result in less than a full recharge of the battery. AC Power Operation Use the following procedure to operate the MT9083 Series on AC power. To run the unit on the AC Charger/Adapter: 1. Attach the jack from the AC charger/adapter to the DC input located on the top connector panel of the MT9083 Series (see Figure 2-3 on page 2-10). 2. Attach the AC line cord to the receptacle on the AC charger/adapter. 3. Insert the plug from the AC line cord into an AC outlet. 4. Press the Power key to start the MT9083 Series. Charging the Battery Pack To charge the Battery Pack using the AC Charger/Adapter: 1. Power off the MT9083 Series. 2. Attach the jack from the AC charger/adapter to the DC input located on the top connector panel of the MT9083 Series (see Figure 2-3 on page 2-10). 3. Attach the AC line cord to the receptacle on the AC charger/adapter. 4. Insert the plug from the AC line cord into an AC outlet; high-speed changing starts. The Battery Charging indicator lamp (see item 2 in Figure 2-3 on page 2-10) is illuminated while the battery pack is charging. 5. Charging finished in about 6 hours and the Battery Charging indicator lamp goes out. The battery is, however charged 90% or more after 5 hours. 6. Disconnect the AC charger/adapter from the DC input when charging is completed. Note Notes on charging with the AC adapter/charger: MT9083 Series ACCESS Master Operation Manual 2-11 Chapter 2: Overview • • • ! To charge the battery pack fully, keep the MT9080 Series at an ambient temperature of 5 to 30C and keep the power off during the charging process. Even while the battery pack is left installed and used with the power on, charging occurs. In this case, it stops after three hours. Also when charging is attempted at an ambient temperature higher than the specified value, it may stop before the pack is fully charged. This is because the temperature in the battery pack may rise above the upper limit during high-speed charging. If the battery pack has been over-discharged, high-speed charging may not start until trickle charging has occurred for several hours. If the Battery Charging lamp does not light up even if you connect the AC adapter, leave it as is for several hours and remove the AC adapter once before reconnecting it. The charging rate may not reach 100% even if the battery pack is fully charged. However, the battery is charged completely if the charging rate reaches 90%. CAUTION The battery pack must not be charged for more than 24 hours. Over-charging the battery pack may shorten its life. Checking the Remaining Battery Power The remaining battery power can be checked from either the indicator on the battery pack or by checking the on-screen Battery Status area on the MT9083 Series. The battery pack has an integral battery charge indictor, consisting of a TEST button and 4 LED, located on the lower right section of the battery, as shown in the following figure. 25 50 75 0 10 Figure 2-4: Battery Pack with Charge Indicator detail To check remaining battery power via the Battery Pack charge indicator: 2-12 MT9083 Series ACCESS Master Operation Manual Chapter 2: Overview 1. Open the battery compartment on the MT9083 Series. See “Installing a Battery Pack” on page 2-8 for details on opening the battery compartment. 2. Press the TEST button on the battery pack. You can determine the remaining battery charge by the number of illuminated LEDs, as shown in the following table. LED state Remaining battery charge (guide) 0 to 5% 25 50 75 0 10 5 to 25% (The LED flashes at 5 to 10%) 25 50 75 0 10 25 to 50% 25 50 75 0 10 50 to 75% 25 50 75 0 10 75 to 100% 25 50 75 0 10 You can also check the remaining battery power by viewing the Battery Status area located in the upper right corner of the screen as shown in Figure 2-5 on page 2-14. MT9083 Series ACCESS Master Operation Manual 2-13 Chapter 2: Overview Remaining battery power Estimated available time Figure 2-5: Battery Status Area Indicators If the entire battery indicator is colored green, the battery has been fully charged (100%). As the battery is discharged, the green field lessens. The remaining battery charge is expressed numerically to the right of the battery indicator. This field displays the remaining battery charge in percent (%) and the estimated available time (h) forecast from the average power consumption over the previous 1 minute period. When the remaining battery charge falls below 10%, the battery indicator flashes. When the remaining battery charge falls below 3% following message appears: “Battery running low. Please connect the AC adapter.” and the warning buzzer sounds. When the remaining battery charge falls below 1% the following message appears: “Battery is empty.” and then the unit automatically powers off. 2-14 MT9083 Series ACCESS Master Operation Manual Chapter 2: Overview Note 1. The remaining battery charge and estimated available time values cannot be guaranteed. The estimated available time may differ from the actual available time, depending on the battery pack or the condition of the MT9083 Series. Remember that these values should be considered as guidelines only. 2. If you attempt to update the unit’s firmware when the remaining battery charge is less than 10%, the following message appears: “Battery is running low, immediately connect the AC charger.” Connect the AC charger/adapter as instructed by the message. Charging the battery pack starts when you plug in the AC charger/adapter. If the power to the MT9083 Series is left on, the pack will not be charged fully; charging will stop after about 6 hours. For further details on the screen display refer to Chapter 3, “General Operation/System Setups.” Important Information about the Battery Pack • If you use a battery pack that has not been charged a sufficient number of times, the charging rate may not reach 100% even after completion of charging. • The battery pack must not be charged for more than 24 hours. Overcharging the battery pack may shorten its life. (The AC charger/adapter must not be left connected for a long time with the battery pack plugged into the MT9083 Series.) • The battery pack is a consumable item, although it can be charged/discharged about 300 to 500 times. If the actual available time shortens suddenly even after the battery pack has been charged, the battery pack’s life may have expired. Replace it with a new one in this case. • It is advisable to discharge the battery pack on occasion in order to enhance its performance and extend its life. • If the battery pack is stored at an excessively high (40°C or higher) or low (0°C or lower) temperature, its performance and life will degrade. When the ambient temperature rises, battery pack discharge speeds up. • A fully charged battery pack will be completely discharged in several months if left as is. MT9083 Series ACCESS Master Operation Manual 2-15 Chapter 2: Overview • ! If the battery pack has been discharged fully, its smart memory capabilities will be lost. In this case, the remaining battery charge indication and other information may be displayed inaccurately, or the pack may be unable to be charged normally. CAUTION 1. The battery pack must be charged only with the AC charger/adapter furnished by Anritsu for the MT9083 Series. Use of a different AC charger/adapter the battery pack may malfunction or cause a fire. 2. Do not short-circuit the terminals of the battery pack. If you do so, the battery pack may malfunction or cause a fire. 3. Do not drop or attempt to disassemble the battery pack. If you do so, the battery pack may malfunction or cause a fire. 4. Do not use the battery pack for other than the intended purpose. If you do so, the battery pack may malfunction or cause a fire. 5. Be sure to recycle or dispose of the battery pack correctly. Do not discard the battery pack in the garbage or burn it. If you do so, fire or explosion may occur. 6. Do not use any battery pack other than the one supplied. Similarly, do not use the supplied battery pack for any other device. Measurement Ports The measurement ports on the MT9083 Series are located on the top panel of the unit (see items 6 and 7 in Figure 2-3 on page 2-10). Depending on the model of the MT9083 Series, there are either one or two measurement ports. The measurement port to which a fiber is connected depends on the test application and the wavelength to be measured. The MT9083 Series can also be equipped with a optional Visual Fault Locator, accessed via the VLD port. 2-16 MT9083 Series ACCESS Master Operation Manual Chapter 2: Overview Optical Connector and Adapter The optical connector is an interface to the measurement ports (OTDR/OPM/OLS ports) which accepts adapters for FC, SC, ST, and DIN fiber connector types. (Others connector adapter types may be available, contact Anritsu for details.) The following are some of the optical connector adapters currently available for the MT9083 Series. UNIV-FC UNIV-SC UNIV-ST Note An FC/APC adapter is also available. The UNIV-AFC is distinguished by the location of the key alignment slot, which is on the left side of the adapter. Note The UNIV-SC can be used with both UPC-SC and APC-SC style connectors. Cleaning the Optical Connector It is advisable to clean the ferrule end surface of the MT9083 Series optical connector periodically. See “Cleaning the MT9083 Series Connector Ferrule End Surface” on page 13-1 for details. Cleaning Optical Adapters It is advisable to clean the optical adapter before mounting it on the optical connector. See “Cleaning the Optical Adapter” on page 13-3 for details. Changing the Optical Adapter ! CAUTION MT9083 Series units equipped with angled-polish (APC) optical connectors require angle-polished optical adapters. MT9083 Series ACCESS Master Operation Manual 2-17 Chapter 2: Overview To change an Optical Adapter: 1. Open the cover on the desired measurement port. 2. Lift up on the adapter’s locking lever. You will hear a “click” when the latch mechanism disengages. 3. Slide the adapter out of the measurement port. 4. Slide the new adapter into the measurement port. 5. Push down on the adapter’s locking lever. You will hear a “click” when the latch mechanism engages. Connecting Fiber to a Measurement Port The measurement ports are used to connect fiber for OTDR, OPM, and OLS testing applications. To connect fiber to a Measurement Port: 1. Clean and connect a patch cord of known good quality to the desired measurement port. See Figure 2-6. 2. Clean the connector of the system to be tested. 3. Attach the free end of the patch cord to the connector of the system to be tested. Cautions on Handling Optical Fiber Cables Optical fiber cables may degrade in performance or be damaged if handled improperly. Note the following points when handling them. 2-18 ! CAUTION Do not pull the cable when removing the connector. Doing so may break the optical fiber inside the cable, or remove the cable sheath from the optical connector. ! CAUTION Do not excessively bend, fold, or pinch an optical fiber cable. Doing so may break the optical fiber inside the cable. Keep the bend radius of an optical fiber cable at 30 mm or more. If the radius is less, optical fiber cable loss will increase. MT9083 Series ACCESS Master Operation Manual Chapter 2: Overview ! CAUTION Do not excessively pull on or twist an optical fiber cable. Also, do not hang anything by using a cable. Doing so may break the optical fiber inside the cable. ! CAUTION Be careful not to hit the end of an optical connector against anything hard such as the floor or a desk by dropping the optical fiber cable. Doing so may damage the connector end and increase connection loss. ! WARNING Do not touch the end of a broken optical fiber cable. The broken optical fiber may pierce the skin, causing injury. ! CAUTION Do not disassemble optical connectors. Doing so may cause part to break or the performance to degrade. MT9083 Series ACCESS Master Operation Manual 2-19 Chapter 2: Overview 1 2 Figure 2-6: Measurement Ports ! 2-20 1 Measurement Port 1 2 Measurement Port 2 CAUTION Never force the connector ferrule or insert it at an angle into the adapter. Optical fibers are susceptible to loss from microbends or other stress. Position the patch cord to minimize mechanical strain. MT9083 Series ACCESS Master Operation Manual Chapter 2: Overview Visual Fault Locator Connection The optional Visual Fault Locator (VFL) is equipped with a 2.5 mm universal fiber connector adapter which accepts the ferrule of most standard fiber connectors. Note Not all MT9083 Series are equipped with the VFL option. To connect fiber to the Visual Fault Locator: 1. Open the cover on the VLD port. 2. Insert the ferrule of a connectorized fiber into the connector on the VLD port. VLD Port Figure 2-7: VLD Port. MT9083 Series ACCESS Master Operation Manual 2-21 Chapter 2: Overview Connecting Peripheral Devices The standard configuration of the MT9083 Series includes two USB ports, which allows a USB memory or personal computer to be connected. 1 2 Figure 2-8: USB Ports 1 USB Down port 2 USB Up (to PC) port USB Up (to PC) Port By connecting the USB UP (to PC) port of the MT9083 Series to a personal computer via a USB A to USB B cable, you can access the internal memory of the unit directly from your computer. While a personal computer is connected to the MT9083 Series, accessing the internal memory from the MT9083 Series via the Save key is disabled. See “USB Video Output” on page 3-11 for details. ! 2-22 CAUTION Before disconnecting the USB cable between the MT9083 Series and the personal computer, be sure to prepare the computer so that the hardware can be removed. Otherwise, the internal memory may be damaged. MT9083 Series ACCESS Master Operation Manual Chapter 2: Overview USB Down Port This port is used to connect a USB memory (USB memory stick), a printer, a keyboard or the VIP (Video Inspection Probe) option to the MT9083 Series. • USB memory Use a USB memory stick conforming to USB 1.1. Note Not all commercially available USB memory work with this port. ! • CAUTION A mark during access is displayed on screen when recalling, saving, copying, or deleting folders and/or files. Do not remove USB memory while accessing it. USB memory or files may be damaged. USB printer conversion cable Use a USB printer conversion cable conforming to USB 1.1. Note Not all commercially available USB printer conversion cables work with this port. • USB keyboard Use a USB keyboard conforming to USB 1.1. Use a 104-key Windows keyboard. Use a QWERTY keyboard. Note Not all commercially available USB keyboard work with this port. The table below shows the mapping between the keys in the front panel and the keys on the USB keyboard. USB keyboard keys Front panel keys F1-F6 f1-f6 hard keys F9-F12 F1-F4 hard keys 0-9 0 - 9 hard keys . . MT9083 Series ACCESS Master Operation Manual 2-23 Chapter 2: Overview USB keyboard keys • Front panel keys Backspace BS hard key ESC ESC hard key Enter Enter hard key Arrow keys Arrow keys Spacebar Start hard key Home Top Menu hard key USB Ethernet converter Use a USB Ethernet converter conforming to USB 1.1. Note Not all commercially available USB Ethernet converter work with this port. • VIP (Video Inspection Probe) option Video fiber microscope used to inspect fiber optic terminations. Basic Notes on Use ! CAUTION • Connector cover A connector cover is installed on each of the connectors to prevent dust. Do not remove these connector covers except when connecting a cable to the connectors. • Condensation Condensation may occur on the inside surface of the MT9083 Series when the MT9083 Series is carried into a room (high temperature) from an outdoor location (low temperature), etc. If this occurs, dry the MT9083 Series thoroughly before turning on the power. 2-24 MT9083 Series ACCESS Master Operation Manual Chapter 2: Overview • Temperature range Use the MT9083 Series within the operating temperature range (-10 to +50°C. Excluding Opt004/005/007and 002) and storage temperature range (-20 to +60°C). If the MT9083 Series is placed in a car or other enclosed space for a long time, the ambient temperature may exceed the specified range, resulting in malfunction of the MT9083 Series. • Safety Do not use any AC adapter or battery pack other than the one supplied. Otherwise, the MT9083 Series may be damaged due to nonconformity with the specifications. • Laser Never look directly into the cable connector on the equipment nor into the end of a cable connected to the equipment. If laser radiation enters the eye, there is a risk of injury. In addition, the MT9083 Series outputs high-power optical pulses. To prevent damage to the photoreceiving circuit of the communication device connected to the optical fiber to be measured, remove the communication device from the optical fiber before measurement. Anritsu will take no responsibility for damage to the communication or any other device. • Maintenance Anritsu recommends that the MT9083 Series be inspected once a year at the Anritsu Customer Service Center (a fee will be charged). • Humid or dusty place Avoid installing MT8820C in a humid or dusty place. Drops of water or accumulated dust may constitute a short circuit, thus causing a fire accident, electric shock and/or failure. MT9083 Series ACCESS Master Operation Manual 2-25 Chapter 2: Overview • Place where it is exposed to active gas Avoid installing MT8820C in a place that may be ex-posed to active gas. Otherwise MT8820C may be damaged, thus causing a fire accident and/or failure. For other notes on use, read the safety-related information in this manual thoroughly before use. 2-26 MT9083 Series ACCESS Master Operation Manual Chapter 3: General Operation/System Setups Chapter 3: General Operation/System Setups General Operation This section assumes that the battery pack is already charged or that the AC charger/adapter is connected to the unit. Refer to the following sections for details on charging the battery pack or connecting the AC charger/adapter: • • “Charging the Battery Pack” on page 2-11 “AC Power Operation” on page 2-11 Press the Power key displayed. to start the MT9083 Series; the Top Menu screen is Figure 3-1: Initial Screen – Top Menu Note If the screen shown in Figure 3-1 does not appear after powering up, the MT9083 Series may have failed. Run the unit through a power cycle (power MT9083 Series ACCESS Master Operation Manual 3-1 Chapter 3: General Operation/System Setups down / power up). If the problem persists, contact the Anritsu Technical Support Center (see page xxx) or your local Anritsu representative. Power On/Power Off To Power On the MT9083 Series: • Press the Power key . The MT9083 Series performs a self-test during which the Anritsu splash screen, followed by the MT9083 Series splash screen, briefly appears. When the self-test is completed, the Top Menu screen, or one of the Test Application screens (if the unit was powered down via the Auto Power Off function), appears (see Figure 3-1 on page 3-1). To Power Off the MT9083 Series: 1. Press the Power key , the following message appears: Press the Power key again to turn off the instrument. Press any other key to cancel 2. Press the Power key again to power off the instrument, or press any other key to cancel the power off process. Note You can force a Power Off at any time by holding down the Power key for approximately 10 seconds. Adjusting the Backlight Pressing the Backlight key following order: 1 switches the brightness of the backlight in the High Low OFF High… Note You cannot adjust the backlight in the following cases because the Backlight key is either used for another function or is disabled. • • • 3-2 Access to the internal memory or USB memory is in progress. You have selected a settings item and are entering a character or making a setting. A warning or caution message is displayed. MT9083 Series ACCESS Master Operation Manual Chapter 3: General Operation/System Setups • The backlight has been turned off via the Auto Backlight Off function in the system settings. When the backlight is left off via the Auto Backlight Off function, you can return to the initially set conditions by pressing any key. Top Menu Screen All test applications are accessed from the MT9083 Series Top Menu screen. The menu items displayed in the Top Menu will vary with the options installed on the unit. Use the Left/Right/Up/Down Arrow keys or the Rotary knob to highlight the desired test application and then press the Enter key (or press the Rotary knob) to open the application. 2 1 3 4 5 6 7 Figure 3-2: Top Menu Screen 1 Screen Title area Displays the title for the current screen as well as the name of a recalled file (when displaying a recalled file). 2 Date/Time area Displays the current date and time. MT9083 Series ACCESS Master Operation Manual 3-3 Chapter 3: General Operation/System Setups 3 Battery Status area Displays the battery indicator and remaining battery power. See “Battery Status Area” on page 3-4 for details. 4 Driving Power icon The icon displayed indicates the current power source: The Plug icon indicates that the unit is currently operating on the AC charger/adapter. The Battery icon indicates that the unit is currently operating on battery power, via the rechargeable battery pack. 5 Test Application Selection area Displays the test applications available. The number of available test applications will vary with the options installed. 6 Source Wavelengths list The Source Wavelength list displays all laser source wavelengths available for the current MT9083 Series. The list displays up to four wavelengths, depending on the unit’s configuration. 7 Select SM/MM softkey The Select SM/MM softkey (f6) is only available on specific units, such as those with both single mode and multimode laser sources. Toggle Select SM/MM (f6) to set the unit to the desired wavelength type. Battery Status Area The Battery Status area (see item 3 in Figure 3-2 on page 3-3) displays the battery indicator and the remaining battery power. For the remaining battery power, the percent of the remaining battery power with the operating time remaining for the current battery. The following items are displayed in the Battery Status area – Battery indicator: 3-4 Provides a quick, graphic illustration of the amount of charge remaining in the battery. MT9083 Series ACCESS Master Operation Manual Chapter 3: General Operation/System Setups Remaining battery power (%): Remaining battery power (h): Presents the amount of charge remaining in the battery as a percentage of the fully charged battery. Presents the amount of charge remaining in the battery relative to the amount remaining operation time. Remaining Battery Charge Indication The following section details what occurs when the battery charges falls below certain levels (10%, 2%, and 1%) as well as when a battery pack temperature warning occurs. • Remaining battery power is less than 10%: The battery indicator flashes. • Remaining battery power is less than 2%: The following message appears: “Battery running low. Please connect AC adapter” and the buzzer sounds. Pressing any key causes the message to disappear, stopping the buzzer. Note The following operations will be interrupted in this event: - Copying and deleting of files • Remaining battery power is less than 1%: The following message appears: “Battery is empty”, and the power goes off automatically. At this time any measurement currently in progress is canceled. The current settings and trace (if in Standard OTDR mode) are saved in memory and will be read at the next startup with the screen at shut down displayed. • A battery pack temperature failure warning occurs: When the battery pack is in use or charging, the following message appears: “Battery charge was terminated since the temperature exceeded the limit (0 to 40 deg.C).” MT9083 Series ACCESS Master Operation Manual 3-5 Chapter 3: General Operation/System Setups When charging is terminated: “Battery temperature exceeded the discharging temperature limit. The instrument will automatically turn off after a minute.” When the above message is displayed, the charging is terminated. Charging will resume automatically when the battery pack temperature returns to the normal temperature. When the power is OFF: “Battery temperature exceeded the discharging temperature limit. The instrument will automatically turn off after a minute.” When one minute has elapsed, the power automatically shuts down. At this time any measurement currently in progress is canceled. The current settings and trace (if in Standard OTDR mode) are saved in memory and will be read at the next startup with the screen at shut down displayed. Figure 3-3: Charging/discharging temperature range of battery pack Note The remaining battery power indicators only provide an approximate indication of the current battery power level. Even if the remaining battery power indicated is greater than 1%, the instrument may automatically power down, depending on the condition of the battery pack. System Setups Setup Press the Setup key 5 to display the General screen which provides access to the general systems settings. 3-6 MT9083 Series ACCESS Master Operation Manual Chapter 3: General Operation/System Setups General Screen Settings Use the General screen to set such default setup information as date/time, color theme, and language. The General screen also provide access to the Password Settings screen and About screen. Figure 3-4: General Screen To select a setting on the General screen: 1. Use the Up and Down Arrow keys or the Rotary knob to highlight the desired General settings item. 2. Press the Enter key (or press the Rotary knob) to display the dialog box for the selected settings item. To cancel the selection, press the ESC key to close the dialog and return the previous setting. The following settings are accessed via the General screen: • • • • Date — modify the date displayed Local Time — modify the time displayed Time difference from UTC — set the difference, in hours, of the local time from Coordinated Universal Time. For example, US Eastern time is -5hrs from UTC. Date display format — select the format for the Date displayed MT9083 Series ACCESS Master Operation Manual 3-7 Chapter 3: General Operation/System Setups • • • • • • • • • Auto Launch — select a specific test application to launch at power up Printer — select the printer type (Note: There are printers type available at the current software release) Paper feed — turn the paper feed on or off Color Theme – select your screen color preference Language — select the language used on-screen USB Video Output — turn Video Output on or off Auto Backlight Off — set an idle time to automatically turn off the display backlight Auto Power Off — set an idle time to automatically power down the unit Instrument Power-Save Mode — set the power-save mode status to conserve power when making successive OTDR measurements Date setting To set the Date: 1. Highlight Date and then press the Enter key. 2. The Date dialog appears. Use the Left and Right Arrow keys to move the highlight to the desired section of the date. 3. Use the Up and Down Arrow keys to increment or decrement the highlighted section. 4. Repeat steps 2 and 3 until the desired date is displayed in the dialog box. 5. Press the Enter key to save the new Date setting. Local Time setting To set the Local Time: 1. Highlight Local Time and then press the Enter key. 2. The Local Time dialog appears. Use the Left and Right Arrow keys to move the highlight to the desired section. 3. Use the Up and Down Arrow keys to increment or decrement the highlighted section. 4. Press the Enter key to save the new Local Time setting. Time Difference from UTC To set the Time difference from UTC: 1. Highlight Time difference from UTC and then press the Enter key. 3-8 MT9083 Series ACCESS Master Operation Manual Chapter 3: General Operation/System Setups 2. The Time difference from UTC dialog and the Change +- softkey (f1) appear. 3. Use the Up and Down Arrow keys (or the Rotary knob) to increment/decrement the setting in the hours field. Or enter it directly with the Numeric keypad. The number of hours set can range from -12.0 to +12.0 in half hour (.5) increments. 4. Toggle Change+- (f1) to change the value of the hours setting from “+” (adding the hours set) to “-” (subtracting the hours set). 5. Press the Enter key to save the time difference setting. Date Display Format To select the Date display Format: 1. Highlight Date display Format and then press the Enter key. 2. The Date display Format dialog appears. Use the Up and Down Arrow keys (or the Rotary knob) to highlight the desired format: - Day-Month-Year - Month-Day-Year - Year-Month-Day 3. Press the Enter key to save the selected format setting. Auto Launch Auto Launch allows you to select a test application which will be automatically launched at start up. To set the Auto Launch: 1. Highlight Auto Launch and then press the Enter key. 2. The Auto Launch dialog appears. Use the Up and Down Arrow keys (or the Rotary knob) to highlight the desired test application. 3. Press the Enter key. The MT9083 Series will automatically launch the selected test application at power up. Printer There are printers supported at the current software release, the BL-80RII and SD1-31. MT9083 Series ACCESS Master Operation Manual 3-9 Chapter 3: General Operation/System Setups Paper Feed Setting the Paper feed to “On” will automatically advance the paper to the cutting position when a trace has finished printing. To set the Paper feed: 1. Highlight Paper feed and then press the Enter key. 2. The Paper feed dialog appears. Use the Up and Down Arrow keys (or the Rotary knob) to highlight either On or Off. On: The printer paper is automatically fed forward to the cutter after printout. Off: The printer paper is not fed forward to the cutter after printout, but is automatically fed forward just enough to prevent any overlap between images. 3. Press the Enter key to save the selected Paper feed setting. Note The printer paper is also fed according to this setting when printing is cancelled. If an error (out of paper, excluded) occurs during printing, the printer paper is fed according to this setting when printing out next time. However, the printer paper is not fed for the next printout if the MT9083 Series was turned off after a print error occurrence. Color Theme Use the Color Theme setting to select one of the four preset screen color themes. To change the Color Theme: 1. Highlight Color Theme and then press the Enter key. 2. The Color Theme dialog appears. Use the Up and Down Arrow keys (or the Rotary knob) to highlight the desired color theme. 3. Press the Enter key. The display changes to the selected color theme. Language This setting switches the language of the on-screen characters. To set the on-screen Language: 1. Highlight Language and then press the Enter key. 3-10 MT9083 Series ACCESS Master Operation Manual Chapter 3: General Operation/System Setups 2. The Language dialog appears. Use the Up and Down Arrow keys (or the Rotary knob) to highlight the desired language. 3. Press the Enter key. The MT9083 Series switches to the selected language. Note Some symbols in “Chinese-Simplified” differ from those in other languages. For example, “$” is displayed as “¥”. USB Video Output Turning USB Video Output ON allows the ACCESS Master screens to be displayed on a PC. To set the USB Video Output: 1. Highlight USB Video Output and then press the Enter key. 2. The USB Video Output dialog appears. Use the Up and Down Arrow keys (or the Rotary knob) to highlight either On or Off. 3. Press the Enter key to save the selected USB Video Output setting. 4. Finally, turn off, and then turn on the power of ACCESS Master. Note To use the USB Video Output function, you need to install MX900021A on your PC. Refer to “MX900021A Remote Screen Software Operation Manual” for details. When USB Video Output is set to On, access from the PC to the internal memory of ACCESS Master is not possible. Power-saving Setting There are three power-saving settings for the MT9083 Series, Auto Backlight Off, Auto Power Off, and Instrument Power–Save Mode, all of which are accessed via the General screen. Auto Backlight Off The Auto Backlight Off setting turns off the LCD screen backlight when a set period of time passes without any key presses. When the time period elapses and the backlight goes out, pressing any key on the unit will restore the backlight. To set a time period for the Auto Backlight Off: MT9083 Series ACCESS Master Operation Manual 3-11 Chapter 3: General Operation/System Setups 1. Highlight Auto Backlight Off on the General screen and then press the Enter key. 2. The Auto Backlight Off dialog appears. Depending on the current setting, the dialog will either state “None”, indicating that the Auto Backlight Off setting is set to None, or the dialog will display the number of minutes for the current Auto Backlight Off setting. 3. If the Auto Backlight dialog displays “None”, press the Up or Down Arrow key to change it to the minutes setting mode. 4. Use the Up and Down Arrow keys (or the Rotary knob or the Numeric keypad) to set the desired time period (from 1 to 99 minutes). 5. Press the Enter key. The Auto Backlight Off setting is now set to the desired interval and the display backlight will turn off if no keys are pressed before the time interval ends. Use the following procedure to set Auto Backlight Off to “None” when it is currently set for a time interval. To set Auto Backlight Off to None: 1. Highlight Auto Backlight Off on the General screen and then press the Enter key. 2. The Auto Backlight Off dialog appears, displaying the currently set time interval. 3. Press None (f1), the dialog changes to “None”. 4. Press the Enter key. The Auto Backlight Off setting is now set to “None”. Auto Power Off The Auto Power Off setting shuts down the MT9083 Series when the unit is inactive for a set period of time. Note Auto Power Off does not function in Optical Power Meter mode or Light Source mode. To set a time period for the Auto Power Off: 1. Highlight Auto Power Off on the General screen and then press the Enter key. 2. The Auto Power Off dialog appears. Depending on the current setting, the dialog will either state “None”, indicating that the Auto Power Off 3-12 MT9083 Series ACCESS Master Operation Manual Chapter 3: General Operation/System Setups setting is set to None, or the dialog will display the number of minutes for the current Auto Power Off setting. 3. If the Auto Power Off dialog displays “None”, press the Up or Down Arrow key to change it to the minutes setting mode. 4. Use the Up and Down Arrow keys (or the Rotary knob or the Numeric keypad) to set the desired time period (from 1 to 99 minutes). 5. Press the Enter key. The Auto Power Off setting is now set to the desired interval and the MT9083 Series will automatically turn off if it is inactive for the set time interval. Use the following procedure to set Auto Power Off to “None” when it is currently set for a time interval. To set Auto Power Off to None: 1. Highlight Auto Power Off on the General screen and then press the Enter key. 2. The Auto Power Off dialog appears, displaying the currently set time interval. 3. Press None (f1), the dialog changes to “None”. 4. Press the Enter key. The Auto Power Off setting is now set to “None”. Note In the following cases, the Auto Backlight Off function is disabled, and the timer of the Auto Power Off function is restarted at the end of the current operation: • • • • • • • • An OTDR test is in progress. A Real Time measurement is in progress. Optical power level measurement is in progress. Fiber identification light source is on. The Visual Fault Locator is on or flashing. File access (save, read, copy, delete, etc.) is in progress. The firmware is being updated. Currently connected to a personal computer. MT9083 Series ACCESS Master Operation Manual 3-13 Chapter 3: General Operation/System Setups Instrument Power–Save Mode When an OTDR measurement is completed and a successive measurement is not performed within a set period of time, the MT9083 Series enters a standby status when an Instrument Power–Save mode is active. Note The Instrument Power–Save mode setting only applies to OTDR test modes. All other test applications and screens (such as the Top Menu screen), when not currently in use, are already in standby status to save power regardless of this setting. To set the Instrument Power–Save mode: 1. Highlight Instrument Power–Save mode on the General screen and then press the Enter key. 2. The Instrument Power–Save mode dialog appears. Use the Up and Down Arrow keys (or the Rotary knob) to highlight one of the following settings: High: (recommended) Activates the standby mode when successive OTDR measurements are not performed within approximately 10 seconds after the current measurement has completed. Low: Activates the standby mode when successive OTDR measurements are not performed within approximately 180 seconds after the current measurement has completed. Off: Does not activate the standby mode after the completion of an OTDR measurement. 3. Press the Enter key. The Instrument Power–Save mode is now set to the desired setting. When starting an OTDR test with the Instrument Power–Save mode active, there is a delay of about one second while the MT9083 Series comes out of standby mode. 3-14 MT9083 Series ACCESS Master Operation Manual Chapter 3: General Operation/System Setups Password Settings Use the Password Settings screen to set the following items: • • • General Setting: - Password Protect Administrator Setting: - Password User Setting: - Password - Password Lifespan Models in the MT9083 Series can be set to allow use only at specific user authorization levels (i.e., set to block access at the Administrator level). There are two authorization levels; Administrator and User. Rights assigned to each authorization level are different. Table 3-1: Command-by-command access restrictions Administrator Change the Password Protection setting Change the Administrator Password Change the User Password Change the Password Lifespan Password expiration date Record logs automatically View the log Update the firmware Change the Date Change the Local Time Perform a Restore Default Measure OTDR / Power Meter / OLTS / IP Use remote GUI Configure to accept SCPI commands *1: User *1 *2 *1 *2 With Password Protect ON. MT9083 Series ACCESS Master Operation Manual 3-15 Chapter 3: General Operation/System Setups *2: The unit cannot accept SCPI commands unless you log in. To access the Password Settings screen: 1. Press the Setup key on the Top Menu screen if you are not currently in Setup. 2. Press Password Settings (f2) to display the Password Settings screen. Figure 3-5: Password Settings screen 3. Use the Up and Down keys (or the rotary knob) to highlight the desired item. OR – Press the ESC key to close the Password Settings screen. 3-16 MT9083 Series ACCESS Master Operation Manual Chapter 3: General Operation/System Setups Password Protect If Password Protect is set to On, the Login screen will appear at startup. Additionally, when Password Protect is set to On, all user access will be recorded to a log file. Access log entries are recorded at the following times: ! Power on (Login) Start OTDR measurement Power off CAUTION Do not forget your Administrator Password. If you forget the password, you will be unable to use the unit. To set Password Protect: 1. Use the Up and Down keys (or the rotary knob) to highlight Password Protect. 2. Press the Enter key to display the Password Protect dialog box. Figure 3-6: Password Protect dialog box 3. Use the Up and Down keys (or the rotary knob) to highlight the desired selection (On or Off ). MT9083 Series ACCESS Master Operation Manual 3-17 Chapter 3: General Operation/System Setups Setting the Administrator Password A valid Administrator Password contains 8 to 16 alphanumeric characters and symbols. If you execute the Restore Default, the default Administrator password will be restored. The default password for the current version is "MT9083ANRITSU". This password is used to login in as an Administrator. ! CAUTION Do not forget your Administrator Password. If you forget this password, you will be unable to use the unit. To set the Password: 1. Use the Up and Down keys (or the rotary knob) to highlight Password. 2. Press the Enter key to display the Administrator Password dialog box. Figure 3-7: Administrator Password dialog box If no USB keyboard is connected, start from Step 3 to use the front panel keys. If a USB keyboard is connected, you can modify the name directly from the keyboard. Once you have entered all desired characters, press OK (f6) 3-18 MT9083 Series ACCESS Master Operation Manual Chapter 3: General Operation/System Setups to activate and use the new Administrator Password or press the ESC key to close the dialog box without changing the password. 3. Use Backspace (f5) or the BS key (Backspace key) to clear the entry in the Administrator Password field (located above the character matrix). Pressing the Backspace (f5) or BS key once will delete a single character to the left of the text cursor (vertical line) and move the cursor one space to the left. Continue backspacing until you have deleted the entire password or the desired portion of the password. To select and delete specific characters of the password, use the Left and Right keys to position the text cursor to the right of the character to delete, then press Backspace (f5) or the BS key. 4. Use the Up and Down keys to move the highlighted selection from row to row, including the Administrator Password field. Use the Left and Right keys to move the highlighted selection within the selected row or to move the text cursor in the Administrator Password field if the field is highlighted. Or – Use the rotary knob to navigate through each character in the character matrix or to highlight the Administrator Password field. 5. Use the f1 – f3 softkeys for the following actions: • Small Letter (f1) to switch the character matrix to lower case letters. • Capital Letter (f2) to switch the character matrix to upper case letters. • Symbols (f3) to switch the character matrix to display symbols. 6. With the text cursor positioned at the desired location, press the Enter key to enter the character selected (highlighted) from the character matrix into the password. Use the numeric keypad to enter numbers into a password. 7. Press OK (f6) after making all desired entries. 8. Enter the password again to confirm it. MT9083 Series ACCESS Master Operation Manual 3-19 Chapter 3: General Operation/System Setups 9. Press OK (f6), and you can now use the new Administrator Password. To cancel, press the ESC key. Figure 3-8: Input same Password for the confirmation dialog box 3-20 MT9083 Series ACCESS Master Operation Manual Chapter 3: General Operation/System Setups Setting the User Password A valid User Password contains up to 16 alphanumeric characters and symbols. If you execute the Restore Default, the password field becomes blank. This is the password used to login in as a User. To set the Password: 1. Use the Up and Down keys (or the rotary knob) to highlight Password. Note Password can be highlighted only when Protection with password is set to On. 2. Press the Enter key to display the User Password dialog box. Figure 3-9: User Password dialog box 3. Press OK (f6) after making all desired entries or press ESC key to cancel. 4. Enter the password again to confirm it. 5. Press OK (f6), and you can now user the new User Password. Note Unless you are the User, you must enter the Administrator Password to change a User Password. MT9083 Series ACCESS Master Operation Manual 3-21 Chapter 3: General Operation/System Setups Password Lifespan Set the Password Lifespan for the user password. You can set a value from 1 day to 200 days or set the password not to expire. Note The unit will shut down automatically if running at the time the Duration of use (Password Lifespan) expires. Regardless of when you set the Password Lifespan, the day count is updated at 0:00 of each day. To set the Password Lifespan: 1. Use the Up and Down keys (or the rotary knob) to highlight Password Lifespan. 2. Press the Enter key to display the Password Lifespan dialog box. Figure 3-10: Password Lifespan dialog box 3. Depending on the current setting, the dialog will indicate “Unlimited” (indicating no Password Lifespan is set) or the number of days currently set for Password Lifespan. 4. Press the Up and Down keys to switch the Password Lifespan dialog box from “Unlimited” to a mode allowing you to set the number of days. 3-22 MT9083 Series ACCESS Master Operation Manual Chapter 3: General Operation/System Setups 5. Use the Up and Down keys (or use the rotary knob or numeric keypad) to set a desired lifespan from 1 to 200 days. 6. Press the Enter key. The Expiration Date indicates the expiration date calculated based on the current time. To set the Password Lifespan to Unlimited: 1. Use the Up and Down keys (or the rotary knob) to highlight Password Lifespan. 2. Press the Enter key to display the Password Lifespan dialog box. Figure 3-11: Password Lifespan dialog box 3. Press Unlimited (f1) to switch the dialog box to “Unlimited”. 4. Press the Enter key to display “Unlimited” in Expiration Date. MT9083 Series ACCESS Master Operation Manual 3-23 Chapter 3: General Operation/System Setups To reset the expiration date: 1. Use the Up and Down keys (or the rotary knob) to highlight Password Lifespan. 2. Press the Enter key to display the Password Lifespan dialog box. 3. Press Reset Expiration Date (f2) to reset the expiration date. The new expiration date is displayed at Expiration Date. 3-24 MT9083 Series ACCESS Master Operation Manual Chapter 3: General Operation/System Setups Viewing the access log file An access log file is created automatically if Password Protect is On. The log format is as follows: Figure 3-12: Access log entry formats Note The system capacity is 1,000 log entries. Once this limit is reached, newer entries will overwrite entries, starting with the oldest. To access the access log file: 1. 2. 3. 4. 5. 6. 7. 8. 9. Login with the Administrator Password. Press the File key on the Top Menu screen to display the Load screen. Set Internal Memory to Medium. Use the Up and Down keys (or the rotary knob) to highlight the file named “MT9083_Access_Log.txt”. Press More (f6), then press Copy (f1). Connect the USB memory stick to the unit. Set USB Memory to Medium. Use the Up and Down keys (or the rotary knob) to select (highlight) the copy destination folder. Press Paste (f2). MT9083 Series ACCESS Master Operation Manual 3-25 Chapter 3: General Operation/System Setups About Screen The About screen displays the following information pertaining to the MT9083 Series currently being used: • System Information – - Manufacturer - Model - Serial Number - Hardware Version - Software Version - UNITROM Version To access the About screen: 1. Press the Setup key, if you are not currently in setups. 2. Press About (f6), the About screen appears (see Figure 3-13 on page 3-26). 3. Press the Enter key to update the firmware (see “Updating Firmware” on page 3-27 for details). OR – Press the ESC key to close the About screen. Figure 3-13: About Screen 3-26 MT9083 Series ACCESS Master Operation Manual Chapter 3: General Operation/System Setups Updating Firmware ! CAUTION Always use the AC Charge/Adapter to power the MT9083 Series when performing a firmware update. Use the following procedure to update the MT9083 Series firmware. Loading Firmware Data Using USB Cable: 1. 2. 3. 4. Connect the MT9083 Series to a USB port on the PC via the provided USB cable. A mass storage window should open; if not, open it via Windows Explorer. Select the firmware file (.APM) and copy it to the MT9083 Series’ Internal Memory. Disconnect the USB cable. Using USB Memory Stick: 1. Copy the firmware file (.APM) to the USB Memory Stick connected to the PC. 2. Remove the USB Memory Stick from the PC, as advised, and insert the stick to the MT9083 Series. Updating Firmware Data 1. Press the Setup key on the MT9083 Series. 2. Press About (f6). The About screen appears. 3. Press the Enter key, the Update Firmware dialog appears. 4. Locate the .APM file in the Internal Memory and press the Enter key. Information about the .APM file is displayed. 5. Press f1 to begin the update. 6. Wait for the update to complete. Do not power-off the MT9083 Series. The unit will restart automatically when the update is complete. MT9083 Series ACCESS Master Operation Manual 3-27 Chapter 3: General Operation/System Setups Restore Defaults The Restore Defaults button on the About tab restores factory defaults for all OTDR applications for the following setup screens: Preferences, Thresholds, and AutoSave. Note • General setups are not affected by the Restore Defaults function. • Password Settings are restored factory defaults if you execute the Restore Defaults. • The access log file is deleted if you execute the Restore Defaults. To restore the default settings for the OTDR test applications: 1. Press the Setup key. 2. Press About (f6). 3. Highlight Restore Defaults and then press the Enter key. The following message appears: Are you sure you want to apply factory defaults? 4. Press Yes (f1) to restore the factory defaults. OR – Press No (f2) to cancel the restore. 5. Press the ESC key to exit setups. Formatting Internal Memory The Format Internal Memory button on the About tab formats Internal Memory. To format Internal Memory: 1. Press the Setup key. 2. Press About (f6). 3. Highlight Format Internal Memory and then press the Enter key. The following message appears: All user data files in the internal memory will be lost. Are you sure you want to format internal memory? 3-28 MT9083 Series ACCESS Master Operation Manual Chapter 3: General Operation/System Setups 4. Press Yes (f1) to format the Internal Memory. OR – Press No (f2) to cancel the format. The following progress message appears. Figure 3-14: About Screen 5. Wait for the format to complete. Do not power-off the MT9083 Series. 6. Press the ESC key to exit setups. Erase Internal Memory The Erase Internal Memory button on the About tab erases Internal Memory. ! CAUTION Always use the AC adapter/charger to power the MT9083 Series when performing an internal memory format. As it takes about 30 minutes to finish formatting the 1 GB of internal memory, aborted formatting caused by battery failure may damage the internal memory; use the AC adapter/charger for power supply. MT9083 Series ACCESS Master Operation Manual 3-29 Chapter 3: General Operation/System Setups To erase Internal Memory: 1. Press the Setup key. 2. Press About (f6). 3. Highlight Erase Internal Memory and then press the Enter key. The following message appears: All user data files in the internal memory will be lost. Are you sure you want to format internal memory? 4. Press Yes (f1) to erase the Internal Memory. OR – Press No (f2) to cancel the erase. The following progress message appears. Figure 3-15: About Screen 5. Wait for the erase to complete. Do not power-off the MT9083 Series. 6. Press the ESC key to exit setups. 3-30 MT9083 Series ACCESS Master Operation Manual Chapter 3: General Operation/System Setups Saving a Screen Image to a File You can save the image on test result screens and most setup screens as PNG files. To save a Screen Image to a file: Print 1. With the desired screen displayed, press the Print key message appears: 7 , the following Output screen image to a printer or as an image file. Please select output type using the function keys. 2. Press File (f2). The Save screenshot screen appears (see Figure 3-16). Figure 3-16: Save Screenshot Screen 3. Select the image file type. Each time File (f2) is pressed, the file extension changes from .png, .bmp, and .jpg. 4. With the File Name highlighted, press the Enter key to rename the file, if desired. See “Renaming a File” on page 3-32 for details. 5. Select the desired Medium to save the file to by highlighting the Medium field and toggling the Enter key to choose from Internal Memory or USB Memory. MT9083 Series ACCESS Master Operation Manual 3-31 Chapter 3: General Operation/System Setups Note The USB Memory selection is only available when a USB memory stick is connected to the MT9083 Series. 6. Press New Folder (f4) if you desire to setup a new folder in which to save the image file. See “New Folder” on page 3-40 for details. 7. Press Save Image (f1) to save the image file, or press ESC to cancel the file save. Renaming a File Use the following procedure to enter a new filename. Test Data files can be renamed from the Save screen, while screen captures can be renamed from the Save screenshot screen. To rename a file: 1. With the desired results displayed on the screen, press either the Save key (when saving test data) or the Print key (when saving a screen capture). 2. When the Save screen (for saving test data) or the Save screenshot screen appears, press the Enter key. The FileName dialog box appears (see Figure 3-17, below). If no USB keyboard is connected, follow the instructions from step 3. to enter the name using the front panel keys. If a USB keyboard is connected, you can modify the name directly from the keyboard. When all of the desired characters are entered, press the Enter key to use the new file name or press the ESC key to close the File Name dialog box without changing the file name. 3-32 MT9083 Series ACCESS Master Operation Manual Chapter 3: General Operation/System Setups Figure 3-17: File Name dialog box 3. Use the Up and Down Arrow keys (or Rotary knob) to select File Name field on the Save Screenshot Screen (Figure 3-16). Press the Enter key to display the File Name dialog box. Above the buttons, the names of the button groups are displayed. 4. Use the Left, Right, Up and Down Arrow keys (or Rotary knob) to invert the button and press the Enter key. The word on the button will be displayed in the File Name field (white letters in the above figure). 5. The buttons are displayed up to 4 columns. When there are 5 or more columns, Next Page (f3) is displayed. Press Next Page (f3) to flip the pages. The words on the button will be displayed in the File Name field (white letters in the above figure). Up to 30 characters can be input. Press Edit List (f5) to edit shortcut characters that are displayed. Note The number of characters input by pressing the button of the MACRO column and that of the actual file name are different. The actual number MT9083 Series ACCESS Master Operation Manual 3-33 Chapter 3: General Operation/System Setups of characters is displayed above the File Name field. The file name without extension should be up to 30 characters. 6. Press All Clear (f4) to clear all the characters in the File Name field. 7. Use the BS key (Backspace key) to clear the entry in the File Name field (located above the character matrix). Each press of or the BS key, moves the text cursor (vertical line) one character space to the left, while deleting the character in that space. Continue backspacing until you have deleted all or as much of the file name as desired. 8. You can delete specific characters in a file name by using the Left and Right Arrow keys to position the text cursor behind the character to delete and then pressing the BS key.When all of the desired characters are entered, press OK (f6) to use the new file name or press ESC to close the File Name dialog box without changing the file name. Edit shortcut characters as described below. 1. Press Edit List (f5) to display the Edit List screen on the Figure 3-17: File Name dialog box. Figure 3-18: Edit List screen 2. The following operations are allowed on the Edit List screen. 3-34 MT9083 Series ACCESS Master Operation Manual Chapter 3: General Operation/System Setups - Changing order of groups/items in the list Changing a group/item name Adding a new group/item Copying a group/item Deleting a group/item Changing a group type 3. To change the order of groups/items in the list, use the Left and Right Arrow keys to select the group name filed or selections field. Use the Up and Down Arrow keys (or Rotary knob) to select an item to change the order in the list. Then press Up (F3) or Down (F4) to move the selected item up or down. 4. To change a name, use the Left and Right Arrow keys to select the group name filed or selections field. Then use the Up and Down Arrow keys (or Rotary knob) to select an item to change name. Press Rename (f3),the Enter key or Rotary knob. Edit the name on the character input screen, and press OK (f6). 5. To add a new group or item, use the Left and Right Arrow keys to select the group name filed or selections field. Press Add (f1) to display the character input screen. Input a name to add and press OK (f6). 6. To copy a group or item, use the Left and Right Arrow keys to select the group name filed or selections field. Then use the Up and Down Arrow keys (or Rotary knob) to select an item to copy and press Duplicate (f4). The selected item is added at the bottom of the list. 7. To delete a group or item, use the Left and Right Arrow keys to select the group name filed or selections field. Then use the Up and Down Arrow keys (or Rotary knob) to select an item to delete and press Delete (f2). The item is deleted from the list. 8. To change a group type, use the Left and Right Arrow keys to select the group name filed. Then use the Up and Down Arrow keys (or Rotary knob) to select an item to change the group type and press Change Group Type (f5). OTDR, VIP, and blank appears in turns every time f5 is pressed. To display only in OTDR or VIP, select the type. Set to blank to use in common. 9. To use the edited list for other Access Master, use the Left and Right Arrow keys to select the Internal Memory or USB Memory, and press the Enter key or Rotary knob. 10. Press OK (f6) when all the editing has finished. MT9083 Series ACCESS Master Operation Manual 3-35 Chapter 3: General Operation/System Setups There are MACRO buttons as below. Table 3-2: MACRO Buttons Name Character string to insert Number 4 digit-serial number starting from the number in the Number field on the right bottom yy-mm-dd Digits to represent Year-Month-Day hh-mm-ss Digits to represent Hour-Minute-Second 1. Use the Up and Down Arrow keys (or Rotary knob) to select the Number field on the Figure 3-17: File Name dialog box. Press the Enter key to display the Number dialog box. 2. Use the Up and Down Arrow keys (or Rotary knob) to change the number. Or – Use the Numeric keypad to enter numbers. 3-36 MT9083 Series ACCESS Master Operation Manual Chapter 3: General Operation/System Setups 3. Press Enter key to use the new number or press ESC to close the Number dialog box without changing the number. Figure 3-19: Number dialog box Perform the following steps to input arbitrary characters. MT9083 Series ACCESS Master Operation Manual 3-37 Chapter 3: General Operation/System Setups 1. Press the Keyboard (f1) or Enter key in the File Name field to display Text Entry dialog box. Figure 3-20: Text Entry dialog box 2. Use the Up and Down Arrow keys to scroll the highlight from row to row, including the File Name field. Use the Right and Left Arrow keys to move the highlight within the selected row or, to move the text cursor in the base File Name field when the field is highlighted. Or – Use the Rotary knob to navigate through each character in the character matrix as well as wrapping the highlight to the File Name field. 3. Use the f1 – f4 softkeys for the following: • Press Small Letter (f1) to change the character matrix to lower case letters. • Press Capital Letter (f2) to change the character matrix to upper case letters. • Press Symbols (f3) to change the character matrix to display the symbols available. • Press Space (f4) to insert a blank space in the file name. 3-38 MT9083 Series ACCESS Master Operation Manual Chapter 3: General Operation/System Setups 4. With the desired character highlighted in the character matrix and the text cursor placed in the desired position, press the Enter key to enter the selected character in the file name. Use the Numeric keypad to enter numbers in the file name. 5. When all of the desired characters are entered, press OK (f6) to use the new file name or press ESC to close the Text Entry dialog box without changing the file name Registration of Word Buttons. The buttons can be added to display in the File Name dialog box. 1. Edit the button name and group name in text file and save in the USB memory stick. 2. Connect the USB memory stick to ACCESS Master. 3. Press Load (f2) to display the file selection screen. Select the created test file and press the Enter key. Text file contents Text file contents [Tohoku] Mode=OTDR Aomori Iwate Akita Miyagi Yamagata Fukushima Buttons Figure 3-21: File Format for Word Button Registration • Put the group name in brackets. The group name can be written in two lines and “$$” is used as new line character. Example: [Tohoku$$Japan] Note When language is set to “Chinese-Simplified”, “$” is displayed as “¥”. MT9083 Series ACCESS Master Operation Manual 3-39 Chapter 3: General Operation/System Setups • Specify Mode to select application to display buttons. OTDR or VIP can be set for Mode. Then write the characters to display on the buttons. Up to 10 mixed characters of alphabets, numbers, and symbols can be registered for button display. However, the characters below are not usable for a file name. “?”, ”/”, ”<“, ”>”, ”:”, ”;”, ”|”,”, ”*” Up to 20 groups up to 25 words each can be registered. Characters of different languages can be displayed for group names. However, if the language is changed, the characters are not displayed properly. The extension of text file should be “txt” or “ini”. • • • • Clearing Word Buttons To clear all the buttons registered, execute “Restore Defaults”. The File Name dialog box will be initialized. New Folder Use the following procedure to set-up a new folder when saving a file. 1. With the desired results displayed on the screen, press either the Save key (when saving test data) or the Print key (when saving a screen capture). 2. Select the desired medium in which the new folder will be located by highlighting the Medium field and toggling the Enter key to choose from Internal Memory or USB Memory. Note The USB Memory selection is only available when a USB memory stick is connected to the MT9083 Series. 3. Press New Folder (f4), the New Folder screen appears. If no USB keyboard is connected, follow the instructions from step 4. to enter the name using the front panel keys. If a USB keyboard is connected, you can modify the name directly from the keyboard. When all of the desired characters are entered, press the 3-40 MT9083 Series ACCESS Master Operation Manual Chapter 3: General Operation/System Setups Enter key to save the new folder to the selected medium or press the ESC key to cancel the New Folder process. Figure 3-22: New Folder Screen 4. Use the Up and Down Arrow keys to scroll the highlight from row to row, including the New Folder name field. Use the Right and Left Arrow keys to move the highlight within the selected row or, to move the text cursor in the New Folder name field when the field is highlighted. Or – Use the Rotary knob to navigate through each character in the character matrix as well as wrapping the highlight to the New Folder name field. 5. Use the f1 – f4 softkeys for the following: • Press Small Letter (f1) to change the character matrix to lower case letters. • Press Capital Letter (f2) to change the character matrix to upper case letters. • Press Symbols (f3) to change the character matrix to display the symbols available. • Press Space (f4) to insert a blank space in the file name. MT9083 Series ACCESS Master Operation Manual 3-41 Chapter 3: General Operation/System Setups 6. With the desired character highlighted in the character matrix and the text cursor placed in the desired position, press the Enter key to enter the selected character in the New Folder name field. Use the Numeric keypad to enter numbers in New Folder name field. 7. When all of the desired characters are entered, press OK (f6) save the new folder to the selected medium or press ESC to cancel the New Folder process. 3-42 MT9083 Series ACCESS Master Operation Manual Chapter 4: OTDR (Standard) Mode Chapter 4: OTDR (Standard) Mode Overview OTDR (Standard) mode utilizes the advanced capabilities of the MT9083 Series to provide classic OTDR testing. This mode provides an Event Table which can be used to perform auto analysis (auto event detection) of the measured results. Tests can be performed either manually or automatically (via the Auto Test feature). Auto Test provides one-button testing, which automatically selects the range and pulse width, and sets the resolution to high for the current fiber under test, and then displaying the results. Starting OTDR (Standard) Mode To start the OTDR function in Standard mode: 1. Press the Top Menu key. 2. Highlight OTDR (Standard), then press the Enter key. The Trace screen appears by default when you start the OTDR (Standard) application. Figure 4-1: OTDR (Standard) Mode – Initial Screen MT9083 Series ACCESS Master Operation Manual 4-1 Chapter 4: OTDR (Standard) Mode Setups – OTDR (Standard) Mode Press the Setup key to display the setup information for OTDR (Standard) mode (See “Starting OTDR (Standard) Mode” on page 4-1 for details). This section allows you to customize the preferences and parameters for a given data collection or series of collections. Entering OTDR (Standard) Setups 1. Start OTDR (Standard) mode. The Trace screen appears (see Figure 4-1 on page 4-1). 2. Press the Setup key. The following Setup screens are available: • General (f1) • Preferences (1-2) (f2) • Preferences (2-2) (f3) • Thresholds (f4) • AutoSave (f5) Press the softkey (f1 – f5) that corresponds to the desired settings category. General Setups Press General (f1) to access the General setups screen, if not already displayed. The General setups pertain to general settings for the MT9083 Series and are detailed in “General Screen Settings” on pages 3-7 – 3-15. 4-2 MT9083 Series ACCESS Master Operation Manual Chapter 4: OTDR (Standard) Mode Figure 4-2: General Setups Screen – OTDR (Standard) Mode Preferences (1-2) Press Preferences (1-2) (f2) to access the Preferences (1-2) screen and set the status for the following: • • • • • • • • • • • • Distance display Units Connection Check Active Fiber Check Auto Analysis Auto Scale Event Summary Reflectance Calculation ORL Calculation Trace Overview Real Time Averages Real Time Attenuation Display Mode After Analysis MT9083 Series ACCESS Master Operation Manual 4-3 Chapter 4: OTDR (Standard) Mode Figure 4-3: Preferences (1-2) Screen Distance Display Units Select the unit of measurement used to display distance on the horizontal axis of the Trace graph. This affects Range and Resolution readings and analysis events incorporating distance. To set the Distance Display units: 1. Use the Up and Down Arrow keys (or the Rotary knob) to highlight Distance display Units. 2. Press Enter and select the desired unit from the Distance display Units menu. 3. Press Enter again. The menu closes and the selected unit is set. Connection Check The Connection Check function confirms whether or not the fiber is connected correctly to the OTDR measurement port. To set the Connection Check: 1. Use the Up and Down Arrow keys (or the Rotary knob) to highlight Connection Check. 2. Press Enter and then select either On or Off from the dialog. 4-4 MT9083 Series ACCESS Master Operation Manual Chapter 4: OTDR (Standard) Mode 3. Press Enter again. The dialog closes and the selection is set. Active Fiber Check The Active Fiber Check performs a “live fiber” check on the currently attached fiber under test to detect whether the fiber is carrying traffic before firing any OTDR laser sources. • • If no traffic is detected the test proceeds normally. If traffic is detected a warning message appears on the screen and the test is aborted. To set the Active Fiber Check 1. Use the Up and Down Arrow keys (or the Rotary knob) to highlight Active Fiber Check. 2. Press Enter and then select either On or Off from the dialog. 3. Press Enter again. The dialog closes and the selection is set. Note The Active Fiber Check feature does not apply for the following options – Opt 063 (0.85/1.3 µm MMF only). Auto Analysis When set to “On”, OTDR trace analysis is automatically performed at the completion of data collection for the current fiber under test. To set Auto Analysis: 1. Use the Up and Down Arrow keys (or the Rotary knob) to highlight Auto Analysis. 2. Press Enter and select either On or Off from the dialog. 3. Press Enter again. The menu closes and the selection is set. Note Auto Analysis is not available in Real-Time test mode. MT9083 Series ACCESS Master Operation Manual 4-5 Chapter 4: OTDR (Standard) Mode Auto Scale When set to “On”, Auto Scale provides a trace display that utilizes the maximum amount of horizontal scale for optimum trace viewing. To activate Auto Scale: 1. Use the Up and Down Arrow keys (or the Rotary knob) to highlight Auto Scale. 2. Press Enter and select either On or Off from the dialog. 3. Press Enter again. The menu closes and the selection is set. Event Summary When the Event Summary selection is set to “On” the Fiber Test Parameters area (see item 5 in Figure 4-10 on page 4-30) of the Trace screen is replaced by the Event Summary area, listing the Total Events, Fiber Length, and Total Loss of the current fiber under test. To set the Event Summary status: 1. Use the Up and Down Arrow keys (or the Rotary knob) to highlight Event Summary. 2. Press Enter and select either On or Off from the dialog. 3. Press Enter again. The menu closes and the selection is set. Reflectance Calculation Reflectance is the ratio of reflected power to incident power displayed in dB (see “Reflectance Measurements” on page 7-17 for details). The MT9083 Series has three settings for Reflectance Calculations: Off, Auto, and Manual. 4-6 • Off – Reflectance will not be calculated. • Auto – The reflectance of any event is reported based on the position of cursor A. The Auto setting is most useful for reflective events that are not close together or close-in to the OTDR. • Manual – MT9083 Series ACCESS Master Operation Manual Chapter 4: OTDR (Standard) Mode When set to Manual, the reported reflectance is based on the positions of both cursors (A and B). The Manual setting is most useful for reflective events that are close together or close-in to the OTDR. To set the Reflectance Calculation type: 1. Use the Up and Down Arrow keys (or the Rotary knob) to highlight Reflectance Calculation. 2. Press Enter. The Reflectance Calculation dialog appears. 3. Highlight the desired Reflectance Calculation setting: Off, Auto, or Manual. 4. Press Enter. The dialog closes and the selected setting is displayed in the Reflectance Calculation field. ORL Calculation Set the starting point for ORL (Optical Return Loss) measurements (see “ORL (Optical Return Loss)” on page 7-15 for details). Select from the following: • • • A Cursor – The ORL measurement is calculated from the A cursor to the B cursor, but the Incident Power is attained from the A cursor position. Origin – The ORL measurement is calculated from the A cursor to the B cursor, but the Incident Power is attained from the origin (e.g.: 0 km, or Bulkhead connector). Full Trace – The ORL measurement is calculated from the Origin to the last data point, and the Incident Power is attained from the origin (e.g.: 0 km, or Bulkhead connector). To set the ORL Calculation type: 1. Use the Up and Down Arrow keys (or the Rotary knob) to highlight ORL Calculation. 2. Press Enter. The ORL Calculation dialog appears. 3. Highlight the desired ORL Calculation setting: A Cursor, Origin, or Full Trace. 4. Press Enter. The dialog closes and the selected setting is displayed in the ORL Calculation field. Trace Overview When set to “On”, a small overview of the trace is displayed in the lower left portion of the Trace graph. MT9083 Series ACCESS Master Operation Manual 4-7 Chapter 4: OTDR (Standard) Mode To activate the Trace Overview: 1. Use the Up and Down Arrow keys (or the Rotary knob) to highlight Trace Overview. 2. Press Enter and select either On or Off from the dialog. 3. Press Enter again. The menu closes and the selection is set. Real Time Averages Use the Real Time Averages setting to set the amount of averages used in a real-time scan. To set the Real Time Averages: 1. Use the Up and Down Arrow keys (or the Rotary knob) to highlight Real Time Averages. 2. Press Enter. The Real Time Averages dialog appears. 3. Highlight the desired setting: - Low – provides fast real-time updates with a lower dynamic range. - High – provides slower real-time updates with a higher dynamic range. 4. Press Enter. The dialog closes and the selected setting is displayed in the Real Time Averages field. Real Time Attenuation Select the attenuation method used during real-time scans. To set the Real Time Attenuation: 1. Use the Up and Down Arrow keys (or the Rotary knob) to highlight Real Time Attenuation. 2. Press Enter. The Real Time Attenuation dialog appears. 3. Highlight the desired setting: - Auto Attenuation – Real Time attenuation is automatically selected. - Around selected cursor – Attenuation is optimized in real-time to show the backscatter around the selected (active) cursor. 4. Press Enter. The dialog closes and the selected setting is displayed in the Real Time Attenuation field. 4-8 MT9083 Series ACCESS Master Operation Manual Chapter 4: OTDR (Standard) Mode Display Mode After Analysis The Display Mode After Analysis setting is used to set the post-analysis display mode. To set the Display Mode After Analysis: 1. Use the Up and Down Arrow keys (or the Rotary knob) to highlight Display Mode After Analysis. 2. Press Enter. The Display Mode After Analysis dialog appears. 3. Highlight the desired setting: - End/Break – The display mode focuses on the end/break event. - Full Trace – The full trace is displayed in Display from Origin mode. - Current – The display mode and cursor positions remain unchanged. 4. Press Enter. The dialog closes and the selected setting is displayed in the Display Mode After Analysis field. Preferences (2-2) Press Preferences (2-2) (f3) to access the Preferences (2-2) screen and set the status for the following: • • • • • • • Auto Patch-cord Removal Grid Display Force Total Loss Event Icon Movement End Event for ORL Calculation Span Calculation A-B Span Analysis Note The following settings are used only on the Fiber Visualizer. • • • • Event Icon Movement End Event for ORL Calculation Span Calculation A-B Span Analysis MT9083 Series ACCESS Master Operation Manual 4-9 Chapter 4: OTDR (Standard) Mode Figure 4-4: Preferences (2-2) Screen 4-10 MT9083 Series ACCESS Master Operation Manual Chapter 4: OTDR (Standard) Mode Auto Patch-cord Removal Specify the event number to treat as dummy fiber. The range of settings for this parameter is 1 to 9 in 1 increments. To set the Auto Patch-cord Removal: 1. Use the Up and Down Arrow keys (or the Rotary knob) to highlight Auto Patch-cord Removal. 2. Press Enter. The Auto Patch-cord Removal dialog appears. Depending on the current setting, the dialog will either state “None”, indicating that there is no Auto Patch-cord Removal currently set, or the dialog displays the current setting for the Auto Patch-cord Removal. 3. If the Auto Patch-cord Removal dialog displays “None”, press the Up or Down Arrow key to change it to the event number setting mode. 4. Use the Up and Down Arrow keys (or the Rotary knob) to increment or decrement the desired event number setting. Or enter it directly with the Numeric keypad. 5. Press Enter again to close the dialog and save the current setting. The event tables shows the distance information of dummy fiber. Figure 4-5: Auto Patch Screen MT9083 Series ACCESS Master Operation Manual 4-11 Chapter 4: OTDR (Standard) Mode Use the following procedure to set Auto Patch-cord Removal to “None” when it is currently set in event number. To set the Auto Patch-cord Removal to None: 1. Highlight Auto patch cord and then press the Enter key. The Auto Patch-cord Removal dialog appears, displaying the current event number setting. 2. Press None (f1), the dialog changes to “None”. 3. Press Enter. The dialog closes and the parameter is set to “None” Note The Auto Patch-cord Removal feature works only with patch-cords that are at least 40 m (120 ft) and 40 data points longer than the pulse width. Grid Display Select the format for the grid lines on the trace screen. To set the Grid Display: 1. Use the Up and Down Arrow keys (or the Rotary knob) to highlight Grid Display. 2. Press Enter. The Grid Display dialog appears. 3. Highlight the desired setting: - Dotted - A dotted line grid is used for trace display. - Solid - A solid line grid is used for trace display. 4. Press Enter. The dialog closes and the selected setting is displayed in the Grid Display field. Force Total Loss Select the display settings for Total Loss (Cum.Loss(dB)). To set the Force Total Loss: 1. Use the Up and Down Arrow keys (or the Rotary knob) to highlight Force Total Loss. 2. Press Enter. The Force Total Loss dialog appears. 3. Highlight the desired setting: - ON - Always displays Total Loss (Cum.Loss). - OFF - Depending on conditions, "**.***" is displayed for the Total Loss (Cum.Loss) slot. 4-12 MT9083 Series ACCESS Master Operation Manual Chapter 4: OTDR (Standard) Mode Note Total Loss (Cum.Loss) cannot be displayed when: • An event appeared before backscatter could be found after the launch reflection. • An event exists 1.1 pulse widths after the launch backscatter. • Fiber end cannot be detected. 4. Press Enter. The dialog closes and the selected setting is displayed in the Force Total Loss field. Event Icon Movement Selects the direction of event icon movement when the encoder is turned. This setting function applies only to Fiber Visualizer. To set the Event Icon Movement: 1. Use the Up and Down Arrow keys (or the Rotary knob) to highlight Event Icon Movement. 2. Press Enter. The Event Icon Movement dialog appears. 3. Highlight the desired setting: - Left to Right- If the encoder is turned clockwise, the event icons move from right to left. If it is turned counterclockwise, the event icons move from left to right. - Right to Left- Opposite to Left to Right. 4. Press Enter. The dialog closes and the selected setting is displayed in the Event Icon Movement field. End Event for ORL Calculation Set whether to include reflection in Far-End events or not when calculating the ORL. This setting function applies only to Fiber Visualizer. To set the End Event for ORL Calculation: 1. Use the Up and Down Arrow keys (or the Rotary knob) to highlight End Event for ORL Calculation. 2. Press Enter. The End Event for ORL Calculation dialog appears. 3. Highlight the desired setting: - INCLUDE- Includes the reflection in Far-End events when calculating the ORL. MT9083 Series ACCESS Master Operation Manual 4-13 Chapter 4: OTDR (Standard) Mode - OMIT- Not Includes the reflection in Far-End events when calculating the ORL. 4. Press Enter. The dialog closes and the selected setting is displayed in the End Event for ORL Calculation field. Event Table Span Calculation Selects whether to display the span length or transmission loss (dB/km) on event table. This setting function applies only to Fiber Visualizer. To set the Event Table Span Calculation: 1. Use the Up and Down Arrow keys (or the Rotary knob) to highlight SPAN Calculation. 2. Press Enter. The Event Table Span Calculation dialog appears. 3. Highlight the desired setting: - Span Length- Display the span length between each event calculation on event table. - dB/km- Display the transmission loss (dB/km) between each event calculation on event table. 4. Press Enter. The dialog closes and the selected setting is displayed in the Event Table Span Calculation field. A-B Span Analysis Sets whether to specify the PASS/FAIL analysis span by Marker A and B. This setting function applies only to Fiber Visualizer. To set the A-B Span Analysis: 1. Use the Up and Down Arrow keys (or the Rotary knob) to highlight AB Span analysis. 2. Press Enter. The A-B Span Analysis dialog appears. 3. Highlight the desired setting: - Off- Gives PASS/FAIL judgment on all events. - On- Gives PASS/FAIL judgement only on the events within the span specified by Marker A and B. However, the last event specified by the marker is excluded from analysis. (If Marker A specifies the first event, the last event specified by Marker B is excluded from analysis, and vice versa.) 4-14 MT9083 Series ACCESS Master Operation Manual Chapter 4: OTDR (Standard) Mode 4. Press Enter. The dialog closes and the selected setting is displayed in the A-B Span Analysis field. Thresholds Press Thresholds (f4) to access the Thresholds screen. This screen provides access to the various Auto Detect and Pass/Fail Thresholds setting. Figure 4-6: Thresholds Screen Auto Detect Parameters Events that exceed the Auto Detect parameter settings are reported in the Event Analysis table. • The Auto Detect parameters include: - Splice Loss - Reflectance - Fiber End - Macro Bend - Splitter Loss MT9083 Series ACCESS Master Operation Manual 4-15 Chapter 4: OTDR (Standard) Mode Splice Loss Determines the Splice Loss value equal to or above which will be reported in the Events analysis. The range of settings for this parameter is 0.01 dB to 9.99 dB in 0.01 dB increments. To set the Splice Loss threshold: 1. Use the Up and Down Arrow keys (or the Rotary knob) to highlight Splice Loss. 2. Press Enter. The Splice Loss dialog appears. 3. Use the Up and Down Arrow keys (or the Rotary knob) to increment/decrement the splice loss threshold setting. Or enter it directly with the Numeric keypad. 4. Press Enter again. The dialog closes and the new Splice Loss threshold is set. Reflectance Determines the lowest Reflectance value that will be reported by analysis. Any event with a reflectance equal to or greater than the value in this parameter will be reported in Event analysis. The range of settings for this parameter is -70.0 dB to -20.0 dB in 0.1 dB increments. To set the Reflectance threshold: 1. Use the Up and Down Arrow keys (or the Rotary knob) to highlight Reflectance. 2. Press Enter. The Reflectance dialog appears. 3. Use the Up and Down Arrow keys (or the Rotary knob) to increment/decrement the reflectance threshold setting. Or enter it directly with the Numeric keypad. 4. Press Enter again. The dialog closes and the new Reflectance threshold is set. Fiber End Determines the Fiber End value equal to or above which will be reported in the Events analysis. The range of settings for this parameter is 1 dB to 99 dB in 1 dB increments. 4-16 MT9083 Series ACCESS Master Operation Manual Chapter 4: OTDR (Standard) Mode To set the Fiber End threshold: 1. Use the Up and Down Arrow keys (or the Rotary knob) to highlight Fiber End. 2. Press Enter. The Fiber End dialog appears. 3. Use the Up and Down Arrow keys (or the Rotary knob) to increment/decrement the fiber end threshold setting. Or enter it directly with the Numeric keypad. 4. Press Enter again. The dialog closes and the new Fiber End threshold is set. Macro Bend Determines the Macro Bend detect value equal to or above which will be reported in the Events analysis. Note Macro Bend detection is only available when in Wavelength All test mode. Note Macro Bend detection requires a unit with at least two single mode operating wavelengths; one at 1310 nm and a second at either 1550 nm or 1625 nm. The range of settings for this parameter is 0.3 dB to 2 dB in 0.1 dB increments. To set the Macro Bend threshold: 1. Use the Up and Down Arrow keys (or the Rotary knob) to highlight Macro Bend. 2. Press Enter. The Macro Bend dialog appears. 3. Use the Up and Down Arrow keys (or the Rotary knob) to increment/decrement the fiber end threshold setting. Or enter it directly with the Numeric keypad. 4. Press Enter again. The dialog closes and the new Macro Bend threshold is set. Splitter Loss Determines the Splitter Loss value equal to or above which will be reported as Splitter event in the Events analysis. The range of settings for this parameter is 1.0 dB to 30.0 dB in 0.1 dB increments. MT9083 Series ACCESS Master Operation Manual 4-17 Chapter 4: OTDR (Standard) Mode To set the Splitter Loss threshold: 1. Use the Up and Down Arrow keys (or the Rotary knob) to highlight Splitter Loss. 2. Press Enter. The Splitter Loss dialog appears. 3. Go to Step 4 if the splitter loss is already at hand. Use the Left and Right Arrow keys to select Branch, and then use the Up and Down Arrow keys (or the Rotary knob) to select the number of branches. 4. Use the Left and Right Arrow keys to select Splitter Loss, and then use the Up and Down Arrow keys (or the Rotary knob) to increment/decrement the splitter loss threshold setting. Or enter it directly with the Numeric keypad. 5. Press Enter again. The dialog closes and the new Splitter Loss threshold is set. 4-18 MT9083 Series ACCESS Master Operation Manual Chapter 4: OTDR (Standard) Mode Pass/Fail Thresholds Parameters Events that exceed the Pass/Fail Threshold parameters are highlighted in red in the Event Analysis table. • The Pass/Fail Thresholds parameters include: - Non-Reflective Event Loss (fusion) - Reflective Event Loss (connector, mechanical) - Reflectance - Fiber Loss (dB/km) - Total Loss - Splitter Loss Non-Reflective Event Loss (fusion) This parameter highlights non-reflective event losses, such as fusion splices, in the Events Analysis table. The range of settings for this parameter is 0.10 dB to 9.99 dB in 0.01dB increments. To set the Non-Reflective Event Loss threshold: 1. Use the Up and Down Arrow keys (or the Rotary knob) to highlight Non-Reflective Event Loss. 2. Press Enter. The Non-Reflective Event Loss dialog appears. Depending on the current setting, the dialog will either state “None”, indicating that there is no threshold currently set, or the dialog displays the current setting for the threshold in dBs. 3. If the Non-Reflective Event Loss dialog displays “None”, press the Up or Down Arrow key to change it to the dB setting mode. 4. Use the Up and Down Arrow keys (or the Rotary knob) to increment or decrement the desired dB setting. Or enter it directly with the Numeric keypad. 5. Press the Enter key again to close the dialog and save the current setting. Use the following procedure to set Non-Reflective Event Loss to “None” when it is currently set in dBs. To set Non-Reflective Event Loss threshold to None: MT9083 Series ACCESS Master Operation Manual 4-19 Chapter 4: OTDR (Standard) Mode 1. Highlight Non-Reflective Event Loss and then press the Enter key. The Non-Reflective Event Loss dialog appears, displaying the current dB setting. 2. Press None (f1), the dialog changes to “None”. 3. Press the Enter key. The dialog closes and the parameter is set to “None”. Reflective Event Loss (connector, mechanical) This parameter highlights reflective event losses, such as connectors and mechanical splices, in the Events Analysis table. The range of settings for this parameter is 0.10 dB to 9.99 dB in 0.01 dB increments. To set the Reflective Event Loss threshold: 1. Use the Up and Down Arrow keys (or the Rotary knob) to highlight Reflective Event Loss. 2. Press Enter. The Reflective Event Loss dialog appears. Depending on the current setting, the dialog will either state “None”, indicating that there is no threshold currently set, or the dialog displays the current setting for the threshold in dBs. 3. If the Reflective Event Loss dialog displays “None”, press the Up or Down Arrow key to change it to the dB setting mode. 4. Use the Up and Down Arrow keys (or the Rotary knob) to increment or decrement the desired dB setting. Or enter it directly with the Numeric keypad. 5. Press the Enter key again to close the dialog and save the current setting. Use the following procedure to set Reflective Event Loss to “None” when it is currently set in dBs. To set Reflective Event Loss threshold to None: 1. Highlight Reflective Event Loss and then press the Enter key. The Reflective Event Loss dialog appears, displaying the current dB setting. 2. Press None (f1), the dialog changes to “None”. 3. Press the Enter key. The dialog closes and the parameter is set to “None”. Reflectance This parameter highlights events in the Event Analysis table that exceed the set Reflectance value. 4-20 MT9083 Series ACCESS Master Operation Manual Chapter 4: OTDR (Standard) Mode The range of settings for this parameter is -50.0 dB to -10.0 dB in 0.1 dB increments. To set the Reflectance threshold: 1. Use the Up and Down Arrow keys (or the Rotary knob) to highlight Reflectance. 2. Press Enter. The Reflectance dialog appears. Depending on the current setting, the dialog will either state “None”, indicating that there is no threshold currently set, or the dialog displays the current setting for the threshold in dBs. 3. If the Reflectance dialog displays “None”, press the Up or Down Arrow key to change it to the dB setting mode. 4. Use the Up and Down Arrow keys (or the Rotary knob) to increment or decrement the desired dB setting. Or enter it directly with the Numeric keypad. 5. Press the Enter key again to close the dialog and save the current setting. Use the following procedure to set Reflectance to “None” when it is currently set in dBs. To set Reflectance threshold to None: 1. Highlight Reflectance and then press the Enter key. The Reflectance dialog appears, displaying the current dB setting. 2. Press None (f1), the dialog changes to “None”. 3. Press the Enter key. The dialog closes and the parameter is set to “None”. Fiber Loss (dB/km) This parameter highlights events in the Event Analysis table when the dB/km loss exceeds the value set. The range of settings for this parameter is 0.01 dB to 9.99 dB in 0.01 dB increments. To set the Fiber Loss (dB/km) threshold: 1. Use the Up and Down Arrow keys (or the Rotary knob) to highlight Fiber Loss (dB/km). 2. Press Enter. The Fiber Loss (dB/km) dialog appears. Depending on the current setting, the dialog will either state “None”, indicating that there MT9083 Series ACCESS Master Operation Manual 4-21 Chapter 4: OTDR (Standard) Mode is no threshold currently set, or the dialog displays the current setting for the threshold in dBs. 3. If the Fiber Loss (dB/km) dialog displays “None”, press the Up or Down Arrow key to change it to the dB setting mode. 4. Use the Up and Down Arrow keys (or the Rotary knob) to increment or decrement the desired dB setting. Or enter it directly with the Numeric keypad. 5. Press the Enter key again to close the dialog and save the current setting. Use the following procedure to set the Fiber Loss (dB/km) threshold to “None” when it is currently set in dBs. To set the Fiber Loss (dB/km) threshold to None: 1. Highlight Fiber Loss (dB/km) and then press the Enter key. The Fiber Loss (dB/km) dialog appears, displaying the current dB setting. 2. Press None (f1), the dialog changes to “None”. 3. Press the Enter key. The dialog closes and the parameter is set to “None”. Total Loss This Parameter highlights events in the Event Analysis table when the Total loss (Cum.Loss (dB)) exceeds the value set. The range of settings for this parameter is 0.1 dB to 60.0 dB in 0.1 dB increments. To set the Total Loss threshold: 1. Use the Up and Down Arrow keys (or the Rotary knob) to highlight Total Loss. 2. Press Enter. The Total Loss dialog appears. Depending on the current setting, the dialog will either state "None", indicating that there is no threshold currently set, or the dialog displays the current setting for the threshold in dBs. 3. If the Total Loss dialog displays "None", press the Up or Down Arrow key to change it to the dB setting mode. 4. Use the Up and Down Arrow keys (or the Rotary knob) to increment or decrement the desired dB setting. Or enter it directly with the Numeric keypad. 5. Press the Enter key again to close the dialog and save the current setting. 4-22 MT9083 Series ACCESS Master Operation Manual Chapter 4: OTDR (Standard) Mode Use the following procedure to set the Total Loss threshold to "None" when it is currently set in dBs. To set the Total Loss threshold to None: 1. Highlight Total Loss and then press the Enter key. The Total Loss dialog appears, displaying the current dB setting. 2. Press None (f1), the dialog changes to "None". 3. Press the Enter key. The dialog closes and the parameter is set to "None". Splitter Loss This Parameter highlights events in the Event Analysis table when the splitter loss exceeds the Auto Detect threshold plus value set. The range of settings for this parameter is 0.1 dB to 20.0 dB in 0.1 dB increments. To set the Splitter Loss threshold: 1. Use the Up and Down Arrow keys (or the Rotary knob) to highlight Splitter Loss. 2. Press Enter. The Splitter Loss dialog appears. Depending on the current setting, the dialog will either state "None", indicating that there is no threshold currently set, or the dialog displays the current setting for the threshold in dBs. 3. If the Splitter Loss dialog displays "None", press the Up or Down Arrow key to change it to the dB setting mode. 4. Use the Up and Down Arrow keys (or the Rotary knob) to increment or decrement the desired dB setting. Or enter it directly with the Numeric keypad. 5. Press the Enter key again to close the dialog and save the current setting. Use the following procedure to set the Splitter Loss threshold to "None" when it is currently set in dBs. To set the Splitter Loss threshold to None: 1. Highlight Splitter Loss and then press the Enter key. The Splitter Loss dialog appears, displaying the current dB setting. 2. Press None (f1), the dialog changes to "None". 3. Press the Enter key. The dialog closes and the parameter is set to "None". MT9083 Series ACCESS Master Operation Manual 4-23 Chapter 4: OTDR (Standard) Mode AutoSave Press AutoSave (f5) to access the AutoSave screen. This screen provides access to the Auto-Filename and AutoSave parameters. Figure 4-7: AutoSave Screen Auto-Filename Parameters The Auto-Filename parameters allow you to enter a base filename which is used to generate sequentially numbered filenames. • The Auto-Filename parameters include: - Enabled - AutoSave Directory - Base Filename - Start Number Enabled (Auto-Filename) Set this field to “On” to automatically generate a filename when a save is performed, or set the field to “Off ” so a filename is not automatically generated when a save is performed. To turn the Auto-Filename feature On or Off: 4-24 MT9083 Series ACCESS Master Operation Manual Chapter 4: OTDR (Standard) Mode 1. Use the Up and Down Arrow keys (or the Rotary knob) to highlight Enabled and then press the Enter key. The Enable dialog appears. 2. Highlight the desired selection; On or Off. 3. Press the Enter key. The dialog closes and the parameter is set to the desired setting. Note The status of the Auto-Filename Enabled field is automatically set to “On” when the AutoSave Enabled field is set to “On”. See “Enabled (AutoSave)” on page 4-28 for details. AutoSave Directory The AutoSave Directory field allows you to select the directory into which AutoSave will save files. To select the AutoSave directory: 1. Use the Up and Down Arrow keys (or the Rotary knob) to highlight AutoSave Directory and then press the Enter key. The Select Directory screen appears. 2. Select the desired storage medium by highlighting the Medium field, if not already highlighted, and then press the Enter key to toggle the selection to either Internal Memory (which is the default setting) or USB Memory. Note You must have a USB Memory stick connected to the MT9083 Series in order to access the USB Memory selection in the Medium field. 3. To save to a specific folder in the selected Medium, highlight the name of the folder and then press the Enter key. The name of the selected folder appears below the Medium field. If you are not saving to a specific folder, skip step 3 and continue at step 4 4. Press Select (f1). The AutoSave setups screen appears with the selected directory displayed in the AutoSave Directory field. MT9083 Series ACCESS Master Operation Manual 4-25 Chapter 4: OTDR (Standard) Mode Base Filename The Base Filename field provides a template for use when generating an autofilename. You can enter a base filename of up to 30 characters with a three character file extension. To set a Base Filename: Use the Up and Down Arrow keys (or the Rotary knob) to highlight Base Filename and then press the Enter key. The Base Filename dialog box appears (see Figure 4-8, below). If no USB keyboard is connected, Refer to “Renaming a File” on page 3-32 to input the file name. If a USB keyboard is connected, you can modify the name directly from the keyboard. When all of the desired characters are entered, press the Enter key to use the new base filename or press the ESC key to close the Base Filename dialog box without changing the base filename. Figure 4-8: Base Filename – Base Filename dialog box 4-26 MT9083 Series ACCESS Master Operation Manual Chapter 4: OTDR (Standard) Mode In OTDR (Standard) Mode, the items below are displayed for MACRO. Table 4-1: MACRO Buttons Name Character strings to insert Number 4 digit-serial number starting with the number in the Number field yy-mm-dd Digits to represent Year-Month-Day hh-mm-ss Digits to represent Hour-Minute-Second Wavelength Wavelength used for measurement Start Number Use this field to establish a start number for the auto-increment section of the Base Filename. You can set a start number for each test wavelength available on the MT9083 Series in use or apply the same start number to all wavelengths. The range of setting for the Start Number is from 1 to 9999, set in increments of 1. Note The wavelength listed in parentheses after the text “Start Number” will vary with the current test wavelength setting. See “Setting the Source Wavelength” on page 4-68 for details. To set the Start Number: 1. Use the Up and Down Arrow keys (or the Rotary knob) to highlight Start Number and then press the Enter key. The Start Number dialog appears. MT9083 Series ACCESS Master Operation Manual 4-27 Chapter 4: OTDR (Standard) Mode Figure 4-9: Start Number Dialog 2. Use the Up and Down Arrow keys (or the Rotary knob) to increment or decrement the Start number. Or enter it directly with the Numeric keypad. 3. Use the Left and Right Arrow keys to select either Yes or No in the Apply to All Wavelengths field. 4. Press the Enter key. The dialog closes and the start number for the current test wavelength or for all wavelengths, depending on the selection made in step 3, is set. Enabled (AutoSave) This parameter sets the status for the AutoSave function. Select from the following setting: • Off – No AutoSave is performed after the measurement is complete. • On – AutoSave is performed after the measurement is complete. • Verify – The Save screen appears after the measurement is complete so you can verify the Auto Filename. To select the AutoSave Enabled status: 4-28 MT9083 Series ACCESS Master Operation Manual Chapter 4: OTDR (Standard) Mode 1. Use the Up and Down Arrow keys (or the Rotary knob) to highlight Enabled in the AutoSave field and then press the Enter key. The Enabled dialog appears. 2. Use the Up and Down Arrow keys (or the Rotary knob) to highlight the desired AutoSave Enabled status: Off, On, or Verify 3. Press the Enter key. The dialog closes and the AutoSave Enabled status is set. Note Setting the AutoSave Enabled status to “On” automatically sets and locks the Auto-Filename Enabled status at the “On” setting. About Screen See “About Screen” on page 3-26 for details. MT9083 Series ACCESS Master Operation Manual 4-29 Chapter 4: OTDR (Standard) Mode Trace Screen – OTDR (Standard) The Trace screen appears when you start Standard OTDR mode. The following figure show the Trace screen when an OTDR laser source firing, as indicated by item 2, the Laser On icon. 2 1 6 3 5 4 6 Figure 4-10: Trace Screen with Laser On Indicator 1 Trace graph 2 Laser On icon 3 Cursor distance information 4 Loss mode, Measurement, and Reflectance 5 Fiber test parameters 6 Softkeys Trace Graph See “Trace Graph – OTDR (Standard) Mode” on page 4-32 for details. 4-30 MT9083 Series ACCESS Master Operation Manual Chapter 4: OTDR (Standard) Mode Laser On Icon The flashing Laser On icon (see item 2 in Figure 4-10) appears whenever a laser is firing. Cursor Distance Information The Cursor Distance information (see item 3 in Figure 4-10) displays the following: • • • Distance from the origin of the trace to Cursor A Distance from the origin of the trace to Cursor B Distance between Cursor A and Cursor B As you move the cursors, the Cursor Distance information updates simultaneously. Loss Mode, Measurement, and Reflectance The Loss Mode, Measurement, and Reflectance area (see item 4 in Figure 4-10) displays the following: • • • The current loss mode, listed in the top section The current loss reading in dB, in the center section A reflectance value reading for reflective events in the bottom section Fiber Test Parameters The Fiber Test Parameters area displays the Wavelength (WL), Distance Range (DR), Pulsewidth (PW), Index of Refraction (IOR), Resolution (RES), and Averaging mode (AVG) set for the current test. The Test Progress bar indicates the current averaging status. In addition, it also displays the same information for a recalled trace placed in the Primary Trace position. The Dead-zone mode selected when performing the measurement is displayed after the Pulsewidth value. • • In the case of Enhanced Range mode, “ER” is displayed. In the case of Standard mode, “HR” is displayed. Note The Fiber Test Parameters area is replaced by the Event Summary area when the Event Summary selection is set to “On” on the Preferences screen (see Figure 4-3 on page 4-4). The Event Summary area displays the Total Events, Fiber Length, and Total Loss of the current fiber under test. MT9083 Series ACCESS Master Operation Manual 4-31 Chapter 4: OTDR (Standard) Mode Trace Graph – OTDR (Standard) Mode The Trace graph displays the trace data in graph form. Power loss is measured in dB along the vertical axis and distance is measured along the horizontal axis. Use the Distance Display Units setting on the Preferences screen to set the horizontal axis units. The downward slope of the trace indicates power loss (attenuation) over the distance of the fiber. 4 1 6 3 2 7 8 5 Figure 4-11: Trace Graph – OTDR (Standard) Mode 1 Trace waveform(s) 2 Cursor A 3 Cursor B 4 Horizontal/Vertical offset 5 Horizontal Axis scale 6 Vertical Axis scale 7 dB level indicator 8 Trace Overview window 4-32 MT9083 Series ACCESS Master Operation Manual Chapter 4: OTDR (Standard) Mode Trace Waveform The Trace Waveform (or Trace) is the downward sloping line going from left to right that connects the data points collected during a test. See item 1 in Figure 4-11. Up to four traces can be displayed simultaneously: a primary trace and up to three overlay traces. This area also contains scroll bars, located at the top and left side of the trace graph, which define the display range of the waveform. Cursors The cursors (see items 2 and 3 in Figure 4-11 on page 4-32) are the two vertical lines that extend from the top to the bottom of the trace graph. The cursors allow you to extract power and distance information from the trace graph. The active cursor is displayed in red and the inactive cursor is displayed in blue. See “Selecting and Positioning Cursors” on page 4-57 for details on cursor use. Horizontal/Vertical Offset The primary trace data can be shifted horizontally or vertically by using the Shift Mode softkeys and the Rotary knob. The distance offset (horizontal) and decibel offset (vertical) are displayed above the trace graph. These values (see item 4 Figure 4-11 on page 4-32) in are only displayed when some type of shift is in use. See “Shifting Trace Data” on page 4-75 for details on how to shift the primary trace. Scale The vertical axis scale (see item 6 in Figure 4-11 on page 4-32) is located on the left side of the trace graph and is expressed in dBs, while the horizontal axis scale (see item 5 in Figure 4-11) is located at the bottom of the trace graph and is expressed in the distance unit as set on the Preferences screen. See “Distance Display Units” on page 4-4 for details. dB Level Indicator The dB level indicator (see item 7 in Figure 4-11 on page 4-32) denotes the intersection of the active cursor and the trace level. MT9083 Series ACCESS Master Operation Manual 4-33 Chapter 4: OTDR (Standard) Mode Trace Overview Window The Trace Overview window, located in the lower left corner or the Trace graph, show a thumbnail view of the current trace. This is helpful in determining the location of an expanded section on the main view. The black rectangle inside the Trace Overview window indicates the section of the trace that is currently displayed in the Trace graph when the trace has been expanded horizontally, vertically. Trace Overview must be set to On in the Preferences tab for the window to be displayed. See “Trace Overview” on page 4-7 for details. Connection check Screen When the Connection Check is set to “On” on the setups Preferences screen, a connection check is automatically performed at the beginning of each fault locate test. The Connection Check screen consist of a simple gauge which provides a graphical representation of the connection quality along with instructions detailing how to proceed when the connection is “GOOD” and how to correct a “BAD” connection. GOOD connection – The gauge is green and yellow when connection is good. The closer the bar in the connection gauge extends to “HIGH” end, the better the connection is. If the gauge is yellow and red, the fiber needs cleaning. Press Continue (f1) or Start key to start the measurement immediately. 4-34 MT9083 Series ACCESS Master Operation Manual Chapter 4: OTDR (Standard) Mode Figure 4-12: Connection Check– Good Connection BAD connection – When the connection check level is low, the bar in the connection gauge is red and only extends a short distance from the “LOW” end of the gauge. If the connection state is not improved even if the fiber is cleaned, the fiber needs to be replaced. MT9083 Series ACCESS Master Operation Manual 4-35 Chapter 4: OTDR (Standard) Mode Figure 4-13: Connection Check– Bad Connection To correct a low connection level: 1. 2. 3. 4. 5. Press the ESC key or Cancel (f6) to abort the current test. Clean all of the optical connectors. Press the Start key or Manual Test (f1)to re-start the test. If the Connection Check is still low, press the ESC key or Cancel (f6). Switch the ends of the patch cord and press the Start key or Manual Test (f1) again. 6. If the Connection Check is still low, press the ESC key or Cancel (f6) and then replace the patch cord. 7. Press the Start key or Manual Test (f1) to re-start the test. Note Fibers shorter than approximately 48 meters (160 ft.) will generally result in a low connection. 4-36 MT9083 Series ACCESS Master Operation Manual Chapter 4: OTDR (Standard) Mode If the Connection Check remains LOW after following the steps in the preceding procedure, contact the Anritsu Technical Support Center at: Phone: 1-800-ANRITSU or 972-761-4600 (Canada, U.S., Latin and South America) Fax: +1 972-671-1877 e-mail: [email protected] Web: www.anritsu.com MT9083 Series ACCESS Master Operation Manual 4-37 Chapter 4: OTDR (Standard) Mode OTDR (Standard) Analysis Screen The OTDR (Standard) Analysis screen consists of the same elements detailed for the OTDR (Standard) Trace screen (see “Trace Screen – OTDR (Standard)” on pages 4-30 – 4-33), with the addition of the Event Table and event marker flags on fiber trace. Figure 4-14: OTDR (Standard) Analysis Screen Analysis can be executed in one of two ways To run Auto Analysis: • Set Auto Analysis to “On” in the OTDR (Standard) setups Preferences screen to automatically display the Analysis screen at the completion of each test. This is the default setting for the MT9083. Note Auto Analysis is not available in Real-Time test mode. To run a manual analysis: • 4-38 Press Analysis Off (f5) when operating the unit in OTDR (Standard) mode, the OTDR (Analysis) screen appears and the Event Table is generated. MT9083 Series ACCESS Master Operation Manual Chapter 4: OTDR (Standard) Mode Note If the legend on the f5 softkey does not read “Analysis Off ” press More>> (f6) twice to display the level three softkeys. The highlighted row in the Event Table corresponds to the event on the trace with the solid event marker. Event Table In fiber analysis, an “event” is considered to be a distinct deviation from normal fiber attenuation that may be introduced by a lossy connection (microbend, connector, or splice), a reflective connection (connector or fiber break) or the end of the fiber. Only events that meet one or more of the pre-set threshold criteria will be reported in the Event table (see “Thresholds” on pages 4-15 – 4-19). Events whose loss equals or exceeds the Pass/Fail Thresholds (see pages 4-19 – 4-22) are highlighted in red in the Event Table. Figure 4-15: Event Table The Event Table displays the following: • • • • • • • Event number Distance to the event Type of event dB loss for the event Reflectance (if the event is a reflective event) dB/km Cumulative loss (dB) Note If the measured value cannot be obtained, for example, because a fault point is being approximated, this is displayed as “**.***”. MT9083 Series ACCESS Master Operation Manual 4-39 Chapter 4: OTDR (Standard) Mode Distance to Event The Distance field [Dist(km)] on the Event Table represents the distance from the start of the trace to the start of the feature. This value is reported in the Distance Display Units selected on the setups Preferences screen, for example “km”. Types of Events Reported Reflective Event Reflection from an splice point, such as a Fresnel reflection caused by a mechanical splice or connector. Non-Reflective Event Non-reflective events include such low loss events as fusion splices and Macro Bends. Grouped Event Events spaced too close to each other for Analysis to distinguish them as separate events are reported as Grouped events. Far End Event Any event with a loss equal to or greater than the Fiber End threshold is reported as the Far End event. Questionable End Event A Questionable End event is reported, instead of a Far End event, when an Out of Range or Out of Distance condition is encountered. PON Event All events other than far end events with losses greater than the far end threshold are displayed as PON events. Loss (dB) The Loss calculated for the event is displayed in decibels (dB). 4-40 MT9083 Series ACCESS Master Operation Manual Chapter 4: OTDR (Standard) Mode Reflectance A reflectance value is displayed for all reflective events, while “**.***” is displayed in the Reflectance field [Reflect(dB)] for non-reflective events. In addition to the reflectance value, two other indicators may be present: S. • An “S” following the numeric value indicates that the reflective event being measured is very close to the top limit of the OTDR’s data set, and that it is considered “saturated” (hitting the high limit of the measurement ability). An “S” (saturated indicator) will be present any time that the peak of the event being measured is within 1 dB of the top of the OTDR Trace graph. dB/km This field displays the dB/km between the selected event and the prior event. Cumulative Loss (dB) This field displays the total loss (Cum.Loss (dB)) up to the selected event, expressed in dB. Note The Total Loss (Cum.Loss (dB)) display differs depending on the Force Total Loss setting. (See “Preferences (2-2)” on page 4-9) If set ON, the result is displayed for all waveforms. If set OFF, "**.***" is displayed if the measured waveform is abnormal. MT9083 Series ACCESS Master Operation Manual 4-41 Chapter 4: OTDR (Standard) Mode Pass/Fail Thresholds Events whose loss exceeds the Pass/Fail Thresholds are highlighted in red in the Event Table. If within the Pass/Fail Thresholds, only Total Loss is highlighted in green in the Event Table. Figure 4-16: OTDR (Standard) Analysis Screen - Event Summary "ON" Note To disable Pass/Fail display, set all of the Pass/Fail Thresholds in Thresholds (f4) to NONE. (See “Thresholds” on page 4-15 - 4-22) PASS is displayed in Event Summary when all of the Pass/Fail Thresholds pass. 4-42 MT9083 Series ACCESS Master Operation Manual Chapter 4: OTDR (Standard) Mode Editing Events – Overview There are times when it is desirable to edit analysis events. Some examples are: • • Changing analysis results to reflect more accurate manual measurements. Inserting manually located events where analysis located a Grouped event. The following editing softkeys are only available when an Event Table is displayed: • • • Add Event (f1) Edit Event (f2) Delete Event (f3) Adding an Event To add an event: 1. Make sure that the current trace displays an Event Table. 2. Set Cursor A as the active (red) cursor and position it at the location for the new event (see “Selecting and Positioning Cursors” on page 4-57). Note If the cursor snaps to the events on the trace when you turn the Rotary knob, toggle the More >> softkey (f6) until the legend on the f2 softkey reads “Cursor” and then toggle f2 so that the red legend on the softkey reads “Free”. You can now position the cursor as needed. Press More>> (f6) once again to return to the editing softkeys. 3. Press Add Event (f1), the New Event dialog appears. MT9083 Series ACCESS Master Operation Manual 4-43 Chapter 4: OTDR (Standard) Mode Figure 4-17: Adding an Event Note The Add Event softkey is only active in Splice Loss mode. Pressing Add Event (f1) when in any test mode other than Splice Loss displays the following message: Cannot add event. Loss mode must be set to splice loss. 4. Use the Left/Right/Up/Down Arrow keys to navigate the highlight (white arrow) to the desired field to select that field. • Select the Start (km) field and then use the Numeric keypad (see item 2 in Figure 2-1 on page 2-1) to enter the desired starting point for the new event. • Select the End (km) field and then use the Numeric keypad (see item 2 in Figure 2-1 on page 2-1) to enter the desired end point for the new event. • Move the highlight to the Event Type field and then use the Up and Down Arrow keys to position the highlight at the desired event type: Non-Reflective, Reflective or Group. 4-44 MT9083 Series ACCESS Master Operation Manual Chapter 4: OTDR (Standard) Mode • • Select the Loss (dB) field and then use the Numeric keypad (see item 2 in Figure 2-1 on page 2-1) to enter the desired loss for the new event. Toggle Change+- (f5) to change the value of the loss setting from negative (-) to positive (+). Select Reflect (dB) and then use the Numeric keypad (see item 2 in Figure 2-1 on page 2-1) to enter the desired reflectance value for the new event. Toggle Change+- (f5) to change the value of the Reflectance setting from negative (-) to positive (+). Note The Reflect (dB) field is dimmed when the Event Type is set to “Non-Reflective”. • Move the highlight to the Saturated check box and then press the Enter key to select the check box. The new event will be flagged with an “S” after it’s Reflectance value in the Event table to denote it as a saturated event when you complete step 5. Note The Saturated check box is dimmed when the Event Type is set to “Non-Reflective”. 5. Press OK (f1), the following happens: • The New Events dialog closes. • The new event is flagged on the trace display. • The new event is added to the Event table. Note An event which as been added to a trace is flagged with an “*” before its event number in the Event table to signify that it was manually added. Note The original trace and event table can be retrieved, even if you have saved the edited trace. Press More >> (f6) until f1 reads “Analyze”, and then press f1 to re-run the analysis. The trace and it’s Event table are returned to their original status. Editing an Event The most common application for editing an event is to move the event so it reflects a more accurate manual measurement. MT9083 Series ACCESS Master Operation Manual 4-45 Chapter 4: OTDR (Standard) Mode Moving an Event To move an event: 1. Make sure that the current trace displays an Event table. 2. Set Cursor A as the active (red) cursor and position it at the desired event (see “Selecting and Positioning Cursors” on page 4-57). Note Toggle More >> (f6) until the legend on the f2 softkey reads “Cursor” and then toggle f2 so that the red legend on the softkey reads “Event”. Turning the Rotary knob will cause the active cursor to snap to the events on the trace. Press More>> (f6) once again to return to the editing softkeys. 3. Press Edit Event (f2), the Edit Event dialog appears. Figure 4-18: Editing an Event Note The Edit Event softkey is only active in Splice Loss mode. Pressing Edit Event (f2) when in any test mode other than Splice Loss displays the following message: Cannot edit event. Loss mode must be set to splice loss. 4-46 MT9083 Series ACCESS Master Operation Manual Chapter 4: OTDR (Standard) Mode 4. Use the Left/Right/Up/Down Arrow keys to select the Start (km) field, and then use the Numeric keypad (see item 2 in Figure 2-1 on page 2-1) to enter the new starting point for the selected event. 5. Move the to highlight the End (km) field and then use the Numeric keypad (see item 2 in Figure 2-1 on page 2-1) to enter the new end point for the selected event. 6. Press OK (f1), the following happens: • The Edit Events dialog closes. • The event flag on the trace is moved to the new position. Note An event that has been edited is flagged with an “*” before its event number in the Event table. Note The original trace and event table can be retrieved, even if you have saved the edited trace. Press More >> (f6) until f1 reads “Analyze”, and then press f1 to re-run the analysis. The trace and it’s Event table are returned to their original status. Pasting an Event To Paste an event to a new location. 1. Make sure that the current trace displays an Event Table. 2. Set Cursor A as the active (red) cursor and position it at the desired event (see “Selecting and Positioning Cursors” on page 4-57). Note Toggle More >> (f6) until the legend on the f2 softkey reads “Cursor” and then toggle f2 so that the red legend on the softkey reads “Event”. Turning the Rotary knob will cause the active cursor to snap to the events on the trace. Press More>> (f6) once again to return to the editing softkeys. 3. Position Cursor A at the location for the new event. Note If the cursor snaps to the events on the trace when you turn the Rotary knob, toggle the More >> softkey (f6) until the legend on the f2 softkey MT9083 Series ACCESS Master Operation Manual 4-47 Chapter 4: OTDR (Standard) Mode reads “Cursor” and then toggle f2 so that the red legend on the softkey reads “Free”. You can now position the cursor as needed. Press More>> (f6) once again to return to the editing softkeys. 4. Press Edit Event (f2), the Edit Event dialog appears. Note The Edit Event softkey is only active in Splice Loss mode. Pressing Edit Event (f2) when in any test mode other than Splice Loss displays the following message: Cannot edit event. Loss mode must be set to splice loss. 5. Press Paste (f3). The Distance field in the Edit Event dialog changes to reflect the position of the active cursor. 6. Press OK (f1), the following happens: • The Edit Events dialog closes. • The event flag on the trace is moved to the new position, which is reflected in the Event table. Note An event that has been moved is flagged with an “*” before its event number in the Event table. Note The original trace and event table can be retrieved as long as you have not saved the edited trace. Press More >> (f6) until f1 reads “Analyze”, and then press f1 to re-run the analysis. 4-48 MT9083 Series ACCESS Master Operation Manual Chapter 4: OTDR (Standard) Mode Deleting an Event The most common application for deleting an event is when a point is erroneously judged as a fault point due to noise in the trace. To Delete an event: 1. Make sure that the current trace displays an Event Table. 2. Position the active cursor at the event to be deleted. Note Toggle More >> (f6) until the legend on the f2 softkey reads “Cursor” and then toggle f2 so that the red legend on the softkey reads “Event”. Turning the Rotary knob will cause the active cursor to snap to the events on the trace. Press More>> (f6) once again to return to the editing softkeys. 3. Press Delete Event (f3), a warning message appears on the screen (see the following figure). Figure 4-19: Delete Event Warning Message Note The end event cannot be deleted. If you select the end event the following message is displayed: Cannot delete the end event. MT9083 Series ACCESS Master Operation Manual 4-49 Chapter 4: OTDR (Standard) Mode 4. Press Yes (f1). The following happens: • The Warning Message closes. • The event is removed from the Event table. • The event flag for the deleted event is removed from the trace. Note The original trace and event table can be retrieved, even if you have saved the edited trace. Press More >> (f6) until f1 reads “Analyze”, and then press f1 to re-run the analysis. The trace and it’s Event table are returned to their original status. Softkeys – OTDR (Standard) Mode OTDR (Standard) mode has six softkeys accessed via the f1-f6 keys on the right side of the LCD screen and four softkeys accessed via the F1-F4 keys on the lower side of the LCD Screen (see Figure 2-1 on page 2-1). Softkey text indicates the softkey functions and may change with each keypress. Softkey Levels There are four main levels of softkeys; levels one, two, and three are available at all times, while level four, the editing function softkeys are only available when an Event Table is displayed. Level One Softkeys Press f1 to start a new test using the currently set test parameters. The red legend on the Manual Test softkey changes to “On” while the test is running. Press f2 to start a Real Time test. The red legend on the Real Time softkey changes to “On” while the test is running. 4-50 MT9083 Series ACCESS Master Operation Manual Chapter 4: OTDR (Standard) Mode Press f3 to toggle through the available wavelengths. The red legend on the softkey displays the current wavelength setting. In addition, dual, tri and quad wavelength units also feature a “Wavelength All” setting. See “Setting the Source Wavelength to All” on page 4-78 for details. Note Pressing the Wavelength softkey on single wavelength units sounds an error tone Press f4 to set the Distance Range, Pulse width, and Resolution for the current test. The red legends on the softkey display the current Distance Range and Pulse Width settings. The red legends on the softkey also display the current Dead-zone mode. Or When Wavelength (f3) is set to “All”, f4 changes to the Test Parameters softkey. Press f4 to display the Test Parameters screen. See “Setting the Test Parameters” on page 4-78 for details. Press f5 to set the Display From mode for viewing the trace graph. The red legend on the softkey displays the current display mode. Press f6 to advance to the Level Two softkeys. MT9083 Series ACCESS Master Operation Manual 4-51 Chapter 4: OTDR (Standard) Mode Level Two Softkeys Press f1 to set the averaging time. The red legend displays the current averaging time. Note The Average Time softkey is dimmed when the Wavelength softkey is set to “Wavelength All” mode. Actual average time may be longer than the set average time depending on the resolution and distance range setting. Press f2 to set the IOR (Index of Refraction) and BSC (Backscatter Coefficient) used for the current test. The red legends display the current settings. Note The IOR/BSC softkey is dimmed when the Wavelength softkey is set to “Wavelength All” mode. Press f3 to select the desired loss mode for the current test. The red legend displays the currently selected loss mode. Press f4 to access the Cursor softkeys. See “Cursor Softkeys” on page 4-55 for details. Press f5 to access the Shift mode softkeys. See “Shift Mode Softkeys” on page 4-55 for details. Press f6 to advance to the Level Three softkeys. 4-52 MT9083 Series ACCESS Master Operation Manual Chapter 4: OTDR (Standard) Mode Level Three Softkeys Press f1 to perform analysis on the current primary trace. Press f2 to toggle the status of the active cursor. When the red legend reads “Event”, turning the Rotary knob causes the active cursor to snap to the events on the trace. When the red legend reads “Free” you can position the cursors anywhere on the trace grid. Place Cursor A near an event and then press f3 to automatically zoom in on the event. Press f4 to display the ORL value in the Loss Mode area (see item 4 in Figure 4-10 on page 4-30). Note This softkey is only active when the loss mode is set to ORL. Press f5 to toggle the Analysis function “On” and “Off ”. The Event Table for the current trace is displayed when the red legend on the softkey reads “On” and the table is hidden when the legend reads “Off ”. Press f6 to advance to the Level Four softkeys, if the current trace displays an Event Table. If the currently displayed trace does not include an Event Table, press f6 to return to the Level One softkeys. MT9083 Series ACCESS Master Operation Manual 4-53 Chapter 4: OTDR (Standard) Mode Level Four Softkeys The Level Four softkeys provide trace editing functions and are only available when the current trace displays an Event Table. Press f1 to add a new event to the current event table. Note The Add Event softkey is only active in Splice Loss mode. Press f2 to edit an event in the current event table. Note The Edit Event softkey is only active in Splice Loss mode. Press f3 to delete an event from the current event table. Press f4 to enter the Template Mode softkeys layer. Press f6 to return to the Level One softkeys. 4-54 MT9083 Series ACCESS Master Operation Manual Chapter 4: OTDR (Standard) Mode Cursor Softkeys The Cursor softkeys are accessed from the Level Two softkeys by pressing Cursors (f4). Toggle f1 so that the red legend on the softkey reads “Locked”. The distance between Cursor A and Cursor B will remain fixed when Cursor B is moved. See “Locking and Unlocking Cursors” on page 4-58 for details. Press f2 to toggle the state of the LSA loss intervals. When the red legend on the softkey reads “On” you can adjust the length of the LSA loss intervals. Note The Move LSA softkey is only active in the following loss modes: Splice Loss, 2pt LSA, and dB/km LSA. Press f3 to return the LSA loss intervals to their default settings. Note The Default LSA softkey is only active when in the following loss modes: Splice Loss, 2Pt LSA, and dB/km LSA. Press f6 to close the Cursor softkeys and return to the Level Two softkeys. Shift Mode Softkeys The Shift Mode softkeys are accessed from the Level Two softkeys by pressing Shift (f5). Toggle f1 to set the Shift Mode: Horizontal or Vertical. MT9083 Series ACCESS Master Operation Manual 4-55 Chapter 4: OTDR (Standard) Mode Press f2 to reset the horizontal shift to 0 (zero). Press f3 to reset the vertical shift to 0 (zero). Press f6 to close the Shift Mode softkeys and return to the Level Two softkeys. Template Mode Softkeys The Template Mode softkeys are accessed from the Level Four softkeys by pressing Shift (f4). Press f1 to apply the template to the current primary trace manually. Note This softkey is only enabled when a template is present. Press f2 to create a template from the current primary trace and enable template mode. (The template trace is drawn in purple). Press f3 to clear the template trace and de-activate template mode. Note This softkey is only enabled when a template is present. Press f4 to open the Template Settings screen. 4-56 MT9083 Series ACCESS Master Operation Manual Chapter 4: OTDR (Standard) Mode Press f6 to close the Template Mode softkeys and return to the Level Four softkeys. Extension softkeys Press F1 when the Analysis screen is displayed displays only the waveform on the screen. Press F2 when only the waveform is displayed on the screen selects the event just before the selected one. Press F3 when the Analysis screen is displayed selects the event just after the selected event. Press F4 when the Analysis screen is displayed selects the event just after the selected event. Note When the Analysis screen is not displayed or the event does not exist, this button is invalid (displayed in gray). Selecting and Positioning Cursors The active cursor is displayed as a red vertical line in the Trace graph. Setting the Active Cursor To toggle the active cursor: • Press the Rotary knob (or the Enter key) to select the desired cursor. Precise Positioning of the Active Cursor To precisely position the cursor: 1. Select the desired cursor (see “Setting the Active Cursor” above). 2. Press Display From (f5) and select the desired display from setting (Display From A or Display From B, depending on which is cursor is currently selected as the active cursor). 3. Use the Left, Right, Up and Down Arrow keys to zoom up the desired amount. See “Horizontal and Vertical Expand and Contract” below for details. MT9083 Series ACCESS Master Operation Manual 4-57 Chapter 4: OTDR (Standard) Mode 4. Turn the Rotary knob to position the active cursor until the desired cursor distance is displayed in the Cursor Distance Information area (see item 3 in Figure 4-10 on page 4-30). Locking and Unlocking Cursors To lock the cursors: 1. Set Cursor B as the active cursor. 2. Press Cursors (f4), the Cursor softkeys appear. 3. Toggle Cursors (f1) until the red legend on the softkey reads “Locked”. When the cursors are locked, the distance between the cursors remains fixed. To unlock the cursors: 1. Press Cursors (f4), the Cursor softkeys appear. 2. Press Cursors Locked (f1), the red legend on the softkey changes to “Unlocked”. 3. Press Exit (f6) to close the Cursor softkeys and return to the Level Two softkeys. Horizontal and Vertical Expand and Contract Use the Horizontal/Vertical expand to expand a section of the trace when: • • Positioning the cursors for a test Adjusting the LSA intervals To expand an area: 1. Position the desired cursor (A or B) to the approximate position. 2. Toggle Display From (f5) to the desired mode, Display From A or Display From B, depending on the cursor selected in step 1. 3. Press the Up Arrow key. Each press decreases the dB/division value of the vertical grid scale by a factor of two. Press the Right Arrow key. Each press decreases the distance/division value on the horizontal grid scale by a factor of two. To contract an area: • 4-58 Press the Down Arrow key. Each press increases the dB/division value of the vertical grid scale by a factor of two. MT9083 Series ACCESS Master Operation Manual Chapter 4: OTDR (Standard) Mode • Press the Left Arrow key. Each press increases the distance/division value on the horizontal grid scale by a factor of two. Note An error tone sounds when you reach the full expand/contract value for either axis. MT9083 Series ACCESS Master Operation Manual 4-59 Chapter 4: OTDR (Standard) Mode Template Mode Template mode is a function to display event information by generating a predefined event table and mapping the collected trace onto the event conditions in this event table. Template soft key layer To Enter the Template soft key layer 1. Make sure that the current trace displays an Event table. 2. Toggle More >> (f6) until the legend on the f4 softkey reads “Template” and Press Template (f4). The template soft key layer includes the following softkeys. • • • • Apply Template (f1) Create Template (f2) Clear Template (f3) Template Setting (f4) Figure 4-20: Template soft key layer To apply template 4-60 MT9083 Series ACCESS Master Operation Manual Chapter 4: OTDR (Standard) Mode • Press Apply Template (f1) to apply the created template trace to the current primary trace. The Apply Template softkey is dimmed if there is no template trace. To create template • Press Create Template (f2) to create a template from the current primary trace. When a template is created, template mode becomes enabled, gray bars appear on the screen to indicate where the template events are located, and the template trace is drawn in purple. To clear template • Press Clear Template (f3) to clear the template trace. Template mode is disabled when the template is cleared. To set the Template Setting • Press Template Settings (f4) to access the template settings screen. Template Settings Screen Template Settings screen (see Figure 4-21 on page 4-62) contains access for the following parameter settings: • • • • • Event Determination Trace Priority Distance Absolute Distance Distance Helix Factor Adjustment: Note Trace Priority, Distance and Absolute Distance are only activated when Merge is selected for Event Determination. MT9083 Series ACCESS Master Operation Manual 4-61 Chapter 4: OTDR (Standard) Mode Figure 4-21: Template Setting screen Event Determination The setting made in the Event Determination control how the Template trace event are applied to the selected target trace. To Set the Event Determination: 1. Use the Left/Right/Up/Down Arrow keys (or the Rotary knob) to highlight Template on the Event Determination field. 2. Toggle the Enter key (or the Rotary knob) to select the desire mode (Template or Merge). 3. Press Exit (f6) to close the Template Setting screen. • • 4-62 If Template is selected, all events are copied directly from the template trace and onto the collected trace. If Merge is selected, the events in the template trace and the collected trace are correlated and merged. MT9083 Series ACCESS Master Operation Manual Chapter 4: OTDR (Standard) Mode Trace Priority The Trace Priority check box gives the target trace event location priority over correlated events from the template when Merge is selected. If cleared, non-correlated template events are inserted into the target trace, correlated template events replace the correlating target trace events, and all other target trace events are left unchanged. To Set the Trace Priority 1. Use the Left/Right/Up/Down Arrow keys (or the Rotary knob) to highlight the Trace Priority field. 2. Toggle the Enter key to select or clear the check box for the trace priority. 3. Press Exit (f6) to close the Template Setting screen. • • If the Trace Priority check box is cleared, non-correlated template events are inserted into the target trace, correlated template events replace the correlating target trace events, and all other target trace events are left unchanged. If the Trace Priority check box is selected, only non-correlated template events are inserted into the target trace, all other events are left unchanged. Note Correlation of events is determined by the correlation window which is based on the Distance and Absolute Distance settings. If more than one target trace Event falls within the correlation window of a template event, the closest event is considered correlated. For each template non-end event that is propagated to the target trace, the target trace event’s loss value is computed using the adjusted template event distance and LSA cursors. “Table 4-2: Resultant Target Trace Events” shows examples of resultant target trace events for the three merge/priority states: Template On/Merge Off, Merge On/Trace Priority Off, Merge On/Trace Priority On. MT9083 Series ACCESS Master Operation Manual 4-63 Chapter 4: OTDR (Standard) Mode Table 4-2: Resultant Target Trace Events Template Trace Event Location result Target Trace Event Location Template=On 10.0 NONE 10.0 10.0 10.0 20.0 20.1 20.0 20.0 20.1 NONE 30.1 NONE 30.1 30.1 40.0 40.1 40.0 40.0 40.1 (end event) Merge=On Trace Priority=Off Merge=On Trace Priority=On Distance and Absolute Distance The Percent Distance and Absolute Distance define the size of the correlation window which determines how close together events must be to correlate. The size of the window is defined to be: MINIMUM (Percent * Template Event Distance, Absolute Distance). To set Distance 1. Use the Left/Right/Up/Down Arrow keys (or the Rotary knob) to highlight the Distance field. 2. Use the Numeric keypad to directly enter the desired value, from 0.0 to 100.0 in the field. 3. Press Exit (f6) to close the Template Setting screen. To set Absolute Distance 1. Use the Left/Right/Up/Down Arrow keys (or the Rotary knob) to highlight the Absolute Distance field. When the distance display units are set to km 2. Use the Numeric keypad to directly enter the desired value, from 0.000 to 250.0000km in the field. 3. Press Exit (f6) to close the Template Setting screen. 4-64 MT9083 Series ACCESS Master Operation Manual Chapter 4: OTDR (Standard) Mode Distance Helix Factor Events in the template trace and the target trace may not align perfectly due to the differences in length of the fibers within a single cable. Distance Helix Factor Adjust options compensate for the difference in length and also obtain improved splice location and loss estimation. There are three option buttons in the Distance Helix Factor Adjustment area: • • • None - The template and target trace event locations will be used as is, without Distance Helix Factor Adjustment. Snap to Template End - All template event locations will be converted to proportional (relative to target end) target event locations prior to correlation. For example, if a template event is located at a distance which is 43.21% from the template end event location, then the location will be temporarily converted to a distance 43.21% from the target trace end event. After correlation, all events will be converted to proportional template end locations and stored in the target trace. Snap to Trace End - All template event locations will be converted to proportional (relative to target end) target event locations prior to correlation and left as is after correlation. To Set the Distance Helix Factor 1. Use the Left/Right/Up/Down Arrow keys (or the Rotary knob) to highlight the desired option (None, Snap to Template End or Snap to Trace End) on the Distance Helix Factor Adjustment field. 2. Toggle the Enter key (or the Rotary knob) to select the desire option. 3. Press Exit (f6) to close the Template Setting screen. Note The “Snap to” options should only be used if all traces have correct fiber end events. Detailed explanation of the Distance Helix Factor Adjustment function The following explanation assumes the Template Settings screen settings other than the Distance Helix Factor Adjustment options are as follows. • • • • Event Determination: Merge Trace Priority: OFF Distance: 30% Absolute Distance: 1 km MT9083 Series ACCESS Master Operation Manual 4-65 Chapter 4: OTDR (Standard) Mode Next, assuming the Template trace and Target trace event locations are as follows: Target trace event locations Template trace event locations 15 10 30 20 45 40 The following describes the corrections performed when each option is selected for the example shown above. • If None is selected 1. The event locations for the Target trace and Template trace events remain unchanged and correlation is performed without using the Distance Helix Factor Adjustment function. Target trace event locations after correlation 10 15 20 30 40 • If Snap to Template End is selected 1. Each Template trace event is converted proportionately relative to the Target trace end event location. Adjusted Template trace event locations after conversion 11.25 22.5 45 2. Next, correlation is performed using the Target trace events and converted temporary Template trace events. Temporary Target trace event locations after correlation 4-66 11.25 15 22.5 30 45 MT9083 Series ACCESS Master Operation Manual Chapter 4: OTDR (Standard) Mode 3. Finally, the correlated temporary Template trace events are converted proportionately relative to the end event location for the Template trace events. Final Target trace event locations 10 13.33 20 26.66 40 • If Snap to Trace End is selected 1. Each Template trace event is converted proportionately relative to the Target trace end event location. Adjusted Template trace event locations after conversion 11.25 22.5 45 2. Next, correlation is performed using the Target trace events and converted temporary Template trace events. Target trace event locations after correlation 11.25 15 22.5 30 45 “Table 4-2: Resultant Target Trace Events” shows examples of resultant target trace events for the three Distance Helix Factor Adjustment options: None, Snap to Template End, Snap to Trace End. Table 4-2: Resultant Target Trace Events result Template Trace Event Location Target Trace Event Location Distance Helix Factor Adjustment: None Snap to Template End Snap to Trace End 10 15 10, 15 10, 13.33 11.25, 15 20 30 20, 30 20, 26.66 22.5, 30 40 45 40 40.0 45 MT9083 Series ACCESS Master Operation Manual 4-67 Chapter 4: OTDR (Standard) Mode OTDR (Standard) Mode Measurement Parameters Setting the Source Wavelength To set the source wavelength: • Press Wavelength (f3) to toggle through the source wavelengths. The red legend on the softkey changes with each key press. Depending on the configuration of MT9083 Series in use, up to four wavelengths are available. In addition, dual, tri and quad wavelength units also feature a “Wavelength All” setting. See “Setting the Source Wavelength to All” on page 4-78 for details on setting the wavelength in Wavelength All mode. Note Pressing the Wavelength softkey on single wavelength units causes an error tone to sound. The wavelength may be changed while a Real Time or Averaging cycle is running. The test will restart using the new wavelength. Setting the Range, Resolution, and Pulse Width The Range, Resolution, and Pulse Width settings determine the trace data distance range and resolution value (data point spacing) as well as the pulse width used for the test cycle. To set the Range, Resolution, and Pulse Width: 1. Press Range / Pulse Width (f4), the Distance Range, Resolution, and Pulse width dialog appears (see Figure 4-22 on page 4-68). Figure 4-22: Range /Resolution/ Pulse Width Dialog 4-68 MT9083 Series ACCESS Master Operation Manual Chapter 4: OTDR (Standard) Mode 2. Use the Right and Left Arrow keys to move the white arrow to the desired list. 3. Use the Up and Down Arrow keys (or the Rotary knob) to highlight the desired setting within the selected list. 4. Repeat steps 2 and 3 until all the desired settings are highlighted. 5. Press the Enter key (or the Rotary knob). The dialog closes and the red legend on the Range / Pulse Width softkey displays the newly selected Distance Range and Pulse Width. The distance range/resolution/pulse width settings may be changed while a Real Time or Averaging cycle is running. The test will restart using the new settings. The distance range/resolution/pulse width settings vary depending on what model of MT9083 Series product you are using. Selecting the Dead-zone Mode The MT9083A2/B2/C2 have a Dead-zone mode selection function. The two modes available via this mode selection function are Standard mode and Enhanced Range mode. The features of the two modes are described below. Standard mode: • Standard mode allows short dead-zone measurements to be performed Enhanced Range mode: • • • Allows high dynamic range measurements. Allows fast measurements. Can be used to test the path over each optical fiber split by the splitter included in the PON system. Setting the Standard Mode To Set the Standard Mode: 1. Pressing Range/Pulse Width (f4) brings up Dead-zone (f1). (See figure below.) 2. Press Dead-zone (f1) and set “Standard (HR)”. 3. Press the Enter key (or the Rotary knob). The dialog closes and the red legend on the Range / Pulse Width softkey displays the newly selected Dead-zone mode. • HR: Standard mode MT9083 Series ACCESS Master Operation Manual 4-69 Chapter 4: OTDR (Standard) Mode • ER: Enhanced Range mode Note • If the range of the selected pulse width does not fall between 50 ns to 2000 ns, the (f1) key is grayed out and set to Standard (HR). Figure 4-23: Dead-zone Mode Selecting screen Setting the Enhanced Range Mode To Set the Enhanced Range Mode: 1. Pressing Range/Pulse Width (f4) brings up Dead-zone (f1). 2. Press Dead-zone (f1) and set “Enhanced Range (ER)”. 3. Press the Enter key (or the Rotary knob). The dialog closes and the red legend on the Range / Pulse Width softkey displays the newly selected Dead-zone mode. • • HR: Standard mode ER: Enhanced Range mode Note • The Enhanced Range mode is only available if an SM unit is fitted. The Dead-zone (f1) key becomes unavailable if an MM unit is fitted. • If the range of the selected pulse width does not fall between 50 ns to 2000 ns, the (f1) key is grayed out and set to Standard (HR). 4-70 MT9083 Series ACCESS Master Operation Manual Chapter 4: OTDR (Standard) Mode Display From Three Display From modes are available for viewing the trace graph: Display From A, Display From B, and Display From Origin. • Press Display From (f5) to toggle through the three modes. The legend on the softkey changes to the current Display From mode. Display From Origin Keeps the origin (0 distance and 0 dB) in the upper left corner of the trace graph. Display From A Displays the A cursor intercept with the trace data in the center of the trace graph view. Display From B Displays the B cursor intercept with the trace data in the center of the trace graph view. Setting the Average Time/Average Count Specify the Average Time/Average Count by either selecting one of the four preset values or by entering the desired value in the field at the bottom of the dialog (see Figure 4-24 on page 4-72). Note Average Count can only be accessed when the language for the MT9083 Series is set to “Chinese”. See “Language” on page 3-10 for details on changing the current language selection. Actual average time may be longer than the set average time depending on the resolution and distance range setting. To set the Average Time: 1. Press Average Time (f1). The Average Time dialog appears (see Figure 4-24 on page 4-72). Note When the language is set to “Chinese” this dialog is titled “Averaging”. MT9083 Series ACCESS Master Operation Manual 4-71 Chapter 4: OTDR (Standard) Mode Figure 4-24: Average Time Dialog 2. If the language is currently set to Chinese, use the Left and Right Arrow keys to toggle the Averaging mode from “Time” to “Count” depending on the desired mode. For any language other than Chinese, skip step 2 and continue at step 3. Note The “Time” and “Count” selections are only available when the language is set to Chinese and are not show in Figure 4-24. 3. Use the Up and Down Arrow keys (or the Rotary knob) to highlight the desired pre-set value, or to move the white arrow down to the Sec field (or Times field if the language is set to Chinese and Count is selected in step 2). • If you highlighted one of the pre-set values continue at step 5. • If you are entering an amount in the Sec field (or Times field if the language is set to Chinese and Count is selected in step 2) continue at step 4. 4. Use the Numeric keypad to directly enter the desired value, from 1 to 3600 in the field. 5. Press the Enter key (or the Rotary knob). The dialog closes and the new value is displayed in the red legend on the softkey. The Averaging Mode setting can be changed on the fly while either in a Real Time or an averaging cycle by using the procedure above. The test will restart using the new setting. 4-72 MT9083 Series ACCESS Master Operation Manual Chapter 4: OTDR (Standard) Mode Setting the IOR and BSC Use the IOR/BSC dialog box to select one of the pre-set Fiber Types, which automatically sets the IOR (Index of Refraction) and BSC (Backscatter Coefficient) for the selected fiber type, or select “Other” and then use the Numeric keypad to enter the desired IOR and BSC settings. To set the IOR and BSC values: 1. Press IOR / BSC (f2). The IOR/BSC dialog appears (see Figure 4-25). Figure 4-25: IOR/BSC Dialog 2. Use the Left/Right/Up/Down Arrow keys to move the white arrow to the Fiber Type field, if necessary, and then use the Up and Down Arrow keys (or the Rotary knob) to highlight the desired fiber type. When the desired fiber type is highlighted, press the Enter key (or the Rotary knob). Or – If the fiber type is not listed, select Other and then move the white arrow to the IOR and BSC fields. Use the Numeric keypad to enter the desired values. When the IOR and BSC values are entered, press the Enter key (or the Rotary knob). Use the Numeric keypad to directly enter the desired value. 3. The dialog box closes and the new settings are displayed in the red legend on the softkey. Dial IOR This can be used to change the IOR in response to an event when a measurement result is present. MT9083 Series ACCESS Master Operation Manual 4-73 Chapter 4: OTDR (Standard) Mode To set the IOR with Dial IOR: 1. 2. 3. 4. Press IOR / BSC (f2). The IOR/BSC dialog appears (see Figure 4-25). Press Dial IOR (f1). Use the Right and Left to select digit. Use the Up and Down Arrow keys (or the Rotary knob) to change the IOR. 5. To confirm the change, press Accept (f1). To cancel, press Cancel (f2). Note When the Wavelength is set to All, IOR cannot be changed. Setting the Loss Mode To set the Loss Mode: 1. Press Loss Mode (f3). The Loss Mode dialog appears. Figure 4-26: Loss Mode Dialog 2. Use the Up and Down Arrow keys (or the Rotary knob) to highlight the desired loss mode. For details on the various loss modes see Chapter 7, “OTDR Mode Measurements”. 3. Press the Enter key (or the Rotary knob). The dialog closes and the red legend on the softkey changes to the selected loss mode. The Loss Mode may be changed on the fly while either a Real Time or an averaging cycle is running by using the procedure above. The test will restart using the new loss mode. 4-74 MT9083 Series ACCESS Master Operation Manual Chapter 4: OTDR (Standard) Mode Shifting Trace Data The primary trace data can be horizontally or vertically shifted to adjust the view and event locations. The distance offset (horizontal) and decibel offset (vertical) are displayed above the trace graph. To shift trace data: 1. If two traces are displayed, make sure that the desired trace is in the primary trace position. The primary trace is always displayed in red. 2. With the Level Two softkeys displayed, press Shift (f5). The Shift Mode softkeys appear. 3. Toggle the Shift Mode softkey (f1) to the desired shift type: Horizontal or Vertical. 4. Turn the Rotary knob to shift the trace along the chosen axis. The offset values of the shift are displayed above the trace graph. See Figure 4-27. Figure 4-27: Shift Mode 5. Repeat steps 3 and 4 to shift along the other axis. 6. When you have reached the desired shift location, press Exit (f6) to close the Shift mode and return to the Level Two softkeys. MT9083 Series ACCESS Master Operation Manual 4-75 Chapter 4: OTDR (Standard) Mode Resetting a Shifted Trace Use the following procedure to reset the Shift values to 0. To reset shift values to 0: 1. With the Shift Mode softkeys displayed, press Reset Horiz (f2) to reset the horizontal shift to 0 (zero) and/or press Reset Vert (f3) to reset the vertical shift to 0 (zero). 2. Press Exit (f6) to close the Shift mode and return to the Level Two softkeys. Running Analysis on a Trace The Analysis feature performs an automatic analysis of the fiber waveform, returning information such as the location of connectors, splices, reflectance and loss values. The results are presented in detail in the Event Table. The types of data gathered by analysis are dependent upon the various settings selected on the Thresholds screen in setups (see pages 4-15 – 4-22). Use the following procedure to automatically launch Analysis at the conclusion of a data collection. The results appear on the OTDR (Analysis) screen (see Figure 4-14 on page 4-38). To activate Auto Analysis: 1. Enter OTDR (Standard) mode, and then press the Setup key. 2. Press Preferences(1-2) (f2), if necessary. 3. Use the Up and Down Arrow keys (or the Rotary knob) to highlight Auto Analysis. 4. Press the Enter key. The Auto Analysis dialog appears. 5. Highlight “On”, and then press the Enter key. The dialog closes and the Auto Analysis status field reads “On”. 6. Press the ESC key to close Setups and return to the OTDR (Standard) mode. Note Auto Analysis is not available in Real-Time test mode. To analyze a trace when Auto Analysis is not active: 4-76 MT9083 Series ACCESS Master Operation Manual Chapter 4: OTDR (Standard) Mode • When the data collection for the current trace concludes, press Analysis (f5). The red legend on the softkey changes from “Off ” to “On” and a populated Event Table is displayed above the trace graph. Note If the legend on f5 does not read “Analysis” press the More >> softkey (f6) until the Level Three softkeys are displayed. MT9083 Series ACCESS Master Operation Manual 4-77 Chapter 4: OTDR (Standard) Mode Wavelength All Mode Wavelength All mode provides multiple wavelength testing (for all singlemode or all multimode wavelengths available for the given MT9083 Series) with trace overlay and macro bend detect features. Note • Mixed singlemode/multimode testing is not supported. Wavelength All Test Parameters The following section outlines setting the test parameters when in Wavelength All mode. Setting the Source Wavelength to All To set the source wavelength to All: • Press Wavelength (f3) to toggle through the source wavelengths until the red legend on the softkey reads “All”. Setting the Test Parameters When the Wavelength softkey (f3) is set to “All”, the f4 softkey legend changes to “Test Parameters”. Pressing Test Parameters (f4) displays the OTDR Parameters screen (see Figure 4-28 on page 4-79) which contains access for the following test parameter settings: • • • • Range/Resolution/Pulse Width Dead-zone Number of Averages (Averaging Time) IOR (Index of Refraction) / BSC (Backscatter Coefficient) In addition, each pane has an option button which, when selected sets the basic test parameters to the same setting for all available wavelengths. The OTDR Parameters screen also provides access to Macro Bend testing. To access the OTDR Parameters screen: 4-78 MT9083 Series ACCESS Master Operation Manual Chapter 4: OTDR (Standard) Mode • With the Wavelength softkey (f3) set to Wavelength All, press Test Parameters (f4). The OTDR Parameters screen (see Figure 4-28 on page 4-79) appears. Figure 4-28: OTDR Parameters Screen To set the Range, Resolution, and Pulse Width in Wavelength All mode: 1. With the OTDR Parameters screen displayed, use the Left/Right/Up/Down Arrow keys (or the Rotary knob) to highlight the Range field or PW field for the for the first desired wavelength and then press the Enter key (or the Rotary knob). The Distance Range, Resolution, and Pulse width dialog appears (see Figure 4-22 on page 4-68). 2. Use the Right and Left Arrow keys to move the white arrow to the desired list. 3. Use the Up and Down Arrow keys (or the Rotary knob) to highlight the desired setting within the selected list. 4. Repeat steps 2 and 3 until all the desired settings are highlighted. 5. Press the Enter key (or the Rotary knob). The dialog closes and the Range field and PW field displays the newly selected Distance Range and Pulse Width. MT9083 Series ACCESS Master Operation Manual 4-79 Chapter 4: OTDR (Standard) Mode 6. Repeat steps 1 through 5 for each desired wavelength. 7. Press Exit (f6) to close the OTDR Parameters screen or move the highlight to the next desired parameter to continue. Use the following procedure to specify the Average Time/Average Count by either selecting one of the four pre-set values or by entering the desired value in the field at the bottom of the dialog (see Figure 4-24 on page 4-72). Note Average Count can only be accessed when the language for the MT9083 Series is set to “Chinese”. See “Language” on page 3-10 for details on changing the current language selection. To select the Dead-zone mode in Wavelength All mode: 1. With the OTDR Parameters screen displayed, use the Left/Right/Up/Down Arrow keys (or the Rotary knob) to highlight the Range field or PW field for the for the first desired wavelength and then press the Enter key (or the Rotary knob). The Distance Range, Resolution, and Pulse width dialog appears (see Figure 4-22 on page 4-68). 2. Press Dead-zone (f1) and set the desired mode. 3. Press the Enter key (or the Rotary knob). The dialog closes and the newly selected Dead-zone mode displays on the PW field. Note • This mode selection function is not available on the MT9083A2 except the models with Option 073. • The Enhanced Range mode is only available if an SM unit is fitted. The Dead-zone (f1) key becomes unavailable if an MM unit is fitted. • If the range of the selected pulse width does not fall between 50 ns to 2000 ns, the (f1) key is grayed out and set to Standard (HR). To set the Average Time in Wavelength All mode: 1. Use the Left/Right/Up/Down Arrow keys (or the Rotary knob) to highlight the Num Avgs field for the for the first desired wavelength and then press the Enter key (or the Rotary knob). The Average Time dialog appears (see Figure 4-24 on page 4-72). 4-80 MT9083 Series ACCESS Master Operation Manual Chapter 4: OTDR (Standard) Mode Note When the language is set to “Chinese” this dialog is titled “Averaging”. 2. If the language is currently set to Chinese, use the Left and Right Arrow keys to toggle the Averaging mode from “Time” to “Count” depending on the desired mode. For any language other than Chinese, skip step 2 and continue at step 3. Note The “Time” and “Count” selections are only available when the language is set to Chinese and are not show in Figure 4-24 on page 4-72. 3. Use the Up and Down Arrow keys (or the Rotary knob) to highlight the desired pre-set value, or to move the white arrow down to the Sec field (or Times field if the language is set to Chinese and Count is selected in step 2). • If you highlighted one of the pre-set values continue at step 5. • If you are entering an amount in the Sec field (or Times field if the language is set to Chinese and Count is selected in step 2) continue at step 4. 4. Use the Numeric keypad to directly enter the desired value, from 1 to 3600 in the field. 5. Press the Enter key (or the Rotary knob). The dialog closes and the new value is displayed in the Num Avgs field. 6. Repeat steps 1 through 5 for each desired wavelength. 7. Press Exit (f6) to close the OTDR Parameters screen or move the highlight to the next desired parameter to continue. Use the following procedure to set the Range, Resolution, Pulse Width, and Average Time to the same values for all available wavelengths. To apply the Range, Resolution, Pulse Width, and Average Time to all wavelengths: 1. Set the Range, Resolution and Pulse Width, as well as the Average Time as detailed in the previous two procedures, for one of the available wavelengths. 2. Select Apply to All Wavelengths. MT9083 Series ACCESS Master Operation Manual 4-81 Chapter 4: OTDR (Standard) Mode 3. Press Exit (f6) to close the OTDR Parameters screen or move the highlight to the next desired parameter to continue. Use the following procedure to set the IOR (Index of Refraction) and BSC (Backscatter Coefficient) for each available wavelength. To set the IOR and BSC values in Wavelength All mode: 1. Use the Left/Right/Up/Down Arrow keys (or the Rotary knob) to highlight the IOR/BSC field for the for the first desired wavelength and then press the Enter key (or the Rotary knob). The IOR/BSC dialog appears (see Figure 4-25 on page 4-73). 2. Use the Left/Right/Up/Down Arrow keys to move the white arrow to the Fiber Type field, if necessary, and then use the Up and Down Arrow keys (or the Rotary knob) to highlight the desired fiber type. When the desired fiber type is highlighted, press the Enter key (or the Rotary knob). Or – If the fiber type is not listed, select Other and then move the white arrow to the IOR and BSC fields. Use the Numeric keypad to enter the desired values. When the IOR and BSC values are entered, press the Enter key (or the Rotary knob). Use the Numeric keypad to directly enter the desired value. 3. The dialog box closes and the new settings are displayed in the IOR/BSC field. 4. Repeat steps 1 through 3 for each desired wavelength. 5. Press Exit (f6) to close the OTDR Parameters screen. To reset the OTDR Parameters to their default settings: • With the OTDR Parameters screen displayed, press Set Defaults (f1). The screen returns to its factory default settings. To activate Macro Bend mode: • 4-82 With the OTDR Parameters screen displayed, press f2 to set the On/Off state of the Macro Bend detect function. Losses that meet or exceed the Macro Bend threshold, are flagged in the Event table with an indicator, following the Loss reading. MT9083 Series ACCESS Master Operation Manual Chapter 4: OTDR (Standard) Mode See “Macro Bend” on page 4-17 for details on setting the Macro Bend threshold. Note Macro Bend detection requires an MT9083 Series unit with at least two single mode operating wavelengths; one at 1310 nm and a second at either 1550 nm or 1625 nm. Wavelength All Testing The following procedure outlines the steps used to perform a Wavelength All test. To perform a Wavelength All test: 1. Toggle Wavelength (f3) until the red legend on the softkey reads “All”. 2. Press Test Parameters (f4) and set the desired test parameters, per available wavelength, for the test. See “Setting the Test Parameters” on pages 4-78 through 4-82 for details. 3. Set the desired Loss Mode. See “Setting the Loss Mode” on page 4-74 for details. 4. Enable Auto Analysis, if desired. See “To set Auto Analysis:” on page 4-5 for details. 5. Enable AutoSave, if desired. See “AutoSave” on page 4-24 for details. 6. When all of the desired test parameters have been set, press Manual Test (f1) to start the test. This starts an averaged scan at the lowest wavelength using the parameters as set in steps 2 through 5. When the test completes, Event analysis is run (if Auto Analysis is enabled), and the trace is saved (if AutoSave is enabled). The trace is placed into an Overlay position, and the next wavelength starts and updates the Primary trace position. This process continues until all traces have be collected. The Trace screen, at the end of the test, will appear as shown in Figure 4-29. Note The number of Overlay traces displayed is depended on the number of wavelengths available for testing. MT9083 Series ACCESS Master Operation Manual 4-83 Chapter 4: OTDR (Standard) Mode Figure 4-29: Wavelength All Trace Screen 4-84 MT9083 Series ACCESS Master Operation Manual Chapter 4: OTDR (Standard) Mode Trace Overlay Management The MT9083 Series can display up to four traces in the Trace grid, one primary trace and up to three overlay traces. The Trace Overlay management function softkeys are only available when the Trace grid contains a trace in the primary trace position and at least one overlay trace. Figure 4-30: Trace Screen with Trace Overlay Softkeys Trace Overlay Functions The Trace Overlay functions include: • • • • Drop Overlay Swap Overlay Hide/Show Overlay Align Overlays Depending on the Trace Overlay function selected, the function will either operate on all currently displayed Overlay traces (Align Overlays and Hide/Show Overlays) or on a single, user selected overlay trace (Drop Overlay and Swap Overlay). Drop Overlay Use the following procedure to drop (remove) a currently displayed Overlay trace. MT9083 Series ACCESS Master Operation Manual 4-85 Chapter 4: OTDR (Standard) Mode To Drop an Overlay trace: 1. When the Trace screen has a Primary trace and one or more Overlay traces displayed, press Drop Overlay (f1), the Drop Overlay dialog appears. Figure 4-31: Drop Overlay Dialog 2. Use the Up and Down Arrow keys to highlight the desired overlay trace in the Drop Overlay dialog (when there is more than one overlay traces currently displayed). 3. Press the Enter key. The Drop Overlay dialog closes and the selected Overlay trace is removed from the Trace screen. 4-86 MT9083 Series ACCESS Master Operation Manual Chapter 4: OTDR (Standard) Mode Swap Overlay Use the following procedure to swap an Overlay trace with the trace currently in the Primary trace position. To Swap an overlay trace with the primary trace: 1. When the Trace screen has a Primary trace and one or more Overlay traces displayed, press Swap Overlay (f2), the Swap Overlay dialog appears. Figure 4-32: Swap Overlay Dialog 2. Use the Up and Down Arrow keys to highlight the desired overlay trace in the Swap Overlay dialog (when there is more than one overlay traces currently displayed). 3. Press the Enter key. The Swap Overlay dialog closes and the selected Overlay trace is moved to the Primary trace position while the former Primary trace is moved to the overlay position of the swapped Overlay trace. MT9083 Series ACCESS Master Operation Manual 4-87 Chapter 4: OTDR (Standard) Mode Hide/Show Overlays Use Hide Overlays function to isolate the Primary trace by temporarily removing the currently displayed overlay trace(s) from the Trace screen. To isolate the Primary trace: • When the Trace screen has a Primary trace and one or more Overlay traces displayed, press Hide Overlays (f3). The legend on the softkey changes to Show Overlays and the Overlay traces are hidden, leaving only the Primary trace visible. Note The Hide Overlays softkey is only available when there are overlay traces currently displayed, as shown in Figure 4-30 on page 4-85. Figure 4-33: Trace Screen with Overlay Traces Hidden To restore hidden Overlay traces: • Press Show Overlays (f3). The hidden overlays are restored to the Trace screen. Note The Show Overlays softkey is only available when there are hidden overlay traces, as shown in Figure 4-33 above. 4-88 MT9083 Series ACCESS Master Operation Manual Chapter 4: OTDR (Standard) Mode Align Overlays The Align Overlay function forces all Overlay traces to align at the intersection of the currently active cursor and the Primary trace. Note The Align Overlay function is only available when in either Display From A or Display From B mode. See “Display From” on page 4-71 for details on setting the Display From mode. There are three Align Overlay states, which are reached by toggling Align Overlays (f4): • Align Overlays Off – When Align Overlay is toggled to Off, the currently displayed Overlay traces are not aligned. • Align Overlays On – When Align Overlay is toggled to On, all currently displayed Overlay traces are aligned to the same point on the screen as that of the intersection of the Primary trace and the cursor. See Figure 4-30 on page 4-85. • Align Overlay 1 dB Offset – When Align Overlay is toggled to 1 dB Offset, the traces are aligned as in Align Overlays On, but each overlay is offset from the common intersection point by 1 dB. See Figure 4-34, below. Figure 4-34: Align Overlays 1 dB Offset MT9083 Series ACCESS Master Operation Manual 4-89 Chapter 4: OTDR (Standard) Mode Working with OTDR (Standard) Trace Files Displaying Trace Files You can display up to four traces, at one time, on the Trace grid. Traces can either be recalled from mass storage (e.g.: internal memory or USB memory stick) or displayed while testing. To load a Primary trace from Mass Storage: 1. Press the File key. The Load screen appears. Figure 4-35: Load Screen 2. Use the Up and Down Arrow keys (or the Rotary knob) to highlight the desired trace file. 3. Select Load Primary (f1), the Load screen closes and the selected trace is displayed in the Trace grid in the Primary trace position. To load an Overlay trace from Mass Storage: 1. Press the File key. The Load screen appears. 2. Use the Up and Down Arrow keys (or the Rotary knob) to highlight the desired trace file. 3. Select Load Overlay (f2), the Load Overlay dialog appears. See Figure 4-36 on page 4-91. 4-90 MT9083 Series ACCESS Master Operation Manual Chapter 4: OTDR (Standard) Mode Figure 4-36: Load Overlay Dialog 4. Use the Up and Down Arrow keys (or the Rotary knob) to highlight the desired Load Overlay mode: • • Without Setups – Loads the trace for display only. With Setups – Loads the trace for display and forces the instrument test parameters to those used when the selected Overlay trace was collected. 5. Press the Enter key, the Load screen closes and the selected trace is displayed in the Trace grid in the an Overlay trace position. Note If an Overlay trace is loaded when no primary trace exists, the Overlay trace will NOT behave the same as a Primary trace when performing expansion/contraction, or Display From A, B, or Origin. Sorting Files The Sort function allows you to change the order in which files are listed in mass storage (files saved to the unit’s internal memory or to a USB memory stick). Files can be sorted by type (Name or Time/Date) in ascending or descending order. MT9083 Series ACCESS Master Operation Manual 4-91 Chapter 4: OTDR (Standard) Mode To set the Sort type: 1. Press the File key. The Load screen appears. 2. Press Sort (f3). The Sort/By dialog appears. Figure 4-37: Sort/By Dialog 3. Use the Left and Right Arrow keys to move the white arrow so that it is positioned to the left of the first selection in the desired pane of the dialog (Sort or By). 4. Use the Up and Down Arrow keys (or the Rotary knob) to highlight the desire setting within the pane. 5. With the desired settings highlighted in both panes, press the Enter key. The dialog closes and the files are listed in the selected order. New Folder Use the following procedure to create a new folder 1. Press the File key, the Load screen appears (see Figure 4-35 on page 4-90). 2. Select the desired medium in which the new folder will be located by highlighting the Medium field and toggling the Enter key to choose from Internal Memory or USB Memory. 4-92 MT9083 Series ACCESS Master Operation Manual Chapter 4: OTDR (Standard) Mode Note The USB Memory selection is only available when a USB memory stick is connected to the MT9083 Series. 3. Press New Folder (f4), the New Folder screen appears. See Figure 3-22 on page 3-41. If no USB keyboard is connected, follow the instructions from step 4. to enter the name using the front panel keys. If a USB keyboard is connected, you can modify the name directly from the keyboard. When all of the desired characters are entered, press the Enter key to save the new folder to the selected medium or press the ESC key to cancel the New Folder process. 4. Use the Up and Down Arrow keys to scroll the highlight from row to row, including the New Folder name field. Use the Right and Left Arrow keys to move the highlight within the selected row or, to move the text cursor in the New Folder name field when the field is highlighted. Or – Use the Rotary knob to navigate through each character in the character matrix as well as wrapping the highlight to the New Folder name field. 5. Use the f1 – f4 softkeys for the following: • Press Small Letter (f1) to change the character matrix to lower case letters. • Press Capital Letter (f2) to change the character matrix to upper case letters. • Press Symbols (f3) to change the character matrix to display the symbols available. • Press Space (f4) to insert a blank space in the file name. 6. With the desired character highlighted in the character matrix and the text cursor placed in the desired position, press the Enter key to enter the selected character in the New Folder name field. Use the Numeric keypad to enter numbers in New Folder name field. 7. When all of the desired characters are entered, press OK (f6) save the new folder to the selected medium or press ESC to cancel the New Folder process. MT9083 Series ACCESS Master Operation Manual 4-93 Chapter 4: OTDR (Standard) Mode Deleting Files Use either the Save screen (see Figure 4-39 on page 4-100) or the Load screen (see Figure 4-35 on page 4-90) to delete any data files stored in the internal memory or on a USB memory stick. You can delete a single file, multiple files or all of the files in the current directory. To delete a file: 1. Press the Save key, or the File key, if not already displaying either the Save screen (see Figure 4-39 on page 4-100) or the Load screen (see Figure 4-35 on page 4-90). 2. Use the Up and Down Arrow keys (or the Rotary knob) to highlight the desired trace file. 3. Press Delete (f5). The following message appears: Are you sure you want to delete the current selection? 4. Press Yes (f1) to delete the selected file, or press No (f2) to cancel without deleting the file. 5. Press the ESC Key to return to the test application. Use the following procedure to delete multiple files in a directory. To delete multiple files: 1. Press the Save key, or the File key, if not already displaying either the Save screen (see Figure 4-39 on page 4-100) or the Load screen (see Figure 4-35 on page 4-90). 2. Press More (f6). 3. Press Multi-Select Off (f3). The red legend on the softkey changes to “On”. 4. Use the Up and Down Arrow keys (or the Rotary knob) to highlight the first file to delete and then press the Enter key. A bullet appears before the selected file name and the total size of the selected files is shown on the bottom. Repeat step 4 until you have selected all of the files you want to delete. 5. Press More >> (f6). 6. Press Delete (f5). The following message appears: Are you sure you want to delete the current selection? 4-94 MT9083 Series ACCESS Master Operation Manual Chapter 4: OTDR (Standard) Mode 7. Press Yes (f1) to delete the selected files, or press No (f2) to cancel without deleting the files. Use the following procedure to delete all of the files in a directory or folder. To delete all files in a directory or folder: 1. Press the Save key, or the File key, if not already displaying either the Save screen (see Figure 4-39 on page 4-100) or the Load screen (see Figure 4-35 on page 4-90). 2. Select the desired folder/directory in which contains the file to be deleted. 3. Press the Down Arrow key to open the selected folder/directory. 4. Press More (f6). 5. Press Select All (f4). A bullet appears before each filename. Note If the Select All softkey (f4) is dimmed, toggle f3 so that the legend on the softkey reads “Multi-Select Off ”. 6. Press More (f6). 7. Press Delete (f5). The following message appears: Are you sure you want to delete the current selection? 8. Press Yes (f1) to delete all files in the selected directory, or press No (f2) to cancel without deleting the files. Copying Files Use either the Save screen (see Figure 4-39 on page 4-100) or the Load screen (see Figure 4-35 on page 4-90) to copy data files stored in the internal memory or on a USB memory stick. You can copy a single file, multiple files or all of the files in the current directory. To copy a file: 1. Press the Save key, or the File key, if not already displaying either the Save screen (see Figure 4-39 on page 4-100) or the Load screen (see Figure 4-35 on page 4-90). 2. Press More >> (f6). 3. Use the Up and Down Arrow keys (or the Rotary knob) to highlight the desired trace file. 4. Press Copy (f1). MT9083 Series ACCESS Master Operation Manual 4-95 Chapter 4: OTDR (Standard) Mode 5. Select the desired folder/directory in which to paste the selected file. 6. Press Paste (f2). A message box stating “Copy 1/1” along with the name of the file appears briefly. Use the following procedure to copy multiple files in a directory. To copy multiple files: 1. Press the Save key, or the File key, if not already displaying either the Save screen (see Figure 4-39 on page 4-100) or the Load screen (see Figure 4-35 on page 4-90). 2. Press More (f6). 3. Press Multi-Select Off (f3). The red legend on the softkey changes to “On”. 4. Use the Up and Down Arrow keys (or the Rotary knob) to highlight the first file to copy and then press the Enter key. A bullet appears before the selected file name and the total size of the selected files is shown on the bottom. 5. Repeat step 4 until you have selected all of the files you want to copy. 6. Press Copy(f1) 7. Select the desired folder/directory in which to paste the selected files. 8. Press Paste (f2). A message box appears displaying the count for each copied file as it is being pasted to the new directory/folder, as well as its filename. The message box closes when all of the selected files are pasted to their new location. Use the following procedure to copy all of the files in a directory/folder. To copy all files in a directory or folder: 1. Press the Save key, or the File key, if not already displaying either the Save screen (see Figure 4-39 on page 4-100) or the Load screen (see Figure 4-35 on page 4-90). 2. Select the desired folder/directory in which contains the files to be copied. 3. Press the Down Arrow key and highlight the first file in the selected directory/folder, if not already highlighted. 4. Press More (f6). 5. Press Select All (f4). A bullet appears before each filename. 4-96 MT9083 Series ACCESS Master Operation Manual Chapter 4: OTDR (Standard) Mode Note If the Select All softkey (f4) is dimmed, toggle f3 so that the legend on the softkey reads “Multi-Select Off ”. 6. Press Copy (f1). 7. Select the desired folder/directory in which to paste the selected files. 8. Press Paste (f2). A message box appears displaying the count for each copied file as it is being pasted to the new directory/folder, as well as its filename. The message box closes when all of the files from the selected directory/folder are pasted to their new location. Saving Files with AutoSave AutoSave automatically saves trace data at the completion of data collection. Note The MT9083 Series maintains the path of the last directory to which a manual file-save has occurred. The auto-save directory may in fact be a different directory. The MT9083 Series therefore maintains 2 file-save pathnames: manual save and auto-save. Depending on the settings made on the AutoSave screen in Setups, AutoSave behaves in one of the following way: • • • On – AutoSave is performed automatically, without displaying the Save screen. Verify – AutoSave displays the Save screen at the end of each data collection so you can verify the save details. Off – AutoSave is not performed. You need to perform a manual save to save the current test data, if desired. Automatic File Save To set up AutoSave for a full, automatic save: 1. Press the Setup key while in OTDR (Standard) mode. 2. Press AutoSave (f5). The AutoSave setups screen appears (see Figure 4-38 on page 4-98). MT9083 Series ACCESS Master Operation Manual 4-97 Chapter 4: OTDR (Standard) Mode Figure 4-38: AutoSave Setups Screen 3. Use the Up and Down Arrow keys (or the Rotary knob) to highlight Enabled in the AutoSave field and then press the Enter key. The Enabled dialog appears. 4. Use the Up and Down Arrow keys (or the Rotary knob) to highlight On. 5. Press the Enter key. The dialog closes and the AutoSave Enabled status is set to “On”. All data collections will be automatically saved. Note Setting the AutoSave Enabled status to “On” automatically sets and locks the Auto-Filename Enabled status at the “On” setting. Verifying the AutoSave Use the following procedure to set the AutoSave status to “Verify”, which displays the Save screen at the end of each data collection. To set the AutoSave status to Verify: 1. Press the Setup key while in OTDR (Standard) mode. 2. Press AutoSave (f5). The AutoSave setups screen appears (see Figure 4-38 on page 4-98). 4-98 MT9083 Series ACCESS Master Operation Manual Chapter 4: OTDR (Standard) Mode 3. Use the Up and Down Arrow keys (or the Rotary knob) to highlight Enabled in the AutoSave field and then press the Enter key. The Enabled dialog appears. 4. Use the Up and Down Arrow keys (or the Rotary knob) to highlight Verify. 5. Press the Enter key. The dialog closes and the AutoSave Enabled status is set to “Verify”. To AutoSave with verification: 1. Set the AutoSave status to “Verify” as detailed in the procedure above. 2. Perform the desired OTDR test. When the data collection is complete the Save screen (see Figure 4-39 on page 4-100) is displayed with the File Name field highlighted. 3. Choose any or all of the following functions, if desired, or continue at step 4: • Press the Enter key to edit the File Name, if desired, and follow the on-screen instructions for editing the file name. • Highlight the Medium field and then press Enter to toggle through the available selections. • Press Header (f2) to enter Header information. See “Headers” on page 4-102 for details. • Press New Folder (f4) to create a new folder for the file save. See “New Folder” on page 3-40 for details. • Select a different folder for the file save by highlighting the desired folder name (folder names are displayed in parentheses above the list of filenames) and then pressing Enter. 4. Press Save Trace (f1) to complete the verified AutoSave. MT9083 Series ACCESS Master Operation Manual 4-99 Chapter 4: OTDR (Standard) Mode Saving Files Manually You can perform a manual file save when the AutoSave status is set to “Off ”. See “To select the AutoSave Enabled status:” on page 4-28 for details. Note The MT9083 Series maintains the path of the last directory to which a manual file-save has occurred. The auto-save directory may in fact be a different directory. The MT9083 Series therefore maintains 2 file-save pathnames: manual save and auto-save. To manually save files: 1. At the completion of a test, press the Save key. The Save screen (Figure 4-39) appears with the File Name field highlighted. Figure 4-39: Save Screen Edit the filename, if desired, or continue at step 6 to use the current filename. To edit the filename, press the Enter key. The File Name dialog box appears. If no USB keyboard is connected, Refer to “Renaming a File” on page 3-32to input file name. 4-100 MT9083 Series ACCESS Master Operation Manual Chapter 4: OTDR (Standard) Mode If a USB keyboard is connected, you can modify the name directly from the keyboard. When all of the desired characters are entered, press the Enter key to return to the Save screen. Press the f1 key to complete the manual save. 2. When all of the desired characters are entered in the File Name field, press OK (f6) to return to the Save screen. 3. Press Save Trace (f1) to complete the manual save. MT9083 Series ACCESS Master Operation Manual 4-101 Chapter 4: OTDR (Standard) Mode Headers Headers hold valuable information about the trace files which may save a considerable amount of time when recalling traces for comparison. The header does not require repopulating each time a new trace is collected. Information entered on the Header screen is retained until such a time as the header requires editing. Editing the header on a recalled trace file (see “Displaying Trace Files” on page 4-90) affects only that trace file; the edits are not carried over to the general header. Use the following procedure to access and edit the header when collecting traces in OTDR (Standard) mode. To access and edit the Header: 1. Press the Save key. The Save screen appears (see Figure 4-39 on page 4-100). 2. Use the Up and Down Arrow keys (or the Rotary knob) to highlight the desired file name, if necessary. 3. Press Header (f2), the Header screen appears (see Figure 4-40). • To edit or enter header information continue at step 4. • To close the Header continue at step 10. Figure 4-40: Header Screen 4-102 MT9083 Series ACCESS Master Operation Manual Chapter 4: OTDR (Standard) Mode Note When Auto-Filename is enabled on the AutoSave screen (see Figure on page 4-24) the Fiber ID field of the Header screen is auto-populated, starting with the number set in the Start Number field. 4. Use the Up and Down Arrow keys (or the Rotary knob) to highlight the desired field and then press the Enter key. The Text Entry dialog boxdialog box appears (see Figure 4-41). If no USB keyboard is connected, follow the instructions from step 5. to enter the name using the front panel keys. If a USB keyboard is connected, you can modify the name directly from the keyboard. When all of the desired characters are entered, press the Enter key to return to the Header screen. Repeat steps 4 until all desired text entry fields on the Header screen are edited. Press the f6 key to close the Header and return to the Save screen. Figure 4-41: Text Entry dialog box MT9083 Series ACCESS Master Operation Manual 4-103 Chapter 4: OTDR (Standard) Mode 5. Use the Up and Down Arrow keys to scroll the highlight from row to row, including the current text entry field, which is located directly above the character matrix. (The current title of the text entry field matches the currently selected Header screen field.) Use the Right and Left Arrow keys to move the highlight within the selected row or, to move the text cursor in the text entry field when the field is highlighted. Or – Use the Rotary knob to navigate through each character in the character matrix as well as wrapping the highlight to the text entry field. 6. Use the f1 – f4 softkeys for the following: • Press Small Letter (f1) to change the character matrix to lower case letters. • Press Capital Letter (f2) to change the character matrix to upper case letters. • Press Symbols (f3) to change the character matrix to display the symbols available. • Press Space (f4) to insert a blank space in the file name. 7. With the desired character is highlighted in the character matrix press the Enter key to enter the selected character in the text entry field. Use the Numeric keypad to enter numbers in the filename. Use Backspace (f5) or the BS key to delete characters entered in the text entry field. 8. When all of the desired characters are entered in the text entry field, press OK (f6) to return to the Header screen. 9. Repeat steps 4 through 8 until all desired text entry fields on the Header screen are edited. 10. Press Exit (f6) to close the Header and return to the Save screen. 4-104 MT9083 Series ACCESS Master Operation Manual Chapter 4: OTDR (Standard) Mode Printing Trace Files Trace files can be printed via the optional BL-80RII or SD1-31 printers. Note The printed output from the MT9083 Series consists of a screen shot. Only the details currently displayed on the LCD, less the softkeys, are printed. Make sure that the desired details are displayed before printing. Connecting the Printer Connect the MT9083 Series to the BL-80RII or SD1-31 printers using a USB printer conversion cable as shown in the figure below: Figure 4-42: Connecting the BL-80RII Printer Printing a Trace File Make sure that the Printer setup parameters are set as desired on the setups General screen. See “Printer” and “Paper Feed” on page 3-9 for details. To print trace files: 1. Connect the BL-80RII or SD1-31 printers to the MT9083 Series as shown in Figure 4-42, and then power up the printer. 2. Perform the desired test or recall the desired trace file from mass storage. 3. Press the Print key. The following message appears: Output screen image to a printer or as an image file. Please select output type using the function keys. 4. Press Printer (f1). The message changes to “Please wait. Printing...”. The MT9083 Series returns to the Trace grid when the printout is completed. Saving a Trace File as an Image File See “Saving a Screen Image to a File” on page 3-31 for details. MT9083 Series ACCESS Master Operation Manual 4-105 Chapter 4: OTDR (Standard) Mode 4-106 MT9083 Series ACCESS Master Operation Manual Chapter 5: Fiber Visualizer Mode Chapter 5: Fiber Visualizer Mode Overview Fiber Visualizer mode provides a one button test to determine the end/fault location of a fiber. Press the Start key to start a test. The test proceeds through the following: • • • • Performs a connection check Selects the test parameters Runs the test Reports the test results in both summary form and in an event table. Starting Fiber Visualizer Mode To start the Fiber Visualizer mode: 1. Press the Top Menu key. 2. Highlight Fiber Visualizer, then press the Enter key. The initial Fiber Visualizer screen appears, and the measurement starts when the Start key is pressed, and the fault points in the fiber are shown by icons. MT9083 Series ACCESS Master Operation Manual 5-1 Chapter 5: Fiber Visualizer Mode Figure 5-1: Initial Fiber Visualizer Mode screen Setups – Fiber Visualizer Mode Setups for the Fiber Visualizer mode are accessed via the Setup key. This section allows you to customize the preferences and parameters for a given data collection or a series of collections. Entering Fiber Visualizer Setups 1. Start Fiber Visualizer mode. The Fiber Visualizer screen appears. 2. Press the Setup key. The following Setup screens are available: • General (f1) • Preferences (1-2) (f2) • Preferences (2-2) (f3) • Thresholds (f4) • AutoSave (f5) • About (f6) Press the softkey (f1 – f5) that corresponds to the desired settings category. 5-2 MT9083 Series ACCESS Master Operation Manual Chapter 5: Fiber Visualizer Mode Note The thresholds cannot be changed on Setup screen. Press Thresholds (F3) on the Fiber Visualizer screen to change the thresholds. General Setups Press General (f1) to access the General setups screen, if not already displayed. The General setups pertain to general setting for the MT9083 Series and are detailed in “General Screen Settings” on pages 3-7 – 3-15. Figure 5-2: General Setups Screen – Fiber Visualizer Mode Preferences (1-2) Press Preferences (1-2) (f2) to access the Preferences (1-2) screen (Figure 5-3 on page 5-4) and set the status for the following: • • • • • • Distance display Units Connection Check Active Fiber Check Auto Analysis Auto Scale Event Summary MT9083 Series ACCESS Master Operation Manual 5-3 Chapter 5: Fiber Visualizer Mode • • • • • • Reflectance Calculation ORL Calculation Trace Overview Real Time Averages Real Time Attenuation Display Mode After Analysis Figure 5-3: Preferences (1-2) Screen Distance Display Units Select the unit of measurement used to display distance on the horizontal axis of the Trace graph. This affects Range and Resolution readings and analysis events incorporating distance. To set the Distance Display units: 1. Use the Up and Down Arrow keys (or the Rotary knob) to highlight Distance display Units. 2. Press Enter and select the desired unit from the Distance display Units menu. 3. Press Enter again. The menu closes and the selected unit is set. 5-4 MT9083 Series ACCESS Master Operation Manual Chapter 5: Fiber Visualizer Mode Connection Check The Connection Check function confirms whether or not the fiber is connected correctly to the OTDR measurement port. To set the Connection Check: 1. Use the Up and Down Arrow keys (or the Rotary knob) to highlight Connection Check. 2. Press Enter and then select either On or Off from the dialog. 3. Press Enter again. The dialog closes and the selection is set. Active Fiber Check The Active Fiber Check performs a “live fiber” check on the currently attached fiber under test to detect whether the fiber is carrying traffic before firing any OTDR laser sources. • • If no traffic is detected the test proceeds normally. If traffic is detected a warning message appears on the screen and the test is aborted. To set the Active Fiber Check 1. Use the Up and Down Arrow keys (or the Rotary knob) to highlight Active Fiber Check. 2. Press Enter and then select either On or Off from the dialog. 3. Press Enter again. The dialog closes and the selection is set. Note The Active Fiber Check feature does not apply for the following options – Opt 063 (0.85/1.3 µm MMF only). Auto Analysis When set to “On”, OTDR trace analysis is automatically performed at the completion of data collection for the current fiber under test. To set Auto Analysis: 1. Use the Up and Down Arrow keys (or the Rotary knob) to highlight Auto Analysis. 2. Press Enter and select either On or Off from the dialog. 3. Press Enter again. The menu closes and the selection is set. MT9083 Series ACCESS Master Operation Manual 5-5 Chapter 5: Fiber Visualizer Mode Note Regardless of the set value, the waveform data is automatically analyzed if measured on the Fiber Visualizer screen. Auto Scale When set to “On”, Auto Scale provides a trace display that utilizes the maximum amount of horizontal scale for optimum trace viewing. To activate Auto Scale: 1. Use the Up and Down Arrow keys (or the Rotary knob) to highlight Auto Scale. 2. Press Enter and select either On or Off from the dialog. 3. Press Enter again. The menu closes and the selection is set. Event Summary When the Event Summary selection is set to “On” the Fiber Test Parameters area (see item 5 in Figure 4-10 on page 4-30) of the Trace screen is replaced by the Event Summary area, listing the Total Events, Fiber Length, and Total Loss of the current fiber under test. To set the Event Summary status: 1. Use the Up and Down Arrow keys (or the Rotary knob) to highlight Event Summary. 2. Press Enter and select either On or Off from the dialog. 3. Press Enter again. The menu closes and the selection is set. 5-6 MT9083 Series ACCESS Master Operation Manual Chapter 5: Fiber Visualizer Mode Reflectance Calculation Reflectance is the ratio of reflected power to incident power displayed in dB (see “Reflectance Measurements” on page 7-17 for details). The MT9083 Series has three settings for Reflectance Calculations: Off, Auto, and Manual. • Off – Reflectance will not be calculated. • Auto – The reflectance of any event is reported based on the position of cursor A. The Auto setting is most useful for reflective events that are not close together or close-in to the OTDR. • Manual – When set to Manual, the reported reflectance is based on the positions of both cursors (A and B). The Manual setting is most useful for reflective events that are close together or close-in to the OTDR. To set the Reflectance Calculation type: 1. Use the Up and Down Arrow keys (or the Rotary knob) to highlight Reflectance Calculation. 2. Press Enter. The Reflectance Calculation dialog appears. 3. Highlight the desired Reflectance Calculation setting: Off, Auto, or Manual. 4. Press Enter. The dialog closes and the selected setting is displayed in the Reflectance Calculation field. ORL Calculation Set the starting point for ORL (Optical Return Loss) measurements (see “ORL (Optical Return Loss)” on page 7-15 for details). Select from the following: • • • A Cursor – the measurement is calculated relative to the A Cursor. Origin – the measurement is calculated relative to the Origin of the trace. Full Trace – the measurement is calculated relative to the entire trace. To set the ORL Calculation type: 1. Use the Up and Down Arrow keys (or the Rotary knob) to highlight ORL Calculation. 2. Press Enter. The ORL Calculation dialog appears. MT9083 Series ACCESS Master Operation Manual 5-7 Chapter 5: Fiber Visualizer Mode 3. Highlight the desired ORL Calculation setting: A Cursor, Origin, or Full Trace. 4. Press Enter. The dialog closes and the selected setting is displayed in the ORL Calculation field. Trace Overview When set to “On”, a small overview of the trace is displayed in the lower left portion of the Trace graph. To activate the Trace Overview: 1. Use the Up and Down Arrow keys (or the Rotary knob) to highlight Trace Overview. 2. Press Enter and select either On or Off from the dialog. 3. Press Enter again. The menu closes and the selection is set. Real Time Averages Use the Real Time Averages setting to set the amount of averages used in a real-time scan. To set the Real Time Averages: 1. Use the Up and Down Arrow keys (or the Rotary knob) to highlight Real Time Averages. 2. Press Enter. The Real Time Averages dialog appears. 3. Highlight the desired setting: - Low – provides fast real-time updates with a lower dynamic range. - High – provides slower real-time updates with a higher dynamic range. 4. Press Enter. The dialog closes and the selected setting is displayed in the Real Time Averages field. Real Time Attenuation Select the attenuation method used during real-time scans. To set the Real Time Attenuation: 1. Use the Up and Down Arrow keys (or the Rotary knob) to highlight Real Time Attenuation. 2. Press Enter. The Real Time Attenuation dialog appears. 5-8 MT9083 Series ACCESS Master Operation Manual Chapter 5: Fiber Visualizer Mode 3. Highlight the desired setting: - Auto Attenuation – Real Time attenuation is automatically selected. - Around selected cursor – Attenuation is optimized in real-time to show the backscatter around the selected (active) cursor. 4. Press Enter. The dialog closes and the selected setting is displayed in the Real Time Attenuation field. Display Mode After Analysis In Fiber Visualizer, the cursor position is End/Break regardless of user’s setting. Preferences (2-2) Press Preferences (2-2) (f3) to access the Preferences (2-2) screen and set the status for the following: • • • • • • • Auto Patch-cord Removal Grid Display Force Total Loss Event Icon Movement End Event for ORL Calculation Event Table Span Calculation A-B Span analysis Figure 5-4: Preferences (2-2) Screen MT9083 Series ACCESS Master Operation Manual 5-9 Chapter 5: Fiber Visualizer Mode Auto Patch-cord Removal Specify the event number to treat as dummy fiber. The range of settings for this parameter is 1 to 9 in 1 increments. To set the Auto Patch-cord Removal: 1. Use the Up and Down Arrow keys (or the Rotary knob) to highlight Auto Patch-cord Removal. 2. Press Enter. The Auto Patch-cord Removal dialog appears. Depending on the current setting, the dialog will either state “None”, indicating that there is no Auto Patch-cord Removal currently set, or the dialog displays the current setting for the Auto Patch-cord Removal. 3. If the Auto Patch-cord Removal dialog displays “None”, press the Up or Down Arrow key to change it to the event number setting mode. 4. Use the Up and Down Arrow keys (or the Rotary knob) to increment or decrement the desired event number setting. Or enter it directly with the Numeric keypad. 5. Press Enter again to close the dialog and save the current setting. The event tables shows the distance information of dummy fiber. Figure 5-5: Auto Patch Screen 5-10 MT9083 Series ACCESS Master Operation Manual Chapter 5: Fiber Visualizer Mode Use the following procedure to set Auto Patch-cord Removal to “None” when it is currently set in event number. To set the Auto Patch-cord Removal to None: 1. Highlight Auto patch cord and then press Enter. The Auto Patch-cord Removal dialog appears, displaying the current event number setting. 2. Press None (f1), the dialog changes to “None”. 3. Press Enter. The dialog closes and the parameter is set to “None”. Note The Auto Patch-cord Removal feature works only with patch-cords that are at least 40 m (120 ft) and 40 data points longer than the pulse width. MT9083 Series ACCESS Master Operation Manual 5-11 Chapter 5: Fiber Visualizer Mode Grid Display Select the format for the grid lines on the trace screen. To set the Grid Display: 1. Use the Up and Down Arrow keys (or the Rotary knob) to highlight Grid Display. 2. Press Enter. The Grid Display dialog appears. 3. Highlight the desired setting: - Dotted - A dotted line grid is used for trace display. - Solid - A solid line grid is used for trace display. 4. Press Enter. The dialog closes and the selected setting is displayed in the Grid Display field. Force Total Loss Select the display settings for Total Loss (Cum.Loss(dB)). To set the Force Total Loss: 1. Use the Up and Down Arrow keys (or the Rotary knob) to highlight Force Total Loss. 2. Press Enter. The Force Total Loss dialog appears. 3. Highlight the desired setting: - ON - Always displays Total Loss (Cum.Loss). - OFF - Depending on conditions, "**.***" is displayed for the Total Loss (Cum.Loss) slot. Note Total Loss (Cum.Loss) cannot be displayed when: • An event appeared before backscatter could be found after the launch reflection. • An event exists 1.1 pulse widths after the launch backscatter. • Fiber end cannot be detected. 4. Press Enter. The dialog closes and the selected setting is displayed in the Force Total Loss field. 5-12 MT9083 Series ACCESS Master Operation Manual Chapter 5: Fiber Visualizer Mode Event Icon Movement Selects the direction of event icon movement when the encoder is turned. To set the Event Icon Movement: 1. Use the Up and Down Arrow keys (or the Rotary knob) to highlight Event icon movement. 2. Press Enter. The Event Icon Movement dialog appears. 3. Highlight the desired setting: - Left to Right- If the encoder is turned clockwise, the event icons move from right to left. If it is turned counterclockwise, the event icons move from left to right. - Right to Left- Opposite to Left to Right. 4. Press Enter. The dialog closes and the selected setting is displayed in the Event Icon Movement. End Event for ORL Calculation Set whether to include reflection in Far-End events or not when calculating the ORL. To set the End Event for ORL Calculation: 1. Use the Up and Down Arrow keys (or the Rotary knob) to highlight End Event for ORL Calculation. 2. Press Enter. The End event for ORL calculation dialog appears. 3. Highlight the desired setting: - INCLUDE- Includes the reflection in Far-End events when calculating the ORL. - OMIT- Not Includes the reflection in Far-End events when calculating the ORL. 4. Press Enter. The dialog closes and the selected setting is displayed in the End Event for ORL Calculation. MT9083 Series ACCESS Master Operation Manual 5-13 Chapter 5: Fiber Visualizer Mode Event Table Span Calculation Selects whether to display the span length or transmission loss (dB/km) on event table.This setting function applies only to Fiber Visualizer. To set the Event Table Span Calculation: 1. Use the Up and Down Arrow keys (or the Rotary knob) to highlight Event Table Span Calculation. 2. Press Enter. The Event Table Span Calculation dialog appears. 3. Highlight the desired setting: - Span Length- Display the span length between each event calculation on event table. - dB/km- Display the transmission loss (dB/km) between each event calculation on event table. 4. Press Enter. The dialog closes and the selected setting is displayed in the Event Table Span Calculation field. A-B Span Analysis Sets whether to specify the PASS/FAIL analysis span by Marker A and B. This setting function applies only to Fiber Visualizer. To set the A-B Span Analysis: 1. Use the Up and Down Arrow keys (or the Rotary knob) to highlight AB Span Analysis. 2. Press Enter. The A-B Span Analysis dialog appears. 3. Highlight the desired setting: - Off- Gives PASS/FAIL judgment on all events. - On- Gives PASS/FAIL judgment only on the events within the span specified by Marker A and B. However, the last event specified by the marker is excluded from analysis. (If Marker A specifies the first event, the last event specified by Marker B is excluded from analysis, and vice versa.) 4. Press Enter. The dialog closes and the selected setting is displayed in the A-B Span Analysis field. 5-14 MT9083 Series ACCESS Master Operation Manual Chapter 5: Fiber Visualizer Mode AutoSave Press AutoSave (f5) to access the AutoSave screen. This screen provides access to the Auto-Filename and AutoSave parameters. Figure 5-6: AutoSave Screen Auto-Filename Parameters The Auto-Filename parameters allow you to enter a base filename which is used to generate sequentially numbered filenames. • The Auto-Filename parameters include: - Enabled - AutoSave Directory - Base Filename - Start Number Enabled (Auto-Filename) Set this field to “On” to automatically generate a filename when a save is performed, or set the field to “Off ” so a filename is not automatically generated when a save is performed. MT9083 Series ACCESS Master Operation Manual 5-15 Chapter 5: Fiber Visualizer Mode To turn the Auto-Filename feature On or Off: 1. Use the Up and Down Arrow keys (or the Rotary knob) to highlight Enabled and then press the Enter key. The Enable dialog appears. 2. Highlight the desired selection On or Off. 3. Press the Enter key. The dialog closes and the parameter is set to the desired setting. Note The status of the Auto-Filename Enabled field is automatically set to “On” when the AutoSave Enabled field is set to “On”. See “Enabled (AutoSave)” on page 5-19 for details. AutoSave Directory The AutoSave Directory field allows you to select the directory into which AutoSave will save files. To select the AutoSave directory: 1. Use the Up and Down Arrow keys (or the Rotary knob) to highlight AutoSave Directory and then press the Enter key. The Select Directory screen appears. 2. Select the desired storage medium by highlighting the Medium field, if not already highlighted, and then press the Enter key to toggle the selection to either Internal Memory (which is the default setting) or USB Memory. Note You must have a USB Memory stick connected to the MT9083 Series in order to access the USB Memory selection in the Medium field. 3. To save to a specific folder in the selected Medium, highlight the name of the folder and then press the Enter key. The name of the selected folder appears below the Medium field. If you are not saving to a specific folder, skip step 3 and continue at step 4 4. Press Select (f1). The AutoSave setups screen appears with the selected directory displayed in the AutoSave Directory field. 5-16 MT9083 Series ACCESS Master Operation Manual Chapter 5: Fiber Visualizer Mode Base Filename The Base Filename field provides a template for use when generating an autofilename. You can enter a base filename of up to 30 characters with a three character file extension. To set a Base Filename: 1. Use the Up and Down Arrow keys (or the Rotary knob) to highlight Base Filename and then press the Enter key. The Filename dialog boxdialog box appears (see Figure 5-7, below). If no USB keyboard is connected, refer to “Renaming a File” on page 3-32 to input the file name. If a USB keyboard is connected, you can modify the name directly from the keyboard. When all of the desired characters are entered, press the Enter key to use the new base file name or press the ESC key to close the Base Filename dialog box without changing the base file name. Figure 5-7: Base Filename Screen – File Name dialog box 2. When all of the desired characters are entered, press OK (f6) to use the new Base Filename or press ESC to close the FileName dialog box without changing the Base Filename. MT9083 Series ACCESS Master Operation Manual 5-17 Chapter 5: Fiber Visualizer Mode Start Number Use this field to establish a start number for the auto-increment section of the Base Filename. You can set a start number for each test wavelength available on the MT9083 Series in use or apply the same start number to all wavelengths. The range of setting for the Start Number is from 1 to 9999, set in increments of 1. Note The wavelength listed in parentheses after the text “Start Number” will vary with the current test wavelength setting. To set the Start Number: 1. Use the Up and Down Arrow keys (or the Rotary knob) to highlight Start Number and then press the Enter key. The Start Number dialog appears. Figure 5-8: Start Number Dialog 2. Use the Up and Down Arrow keys (or the Rotary knob) to increment or decrement the Start number. Or enter it directly with the Numeric keypad. 3. Use the Left and Right Arrow keys to select either Yes or No in the Apply to All Wavelengths field. 4. Press the Enter key. The dialog closes and the start number for the current test wavelength or for all wavelengths, depending on the selection made in step 3, is set. 5-18 MT9083 Series ACCESS Master Operation Manual Chapter 5: Fiber Visualizer Mode Enabled (AutoSave) This parameter sets the status for the AutoSave function. Select from the following setting: • Off – No AutoSave is performed after the measurement is complete. • On – AutoSave is performed after the measurement is complete. • Verify – The Save screen appears after the measurement is complete so you can verify the Auto Filename. To select the AutoSave Enabled status: 1. Use the Up and Down Arrow keys (or the Rotary knob) to highlight Enabled in the AutoSave field and then press the Enter key. The Enabled dialog appears. 2. Use the Up and Down Arrow keys (or the Rotary knob) to highlight the desired AutoSave Enabled status: Off, On, or Verify 3. Press the Enter key. The dialog closes and the AutoSave Enabled status is set. Note Setting the AutoSave Enabled status to “On” automatically sets and locks the Auto-Filename Enabled status at the “On” setting. About Screen See “About Screen” on page 3-26 for details. MT9083 Series ACCESS Master Operation Manual 5-19 Chapter 5: Fiber Visualizer Mode Fiber Visualizer Screen The initial Fiber Visualizer screen appears when you start a Fault Locate test. When the measurement completes, the fault points are indicated by icons as the figure below. 1 2 3 5 4 5 Figure 5-9: Fiber Visualizer screen 1 Measurement Conditions 2 Overview of the fiber under test 3 Trace events 4 Test results 5 Softkeys Over view of the fiber under test The total length of the measured fiber, a count of events, the position of the displayed event, and the event point on the fiber are displayed. 5-20 MT9083 Series ACCESS Master Operation Manual Chapter 5: Fiber Visualizer Mode Trace events The automatically detected points such as connection point, splice points or splitter are indicated by the icons. Event point is displayed above the icon, loss is displayed under the icon. The icon in red indicates the loss exceeds the threshold level. Test Results The total loss, ORL, the reflection of the selected event and the trace are displayed at each wavelength. Pass/Fail Thresholds Events whose loss exceeds the Pass/Fail Thresholds are highlighted in red. Figure 5-10: Fiber Visualizer Screen MT9083 Series ACCESS Master Operation Manual 5-21 Chapter 5: Fiber Visualizer Mode Figure 5-11: Trace Screen in Fiber Visualizer 5-22 MT9083 Series ACCESS Master Operation Manual Chapter 5: Fiber Visualizer Mode Trace Screen Trace screen appears when you press Trace (F2) on the Fiber Visualizer screen (see Figure 5-9 on page 5-20). 1 2 6 5 4 3 6 Figure 5-12: Trace screen 1 Event table 2 Trace graph 3 Cursor distance information 4 Loss mode, Measurement. and Reflectance 5 Fiber test parameters or Event summary 6 Softkeys Event Table The list of the event icons on the Fiber Visualizer screen is displayed. MT9083 Series ACCESS Master Operation Manual 5-23 Chapter 5: Fiber Visualizer Mode Note Any detected event within the threshold is enclosed within parentheses. If the measured value cannot be obtained, for example, because a fault point is being approximated, this is displayed as “**.***”. Reflectance A reflectance value is displayed for all reflective events, while “**.***” is displayed in the Reflectance field [Reflect(dB)] for non-reflective events. In addition to the reflectance value, two other indicators may be present: S. • An “S” following the numeric value indicates that the reflective event being measured is very close to the top limit of the OTDR’s data set, and that it is considered “saturated” (hitting the high limit of the measurement ability). An “S” (saturated indicator) will be present any time that the peak of the event being measured is within 1 dB of the top of the OTDR Trace graph. dB/km This field displays the dB/km between the selected event and the prior event. The unit of distance (km, kf, or mi) will vary depending on the Distance Display Units selected on the Preferences screen. Trace Graph The Trace graph displays the trace data in graph form. Power loss is measured in dB along the vertical axis and distance is measured along the horizontal axis. Use the Distance Display Units setting on the Preferences screen to set the horizontal axis units. The downward slope of the trace indicates power loss (attenuation) over the distance of the fiber. 5-24 MT9083 Series ACCESS Master Operation Manual Chapter 5: Fiber Visualizer Mode 4 2 1 3 7 6 8 5 Figure 5-13: Trace Graph 1 Trace waveform(s) 2 Cursor A 3 Cursor B 4 Horizontal/Vertical offset 5 Horizontal Axis scale 6 Vertical Axis scale 7 dB level indicator 8 Trace Overview window Trace Waveform The Trace Waveform (or Trace) is the downward sloping line going from left to right that connects the data points collected during a test. See item 1 in Figure 5-13 on page 5-25. Up to four traces can be displayed simultaneously: a primary trace and up to three overlay traces. MT9083 Series ACCESS Master Operation Manual 5-25 Chapter 5: Fiber Visualizer Mode This area also contains scroll bars, located at the top and left side of the trace graph, which define the display range of the waveform. Cursors The cursors (see items 2 and 3 in Figure 5-13 on page 5-25) are the two vertical lines that extend from the top to the bottom of the trace graph. The cursors allow you to extract power and distance information from the trace graph. The active cursor is displayed in red and the inactive cursor is displayed in blue. See “Selecting and Positioning Cursors” on page 4-57 for details on cursor use. Horizontal/Vertical Offset Trace data can be shifted horizontally or vertically by using the Shift Mode softkeys and the Rotary knob. The distance offset (horizontal) and decibel offset (vertical) are displayed above the trace graph. These values (see item 4 in Figure 5-13 on page 5-25) in are only displayed when some type of shift is in use. See “Swap Overlay” on page 5-58 for details on how to shift the trace. Scale The vertical axis scale (see item 6 in Figure 5-13 on page 5-25) is located on the left side of the trace graph and is expressed in dBs, while the horizontal axis scale (see item 5 in Figure 5-13) is located at the bottom of the trace graph and is expressed in the distance unit as set on the Preferences screen. See “Distance Display Units” on page 5-4 for details. dB Level Indicator The dB level indicator (see item 7 in Figure 5-13 on page 5-25) denotes the intersection of the active cursor and the trace level. Trace Overview Window The Trace Overview window, located in the lower left corner or the Trace graph, show a thumbnail view of the current trace. This is helpful in determining the location of an expanded section on the main view. The black rectangle inside the Trace Overview window indicates the section of the trace that is currently displayed in the Trace graph when the trace has been expanded horizontally, vertically. 5-26 MT9083 Series ACCESS Master Operation Manual Chapter 5: Fiber Visualizer Mode Trace Overview must be set to On in the Preferences tab for the window to be displayed. See “Trace Overview” on page 5-8 for details. Cursor Distance Information The Cursor Distance information (see item 3 in Figure 5-12 on page 5-23) displays the following: • • • Distance from the origin of the trace to Cursor A Distance from the origin of the trace to Cursor B Distance between Cursor A and Cursor B As you move the cursors, the Cursor Distance information updates simultaneously. Loss Mode, Measurement, and Reflectance The Loss Mode, Measurement, and Reflectance area (see item 4 in Figure 5-12 on page 5-23) displays the following: • • • The current loss mode, listed in the top section The current loss reading in dB, in the center section A reflectance value reading for reflective events in the bottom section Fiber Test Parameters The Fiber Test Parameters area (see item 5 in Figure 5-12 on page 5-23) displays the Wavelength (WL), Distance Range (DR), Pulsewidth (PW), Index of Refraction (IOR), Resolution (RES), and Averaging mode (AVG) set for the current test. The Test Progress bar indicates the current averaging status. See item 5 in Figure 4-10 on page 4-30. Note The Fiber Test Parameters area is replaced by the Event Summary area when the Event Summary selection is set to “On” on the Preferences screen (see Figure 5-3 on page 5-4). The Event Summary area displays the Total Events, Fiber Length, and Total Loss of the current fiber under test. MT9083 Series ACCESS Master Operation Manual 5-27 Chapter 5: Fiber Visualizer Mode Softkeys – Fiber Visualizer Mode Fiber Visualizer screen and Trace screen has six softkeys accessed via the f1- f6 keys on the right side of the LCD screen and four softkeys accessed via the F1-F4 keys on the lower side of the LCD Screen (see Figure 2-1 on page 2-1). Softkey text indicates the softkey functions and may change with each keypress. Softkey Levels - Fiber Visualizer screen Fiber Visualizer screen has only Level One softkeys. Softkey text indicates the softkey functions and may change with each keypress. If the softkey text is dimmed, the function is not available. Press f1 to advance the test from the Connection Check. Note The softkey is displayed only when Connection Check is being executed. Press f6 to cancel the current data collection. Note The softkey is displayed only when Connection Check is being executed. Press f1 to switch Auto, Manual or FTTA of Average measurement mode. FTTA stands for Fiber to the antenna. The red legend on the softkey displays the current Test Mode setting. Press f2 to switch the marker A or B. The red legend on the softkey displays the current Marker setting. Press the Enter key to specify the marker position. The distance and loss between A and B are displayed in the trace events. 5-28 MT9083 Series ACCESS Master Operation Manual Chapter 5: Fiber Visualizer Mode Press f3 to toggle through the available source wavelengths. The red legend on the softkey displays the current wavelength setting. Note Pressing the Wavelength softkey on single wavelength units sounds an error tone. The macro bending is detected before tests when Wavelength 1310/1550 (Macro Bend) or 1310/1625 (Macro Bend) is selected. Note Macro Bend detection requires a unit with at least two single mode operating wavelengths; one at 1310 nm and a second at either 1550 nm or 1625 nm. Press f4 to display the Test Parameter screen See “Setting the Test Parameters” on page 4-78 for details. When Test Mode is set to FTTA, Test Parameters are fixed values. Press f5 to set the IOR (Index of Refraction) and BSC (Backscatter Coefficient) used for the current test. The red legends display the current settings. Press f6 to swap the event icons between 1310 nm and 1550 (or 1625) nm. MT9083 Series ACCESS Master Operation Manual 5-29 Chapter 5: Fiber Visualizer Mode Softkey Levels - Trace screen Trace screen has Level Three softkeys. Softkey text indicates the softkey functions and may change with each keypress. If the softkey text is dimmed, the function is not available. Level One Softkeys Press f1 to switch Auto, Manual or FTTA of Average measurement mode. The red legend on the softkey displays the current Test Mode setting. Press f2 to start a Real Time test. The red legend on the Real Time softkey changes to “On” while the test is running. Press f3 to toggle through the available wavelengths. The red legend on the softkey displays the current wavelength setting. In addition, dual, tri and quad wavelength units also feature a “Wavelength All” setting. See “Setting the Source Wavelength to All” on page 4-78 for details. Note Pressing the Wavelength softkey on single wavelength units sounds an error tone When Wavelength (f3) is set to “All”, f4 changes to the Test Parameters softkey. Press f4 to display the Test Parameters screen. See “Setting the Test Parameters” on page 4-78 for details. When Test Mode is set to FTTA, Test Parameters are fixed values. Press f5 to set the Display From mode for viewing the trace graph. The red legend on the softkey displays the current display mode. 5-30 MT9083 Series ACCESS Master Operation Manual Chapter 5: Fiber Visualizer Mode Press f6 to advance to the Level Two softkeys. Level Two Softkeys Press f2 to set the IOR (Index of Refraction) and BSC (Backscatter Coefficient) used for the current test. The red legends display the current settings. Note The IOR/BSC softkey is dimmed when the Wavelength softkey is set to “Wavelength All” mode. Press f3 to select the desired loss mode for the current test. The red legend displays the currently selected loss mode. Press f4 to access the Cursor softkeys. See “Level Four Softkeys” on page 5-33 for details. Press f5 to access the Shift mode softkeys. See “Shift Mode Softkeys” on page 5-35 for details. Press f6 to advance to the Level Three softkeys. MT9083 Series ACCESS Master Operation Manual 5-31 Chapter 5: Fiber Visualizer Mode Level Three Softkeys Press f2 to toggle the status of the active cursor. When the red legend reads “Event”, turning the Rotary knob causes the active cursor to snap to the events on the trace. When the red legend reads “Free” you can position the cursors anywhere on the trace grid. Place Cursor A near an event and then press f3 to automatically zoom in on the event. Press f4 to display the ORL value in the Loss Mode area (see item 4 in Figure 4-10 on page 4-30). Note This softkey is only active when the loss mode is set to ORL. Press f5 to toggle the Analysis function “On” and “Off ”. The Event Table for the current trace is displayed when the red legend on the softkey reads “On” and the table is hidden when the legend reads “Off ”. Press f6 to return to the Level One softkeys. 5-32 MT9083 Series ACCESS Master Operation Manual Chapter 5: Fiber Visualizer Mode Level Four Softkeys The Level Four softkeys provide trace editing functions and are only available when the current trace displays an Event Table. Press f1 to add a new event to the current event table. See “Adding an Event” on page 4-43 Note The Add Event softkey is only active in Splice Loss mode. Press f2 to edit an event in the current event table. See “Editing an Event” on page 4-45 Note The Edit Event softkey is only active in Splice Loss mode. Press f3 to delete an event from the current event table. See “Deleting an Event” on page 4-49 Press f6 to return to the Level One softkeys. MT9083 Series ACCESS Master Operation Manual 5-33 Chapter 5: Fiber Visualizer Mode Cursor Softkeys The Cursor softkeys are accessed from the Level Three softkeys by pressing Cursors (f4). Toggle f1 so that the red legend on the softkey reads “Locked”. The distance between Cursor A and Cursor B will remain fixed when Cursor B is moved. See “Locking and Unlocking Cursors” on page 5-36 for details. Press f2 to toggle the state of the LSA loss intervals. When the red legend on the softkey reads “On” you can adjust the length of the LSA loss intervals. Note The Move LSA softkey is only active in the following loss modes: Splice Loss, 2pt LSA, and dB/km LSA. Press f3 to return the LSA loss intervals to their default settings. Note The Default LSA softkey is only active when in the following loss modes: Splice Loss, 2Pt LSA, and dB/km LSA. Press f6 to close the Cursor softkeys and return to the Level Three softkeys. 5-34 MT9083 Series ACCESS Master Operation Manual Chapter 5: Fiber Visualizer Mode Shift Mode Softkeys The Shift Mode softkeys are accessed from the Level Three softkeys by pressing Shift (f5). Toggle f1 to set the Shift Mode: Horizontal or Vertical. Press f2 to reset the horizontal shift to 0 (zero). Press f3 to reset the vertical shift to 0 (zero). Press f6 to close the Shift Mode softkeys and return to the Level Two softkeys. Extension Softkeys Press F1 to display the Fiber Visualizer screen. Press F2 to display the Trace screen. Press F3 to display the Threshold screen. Press F4 to display the OTDR Report Settings screen Selecting and Positioning Cursors The active cursor is displayed as a red vertical line in the Trace graph. Setting the Active Cursor To toggle the active cursor: • Press the Rotary knob (or the Enter key) to select the desired cursor. MT9083 Series ACCESS Master Operation Manual 5-35 Chapter 5: Fiber Visualizer Mode Precise Positioning of the Active Cursor To precisely position the cursor: 1. Select the desired cursor (see “Setting the Active Cursor” above). 2. Press Display From (f5) and select the desired display from setting (Display From A or Display From B, depending on which is cursor is currently selected as the active cursor). 3. Use the Left, Right, Up and Down Arrow keys to zoom up the desired amount. See “Horizontal and Vertical Expand and Contract” on page 5-36 for details. 4. Turn the Rotary knob to position the active cursor until the desired cursor distance is displayed in the Cursor Distance Information area (see item 3 in Figure 5-12 on page 5-23). Locking and Unlocking Cursors To lock the cursors: 1. Set Cursor B as the active cursor. 2. Press Cursors (f4), the Cursor softkeys appear. 3. Toggle Cursors (f1) until the red legend on the softkey reads “Locked”. When the cursors are locked, the distance between the cursors remains fixed. To unlock the cursors: 1. Press Cursors (f4), the Cursor softkeys appear. 2. Press Cursors Locked (f1), the red legend on the softkey changes to “Unlocked”. 3. Press Exit (f6) to close the Cursor softkeys and return to the Level Two softkeys. Horizontal and Vertical Expand and Contract Use the Horizontal/Vertical expand to expand a section of the trace when: • • Positioning the cursors for a test Adjusting the LSA intervals To expand an area: 1. Position the desired cursor (A or B) to the approximate position. 2. Toggle Display From (f5) to the desired mode, Display From A or Display From B, depending on the cursor selected in step 1. 5-36 MT9083 Series ACCESS Master Operation Manual Chapter 5: Fiber Visualizer Mode 3. Press the Up Arrow key. Each press decreases the dB/division value of the vertical grid scale by a factor of two. Press the Right Arrow key. Each press decreases the distance/division value on the horizontal grid scale by a factor of two. To contract an area: • • Press the Down Arrow key. Each press increases the dB/division value of the vertical grid scale by a factor of two. Press the Left Arrow key. Each press increases the distance/division value on the horizontal grid scale by a factor of two. Note An error tone sounds when you reach the full expand/contract value for either axis. Thresholds Press Thresholds (F3) on the Fiber Visualizer screen or the Trace screen to access the Thresholds screen. Figure 5-14: Thresholds Screen Thresholds settings can be saved and loaded. MT9083 Series ACCESS Master Operation Manual 5-37 Chapter 5: Fiber Visualizer Mode To Load a Threshold file: 1. Press Load (f1) to display the Load Threshold screen. 2. Use the Up and Down Arrow keys (or the Rotary knob) to highlight Threshold file(.INI) to read. 3. Press Load (f1). To Save a Threshold file 1. Press Save (f2) to display the Save Threshold screen. 2. Use the Up and Down Arrow keys (or the Rotary knob) to highlight File Name and then press the Enter key. 3. Enter the file name for Threshold file and then press OK (f6). 4. Select the desired storage medium by highlighting the Medium field, if not already highlighted, and then press the Enter key to toggle the selection to either Internal Memory (which is the default setting) or USB Memory. 5. Press Save (f1). Auto Detect Parameters Events that exceed the Auto Detect parameter settings are reported in the Event Analysis table. • The Auto Detect parameters include: - Splice Loss - Reflectance - Fiber End - Macro Bend - Splitter Loss Splice Loss Determines the Splice Loss value equal to or above which will be reported in the Events analysis. The range of settings for this parameter is 0.01 dB to 9.99 dB in 0.01 dB increments. To set the Splice Loss threshold: 1. Use the Up and Down Arrow keys (or the Rotary knob) to highlight Splice Loss. 5-38 MT9083 Series ACCESS Master Operation Manual Chapter 5: Fiber Visualizer Mode 2. Press Enter. The Splice Loss dialog appears. 3. Use the Up and Down Arrow keys (or the Rotary knob) to increment/decrement the splice loss threshold setting. Or enter it directly with the Numeric keypad. 4. Press Enter again. The dialog closes and the new Splice Loss threshold is set. Reflectance Determines the lowest Reflectance value that will be reported by analysis. Any event with a reflectance equal to or greater than the value in this parameter will be reported in Event analysis. The range of settings for this parameter is -70.0 dB to -20.0 dB in 0.1 dB increments. To set the Reflectance threshold: 1. Use the Up and Down Arrow keys (or the Rotary knob) to highlight Reflectance. 2. Press Enter. The Reflectance dialog appears. 3. Use the Up and Down Arrow keys (or the Rotary knob) to increment/decrement the reflectance threshold setting. Or enter it directly with the Numeric keypad. 4. Press Enter again. The dialog closes and the new Reflectance threshold is set. Fiber End Determines the Fiber End value equal to or above which will be reported in the Events analysis. The range of settings for this parameter is 1 dB to 99 dB in 1 dB increments. To set the Fiber End threshold: 1. Use the Up and Down Arrow keys (or the Rotary knob) to highlight Fiber End. 2. Press Enter. The Fiber End dialog appears. 3. Use the Up and Down Arrow keys (or the Rotary knob) to increment/decrement the fiber end threshold setting. Or enter it directly with the Numeric keypad. MT9083 Series ACCESS Master Operation Manual 5-39 Chapter 5: Fiber Visualizer Mode 4. Press Enter again. The dialog closes and the new Fiber End threshold is set. 5-40 MT9083 Series ACCESS Master Operation Manual Chapter 5: Fiber Visualizer Mode Macro Bend Determines the Macro Bend detect value equal to or above which will be reported in the Events analysis. Note Macro Bend detection requires a unit with at least two single mode operating wavelengths; one at 1310 nm and a second at either 1550 nm or 1625 nm. The range of settings for this parameter is 0.3 dB to 2 dB in 0.1 dB increments. To set the Macro Bend threshold: 1. Use the Up and Down Arrow keys (or the Rotary knob) to highlight Macro Bend. 2. Press Enter. The Macro Bend dialog appears. 3. Use the Up and Down Arrow keys (or the Rotary knob) to increment/decrement the fiber end threshold setting. Or enter it directly with the Numeric keypad. 4. Press Enter again. The dialog closes and the new Macro Bend threshold is set. Splitter Loss Determines the Splitter Loss value equal to or above which will be reported as Splitter event in the Events analysis. The range of settings for this parameter is 1.0 dB to 30.0 dB in 0.1 dB increments. To set the Splitter Loss threshold: 1. Use the Up and Down Arrow keys (or the Rotary knob) to highlight Splitter Loss. 2. Press Enter. The Splitter Loss dialog appears. 3. Go to Step 4 if the splitter loss is already at hand. Use the Left and Right Arrow keys to select Branch, and then use the Up and Down Arrow keys (or the Rotary knob) to select the number of branches. 4. Use the Left and Right Arrow keys to select Splitter Loss, and then use the Up and Down Arrow keys (or the Rotary knob) to increment/decrement the splitter loss threshold setting. Or enter it directly with the Numeric keypad. MT9083 Series ACCESS Master Operation Manual 5-41 Chapter 5: Fiber Visualizer Mode 5. Press Enter again. The dialog closes and the new Splitter Loss threshold is set. Pass/Fail Thresholds Parameters Events that exceed the Pass/Fail Threshold parameters are highlighted in red in the Event Analysis table. • 5-42 The Pass/Fail Thresholds parameters include: - Non-Reflective Event Loss (fusion) - Reflective Event Loss (connector, mechanical) - Reflectance - Fiber Loss (dB/km) - Total Loss - Splitter Loss - ORL MT9083 Series ACCESS Master Operation Manual Chapter 5: Fiber Visualizer Mode Non-Reflective Event Loss (fusion) This parameter highlights non-reflective event losses, such as fusion splices, in the Events Analysis table. The range of settings for this parameter is 0.10 dB to 9.99 dB in 0.01 dB increments. To set the Non-Reflective Event Loss threshold: 1. Use the Up and Down Arrow keys (or the Rotary knob) to highlight Non-Reflective Event Loss. 2. Press Enter. The Non-Reflective Event Loss dialog appears. The dialog displays the current setting for the threshold in dBs. 3. Use the Up and Down Arrow keys (or the Rotary knob) to increment or decrement the desired dB setting. Or enter it directly with the Numeric keypad. 4. Press the Enter key again to close the dialog and save the current setting. Use the following procedure to set Non-Reflective Event Loss to “None” when it is currently set in dBs. Reflective Event Loss (connector, mechanical) This parameter highlights reflective event losses, such as connectors and mechanical splices, in the Events Analysis table. The range of settings for this parameter is 0.10 dB to 9.99 dB in 0.01 dB increments. To set the Reflective Event Loss threshold: 1. Use the Up and Down Arrow keys (or the Rotary knob) to highlight Reflective Event Loss. 2. Press Enter. The Reflective Event Loss dialog appears. The dialog displays the current setting for the threshold in dBs. 3. Use the Up and Down Arrow keys (or the Rotary knob) to increment or decrement the desired dB setting. Or enter it directly with the Numeric keypad. 4. Press the Enter key again to close the dialog and save the current setting. MT9083 Series ACCESS Master Operation Manual 5-43 Chapter 5: Fiber Visualizer Mode Reflectance This parameter highlights events in the Event Analysis table that exceed the set Reflectance value. The reflectance of Fiber End is not checked when End event for ORL calculation is OMIT. The range of settings for this parameter is -50.0 dB to -10.0 dB in 0.1 dB increments. To set the Reflectance threshold: 1. Use the Up and Down Arrow keys (or the Rotary knob) to highlight Reflectance. 2. Press Enter. The Reflectance dialog appears. The dialog displays the current setting for the threshold in dBs. 3. Use the Up and Down Arrow keys (or the Rotary knob) to increment or decrement the desired dB setting. Or enter it directly with the Numeric keypad. 4. Press the Enter key again to close the dialog and save the current setting. Use the following procedure to set Reflectance to “None” when it is currently set in dBs. Fiber Loss (dB/km) This parameter highlights events in the Event Analysis table when the dB/km loss exceeds the value set. The range of settings for this parameter is 0.01 dB to 9.99 dB in 0.01 dB increments. To set the Fiber Loss (dB/km) threshold: 1. Use the Up and Down Arrow keys (or the Rotary knob) to highlight Fiber Loss (dB/km). 2. Press Enter. The Fiber Loss (dB/km) dialog appears. The dialog displays the current setting for the threshold in dBs. 3. Use the Up and Down Arrow keys (or the Rotary knob) to increment or decrement the desired dB setting. Or enter it directly with the Numeric keypad. 4. Press the Enter key again to close the dialog and save the current setting. 5-44 MT9083 Series ACCESS Master Operation Manual Chapter 5: Fiber Visualizer Mode Total Loss This Parameter highlights events in the Event Analysis table when the Total loss (Cum.Loss (dB)) exceeds the value set. The range of settings for this parameter is 0.1 dB to 60.0 dB in 0.1 dB increments. To set the Total Loss threshold: 1. Use the Up and Down Arrow keys (or the Rotary knob) to highlight Total Loss. 2. Press Enter. The Total Loss dialog appears. The dialog displays the current setting for the threshold in dBs. 3. Use the Up and Down Arrow keys (or the Rotary knob) to increment or decrement the desired dB setting. Or enter it directly with the Numeric keypad. 4. Press the Enter key again to close the dialog and save the current setting. Splitter Loss This Parameter highlights events in the Event Analysis table when the splitter loss exceeds the Auto Detect threshold plus value set. The range of settings for this parameter is 0.1 dB to 20.0 dB in 0.1 dB increments. To set the Splitter Loss threshold: 1. Use the Up and Down Arrow keys (or the Rotary knob) to highlight Splitter Loss. When Test Mode is FTTA, Splitter Loss cannot be selected. 2. Press Enter. The Splitter Loss dialog appears. Depending on the current setting, the dialog displays the current setting for the threshold in dBs. 3. 4. Use the Up and Down Arrow keys (or the Rotary knob) to increment or decrement the desired dB setting. Or enter it directly with the Numeric keypad. 5. Press the Enter key again to close the dialog and save the current setting. ORL This parameter highlights ORL value in the ORL of Test results field that exceed the set ORL value. The Fiber End event is not included when End event for ORL calculation is OMIT. MT9083 Series ACCESS Master Operation Manual 5-45 Chapter 5: Fiber Visualizer Mode The range of settings for this parameter is 0.0 dB to 60.0 dB in 0.1 dB increments. To set the ORL threshold: 1. Use the Up and Down Arrow keys (or the Rotary knob) to highlight ORL. 2. Press Enter key. The ORL dialog appears. The dialog displays the current setting for the threshold in dBs. 3. Use the Up and Down Arrow keys (or the Rotary knob) to increment or decrement the desired dB setting. Or enter it directly with the Numeric keypad. 4. Press the Enter key again to close the dialog and save the current setting. Report Settings In Fiber Visualizer mode, the measurement result is output to PDF by report format. Header The following items can be output as a header on report cover. • • • • Customer Location Operator Notes To edit Headers 1. Press Report (F4) on Fiber Visualizer screen or Trace screen to display the Report Settings screen. 2. Use the Up and Down Arrow keys (or the Rotary knob) to highlight the desired field and then press the Enter key. The Text Entry dialog boxdialog box appears. 3. Correct the selected field. 4. When all of the desired characters are entered, press the Enter key to return to the Report Settings Header screen. 5. Repeat Step 2 through 4. Selecting Data to Output The following items can be output in the report. 5-46 MT9083 Series ACCESS Master Operation Manual Chapter 5: Fiber Visualizer Mode • • • • • • • • Report Header File Header Fiber Pass/Fail Graphical Events Events Table Trace VIP result Logo To select output data 1. Press Report (F4) on Fiber Visualizer screen or Trace screen to display the Report Settings screen. 2. Use the Up and Down Arrow keys (or the Rotary knob) to highlight the desired field and then press the Enter key. The Text Entry dialog boxdialog box appears. 3. To output logo, select the logo file field and press the Enter key. 4. Select the desired image, and press Select (f1). Note Only image files in JPEG and PNG can be output as Logo. MT9083 Series ACCESS Master Operation Manual 5-47 Chapter 5: Fiber Visualizer Mode Fault Locate Testing Running a Fault Locate Test Fiber Visualizer provides an easy method to determine the end/fault location of a fiber. To run a Fault Locate test: 1. Power up the MT9083 Series (if necessary). 2. Highlight Fiber Visualizer on the Top Menu screen and then press the Enter key. Figure 5-15: Initial Fiber Visualizer Mode screen 3. Connect the fiber under test to the desired test measurement port. See Figure 2-3 on page 2-10 for the location of the test measurement ports. Note Depending on the configuration of your MT9083 Series, the unit may have one or two test measurement ports. 4. If the Connection Check is “On” on the setups Preferences screen (see Figure 5-3 on page 5-4), a connection check is automatically preformed. When the best optimized connection is achieved (the closer the 5-48 MT9083 Series ACCESS Master Operation Manual Chapter 5: Fiber Visualizer Mode connection check gauge is to “HIGH” the better the optimization of the connection) press the Start key to perform the test. If the Connection Check is set to “Off ”, continue at step 5. Figure 5-16: Connection Check screen 5. The Selecting Test Parameters screen is displayed briefly, followed by the Test In Progress screen. 6. When Fault Locate test has finished, the test results are displayed in Fiber Visualizer Main screen. MT9083 Series ACCESS Master Operation Manual 5-49 Chapter 5: Fiber Visualizer Mode Figure 5-17: Fiber Visualizer Main screen 7. Press Trace (F2) to view the trace and further analyze the results, if desired. See Chapter 7, “OTDR Mode Measurements” for detail on further analyzing a trace. 8. Connect the next fiber to be tested and then press the Start key to continue. 5-50 MT9083 Series ACCESS Master Operation Manual Chapter 5: Fiber Visualizer Mode Connection Check When the Connection Check is set to “On” on the setups Preferences screen, a connection check is automatically performed at the beginning of each fault locate test. The Connection Check screen consist of a simple gauge which provides a graphical representation of the connection quality along with instructions detailing how to proceed when the connection is “GOOD” and how to correct a “BAD” connection. GOOD connection – The gauge is green and yellow when connection is good. The closer the bar in the connection gauge extends to “HIGH” end, the better the connection is. If the gauge is yellow and red, the fiber needs cleaning. Press Continue (f1) or Start key to start the measurement immediately. Figure 5-18: Connection Check – Good Connection MT9083 Series ACCESS Master Operation Manual 5-51 Chapter 5: Fiber Visualizer Mode BAD connection – When the connection check level is low, the bar in the connection gauge is red and only extends a short distance from the “LOW” end of the gauge. If the connection state is not improved even if the fiber is cleaned, the fiber needs to be replaced. Figure 5-19: Connection Check – Bad Connection To correct a low connection: 1. 2. 3. 4. 5. 6. Press the ESC key or Cancel (f6) to abort the current test. Clean all of the optical connectors. Press the Start key to re-start the test. If the Connection Check is still low, press the ESC key or Cancel (f6). Switch the ends of the patch cord and press the Start key again. If the Connection Check is still low, press the ESC key or Cancel (f6) and then replace the patch cord. 7. Press the Start key to re-start the test. Note Fibers shorter than approximately 48 meters (160 ft.) will generally result in a low connection. 5-52 MT9083 Series ACCESS Master Operation Manual Chapter 5: Fiber Visualizer Mode If the Connection Check remains LOW after following the steps in the preceding procedure, contact the Anritsu Technical Support Center at: Phone: 1-800-ANRITSU or 972-761-4600 (Canada, U.S., Latin and South America) Fax: +1 972-671-1877 e-mail: [email protected] Web: www.anritsu.com Real Time Testing Real Time test mode provides a quick 'real-time' view of the initial trace information. In this mode, trace data is not continually averaged, but is stopped and restarted after each screen update. Real Time mode enables optimization of fiber connections at or near the OTDR connector, as the trace display shows the affect of making changes to the connections. To start a Real Time test: 1. Press Trace (F2) to display the Trace screen. 2. Press Real Time (f2) to start a real time test. The red legend on the softkey changes to “On” and the test begins. Note To attenuate a saturated event when in Real Time test mode, move the active cursor within the event, until the unit auto-attenuates the event (pulling the event out of saturation). To stop a Real Time test: • Press Real Time (f2) to stop the current real time test. The red legend on the softkey changes to “Off ” and the real time test ends. MT9083 Series ACCESS Master Operation Manual 5-53 Chapter 5: Fiber Visualizer Mode Fiber Visualizer Mode Measurement Parameters Setting the Source Wavelength To set the source wavelength: • Press Wavelength (f3) to toggle through the source wavelengths. The red legend on the softkey changes with each key press. Depending on the configuration of MT9083 Series in use, up to four wavelengths are available. Note Pressing the Wavelength softkey on single wavelength units causes an error tone to sound. The wavelength may be changed while a Real Time or Averaging cycle is running. The test will restart using the new wavelength. Setting the Range, Resolution Pulse Width, and Average Time The Range, Resolution Pulse Width, and Average Time settings determine the trace data distance range and resolution value (data point spacing) as well as the pulse width used for the test cycle. To set the Range, Resolution Pulse Width, and Average Time: 1. Press Test Parameters (f4), the Distance Range, Resolution Pulse width, and Average Time dialog appears (see Figure 5-20 on page 5-54). Figure 5-20: Range /Resolution/ Pulse Width/Average Time Dialog 2. Use the Right and Left Arrow keys to move the white arrow to the desired list. 5-54 MT9083 Series ACCESS Master Operation Manual Chapter 5: Fiber Visualizer Mode 3. Use the Up and Down Arrow keys (or the Rotary knob) to highlight the desired setting within the selected list. 1 to 3600 seconds can be input directly only for Average Time. 4. Repeat steps 2 and 3 until all the desired settings are highlighted. 5. Press the Enter key (or the Rotary knob). The dialog closes and the red legend on the Range / Pulse Width softkey displays the newly selected Distance Range and Pulse Width. If distance range, resolution, pulse width, or average time is changed during a Real Time test, the test re-starts in the newly-set conditions. Selecting the Dead-zone Mode The MT9083A2/B2/C2 have a Dead-zone mode selection function. The two modes available via this mode selection function are Standard mode and Enhanced Range mode. The features of the two modes are described below. Standard mode: • Standard mode allows short dead-zone measurements to be performed Enhanced Range mode: • • • Allows high dynamic range measurements. Allows fast measurements. Can be used to test the path over each optical fiber split by the splitter included in the PON system. Setting the Standard Mode To Set the Standard Mode: 1. Pressing Test Parameters (f4) brings up Dead-zone (f1). (See figure below.) 2. Press Dead-zone (f1) and set “Standard (HR)”. Note • The Enhanced Range mode is only available if an SM unit is fitted. The Dead-zone (f1) key becomes unavailable if an MM unit is fitted. • If the range of the selected pulse width does not fall between 50 ns to 2000 ns, the (f1) key is grayed out and set to Standard (HR). MT9083 Series ACCESS Master Operation Manual 5-55 Chapter 5: Fiber Visualizer Mode Figure 5-21: Dead-zone Mode Selecting screen Setting the Enhanced Range Mode To Set the Enhanced Range Mode: 1. Pressing Test Parameters(f4) brings up Dead-zone (f1). 2. Press Dead-zone (f1) and set “Enhanced Range (ER)”. 3. Press the Enter key (or the Rotary knob). The dialog closes and the red legend on the Range / Pulse Width softkey displays the newly selected Dead-zone mode. • HR: Standard mode • ER: Enhanced Range mode Note • The Enhanced Range mode is only available if an SM unit is fitted. The Dead-zone (f1) key becomes unavailable if an MM unit is fitted. • If the range of the selected pulse width does not fall between 50 ns to 2000 ns, the (f1) key is grayed out and set to Standard (HR). 5-56 MT9083 Series ACCESS Master Operation Manual Chapter 5: Fiber Visualizer Mode Setting the IOR and BSC Use the IOR/BSC dialog box to select one of the pre-set Fiber Types, which automatically sets the IOR (Index of Refraction) and BSC (Backscatter Coefficient) for the selected fiber type, or select “Other” and then use the Numeric keypad to enter the desired IOR and BSC settings. To set the IOR and BSC values: 1. Press IOR / BSC (f5). The IOR/BSC dialog appears. Figure 5-22: IOR/BSC Dialog 2. Press Wavelength (f1) to select the wavelength changing IOR/BSC. 3. Use the Left/Right/Up/Down Arrow keys to move the white arrow to the Fiber Type field, if necessary, and then use the Up and Down Arrow keys (or the Rotary knob) to highlight the desired fiber type. When the desired fiber type is highlighted, press the Enter key (or the Rotary knob). Or – If the fiber type is not listed, select Other and then move the white arrow to the IOR and BSC fields. Use the Numeric keypad to enter the desired values. When the IOR and BSC values are entered, press the Enter key (or the Rotary knob). Use the Numeric keypad to directly enter the desired value. 4. The dialog box closes and the new settings are displayed in the red legend on the softkey. MT9083 Series ACCESS Master Operation Manual 5-57 Chapter 5: Fiber Visualizer Mode Swap Overlay When the wavelength is set to 1310/1550 (Macro Bend) or 1310/1625 (Macro Bend) , the event icons of these can be swapped on display. To swap overlay: 1. Press Swap Overlay (f6). 2. The event icons are swapped between 1310nm and the other wavelength. 5-58 MT9083 Series ACCESS Master Operation Manual Chapter 5: Fiber Visualizer Mode Working with OTDR Trace Files Deleting Files Use the Save screen (see Figure 5-24 on page 5-65) to delete any data files stored in the internal memory or on a USB memory stick. You can delete a single file, multiple files or all of the files in the current directory. To delete a file: 1. At the completion of a Fault Locate test, press the Save key. The Save screen appears (see Figure 5-24 on page 5-65). 2. Use the Up and Down Arrow keys (or the Rotary knob) to highlight the desired trace file. 3. Press Delete (f5). A message box appears with the following message appears: Are you sure you want to delete the current selection? 4. Press Yes (f1) to delete the selected file, or press No (f2) to cancel without deleting the file. 5. Repeat steps 2 through 4 for any additional file deletions. 6. Press the ESC key to return to the test application. Use the following procedure to delete multiple files in a directory. To delete multiple files: 1. At the completion of a Fault Locate test, press the Save key. The Save screen appears (see Figure 5-24 on page 5-65). 2. Press More (f6). 3. Press Multi-Select Off (f3). The red legend on the softkey changes to “On”. 4. Use the Up and Down Arrow keys (or the Rotary knob) to highlight the first file to delete and then press the Enter key. A bullet appears before the selected file name and the total size of the selected files is shown on the bottom. 5. Repeat step 4 until you have selected all of the files you want to delete. 6. Press More >> (f6). 7. Press Delete (f5). The following message appears: Are you sure you want to delete the current selection? MT9083 Series ACCESS Master Operation Manual 5-59 Chapter 5: Fiber Visualizer Mode 8. Press Yes (f1) to delete the selected files, or press No (f2) to cancel without deleting the files. To delete all files in a directory or folder: 1. At the completion of a Fault Locate test, press the Save key. The Save screen appears (see Figure 5-24 on page 5-65). 2. Select the desired folder/directory in which contains the file to be deleted. 3. Press the Enter key to open the selected folder/directory. 4. Press More (f6). 5. Press Select All (f4). A bullet appears before each filename. Note If the Select All softkey (f4) is dimmed, toggle f3 so that the legend on the softkey reads “Multi-Select Off ”. 6. Press More (f6). 7. Press Delete (f5). The following message appears: Are you sure you want to delete the current selection? 8. Press Yes (f1) to delete all files in the selected directory, or press No (f2) to cancel without deleting the files. Copying Files Use the Save screen (see Figure 5-24 on page 5-65) to copy data files stored in the internal memory or on a USB memory stick. You can copy a single file, multiple files or all of the files in the current directory. To copy a file: 1. At the completion of a Fault Locate test, press the Save key. The Save screen appears (see Figure 5-24 on page 5-65). 2. Press More >> (f6). 3. Use the Up and Down Arrow keys (or the Rotary knob) to highlight the desired trace file. 4. Press Copy (f1). 5. Select the desired folder/directory in which to paste the selected file. 6. Press Paste (f2). A message box stating “Copying 1/1” along with the name of the file appears briefly. 5-60 MT9083 Series ACCESS Master Operation Manual Chapter 5: Fiber Visualizer Mode Use the following procedure to copy multiple files in a directory. To copy multiple files: 1. At the completion of a Fault Locate test, press the Save key. The Save screen appears (see Figure 5-24 on page 5-65). 2. Press More (f6). 3. Press Multi-Select Off (f3). The red legend on the softkey changes to “On”. 4. Use the Up and Down Arrow keys (or the Rotary knob) to highlight the first file to copy and then press the Enter key. A bullet appears before the selected file name and the total size of the selected files is shown on the bottom. 5. Repeat step 4 until you have selected all of the files you want to copy. 6. Press Copy (f1). 7. Select the desired folder/directory in which to paste the selected files. 8. Press Paste (f2). A message box appears displaying the count for each copied file as it is being pasted to the new directory/folder, as well as its filename. The message box closes when all of the selected files are pasted to their new location. To copy all files in a directory or folder: 1. At the completion of a Fault Locate test, press the Save key. The Save screen appears (see Figure 5-24 on page 5-65). 2. Select the desired folder/directory in which contains the files to be copied. 3. Press the Enter key and highlight the first file in the selected directory/folder, if not already highlighted. 4. Press More (f6). 5. Press Select All (f4). A bullet appears before each filename. Note If the Select All softkey (f4) is dimmed, toggle f3 so that the legend on the softkey reads “Multi-Select Off ”. 6. Press Copy (f1). 7. Select the desired folder/directory in which to paste the selected files. 8. Press Paste (f2). MT9083 Series ACCESS Master Operation Manual 5-61 Chapter 5: Fiber Visualizer Mode A message box appears displaying the count for each copied file as it is being pasted to the new directory/folder, as well as its filename. The message box closes when all of the files from the selected directory/folder are pasted to their new location. Saving Files with AutoSave AutoSave automatically saves trace data at the completion of data collection. Note The MT9083 Series maintains the path of the last directory to which a manual file-save has occurred. The auto-save directory may in fact be a different directory. The MT9083 Series therefore maintains 2 file-save pathnames: manual save and auto-save. Depending on the settings made on the AutoSave screen in Setups, AutoSave behaves in one of the following way: • • • On – AutoSave is performed automatically, without displaying the Save screen. Verify – AutoSave displays the Save screen at the end of each data collection so you can verify the save details. Off – AutoSave is not performed. You need to perform a manual save to save the current test data, if desired. Automatic File Save To set up AutoSave for a full, automatic save: 1. Enter the OTDR (Fault Locate) setups, see page 5-2 for details. 2. Press AutoSave (f5). The AutoSave setups screen appears (see Figure 5-23 on page 5-63). 5-62 MT9083 Series ACCESS Master Operation Manual Chapter 5: Fiber Visualizer Mode Figure 5-23: AutoSave Setups Screen 3. Use the Up and Down Arrow keys (or the Rotary knob) to highlight Enabled in the AutoSave field and then press the Enter key. The Enabled dialog appears. 4. Use the Up and Down Arrow keys (or the Rotary knob) to highlight On. 5. Press the Enter key. The dialog closes and the AutoSave Enabled status is set to “On”. All data collections will be automatically saved. Note Setting the AutoSave Enabled status to “On” automatically sets and locks the Auto-Filename Enabled status at the “On” setting. Verifying the AutoSave Use the following procedure to set the AutoSave status to “Verify”, which displays the Save screen at the end of each data collection. To set the AutoSave status to Verify: 1. Enter the OTDR (Fault Locate) setups, see page 5-2 for details. 2. Press AutoSave (f5). The AutoSave setup screen appears (see Figure 5-23). MT9083 Series ACCESS Master Operation Manual 5-63 Chapter 5: Fiber Visualizer Mode 3. Use the Up and Down Arrow keys (or the Rotary knob) to highlight Enabled in the AutoSave field and then press the Enter key. The Enabled dialog appears. 4. Use the Up and Down Arrow keys (or the Rotary knob) to highlight Verify. 5. Press the Enter key. The dialog closes and the AutoSave Enabled status is set to “Verify”. To AutoSave with verification: 1. Set the AutoSave status to “Verify” as detailed in the procedure above. 2. Perform the desired Fault Locate test. When the data collection is complete the Save screen (Figure 5-23 on page 5-63) is displayed with the File Name field highlighted. 3. Choose any or all of the following functions, if desired, or continue at step 4: • Press the Enter key to edit the File Name, if desired, and follow the on-screen instructions for editing the file name. • Highlight the Medium field and then press Enter to toggle through the available selections. • Press Header (f2) to enter Header information. See “Headers” on page 5-67 for details. • Press New Folder (f4) to create a new folder for the file save. See “New Folder” on page 3-40 for details. • Select a different folder for the file save by highlighting the desired folder name (folder names are displayed in parentheses above the list of filenames) and then pressing Enter. 4. Press Save Trace (f1) to complete the verified AutoSave. 5-64 MT9083 Series ACCESS Master Operation Manual Chapter 5: Fiber Visualizer Mode Saving Files Manually You can perform a manual file save when the AutoSave status is set to “Off ”. See “To select the AutoSave Enabled status:” on page 5-19 for details. Note The MT9083 Series maintains the path of the last directory to which a manual file-save has occurred. The auto-save directory may in fact be a different directory. The MT9083 Series therefore maintains 2 file-save pathnames: manual save and auto-save. To manually save files: 1. At the completion of a test, press the Save key. The Save screen (see Figure 5-24) appears with the File Name field highlighted. Figure 5-24: Save Screen Edit the filename, if desired, or continue at step 6 to use the current filename. To edit the filename, press the Enter key. The FileName dialog box appears. If no USB keyboard is connected, Refer to “Renaming a File” on page 3-32 to input the file name. If a USB keyboard is connected, you can modify the name directly from the keyboard. When all of the desired characters are entered, press the MT9083 Series ACCESS Master Operation Manual 5-65 Chapter 5: Fiber Visualizer Mode Enter key to return to the Save screen. Press the F1 key to complete the manual save. Use the Up and Down Arrow keys to scroll the highlight from row to row, including the File Name field, which is located directly above the character matrix. Use the Right and Left Arrow keys to move the highlight within the selected row or, to move the text cursor in the File Name field when the field is highlighted. Or – Use the Rotary knob to navigate through each character in the character matrix as well as wrapping the highlight to the File Name field. In Fiber Visualizer Mode, the item below is displayed for MACRO. Table 5-1: MACRO Buttons Name 5-66 Word string to insert Number 4-digit serial number starting with a number in the Number field yy-mm-dd Digits to represent Year-Month-Day hh-mm-ss Digits to represent Hour-Minute-Second Wavelength Wave length used for measurement MT9083 Series ACCESS Master Operation Manual Chapter 5: Fiber Visualizer Mode Headers Headers hold valuable information about the trace files which may save a considerable amount of time when recalling traces for comparison. The header does not require repopulating each time a new trace is collected. Information entered on the Header screen is retained until such a time as the header requires editing. To access and edit the Header: 1. At the completion of a test, press the Save key. The Save screen appears (see Figure 5-24 on page 5-65). 2. Use the Up and Down Arrow keys (or the Rotary knob) to highlight the desired file name, if necessary. 3. Press Header (f2), the Header screen appears (see Figure 5-25 on page 5-67). • To edit or enter header information continue at step 4. • To close the Header continue at step 10. Figure 5-25: Header Screen Note When Auto-Filename is enabled on the AutoSave screen (see Figure 5-6 on page 5-15) the Fiber ID field of the Header screen is auto-populated, starting with the number set in the Start Number field. MT9083 Series ACCESS Master Operation Manual 5-67 Chapter 5: Fiber Visualizer Mode 4. Use the Up and Down Arrow keys (or the Rotary knob) to highlight the desired field and then press the Enter key. The Text Entry dialog boxdialog box appears (see Figure 5-26). If no USB keyboard is connected, follow the instructions from step 5. to enter the name using the front panel keys. If a USB keyboard is connected, you can modify the name directly from the keyboard. When all of the desired characters are entered, press the Enter key to return to the Header screen. Repeat steps 4 until all desired text entry fields on the Header screen are edited. Press the f6 key to close the Header and return to the Save screen. Figure 5-26: Text Entry dialog box 5. Use the Up and Down Arrow keys to scroll the highlight from row to row, including the current text entry field, which is located directly above the character matrix. (The current title of the text entry field matches the currently selected Header screen field.) Use the Right and Left Arrow keys to move the highlight within the selected row or, to move the text cursor in the text entry field when the field is highlighted. Or – Use the Rotary knob to navigate through each character in the character matrix as well as wrapping the highlight to the text entry field. 5-68 MT9083 Series ACCESS Master Operation Manual Chapter 5: Fiber Visualizer Mode 6. Use the f1 – f4 softkeys for the following: • Press Small Letter (f1) to change the character matrix to lower case letters. • Press Capital Letter (f2) to change the character matrix to upper case letters. • Press Symbols (f3) to change the character matrix to display the symbols available. • Press Space (f4) to insert a blank space in the file name 7. With the desired character is highlighted in the character matrix press the Enter key to enter the selected character in the text entry field. Use the Numeric keypad to enter numbers in the text entry field. Use Backspace (f5) or the BS key to delete characters entered in the text entry field. 8. When all of the desired characters are entered in the text entry field, press OK (f6) to return to the Header screen. 9. Repeat steps 4 through 8 until all desired text entry fields on the Header screen are edited. 10. Press Exit (f6) to close the Header and return to the Save screen. MT9083 Series ACCESS Master Operation Manual 5-69 Chapter 5: Fiber Visualizer Mode Sorting Files The Sort function allows you to change the order in which files are listed in mass storage (files saved to the MT9083 Series’ internal memory or to a USB memory stick). Files can be sorted by type (Name or Time/Date) in ascending or descending order. To set the Sort type: 1. At the completion of a Fault Locate test, press the Save key. The Save screen appears. 2. Press Sort (f3). The Sort/By dialog appears. Figure 5-27: Sort/By Dialog 3. Use the Left and Right Arrow keys to move the white arrow so that it is positioned to the left of the first selection in the desired pane of the dialog (Sort or By). 4. Use the Up and Down Arrow keys (or the Rotary knob) to highlight the desire setting within the pane. 5. With the desired settings highlighted in both panes, press the Enter key. The dialog closes and the files are listed in the selected order. 5-70 MT9083 Series ACCESS Master Operation Manual Chapter 5: Fiber Visualizer Mode Printing Fault Locate Data Files Fault Locate date files can be printed via the optional BL-80RII or SD1-31 printers. Note The printed output from the MT9083 Series consists of a screen shot. Only the details currently displayed on the LCD, less the softkeys, are printed. Make sure that the desired details are displayed before printing. Connecting the Printer Connect the MT9083 Series to the BL-80RII or SD1-31 printers using a USB printer conversion cable as shown in the figure below: Figure 5-28: Connecting the BL-80RII Printer Printing a Fault Locate Trace File Make sure that the Printer setup parameters are set as desired on the setups General screen. See “Printer” and “Paper Feed” on pages 3-9 – 3-10 for details. To print trace files: 1. Connect the BL-80RII or SD1-31 printers to the MT9083 Series as shown in Figure 5-28, and then power up the printer. 2. Perform a Fault Locate test. 3. At the conclusion of the test: - To print the Summary screen, continue at step 4. or - To print the Trace, press View Trace (f6) and then continue at step 4. 4. Press the Print key. The following message is displayed: Output screen image to a printer or as an image file. Please select output type using the function keys. MT9083 Series ACCESS Master Operation Manual 5-71 Chapter 5: Fiber Visualizer Mode 5. Press Printer (f1). The message changes to “Please wait. Printing...”. The MT9083 Series returns to the Trace grid when the printout is completed. Saving Fault Locate Data as an Image File You can save the image on test result screens and most setup screens. To save a Screen Image to a file: 1. Perform a Fault Locate test. 2. At the conclusion of the test: - To save a screen image of the Summary screen, continue at step 3. or - To save a screen image of the Trace, press View Trace (f6) and then continue at step 3. 3. Press the Print key, the following message appears: Output screen image to a printer or as an image file. Please select output type using the function keys. 4. Press File (f2). The Save screenshot screen appears (see Figure 5-29). Figure 5-29: Save Screenshot Screen 5-72 MT9083 Series ACCESS Master Operation Manual Chapter 5: Fiber Visualizer Mode 5. With the File Name highlighted, press the Enter key to rename the file, if desired. See “Renaming a File” on page 3-32 for details. 6. Select the desired Medium to save the file to by highlighting the Medium field and toggling the Enter key to choose from Internal Memory or USB Memory. Note The USB Memory selection is only available when a USB memory stick is connected to the MT9083 Series. 7. Press New Folder (f4) if you desire to setup a new folder in which to save the image file. See “New Folder” on page 3-40 for details. 8. Press File Type (f2) to toggle through the file type. 9. Press Save Image (f1) to save the image file, or press ESC to cancel the file save. MT9083 Series ACCESS Master Operation Manual 5-73 Chapter 5: Fiber Visualizer Mode 5-74 MT9083 Series ACCESS Master Operation Manual Chapter 6: OTDR (Construction) Mode Chapter 6: OTDR (Construction) Mode Overview Construction mode simplifies and automates the testing required when installing fiber. Construction mode is used when many fibers in a cable need to be tested and documented before deployment. Starting OTDR (Construction) Mode To start the OTDR function in Construction mode: 1. Press the Top Menu key. 2. Highlight OTDR (Construction), then press the Enter key. The OTDR (Construction) Setup screen appears, see Figure 6-1, below. Figure 6-1: OTDR (Construction) Setup Screen MT9083 Series ACCESS Master Operation Manual 6-1 Chapter 6: OTDR (Construction) Mode Setups – OTDR (Construction) Mode Setups for the OTDR (Construction) mode are accessed via the Setup key. This section allows you to customize the preferences and parameters for a given data collection or a series of collections. Entering OTDR (Construction) Setups 1. Start OTDR (Construction) mode. The OTDR (Construction) Setup screen appears. 2. Press the Setup key. The following Setup screens are available: • General (f1) • Preferences (1-2) (f2) • Preferences (2-2) (f3) • Thresholds (f4) Press the softkey (f1 – f4) that corresponds to the desired settings category. General Setups Press General (f1) to access the General setups screen, if not already displayed. The General setups pertain to general setting for the MT9083 Series and are detailed in “General Screen Settings” on pages 3-7 – 3-15. Figure 6-2: General Setups Screen – OTDR (Construction) Mode 6-2 MT9083 Series ACCESS Master Operation Manual Chapter 6: OTDR (Construction) Mode Preferences (1-2) Press Preferences (1-2) (f2) to access the Preferences (1-2) screen (Figure 6-3 on page 6-3) and set the status for the following: • • • • • • • • • • • • Distance display Units Connection Check Active Fiber Check Auto Analysis [not applicable to OTDR (Construction) mode] Auto Scale Event Summary Reflectance Calculation ORL Calculation [not applicable to OTDR (Construction) mode] Trace Overview Real Time Averages [not applicable to OTDR (Construction) mode] Real Time Attenuation [not applicable to OTDR (Construction) mode] Display Mode After Analysis Figure 6-3: Preferences (1-2) Screen Distance Display Units Select the unit of measurement used to display distance on the horizontal axis of the Trace graph. This affects Range and Resolution readings and analysis events incorporating distance. MT9083 Series ACCESS Master Operation Manual 6-3 Chapter 6: OTDR (Construction) Mode To set the Distance Display units: 1. Use the Up and Down Arrow keys (or the Rotary knob) to highlight Distance display Units. 2. Press Enter and select the desired unit from the Distance display Units menu. 3. Press Enter again. The menu closes and the selected unit is set. Connection Check The Connection Check function confirms whether or not the fiber is connected correctly to the OTDR measurement port. To set the Connection Check: 1. Use the Up and Down Arrow keys (or the Rotary knob) to highlight Connection Check. 2. Press Enter and then select either On or Off from the dialog. 3. Press Enter again. The dialog closes and the selection is set. Note The Connection Check function on the Preferences screen also controls the Connection Check in the Options area of the OTDR (Construction) Setup screen (see Figure 6-1 on page 6-1). Changing the enabled/disabled status on either screen is tracked on both. Active Fiber Check The Active Fiber Check performs a “live fiber” check on the currently attached fiber under test to detect whether the fiber is carrying traffic before firing any OTDR laser sources. • • If no traffic is detected the test proceeds normally. If traffic is detected a warning message appears on the screen and the test is aborted. To set the Active Fiber Check 1. Use the Up and Down Arrow keys (or the Rotary knob) to highlight Active Fiber Check. 2. Press Enter and then select either On or Off from the dialog. 3. Press Enter again. The dialog closes and the selection is set. 6-4 MT9083 Series ACCESS Master Operation Manual Chapter 6: OTDR (Construction) Mode Note The Active Fiber Check feature does not apply for the following options – Opt 063 (0.85/1.3 µm MMF only). Auto Analysis This preference setting does not apply to OTDR (Construction) mode. Auto Scale When set to “On”, Auto Scale provides a trace display that utilizes the maximum amount of horizontal scale for optimum trace viewing. To activate Auto Scale: 1. Use the Up and Down Arrow keys (or the Rotary knob) to highlight Auto Scale. 2. Press Enter and select either On or Off from the dialog. 3. Press Enter again. The menu closes and the selection is set. Event Summary When the Event Summary selection is set to “On” the Fiber Test Parameters area (see item 5 in Figure 6-19 on page 6-51) of the Test Results screen is replaced by the Event Summary area, listing the Total Events, Fiber Length, and Total Loss of the current fiber under test. Note The OTDR (Construction) Test Results screen appears at the end of each test, providing that Preview (f3) is set to “On” on the Test in Progress screen (see Figure 6-18 on page 6-49). To set the Event Summary status: 1. Use the Up and Down Arrow keys (or the Rotary knob) to highlight Event Summary. 2. Press Enter and select either On or Off from the dialog. 3. Press Enter again. The menu closes and the selection is set. MT9083 Series ACCESS Master Operation Manual 6-5 Chapter 6: OTDR (Construction) Mode Reflectance Calculation Reflectance is the ratio of reflected power to incident power displayed in dB (see “Reflectance Measurements” on page 7-17 for details). The MT9083 Series has three settings for Reflectance Calculations: Off, Auto, and Manual. • Off – Reflectance will not be calculated. • Auto – The reflectance of any event is reported based on the position of cursor A. The Auto setting is most useful for reflective events that are not close together or close-in to the OTDR. • Manual – When set to Manual, the reported reflectance is based on the positions of both cursors (A and B). The Manual setting is most useful for reflective events that are close together or close-in to the OTDR. To set the Reflectance Calculation type: 1. Use the Up and Down Arrow keys (or the Rotary knob) to highlight Reflectance Calculation. 2. Press Enter. The Reflectance Calculation dialog appears. 3. Highlight the desired Reflectance Calculation setting: Off, Auto, or Manual. 4. Press Enter. The dialog closes and the selected setting is displayed in the Reflectance Calculation field. ORL Calculation ORL testing is not available in OTDR (Construction) mode. Trace Overview When set to “On”, a small overview of the trace is displayed in the lower left portion of the Trace graph. To activate the Trace Overview: 1. Use the Up and Down Arrow keys (or the Rotary knob) to highlight Trace Overview. 2. Press Enter and select either On or Off from the dialog. 3. Press Enter again. The menu closes and the selection is set. 6-6 MT9083 Series ACCESS Master Operation Manual Chapter 6: OTDR (Construction) Mode Real Time Averages Real Time Averages is not applicable to OTDR (Construction) mode. Real Time Attenuation Real Time Attenuation is not applicable to OTDR (Construction) mode. Display Mode After Analysis The Display Mode After Analysis setting is used to set the post-analysis display mode. To set the Display Mode After Analysis: 1. Use the Up and Down Arrow keys (or the Rotary knob) to highlight Display Mode After Analysis. 2. Press Enter. The Display Mode After Analysis dialog appears. 3. Highlight the desired setting: - End/Break – The display mode focuses on the end/break event. - Full Trace – The full trace is displayed in Display from Origin mode. - Current – The display mode and cursor positions remain unchanged. 4. Press Enter. The dialog closes and the selected setting is displayed in the Display Mode After Analysis field. MT9083 Series ACCESS Master Operation Manual 6-7 Chapter 6: OTDR (Construction) Mode Preferences (2-2) Press Preferences (2-2) (f3) to access the Preferences (2-2) screen and set the status for the following: • • • • • Auto Patch-cord Removal Grid Display Force Total Loss Event icon movement End event for ORL calculation Figure 6-4: Preferences (2-2) Screen Auto Patch-cord Removal Specify the event number to treat as dummy fiber. The range of settings for this parameter is 1 to 9 in 1 increments. To set the Auto Patch-cord Removal: 1. Use the Up and Down Arrow keys (or the Rotary knob) to highlight Auto Patch-cord Removal. 2. Press Enter. The Auto Patch-cord Removal dialog appears. Depending on the current setting, the dialog will either state “None”, indicating that there is no Auto Patch-cord Removal currently set, or the dialog displays the current setting for the Auto Patch-cord Removal. 6-8 MT9083 Series ACCESS Master Operation Manual Chapter 6: OTDR (Construction) Mode 3. If the Auto Patch-cord Removal dialog displays “None”, press the Up or Down Arrow key to change it to the event number setting mode. 4. Use the Up and Down Arrow keys (or the Rotary knob) to increment or decrement the desired event number setting. Or enter it directly with the Numeric keypad. 5. Press Enter again to close the dialog and save the current setting. The event tables shows the distance information of dummy fiber. Figure 6-5: Auto Patch Screen Use the following procedure to set Auto Patch-cord Removal to “None” when it is currently set in event number. To set the Auto Patch-cord Removal to None: 1. Highlight Auto patch cord and then press Enter. The Auto Patch-cord Removal dialog appears, displaying the current event number setting. 2. Press None (f1), the dialog changes to “None”. 3. Press Enter. The dialog closes and the parameter is set to “None”. Note The Auto Patch-cord Removal feature works only with patch-cords that are at least 40 m (120 ft) and 40 data points longer than the pulse width. MT9083 Series ACCESS Master Operation Manual 6-9 Chapter 6: OTDR (Construction) Mode Grid Display Select the format for the grid lines on the trace screen. To set the Grid Display: 1. Use the Up and Down Arrow keys (or the Rotary knob) to highlight Grid Display. 2. Press Enter. The Grid Display dialog appears. 3. Highlight the desired setting: - Dotted - A dotted line grid is used for trace display. - Solid - A solid line grid is used for trace display. 4. Press Enter. The dialog closes and the selected setting is displayed in the Grid Display field. Force Total Loss Select the display settings for Total Loss (Cum.Loss(dB)). To set the Force Total Loss: 1. Use the Up and Down Arrow keys (or the Rotary knob) to highlight Force Total Loss. 2. Press Enter. The Force Total Loss dialog appears. 3. Highlight the desired setting: - ON - Always displays Total Loss (Cum.Loss). - OFF - Depending on conditions, "**.***" is displayed for the Total Loss (Cum.Loss) slot. Note Total Loss (Cum.Loss) cannot be displayed when: • An event appeared before backscatter could be found after the launch reflection. • An event exists 1.1 pulse widths after the launch backscatter. • Fiber end cannot be detected. 4. Press Enter. The dialog closes and the selected setting is displayed in the Force Total Loss field. Event Icon Movement in Fiber Visualizer This setting function applies only to Fiber Visualizer. 6-10 MT9083 Series ACCESS Master Operation Manual Chapter 6: OTDR (Construction) Mode End Event for ORL Calculation This setting function applies only to Fiber Visualizer. Event Table Span Calculation This setting function applies only to Fiber Visualizer. A-B Span Analysis This setting function applies only to Fiber Visualizer. Thresholds Press Thresholds (f4) to access the Thresholds screen. This screen provides access to the various Auto Detect and Pass/Fail Thresholds setting. Figure 6-6: Thresholds Screen Auto Detect Parameters Events that exceed the Auto Detect parameter settings are reported in the Event Analysis table. • The Auto Detect parameters include: - Splice Loss - Reflectance - Fiber End MT9083 Series ACCESS Master Operation Manual 6-11 Chapter 6: OTDR (Construction) Mode - Macro Bend Splitter Loss Splice Loss Determines the Splice Loss value equal to or above which will be reported in the Events analysis. The range of settings for this parameter is 0.01 dB to 9.99 dB in 0.01 dB increments. To set the Splice Loss threshold: 1. Use the Up and Down Arrow keys (or the Rotary knob) to highlight Splice Loss. 2. Press Enter. The Splice Loss dialog appears. 3. Use the Up and Down Arrow keys (or the Rotary knob) to increment/decrement the splice loss threshold setting. Or enter it directly with the Numeric keypad. 4. Press Enter again. The dialog closes and the new Splice Loss threshold is set. Reflectance Determines the lowest Reflectance value that will be reported by analysis. Any event with a reflectance equal to or greater than the value in this parameter will be reported in Event analysis. The range of settings for this parameter is -70.0 dB to -20.0 dB in 0.1 dB increments. To set the Reflectance threshold: 1. Use the Up and Down Arrow keys (or the Rotary knob) to highlight Reflectance. 2. Press Enter. The Reflectance dialog appears. 3. Use the Up and Down Arrow keys (or the Rotary knob) to increment/decrement the reflectance threshold setting. Or enter it directly with the Numeric keypad. 4. Press Enter again. The dialog closes and the new Reflectance threshold is set. 6-12 MT9083 Series ACCESS Master Operation Manual Chapter 6: OTDR (Construction) Mode Fiber End Determines the Fiber End value equal to or above which will be reported in the Events analysis. The range of settings for this parameter is 1 dB to 99 dB in 1 dB increments. To set the Fiber End threshold: 1. Use the Up and Down Arrow keys (or the Rotary knob) to highlight Fiber End. 2. Press Enter. The Fiber End dialog appears. 3. Use the Up and Down Arrow keys (or the Rotary knob) to increment/decrement the fiber end threshold setting. Or enter it directly with the Numeric keypad. 4. Press Enter again. The dialog closes and the new Fiber End threshold is set. Macro Bend Determines the Macro Bend detect value equal to or above which will be reported in the Events analysis. Note Macro Bend detection requires a unit with at least two single mode operating wavelengths; one at 1310 nm and a second at either 1550 nm or 1625 nm. The range of settings for this parameter is 0.3 dB to 2 dB in 0.1 dB increments. To set the Macro Bend threshold: 1. Use the Up and Down Arrow keys (or the Rotary knob) to highlight Macro Bend. 2. Press Enter. The Macro Bend dialog appears. 3. Use the Up and Down Arrow keys (or the Rotary knob) to increment/decrement the Macro Bend threshold setting. Or enter it directly with the Numeric keypad. 4. Press Enter again. The dialog closes and the new Macro Bend threshold is set. Splitter Loss Determines the Splitter Loss value equal to or above which will be reported as Splitter event in the Events analysis. MT9083 Series ACCESS Master Operation Manual 6-13 Chapter 6: OTDR (Construction) Mode The range of settings for this parameter is 1.0 dB to 30.0 dB in 0.1 dB increments. To set the Splitter Loss threshold: 1. Use the Up and Down Arrow keys (or the Rotary knob) to highlight Splitter Loss. 2. Press Enter. The Splitter Loss dialog appears. 3. Go to Step 4 if the splitter loss is already at hand. Use the Left and Right Arrow keys to select Branch, and then use the Up and Down Arrow keys (or the Rotary knob) to select the number of branches. 4. Use the Left and Right Arrow keys to select Splitter Loss, and then use the Up and Down Arrow keys (or the Rotary knob) to increment/decrement the splitter loss threshold setting. Or enter it directly with the Numeric keypad. 5. Press Enter again. The dialog closes and the new Splitter Loss threshold is set. Pass/Fail Thresholds Parameters Events that exceed the Pass/Fail Threshold parameters are highlighted in red in the Event Analysis table. • 6-14 The Pass/Fail Thresholds parameters include: - Non-Reflective Event Loss (fusion) - Reflective Event Loss (connector, mechanical) - Reflectance - Fiber Loss (dB/km) - Total Loss - Splitter Loss MT9083 Series ACCESS Master Operation Manual Chapter 6: OTDR (Construction) Mode Non-Reflective Event Loss (fusion) This parameter highlights non-reflective event losses, such as fusion splices, in the Events Analysis table. The range of settings for this parameter is 0.10 dB to 9.99 dB in 0.01dB increments. To set the Non-Reflective Event Loss threshold: 1. Use the Up and Down Arrow keys (or the Rotary knob) to highlight Non-Reflective Event Loss. 2. Press Enter. The Non-Reflective Event Loss dialog appears. Depending on the current setting, the dialog will either state “None”, indicating that there is no threshold currently set, or the dialog displays the current setting for the threshold in dBs. 3. If the Non-Reflective Event Loss dialog displays “None”, press the Up or Down Arrow key to change it to the dB setting mode. 4. Use the Up and Down Arrow keys (or the Rotary knob) to increment or decrement the desired dB setting. Or enter it directly with the Numeric keypad. 5. Press the Enter key again to close the dialog and save the current setting. Use the following procedure to set Non-Reflective Event Loss to “None” when it is currently set in dBs. To set Non-Reflective Event Loss threshold to None: 1. Highlight Non-Reflective Event Loss and then press the Enter key. The Non-Reflective Event Loss dialog appears, displaying the current dB setting. 2. Press None (f1), the dialog changes to “None”. 3. Press the Enter key. The dialog closes and the parameter is set to “None”. Reflective Event Loss (connector, mechanical) This parameter highlights reflective event losses, such as connectors and mechanical splices, in the Events Analysis table. The range of settings for this parameter is 0.10 dB to 9.99 dB in 0.01 dB increments. To set the Reflective Event Loss threshold: MT9083 Series ACCESS Master Operation Manual 6-15 Chapter 6: OTDR (Construction) Mode 1. Use the Up and Down Arrow keys (or the Rotary knob) to highlight Reflective Event Loss. 2. Press Enter. The Reflective Event Loss dialog appears. Depending on the current setting, the dialog will either state “None”, indicating that there is no threshold currently set, or the dialog displays the current setting for the threshold in dBs. 3. If the Reflective Event Loss dialog displays “None”, press the Up or Down Arrow key to change it to the dB setting mode. 4. Use the Up and Down Arrow keys (or the Rotary knob) to increment or decrement the desired dB setting. Or enter it directly with the Numeric keypad. 5. Press the Enter key again to close the dialog and save the current setting. Use the following procedure to set Reflective Event Loss to “None” when it is currently set in dBs. To set Reflective Event Loss threshold to None: 1. Highlight Reflective Event Loss and then press the Enter key. The Reflective Event Loss dialog appears, displaying the current dB setting. 2. Press None (f1), the dialog changes to “None”. 3. Press the Enter key. The dialog closes and the parameter is set to “None”. Reflectance This parameter highlights events in the Event Analysis table that exceed the set Reflectance value. The range of settings for this parameter is -50.0 dB to -10.0 dB in 0.1 dB increments. To set the Reflectance threshold: 1. Use the Up and Down Arrow keys (or the Rotary knob) to highlight Reflectance. 2. Press Enter. The Reflectance dialog appears. Depending on the current setting, the dialog will either state “None”, indicating that there is no threshold currently set, or the dialog displays the current setting for the threshold in dBs. 3. If the Reflectance dialog displays “None”, press the Up or Down Arrow key to change it to the dB setting mode. 6-16 MT9083 Series ACCESS Master Operation Manual Chapter 6: OTDR (Construction) Mode 4. Use the Up and Down Arrow keys (or the Rotary knob) to increment or decrement the desired dB setting. Or enter it directly with the Numeric keypad. 5. Press the Enter key again to close the dialog and save the current setting. Use the following procedure to set Reflectance to “None” when it is currently set in dBs. To set Reflectance threshold to None: 1. Highlight Reflectance and then press the Enter key. The Reflectance dialog appears, displaying the current dB setting. 2. Press None (f1), the dialog changes to “None”. 3. Press the Enter key. The dialog closes and the parameter is set to “None”. Fiber Loss (dB/km) This parameter highlights events in the Event Analysis table when the dB/km loss exceeds the value set. The range of settings for this parameter is 0.01 dB to 9.99 dB in 0.01 dB increments. To set the Fiber Loss (dB/km) threshold: 1. Use the Up and Down Arrow keys (or the Rotary knob) to highlight Fiber Loss (dB/km). 2. Press Enter. The Fiber Loss (dB/km) dialog appears. Depending on the current setting, the dialog will either state “None”, indicating that there is no threshold currently set, or the dialog displays the current setting for the threshold in dBs. 3. If the Fiber Loss (dB/km) dialog displays “None”, press the Up or Down Arrow key to change it to the dB setting mode. 4. Use the Up and Down Arrow keys (or the Rotary knob) to increment or decrement the desired dB setting. Or enter it directly with the Numeric keypad. 5. Press the Enter key again to close the dialog and save the current setting. Use the following procedure to set the Fiber Loss (dB/km) threshold to “None” when it is currently set in dBs. To set the Fiber Loss (dB/km) threshold to None: MT9083 Series ACCESS Master Operation Manual 6-17 Chapter 6: OTDR (Construction) Mode 1. Highlight Fiber Loss (dB/km) and then press the Enter key. The Fiber Loss (dB/km) dialog appears, displaying the current dB setting. 2. Press None (f1), the dialog changes to “None”. 3. Press the Enter key. The dialog closes and the parameter is set to “None”. Total Loss This Parameter highlights events in the Event Analysis table when the Total loss (Cum.Loss (dB)) exceeds the value set. The range of settings for this parameter is 0.1 dB to 60.0 dB in 0.1 dB increments. To set the Total Loss threshold: 1. Use the Up and Down Arrow keys (or the Rotary knob) to highlight Total Loss. 2. Press Enter. The Total Loss dialog appears. Depending on the current setting, the dialog will either state "None", indicating that there is no threshold currently set, or the dialog displays the current setting for the threshold in dBs. 3. If the Total Loss dialog displays "None", press the Up or Down Arrow key to change it to the dB setting mode. 4. Use the Up and Down Arrow keys (or the Rotary knob) to increment or decrement the desired dB setting. Or enter it directly with the Numeric keypad. 5. Press the Enter key again to close the dialog and save the current setting. Use the following procedure to set the Total Loss threshold to "None" when it is currently set in dBs. To set the Total Loss threshold to None: 1. Highlight Total Loss and then press the Enter key. The Total Loss dialog appears, displaying the current dB setting. 2. Press None (f1), the dialog changes to "None". 3. Press the Enter key. The dialog closes and the parameter is set to "None". Splitter Loss This Parameter highlights events in the Event Analysis table when the splitter loss exceeds the Auto Detect threshold plus value set. The range of settings for this parameter is 0.1 dB to 20.0 dB in 0.1 dB increments. 6-18 MT9083 Series ACCESS Master Operation Manual Chapter 6: OTDR (Construction) Mode To set the Splitter Loss threshold: 1. Use the Up and Down Arrow keys (or the Rotary knob) to highlight Splitter Loss. 2. Press Enter. The Splitter Loss dialog appears. Depending on the current setting, the dialog will either state "None", indicating that there is no threshold currently set, or the dialog displays the current setting for the threshold in dBs. 3. If the Splitter Loss dialog displays "None", press the Up or Down Arrow key to change it to the dB setting mode. 4. Use the Up and Down Arrow keys (or the Rotary knob) to increment or decrement the desired dB setting. Or enter it directly with the Numeric keypad. 5. Press the Enter key again to close the dialog and save the current setting. Use the following procedure to set the Splitter Loss threshold to "None" when it is currently set in dBs. To set the Splitter Loss threshold to None: 1. Highlight Splitter Loss and then press the Enter key. The Splitter Loss dialog appears, displaying the current dB setting. 2. Press None (f1), the dialog changes to "None". 3. Press the Enter key. The dialog closes and the parameter is set to "None". About Screen See “Password Settings” on page 3-15 for details. MT9083 Series ACCESS Master Operation Manual 6-19 Chapter 6: OTDR (Construction) Mode OTDR (Construction) Setup Screen The OTDR (Construction) Setup screen appears when you start a Construction mode test. 1 2 3 4 9 5 8 6 7 Figure 6-7: Initial Construction Mode screen – OTDR (Construction) Setup screen 1 2 3 4 5 Store Files At Base Filename Filename Base Filename Elements • Test Direction • Site A: • Site B: • Other: Wavelengths 6 7 8 9 Number of Fibers Start Number Options • Connection Check • Automode • File Save Verify • Macro Bend Softkeys Store Files At The Store Files At setting allows you to select a directory/folder for trace file storage of Construction mode test data. To select a file storage location: 6-20 MT9083 Series ACCESS Master Operation Manual Chapter 6: OTDR (Construction) Mode 1. Highlight the Store Files At field and then press the Enter key. The Select Directory screen appears. 2. With the Medium field highlighted, press the Enter key to toggle the selection between “Internal Memory” and “USB Memory”. Note The USB Memory selection is only available when a USB memory stick is connected to the MT9083 Series. 3. Choose either or both of the following functions, if desired, or continue at step 4: • Press New Folder (f4) to create a new folder for the file save. See “New Folder” on page 3-40 for details. • Select a different folder for the file save by highlighting the desired folder name (folder names are displayed in parentheses above the list of filenames) and then pressing Enter. 4. Press Select (f1). The Select Directory screen closes and the OTDR (Construction) Setup screen reappears. Base Filename The Base Filename field displays the filename template, which includes placeholder characters for Site A, Site B, Wavelength, and Fiber Number. See the following table for details. ! Placeholder Characters Filename Elements a Site A b Site B _ Wavelength o Other # Fiber Number CAUTION You may edit the order of the base filename placeholders and add additional text to the base filename (not to exceed 28 characters). DO NOT delete or change any of the placeholder characters. Doing so will break the link to their base filename element. MT9083 Series ACCESS Master Operation Manual 6-21 Chapter 6: OTDR (Construction) Mode To edit the Base Filename: 1. Use the Up and Down Arrow keys (or the Rotary knob) to highlight the Base Filename field and then press the Enter key. The Base Filename screen appears. If no USB keyboard is connected, follow the instructions from step 2. to enter the name using the front panel keys. If a USB keyboard is connected, you can modify the name directly from the keyboard. When all of the desired characters are entered, press the Enter key to use the new base file name or press the ESC key to close the Text Entry dialog boxdialog box without changing the base file name. Figure 6-8: Base Filename screen 2. Use the Up and Down Arrow keys to scroll the highlight from row to row, including the Base Filename field. Use the Right and Left Arrow keys to move the highlight within the selected row or, to move the text cursor in the Base Filename field when the field is highlighted. Or – Use the Rotary knob to navigate through each character in the character matrix as well as wrapping the highlight to the Base Filename field. 3. Use the f1 – f4 softkeys for the following: • Press Small Letter (f1) to change the character matrix to lower case letters. 6-22 MT9083 Series ACCESS Master Operation Manual Chapter 6: OTDR (Construction) Mode • • • Press Capital Letter (f2) to change the character matrix to upper case letters. Press Symbols (f3) to change the character matrix to display the symbols available. Press Space (f4) to insert a blank space in the file name. 4. With the desired character is highlighted in the character matrix and the text cursor placed in the desired position, press the Enter key to enter the selected character in the file name. Use the Numeric keypad to enter numbers in the Base Filename. 5. When you have finished editing the base filename, press OK (f6) to close the Base Filename screen and return to the OTDR (Construction) Setup screen. The edited base filename is now displayed in the Base Filename field. Filename The Filename field reflects results of the replacement of the placeholder characters with the text entered in the Filename Element fields (Site A, Site B, and Other) as well the test wavelength and current fiber number. Filename Elements The filename elements consist of the following: • • • • Test Direction Site A Site B Other Test Direction Specify the direction in which the test is performed; “A –> B” or “B <– A”. The a and b placeholders in the Base Filename, as well as the Site A and Site B filename elements reflect the chosen test direction. To specify the Test Direction: 1. Highlight A –> B the Test Direction field. 2. Toggle the Enter key to select the desire direction. MT9083 Series ACCESS Master Operation Manual 6-23 Chapter 6: OTDR (Construction) Mode Site A/Site B The Site A field is the text field which contains the literal string (filename element) for Site A. This is typically the location where the MT9083 Series is located (such as a City, Central Office, Patch Panel, etc.) The characters in the Site A field replace the “a” placeholder characters in the filename. The Site B field is the text field which contains the literal string (filename element) for Site B. This is typically the end point location of the current fiber under test (such as a City, Central Office, Patch Panel, etc.) The characters in the Site B field replace the “b” placeholder characters in the filename. Other The Other field is commonly used to add any descriptive text into the base filename, such as the Cable ID. Text entered into this field replaces the “o” placeholder character in the filename. To edit the Site A, Site B and/or Other fields: 1. Use the Up and Down Arrow keys (or the Rotary knob) to highlight the desired field (Site A, Site B, or Other) and then press the Enter key. The Text Entry dialog boxdialog box appears (see Figure 6-9, below). If no USB keyboard is connected, follow the instructions from step 2. to enter the name using the front panel keys. If a USB keyboard is connected, you can modify the name directly from the keyboard. When all of the desired characters are entered, press the Enter key to use the new name or press the ESC key to close the Text Entry dialog boxdialog box without changing the name. Repeat this step until all desired fields are edited. 6-24 MT9083 Series ACCESS Master Operation Manual Chapter 6: OTDR (Construction) Mode Figure 6-9: OTDR (Construction) Setup – Text Entry dialog box 2. Use the Up and Down Arrow keys to scroll the highlight from row to row, including the current text entry field, which is located directly above the character matrix. (The current title of the text entry field matches the currently selected Header screen field.) Use the Right and Left Arrow keys to move the highlight within the selected row or, to move the text cursor in the text entry field when the field is highlighted. Or – Use the Rotary knob to navigate through each character in the character matrix as well as wrapping the highlight to the text entry field. 3. Use the f1 – f4 softkeys for the following: • Press Small Letter (f1) to change the character matrix to lower case letters. • Press Capital Letter (f2) to change the character matrix to upper case letters. • Press Symbols (f3) to change the character matrix to display the symbols available. • Press Space (f4) to insert a blank space in the file name. MT9083 Series ACCESS Master Operation Manual 6-25 Chapter 6: OTDR (Construction) Mode 4. With the desired character is highlighted in the character matrix press the Enter key to enter the selected character in the text entry field. Use the Numeric keypad to enter numbers in the filename. Use Backspace (f5) or the BS key to delete characters entered in the text entry field. 5. Repeat steps 1-4 until all desired fields are edited. Wavelengths The Wavelengths field displays all of the test wavelengths available for the current MT9083 Series. Depending on the configuration of the unit, this field will display 1 to 4 wavelengths. In addition, the selected wavelength, per test, replaces the “_” placeholder character in the filename. To select the desired test wavelength(s): 1. Highlight the desired wavelength. 2. Toggle the Enter key to select or clear the check box for the highlighted wavelength (depending on the current status of the check box). 3. Repeat steps 1 and 2 until the desired wavelength settings are made. Number of Fibers Enter the maximum number of fibers for the current test in this field. The number entered in this field sets the number of digits (up to 4 digits) used by the autonumber section of the base filename, which is represented by the “#” placeholder character. To set the number of fibers to be tested: 1. Highlight the Number of Fibers field. 2. Press the Enter key. The Number of Fibers dialog appears. 3. Use the Up and Down Arrow keys or the Numeric keypad to enter the desired number of fibers, up to 9999. 4. Press the Enter key. The dialog closes and the number set is displayed in the Number of Fibers field and the autonumber section of the filename is set to the number of digits used. 6-26 MT9083 Series ACCESS Master Operation Manual Chapter 6: OTDR (Construction) Mode Start Number Enter the number of the first fiber to be tested in the Start Number field. The number entered is also displayed in the autonumber section of Filename field. To set the Start Number: 1. Highlight the Start Number field. 2. Press the Enter key. The Start Number dialog appears. 3. Use the Up and Down Arrow keys or the Numeric keypad to enter the desired start number. Leading 0 (zeros) will be automatically added for numbers of less than 4 digits. 4. Press the Enter key. The dialog closes and the number set is displayed in both the Start Number field and the autonumber section of the filename. Options The Options field consists of check boxes use to activate the following features: • • • • Connection Check Automode File Save Verify Macro Bend Connection Check Select the Connection Check check box to have Construction mode perform a Connection Check each time a new fiber is connected for testing. See “Connection Check” on page 6-67 for complete details. Note Selecting the Connection Check in the Options area also controls The Connection Check function on the Preferences screen. Changing the enabled/disabled status on either screen is tracked on both. Automode Select the Automode check box to have Construction mode automatically select the test parameters for the current fiber under test. If you do not select Automode, see “Setting the OTDR (Construction) Test Parameters” on pages 6-31 through 6-36 for details on how to manually set the test parameters. MT9083 Series ACCESS Master Operation Manual 6-27 Chapter 6: OTDR (Construction) Mode File Save Verify Select the File Save Verify check box to display the Save screen (see Figure 6-25 on page 6-64) when each test trace about to be saved. This allow you to review the file save details, such as the filename and save location. Macro Bend Select the Macro Bend check box to activate the Macro Bend detection feature. Macro Bends are indicated in the Event Table when a Loss value is followed by the indicator. Note Macro Bend detection requires an MT9083 Series unit with at least two single mode operating wavelengths; one at 1310 nm and a second at either 1550 nm or 1625 nm. To select/clear the Options: 1. Highlight the desired Option: Connection Check, Automode, File Save Verify, or Macro Bend. 2. Toggle the Enter key to select or clear the check box for the highlighted option (depending on the current status of the check box). 3. Repeat steps 1 and 2 until the desired option settings are made. 6-28 MT9083 Series ACCESS Master Operation Manual Chapter 6: OTDR (Construction) Mode OTDR (Construction) Setup Screen Softkeys The OTDR (Construction) Setup screen contains the following three softkeys: Press Continue (f1) to advance to the OTDR (Construction) Connect Fiber screen (see Figure 6-17 on page 6-47). Press Test Parameters (f2) to advance to the OTDR (Construction) Parameters screen (see Figure 6-10 on page 6-30). Note This softkey is dimmed when Automode is selected in the Options area of the OTDR (Construction) Setup screen (see Figure 6-7 on page 6-20). Press Header (f3) to open the Header screen. See “Headers” on page 6-37 for details. Press Template (f4) to open the Template Settings screen. See “Template” on page 6-39 for details. MT9083 Series ACCESS Master Operation Manual 6-29 Chapter 6: OTDR (Construction) Mode OTDR (Construction) Parameters Screen The OTDR (Construction) Parameters screen is divided into four panes, with each pane representing the basic test parameters set per wavelength for the MT9083 Series unit in use. To access the OTDR (Construction) Parameters screen: • Press Test Parameters (f2) on the OTDR (Construction) Setup screen. The OTDR (Construction) Parameters screen appears. Note The OTDR (Construction) Parameters screen can not be accessed when Automode is selected in the Options area of the OTDR (Construction) Setup screen (see Figure 6-7 on page 6-20). Figure 6-10: OTDR (Construction) Parameters screen 6-30 MT9083 Series ACCESS Master Operation Manual Chapter 6: OTDR (Construction) Mode Setting the OTDR (Construction) Test Parameters Each pane in the OTDR (Construction) Parameters screen provides access to the basic test parameters per wavelengths available on the unit: • • • • Range/Resolution/Pulse Width Dead-zone Number of Averages (Averaging Time) IOR (Index of Refraction) / BSC (Backscatter Coefficient) In addition, each pane has an option button which, when selected sets the basic test parameters to the same setting for all available wavelengths. Setting the Distance Range, Resolution, and Pulse Width The Range, Resolution, and Pulse Width settings determine the trace data distance range and resolution value (data point spacing) as well as the pulse width used for the test cycle. To set the Range, Resolution, and Pulse Width: 1. With the OTDR (Construction) Parameters screen displayed, highlight the Range field or PW field. 2. Press the Enter key. The Distance Range, Resolution, and Pulse width dialog appears (see Figure 6-11). Figure 6-11: Range /Resolution/ Pulse Width Dialog 3. Use the Right and Left Arrow keys to move the white arrow to the desired list. 4. Use the Up and Down Arrow keys (or the Rotary knob) to highlight the desired setting within the selected list. 5. Repeat steps 3 and 4 until all the desired settings are highlighted. MT9083 Series ACCESS Master Operation Manual 6-31 Chapter 6: OTDR (Construction) Mode 6. Press the Enter key (or the Rotary knob). The dialog closes and the Range field and PW field displays the newly selected Distance Range and Pulse Width. The distance range/resolution/pulse width settings may be changed while a Real Time or Averaging cycle is running. The test will restart using the new settings. The distance range/resolution/pulse width settings vary depending on what model of MT9083 Series product you are using. Selecting the Dead-zone Mode The MT9083A2/B2/C2 have a Dead-zone mode selection function. The two modes available via this mode selection function are Standard mode and Enhanced Range mode The features of the two modes are described below. Standard mode: • Standard mode allows short dead-zone measurements to be performed Enhanced Range mode: • • • Allows high dynamic range measurements. Allows fast measurements. Can be used to test the path over each optical fiber split by the splitter included in the PON system. To select the Dead-zone mode in Wavelength All mode: 1. With the OTDR Parameters screen displayed, use the Left/Right/Up/Down Arrow keys (or the Rotary knob) to highlight the Range field or PW field for the for the first desired wavelength and then press the Enter key (or the Rotary knob). The Distance Range, Resolution, and Pulse width dialog appears (see Figure 6-12 on page 6-33). 2. Press Dead-zone (f1) and set the desired mode. 3. Press the Enter key (or the Rotary knob). The dialog closes and the newly selected Dead-zone mode displays on the PW field. Note • The Enhanced Range mode is only available if an SM unit is fitted. The Dead-zone (f1) key becomes unavailable if an MM unit is fitted. 6-32 MT9083 Series ACCESS Master Operation Manual Chapter 6: OTDR (Construction) Mode • If the range of the selected pulse width does not fall between 50 ns to 2000 ns, the (f1) key is grayed out and set to Standard (HR). Figure 6-12: Dead-zone Mode Selecting screen Setting the Average Time/Average Count Specify the Average Time/Average Count by either selecting one of the four preset values or by entering the desired value in the field at the bottom of the dialog (see Figure 6-13 on page 6-34). Note Average Count can only be accessed when the language for the MT9083 Series is set to “Chinese”. See “Language” on page 3-10 for details on changing the current language selection. Actual average time may be longer than the set average time depending on the resolution and distance range setting. To set the Average Time: 1. With the OTDR (Construction) Parameters screen displayed, highlight the Num Avgs field. 2. Press the Enter key. The Average Time dialog appears (see Figure 6-13). Note When the language is set to “Chinese” this dialog is titled “Averaging”. MT9083 Series ACCESS Master Operation Manual 6-33 Chapter 6: OTDR (Construction) Mode Figure 6-13: Average Time Dialog 3. If the language is currently set to Chinese, use the Left and Right Arrow keys to toggle the Averaging mode from “Time” to “Count” depending on the desired mode. For any language other than Chinese, skip step 3 and continue at step 4. Note The “Time” and “Count” selections are only available when the language is set to Chinese and are not show in Figure 6-13. 4. Use the Up and Down Arrow keys (or the Rotary knob) to highlight the desired pre-set value, or to move the white arrow down to the Sec field (or Times field if the language is set to Chinese and Count is selected in step 3). • If you highlighted one of the pre-set values continue at step 6. • If you are entering an amount in the Sec field (or Times field if the language is set to Chinese and Count is selected in step 2) continue at step 5. 5. Use the Numeric keypad to directly enter the desired value, from 1 to 3600 in the field 6. Press the Enter key (or the Rotary knob). The dialog closes and the new value is displayed in the Num Avgs field. 6-34 MT9083 Series ACCESS Master Operation Manual Chapter 6: OTDR (Construction) Mode Setting the IOR and BSC Use the IOR/BSC dialog box to select one of the pre-set Fiber Types, which automatically sets the IOR (Index of Refraction) and BSC (Backscatter Coefficient) for the selected fiber type, or select “Other” and then use the Numeric keypad to enter the desired IOR and BSC settings. To set the IOR and BSC values: 1. With the OTDR (Construction) Parameters screen displayed, highlight the IOR/BSC field. 2. Press the Enter key. The IOR/BSC dialog appears (see Figure 6-14). Figure 6-14: IOR/BSC Dialog 3. Use the Left/Right/Up/Down Arrow keys to move the white arrow to the Fiber Type field, if necessary, and then use the Up and Down Arrow keys (or the Rotary knob) to highlight the desired fiber type. When the desired fiber type is highlighted, press the Enter key (or the Rotary knob). Or – If the fiber type is not listed, select Other and then move the white arrow to the IOR and BSC fields. Use the Numeric keypad to enter the desired values. When the IOR and BSC values are entered, press the Enter key (or the Rotary knob). Use the Numeric keypad to directly enter the desired value. 4. Press the Enter key (or the Rotary knob) to close the dialog. The new settings are displayed in the IOR/BSC field. MT9083 Series ACCESS Master Operation Manual 6-35 Chapter 6: OTDR (Construction) Mode Apply to All Wavelengths setting Use the Apply to All Wavelengths setting to automatically set the same basic test parameters for all test wavelengths available on the MT9083 Series in use. To apply the same parameter settings for all wavelengths: 1. With the OTDR (Construction) Parameters screen displayed, highlight the Apply to All Wavelengths field. 2. Press the Enter key. The setting established for the current wavelength will be applied to all available wavelengths. OTDR (Construction) Parameters Screen Softkeys The following three softkeys are available on the OTDR (Construction) Parameters screen: Press Set Defaults (f1) to return the settings on the OTDR (Construction) Parameters screen to their default settings. Press Cancel (f5) to close the OTDR (Construction) Parameters screen without saving any changes made, returning to the OTDR (Construction) Setup screen. Press Exit (f6) to save any changes made on the OTDR (Construction) Parameters screen and return to the OTDR (Construction) Setup screen. 6-36 MT9083 Series ACCESS Master Operation Manual Chapter 6: OTDR (Construction) Mode Headers Headers hold valuable information about the trace files which may save a considerable amount of time when recalling traces for comparison. The header does not require repopulating each time a new trace is collected. Information entered on the Header screen is retained until such a time as the header requires editing. Use the following procedure to access and edit the header when in Construction mode. To access and edit the Header: 1. With the OTDR (Construction) Setup screen (see Figure 6-7 on page 6-20) displayed press Header (f3). The Header screen appears. Figure 6-15: Header screen Note When the <AUTO> designator is displayed (see Figure 6-15), the Fiber ID field is auto-populated, starting with the number set in the Start Number field on the OTDR (Construction) Setup screen (see Figure 6-7 on page 6-20), If you replace the <AUTO> designator with a specific number, that number will be used in all subsequent headers until OTDR (Construction) mode is re-entered from the Top Menu. MT9083 Series ACCESS Master Operation Manual 6-37 Chapter 6: OTDR (Construction) Mode 2. Use the Up and Down Arrow keys (or the Rotary knob) to highlight the desired field and then press the Enter key. The Text Entry dialog box appears (see Figure ). If no USB keyboard is connected, follow the instructions from step 3. to enter the name using the front panel keys. If a USB keyboard is connected, you can modify the name directly from the keyboard. When all of the desired characters are entered, press the Enter key to return to the Header screen. Repeat steps 2 until all desired text entry fields on the Header screen are edited. Press the f6 key to close the Header and return to the Save screen.Text Entry dialog box 3. Use the Up and Down Arrow keys to scroll the highlight from row to row, including the current text entry field, which is located directly above the character matrix. (The current title of the text entry field matches the currently selected Header screen field.) Use the Right and Left Arrow keys to move the highlight within the selected row or, to move the text cursor in the text entry field when the field is highlighted. Or – Use the Rotary knob to navigate through each character in the character matrix as well as wrapping the highlight to the text entry field. 4. Use the f1 – f4 softkeys for the following: • Press Small Letter (f1) to change the character matrix to lower case letters. 6-38 MT9083 Series ACCESS Master Operation Manual Chapter 6: OTDR (Construction) Mode • • • Press Capital Letter (f2) to change the character matrix to upper case letters. Press Symbols (f3) to change the character matrix to display the symbols available. Press Space (f4) to insert a blank space in the file name. 5. With the desired character is highlighted in the character matrix press the Enter key to enter the selected character in the text entry field. Use the Numeric keypad to enter numbers in the Base Filename. Use Backspace (f5) or the BS key to delete characters entered in the text entry field. 6. When all of the desired characters are entered in the text entry field, press OK (f6) to return to the Header screen. 7. Repeat steps 2 through 6 until all desired text entry fields on the Header screen are edited. Template Template mode is a function to display event information by generating a predefined event table and mapping the collected trace onto the event conditions in this event table. Use the following procedure to access and set the Template Settings when in Construction mode. To access and set the Template Settings: 1. With the OTDR (Construction) Setup screen (See Figure 6-16 on page 6-40) displayed press Template (f4). The Template Settings screen appears. MT9083 Series ACCESS Master Operation Manual 6-39 Chapter 6: OTDR (Construction) Mode Figure 6-16: Template Setting Template Settings screen contains access for the following file selecting and parameter settings: • • • • • • Template File Event Determination Trace Priority Distance Absolute Distance Distance Helix Factor Adjustment The following softkeys are available in the Template Setting screen. • Clear Template (f1) Selecting Template File Only one template trace can be loaded at a time. Template trace can either be recalled from mass storage (e.g.: internal memory or USB memory stick) To load the Template Trace 6-40 MT9083 Series ACCESS Master Operation Manual Chapter 6: OTDR (Construction) Mode 1. Use the Left/Right/Up/Down Arrow keys (or the Rotary knob) to highlight Template File field and then press the Enter key. The Load screen appears. 2. Use the Up and Down Arrow keys (or the Rotary knob) to highlight the desired trace file. 3. Select Load Template with Setup (f1), the Load screen closes. 4. Press Exit (f6) to close the Template Setting screen. Event Determination The setting made in the Event Determination control how the Template trace event are applied to the selected target trace. To Set the Event Determination: 1. Use the Left/Right/Up/Down Arrow keys (or the Rotary knob) to highlight Template on the Event Determination field. 2. Toggle the Enter key (or the Rotary knob) to select the desire mode (Template or Merge). 3. Press Exit (f6) to close the Template Setting screen. • • If Template is selected, all events are copied directly from the template trace and onto the collected trace. If Merge is selected, the events in the template trace and the collected trace are correlated and merged. Trace Priority The Trace Priority check box gives the target trace event location priority over correlated events from the template when Merge is selected. If cleared, non-correlated template events are inserted into the target trace, correlated template events replace the correlating target trace events, and all other target trace events are left unchanged. To Set the Trace Priority 1. Use the Left/Right/Up/Down Arrow keys (or the Rotary knob) to highlight the Trace Priority field. 2. Toggle the Enter key to select or clear the check box for the trace priority. MT9083 Series ACCESS Master Operation Manual 6-41 Chapter 6: OTDR (Construction) Mode 3. Press Exit (f6) to close the Template Setting screen. • • If the Trace Priority check box is cleared, non-correlated template events are inserted into the target trace, correlated template events replace the correlating target trace events, and all other target trace events are left unchanged. If the Trace Priority check box is selected, only non-correlated template events are inserted into the target trace, all other events are left unchanged. Note Correlation of events is determined by the correlation window which is based on the Distance and Absolute Distance settings. If more than one target trace Event falls within the correlation window of a template event, the closest event is considered correlated. For each template non-end event that is propagated to the target trace, the target trace event’s loss value is computed using the adjusted template event distance and LSA cursors. “Table 6-1: Resultant Target Trace Events” shows examples of resultant target trace events for the three merge/priority states: Template On/Merge Off, Merge On/Trace Priority Off, Merge On/Trace Priority On. Table 6-1: Resultant Target Trace Events Template Trace Event Location result Target Trace Event Location Template=On Merge=On Merge=On Trace Priority=Off Trace Priority=On 10.0 NONE 10.0 10.0 10.0 20.0 20.1 20.0 20.0 20.1 NONE 30.1 NONE 30.1 30.1 40.0 40.1 40.0 40.0 40.1 (end event) 6-42 MT9083 Series ACCESS Master Operation Manual Chapter 6: OTDR (Construction) Mode Distance and Absolute Distance The Percent Distance and Absolute Distance define the size of the correlation window which determines how close together events must be to correlate. The size of the window is defined to be: MINIMUM (Percent * Template Event Distance, Absolute Distance). To set Distance 1. Use the Left/Right/Up/Down Arrow keys (or the Rotary knob) to highlight the Distance field. 2. Use the Numeric keypad to directly enter the desired value, from 0 to 100.0 in the field. 3. Press Exit (f6) to close the Template Setting screen. To set Absolute Distance 1. Use the Left/Right/Up/Down Arrow keys (or the Rotary knob) to highlight the Absolute Distance field. When the distance display units are set to km 2. Use the Numeric keypad to directly enter the desired value, from 0.000 to 250.000km in the field. 3. Press Exit (f6) to close the Template Setting screen. Distance Helix Factor Events in the template trace and the target trace may not align perfectly due to the differences in length of the fibers within a single cable. Distance Helix Factor Adjust options compensate for the difference in length and also obtain improved splice location and loss estimation. There are three option buttons in the Distance Helix Factor Adjustment area: • • None - The template and target trace event locations will be used as is, without Distance Helix Factor Adjustment. Snap to Template End - All template event locations will be converted to proportional (relative to target end) target event locations prior to correlation. For example, if a template event is located at a distance which is 43.21% from the template end event location, then the location will be temporarily converted to a distance 43.21% from the target trace end event. After correlation, all events will be converted to proportional template end locations and stored in the target trace. MT9083 Series ACCESS Master Operation Manual 6-43 Chapter 6: OTDR (Construction) Mode • Snap to Trace End - All template event locations will be converted to proportional (relative to target end) target event locations prior to correlation and left as is after correlation. To Set the Distance Helix Factor 1. Use the Left/Right/Up/Down Arrow keys (or the Rotary knob) to highlight the desired option (None, Snap to Template End or Snap to Trace End) on the Distance Helix Factor Adjustment field. 2. Toggle the Enter key (or the Rotary knob) to select the desire option. 3. Press Exit (f6) to close the Template Setting screen. Note The “Snap to” options should only be used if all traces have correct fiber end events. Detailed explanation of the Distance Helix Factor Adjustment function The following explanation assumes the Template Settings screen settings other than the Distance Helix Factor Adjustment options are as follows. • • • • Event Determination: Merge Trace Priority: OFF Distance: 30% Absolute Distance: 1 km Next, assuming the Template trace and Target trace event locations are as follows: Target trace event locations Template trace event locations 15 10 30 20 45 40 The following describes the corrections performed when each option is selected for the example shown above. • If None is selected 1. The event locations for the Target trace and Template trace events remain unchanged and correlation is performed without using the Distance Helix Factor Adjustment function. 6-44 MT9083 Series ACCESS Master Operation Manual Chapter 6: OTDR (Construction) Mode Target trace event locations after correlation 10 15 20 30 40 • If Snap to Template End is selected 1. Each Template trace event is converted proportionately relative to the Target trace end event location. Adjusted Template trace event locations after conversion 11.25 22.5 45 2. Next, correlation is performed using the Target trace events and converted temporary Template trace events. Temporary Target trace event locations after correlation 11.25 15 22.5 30 45 3. Finally, the correlated temporary Template trace events are converted proportionately relative to the end event location for the Template trace events. Final Target trace event locations 10 13.33 20 26.66 40 • If Snap to Trace End is selected 1. Each Template trace event is converted proportionately relative to the Target trace end event location. Adjusted Template trace event locations after conversion MT9083 Series ACCESS Master Operation Manual 11.25 22.5 45 6-45 Chapter 6: OTDR (Construction) Mode 2. Next, correlation is performed using the Target trace events and converted temporary Template trace events. Target trace event locations after correlation 11.25 15 22.5 30 45 “Table 6-2: Resultant Target Trace Events” shows examples of resultant target trace events for the three Distance Helix Factor Adjustment options: None, Snap to Template End, Snap to Trace End. Table 6-2: Resultant Target Trace Events result Template Trace Event Location Target Trace Event Location Distance Helix Factor Adjustment: None Snap to Template End Snap to Trace End 10 15 10, 15 10, 13.33 11.25, 15 20 30 20, 30 20, 26.66 22.5, 30 40 45 40 40.0 45 Template Settings Screen softkey The following two softkeys are available on the Template Settings screen: Click the currently selected template trace and then click Clear Template (f1) to turn template mode off. Press Exit (f6) to save any changes made on the Template Settings screen and return to the OTDR (Construction) Setup screen. 6-46 MT9083 Series ACCESS Master Operation Manual Chapter 6: OTDR (Construction) Mode OTDR (Construction) Connect Fiber Screen The OTDR (Construction) Connect Fiber screen contains two panes. The top pane is the Connect Fiber prompt which prompts you to connect the fiber that corresponds to the number displayed. The lower pane displays a list of filenames based on the base filename as established on the OTDR (Construction) Setup screen (see Figure 6-7 on page 6-20). Figure 6-17: OTDR (Construction) Connect Fiber screen OTDR (Construction) Connect Fiber Screen Softkeys The following four softkeys are available on the OTDR (Construction) Connect Fiber screen: Press Continue (f1) to advance to the Connection Check screen, if Connection Check is selected in the Options section of the OTDR (Construction) Setup screen. If Connection Check is cleared in the Options section of the OTDR (Construction) Setup screen, pressing Continue (f1) advances to the OTDR (Construction) Trace screen and starts the test of the currently connected fiber. MT9083 Series ACCESS Master Operation Manual 6-47 Chapter 6: OTDR (Construction) Mode Press Change Fiber # (f2) to change the current Connect Fiber number. See “Changing the Connect Fiber Number” below for details. Cancel Test (f4) cancels the pending test and advances both the Connect Fiber number and the filename auto-increment number by one each time Cancel Test is pressed. Note If the Number of Fibers field (see Figure 6-7 on page 6-20) is set to “1”, pressing Cancel Test returns you to the OTDR (Construction) Setup screen. Press Cancel All Tests (f5) to cancel all test and return to the OTDR (Construction) Setup screen. Changing the Connect Fiber Number Use the following procedure to change the Connect Fiber number from the OTDR (Construction) Connect Fiber screen. To change the Fiber Connect number: 1. With the OTDR (Construction) Connect Fiber screen displayed, press Change Fiber # (f2). The Current Fiber dialog appears. 2. Use the Up and Down Arrow keys or the Numeric keypad to enter the desired new current fiber number (up to 999). 3. Press the Enter key. The dialog closes and the number set is displayed in the Connect Fiber pane. 6-48 MT9083 Series ACCESS Master Operation Manual Chapter 6: OTDR (Construction) Mode Test In Progress Screen When a test has been started, Construction mode enters Analysis mode, displaying the Test in Progress screen (see Figure 6-18). 1 2 Figure 6-18: Test in Progress screen – OTDR (Construction) mode 1 Laser On icon 2 Softkeys Laser On Icon The flashing Laser On icon (item 1 in Figure 6-18) appears whenever a laser is firing. In OTDR (Construction) mode, the Laser On icon appears on the Test in Progress screen only. MT9083 Series ACCESS Master Operation Manual 6-49 Chapter 6: OTDR (Construction) Mode Test in Progress Softkeys The following two softkeys are active on the Test in Progress screen: Cancel (f2) cancels the pending test and advances both the Connect Fiber number and the filename auto-increment number by one each time Cancel is pressed. Note If the Number of Fibers field (see Figure 6-7 on page 6-20) is set to “1”, pressing Cancel returns you to the OTDR (Construction) Setup screen. Press Preview (f3) to set the Preview mode to “On” or “Off ”. • • 6-50 When the Preview is set to “On”, once a test is completed, the Trace screen remains static, permitting review of the Trace and Event Table. When the Preview is set to “Off ”, Construction mode does not display the Event Table. Instead it automatically saves the test data and starts the next test. MT9083 Series ACCESS Master Operation Manual Chapter 6: OTDR (Construction) Mode Test Results Screen – OTDR (Construction) The OTDR (Construction) Test Results screen appears at the end of each test, providing that Preview (f3) is set to “On” on the Test in Progress screen (see Figure 6-18 on page 6-49). 1 2 6 3 6 4 5 Figure 6-19: Test Results screen with Summary Closed 1 2 3 4 Event table Trace graph Cursor distance information Loss mode, Measurement, and Reflection 5 Fiber test parameters 6 Softkeys Event Table In fiber analysis, an “event” is considered to be a distinct deviation from normal fiber attenuation that may be introduced by a lossy connection (microbend, connector, or splice), a reflective connection (connector or fiber break) or the end of the fiber. Only events that meet one or more of the pre-set threshold criteria will be reported in the Event table (see “Thresholds” on pages 6-11 – 6-13). MT9083 Series ACCESS Master Operation Manual 6-51 Chapter 6: OTDR (Construction) Mode Events whose loss equals or exceeds the Pass/Fail Thresholds (see pages 6-14 – 6-17) are highlighted in red in the Event Table. Figure 6-20: Event Table The Event Table displays the following: • • • • • • • Event number Distance to the event Type of event dB loss for the event Reflectance (if the event is a reflective event) dB/km Cumulative loss (dB) If the measured value cannot be obtained, for example, because a fault point is being approximated, this is displayed as “**.***”. Distance to Event The Distance field [Dist(km)] on the Event Table represents the distance from the start of the trace to the start of the feature. This value is reported in the Distance Display Units selected on the setups Preferences screen, for example “km”. Types of Events Reported Reflective Event Reflection from an splice point, such as a Fresnel reflection caused by a mechanical splice or connector. Non-Reflective Event Non-reflective events include such low loss events as fusion splices and macro bends. 6-52 MT9083 Series ACCESS Master Operation Manual Chapter 6: OTDR (Construction) Mode Grouped Event Events spaced too close to each other for Analysis to distinguish them as separate events are reported as Grouped events. Far End Event Any event with a loss equal to or greater than the Fiber End threshold is reported as the Far End event. Questionable End Event A Questionable End event is reported, instead of a Far End event, when an Out of Range or Out of Distance condition is encountered. PON Event All events other than far end events with losses greater than the far end threshold are displayed as PON events. Loss (dB) The Loss calculated for the event is displayed in decibels (dB). A Loss value followed by an indicates detection of a Macro Bend. Note Macro Bend detection requires an MT9083 Series unit with at least two single mode operating wavelengths; one at 1310 nm and a second at either 1550 nm or 1625 nm. Reflectance A reflectance value is displayed for all reflective events, while “**.***” is displayed in the Reflectance field [Reflect(dB)] for non-reflective events. In addition to the reflectance value, two other indicators may be present: S. • An “S” following the numeric value indicates that the reflective event being measured is very close to the top limit of the OTDR’s data set, and that it is considered “saturated” (hitting the high limit of the measurement ability). An “S” (saturated indicator) will be present any time that the peak of the event being measured is within 1 dB of the top of the OTDR Trace graph. MT9083 Series ACCESS Master Operation Manual 6-53 Chapter 6: OTDR (Construction) Mode dB/km This field displays the dB/km between the selected event and the prior event. Cumulative Loss (dB) This field displays the total loss (Cum.Loss (dB)) up to the selected event, expressed in dB. Note The Total Loss (Cum.Loss (dB)) display differs depending on the Force Total Loss setting. (See “Preferences (2-2)” on page 6-8) If set ON, the result is displayed for all waveforms. If set OFF, "**.***" is displayed if the measured waveform is abnormal. Pass/Fail Thresholds Events whose loss exceeds the Pass/Fail Thresholds are highlighted in red in the Event Table. If within the Pass/Fail Thresholds, only Total Loss (Cum.Loss (dB)) is highlighted in green in the Event Table. Figure 6-21: OTDR (Standard) Analysis Screen - Event Summary "ON" and open summary 6-54 MT9083 Series ACCESS Master Operation Manual Chapter 6: OTDR (Construction) Mode Note To disable Pass/Fail display, set all of the Pass/Fail Thresholds in Thresholds (f4) to NONE. (See “Thresholds” on page 6-11 - 6-18). PASS is displayed in Event Summary when all of the Pass/Fail Thresholds pass. MT9083 Series ACCESS Master Operation Manual 6-55 Chapter 6: OTDR (Construction) Mode Trace Graph – OTDR (Construction) Mode The Trace graph displays the trace data in graph form. Power loss is measured in dB along the vertical axis and distance is measured along the horizontal axis. Use the Distance Display Units setting on the Preferences screen to set the horizontal axis units. The downward slope of the trace indicates power loss (attenuation) over the distance of the fiber. 2 5 6 3 1 7 4 Figure 6-22: Trace Graph – OTDR (Construction) Mode 1 Trace waveform(s) 2 Cursor A 3 Cursor B 4 Horizontal Axis scale 5 Vertical Axis scale 6 dB level indicator 7 Trace Overview window Trace Waveform The Trace Waveform (or Trace) is the downward sloping line going from left to right that connects the data points collected during a test. See item 1 in Figure 6-22. Up to four traces can be displayed simultaneously in Construction mode, depending on how many test wavelengths are currently being used and how many wavelengths are available on the MT9083 Series in use. 6-56 MT9083 Series ACCESS Master Operation Manual Chapter 6: OTDR (Construction) Mode This area also contains scroll bars, located at the top and left side of the trace graph, which define the display range of the waveform. Cursors The cursors (see items 2 and 3 in Figure 6-22 on page 6-56) are the two vertical lines that extend from the top to the bottom of the trace graph. The cursors allow you to extract power and distance information from the trace graph. The active cursor is displayed in red and the inactive cursor is displayed in blue. See “Selecting and Positioning Cursors” on page 4-57 for details on cursor use. Scale The vertical axis scale (see item 5 in Figure 6-22 on page 6-56) is located on the left side of the trace graph and is expressed in dBs, while the horizontal axis scale (see item 4 in Figure 6-22 on page 6-56) is located at the bottom of the trace graph and is expressed in the distance unit as set on the Preferences screen. See “Distance Display Units” on page 6-3 for details. dB Level Indicator The dB level indicator (see item 6 in Figure 6-22 on page 6-56) denotes the intersection of the active cursor and the trace level. Trace Overview Window The Trace Overview window (see item 7 in Figure 6-22 on page 6-56), located in the lower left corner or the Trace graph, show a thumbnail view of the current trace. This is helpful in determining the location of an expanded section on the main view. The black rectangle inside the Trace Overview window indicates the section of the trace that is currently displayed in the Trace graph when the trace has been expanded horizontally, vertically. Trace Overview must be set to On in the Preferences tab for the window to be displayed. See “Trace Overview” on page 6-6 for details. Cursor Distance Information The Cursor Distance information (see item 3 in Figure 6-19 on page 6-51) displays the following: • • • Distance from the origin of the trace to Cursor A Distance from the origin of the trace to Cursor B Distance between Cursor A and Cursor B MT9083 Series ACCESS Master Operation Manual 6-57 Chapter 6: OTDR (Construction) Mode As you move the cursors, the Cursor Distance information updates simultaneously. Loss Mode, Measurement, and Reflectance The Loss Mode, Measurement, and Reflectance area (see item 4 in Figure 6-19 on page 6-51) displays the following: • • • The current loss mode, listed in the top section The current loss reading in dB, in the center section A reflectance value reading for reflective events in the bottom section Fiber Test Parameters The Fiber Test Parameters area (see item 5 in Figure 6-19 on page 6-51) displays the Wavelength (WL), Distance Range (DR), Pulsewidth (PW), Index of Refraction (IOR), Resolution (RES), and Averaging mode (AVG) set for the current test. Note The Fiber Test Parameters area is replaced by the Event Summary area when the Event Summary selection is set to “On” on the Preferences screen (see Figure 6-3 on page 6-3). The Event Summary area displays the Total Events, Fiber Length, and Total Loss of the current fiber under test. Test Results Screen Softkeys The following softkeys are available on the OTDR (Construction) Test Results screen: At the end of a test, a Summary box containing the End/Fault Distance, Prior Event location, and Total Loss value for the current test is superimposed over the Trace Grid. OR • • 6-58 To view the Trace Grid, press Close Summary (f1). The Summary box closes, allowing the full Trace Grid to be viewed. To recall the Summary box, press f1 when the legend on the softkey reads “Open Summary”. MT9083 Series ACCESS Master Operation Manual Chapter 6: OTDR (Construction) Mode Press Accept (f2) to accept the current test results. The following actions occur: • • • The Summary window closes (if opened). The current test results data is saved to Mass Storage. If File Save Verify is selected on the OTDR (Construction) Setup screen (see Figure 6-7 on page 6-20), the Save screen is displayed, requiring the user to press Save Trace (f1) before continuing to the next test. Construction mode advances to the next test. Pressing Cancel (f3) cancels the current test without saving the trace data and returns to the Connect Fiber screen (see Figure 6-17 on page 6-47). Note If the Number of Fibers field (see Figure 6-7 on page 6-20) is set to “1”, pressing Cancel returns you to the OTDR (Construction) Setup screen. Press f4 to select the desired loss mode for the current test. The red legend displays the currently selected loss mode. Press f5 to set the Display From mode for viewing the trace graph. The red legend on the softkey displays the current display mode. Press f6 to toggle the status of the active cursor. When the red legend reads “Event”, turning the Rotary knob causes the active cursor to snap to the events on the trace. When the red legend reads “Free” you can position the cursors anywhere on the trace grid. Note The Loss Mode, Display From, and Cursor softkeys (f4 – f6) are only active when the legend on f1 reads “Open Summary”. MT9083 Series ACCESS Master Operation Manual 6-59 Chapter 6: OTDR (Construction) Mode Press F1 when the Analysis screen is displayed displays only the waveform on the screen. Press F2 when only the waveform is displayed on the screen selects the event just before the selected one. Press F3 when the Analysis screen is displayed selects the event just after the selected event. Press F4 when the Analysis screen is displayed selects the event just after the selected event. Note When the Analysis screen is not displayed or the event does not exist, this button is invalid (displayed in gray). 6-60 MT9083 Series ACCESS Master Operation Manual Chapter 6: OTDR (Construction) Mode OTDR (Construction) Mode Testing The following section details how to run an OTDR (Construction) mode test. Running an OTDR (Construction) Test Construction mode simplifies and automates the testing required when installing fiber. Construction mode is used when many fibers in a cable need to be tested and documented before deployment. To run a Construction mode test: 1. Power up the MT9083 Series (if necessary). 2. Highlight OTDR (Construction) on the Top Menu screen and then press the Enter key. The OTDR (Construction) Setup screen appears. Figure 6-23: OTDR (Construction) Setup screen 3. Make the desired settings on the OTDR (Construction) Setup screen. See “OTDR (Construction) Setup Screen” on pages 6-20 through 6-36 for details. 4. Fill in the header details, if desired. Press Header (f3), the Header screen appears. See “Headers” on page 6-37 for details. 5. If you want to set a template, press Template (f4) to open the Template Settings screen. See “Template” on page 6-39 for details. MT9083 Series ACCESS Master Operation Manual 6-61 Chapter 6: OTDR (Construction) Mode 6. Press Continue (f1). The OTDR (Construction) Connect Fiber screen appears (see Figure 6-17 on page 6-47). 7. Connect the first fiber to be tested to the desired test measurement port. See Figure 2-3 on page 2-10 for the location of the test measurement ports. Note Depending on the configuration of your MT9083 Series, the unit may have one or two test measurement ports. 8. Press Continue (f1). Depending on the “Connection Check” setting on the previous screen one of the following will happen: • If you selected “Connection Check” on the Setup screen, the Connection Check screen appears. When the best optimized connection is achieved (see “Connection Check” on page 6-67 for details) press the Start key or Continue (f1) to perform the test. • If you cleared the “Connection Check” check box, pressing Continue (f1) begins the Construction mode test and advances to the Test in Progress Trace screen (see Figure 6-18 on page 6-49). 9. If you want to review the Trace data and Event Table at the conclusion of the current test, toggle Preview (f3) so that the red legend on the softkey reads “On” and continue at step 9. If you do not want to review the Trace and Event Table, toggle Preview (f3) so that the red legend on the softkey reads “Off ” and continue at step 11. 10. At the conclusion of the data collection and analysis, the OTDR (Construction) Summary screen appears (see Figure 6-24 on page 6-63). 6-62 MT9083 Series ACCESS Master Operation Manual Chapter 6: OTDR (Construction) Mode Figure 6-24: OTDR (Construction) Summary screen Press Close Summary (f1) to view the Trace graph. 11. Press Accept (f2) to save the trace and advance to the next test. 12. If File Save Verify is selected on the OTDR (Construction) Setup screen (see Figure 6-23 on page 6-61) the Save screen appears (see Figure 6-25 on page 6-64). Review the file name and edit if desired, then press Save Trace (f1). The Save screen closes and Construction mode advances to the next test. For how to edit a file name, refer to “Renaming a File” on page 3-32. If you did not select File Save Verify, continue at step 12. MT9083 Series ACCESS Master Operation Manual 6-63 Chapter 6: OTDR (Construction) Mode Figure 6-25: Save screen 13. Continue until the connected fiber is tested at all the wavelengths selected on the OTDR (Construction) Setup screen. 14. Connect the next fiber to be tested. Selecting and Positioning Cursors The active cursor is displayed as a red vertical line in the Trace graph. Setting the Active Cursor To toggle the active cursor: • Press the Rotary knob (or the Enter key) to select the desired cursor. Precise Positioning of the Active Cursor To precisely position the cursor: 1. Select the desired cursor (see “Setting the Active Cursor” above). 2. Press Display From (f5) and select the desired display from setting (Display From A or Display From B, depending on which is cursor is currently selected as the active cursor). 3. Use the Left, Right, Up and Down Arrow keys to zoom up the desired amount. See “Horizontal and Vertical Expand and Contract” on page 6-65 for details. 6-64 MT9083 Series ACCESS Master Operation Manual Chapter 6: OTDR (Construction) Mode 4. Turn the Rotary knob to position the active cursor until the desired cursor distance is displayed in the Cursor Distance Information area (see item 3 in Figure 6-22 on page 6-56). Horizontal and Vertical Expand and Contract Use the Horizontal/Vertical expand to expand a section of the trace when: • • Positioning the cursors for a test Adjusting the LSA intervals To expand an area: 1. Position the desired cursor (A or B) to the approximate position. 2. Toggle Display From (f5) to the desired mode, Display From A or Display From B, depending on the cursor selected in step 1. 3. Press the Up Arrow key. Each press decreases the dB/division value of the vertical grid scale by a factor of two. Press the Right Arrow key. Each press decreases the distance/division value on the horizontal grid scale by a factor of two. To contract an area: • • Press the Down Arrow key. Each press increases the dB/division value of the vertical grid scale by a factor of two. Press the Left Arrow key. Each press increases the distance/division value on the horizontal grid scale by a factor of two. An error tone sounds when you reach the full expand/contract value for either axis. Display From Three Display From modes are available for viewing the trace graph: Display From A, Display From B, and Display From Origin. • Press Display From (f5) to toggle through the three modes. The legend on the softkey changes to the current Display From mode. . Display From Origin Keeps the origin (0 distance and 0 dB) in the upper left corner of the trace graph. MT9083 Series ACCESS Master Operation Manual 6-65 Chapter 6: OTDR (Construction) Mode Display From A Displays the A cursor intercept with the trace data in the center of the trace graph view. Display From B Displays the B cursor intercept with the trace data in the center of the trace graph view. Note The Display From softkey (f5) is only active when the legend on f1 reads “Open Summary”. Setting the Loss Mode You can change the Loss Mode in the OTDR (Construction) application at the end of a test, providing the Preview is set to “On” on the Test in Progress screen (see Figure 6-18 on page 6-49). To set the Loss Mode: 1. Press Loss Mode (f4). The Loss Mode dialog appears. Figure 6-26: Loss Mode Dialog 2. Use the Up and Down Arrow keys (or the Rotary knob) to highlight the desired loss mode. For details on the various loss modes see Chapter 7, “OTDR Mode Measurements”. Note Not all of the procedures described in Chapter 7, “OTDR Mode Measurements” apply to OTDR (Construction) mode. 6-66 MT9083 Series ACCESS Master Operation Manual Chapter 6: OTDR (Construction) Mode 3. Press the Enter key (or the Rotary knob). The dialog closes and red legend on the softkey changes to the selected loss mode. Note The Loss Mode softkey (f4) is only active when the legend on f1 reads “Open Summary”. Connection Check When the Connection Check is set to “On” on the setups Preferences screen, a connection check is automatically performed at the beginning of each fault locate test. The Connection Check screen consist of a simple gauge which provides a graphical representation of the connection quality along with instructions detailing how to proceed when the connection is “GOOD” and how to correct a “BAD” connection. GOOD connection – The gauge is green and yellow when connection is good. The closer the bar in the connection gauge extends to “HIGH” end, the better the connection is. If the gauge is yellow and red, the fiber needs cleaning. Press Continue (f1) or Start key to start the measurement immediately. Figure 6-27: Connection Check – Medium MT9083 Series ACCESS Master Operation Manual 6-67 Chapter 6: OTDR (Construction) Mode BAD connection – When the connection check level is low, the bar in the connection gauge is red and only extends a short distance from the “LOW” end of the gauge. If the connection state is not improved even if the fiber is cleaned, the fiber needs to be replaced. Figure 6-28: Connection Check – Low To correct a low connection: 1. Press Cancel (f6) to abort the current test. The Connect Fiber screen appears (see Figure 6-17 on page 6-47). Note If the Number of Fibers field (see Figure 6-7 on page 6-20) is set to “1”, pressing Cancel (f6) returns you to the OTDR (Construction) Setup screen. 2. Clean all of the optical connectors. 3. Press the Continue (f1) once or twice, depending on the setup conditions described in step 1, to re-enter the Connect Check screen. 4. If the Connection Check is still low, press Cancel (f6). 5. Switch the ends of the patch cord and press Continue (f1) once or twice again. 6-68 MT9083 Series ACCESS Master Operation Manual Chapter 6: OTDR (Construction) Mode 6. If the Connection Check is still low, press Cancel (f6) and then replace the patch cord. 7. Press Continue (f1) once or twice again to re-enter the Connect Check screen. Note Fibers shorter than approximately 48 meters (160 ft.) will generally result in a low connection. If the Connection Check remains LOW after following the steps in the preceding procedure, contact the Anritsu Technical Support Center at: Phone: 1-800-ANRITSU or 972-761-4600 (Canada, U.S., Latin and South America) Fax: +1 972-671-1877 e-mail: [email protected] Web: www.anritsu.com MT9083 Series ACCESS Master Operation Manual 6-69 Chapter 6: OTDR (Construction) Mode Working with OTDR (Construction) Trace Files Deleting Files Use the Save screen (see Figure 6-25 on page 6-64) to delete any data files stored in the internal memory or on a USB memory stick. You can delete a single file, multiple files or all of the files in the current directory. To delete a file: 1. At the completion of a Construction mode test, the Save screen appears (see Figure 6-25 on page 6-64). Note You can only access the Save screen in OTDR (Construction) mode when “File Save Verify” is selected on the OTDR (Construction) Setup screen (see Figure 6-23 on page 6-61). 2. Use the Up and Down Arrow keys (or the Rotary knob) to highlight the desired trace file. 3. Press Delete (f5). The following message appears: Are you sure you want to delete the current selection? 4. Press Yes (f1) to delete the selected file, or press No (f2) to cancel without deleting the file. 5. Repeat steps 2 through 4 for any additional file deletions. 6. Press the ESC Key to return to the test application. Use the following procedure to delete multiple files in a directory. To delete multiple files: 1. At the completion of a Construction mode test, the Save screen appears (see Figure 6-25 on page 6-64). Note You can only access the Save screen in OTDR (Construction) mode when “File Save Verify” is selected on the OTDR (Construction) Setup screen (see Figure 6-23 on page 6-61). 2. Press More (f6). 3. Press Multi-Select Off (f3). The red legend on the softkey changes to “On”. 6-70 MT9083 Series ACCESS Master Operation Manual Chapter 6: OTDR (Construction) Mode 4. Use the Up and Down Arrow keys (or the Rotary knob) to highlight the first file to delete and then press the Enter key. A bullet appears before the selected file name and the total size of the selected files is shown on the bottom. 5. Repeat step 4 until you have selected all of the files you want to delete. 6. Press More (f6). 7. Press Delete (f5). The following message appears: Are you sure you want to delete the current selection? 8. Press Yes (f1) to delete the selected files, or press No (f2) to cancel without deleting the files. To delete all files in a directory or folder: 1. At the completion of a Construction mode test, the Save screen appears (see Figure 6-25 on page 6-64). Note You can only access the Save screen in OTDR (Construction) mode when “File Save Verify” is selected on the OTDR (Construction) Setup screen (see Figure 6-23 on page 6-61). 2. 3. 4. 5. Select the desired folder/directory in which contains the file to be deleted. Press the Enter key to open the selected folder/directory. Press More (f6). Press Select All (f4). A bullet appears before each filename. Note If the Select All softkey (f4) is dimmed, toggle f3 so that the legend on the softkey reads “Multi-Select Off ”. 6. Press More (f6). 7. Press Delete (f5). The following message appears: Are you sure you want to delete the current selection? 8. Press Yes (f1) to delete all files in the selected directory, or press No (f2) to cancel without deleting the files. MT9083 Series ACCESS Master Operation Manual 6-71 Chapter 6: OTDR (Construction) Mode Copying Files Use the Save screen (see Figure 6-25 on page 6-64) to copy data files stored in the internal memory or on a USB memory stick. You can copy a single file, multiple files or all of the files in the current directory. To copy a file: 1. At the completion of a Construction mode test, the Save screen appears (see Figure 6-25 on page 6-64). Note You can only access the Save screen in OTDR (Construction) mode when “File Save Verify” is selected on the OTDR (Construction) Setup screen (see Figure 6-23 on page 6-61). 2. Press More (f6). 3. Use the Up and Down Arrow keys (or the Rotary knob) to highlight the desired trace file. 4. Press Copy (f1). 5. Select the desired folder/directory in which to paste the selected file. 6. Press Paste (f2). A message box stating “Copying 1/1” along with the name of the file appears briefly. Use the following procedure to copy multiple files in a directory. To copy multiple files: 1. At the completion of a Construction mode test, the Save screen appears (see Figure 6-25 on page 6-64). Note You can only access the Save screen in OTDR (Construction) mode when “File Save Verify” is selected on the OTDR (Construction) Setup screen (see Figure 6-23 on page 6-61). 2. Press More (f6). 3. Press Multi-Select Off (f3). The red legend on the softkey changes to “On”. 4. Use the Up and Down Arrow keys (or the Rotary knob) to highlight the first file to copy and then press the Enter key. A bullet appears before the selected file name and the total size of the selected files is shown on the bottom. 6-72 MT9083 Series ACCESS Master Operation Manual Chapter 6: OTDR (Construction) Mode 5. Repeat step 4 until you have selected all of the files you want to copy. 6. Press Copy (f1). 7. Select the desired folder/directory in which to paste the selected files. 8. Press Paste (f2). A message box appears displaying the count for each copied file as it is being pasted to the new directory/folder, as well as its filename. The message box closes when all of the selected files are pasted to their new location. To copy all files in a directory or folder: 1. At the completion of a Construction mode test, the Save screen appears (see Figure 6-25 on page 6-64). Note You can only access the Save screen in OTDR (Construction) mode when “File Save Verify” is selected on the OTDR (Construction) Setup screen (see Figure 6-23 on page 6-61). 2. Select the desired folder/directory in which contains the files to be copied. 3. Press More (f6). 4. Press Select All (f4). A bullet appears before each filename. Note If the Select All softkey (f4) is dimmed, toggle f3 so that the legend on the softkey reads “Multi-Select Off ”. 5. Press the Down Arrow key and highlight the first file in the selected folder/directory. 6. Press Copy (f1). 7. Select the desired folder/directory in which to paste the selected files. 8. Press Paste (f2). A message box appears displaying the count for each copied file as it is being pasted to the new directory/folder, as well as its filename. The message box closes when all of the files from the selected directory/folder are pasted to their new location. MT9083 Series ACCESS Master Operation Manual 6-73 Chapter 6: OTDR (Construction) Mode Sorting Files The Sort function allows you to change the order in which files are listed in mass storage (files saved to the MT9083 Series’ internal memory or to a USB memory stick). Files can be sorted by type (Name or Time/Date) in ascending or descending order. To set the Sort type: 1. At the completion of a Construction mode test, the Save screen appears (see Figure 6-25 on page 6-64). Note You can only access the Save screen in OTDR (Construction) mode when “File Save Verify” is selected on the OTDR (Construction) Setup screen (see Figure 6-23 on page 6-61). 2. Press Sort (f3). The Sort/By dialog appears. Figure 6-29: Sort/By Dialog 3. Use the Left and Right Arrow keys to move the white arrow so that it is positioned to the left of the first selection in the desired pane of the dialog (Sort or By). 6-74 MT9083 Series ACCESS Master Operation Manual Chapter 6: OTDR (Construction) Mode 4. Use the Up and Down Arrow keys (or the Rotary knob) to highlight the desire setting within the pane. 5. With the desired settings highlighted in both panes, press the Enter key. The dialog closes and the files are listed in the selected order. Printing Trace Files Trace files can be printed via the optional BL-80RII or SD1-31 printers. Note The printed output from the MT9083 Series consists of a screen shot. Only the details currently displayed on the LCD, less the softkeys, are printed. Make sure that the desired details are displayed before printing. Connecting the Printer Connect the MT9083 Series to the BL-80RII or SD1-31 printers using a USB printer conversion cable as shown in the figure below: Figure 6-30: Connecting the BL-80RII Printer Printing a Trace File Make sure that the Printer setup parameters are set as desired on the setups General screen. See “Printer” and “Paper Feed” on page 3-9 for details. Note In order to print an OTDR (Construction) Test Results screen, Preview (f3) must be set to “On” on the Test in Progress screen (see Figure 6-18 on page 6-49). To print trace files: 1. Connect the BL-80RII or SD1-31 printers to the MT9083 Series as shown in Figure 6-30, and then power up the printer. MT9083 Series ACCESS Master Operation Manual 6-75 Chapter 6: OTDR (Construction) Mode 2. Perform the test. 3. Press Close Summary (f1) to display the trace graph without the Summary box, if desired. 4. Press the Print key. The following message appears: Output screen image to a printer or as an image file. Please select output type using the function keys. 5. Press Printer (f1). The message changes to “Please wait. Printing...”. The MT9083 Series returns to the Trace grid when the printout is completed. Saving a Trace File as an Image File See “Saving a Screen Image to a File” on page 3-31 for details. Note In order to save the OTDR (Construction) Test Results screen as an image file, Preview (f3) must be set to “On” on the Test in Progress screen (see Figure 6-18 on page 6-49). 6-76 MT9083 Series ACCESS Master Operation Manual Chapter 7: OTDR Mode Measurements Distance Measurement When a primary trace is displayed, the fiber distance is automatically measured from the origin of the trace to each of the two cursors and between the cursors. The values are displayed in the Cursor Distance area. Proper cursor placement is crucial for accurate measurements. Note Improper distance readings may be reported if the Index of Refraction (IOR) is set inaccurately. See “Setting the IOR and BSC” on page 4-73 for details on changing the IOR setting. Two of the most common distance measurements are: • • Fiber Length (the total distance of a fiber) Distance to a Break (the distance from a known point to a break in the fiber) Fiber Length Measurement To measure the total length of a fiber: 1. Select Display From Origin (see “Display From” on page 4-71). 2. Place Cursor A at the end of the test fiber box (pulse suppressor), if one is used, or at 0.0000 km, as shown in the following figure. LAUNCH CORD OTDR FIBER UNDER TEST B A dB Distance MT9083 Series ACCESS Master Operation Manual 7-1 Chapter 7: OTDR Mode Measurements 3. Select Display From A. 4. Use the Right and Up Arrow keys to expand the screen horizontally and vertically around Cursor A for more accurate cursor placement. 5. Use the Rotary knob to place Cursor A on linear backscatter just prior (to the left side) of the reflective or non-reflective event, as shown in the following figure. Reflective Non-Reflective Cursor 6. Place Cursor B at the end of the fiber (see figure in step 2). 7. Select Display From B. 8. Use the Right and Up Arrow keys to expand the screen horizontally and vertically around Cursor B for more accurate cursor placement. 9. Use the Rotary knob to place Cursor B on linear backscatter just prior (to the left side) of the reflective or non-reflective event (see figure in step 5). 10. Read the fiber length as the A->B distance in the Cursor Distance information area (see item 3 in Figure 4-10 on page 4-30). Note If Cursor A was set to 0.0000 km, then the A-B distance will be the same as the Cursor B distance. Distance to a Break Measurement The following procedure demonstrates a method of locating a break relative to a known point on the fiber. 1. Select Display From Origin (see “Display From” on page 4-71). 2. Place Cursor B at the break in the fiber, as shown in the following figure. 7-2 MT9083 Series ACCESS Master Operation Manual Chapter 7: OTDR Mode Measurements FIBER UNDER TEST OTDR LAUNCH CORD KNOWN SPLICE x A dB B { A B Distance 3. Select Display From B. 4. Use the Right and Up Arrow keys to expand the screen horizontally and vertically around Cursor B for more accurate cursor placement. 5. Use the Rotary knob to place Cursor B on linear backscatter just prior (to the left side) of the break in the fiber (see the following figure). Reflective Non-Reflective Cursor 6. 7. 8. 9. Select Display From Origin. Place Cursor A at a known point on the fiber (see figure in step 2). Select Display From A. Use the Right and Up Arrow keys to expand the screen horizontally and vertically around Cursor A for more accurate cursor placement. 10. Use the Rotary knob to place Cursor A on linear backscatter just prior to (the left side) of the beginning of the known point (see figure in step 5). 11. Read the distance from the known point to the break as the A-B distance in the Cursor Distance information area (see item 3 in Figure 4-10 on page 4-30). MT9083 Series ACCESS Master Operation Manual 7-3 Chapter 7: OTDR Mode Measurements Loss Measurements Loss Modes When a primary trace is displayed, there are several different types of measurements available through the Loss Mode (f3) softkey: • • • • • • • 2-Pt Loss dB/km Loss Splice Loss 2-Pt LSA dB/km LSA ORL (Optical Return Loss) 2-Pt & dB/km Loss See “Setting the Loss Mode” on page 4-74 for details on how to set a loss mode. Event Examples Figure 7-1: Event Examples shows examples of events on a fiber that are referred to in the various Loss Mode procedures that follow this section. Use the figure as an aid to understanding some to the terminology used to describe measurement procedures. 2 1 3 4 5 0 dB 8 12 ATTENUATION 6 40 dB 0 km 9 7 10 11 13 DISTANCE 75 km Figure 7-1: Event Examples 7-4 MT9083 Series ACCESS Master Operation Manual Chapter 7: OTDR Mode Measurements 1 2 3 4 5 6 7 OTDR input Fusion splice Mechanical splice connector Fusion splice End of cable Diffusion tail Non-reflective loser 8 9 10 11 12 13 Reflective splice connector Fresnel reflection Rayleigh backscatter Non-reflective gainer Reflective end Noise floor 2-Point Loss The 2-Point Loss Measurement uses a data point at Cursor A and a data point at Cursor B to calculate the change in dB between the two points. Normally the Cursor A (Y-Axis) data is greater than the Cursor B (Y-Axis) data and a positive loss measurement is displayed. Otherwise, the loss value is reported as a negative quantity called a “gainer.” To perform a 2-Point Loss measurement: 1. Select Display From Origin (see “Display From” on page 4-71). 2. Place Cursor B at the end of the fiber. See “Selecting and Positioning Cursors” on page 4-57 for details. 3. Select Display From B. 4. Expand the screen horizontally and vertically for more accurate cursor placement. See “Horizontal and Vertical Expand and Contract” on page 4-58 for details. 5. Place Cursor B at the beginning of the reflective end of the fiber and read the total fiber length from the highlighted Cursor B location in the Cursor Distance area. 6. Select Display From Origin. 7. Place Cursor A just to the right of the diffusion tail, if one exists, after the beginning of the fiber. 8. Select Display From A. 9. Expand the screen horizontally and vertically for more accurate cursor placement. 10. Move Cursor A to the end of the diffusion tail. 11. Set the Loss Mode to 2-Pt Loss. See “Setting the Loss Mode” on page 4-74 for details. MT9083 Series ACCESS Master Operation Manual 7-5 Chapter 7: OTDR Mode Measurements 12. The 2-Pt Loss reading appears the Loss Mode, Measurement, and Reflectance area (see item 4 in Figure 4-10 on page 4-30). dB/km Loss The dB/km Loss measurement uses a data point at Cursor A and a data point at Cursor B to calculate the change in dB (Y-Axis) between the two points. This is divided by the distance between the two Cursors to calculate the Loss/Distance measurement. When Cursor A (Y-Axis) data is greater than Cursor B (Y-Axis) data, a positive loss measurement is displayed. 2-Point Loss Distance Between Cursor A and Cursor B Loss/Distance (dB/km) = To perform a dB/km Loss measurement: 1. Select Display From Origin (see “Display From” on page 4-71). 2. Place Cursor B at the end of the fiber. See “Selecting and Positioning Cursors” on page 4-57 for details. 3. Select Display From B. 4. Expand the screen horizontally and vertically for more accurate cursor placement. See “Horizontal and Vertical Expand and Contract” on page 4-58 for details. 5. Place Cursor B at the beginning of the reflective end of the fiber and read the total fiber length from the highlighted Cursor B location in the Cursor Distance area. 6. Select Display From Origin. 7. Place Cursor A just to the right of the diffusion tail, if one exists, after the beginning of the fiber. 8. Select Display From A. 9. Expand the screen horizontally and vertically for more accurate cursor placement. 10. Move Cursor A to the end of the diffusion tail. 11. Set the Loss Mode to dB/km Loss. See “Setting the Loss Mode” on page 4-74 for details. 12. The dB/km loss reading appears the Loss Mode, Measurement, and Reflectance area (see item 4 in Figure 4-10 on page 4-30). 7-6 MT9083 Series ACCESS Master Operation Manual Chapter 7: OTDR Mode Measurements Splice Loss Use Splice Loss mode to measure the optical power loss caused by connectors, splices, and couplers on a fiber optic cable. Use the following figure in conjunction with the splice loss procedure to measure splice loss: A 2 1 3 a 3 b 1 2 c Reflective Reflective Gainer d LSA Cursor Position A 1 2 3 3 2 1 Non-Reflective Non-Reflective Gainer a b c d LSA Cursor Position Start of Splice 3 Y-Intercept Splice Loss (The Splice Loss is equal to the Y-axis position at the Y-axis position at .) less Cursor A should be placed at the start of the splice. The Y-Axis position ( ) at the start of the splice will be determined by an LSA calculation using the interval set up to the left of Cursor A. The Y-Intercept point ( ) is determined by an LSA calculation using the current data interval setup to the right of Cursor A, and calculating the intercept back to Cursor A. To perform a splice loss measurement: 1. Select Display From Origin (see “Display From” on page 4-71). 2. Place Cursor A near the beginning of the splice where loss is to be measured. See “Selecting and Positioning Cursors” on page 4-57 for details. MT9083 Series ACCESS Master Operation Manual 7-7 Chapter 7: OTDR Mode Measurements 3. Select Display From A. 4. Expand the screen horizontally and vertically (see “Horizontal and Vertical Expand and Contract” on page 4-58) for more accurate cursor placement and place Cursor A at the beginning of the splice to be measured. 5. Set the Loss Mode to Splice Loss. See “Setting the Loss Mode” on page 4-74 for details. 6. If the LSA intervals are set properly they should appear similar to those in the following figure. If so, go to Step 8. 7. Adjust the LSA intervals so that they are on linear backscatter. See “Adjusting the LSA Intervals for Splice Loss Mode” on page 7-9 for details. 8. The Splice Loss reading appears in the Loss Mode, Measurement, and Reflectance area, as shown in the figure above. 7-8 MT9083 Series ACCESS Master Operation Manual Chapter 7: OTDR Mode Measurements Adjusting the LSA Intervals for Splice Loss Mode On some events you may need to adjust the LSA intervals (fuzzy cursors) to obtain a better estimate of an event splice loss, especially if either of the intervals fall within the actual loss interval or “knee” (see the following figure). Note This function is not available for the OTDR (Construction) application at the current software release. To modify the loss intervals: 1. 2. 3. 4. 5. 6. Set the Loss Mode to Splice Loss. Move Cursor A to the start of the desired event (see the figure above). Toggle Display From (f5) to Display from A. Expand the trace around Cursor A using the Right and Up Arrow keys. Use the Rotary knob to place Cursor A at the beginning of the splice. Press More>> (f6) and then press Cursors (f5). The Cursor softkeys appear. 7. Press Move LSA Off (f2). The softkey legend changes to Move LSA On and the “ ” marker on the left LSA interval changes from “ ” to “ ” (a larger “X” with a diamond superimposed on it). MT9083 Series ACCESS Master Operation Manual 7-9 Chapter 7: OTDR Mode Measurements Note Adjust the left LSA interval ( ) only if part of it falls within the preceding event. 8. Press the Rotary knob twice to change the left marker ( ) on the right LSA interval from “ ” to “ ”, and then rotate the Rotary knob clockwise until the “ ” is centered on linear backscatter to the right of the event. 9. Press the Rotary knob once to select the right marker ( ) on the right LSA interval. 10. Turn the Rotary knob clockwise until the Splice Loss reading stabilizes. 11. Press Exit (f6), the Cursor softkeys close and the Level Two softkeys return. Setting LSA Defaults To reset the LSA cursors to the factory default setting: 1. With the Cursor softkeys displayed, press Default LSA (f3). 2. Press Exit (f6), the Cursor softkeys close and the Level Two softkeys return. Note This function is not available for the OTDR (Construction) application at the current software release. 2-Point LSA The Least Squares Approximation (LSA) 2-Point Loss measurement uses an LSA technique to calculate the best Y-intercept values based on the current cursor positions. Intervals directly to the right of Cursor A and left of Cursor B will be used to calculate the intercept values. The length of the LSA intervals is user selectable. The default value is approximately 400 meters. The ends of the intervals are displayed as “ ” marks, as shown in the following figure. 7-10 MT9083 Series ACCESS Master Operation Manual Chapter 7: OTDR Mode Measurements The LSA 2-Point Loss is the change in dB (Y-Axis) calculated between the two points. When the Cursor A, Y-Axis position is greater than the Cursor B, Y-Axis position, a positive loss measurement is displayed. LSA (Least Squares Approximation) technique is useful when the trace is excessively noisy. The left interval is associated with Cursor A and the right interval with Cursor B. The default location for the left interval is immediately to the right of Cursor A. The default location for the right interval is immediately to the left of the B Cursor. To perform a 2-point LSA loss measurement: 1. Place the cursors as for an end-to-end loss measurement. See “Fiber Length Measurement” on page 7-1 for details. 2. Select Display From Origin (see “Display From” on page 4-71). 3. Press More>> (f6) to access the Level Two softkeys. 4. Press Loss Mode (f3) and set the loss mode to 2-Pt LSA. 5. Display from each cursor and expand the screen horizontally and vertically for more accurate cursor placement if necessary (see “Horizontal and Vertical Expand and Contract” on page 4-58). 6. Check that the LSA intervals are located on areas of linear backscatter and do not touch a splice or other feature. If necessary, adjust the LSA MT9083 Series ACCESS Master Operation Manual 7-11 Chapter 7: OTDR Mode Measurements intervals. See “Adjusting the Left and Right LSA Intervals” on page 7-12 for details. 7. The 2-Point LSA loss reading appears the Loss Mode, Measurement, and Reflectance area. Adjusting the Left and Right LSA Intervals The left interval is associated with Cursor A and the right interval with Cursor B. The default location for the left interval is immediately to the right of Cursor A. The default location for the right interval is immediately to the left of the B Cursor. Note This function is not available for the OTDR (Construction) application at the current software release. In some cases, such as a very noisy trace or a trace with closely spaced event, you may need to adjust the LSA intervals (fuzzy cursors) to obtain more accurate 2-Point LSA and dB/km LSA loss measurements. To modify the LSA interval: 1. 2. 3. 4. 7-12 Set the Loss Mode to either 2-Pt LSA or dB/km LSA. Select the desired cursor (A or B). Press More>> (f6) to access the Level One softkeys. Toggle Display From to display from the selected cursor (Display From A or Display From B). MT9083 Series ACCESS Master Operation Manual Chapter 7: OTDR Mode Measurements 5. Expand the trace around the cursor. See “Horizontal and Vertical Expand and Contract” on page 4-58 for details. 6. If necessary, use the Rotary knob to position the cursor closer to the event. 7. Press More>> (f6) to access the Level Two softkeys. 8. Press Cursors (f4) to access the Cursor softkeys. 9. Press Move LSA Off (f2). The softkey legend changes to Move LSA On and the “ ” marker on the left LSA interval changes from “ ” to “ ” (a larger “X” with a diamond superimposed on it). 10. Press the Rotary knob (or the Enter key) until the desired LSA interval icon changes from “ ” to “ ” and then turn the Rotary knob until the “ ” is centered on linear backscatter. Make sure that the LSA interval icon is clear of any near by event. 11. Repeat step 10, selecting the other marker, if necessary. 12. Repeat steps 2 through 10 to adjust the other LSA interval, if necessary. 13. Press Exit (f6). The Cursor softkeys close and the Level Two softkeys appear. dB/km LSA The dB/km LSA Loss measurement finds the LSA 2-Point Loss (see “2-Point LSA” on page 7-10 for details) and divides it by the distance between the two cursors. LSA 2-Point Loss Distance Between Cursor A and Cursor B Loss/Distance (dB/km) = To perform a dB/km LSA loss measurement: 1. 2. 3. 4. 5. Position the cursors at the desired locations on the trace. Select Display From Origin (see “Display From” on page 4-71). Press More>> (f6) to access the Level Two softkeys. Press Loss Mode (f3) and set the loss mode to dB/km LSA. Display from each cursor and expand the screen horizontally and vertically for more accurate cursor placement, if necessary (see “Horizontal and Vertical Expand and Contract” on page 4-58). 6. Check that the LSA intervals are located on areas of linear backscatter and do not touch a preceding feature. If necessary, adjust the LSA intervals. See “Adjusting the Left and Right LSA Intervals” on page 7-12 for details. MT9083 Series ACCESS Master Operation Manual 7-13 Chapter 7: OTDR Mode Measurements 7. The dB/km LSA loss reading appears the Loss Mode, Measurement, and Reflectance area. 7-14 MT9083 Series ACCESS Master Operation Manual Chapter 7: OTDR Mode Measurements ORL (Optical Return Loss) The MT9083 provides the ability to calculate Optical Return Loss (ORL), the ratio of reflected energy to input energy for a fiber optic link. ORL can be calculated for a section of the fiber optic link or for the entire link. Note The ORL function is not available for the OTDR (Construction) application at the current software release. To perform an ORL measurement: 1. Select the desired ORL Calculation on the Preferences screen in setups. See “ORL Calculation” on page 4-7 for details. 2. Press Range / Pulse Width (f4), the Distance Range, Pulse width, and Resolution dialog appears. Set the following: • Set the Distance Range, selecting the shortest possible range, following the fiber length plus 25% rule. • Set the Pulse width. 1000ns is a good typical setting. This setting generally provides a combination of good range and good resolution. • Set the Resolution to High Density. See “Setting the Range, Resolution, and Pulse Width” on page 4-68 for details on making the setting for step 2. 3. Press More>> (f6) to access the Level Two softkeys. 4. Press Average Time (f1) and set the averaging to 1 minute, to provide good data acquisition. See “Setting the Average Time/Average Count” on page 4-71 for details. 5. Press Loss Mode (f3) and set the loss mode to ORL. 6. Press More>> (f6) to return to the Level One softkeys. 7. Press ManualTest (f1) to test the fiber. 8. Place Cursor B in the noise floor at the end of the trace. See “Selecting and Positioning Cursors” on page 4-57 for details on cursor placement. 9. Place Cursor A at the desired measurement point along the vertical backscatter, after the initial refection. 10. Press More>> (f6) twice to display the Level Three softkeys. 11. Press Calc ORL (f4) The ORL value appears in the Loss Mode, Measurement, and Reflectance area as shown in the following figure. MT9083 Series ACCESS Master Operation Manual 7-15 Chapter 7: OTDR Mode Measurements Depending on the ORL Calculation type selected on the Preferences setup screen, the ORL value will be follow by either an [A] if set for “A Cursor” or an [O] if set for “Origin. If there is no indicator displayed after the ORL value, the ORL Calculation was set to “Full Trace”. An ORL value with a “<” before the reading and an “S” following the reading indicates that saturation was encountered for the selected area of the trace. This implies that the actual ORL value is, at most, the displayed value, but is probably less. An ORL value with a “<“, but without an “S”, indicates that there were insufficient points per pulsewidth to obtain an accurate ORL value. 2-Point & dB/km Loss The combined 2-Point & dB/km loss mode displays both loss values at the same time. The loss values, separated by a “,” are displayed in the Loss Mode, Measurement, and Reflectance area (see item 4 in Figure 4-10 on page 4-30). See “2-Point Loss” on page 7-5 and “dB/km Loss” on page 7-6 for details on the individual loss modes. To perform a 2-Pt & dB/km loss measurement: 1. Select Display From Origin (see “Display From” on page 4-71). 2. Place Cursor B at the end of the fiber. See “Selecting and Positioning Cursors” on page 4-57 for details. 7-16 MT9083 Series ACCESS Master Operation Manual Chapter 7: OTDR Mode Measurements 3. Select Display From B. 4. Expand the screen horizontally and vertically for more accurate cursor placement. See “Horizontal and Vertical Expand and Contract” on page 4-58 for details. 5. Place Cursor B at the beginning of the reflective end of the fiber and read the total fiber length from the highlighted Cursor B location in the Cursor Distance area. 6. Select Display From Origin. 7. Place Cursor A just to the right of the diffusion tail, if one exists, after the beginning of the fiber. 8. Select Display From A. 9. Expand the screen horizontally and vertically for more accurate cursor placement. 10. Move Cursor A to the end of the diffusion tail. 11. Set the Loss Mode to 2pt, dB/km. See “Setting the Loss Mode” on page 4-74 for details. 12. The 2-Pt & dB/km loss values, separated by a “,” are displayed in the Loss Mode, Measurement, and Reflectance area. The first value is the 2-point loss and the second value is the dB/km loss. Reflectance Measurements Overview Reflectance is the ratio of reflected power to incident power displayed in dB. A reflectance measurement is affected by the Pulsewidth and the Backscatter Coefficient. A reflectance value for reflective events is displayed in the lower section of the Loss Mode, Measurement, and Reflectance area (see item 4 in Figure 4-10 on page 4-30) when either Auto or Manual is selected on the Preferences screen in Setups. The reflectance reading may also contain an “S” indicator (see “Reflectance” on page 4-41 for details on the “S” indicators). The reflectance measurement is made relative to Cursor A when set to Auto and relative to Cursors A and B when set to Manual. MT9083 Series ACCESS Master Operation Manual 7-17 Chapter 7: OTDR Mode Measurements Auto Reflectance Mode Auto Reflectance mode requires placement of Cursor A only and automatically makes the measurement based upon the cursor placement. There are restrictions on the placement of Cursor A detailed in the following procedure. Note The following procedure applies to the OTDR (Standard) and OTDR (Fault Locate) applications only. To perform auto reflectance measurements: 1. Press the Setup key. 2. Press Preferences (f2). 3. Set the Reflectance Calculation to Auto. See “Reflectance” on page 4-16 for details. 4. Press Range / Pulse Width (f4), the Distance Range, Pulse width, and Resolution dialog appears. Set the following: • Set the Distance Range, selecting the shortest possible range, following the fiber length plus 25% rule. • Set the Pulse width. 1000ns is a good typical setting. This setting generally provides a combination of good range and good resolution. • Set the Resolution to High Density. See “Setting the Range, Resolution, and Pulse Width” on page 4-68 for details on making the setting for step 4. 5. Press Average Time (f1) and set the averaging to 60 seconds, to provide good data acquisition. See “Setting the Average Time/Average Count” on page 4-71 for details. 6. Press Manual Test(f1) to test the fiber. After the test is complete, the reflectance reading is displayed in the lower section of the Loss Mode, Measurement, and Reflectance area (see item 4 in Figure 4-10 on page 4-30). Moving Cursor A will change the reflectance value. Note The Reflectance value may be preceded by an “S”. See “Reflectance” on page 4-41 for details. 7-18 MT9083 Series ACCESS Master Operation Manual Chapter 7: OTDR Mode Measurements 7. Place Cursor A on backscatter just prior (to the left side) of the reflective event in order to achieve an accurate reflectance measurement. See “Selecting and Positioning Cursors” on page 4-57 for details on cursor placement. A (200 meters minimum) A: 200 meters PW: 1000ns /100.0m 8. Select Display From A (see “Display From” on page 4-71) and then use the Right and Up Arrow keys to zoom in on the trace (see “Horizontal and Vertical Expand and Contract” on page 4-58) to place Cursor A as close as possible to the rising edge of the reflection. Cursor A must be placed on a linear section of the waveform backscatter and NOT the rising edge of the reflection. (See the figure in step 7 which uses a 1000 ns pulsewidth and yields a 200 meter minimum distance between origin and Cursor A placement.) Cursor A may be placed to within two pulsewidths from the origin or start of the OTDR trace (OTDR bulkhead). MT9083 Series ACCESS Master Operation Manual 7-19 Chapter 7: OTDR Mode Measurements Manual Reflectance Mode Both Cursors (A and B) are used for this measurement. Note The following procedure applies to the OTDR (Standard) and OTDR (Fault Locate) applications only. To perform manual reflectance measurements: 1. Press the Setup key. 2. Press Preferences (f2). 3. Set the Reflectance Calculation to Manual. See “Reflectance” on page 4-16 for details. 4. Press Range / Pulse Width (f4), the Distance Range, Pulse width, and Resolution dialog appears. Set the following: • Set the Distance Range, selecting the shortest possible range, following the fiber length plus 25% rule. • Set the Pulse width. 1000 ns is a good typical setting. This setting generally provides a combination of good range and good resolution. • Set the Resolution to High Density. See “Setting the Range, Resolution, and Pulse Width” on page 4-68 for details on making the setting for step 4. 5. Press Average Time (f1) and set the averaging to 60 seconds, to provide good data acquisition. See “Setting the Average Time/Average Count” on page 4-71 for details. 6. Press ManualTest (f1) to test the fiber. After the test is complete, the reflectance reading is displayed in the lower section of the Loss Mode, Measurement, and Reflectance area (see item 4 in Figure 4-10 on page 4-30). Moving Cursor A will change the reflectance value. Note The Reflectance value may be preceded by an “S”. See “Reflectance” on page 4-41 for details. 7. Place Cursor A on backscatter just prior (to the left side) of the reflective event in order to achieve an accurate reflectance measurement. See 7-20 MT9083 Series ACCESS Master Operation Manual Chapter 7: OTDR Mode Measurements “Selecting and Positioning Cursors” on page 4-57 for details on cursor placement. A B A: 4.0 m Range / Reso: 125 km / 0.5 m 8. Select Display From A (see “Display From” on page 4-71) and then use the Right and Up Arrow keys to zoom in on the trace (see “Horizontal and Vertical Expand and Contract” on page 4-58) to place Cursor A as close as possible to the rising edge of the reflection. Cursor A must be placed on a linear section of the waveform backscatter and NOT the rising edge of the reflection (see the figure above). 9. Place Cursor B on the center of the reflectance pulse (see the figure above). Note Occasionally a small, narrow peak may be present (as shown in the figure above). Do not place Cursor B on top of the first narrow peak, if a narrow peak is present, as this will result in an inaccurate reflectance measurement. MT9083 Series ACCESS Master Operation Manual 7-21 Chapter 7: OTDR Mode Measurements Real Time Testing Real Time test mode provides a quick 'real-time' view of the initial trace information. In this mode, trace data is not continually averaged, but is stopped and restarted after each screen update. Real Time mode enables optimization of fiber connections at or near the OTDR connector, as the trace display shows the effect of the making changes to the connections. To start a Real Time test: • Press Real Time Off (f2) to start a real time test. The red legend on the softkey changes to “On” and the test begins. Note To attenuate a saturated event when in Real Time test mode, move the active cursor within the event, until the unit auto-attenuates the event (pulling the event out of saturation). To stop a Real Time test: • 7-22 Press Real Time On (f2) to stop the current real time test. The red legend on the softkey changes to “Off ” and the real time test ends. MT9083 Series ACCESS Master Operation Manual Chapter 8: Loss Test Set Mode Overview Loss Test Set mode is made available by equipping a MT9083 Series with one of the optional Power Meters (options 004/005/007). This provides the ability to perform power meter/light source tests. The optical power measurement range varies depending on the specific optional power meter with which the MT9083 Series is equipped. See “MT9083A2/B2/C2 ACCESS Master Common” on page A-8 for details. Starting Loss Test Set Mode To start Loss Test Set mode: 1. Press the Top Menu key. 2. Highlight Loss Test Set, then press the Enter key. Note Units not equipped with the power meter option will not display the Loss Test Set selection. 3. The unit displays the initial Loss Test Set screen (see Figure 8-1). Figure 8-1: Initial Loss Test Set screen MT9083 Series ACCESS Master Operation Manual 8-1 Chapter 8: Loss Test Set Mode Setups – Loss Test Set mode Press the Setup key to display the setup information for Loss Test Set mode (See “Starting Loss Test Set Mode” on page 8-1 for details). Entering Loss Test Set Setups 1. Start Loss Test Set mode. The initial Loss Test Set screen appears (see Figure 8-1 on page 8-1). 2. Press the Setup key. The General Setups screen appears. The General and About screens are the only setup screens available when in Loss Test Set mode. General Setups The General setups pertain to general setting for the MT9083 Series and are detailed in “General Screen Settings” on pages 3-7 – 3-15. Figure 8-2: General Setups Screen About Screen See “Password Settings” on page 3-15 for details. 8-2 MT9083 Series ACCESS Master Operation Manual Chapter 8: Loss Test Set Mode Loss Test Set Screen The initial Loss Test Set screen consists of four main areas, as flagged in the following figure: 1 2 4 3 Figure 8-3: Loss Test Set Screen Elements 1 Light Source area 2 Power Meter area 3 Port connection indicator 4 Softkeys MT9083 Series ACCESS Master Operation Manual 8-3 Chapter 8: Loss Test Set Mode Light Source Area 2 1 Figure 8-4: Light Source Area 1 Light Source Wavelength indicator 2 Light Source On/Off indicator Light Source Wavelength Indicator Displays the current test wavelength, as set via the Light Source Wavelength (f2) softkey. Light Source On/Off Indicator Displays the current status of the Light Source laser. Power Meter Area Figure 8-5: Power Meter Area 8-4 1 Power Meter Wavelength indicator 2 Absolute Power reading 3 Range indicator MT9083 Series ACCESS Master Operation Manual Chapter 8: Loss Test Set Mode 4 Average field 5 Reference field 6 Threshold field 7 Loss reading Power Meter Wavelength Indicator Displays the current test wavelength, as set via the Power Meter Wavelength (f3) softkey. Absolute Power Reading Displays the current value measured by the Optical Power Meter. The optical power measurement range varies depending on the specific optional power meter with which the MT9083 Series is equipped. See “MT9083A2/B2/C2 ACCESS Master Common” on page A-8 for details. When an optical power level under the measurement range (including light shielding) is measured, it is regarded as “under range” and “Under” is displayed in the Power reading area. When an optical power level over the measurement range is measured, it is regarded as “over range” and “Over” is displayed in the Power reading area. Correct measurements cannot be performed in the under range or over range status. ! CAUTION The light receiving part of the MT9083 Series may be damaged if light exceeding +10 dBm is injected. In addition, when the reference value (as set in the Reference Field, item 5 in Figure 8-5 on page 8-4) is set to “None”, the background color of the Absolute Power reading changes according to the Pass/Fail status established by the value in the Threshold field (see item 6 in Figure 8-5 on page 8-4). Readings that “pass” have a black background, while readings that “fail” have a red background. Range Indicator The Range Indicator provides a graphic representation of the optical power level being measured. The greater the optical power level measured, the further the Range Indicator is filled in. MT9083 Series ACCESS Master Operation Manual 8-5 Chapter 8: Loss Test Set Mode Average Field Displays the number of times that the current test data is averaged before the Power reading (item 2 in Figure 8-5 on page 8-4) is refreshed. The higher the number of averages, the more stable the Power reading. Reference Field Displays the currently set reference value which is used to calculate the Loss reading (item 5 in Figure 8-5 on page 8-4). Reference values can be entered for each of the power meter’s calibrated wavelengths. Threshold Field Displays the currently set threshold value which is used to determines the Pass/Fail status of the Loss reading, as displayed in the Loss Table (see Figure 8-7 on page 8-9). Threshold values can be entered for each of the power meter’s calibrated wavelengths. Loss Reading The Loss reading (item 7 in Figure 8-5 on page 8-4) displays the optical power loss value. When the reference value is set to “None”, “– – – –” is displayed, as a Loss reading requires that a reference value is set. When a reference value is set, the optical power loss is obtained as follows: Optical power loss = Reference – Optical power measurement In addition, when a reference value other than “None”, is set in the Reference Field (item 5 in Figure 8-5 on page 8-4), the background color of the Loss reading changes according to the Pass/Fail status established by the value in the Threshold field (see item 6 in Figure 8-5 on page 8-4). Readings that “pass” have a black background, while readings that “fail” have a red background. Port Connection Indicator The lower third of the Loss Test Set screen contains the Port Connection Indicator. The Input port, as shown in the following figure, is the connection for the optional Power Meter, while the Output port is the Optical Light Source. 8-6 MT9083 Series ACCESS Master Operation Manual Chapter 8: Loss Test Set Mode Figure 8-6: Port Connection Indicator – Loss Test Set mode Note The measurement port indicated as the Output port varies according to the optical wavelength of the light to be emitted. Softkeys (Loss Test Set screen) The following softkeys are available on the Loss Test Set screen: Light Source Off/On (f1) Press the Light Source Off softkey to start the optical light source. The red legend on the softkey as well as the legend in the Light Source Wavelength indicator (see item 2 in Figure 8-4 on page 8-4) change to “On”. In addition, the background of the Light Source Wavelength indicator changes from black to red. Light Source Wavelength (f2) Press the Light Source Wavelength softkey to scroll through the available wavelengths for the MT9083 Series Optical Light Source. Check the Light Source Wavelength indicator (see item 1 in Figure 8-4 on page 8-4) for the currently selected wavelength. Note This softkey also toggles the Power Meter Wavelength selection field, when the selected Light Source wavelength matches one of the calibrated Power Meter wavelengths. MT9083 Series ACCESS Master Operation Manual 8-7 Chapter 8: Loss Test Set Mode Power Meter Wavelength (f3) Press the Power Meter Wavelength softkey to scroll through the calibrated wavelengths for the optional Power Meter. Modulation (f4) Press the Modulation softkey to scroll through the modulation rates for Loss Test Set. The red legend on the softkey displays the current modulation rate. The four modulation rates are as follow: • • • • CW (Continuous Wave) 270 Hz 1 kHz 2 kHz Set Zero (f5) Press the Set Zero softkey to adjust the optical power meter offset. Loss Table (f6) Press the Loss Table softkey to advance to the Loss Table screen. Loss Table Screen The Loss Table screen consists of four main areas, as flagged in the following figure. Press Loss Table (f6) on the Loss Test Set screen (see Figure 8-3 on page 8-3) to display the Loss Table screen. 8-8 MT9083 Series ACCESS Master Operation Manual Chapter 8: Loss Test Set Mode 1 2 4 3 Figure 8-7: Loss Test Set – Loss Table screen 1 Light Source settings area 2 Power Meter settings area 3 Loss table 4 Softkeys Light Source Settings Area The Light Source Settings area displays the wavelength and modulation settings made on the Loss Test Set screen (see Figure 8-3 on page 8-3), as well as the current operating status of the Light Source (“On” or “Off ”). Power Meter Settings Area The Power Meter Settings area displays the wavelength selection, modulation setting, and Reference value established on the Loss Test Set screen (see Figure 8-3 on page 8-3), as well as the current optical Loss reading. If the Reference value is set to “None”, the screen displays the Power reading instead of the Loss reading. Loss Table The Loss Table occupies the lower half of the Loss Test Set – Loss Table screen. The table is scrollable, by using either the Rotary knob or the Up and Down Arrow keys. MT9083 Series ACCESS Master Operation Manual 8-9 Chapter 8: Loss Test Set Mode Each row in the table represents a tested fiber. A Loss Table can contain up to a maximum of 999 rows and presents the following details: • • • • • • No – Number of the fiber tested WL – Wavelength set for the Power Meter Loss – Current loss value Power – Current optical power measurement value Threshold – Pass/Fail status as determined by the current Threshold value Comment – Comments entered by the operator. Loss Table Softkeys The following softkeys are available on the Loss Table screen. Add (f1) Press the Add softkey to add the current test results to the Loss Table. Overwrite (f2) Press the Overwrite softkey to overwrite the highlighted row in the Loss Table with the results from the current test. Delete (f3) Press the Delete softkey to delete the test results of currently highlight row. Delete All (f4) Press the Delete All softkey to clear all test results from the Loss Table. Comment (f5) Press the Comment softkey to open the Text Entry dialog box. Back (f6) Press the Back softkey to return to the Loss Test Set screen. 8-10 MT9083 Series ACCESS Master Operation Manual Chapter 8: Loss Test Set Mode Setting Loss Test Set Measurement Parameters Setting the Light Source Wavelength Note This procedure only applies when using the MT9083 Series light source. To set the Light Source wavelength: • Press Light Source Wavelength (f2). Each key press toggles to the next light source wavelength. The current wavelength is indicated by the Light Source Wavelength indicator (see item 1 in Figure 8-4 on page 8-4). - This softkey also toggles the Power Meter Wavelength selection field, when the selected Light Source wavelength matches one of the calibrated Power Meter wavelengths. See item 1 in Figure 8-5 on page 8-4 for the location of the indicator. - Single wavelength units will sound an error tone when Light Source Wavelength (f2) is pressed. Setting the Power Meter Wavelength The MT9083 Series optional Power Meter is calibrated at the following wavelengths: • • • • 850 nm* 1300 nm* 1310 nm 1383 nm • • • • 1490 nm 1550 nm 1625 nm 1650 nm * These wavelengths only available on units equipped with Option 007. To set the Power Meter wavelength: • Press Power Meter Wavelength (f3). Each key press toggles to the next power meter wavelength. The current wavelength is indicated by the Power Meter Wavelength indicator. See item 1 in Figure 8-5 on page 8-4 for the location of the indicator. MT9083 Series ACCESS Master Operation Manual 8-11 Chapter 8: Loss Test Set Mode Setting the Modulation Mode The MT9083 Series has four modulation settings in Loss Test Set mode: • • • • CW (Continuous Wave) 270 Hz 1 kHz 2 kHz Note The following procedure applies to both the Light Source and the Power Meter when performing Loss tests with a single MT9083 Series. It applies to the Power Meter only when testing with an external light source. To set the Modulation mode: • 8-12 Press Modulation (f4). Each key press toggles to the next modulation rate. The red legend on the Modulation softkey displays the current modulation rate. MT9083 Series ACCESS Master Operation Manual Chapter 8: Loss Test Set Mode Setting the Average Time The following procedure details how to set the number of times the test data is averaged. The higher the number of averages, the more stable the Power reading. To set the number of times data is averaged: 1. Use the Up and Down Arrow keys (or the Rotary knob) to highlight the Average field. 2. Press the Enter key. The Average dialog appears. Figure 8-8: Average Times dialog 3. Use the Up and Down Arrow keys (or the Rotary knob) to enter the desired number of times). OR – Use the Numeric keypad to directly enter the desired number of times. 4. Press the Enter key to close the dialog. The new setting is displayed in the Average field. Setting the Power Meter Reference Set a reference value for each power meter wavelength required by the current test conditions. The reference can either be entered directly, or you can use the current power meter reading by pasting it into the reference. To direct enter a Power Meter reference value: 1. Use the Up and Down Arrow keys (or the Rotary knob) to highlight the Reference field. 2. Press the Enter key. The Reference dialog appears and the legends on softkeys f1 – f3 change as follows: • Change +- (f1) • None (f2) • Paste (f3) MT9083 Series ACCESS Master Operation Manual 8-13 Chapter 8: Loss Test Set Mode Depending on the current setting, the dialog will either state “None”, indicating that there is no reference currently set, or the dialog displays the current reference setting in dBm. Figure 8-9: Reference screen 3. If the Reference dialog displays “None”, press the Up or Down Arrow key (or turn the Rotary knob) to change it to the dBm setting mode. 4. Use the Up and Down Arrow keys (or the Rotary knob) to increment or decrement the desired dBm setting. Or enter it directly with the Numeric keypad. 5. If necessary, change the reference from “-” to “+” by pressing Change +(f1). 6. Press the Enter key again to close the dialog and save the new setting. 7. Repeat steps 1 through 6 for each wavelength to be tested. To paste the current Power Meter reading as a reference: 1. Connect a patch cord from the Power Meter port (Input) to the Light Source port (Output). 2. Press Light Source Off (f1) to activate the light source. 3. Use the Up and Down Arrow keys (or the Rotary knob) to highlight the Reference field. 4. Press the Enter key. The Reference screen appears. 8-14 MT9083 Series ACCESS Master Operation Manual Chapter 8: Loss Test Set Mode 5. Press Paste (f3). The reference value is replaced with the current Power Meter reading. 6. Press the Enter key again to close the dialog and save the new setting. 7. Repeat steps 1 through 6 for each wavelength to be tested. To set Reference to None: 1. Highlight Reference and then press the Enter key. The Reference dialog appears, displaying the current setting. 2. Press None (f2), the dialog changes to “None”. 3. Press the Enter key. The dialog closes and the reference is set to “None”. Setting the Threshold value Use the following procedure to set threshold value used to determine the Pass/Fail status of the Loss reading, as displayed in the Loss Table (see Figure 8-7 on page 8-9). Threshold values can be entered for each of the power meter’s calibrated wavelengths. To set the Threshold value: 1. Use the Up and Down Arrow keys (or the Rotary knob) to highlight the Threshold field. 2. Press the Enter key. The Threshold screen appears. Figure 8-10: Threshold screen MT9083 Series ACCESS Master Operation Manual 8-15 Chapter 8: Loss Test Set Mode Depending on the current setting, the dialog will either state “None”, indicating that there is no reference currently set, or the dialog displays the current reference setting in dB. 3. If the Threshold dialog displays “None”, press the Up or Down Arrow key (or turn the Rotary knob) to change it to the dB setting mode. 4. Use the Up and Down Arrow keys (or the Rotary knob) to increment or decrement the desired dB setting. Or enter it directly with the Numeric keypad. 5. If necessary, change the threshold from “-” to “+” by pressing Change +(f1). 6. Press the Enter key again to close the dialog and save the new setting. 7. Repeat steps 1 through 6 for each wavelength to be tested. To set Threshold to None: 1. Highlight Threshold and then press the Enter key. The Reference screen appears, displaying the current setting. 2. Press None (f2), the dialog changes to “None”. 3. Press the Enter key. The dialog closes and the threshold is set to “None”. 8-16 MT9083 Series ACCESS Master Operation Manual Chapter 8: Loss Test Set Mode Optical Power Meter Zero Offset To zero the optical power meter offset: 1. With the unit set to Loss Test Set mode, press Set Zero (f5). The Zero Offset screen appears. Figure 8-11: Zero Offset Start Screen 2. Disconnect the fiber from the Power Meter (Input) port, if connected, and close the protective cover to shield the port from incident light. 3. Press Start (f1). The message “Zeroing power meter...” appears briefly and the unit returns to the Loss Test Set screen with a Power reading of “Under”. Note The following message, “Zero set failed, please check protective cover is fully closed and try again.”, may be displayed when executing zero offset without light shielding. Press any key to clear the message from the screen, make sure that the measurement port is closed, and then execute zero offset again. MT9083 Series ACCESS Master Operation Manual 8-17 Chapter 8: Loss Test Set Mode Loss Test Set Measurement Procedures There are three methods of performing Loss Test Set measurements with the MT9083 Series (when equipped with one of the optional Power Meters; 004/005/007): • • • Single MT9083 Series method Single MT9083 Series with an external light source Dual MT9083 Series method Note Before performing any measurements, verify all reference patch cords in all directions. Verifying Patch Cords Verify all reference patch cords, in both directions, before performing any tests. To verify patch cords: 1. Connect a short patch cord, with the same fiber and connector type as the system to be tested, between the Light Source port and the Power Meter port. 2. Power up the MT9083 Series and enter Loss Test Set mode. The unit performs a Zero Offset. 3. If there is a value in the Reference field, clear the current reference value by setting it to “None”. See “To set Reference to None:” on page 8-15 for details. 4. Press Light Source Off (f1) to turn on the light source. 5. Press Light Source Wavelength (f2) to set the Light Source and the Power Meter to the same wavelength. 6. Press the Enter key. The Reference screen appears. 7. Press Paste (f3). The Reference dialog now displays the current Power reading. 8. Press the Enter key. The dialog closes and the new reference value is displayed in the Reference field. 9. Press Light Source On (f1) to power down the Light Source. 10. Reverse the Power Meter and Light Source connections. 8-18 MT9083 Series ACCESS Master Operation Manual Chapter 8: Loss Test Set Mode 11. Press Light Source Off (f1) to turn on the Light Source. • If the Loss reading displayed is <0.5 dB, the patch cord is good and will provide a valid test. • If the Loss reading is >0.5 dB, clean the connections and repeat steps 9 and 11. If the Loss reading is still >0.5 dB, after cleaning the connectors, replace the patch cord and repeat steps 5 through 11. 12. Repeat as required for all wavelengths to be tested. Single MT9083 Series Method This procedure details how to use a single MT9083 Series (equipped with an optional Power Meter - options 004/005/007) in Loss Test Set mode. This procedure requires that the Input and Output for the fiber to be tested are at the same location. The Single MT9083 Series method consist of two parts; a reference procedure and then the test procedure. Reference Procedure: 1. Power up the MT9083 Series and enter Loss Test Set mode. 2. Connect the optional Power Meter to the Optical Light Source port using either a single patch cord, or two patch cords and an inline connector. 3 2 1 EMS or M/F (see the following note) Patch cords 3 In-line connector MT9083 Series ACCESS Master Operation Manual 8-19 Chapter 8: Loss Test Set Mode Note EMS - Equilibrium Mode Simulator (multimode fiber) M/F - Mode Filter (singlemode fiber) Use of either an EMS or M/F, while not necessary in most cases, is however recommended by the TIA (Telecommunications Industry Association). EMS and M/F are not included with the MT9083 Series. 3. Press Light Source Wavelength (f2) to set the Light Source and Power Meter to the same wavelength, if necessary. 4. Make sure that the modulation mode is set to CW by checking the red legend on the Modulation (f4) softkey. Toggle the softkey until the red legend reads “CW”, if necessary. 5. Press Light Source Off (f1) to activate the unit’s light source. 6. Highlight the Reference field and paste the current Power reading as the reference. See “To paste the current Power Meter reading as a reference:” on page 8-14 for details. The Loss reading indicates 0.00 dB and the Reference field displays the reference value for the current wavelength. 7. Repeat steps 3 through 6 for any additional wavelengths to be tested. Note The Reference value(s) just stored are retained on power down of the MT9083 Series. Test Procedure 1. Highlight the Threshold field to set a “Pass/Fail” threshold for the current wavelength, if desired. See “To set the Threshold value:” on page 8-15 for details. 2. If using the two patch cord method, disconnect the patch cords at the inline connector. If using the one patch cord method, disconnect the patch cord from the optional Power Meter port. 8-20 MT9083 Series ACCESS Master Operation Manual Chapter 8: Loss Test Set Mode ! CAUTION Regardless of the method used (one or two patch cord) do not disconnect the patch cord from the Optical Light Source port. The coupled level of the light source may change when the patch cord is reconnected. 3. Attach the free end of the patch cord connected to the Optical Light Source port to one end of the fiber to be tested. Using a second patch cord, connect the optional Power Meter to the other end of the fiber to be tested. 3 2 1 EMS or M/F (see the following note) Patch cords 3 Fiber under test (FUT) Note EMS - Equilibrium Mode Simulator (multimode fiber) M/F - Mode Filter (singlemode fiber) Use of either an EMS or M/F, while not necessary in most cases, is however recommended by the TIA (Telecommunications Industry Association). EMS and M/F are not included with the MT9083 Series. 4. Make sure that the Power Meter and Light Source are set to the same wavelength. 5. Press Light Source Off (f1) to activate the light source (the red legend on the softkey changes to “On”). MT9083 Series ACCESS Master Operation Manual 8-21 Chapter 8: Loss Test Set Mode 6. Press Loss Table (f6). The Loss Table screen appears (see Figure 8-7 on page 8-9). 7. Press Add (f1) to add the current test data to the Loss Table. 8. Repeat steps 3 through 7 until all fibers for the current Loss Table are tested. Note It is a good practice to save the Loss Table periodically (for example, every ten fibers) as you store the loss readings to prevent loss of data in the event of a power failure. You can replace the loss readings in a file, if you need to retest a fiber at a later date. See “Editing the Loss Table” on page 8-30 for details. Single MT9083 Series with an External Light Source This method is used when the start and end of the fiber to be tested are at two different locations. This procedure method consists of two parts; a reference procedure and then the test procedure. Reference Procedure: 1. Power up the MT9083 Series and enter Loss Test Set mode. 2. Connect the optional Power Meter to the external light source using either a single patch cord, or two patch cords and an inline connector. 3 1 2 EMS or M/F (see the following note) Patch cords 3 8-22 In-line connector MT9083 Series ACCESS Master Operation Manual Chapter 8: Loss Test Set Mode Note EMS - Equilibrium Mode Simulator (multimode fiber) M/F - Mode Filter (singlemode fiber) Use of either an EMS or M/F, while not necessary in most cases, is however recommended by the TIA (Telecommunications Industry Association). EMS and M/F are not included with the MT9083 Series. 3. Make sure that the optional Power Meter and the external light source are set to the same wavelength. • On the MT9083 Series, press Power Meter Wavelength (f3) until the desired wavelength is displayed in the Power Meter Wavelength field. • Power up the external light source. Follow the instructions for the given external light source to set it to the desired wavelength. Allow 5 minutes for the light source to stabilize. 4. Make sure that the modulation mode for the MT9083 Series optional Power Meter and the external light source are set to CW. • On the MT9083 Series, check the red legend on the Modulation (f4) softkey. Toggle the softkey until the red legend reads “CW”, if necessary. • Follow the instructions for the given external light source to set it to CW (Continuous Wave) mode. 5. Start the transmit mode for the external light source. 6. Highlight the Reference field and paste the current Power reading as the reference. See “To paste the current Power Meter reading as a reference:” on page 8-14 for details. The Loss reading indicates 0.00 dB and the Reference field displays the reference value for the current wavelength. 7. Repeat steps 3 through 6 for any additional wavelengths to be tested. Note The Reference value(s) just stored are retained on power down of the MT9083 Series. MT9083 Series ACCESS Master Operation Manual 8-23 Chapter 8: Loss Test Set Mode Test Procedure 1. On the MT9083 Series, highlight the Threshold field to set a “Pass/Fail” threshold for the current wavelength, if desired. See “To set the Threshold value:” on page 8-15 for details. 2. If using the two patch cord method, disconnect the patch cords at the inline connector. If using the one patch cord method, disconnect the patch cord from the optional Power Meter port. ! CAUTION Regardless of the method used (one or two patch cord) do not disconnect the patch cord from the external light source. The coupled level of the light source may change when the patch cord is reconnected. 3. Attach the free end of the patch cord connected to the external light source to one end of the fiber to be tested. Using a second patch cord, connect the MT9083 Series optional Power Meter to the other end of the fiber to be tested. 3 2 1 2 EMS or M/F (see the following note) Patch cords 3 8-24 Fiber under test (FUT) MT9083 Series ACCESS Master Operation Manual Chapter 8: Loss Test Set Mode Note EMS - Equilibrium Mode Simulator (multimode fiber) M/F - Mode Filter (singlemode fiber) Use of either an EMS or M/F, while not necessary in most cases, is however recommended by the TIA (Telecommunications Industry Association). EMS and M/F are not included with the MT9083 Series. 4. Make sure that the Power Meter and external light source are set to the same wavelength. 5. Start the transmit mode for the external light source. (Allow 5 minutes for the light source to stabilize.) 6. On the MT9083 Series, press Loss Table (f6). The Loss Table screen appears (see Figure 8-7 on page 8-9). 7. Press Add (f1) to add the current test data to the Loss Table. 8. Repeat steps 3 through 7 until all fibers for the current Loss Table are tested. Note It is a good practice to save the Loss Table periodically (for example, every ten fibers) as you store the loss readings to prevent loss of data in the event of a power failure. You can replace the loss readings in a file, if you need to retest a fiber at a later date. See “Editing the Loss Table” on page 8-30 for details. Dual MT9083 Series method This procedure details how to operate the Loss Test Set mode for two MT9083 Series (designated Unit-A and Unit-B) that have not been physically connected together to establish their Reference settings. There are three parts to this test method; a reference procedure, a modification procedure, and then a test procedure. Reference Procedure: Perform the following procedure on both Unit-A and Unit-B: 1. Power up the MT9083 Series and enter Loss Test Set mode. 2. Connect the optional Power Meter to the Optical Light Source port using two patch cords and an inline connector. MT9083 Series ACCESS Master Operation Manual 8-25 Chapter 8: Loss Test Set Mode 2 3 1 EMS or M/F (see the following note) Patch cords 3 In-line connector Note EMS - Equilibrium Mode Simulator (multimode fiber) M/F - Mode Filter (singlemode fiber) Use of either an EMS or M/F, while not necessary in most cases, is however recommended by the TIA (Telecommunications Industry Association). EMS and M/F are not included with the MT9083 Series. 3. Press Light Source Wavelength (f2) to set the Light Source and Power Meter to the same wavelength, if necessary. 4. Make sure that the modulation mode is set to CW by checking the red legend on the Modulation (f4) softkey. Toggle the softkey until the red legend reads “CW”, if necessary. 5. Press Light Source Off (f1) to activate the unit’s light source. 6. Highlight the Reference field and paste the current Power reading as the reference. See “To paste the current Power Meter reading as a reference:” on page 8-14 for details. The Loss reading indicates 0.00 dB and the Reference field displays the reference value for the current wavelength. Make note of the reading in the Reference field. The reference values are manually entered into the MT9083 Series unit at the opposite end in the next procedure (see “Modifying the Stored Reference” for details). 8-26 MT9083 Series ACCESS Master Operation Manual Chapter 8: Loss Test Set Mode 7. Repeat steps 3 through 6 for any additional wavelengths to be tested. Note The Reference value(s) just stored are retained on power down of the MT9083 Series. Modifying the Stored Reference The stored reference values in Unit-A need to be input into Unit-B and the stored reference values in Unit-B need to be input into Unit-A. 1. To input the Reference Value(s) noted on the opposite MT9083 Series unit, press Light Source Wavelength (f2) and select the wavelength to modify. 2. Enter the reference from the opposite MT9083 Series by following the steps outlined in “To direct enter a Power Meter reference value:” on page 8-13. 3. Repeat steps 1 and 2 to input the reference values noted for the current MT9083 Series unit into the MT9083 Series unit at the opposite end. Test Procedure 1. On the MT9083 Series, designated as Unit-A, highlight the Threshold field to set a “Pass/Fail” threshold for the current wavelength, if desired. See “To set the Threshold value:” on page 8-15 for details. 2. Disconnect the patch cords at the inline connector. If using the one patch cord method, disconnect the patch cord from the optional Power Meter port. ! CAUTION Do not disconnect the patch cord from the Optical Light Source port. The coupled level of the light source may change when the patch cord is reconnected. MT9083 Series ACCESS Master Operation Manual 8-27 Chapter 8: Loss Test Set Mode 3 2 2 1 1 UNIT-A UNIT-B EMS or M/F (see the following note) Patch cords 3 Fiber under test (FUT) Note EMS - Equilibrium Mode Simulator (multimode fiber) M/F - Mode Filter (singlemode fiber) Use of either an EMS or M/F, while not necessary in most cases, is however recommended by the TIA (Telecommunications Industry Association). EMS and M/F are not included with the MT9083 Series. 3. Attach the free end of the patch cord connected to the Optical Light Source port on Unit-A to one end of the fiber to be tested. Using a second patch cord, connect the optional Power Meter port of the MT9083 Series designated as Unit-B to the opposite end of the fiber to be tested. 4. Make sure that the Optical Light Source (on Unit-A) and optional Power Meter (on Unit B) are set to the same wavelength. 5. Press Light Source Off (f1) on Unit-A. The red legend on the softkey changes to “On”. 6. On the MT9083 Series, designated as Unit-B, press Loss Table (f6). The Loss Table screen appears (see Figure 8-7 on page 8-9). 7. Press Add (f1) to add the current test data to the Loss Table. 8-28 MT9083 Series ACCESS Master Operation Manual Chapter 8: Loss Test Set Mode 8. Repeat steps 3 through 7 until all fibers are tested in the current direction: Unit-A transmitting, Unit-B receiving. 9. Repeat steps 1 through 8, reversing the roles of the Unit-A and Unit-B, making Unit-B the transmitter (Optical Light Source) and Unit-A the receiver (optional Power Meter). Note It is a good practice to save the Loss Table periodically (for example, every ten fibers) as you store the loss readings to prevent loss of data in the event of a power failure. You can replace the loss readings in a file, if you need to retest a fiber at a later date. See “Editing the Loss Table” on page 8-30 for details. MT9083 Series ACCESS Master Operation Manual 8-29 Chapter 8: Loss Test Set Mode Editing the Loss Table Each row in the table represents a tested fiber. A Loss Table can contain up to a maximum of 999 rows. The following edits can be made to a Loss Table: • • • • • Adding test data to an existing Loss Table Overwriting test data in an existing Loss Table Deleting test data from a Loss Table Deleting all test data from a Loss Table Adding comments to a Loss Table Adding Test Data to an Existing Loss Table To add Test Data to an existing Loss Table: 1. With a Loss Table displayed (either current or recalled), press Add (f1). The current test data will be added at the end of the Loss Table. Note Make sure that the Light Source is active for the current trace. If the Light Source is not “On”, a Loss value of “**.**dB along with a Power reading of “Under” is recorded for the current fiber test data number. In addition, if a Threshold value was set, it will be recorded as “Fail”. 2. Continue testing to populate the table with the additional fiber test data required. Note When working with a recalled Loss Table, always rename the file before saving it. This assures that the original data is still available. See “Saving Loss Test Set Files” on page 8-34 for details. Overwriting Test Data in an Existing Loss Table To overwrite Test Data in an existing Loss Table: 1. With a Loss Table displayed (either current or recalled), use the Up and Down Arrow keys (or the Rotary knob) to highlight the desired row in the Loss Table. 2. Press Overwrite (f2). The new test data information appears in the highlighted row. 8-30 MT9083 Series ACCESS Master Operation Manual Chapter 8: Loss Test Set Mode Note Make sure that the Light Source is active for the current trace. If the Light Source is not “On”, a Loss value of “**.**dB along with a Power reading of “Under” is recorded for the current fiber test data number. In addition, if a Threshold value was set, it will be recorded as “Fail”. 3. Repeat steps 1 and 2, as needed. Note When working with a recalled Loss Table, always rename the file before saving it. This assures that the original data is still available. See “Saving Loss Test Set Files” on page 8-34 for details. Deleting Test Data from a Loss Table To delete Test Data from a Loss Table: 1. With a Loss Table displayed (either current or recalled), use the Up and Down Arrow keys (or the Rotary knob) to highlight the last row in the Loss Table. Note The Delete (f3) softkey is only available when the last row in a Loss Table is highlighted. 2. Press Delete (f3). The test data is deleted. Note When working with a recalled Loss Table, always rename the file before saving it. This assures that the original data is still available. See “Saving Loss Test Set Files” on page 8-34 for details. Deleting All Test Data from a Loss Table When you start a new Loss Test Set test, the Loss Table is populated with the data from the previous test (either current or recalled). Use the following procedure to delete all data from the Loss Table. To delete all Test Data from a Loss Table: 1. With a Loss Table displayed (either current or recalled), press Delete All (f4). MT9083 Series ACCESS Master Operation Manual 8-31 Chapter 8: Loss Test Set Mode 2. A dialog box with the following question appears: “Are you sure you want to clear the table?”. 3. Press Yes (f1) to delete all test data from the table. The dialog closes and the Loss Table screen is displayed with a blank Loss Table. In addition, the only softkeys available are Add (f1) and Back (f6). Adding Comments to a Loss Table Use the following procedure to add comments to any row in a Loss Table. To add Comments to a Loss Table: 1. With a Loss Table displayed (either current or recalled), use the Up and Down Arrow keys (or the Rotary knob) to highlight the desired row in the Loss Table. 2. Press Comment (f5). The Text Entry dialogbox appears. If no USB keyboard is connected, follow the instructions from step 3. to enter the name using the front panel keys. If a USB keyboard is connected, you can modify the name directly from the keyboard. When all of the desired characters are entered, press the Enter key to use the new comment or press the ESC key to close the Text Entry dialogbox without changing the comment. Figure 8-12: Text Entry dialogbox- Loss Test Set mode 8-32 MT9083 Series ACCESS Master Operation Manual Chapter 8: Loss Test Set Mode 3. Use the Up and Down Arrow keys to scroll the highlight from row to row, including the Comment field, which is located directly above the character matrix. Use the Right and Left Arrow keys to move the highlight within the selected row or, to move the text cursor in the Comment field when the field is highlighted. Or – Use the Rotary knob to navigate through each character in the character matrix as well as wrapping the highlight to the Comment field. 4. Use the f1 – f4 softkeys for the following: • Press Small Letter (f1) to change the character matrix to lower case letters. • Press Capital Letter (f2) to change the character matrix to upper case letters. • Press Symbols (f3) to change the character matrix to display the symbols available. • Press Space (f4) to insert a blank space in the file name. 5. With the desired character is highlighted in the character matrix press the Enter key to enter the selected character in the Comment field. Use the Numeric keypad to enter numbers in the Comment. Use Backspace (f5) or the BS key to delete characters entered in the Comment field. 6. When all of the desired characters are entered in the Comment field, press OK (f6) to return to the Loss Table screen. The Loss Table screen appears with the comment added to the Comment column of the selected row. MT9083 Series ACCESS Master Operation Manual 8-33 Chapter 8: Loss Test Set Mode Working with Loss Test Set Files Saving Loss Test Set Files Loss Test Set test data (Loss Tables) can be saved to the unit’s internal memory or to a USB memory stick. To save a Loss Table: 1. Press the Save key. The Save screen appears with the File Name field highlighted (see Figure 8-13, below). Figure 8-13: Save screen – Loss Test Set mode 2. Press the Enter key. The FileName dialog box appears. See “Renaming a File” on page 3-32 for details. 3. When you have finished editing the file name, the Save screen appears with the edited name highlighted in the File Name field. 4. Choose any or all of the following functions, if desired, or continue at step 5: • Highlight the Medium field and then press the Enter key to toggle through the available selections. • 8-34 Press Sort (f3) and then select the method by which the file names are displayed. See “Sorting Files” on page 8-35 for details. MT9083 Series ACCESS Master Operation Manual Chapter 8: Loss Test Set Mode • Press New Folder (f4) to create a new folder for the file save. See “New Folder” on page 3-40 for details. 5. Press Save Table (f1). To overwrite the current Loss Table: 1. With a Loss Table displayed (either the current table, after having been saved, or a recalled table), press the Save key. 2. Press Save Table (f1). The following message appears: “File exists already. Do you want to overwrite it?” • Press Yes (f1) if you want to overwrite the file. • Press No (f2) if you do not want to overwrite the file. Sorting Files The Sort function allows you to change the order in which files are listed in mass storage (files saved to the MT9083 Series’ internal memory or to a USB memory stick). Files can be sorted by type (Name or Time/Date) in ascending or descending order. To set the Sort type: 1. Press the File key. The Load screen appears. 2. Press Sort (f3). The Sort/By dialog appears. 3. Use the Left and Right Arrow keys to move the white arrow so that it is positioned to the left of the first selection in the desired pane of the dialog (Sort or By). 4. Use the Up and Down Arrow keys (or the Rotary knob) to highlight the desire setting within the pane. 5. With the desired settings highlighted in both panes, press the Enter key. The dialog closes and the files are listed in the selected order. Deleting Files Use either the Save screen (see Figure 8-13 on page 8-34) or the Load screen (see Figure 8-14 on page 8-39) to delete any data files stored in the internal memory or on a USB memory stick. You can delete a single file, multiple files or all of the files in the current directory. MT9083 Series ACCESS Master Operation Manual 8-35 Chapter 8: Loss Test Set Mode To delete a file: 1. Press the Save key, or the File key, if not already displaying either the Save screen (see Figure 8-13 on page 8-34) or the Load screen (see Figure 8-14 on page 8-39). 2. Use the Up and Down Arrow keys (or the Rotary knob) to highlight the desired file. 3. Press Delete (f5). The following message appears: Are you sure you want to delete the current selection? 4. Press Yes (f1) to delete the selected file, or press No (f2) to cancel without deleting the file. 5. Press the ESC key to return to the test application. Use the following procedure to delete multiple files in a directory. To delete multiple files: 1. Press the Save key, or the File key, if not already displaying either the Save screen (see Figure 8-13 on page 8-34) or the Load screen (see Figure 8-14 on page 8-39). 2. Press More (f6). 3. Press Multi-Select Off (f3). The red legend on the softkey changes to “On”. 4. Use the Up and Down Arrow keys (or the Rotary knob) to highlight the first file to delete and then press the Enter key. A bullet appears before the selected file name and the total size of the selected files is shown on the bottom. 5. Repeat step 4 until you have selected all of the files you want to delete. 6. Press More >> (f6). 7. Press Delete (f5). The following message appears: Are you sure you want to delete the current selection? 8. Press Yes (f1) to delete the selected files, or press No (f2) to cancel without deleting the files. Use the following procedure to delete all of the files in a directory or folder. To delete all files in a directory or folder: 8-36 MT9083 Series ACCESS Master Operation Manual Chapter 8: Loss Test Set Mode 1. Press the Save key, or the File key, if not already displaying either the Save screen (see Figure 8-13 on page 8-34) or the Load screen (see Figure 8-14 on page 8-39). 2. Select the desired folder/directory in which contains the file to be deleted. 3. Press the Down Arrow key to open the selected folder/directory. 4. Press More (f6). 5. Press Select All (f4). A bullet appears before each filename. Note If the Select All softkey (f4) is dimmed, toggle f3 so that the legend on the softkey reads “Multi-Select Off ”. 6. Press More (f6). 7. Press Delete (f5). The following message appears: Are you sure you want to delete the current selection? 8. Press Yes (f1) to delete all files in the selected directory, or press No (f2) to cancel without deleting the files. Copying Files Use either the Save screen (see Figure 8-13 on page 8-34) or the Load screen (see Figure 8-14 on page 8-39) to copy data files stored in the internal memory or on a USB memory stick. You can copy a single file, multiple files or all of the files in the current directory. To copy a file: 1. Press the Save key, or the File key, if not already displaying either the Save screen (see Figure 8-13 on page 8-34) or the Load screen (see Figure 8-14 on page 8-39). 2. Press More >> (f6). 3. Use the Up and Down Arrow keys (or the Rotary knob) to highlight the desired trace file. 4. Press Copy (f1). 5. Select the desired folder/directory in which to paste the selected file. 6. Press Paste (f2). A message box stating “Copy 1/1” along with the name of the file appears briefly. Use the following procedure to copy multiple files in a directory. MT9083 Series ACCESS Master Operation Manual 8-37 Chapter 8: Loss Test Set Mode To copy multiple files: 1. Press the Save key, or the File key, if not already displaying either the Save screen (see Figure 8-13 on page 8-34) or the Load screen (see Figure 8-14 on page 8-39). 2. Press More (f6). 3. Press Multi-Select Off (f3). The red legend on the softkey changes to “On”. 4. Use the Up and Down Arrow keys (or the Rotary knob) to highlight the first file to copy and then press the Enter key. A bullet appears before the selected file name and the total size of the selected files is shown on the bottom. 5. Repeat step 4 until you have selected all of the files you want to copy. 6. Press Copy(f1) 7. Select the desired folder/directory in which to paste the selected files. 8. Press Paste (f2). A message box appears displaying the count for each copied file as it is being pasted to the new directory/folder, as well as its filename. The message box closes when all of the selected files are pasted to their new location. Use the following procedure to copy all of the files in a directory/folder. To copy all files in a directory or folder: 1. Press the Save key, or the File key, if not already displaying either the Save screen (see Figure 8-13 on page 8-34) or the Load screen (see Figure 8-14 on page 8-39). 2. Select the desired folder/directory in which contains the files to be copied. 3. Press the Down Arrow key and highlight the first file in the selected directory/folder, if not already highlighted. 4. Press More (f6). 5. Press Select All (f4). A bullet appears before each filename. Note If the Select All softkey (f4) is dimmed, toggle f3 so that the legend on the softkey reads “Multi-Select Off ”. 6. Press Copy (f1). 7. Select the desired folder/directory in which to paste the selected files. 8-38 MT9083 Series ACCESS Master Operation Manual Chapter 8: Loss Test Set Mode 8. Press Paste (f2). A message box appears displaying the count for each copied file as it is being pasted to the new directory/folder, as well as its filename. The message box closes when all of the files from the selected directory/folder are pasted to their new location. Loading a Loss Table from Mass Storage Use the following procedure to load a Loss Table from mass storage (files saved to the MT9083 Series’ internal memory or to a USB memory stick). 1. Press the File key. The Load screen appears (see Figure 8-14, below). Figure 8-14: Load screen – Loss Test Set mode 2. Highlight the desired File Name in the File Name table. 3. Press Load Table (f1). The Loss Table screen appears with the selected Loss Table displayed. MT9083 Series ACCESS Master Operation Manual 8-39 Chapter 8: Loss Test Set Mode Printing Loss Tables Loss Tables can be printed via the optional BL-80RII printer. Note The printed output from the MT9083 Series consists of a screen shot. Only the details currently displayed on the LCD, less the softkeys, are printed. Make sure that the desired details are displayed before printing. Connecting the Printer Connect the MT9083 Series to the BL-80RII printer using a USB printer conversion cable as shown below in Figure 8-15. Figure 8-15: Connecting the BL-80RII Printer Printing a Loss Table Make sure that the Printer setup parameters are set as desired on the setups General screen. See “Printer” and “Paper Feed” on page 3-9 for details. To print a Loss Table: 1. Connect the BL-80RII printer to the MT9083 Series as shown in Figure 8-15, and then power up the printer. 2. Perform the desired test or recall the desired Loss Table from mass storage. 3. Press the Print key. The following message is displayed: Output screen image to a printer or as an image file. Please select output type using the function keys. Press Printer (f1). The message changes to “Please wait. Printing...”. The MT9083 Series returns to the Loss Table screen when the printout is completed. 8-40 MT9083 Series ACCESS Master Operation Manual Chapter 9: Optical Power Meter (OPM) & Optical Light Source (OLS) In addition to its OTDR functions, the MT9083 Series also provides an optical power meter (OPM) function which allows checking of optical power levels, and an optical light source (OLS) function required for fiber identification measurement. Optical Power Meter (OPM) Overview The optical communications power level from a station can be measured using the optical power meter function. Breakage, loss increases, and other optical fiber conditions can be checked by measuring the optical communications power level. Accessing the Optical Power Meter To start Power Meter mode: 1. Press the Top Menu key. The Top Menu screen appears. 2. Use the Up and Down Arrow keys (or the Rotary knob) to highlight Power Meter, then press the Enter key. The Power Meter screen appears. Figure 9-1: Power Meter Screen MT9083 Series ACCESS Master Operation Manual 9-1 Chapter 9: Optical Power Meter (OPM) & Optical Light Source (OLS) Power Meter Screen The Power Meter screen is comprised of the elements flagged in the following figure: 2 1 3 4 5 6 8 7 Figure 9-2: Power Meter Screen Elements 1 Wavelength indicator 2 Power reading 3 Range indicator 4 Reference field 5 Threshold field 6 Loss reading 7 Port connection indicator 8 Softkeys Wavelength Indicator Displays the current test wavelength, as set via the Power Meter Wavelength (f1) softkey. 9-2 MT9083 Series ACCESS Master Operation Manual Chapter 9: Optical Power Meter (OPM) & Optical Light Source (OLS) Power Reading Displays the current value measured by the Optical Power Meter. The optical power meter measurement range is: -50 to -5 dBm. When an optical power level under the measurement range (including light shielding) is measured, it is regarded as “under range” and “Under” is displayed in the Power reading area. When an optical power level over the measurement range is measured, it is regarded as “over range” and “Over” is displayed in the Power reading area. Correct measurements cannot be performed in the under range or over range status. ! CAUTION The light receiving part of the MT9083 Series may be damaged if light exceeding +10 dBm is injected. In addition, when the reference value (as set in the Reference Field, item 4 in Figure 9-2 on page 9-2) is set to “None”, the background color of the Absolute Power reading changes according to the Pass/Fail status established by the value in the Threshold field (see item 5 in Figure 9-2 on page 9-2). Readings that “pass” have a black background, while readings that “fail” have a red background. Range Indicator The Range Indicator (see item 3 in Figure 9-2 on page 9-2) provides a graphic representation of the optical power level being measured. The greater the optical power level measured, the further the Range Indicator is filled in. Reference Field Displays the currently set reference value which is used to calculate the Loss reading (item 4 in Figure 9-2 on page 9-2). Reference values can be entered for each of the power meter’s calibrated wavelengths. Threshold Field Displays the currently set threshold value which is used to determines the Pass/Fail status of the Loss reading, as displayed in the Loss Table (see item 5 in Figure 9-2 on page 9-2). Threshold values can be entered for each of the power meter’s calibrated wavelengths. MT9083 Series ACCESS Master Operation Manual 9-3 Chapter 9: Optical Power Meter (OPM) & Optical Light Source (OLS) Loss Reading The Loss reading (item 6 in Figure 9-2 on page 9-2) displays the optical power loss value. When the reference value is set to “None”, “– – – –” is displayed, as a Loss reading requires that a reference value is set. When a reference value is set, the optical power loss is obtained as follows: Optical power loss = Reference – Optical power measurement In addition, when a reference value other than “None”, is set in the Reference Field (item 4 in Figure 9-2 on page 9-2), the background color of the Loss reading changes according to the Pass/Fail status established by the value in the Threshold field (see item 5 in Figure 9-2 on page 9-2). Readings that “pass” have a black background, while readings that “fail” have a red background. Port Connection Indicator The measurement port varies according to the optical wavelength of the light to be injected. Item 7 in Figure 9-2 on page 9-2, the Port Connection indicator, displays the port to be used when testing. Note If the optional power meter is present, the access port is changed and the standard power meter can not be used. Softkeys Power Meter Wavelength (f1) Toggle the Power Meter Wavelength softkey to scroll through the available test wavelengths. Set Zero (f5) Press the Set Zero softkey to adjust the optical power meter offset. Loss Table (f6) Press the Loss Table softkey to advance to the Loss Table screen. 9-4 MT9083 Series ACCESS Master Operation Manual Chapter 9: Optical Power Meter (OPM) & Optical Light Source (OLS) Loss Table Screen – Power Meter Mode The Loss Table screen consists of three main areas, as flagged in the following figure. Press Loss Table (f6) on the Power Meter screen (see Figure 9-2 on page 9-2) to display the Loss Table screen. 1 3 2 Figure 9-3: Power Meter mode – Loss Table screen 1 Power Meter settings area 2 Loss table 3 Softkeys Power Meter Settings Area The Power Meter Settings area displays the Wavelength selection and Reference value established on the Power Meter screen (see Figure 9-2 on page 9-2), as well as the current Loss reading. Loss Table The Loss Table occupies the lower half of the Power Meter mode – Loss Table screen. The table is scrollable, by using either the Rotary knob or the Up and Down Arrow keys. MT9083 Series ACCESS Master Operation Manual 9-5 Chapter 9: Optical Power Meter (OPM) & Optical Light Source (OLS) Each row in the table represents a tested fiber. A Loss Table can contain up to a maximum of 999 rows and presents the following details: • • • • • • No – Number of the fiber tested WL – Wavelength set for the Power Meter Loss – Current loss value Power – Current optical power measurement value Threshold – Pass/Fail status as determined by the current Threshold value Comment – Comments entered by the operator. Loss Table Softkeys The following softkeys are available on the Power Meter mode – Loss Table screen. Add (f1) Press the Add softkey to add the current test results to the Loss Table. Overwrite (f2) Press the Overwrite softkey to overwrite the highlighted row in the Loss Table with the results from the current test. Delete (f3) Press the Delete softkey to delete the test results of currently highlight row. Delete All (f4) Press the Delete All softkey to clear all test results from the Loss Table. Comment (f5) Press the Comment softkey to open the Text Entry dialog box. 9-6 MT9083 Series ACCESS Master Operation Manual Chapter 9: Optical Power Meter (OPM) & Optical Light Source (OLS) Back (f6) Press the Back softkey to return to the Loss Test Set screen. Optical Power Meter Zero Offset To zero the power meter offset: 1. With the unit set to Optical Power Meter mode, press Set Zero (f5). The Set Zero screen appears. Figure 9-4: Set Zero screen 2. Disconnect the fiber (if connected) and close the measurement port cover to shield the port from incident light. 3. Press Start (f1). The message “Zeroing Power Meter...” appears briefly and the unit returns to the Power Meter screen with a Power reading of “Under”. MT9083 Series ACCESS Master Operation Manual 9-7 Chapter 9: Optical Power Meter (OPM) & Optical Light Source (OLS) Note The following message, “Zero set failed, please check protective cover is fully closed, and try again.”, may be displayed when executing zero offset without light shielding. Press any key to clear the message from the screen, make sure that the measurement port is closed, and then execute zero offset again. 9-8 MT9083 Series ACCESS Master Operation Manual Chapter 9: Optical Power Meter (OPM) & Optical Light Source (OLS) Setting Power Meter Measurement Parameters To set the Power Meter wavelength: • Press Power Meter Wavelength (f1). Each key press toggles to the next power meter wavelength. The current wavelength is indicated by the Power Meter Wavelength indicator. See item 1 in Figure 9-2 on page 9-2 for the location of the indicator. Note Pressing Power Meter Wavelength (f1) on single wavelength MT9083 Series units will sound an error tone. Setting the Power Meter Reference Set a reference value for each power meter wavelength required by the current test conditions. The reference can either be entered directly, or you can use the current power meter reading by pasting it into the reference. To direct enter a Power Meter reference value: 1. Use the Up and Down Arrow keys (or the Rotary knob) to highlight the Reference field. 2. Press the Enter key. The Reference dialog appears and the legends on softkeys f1 – f3 change as follows: • Change +- (f1) • None (f2) • Paste (f3) Depending on the current setting, the dialog will either state “None”, indicating that there is no reference currently set, or the dialog displays the current reference setting in dBm. MT9083 Series ACCESS Master Operation Manual 9-9 Chapter 9: Optical Power Meter (OPM) & Optical Light Source (OLS) Figure 9-5: Reference screen 3. If the Reference dialog displays “None”, press the Up or Down Arrow key (or turn the Rotary knob) to change it to the dBm setting mode. 4. Use the Up and Down Arrow keys (or the Rotary knob) to increment or decrement the desired dBm setting. Or enter it directly with the Numeric keypad. 5. If necessary, change the reference from “-” to “+” by pressing Change +(f1). 6. Press the Enter key again to close the dialog and save the new setting. 7. Repeat steps 1 through 6 for each wavelength to be tested. To paste the current Power Meter reading as a reference: 1. Connect a patch cord from the Optical Power Meter port on the MT9083 Series to the output port of an external light source. 2. Activate the external light source. 3. On the MT9083 Series, use the Up and Down Arrow keys (or the Rotary knob) to highlight the Reference field. 4. Press the Enter key. The Reference screen appears. 5. Press Paste (f3). The reference value is replaced with the current Power Meter reading. 6. Press the Enter key again to close the dialog and save the new setting. 9-10 MT9083 Series ACCESS Master Operation Manual Chapter 9: Optical Power Meter (OPM) & Optical Light Source (OLS) 7. Repeat steps 1 through 6 for each wavelength to be tested. To set Reference to None: 1. Highlight Reference and then press the Enter key. The Reference dialog appears, displaying the current setting. 2. Press None (f2), the dialog changes to “None”. 3. Press the Enter key. The dialog closes and the reference is set to “None”. Setting the Threshold value Use the following procedure to set threshold value used to determine the Pass/Fail status of the Loss reading, as displayed in the Loss Table (see Figure 9-3 on page 9-5). Threshold values can be entered for each of the power meter’s calibrated wavelengths. To set the Threshold value: 1. Use the Up and Down Arrow keys (or the Rotary knob) to highlight the Threshold field. 2. Press the Enter key. The Threshold screen appears. Figure 9-6: Threshold screen Depending on the current setting, the dialog will either state “None”, indicating that there is no reference currently set, or the dialog displays the current reference setting in dB. MT9083 Series ACCESS Master Operation Manual 9-11 Chapter 9: Optical Power Meter (OPM) & Optical Light Source (OLS) 3. If the Threshold dialog displays “None”, press the Up or Down Arrow key (or turn the Rotary knob) to change it to the dB setting mode. 4. Use the Up and Down Arrow keys (or the Rotary knob) to increment or decrement the desired dB setting. Or enter it directly with the Numeric keypad. 5. If necessary, change the threshold from “-” to “+” by pressing Change +(f1). 6. Press the Enter key again to close the dialog and save the new setting. 7. Repeat steps 1 through 6 for each wavelength to be tested. To set Threshold to None: 1. Highlight Threshold and then press the Enter key. The Reference screen appears, displaying the current setting. 2. Press None (f2), the dialog changes to “None”. Press the Enter key. The dialog closes and the threshold is set to “None”. Optical Power Measurements Optical Power Level Measurement The following procedure outlines how to measure the optical power level. Note The Optical Power Meter only supports single mode fibers. To measure optical power levels: 1. Set the MT9083 Series to Power Meter mode. See “Accessing the Optical Power Meter” on page 9-1 for details. 2. Close the measurement port connector cover to shield the port form incident light and then execute zero offset for the optical power meter. See “Optical Power Meter Zero Offset” on page 9-7 for details. 3. Toggle Power Meter Wavelength (f1) until the desired wavelength is displayed. 4. Connect the fiber under test to the desired measurement port on the MT9083 Series. The optical power level of the fiber under test is displayed in the Power reading area (see item 2 in Figure 9-2). 9-12 MT9083 Series ACCESS Master Operation Manual Chapter 9: Optical Power Meter (OPM) & Optical Light Source (OLS) Note Correct measurement may not be obtained until zero offset is executed. Be sure to perform light shielding and execute zero offset before measurement. Optical Power Loss Measurements The following procedure outlines how to measure optical power loss. This procedure method consist of two parts; a reference procedure and then the test procedure. Reference Procedure 1. Power up the MT9083 Series and enter Power Meter mode. 2. Connect the Optical Power Meter to the external light source using either a single patch cord, or two patch cords and an inline connector. 3. Power up the external light source. 4. Make sure that the Optical Power Meter and the external light source are set to the same wavelength. • On the MT9083 Series, press Power Meter Wavelength (f1) until the Power Meter Wavelength indicator displays the desired wavelength. Note Pressing Power Meter Wavelength (f1) on single wavelength MT9083 Series units will sound an error tone. • Follow the instructions for the given external light source set it to the desired wavelength. 5. Start the transmit mode for the external light source. 6. Highlight the Reference field and paste the current Power reading as the reference. See “To paste the current Power Meter reading as a reference:” on page 9-10 for details. The Loss reading indicates 0.0 dB and the Reference field displays the reference value for the current wavelength. 7. Repeat steps 3 through 6 for any additional wavelengths to be tested. Note The Reference value(s) just stored are retained on power down of the MT9083 Series. MT9083 Series ACCESS Master Operation Manual 9-13 Chapter 9: Optical Power Meter (OPM) & Optical Light Source (OLS) Test Procedure 1. On the MT9083 Series, highlight the Threshold field to set a “Pass/Fail” threshold for the current wavelength, if desired. See “To set the Threshold value:” on page 9-11 for details. 2. If using the two patch cord method, disconnect the patch cords at the inline connector. If using the one patch cord method, disconnect the patch cord from the Optical Power Meter port. ! CAUTION Regardless of the method used (one or two patch cord) do not disconnect the patch cord from the external light source. The coupled level of the light source may change when the patch cord is reconnected. 3. Attach the free end of the patch cord connected to the external light source to one end of the fiber to be tested. Using a second patch cord, connect the MT9083 Series Optical Power Meter to the other end of the fiber to be tested. 4. Make sure that the Power Meter and external light source are set to the same wavelength. 5. Start the transmit mode for the external light source. 6. On the MT9083 Series, press Loss Table (f6). The Loss Table screen appears (see Figure 9-3 on page 9-5). 7. Press Add (f1) to add the current test data to the Loss Table. 8. Repeat steps 3 through 7 until all fibers for the current Loss Table are tested. Note It is a good practice to save the Loss Table periodically (for example, every ten fiber) as you store the loss readings to prevent loss of data in the event of a power failure. You can replace the loss readings in a file, if you need to retest a fiber at a later date. See “Editing the Loss Table” on page 9-15 for details. 9-14 MT9083 Series ACCESS Master Operation Manual Chapter 9: Optical Power Meter (OPM) & Optical Light Source (OLS) Editing the Loss Table Each row in the table represents a tested fiber. A Loss Table can contain up to a maximum of 999 rows. The following edits can be made to a Loss Table: • • • • • Adding test data to an existing Loss Table Overwriting test data in an existing Loss Table Deleting test data from a Loss Table Deleting all test data from a Loss Table Adding comments to a Loss Table Adding Test Data to an Existing Loss Table To add Test Data to an existing Loss Table: 1. With a Loss Table displayed (either current or recalled), press Add (f1). The current test data will be added at the end of the Loss Table. Note Make sure that the external light source is active for the current trace. If the external light source is not active (ON), a Loss value of “**.**dB along with a Power reading of “Under” is recorded for the current fiber test data number. In addition, if a Threshold value was set, it will be recorded as “Fail”. 2. Continue testing to populate the table with the additional fiber test data required. Note When working with a recalled Loss Table, always rename the file before saving it. This assures that the original data is still available. See “Saving Loss Table Data” on page 9-20 for details. Overwriting Test Data in an Existing Loss Table To overwrite Test Data in an existing Loss Table: 1. With a Loss Table displayed (either current or recalled), use the Up and Down Arrow keys (or the Rotary knob) to highlight the desired row in the Loss Table. MT9083 Series ACCESS Master Operation Manual 9-15 Chapter 9: Optical Power Meter (OPM) & Optical Light Source (OLS) 2. Press Overwrite (f2). The new test data information appears in the highlighted row. Note Make sure that the external light source is active for the current trace. If the external light source is not active (ON), a Loss value of “**.**dB along with a Power reading of “Under” is recorded for the current fiber test data number. In addition, if a Threshold value was set, it will be recorded as “Fail”. 3. Repeat steps 1 and 2, as needed. Note When working with a recalled Loss Table, always rename the file before saving it. This assures that the original data is still available. See “Saving Loss Table Data” on page 9-20 for details. Deleting Test Data from a Loss Table To delete Test Data from a Loss Table: 1. With a Loss Table displayed (either current or recalled), use the Up and Down Arrow keys (or the Rotary knob) to highlight the last row in the Loss Table. Note The Delete (f3) softkey is only available when the last row in a Loss Table is highlighted. 2. Press Delete (f3). The test data is deleted. Note When working with a recalled Loss Table, always rename the file before saving it. This assures that the original data is still available. See “Saving Loss Table Data” on page 9-20 for details. Deleting All Test Data from a Loss Table When you start a new Loss Test Set test, the Loss Table is populated with the data from the previous test (either current or recalled). Use the following procedure to delete all data from the Loss Table. 9-16 MT9083 Series ACCESS Master Operation Manual Chapter 9: Optical Power Meter (OPM) & Optical Light Source (OLS) To delete all Test Data from a Loss Table: 1. With a Loss Table displayed (either current or recalled), press Delete All (f4). 2. A dialog box with the following question appears: “Are you sure you want to clear the table?”. 3. Press Yes (f1) to delete all test data from the table. The dialog closes and the Loss Table screen is displayed with a blank Loss Table. In addition, the only softkeys available are Add (f1) and Back (f6). Adding Comments to a Loss Table Use the following procedure to add comments to any row in a Loss Table. To add Comments to a Loss Table: 1. With a Loss Table displayed (either current or recalled), use the Up and Down Arrow keys (or the Rotary knob) to highlight the desired row in the Loss Table. 2. Press Comment (f5). The Text Entry dialogbox appears. If no USB keyboard is connected, follow the instructions from step 3. to enter the name using the front panel keys. If a USB keyboard is connected, you can modify the name directly from the keyboard. When all of the desired characters are entered, press the MT9083 Series ACCESS Master Operation Manual 9-17 Chapter 9: Optical Power Meter (OPM) & Optical Light Source (OLS) Enter key to use the new comment or press the ESC key to close the Text Entry dialogbox without changing the comment. Figure 9-7: Text Entry dialogbox- Loss Test Set mode 3. Use the Up and Down Arrow keys to scroll the highlight from row to row, including the Comment field, which is located directly above the character matrix. Use the Right and Left Arrow keys to move the highlight within the selected row or, to move the text cursor in the Comment field when the field is highlighted. Or – Use the Rotary knob to navigate through each character in the character matrix as well as wrapping the highlight to the Comment field. 4. Use the f1 – f4 softkeys for the following: • Press Small Letter (f1) to change the character matrix to lower case letters. • Press Capital Letter (f2) to change the character matrix to upper case letters. • Press Symbols (f3) to change the character matrix to display the symbols available. • Press Space (f4) to insert a blank space in the file name. 9-18 MT9083 Series ACCESS Master Operation Manual Chapter 9: Optical Power Meter (OPM) & Optical Light Source (OLS) 5. With the desired character is highlighted in the character matrix press the Enter key to enter the selected character in the Comment field. Use the Numeric keypad to enter numbers in the Comment. Use Backspace (f5) or the BS key to delete characters entered in the Comment field. 6. When all of the desired characters are entered in the Comment field, press OK (f6) to return to the Loss Table screen. The Loss Table screen appears with the comment added to the Comment column of the selected row. MT9083 Series ACCESS Master Operation Manual 9-19 Chapter 9: Optical Power Meter (OPM) & Optical Light Source (OLS) Working with the Loss Table Saving Loss Table Data Loss Table test data can be saved to the unit’s internal memory or to a USB memory stick. To save a Loss Table: 1. Press the Save key. The Save screen appears with the File Name field highlighted (see Figure 9-8, below). Figure 9-8: Save screen – Power Meter mode 2. Press the Enter key. The Text Entry dialogbox appears. See “Renaming a File” on page 3-32 for details. 3. When you have finished editing the file name, the Save screen appears with the edited name highlighted in the File Name field. 4. Choose any or all of the following functions, if desired, or continue at step 5: • Highlight the Medium field and then press the Enter key to toggle through the available selections. • 9-20 Press Sort (f3) and then select the method by which the file names are displayed. See “Sorting Files” on page 9-21 for details. MT9083 Series ACCESS Master Operation Manual Chapter 9: Optical Power Meter (OPM) & Optical Light Source (OLS) • Press New Folder (f4) to create a new folder for the file save. See “New Folder” on page 3-40 for details. 5. Press Save Table (f1). To overwrite the current Loss Table: 1. With a Loss Table displayed (either the current table, after having been saved, or a recalled table), press the Save key. 2. Press Save Table (f1). The following message appears: “File exists already. Do you want to overwrite it?” • Press Yes (f1) if you want to overwrite the file. • Press No (f2) if you do not want to overwrite the file. Sorting Files The Sort function allows you to change the order in which files are listed in mass storage (files saved to the MT9083 Series’ internal memory or to a USB memory stick). Files can be sorted by type (Name or Time/Date) in ascending or descending order. To set the Sort type: 1. Press the File key. The Load screen appears. 2. Press Sort (f3). The Sort/By dialog appears. 3. Use the Left and Right Arrow keys to move the white arrow so that it is positioned to the left of the first selection in the desired pane of the dialog (Sort or By). 4. Use the Up and Down Arrow keys (or the Rotary knob) to highlight the desire setting within the pane. 5. With the desired settings highlighted in both panes, press the Enter key. The dialog closes and the files are listed in the selected order. Deleting Files Use either the Save screen (see Figure 9-8 on page 9-20) or the Load screen (see Figure 9-9 on page 9-25) to delete any data files stored in the internal memory or on a USB memory stick. You can delete a single file, multiple files or all of the files in the current directory. MT9083 Series ACCESS Master Operation Manual 9-21 Chapter 9: Optical Power Meter (OPM) & Optical Light Source (OLS) To delete a file: 1. Press the Save key, or the File key, if not already displaying either the Save screen (see Figure 9-8 on page 9-20) or the Load screen (see Figure 9-9 on page 9-25). 2. Use the Up and Down Arrow keys (or the Rotary knob) to highlight the desired file. 3. Press Delete (f5). The following message appears: Are you sure you want to delete the current selection? 4. Press Yes (f1) to delete the selected file, or press No (f2) to cancel without deleting the file. 5. Press the ESC Key to return to the test application. Use the following procedure to delete multiple files in a directory. To delete multiple files: 1. Press the Save key, or the File key, if not already displaying either the Save screen (see Figure 9-8 on page 9-20) or the Load screen (see Figure 9-9 on page 9-25). 2. Press More (f6). 3. Press Multi-Select Off (f3). The red legend on the softkey changes to “On”. 4. Use the Up and Down Arrow keys (or the Rotary knob) to highlight the first file to delete and then press the Enter key. A bullet appears before the selected file name and the total size of the selected files is shown on the bottom. 5. Repeat step 4 until you have selected all of the files you want to delete. 6. Press More >> (f6). 7. Press Delete (f5). The following message appears: Are you sure you want to delete the current selection? 8. Press Yes (f1) to delete the selected files, or press No (f2) to cancel without deleting the files. Use the following procedure to delete all of the files in a directory or folder. To delete all files in a directory or folder: 9-22 MT9083 Series ACCESS Master Operation Manual Chapter 9: Optical Power Meter (OPM) & Optical Light Source (OLS) 1. Press the Save key, or the File key, if not already displaying either the Save screen (see Figure 9-8 on page 9-20) or the Load screen (see Figure 9-9 on page 9-25). 2. Select the desired folder/directory in which contains the file to be deleted. 3. Press the Down Arrow key to open the selected folder/directory. 4. Press More (f6). 5. Press Select All (f4). A bullet appears before each filename. Note If the Select All softkey (f4) is dimmed, toggle f3 so that the legend on the softkey reads “Multi-Select Off ”. 6. Press More (f6). 7. Press Delete (f5). The following message appears: Are you sure you want to delete the current selection? 8. Press Yes (f1) to delete all files in the selected directory, or press No (f2) to cancel without deleting the files. Copying Files Use either the Save screen (see Figure 9-8 on page 9-20) or the Load screen (see Figure 9-9 on page 9-25) to copy data files stored in the internal memory or on a USB memory stick. You can copy a single file, multiple files or all of the files in the current directory. To copy a file: 1. Press the Save key, or the File key, if not already displaying either the Save screen (see Figure 9-8 on page 9-20) or the Load screen (see Figure 9-9 on page 9-25). 2. Press More >> (f6). 3. Use the Up and Down Arrow keys (or the Rotary knob) to highlight the desired trace file. 4. Press Copy (f1). 5. Select the desired folder/directory in which to paste the selected file. 6. Press Paste (f2). A message box stating “Copy 1/1” along with the name of the file appears briefly. Use the following procedure to copy multiple files in a directory. MT9083 Series ACCESS Master Operation Manual 9-23 Chapter 9: Optical Power Meter (OPM) & Optical Light Source (OLS) To copy multiple files: 1. Press the Save key, or the File key, if not already displaying either the Save screen (see Figure 9-8 on page 9-20) or the Load screen (see Figure 9-9 on page 9-25). 2. Press More (f6). 3. Press Multi-Select Off (f3). The red legend on the softkey changes to “On”. 4. Use the Up and Down Arrow keys (or the Rotary knob) to highlight the first file to copy and then press the Enter key. A bullet appears before the selected file name and the total size of the selected files is shown on the bottom. 5. Repeat step 4 until you have selected all of the files you want to copy. 6. Press Copy(f1) 7. Select the desired folder/directory in which to paste the selected files. 8. Press Paste (f2). A message box appears displaying the count for each copied file as it is being pasted to the new directory/folder, as well as its filename. The message box closes when all of the selected files are pasted to their new location. Use the following procedure to copy all of the files in a directory/folder. To copy all files in a directory or folder: 1. Press the Save key, or the File key, if not already displaying either the Save screen (see Figure 9-8 on page 9-20) or the Load screen (see Figure 9-9 on page 9-25). 2. Select the desired folder/directory in which contains the files to be copied. 3. Press the Down Arrow key and highlight the first file in the selected directory/folder, if not already highlighted. 4. Press More (f6). 5. Press Select All (f4). A bullet appears before each filename. Note If the Select All softkey (f4) is dimmed, toggle f3 so that the legend on the softkey reads “Multi-Select Off ”. 6. Press Copy (f1). 7. Select the desired folder/directory in which to paste the selected files. 9-24 MT9083 Series ACCESS Master Operation Manual Chapter 9: Optical Power Meter (OPM) & Optical Light Source (OLS) 8. Press Paste (f2). A message box appears displaying the count for each copied file as it is being pasted to the new directory/folder, as well as its filename. The message box closes when all of the files from the selected directory/folder are pasted to their new location. Loading a Loss Table from Mass Storage Use the following procedure to load a Loss Table from mass storage (files saved to the MT9083 Series’ internal memory or to a USB memory stick). 1. Press the File key. The Load screen appears. Figure 9-9: Load screen – Loss Test Set mode 2. Highlight the desired File Name in the File Name table. 3. Press Load Table (f1). The Loss Table screen appears with the selected Loss Table displayed. Printing Loss Tables Loss Tables can be printed via the optional BL-80RII printer. MT9083 Series ACCESS Master Operation Manual 9-25 Chapter 9: Optical Power Meter (OPM) & Optical Light Source (OLS) Note The printed output from the MT9083 Series consists of a screen shot. Only the details currently displayed on the LCD, less the softkeys, are printed. Make sure that the desired details are displayed before printing. Connecting the Printer Connect the MT9083 Series to the BL-80RII printer using a USB printer conversion cable as shown in the figure below: Figure 9-10: Connecting the BL-80RII Printer Printing a Loss Table Make sure that the Printer setup parameters are set as desired on the setups General screen. See “Printer” and “Paper Feed” on page 3-9 for details. To print a Loss Table: 1. Connect the BL-80RII printer to the MT9083 Series as shown in Figure 9-10, and then power up the printer. 2. Perform the desired test or recall the desired Loss Table from mass storage. 3. Press the Print key. The following message is displayed: Output screen image to a printer or as an image file. Please select output type using the function keys. • 9-26 Press Printer (f1). The message changes to “Please wait. Printing...”. The MT9083 Series returns to the Loss Table screen when the printout is completed. MT9083 Series ACCESS Master Operation Manual Chapter 9: Optical Power Meter (OPM) & Optical Light Source (OLS) Optical Light Source (OLS) Overview The MT9083 Series includes an optical light source for fiber identification measurements as standard equipment. Fiber identification measurement provides a comparatively simple method to approximate the location of a break point in an optical fiber. Using the unit’s optical light source to inject light at a specific wavelength and modulation into the fiber under test, you can then use a fiber identifier to locate the break by finding the section of fiber where the signal drops off. Accessing Optical Light Source Mode To start Light Source mode: 1. Press the Top Menu key. The Top Menu screen appears. 2. Use the Up and Down Arrow keys (or the Rotary knob) to highlight Light Source, then press the Enter key. The Optical Light Source screen appears. Figure 9-11: Optical Light Source Screen MT9083 Series ACCESS Master Operation Manual 9-27 Chapter 9: Optical Power Meter (OPM) & Optical Light Source (OLS) Optical Light Source Screen Elements The Optical Light Source screen is comprised of the elements flagged in the following figure: 3 1 2 Figure 9-12: Optical Light Source Screen Elements 1 Light Source On/Off indicator 2 Port connection indicator 3 Softkeys Light Source On/Off Indicator Displays the current status of the Optical Light Source laser: • • The indicator reads “On”, and the background is red, when the laser is on. The indicator reads “Off ”, and the background is black, when the laser off. Port Connection Indicator The measurement port indicated varies according to the optical wavelength of the light to be emitted. Item 2 in Figure 9-12, the Port Connection indicator, displays the port to be used when testing. 9-28 MT9083 Series ACCESS Master Operation Manual Chapter 9: Optical Power Meter (OPM) & Optical Light Source (OLS) Softkeys Light Source Off/On (f1) Press the Light Source Off softkey to start the optical light source. The red legend on the softkey as well as the legend in the Light Source Wavelength indicator (see item 1 in Figure 9-12 on page 9-28) change to “On”. In addition, the background of the Light Source Wavelength indicator changes from black to red. Wavelength (f2) Toggle the Wavelength softkey to scroll through the available light source wavelengths. The red legend on the softkey displays the current wavelength. Modulation (f3) Toggle the Change Modulation softkey to scroll through the modulation modes: CW (continuous wave), 270 Hz, 1 kHz, and 2 kHz. The red legend on the softkey displays the current modulation mode. Turning the Light Source On/Off To turn the Light Source On/Off: 1. Set the MT9083 Series to Light Source mode. See “Accessing Optical Light Source Mode” on page 9-27 for details. 2. Press Light Source Off (f1) to turn on the light source. The red legend on the softkey changes to “On”. In addition, the Light Source On/Off indicator (see item 1 in Figure 9-12 on page 9-28) changes to read “On” and its background changes from black to red. 3. Press Light Source On (f1) to turn off the light source. The red legend on the softkey changes to “Off ”. The Light Source On/Off indicator changes to read “Off ” and its background changes to black. Note Indication of warm-up operation and out of operating temperature ranges status: MT9083 Series ACCESS Master Operation Manual 9-29 Chapter 9: Optical Power Meter (OPM) & Optical Light Source (OLS) • • Certain units may require a warm-up. If Light Source Off (f1) is pressed during a warm-up the following message is displayed: “Laser Diode warm-up. Please re-select after a short while.”. Close the Light Source screen by pressing any key, wait a short while, and then re-start the light source. If Light Source Off (f1) is pressed at a temperature that is out of the operating temperature range, the following message appears: “Laser Diode out of the operating temperature range. Function in fail safe mode.” is displayed and the light source does not turn on. ! WARNING NEVER look directly into the cable connector on the MT9083 Series nor into the end of a cable connected to the MT9083 Series, If laser radiation enters the eye, there is a risk of injury. ! CAUTION The MT9083 Series emits high output optical pulses. Disconnect communications devices, etc. from the target measurement optical fiber during measurement to prevent the optical sensors from being damaged. Fiber Identification Measurement The following is an example of how to use the Optical Light Source to perform a fiber identification measurement. Note The Optical Light Source only supports single mode fiber. To perform a fiber identification measurement: 1. Set the MT9083 Series to Light Source mode, if necessary. See “Accessing Optical Light Source Mode” on page 9-27 for details. 2. Toggle Wavelength (f2) to select the desired wavelength. Note Single wavelength MT9083 Series units will sound an error tone if you press the Wavelength (f2) softkey. 3. Toggle Modulation (f3) to select the desired modulation frequency. The modulation frequency must match that of the fiber identification device (ID tester). 9-30 MT9083 Series ACCESS Master Operation Manual Chapter 9: Optical Power Meter (OPM) & Optical Light Source (OLS) 4. Connect the optical fiber to be measured to the measurement port of the Optical Light Source. 5. Press Light Source Off (f1) to turn on the Optical Light Source. 6. Measure the target optical fiber with the fiber identification device (ID tester). 7. Press Light Source On (f1) when the measurement is completed. Note 1. The output from Optical Light Source may interrupt communications if the target measurement optical fiber is connected to the optical fiber currently operating. Disconnect the target measurement optical fiber from the operating line. 2. The MT9083 Series emits high output optical pulses. Disconnect communications devices, etc. from the target measurement optical fiber during measurement to prevent the optical sensors from being damaged. MT9083 Series ACCESS Master Operation Manual 9-31 Chapter 9: Optical Power Meter (OPM) & Optical Light Source (OLS) 9-32 MT9083 Series ACCESS Master Operation Manual Chapter 10: Visual Fault Locate (VFL) Mode The Visual Fault Locate mode is available on MT9083 Series units equipped with the optional visible light (red) source. Since the light from this light source is visible, it is useful for locating fault points in the dead zone by visually checking the diffusing light. It is also useful for fiber identification of a multi-core optical fiber. When visible light is injected into a non-coated optical fiber, diffused light can be visually checked by manually bending the fiber. It is possible to determine whether there is a break point on the optical fiber by checking the diffusing light. The Visual Fault Locator enables checking for break points when no fiber identification device (ID tester) is available. Note that the further the distance from the light source, the harder it is to check the visible light. Accessing the Visual Fault Locator To start the Visual Fault Locator: 1. Press the Top Menu key. The Top Menu screen appears. 2. Use the Up and Down Arrow keys (or the Rotary knob) to highlight Visual Fault Locate, then press the Enter key. The Visual Fault Locate screen appears. Figure 10-1: Visual Fault Locate Screen MT9083 Series ACCESS Master Operation Manual 10-1 Chapter 10: Visual Fault Locate (VFL) Mode Visual Fault Locate Screen Elements The Visual Fault Locate screen is comprised of the elements flagged in the following figure: 3 1 2 Figure 10-2: Visual Fault Locator On/Off indicator 1 Visual Fault Locator On/Off indicator 2 Port connection indicator 3 Softkeys Visual Fault Locator On/Off Indicator Displays the current status of the Visual Fault Locator laser: • • • The indicator reads “On”, and the background is red, when the laser is on. The indicator reads “Off ”, and the background is black, when the laser off. The background of the indicator pulsates, changing from Red (On) to Black (Off ) when blink mode is active. Port Connection Indicator The Port Connection Indicator shows which port to use for the Visual Fault Locator. 10-2 MT9083 Series ACCESS Master Operation Manual Chapter 10: Visual Fault Locate (VFL) Mode Softkeys Light Source Off/On (f1) Press the Light Source Off softkey to start the Visual Fault Locator. The red legend on the softkey changes to “On” and the Visual Fault Locator’s laser starts firing (as indicated by the Visual Fault Locator On/Off indicator (see item 1 in Figure 10-2 on page 10-2). Press the softkey again to turn off the laser. The red legend changes to “Off ” and the Visual Fault Locator On/Off indicator shows that the laser is not firing. Blink On/Off (f2) Press the Blink Off softkey to set the Visual Fault Locator to a 1 Hz modulated mode. The red legend on the softkey changes to “On” and the background of the Visual Fault Locator On/Off indicator pulsates, changing from Red (On) to Black (Off ) when blink mode is active. Press the softkey again to turn off the blink mode. Note Take care not to press too hard when inserting the APC connector as this may scratch the sides of the ferrule. ! WARNING NEVER look directly into the cable connector on the MT9083 Series nor into the end of a cable connected to the MT9083 Series, If laser radiation enters the eye, there is a risk of injury. MT9083 Series ACCESS Master Operation Manual 10-3 Chapter 10: Visual Fault Locate (VFL) Mode Visible Fault Location The following is an example of how to use the Visual Fault Locate option to perform visible fault locations. To perform a visible fault location: 1. Set the MT9083 Series to Visual Fault Locate mode, if necessary. See “Accessing the Visual Fault Locator” on page 10-1 for details. 2. Connect the optical fiber to be measured to the VLD port, as shown by the Port Connection indicator (see item 2 in Figure 10-2 on page 10-2). 3. Press Light Source Off (f1), or Blink Off (f2), to turn on the Visual Fault Locator. 4. Visually examine the fiber under test, locating the fault (bend or break) by finding the red glow. 5. Press Light Source On (f1), or Blink On (f2), depending on which softkey was selected in step 2, to turn off the Visual Fault Locator when you have finished examining the fiber under test. Note Loss measurement and event-point detection cannot be performed in the Visual Fault Locate mode. 10-4 MT9083 Series ACCESS Master Operation Manual Chapter 11: Video Inspection Probe (VIP) Option Chapter 11: Video Inspection Probe (VIP) Option The Video Inspection Probe (VIP) option is used to inspect fiber optic terminations. Use the VIP to inspect installed connectors located inside hardware devices or on the “backside” of patch panels, eliminating the need to either disassemble hardware devices prior to inspection or access the backside of patch panels. MT9083 Series can use following VIP. OPTION-545 VIP Magnification 200/400 G0293A Magnification 400 G0306A Magnification 400 This section explains the operation of OPTION-545 VIP. 1. Video Inspection Probe (VIP) 1 3 2. USB converter 3. Probe tips 2 Figure 11-1: Video Inspection Probe (OPTION-545VIP) MT9083 Series ACCESS Master Operation Manual 11-1 Chapter 11: Video Inspection Probe (VIP) Option The VIP option consists of the following: • • • • Video Inspection Probe (VIP) 5 probe tips (one each: SC, ST, FC, Universal 1.25 mm, and Universal 2.5 mm) USB converter Software CD Note The Software CD contains the VIP Analysis software which is for PC use only. See the software’s help set for details on its use. 11-2 MT9083 Series ACCESS Master Operation Manual Chapter 11: Video Inspection Probe (VIP) Option Video Inspection Probe (VIP) This small, lightweight probe measures 139.7 mm in length. It contains a longlife coaxial LED source and 8.46 mm CCD video camera. 1. Dust cap 2. Focus Control knob 3. 200x/400x switch Figure 11-2: Video Inspection Probe Probe Tips The VIP includes five interchangeable probe tips; three standard tips (FC, ST, and SC) and two universal tips (1.25 mm and 2.5 mm). Standard Tips There are specific tips for each of the common types of bulkhead adapters. These tips allow inspection of the fiber surface on the opposite side of the bulkhead (i.e. inside hardware devices or on the back side of patch panels). FBPT-FC FC tip FBPT-ST ST tip FBPT-SC SC tip Universal Tips The two universal tips are primarily used for inspecting patch cords. The 1.25 mm tip is compatible with 1.25 mm ferrules (as used in LC and MU type connector) while the 2.5 mm tip is compatible with 2.5 mm ferrules (as used in FC, ST, and SC style connectors). These tips allow the probe to work with either male connector ends, or inspect through female bulkhead adapters. MT9083 Series ACCESS Master Operation Manual 11-3 Chapter 11: Video Inspection Probe (VIP) Option FBPT-U12M Universal 1.25 mm tip FBPT-U25M Universal 2.5 mm tip VIP Setup The steps outlined in the following sections prepare the VIP for use: • • • Attaching a Probe Tip (or Attaching a Probe Tip with Optics) Connecting the Probe to the USB Converter Connecting the VIP to the MT9083 Series Attaching a Probe Tip Use the following procedure to attach a probe tip to the VIP. To attach a Probe tip: 1. Remove the dust cap (see item 1 in Figure 11-2 on page 11-3). Or – If a probe tip is already attached, loosen the front retaining nut (see item 2 in Figure 11-3) until it slides freely on the Barrel assembly (see item 3 in Figure 11-3). 1. Probe tip (1.25 mm Universal) 2. Front retaining nut 3. Barrel assembly 4. Lens Figure 11-3: Video Inspection Probe with Universal 1.25 mm Tip 11-4 MT9083 Series ACCESS Master Operation Manual Chapter 11: Video Inspection Probe (VIP) Option Note Do not touch the lens surface (see item 4 in Figure 11-3 on page 11-4). 2. Select the desired probe tip. Make sure that the key (small set screw on the inside of the threaded end of the probe tip) aligns with the key channel on the barrel assembly (see items 3 and 4 in Figure 11-4) and slide the probe tip into place. 1. Probe tip (FC style) 2. Front retaining nut 3. Key 4. Key channel Figure 11-4: Attaching a Probe Tip Note Do not adjust the set screw. The 1.25 mm and 2.5 mm Universal probe tips do not have keys. 3. Secure the probe tip in place with the front retaining nut (see item 2 in Figure 11-4). Probe Tips with Optics Certain optional probe tips, such as the long reach probes (“L” series) and the angled tips (“A-6” series), contain their own optics. Use of these tips requires removal of the barrel assembly. Probe tips that require removing the barrel assembly are easily identified as they have a retaining nut (see Figure 11-5). Retaining Nut Figure 11-5: Long Reach Style Probe Tip (FBPT-ST-L) MT9083 Series ACCESS Master Operation Manual 11-5 Chapter 11: Video Inspection Probe (VIP) Option To Attach a Probe tip with Optics: 1. Loosen the rear retaining nut on the barrel assembly (see item 2 in Figure 11-6). 2. Align the key channel on the probe tip with the key on the probe housing (see items 3 and 4 in Figure 11-6). 3. Secure the retaining nut on the probe tip to the probe housing. 1. Barrel assembly 2. Rear retaining nut 3. Key channel 4. Key Figure 11-6: Attaching a Probe Tip with Optics Connecting the VIP to the USB Converter For OPTION-545 VIP, use the following procedure to connect the Video Inspection Probe to the USB converter. To connect the VIP to the USB converter: 1. Align the connector on the coiled cord of the VIP with the receptacle on the USB converter (see items 2 and 4 in Figure 11-7 on page 11-7). When properly aligned, the connector slides into the receptacle. 2. Use the retaining nut (see item 3 in Figure 11-7 on page 11-7) on the connector to secure it to the USB converter (see item 4 in Figure 11-7 on page 11-7). 11-6 MT9083 Series ACCESS Master Operation Manual Chapter 11: Video Inspection Probe (VIP) Option 1. Video Inspection Probe 1 2. Connector 3. Retaining nut 4 4. USB converter 3 2 5 5. USB connector Figure 11-7: VIP Connected to USB Converter Connecting the VIP to the MT9083 Series Use the following procedure to connect the VIP to the MT9083 Series. To connect the VIP to the MT9083 Series: 1. Open the cover for the USB ports on the MT9083 Series, if not already opened. See Figure 2-3 on page 2-10 for location. 2. Insert the USB connector (see item 5 in Figure 11-7) into the USB Down port. MT9083 Series ACCESS Master Operation Manual 11-7 Chapter 11: Video Inspection Probe (VIP) Option Accessing VIP Mode To start the VIP: 1. Assemble the VIP and attach it to the MT9083 Series as outlined in “VIP Setup” on pages 11-4 through 11-7. 2. Depending on the probe tip selected, connect the probe to the bulkhead or patch cord to be tested. 3. Press the Top Menu key. The Top Menu screen appears. 4. Use the Up and Down Arrow keys (or the Rotary knob) to highlight VIP, then press the Enter key. The VIP screen appears. Note Do not disconnect the fiber scope before displaying the fiber scope screen. Otherwise, the USB device may not be recognized. Figure 11-8: VIP Screen – Live Mode 5. Use the 200x/400x switch (see item 3 in Figure 11-2 on page 11-3) to set the desired magnification rate. The example shown in Figure 11-8 has the magnification rate set to 400x. 6. Use the Focus Control knob (see item 2 in Figure 11-2 on page 11-3) to adjust the focus of the image, if the image is not in clear focus. 7. Press Settings (f4) to change the VIP Test Settings. 11-8 MT9083 Series ACCESS Master Operation Manual Chapter 11: Video Inspection Probe (VIP) Option 8. Press Report (f5) to change the VIP Report Settings. 9. Press the Start key to capture the current image and analyze. VIP Test Settings Images captured by the VIP can be analyzed on the MT9083 Series. Set Probe Model, Tip Type, and Test Profile to analyze correctly. Figure 11-9: VIP Test Settings Screen To set the Probe Model: 1. Press Settings (f4) on the VIP screen to display the VIP Test Settings screen. 2. Use the Up and Down keys (or the rotary knob) to highlight the Probe Model. 3. Press the Enter key to display the Probe Model dialog box. 4. Highlight the desired Probe Model setting: 545VIP, G0293A or G0306A. 5. Press the Enter key, and the dialog box closes and the selected setting is displayed in the Probe Model field. MT9083 Series ACCESS Master Operation Manual 11-9 Chapter 11: Video Inspection Probe (VIP) Option To set the Tip Type: 1. Press Settings (f4) on the VIP screen to display the VIP Test Settings screen. 2. Use the Up and Down keys (or the rotary knob) to highlight the Tip Type. 3. Press the Enter key to display the Tip Type dialog box. 4. Use the Up and Down keys (or the rotary knob) to highlight the desired Tip Type setting in the list. 5. Press the Enter key, and the dialog box closes and the selected setting is displayed in the Tip Type field. To set the Test Profile: 1. Press Settings (f4) on the VIP screen to display the VIP Test Settings screen. 2. Use the Up and Down keys (or the rotary knob) to highlight the Test Profile. 3. Press the Enter key to display the Test Profile dialog box. 4. Use the Up and Down keys (or the rotary knob) to highlight the desired Test Profile setting in the list. 5. Press the Enter key, and the dialog box closes and the selected setting is displayed in the Test Profile field. 11-10 MT9083 Series ACCESS Master Operation Manual Chapter 11: Video Inspection Probe (VIP) Option VIP Auto File Settings VIP images and analysis results can be saved. Figure 11-10: VIP Auto File Settings Screen File Location The File Location field allows you to select the directory in which you want to save VIP image files. To set the File Location: 1. Press Settings (f4) on the VIP screen to display the VIP Test Settings screen. 2. Press Auto Settings (f3) to display the VIP Auto File Settings screen. 3. Use the Up and Down keys (or the rotary knob) to highlight the File Location. 4. Press the Enter key to display the Select Directory screen. 5. Select the desired storage medium by highlighting the Medium field, if not already highlighted, and then press the Enter key to toggle the selection to either Internal Memory (Default) or USB Memory. MT9083 Series ACCESS Master Operation Manual 11-11 Chapter 11: Video Inspection Probe (VIP) Option Note USB Memory is displayed in the Medium field when you connect the USB memory stick. USB HUB cannot be used. Disconnect the probe before using the USB memory stick. 6. To save to a specific folder in the selected Medium, highlight the name of the folder. Then, press the Enter key, and the name of the selected folder appears below the Medium field. 7. Press Select (f1), and the Select Directory screen closes and the selected directory is displayed in the File Location field. Base Filename The Base Filename field provides a template for use when generating an autofilename. You can enter a base filename of up to 26 characters with a four character file extension. To set the Base Filename: 1. Press Settings (f4) on the VIP screen to display the VIP Test Settings screen. 2. Press Auto Settings (f3) to display the VIP Auto File Settings screen. 3. Use the Up and Down keys (or the rotary knob) to highlight the Base Filename. 4. Press the Enter key to display the Base Filename dialog box. Refer to “Renaming a File” on page 3-32 to input the file name. 5. Press OK (f6) after making all desired entries and exit the Base Filename dialog box or press the ESC key to cancel. You can now use the new Base Filename. Auto Functions - Analysis This check box sets the status of the Auto Analysis function. Select either of the followings: • • 11-12 Clear the check box – No Auto Analysis is performed after capturing an image. Select the check box – Auto Analysis is performed after capturing an image. MT9083 Series ACCESS Master Operation Manual Chapter 11: Video Inspection Probe (VIP) Option Auto Functions – File Name This check box sets the status of the Auto File Name function. Select either of the followings: • • Clear the check box – File name is not automatically generated. Select the check box – File name is automatically generated. Start Number Use this field to establish a start number for the auto-increment section of the Auto-Filename. The setting range of the Start Number is from 1 to 9999, in increments of 1. To set the Start Number: 1. Press Settings (f4) on the VIP screen to display the VIP Test Settings screen. 2. Press Auto Settings (f3) to display the VIP Auto File Settings screen. 3. Use the Up and Down keys (or the rotary knob) to highlight the Start Number. 4. Press the Enter key to display the Start Number dialog box. 5. Increment and decrement the Start number by using the Up and Down keys (or the rotary knob) or directly entering with the numeric keypad. 6. Press the Enter key, and the dialog box closes and the entered Start Number is displayed in the Start Number field. MT9083 Series ACCESS Master Operation Manual 11-13 Chapter 11: Video Inspection Probe (VIP) Option Captured a VIP image A captured image will look similar to the live image. If it is read from a file, a filename will be loaded and displayed on the image. You can pan and zoom the captured image using the Left, Right, Up, and Down keys and the rotary knob. Figure 11-11: Captured a VIP image To capture image: 1. Use the Up and Down keys (or the rotary knob) to highlight VIP on the Top Menu screen. Then, press the Enter key to display the VIP screen. 2. Assemble the VIP and press Settings (f4) on the VIP screen to display the VIP Test Settings screen. 3. Edit the VIP Test Settings, and then press the Start key. 4. Use the rotary knob to zoom in (counterclockwise) or zoom out (clockwise). The range of magnification percentage is from 100% to 200% and is displayed in the lower left of the image area. If press the ESC key, then the magnification percentage will become 100%. 5. Use the Left, Right, Up, and Down keys to move the captured image. 11-14 MT9083 Series ACCESS Master Operation Manual Chapter 11: Video Inspection Probe (VIP) Option Note If the magnification percentage is 100%, the captured image cannot be moved. Analyze a VIP image Images captured by the VIP can be analyzed on the MT9083. Figure 11-12: Analyze a VIP image To analyze the image: 1. Capture the image or load VIP image. 2. If you would like to change the VIP Test Settings, press Settings (f4) and change the settings. 3. Press Analyze (f2) to start analysis of the VIP image. The progress bar is displayed during analysis. 4. Circle of analysis range on VIP image, and Pass/Fail indicator are displayed if analysis is normally completed. MT9083 Series ACCESS Master Operation Manual 11-15 Chapter 11: Video Inspection Probe (VIP) Option 5. Press Analysis Result (f6) to show the table of analysis details. If there are defects, whose size is acceptable, found on the fiber, they are graphically displayed in green that means. Figure 11-13: Passing Analysis When major defects detected during analysis are flagged, a pop-up is displayed to instruct you to correct the problem. Figure 11-14: Failed Analysis If there are defects, whose size is not acceptable, found on the fiber, they are displayed in red that means Fail. The table shows the zone and area of each defect. Figure 11-15: Damaged fiber 11-16 MT9083 Series ACCESS Master Operation Manual Chapter 11: Video Inspection Probe (VIP) Option VIP Report Settings Analysis results can be output as PDF file on the MT9083 Series. Figure 11-16: VIP Report Settings Screen Headers Headers hold valuable information about the VIP Report files. You don’t need to fill the header each time a new VIP image is analyzed. Information entered on the VIP Report Settings screen is retained until such a time as the header requires editing. Header consists of the following fields: • • • • Customer: This field allows you to enter a customer name. Location: This field allows you to enter a location, such as an address or city. Operator: This field allows you to enter an operator name. Notes: This filed allows you to enter any notes that may be desired concerning the specific job. Use the following procedure to access and edit the header on the VIP Report Settings screen. MT9083 Series ACCESS Master Operation Manual 11-17 Chapter 11: Video Inspection Probe (VIP) Option To access and edit the Header: 1. Press Report (f5) on the VIP screen to display the VIP Report Settings screen. 2. Use the Up and Down keys (or the rotary knob) to highlight the desired field (Customer/Location/Operator/Notes). Then, press the Enter key to display the Text Entry dialog box (see Figure 2.1-5). When all the desired characters are entered, press OK (f6) to return to the VIP Report Settings screen. Repeat Step 2 until all desired text entry fields on the VIP Report Settings screen are edited. Press Exit (f6) to close the VIP Report Settings screen and return to the VIP screen. Figure 11-17: Text Entry Screen 3. Use the Up and Down keys to move the highlighted selection from row to row, including the current text entry field. Use the Left and Right keys to move the highlighted selection within the selected row or to move the text cursor in the text entry field if the field is highlighted. Or – Use the rotary knob to highlight the string entered from the software keyboard. Then, press the Enter key, and you can copy and paste the highlighted string to the text entry field. Press OK (f6), and the Text 11-18 MT9083 Series ACCESS Master Operation Manual Chapter 11: Video Inspection Probe (VIP) Option Entry dialog box closes and the entered text is displayed in the current field. 4. Use the f1 – f4 softkeys for the following actions: • Small Letter (f1) to switch the software keyboard to lower case letters. • Capital Letter (f2) to switch the software keyboard to upper case letters. • Symbols (f3) to switch the software keyboard to display symbols. • Space (f4) to insert a blank space in the text entry field. 5. With the text cursor positioned at the desired location, press the Enter key to enter the character selected (highlighted) in the text entry field. Use the numeric keypad to enter numbers into the text entry field. 6. When all the desired characters are entered, press OK (f6) if you want to use the new Header or press the ESC key if you want to cancel the new Header and close the Text Entry screen. 7. Repeat Steps 2 through 6 until all desired text entry fields on the VIP Report Settings screen are edited. Include Analysis Results This check box sets the status of the Include Analysis Results function. Select either of the followings: • • Clear the check box – Analysis Results are not included in a report. Select the check box – Analysis Results are included in a report. Include Analysis Details This check box sets the status of the Auto File Name function. Select either of the followings: • • Clear the check box – Analysis Details are not included in a report. Select the check box – Analysis Details are included in a report. MT9083 Series ACCESS Master Operation Manual 11-19 Chapter 11: Video Inspection Probe (VIP) Option Current Results Only / Results in Folder This option button switches setting which analysis result to be included in a report. Select either of the followings: • Current Results Only – Include only the results of the current analysis in a report. Note If there is no captured or loaded image available, this button is disabled, and reports can only be made from previously saved test results. • Results in Folder – Include all the VIP results in the selected folder. When this button is selected, a default folder name will appear on the screen, and the Select Folder softkey will be enabled. Highlight the Folder file, press the Enter key, and the Select Directory screen that allows you to select a different file folder. Create a PDF file When all the desired settings are completed, press Create PDF (f5) to create a PDF file. Or – Press Exit (f6) or the ESC key to close the VIP Report Settings screen. 11-20 MT9083 Series ACCESS Master Operation Manual Chapter 11: Video Inspection Probe (VIP) Option Working with VIP Image Files Saving VIP Images Images captured by the VIP can be saved as VIPI files or PNG files which can be recalled for viewing on the MT9083 Series. Also, recalled file can be analyzed on MT9083 Series. Figure 11-18: Saving VIP image To save a VIP image: 1. Display the desired image on the VIP screen. 2. Auto File Name is ON: Press Save (f1), and the VIP image is automatically saved as a VIPI file. Note If you press Save (f1) or the Save key again before capturing a VIP image, the Save VIP screen appears. Or – Auto File Name is OFF or VIP image is not captured: Press Save (f1) to display the Save VIP screen. Continue from Step 3. MT9083 Series ACCESS Master Operation Manual 11-21 Chapter 11: Video Inspection Probe (VIP) Option 3. Edit the filename, if desired, or continue from Step 8 to use the current filename. To edit the filename, press the Enter key to display the FileName dialog box Refer to “Renaming a File” on page 3-32 to input the file name. 4. When all the desired characters are entered, press OK (f6) if you want to use the new File Name or press the ESC key if you want to cancel the new file name and close the Text Entry screen. 5. If you would like to save the format, toggle File Type (f2) 6. Press Save (f1) to save the current VIP image as a PNG file. 11-22 MT9083 Series ACCESS Master Operation Manual Chapter 11: Video Inspection Probe (VIP) Option Loading a VIP Image VIPI files or VIP PNG files can be loaded to the MT9083 Series from the mass storage. This provides a method of visually checking the condition of a fiber optic termination that has been saved as VIPI or PNG files. To load a VIP image (VIPI or PNG): 1. Launch the VIP application from the Top Menu, if it is not already running. 2. Press File to display the Load screen appears. 3. Select the desired VIPI or PNG file. 4. Press Load (f1), then the Load screen closes and the selected VIPI or PNG file is now displayed on the VIP screen. Note The following items are not changed, even if either VIPI or PNG file is loaded: • Probe Model • Tip Type • Test Profile Sorting Files The Sort function allows you to change the order in which files are listed in mass storage (files saved to the unit’s internal memory or to a USB memory stick). Files can be sorted by type (Name or Time/Date) in ascending or descending order. To set the Sort type: 1. Press the File key. The Load screen appears. 2. Press Sort (f3). The Sort/By dialog appears. 3. Use the Left and Right Arrow keys to move the white arrow so that it is positioned to the left of the first selection in the desired pane of the dialog (Sort or By). 4. Use the Up and Down Arrow keys (or the Rotary knob) to highlight the desire setting within the pane. 5. With the desired settings highlighted in both panes, press the Enter key. The dialog closes and the files are listed in the selected order. MT9083 Series ACCESS Master Operation Manual 11-23 Chapter 11: Video Inspection Probe (VIP) Option New Folder Use the following procedure to create a new folder. 1. Press the File key, the Load screen appears. 2. Select the desired medium in which the new folder will be located by highlighting the Medium field and toggling the Enter key to choose from Internal Memory or USB Memory. Note The USB Memory selection is only available when a USB memory stick is connected to the MT9083 Series. 3. Press New Folder (f4), the New Folder screen appears. 4. Use the Up and Down Arrow keys to scroll the highlight from row to row, including the New Folder name field. Use the Right and Left Arrow keys to move the highlight within the selected row or, to move the text cursor in the New Folder name field when the field is highlighted. Or – Use the Rotary knob to navigate through each character in the character matrix as well as wrapping the highlight to the New Folder name field. 5. Use the f1 – f4 softkeys for the following: • Press Small Letter (f1) to change the character matrix to lower case letters. • Press Capital Letter (f2) to change the character matrix to upper case letters. • Press Symbols (f3) to change the character matrix to display the symbols available. • Press Space (f4) to insert a blank space in the file name. 6. With the desired character highlighted in the character matrix and the text cursor placed in the desired position, press the Enter key to enter the selected character in the New Folder name field. Use the Numeric keypad to enter numbers in New Folder name field. 7. When all of the desired characters are entered, press OK (f6) save the new folder to the selected medium or press ESC to cancel the New Folder process. 11-24 MT9083 Series ACCESS Master Operation Manual Chapter 11: Video Inspection Probe (VIP) Option Deleting Files Use either the Save screen or the Load screen to delete any data files stored in the internal memory or on a USB memory stick. You can delete a single file, multiple files or all of the files in the current directory. To delete a file: 1. Press the Save key, or the File key, if not already displaying either the Save screen or the Load screen. 2. Use the Up and Down Arrow keys (or the Rotary knob) to highlight the desired file. 3. Press Delete (f5). The following message appears: Are you sure you want to delete the current selection? 4. Press Yes (f1) to delete the selected file, or press No (f2) to cancel without deleting the file. 5. Press the ESC Key to return to the test application. Use the following procedure to delete multiple files in a directory. To delete multiple files: 1. Press the Save key, or the File key, if not already displaying either the Save screen or the Load screen. 2. Press More (f6). 3. Press Multi-Select Off (f3). The red legend on the softkey changes to “On”. 4. Use the Up and Down Arrow keys (or the Rotary knob) to highlight the first file to delete and then press the Enter key. A bullet appears before the selected file name and the total size of the selected files is shown on the bottom. 5. Repeat step 4 until you have selected all of the files you want to delete. 6. Press More >> (f6). 7. Press Delete (f5). The following message appears: Are you sure you want to delete the current selection? 8. Press Yes (f1) to delete the selected files, or press No (f2) to cancel without deleting the files. Use the following procedure to delete all of the files in a directory or folder. MT9083 Series ACCESS Master Operation Manual 11-25 Chapter 11: Video Inspection Probe (VIP) Option To delete all files in a directory or folder: 1. Press the Save key, or the File key, if not already displaying either the Save screen or the Load screen. 2. Select the desired folder/directory in which contains the file to be deleted. 3. Press the Down Arrow key to open the selected folder/directory. 4. Press More (f6). 5. Press Select All (f4). A bullet appears before each filename. Note If the Select All softkey (f4) is dimmed, toggle f3 so that the legend on the softkey reads “Multi-Select Off ”. 6. Press More (f6). 7. Press Delete (f5). The following message appears: Are you sure you want to delete the current selection? 8. Press Yes (f1) to delete all files in the selected directory, or press No (f2) to cancel without deleting the files. 11-26 MT9083 Series ACCESS Master Operation Manual Chapter 11: Video Inspection Probe (VIP) Option Copying Files Use either the Save screen or the Load screen to copy data files stored in the internal memory or on a USB memory stick. You can copy a single file, multiple files or all of the files in the current directory. To copy a file: 1. Press the Save key, or the File key, if not already displaying either the Save screen or the Load screen. 2. Press More >> (f6). 3. Use the Up and Down Arrow keys (or the Rotary knob) to highlight the desired trace file. 4. Press Copy (f1). 5. Select the desired folder/directory in which to paste the selected file. 6. Press Paste (f2). A message box stating “Copy 1/1” along with the name of the file appears briefly. Use the following procedure to copy multiple files in a directory. To copy multiple files: 1. Press the Save key, or the File key, if not already displaying either the Save screen or the Load screen. 2. Press More (f6). 3. Press Multi-Select Off (f3). The red legend on the softkey changes to “On”. 4. Use the Up and Down Arrow keys (or the Rotary knob) to highlight the first file to copy and then press the Enter key. A bullet appears before the selected file name and the total size of the selected files is shown on the bottom. 5. Repeat step 4 until you have selected all of the files you want to copy. 6. Press Copy (f1) 7. Select the desired folder/directory in which to paste the selected files. 8. Press Paste (f2). A message box appears displaying the count for each copied file as it is being pasted to the new directory/folder, as well as its filename. The message box closes when all of the selected files are pasted to their new location. Use the following procedure to copy all of the files in a directory/folder. MT9083 Series ACCESS Master Operation Manual 11-27 Chapter 11: Video Inspection Probe (VIP) Option To copy all files in a directory or folder: 1. Press the Save key, or the File key, if not already displaying either the Save screen or the Load screen. 2. Select the desired folder/directory in which contains the files to be copied. 3. Press the Down Arrow key and highlight the first file in the selected directory/folder, if not already highlighted. 4. Press More (f6). 5. Press Select All (f4). A bullet appears before each filename. Note If the Select All softkey (f4) is dimmed, toggle f3 so that the legend on the softkey reads “Multi-Select Off ”. 6. Press Copy (f1). 7. Select the desired folder/directory in which to paste the selected files. 8. Press Paste (f2). A message box appears displaying the count for each copied file as it is being pasted to the new directory/folder, as well as its filename. The message box closes when all of the files from the selected directory/folder are pasted to their new location. 11-28 MT9083 Series ACCESS Master Operation Manual Chapter 12: Performance Test and Calibration This chapter details how to check the performance of the MT9083 Series and calibrate measurement values. Contact an Anritsu Service and Sales office when the specifications have been determined not to have been satisfied based on the performance test as described in this chapter. Contact information can be found on the last page of the printed version of this manual, and is available in a separate file on the CD version. Make sure that you can provide the following details when requesting repairs. • • • ! Device name and serial number. The serial number is located on the back panel of the unit (see item 2 in Figure 2-2 on page 2-8). Description of the Failure condition. Name and contact information for the supervisor who checked the failure condition and/or the name of the contact to inform when the repairs are completed. WARNING NEVER look directly into the cable connector on the MT9083 Series nor into the end of a cable connected to the MT9083 Series. If laser radiation enters the eye, there is a risk of injury. There are risks from laser light when performing operations outside those noted in this manual. Performance Test The following eight items are tested to check the performance of the MT9083 Series (Item 6 is tested when Option 002 or 102 is installed). (1) Optical output and wavelength of the OTDR (Standard OTDR and Fault Locate testing) (2) Pulse width (3) Dynamic range (One-way back-scattered light dynamic range test) (4) Distance measurement accuracy (5) Loss measurement accuracy (linearity) MT9083 Series ACCESS Master Operation Manual 12-1 Chapter 12: Performance Test and Calibration (6) Optical output and wavelength of the visible light source (VLD) (Option 002 or 102) (7) Optical output and wavelength of the optical light source (OLS) for fiber identification (8) Measurement accuracy of the optical power meter (OPM) Clean the optical connector before testing. Test steps in this chapter are described based on conditions where the power is On and the MT9083 Series is activated. Rated Values for Each Item Unless otherwise specified, the following rated values are guaranteed at a temperature of 25 ±5°C. Table 12-1: MT9083A2 specifications Item Rated values Remarks Wavelength 1310 ±25nm (Opt 050/055 to 059/063/073) 1550 ±25nm (Opt 051 to 059/063/068/073) 1645 to 1655nm (Opt 052/054/055)*1 1625 ±25nm (Opt 057 to 059/061) 850 ±30nm (Opt 063 to 065) 1300 ±30nm (Opt 063/064) Temperature: 25°C, Pulse width: 1µs 100ns for Opt 063: MMF Pulse Width (ns) 3/10/20/50/100/200 500/1000/2000/4000/10000/20000 Opt055/057/073,063 : SMF 3/10/20/50/100/200 500/1000/2000/4000 Opt 063: MMF, 850 nm: Does not support 1000, 2000, 4000 12-2 MT9083 Series ACCESS Master Operation Manual Chapter 12: Performance Test and Calibration Table 12-1: MT9083A2 specifications (Cont’d) Item Rated values Remarks Dynamic Range (dB) (S/N = 1)*2 Opt055 37.5/36/33.5 dB (1.31/1.55/1.65 µm)*3 Opt057 36/34.5/31.5 dB (1.31/1.55/1.625 µm) Opt 063 28/27 dB (MMF 0.85/1.3 µm)*3 38/36.5 dB (SMF 1.31/1.55 µm) Opt073 38/36.5 dB (SMF 1.31/1.55 µm) Distance Measurement Accuracy ±1 m ±3 measurement distance 10-5 ± marker resolution (Note that this does not include optical fiber refraction index (IOR) based uncertainty.) Loss Measurement Accuracy (Linearity) ±0.05 dB/dB or ±0.1 dB (Whichever is greater) MT9083 Series ACCESS Master Operation Manual 25°C, Pulse width: 20 µs, Distance range: 100 km, Average time: 180 sec. *3 12-3 Chapter 12: Performance Test and Calibration Table 12-1: MT9083A2 specifications (Cont’d) Item Rated values Fiber Identification Light Source Remarks CW, 25°C, SM fiber length: 2 m Light Source Output -5 dBm ±1.5 dB 1310 ±30nm (Opt 055/057/063/073) 1550 ±30nm (Opt 055/057/063/073) Center Wavelength 1650 ±5nm (Opt 055) 1625 ±30nm (Opt 057) 850 ±30nm (Opt 063) 1300 ±30nm (Opt 063) Optical Power Meter*4 Measurement Accuracy No function for Opt 063 : MMF ±6.5% 1550nm, CW, -20 dBm, 23 ±2°C After executing zero offset*5 *1 Wavelength range of less than 20 dB from peak value. Peak value (optical output): +15 dBm max. *2 S/N = 1 Dynamic range value applies +2.6 dB to the noise peak values. *3 Background light of 1550 nm and CW light of -19 dBm are added when wavelength is 1650 nm. Pulse width is 500 ns and distance range is 25 km for MMF 850 nm. Pulse width is 4 µs and distance range is 25 km for MMF 1300 nm. *4 Measurement range -50 to -5 dBm (Peak power), absolute maximum input rating at +10 dBm, wavelength at 1550 nm. *5 An SM fiber (ITU-T G.652) and a master FC connector are used. 12-4 MT9083 Series ACCESS Master Operation Manual Chapter 12: Performance Test and Calibration Table 12-2: MT9083B2 specifications Item Wavelength Pulse Width (ns) Rated values Remarks 1310 ±25 nm (Opt 053/055/056/057/058/ 063) 1490 ±25 nm (Opt 056/058) 1550 ±25 nm (Opt 053/055/056/057/058) 1645 to 1655 nm (Opt 055)*1 1625 ±25 nm (Opt 057/058) 850 ± 30 nm (Opt 063) 1300 ± 30 nm (Opt 063) Temperature: 25°C, Pulse width: 1µs 3/10/20/50/100/200 500/1000/2000/4000/10000/20000 Opt 053/055/056/ 057/058 Opt 063: SMF 100 ns for Opt 063: MMF 3/10/20/50/100/200/500/1000/2000/4000 Opt 063: MMF 850 nm: Does not support 1000, 2000, 4000 Dynamic Range (dB) (S/N = 1)*2 Opt053 41/40dB (1.31/1.55µm) *3 Opt055 41/40/34dB (1.31/1.55/1.65µm) Opt056 41/40/40dB (1.31/1.49/1.55µm) Opt057 39/38/37dB (1.31/1.55/1.625µm) Opt058 41/40/40/39dB (1.31/1.49/1.55/1.625µm) Opt063 28/27dB (0.85/1.3µm) *3 41/40dB (1.31/1.55µm) Distance Measurement Accuracy ±1 m ±3 measurement distance 10-5 ± marker resolution (Note that this does not include optical fiber refraction index (IOR) based uncertainty.) Loss Measurement Accuracy (Linearity) ±0.05 dB/dB or ±0.1 dB (Whichever is greater) MT9083 Series ACCESS Master Operation Manual 25°C, Pulse width: 20 µs, Distance range: 100 km, Average time: 180 sec.*3 12-5 Chapter 12: Performance Test and Calibration Table 12-2: MT9083B2 specifications (Cont’d) Item Rated values Fiber Identification Light Source Remarks CW, 25°C SM fiber length: 2 m Light Source Output -5 dBm ±1.5 dB 1310 ±30 nm (Opt 053/055/056/057/058 /063) 1490 ±30 nm (Opt 056/058) Center Wavelength 1550 ±30 nm (Opt 053/055/056/057/058 /063) 1650 ±5 nm (Opt 055) 1625 ±30 nm (Opt 057/058) 850 ±30 nm (Opt 063) 1300 ±30 nm (Opt 063) Optical Power Meter*4 No function for Opt 063: MMF Measurement Accuracy ±6.5% 1550nm, CW, -20 dBm, 23 ±2°C After executing zero offset*5 *1 Wavelength range of less than 20 dB from peak value. Peak value (optical output): +15 dBm max. *2 S/N = 1 Dynamic range value applies +2.6 dB to the noise peak values. *3 Background light of 1550 nm and CW light of -19 dBm are added when wavelength is 1650 nm. Pulse width is 500 ns and distance range is 25 km for MMF 850 nm. Pulse width is 4 µs and distance range is 25 km for MMF 1300 nm. *4 Measurement range -50 to -5 dBm (Peak power), absolute maximum input rating at +10 dBm, wavelength at 1550 nm. *5 An SM fiber (ITU-T G.652) and a master FC connector are used. 12-6 MT9083 Series ACCESS Master Operation Manual Chapter 12: Performance Test and Calibration Table 12-3: MT9083C2 specifications Item Rated values Remarks Wavelength 1310±25 nm (Opt053/057) 1550±25 nm (Opt053/057) 1625±25 nm (Opt057) Temperature: 25°C Pulse width: 1µs Pulse Width (ns) 3/10/20/50/100/200 500/1000/2000/4000/10000/20000 Opt053/057 Dynamic Range (dB) (S/N = 1)*1 Opt053 45/45 dB (1.31/1.55 µm @20 µs) 25/25 dB (1.31/1.55 µm @100 ns) Opt057 25°C, Distance range: 100 km Average time: 180 sec. 45/45/43 dB (1.31/1.55/1.625 µm @20 µs) 25/25/23 dB (1.31/1.55/1.625 µm @100 ns)*2 Distance Measurement Accuracy ±1 m ±3 measurement distance 10-5 ± marker resolution (Note that this does not include optical fiber refraction index (IOR) based uncertainty.) Loss Measurement Accuracy (Linearity) ±0.05 dB/dB or 0.1 dB (Whichever is greater) Fiber Identification Light Source Light Source Output -5 dBm ±1.5 dB Center Wavelength 1310 ±30 nm (Opt053/057) 1550 ±30 nm (Opt053/057) 1625 ±30 nm (Opt 057) Optical Power Meter*3 Measurement Accuracy ±6.5% MT9083 Series ACCESS Master Operation Manual 1550nm CW -20 dBm, 23 ±2°C After executing zero offset*4 12-7 Chapter 12: Performance Test and Calibration *1 S/N=1 Dynamic range value applies +2.6 dB to the peak value. *2 Enhanced Range mode *3 Measurement range -50 to -5 dBm (peak power), absolute maximum input rating at +10 dBm, wavelength at 1550 nm *4 An SM fiber (ITU-T G.652) and a master FC connector are used Table 12-4: Visible light source (VLD; option 002 or 102) specifications Item Rated values Center Wavelength 650 nm ±15 nm Optical Output Power 0 ±3 dBm Remarks CW Table 12-5: Optical power meter (OPM; option 004/005/007) specifications Item Rated values Remarks Measuremen Opt 007 t ±5% (-10 dBm, 1310/1550 nm, CW) After executing zero ±5% (-10 dBm, 850 nm, CW, 25°C) offset. Accuracy Opt 004 ±5% (0 dBm, 1310/1550 nm, CW) Opt 005 ±5% (0 dBm, 1310/1550 nm CW, 25°C) Using a SM fiber (ITU-T G.652) and a master FC connector (1310/1550 nm). Using a MM fiber (62.5/125 µm) and a master FC connector (850 nm). 12-8 MT9083 Series ACCESS Master Operation Manual Chapter 12: Performance Test and Calibration Table 12-6: Measuring instrument (recommended) and optical fiber required for performance test (for SMF unit) Optical Spectrum Analyzer: MS9740A Wavelength: 0.6 to 1.65 µm Level: -65 to +20 dBm (8) Measurement accuracy Wavelength Measuring instrument and cable (1) (2) (3) (4) (5) (7) Optical Output Test item Wavelength (6) Optical Output OTDR Wavelength accuracy: ±0.3 nm Variable Attenuator: 8163B + 81570A (Agilent Technologies) Wavelength: 1.1 to 1.65 µm Attenuation: 0 to 30 dB Insertion loss: 3 dB or less Resolution: 0.1 dB or less Waveform Monitor: P6703B (Tektronix) Wavelength: 1.1 to 1.65 µm Rising/Falling: 500 ps max. Oscilloscope DC to 1 GHz SM Optical Fiber (60 km) SM Optical Fiber (20 km) SM Optical Fiber (2 km) SM Optical Fiber (2 m) Optical Power Meter: OPM37LAN (Sanwa Electric Instrument co., ltd.) Wavelength: 0.65 µm Level: -65 to +10 dBm Accuracy: ±0.3 dB MT9083 Series ACCESS Master Operation Manual 12-9 Chapter 12: Performance Test and Calibration Table 12-6: Measuring instrument (recommended) and optical fiber required for performance test (for SMF unit) (Cont’d) Optical Power Meter: 8163B+81630B (Agilent Technologies) Wavelength: 0.97 mm to 1.65 mm Level: –70 dBm to +28 dBm Measurement accuracy (8) Wavelength Measuring instrument and cable (1) (2) (3) (4) (5) Wavelength Test item (7) Optical Output (6) Optical Output OTDR Accuracy: ±3.0 % (1255 to 1630 nm) Reference Light Source :81654A + 8163B (Agilent Technologies) Wavelength: 1.31/1.55 mm Output: 0 dBm or more Table 12-7: Measuring instruments (recommended) and optical fiber required for performance test (for MMF unit) Test item Measuring instrument and cable (1) Optical Spectrum Analyzer: MS9740A Wavelength: 0.6 µm to 1.65 µm Level: -65 dBm to +20 dBm Wavelength accuracy: ±0.3 nm Variable Attenuator: 81578A#062 + 8163B (Agilent Technologies) Wavelength: 0.7µm to 1.4 µm Attenuation: 0 to 60 dB 12-10 (2) (3) (4) (5) Wavelength (7) Optical Output OTDR MT9083 Series ACCESS Master Operation Manual Chapter 12: Performance Test and Calibration Table 12-7: Measuring instruments (recommended) and optical fiber required for performance test (for MMF unit) (Cont’d) Test item Measuring instrument and cable (1) (2) Waveform Monitor: P6701B (Tektronix) Wavelength: 0.5 µm to 0.95 µm P6703B (Tektronix) Wavelength: 1.1 µm to 1.65 µm Rising/Falling: 500 ps max. Oscilloscope DC to 1 GHz (3) GI Optical Fiber (62.5/125 µm) (8 km) GI Optical Fiber (62.5/125 µm) (2 km) GI Optical Fiber (62.5/125 µm) (2 m) (4) (5) Wavelength (7) Optical Output OTDR Optical Power Meter 81635A + 8163B (Agilent Technologies) Wavelength: 0.80 µm to 1.65 µm Level: -80 dBm to +10 dBm Accuracy: ±3.5 % (0.80 to 1.2 µm) Note See “Conventions” below for items (1) through (8). Conventions (1): Optical output and wavelength (2): Pulse width (3): Dynamic range (4): Distance measurement accuracy MT9083 Series ACCESS Master Operation Manual 12-11 Chapter 12: Performance Test and Calibration (5): Loss measurement accuracy (6): Visible light source (VLD: Visible Laser Diode) (7): Optical light source for fiber identification (OLS: Optical Light Source) (8): Optical Power Meter (OPM) Table 12-8: Measuring instruments (recommended) and optical fiber required for performance test (for 004/005/007 Optical Power Meter options) Measurement accuracy Test item Measuring instrument and cable 1310/1550nm Optical Power Meter: 8163B + 81630B (Agilent Technologies) Wavelength: 0.97 µm to 1.65 µm Level: -70 dBm to +28 dBm Accuracy: ±3.0 % (1255 to 1630nm) Reference Light Source: 81657A + 8163B (Agilent Technologies) Wavelength: 1.31/1.55 µm Output: +13 dBm min. Variable Attenuator: 8163B + 81570A (Agilent Technologies) Wavelength: 1.2 µm to 1.65 µm Attenuation: 0 to 30 dB Insertion loss: 3dB max. Resolution: 0.1dB max. SM Optical Fiber (2 m) Optical Power Meter: 81635A + 8163B (Agilent Technologies) Wavelength: 0.80 µm to 1.65 µm Level: -80 dBm to +10 dBm Accuracy: ±3.5 % (0.80 to 1.2 µm) 12-12 850nm MT9083 Series ACCESS Master Operation Manual Chapter 12: Performance Test and Calibration Table 12-8: Measuring instruments (recommended) and optical fiber required for performance test (for 004/005/007 Optical Power Meter options) (Cont’d) Measurement accuracy Test item Measuring instrument and cable 1310/1550nm 850nm Reference Light Source: MPS-8033/06 (ILX Lightwave) Wavelength: 0.85 µm Output: 0 dBm (CW) Variable Attenuator: 81578A#062 + 8163B (Agilent Technologies) Wavelength: 0.7 to 1.4 µm Attenuation: 0 to 60 dB GI Optical Fiber (62.5/125 µm) (2 m) MT9083 Series ACCESS Master Operation Manual 12-13 Chapter 12: Performance Test and Calibration Optical Output and Wavelength of OTDR Check whether the optical output and center wavelength, equivalent to the peak pulse level of the OTDR, satisfy the specification. Connect the devices as shown in the following figure. MT9083 Series Optical Variable Attenuator Optical Fiber Optical Spectrum Analyzer Optical Fiber Optical Power Meter Figure 12-1: Optical Output and Wavelength of OTDR Test – Connection Diagram Test Procedure 1. At the Top Menu screen select OTDR (Standard) and then press the Enter key, the OTDR (Standard) Trace screen appears. 2. Press the Setup key and then press Preferences (f2). 3. Enter the following number, using the Numeric keypad: 9083. The legend on softkey f5 appears, reading “Performance Test”. 4. Press Performance Test (f5). The Performance Test screen appears. Note The Performance Test screen is only used during the Optical Output and Wavelength test and is only available in OTDR (Standard) mode. 12-14 MT9083 Series ACCESS Master Operation Manual Chapter 12: Performance Test and Calibration Figure 12-2: Performance Test screen 5. Press the Enter key, the Continuous Pulse Emission dialog appears. 6. Press the Up Arrow key to highlight “On” in the dialog and then press the Enter key. The dialog closes and the Continuous Pulse Emission field reads “On”. 7. Press the ESC key. The OTDR (Standard) Trace screen appears. 8. Set the following test parameters: • Wavelength (see “Setting the Source Wavelength” on page 4-68 for details). • Range and Pulse width (see “Setting the Range, Resolution, and Pulse Width” on page 4-68 for details). 9. Press ManualTest (f1), the following message box is superimposed over the OTDR (Standard) Trace screen. Figure 12-3: Calibration Value Message Box MT9083 Series ACCESS Master Operation Manual 12-15 Chapter 12: Performance Test and Calibration 10. Use the optical power meter to measure the optical output. Set the optical power meter wavelength and Calibration factor prior to measuring the optical output. 11. The laser beam is received by the optical spectrum analyzer when measuring wavelength to adjust the optical spectrum analyzer measurement level and wavelength resolution. Optical spectrum analyzer measurement varies according to the wavelength. Select RMS for 850/1300±30 nm, 1310/1490/1550/1625 ±25 nm, and select Threshold for 1645 to 1655 nm. 12. Check that the optical output and wavelength measured results are within the specifications. 13. When measuring another waveform continuously, repeat steps 8, 9 and 10. 14. When you have finished making all of the desired measurements, return to the Preferences screen and set Continuous Pulse Emission to “Off ”. Pulse Width Check that the pulse width of the output light of the OTDR satisfies the specifications. This test is performed for each wavelength. Connect the devices as shown in the following figure. MT9083 Series Optical Variable Attenuator Optical Fiber Waveform Monitor Oscilloscope Optical Fiber Figure 12-4: Pulse Width Test – Connection Diagram Test Procedure: 1. At the Top Menu screen select OTDR (Standard) and then press the Enter key, the OTDR (Standard) Trace screen appears. 12-16 MT9083 Series ACCESS Master Operation Manual Chapter 12: Performance Test and Calibration 2. With the Level One softkeys displayed press the following softkeys: a. Wavelength (f3) and set the desired wavelength. See “Setting the Source Wavelength” on page 4-68. b. Range/Pulse width (f4) and set the desired distance range and pulse width. See “Setting the Range, Resolution, and Pulse Width” on page 4-68. 3. Press Real Time Off (f2) to start real time mode. The red legend on the softkey changes to “On”. 4. Adjust the oscilloscope amplitude and time base scale to display the waveform in the oscilloscope. Adjust the optical variable attenuator to prevent the waveform monitor from being saturated at this time. 5. Observe the oscilloscope waveform and measure the peak level half amplitude as shown in the following figure then check that measured results are with the specifications. Peak Level 100% 50% Pulse Width Figure 12-5: Example – Peak Level Half Amplitude measurement 6. When measuring another pulse width continuously, return to the OTDR (Standard) Trace screen and set the pulse width again, the repeat measurement from step 3 above in the same manner. MT9083 Series ACCESS Master Operation Manual 12-17 Chapter 12: Performance Test and Calibration Dynamic Range (one-way back-scattered light dynamic range test) Check that the dynamic range satisfies the specifications. This test is performed for each wavelength and pulse width. Background light should be injected for this measurement. For example, when the wavelength is 1650 nm and the pulse width is 20 µs, the background light of -19 dBm, 1550 nm is injected. Background light is created using the reference light source and optical variable attenuator. Connect the devices as shown in the following figure. Connection with no background light MT9083 Series SM Optical Fiber (60 km) or GI Fiber (12 km) Far End: Grease for connection Connection with background light (1650 nm) MT9083 Series SM Optical Fiber (20 km) SM Optical Fiber (20 km) Remote End: Grease for connection Optical Coupler Optical Variable Attenuator Reference Light Source Background light (-19 dBm, 1550 nm) Optical Fiber Optical Fiber Figure 12-6: Dynamic Range Test – Connection Diagram Test Procedure: 1. At the Top Menu screen select OTDR (Standard) and then press the Enter key, the OTDR (Standard) Trace screen appears. 12-18 MT9083 Series ACCESS Master Operation Manual Chapter 12: Performance Test and Calibration 2. With the Level One softkeys displayed press the following softkeys: a. Wavelength (f3) and set the desired wavelength. See “Setting the Source Wavelength” on page 4-68. b. Range/Pulse width (f4) and set the desired distance range and pulse width. See “Setting the Range, Resolution, and Pulse Width” on page 4-68. 3. Press More (f6) to display the Level Two softkeys and then press the following softkeys: a. Average Time (f1) to set the desired averaging time. See “Setting the Average Time/Average Count” on page 4-71. b. Loss Mode (f3) and set the loss mode to 2-Pt Loss. See “Setting the Loss Mode” on page 4-74. 4. Press More (f6) twice to return to the Level One softkeys and then press Test (f1) to start the measurement. 5. When the measurement is complete, read the following values from the measurement waveform: • Calculate the level of the gap between the MT9083 Series optical connector end level and the floor noise peak level, then add 2.6 dB to this value. 6. Check that this value satisfies the standard values prescribed for each wavelength. Dynamic Range (Noise Peak) Dynamic Range (S/N = 1) 2.6 dB Figure 12-7: Dynamic Range (S/N = 1) MT9083 Series ACCESS Master Operation Manual 12-19 Chapter 12: Performance Test and Calibration Distance Measurement Accuracy Measure the optical fiber whose length and refraction index are known, then perform a horizontal axis (i.e., measurement distance) accuracy test. This is not required for other ranges when this test is performed at a certain distance range. Connect the devices as shown in the following figure. MT9083 Series SM Optical Fiber (2 km) or GI Fiber (2 km) 4% Fresnel Reflection Figure 12-8: Distance Measurement Accuracy Test – Connection Diagram Test Procedure: 1. At the Top Menu screen select OTDR (Standard) and then press the Enter key, the OTDR (Standard) Trace screen appears. 2. With the Level One softkeys displayed press the following softkeys: a. Wavelength (f3) and set the desired wavelength. See “Setting the Source Wavelength” on page 4-68. b. Range/Pulse width (f4) and set the Distance Range to 5 km and then select the desired Pulse Width. See “Setting the Range, Resolution, and Pulse Width” on page 4-68. 3. Press More (f6) to display the Level Two softkeys and then press the following softkeys: a. Average Time (f1) to set the desired averaging time. See “Setting the Average Time/Average Count” on page 4-71. b. IOR/BSC (f2) to set the IOR (Index of Refraction) to the known IOR of the test fiber. See “Setting the IOR and BSC” on page 4-73. 4. Press More (f6) twice to return to the Level One softkeys and then press Test (f1) to start the measurement. 12-20 MT9083 Series ACCESS Master Operation Manual Chapter 12: Performance Test and Calibration 5. Align the active cursor with the rising point of the fiber far-end Fresnel return (see “Selecting and Positioning Cursors” on page 4-57), then press the Right Arrow key until the horizontal axis scale is set to 0.005 km/div. 6. Accurately align the active cursor with the Fresnel return rising point (see the following figure), then read the absolute distance. Check that this value satisfies the specifications. Fresnel Return Cursor Position Figure 12-9: Cursor Placement for Distance Measurement Accuracy Test MT9083 Series ACCESS Master Operation Manual 12-21 Chapter 12: Performance Test and Calibration Loss Measurement Accuracy (Linearity) Perform a vertical axis (i.e., level measurement) accuracy test. Connect the devices as shown in the following figure. MT9083 Series SM Optical Fiber (60 km) or GI Fiber (12 km) Grease for connection Figure 12-10: Loss Measurement Accuracy (Linearity) Test – Connection Diagram Only one wavelength is tested even if the device has multiple wavelengths. This section shows the measurement procedure at 1310 nm. Test Procedure: 1. At the Top Menu screen select OTDR (Standard) and then press the Enter key, the OTDR (Standard) Trace screen appears. 2. With the Level One softkeys displayed press the following softkeys: a. Wavelength (f3) and set the wavelength to 1310 nm. See “Setting the Source Wavelength” on page 4-68. b. Range/Pulse width (f4) and set the Pulse Width to 100 ns. See “Setting the Range, Resolution, and Pulse Width” on page 4-68. 3. Press More (f6) to display the Level Two softkeys, then press Loss Mode (f3) and set the loss mode to 2-Pt LSA. See “Setting the Loss Mode” on page 4-74. 4. Press More (f6) twice to return to the Level One softkeys and then press Test (f1) to start the measurement. 5. Measure the loss (Lx) for each 3 km (at 1310 nm) up to approximately. 30 km, then calculate the average loss (Lave_m) for these. Perform for each fiber when there are fibers connected at this time. 6. Calculate the difference (Ldiff_n) between loss (Lx) and average loss (Lave_m). 7. Check that the difference (Ldiff_n) is less than ±0.1 dB. 12-22 MT9083 Series ACCESS Master Operation Manual Chapter 12: Performance Test and Calibration Measuring from L1 to L6 Measuring from L9 to LX Disabled (Note) L1 Connector Connection Part L3 L5 L2 L7 L4 3 km L9 L6 L8 L11 LX-1 L10 Disabled (Note) LX 3 km Note: L7 and L8 cannot be measured because a connector connection part step exists in the target period. Figure 12-11: Example – When a Fiber (20 km 2) is connected Measuring L1 to L6 Lave_1 = (L1 + L2 + L3 + L4 + L5 + L6)/6 Ldiff_1 = (L1 – Lave_1), Ldiff_2=(L2 – Lave_1) , . . . . Ldiff_6 = (L6 – Lave_1) Measuring L9 to Lx Lave_2 = (L9 + L10 + L11 + . . . . + Lx)/(x – 9 +1) Ldiff_9 = (L9 – Lave_2), Ldiff_10=(L10 – Lave_2), . . . . Ldiff_x = (Lx – Lave_2) Check that the Ldiff_n{Ldiff_1, Ldiff_2,......Ldiff_6, Ldiff_9, .....Ldiff_X} is ±0.1 or less. MT9083 Series ACCESS Master Operation Manual 12-23 Chapter 12: Performance Test and Calibration Optical Output Level and Wavelength of Visual Fault Locator (VLD: option 002 or 102) This test is performed on MT9083 Series units equipped with the optional Visual Fault Locator (VLD: Visual Laser Diode). Connect the devices as shown in the following figure. Optical Fiber (within 2 m, fiber bending radius ³ 50 mm) MT9083 Series Optical Detector Optical Spectrum Analyzer Optical Power Meter Figure 12-12: Optical Output Level and Wavelength of Visual Fault Locator Test – Connection Diagram Test Procedure: 1. At the Top Menu screen select Visual Fault Locate and then press the Enter key, the Visual Fault Locate screen appears. 2. Press Light Source Off (f1) to start the Visual Fault Locator (visible laser diode), the red legend on the softkey changes to “On”. 3. Measure the center wavelength using the optical spectrum analyzer and measure the optical output level using the optical power meter. Note The wavelength and optical output performance test is performed with the Visual Fault Locator set to “On”. Do Not activate the Blink mode. 12-24 MT9083 Series ACCESS Master Operation Manual Chapter 12: Performance Test and Calibration Optical Output and Wavelength of Optical Light Source for Fiber Identification Measure the optical output and center wavelength of the optical light source (OLS) for fiber identification. Connect the devices as shown in the following figure. Optical Fiber (within 2 m, fiber bending radius ³ 50 mm) MT9083 Series Optical Spectrum Analyzer Optical Power Meter Figure 12-13: Optical Output and Wavelength of OLS Test– Connection Diagram Test Procedure: 1. At the Top Menu screen select Light Source and then press the Enter key, the Light Source screen appears. 2. Press Wavelength (f2) until the red legend on the softkey displays the desired wavelength. 3. Press Modulation (f3) until the red legend on the softkey displays the desired modulation mode. 4. Press Light Source (f1) to start the test. The red legend on the softkey changes from “Off ” to “On”. 5. Check that the center wavelength and spectrum width satisfy the specifications by using the optical spectrum analyzer. MT9083 Series ACCESS Master Operation Manual 12-25 Chapter 12: Performance Test and Calibration 6. When measurement is complete, press Light Source (f1) to turn off the light source. Measurement Accuracy of the Optical Power Meter Check that the measurement accuracy of the optical power meter satisfies the specifications. Be sure to execute zero offset (see page 9-7) for the optical power meter before starting measurement. Connect the devices as shown in the following figure. M T 9083 Series or w ith options 004/005/007. O ptical Variabl e Attenuator O ptic al fiber Reference O ptic al Power M eter Reference O ptical Detector Reference Light S ource O ptical fiber M ultim ode F iber M andrel (850 nm m easurem ent) Figure 12-14: Optical Power Meter Measurement Accuracy Test – Connection Diagram Test Procedure: Measure the measurement accuracy for input level -20 dBm and measurement wavelength of 1550 nm. When Option 007 is installed, the measurement is performed for input level -10 dBm and measurement wavelength of 1310/1550/850 nm. When Option 004 or 005 is installed, the measurement is performed for input level 0 dBm and measurement wavelength of 1310/1550 nm. 1. Connect the reference optical power meter to the optical variable attenuator. 12-26 MT9083 Series ACCESS Master Operation Manual Chapter 12: Performance Test and Calibration 2. Adjust the optical variable attenuator so that the indication value of the reference optical power meter is -20.00 dBm (-10 dBm when Option 007 is installed, and 0 dBm when Option 004 or 005 is installed). 3. Connect the MT9083 Series to the optical variable attenuator. 4. Check that the indication value of the MT9083 Series is -20.0 ±0.27 dBm (measurement accuracy ±6.5%). Check that the indication value is -10 ±0.21 dBm (measurement accuracy ±5%) when Option 007 is installed, and -0 ±0.21 dBm (measurement accuracy ±5%) when Option 004 or 005 is installed. Note Use a SM fiber (ITU-T G.652) and master FC connector. MT9083 Series ACCESS Master Operation Manual 12-27 Chapter 12: Performance Test and Calibration Calibration The parameters that can be calibrated with the MT9083 Series are the Backscatter coefficient (BSC) level and the Optical Power Meter measurement accuracy. Of these, the Backscatter coefficient level is the only parameter that the user can calibrate. Backscatter Coefficient Level Calibration Prepare the optical connection where the return loss (R0 dB) is known then connect the devices as shown in the following figure. MT9083 Series Optical connector where return loss is known SM Optical Fiber SM Optical Fiber Figure 12-15: Backscatter Coefficient Level Calibration – Connection Diagram Test Procedure: 1. At the Top Menu screen select OTDR (Standard) and then press the Enter key, the OTDR (Standard) Trace screen appears. 2. Press the Setup key. 3. Press Preferences (f2) and then set the Reflectance Calculation to “Auto”, if not already set. See “Reflectance Calculation” on page 4-6 for details. 4. Press the ESC key to close the Setups and return to the OTDR (Standard) Trace screen. 5. Press More (f6) until the black legend on f2 reads “IOR/BSC”. 6. Press IOR/BSC (f2) and set the BSC to -80.00dB. See “Setting the IOR and BSC” on page 4-73 for details. 7. Press More (f6) twice. 8. Press Test (f1) to start the test. 9. Set cursor A just prior to know reflective event. Auto reflectance calculation will display the measured value. 10. Check that the return peak is not saturated. 12-28 MT9083 Series ACCESS Master Operation Manual Chapter 12: Performance Test and Calibration 11. Perform averaging until maximum noise reduction has occurred. 12. The Return Loss (reflectance) is displayed in the lower left section of the screen (see item 4 in Figure 4-10 on page 4-30). This value is assumed as R1 dB. 13. Obtain the Difference between R1 dB and R0 dB. 14. Add (or subtract) the result from step 13 to the current BSC value so that the measured reflectance equals the known reflectance (R0 dB). Optical Power Meter Measurement Accuracy Calibration Please contact Anritsu for calibration of the OPM measurement accuracy. To maintain the performance of this parameter, we recommend that the MT9083 Series is calibrated once a year. MT9083 Series ACCESS Master Operation Manual 12-29 Chapter 12: Performance Test and Calibration Performance Test Result Sheet Test site: Report No.: Date: Test supervisor: Equipment name: Serial No.: Ambient temperature: °C Relative humidity: % Note: 12-30 MT9083 Series ACCESS Master Operation Manual Chapter 12: Performance Test and Calibration MT9083A2-Option 073 Test item Wavelength Pulse width Dynamic range (S/N = 1) Specification 1310 nm ±25 nm 1550 nm 1550 nm ±25 nm 10 ns 10 ns ±35% 20 ns 20 ns ±35% 50 ns 50 ns ±25% 100 ns 100 ns ±20% 200 ns 200 ns ±10% 500 ns 500 ns ±10% 1 µs 1 µs ±10% 2 µs ±10% 4 µs 4 µs ±10% 10 µs 10 µs ±10% 20 µs 20 µs Wavelength [µm] 1.55 38 dB 36.5 dB ±0.05 dB/dB or ±0.1 dB (Whichever is greater) VLD 1.31 1.55 Light Source output -5±1.5 dBm Center wave- length (Indicative values) ±10% 1.31 Loss measurement accuracy (Linearity) OPM (Option) Pulse width: 1 µs 2 µs ±1 m ±3 measurement distance 10-5 ± marker resolution OPM Remarks 1310 nm Distance measurement accuracy OLS Results 1310 nm 1310 ±30 nm Pulse width: 20 µs Distance range: 100 km, Average time: 180 seconds CW CW 1550 nm 1550 ±30 nm ±6.5% 1550 nm, CW, -20 dBm Option 007 ±5% -10 dBm, 1310/1550 nm, CW -10 dBm, 850 nm, CW, 25°C Option 004 ±5% 0 dBm, 1310/1550 nm, CW Option 005 ±5% 0 dBm, 1310/1550 nm, CW, 25°C 650 nm ±15 nm When Option 002 installed Measurement accuracy Center wavelength Optical output power 0 ±3 dBm Note: OLS:Optical light source for fiber identification OPM:Optical power meter VLD:Visible laser diode MT9083 Series ACCESS Master Operation Manual 12-31 Chapter 12: Performance Test and Calibration MT9083A2-Option 055 Test item Wavelength 1310 nm 1550 nm 1650 nm Specification 1310 nm ±25 nm 1550 nm ±25 nm 1645 to 1655 nm Peak value (Optical output) Pulse width 1650 nm +15 dBm or less 10 ns 20 ns 50 ns 100 ns 200 ns 500 ns 1 µs 2 µs 4 µs 10 µs 20 µs Wavelength [µm] 10 ns 20 ns 50 ns 100 ns 200 ns 500 ns 1 µs 2 µs 4 µs 10 µs 20 µs 1.31 Dynamic range (S/N = 1) Distance measurement accuracy Loss measurement accuracy (Linearity) OLS Light Source output Center 1310 nm wave- 1550 nm length 1650 nm OPM Measurement accuracy OPM (Option) Option 007 VLD Option 004 Option 005 Center wavelength Optical output power Notes: 1. 2. 12-32 1.55 1.65 37.5 dB 36 dB 33.5 dB Results Remarks Pulse width: 1 µs Pulse width: 1 µs Wavelength range of 20 dB less than peak value 1.31 1.55 ±35% (Indicative values) ±35% ±25% ±20% ±10% ±10% ±10% ±10% ±10% ±10% ±10% 1.65 Pulse width: 20 µs Distance range: 100 km, Average time: 180 seconds ±1 m ±3 measurement distance 10-5 ± marker resolution ±0.05 dB/dB or ±0.1 dB (Whichever is greater) -5±1.5 dBm 1310 ±30 nm 1550 ±30 nm 1650 ±5 nm ±6.5% ±5% ±5% ±5% 650 nm ±15 nm 0 ±3 dBm CW CW 1550 nm, CW, -20 dBm -10 dBm, 1310/1550 nm, CW -10 dBm, 850 nm, CW, 25°C 0 dBm, 1310/1550 nm, CW 0 dBm, 1310/1550 nm, CW, 25°C When Option 002 installed OLS: Optical light source for fiber identification OPM: Optical power meter VLD: Visible laser diode Note that the measurement port varies according to the measurement wavelength. MT9083 Series ACCESS Master Operation Manual Chapter 12: Performance Test and Calibration MT9083A2-Option 057 Test item Wavelength Pulse width Dynamic range (S/N = 1) Specification Pulse width: 1 µs 1550 nm 1550 nm ±25 nm 1625 nm 1625 nm ±25 nm 10 ns 10 ns ±35% 20 ns 20 ns ±35% 50 ns 50 ns ±25% 100 ns 100 ns ±20% 200 ns 200 ns ±10% 500 ns 500 ns ±10% 1 µs 1 µs ±10% 2 µs 2 µs ±10% 4 µs 4 µs ±10% 10 µs 10 µs ±10% 20 µs 20 µs Wavelength [µm] 36 dB 1.55 1.625 34.5 dB 31.5 dB Loss measurement accuracy (Linearity) ±0.05 dB/dB or ±0.1 dB (Whichever is greater) Light Source output -5 ±1.5 dBm Center wave- length OPM (Option) VLD (Indicative values) ±10% 1.31 ±1 m ±3 measurement distance 10-5 ± marker resolution OPM Remarks 1310 nm ±25 nm Distance measurement accuracy OLS Results 1310 nm 1310 nm 1310 ±30 nm 1.31 1.55 1.625 Pulse width: 20 µs Distance range: 100 km, Average time: 180 seconds CW CW 1550 nm 1550 ±30 nm 1625 nm 1625 ±30 nm ±6.5% 1550 nm, CW, -20 dBm Option 007 ±5% -10 dBm, 1310/1550 nm, CW -10 dBm, 850 nm, CW, 25°C Option 004 ±5% 0 dBm, 1310/1550 nm, CW Option 005 ±5% 0 dBm, 1310/1550 nm, CW, 25°C Measurement accuracy Center wavelength 650 nm ±15 nm Optical output power 0 ±3 dBm When Option 002 installed Note: OLS:Optical light source OPM:Optical power meter VLD:Visible laser diode MT9083 Series ACCESS Master Operation Manual 12-33 Chapter 12: Performance Test and Calibration MT9083A2-Option 063 Test item Wavelength MMF Specification 850 nm Results 850 nm ±30 nm Remarks Pulse width: 100 ns 1300 nm 1300 nm ±30 nm SMF 1310 nm 1310 nm ±25 nm Pulse width: 1 µs 1550 nm 1550 nm ±25 nm Pulse width Dynamic range (S/N = 1) The selectable pulse width is 500 ns or less when the wavelength is MMF 850 nm, and 4 µs or less when the wavelength is 1300 nm. 10 ns 10 ns ±35% 20 ns 20 ns ±35% 50 ns 50 ns ±25% 100 ns 100 ns ±20% 200 ns 200 ns ±10% 500 ns 500 ns ±10% 1 µs 1 µs ±10% 2 µs 2 µs ±10% 4 µs 4 µs ±10% 10 µs 10 µs ±10% 20 µs 20 µs ±10% Wavelength [µm] 0.85 1.3 28 dB 27 dB 1.31 1.55 0.85 1.3 38 dB 36.5 dB Distance measurement accuracy ±1 m ±3 measurement distance 10-5 ± marker resolution Loss measurement accuracy (Linearity) ±0.05 dB/dB or ±0.1 dB (Whichever is greater) OLS 1.31 1.55 Pulse width: 20 µs Distance range: 100 km for SMF. 25 km for MMF, Average time: 180 seconds 500 ns when the wavelength is 850 nm, and 4 µs when 1300 nm. Light Source output -5 ±1.5 dBm CW Center wave- length CW 850 nm 850 ±30 nm (Indicative values) 1300 nm 1300 ±30 nm 1310 nm 1310 ±30 nm 1550 nm 1550 ±30 nm 12-34 MT9083 Series ACCESS Master Operation Manual Chapter 12: Performance Test and Calibration Test item OPM OPM (Option) VLD Specification Results Remarks ±6.5% 1550 nm, CW, -20 dBm Option 007 ±5% -10 dBm, 1310/1550 nm, CW -10 dBm, 850 nm, CW, 25°C Option 004 ±5% 0 dBm, 1310/1550 nm, CW Option 005 ±5% Measurement accuracy Center wavelength 650 nm ±15 nm Optical output power 0 ±3 dBm 0 dBm, 1310/1550 nm, CW, 25°C When Option 002 installed Notes: 1. 2. OLS: Optical light source for fiber identification OPM: Optical power meter VLD: Visible laser diode Note that the measurement port varies according to the measurement wavelength. MT9083 Series ACCESS Master Operation Manual 12-35 Chapter 12: Performance Test and Calibration MT9083B2-Option 053 Test item Wavelength Pulse width Dynamic range (S/N = 1) Specification 1310 nm ±25 nm 1550 nm 1550 nm ±25 nm 10 ns 10 ns ±35% 20 ns 20 ns ±35% 50 ns 50 ns ±25% 100 ns ±20% 200 ns 200 ns ±10% 500 ns 500 ns ±10% 1 µs 1 µs ±10% 2 µs 2 µs ±10% 4 µs 4 µs ±10% 10 µs 10 µs ±10% 20 µs 20 µs Wavelength [µm] 1.55 41 dB 40 dB ±0.05 dB/dB or ±0.1 dB (Whichever is greater) Light Source output -5±1.5 dBm Center wave- length VLD 1310 nm 1310 ±30 nm 1.31 1.55 25°C Pulse width: 20 µs Distance range: 100 km, Average time: 180 seconds CW CW 1550 nm 1550 ±30 nm ±6.5% 1550 nm, CW, -20 dBm Option 007 ±5% -10 dBm, 1310/1550 nm, CW, -10 dBm, 850 nm, CW, 25°C Option 004 ±5% 0 dBm, 1310/1550 nm, CW Option 005 ±5% 0 dBm, 1310/1550 nm, CW, 25°C 650 nm ±15 nm When Option 002 installed Measurement accuracy Center wavelength Optical output power 0 ±3 dBm 12-36 (Indicative values) ±10% 1.31 Loss measurement accuracy (Linearity) OPM (Option) Pulse width: 1 µs 100 ns ±1 m ±3 measurement distance 10-5 ± marker resolution OPM Remarks 1310 nm Distance measurement accuracy OLS Results MT9083 Series ACCESS Master Operation Manual Chapter 12: Performance Test and Calibration Note: OLS:Optical light source for fiber identification OPM:Optical power meter VLD:Visible laser diode MT9083B2-Option 055 Test item Wavelength Specification Results Remarks 1310 nm 1310 nm ±25 nm 1550 nm 1550 nm ±25 nm 1650 nm 1645 to 1655 nm Peak value (Optical output) 1650 nm +15 dBm or less Pulse width 10 ns 10 ns ±35% 20 ns 20 ns ±35% 50 ns 50 ns ±25% 100 ns 100 ns ±20% 200 ns 200 ns ±10% 500 ns 500 ns ±10% 1 µs 1 µs ±10% 2 µs 2 µs ±10% 4 µs 4 µs ±10% 10 µs 10 µs ±10% 20 µs 20 µs Dynamic range (S/N = 1) Wavelength [µm] Pulse width: 1 µs Pulse width: 1 µs Wavelength range of 20 dB less than peak value ±10% 1.31 1.55 1.65 41 dB 40 dB 34 dB Distance measurement accuracy ±1 m ±3 measurement distance 10-5 ± marker resolution Loss measurement accuracy (Linearity) ±0.05 dB/dB or ±0.1 dB (Whichever is greater) OLS Light Source output -5 ±1.5 dBm Center wave- length (Indicative values) 1310 nm 1310 ±30 nm 1.31 1.55 1.65 Pulse width: 20 µs Distance range: 100 km, Average time: 180 seconds CW CW 1550 nm 1550 ±30 nm 1650 nm 1650 ±5 nm MT9083 Series ACCESS Master Operation Manual 12-37 Chapter 12: Performance Test and Calibration Test item OPM OPM (Option) VLD Specification Results Remarks ±6.5% 1550 nm, CW, -20 dBm Option 007 ±5% -10 dBm, 1310/1550 nm, CW -10 dBm, 850 nm, CW, 25°C Option 004 ±5% 0 dBm, 1310/1550 nm, CW Option 005 ±5% Measurement accuracy Center wavelength 650 nm ±15 nm Optical output power 0 ±3 dBm 0 dBm, 1310/1550 nm, CW, 25°C When Option 002 installed Note: 1. 2. 12-38 OLS: Optical light source for fiber identification OPM: Optical power meter VLD: Visible laser diode Note that the measurement port varies according to the measurement wavelength. MT9083 Series ACCESS Master Operation Manual Chapter 12: Performance Test and Calibration MT9083B2-Option 056 Test item Wavelength Pulse width Dynamic range (S/N = 1) Specification 1310 nm 1310 nm ±25 nm 1490 nm 1490 nm ±25 nm 1550 nm 1550 nm ±25 nm 10 ns 10 ns ±35% 20 ns 20 ns ±35% 50 ns 50 ns ±25% 100 ns 100 ns ±20% 200 ns 200 ns ±10% 500 ns 500 ns ±10% 1 µs 1 µs ±10% 2 µs 2 µs ±10% 4 µs 4 µs ±10% 10 µs 10 µs ±10% 20 µs 20 µs ±10% Wavelength [µm] 1.31 1.49 1.55 41 dB 40 dB 40 dB ±1 m ±3 measurement distance 10-5 ± marker resolution Loss measurement accuracy (Linearity) ±0.05 dB/dB or ±0.1 dB (Whichever is greater) OPM (Option) VLD 1.31 1.49 (Indicative values) 1.55 Pulse width: 20 µs Distance range: 100 km, Average time: 180 seconds Light Source output -5 ±1.5 dBm Center wave- length OPM Remarks Pulse width: 1 µs Distance measurement accuracy OLS Results 1310 nm 1310 ±30 nm CW CW 1490 nm 1490 ±30 nm 1550 nm 1550 ±30 nm ±6.5% 1550 nm, CW, -20 dBm Option 007 ±5% -10 dBm, 1310/1550 nm, CW -10 dBm, 850 nm, CW, 25°C Option 004 ±5% 0 dBm, 1310/1550 nm, CW Option 005 ±5% Measurement accuracy Center wavelength 650 nm ±15 nm Optical output power 0 ±3 dBm 0 dBm, 1310/1550 nm, CW, 25°C When Option 002 installed Note: OLS:Optical light source for fiber identification OPM:Optical power meter VLD:Visible laser diode MT9083 Series ACCESS Master Operation Manual 12-39 Chapter 12: Performance Test and Calibration MT9083B2-Option 057 Test item Wavelength Pulse width Dynamic range (S/N = 1) Specification 1310 nm 1310 nm ±25 nm 1550 nm 1550 nm ±25 nm 1625 nm 1625 nm ±25 nm 10 ns 10 ns ±35% 20 ns 20 ns ±35% 50 ns 50 ns ±25% 100 ns 100 ns ±20% 200 ns 200 ns ±10% 500 ns 500 ns ±10% 1 µs 1 µs ±10% 2 µs 2 µs ±10% 4 µs 4 µs ±10% 10 µs 10 µs ±10% 20 µs 20 µs ±10% Wavelength [µm] 1.31 1.55 1.625 39 dB 38 dB 37 dB ±1 m ±3 measurement distance 10-5 ± marker resolution Loss measurement accuracy (Linearity) ±0.05 dB/dB or ±0.1 dB (Whichever is greater) OPM (Option) VLD 1.31 (Indicative values) 1.55 1.625 Pulse width: 20 µs Distance range: 100 km, Average time: 180 seconds Light Source output -5 ±1.5 dBm Center wave- length OPM Remarks Pulse width: 1 µs Distance measurement accuracy OLS Results CW 1310 nm 1310 ±30 nm CW 1550 nm 1550 ±30 nm 1625 nm 1625 ±30 nm ±6.5% 1550 nm, CW, -20 dBm Option 007 ±5% -10 dBm, 1310/1550 nm, CW -10 dBm, 850 nm, CW, 25°C Option 004 ±5% 0 dBm, 1310/1550 nm, CW Option 005 ±5% Measurement accuracy 0 dBm, 1310/1550 nm, CW, 25°C Center wavelength 650 nm ±15 nm When Option 002 installed Optical output power 0 ±3 dBm Note: OLS:Optical light source for fiber identification OPM:Optical power meter VLD:Visible laser diode 12-40 MT9083 Series ACCESS Master Operation Manual Chapter 12: Performance Test and Calibration MT9083B2-Option 058 Test item Wavelength Pulse width Dynamic range (S/N = 1) Specification 1310 nm 1310 nm ±25 nm 1490 nm 1490 nm ±25 nm 1550 nm 1550 nm ±25 nm Remarks Pulse width: 1 µs 1625 nm 1625 nm ±25 nm 10 ns 10 ns ±35% 20 ns 20 ns ±35% 50 ns 50 ns ±25% 100 ns 100 ns ±20% 200 ns 200 ns ±10% 500 ns 500 ns ±10% 1 µs 1 µs ±10% 2 µs 2 µs ±10% 4 µs 4 µs ±10% 10 µs 10 µs ±10% 20 µs 20 µs ±10% Wavelength [µm] 1.31 1.55 1.625 1.31 1.49 1.55 1.625 Pulse width: 20 µs Distance range: 100 km, 41 dB 40 dB 40 dB 39 dB Average time: 180 seconds ±1 m ±3 measurement distance 10-5 ± marker resolution Loss measurement accuracy (Linearity) ±0.05 dB/dB or ±0.1 dB (Whichever is greater) Light Source output -5 ±1.5 dBm Center wave- length (Indicative values) 1.49 Distance measurement accuracy OLS Results 1310 nm 1310 ±30 nm CW CW 1490 nm 1490 ±30 nm 1550 nm 1550 ±30 nm 1625 nm 1625 ±30 nm OPM OPM (Option) VLD ±6.5% 1550 nm, CW, -20 dBm Option 007 ±5% -10 dBm, 1310/1550 nm, CW -10 dBm, 850 nm, CW, 25°C Option 004 ±5% 0 dBm, 1310/1550 nm, CW Option 005 ±5% 0 dBm, 1310/1550 nm, CW, 25°C Measurement accuracy Center wavelength 650 nm ±15 nm Optical output power 0 ±3 dBm Note: When Option 002 installed OLS:Optical light source for fiber identification OPM:Optical power meter, VLD:Visible laser diode MT9083 Series ACCESS Master Operation Manual 12-41 Chapter 12: Performance Test and Calibration MT9083B2-Option 063 Test item Wavelength Specification MMF 850 nm 850 nm ±30 nm SMF Results Remarks Pulse width: 100 ns 1300 nm 1300 nm ±30 nm 1310 nm 1310 nm ±25 nm 1550 nm 1550 nm ±25 nm Pulse width Pulse width: 1 µs The selectable pulse width is 500 ns or less when the wavelength is MMF 850 nm, and 4 µs or less when the wavelength is 1300 nm. 10 ns 10 ns ±35% 20 ns 20 ns ±35% 50 ns 50 ns ±25% 100 ns 100 ns ±20% 200 ns 200 ns ±10% 500 ns 500 ns ±10% 1 µs 1 µs ±10% 2 µs 2 µs ±10% 4 µs 4 µs ±10% 10 µs 10 µs ±10% 20 µs 20 µs (Indicative values) ±10% Dynamic range Wavelength (S/N = 1) [µm] 1.55 0.85 1.3 1.31 1.55 25°C Pulse width: 20 µs 28 dB 27 dB 41 dB 40 dB Distance range: 25 km, Average time: 180 seconds, 500 nm when the wavelength is 850 nm, and 4 µs when 1300 nm. Distance measurement accuracy ±1 m ±3 measurement distance 10-5 ± marker resolution Loss measurement accuracy (Linearity) ±0.05 dB/dB or ±0.1 dB (Whichever is greater) 12-42 0.85 1.3 1.31 MT9083 Series ACCESS Master Operation Manual Chapter 12: Performance Test and Calibration Test item OLS Specification Light Source output -5 ±1.5 dBm Center 850 nm 850 ±30 nm wave- 1330 1300 ±30 nm length nm OPM OPM (Option) VLD 1310 nm 1310 ±30 nm 1550 nm 1550 ±30 nm Results Remarks CW CW ±6.5% 1550 nm, CW, -20 dBm Option 007 ±5% -10 dBm, 1310/1550 nm, CW -10 dBm, 850 nm, CW, 25°C Option 004 ±5% 0 dBm, 1310/1550 nm, CW Option 005 ±5% 0 dBm, 1310/1550 nm, CW, 25°C Center wavelength 650 nm ±15 nm When Option 002 installed Optical output power 0 ±3 dBm Measurement accuracy Note: 1. 2. OLS: Optical light source for fiber identification OPM: Optical power meter VLD: Visible laser diode Note that the measurement port varies according to the measurement wavelength. MT9083 Series ACCESS Master Operation Manual 12-43 Chapter 12: Performance Test and Calibration MT9083C2-Option053 Test item Wavelength Pulse width Specification Remarks 1310±25 nm 1550 nm 1550±25 nm 10 ns 10 ns ±35% 20 ns 20 ns ±35% Pulse width : 1 µs ±25% 50 ns 50 ns 100 ns 100 ns ±20% 200 ns 200 ns ±10% 500 ns 500 ns ±10% 1000 ns 1000 ns ±10% 1 µs 1 µs ±10% 2 µs 2 µs ±10% 4 µs 4 µs ±10% 10 µs 10 µs ±10% 20 µs 20 µs Dynamic Wavelength [µm] Range (S/N=1) 1.55 45 dB 45 dB 25 dB 25 dB ±1m±3 measurement distance 10-5 ±marker resolution Loss Measurement Accuracy (Linearity) ±0.05 dB/dB or 0.1 dB (Whichever is greater) Light Source Output Center wavelength -5±1.5 dBm 1310 nm 1310±30 nm (Indicative value) ±10% 1.31 Distance Measurement Accuracy OLTS Results 1310nm 1.31 1.55 25°C Pulse width : 20 µs Distance range : 100 km Average time : 180 sec 25°C Pulse width : 100 ns (Enhanced Range mode) Distance range : 100 km Average time : 180 sec CW CW 1550 nm 1550±30 nm OPM ±6.5% 1550 nm, CW -20 dBm OPM(option) Option 007 ±5% -10 dBm, 1310/1550 nm, CW -10 dBm, 850 nm, CW, 25°C Option 004 ±5% 0 dBm, 1310/1550 nm, CW Option 005 ±5% 0 dBm, 1310/1550 nm,CW,25°C 12-44 Measurement accuracy MT9083 Series ACCESS Master Operation Manual Chapter 12: Performance Test and Calibration MT9083C2-Option053 VLD Center wavelength 650±15 nm Optical Output power 0±dBm When Option 002 installed Note: OLS: OPM: VLD: Optical light source for fiber identification Optical power meter Visible laser diode MT9083C2-Option057 Test item Wavelength Pulse width 1310nm 1310±25 nm 1550 nm 1550±25 nm Results Remarks Pulse width: 1 µs 1625 nm 1625±25 nm 10 ns 10 ns ±35% 20 ns 20 ns ±35% 50 ns 50 ns ±25% 100 ns 100 ns ±20% 200 ns 200 ns ±10% 500 ns 500 ns ±10% 1000 ns 1000 ns ±10% 1 µs 1 µs ±10% 2 µs 2 µs ±10% 4 µs 4 µs ±10% 10 µs 10 µs ±10% 20 µs 20 µs ±10% Dynamic Wavelength [µm] Range (S/N=1) Distance Measurement Accuracy Loss Measurement Accuracy (Linearity) Specification 1.31 1.55 1.625 45 dB 45 dB 43 dB 25 dB 25 dB 23 dB 1.31 1.55 (Indicative value) 1.625 25°C Pulse width: 20 µs Distance range: 100 km Average time: 180 sec 25°C Pulse width: 100 ns (Enhanced Range mode) Distance range: 100 km Average time: 180 sec ±1m±3 measurement distance 10-5 ±marker resolution ±0.05 dB/dB or 0.1 dB (Whichever is greater) MT9083 Series ACCESS Master Operation Manual 12-45 Chapter 12: Performance Test and Calibration MT9083C2-Option057 OLTS Light Source Output -5±1.5 dBm Center 1310 nm 1310±30 nm wavelength 1550 nm 1550±30 nm CW CW 1625 nm 1625±30 nm OPM Measurement accuracy ±6.5% 1550 nm, CW -20 dBm OPM(option) Option 007 ±5% -10 dBm, 1310/1550 nm, CW -10 dBm, 850 nm, CW, 25°C Option 004 ±5% 0 dBm, 1310/1550 nm, CW Option 005 ±5% 0 dBm, 1310/1550 nm, CW, 25°C Center wavelength 650±15 nm When Option 002 installed Optical Output power 0±dBm VLD Note: OLS: OPM: VLD: 12-46 Optical light source for fiber identification Optical power meter Visible laser diode MT9083 Series ACCESS Master Operation Manual Chapter 13: Maintenance This chapter details cleaning, storage and transport of the MT9083 Series to help maintain performance. Optical Connector/Optical Adapter Cleaning Optical connectors and adapters need periodic cleaning. Although the following procedures use the FC connector and adapter as an example, use the same methods when cleaning other connector and adapter types. Cleaning the MT9083 Series Connector Ferrule End Surface Use an approved adapter cleaner to clean the ferrule inside of the MT9083 Series measurement port(s). The ferrule should be cleaned periodically. To clean the Ferrule end surface: 1. Remove the currently connected adapter by raising the adapter lever (you will hear a “click” when the latch disengages) and then gently pull the adapter straight towards you. Adapter lever Latch Figure 13-1: Removing the Optical Adapter MT9083 Series ACCESS Master Operation Manual 13-1 Chapter 13: Maintenance 2. Saturate an adapter cleaner with isopropyl alcohol and then use it to clean the end surface and sides of the ferrule. Figure 13-2: Cleaning the Ferrule End Surface 3. Press the tip of a new (dry) adapter cleaner into the ferrule end surface and then wipe in one direction 2 or 3 times to dry the surface. Dust and other contaminates in the isopropyl alcohol may remain on the ferrule end surface if cleaning is not properly finished. 4. Clean the connector adapter before reattaching it. See the following procedure “To clean an Optical Adapter:” for details. 5. Attach the adapter in the reverse order described in step 1. Be careful not to scratch the ferrule end surface. 6. OPTIONAL: With the MT9083 Series powered down, inspect the ferrule using a hand held microscope or magnifier. It should appear similar to the Clean Ferrule Tip below (see Figure 13-3). ). Contaminated Ferrule End Surface Clean Ferrule End Surface Figure 13-3: Magnified Ferrule End Surface 13-2 MT9083 Series ACCESS Master Operation Manual Chapter 13: Maintenance Cleaning the Optical Adapter Use an approved adapter cleaner to clean the optical fiber cable optical adapter. To clean an Optical Adapter: 1. Remove the Optical adapter. See step 1 of “To clean the Ferrule end surface:” on page 13-1 for details. 2. Saturate an adapter cleaner with isopropyl alcohol and then insert it into the split sleeve of the adapter. Rotate the adapter cleaner in one direction while moving it back and forth. Figure 13-4: Cleaning an Optical Adapter Note Check the ferrule diameter and use a cleaner only for the ø1.25 mm or ø2.5mm adapter. Cleaning the Optical Fiber Cable Ferrule End Surface It is advised that you clean the ferrule end surface of the fiber to be tested with an approved ferrule cleaner prior to making any connections. To clean the optical fiber Ferrule end surface: 1. Pull the ferrule cleaner lever to expose the cleaning surface. Lever Ferrule cleaner Cleaning surface Figure 13-5: Ferrule Cleaner – details MT9083 Series ACCESS Master Operation Manual 13-3 Chapter 13: Maintenance 2. Hold the lever in the opened position, press the optical connector ferrule end into the cleaning surface, and then rub in one direction as shown in the following figure. Figure 13-6: Cleaning the Optical Fiber Ferrule End Surface General Notes on Cleaning 1. Do not clean with a used ferrule cleaner. 2. Do not finish cleaning with a swab as the swab fibers may adhere. 3. Cap the cleaned connector. ! WARNING Check that no light is being emitted when cleaning and checking the ferrule end surface. ! CAUTION The MT9083 Series may not satisfy performance when used with dirt or dust adhering to the ferrule end surface. In addition, the connected fiber and/or the MT9083 Series ferrule end surface may be burned if high output light is emitted in this state. Fully clean the fiber to be connected and the MT9083 Series ferrule end surface before measurement. Notes On Storage Note the following when storing for long periods. 1. Remove any dust or dirt adhering to the MT9083 Series before storage. 2. Avoid storing in locations with high temperatures above 60°C, low temperatures below -20°C, or in humidity above 85%. 3. Avoid storing in locations where there is direct sunlight or in dusty locations. 13-4 MT9083 Series ACCESS Master Operation Manual Chapter 13: Maintenance 4. Avoid storing in locations where water droplets are adhering or where exposed to active gases. 5. Avoid storing in locations that may oxidize the MT9083 Series or in locations with severe vibrations. 6. Remove the battery pack from the MT9083 Series and store separately. Recommended Storage Conditions It is recommended to store the MT9083 Series in the following conditions, as well as to satisfy the general notes described above. 1. Temperature: 5 to 30°C 2. Humidity: 40 to 75% 3. Locations where there is little daily temperature or humidity changes. MT9083 Series ACCESS Master Operation Manual 13-5 Chapter 13: Maintenance Transporting Use the original shipping materials, or an approved optional transit case, when repacking the MT9083 Series for transport. Repack according to the following procedure when the original shipping materials (or a transit case) are not available. To repack the MT9083 Series for transport: 1. Clean the MT9083 Series with a soft, dry cloth. 2. Make sure that all port covers and fasteners are securely in place. 3. Place the MT9083 Series in a polyester bag. Make sure that the bag is large enough to seal to protect the unit. 4. Use a heavy, corrugated cardboard box several times larger than the MT9083 Series to provides ample space for the unit and for protective packing materials such as “bubble” wrap or “packing peanuts” to provide cushioning. Make sure that the MT9083 Series is nested within the packing material. 5. Seal the box with adhesive tape along the seams. 13-6 MT9083 Series ACCESS Master Operation Manual Chapter 14: Remote GUI Function Chapter 14: Remote GUI Function Outline MT9083 supports remote control via PC. The screen simulates the operation panel and buttons of the unit, allowing you to operate with a mouse. It is also possible to transfer and save the files stored in the MT9083 to your PC. Figure 14-1: Remote GUI Overview When this function is used, the main unit works as a web server. Therefore, the PC side is not required to have dedicated software. It is also possible to control the main unit via network. The following is required to use the Remote GUI function. MT9083 Series ACCESS Master Operation Manual 14-1 Chapter 14: Remote GUI Function Table 14-1: Required Equipment Equipment PC Performance OS: Windows XP Professional SP3 or later CPU: Intel Pentium 4 3.0 GHz or more Memory: 1 GB or more Free hard disk space: 5 GB or more Ethernet: 10/100BASE-T Display: 1280 × 1024 or more Software Microsoft Internet Explorer Ver 8.0 or later Adobe Flash Player 10.1 or later USB Ethernet Converter USB1.1/2.0 support, 10/100 BASE-T USB Hub *1 USB1.1/2.0 support, 2 ports or more *1: Required for USB memory. Note Anritsu does not guarantee the performance of USB-Ethernet converters that are not supplied by Anritsu. 14-2 MT9083 Series ACCESS Master Operation Manual Chapter 14: Remote GUI Function Preparation Cable connection Connect the Ethernet cable to the USB connector of the main unit, via USBEthernet converter. Figure 14-2: Ethernet Cable Connection MT9083 Series ACCESS Master Operation Manual 14-3 Chapter 14: Remote GUI Function Network Setup on Main Unit To prepare the unit for connection to the network and remote control, it is necessary to establish a proper network address and password for the unit. Once the unit is powered on and the Top Menu is displayed, perform the following steps: 1. Connect the USB end of the USB to Ethernet adapter to the USB type A port of the MT9083. The Remote Setup screen displays. Note If the Ethernet adapter is plugged and de-plugged too frequently, USB port may stop working. If this is the case, turn off the power of MT9083 once and turn back on. Figure 14-3: Remote Setup Screen 14-4 MT9083 Series ACCESS Master Operation Manual Chapter 14: Remote GUI Function To set the IP Address, IP Netmask, and Default Gateway: 1. Use the Left/Right/Up/Down Arrow keys (or the Rotary knob) to highlight the field. 2. Press the Enter key. An editor displays. Figure 14-4: Editor 3. Use the Numeric keypad, Left/Right/Up/Down Arrow keys, and Rotary knob to change the value. Note When editing Default Gateway, press None (f1) to indicate that no default gateway address is to be used. To set the Remote GUI Password: 1. Use the Left/Right/Up/Down Arrow keys (or the Rotary knob) to highlight Remote GUI Password. 2. Press the Enter key. 3. The Text Entry dialogbox appears. Up to 12 characters in length is acceptable. This password will be required to gain access to the unit from the remote client. Note The default password is blank. MT9083 Series ACCESS Master Operation Manual 14-5 Chapter 14: Remote GUI Function To set the Remote GUI Port Number: The Remote Control feature uses HTTP protocol for communications. The default port for HTTP protocol is 80. In some cases, due to network configuration rules, it may be necessary to change the default port for HTTP. 1. Use the Left/Right/Up/Down Arrow keys (or the Rotary knob) to highlight Remote GUI Port Number. 2. Press the Enter key. Use the editor to change the value. Acceptable values are 1 through 65535. Note If the default port number for HTTP is changed, the new port number must be specified in the URL that is entered into the Web browser to start the Remote Control client. See “Connection” on page 14-10 for details. To accept changes made to Remote Setup parameters: 1. Once all fields have been entered, press the Accept (f1) key to record the new settings. The Remote Setup screen will close and the Top Menu will be shown. 2. A network icon will appear at the top of the screen to indicate that remote control communication is active. To disable the network connection once the communication is established, press Disable Remote (f2) key. The network icon will disappear. Note Upon pressing the Accept (f1) key, note that any existing network connection will be dropped so the network connection can be re-configured to use the new settings. If the Remote Client is used to change the network configuration on the Remote Setup screen, upon pressing the Accept (f1) key, its connection will be dropped and the Remote Client will no longer be able to communicate with the Remote Unit. In this case it is necessary to re-enter the URL in the Web browser using the new IP Address (and port if not 80) to obtain a new client connection. 14-6 MT9083 Series ACCESS Master Operation Manual Chapter 14: Remote GUI Function Network Setup on PC Follow the steps below to connect the main unit and PC via LAN. The example uses the Window XP screens. 1. Click Start, right-click My Network Places, and click Properties. 2. Right-click Local Area Connection, and then click Properties. 3. The Local Area Connection Properties dialog box displays. Select Internet Protocol (TCP/IP). MT9083 Series ACCESS Master Operation Manual 14-7 Chapter 14: Remote GUI Function 4. Click Properties. The Internet Protocol (TCP/IP) Properties dialog box displays. Select Use the following IP address. 14-8 MT9083 Series ACCESS Master Operation Manual Chapter 14: Remote GUI Function 5. For the IP address, assign the network address that is different from the one set for the main unit. In this document, we use the below address. When finished, click OK. IP address: 192.168.1.1 Subnet mask: 255.255.255.0 MT9083 Series ACCESS Master Operation Manual 14-9 Chapter 14: Remote GUI Function 6. Click OK on the Local Area Connection Properties dialog box. Connection 1. Open a web browser on your PC. 2. In the address bar, enter the IP address you set for the Access Master. In this example, enter “http://192.168.1.2”. 3. The following screen will appear when connection is established. When a message indicates no network in found, ensure that no problem exists for cable connection, network setting at PC and the main unit. 14-10 MT9083 Series ACCESS Master Operation Manual Chapter 14: Remote GUI Function 4. Enter the password set at the main unit, and then click Login. 5. Press Control, and the unit’s panel screen displays. 6. A network icon appears on the upper right of the screen, indicating that unit is now control via Remote GUI. MT9083 Series ACCESS Master Operation Manual 14-11 Chapter 14: Remote GUI Function Operation Panel operation Just as you use the panel button on the actual main unit, you can click the buttons of Remote GUI on-screen. Available keys for Remote GUI mode turns red when you move the cursor over it. Figure 14-5: Available Hard Key Display A click on the rotary know moves the marker or cursor. The speed with which the cursor and marker moves is determined by the size of the red circle, as shown. Figure 14-6: Rotary Knob Speed Display You cannot rotate the rotary knob on the Remote GUI. Also, you cannot move any by keep pressing the rotary knob on the Remote GUI. ! 14-12 CAUTION If you change the remote control configuration (such as IP address) on the Remote GUI, you can no longer control the main unit. MT9083 Series ACCESS Master Operation Manual Chapter 14: Remote GUI Function File operation Click File to display the file operation screen. Click the Name column on the first line to switch the save destination. Intmem: internal memory usb: USB memory No file name will display even if you select "usb", when no USB memory is connected. MT9083 Series ACCESS Master Operation Manual 14-13 Chapter 14: Remote GUI Function File transfer from the main unit to PC 1. Click the file name to be transferred. To select multiple files, click the mouse while pressing and holding Shift or Ctrl key. When multiple files are selected, it will be saved in a zip file. 2. Click Download on the bottom left. Save destination selection screen will display. 3. Choose the destination folder, and click OK. File transfer from PC to the main unit 1. Click Upload on the bottom left. A file selection screen will display. 2. Click to select the file to be transferred. To select multiple files, click the mouse while pressing and holding Shift or Ctrl key. 3. Click OK. Ensure that the PC has enough free disk space. Note 1. If total of multiple transferred files exceeds 5 MB, an error message displays. In this case, the selected files will not be archived. 2. File transfer will also fail when any of the following is used for the file name: \/:*?"<>|#%+& No folder can be loaded on the file operation screen when any of the following is used for the folder name: \/:*?"<>|#%+& File transfer from the main unit to PC becomes possible if file/folder name is changed in File Utility via panel operation. 3 14-14 You cannot upload the file whose name includes multi-byte character. MT9083 Series ACCESS Master Operation Manual Appendix A: Specifications Appendix A: Specifications MT9083A2 ACCESS Master Item Specifications Remarks Model name, unit name MT9083A2 ACCESS Master Composition • Option 055: SMF 1.31/1.55/1.65 µm OTDR • Option 057: SMF 1.31/1.55/1.625 µm OTDR • Option 063: MMF 0.85/1.3 µm & SMF 1.31/1.55 µm OTDR • Option 073: SMF 1.31/1.55µm OTDR Dynamic range (S/N = 1) Opt 055 (1.31/1.55/1.65 µm) Temperature: 25°C, 37.5/36/33.5 dB Pulse width: 20 µs, (Typ. 38.5/37/34.5dB @25°C) Distance range: 100 km, Opt 057 (1.31/1.55/1.625 µm) Averaging time: 180 sec. 36/34.5/31.5 dB (Typ. 37/35.5/32.5dB @25°C) Opt 073 (1.31/1.55 µm) 38/36.5 dB At 1.65 µm: With background light, 1.31/1.55 µm, – 19 dBm CW light (Typ. 39/37.5dB @25°C) Opt 063 (0.85/1.3/1.31/1.55 µm) Temperature: 25°C, SMF (1.31/1.55 µm) Distance range: 38/36.5 dB (Typ. 39/37.5dB @25°C) 100 km for SMF. MMF (0.85/1.3 µm) 25 km for MMF. 28/27 dB (Typ. 29/28dB @25°C) Averaging time: 180 sec. Pulse width: The dynamic range is lowered by about 3 dB when a 50/125 µm optical fiber is measured using an MMF option. For 1.31/1.55 µm: 20 µs For 0.85 µm: 500 ns For 1.3 µm: 4 µs MT9083 Series ACCESS Master Operation Manual A-1 Appendix A: Specifications MT9083A2 ACCESS Master Item Specifications Remarks Dead zone Temperature: 25°C, (Back-scattered light) Deviation: ±0.5 dB (IOR = 1.500000) Opt 055/073 1.31 µm: <7.0 m Pulse width: 10 ns, 1.55 µm: <8.0 m Return loss: 40 dB 1.65 µm: <11.0 m (Opt 055 only) 1.31 µm: <5.0 m Pulse width: 10 ns, 1.55 µm: <5.5 m Return loss: 55 dB 1.65 µm: <6.5 m (Opt 055 only) Opt 057 1.31 µm: <8.0 m Pulse width: 10 ns, 1.55 µm: <9.0 m Return loss: 40 dB 1.625 µm: <12.0 m 1.31 µm: <6.0 m Pulse width: 10 ns, 1.55 µm: <6.5 m Return loss: 55 dB 1.625 µm: <7.5 m Opt 063 1.31 µm: <7.0 m Pulse width: 10 ns, 1.55 µm: <8.0 m Return loss: 40 dB 1.31 µm: <5.0 m Pulse width: 10 ns, 1.55 µm: <5.5 m Return loss: 55 dB 0.85 µm: <4.0 m Pulse width: 3 ns, (Typ. 3.0 m) Return loss: 40 dB 1.3 µm: <5.0 m (Typ. 4.0 m) Dead zone (Fresnel reflection) (IOR = 1.500000) <1.0 m (Typ. 0.8 m) The width for 1.5 dB lower than the peak value of the reflected waveform Pulse width: 3 ns, Return loss: 40 dB, Temperature: 25°C A-2 MT9083 Series ACCESS Master Operation Manual Appendix A: Specifications MT9083B2 ACCESS Master Item Specifications Remark Model name, unit name MT9083B2 ACCESS Master Composition • Option 053: SMF 1.31/1.55 µm OTDR • Option 055: SMF 1.31/1.55/1.65 µm OTDR • Option 056: SMF 1.31/1.49/1.55 µm OTDR • Option 057: SMF 1.31/1.55/1.625 µm OTDR • Option 058: SMF 1.31/1.49/1.55/1.625 µm OTDR • Option 063: MMF 0.85/1.3 µm & SMF 1.31/1.55 µm OTDR MT9083 Series ACCESS Master Operation Manual A-3 Appendix A: Specifications MT9083B2 ACCESS Master Item Dynamic range (S/N = 1) Specifications Opt 053 (1.31/1.55 µm) Remark Temperature: 25°C, 41/40 dB (Typ. 42/41dB @25°C) Opt 055 (1.31/1.55/1.65 µm) 41/40/34 dB (Typ. 42/41/35 dB @25°C) Opt 056 (1.31/1.49/1.55 µm) 41/40/40 dB (Typ. 42/41/41 dB @25°C) Opt 057 (1.31/1.55/1.625 µm) 39/38/37 dB Pulse width: 20 µs, Distance range: 100 km, Averaging time: 180 sec. At 1.65 µm: With background light, 1.31/1.55 µm, – 19 dBm CW light (Typ. 40/39/38 dB @25°C) Opt 058 (1.31/1.49/1.55/1.625 µm) 41/40/40/39 dB (Typ. 42/41/41/40 dB @25°C) Opt 063 (0.85/1.3/1.31/1.55 µm) Temperature: 25°C, SMF (1.31/1.55 µm) Distance range: 41/40 dB (Typ. 42/41dB @25°C) MMF (0.85/1.3 µm) 100 km for SMF. 25 km for MMF. 28/27 dB (Typ. 29/28dB @25°C) The dynamic range is lowered by about 3 dB when a 50/125 µm optical fiber is measured using an MMF option. Averaging time: 180 sec. Pulse width: For 1.31/1.55 µm: 20 µs For 0.85 µm: 500 ns For 1.3 µm: 4 µs A-4 MT9083 Series ACCESS Master Operation Manual Appendix A: Specifications MT9083B2 ACCESS Master Item Specifications Remark Dead zone Temperature: 25°C, (Back-scattered light) Deviation: ±0.5 dB (IOR = 1.500000) Opt 053/055 1.31 µm: <7.0 m Pulse width: 10 ns, 1.55 µm: <8.0 m Return loss: 40 dB 1.65 µm: <11.0 m (Opt 055 only) 1.31 µm: <5.0 m Pulse width: 10 ns, 1.55 µm: <5.5 m Return loss: 55 dB 1.65 µm: <6.5 m (Opt 055 only) Opt 056 1.31 µm: <8.0 m Pulse width: 10 ns, 1.49 µm: <9.0 m Return loss: 40 dB 1.55 µm: <9.0 m 1.31 µm: <6.0 m Pulse width: 10 ns, 1.49 µm: <6.3 m Return loss: 55 dB 1.55 µm: <6.5 m Opt 057 1.31 µm: <8.0 m Pulse width: 10 ns, 1.55 µm: <9.0 m Return loss: 40 dB 1.625 µm: <12.0 m 1.31 µm: <6.0 m Pulse width: 10 ns, 1.55 µm: <6.5 m Return loss: 55 dB 1.625 µm: <7.5 m Opt 058 1.31 µm: <9.0 m Pulse width: 10 ns, 1.49 µm: <10.0 m Return loss: 40 dB 1.55 µm: <10.0 m 1.625 µm: <13.0 m 1.31 µm: <7.0 m Pulse width: 10 ns, 1.49 µm: <7.5 m Return loss: 55 dB 1.55 µm: <7.5 m 1.625 µm: <8.5 m MT9083 Series ACCESS Master Operation Manual A-5 Appendix A: Specifications MT9083B2 ACCESS Master Item Dead zone Specifications Opt 063 Remark 1.31 µm: <7.0 m Pulse width: 10 ns, (Back-scattered light) 1.55 µm: <8.0 m Return loss: 40 dB (IOR = 1.500000) 1.31 µm: <5.0 m Pulse width: 10 ns, 1.55 µm: <5.5 m Return loss: 55 dB 0.85 µm: <4.0 m Pulse width: 3 ns, (Typ. 3.0 m) Return loss: 40 dB 1.3 µm: <5.0 m (Typ. 4.0 m) Dead zone (Fresnel reflection) (IOR = 1.500000) <1.0 m (Typ. 0.8 m) The width for 1.5 dB lower than the peak value of the reflected waveform Pulse width: 3 ns, Return loss: 40 dB, Temperature: 25°C A-6 MT9083 Series ACCESS Master Operation Manual Appendix A: Specifications MT9083C2 ACCESS Master Item Specifications Remark Model name, unit name MT9083C2 ACCESS Master Composition • Option 053: SMF 1.31/1.55 µm OTDR • Option 057: SMF 1.31/1.55/1.625 µm OTDR Dynamic range Opt 053 (1.31/1.55 µm) (S/N = 1) 45/45 dB @20 µs (Typ. 46/46 dB @25°C) 25/25 dB @100 ns *1 Opt 057 (1.31/1.55/1.625 µm) 45/45/43 dB @20 µs (Typ. 46/46/44 dB @25°C) 25/25/23 dB @100 ns *1 Temperature: 25°C, Distance range: 100 km, Averaging time: 180 sec. *1:Enhanced Range mode Dead zone Temperature: 25°C, (Back-scattered light) Deviation: ±0.5 dB (IOR = 1.500000) Opt 053/057 1.31 µm: <6.0 m Pulse width: 10 ns, 1.55 µm: <6.5 m Return loss: 40 dB 1.625 µm: <7.0 m (Opt 057 only) 1.31 µm: <3.8 m Pulse width: 10 ns, 1.55 µm: <4.3 m Return loss: 55 dB 1.625 µm: <4.8 m (Opt 057 only) Dead zone <1.0 m (Typ. 0.8 m) (Fresnel reflection) (IOR = 1.500000) The width for 1.5 dB lower than the peak value of the reflected waveform Pulse width: 3 ns, Return loss: 40 dB, Temperature: 25°C MT9083 Series ACCESS Master Operation Manual A-7 Appendix A: Specifications MT9083A2/B2/C2 ACCESS Master Common Item Composition Specifications • Option 002/102: Visible LD • Option 004/104/204: SMF Optical Power Meter Remarks Only one can be selected from three optional power meters. • Option 005/105/205: SMF High Power Optical Power Meter • Option 007/107/207: SMF/MMF Optical Power Meter • Option 010/110/210: Protector (including protective cover and strap) Optical Connector • Option 025: FC-APC Connector • Option 026: SC-APC Connector One specified connection is supplied. • Option 037: FC Connector • Option 038: ST Connector • Option 039: DIN 4725 Connector • Option 040: SC Connector • Option 043: HMS-10/A DIAMOND Connector (SM) A-8 Can be replaced by the user. APC type connectors are factory options MT9083 Series ACCESS Master Operation Manual Appendix A: Specifications MT9083A2/B2/C2 ACCESS Master Common (Cont’d) Item Wavelength Specifications 1310 ±25 nm (Opt 053/055/056/057/058 063/073) 1490 ±25 nm (Opt 056/058) 1550 ±25 nm (Opt 053/055/056/057/058 063/073) 1645 to 1655 nm (Opt 055)* 1625 ±25 nm (Opt 057) 850 ±30 nm (Opt 063) Remarks Temperature: 25°C, Pulse width For Opt 053/ 055/056/057/ 058/063/,073: SMF:1 µs For Opt 063 MMF:100 ns 1300 ±30 nm (Opt 063) *:Wavelength range for 20 dB lower than the peak value. Peak value +15 dBm or less. Fiber under test 10/125 µm single mode fiber (ITU-T G.652, except for Opt 063 MMF) 62.5/125 µm GI fiber (Opt 063 MMF) Pulse width 3/10/20/50/100/200/500 ns, 1/2/4/10/20 µs Opt 053, 055, 056, 057, 058, 073 Opt 063 SMF 3/10/20/50/100/200/500 ns, Opt 063 MMF 1/2/4 µs Note: Only 1300 nm can be selected f or 1 µs or more. Loss measurement accuracy (linearity) ±0.05 dB/dB or ±0.1 dB (whichever is greater) MT9083 Series ACCESS Master Operation Manual A-9 Appendix A: Specifications MT9083A2/B2/C2 ACCESS Master Common (Cont’d) Item Return loss measurement accuracy Specifications Remarks ±2 dB Opt 053,055,056,057, 058,073: SMF, 063 ±4 dB Opt 063: MMF Distance measurement accuracy ± 1 m ±3 x measured distance x 10-5 ± marker resolution Distance range 0.5/1/2.5/5/10/25/50/100/200/300 km Opt 053,055,056,057, 058,073: SMF,063 0.5/1/2.5/5/10/25/50/100 km Opt 063: MMF 0.05 to 400 m Opt 053,055,056,057, 058,073: SMF,063 0.05 to 200 m Opt 063: MMF 0.05 to 60 m Opt 053,055,056,057, 058,073: SMF,063 0.05 to 20 m Opt 063: MMF (IOR = 1.500000) Marker resolution (IOR = 1.500000) Sampling resolution (IOR = 1.500000) Number of sampling points *:Either value is Normal: 5001 High density: 15001, 20001 or 25001* automatically selected Very high density: 100001 or 150001* depending on the distance range. Only normal mode and high density mode can be selected in MMF Vertical scale 0.13, 0.33, 0.65, 1.3, 3.25, 6.5, 13 dB/div IOR settings 1.300000 to 1.700000 (0.000001 steps) Connection check Check whether or not the fiber is connected correctly to the OTDR measurement port. Active fiber check Checks the currently attached fiber under test to detect whether the fiber is carrying traffic (-40 dBm or more; wavelength: 1.55 µm) before firing the OTDR laser source. Active fiber check does not apply for the following options –Opt 063: MMF. A-10 MT9083 Series ACCESS Master Operation Manual Appendix A: Specifications MT9083A2/B2/C2 ACCESS Master Common (Cont’d) Item Specifications Remarks Optical Light Source (OLS) Applicable fiber SM fiber (ITU-T G.652), PC type (Opt 053/ 055/056/057/058/073 SMF, Opt 063), GI fiber (62.5/125 µm GI fiber) (Opt 063 MMF) Optical connector Common with OTDR (same port) Central wavelength 1310 ±30 nm (Opt 053/055/056/057/058/ 063/073) CW, 25°C 1490 ±30 nm (Opt 056/058) 1550 ±30 nm (Opt 053/055/056/057/058/ 063/073) 1650 ±5 nm (Opt 055) 1625 ±30 nm (Opt 057) 850 ±30 nm (Opt 063) 1300 ±30 nm (Opt 063) Spectrum width Optical output power 1310 nm: 5 nm or less 1490 nm: 10 nm or less 1550 nm: 10 nm or less 1625 nm: 10 nm or less 1650 nm: 3 nm or less 850 nm: 10 nm or less 1300 nm: 10 nm or less -5 ±1.5 dBm MT9083 Series ACCESS Master Operation Manual CW, 25°C 25°C, SM or GI fiber length: 2 m, CW A-11 Appendix A: Specifications MT9083A2/B2/C2 ACCESS Master Common (Cont’d) Item Optical output power instant stability Specifications <0.1 dB Remarks • CW, at a point MMF: No specification between -10 to 50°C [±1°C], difference between maximum and minimum values within one minute, SM fiber length: 2 m • When an optical power meter with 40 dB or greater return loss is used (SM) Optical output waveform CW / 270 Hz / 1 kHz / 2 kHz (Modulation light is square wave) Modulated frequency: 270 Hz /1 kHz / 2 kHz ±1.5% Warm-up time A-12 10 minutes (after turning optical output On) MT9083 Series ACCESS Master Operation Manual Appendix A: Specifications MT9083A2/B2/C2 ACCESS Master Common (Cont’d) Item Specifications Optical Power Meter Function Optical power meter function (No function for Opt063: 850/1300 nm, 004/005/007 is installed) Applicable fiber SM fiber (ITU-T G.652) Wavelength setting Opt 053/056/057/058/063/073 (OTDR1 port): Remarks 1310/1490/1550/1625/1650 nm Opt055 OTDR1 port OTDR1 port 1310/1550/1625nm Measurement wavelength range: 1280 to 1625nm OTDR2 port OTDR2 port 1650nm Measurement wavelength range: 1650+/- 5nm Optical connector Common with OTDR Optical power measurement range -50 to -5 dBm (peak power) Measurement accuracy ±6.5% Wavelength: 1550 nm Absolute maximum rated input: +10 dBm MT9083 Series ACCESS Master Operation Manual -20 dBm, CW light, 23°C ±2°C, after executing zero offset, Wavelength: 1550 nm, when an SM fiber (ITU-T G.652) and master FC connector are used A-13 Appendix A: Specifications MT9083A2/B2/C2 ACCESS Master Common (Cont’d) Item Specifications Display 7.0-inch TFT color LCD (800 x 480 dots, with LED backlight) Interface USB 1.1 Type A × 1 (memory; direct save/load OTDR trace fileremote control; MT9083 series can be remotely controlled by connecting LAN cable using a USB-Ethernet converter Video inspection probe; a fiber checker can be connected.) Type B × 1 (USB mass storage class; internal memory of the MT9083 Series product can be read/written as a PC disk drive by connecting to a PC via a USB cable. Remarks video output; the screen displayed on the PC with MX900021A remote screen software.) Power supply DC: Rating: 12 V AC: Rating: 100 to 240 V, frequency: 50/60 Hz (when using the dedicated AC adapter)* Battery pack: Dedicated lithium-ion battery Power consumption 20 W max. (when charged) Standard 4 W (with backlight set to low, sweeping halted) Battery operating time Continuous operating time: 12.0 hours (typical) Telcordia GR-196CORE Issue 2, September 2010 With backlight Off, at 25°C *: Operating voltage: within the range of +10% to –10% from the rated voltage A-14 MT9083 Series ACCESS Master Operation Manual Appendix A: Specifications MT9083A2/B2/C2 ACCESS Master Common (Cont’d) Item Battery charging time Specifications 5 hours maximum (with power off ) (typical) Dimensions 270 (W) x 165 (H) x 61 (D) mm (excluding protrusion) When protector mounted: Remarks Time required for charging until the charging rate reaches 90%, Temperature range: 5 to +30°C 284 (W) x 200 (H) x 77 (D) mm Mass Max. 1.6 kg (with Option 053 installed) Max. 1.9 kg (including battery pack, with Option 053 installed) Max. 2.6 kg (including battery pack, with Option 010 protector mounted and Option 053 installed) Operating temperature, humidity -10 to +50°C, < 80% (No condensation) Storage temperature, humidity -20 to +60°C, < 80% Vibration Conforms to MIL-T-28800E Class 3 EMC Excluding Opt002/004/005/007 EN 61326-1: 2006 (Class A, Table 2) EN 61000-3-2: 2006 +A1:2009 A2:2009 (Class A) Dust proof Conforms to MIL-T-28800E Class 2 Splash proof Conforms to JIS C 0920 TYPE 1 or IP51 (IEC60529) Laser safety level IEC 60825-1: 2007 Class 1M: Option 053,055,056,057,058,063, 073 THIS PRODUCT COMPLIES WITH 21 CFR 1040.10 AND 1040.11 EXCEPT FOR DEVIATIONS PURSUANT TO LASER NOTICE. NO.50, DATED JUNE 24,2007. MT9083 Series ACCESS Master Operation Manual A-15 Appendix A: Specifications Lithium-ion Battery Pack Item Specifications Battery type Lithium-ion rechargeable battery Voltage, capacity 11.1 V, 4200 mAh Dimensions, mass 53 (W) x 19 (H) x 215 (D) mm, Remarks 330 g (typ.) Environmental Conditions Charging: 0 to +40°C Discharging: -20 to +60°C Storage: -20 to +50°C, <80%RH AC Adapter Item Specifications AC rated input* AC 100 to 240 V, 50/60 Hz DC rated output DC 12 V, 5 A Dimensions, mass 47(W) × 33(H) × 112(D) mm, Remarks 240 g or less Environmental Conditions *: A-16 Operating: 0 to +45°C, 20 to 80%RH Storage: -20 to +70°C, 10 to 90%RH Operating voltage: within the range of +10% to –10% from the rated voltage MT9083 Series ACCESS Master Operation Manual Appendix A: Specifications Optical Power Meter (Option 004/005/007) Item Model name, unit name Specifications Remarks Option 004 SMF Optical Power Meter Option 005 High Power Optical Power Meter Option 007 SMF/MMF Optical Power Meter Applicable fiber Option 004/005 10/125 µm single mode fiber (ITU-T G.652) Option 007 10/125 µm single mode fiber (ITU-T G.652) and 62.5/125 µm GI fiber Wavelength range 0.75 to 1.7 µm (Option 007) 1.2 to 1.7 µm (Option 004/005) Settable wavelength Option 004/005: 1310, 1383, 1490, 1550, 1625, 1650 nm Option 007: 850, 1300, 1310, 1383,1490, 1550, 1625, 1650 nm Modulated light measurement 270 Hz/1 kHz/2 kHz MT9083 Series ACCESS Master Operation Manual A-17 Appendix A: Specifications Optical Power Meter (Option 004/005/007) (Cont’d) Item Optical power measurement range Specifications Remarks Option 004: +23 to -50 dBm (CW light, 1550 nm) +20 to -53 dBm (modulated light, 1550 nm) Option 005: +30 to -43 dBm (CW light, 1550 nm) +27 to -46 dBm (modulated light, 1550 nm) Option 007: +6 to -67 dBm (CW light, 1310 nm) +3 to -60 dBm (CW light, 850 nm) +3 to -70 dBm (modulated light, 1310 nm) +0 to -63 dBm (modulated light, 850 nm) Measurement accuracy Option 004: ±5% (+0 dBm, 1310/1550 nm, CW light) Option 005: ±5% After executing zero offset, when master FC connector is used. (+0 dBm, 1310/1550 nm, CW light, 25°C) Option 007: ±5% (-10 dBm, 1310/1550 nm, CW light) ±5% (-10 dBm, 850 nm, CW light, 25°C) A-18 MT9083 Series ACCESS Master Operation Manual Appendix A: Specifications Optical Power Meter (Option 004/005/007) (Cont’d) Item Return loss Specifications Remarks 36 dBm or greater (Option 004) (1.55 ±0.02 µm) * When an SM fiber (ITU-T G.652) is used, with 45 dB or more return loss. No specification for option 005/007 Optical connector Option 004: Replaceable adapter 037: FC (MT9083A2/B2/C2-***) 038: ST Option number for ***: 037, 038, 039, 039: DIN 040, 043 040: SC 043: HMS-10/A Option 005: Connector adapter (MA9005B-**) 37: FC Option number for **: 037, 038, 039, 38: ST 040, 043 39: DIN 40: SC Option 007: Connector adapter (LP-***) 43: HMS-10/A Connector name for ***: FC, ST, SC, DIN Mass Option 004: Max. 75 g Option 005: Max. 210 g Option 007: Max. 65 g Operating temperature, humidity 0 to 50°C, <80% (No condensation) MT9083 Series ACCESS Master Operation Manual A-19 Appendix A: Specifications Visual Fault Locate (Option 002) Item Specifications Remarks Central wavelength 650 ±15 nm At 25°C Optical output power 0 ±3 dBm CW Optical output fiber 10/125 µm single mode (ITU-T G.652) Output connector Direct insertion of φ 2.5 mm ferrule Optical safety IEC Pub 60825-1: 2007 Class 3R THIS PRODUCT COMPLIES WITH 21 CFR 1040.10 AND 1040.11 EXCEPT FOR DEVIATIONS PURSUANT TO LASER NOTICE. NO.50, DATED JUNE 24, 2007. Operating temperature, humidity A-20 0 to +50°C, <80% (no condensation) MT9083 Series ACCESS Master Operation Manual Appendix A: Specifications Parts and accessories Item Specifications Remarks MT9083 Series Operation Manual (CD version) W 2838 AE (Note 1) MT9083 Series Operation Manual (Printed Version) W 2839 AE MT9083 Series Quick User’s Guide (Printed Version) W 3272AE MT9083 Series Remote Control Operation Manual W 3312AE (Printed Version) MX900021A Remote Screen Software Operation Manual (Printed Version) W 3327AE FC-type adapter J0057 Optical fiber cable with FC-PC at both ends for SM fiber J0635 □ (Note 2) Replaceable optical FC connector J0617B Replaceable optical ST connector J0618D Replaceable optical DIN connector J0618E Replaceable optical HMS-10/A connector J0618F Replaceable optical SC connector J0619B Ferrule cleaner CLETOP type (one) Z0914A Replacement reel for ferrule cleaner Six reel / pack Z0915A Adapter cleaner Stick type (200 pcs. per pack) Z0284 Battery pack Lithium-ion rechargeable battery, 11.1 V, Z0921A 4200 mAh AC adapter 100 to 240 VAC, Z1625A 50/60 Hz, 12 VDC, 5 A SC Plug-in Converter (UPC(P)APC(J)) MT9083 Series ACCESS Master Operation Manual J1530A A-21 Appendix A: Specifications Parts and accessories (Cont’d) Item Specifications Remarks SC Plug-in Converter (APC(P)UPC(J)) J1531A FC Plug-in Converter (UPC(P)APC(J)) J1532A FC Plug-in Converter (APC(P)UPC(J)) J1533A LC-SC Plug-in Converter (for SM, SC(P)-LC(J)) J1534A LC-SC Plug-in Converter (for MM, SC(P)-LC(J)) J1535A AC cord J0980 (For US, Canada and Taiwan) J0981 (For UK, Malaysia, South Africa and Hong Kong) J0982 (For Europe) J0983 (For China and Oceania) J1027 (For India) J1028 (For Switzerland) J1511A (For Korea) Soft carrying case An MT9083 Series unit with Option 10 B0582A attached can be stored. Hard carrying case Business (attache) case type B0583A Hard carrying case Hard case with handle and wheels B0549 Front protective cover Used for Option 10 protective cover only B0584A Connector Video Inspection Probe Magnification 200/400 OPTION-545VIP Video Inspection Light Probe Magnification 400 G0293A Magnification 400 G0306A Video Inspection Probe Integrated USB converter A-22 MT9083 Series ACCESS Master Operation Manual Appendix A: Specifications Parts and accessories (Cont’d) Item Specifications Remarks Hard case for VIP option FS-PT-USB-CASE External Battery Charger Li-ion battery charger for MT9083A2/B2/C2 Z1632A Charge time: 1 hour for 90%, 2.5 hours for 100% Note 1. Also includes Quick User's Guide, Remote Control Operation Manual, MX900021A Remote Screen Software Operation Manual. 2. Add A, B, or C to “x” according to the length of the code: A for 1 m, B for 2 m, and C for 3 m. MT9083A2 OTDR Options List Option Model OTDR1 OTDR2 – 055 SMF 1.31/1.55/ Optical Light Source OTDR1 OTDR2 SMF 1.31/1.55/ 1.625 µm OTDR 063 MMF 0.85/1.3 µm &SMF 1.31/1.55 µm OTDR OTDR1 OTDR2 1.31/1.55 1.65 1.31/1.55 1.65 1.31/1.55 1.65 /1.625 1.31/1.55 – /1.625 1.31/1.55 – /1.625 1.31/1.55 – /1.625/ 1.65 1.31/1.55 0.85/1.3 1.31/1.55 0.85/1.3 (SMF) (MMF) 1.31/1.55 – /1.625/1. (MMF) 65 1.65 µm OTDR 057 Optical Power Meter (SMF) 073 SMF 1.31/1.55 µm 1.31/1.55 – OTDR MT9083 Series ACCESS Master Operation Manual 1.31/1.55 – 1.31/1.55 – /1.625/ 1.65 A-23 Appendix A: Specifications MT9083B2 OTDR Options List Option Model OTDR1 OTDR2 Optical Light Source OTDR1 OTDR2 Optical Power Meter OTDR1 OTDR2 053 SMF 1.31/1.55 µm 1.31/1.55 – OTDR 1.31/1.55 – 1.31/1.55 – /1.625/ 1.65 055 SMF 1.31/1.55/ 1.31/1.55 1.65 1.31/1.55 1.65 1.31/1.55 1.65 /1.625 1.31/1.49 – /1.55 1.31/1.49 – /1.55 1.31/1.49 – /1.55 1.31/1.55 – /1.625 1.31/1.55 – /1.625 1.31/1.55 – /1.625/ 1.65 1.31/1.49 – /1.55/1.6 25 1.31/1.49 – /1.55/1.6 25 1.31/1.49 – /1.55/1.6 25 1.31/1.55 0.85/1.3 1.31/1.55 0.85/1.3 (SMF) (MMF) 1.31/1.55 (MMF) /1.625/ 1.65 (SMF) Optical Light Source Optical Power Meter 1.65 µm OTDR 056 SMF 1.31/1.49/ 1.55 µm OTDR 057 SMF 1.31/1.55/ 1.625 µm OTDR 058 SMF 1.31/1.49/ 1.55/1.625 µm OTDR 063 MMF 0.85/1.3 µm & SMF 1.31/1.55 µm OTDR MT9083C2 OTDR Options List Option Model OTDR1 OTDR2 OTDR1 OTDR2 OTDR1 053 SMF 1.31/1.55 µm 1.31/1.55 – OTDR 1.31/1.55 – 1.31/1.55 – /1.625/ 1.65 057 SMF 1.31/1.55/ 1.625 µm OTDR 1.31/1.55 – /1.625 1.31/1.55 – /1.625/ 1.65 A-24 1.31/1.55 – /1.625 OTDR2 MT9083 Series ACCESS Master Operation Manual Appendix B: Sample Traces Appendix B: Sample Traces Overview This appendix contains examples of trace displays and the cursor positions for the various Standard OTDR mode measurements. The samples include: • • • • • • • • • 2-Point Loss Panel-Splice Measurements Panel-Connection and Panel-Splice Measurements Bad Launch End to End Loss Fiber Length Distance Measurements Set-Up when using a Bare Fiber Adapter Set-Up for Short Fibers Determining the dB Loss 2-Point Loss Measurements The following figure shows an OTDR sample trace with a section of launch cord (dead-zone fiber) of a known length preceding it. The 2-Point loss includes the input connector loss of the fiber under test (FUT). OTDR LAUNCH CORD FUT A B dB Distance MT9083 Series ACCESS Master Operation Manual B-1 Appendix B: Sample Traces The next figure shows an OTDR sample trace with a section of launch cord (deadzone fiber) of a known length preceding the FUT and a cord following the FUT. The 2-Point loss includes the loss of both connectors of the fiber under test (FUT). OTDR LAUNCH CORD FUT A CORD B dB Distance Panel-Splice Measurements The figure below shows an OTDR sample trace with Cursor A positioned for a Panel-Splice measurement using the Launch Level. LAUNCH CORD FUT OTDR A dB Distance B-2 MT9083 Series ACCESS Master Operation Manual Appendix B: Sample Traces Panel-Connector and Panel-Splice Measurements The figure below shows an OTDR sample trace with Cursor A positioned for a Panel-Connection and Panel-Splice measurement using Splice Loss mode and a long launch cable. LAUNCH CORD OTDR FUT A dB Distance Bad Launch The following figure show an example of a bad launch Ft 6.000 12.000 18.000 24.000 30.000 Possible causes of a bad launch can include: • • • • Faulty connection at the OTDR Defective patch cord Bad connectors on the FUT (fiber under test) A break in the first few feet of the FUT (fiber under test) MT9083 Series ACCESS Master Operation Manual B-3 Appendix B: Sample Traces End to End Loss The figure below shows an OTDR sample trace with cursor placement for an End to End Loss measurement. Place Cursor A and Cursor B as shown. Fiber Under Test (1km) Connector OTDR B A 2 PT Loss: 0.20 dB See “2-Point Loss” on page 7-5 for further details. Fiber Length Distance Measurements The figure below shows an OTDR sample trace with the proper cursor placement for a Fiber Length Distance measurement. Position Cursor A at 0.00 km (or at the end of a pulse suppressor such as a Test Fiber module, if one is used). Place Cursor B at the location shown. A B A: XX.X km B: 1 km B-4 MT9083 Series ACCESS Master Operation Manual Appendix B: Sample Traces See the “B:” (or “A:”, depending on the cursor positioned at the end of the fiber under test) in the Cursor Distance Area for the distance measurement (see “Cursor Distance Information” on page 4-31 for details). Set-Up Using a Bare Fiber Adapter The following figure shows an OTDR sample trace with the proper cursor placement when using a bare fiber adapter (such as the Fiber Connect). For accurate measurements, be sure to place Cursor A in the linear portion of the trace. Bare Fiber Adapter Fiber Under Test OTDR A B Note Cursor B is placed at the end of the fiber reel. Set-Up for Short Fibers The following figure shows an OTDR sample trace with proper cursor placement for measuring a short fiber span. Place Cursor A and Cursor B as shown. Note The distance from Cursor A to Cursor B is the length of the fiber under test. Select 2-Pt loss to determine the loss in the fiber under test (FUT). MT9083 Series ACCESS Master Operation Manual B-5 Appendix B: Sample Traces OTDR LAUNCH CORD CORD FUT A B dB Distance Determining the dB Loss The figure below shows an OTDR sample trace with the cursor placement for determining the overall dB loss for a fiber span. A B Initial Backscatter Level dB Loss Move Cursor A to the beginning of the fiber and then zoom in on the initial reflection (dead zone). Determine the point where the initial backscatter level would intersect the ascending side of the initial reflection and place cursor A as shown in the figure above. Place Cursor B at the beginning of the reflective end of the fiber. B-6 MT9083 Series ACCESS Master Operation Manual Appendix C: Software License Appendix C: Software License The MT9083 Series contains the software shown in the table below. Refer to our website for more information on the MT9083 Series. Anritsu Corporation Website: http//www.anritsu.co.jp The package software on the table below is not covered in the Software License Agreement of Anritsu Corporation. For complete details on the GNU, LGPL, and MPL General Public Licenses, refer to the GNU Website: http//www.gnu.org Table C-1: Software License List Package Name License Remarks busybox GPL (*1) dosfstools-3.0.12 GPL (*1) e2fsprogs-1.42 GPL (*1) flnx-0.18 LGPL+ (*4) exceptions freetype-1.3.1 GPL (*1) Freewnn-Server-1.10 GPL (*1) gerodic-1.00 Others (*5) glibc LGPL (*2) inetutils 1.5 GPL (*1) jpeg-8d Others libpng-1.2.48 libpng license libstdc++6 LGPL (*2) linux-2.6.20.1 GPL (*1) microwindows-0.90 MPL (*3) mount GPL (*1) mtd-utils GPL (*1) [program/widget] is based in part on the work of the FLTK project (http://www.fltk.org). This software is based in part on the work of the Independent JPEG Group. MT9083 Series ACCESS Master Operation Manual C-1 Appendix C: Software License Table C-1: (Continued)Software License List Package Name License Remarks sys5utils GPL (*1) U-Boot-1.1.4 GPL (*1) util-linux-ng-2.16 GPL (*1) zlib-1.2.6 Others (*6) C-2 MT9083 Series ACCESS Master Operation Manual Appendix C: Software License (*1) GPL: GNU GENERAL PUBLIC LICENSE Version 2, June 1991 Copyright (C) 1989, 1991 Free Software Foundation, Inc. 59 Temple Place, Suite 330, Boston, MA 02111-1307 USA Everyone is permitted to copy and distribute verbatim copies of this license document, but changing it is not allowed. Preamble The licenses for most software are designed to take away your freedom to share and change it. By contrast, the GNU General Public License is intended to guarantee your freedom to share and change free software--to make sure the software is free for all its users. This General Public License applies to most of the Free Software Foundation's software and to any other program whose authors commit to using it. (Some other Free Software Foundation software is covered by the GNU Library General Public License in-stead.) You can apply it to your programs, too. When we speak of free software, we are referring to freedom, not price. Our General Public Licenses are designed to make sure that you have the freedom to distribute copies of free software (and charge for this service if you wish), that you receive source code or can get it if you want it, that you can change the software or use pieces of it in new free programs; and that you know you can do these things. To protect your rights, we need to make restrictions that forbid anyone to deny you these rights or to ask you to surrender the rights. These restrictions translate to certain responsibilities for you if you distribute copies of the software, or if you modify it. For example, if you distribute copies of such a program, whether gratis or for a fee, you must give the recipients all the rights that you have. You must make sure that they, too, receive or can get the source code. And you must show them these terms so they know their rights. We protect your rights with two steps: (1) copyright the software, and (2) offer you this license which gives you legal permission to copy, distribute and/or modify the software. Also, for each author's protection and ours, we want to make certain that everyone understands that there is no warranty for this free software. If the software is modified by someone else and passed on, we want its recipients to know that what they have is not the original, so that any problems introduced by others will not reflect on the original authors' reputations. Finally, any free program is threatened constantly by software patents. We wish to avoid the danger that redistributors of a free program will individually obtain patent licenses, in effect making the program proprietary. To prevent this, we have made it clear that any patent must be licensed for everyone's free use or not licensed at all. The precise terms and conditions for copying, distribution and modification follow. GNU GENERAL PUBLIC LICENSE TERMS AND CONDITIONS FOR COPYING, DISTRIBUTION AND MODIFICATION 0. This License applies to any program or other work which contains a notice placed by the copyright holder saying it may be distributed under the terms of this General Public License. The MT9083 Series ACCESS Master Operation Manual C-3 Appendix C: Software License “Program”, below, refers to any such program or work, and a “work based on the Program” means either the Program or any derivative work under copyright law: that is to say, a work containing the Program or a portion of it, either verbatim or with modifications and/or translated into another language. (Hereinafter, translation is included without limitation in the term “modification”.) Each licensee is addressed as “you”. Activities other than copying, distribution and modification are not covered by this License; they are outside its scope. The act of running the Program is not restricted, and the output from the Program is covered only if its contents constitute a work based on the Program (independent of having been made by running the Program). Whether that is true depends on what the Program does. 1. You may copy and distribute verbatim copies of the Program's source code as you receive it, in any medium, provided that you conspicuously and appropriately publish on each copy an appropriate copyright notice and disclaimer of warranty; keep intact all the notices that refer to this License and to the absence of any warranty; and give any other recipients of the Program a copy of this License along with the Program. You may charge a fee for the physical act of transferring a copy, and you may at your option offer warranty protection in exchange for a fee. 2. You may modify your copy or copies of the Program or any portion of it, thus forming a work based on the Program, and copy and distribute such modifications or work under the terms of Section 1 above, provided that you also meet all of these conditions: a) You must cause the modified files to carry prominent notices stating that you changed the files and the date of any change. b) You must cause any work that you distribute or publish, that in whole or in part contains or is derived from the Program or any part thereof, to be licensed as a whole at no charge to all third parties under the terms of this License. c) If the modified program normally reads commands interactively when run, you must cause it, when started running for such interactive use in the most ordinary way, to print or display an announcement including an appropriate copyright notice and a notice that there is no warranty (or else, saying that you provide a warranty) and that users may redistribute the program under these conditions, and telling the user how to view a copy of this License. (Exception: if the Program itself is inter-active but does not normally print such an announcement, your work based on the Program is not required to print an announcement.) These requirements apply to the modified work as a whole. If identifiable sections of that work are not derived from the Program, and can be reasonably considered independent and separate works in themselves, then this License, and its terms, do not apply to those sections when you distribute them as separate works. But when you distribute the same sections as part of a whole which is a work based on the Program, the distribution of the whole must be on the terms of this License, whose permissions for other licensees extend to the entire whole, and thus to each and every part regardless of who wrote it. Thus, it is not the intent of this section to claim rights or contest your rights to work written entirely by you; rather, the intent is to exercise the right to control the distribution of derivative or collective works based on the Program. C-4 MT9083 Series ACCESS Master Operation Manual Appendix C: Software License In addition, mere aggregation of another work not based on the Program with the Program (or with a work based on the Program) on a volume of a storage or distribution medium does not bring the other work under the scope of this License. 3. You may copy and distribute the Program (or a work based on it, under Section 2) in object code or executable form under the terms of Sections 1 and 2 above provided that you also do one of the following: a) Accompany it with the complete corresponding ma-chine-readable source code, which must be distributed under the terms of Sections 1 and 2 above on a medium customarily used for software interchange; or, b) Accompany it with a written offer, valid for at least three years, to give any third party, for a charge no more than your cost of physically performing source distribution, a complete machine-readable copy of the corresponding source code, to be distributed under the terms of Sections 1 and 2 above on a medium customarily used for software interchange; or, c) Accompany it with the information you received as to the offer to distribute corresponding source code. (This alternative is allowed only for noncommercial distribution and only if you received the program in object code or executable form with such an offer, in accord with Subsection b above.) The source code for a work means the preferred form of the work for making modifications to it. For an executable work, complete source code means all the source code for all modules it contains, plus any associated interface definition files, plus the scripts used to control compilation and installation of the executable. However, as a special exception, the source code distributed need not include anything that is normally distributed (in either source or binary form) with the major components (compiler, kernel, and so on) of the operating system on which the executable runs, unless that component itself accompanies the executable. If distribution of executable or object code is made by offering access to copy from a designated place, then offering equivalent access to copy the source code from the same place counts as distribution of the source code, even though third parties are not compelled to copy the source along with the object code. 4. You may not copy, modify, sublicense, or distribute the Program except as expressly provided under this License. Any attempt otherwise to copy, modify, sublicense or distribute the Program is void, and will automatically terminate your rights under this License. However, parties who have received copies, or rights, from you under this License will not have their licenses terminated so long as such parties remain in full compliance. 5. You are not required to accept this License, since you have not signed it. However, nothing else grants you per-mission to modify or distribute the Program or its derivative works. These actions are prohibited by law if you do not accept this License. Therefore, by modifying or distributing the Program (or any work based on the Program), you indicate your acceptance of this License to do so, and all its terms and conditions for copying, distributing or modifying the Program or works based on it. 6. Each time you redistribute the Program (or any work based on the Program), the recipient automatically receives a license from the original licensor to copy, distribute or modify the Program subject to these terms and conditions. You may not impose any further restrictions on the recipients' MT9083 Series ACCESS Master Operation Manual C-5 Appendix C: Software License exercise of the rights granted herein. You are not responsible for enforcing compliance by third parties to this License. 7. If, as a consequence of a court judgment or allegation of patent infringement or for any other reason (not limited to patent issues), conditions are imposed on you (whether by court order, agreement or otherwise) that contradict the conditions of this License, they do not excuse you from the conditions of this License. If you cannot distribute so as to satisfy simultaneously your obligations under this License and any other pertinent obligations, then as a consequence you may not distribute the Program at all. For example, if a patent license would not permit royalty-free redistribution of the Program by all those who receive copies directly or indirectly through you, then the only way you could satisfy both it and this License would be to refrain entirely from distribution of the Program. If any portion of this section is held invalid or unenforceable under any particular circumstance, the balance of the section is intended to apply and the section as a whole is in-tended to apply in other circumstances. It is not the purpose of this section to induce you to infringe any patents or other property right claims or to contest validity of any such claims; this section has the sole purpose of protecting the integrity of the free software distribution system, which is implemented by public license practices. Many people have made generous contributions to the wide range of software distributed through that system in reliance on consistent application of that system; it is up to the author/donor to decide if he or she is willing to distribute software through any other system and a licensee cannot impose that choice. This section is intended to make thoroughly clear what is believed to be a consequence of the rest of this License. 8. If the distribution and/or use of the Program is restricted in certain countries either by patents or by copy-righted interfaces, the original copyright holder who places the Program under this License may add an explicit geographical distribution limitation excluding those countries, so that distribution is permitted only in or among countries not thus excluded. In such case, this License incorporates the limitation as if written in the body of this License. 9. The Free Software Foundation may publish revised and/or new versions of the General Public License from time to time. Such new versions will be similar in spirit to the present version, but may differ in detail to address new problems or concerns. Each version is given a distinguishing version number. If the Program specifies a version number of this License which applies to it and “any later version”, you have the option of following the terms and conditions either of that version or of any later version published by the Free Software Foundation. If the Program does not specify a version number of this License, you may choose any version ever published by the Free Software Foundation. 10. If you wish to incorporate parts of the Program into other free programs whose distribution conditions are different, write to the author to ask for permission. For soft-ware which is copyrighted by the Free Software Foundation, write to the Free Software Foundation; we sometimes make exceptions for this. Our decision will be guided by the two goals of preserving the free status of all derivatives of our free software and of promoting the sharing and reuse of software generally. C-6 MT9083 Series ACCESS Master Operation Manual Appendix C: Software License NO WARRANTY 11. BECAUSE THE PROGRAM IS LICENSED FREE OF CHARGE, THERE IS NO WARRANTY FOR THE PROGRAM, TO THE EXTENT PERMITTED BY AP-PLICABLE LAW. EXCEPT WHEN OTHERWISE STATED IN WRITING THE COPYRIGHT HOLDERS AND/OR OTHER PARTIES PROVIDE THE PROGRAM “AS IS” WITHOUT WARRANTY OF ANY KIND, EI-THER EXPRESSED OR IMPLIED, INCLUDING, BUT NOT LIMITED TO, THE IMPLIED WARRANTIES OF MERCHANTABILITY AND FITNESS FOR A PAR-TICULAR PURPOSE. THE ENTIRE RISK AS TO THE QUALITY AND PERFORMANCE OF THE PROGRAM IS WITH YOU. SHOULD THE PROGRAM PROVE DEFECTIVE, YOU ASSUME THE COST OF ALL NECESSARY SERVICING, REPAIR OR CORRECTION. 12. IN NO EVENT UNLESS REQUIRED BY APPLI-CABLE LAW OR AGREED TO IN WRITING WILL ANY COPYRIGHT HOLDER, OR ANY OTHER PARTY WHO MAY MODIFY AND/OR REDISTRIB-UTE THE PROGRAM AS PERMITTED ABOVE, BE LIABLE TO YOU FOR DAMAGES, INCLUDING ANY GENERAL, SPECIAL, INCIDENTAL OR CONSE-QUENTIAL DAMAGES ARISING OUT OF THE USE OR INABILITY TO USE THE PROGRAM (INCLUD-ING BUT NOT LIMITED TO LOSS OF DATA OR DATA BEING RENDERED INACCURATE OR LOSSES SUSTAINED BY YOU OR THIRD PARTIES OR A FAILURE OF THE PROGRAM TO OPERATE WITH ANY OTHER PROGRAMS), EVEN IF SUCH HOLDER OR OTHER PARTY HAS BEEN ADVISED OF THE POSSIBILITY OF SUCH DAMAGES. END OF TERMS AND CONDITIONS How to Apply These Terms to Your New Programs If you develop a new program, and you want it to be of the greatest possible use to the public, the best way to achieve this is to make it free software which everyone can redistribute and change under these terms. To do so, attach the following notices to the program. It is safest to attach them to the start of each source file to most effectively convey the exclusion of warranty; and each file should have at least the “copyright” line and a pointer to where the full notice is found. <one line to give the program's name and a brief idea of what it does.> Copyright (C) <year> <name of author> This program is free software; you can redistribute it and/or modify it under the terms of the GNU General Public License as published by the Free Software Foundation; either version 2 of the License, or (at your option) any later version. This program is distributed in the hope that it will be useful, but WITHOUT ANY WARRANTY; without even the implied warranty of MERCHANTABILITY or FITNESS FOR A PARTICULAR PURPOSE. See the GNU General Public License for more details. You should have received a copy of the GNU General Public License along with this program; if not, write to the Free Software Foundation, Inc., 59 Temple Place, Suite 330, Boston, MA 02111-1307 USA Also add information on how to contact you by electronic and paper mail. MT9083 Series ACCESS Master Operation Manual C-7 Appendix C: Software License If the program is interactive, make it output a short notice like this when it starts in an interactive mode: Gnomovision version 69, Copyright (C) year name of author Gnomovision comes with ABSOLUTELY NO WARRANTY; for details type `show w'. This is free software, and you are welcome to redistribute it under certain conditions; type `show c' for details. The hypothetical commands `show w' and `show c' should show the appropriate parts of the General Public License. Of course, the commands you use may be called something other than `show w' and `show c'; they could even be mouse-clicks or menu items--whatever suits your program. You should also get your employer (if you work as a programmer) or your school, if any, to sign a “copyright disclaimer” for the program, if necessary. Here is a sample; alter the names: Yoyodyne, Inc., hereby disclaims all copyright interest in the program `Gnomovision' (which makes passes at compilers) written by James Hacker. <signature of Ty Coon>, 1 April 1989 Ty Coon, President of Vice This General Public License does not permit incorporating your program into proprietary programs. If your program is a subroutine library, you may consider it more useful to permit linking proprietary applications with the library. If this is what you want to do, use the GNU Library General Public License instead of this License. C-8 MT9083 Series ACCESS Master Operation Manual Appendix C: Software License (*2) LGPL: GNU LESSER GENERAL PUBLIC LICENSE Version 2.1, February 1999 Copyright (C) 1991, 1999 Free Software Foundation, Inc. 59 Temple Place, Suite 330, Boston, MA 02111-1307 USA Everyone is permitted to copy and distribute verbatim copies of this license document, but changing it is not allowed. [This is the first released version of the Lesser GPL. It also counts as the successor of the GNU Library Public License, version 2, hence the version number 2.1.] Preamble The licenses for most software are designed to take away your freedom to share and change it. By contrast, the GNU General Public Licenses are intended to guarantee your freedom to share and change free software--to make sure the software is free for all its users. This license, the Lesser General Public License, applies to some specially designated software packages--typically libraries--of the Free Software Foundation and other authors who decide to use it. You can use it too, but we suggest you first think carefully about whether this license or the ordinary General Public License is the better strategy to use in any particular case, based on the explanations below. When we speak of free software, we are referring to freedom of use, not price. Our General Public Licenses are designed to make sure that you have the freedom to distribute copies of free software (and charge for this service if you wish); that you receive source code or can get it if you want it; that you can change the software and use pieces of it in new free programs; and that you are informed that you can do these things. To protect your rights, we need to make restrictions that forbid distributors to deny you these rights or to ask you to surrender these rights. These restrictions translate to certain responsibilities for you if you distribute copies of the library or if you modify it. For example, if you distribute copies of the library, whether gratis or for a fee, you must give the recipients all the rights that we gave you. You must make sure that they, too, receive or can get the source code. If you link other code with the library, you must provide complete object files to the recipients, so that they can relink them with the library after making changes to the library and recompiling it. And you must show them these terms so they know their rights. We protect your rights with a two-step method: (1) we copyright the library, and (2) we offer you this license, which gives you legal permission to copy, distribute and/or modify the library. To protect each distributor, we want to make it very clear that there is no warranty for the free library. Also, if the library is modified by someone else and passed on, the recipients should know that what they have is not the original version, so that the original author's reputation will not be affected by problems that might be introduced by others. Finally, software patents pose a constant threat to the existence of any free program. We wish to make sure that a company cannot effectively restrict the users of a free pro-gram by obtaining a restrictive license from a patent holder. Therefore, we insist that any patent license obtained for a version of the library must be consistent with the full freedom of use specified in this license. MT9083 Series ACCESS Master Operation Manual C-9 Appendix C: Software License Most GNU software, including some libraries, is covered by the ordinary GNU General Public License. This license, the GNU Lesser General Public License, applies to certain designated libraries, and is quite different from the ordinary General Public License. We use this license for certain libraries in order to permit linking those libraries into non-free programs. When a program is linked with a library, whether statically or using a shared library, the combination of the two is legally speaking a combined work, a derivative of the original library. The ordinary General Public License therefore permits such linking only if the entire combination fits its criteria of freedom. The Lesser General Public License permits more lax criteria for linking other code with the library. We call this license the “Lesser” General Public License because it does Less to protect the user's freedom than the ordinary General Public License. It also provides other free software developers Less of an advantage over competing non-free programs. These disadvantages are the reason we use the ordinary General Public License for many libraries. However, the Lesser license provides advantages in certain special circumstances. For example, on rare occasions, there may be a special need to encourage the widest possible use of a certain library, so that it becomes a de-facto standard. To achieve this, non-free programs must be allowed to use the library. A more frequent case is that a free library does the same job as widely used non-free libraries. In this case, there is little to gain by limiting the free library to free software only, so we use the Lesser General Public License. In other cases, permission to use a particular library in non-free programs enables a greater number of people to use a large body of free software. For example, permission to use the GNU C Library in non-free programs enables many more people to use the whole GNU operating system, as well as its variant, the GNU/Linux operating system. Although the Lesser General Public License is Less protective of the users' freedom, it does ensure that the user of a program that is linked with the Library has the freedom and the wherewithal to run that program using a modified version of the Library. The precise terms and conditions for copying, distribution and modification follow. Pay close attention to the difference between a “work based on the library” and a “work that uses the library”. The former contains code derived from the library, whereas the latter must be combined with the library in order to run. GNU LESSER GENERAL PUBLIC LICENSE TERMS AND CONDITIONS FOR COPYING, DISTRIBUTION AND MODIFICATION 0. This License Agreement applies to any software library or other program which contains a notice placed by the copyright holder or other authorized party saying it may be distributed under the terms of this Lesser General Public License (also called “this License”). Each licensee is ad-dressed as “you”. A “library” means a collection of software functions and/or data prepared so as to be conveniently linked with application programs (which use some of those functions and data) to form executables. The “Library”, below, refers to any such software library or work which has been distributed under these terms. A “work based on the Library” means either the Library or any derivative work under copyright law: that is to say, a work containing the Library or a portion of it, either verbatim or with C-10 MT9083 Series ACCESS Master Operation Manual Appendix C: Software License modifications and/or translated straightforwardly into another language. (Hereinafter, translation is included without limitation in the term “modification”.) “Source code” for a work means the preferred form of the work for making modifications to it. For a library, complete source code means all the source code for all modules it contains, plus any associated interface definition files, plus the scripts used to control compilation and installation of the library. Activities other than copying, distribution and modification are not covered by this License; they are outside its scope. The act of running a program using the Library is not restricted, and output from such a program is covered only if its contents constitute a work based on the Library (independent of the use of the Library in a tool for writing it). Whether that is true depends on what the Library does and what the program that uses the Library does. 1. You may copy and distribute verbatim copies of the Library's complete source code as you receive it, in any medium, provided that you conspicuously and appropriately publish on each copy an appropriate copyright notice and disclaimer of warranty; keep intact all the notices that refer to this License and to the absence of any warranty; and distribute a copy of this License along with the Library. You may charge a fee for the physical act of transferring a copy, and you may at your option offer warranty protection in exchange for a fee. 2. You may modify your copy or copies of the Library or any portion of it, thus forming a work based on the Library, and copy and distribute such modifications or work under the terms of Section 1 above, provided that you also meet all of these conditions: a) The modified work must itself be a software library. b) You must cause the files modified to carry prominent notices stating that you changed the files and the date of any change. c) You must cause the whole of the work to be licensed at no charge to all third parties under the terms of this License. d) If a facility in the modified Library refers to a function or a table of data to be supplied by an application program that uses the facility, other than as an argument passed when the facility is invoked, then you must make a good faith effort to ensure that, in the event an application does not supply such function or table, the facility still operates, and performs whatever part of its purpose remains meaningful. (For example, a function in a library to compute square roots has a purpose that is entirely welldefined independent of the application. Therefore, Subsection 2d requires that any application-supplied function or table used by this function must be optional: if the application does not supply it, the square root function must still compute square roots.) These requirements apply to the modified work as a whole. If identifiable sections of that work are not derived from the Library, and can be reasonably considered independent and separate works in themselves, then this License, and its terms, do not apply to those sections when you distribute them as separate works. But when you distribute the same sections as part of a whole which is a work based on the Library, the distribution of the whole must be on the terms of this License, whose permissions for other licensees extend to the entire whole, and thus to each and every part regardless of who wrote it. MT9083 Series ACCESS Master Operation Manual C-11 Appendix C: Software License Thus, it is not the intent of this section to claim rights or contest your rights to work written entirely by you; rather, the intent is to exercise the right to control the distribution of derivative or collective works based on the Library. In addition, mere aggregation of another work not based on the Library with the Library (or with a work based on the Library) on a volume of a storage or distribution medium does not bring the other work under the scope of this License. 3. You may opt to apply the terms of the ordinary GNU General Public License instead of this License to a given copy of the Library. To do this, you must alter all the notices that refer to this License, so that they refer to the ordinary GNU General Public License, version 2, instead of to this License. (If a newer version than version 2 of the ordinary GNU General Public License has appeared, then you can specify that version instead if you wish.) Do not make any other change in these notices. Once this change is made in a given copy, it is irreversible for that copy, so the ordinary GNU General Public License applies to all subsequent copies and derivative works made from that copy. This option is useful when you wish to copy part of the code of the Library into a program that is not a library. 4. You may copy and distribute the Library (or a portion or derivative of it, under Section 2) in object code or executable form under the terms of Sections 1 and 2 above provided that you accompany it with the complete corresponding machine-readable source code, which must be distributed under the terms of Sections 1 and 2 above on a medium customarily used for software interchange. If distribution of object code is made by offering access to copy from a designated place, then offering equivalent access to copy the source code from the same place satisfies the requirement to distribute the source code, even though third parties are not compelled to copy the source along with the object code. 5. A program that contains no derivative of any portion of the Library, but is designed to work with the Library by being compiled or linked with it, is called a “work that uses the Library”. Such a work, in isolation, is not a derivative work of the Library, and therefore falls outside the scope of this License. However, linking a “work that uses the Library” with the Library creates an executable that is a derivative of the Library (because it contains portions of the Library), rather than a “work that uses the library”. The executable is therefore covered by this License. Section 6 states terms for distribution of such executables. When a “work that uses the Library” uses material from a header file that is part of the Library, the object code for the work may be a derivative work of the Library even though the source code is not. Whether this is true is especially significant if the work can be linked without the Library, or if the work is itself a library. The threshold for this to be true is not precisely defined by law. If such an object file uses only numerical parameters, data structure layouts and accessories, and small macros and small inline functions (ten lines or less in length), then the use of the object file is unrestricted, regardless of whether it is legally a derivative work. (Executables containing this object code plus portions of the Library will still fall under Section 6.) C-12 MT9083 Series ACCESS Master Operation Manual Appendix C: Software License Otherwise, if the work is a derivative of the Library, you may distribute the object code for the work under the terms of Section 6. Any executables containing that work also fall under Section 6, whether or not they are linked directly with the Library itself. 6. As an exception to the Sections above, you may also combine or link a “work that uses the Library” with the Library to produce a work containing portions of the Library, and distribute that work under terms of your choice, provided that the terms permit modification of the work for the customer's own use and reverse engineering for debugging such modifications. You must give prominent notice with each copy of the work that the Library is used in it and that the Library and its use are covered by this License. You must supply a copy of this License. If the work during execution displays copyright notices, you must include the copyright notice for the Library among them, as well as a reference directing the user to the copy of this License. Also, you must do one of these things: a) Accompany the work with the complete corresponding machine-readable source code for the Library including whatever changes were used in the work (which must be distributed under Sections 1 and 2 above); and, if the work is an executable linked with the Library, with the complete machine-readable “work that uses the Library”, as object code and/or source code, so that the user can modify the Library and then relink to produce a modified executable containing the modified Library. (It is understood that the user who changes the contents of definitions files in the Library will not necessarily be able to recompile the application to use the modified definitions.) b) Use a suitable shared library mechanism for linking with the Library. A suitable mechanism is one that (1) uses at run time a copy of the library already present on the user's computer system, rather than copying library functions into the executable, and (2) will operate properly with a modified version of the library, if the user in-stalls one, as long as the modified version is inter-face-compatible with the version that the work was made with. c) Accompany the work with a written offer, valid for at least three years, to give the same user the materials specified in Subsection 6a, above, for a charge no more than the cost of performing this distribution. d) If distribution of the work is made by offering access to copy from a designated place, offer equivalent access to copy the above specified materials from the same place. e) Verify that the user has already received a copy of these materials or that you have already sent this user a copy. For an executable, the required form of the “work that uses the Library” must include any data and utility programs needed for reproducing the executable from it. However, as a special exception, the materials to be distributed need not include anything that is normally distributed (in either source or binary form) with the major components (compiler, kernel, and so on) of the operating system on which the executable runs, unless that component itself accompanies the executable. It may happen that this requirement contradicts the license restrictions of other proprietary libraries that do not normally accompany the operating system. Such a contra-diction means you cannot use both them and the Library together in an executable that you distribute. 7. You may place library facilities that are a work based on the Library side-by-side in a single library together with other library facilities not covered by this License, and distribute such a MT9083 Series ACCESS Master Operation Manual C-13 Appendix C: Software License combined library, provided that the separate distribution of the work based on the Library and of the other library facilities is otherwise permitted, and provided that you do these two things: a) Accompany the combined library with a copy of the same work based on the Library, uncombined with any other library facilities. This must be distributed under the terms of the Sections above. b) Give prominent notice with the combined library of the fact that part of it is a work based on the Library, and explaining where to find the accompanying uncombined form of the same work. 8. You may not copy, modify, sublicense, link with, or distribute the Library except as expressly provided under this License. Any attempt otherwise to copy, modify, sublicense, link with, or distribute the Library is void, and will automatically terminate your rights under this License. However, parties who have received copies, or rights, from you under this License will not have their licenses terminated so long as such parties remain in full compliance. 9. You are not required to accept this License, since you have not signed it. However, nothing else grants you per-mission to modify or distribute the Library or its derivative works. These actions are prohibited by law if you do not accept this License. Therefore, by modifying or distributing the Library (or any work based on the Library), you indicate your acceptance of this License to do so, and all its terms and conditions for copying, distributing or modifying the Library or works based on it. 10. Each time you redistribute the Library (or any work based on the Library), the recipient automatically receives a license from the original licensor to copy, distribute, link with or modify the Library subject to these terms and conditions. You may not impose any further restrictions on the recipients' exercise of the rights granted herein. You are not responsible for enforcing compliance by third parties with this License. 11. If, as a consequence of a court judgment or allegation of patent infringement or for any other reason (not limited to patent issues), conditions are imposed on you (whether by court order, agreement or otherwise) that contradict the conditions of this License, they do not excuse you from the conditions of this License. If you cannot distribute so as to satisfy simultaneously your obligations under this License and any other pertinent obligations, then as a consequence you may not distribute the Library at all. For example, if a patent license would not permit royalty-free redistribution of the Library by all those who receive copies directly or indirectly through you, then the only way you could satisfy both it and this License would be to refrain entirely from distribution of the Library. If any portion of this section is held invalid or unenforceable under any particular circumstance, the balance of the section is intended to apply, and the section as a whole is in-tended to apply in other circumstances. It is not the purpose of this section to induce you to infringe any patents or other property right claims or to contest validity of any such claims; this section has the sole purpose of protecting the integrity of the free software distribution system which is implemented by public license practices. Many people have made generous contributions to the wide range of software distributed through that system in reliance on consistent application of that system; it is up to the author/donor to decide if he or she is willing to distribute software through any other system and a licensee cannot impose that choice. C-14 MT9083 Series ACCESS Master Operation Manual Appendix C: Software License This section is intended to make thoroughly clear what is believed to be a consequence of the rest of this License. 12. If the distribution and/or use of the Library is restricted in certain countries either by patents or by copy-righted interfaces, the original copyright holder who places the Library under this License may add an explicit geographical distribution limitation excluding those countries, so that distribution is permitted only in or among countries not thus excluded. In such case, this License incorporates the limitation as if written in the body of this License. 13. The Free Software Foundation may publish revised and/or new versions of the Lesser General Public License from time to time. Such new versions will be similar in spirit to the present version, but may differ in detail to ad-dress new problems or concerns. Each version is given a distinguishing version number. If the Library specifies a version number of this License which applies to it and “any later version”, you have the option of following the terms and conditions either of that version or of any later version published by the Free Software Foundation. If the Library does not specify a license version number, you may choose any version ever published by the Free Software Foundation. 14. If you wish to incorporate parts of the Library into other free programs whose distribution conditions are in-compatible with these, write to the author to ask for permission. For software which is copyrighted by the Free Soft-ware Foundation, write to the Free Software Foundation; we sometimes make exceptions for this. Our decision will be guided by the two goals of preserving the free status of all derivatives of our free software and of promoting the sharing and reuse of software generally. NO WARRANTY 15. BECAUSE THE LIBRARY IS LICENSED FREE OF CHARGE, THERE IS NO WARRANTY FOR THE LIBRARY, TO THE EXTENT PERMITTED BY APPLI-CABLE LAW. EXCEPT WHEN OTHERWISE STATED IN WRITING THE COPYRIGHT HOLDERS AND/OR OTHER PARTIES PROVIDE THE LIBRARY “AS IS” WITHOUT WARRANTY OF ANY KIND, EITHER EXPRESSED OR IMPLIED, INCLUDING, BUT NOT LIMITED TO, THE IMPLIED WARRANTIES OF MERCHANTABILITY AND FITNESS FOR A PARTICULAR PURPOSE. THE ENTIRE RISK AS TO THE QUALITY AND PERFORMANCE OF THE LIBRARY IS WITH YOU. SHOULD THE LIBRARY PROVE DEFECTIVE, YOU ASSUME THE COST OF ALL NECESSARY SERVICING, REPAIR OR CORRECTION. 16. IN NO EVENT UNLESS REQUIRED BY APPLI-CABLE LAW OR AGREED TO IN WRITING WILL ANY COPYRIGHT HOLDER, OR ANY OTHER PARTY WHO MAY MODIFY AND/OR REDISTRIB-UTE THE LIBRARY AS PERMITTED ABOVE, BE LIABLE TO YOU FOR DAMAGES, INCLUDING ANY GENERAL, SPECIAL, INCIDENTAL OR CONSE-QUENTIAL DAMAGES ARISING OUT OF THE USE OR INABILITY TO USE THE LIBRARY (INCLUDING BUT NOT LIMITED TO LOSS OF DATA OR DATA BEING RENDERED INACCURATE OR LOSSES SUS-TAINED BY YOU OR THIRD PARTIES OR A FAILURE OF THE LIBRARY TO OPERATE WITH ANY OTHER SOFTWARE), EVEN IF SUCH HOLDER OR OTHER PARTY HAS BEEN ADVISED OF THE POSSIBILITY OF SUCH DAMAGES. MT9083 Series ACCESS Master Operation Manual C-15 Appendix C: Software License END OF TERMS AND CONDITIONS How to Apply These Terms to Your New Libraries If you develop a new library, and you want it to be of the greatest possible use to the public, we recommend making it free software that everyone can redistribute and change. You can do so by permitting redistribution under these terms (or, alternatively, under the terms of the ordinary General Public License). To apply these terms, attach the following notices to the library. It is safest to attach them to the start of each source file to most effectively convey the exclusion of warranty; and each file should have at least the “copyright” line and a pointer to where the full notice is found. <one line to give the library's name and a brief idea of what it does.> Copyright (C) <year> <name of author> This library is free software; you can redistribute it and/or modify it under the terms of the GNU Lesser General Public License as published by the Free Soft-ware Foundation; either version 2.1 of the License, or (at your option) any later version. This library is distributed in the hope that it will be useful, but WITHOUT ANY WARRANTY; without even the implied warranty of MERCHANTABILITY or FITNESS FOR A PARTICULAR PURPOSE. See the GNU Lesser General Public License for more details. You should have received a copy of the GNU Lesser General Public License along with this library; if not, write to the Free Software Foundation, Inc., 59 Temple Place, Suite 330, Boston, MA 02111-1307 USA Also add information on how to contact you by electronic and paper mail. You should also get your employer (if you work as a programmer) or your school, if any, to sign a “copyright disclaimer” for the library, if necessary. Here is a sample; alter the names: Yoyodyne, Inc., hereby disclaims all copyright interest in the library `Frob' (a library for tweaking knobs) written by James Random Hacker. <signature of Ty Coon>, 1 April 1990 Ty Coon, President of Vice That's all there is to it! C-16 MT9083 Series ACCESS Master Operation Manual Appendix C: Software License (*3) MPL: MOZILLA PUBLIC LICENSE Version 1.1 --------------1. Definitions. 1.0.1. “Commercial Use” means distribution or other-wise making the Covered Code available to a third party. 1.1. “Contributor” means each entity that creates or con-tributes to the creation of Modifications. 1.2. “Contributor Version” means the combination of the Original Code, prior Modifications used by a Contributor, and the Modifications made by that particular Contributor. 1.3. “Covered Code” means the Original Code or Modifications or the combination of the Original Code and Modifications, in each case including portions thereof. 1.4. “Electronic Distribution Mechanism” means a mechanism generally accepted in the software development community for the electronic transfer of data. 1.5. “Executable” means Covered Code in any form other than Source Code. 1.6. “Initial Developer” means the individual or entity identified as the Initial Developer in the Source Code notice required by Exhibit A. 1.7. “Larger Work” means a work which combines Covered Code or portions thereof with code not governed by the terms of this License. 1.8. “License” means this document. 1.8.1. “Licensable” means having the right to grant, to the maximum extent possible, whether at the time of the initial grant or subsequently acquired, any and all of the rights conveyed herein. 1.9. “Modifications” means any addition to or deletion from the substance or structure of either the Original Code or any previous Modifications. When Covered Code is released as a series of files, a Modification is: A. Any addition to or deletion from the contents of a file containing Original Code or previous Modifications. B. Any new file that contains any part of the Original Code or previous Modifications. 1.10. “Original Code” means Source Code of computer software code which is described in the Source Code notice required by Exhibit A as Original Code, and which, at the time of its release under this License is not already Covered Code governed by this License. MT9083 Series ACCESS Master Operation Manual C-17 Appendix C: Software License 1.10.1. “Patent Claims” means any patent claim(s), now owned or hereafter acquired, including without limitation, method, process, and apparatus claims, in any patent Licensable by grantor. 1.11. “Source Code” means the preferred form of the Covered Code for making modifications to it, including all modules it contains, plus any associated interface definition files, scripts used to control compilation and installation of an Executable, or source code differential comparisons against either the Original Code or another well known, available Covered Code of the Contributor's choice. The Source Code can be in a compressed or archival form, provided the appropriate decompression or de-archiving software is widely available for no charge. 1.12. “You” (or “Your”) means an individual or a legal entity exercising rights under, and complying with all of the terms of, this License or a future version of this License issued under Section 6.1. For legal entities, “You” includes any entity which controls, is controlled by, or is under common control with You. For purposes of this definition, “control” means (a) the power, direct or indirect, to cause the direction or management of such entity, whether by contract or otherwise, or (b) ownership of more than fifty percent (50%) of the outstanding shares or beneficial ownership of such entity. 2. Source Code License. 2.1. The Initial Developer Grant. The Initial Developer hereby grants You a world-wide, royalty-free, non-exclusive license, subject to third party intellectual property claims: (a) under intellectual property rights (other than patent or trademark) Licensable by Initial Developer to use, reproduce, modify, display, perform, sublicense and distribute the Original Code (or portions thereof ) with or without Modifications, and/or as part of a Larger Work; and (b) under Patents Claims infringed by the making, using or selling of Original Code, to make, have made, use, practice, sell, and offer for sale, and/or otherwise dispose of the Original Code (or portions thereof ). (c) the licenses granted in this Section 2.1(a) and (b) are effective on the date Initial Developer first distributes Original Code under the terms of this License. (d) Notwithstanding Section 2.1(b) above, no patent license is granted: 1) for code that You delete from the Original Code; 2) separate from the Original Code; or 3) for infringements caused by: i) the modification of the Original Code or ii) the combination of the Original Code with other software or devices. 2.2. Contributor Grant. Subject to third party intellectual property claims, each Contributor hereby grants You a worldwide, royalty-free, non-exclusive license (a) under intellectual property rights (other than patent or trademark) Licensable by Contributor, to use, reproduce, modify, display, perform, sublicense and distribute the Modifications created by such Contributor (or portions thereof ) either on an un- C-18 MT9083 Series ACCESS Master Operation Manual Appendix C: Software License modified basis, with other Modifications, as Covered Code and/or as part of a Larger Work; and (b) under Patent Claims infringed by the making, using, or selling of Modifications made by that Contributor either alone and/or in combination with its Contributor Version (or portions of such combination), to make, use, sell, offer for sale, have made, and/or otherwise dispose of: 1) Modifications made by that Contributor (or portions thereof ); and 2) the combination of Modifications made by that Contributor with its Contributor Version (or portions of such combination). (c) the licenses granted in Sections 2.2(a) and 2.2(b) are effective on the date Contributor first makes Commercial Use of the Covered Code. (d) Notwithstanding Section 2.2(b) above, no patent license is granted: 1) for any code that Contributor has deleted from the Contributor Version; 2) separate from the Contributor Version; 3) for infringements caused by: i) third party modifications of Contributor Version or ii) the combination of Modifications made by that Contributor with other software (except as part of the Contributor Version) or other devices; or 4) under Patent Claims infringed by Covered Code in the absence of Modifications made by that Contributor. 3. Distribution Obligations. 3.1. Application of License. The Modifications which You create or to which You contribute are governed by the terms of this License, including without limitation Section 2.2. The Source Code version of Covered Code may be distributed only under the terms of this License or a future version of this License released under Section 6.1, and You must include a copy of this License with every copy of the Source Code You distribute. You may not offer or impose any terms on any Source Code version that alters or restricts the applicable version of this License or the recipients' rights hereunder. However, You may include an additional document offering the additional rights described in Section 3.5. 3.2. Availability of Source Code. Any Modification which You create or to which You contribute must be made available in Source Code form under the terms of this License either on the same media as an Executable version or via an accepted Electronic Distribution Mechanism to anyone to whom you made an Executable version available; and if made available via Electronic Distribution Mechanism, must remain available for at least twelve (12) months after the date it initially became available, or at least six (6) months after a subsequent version of that particular Modification has been made available to such recipients. You are responsible for ensuring that the Source Code version remains available even if the Electronic Distribution Mechanism is maintained by a third party. 3.3. Description of Modifications. You must cause all Covered Code to which You contribute to contain a file documenting the changes You made to create that Covered Code and the date of any change. You must include a prominent statement that the Modification is derived, directly or indirectly, from Original Code provided by the Initial Developer and including the name of the Initial Developer in (a) MT9083 Series ACCESS Master Operation Manual C-19 Appendix C: Software License the Source Code, and (b) in any notice in an Executable version or related documentation in which You describe the origin or ownership of the Covered Code. 3.4. Intellectual Property Matters (a) Third Party Claims. If Contributor has knowledge that a license under a third party's intellectual property rights is required to exercise the rights granted by such Contributor under Sections 2.1 or 2.2, Contributor must include a text file with the Source Code distribution titled “LEGAL” which describes the claim and the party making the claim in sufficient detail that a recipient will know whom to contact. If Contributor obtains such knowledge after the Modification is made available as described in Section 3.2, Contributor shall promptly modify the LEGAL file in all copies Contributor makes available thereafter and shall take other steps (such as notifying appropriate mailing lists or newsgroups) reasonably calculated to inform those who received the Covered Code that new knowledge has been obtained. (b) Contributor APIs. If Contributor's Modifications include an application programming interface and Contributor has knowledge of patent licenses which are reasonably necessary to implement that API, Contributor must also include this information in the LEGAL file. (c) Representations. Contributor represents that, except as disclosed pursuant to Section 3.4(a) above, Contributor believes that Contributor's Modifications are Contributor's original creation(s) and/or Contributor has sufficient rights to grant the rights conveyed by this License. 3.5. Required Notices. You must duplicate the notice in Exhibit A in each file of the Source Code. If it is not possible to put such notice in a particular Source Code file due to its structure, then You must include such notice in a location (such as a relevant directory) where a user would be likely to look for such a notice. If You created one or more Modification(s) You may add your name as a Contributor to the notice described in Exhibit A. You must also duplicate this License in any documentation for the Source Code where You describe recipients' rights or ownership rights relating to Covered Code. You may choose to offer, and to charge a fee for, warranty, support, indemnity or liability obligations to one or more recipients of Covered Code. However, You may do so only on Your own behalf, and not on behalf of the Initial Developer or any Contributor. You must make it absolutely clear than any such warranty, support, indemnity or liability obligation is offered by You alone, and You hereby agree to indemnify the Initial Developer and every Contributor for any liability incurred by the Initial Developer or such Contributor as a result of warranty, support, indemnity or liability terms You offer. 3.6. Distribution of Executable Versions. You may distribute Covered Code in Executable form only if the requirements of Section 3.13.5 have been met for that Covered Code, and if You include a notice stating that the Source Code version of the Covered Code is available under the terms of this License, including a C-20 MT9083 Series ACCESS Master Operation Manual Appendix C: Software License description of how and where You have fulfilled the obligations of Section 3.2. The notice must be conspicuously included in any notice in an Executable version, related documentation or collateral in which You describe recipients' rights relating to the Covered Code. You may distribute the Executable version of Covered Code or ownership rights under a license of Your choice, which may contain terms different from this License, provided that You are in compliance with the terms of this License and that the license for the Executable version does not attempt to limit or alter the recipient's rights in the Source Code version from the rights set forth in this License. If You distribute the Executable version under a different license You must make it absolutely clear that any terms which differ from this License are offered by You alone, not by the Initial Developer or any Contributor. You hereby agree to indemnify the Initial Developer and every Contributor for any liability incurred by the Initial Developer or such Contributor as a result of any such terms You offer. 3.7. Larger Works. You may create a Larger Work by combining Covered Code with other code not governed by the terms of this License and distribute the Larger Work as a single product. In such a case, You must make sure the requirements of this License are fulfilled for the Covered Code. 4. Inability to Comply Due to Statute or Regulation. If it is impossible for You to comply with any of the terms of this License with respect to some or all of the Covered Code due to statute, judicial order, or regulation then You must: (a) comply with the terms of this License to the maximum extent possible; and (b) describe the limitations and the code they affect. Such description must be included in the LEGAL file described in Section 3.4 and must be included with all distributions of the Source Code. Except to the extent prohibited by statute or regulation, such description must be sufficiently de-tailed for a recipient of ordinary skill to be able to understand it. 5. Application of this License. This License applies to code to which the Initial Developer has attached the notice in Exhibit A and to related Covered Code. 6. Versions of the License. 6.1. New Versions. Netscape Communications Corporation (“Netscape”) may publish revised and/or new versions of the License from time to time. Each version will be given a distinguishing version number. 6.2. Effect of New Versions. Once Covered Code has been published under a particular version of the License, You may always continue to use it under the terms of that version. You may also choose to use such Covered Code under the terms of any subsequent version of the License published by Netscape. No one other than Netscape has the right to modify the terms applicable to Covered Code created under this License. 6.3. Derivative Works. If You create or use a modified version of this License (which you may only do in order to apply MT9083 Series ACCESS Master Operation Manual C-21 Appendix C: Software License it to code which is not already Covered Code governed by this License), You must (a) rename Your license so that the phrases “Mozilla”, “MOZILLAPL”, “MOZPL”, “Netscape”, “MPL”, “NPL” or any confusingly similar phrase do not appear in your license (except to note that your license differs from this License) and (b) otherwise make it clear that Your version of the license contains terms which differ from the Mozilla Public License and Netscape Public License. (Filling in the name of the Initial Developer, Original Code or Contributor in the notice described in Exhibit A shall not of themselves be deemed to be modifications of this License.) 7. DISCLAIMER OF WARRANTY. COVERED CODE IS PROVIDED UNDER THIS LI-CENSE ON AN “AS IS” BASIS, WITHOUT WAR-RANTY OF ANY KIND, EITHER EXPRESSED OR IMPLIED, INCLUDING, WITHOUT LIMITATION, WARRANTIES THAT THE COVERED CODE IS FREE OF DEFECTS, MERCHANTABLE, FIT FOR A PARTICULAR PURPOSE OR NON-INFRINGING. THE ENTIRE RISK AS TO THE QUALITY AND PERFORMANCE OF THE COVERED CODE IS WITH YOU. SHOULD ANY COVERED CODE PROVE DEFECTIVE IN ANY RESPECT, YOU (NOT THE INITIAL DEVELOPER OR ANY OTHER CON-TRIBUTOR) ASSUME THE COST OF ANY NEC-ESSARY SERVICING, REPAIR OR CORRECTION. THIS DISCLAIMER OF WARRANTY CONSTI-TUTES AN ESSENTIAL PART OF THIS LICENSE. NO USE OF ANY COVERED CODE IS AUTHOR-IZED HEREUNDER EXCEPT UNDER THIS DISCLAIMER. 8. TERMINATION. 8.1. This License and the rights granted hereunder will terminate automatically if You fail to comply with terms herein and fail to cure such breach within 30 days of becoming aware of the breach. All sublicenses to the Covered Code which are properly granted shall survive any termination of this License. Provisions which, by their nature, must remain in effect beyond the termination of this License shall survive. 8.2. If You initiate litigation by asserting a patent infringement claim (excluding declatory judgment actions) against Initial Developer or a Contributor (the Initial Developer or Contributor against whom You file such action is referred to as “Participant”) alleging that: (a) such Participant's Contributor Version directly or indirectly infringes any patent, then any and all rights granted by such Participant to You under Sections 2.1 and/or 2.2 of this License shall, upon 60 days notice from Participant terminate prospectively, unless if within 60 days after receipt of notice You either: (i) agree in writing to pay Participant a mutually agreeable reason-able royalty for Your past and future use of Modifications made by such Participant, or (ii) withdraw Your litigation claim with respect to the Contributor Version against such Participant. If within 60 days of notice, a reasonable royalty and payment arrangement are not mutually agreed upon in writing by the parties or the litigation claim is not withdrawn, the rights granted by Participant to You under Sections 2.1 and/or 2.2 automatically terminate at the expiration of the 60 day notice period specified above. (b) any software, hardware, or device, other than such Participant's Contributor Version, directly or indirectly infringes any patent, then any rights granted to You by such C-22 MT9083 Series ACCESS Master Operation Manual Appendix C: Software License Participant under Sections 2.1(b) and 2.2(b) are revoked effective as of the date You first made, used, sold, distributed, or had made, Modifications made by that Participant. 8.3. If You assert a patent infringement claim against Participant alleging that such Participant's Contributor Version directly or indirectly infringes any patent where such claim is resolved (such as by license or settlement) prior to the initiation of patent infringement litigation, then the reasonable value of the licenses granted by such Participant under Sections 2.1 or 2.2 shall be taken into account in determining the amount or value of any payment or license. 8.4. In the event of termination under Sections 8.1 or 8.2 above, all end user license agreements (excluding distributors and resellers) which have been validly granted by You or any distributor hereunder prior to termination shall survive termination. 9. LIMITATION OF LIABILITY. UNDER NO CIRCUMSTANCES AND UNDER NO LEGAL THEORY, WHETHER TORT (INCLUDING NEGLIGENCE), CONTRACT, OR OTHERWISE, SHALL YOU, THE INITIAL DEVELOPER, ANY OTHER CONTRIBUTOR, OR ANY DISTRIBUTOR OF COVERED CODE, OR ANY SUPPLIER OF ANY OF SUCH PARTIES, BE LIABLE TO ANY PERSON FOR ANY INDIRECT, SPECIAL, INCIDENTAL, OR CONSEQUENTIAL DAMAGES OF ANY CHAR-ACTER INCLUDING, WITHOUT LIMITATION, DAMAGES FOR LOSS OF GOODWILL, WORK STOPPAGE, COMPUTER FAILURE OR MAL-FUNCTION, OR ANY AND ALL OTHER COM-MERCIAL DAMAGES OR LOSSES, EVEN IF SUCH PARTY SHALL HAVE BEEN INFORMED OF THE POSSIBILITY OF SUCH DAMAGES. THIS LIMI-TATION OF LIABILITY SHALL NOT APPLY TO LIABILITY FOR DEATH OR PERSONAL INJURY RESULTING FROM SUCH PARTY'S NEGLIGENCE TO THE EXTENT APPLICABLE LAW PROHIBITS SUCH LIMITATION. SOME JURISDICTIONS DO NOT ALLOW THE EXCLUSION OR LIMITATION OF INCIDENTAL OR CONSEQUENTIAL DAM-AGES, SO THIS EXCLUSION AND LIMITATION MAY NOT APPLY TO YOU. 10. U.S. GOVERNMENT END USERS. The Covered Code is a “commercial item,” as that term is defined in 48 C.F.R. 2.101 (Oct. 1995), consisting of “commercial computer software” and “commercial computer software documentation,” as such terms are used in 48 C.F.R. 12.212 (Sept. 1995). Consistent with 48 C.F.R. 12.212 and 48 C.F.R. 227.7202-1 through 227.7202-4 (June 1995), all U.S. Government End Users acquire Covered Code with only those rights set forth herein. 11. MISCELLANEOUS. This License represents the complete agreement concerning subject matter hereof. If any provision of this License is held to be unenforceable, such provision shall be reformed only to the extent necessary to make it enforceable. This License shall be governed by California law provisions (except to the extent applicable law, if any, provides otherwise), excluding its conflict-of-law provisions. With respect to disputes in which at least one party is a citizen of, or an entity chartered or registered to do business in the United States of America, any litigation relating to this License shall be subject to the jurisdiction of the Federal Courts of the Northern MT9083 Series ACCESS Master Operation Manual C-23 Appendix C: Software License District of California, with venue lying in Santa Clara County, California, with the losing party responsible for costs, including without limitation, court costs and reasonable attorneys' fees and expenses. The application of the United Nations Convention on Contracts for the International Sale of Goods is expressly excluded. Any law or regulation which provides that the language of a con-tract shall be construed against the drafter shall not apply to this License. 12. RESPONSIBILITY FOR CLAIMS. As between Initial Developer and the Contributors, each party is responsible for claims and damages arising, directly or indirectly, out of its utilization of rights under this License and You agree to work with Initial Developer and Contributors to distribute such responsibility on an equitable basis. Nothing herein is intended or shall be deemed to constitute any admission of liability. 13. MULTIPLE-LICENSED CODE. Initial Developer may designate portions of the Covered Code as “Multiple-Licensed”. “Multiple-Licensed” means that the Initial Developer permits you to utilize portions of the Covered Code under Your choice of the NPL or the alternative licenses, if any, specified by the Initial Developer in the file described in Exhibit A. EXHIBIT A - Mozilla Public License. ``The contents of this file are subject to the Mozilla Public License Version 1.1 (the “License”); you may not use this file except in compliance with the License. You may obtain a copy of the License at http://www.mozilla.org/MPL/ Software distributed under the License is distributed on an “AS IS” basis, WITHOUT WARRANTY OF ANY KIND, either express or implied. See the License for the specific language governing rights and limitations under the License. The Original Code is ___________________________________________. The Initial Developer of the Original Code is ________________________. Portions created by ______________________ are Copyright (C) ________ _______________________. All Rights Reserved. Contributor(s): ________________________________________________. Alternatively, the contents of this file may be used under the terms of the _____ license (the “[___] License”), in which case the provisions of [______] License are applicable instead of those above. If you wish to allow use of your version of this file only under the terms of the [____] License and not to allow others to use your version of this file under the MPL, indicate your decision by deleting the provisions above and replace them with the notice and other provisions required by the [___] License. If you do not delete the provisions above, a recipient may use your version of this file under either the MPL or the [___] License.” [NOTE: The text of this Exhibit A may differ slightly from the text of the notices in the Source Code files of the Original Code. You should use the text of this Exhibit A rather than the text found in the Original Code Source Code for Your Modifications.] C-24 MT9083 Series ACCESS Master Operation Manual Appendix C: Software License (*4) LGPL + exception FLTK License Agreement - The Fast Light Toolkit Home Page[Home | Documentation | FAQ | Links/Bazaar | News | Newsgroups | Polls | Software | Support] FLTK License Agreement December 11, 2001 The FLTK library and included programs are provided under the terms of the GNU Library General Public License (LGPL) with the following exceptions: Modifications to the FLTK configure script, config header file, and makefiles by themselves to support a specific platform do not constitute a modified or derivative work. The authors do request that such modifications be contributed to the FLTK project - send all contributions to “[email protected]”. Widgets that are subclassed from FLTK widgets do not constitute a derivative work. Static linking of applications and widgets to the FLTK library does not constitute a derivative work and does not require the author to provide source code for the application or widget, use the shared FLTK libraries, or link their applications or widgets against a user-supplied version of FLTK. If you link the application or widget to a modified version of FLTK, then the changes to FLTK must be provided under the terms of the LGPL in sections 1, 2, and 4. You do not have to provide a copy of the FLTK license with programs that are linked to the FLTK library, nor do you have to identify the FLTK license in your program or documentation as required by section 6 of the LGPL. However, programs must still identify their use of FLTK. The following example statement can be included in user documentation to satisfy this requirement: [program/widget] is based in part on the work of the FLTK project (http://www.fltk.org). GNU LIBRARY GENERAL PUBLIC LICENSE Version 2, June 1991 Copyright (C) 1991 Free Software Foundation, Inc. 59 Temple Place - Suite 330, Boston, MA 02111-1307, USA Everyone is permitted to copy and distribute verbatim copies of this license document, but changing it is not allowed. [This is the first released version of the library GPL. It is numbered 2 because it goes with version 2 of the ordinary GPL.] MT9083 Series ACCESS Master Operation Manual C-25 Appendix C: Software License Preamble The licenses for most software are designed to take away your freedom to share and change it. By contrast, the GNU General Public Licenses are intended to guarantee your freedom to share and change free soft-ware--to make sure the software is free for all its users. This license, the Library General Public License, applies to some specially designated Free Software Foundation software, and to any other libraries whose authors decide to use it. You can use it for your libraries, too. When we speak of free software, we are referring to freedom, not price. Our General Public Licenses are designed to make sure that you have the freedom to distribute copies of free software (and charge for this service if you wish), that you receive source code or can get it if you want it, that you can change the soft-ware or use pieces of it in new free programs; and that you know you can do these things. To protect your rights, we need to make restrictions that forbid anyone to deny you these rights or to ask you to surrender the rights. These restrictions translate to certain responsibilities for you if you distribute copies of the library, or if you modify it. For example, if you distribute copies of the library, whether gratis or for a fee, you must give the recipients all the rights that we gave you. You must make sure that they, too, receive or can get the source code. If you link a program with the library, you must provide complete object files to the recipients so that they can relink them with the library, after making changes to the library and recompiling it. And you must show them these terms so they know their rights. Our method of protecting your rights has two steps: (1) copyright the library, and (2) offer you this license which gives you legal permission to copy, distribute and/or modify the library. Also, for each distributor's protection, we want to make certain that everyone understands that there is no warranty for this free library. If the library is modified by someone else and passed on, we want its recipients to know that what they have is not the original version, so that any problems introduced by others will not reflect on the original authors' reputations. Finally, any free program is threatened constantly by software patents. We wish to avoid the danger that companies distributing free software will individually obtain patent licenses, thus in effect transforming the program into proprietary software. To prevent this, we have made it clear that any patent must be licensed for everyone's free use or not licensed at all. Most GNU software, including some libraries, is covered by the ordinary GNU General Public License, which was designed for utility programs. This license, the GNU Library General Public License, applies to certain designated libraries. This license is quite different from the ordinary one; be sure to read it in full, and don't assume that anything in it is the same as in the ordinary license. The reason we have a separate public license for some libraries is that they blur the distinction we usually make between modifying or adding to a program and simply using it. Linking a program with a library, without changing the library, is in some sense simply using the library, and is analogous to running a utility program or application program. However, in a textual and legal sense, the linked executable is a combined work, a derivative of the original library, and the ordinary General Public License treats it as such. Because of this blurred distinction, using the ordinary General Public License for libraries did C-26 MT9083 Series ACCESS Master Operation Manual Appendix C: Software License not effectively promote software sharing, because most developers did not use the libraries. We concluded that weaker conditions might promote sharing better. However, unrestricted linking of non-free programs would deprive the users of those programs of all benefit from the free status of the libraries themselves. This Library General Public License is intended to permit developers of non-free programs to use free libraries, while preserving your freedom as a user of such pro-grams to change the free libraries that are incorporated in them. (We have not seen how to achieve this as regards changes in header files, but we have achieved it as regards changes in the actual functions of the Library.) The hope is that this will lead to faster development of free libraries. The precise terms and conditions for copying, distribution and modification follow. Pay close attention to the difference between a “work based on the library” and a “work that uses the library”. The former contains code derived from the library, while the latter only works together with the library. Note that it is possible for a library to be covered by the ordinary General Public License rather than by this special one. TERMS AND CONDITIONS FOR COPYING, DISTRIBUTION AND MODIFICATION 0. This License Agreement applies to any software library which contains a notice placed by the copyright holder or other authorized party saying it may be distributed under the terms of this Library General Public License (also called “this License”). Each licensee is addressed as “you”. A “library” means a collection of software functions and/or data prepared so as to be conveniently linked with application programs (which use some of those functions and data) to form executables. The “Library”, below, refers to any such software library or work which has been distributed under these terms. A “work based on the Library” means either the Library or any derivative work under copyright law: that is to say, a work containing the Library or a portion of it, either verbatim or with modifications and/or translated straightforwardly into another language. (Hereinafter, translation is included without limitation in the term “modification”.) “Source code” for a work means the preferred form of the work for making modifications to it. For a library, complete source code means all the source code for all modules it contains, plus any associated interface definition files, plus the scripts used to control compilation and installation of the library. Activities other than copying, distribution and modification are not covered by this License; they are outside its scope. The act of running a program using the Library is not restricted, and output from such a program is covered only if its contents constitute a work based on the Library (independent of the use of the Library in a tool for writing it). Whether that is true depends on what the Library does and what the program that uses the Library does. 1. You may copy and distribute verbatim copies of the Library's complete source code as you receive it, in any medium, provided that you conspicuously and appropriately publish on each copy an appropriate copyright notice and disclaimer of warranty; keep intact all the notices that refer to this License and to the absence of any warranty; and distribute a copy of this License along with the Library. MT9083 Series ACCESS Master Operation Manual C-27 Appendix C: Software License You may charge a fee for the physical act of transfer-ring a copy, and you may at your option offer warranty protection in exchange for a fee. 2. You may modify your copy or copies of the Library or any portion of it, thus forming a work based on the Library, and copy and distribute such modifications or work under the terms of Section 1 above, provided that you also meet all of these conditions: The modified work must itself be a software library. You must cause the files modified to carry prominent notices stating that you changed the files and the date of any change. You must cause the whole of the work to be licensed at no charge to all third parties under the terms of this License. If a facility in the modified Library refers to a function or a table of data to be supplied by an application program that uses the facility, other than as an argument passed when the facility is invoked, then you must make a good faith effort to ensure that, in the event an application does not supply such function or table, the facility still operates, and performs whatever part of its purpose remains meaningful. (For example, a function in a library to compute square roots has a purpose that is entirely well-defined independent of the application. There-fore, Subsection 2d requires that any application-supplied function or table used by this function must be optional: if the application does not supply it, the square root function must still compute square roots.) These requirements apply to the modified work as a whole. If identifiable sections of that work are not de-rived from the Library, and can be reasonably considered independent and separate works in themselves, then this License, and its terms, do not apply to those sections when you distribute them as separate works. But when you distribute the same sections as part of a whole which is a work based on the Library, the distribution of the whole must be on the terms of this License, whose permissions for other licensees extend to the entire whole, and thus to each and every part regardless of who wrote it. Thus, it is not the intent of this section to claim rights or contest your rights to work written entirely by you; rather, the intent is to exercise the right to control the distribution of derivative or collective works based on the Library. In addition, mere aggregation of another work not based on the Library with the Library (or with a work based on the Library) on a volume of a storage or distribution medium does not bring the other work under the scope of this License. 3. You may opt to apply the terms of the ordinary GNU General Public License instead of this License to a given copy of the Library. To do this, you must alter all the notices that refer to this License, so that they refer to the ordinary GNU General Public License, version 2, instead of to this License. (If a newer version than version 2 of the ordinary GNU General Public License has appeared, then you can specify that version instead if you wish.) Do not make any other change in these notices. Once this change is made in a given copy, it is irreversible for that copy, so the ordinary GNU General Public License applies to all sub-sequent copies and derivative works made from that copy. This option is useful when you wish to copy part of the code of the Library into a program that is not a library. C-28 MT9083 Series ACCESS Master Operation Manual Appendix C: Software License 4. You may copy and distribute the Library (or a portion or derivative of it, under Section 2) in object code or executable form under the terms of Sections 1 and 2 above provided that you accompany it with the complete corresponding machine-readable source code, which must be distributed under the terms of Sections 1 and 2 above on a medium customarily used for software interchange. If distribution of object code is made by offering access to copy from a designated place, then offering equivalent access to copy the source code from the same place satisfies the requirement to distribute the source code, even though third parties are not compelled to copy the source along with the object code. 5. A program that contains no derivative of any portion of the Library, but is designed to work with the Library by being compiled or linked with it, is called a “work that uses the Library”. Such a work, in isolation, is not a derivative work of the Library, and therefore falls outside the scope of this License. However, linking a “work that uses the Library” with the Library creates an executable that is a derivative of the Library (because it contains portions of the Library), rather than a “work that uses the library”. The executable is therefore covered by this License. Section 6 states terms for distribution of such executables. When a “work that uses the Library” uses material from a header file that is part of the Library, the object code for the work may be a derivative work of the Library even though the source code is not. Whether this is true is especially significant if the work can be linked without the Library, or if the work is itself a library. The threshold for this to be true is not precisely defined by law. If such an object file uses only numerical parameters, data structure layouts and accessories, and small macros and small inline functions (ten lines or less in length), then the use of the object file is unrestricted, regardless of whether it is legally a derivative work. (Executables containing this object code plus portions of the Library will still fall under Section 6.) Otherwise, if the work is a derivative of the Library, you may distribute the object code for the work under the terms of Section 6. Any executables containing that work also fall under Section 6, whether or not they are linked directly with the Library itself. 6. As an exception to the Sections above, you may also compile or link a “work that uses the Library” with the Library to produce a work containing portions of the Library, and distribute that work under terms of your choice, provided that the terms permit modification of the work for the customer's own use and reverse engineering for debugging such modifications. You must give prominent notice with each copy of the work that the Library is used in it and that the Library and its use are covered by this License. You must sup-ply a copy of this License. If the work during execution displays copyright notices, you must include the copyright notice for the Library among them, as well as a reference directing the user to the copy of this License. Also, you must do one of these things: Accompany the work with the complete corresponding machine-readable source code for the Library including whatever changes were used in the work (which must be distributed under Sections 1 and 2 above); and, if the work is an executable linked with the Library, with the complete ma-chine-readable “work that uses the Library”, as object code and/or source code, so that the user can modify the Library and then relink to produce a modified MT9083 Series ACCESS Master Operation Manual C-29 Appendix C: Software License executable containing the modified Library. (It is understood that the user who changes the contents of definitions files in the Library will not necessarily be able to recompile the application to use the modified definitions.) Accompany the work with a written offer, valid for at least three years, to give the same user the materials specified in Subsection 6a, above, for a charge no more than the cost of performing this distribution. If distribution of the work is made by offering access to copy from a designated place, offer equivalent access to copy the above specified materials from the same place. Verify that the user has already received a copy of these materials or that you have already sent this user a copy. For an executable, the required form of the “work that uses the Library” must include any data and utility programs needed for reproducing the executable from it. However, as a special exception, the source code distributed need not include anything that is normally distributed (in either source or binary form) with the major components (compiler, kernel, and so on) of the operating system on which the executable runs, unless that component itself accompanies the executable. It may happen that this requirement contradicts the license restrictions of other proprietary libraries that do not normally accompany the operating system. Such a contradiction means you cannot use both them and the Library together in an executable that you distribute. 7. You may place library facilities that are a work based on the Library side-by-side in a single library together with other library facilities not covered by this License, and distribute such a combined library, provided that the separate distribution of the work based on the Library and of the other library facilities is otherwise permitted, and provided that you do these two things: Accompany the combined library with a copy of the same work based on the Library, uncombined with any other library facilities. This must be distributed under the terms of the Sections above. Give prominent notice with the combined library of the fact that part of it is a work based on the Library, and explaining where to find the accompanying un-combined form of the same work. 8. You may not copy, modify, sublicense, link with, or distribute the Library except as expressly provided under this License. Any attempt otherwise to copy, modify, sublicense, link with, or distribute the Library is void, and will automatically terminate your rights under this License. However, parties who have received copies, or rights, from you under this License will not have their licenses terminated so long as such parties remain in full compliance. 9. You are not required to accept this License, since you have not signed it. However, nothing else grants you permission to modify or distribute the Library or its derivative works. These actions are prohibited by law if you do not accept this License. Therefore, by modifying or distributing the Library (or any work based on the Library), you indicate your acceptance of this License to do so, and all its terms and conditions for copying, distributing or modifying the Library or works based on it. 10. Each time you redistribute the Library (or any work based on the Library), the recipient automatically receives a license from the original licensor to copy, distribute, link with or modify the Library subject to these terms and conditions. You may not impose any further C-30 MT9083 Series ACCESS Master Operation Manual Appendix C: Software License restrictions on the recipients' exercise of the rights granted herein. You are not responsible for enforcing compliance by third parties to this License. 11. If, as a consequence of a court judgment or allegation of patent infringement or for any other reason (not limited to patent issues), conditions are imposed on you (whether by court order, agreement or other-wise) that contradict the conditions of this License, they do not excuse you from the conditions of this License. If you cannot distribute so as to satisfy simultaneously your obligations under this License and any other pertinent obligations, then as a consequence you may not distribute the Library at all. For example, if a patent license would not permit royalty-free redistribution of the Library by all those who receive copies directly or indirectly through you, then the only way you could satisfy both it and this License would be to refrain entirely from distribution of the Library. If any portion of this section is held invalid or unenforceable under any particular circumstance, the balance of the section is intended to apply, and the section as a whole is intended to apply in other circumstances. It is not the purpose of this section to induce you to infringe any patents or other property right claims or to contest validity of any such claims; this section has the sole purpose of protecting the integrity of the free software distribution system which is implemented by public license practices. Many people have made generous contributions to the wide range of software distributed through that system in reliance on consistent application of that system; it is up to the author/donor to decide if he or she is willing to distribute software through any other system and a licensee cannot impose that choice. This section is intended to make thoroughly clear what is believed to be a consequence of the rest of this License. 12. If the distribution and/or use of the Library is restricted in certain countries either by patents or by copyrighted interfaces, the original copyright holder who places the Library under this License may add an explicit geographical distribution limitation excluding those countries, so that distribution is permitted only in or among countries not thus excluded. In such case, this License incorporates the limitation as if written in the body of this License. 13. The Free Software Foundation may publish revised and/or new versions of the Library General Public License from time to time. Such new versions will be similar in spirit to the present version, but may differ in detail to address new problems or concerns. Each version is given a distinguishing version number. If the Library specifies a version number of this License which applies to it and “any later version”, you have the option of following the terms and conditions either of that version or of any later version published by the Free Software Foundation. If the Library does not specify a license version number, you may choose any version ever published by the Free Software Foundation. 14. If you wish to incorporate parts of the Library into other free programs whose distribution conditions are incompatible with these, write to the author to ask for permission. For software which is copyrighted by the Free Software Foundation, write to the Free Software Foundation; we sometimes make exceptions for this. Our decision will be guided by the two goals of preserving the free status of all derivatives of our free software and of promoting the sharing and reuse of software generally. MT9083 Series ACCESS Master Operation Manual C-31 Appendix C: Software License NO WARRANTY 15. BECAUSE THE LIBRARY IS LICENSED FREE OF CHARGE, THERE IS NO WARRANTY FOR THE LIBRARY, TO THE EXTENT PERMITTED BY APPLICABLE LAW. EXCEPT WHEN OTHERWISE STATED IN WRITING THE COPYRIGHT HOLDERS AND/OR OTHER PARTIES PROVIDE THE LIBRARY “AS IS” WITHOUT WARRANTY OF ANY KIND, EITHER EXPRESSED OR IMPLIED, INCLUDING, BUT NOT LIMITED TO, THE IMPLIED WARRANTIES OF MERCHANTABILITY AND FITNESS FOR A PARTICULAR PURPOSE. THE ENTIRE RISK AS TO THE QUALITY AND PERFORMANCE OF THE LIBRARY IS WITH YOU. SHOULD THE LI-BRARY PROVE DEFECTIVE, YOU ASSUME THE COST OF ALL NECESSARY SERVICING, REPAIR OR CORRECTION. 16. IN NO EVENT UNLESS REQUIRED BY AP-PLICABLE LAW OR AGREED TO IN WRITING WILL ANY COPYRIGHT HOLDER, OR ANY OTHER PARTY WHO MAY MODIFY AND/OR REDISTRIBUTE THE LIBRARY AS PERMITTED ABOVE, BE LIABLE TO YOU FOR DAMAGES, INCLUDING ANY GENERAL, SPECIAL, INCIDENTAL OR CONSEQUENTIAL DAMAGES ARISING OUT OF THE USE OR INABILITY TO USE THE LIBRARY (INCLUDING BUT NOT LIMITED TO LOSS OF DATA OR DATA BEING RENDERED INACCURATE OR LOSSES SUSTAINED BY YOU OR THIRD PARTIES OR A FAILURE OF THE LIBRARY TO OPERATE WITH ANY OTHER SOFTWARE), EVEN IF SUCH HOLDER OR OTHER PARTY HAS BEEN AD-VISED OF THE POSSIBILITY OF SUCH DAMAGES. END OF TERMS AND CONDITIONS All source and documentation © 1998-2003 Bill Spitzak and others. Send questions and comments concerning this site to “webmaster at fltk dot org”. This library is free software; you can redistribute it and/or modify it under the terms of the FLTK License Agreement C-32 MT9083 Series ACCESS Master Operation Manual Appendix C: Software License (*5) Others: /* * Copyright Wnn Consortium. 1993 * * Permission to use, copy, modify, distribute, and sell this software * and its documentation for any purpose is hereby granted without fee, * provided that all of the following conditions are satisfied: * * 1) The above copyright notice appears in all copies * 2) Both that copyright notice and this permission notice appear * in supporting documentation * 3) The name of “gerodic” NOT be used if ANY modifications are made, * and * 3') Following words followed by the above copyright notice appear * in software based on “gerodic”: * * “This software is based on the original version of gerodic * developed by Wnn Consortium.” * * 4) The name “Wnn Consortium” not be used in advertising or * publicity pertaining to distribution of the software without * specific, written prior permission. * * Wnn Consortium makes no representations about the suitability * of this software for any purpose. It is provided “as is” without * express or implied warranty. * * WNN CONSORTIUM DISCLAIMS ALL WARRANTIES WITH REGARD TO THIS * SOFTWARE, INCLUDING ALL IMPLIED WARRANTIES OF MERCHANTABILITY * AND FITNESS, IN NO EVENT SHALL WNN CONSORTIUM BE LIABLE FOR ANY * SPECIAL, INDIRECT OR CONSEQUENTIAL DAMAGES OR ANY DAMAGES * WHATSOEVER RESULTING FROM LOSS OF USE, DATA OR PROFITS, WHETHER * IN AN ACTION OF CONTRACT, NEGLIGENCE OR OTHER TORTUOUS ACTION, * ARISING OUT OF OR IN CONNECTION WITH THE USE OR PERFORMANCE OF * THIS SOFTWARE. */ MT9083 Series ACCESS Master Operation Manual C-33 Appendix C: Software License (*6) Others: Copyright (C) 1995-1998 Jean-loup Gailly and Mark Adler This software is provided 'as-is', without any express or implied warranty. In no event will the authors be held liable for any damages arising from the use of this software. Permission is granted to anyone to use this software for any purpose, including commercial applications, and to alter it and redistribute it freely, subject to the following restrictions: 1. The origin of this software must not be misrepresented; you must not claim that you wrote the original software. If you use this software in a product, an acknowledgment in the product documentation would be appreciated but is not required. 2. Altered source versions must be plainly marked as such, and must not be misrepresented as being the original software. 3. This notice may not be removed or altered from any source distribution. C-34 MT9083 Series ACCESS Master Operation Manual Appendix D: Limited Life Span Parts Appendix D: Limited Life Span Parts The MT9083 Series uses consumable parts for which the life span is determined according to the usage frequency (times). A fee will be charged for replacement of such parts due to end of life even if it is within the warranty period of the MT9083 Series. Take the life span of the consumable parts into consideration when using the MT9083 Series continuously for a long period of time. Display backlight Cold-cathode tubes are used as the backlight of the MT9083 Series display (LCD.) Luminance deteriorates as lighting time advances. The lifetime of the backlight is between 15,000 and 20,000 hours. When replacing the backlight, the entire display device should be replaced because they are joined. Contact your local Anritsu Service office or the Technical Support Center (see page xxx) for details on replacing the display device. MT9083 Series ACCESS Master Operation Manual D-1 Appendix D: Limited Life Span Parts D-2 MT9083 Series ACCESS Master Operation Manual