1
Roland ColorChoiceTM Software for Windows
User’s Manual
Thank you very much for purchasing the FJ-50/40.
•
To ensure correct and safe usage with a full
understanding of this product’s performance,
please be sure to read through this manual
completely and store it in a safe location.
• Unauthorized copying or transferal, in whole or in
part, of this manual is prohibited.
• The contents of this operation manual and the
specifications of this product are subject to change
without notice.
• The operation manual and the product have been
prepared and tested as much as possible. If you find
any misprint or error, please inform us.
&217(176
:HOFRPH 6\VWHP 5HTXLUHPHQWV
Windows 95/98 Installation ...................................................................................................... 5
Windows NT Installation ........................................................................................................ 10
Uninstalling the Software (Windows 95) ................................................................................ 15
Uninstalling the Software (Windows NT) .............................................................................. 15
*HWWLQJ 6WDUWHG :RUNLQJ ZLWK 6HWXS 3URSHUWLHV General Tab ............................................................................................................................. 17
Print Tab .................................................................................................................................. 17
Communications Tab .............................................................................................................. 19
Color Tab ................................................................................................................................ 19
3ULQWLQJ ZLWK &RORU&KRLFH Printing Already Prepared Jobs ............................................................................................... 20
Printing Directly from an Application ..................................................................................... 20
:RUNLQJ ZLWK -REV Adding Jobs to the Print Monitor ............................................................................................ 21
Deleting Jobs from the Print Monitor ..................................................................................... 21
Printing Jobs ............................................................................................................................ 22
Pausing and Resuming Printing .............................................................................................. 22
Aborting a Job ......................................................................................................................... 22
Saving Jobs in Native Format ................................................................................................. 22
Setting Preferences .................................................................................................................. 22
$GYDQFHG 3ULQWLQJ 3URFHGXUHV CorelDRAW 8 ......................................................................................................................... 23
CorelDRAW 7 ......................................................................................................................... 25
FreeHand 7 .............................................................................................................................. 26
Illustrator 7.0 ........................................................................................................................... 27
PageMaker 6.5 ......................................................................................................................... 28
Photoshop 4.0 .......................................................................................................................... 30
License Agreement
Carefully read the following terms and conditions before installing the software. This is a legal agreement between you, the end user (either an individual
or an entity), and Roland DG Corporation. If you do not agree with the following, you should retain the package unopened. (This product is just one of the
included items. Please be aware that any amount of the purchase price will not be refunded for return of this product as a single item regardless of whether
the package is installed or not.) Use of this program indicates your acceptance of the terms and conditions stated below.
The enclosed computer program ("Software") is licensed, not sold, to you by Roland DG Corporation, (hereafter referred to as “Roland”), for use only under the
following terms, and “Roland”, reserves any rights not expressly granted to you.
1. License. This Agreement is governed by the laws of Japan, and the parties shall submit to the exclusive jurisdiction of the Japanese Court.This license allows
you to:
(a) Make one copy of the Software in machine readable form; provided that such a copy of the original may be used solely for bac kup purposes. As an express
condition of this License, you must reproduce on each copy the “Roland”, copyright notice and any other proprietary legends on the original copy supplied
by “Roland”.
(b) Transfer the Software and all rights under this License to another party together with a copy of this License and all written materials accompanying the
Software provided you give “Roland”, written notice of the transfer and the other party reads and agrees to accept the terms and conditions of this License.
(c) Use this Software on a single computer only, but may transfer it to another computer as long as it is used on only one computer at a time. "In use" constitutes
being loaded onto either temporary (i.e., RAM) or permanent memory (e.g., hard disk, CD-ROM or other storage device) of a computer.
2. Restrictions. You may NOT distribute copies of the Software to others or electronically transfer the Software from one computer to another over a network. You
may not decompile, reverse engineer, disassemble or otherwise reduce the Software to a human perceivable form. You may not modify, adapt, transfer, rent,
lease, loan, resell for profit, distribute, network or create derivative works based upon the software or any part thereof.
3. Termination. “Roland” retains the right to terminate this agreement without notice immediately when any of the following occurs:
(a)
When you violate any article of this Agreemnt.
(b)
When you make any serious breach of faith regarding this Agreement.
4. Warranty Disclaimer, Limitation of Remedies and Damages. In no event will “Roland”, be liable for any damages, including lost data, lost profits, cost of
cover or other special, incidental, consequential or indirect damages arising from the use of the program however caused and on any theory of liability. This
limitation will apply even if Roland DG Corporation, or an authorized dealer or distributor has been advised of the possibility of such damage.
“Roland” is not responsible for any typographical errors in the software or in the documentation.
© Copyright 1998 by Amiable Technologies, Inc.
All rights reserved. No part of this publication may be reproduced, stored in a retrieval system or transmitted, in any form or by any means, electronic, mechanical,
photocopy, recording or otherwise, without the prior written permission of the publisher.
ColorChoice is a trademark of Roland DG Corporation. PostScript® software Copyright© 1984-1998 Adobe Systems Incorporated. All rights reserved.AppleTalk,
ImageWriter, LaserWriter, and Macintosh are registered trademarks of Apple Computer, Inc. Windows is a registered trademark of Microsoft Corporation. Other
brand names are trademarks or registered trademarks of their respective holders.
Welcome
Welcome to the documentation for the Roland ColorChoiceTM Software. We believe that you will find the information useful
and the software easy to learn.
System Requirements
Minimum Recommended
Recommened
Processor
166MHz Pentium
233 MHz Pentium II
RAM
64MB
128MB+
Install Space
100MB
100MB
Working Disk Space
1GB+
2+GB for storage
Operating System
Windows 95, Windows 98, or
Windows NT 4.0
Windows 95, Windows 98, or
Windows NT 4.0
Video
14” Monitor, High Colors
17” Monitor, True Color
Other
CD-ROM Drive
CD-ROM Drive
Parallel
ECP Capable
ECP Capable
Windows 95/98 Installation
1
Insert the Roland ColorChoice Installation CD into your CD-ROM drive. You are prompted to select a language.
2
Select the appropriate language and click Next. The Software setup dialog box appears.
3
Click Install Software. The Install Options dialog appears.
4
In the Install Options dialog box enter all the applicable information, including your user number and password. Click
Next. The Software to Install dialog appears.
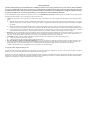
5
Click Next in the Software to Install dialog box. The Welcome dialog appears.
6
Click Next in the Welcome dialog box.
The Choose Destination dialog box appears.
7
Either accept the default destination for your software or create a new one. Click Next when the destination has been
chosen. The installer for Adobe PostScript Printer Driver automatically launches.
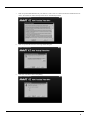
8
Click Accept from the End User License Agreement dialog box.
9
Click Next on the Printer Driver Setup dialog.
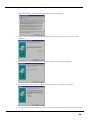
10
Select No from the Install Setup Program dialog box and then click Next.
11
Select Local Printer, and then click Next. The next screen asks you to locate the PostScript Printer description file (PPD)
to install.
12
The file is located in the PPD folder, located on the Installation CD. PPD’s are grouped by language. Select the PPD from
the appropriate language folder. Click next when you have finished. The next dialog prompts you for the port to which
the printer is connected..
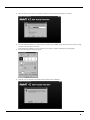
13
Select the port that your printer is connected to from the Local Port Selection dialog box. Click Next.
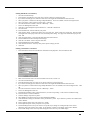
14
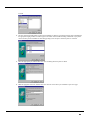
15
From the Add Printer dialog box you may choose the printer as your default printer. You don’t need to print a test page,
so select No for that option. Click Next.
If the installer detects different versions of files on your system, accept their replacement by clicking Next.
The Hi-Fi Jet Properties dialog box appears.
16
Click OK. You are returned to the Adobe PostScript Printer Driver installation.
17
Click Exit.
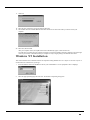
18
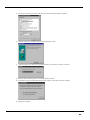
19
Select the port connected to your printer and then click OK.
The installer will now install the Roland ColorChoice Software. The last screen asks if you want to restart your
computer.
20
Select Yes, then click OK.
After your computer restarts, the Update Device Driver Wizard may appear. Click Cancel to exit.
You will notice, each time that your computer is started, an icon for the Roland ColorChoice Software in the lower right
corner of your monitor. This indicates that your computer is ready to begin printing to the Roland ColorChoice.
Windows NT Installation
This section describes how to install the software on computers running Windows NT. The computer on which the software is
installed must have Administrator priviledges.
1
Insert the Roland ColorChoice Installation CD into your CD-ROM drive. You are prompted to select a language.
2
Select the appropriate language and click Next. The Software setup dialog box appears.
3
Click Install Software. The Install Options dialog appears.
4
In the Install Options dialog box enter all the applicable information, including your user number and password. Click
Next. The Software to Install dialog appears.
5
Click next. The ‘Welcome’ dialog appears.
6
Click Next in the ‘Welcome’ dialog box.
The ‘Choose Destination’ dialog box appears.
7
Either, accept the default destination for your software or, create a new one. Click Next when the destination has been
chosen. The installer for the Adobe PostScript Printer Driver automatically launches.
8
Click Yes from the End User License Agreement dialog box. The next screen asks if you want to view the Adobe
ReadMe file.
9
Click Next when you are finished. The next screen gives you the option to copy the Setup program.
10
Choose No, and then click Next. You are asked to specify how the printer is connected to our computer.
11
Select Local Printer, and then click Next. The next screen asks you to locate the PostScript Printer description file (PPD)
to install.
12
The file is located in the PPD folder, located on the Installation CD. PPD’s are grouped by language. Select the PPD from
the appropriate language folder. Two PPD’s appear in the folder. Select the PPD according to the model of your printer.
Click next when you have finished. The next dialog prompts you for the port to which the printer is connected.
13
Select the appropriate port, and then click Next. The next dialog asks if the printer is shared.
14
Make the appropriate selections, and then click Next. The next screen asks if you would like to print a test page.
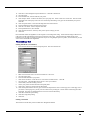
15
Do not print a test page at this time. Click Next. The Hi-Fi Jet Properties dialog box appears.
16
Click OK. The next screen gives you the option to add another printer.
17
Click Exit on this screen. Next, you are prompted for the port to which your printer is connected.
18
19
Select the port to which the printer is connected, and then click OK.
The installer will now install the Roland ColorChoice software. Click OK to restart the computer.
20
Restart your computer.
Uninstalling the Software (Windows 95)
1
2
3
4
5
6
7
8
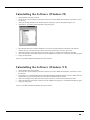
Quit the Roland ColorChoice Software.
Go into the drive where the Roland ColorChoice Software is located. Its default name should be ‘ColorChoice’. Delete
this directory.
Click Start>Settings>Taskbar. On the ‘Taskbar Properties’ dialog box, click the ‘Start Menu Programs’ tab.
Click Remove. The ‘Remove Shortcuts/Folders’ dialog box appears.
Select Roland ColorChoice, and then click Remove. Also locate and remove Roland ColorChoice from within the
‘StartUp’ directory. This will remove the shortcut to the main application that was in the ‘Start’ menu.
Click Start>Settings>Printers. Right click on the Hi-Fi Jet printer icon, and then select Delete from the menu.
Click Start>Settings>Control Panel. Double-click on the Add/Remove Programs icon. Uninstall the Hot Folder program.
Empty your Recycle Bin.
You have successfully uninstalled the Roland ColorChoice Software.
Uninstalling the Software (Windows NT)
1
2
3
4
5
6
Quit the Roland ColorChoice Software.
Go into the drive where the Roland ColorChoice Software is located. Its default name should be ‘ColorChoice’. Delete
this directory.
From Explorer, go to WinNT/Profiles/All Users/Start Menu/Programs and delete Roland ColorChoice. While still in the
Programs directory, open the Startup directory, then locate and delete Roland ColorChoice.
Click Start>Settings>Printers. Right click on the Hi-Fi Jet printer icon, and then select Delete from the menu.
Click Start>Settings>Control Panel. Double-click on the Add/Remove Programs icon. Uninstall the Hot Folder program.
Empty your Recycle Bin.
You have successfully uninstalled the Roland ColorChoice Software.
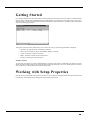
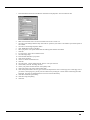
Getting Started
Once installed, Roland ColorChoice RIP Software automatically starts each time you start your computer. The Print Monitor
displays when you double-click the Roland ColorChoice RIP Software Icon located in the lower right corner of your screen.
You can control every facet of job management from the Print Monitor. The Print Monitor is essentially a queue, listing all the
files that are waiting to be printed.
Jobs appear in the queue in the order that they were received. For each job, the following information is displayed:
•
•
•
•
•
Job Name - the name of the file, including any extensions.
Status - the current status of the job, either Holding, RIPing, or Printing.
Copies - the number of copies to be printed.
Media - the media on which the job will be printed.
File Type - the file type of the selected job.
Printing a Test File
To insure that your software is properly installed and that a connection to the printer is established, select Printer>Test Print.
When you do this a small test file is sent to the Print Monitor and then printed. Once you’ve successfully printed a test file, be
sure to read the rest of this document to learn about other features.
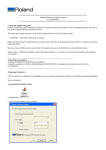
Working with Setup Properties
Setup Properties are the default print settings for your printer. To view them, click Setup Properties from the Print menu of the
Print Monitor. The Setup Properties dialog opens with the General tab selected.
General Tab
The General tab displays standard Windows printer settings associated with printer port selection and media size.
Port- Selects the port to which the printer is connected. You should only change the Port selection if you physically change the
port to which your printer is connected.
Media Size- Select a media size that is currently loaded into your printer. You can specify custom media sizes by selecting
other from the list and then editing the Height and Width values.
Media Size displays the size of the media being used, not the total printable area. The printable area on the media will be slightly
less than the actual area.
Print Tab
The Print tab displays basic processing settings and allows you to access your printer’s Driver Options.
Resolution- You may set the output resolution here. A higher resolution will generally result in better results but slower output.
The resolution set here is separate from the resolution used by your application.
Setting a resolution in this driver that is higher than the resolution in the application will not necessarily improve the output.
Dither Type- This is the pattern in which the individual dots that make an image are applied to the media. Dots of ink are
arranged to fool your eye into seeing different shades.
Perform Color Correction- Checking this setting makes incoming jobs use the color correction settings- ICC input and output
profiles that are explained below- of Roland ColorChoice RIP Software. If this setting is not checked, incoming jobs are
assumed to already have color correction.
ICC input profile- This area is only accessible if Perform Color Correction is checked. Three types of ICC input profiles can
be specified:
•
•
•
CMYK has a default setting of Generic. You also can specify a different CMYK profile using the Add button. You
might, for example, want to use CMYK Swop as a profile, if you have access to it.
RGB corresponds to monitor profiles. In addition to the Generic setting, which will provide good results, you can
select two other popular monitor ICC profiles.
Gray is the gray component ICC profile. Accept the default setting or use the Add button to locate another.
With input profiles, you can accept the default setting of Generic for all three profiles and expect excellent results. The ability
to specify new profiles is an advanced feature, and you should use it only if you have a thorough understanding of ICC profiles
and how to apply them.
ICC output profile- This area is only accessible if Perform Color Correction is checked.
•
•
Profile: Output profiles define the characteristics of your printer. An ICC profile is made for each ink/media
combination that is available for a device. From the pulldown list you can choose the profile that is appropriate for
your job.
Rendering intent: Before a file can be RIPed, its ICC profile must be translated into CRD (Color Rendering
Dictionary) values. This is essentially the process of truncating RGB color space to CMYK color space. How to
truncate this space is determined by the color rendering intent that you select. Select a rendering intent from the list of
standard PostScript types. Perceptual is best for photographic images. The relationship between colors in
the original is scaled proportionally to fit the output device’s color gamut. Relative Colorimetric is best
for images, such as logos, where the original needs to exactly match the output. Colors that fall outside of
the output device’s gamut are converted to colors at the edge of the gamut, which may reduce the total
number of colors available. For this reason, this intent should only be used when there are relatively few
colors in an image. Saturation is best for images where true color matching is not as important as vivid
colors. Colors outside of the output device’s gamut are converted to colors within the same saturation but
with a different lightness. This intent may be used to boost colors within a photographic image. Spot is
best for use with Pantone colors, devices with spot colors and vector images. This intent, which produces
the greatest saturation possible, should only be used with non-photographic images.
•
Info: Click this button for information pertaining to the ICC output profile that has been chosen under Profile. This
dialog box contains a variety of information about the selected profile, including the ink and media names. If you are
not sure whether or not you are using the correct profile, be sure to view this information. Following are a few
guidelines to help you identify a profile:
- FJDyeLcLm indicates dye ink for Cyan, Magenta, Yellow, Black, Light Cyan, and Light Magenta.
- Pig indicates pigment
- If a name has Fine, Super, or Photo in it, then it is appropriate for 720dpi output.
- If a name has Normal or Fast in it, then it is appropriate for 360dpi output.
Driver Options- Clicking this button launches the Driver Options dialog, shown below. Consult the documentation that came
with your printer to see what each setting on this dialog does.
Color Mode- Select either CMYK, LC/LM, or O/G. CMYK is four-color printing with Cyan, Magenta, Yellow, and Black
ink. It is used to create smoother transition between colors, and improved flesh tones. LC/LM is four-color printing plus two
additional colors: Light Cyan and Light Magenta. The LC/LM option is a good way to create smooth transitions between colors.
However, even if you have six inks, some jobs may print satisfactorily using only four. The O/G option increases the capability
to produce reds and greens, and their various shades.
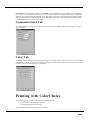
Communications Tab
The Communications tab displays basic communications settings. This is a standard windows tab. Changing these settings is
not recommended.
Color Tab
The Color tab displays settings associated with the color quality of the image. Using the sliders on the tab, you can adjust the
image quality. The sliders that appear vary, depending on which color mode is selected on the Print tab. The modifications that
you make on the Color Tab do not affect the original file.
Printing with ColorChoice
There are two approaches to using the Roland ColorChoice RIP Software.
•
•
Printing already prepared jobs from one station.
Creating and printing jobs on one station.
These approaches can be used concurrently or in combination.
Printing Already Prepared Jobs
1
2
3
4
5
6
Load the CD or disk that has the prepared jobs into the appropriate drive.
Double-click on the Roland ColorChoice RIP Software icon in the lower right corner of your screen to launch the
program.
Select Add... from the File menu.
The Add Job dialog box opens. (You can add jobs in any of the following formats: .prn, .plt, .eps, .ps, .pdf, or .prt.)
Find the drive or folder with the job you want to print.
Select the job and click Open.
The job is added to the Print Monitor.
To send a job to the printer, select the job from the Print Monitor and then select Print from the File menu.
The job prints.
Printing Directly from an Application
Printing to the Roland ColorChoice is the same as printing to any other device.
1
2
3
Create the job in your favorite application.
From your application’s print dialog box, select the Roland Hi-Fi Jet.
To send a job to the printer, select the job from the Print Monitor and then select Print from the File menu.
The job prints.
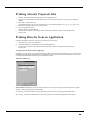
Accessing Printer Properties from an Application
In addition to specifiyng how a job will print by editing the settings in the Setup Properties dialog box, you can access some
settings directly from your design application. The command for viewing printer properties is usually under the File menu.
Consult the documentation that came with your application for details.
The Device Options Tab
Printer features- Highlight any item in the Printer features list. The ‘Change setting for’ list, located just below, applies
changes to reflect the option for the selected feature.
After Spooling- Tells the Print Monitor what to do with the job after it arrives in the Queue, either Hold or Print.
After Printing- Tells the Print Monitor what to do with the job after it has finished printing, either Hold or Delete.
The Paper Tab
Before printing directly from an application, be sure also to view and edit the Paper tab. The Paper tab is where you specify
custom paper sizes.
Working with Jobs
Roland ColorChoice Software provides you with a number of tools for job management. This section explains some of the
many ways in which you can manipulate jobs from the Print Monitor.
Adding Jobs to the Print Monitor
You can add jobs to the Print Monitor by clicking the Add a Job button located on the toolbar. You may alternatively select
File>Add.
1
Click the Add a Job button from the toolbar.
The Add a Job dialog appears.
2
Locate the job you want to add, select it, and then click Open.
Deleting Jobs from the Print Monitor
You can delete jobs or groups of jobs from the Print Monitor by selecting them and then clicking the Delete button from the
toolbar.
1
2
Select the job or jobs that you want to delete by selecting them in the Print Monitor window.
Click the Delete button. You also can click File>Delete once jobs are selected.
Printing Jobs
Once jobs are in the Print Monitor, you can select individual jobs or groups of jobs for printing. When you select a group of
jobs, they are printed in the order that they appear in the queue.
1
2
Select the job or jobs that you want to print by selecting them in the Print Monitor window.
Click the Print button.
The job is RIPed and then printed. You also can click File>Print to RIP and print a job.
Pausing and Resuming Printing
When you print a job, the Roland ColorChoice Software begins RIPing the file. RIP, which stands for Raster Image Processor,
is a process that converts the selected file into a series of dots that are used to reproduce the file on the selected media. RIPing
involves a complex algorythmic process that requires a significant portion of your computer’s processing capacity. Larger files,
in terms of Megabytes, take longer to RIP than smaller files.
The nature of the RIP process makes it impossible to pause and restart. For this reason, the Pause button is dimmed to prevent
you from pausing a job during the RIP process. However, once a job is done RIPing and is printing, you can use the Pause
button to stop and restart the printing process as often as you like.
1
2
Select the job that you want to pause by selecting it in the Print Monitor window.
Click the Pause button.
The printing is paused, and can be resumed by clicking the Pause button once again.
Aborting a Job
Although you cannot pause a job during the RIP process, you can abort the job altogether. Once a job is aborted, all RIP
information is lost and you must re-RIP the job.
1
2
Select the job that you want to abort by selecting it in the Print Monitor window. You only can abort jobs during the RIP
process.
Click the Abort a job button. You also can click File>Abort to abort a job during the RIP process.
Saving Jobs in Native Format
Once a job has been printed, you may want to save the RIPed file so that you can reprint it without having to RIP the file again.
Saving a file as Native format, with a .prt extension, allows you to save RIPed files for reprinting.
1
2
Select the job that you want to save as in Native Format by selecting it in the Print Monitor window.
Click the Save a job button. You also can click File>Save to save a job in Native Format.
Setting Preferences
Select File>Preferences to access default settings, including what to do with files after printing and to specify the units of
measurement. These preferences, in conjunction with Setup Properties, form the default print settings.
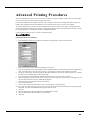
Advanced Printing Procedures
The jobs that Roland ColorChoice receives can arrive in one of two color spaces- RGB or CMYK. This section will explain
how to send jobs in these formats and achieve good color results.
For most users, RGB will be the simplest and easiest way to send jobs. Advanced users, though, may need to send jobs in
CMYK. Some guidelines have been provided but are not necessarily the only way a job can be sent in CMYK.
The specific method that you will use to send a job depends on the software used to prepare the job. Though this section
provides helpful hints for sending jobs from many of the popular applications that are used with Roland ColorChoice, be sure
to read your application’s user assistance materials for detailed information.
If your program is not listed, refer to a section on a similar program.
&RUHO'5$:
Sending an RGB file (recommended)
1
From the Roland ColorChoice Print Monitor click Printer>Setup Properties. Then click the Print Tab.
2
3
Make sure the Perform Color Correction checkbox has a check in it.
In the ICC input profile area, select appropriate CMYK and RGB profiles. If you know which profiles your application is
using, select that profile; if you don’t select Generic, or experiment to see which profile yields the best results.
For the ICC output profile, select the appropriate ink/media combination. Also select a rendering intent to use. Click the
Info button to see a full description of the selected profile.
From the application, select Print Setup and then select Properties to view your printer’s properties.
Select your page size from the menu bar or select Custom for a custom page size. If you choose a custom page size, you
may enter the custom size in the paper width and height fields.
Go to File>Print. Select your printer from the Name menu
Click the Properties button.
Choose a paper size from the Paper field or select a Custom page for a custom page size.
If you choose a custom page size, you may enter the custom size by clicking the Custom button and entering the width
and height. The paper size should match the page size entered in Corel.
Click OK.
Select the PostScript tab and then select PS3 and Output Bitmaps in RGB.
Select the Miscellaneous tab and uncheck Use Color Profile.
Click Print.
4
5
6
7
8
9
10
11
12
13
14
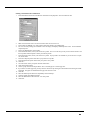
Sending a CMYK file from CorelDRAW 8
1
From the Roland ColorChoice Print Monitor click Printer>Setup Properties. Then click the Print Tab.
2
3
4
Make sure the Perform Color Correction checkbox does not have check in it.
From within CorelDRAW, go to Tools>Options and select Global>Color Management.
For on-screen soft proofing, check Calibrate colors for display and Display simulated printer colors. Choose Simulate
composite printer.
From Color Management, select Profiles.
From the Monitor menu, choose your monitor ICC profile. If it is not in the list, you may choose Generic Profile or use
the Get profile from disk option to locate your monitor profile.
From the Scanner menu, choose your scanner ICC profile. If your profile is not available or you do not have or require
one, choose None.
From the Composite printer menu select your printer’s ICC profile.
From the Separations printer menu select your printer’s ICC profile.
Click OK.
Go to File>Print. Select your printer from the Name menu
Click the Properties button.
Choose a paper size from the Paper field or select a Custom page for a custom page size.
If you choose a custom page size, you may enter the custom size by clicking the Custom button and entering the width
and height. The paper size should match the page size entered in Corel.
Click OK.
Select the PostScript tab and from Compatibility select PostScript 3
Uncheck Output color Bitmaps in RGB.
Select the Miscellaneous tab and check ‘Use color profile.
Click Print.
5
6
7
8
9
10
11
12
13
14
15
16
17
18
19
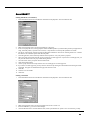
&RUHO'5$:
Sending an RGB file (recommended)
1
From the Roland ColorChoice Print Monitor click Printer>Setup Properties. Then click the Print Tab.
2
3
Make sure the Perform Color Correction checkbox has a check in it.
In the ICC input profile area, select appropriate CMYK and RGB profiles. If you know which profiles your application is
using, select that profile; if you don’t select Generic, or experiment to see which profile yields the best results.
For the ICC output profile, select the appropriate ink/media combination. Also select a rendering intent to use. Click the
Info button to see a full description of the selected profile.
From the application, select Print Setup and then select Properties to view your printer’s properties.
Select your page size from the menu bar or select Custom for a custom page size. If you choose a custom page size, you
may enter the custom size in the paper width and height fields.
Go to File>Print. Select your printer from the Name menu
Click the Properties button.
Choose a paper size from the ‘Paper’ field or select a Custom page for a custom page size.
If you choose a custom page size, you may enter the custom size by clicking the Custom button and entering the width
and height. The paper size should match the page size entered in Corel.
Click OK.
Uncheck Use Color Profile.
Click Print.
4
5
6
7
8
9
10
11
12
13
Sending a CMYK file
1
From the Roland ColorChoice Print Monitor click Printer>Setup Properties. Then click the Print Tab.
2
3
4
Make sure the Perform Color Correction checkbox does not have a check in it.
Inside CorelDRAW 7, go to Tools>Color Manager.
Check the Monitor menu. From the Monitor menu, choose your Monitor ICC profile. If it is not in the list, you may
5
6
7
8
9
10
11
12
13
choose Default or use the ‘Get profile from disk’ option to locate your monitor profile.
Check the Composite menu. From the Composite menu select your printer’s ICC profile.
Uncheck the Scanner and Separation menus.
Click Finish.
Select your page size from the menu bar or select Custom page for a custom page size. If you choose a custom page size,
you may enter the custom size in the width and height fields.
Go to File>Print and select your printer from the Name menu.
Click the Properties button. Choose a paper size from the ‘Paper’ field or select a Custom page for a custom page size. If
you choose a custom page size, you may enter the custom size by clicking the ‘Custom’ button and entering the width
and height. The paper size should match the page size entered in Corel.
Click OK.
Check ‘Use color profile.’
Click OK to print.
CMYK files from CorelDRAW may print differently than RGB files sent from CorelDRAW. This is attributable to
CorelDRAW’s color management system.
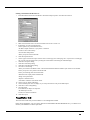
)UHH+DQG
Sending an RGB file (recommended)
1
From the Print Monitor click Printer>Setup Properties. Then click the Print Tab.
2
3
Make sure the Perform Color Correction checkbox has a check in it.
In the ICC input profile area, select appropriate CMYK and RGB profiles. If you know which profiles your application is
using, select that profile; if you don’t select Generic, or experiment to see which profile yields the best results.
For the ICC output profile, select the appropriate ink/media combination. Also select a rendering intent to use. Click the
Info button to see a full description of the selected profile.
From the application, select Print Setup and then select Setup to view your printer’s properties.
Create a page size in the Page tab. Select Custom if you require a custom page size, and enter the height and width.
Go to File>Print. Select you printer from the Name menu.
Click the Properties button.
Select the Paper tab. Choose your page size or select custom if you have a custom page size. Create a custom paper size
by clicking the Custom button and entering a paper size tht matches your custom page size.
If you choose a custom page sized, you may enter the custom size by clicking the Custom button and entering the width
and height.. The paper size should match the page size entered in Freehand.
Click Print Settings>Setup.
From the Separations tab, select Composite.
From the Imaging tab, uncheck Convert RGB to Process from Output Options.
From the Paper Setup tab, select your paper size. It should match the page size of your document. Select Custom for a
custom paper size. If you entered a custom size for your document page size in Freehand, be sure that the custom value
for the paper size matches that of the document page size. Check the Transverse button, if available, then click OK.
Click the Color Management button.
Uncheck the Color Management box and then click OK.
Click OK to print.
4
5
6
7
8
9
10
11
12
13
14
15
16
17
Sending a CMYK file
1
From the Roland ColorChoice Print Monitor click Printer>Setup Properties. Then click the Print Tab.
2
3
Make sure the Perform Color Correction checkbox does not have a check in it.
FreeHand defaults to Relative Colorimetric color rendering intent. To change FreeHand 7’s default rendering intent open
the preference file located in Program Files/Macromedia/FH7/Fhprefs.txt. Search for ‘render.’ The found line should
read ‘(RenderColorimetric) (Yes)’. If you replace (Yes) with (No) you will get the first available rendering intent from
the ICC output profile you select. If the ICC profile contains all the rendering intents, (as is the case with ICC profile’s
created for Roland ColorChoice Software), the next available rendering intent should be Perceptual. Profiles from other
sources may vary in the first available intent.
Inside FreeHand 7, create page size in Page tab. Select Custom if you require a custom page size, and enter the height
and width.
From the Page tab, select or enter the printer resolution according to your printer’s resolution.
Go to File>Print and select your output printer from the list of printers.
Click the Properties button.
Select the Paper tab. Choose your paper size or select Custom paper if you have a custom page size.
Create a custom paper size by clicking the Custom button and entering a paper size that matches your custom page size.
Click ‘OK’.
Click Print Setting>Setup.
From the Separations Tab select Composite and check Print spot colors as process.
From the Imaging tab, check Convert RGB to Process from Output Options.
From the Paper Setup tab select your paper size. It should match the page size of your document. Select Custom for a
custom paper size. If you entered a custom size for your document page size in FreeHand, be sure that the custom value
for the paper size matches that of the document page size. Check the Transverse button (if available). Click OK.
Click the Color Management button and check the ‘Color Management’ box.
From Monitor, choose the ICC profile for your monitor. If you have not created one or one is not available, choose
‘Default’.
From Monitor Simulates choose ‘Composite printer’ if you want on-screen CMYK preview. Choose None if you do not
want an on-screen CMYK preview.
From Composite printer select the ICC profile for your output printer. This is the profile you installed to your system
folder with ICC Windows Installer.
From Separations Printer choose your output printer’s ICC profile.
Uncheck the ‘Composite simulates separations’ checkbox.
Click OK.
Click OK to print.
4
5
6
7
8
9
10
11
12
13
14
15
16
17
18
19
20
21
22
,OOXVWUDWRU
The Kodak Color Management System must be installed to output successfully from Illustrator 7 to Roland ColorChoice
Software. Instructions are limited to generating CMYK files because all printed output from Illustrator is CMYK.
Sending a CMYK file from Illustrator 7.0
1
From the Roland ColorChoice Print Monitor click Printer>Setup Properties. Then click the Print Tab.
2
3
Make sure the Perform Color Correction checkbox does not have a check in it.
In Illustrator, go to File>Document Setup.
•Select Options ‘Use printers default screen.’
•Set Paths ‘Output resolution’ to your printer’s resolution.
•Check box for Use Print Setup.
•Click the Print Setup button.
•Select your printer in the Name field.
Click the Properties button.
Choose a paper size from the ‘Paper’ field or select a Custom page for a custom page size. If you choose a custom page
size, you may enter the custom size by clicking the Custom button and entering the width and height.
Click OK to Properties dialog.
Click OK to Print Setup dialog.
Click OK to Document Setup dialog.
Go to File>Color Settings.
•Select your monitor in the Monitor field. Choose Adobe Illustrator Monitor Default if your monitor is not available.
•Select your printer’s ICC profile in the Printer field.
•Select your rendering intent in the Intent field.
•Default uses the output profile’s default intent.
•Image is Perceptual intent.
•Graphic is Saturation intent.
•Colorimetric is Relative Colorimetric intent.
Check ‘Uses ICC Profile with TIFFs’.
Check ‘Simulate print colors on display’ if you want your monitor to soft-proof CMYK output.
Click OK to Color Settings dialog.
Go to File>Print.
•If not dimmed, set Output to Composite.
•Set PostScript to Level 2.
•Check Force Fonts to Download.
Click OK to print.
4
5
6
7
8
9
10
11
12
13
14
3DJH0DNHU
These directions assume that you have Kodak ICC Color Management installed.
Before starting PageMaker. copy your printers’ PPD files to PM65\RSRC\USENGLSH\PPD4 directory. The PPDs can be
found on your installation CD in the ‘Ppd’ folder.
.
Sending an RGB file (recommended)
1
2
3
4
5
6
7
8
9
10
11
12
13
14
15
16
17
Go to File>Document Setup.
From the Page size field select your paper size or choose Custom for a custom page size.
If you choose Custom page size, enter the custom size in the height and width fields and click Transverse.
Select your printer’s resolution as the Target Output Resolution. If it is not available, select the next highest value.
Select your printer in the Compose to printer menu. Click OK.
Go to File>Preferences>General. Click the ‘CMS Setup...’ button.
From Color Management select OFF.
Click OK to Color Management System Preferences. Click OK to Preferences.
Go to File>Print.
From the PPD menu, select the PPD for your printer.
Click the Paper button. From the Size menu, select your paper size. Select Custom for a custom size. Enter the width
and height of the custom paper size in the new Custom Paper Size dialog. Your paper size should match your job size.
Click OK.
Click the Options button. From the Send image data menu select Normal.
From download fonts select PostScript and TrueType.
Click the Color button. Select Composite and Color.
From Optimized Screen Select Default.
Click the Features button. Select any other printer specific settings you want.
Click Print.
Sending a CMYK file to ColorChoice
1
From the Roland ColorChoice Print Monitor click Printer>Setup Properties. Then click the Print Tab.
2
3
4
5
6
Make sure the Perform Color Correction checkbox does not have a check in it.
Go to File>Document Setup.
From the Page field select your paper size or choose Custom for a custom page size.
If you choose Custom page size, enter the custom size in the height and width fields and click Transverse.
Select your printer’s resolution as the Target Output Resolution. If it is not available, select the next highest value. Click
OK.
Go to File>Preferences>General. Click the ‘CMS Setup...’ button.
From Color Management select ON.
From Monitor Simulates, select Composite Printer if you want ‘soft proofing.’ Select None for standard viewing.
From New Items Use select Kodak ICC.
Uncheck ‘Manage composites on printer.’
Select Kodak ICC from the iconic list of Color Management Modules.
Under Kodak ICC Settings, from Monitor select your monitor’s profile. If your monitor’s profile is not available select
Generic Monitor.
From Composite printer select your printer’s ICC profile.
From Separations printer select your printer’s ICC profile.
From RGB Image Source select your scanner’s ICC profile if your images are coming directly from a scanner.
Otherwise, select your monitor’s ICC profile. If your monitor’s profile is not available, select Generic Monitor.
From CMYK Image Source select the profile that applies to the source of your CMYK images.
7
8
9
10
11
12
13
14
15
16
17
18
19
20
21
22
23
24
25
26
27
Click OK to Color Management System Preferences. Click OK to Preferences.
Go to File>Print.
From the PPD menu, select the PPD for your printer.
Click the Paper button. From the Size menu, select your paper size. Select Custom for a custom size. Enter the width
and height of the custom paper size in the new Custom Paper Size dialog. Your paper size should match your job size.
Click OK.
Click the Options button. From the Send image data menu select Normal.
From download fonts select PostScript and TrueType.
Click the Color button. Select Composite and Color.
From Optimized Screen, select Default.
Click the Features button. Select any other printer specific settings you want.
Click Print.
Each individual element of PageMaker can be assigned a color management setting. Under Element>Image>CMS Source a
CMS, Source Profile and Rendering Intent may be assigned to each object. This means that the default settings in the
Preferences may not apply to all objects within a file. If you are using multiple input ICC profiles, in most instances you will
want to send a CMYK file from PageMaker.
3KRWRVKRS
Sending an RGB file (recommended)
1
From the Print Monitor click Printer>Setup Properties. Then click the Print Tab.
2
3
4
5
6
7
8
9
10
Make sure the Perform Color Correction checkbox has a check in it.
Go to File>Page Setup.
From the Name field select your printer.
Click the Screen button. Check the box for ‘Use Printer’s Default Screens.’ Click OK.
Go to File>Print. Choose RGB from the ‘Print as’ color space selection.
Choose Binary from the Encoding selection.
Choose your printer resolution from the Print Quality field.
Click Setup. Select your printer from the Name field.
Click the Properties button. Choose a paper size from the Paper field or select a Custom page for a custom page size. If
you choose a custom page size, you may enter the custom size by clicking the ‘Custom’ button and entering the width
and height. The paper size should match the canvas size created in Photoshop.
Click OK to Printer Properties dialog.
Click OK to Page Setup dialog.
Click Print.
11
12
13
Sending a CMYK file
These directions assume that you have Kodak Color Mangament installed.
1
From the Roland ColorChoice Print Monitor click Printer>Setup Properties. Then click the Print Tab.
2
3
Make sure the Perform Color Correction checkbox does not have a check in it.
Go to File>Color Settings>Monitor Setup. Select the ICC profile for your monitor. Use Default if your monitor profile is
not available.
Go to File>Color Settings>Separation Tables.
Click ‘Build Tables Using ICC Profiles.’
Select your printer’s ICC profile and the desired rendering intent and then click Build.
Click OK.
To ‘soft preview’ choose View>CMYK Preview.
Go to File>Page Setup.
From the Name field select your printer.
Click the Screen button.
Check ‘Use Printer’s Default Screens.’
Click OK.
Go to File>Print. Choose CMYK from the ‘Print as’ color space selection.
Choose Binary from the ‘Encoding’ selection.
Choose your printer resolution from the ‘Print Quality’ field.
Click Setup. Select your printer from the Name field.
Click the Properties button. Choose a paper size from the Paper field or select a Custom page for a custom page size. If
you choose a custom page size, you may enter the custom size by clicking the ‘Custom’ button and entering the width
and height. The paper size should match the canvas size created in Photoshop.
Click OK to Printer Properties dialog.
Click OK to Page setup dialog.
Click Print.
4
5
6
7
8
9
10
11
12
13
14
15
16
17
18
19
20
21
R2-092998