1
Shanghai Xunlang Technology
Shanghai XunLang Digital Equipment Co.,Ltd
All Rights Reserved
Thank you for purchasing Xunlang Portrait Machine Series.
In order safely and correctly use the machine on the basis of comprehensive understanding of
its performance. Please be sure to read this operating manual carefully and keep it properly.
Xunlang's Equipment specifications and print procedure, only use for the legitimate and
authorized holder of the company. Legitimate holders who are not officially authorized by
Xunlang digital equipment Co., LTD. is forbidden to copy, modify, exchange, or through the
network, and all other ways to leak its content. In violation of any of the foregoing acts, shall
bear criminal responsibility and civil liability.
Any changes of the contents of this manual and the product parameter will not be informed.
Xunlang digital equipment Co., LTD should be no responsible for technical or editorial errors or
omissions occurred in the manual.
We have tried our utmost to edit this operation manual and have already tested the product. If
you find any mistakes or printing errors, please let us know, we would be extremely grateful.
【Trademark Notice】
All trademarks referenced in this book, the manufacturer and product name are as follows:
Xunlang is the Registered Trademark of Shanghai Raster digital equipment Co., LTD.
Windows 98, Windows ME, Windows 2003,Windows 2000,Windows XP,Windows
VISTA,windows 7 are the Registered Trademark of Microsoft
Photoshop is the Registered Trademark of Adobe Corporation.
PhotoPrint is the Registered Trademark of Photoprint.
Maintop is the Registered Trademark of Maintop
Seeget is the Registered Trademark of seeget.
Epson is the Registered Trademark of Japanese EPSON
1 / 101
Shanghai Xunlang Technology
Catalogue
1 Safety Instructions………………………………………………………………………………………………………………1
2 Installation Requirements……………………………………………………………………………………………………5
2-1 Recommended Computer Configuration …………………………………………………………………5
2-2 Site Preparation.……………………………………………………………………………………………………….5
2-2-1 Working Area…………………………………………………………………………………………………5
2-2-2 Environmental Requirements…………………………………………………………………………5
2-2-3 Floor Requirements………………………………………………………………………………………6
2-2-4 Load Restrictions……………………………………………………………………………………………6
2-2-5 Space Requirements………………………………………………………………………………………6
2-2-6 Safety Requirements………………………………………………………………………………………6
2-2-7 Electrical Requirements…………………………………………………………………………………7
2-2-8 Operator Requirements…………………………………………………………………………………7
2-2-9 Installation Requirements………………………………………………………………………………7
2-3 Checking before the installation………………………………………………………………………………8
2-4 Shipment, Opening Box and Checking………………………………………………………………………8
2-4-1 Shipment………………………………………………………………………………………………………8
2-4-2 Opening Box…………………………………………………………………………………………………9
2-4-3 Checking………………………………………………………………………………………………………9
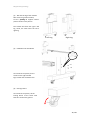
3 Main Parts and Random Parts Recognition………………………………………………………………………10
3-1 Main Parts Diagrams………………………………………………………………………………………………10
3-2 Random Parts Diagrams…………………………………………………………………………………………11
4 Machine Installations…………………………………………………………………………………………………………13
4-1 Install Legs and Body………………………………………………………………………………………………13
4-2 Install Feeding In and Taking Up System………………………………………………………………………15
4-3 Install Drying Devices………………………………………………………………………………………………17
4-4 Install the Ink Tank……………………………………………………………………………………………………17
4-4-1 Connect Ink Tank Channels……………………………………………………………………………17
4-4-2 Install the Ink Tank…………………………………………………………………………………………19
4-5 Install Ground Cable…………………………………………………………………………………………………19
5 How to Operate……………………………………………………………………………………………………………………21
5-1 How to Operate--Basics……………………………………………………………………………………………21
5-1-1 How to Connect USB Cable……………………………………………………………………………21
5-1-2 How to Connect Power Cable…………………………………………………………………………21
5-1-3 How to Install the Driver ………………………………………………………………………………23
5-1-4 How to Add the Ink…………………………………………………………………………………………24
5-1-5 How to Add the Media……………………………………………………………………………………25
5-1-6 How to Use the Media……………………………………………………………………………………27
5-1-7 How to Unload the Media……………………………………………………………………………29
5-1-8 How to Use the Media Holder…………………………………………………………………………29
5-1-9 How to Use the Vacuum Air Suction…………………………………………………………………30
2 / 101
Shanghai Xunlang Technology
5-1-10 How to Use the Platform Heater …………………………………………………………………30
5-2 How To Use--Printing.………………………………………………………………………………………………33
5-2-1 How to Feed In/Take Up Media and Set Starting Position………………………………33
5-2-2 How to Check the Print head According to Test Printing Bar……………………………35
5-2-3 How to Auto- Clean and Manual-Clean the Print Head……………………………………36
5-2-4 How to Adjust the Carriage Height…………………………………………………………………38
5-2-5 How to Begin/Pause/Stop Printing…………………………………………………………………38
5-2-6 Classification of Different Printing Mode………………………………………………………….40
5-2-7 How to Take up the Media………………………………………………………………………………42
5-2-8 How to Use the Drying System…………………………………………………………………………43
5-2-9 How to Protect the Print Head……….…………………………………………………………………44
5-3 How to use--LCD Control Panel……………………………………………………………………………………45
5-3-1 LCD Control Panel Layout…………………………………………………………………………………45
5-3-2 Press Buttons’ Instructions………………………………………………………………………………45
5-3-3 Menu Dendrogram…………………………………………………………………………………………47
6 How to Use the Software………………………………………………………………………………………………………53
6-1 Install the Software………………………………………………………………………………………………………53
6-2 Interface Description …………………………………………………………………………………………………56
6-2-1 Tool Bar …………………………………………………………………………………………………………58
6-3 Print Head Calibration………………………………………………………………………………………………60
6-3-1 Adjustment steps……………………………………………………………………………………………60
6-3-2 Double Heads Spacing Calibration…………………………………………………………………. 63
6-3-3 Color Calibration…………………………………………………………………………………………….64
7 Maintenance…………………………………………………………………………………………………………………………69
7-1 Scheduled Maintenance Guide ………………….………………………………………………………………69
7-2 Daily Check and Maintenance……………………………………………………………………………………70
7-2-1 Print Head Check and Cleaning………………………………………………………………………70
7-2-2 Head Protective Plate Cleaning………………………………………………………………………70
7-2-3 Scraping Sheet Cleaning…………………………………………………………………………………71
7-2-4 Printing Test Calibration…………………………………………………………………………………71
7-2-5 Wasted Ink Bucket Disposition…………………………………………………………………………73
7-2-6 Guide Rail Oiled………………………………………………………………………………………………73
7-2-7 Mechanical Movement Wheel Oiled………………………………………………………………74
7-2-8 Media Holder Cleaning……………………………………………………………………………………75
7-3 Weekly Check and Maintenance …………………………………………………………………………………75
7-3-1 Print Head Cleaning…………………………………………………………………………………………75
7-3-2 Guide Rail Oiled………………………………………………………………………………………………76
7-3-3 Mechanical Movement Wheels Oiled………………………………………………………………76
7-3-4 Carriage Bottom Surface Oiled……………………………………………………………………. …76
7-4 Monthly Check and Maintenance ………………………………………………………………………………76
7-4-1 Change the Scraping Sheet………………………………………………………………………………76
7-4-2 Check the Coupling and Jackscrew……………………………………………………………………77
7-4-3 Clean the Body's Internal Dust …………………………………………………………………………77
7-4-4 Organizing Computer/Antivirus………………………………………………………………………77
7-5 Quarterly Check and Maintenance……………………………………………………………………………77
3 / 101
Shanghai Xunlang Technology
7-5-1 Cleaning Ink Channels System ……………………………………………………………………….77
7-5-2 Change the Ink Sac…………………………………………………………………………………………77
7-5-3 Check the Infrared Heating ……………………………………………………………………………77
7-5-4 Check Platform Heating …………………………………………………………………………………77
7-5-5 Check the Motor and Driver ……………………………………………………………………………78
7-6 Annually Check and Maintenance……………………………………………………………………………… 78
7-6-1 Change the Head Protective Plate…………………………………………………………………… 78
7-6-2 Clean the Ink Channel and Ink Pump……………………………………………………………… 78
7-6-3 Check the Level of Guide Rail and Platform……………………………………………………78
7-6-4 Check the Whole Machine and Loose Screws………………………………………………… 78
7-7 Maintenance During Turning Off For A Long Period……………………………………………………. 78
7-7-1 Long Period(2 days-1week) turning off preparation……………………………………….78
7-7-2 Long Period(1 week-4weeks) turning off preparation…………………………………….78
7-7-3 Long Period(Above 4weeks) turning off preparation………………………………………78
8 Frequently Asked Questions and Solutions……………………………………………………………………………79
8-1 Print Troubles Shooting………………………………………………………………………………………………79
8-1-1 White Lines in Printed Picture…………………………………………………………………………79
8-1-2 Black Lines in Printed Picture………………………………………………………………………… 82
8-1-3 Dirty Printed Picture……………………………………………………………………………………… 83
8-1-4 Blurry Printed Picture…………………………………………………………………………………… 85
8-2 Error Code Description………………………………………………………………………………………………86
8-3 Print Head Defect (Nozzle jam)………………………………………………………………………………….94
9.XunLang Customer Service…………………………………………………………………………………………………… 96
4 / 101
Shanghai Xunlang Technology
1 Safety Instructions
Safety Precautions
Before using this printer, please read the following safety precautions, to ensure the safe use of
the equipment.
General safety guidelines
Before connecting the printer to the power supply, refer to the installation instructions.
When either of the following conditions occurs, turn off the printer, unplug the power cable
of the machine from the outlet and contact local dealers.
The power supply cord or plug is damaged;
Liquid into printer;
Printer smokes or makes abnormal odour;
Printer drops, or drying damage;
Printer's built-in residual current circuit breaker (ground fault of earth leakage
protective device) has repeatedly tripped;
Fuse doesn’t work;
The printer is not functioning properly;
When either of the following conditions occurs, turn off the printer, unplug the power cable
of the machine from the power outlet.
Thunderstorms Weather;
Power off during printing;
Important safety guidelines
Do not insert anything into the printer’s platform, Carefully not to let liquid spilled in the
printer;
Can only use the type of power source that he printer's label identifies. According to the
different countries and regions, may use 110V or 220V AC;
All devices connected to a properly grounded outlet, avoid socket with photocopiers or air
conditioning system used by these rules to switch between on and off the device in the
same loop;
Avoid using wall switches or automatic timers controlled outlet.
Keep your computer system away from potential sources of EMI, such as speakers or
cordless telephone.
Do not use the damaged or worn Power cable.
If you use the attached Power cable, make sure to insert the extra total amps of power line
devices do not exceed the rated amps of the power supply, in addition, make sure to insert
total number of amperes of all devices on the wall do not exceed the rated amperage of the
wall outlet;
1 / 101
Shanghai Xunlang Technology
Precautions During Printing
When turn on the printer, do not move the print head with hand or the printer may be
damaged;
Always use the power switch to turn off the printing, but when the button is pressed, the
power supply will be cut off. Before the power is cut off, do not unplug the printer′s plug
or cable.
Before moving the printer, ensure that the print head in the initial position, and fixed.
Electric Shock Dangerous
Drying system uses normal AC, when the system is in use, do not your
Warning! hand or other objects into the drying system, this will cause human injury
or damage the object.
Printers use two power cable. Before repairing the printer, please unplug the two Power cable.
The printer can only be connected to a grounded AC outlet.
To avoid the risk of electric shock, please keep the following in mind:
Do not attempt to remove the dryer or electric control cabinet.
Do not remove any other closed or open cover or plugs.
Do not insert any objects in the slot of the printer.
Circuit fuse fuses may indicate that the system has failed, Call your
Attention! local dealer, and not try to replace fuse on your own.
Dangerous Of Getting Burn
Drying system running under the high temperature of the printer, if touched, can cause burns. To
avoid personal injury, please note the following precautions:
Do not touch the printer drying system′s interior cover. Even after power is disconnected
from the drying systems, internal surface may still be very hot.
When contact material drying channel, special care should be taken.
2 / 101
Shanghai Xunlang Technology
Fire Disaster
The printer produces high temperature drying system at run time. If the printer's built-in residual
current circuit breaker (earth fault leakage protector) trip repeatedly, please call your local
dealer.
To avoid a fire hazard, please note the following precautions:
Use the power supply voltage specified on the nameplate.
Connect the Power cord to a dedicated line, and according to the wall outlet's rated
parameters, use the branch circuit breaker protection for each line.
Do not use the same power strip (insert row= to connect the two power cables.
Use only the Xunlang Power cord that together provided with the printer.
Do not use a damaged power cord. Do not use the Power cord supplied by the other
products.
Do not place any objects in the slot of the printer.
Be careful not to liquids spilled on the printer.
Do not use the products which contain flammable gases of spray near or inside the printer.
Do not stuck or block the printer opening.
Do not attempt to remove the drying systems or electric control cabinet.
Mounts to 125 ° c (257 ° f) operating temperature and the temperature of spontaneous
combustion higher than 250 ° c (482 ° f) materials (media).
Mechanical Dangerous
The moving parts of the printer may result in personal injury. To avoid personal injury, when
working close to the printer, please note the following precautions:
Keep clothing and all parts of the body away from the moving parts of the printer;
Do not wear necklaces, bracelets and other hanging articles;
If your hair is longer, please protect to prevent hair fall into the printer;
Be careful and not to let your sleeve or glove is entangled by moving parts of the printer;
During printing, do not touch the gears or the reel
Materials (media) Excessive Weight Risk
When dealing with heavier material, and should be especially careful to avoid personal injury:
May many persons to carry a reel of matrix material, should be very careful to avoid back
injuries
Consider using a fork-lift truck, pallet truck or other handling equipment.
Carrying a heavier material or reel , please wear personal protective equipment, including
gloves and work boots
3 / 101
Shanghai Xunlang Technology
Ink disposition
Keep the ink bottles out of the children′s reach, don't let the kid drink or touch ink bottles;
If the ink stick to skin, clean with soap and water; If ink splash in eyes , immediately flush
with water;
Do not shake ink bottles, this will cause the ink leaking;
After using the ink bottles for a certain period (usually three months), immediately removed
for thorough cleaning and drying; Pay attention to cleaning when replaced a new ink bottle
to ensure print quality;
Dispose the waste ink In accordance with relevant local laws;
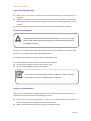
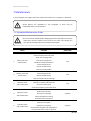
Warning and notice
This manual uses the following symbols to ensure proper use and prevent the printer from
damage. Please follow instructions marked with these symbols.
Warning! If you do not comply with guidelines marked with this symbol, may result in
severe personal injury or even death.
Caution! If you do not comply with guidelines of this symbol, may cause damage to your
printer.
Attention! If you do not comply with guidelines marked with this symbol, can cause minor
personal injuries or damage to the product
4 / 101
Shanghai Xunlang Technology
2 Installation Requirements
2-1 Recommended Computer Configuration
CPU: Intel Core Duo 2.50GHZ or above
Memory: 2.00GB or above
Mainboard: INTEL G41 or above
Operating systems: Microsoft WINDOWS XP/VISTA/7 or above
2-2 Site Preparation
Customers is responsible for complying with all requirements for installation implement them
while the machine is running or the machine may not run properly.
2-2-1 Working Area
The working area listed below refers to the Xunlang VanGogh series printer (herein after
equipment), as shown in the figure.
Please note that users should make sure that the operations personnel's safety in the area.
Working area is long of 4.11 meters, width of 2.2 m, and height of 2.5 meters.
Xunlang VanGogh series printer (width 1.8 m) size: 3.11 m long, 0.7 meters wide, 1.38 m high
2-2-2 Environmental Requirements
Devices should be away from the joint equipment (cloth connection machine) or other sources of
radio frequency interference. The floor should be easy to clean and does not produce dust and
static electricity.
In order to help operators and customers to judge color accuracy, you should try to use neutral
gray and white decoration of light (fluorescent) lighting.
Equipment should be installed in a clean, dust-free, controlled temperature and relative humidity
controlled in the environment as following:
Altitude: within 1000 m from sea level
Temperature: 15-35 ° c
Relative humidity: 40%-65%
5 / 101
Shanghai Xunlang Technology
2-2-3 Floor Requirements
The floor material should be able to guarantee security in the working region evenly distributed,
during installation, the system should maintain the precise level, ensure the right of the print
head moves , so as to prevent sliding and spring.
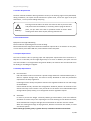
Warning!
Flooring materials within the work area must be able to prevent static
and prevent dust accumulation, if necessary, before laying the device in
place, can put work area clean or polished cement on floors within
working area. Never leave carpets, flooring materials etc.
2-2-4 Load Restrictions
Equipment net weight 200-250 kg.
Device maximum expected general increase of 60 kg.
Recommend that the equipment should be installed at 4 pieces 20 cm in diameter on the plate,
or more than 4 pieces 200 x 200 mm, 8 mm thickness of the steel plate.
2-2-5 Space Requirements
The front of device refers to printing input side. Equipment requirements front reserved 1 m.
Keep 0.5 m on the back, left and right edges keep 0.5 m each. In addition, the space reserved
area also includes 2.5 m height above the ground. Besides, the machine also should make room
for feeding or unloading the supplies.
2-2-6 Safety Requirements
Fire Prevention
Inks and solvents must be enclosed in a special storage cabinet for nonflammable liquids, or
within a separate storage room, and must be clearly identified to meet the professional
requirements of safety regulations.
Ink storage must be strictly compliance with local fire regulations about the use and storage
of combustibles.
Carbon dioxide and dry chemical fire extinguishers should be placed in all channels of the
obvious and easy access location. They should be on the device and nonflammable liquid
storage cabinet (room) nearby, or to comply with local fire regulations require.
Ventilation
In order to prevent the danger caused by volatile gas accumulation, must have sufficient
ventilation to ensure every 1 hour replacing the air of the working area of about 6 to 8 times,
vents should be low enough so that gas cannot accumulate on the floor near the volatile.
When the media gets through of drying devices, because ink solvents are volatile, so need
an emission system
Note: solvent gas specific gravity is greater than air, it would accumulate near the floor.
6 / 101
Shanghai Xunlang Technology
Installation work in the vicinity of electrical equipment must conform to GB/T standards, national
electrical regulations requirements for level II sites, and installation.by a corresponding
qualification of professional electrical contractor.
Attention!
Hazardous waste treatment provisions should comply with the relevant
sector-specific special storage and handling requirements.
2-2-7 Electrical Requirements
Devices use single phase power and require ensuring a good grounding connection independently.
Grounding resistance less than 10 Ω
Power supply range: 220V voltage (± 10%), AC 50Hz or 60Hz. Users must assign a professional
electrician or contractors to install power supply.
Circuit breaker ratings are as follows:
Power Supply\ Voltage
Single phase
AC 220V
AC 110V
10A/phase
20A/phase
Maximum power consumption is less than the 2-kilowatt, average power consumption of 1.2 kW.
UPS available 3KW, can be simultaneously connected to the computer and the power of the
machine.
Device accompanied with a standard 5-metre cable.
2-2-8 Operator Requirements
For the operator of the machine, it is recommended as follows:
Responsible for the operation and maintenance of the machine;
Keep in touch with the XunLang after sale services;
Can solve the problems by telephone;
Experiences of PC and Windows;
Technical Background of machine or electricity;
Capacity and theory about color, the knowledge of pre-printing and after-printing;
2-2-9 Installation Requirements
Installation requirements devices must be installed in a standard place. After the device in place,
use gradienter to check from the front to the back and make sure the ground is plain enough. It is
suggested that to install a telephone beside the operator console to facilitate the daily operation.
7 / 101
Shanghai Xunlang Technology
Before the device powered on, be sure to connect the ground, ground
wire to ground resistance can’t be bigger than 10 ohms
Warning!
2-3 Checking Before the Installation
Should report to the dealer the site's voltage in advance.
The machine′s power Jack is at the back of the machine ( on the left).
Air conditioning of the room should be sufficient, and keep above temperature (15-35 ° c).
Customers should prepare in advance an appropriate machine installation tools: above 1-ton
forklift truck or 1 ton crane. Must in advance inform Xunlang all the tools used by the
company or the resulting delay will be charged.
The customer should not open the box if the engineer is not presence.
Any damage of packaging should, before the engineer arrives, take pictures and immediately
report to the dealer.
Customers must complete all preparations and cleaning before the engineer arrives because
dirt may cause some damage to the machine.
Customers should prepare other devices, such as MAC and Photoshop Freehand, Illustrator,
other application software and 100M computer networks used by MAC.
During the installation, should have at least two operators next to the machine, who have
proficient computer skills, printing experience is preferred.
Before the operator gain enough experience, customers do not produce alone. Training
program must be taken in advance.
Ink from ordering to delivery need long time, the customer should order in advance to avoid
affecting the normal production.
The customer had better order some normal spare parts to void affecting the production.
On the shipping container labeled "right and left" and "before and after", please note when
loading and unloading.
Please carefully read the engineers machine check file, each item in the table are required
"YES", after everything is ready, pass it back to the Distributor customer service and
maintenance center before you start the installation.
2-4 Shipment, Opening Box and Checking
2-4-1 Shipment
When loading and unloading, must pay great attention to the wooden surface marks, handle
with care, may not be in superposition of weights above, and pay attention to the rain.
8 / 101
Shanghai Xunlang Technology
Transport vehicles must be smooth, and there shall be no sudden brake pulsation caused by
sharp movements, such as wooden boxes, rollover, and other factors which lead to wooden
box damage.
2-4-2 Opening Box
If there are any damage before opening the box, take pictures timely, and immediately
proposed treatment and inform Xunlang Company.
Remove the wooden roof.
After the removal of bolts around the wooden, remove wood around.
Remove the machine out of the box and check the accompanied articles
2-4-3 Checking
By the presence of machine engineers, check the articles one by one.
After checking, customer signs on the list and then bring back by a machine engineer. If
anything is missed, please indicate on the list,Xunlang will make it/them up ASAP.
9 / 101
Shanghai Xunlang Technology
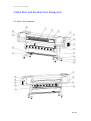
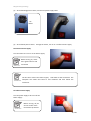
3 Main Parts and Random Parts Recognition
3-1 Main Parts Diagrams
10 / 101
Shanghai Xunlang Technology
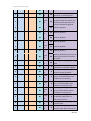
1
Raster Slip
10
Taking Up System
19
Right Feeding
Support Frame
2
Guide Rail
11
Taking up adjustment:
Knob Cabinet
20
Feeding Up Support
Crossbeam
3
Carriage Board
12
Castor
21
USB Interface
4
LCD Control Panel
13
Heating Control Panel
22
Power
Interface
5
Platform suction
regulators
14
Pinch Roller
23
Main Power Switch
6
Taking
up ele-motor 15
speed regulators
Taking Up Support Frame
24
Back Pressing(wheel)
Handle
7
Front
Handle
Left Upright Post
25
Left
Feeding
Support Frame
8
External
system
17
Ink Tube Groove(into the
Tube)
26
Ink Bottle Box
9
Right Upright Post
18
Y-motor belt
adjustment
27
wind
Pressing(wheel) 16
(IR)
drying
tension
UP
Supply
UP
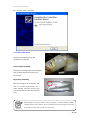
3-2 Random Parts Diagrams
Main Body
Left leg of Machine
Right leg of machine
11 / 101
Shanghai Xunlang Technology
Feeding in system
Taking up system
User Manual
Software CD
Power Supply Cable
9 “M5”screws for installing taking up system
22“M6”screws for installing two crossbeam and main body
12 / 101
Shanghai Xunlang Technology
4 Machine Installations
4-1 Install legs and body
Warning!
The total weight of the machine, including box, is above 300KG. For
safety concerns, the assembling requires at least 6 persons
Please Pay Attention: Do not drop the main body on your arms and legs.
(1) Unloading
Remove the machine body, along with the fixed iron panel from the bottom of the box.
Remove the fixed iron panel from the machine body.
Remove 3 screws.
13 / 101
Shanghai Xunlang Technology
(2) Take out the leg of the machine
Take out the leg of the machine,
Let the “feeding in support surface”
place as shown in the picture.
The surface that faces the right is left
leg, while, the other faces the left is
right leg
Left Leg
Right Leg
(3) Installation The Crossbeam
As it shows in the picture, fix the
screws on the right and left
legs to make the crossbeam firm.
(4) Locking Casters
As it shows in the picture, hit the
locking device of the caster with
foot till it touches the ground.
14 / 101
Shanghai Xunlang Technology
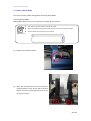
(5) Lifting The Main Body
(6) Place the leg of the machine and
Fix the screws. Put the main body
on the legs, connect the two parts
with the screws. Make sure they
are firm enough.
Warning!
Because the machine
is very heavy, it is quite
dangerous to drop it !
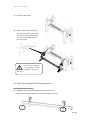
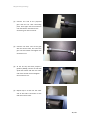
4-2 Install the Feeding In& Taking Up System
Installation Media Feeding
(1) Installation the media feeding left& right supporting frame.
Make the frames go through the beam and twist the bolts firmly.
15 / 101
Shanghai Xunlang Technology
(2) The Supporting Frame
Install support beams on the machine left and right bracket and fix screws.
Media Taking Up System Installation
(1) Put the” taking up” supporting
frame into the beam.
Firm the “taking up device” in the middle
beam, then must fix it at the right leg of
the machine.
16 / 101
Shanghai Xunlang Technology
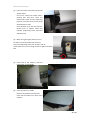
(2) Loading media roller
4-3 Install the Drying Devices
Fix the drying device in the left& right
supporting frame of the machine, Tighten
the captive screw and twist lock bolts.
If need adjustment of the drying device,
First loosen the bolts on both sides, and
then move the drying device to the
place of destination, finally tighten the
bolts on both sides.
4-4 Install the Ink Tank
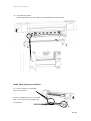
4-4-1 Connect Ink Tank Channels
(1) Prepare a pipe of the certain length
(recommendation10CM), link the pipe
ends with connecting nuts, and then
fitted with gaskets.
17 / 101
Shanghai Xunlang Technology
(2) Connect one side of the prepared
pipe with the ink tube connecting
point. Insert pipe into the connection
until the bottom. And then fix the
connecting nut at the ink tank.
(3) Connect the other end of the pipe
with the control valve, also insert the
pipe into the bottom and tighten the
connection nut.
(4) As the 1st step and then prepare a
pipeline (10CM), connect on side with
spiral and washer and then the other
end of the control valve and tighten
the connection nut.
(5) Repeat step 1--4 and Link the other
side of Ink tube's connection to the
tube and control valve.
18 / 101
Shanghai Xunlang Technology
4-4-2 Install the Ink Tank
Put the ink box that connected with
the tube into the ink bottle.
4-5 Install the Ground Cable
(1) Bury iron bar
use 1.5 meters in diameter of round steel (1cm - 2 cm)
or angles steel to bury in the damp soil.
Please confirm if iron bar that have
been buried in the ground near a
transformer or other national
power/communication cables or
facilities, should be kept away.
Attention!
1M-1.5M
from these facilities
(2) Irrigate the brine
Use 500 g of edible salt and 1000 g water to make salt water
and then irrigate on the iron bar.
Attention!
Salt must be completely dissolved
in the water.
To ensure the ground conductivity,
please irrigate salt-watering once
every month.
19 / 101
Shanghai Xunlang Technology
(3) Connect the Cable
Find a 2 mm diameter cable,and
use a welding gun to weld the cable
in the bar(uneasy to fall), Connect
the other end with the screws that
ground cable marked of the
machine. If there is no sign, could
connect to the bare shell of the
machine parts (part without spray
painted, such as Castor and the
common power strip ground cable)
(4)
Measurement of Earth resistance
Under the machine power is on, Use
the neon-electroscope to measure the
“Live and Neutral" of the machine
(measurement method, please refer to
the relevant document)
Then shut down the machine, turn the
multimeter's resistance to the minimum,
measure the resistance between ground
and neutral, the resistance should be
less than 10 ohms.
20 / 101
Shanghai Xunlang Technology
5 How to use
5-1 How to use--basics
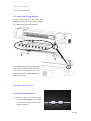
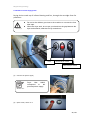
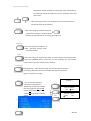
5-1-1 How to connect USB Cable
The following will described in detail how to connect the USB cable and switch machine.
Turn off the machine power before Connecting or disconnecting the USB cable
Attention!
As the picture shows, use the USB cable to connect the machine with the computer.
Attention!
USB interface of the PC
must be version 2 and
above.
USB
`
o
5-1-2 How to Connect the Power Cable
When connecting the power cable, in following specifications socket, connect the power cables:
Voltage: 220 V± 10%
Frequency: 50 Hz ± 1 Hz
Power: 8 A (more than 1500 W) {s-series 10 A (more than 2000 W)}
Please turn off the Power supply when connect or disconnect the
power cable.
Attention!
21 / 101
Shanghai Xunlang Technology
(1) As the following picture shows, connect the power supply cable:
AC
outlet
(2) As the follow picture shows,through the switch, turn on or cut off the Power supply.
Connect the Power supply
Turn the switch to 1 to turn on the Power supply
Attention!
Before turning on, check
if the ground wire is well
connected.
The first time connect the Power supply,
(USB Cable is well connected)The
Attention!Computer will shows that found a new hardware and then follow the
instruction.
Cut off the Power Supply
Turn the power supply to O to cut off the
Power supply
Attention!
Before turning off, be
sure to confirm if the
Print head is protected.
22 / 101
Shanghai Xunlang Technology
5-1-3 How to Install the Driver
If it is the very first time to link the machine to the computer,the computer will shows the new
hardware at the lower right corner, as the picture shows, now we install the driver step by step.
(1) Find The New Hardware
(2) Hardware Guiding Appears Automatically.
(3) Click automatic installation
23 / 101
Shanghai Xunlang Technology
(4) Click the “finish” complete.
5-1-4 How to Add the Ink
The picture will show how to add
the bottle ink or bag ink.
Bottle Package Ink Adding
Bottle Cap unscrewed, open the sealing film
with a knife and then pour the ink into
the ink tank.
B
Bag Package Ink Adding
Take the ink bag of out of the box, and
then in a corner with scissors, cut a
small opening, and then put the ink
into the ink tank the same way as bottle
ink's.
Before adding the bag ink, please confirm its capacity ( normally 1000ML), 3000ML
cartridge capacity of the machine, as far as possible ensure that the bag ink every time
Attention!
you add all ink, because the rest ink is not easy to save.
24 / 101
Shanghai Xunlang Technology
5-1-5 How to Add the Media
Can install 2 kinds of media: Rolling Media and Single Sheet Media.
Install the Rolling Media
Rolling Media, please only use the media that is suitable for the machine.
Roll media is heavy, be careful not to fall off on feet
Before installing the rolling media, please be sure to confirm the carriage's height.
Please confirm the printing side of the material.
Attention!
(1) Uplift The Press Roller Handle
(2) Move the left (facing the back of the machine)
supporting frame to the far left and fix the bolt
tighten, move the right supporting frame to the
far right (not fixed)
25 / 101
Shanghai Xunlang Technology
(3) Insert the media roller tube into the left
support frame.
First of all, confirm the media roller’s
printing side. And then, Insert the
media roller’s tube into the supporting
frame till it is fixed. There are two kinds
of Media roller’s tube:
inner diameter of 2.5-inch and 3.5-inch.
Please insert in support frame that
matches (supporting frame front-end
and back-end).
(4) Move the right support frame to cover
the other end of the media roller and fix it.
Insert the supporting frame into the other side of
media roller till it is firm enough. And then tighten the fixed
bolt
(5) From back of the machine, take the
media roller out 50-60CM.
(6) Insert the taken-out media
between the platform and the press
roller. Pull the media out in front of the
machine.
26 / 101
Shanghai Xunlang Technology
(7) Press the pressing roller firmly
Push down the pressing roller hand knob.
(8) Install the media holder
5-1-6 How to use the media
Details below show the usage of media types, as well as storage methods.
Media usable
Media usable can be the roller media or single sheet media.
Types:
Solvent machines can use: light boxes cloth, all kinds of solvent photo media, silk hanging flag
cloth, solvent-based art cloth, mesh fabric, all types of solvent-membranes, all kinds of body
stickers, various types of solvent-based canvas, various types of solvent-based PVC light, all kinds
of solvent-PP etc.
Water-based machine can use: all kinds of water-based PP, water-based canvas, and water based
PVC light, water-based film, water-based single membrane permeability, water-based photo
media etc.
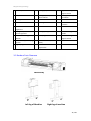
Allowed medium size
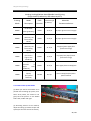
Available media sizes vary from Xunlang machine model. Details please refer to the list below.
27 / 101
Shanghai Xunlang Technology
Medium Size
Roller
Media
Single
Sheet
Media
E180/E180S
E320S
Maximum width
1900mm
3300mm
Minimum width
210mm
210mm
Maximum printing width
1890mm
3290mm
Media roller size
Diameter below 250mm
No restriction
Media roller weight
Below 60KG
Below 200KG
Media tube diameter
2 inches or 3 inches
No restriction
Maximum width
1900mm
3300mm
Minimum width
210mm
210mm
Maximum printing width
2890mm
3290mm
The attention of the media on the usage and storage
Please use special materials
The Media must use material of this machine, otherwise when a failure
occurs,
Attention! the company shall not be liable.
Media thickness
When you install a different kind of material, be sure to adjust the height
of the carriage, otherwise you may damage the carriage and print head.
Media Contraction
When you open the packaging materials, do not use them immediately,
as the indoor temperature and humidity, sometimes the materials are
scalable.
Please only use after a half hour.
Curly Media
Please do not use the media that is curled or warped, otherwise they will be
scratching, causing damage to the print head. When you need to save media
curly, please place the coating face outside.
Additional considerations
In the surface of the coating, do not place anything. When get media,
should wear cotton gloves, hands should not be used directly contact
with coatings ‘surface. Sometimes, coating on the ink does not print after
contact with hands or other objects. Transparent media and black on the
back of the media, is not always detected correctly. (Width)
28 / 101
Shanghai Xunlang Technology
5-1-7 How to Unload the Media
(1) Cut The Media
(2) Press once CUTING MEDIA Button to cut with the picture.
(3) Uplift The Press Roller
(4) Roll Back The Media
5-1-8 How to Use the Media Holder
To keep the materials plain, can use the media holder to keep the edges of the media. As it is
shown in the picture. Do not make the Media Holder all on the materials,if the media runs,the
are no extra space for the media holder. The media will arch up and destroy the print head.。The
correct way is to press 1/2 on the edges of the media.
29 / 101
Shanghai Xunlang Technology
5-1-9 How to Use the Vacuum Air Suction
To adapt to the different thickness of the material, need to adjust the power of platform air
suction, when heavy materials, increase platform air suction; when light materials, decrease it
accordingly.
To increase the power, clockwise rotate
the button as the right picture shows.
To decrease the power, counter clockwise
rotate the button as the right picture
shows.
Rotates to the counter clockwise till the
end, hearing the ”kacha” means the air
suction is shut down.
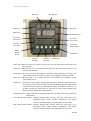
5-1-10 How to Use the Platform Heater
Platform Heating includes the front media, bed media and rear media heating. Controlled by the
heating control panel, as the following picture shows:
30 / 101
Shanghai Xunlang Technology
Setup Led
Running Led
Power Led
Alarm Led
Mode Led
Temperature led
Front Media
Rear Media
Heater Mode
Heater Mode
Bed Media
Print Head
Heater Mode
Heater Mode
Mode
Setting
Button
Stop Button
Increase
the Heat
Decrease
the Heat
Run Button
Power Led:When the power is turned on, the led is on; if it is off, the Board is not in power and
does not work.
Setup Led:When the led is on, have entered the setting mode, press the mode button once to
enter the Setup Mode.
Running Led:The Led is on means the platform is currently working (heating). If the light is off,
means platform does not work currently, or set temperature has been reached.
Alarm Led: When the light is on, it means that the current platform has problems, missing
temperature sensor.
Mode Led: Displays the current mode, including work and status. Heating control panel there
are 4 kinds of mode: before and after heating, bed heating, and print head heating.
Led will continue to replace in a working state display of 4 different modes (1, 2, 3,
4) After pressing the mode button to enter the set status, keep pressing mode
button can alter mode in the mode indicator.
Temperature Led: Displays the current working temperature, set status, shows the “already set
temperature”.
Front Media Heater Mode:Platform heating before printing, when the mode light is on,
represents current mode and the temperature led display
indicates the temperature is the temperature of front media.
Rear Media Heater Mode:Platform heating after printing, when the mode light is on,
represents current mode and the temperature led display
indicates the temperature is the temperature of rear media.
31 / 101
Shanghai Xunlang Technology
Bed Media Heater Mode:Bed Media Heater Led, when the mode light is on, represents current
mode and the temperature led display indicates the temperature is the
temperature of rear media.
Print Head Heating:When the mode light is on, represents current mode and the temperature
led display indicates the temperature of print head (The pattern for reserve
mode, machine does not have the mode of heating devices, so when mode led
shows this mode, alarm light is on).
Mode Setup Button:Press this button to enter set mode immediately, mode indicator led
displays the mode does not change, then press the mode button again to
switch to the next mode. Temperature indicator shows the temperature setting
is displayed.
Increase/Decrease Temperature:After you enter the setting mode, by pressing the two buttons
to change the current mode setting of maximum temperature.
Running Button:After entering the setup mode, when Setup is complete, you can press this
button to exit the setting mode. After one mode is stopped, enter setting mode,
press this button to return to work.
Stop Button: After entering setup mode, if want to stop a certain mode of heating, switches to
the corresponding mode, press this button to stop the mode of heating and exit
settings.
Setting cases:
(1) Set the platform heat to 35 degrees Celsius.
(2) Turn off the pre-heat
(3) Turn on the pre-heat , and the pre-heat set at 40 degrees Celsius, and the rear- heat setting
is 45 degrees Celsius
(1)
Mode Setting: Press the mode setting and shift it to middle-heating status, click
increase/decrease button to set it at 35 Celsius , and then press "running" button to exit the
mode setting.
(2) Mode Setting: Press the mode setting and shift it to pre-heating mode, press "Stop" button
to exit the mode setting.
(3)
Mode Setting: Press the mode setting and shift it to pre-heating mode, click
increase/decrease button to set it at 40 Celsius , and then press "running" button to exit the
mode setting. Again, press the mode setting and shift it to pre-heating mode, click
increase/decrease button to set it at 45 Celsius and then press "running" button to exit the mode
setting.
Each time to enter the "Setup Mode" can only set up one mode of heating, cannot set the
other heating mode meanwhile. If need to set up more than one mode of heating, such
as case 3, respectively, need 2 times to enter the setup mode.
Attention!
Recommended settings for the pre-heating temperature 40 Celsius, 38 Celsius warming
platforms, rear heating 45 Celsius. But if the material is too thick it should be
Attention!
appropriate increase setting temperature.
32 / 101
Shanghai Xunlang Technology
5-2 How to Use-Printing
5-2-1 how to feed in/take up media and set starting position.
Feeding In Media:
(1) Make the machine to return to the standby interface, if not on standby, press the
menu button to exit all menus to return to the standby interface.
(2) Hold
channel, press
button to stop
button to bring the button forward, make it through the printing
button to make the roller move automatically. Release the
moving the media.
Taking up Media:
(1) Connect to make the machine to return to the standby interface, if not on standby, press
the menu button
to exit all menus to return to the standby interface
(2) Hold
button to bring the media backward,press
button that will not make the
33 / 101
Shanghai Xunlang Technology
media “winding”, and have to WIND the media by hand. Release the “button” to stop
moving the media.
How to set the starting position:
(1) Use the LCD control panel to set the staring printing point.
Connect to make the machine to return to the standby interface, if not on standby, press the
menu button
to exit all menus to return to the standby interface
Hold the
button to move the carriage to the start printing point,
then press the ORIGINAL POINT
button.
(2) Use the control software to set
the starting printing point.
Use the TAPE MEASURE to measure from
the right side of platform to the left side.
Read out the number and fill it in the
white blank at the edge of the toolbar of
software. The unit is CM
34 / 101
Shanghai Xunlang Technology
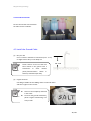
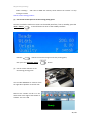
5-2-2 How to check the print head according to “test printing bar”
Print head test checks whether all the spray nozzles open, nozzles are in an optimal state.
There are two ways to print the test bar:
(1) Using the LCD control panel to print.
After setting materials and print starting position and return to the standby interface, if not on
standby, press the menu button
to exit all menus to return to the standby interface.
Press the Menu Button
to enter the print head status interface.
Then Press CONFIRM.
(2) Use CONTROL SOFTWARE to print.
After setting the materials and printing staring position,click the TEST BUTTON
on the toolbar and select the Print Head Status to carry out print head test printing.
Use the eyes to check if the picture missing some lines, or run diagonal lines. If not, start to print
the file. If any of the above conditions occur, have to clean the print head and test it again.
35 / 101
Shanghai Xunlang Technology
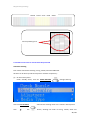
Normal(Intact)Print
Head Status
Seriously Missing Lines
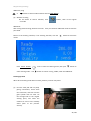
5-2-3 How to auto-clean or manual-clean the print head
Automatic Cleaning
Four modes of automatic cleaning: strong, middle, weak and additional.
All these can be done by LCD control panel or software respectively:
(1) On LCD control panel.
Under standby status, click the CLEAN BUTTON
to begin cleaning.
Click once menu button
will enter the cleaning menu as it is shown in above picture.
Click
button, showing the mode of strong, middle, weak and
the
36 / 101
Shanghai Xunlang Technology
additional, using
or
button to choose mode and then click the enter button.
(2) Software cleaning
On the blank of control software, click
set mode.
button, clean at the original
Additional:
After strong mode cleaning, still does not work,then you could use additional mode to clean the
print head.
Return to the cleaning interface, if not cleaning interface, click the
menus.
button to exit all the
Press Menu Button
once to enter the cleaning menu ,then press
button to
enter cleaning mode,click
button to choose: strong, middle, weak and additional.
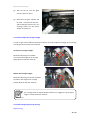
Cleaning by hand
When all the cleaning mode does not work, please try to clean it by hand.
(1) Find the matt pad and ink pump
piping connections, brush aside
the connection, and then connect
glass cylinder with ink matt. Let
the carriage back to the original
starting point, and allow the
machine to return to the standby
status (refer to the previous
section).
37 / 101
Shanghai Xunlang Technology
(2) Take out the ink from the glass
cylinder, about 15-20 ml.
(3) Disconnect the glass cylinder and
ink matt,reconnect the ink matt
and ink-taking channel to carry out
cleaning( Please see the former
chapter as reference)
5-2-4 How to adjust the carriage’s height
In order to get used to different thickness material, we need to adjust the height of the carriage
according to the thickness of the material.
Increase the carriage’s height:
Rotate the adjusting nut clockwise
can increase the height of the carriage
(larger distance with the material)
Reduce the carriage’s height:
Rotate the adjusting nut counter-clockwise
can reduce the height of the carriage
(smaller distance with the material)
The carriage head can adjust between 0mm-5mm. Suggest the print head’s
height is 1-2mm above the material.
Attention!
5-2-5 How to begin/pause/stop printing
Begin Printing:
38 / 101
Shanghai Xunlang Technology
(1) Open the file about to print, run the software. Click the running button to choose the file.
Also can choose the file in RIP software.
(2) Set the printing parameter
Set the print properties, sets the white bar in the software real-time parameter setting, print
speed, print mode (single and dual) and whether to use the file set.
(3) Begin Printing, after confirming the task properties, click OK to start printing
Pause Printing:
Pause Printing can be done by LCD control panel or software respectively.
LCD control panel:
Printing…
Pause
Pause
Clean Head
During Printing press the pause/resume button once to pause printing that in progress, the LCD
will automatically display the Pause option; press the cleaning button to begin the nozzle
cleaning.
Control Software:
During printing, click the pause button to
pause printing after which can clean the print
head.
39 / 101
Shanghai Xunlang Technology
Then click continue button to
resume the previous printing.
Stop Printing:
Stop printing can be done by LCD control panel or software respectively.
LCD control panel:
Printing…
Sure to cancel?
YES
NO
Sure to cancel?
YES
NO
During the printing,click the “cancel button ”once then click the “right direction button” and
then click “YES” to stop the current printing.
Control Software:
During the printing, click the “stop”
button on the toolbar and then click the
“enter” to
stop the current printing.
The printing cannot
recovery after stop.
Attention!
5-2-6 Classification of Different Printing Mode
The following will introduce in more detail the different printing mode with different “PASS”,
productivity every hour and recommended printing mode.
40 / 101
Shanghai Xunlang Technology
Printing Mode Available
Xunlang VanGogh(Eco-Solvent)Double Print head Printing Mode
(Single Head will reduce productivity by 45%)
Printing
Mode
Mode
Description
360DPI
Draft Mode
(Average Quality)
360DPI
Fine Draft
(Normally Use
Fast Printing
Mode)
360DPI
Saturated Fine
Draft
(Ink is more
saturated than
fine draft)
720DPI
Fast&Fine
(Fast Mode)
720DPI
Saturated&Fine
(Precision is
higher than
Fast&Fine)
PASS
Number
Productivity/H
(In Theory)
Materials
Recommendations
34 ㎡/H
Exterior lighting light box
cloth/PP media
(process color images)
24 ㎡/H
Exterior lighting light box
cloth/PP paper
(process color images)
24 ㎡/H
Exterior lighting light box
cloth/PP paper
(process color images)
21 ㎡/H
Exterior lighting light box cloth
paper/PP paper/photo paper/
car body (solid color images)
6PASS
14 ㎡/H
Exterior lighting light box cloth
paper/PP paper/photo paper/
car body (solid color images)
720DPI
Fast High Quality
(Precision is
higher than
Fast&Fine)
8PASS
16 ㎡/H
car body post/photo paper/ the
lamphouse cloth
720DPI
Saturated
High
Quality
(slow speed high
quality precision
is higher than fast
speed mode)
8PASS
11 ㎡/H
car body post/photo paper/ the
lamphouse cloth
720DPI
Super High
Quality
(For special
Material)
12PASS
8 ㎡/H
Lamp light sheet/film/film/and
other special materials
4PASS
4PASS
4PASS
6PASS
41 / 101
Shanghai Xunlang Technology
Xunlang VanGogh(Water-based)Double-head Printing
(Single head’s productivity will reduce by 45%)
Printing
Mode
Mode
Description
PASS
Number
Productivity/H
(In Theory)
Materials
Recommendations
360DPI
Draft Mode
(Average Quality)
4PASS
34 ㎡/H
PP paper (process color images)
360DPI
Fine Draft
(Normally Use
Fast Printing
Mode)
4PASS
24 ㎡/H
PP paper (process color images)
720DPI
Fine Draft
(Normally Use
Fast Printing
Mode)
6PASS
21 ㎡/H
PP paper/photo paper/film
(solid color Image)
720DPI
Fast High Quality
(Precision is
higher than
Fast&Fine)
6PASS
14 ㎡/H
PP paper/ film paper/canvas
(solid color image)
720DPI
Fast High Quality
(Precision
is
higher
than
Fast&Fine)
8PASS
16 ㎡/H
Photo paper/external lamp/film
720DPI
Super High
Quality
(For special
Material)
12PASS
8 ㎡/H
Internal lamp/film/film/other
special material
5-2-7 How to Take Up the Media
(1) When put the file that about to be
printed into the taking up system, use 3
three sticky notes( Car stickers or PP
gum) Stick the picture on the Media
Tube's left, middle and right.
(2) According tension of the material,
adjust the taking up media's torque and
speed (see the next section for details)
42 / 101
Shanghai Xunlang Technology
5-2-8 How to Use the Dying System
Drying device made up of infrared heating and fan, through the cartridge fuses for
protection.
Warning!
Do not let the children get close to the machine or unscrew the fuse
tube caps.
When the dryer work, do not put your hand into the gap between the
dryer and material, otherwise it may cause burns.
Fuse
Infrared dryer switch
Infrared dryer control
(1) Connect the power supply
Attention!
Dryer
Max
800W,
correspond
to
the
provided power supply.
(2) Open switch, switch to 1.
43 / 101
Shanghai Xunlang Technology
(3) Adjust infrared heating temperature, by adjusting knob to change the infrared heating,
clockwise to increase, counterclockwise to decrease.
If you need to replace the fuse tubes, please turn
to professionals for a replacement, If replace on
your own, please disconnect the dryer plug.
Warning !
5-2-9 How to Protect the Print Head
Water-based Machine and Eco-solvent Machine have different ways for protection.
Water-based Machine
Under the standby condition of LCD control Panel, Click
“CONFIRM BUTTON”.
Eco-Solvent Machine
Under the standby condition of LCD control panel,
Click
to move the carriage out of the
head-protective plate,pour some cleaning
liquid into the glass cylinder,
and click
Button for protection
44 / 101
Shanghai Xunlang Technology
The maintenance is limited to maintenance before off-work every day. If long
(more
2 days)
do not use the
(the machine is off), the
5-2-10 How to time
advance
thethan
printing
quality(Adjust
themachine
Print Head)
maintenance see 7-7.
Attention!
5-3 How to Use--the LCD Control Panel
5-3-1 LCD control panel layout
Attention!
If some of the features of software settings and control panel settings
overlay, is subject to the last settings. For example, white edge 200 was set
in the software, and then in Control Panel, set the White side is 300, the final
print will print 300 from the white.
5-3-2 Press Buttons’ Instructions
Buttons do not need to attached, if the display shows an error, all key is invalid.
:Long press this button to control the carriage moving, move to the
45 / 101
Shanghai Xunlang Technology
destination, release the button, and carriage stops immediately; If
the mode has already entered menu, then it would be return and
enter menu.
:After entering the menu, use the button UP or Down to control the
“forward or back” of the material.
Origin Point
:After connecting the machine and press
to move the carriage to a specified location,
and then press this button to set starting printing point.
Cutting Paper
:After connecting the machine and
under non-menu setting mode,
(Currently Useless)
Cleaning
:After connecting the machine and under non-menu setting and printing mode,
press the CLEANING button could carry out the cleaning. For more details,
please refer to the tree-map for menu structure
Pause/Continue
:During printing,when the lines break, can press this button to pause
the printing, then clean the print head after which press the button
again to resume the printing.
Printing…
cancel
:you can click this button to
cancel the printing process.
Afterwards, you will see a dialog
box with 2 options: YES and NO.
Choose YES to stop the printing.
Choose NO to go back to standby
status.
cancel
Sure to cancel?
YES
NO
Enter
Sure to cancel?
YES
NO
Enter
46 / 101
Shanghai Xunlang Technology
: click it to affirm and save the alteration.
Menu
:you can set some parameters by clicking this button. It has the same function as
the setting in the software. Both the machine and software setting take the
last setting data for reference.
For example, firstly, you choose single-direction, high-speed in the software
setting, then you choose both-direction, low-speed in the panel of the machine.
Finally, the machine will print under low-speed, both-direction.
There show you how to change single-direction printing to both-direction
printing. When the machine is standing by, click the MENU button and choose
both-direction, save it and exit. FYI, right button means enter, left button
means back to previous menu, up button means rewrite parameter. And after
you input the expected parameters, remember to click Enter to save and
back to previous menu.
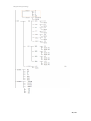
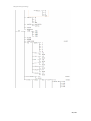
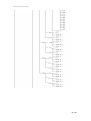
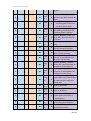
5-3-3 Menu Dendrogram
47 / 101
Shanghai Xunlang Technology
48 / 101
Shanghai Xunlang Technology
49 / 101
Shanghai Xunlang Technology
50 / 101
Shanghai Xunlang Technology
51 / 101
Shanghai Xunlang Technology
52 / 101
Shanghai Xunlang Technology
6 How to Use the Software
6-1 Install the Software
Pick up the CD of Xunlang printing control software and insert to the computer.
Firstly, find the file named “dotnetfx”. Double click it and you will see dialog box below:
Click “yes”, and you will see dialog box below.
Then click “I agree” and “install” to start the installation.
Finally, click “OK” to finish the procedure.
53 / 101
Shanghai Xunlang Technology
Open the “release” disk, double click the icon ”setup.exe”. You will see dialog box below:
Click “Next”:
54 / 101
Shanghai Xunlang Technology
Choose the installation disk, the default installation disk is C\Program Files\PrintManager. If
you want to install it in another place, click “view” and choose the disk you like. Then click
“next step”.
We usually suggest customers to install the software in the default disk:
Caution! C\Program Files\PrintManager. As in other disk, maybe it will be deleted
carelessly or there may be some unexpected issues.
..
Then click “Next” and you will see the dialog box below:
55 / 101
Shanghai Xunlang Technology
Click “Close”.
The installation is accomplished.
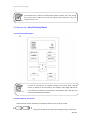
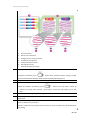
6-2 Interface Description
Double click the icon
on the desk, or click “PrintManager” in “Start/Programs”,
the window of Printmanager will turn up to you.
At this moment, you have to process the factory setting. Right click
a dialog box, double click the
, there will be
in “attribute/search target”. You will see
another dialog box below:
56 / 101
Shanghai Xunlang Technology
Double click “factoryData”, see below:
Input password“00210400”, see below:
After finishing the “factory setting”, change to “extension setting”. See dialog box below:
57 / 101
Shanghai Xunlang Technology
After setting all the parameters, click ”generate”. See dialog box below:
Finally, restart the machine.
:
Caution!
Choose the correct configuration files, if not, the machine cannot work
normally as it should be.
6-2-1 Tool Bar
58 / 101
Shanghai Xunlang Technology
From left to right:
(1) Add task: Open the RIPed image file in the appointed folder. If the RIPed image file
stored in the root directory of disk E, you can just open the disk E and choose the image
file you wanted.
RIPed image files should not store in disk C. The operation system usually
Caution! installed in disk C. If its capacity is not enough, it will affect the RIP process
speed and result in error report.
(2) Delete task: Delete task which has been done.
(3) Print: Before printing, check the image file and then click it to start.
(4) Suspend: suspend the
current printing process. When you
click the icon, its
status will change to “continue”. Click
it again to restart the
printing process
This function is same as that on the led panel.
(5) Stop: stop the current printing process. If you click it, the printing process cannot be
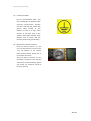
restarted again.
(6) Test of nozzles: to print the test image of the nozzle.
OK,we can start printing.
No, you’d better clean the
print heads.
(7) Clean: clean the print heads. Click it to let the ink pump start cleaning the heads.
(8) Move towards left: move the carriage to the left. The same as the led panel.
(9) Move towards right: move the carriage to the right. The same as the led panel.
59 / 101
Shanghai Xunlang Technology
(10) Media back: move the media back. The function is same as the led panel.
(11) Media ahead: move the media ahead. The function is same as the led panel.
(12) Reset: move the carriage to the origin position.
Caution!
If the test image looks like the above second one, it means you have to clean
the print heads. And it still the same after several cleaning processes, you’d
better contact the local distributor.
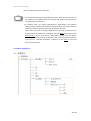
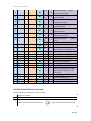
6-3 Print Head Calibration
This paragraph will discuss the calibration process in detail.
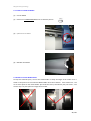
6-3-1 Adjustment Steps
1. Print the head testing bar to check if the ink drop is correct. Menuhead testyes.
Or Senior menu modelhead testvsd1yes. In the senior model, there are 4 different
VSD model and test images. And the color is different. If there are fitful blocks or vacancy, the
head is jammed. You should clean it until its printing status reaches the best.
Before calibrating, check the heads’ status. If it’s not good, clean it until its
best status comes up.
Caution!
2. There are 2 aspects of calibration: hardware calibrating and software calibrating.
For hardware calibrating, there are 2 major procedures, including nozzle discrepancy test and
incline test. We can adjust the print head holder to align the print head’s left-right incline and
front-back level, in order to assure the head’s level and parallel towards the printing platform.
Nozzle discrepancy test: Senior menu modelcalibrationnozzle discrepancy testyes.
See the picture above, when you get the test image, check it with 50-100times magnifier. The
basic color is black. The location relation between black and other colors: at the same level and
contrast to K, the first group and second group of nozzles’ position. It also shows the relative
position of the 2 group of nozzles in same color. As the K is far away from Y, it’s apparent if there
60 / 101
Shanghai Xunlang Technology
is nozzle discrepancy. So you’d better check the color K and Y. If both are 3 straight lines, they
should be overlapped. But if K has 3 lines and Y has 2 lines, they should be crossed to each other.
FYI: the image is opposite in the magnifier. If the test image looks like the above “normal” one,
you can start printing process. Or you have to adjust the print head until it is “normal”.
Sometimes, the head may have problem, such as the 2 group of nozzles in same color is
incompatible. Of course you cannot get a good test image.
If the machine has 2 heads, there are 2 test images. You can adjust the 2 heads separately.
Incline test: senior menu modelcalibrationincline testEnter.
After adjusting the level of the head(left-right incline), you cannot assure the surface of head is
horizontal. Then you can check it by click incline test menu.
61 / 101
Shanghai Xunlang Technology
Caution: the test bar printing process is divided to 2 step, the first is printing from right to left for
2 times, then from left to right for 2 times. If the wide line is not clear enough, you can check the
slim line, which is formed by dots and is easy to view. If the head’s inner is higher than the
exterior, you will get test bar as the second picture above. Otherwise, you will get the third
picture above. Besides, if the test bars from both direction is the same, you’d better not only
check whether the media is vertical to the guide rail, but also check whether the platform is
horizontal. At this moment, you can print the test bar in another place of the media to check
whether the test bar looks the same.
If the malposition of the 2 directions is too much, you can adjust the both-direction calibration
and carefully visual checking is unnecessary.
Calibrate the verticality of the head by adjusting the screws. See picture below.
Procedure:
(1) Calibrating the individual verticality
of the 2 heads. The test bar
should looks like the picture below.
62 / 101
Shanghai Xunlang Technology
(2) Then adjust the spacing of the two
heads.
Only need to adjust one head. And
meantime, in order to assure the
verticality of the head, you have to
adjust left-right screw at the same
amount.
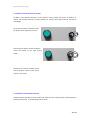
6-3-2 Double heads Spacing Calibration
If you are using 2 heads, you have to implement this calibration. Generally speaking, as the
second heads is far away from the guide rail, its printing quality will be inferior than the first head.
If the testing result is opposite, you’d better check the installation of the head and the head
holder. Sometimes result from the mechanical precision, it’s very hard to conform the 2 heads. At
that moment, you should assure one head is splendid firstly.
Calibrating of the vertical spacing of the 2 heads: for the machine with one head, the hardware
calibration is finished till now. But for 2 heads machine, you have to calibrating the vertical
spacing.
Senior menu modelcalibrationvertical spacing calibratingenter. See picture below:
Caution: the triangle above is printed by the first head, the trapezoid below is printed by the
63 / 101
Shanghai Xunlang Technology
second head. The spacing between the lowest line of the triangle and the top line of the
trapezoid is the same as the spacing between the heads’ own nozzles. Simply speaking, if you
cannot distinguish the limit of the triangle and trapezoid, calibration is unnecessary.
Generally, after malposition and incline calibration, the heads are horizontal. You only have to
paralleled move the second head close to the first one.
When you move the second head, there may be left-right incline. At that moment, you have to
retest the malposition and recalibrating.
6-3-3 Color Calibrating
Software adjusting: including stepping, both-direction, left-align, right-align etc.
Stepping adjusting:
1) normal model:
menucalibrationmediaprint
This simple operation only print one line. The default stepping is 4 PASS, the same as 1 PASS.
Every bar has a number below. Check which one is best and read the number. Then add the
number you got to the default number. Finally, input the calculated number. Reach the second
place after decimal point.
2)senior model:
senior menu modelcalibration->mediachoose PASS numberprint.
Under senior model, there are different media and PASS number. You’d better adjust the 4 PASS
firstly and then 3, 6, 8 or other PASS number for the same media. Different media have different
stepping parameter. Before printing, affirm the media is consent to the default media name.
64 / 101
Shanghai Xunlang Technology
Attention please, under this model, the machine will continuously print 10 circulation. For 4 PASS
printing, there are 3 lines. The 1st line is consequent of 1st PASS and 2nd PASS, the 2nd line is
consequent of 1st PASS and 3rd PASS. The 3rd line is consequent of 1st PASS and 4th PASS. If the
stepping is incorrect, the error of 3rd line is the most apparent. Besides, as there are 10 circulation,
the printing process needs a long time. But we can find out stepping error easily and see whether
the precision of feeding have periodic variation. For 6 PASS, there are 5 lines and 7 lines for 8
PASS.
The lateral test bar print in color K and M. If there’s no physic malposition between the 2 heads,
the stepping of these 2 colors will be consistent to each other. You’d better pay attention to the
left color blocks of the test bar. If the head is not vertical, there will be spaces in the left color
blocks.
You can click the cancel button to stop printing.
If you feel very difficult to affirm the origin position, check the left one and right one. The origin
position is close to the one with less apparent fault. And you can also check it in different media
width, as the mechanic precision will be checked at the same time.
Caution: if the difference between the machine’s stepping and real printing is very big, check the
1st line firstly. Maybe the data needs a big modification. The machine allows 50% modification
every time. When the 1st line origin position is ok, slightly adjust the 3rd line origin position.
The stepping of one head is half of the two head’s.
3)both-direction adjustment:
senior menu modelcalibrationresolution(360*720)VSD(1,2,3,4)both directionprint.
Check the test bar, find out which one is the best aligned. Add the data of it to the default, and
input to the setting menu. FYI, different resolution and VSD has different parameter, and you
have to do adjustment under every model(there are 4 VSD in 360dpi; 4 VSD in 720dpi). If the
machine supports high and low grades, you have to adjust it separately. But for machine which
has no such function, you only need to adjust high or low parameter.
4)left aligning:
senior menucalibrationresolution(360*720)VSD(1,2,3,4)left aligningprint.
65 / 101
Shanghai Xunlang Technology
Observe each color’s test bar, find out the best one. Add the data below to the default and input
to the right place of the parameter setting.
In the picture above, 2 is the opposite group of nozzles of the same color. The first group of K (K1)
is the origin of 1. And all the other colors’ origin is from K1.
If the left group of nozzle is 1 and right group is 2. There are K1K2,K1K1,C1C2,C1K1,M1M2,
M1K1,Y1Y2,Y1K1.
FYI, the 4 different colors are in the same head and 8 groups of nozzles’ position is fixed. If the
physic position of the head is fixed and under the default parameters, the origin position of the
test bar should be consistent. If there is great difference, it means the physic adjustment is not
good enough and you have to repeat the malposition test and incline test of the heads.
66 / 101
Shanghai Xunlang Technology
If the machine has 2 heads, the adjusting principle is same the one head machine’s. But the test
bar will be double sized(H1K1,H1C1,H1M1, H1Y1). The same color’s different position will be
consistent to the H1K1, and so does H1C1, H1M1, H1Y1 etc. H1 is the left head when you are
facing the machine, and H2 is the right head.
In the test bar, H1K2,H2K2,H1K1,H2K1,H1C2,H2C2,H1C1,H2C1,H1M2,H2M2,H1M1,
H2M1,H1Y2,H2Y2, H1Y1, H2Y1, H1K2 is combination of H1K1 and H1K2.
5)right aligning:
senior menucalibrationresolution(360*720)VSD(1,2,3,4)right aligningprint.
In the test bar above, 1 is the result from the left group of nozzles’ both-direction printing (K1, C1,
M1, Y1). 2 is the result from left group of nozzles print towards left and right group of nozzles
print towards right.
67 / 101
Shanghai Xunlang Technology
If there are 2 heads, the origin is separately from H1K1,H1C1,H1M1,H1Y1. The other nozzles
will be consistent to the origin. In the test bar, H1K2,H2K2,H1K1,H2K1,H1C2,H2C2,H1C1,
H2C1,H1M2,H2M2,H1M1,H2M1,H1Y2,H2Y2, H1Y1,H2Y1H1K2 are result from H1K1
print towards left and H1K2 print towards right.
No matter it’s left aligning or right aligning, both defines 2 grades of basic standard. The first
standard is the color itself and the second standard is K. Then, not only the chromatography of
different colors but also the relative position of the same color has been adjusted. Especially for
machine with 2 heads, it’s very useful to improve the quality of pure color block.
As the control software support 360 and 720dpi, and each have 4 different VSD model, and each
VSD model has left aligning, right aligning, both-direction, the adjustment has a lot of options. In
order to get high-level printing, you’d better adjust all of them one by one.
If you want high quality printing, we seldom use VSD1 and VSD2, so you don’t need to adjust
them.
When calibrating, don’t input the data read from the test image. You have to
add or subtract on the default data.
Caution!
After inputting the data, click the “enter” to print test bar, until the 0 position overlap the origin
position.
In order to get the highest precision, you’d better adjust all the heads to
overlap on the 0 position. If not, repeat the chromatically calibrating.
Caution!
68 / 101
Shanghai Xunlang Technology
7 Maintenance
In this paragraph, the regular check and maintenance of the user or engineer is discussed.
Please observe the regulations in this paragraph, or there may be
unexpected destroy to the machine.
Caution!
7-1 Scheduled Maintenance Guide
Don’t turn off the machine before adopting protective procedure to the print
head. Never shut the machine for more than one week, even though you
Caution! have put the cleaning liquid in the head protective plate.
1
2
3
4
5
Items
Content
performer
Daily check and
maintenance
Check and clean the heads
Clean the head protective plate
Clean the scraping sheet
Test the printed picture
Handle the wasted ink barren
Grease the guide rail
Grease the belt wheel
Clean the media holder
user
Weekly check and
maintenance
Clean the surface of the heads
Grease the guide rail
Grease the belt wheel
Clean the bottom of the carriage
user
Monthly check
and maintenance
Replace the scraping sheet
Check the coupling and jackscrew
Clean the interior dust
Clean the computer system/anti-virus
user
Quarterly check
and maintenance
Clean the ink tube system
Replace the ink tank
Check the UV heating
Check the platform heating
Check the motor and driver
engineer
Annually check
and maintenance
Replace the head protective plate
Clean the ink system
Replace the ink pump
Horizontalize the guide rail and platform
total check and the screws’ inspection
engineer
69 / 101
Shanghai Xunlang Technology
7-2 Daily Check and Maintenance
7-2-1 Print Head check and cleaning
Daily check of the head
before turning on the
machine
After starting the machine, print a
total head status testing bar and
save it.
Test of head before
printing
Every time before printing, check
the head whether they are jammed
or surface dry.
Cleaning of the head
when printing
Daily check of the head
after work
If the head jammed when printing,
suspend the project and clean the
head right away.
After finishing the last image, print a
total head status testing bar and
contrast with the daily starting one.
If the head jammed, manually clean
it right away, until get the same
testing bar as the daily starting one.
Testing of head
1, feed in media
2, set the starting point(white
edge)
3, when the machine is
standing by, carry out one
testing procedure.
Cleaning of head
1, when standing by, press
clean button once.
7-2-2 Head Protective Plate Cleaning
Every day, before turning on and off the machine, clean the head protective plate, in order to
assure there are no dirt on the head.
(1) Inject some cleaning liquid to the plate
with the cylinder.
(2) Clean the plate with cotton swab, both
the cotton mat and circumference.
70 / 101
Shanghai Xunlang Technology
7-2-3 Scraping Sheet Cleaning
Wipe both sides of the scraping sheet with
cotton swab, which had been immersed in
cleaning liquid.
Water based cleaning liquid should not be mixed with solvent cleaning
Caution!
liquid. Otherwise, the head may be jammed or broken.
7-2-4 Printing Test Calibration
If the heating system, cooling fans and print heads are all in good status, start printing the test bar.
The test bar can be formed by lines, characters and color block. See the picture below. The lines and
characters must be black(C80,M80,Y80,K100). The color block can be formed by single color block
(K、C、M、Y、LC、LM) or mixed color block.
Correct printed picture:
71 / 101
Shanghai Xunlang Technology
Before printing the test image, make sure the print head is in its best
Caution!
status.
Color process problem:
If the test bar looks like the
picture above, the heads need
calibrating again. See 6-3.
Broken ink drop of single
color:
See picture above, if there are
white line or white block in the
black block, clean the print
head and reprint test bar. See
5-2-2.
72 / 101
Shanghai Xunlang Technology
All the colors turn white:
See picture above, if every
color turns white or there
are white lines in every
color,
recalibrate
the
feeding in speed of media
(6-3-2)
and
stepping
volume (6-3-5). If it doesn’t
work, reset the heating
temperature. If it still
doesn’t work, you have to
change the media. Relative
information see 5-1-6.
7-2-5 Wasted Ink Bucket Disposition
Get out the barrel of wasted ink when you finish daily work. Handle the wasted ink according to
local law and regulations. If not, the wasted ink may flux and damage the machine.
7-2-6 Guide Rail Oiled
Grease both the up and down
groove of the guide rail. And there
should be 5-6 grease position of the
whole rail.
73 / 101
Shanghai Xunlang Technology
The lubricating oil must be grease or liquid. Things like butter is
forbidden to use, as it can speed up the ageing.
Caution!
7-2-7 Mechanical Movement Wheel Oiled
As the guide rail, the belt wheel needs to
be lubricated regularly, in order to
affirm the smooth and steady of the
movement. The positions need
lubricating as below:
Belt wheel
Synchronic wheel
X-axial synchronic wheel
74 / 101
Shanghai Xunlang Technology
Y-axial synchronic wheel
The X/Y-axial synchronic
wheel only needs
lubrication once a month,
Caution! and only a little every time.
For example, if it’s liquid,
1-2 drop is enough.
Y-axial holder
7-2-8 Media Holder Cleaning
Clean it with cotton swab, which should
been immersed in cleaning liquid.
7-3 Weekly Check and Maintenance
7-3-1 Print Head Cleaning
(1) Turn off the machine.
Move the carriage to the left.
75 / 101
Shanghai Xunlang Technology
(2) Add some cleaning liquid to the
cotton swab and lightly wipe the
surface and circumference of the
print head.
Never wipe the print
head heavily. Or the
head may be broken.
Caution!
7-3-2 Guide Rail Oiled
See 7-2-6.
7-3-3 Mechanical Movement Wheels Oiled
See 7-2-7.
7-3-4
Carriage Bottom Surface Cleaning
see 7-3-1.
Turn off the machine.
Move the carriage to the left. Then
clean the bottom with cotton swab.
7-4 Monthly Check and Maintenance
7-4-1 Change the Scraping Sheet
Pull out the scraping sheet. Remove
the screws (see picture). And clamp
out the sheet.
76 / 101
Shanghai Xunlang Technology
7-4-2 Check the Coupling and Jackscrew
Check and tighten the jackscrew of
X-axial and Y-axial synchronic wheel.
7-4-3 Clean the Body’s Internal Dust
You can use the blower gun to remove the
inside dust, as the electrical parts’
lifetime may be affected by the dust.
7-4-4 Organizing Computer/Antivirus
Clear the computer system regularly.
Make sure the capacity of the software disk is no less than 10 G.
7-5 Quarterly Check and Maintenance
7-5-1 cleaning the Ink Channels System
Install the special cleaning ink tank and inject cleaning liquid. See 4-4.
Connect the tubes. See 4-4.
Start cleaning.
Repeat the steps above, until the ink tubes are clean.
7-5-2 Change the Ink Sac
Contact the local distributor.
7-5-3 Check the Infrared Heating
Contact the local distributor.
7-5-4 Check the Platform Heating
Contact the local distributor.
77 / 101
Shanghai Xunlang Technology
7-5-5 Check the Motor and Driver
Contact the local distributor.
7-6 Annually Check and Maintenance
7-6-1 Change the Head Protective Plate
Contact the local distributor.
7-6-2 Clean the Ink Channel and Ink Pump
Clean the ink system please see 7-5-1.
Chang the ink pump please contact the local distributor.
7-6-3 Check the Level of Guide Rail and Platform
Contact the local distributor.
7-6-4 Check the whole Machine and Loose Screws
Contact the local distributor.
7-7 Maintenance During Turning Off for a Long Period
7-7-1 Long period (2 days --1 week) turning off preparation
If you wanna shut the machine for more than 2 days, please proceed the steps below:
1, clean the scraping sheet. See 7-2-3.
2, clean the head protective plate. See 7-2-3.
3, maintain the print head.
Open the machine once 2 days and test the head’s printing status. See 7-2-3. Then, turn off the
machine and maintain the print heads. See 5-2-9.
7-7-2 Long period (1 week --4 weeks) turning off preparation
If you wanna shut the machine for more than 1 week, please proceed the steps below:
1, clean the scraping sheet. See 7-7-1.
2, clean the head protective plate. See 7-7-1.
3, maintain the print head. See 5-2-9.
7-7-3 Long period (above 4 weeks) turning off preparation
If you wanna shut the machine for more than 4 weeks, please proceed the steps below:
1, clean the scraping sheet. See 7-7-1.
2, clean the head protective plate. See 7-7-1.
3, clean the ink tube. See 7-5-1.
4, retain some cleaning liquid. See 7-5-1.
5, maintain the print head. See 5-2-9.
78 / 101
Shanghai Xunlang Technology
8 Frequently Asked Questions and Solutions.
8-1 Print troubles shooting
8-1-1 White lines in printed picture.
There are white lines on the image--picture 1.
Reason:
The media has been fed in incorrectly or the setting of stepping volume is incorrect.
Solution:
1, feed in the media correctly, try to make it tight and straight. See paragraph 5-1-5.
2, calibrate the stepping volume. See paragraph 6-3-5.
3, change the stepping speed. See paragraph 6-3-2.
Caution!
If there are white lines in every color, carry out the procedure above. If
there are only white lines in one color, do the calibration follow picture
2 below.
79 / 101
Shanghai Xunlang Technology
White line picture 2
White line picture 1
There are white lines on the image—picture 2.
Reason:
The head has broken line or jam.
Solution:
1. Make sure whether the head has been tested and cleared before printing. See paragraph 5-2-1
and 5-2-2.
80 / 101
Shanghai Xunlang Technology
2. Suspend printing and clean the head and test it. See paragraph 5-2-1 and 5-2-2.
3. Force to clean the head. See paragraph 5-2-2.
4. Clean the head protective plate. See paragraph 7-2-2.
5. Repeat step 2 and step 3.
6. For the information of replacing the jammed or broken head, see paragraph 8-3. And contact
local distributor.
If this problem occurs when printing image, suspend the machine and try to
solve it. If ink in the head solidified, it’s very useful to clean the head.
Caution!
There are white lines on the image—picture 3.
Reason:
The ink and media are incompatible.
Solution:
1, Do the stepping calibration. See paragraph 6-4-5.
2, turn down the heating temperature and do the stepping calibration. See paragraph 5-1-10 and
6-4-5.
3, turn up the heating temperature and do the stepping calibration. See paragraph 5-1-10 and
6-4-5.
4, increase the PASS number. Chose printing model in RIP.
5, print under high ink density model. set the ink drop in RIP.
6, print on the media which you have got high quality image before.
81 / 101
Shanghai Xunlang Technology
8-1-2 Black lines in printed picture
There are black lines on the image--picture 1.
Reason:
it’s dirty on the circumference of the head or the bottom of the carriage.
Solution:
1, clean the head and carry out head cleaning. See paragraph 7-3-1 and 5-2-2.
2, clean the carriage and carry out head cleaning. See 7-3-4 and 5-2-2.
3, lift up the carriage. See paragraph 5-2-3.
4, adjust the cooling fans. See paragraph 5-1-9.
5, clean the media holder. See paragraph 7-2-8.
There are black lines on the image--picture 2.
Reason:
Media is too sensitive to both-way printing.
82 / 101
Shanghai Xunlang Technology
Solution:
1, print under single-direction model.
2, increase the PASS number. Chose printing model in RIP.
There are black lines on the image--picture 3.
Reason:
The media’s feeding in is not enough.
The ink needs a long time to dry.
The calibrating of fore and after head is incorrect.
Solution:
1, do the calibration of stepping. See paragraph 6-4-5.
2, change the speed of media’s movement. See paragraph 6-3-2.
3, increase the heating temperature. See paragraph 5-1-10.
4, print under single-way model.
5, increase the PASS number. Chose printing model in RIP.
6, do calibration of head position. See paragraph 6-4.
8-1-3 Dirty printed picture
Dirty printed image--picture 1.
83 / 101
Shanghai Xunlang Technology
Reason:
Ink has spread to the media.
Solution:
1, do both-direction printing calibration for the current media. See paragraph 6-4-4.
2, assure the carriage is in a suitable position. If not, adjust its height. See paragraph 5-2-3.
3, do daily maintenance(cleaning of the scraping sheet and head protective plate). And then
clean the head. See paragraph 5-2-2.
4, clean the head. See paragraph 5-2-2.
5, make sure the environment temperature within 18-25 celsius.
6, increase the heating temperature according to printing requirement. See paragraph 5-1-10.
7, print under single-way model.
8, increase PASS number. Chose printing model in the RIP.
9, print under high resolution model. Chose printing model in the RIP.
10, use media that has been applied successfully in the past.
Dirty printed image--picture 2.
84 / 101
Shanghai Xunlang Technology
Reason:
Ink drop from the head unexpected.
Print head touch the media.
Solution:
1, make sure the media is flat, without fold or winkle.
2, lift up the carriage. See paragraph 5-2-3.
3, adjust the cooling fans. See paragraph 5-1-9.
4, do daily maintenance (cleaning of the scraping sheet and head protective plate). And then
clean the head. See paragraph 5-2-2.
5, clean the head and then carry out head cleaning. See paragraph 7-3-1.
6, wipe the media by dry and clean fabric.
7, clean the media holder. See paragraph 7-2-8.
Dirty printed image--picture 3.
85 / 101
Shanghai Xunlang Technology
Reason:
There are winkle in the media, result in print head touch the media.
Solution:
1, make sure the media is fed in correctly.
2, clean the bottom of the carriage. See 7-3-4.
3, adjust the heating temperature. See 5-1-10.
4, adjust the cooling fans. See 5-1-9.
5, lift up the carriage. See 5-2-3.
6, clean the media holder. See 7-2-8.
7, change the media.
8-1-4 Blurry printed picture
Blurry printed picture--picture 1.
86 / 101
Shanghai Xunlang Technology
Reason:
The drying speed is slow.
Too much ink.
Solution:
1, increase the heating temperature. See 5-1-10.
2, change the printing model to single-way and high-quality.
3, print under high PASS and high resolution.
4, print speed should be low.
Blurry printed picture--picture 2.
87 / 101
Shanghai Xunlang Technology
Reason:
The position of the heads is incorrect.
Both-way calibration is failed.
Solution:
1, calibrating the print heads. See 6-4.
2, according to the media, both-way calibrating the heads. See 6-4-4.
3, single-way print for test.
8-2 Error Code Description
st
nd
1 byte
2 byte
Error code formation
3 byte
rd
80 SVC
01
COM
00
SVC
00
80
02
CoreBoar
d
00
SVC
01
80
03
Software
00
SVC
02
80
04
Sensor
00
SVC
03
80
05
Passwd
00
SVC
04
Unk
00
SVC
05
80
4th byte meaning
(STATUS_SVC+0) //USB chip.
After 0.5 second, the USB haven’t
started, maybe it’s broken
(STATUS_SVC+1) //FPG chip 1.
After connecting power, stay in
high position, the chip may be
broken
(STATUS_SVC+2) //FPGA chip 2.
Lower the n setting, but it still in
the high position
(STATUS_SVC+3) //FPGA chip 3.
N setting has high voltage
(STATUS_SVC+4) //FPGA chip 4.
When setting the FPGA, false
alarming or retried 10 times
(STATUS_SVC+5) //failed update
88 / 101
Shanghai Xunlang Technology
80
00
SVC
06
80
00
SVC
07
80
00
SVC
08
80
00
SVC
09
80
00
SVC
10
80
00
SVC
11
80
00
SVC
12
00
SVC
13
00
of the MB
(STATUS_SVC+6) //no factory
initialization for the board
(STATUS_SVC+16) //failed in test
of factory tool’s memory
(STATUS_SVC+7) //failed in the
test of dynamic memory
(STATUS_SVC+8) //cannot read
FPGA in the flash memory
(STATUS_SVC+9) //the dynamic
memory is small, cannot support
the current setting
(STATUS_SVC+10) //false
reading of the board’s ID
(STATUS_SVC+11)
//system’ARM initialization error
(STATUS_SVC+12) //false HB
initialization
00
40 FTA
00
FTA
40
00
FTA
40
00
FTA
40
00
FTA
40
00
FTA
40
00
FTA
40
00
FTA
40
00
FTA
40
00
FTA
40
00
FTA
(STATUS_FTA+0) //USB chip
restarted unusually
(STATUS_FTA+1) //false printing
01
data format
(STATUS_FTA+2) //false printing
data size
(STATUS_FTA+3) //there should
03
be no appendixes data
02
(STATUS_FTA+4) //real PASS
04 number doesn’t match the
number in the setting
(STATUS_FTA+5) //the usb data’s
05
format is wrong
(STATUS_FTA+6) //after finishing
06 one PASS printing, DMAO is still
working
(STATUS_FTA+7) //false starting
07
position or ending position
(STATUS_FTA+8) //the starting
08 position doesn’t reach the origin
position
09
(STATUS_FTA+9) //printing width
exceed the limitation
89 / 101
Shanghai Xunlang Technology
40
00
FTA
40
00
FTA
40
00
FTA
40
00
FTA
40
00
FTA
40
00
FTA
40
00
FTA
40
00
FTA
40
00
FTA
40
00
FTA
40
00
FTA
40
00
FTA
40
00
FTA
40
00
FTA
40
00
FTA
40
00
FTA
40
00
FTA
(STATUS_FTA+10) // movement
10 control’s first stage initialization
failed.
(STATUS_FTA+11) //movement
11 control’s second stage
initialization failed.
(STATUS_FTA+12) //HB’s first
stage initialization failed.
(STATUS_FTA+13) //HB’s second
13
stage initialization failed
(STATUS_FTA+14) //MB’s LVDS
# chip unlocked, or the wire hasn’t
been inserted
(STATUS_FTA+15) //direction
# value of PASS definition
exceeded.
(STATUS_FTA+16) //updating
#
failed
(STATUS_FTA+17) //read RAM
#
failed
(STATUS_FTA+18) //write in RAM
#
failed
(STATUS_FTA+19) //Board
#
haven’t finished default setting
(STATUS_FTA+20) //MB has been
#
restarted
(STATUS_FTA+21) //Spectra high
#
voltage board’s first stage
initialization failed
(STATUS_FTA+22) //print head
type from the HB unmatch the
#
setting type, replace the HB or
reset the hardware parameter.
(STATUS_FTA+23) //the control
system unmatch the software
# version. Replace the control
system or update the software
version.
(STATUS_FTA+24) //exceed time
#
limit, re-entry code.
(STATUS_FTA+25) //inner error,
#
blank PASS or no Y-axial feeding
(STATUS_FTA+26) //connect to
#
USB1.1, fatal error
12
90 / 101
Shanghai Xunlang Technology
40
00
FTA
#
40
00
FTA
#
40
00
FTA
#
40
00
FTA
#
40
00
FTA
#
40
00
FTA
#
40
00
FTA
#
40
00
FTA
#
40
00
FTA
#
40
00
FTA
#
40
00
FTA
#
40
00
FTA
#
40
00
FTA
#
00
FTA
#
00
(STATUS_FTA+27) //language
of the interface is unmatched to
the limit. Reset the language or
password.
(STATUS_FTA+28) //PINCONF
write in FPGA error
(STATUS_FTA+29) //color
number in the factory tools is
wrong
(STATUS_FTA+30) //false input
to the MB’s RAM
(STATUS_FTA+31) //print head
exceed 55 celsius, all the
heating are forced to close.
(STATUS_FTA+32) //software
error or version error.
(STATUS_FTA+33) //Software
version error. The hardware need
special software version.
(STATUS_FTA+34) //current
system doesn’t support one head
two color.
(STATUS_FTA+35) //exceed the
ink quantity limitation, reset the
code.
(STATUS_FTA+36) //software
version error. The hardware
require the software to support
the ink code.
(STATUS_FTA+37) //EPSON
print head error.
(STATUS_FTA+38) //EPSON MB
FPGA error. Usually, it result from
over-frequency or disturbing of
data.
(STATUS_FTA+39) //writing
board ID error
(STATUS_FTA+40) //default
setting error
00
20 ERROR
00
ERR
20
00
ERR
(STATUS_ERR+0) //EP0 order
has been broken down
(STATUS_ERR+1) //connect to
01
USB 1, it’s a fatal error
91 / 101
Shanghai Xunlang Technology
20
00
ERR
(STATUS_ERR+3) //overtime of
02 communication between MB and
HB
20
00
ERR
03
20
00
ERR
20
00
ERR
20
00
ERR
20
20
00
00
ERR
ERR
(STATUS_ERR+6) //printing
data is larger than ignition data
07 (STATUS_ERR+7)
08 (STATUS_ERR+8)//inner status
20
00
ERR
09
20
00
ERR
#
20
00
ERR
#
20
00
ERR
#
20
00
ERR
#
20
00
ERR
120
00
ERR
121
00
INI
00
00
INI
00
INI
00
INI
00
INI
04 (STATUS_INI+4) //initializing HB
00
INI
05
(STATUS_ERR+2) //overtime of
movement communication
(STATUS_ERR+4) //PASS data
04
unfinished
(STATUS_ERR+5) //printing
05 data is less than ignition data, or
invalid strike process
06
(STATUS_ERR+9) //FPGA got
false order
(STATUS_ERR+10) //there are
ignition order when the moving
speed is too fast or uneven
(STATUS_ERR+11) //30 seconds
after sending move order,
haven’t got finish order
(STATUS_ERR+12) // false
clearing order, which should be
stopped
(STATUS_ERR+13) //false
clearing order, which should be
stopped
(STATUS_ERR+) // test status 1
(STATUS_ERR+0x51) //test status
1
00
(STATUS_INI+0) //initializing
MB
(STATUS_INI+1) //initializing
01
USB
(STATUS_INI+2) //initializing
02
FPGA
(STATUS_INI+3)//initializing
03
movement
(STATUS_INI+5) //Spectra is
initializing high voltage board
92 / 101
Shanghai Xunlang Technology
00
00
WA
R
4
00
WA
R
4
00
4
00
4
00
4
00
4
00
4
00
4
Warnin
g
WA
R
WA
R
WA
R
WA
R
WA
R
WA
R
WA
R
4
00
4
00
4
00
4
00
4
00
WA
R
4
00
WA
R
4
00
WA
R
4
00
WA
R
4
00
4
00
WA
R
WA
R
WA
R
WA
R
WA
R
(STATUS_WAR+0) //undefined
data mark, it will be ignored
(STATUS_WAR+1) //EP0 data
transfer unfinished, receive new
01
EPO data at the same time, the
previous data will be ignored
00
02 (STATUS_WAR+2)
03 (STATUS_WAR+3)
04 (STATUS_WAR+4)
05 (STATUS_WAR+5)
06 (STATUS_WAR+6)
07 (STATUS_WAR+7)
(STATUS_WAR+8) //input error of
08 timing code, there are character
out of 0~F
(STATUS_WAR+9)// illegal timing
09
code.
(STATUS_WAR+10) //timing
#
code doesn’t match the supplier.
(STATUS_WAR+11) //timing code
#
doesn’t match the board.
(STATUS_WAR+12) //another 100
#
hours, it will exceed the time
limitation. First warning.
(STATUS_WAR+13) // another 50
# hours, it will exceed the time
limitation. Second warning.
(STATUS_WAR+14) //another 1
#
hour, it will exceed the time
limitation. Final warning.
(STATUS_WAR+16) // input error
# of selective code, there are
character out of 0~F.
(STATUS_WAR+17)//illegal
#
selective code.
(STATUS_WAR+18) //the
#
selective code doesn’t match the
93 / 101
Shanghai Xunlang Technology
supplier.
4
00
WA
R
4
00
WA
R
#
4
00
WA
R
#
4
00
WA
R
#
4
00
4
00
4
00
4
00
WA
R
#
4
00
WA
R
#
4
00
WA
R
#
4
00
WA
R
#
4
00
4
00
4
00
4
00
4
00
WA
R
WA
R
WA
R
WA
R
WA
R
WA
R
WA
R
WA
R
#
#
#
#
(STATUS_WAR+19) //the
selective code doesn’t match the
board.
(STATUS_WAR+20) //sensor
connecting the ink tank and
ink pump doesn’t work
(STATUS_WAR+21) // attempt to
over clocking, but failed, as the
main board doesn’t support.
(STATUS_WAR+22) //input error
of ink code, there are character
out of 0~F.
(STATUS_WAR+23)//illegal ink
code
(STATUS_WAR+24) //ink code
doesn’t match the supplier.
(STATUS_WAR+25) //ink code
doesn’t match the board.
(STATUS_WAR+26) // another 10
liters ink, it will exceed the ink
limitation. First warning.
(STATUS_WAR+27) //another
5liters ink, it will exceed the ink
limitation. Second warning.
(STATUS_WAR+28) //another
1liter ink, it will exceed the ink
limitation. Final warning.
(STATUS_WAR+29) //only
support Konica and Polaris heads.
For other head, the ink drop is
always 42pl.
#
(STATUS_WAR+30)
#
(STATUS_WAR+31)
#
#
#
(STATUS_WAR+32) //print data
under ignition frequency or
invalid ignition
(STATUS_WAR+33) //print data
exceed the ignition frequency
(STATUS_WAR+34) //head
temperature too low
94 / 101
Shanghai Xunlang Technology
4
00
4
00
4
00
4
00
4
00
4
00
4
00
WA
R
WA
R
WA
R
WA
R
WA
R
WA
R
WA
R
#
#
#
#
#
#
#
(STATUS_WAR+35) //head
temperature too high
(STATUS_WAR+36) //print head
didn’t connect
(STATUS_WAR+37) //FPGA
feedback too much
(STATUS_WAR+38) // FPGA
feedback too less
(STATUS_WAR+39) //nozzle
number unknow
(STATUS_WAR+40) // head
temperature too high
(STATUS_WAR+41)
//XHOT
error.
00
00
00
00
00
00
00
00
00
00
00
00
00
00
00
(STATUS_UPDATING+1) //Can
not use (STATUS_UPDATING+0)
(STATUS_UPDATING+2)
(STATUS_UPDATING+3)
(STATUS_UPDATING+4)
(STATUS_UPDATING+5)
(STATUS_UPDATING+6)
(STATUS_UPDATING+7)
(STATUS_UPDATING+8)
(STATUS_UPDATING+9) //ARM
flash erease or write error, 10
times retry
(STATUS_UPDATING+10)
(STATUS_UPDATING+11)
(STATUS_UPDATING+12)
(STATUS_UPDATING+13)
8-3 Print Head Defect (nozzle jam)
How to distinguish jammed print head, see below.
1
Feed in the media.
2
Confirm the starting point(white edge)
3
Under the interface of stand-by, press
button to test the status of the heads.
95 / 101
Shanghai Xunlang Technology
1、 Print head status
2、 Whole print head status
3、 Enlarged picture of red print head
4、 Jammed print head status
5、 Totally jammed print head
6、 Off-angle print head
7、 Seriously off-angle print head
4
(Only if there are jammed print head, you need to carry out this procedure) Under the
interface of stand-by, press
button once, and then choose “strong” to clear
the print head. When finished, retest the print head by repeating step 3.
5
Repeat step 4, if there are still jammed heads, go to next step.
6
Under the interface of stand-by, press
button once, and choose “ink fill” to
clearthe print head. When finished , repeat step 3. If there are still problem, go to next
step.
7
Clear the print head by hand, see paragraph 5-2-2.
8
When finished, follow step 4 to clear the print head and then follow step 3 to retest the
print head.
After all the steps above, if there are still one or two defect, the print head is broken. You
have to replace it by a new one.
Caution: retain the test result of the print head, in order to send to the local distributor
for testing.
96 / 101
Shanghai Xunlang Technology
Caution!
If you are using eco-solvent ink and cannot solve the problem after
finishing all the steps above, you’d better contact the local distributor as
soon as possible.
Replace the print head
If you wanna replace the print head, please contact the local distributor.
9 Xunlang Customer Service
As cooperator, it’s our responsibility to help you run your business smoothly.
Xunlang provide full-scaled, experiential and professional support to our customers. In order to
provide more professional and seasonable service, we set up the customer service department,
which is used to collect and study our customers’ requirements. The customer service including
installation& adjustment service, guarantee& update service, maintain& alternate service,
telephone& internet support, software update service etc.
For more service, please kindly logon to our we call 021-37575015. And before you call our
service line, you’d better:
Check the “Frequently asked questions and solution” in the manual.
Check relative procedure documents about the machine.
If you have installed the third-party software driver and RIP software, check the “read me”
file.
If the problem resulted from the utility software, contact with the supplier.
If you decide to call our local distributor, please kindly provide the information bellow:
1, the machine model and series number, you can find it on the label of the machine.
2, If there are error code on the led panel, please write it down and check it on “Error Code
declaration”.
3, the computer information you are using.
4, any other special software you are using, such as anti-virus software, modem driver etc.
5, the cable you are using and its supplier.
6, the connection type: USB or Internet.
Caution: it’s a product of A-degree. Maybe, radio interference will
occur in the nearby environment. In that situation, the user has to do
something to prevent it.
97 / 101