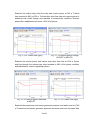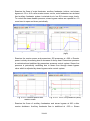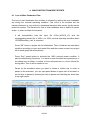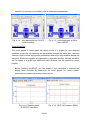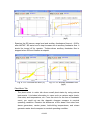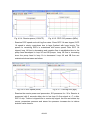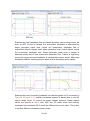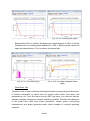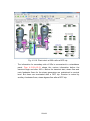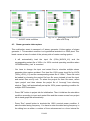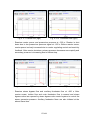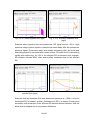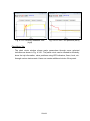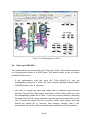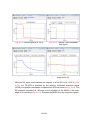
1
Visual System Analyzer (ViSA) Two-loop Large PWR Simulator User Manual Korea Atomic Energy Research Institute 1/109 Overview This simulator is developed using the best-estimate nuclear system analysis code as its engine. Therefore, this simulator could retain the accuracy of the bestestimate code. It provides various on-line graphical displays to give an in-depth understanding of transient thermal-hydraulic behaviors in nuclear power plants. Another unique feature of this simulator is that the simulator can easily be adapted for other plants, while the application shown here are for a two-loop large (1000 MWe class) PWR nuclear power plant. In the last few decades, large system analysis computer codes such as RELAP5, RETRAN, TRACE, CATHARE, etc. have played an important role in evaluating reactor system behavior in a wide range of planned and accidental conditions. Most of these codes required high performance computers and much expertise to simulate complicated reactor phenomena. However, rapid advances in computer technology now enable these codes to run on personal computers or workstation in real or nearly real-time. This has helped in more widespread use of these codes. One limitation that still restricts their use on an even wider scale is that these codes often have complicated I/O structure. User friendly graphical user interfaces (GUI) will not only help in their increased use, they are also likely to help in better and efficient interpretation of the results obtained using these codes. This has motivated the development of the simulator by using best-estimate codes as an NSSS calculation engine. This publication is prepared for beginners to provide insight and practice in reactor response to perturbations and accident situations for a two-loop large PWR. 2/109 Table of Contents Overview .....................................................................................................................2 1. INTRODUCTION ...........................................................................................4 1.1. Objectives ......................................................................................................4 1.2. Historical background ....................................................................................4 2. TWO-LOOP LARGE PRESSURIZED WATER REACTOR SIMULATOR .......7 2.1 Simulator startup ............................................................................................8 2.2 2.3 2.4 2.5 Simulator initialization ....................................................................................8 Event and/or malfunction initiation .................................................................8 List of Two-Loop Large PWR simulator display screens ................................9 Overview of the Target Plant ..........................................................................9 3. 3.1 3.2 3.3 3.4 4. OPERATIONAL TRANSIENT EVENTS ....................................................... 11 Reactor power reduction .............................................................................. 11 Reactor power increase ...............................................................................17 Reactor trip ..................................................................................................23 Turbine trip ...................................................................................................29 MALFUNCTION TRANSIENT EVENTS .......................................................36 4.1 4.2 4.3 4.4 4.5 4.6 5. 5.1 5.2 5.3 Loss of Main Feedwater Flow ......................................................................36 Single RCP trip ............................................................................................43 Steam generator tube rupture ......................................................................51 Cold Leg #1 SBLOCA ..................................................................................60 Cold Leg #1 LBLOCA ..................................................................................70 Station Blackout ...........................................................................................80 MODEL DESCRIPTION ...............................................................................92 Reactor kinetic model ..................................................................................92 Hydrodynamic model ...................................................................................93 Reactor control system ................................................................................97 5.4 Protection system ......................................................................................108 3/109 1. INTRODUCTION 1.1. Objectives This document is prepared for beginners to provide insight and practice in reactor response to perturbations and accident situations for a two-loop large PWR. This manual is written with the assumption that the readers already have some knowledge of the PWR. Therefore no attempt has been made to provide detailed descriptions of each individual PWR subsystem. The manual covers from nuclear power plant operational transients, e.g. turbine trip and reactor trip, to accident conditions, e.g. LOCA, SBO, etc. But it should be noted that this simulator has strength for the simulators of the serious accident situations which cause complicated two-phase flows in the reactor coolant system. It should be mentioned that the plant model used in this simulator represent realistic PWR. However, the response of this simulator may differ from real plant in some extent since the input models developed for the simulator are not fully validated and may not reflect any design or performance. Most importantly, this simulator has not to be used for nuclear plant design and/or safety analysis purposes, despite the fact that they are realistic for the purpose of educational training and/or research. 1.2. Historical background The two-loop large PWR simulator has been developed based on the design of OPR 1000 (Optimized Pressurized water Reactor-1000MWe-class), one of Koreantype PWRs. The Nuclear Steam Supply System (NSSS) of the reference plant of OPR1000 was born through importing and applying a nuclear technology from Combustion Engineering in the USA. Then, OPR 1000 was developed as an integral part of the nuclear power plant standardization program which began in 1984, by incorporating the latest technologies and the experience acquired during years of design, construction and operation of nuclear power plants in Korea. 4/109 OPR 1000 design has been improved significantly from its reference plant by [1] applying state-of-the-art technology to the extent that is justifiable based on the proven technology, [2] implementing design simplification and [3] considering the human factor engineering, which results in improved plant safety and performance with additional operating margin and improved constructability and maintainability. The development of the OPR 1000 design has laid down a foundation to advance Korea into an exporting nation from a nuclear technology importing country, as well as achieving technological independence. As a result, Korea has become one of the countries with the most advanced nuclear power plant design technology in the world and a unique design model of nuclear power plants, along with the United States, France, and Canada. OPR 1000 Configuration OPR 1000 Major design features Thermal Output 2825 MWt Rated Electric Power 1,000MWe Design Life Time 40years Seismic design basis SSE 0.2g, OBE 0.1g Refueling Interval 12~18months In addition, the design enhancements of OPR 1000 related to plant safety are also confirmed by Probabilistic Safety Assessment [PSA], which is a measure of 5/109 evaluating the overall plant capability for accident prevention and mitigation. As the result of the PSA, OPR 1000 shows Core Damage Frequency [CDF] less than onetenth of that of the conventional nuclear power plants, which represents another evidence of OPR 1000's design superiority. OPR 1000 designed with the latest design concepts is based on proven technologies. The features are: - Application of safety depressurization system - Increased safety during shutdown and mid-loop operation - Reduced probability of loss of coolant accident - Application of Leak Before Break[LBB] design concept to the reactor coolant - system piping, shutdown coolant system, safety injection system, and pressurize surge line Incorporation of human factors engineering concept in designing the main control board Improved operability, maintainability, and accessibility Reliability improvement of plant electrical systems Separation between redundant trains of safety related systems Application of passive flood protection design Safety review of OPR 1000, the international Atomic Energy Agency [IAEA] acknowledged that "OPR 1000 represented a significant accomplishment in improving the safety of commercial nuclear power plants in the world." [refer to www.opr1000.co.kr] Nuclear Steam Supply System (NSSS) The Reactor Coolant System (RCS) has two heat transfer loops forming a barrier to the release of radioactive materials from the reactor core to the secondary system and containment atmosphere. The main components of the RCS are a reactor vessel, two steam generators and four reactor coolant pumps. These RCS components are symmetrically located on opposite sides of the reactor vessel with a pressurizer on one side, all of the RCS components are located inside the containment building and connected by pipe assemblies. The RCS also includes the interconnecting piping to auxiliary systems such as the chemical and volume control system, the safety injection system, the shutdown cooling system, and others. 6/109 2. TWO-LOOP LARGE PRESSURIZED WATER REACTOR SIMULATOR The purpose of the two-loop large pressurized water reactor simulator (1000 MWe) is education and research - to provide a training tool for engineers who are interest in newly introducing nuclear power plants in their country. They may find this simulator useful in broadening their understanding of PWR transients and power plant dynamics, especially plant safety. The simulator can be executed on a personal computer (PC), to operate essentially in close to real time, and have a dynamic response with high fidelity to provide PWR plant responses during normal operations and accident situations. It also has a user-friendly interface to allow a user’s interactions with the simulator during the operation of the simulated PWR plant. The two-loop large PWR simulator does not replicate OPR 1000 behavior exactly since its input model is not fully verified. However, most system behaviors in this simulator are behaved similarly with OPR 1000, especially for the accident conditions. The minimum PC requirement is not specified. However, it is better to have fast CPU speed to simulate real-time performance. The operating system can be Windows 7, or Windows XP. This simulator is designed to give an in-depth understanding of transient thermal-hydraulic behaviors in nuclear power plants, especially during the serious accident situation which can be occurred complicated two-phase flow conditions in the reactor coolant system. In order to equip high fidelity, the real-time performance may not be achieved in some transient situation. The current configuration of the simulator is able to respond to the operating conditions normally encountered in power plant operations, as well as to many malfunctions. This simulator is developed based on the best-estimate nuclear system analysis code as its engine. Therefore, this simulator could retain the same accuracy of the best-estimate code. The basic thermal-hydraulic models are based on two-phase conservation of mass, energy, momentum equations for each phase with algebraic relations for the calculation of source terms of conservation equations. The interaction between the user and the simulator is via a combination of monitor displays, mouse and keyboard. Parameter monitoring and operator controls, implemented via the plant display system. 7/109 This manual assumes that the user is familiar with the main characteristics of water cooled thermal nuclear power plants, as well as understanding the unique features of the PWR. 2.1 Simulator startup - - Select program ‘APWRSimulator_visa’ for execution. It will automatically load the input files for nominal operating conditions of the advanced PWR. Click ‘OK’ at the bottom of window to ‘load full power IC’. It will ask if you want to delete the output files generated in previous run. Choose ‘YES’ button to delete the output from previous run. It will initialize the 100% full power input files and the simulator will display ‘trend graph screen’ for the major parameters. To start the simulator, click ‘RUN’ speed button at the top right corner. The condition will be a steady-state run at nominal operating condition 2.2 Simulator initialization If at any time it is necessary to return the simulator to the stored initialization points, do the following: - Click ‘STOP’ speed button at the top left corner. Select the stored snapshot file from the file list. Click on ‘OK’ button at the bottom. Choose ‘YES’ button in dialog box to delete the output from previous run. 2.3 Event and/or malfunction initiation In order to initiate a malfunction, you have to use interactive control function. The interactive control function allows for operator actions so that users can utilize the best-estimate code like conventional NPAs (Nuclear Plant Analyzers). The operator actions are divided into five functions; that is, manual control for trip (on/off), valve area, mass flow rate, heater power, and reactivity control. Using these functions, most malfunction and operator actions can be simulated. Through the interactive control tab, the user can select operator actions. The interactive control function is equipped with the Auto/Manual, Target and Setpoint/Rate. When Auto is selected, the control logic supplied in the input data is in effect. However, once Manual is selected, user can manually set the target value 8/109 and rate. In the case of trip control, a toggle switch is used. In other cases, target value and rate can be entered through the edit boxes. For example, let’s consider the situation that a pressurizer PORV (power-operated relief valve) is closed and the user wants to fully open the valve in 5 seconds. In this case, the target value and the rate are entered as 100 % and 20 %/s, respectively. When the user clicks the “OK” button, the interactive user input is transferred to the system code. More detail description for this function is described in PARTII. 2.4 List of Two-Loop Large PWR simulator display screens (1) Plant I/O control panel (2) Plant mimic (User can develop and/or modify the mimic) (3) Plant major parameter distribution (4) Trip information (5) Interactive control panel (6) Trend graph window (7) On-line trend graph selection function 2.5 Modeling of the Target Plant An OPR-1000 NPP is a two-loop large PWR plant with 1000 MWe and has a pressurizer (PRZ) and two reactor coolant loops. Each reactor coolant loop has a steam generator (SG), a hot leg and two cold legs. Each cold leg is equipped with a reactor coolant pump (RCP) and a common cold leg safety injection line connected with a safety injection tank (SIT) and safety injection pump (SIP). Emergency or auxiliary feedwater (AFW) system for the SGs consists of two motor-driven (MD) and two turbine-driven (TD) pumps which are all safety-related class equipments. Besides, the plant is also equipped with several relief valves such as pressurizer safety valve (PSV) and main steam safety valve (MSSV) to prevent overpressurization. The nodding diagram for system modeling is shown in Fig. 2.5-1. 9/109 966 ADV ADV 967 926 924 964 Safety Valve Safety Valve 923 963 927 MSIV 960 01 02 920 03 MSIV MSIV 940 02 01 03 965 03 02 01 03 02 01 900 MSIV 925 980 945 Safety Valve 01 ADV 947 905 ADV 943 Safety Valve 907 903 02 790 690 946 MFW MD AFW 778 704 716 780 944 MFW 03 906 904 778 678 680 678 670 660 670 04 760 770 723 770 715 MD AFW 604 616 623 615 05 712 710 04 720 Steam line bypass 710 05 750 713 610 987 01 07 TD AFW 01 06 Legend 03 292 Atmospheric volume 02 05 08 02 06 05 08 02 Junction 04 09 10 706 03 03 740 11 01 12 02 724 260 02 030 420 410 01 220 03 02 02 02 01 03 01 222 03 01 400 02 460 230 200 110 112 110 455 RCP -2A 454 02 03 Chargin g 04 466 023 474 477 LPSI 476 120 190 120 122 SIT 606 482 472 022 491 492 132 180 01 03 02 02 03 01 14 13 12 11 10 09 08 07 06 05 04 03 02 01 170 Letdown 488 RCP - 2B 330 453 130 310 02 320 360 390 380 014 SIT 392 370 391 03 04 382 372 LOOP 2 486 LPSI 04 487 04 160 387 01 05 04 03 366 388 03 362 02 01 RCP -1B 385 05 384 HPSI SIT 140 SIT 150 396 484 HPSI 496 485 02 RCP -1A 375HPSI 374 377 376 LPSI 05 452 364 378 013 012 01 02 607 350 280 019 300 01 011 024 MFW 020 021 HPSI 475 12 10 394 05 478 494 464 490 480 11 01 01 381 481 470 02 02 08 240 09 029 01 270 03 630 624 07 250 242 10 03 640 06 430 01 03 05 Cross flow junction 707 462 01 04 01 01 450 09 04 03 Valve 730 02 02 Time dependent junction 01 MFW 02 01 02 03 TD AFW 03 02 290 Time dependent volume 618 01 07 Safety valve 293 291 SDS Valve 620 340 01 294 990 Volume 613 04 620 440 718 612 610 650 05 985 994 720 04 386 LPSI 03 LOOP 1 Fig. 2.5-1. System modeling diagram for a two-loop large PWR plant 10/109 02 3. OPERATIONAL TRANSIENT EVENTS 3.1 Reactor power reduction The reactor power reduction is initiated by decreasing turbine load in nominal operating condition. Since this simulator is not explicitly modeled the turbine generator, it is simulated by reducing the turbine stop valve flow rate. As an example, let’s reduce the turbine stop valve area from 100% to 80%. Turbine flow will be reduced proportionally. Reactor regulating system and reactivity control system make the control rod insert to reduce the reactor power corresponding to the turbine load. - Click the execution file ‘APWRSimulator_visa.exe’ to start a simulation. - It will automatically load the input file (100ic_NLOCA_r3.i) and the corresponding restart file of 100ic.r for 100% nominal operating condition. - Press “OK” button in project tab for initialization. Then it initializes the simulation condition specified in input and restart files and move from project tab to trend graph tab automatically. - Press “Run” speed button to simulate the 100% nominal power condition. It asks the data saving frequency. You have to enter the data saving frequency in the dialog box as either a number of time advancement or a time interval for storing data. Then it will be ready for simulation. - Pause in the simulation when you want to initiate a turbine load reduction. In order to pause in the execution, you can use speed button in upper part of simulator or set the time to pause. - Move to “interactive tab” to initiate the transient. Change the selection box from automatic to manual in the line of “Turbine Load”. Enter the 80 into target edit box and -0.1 into rate edit box. Then, it will reduce turbine load from 100% to 80% in the rate of -0.1%/s. If you enter the change rate greater than 0.1%/s, it may not be reach the steady-state. You had better to enter the change rate smaller than or equal to 0.1%/s. You can confirm by examine the current value of turbine load in status line. Then press OK button at the bottom right. These will 11/109 start to close turbine stop valve to 80% of full opening area. Then, resume the execution by speed button in top left corner. Fig. 3.1-1. Interactive Control Tab for Reactor Power Reduction - Turbine stop valve is started to close as soon as turbine load reduction initiated. With some delay, reactor power is decreasing to match with turbine load by reactor regulating system and reactor reactivity control. - After 300~400 s, the reactor power reaches to steady-state condition at 80% of nominal power. Nodalization Tab This is a unique feature in this simulator. Since the engine for this simulator is based on best-estimate system code, it could predict a complex accident condition close to real situation. Confidence in its fidelity makes it possible to show the distribution of major parameters. Since reactor power reduction is a normal operational transient, it is very hard to 12/109 see the difference from 100% power condition. - Before initiating reactor power reduction, you can see the void distribution of nominal operating condition by examining Fig. 3.1-2. Primary side of RCS is filled with water except pressurizer. Top half of pressurizer is filled with steam to control the RCS pressure. The secondary side of steam generator is divided into 4 parts; downcomer, riser, economizer and steam dome. The downcomer is filled with water and riser part is heat transfer region which removes the primary side heat to secondary side of steam generator. Heat transferred in riser part of steam generator is used to generate steam. The steam and water mixture in riser part are separated in steam separator. Steam flows to turbine through steam line and water is returned to steam generator downcomer. - Examine the void distribution at 400 s. What are the differences from the nominal operation condition? Fig. 3.1-2 Void distribution at nominal condition Fig. 3.1-3 Void distribution at 400 s - Before initiating reactor power reduction, you can see the temperature distribution of nominal operating condition in Fig. 3.1-4. Water cooled down through SGs is heated up in core region and goes to SGs through hot legs. Hottest part in primary side of RCS is pressurizer. - Examine the temperature distribution at 400 s. What are the differences from the nominal operation condition? Since reactor power is decreased to ~80%, hot leg temperature is a little lower than that of nominal condition. 13/109 Fig. 3.1-4 Temperature distribution at nominal condition Fig. 3.1-5 Temperature distribution at 400 s Trend Graph Tab The trend graphs in trend graph tab show on-line X-Y graphs for user-selected variables in input file. To create additional graphs, user can select major volume and junction parameters and minor edit variables during the transient through the dialog box. These trend graphs are appeared in separated window. Multiple variables can be drawn in a graph window and additional trend windows can be created by user’s request. - Before initiating a reactor power reduction, you can assure if the calculation is reached the steady state condition by examining the trend graphs for reactor power, pressurizer and steam generator pressures, etc. Fig. 3.1-6. Reactor power (100%FP) 14/109 Fig. 3.1-7. PRZ/SG pressure (MPa) - Reduce the turbine load to 80% in -0.1%/s rate at 20 s. - Examine the turbine stop valve flow rate and reactor power at 120 s. Turbine load decreased to 90% because we are reducing it -0.1%/s. Turbine stop valve flow is decreasing as soon as we start to close turbine stop valve. With some delay, reactor power is decreasing by reactor regulating control system. Fig. 3.1-8. Turbine flow rate (kg/s) Fig. 3.1-9. Reactor power decreasing - Examine the pressurizer and SG pressures and levels at 120 s. Pressurizer and steam generator pressures do not change much because these are controlled by pressurizer pressure and feedwater control systems. Pressurizer level is increasing little because power reduction is slower than decrease of heat removal rate. But it will be recovered by pressurizer level control. SG levels are not changing much since feedwater flow rate is controlled by feedwater control system. Fig. 3.1-10. PRZ/SG pressure (MPa) 15/109 Fig. 3.1-11. PRZ/SG level (%) - Examine the turbine stop valve flow rate and reactor power at 320 s. Turbine load reached to 80% at 220 s. Turbine stop valve flow rate and reactor power is stabilized with small change and reached to steady-state condition. Reactor power after stabilization becomes ~80% of full power. Fig. 3.1-12 Turbine flow (kg/s) Fig. 3.1-13 Reactor power change (100%FP to 80%FP) - Examine the reactor power and turbine stop valve flow rate at 1200 s. Power and flow through the turbine stop valve reached to 80% of full power condition and stabilized by reactor regulating system . Fig. 3.1-14 Reactor power stabilized at 80%FP Fig. 3.1-15 Turbine flow (kg/s) - Examine the pressurizer and steam generator pressure and water level at 1020 s. Pressurizer and steam generator pressure and water level are increased little 16/109 bit but these are controlled to the reference values at 80% of power by pressurizer pressure control and feedwater control system. Fig. 3.1-16 PRZ / SG pressure (MPa) 3.2 Fig. 3.1-17 PRZ and SG level (%) Reactor power increase The reactor power increase is initiated by increasing turbine load from 80% power operating condition to 100% power operating condition. Since this simulator is not explicitly modeled the turbine generator, it is simulated by increasing the turbine stop valve flow rate. As an example, let’s increase the turbine stop valve area from 80% to 100%. Turbine flow will be increased proportionally. Reactor regulating system and reactivity control system make the control rod withdrawal to increase the reactor power corresponding to the turbine load. - First load the 80% power input file (80ic_NLOCA_r3.i) and the corresponding restart file of 80ic.r. The file load for 80% power condition could be done by choosing the project file from file menu instead to load the input and restart files one by one. To select the project file from file menu, select ‘open project’ and then choose the project file of ‘80ic.mpj’ from directory window. Then it will automatically set up the 80% power operating condition for simulation. - Press “OK” button in project tab for initialization. Then it initializes the simulation condition specified in input and restart files and changes the screen to trend graph tab automatically. - Press “Run” speed button to simulate the 80% power condition. It asks the data 17/109 saving frequency. You have to enter the data saving frequency in the dialog box as either a number of time advancement or a time interval for storing data. Then it will be started to run. - Pause on the simulation when you want to initiate a turbine load increase. In order to pause on the execution, you can use speed button in upper part of simulator or set the time to pause. - Move to “interactive tab” to initiate the transient. Change the selection box from automatic to manual in the line of “Turbine Load”. Enter the 100 into target edit box and 0.1 into rate edit box. Then, it will increase turbine load from 80% to 100% in the rate of 0.1%/s. If you enter the change rate greater than 0.1%/s, it may not be reach the steady-state. You had better to enter the change rate smaller than or equal to 0.1%/s. Then press OK button at the bottom right. These will start to open turbine stop vale to 100% of full opening area. Then, resume the execution by speed button in top left corner. You can confirm the turbine load change by examine the value of status line. Fig. 3.2-1. Interactive Control Tab for Reactor Power Increase 18/109 - Turbine stop valve is started to open as soon as turbine load increase initiated. With some delay, reactor power is increasing to match with turbine load by reactor regulating system and reactor reactivity control. - After 300~400 s, the reactor power reaches to steady-state condition at 100% of nominal power. Nodalization Tab Since reactor power increase is a normal operational transient, it is very hard to see the difference from 80% to 100% power condition in nodalization graph. - Before initiating reactor power increase, you can see the void distribution of 80% power condition by examining Fig. 3.2-2. Primary side of RCS is filled with water except pressurizer. Top half of pressurizer is filled with steam to control the RCS pressure. Steam generator condition is almost same as full power condition and is hard to see the difference. - Examine the void distribution at 400 s. What are the differences from the 80% power operation condition? Fig. 3.2-2 Void distribution at 80%FP initial condition Fig. 3.2-3 Void distribution at 400 s - Before initiating reactor power increase, you can see the temperature distribution of 80% power operating condition in Fig. 3.2-4. Water cooled down through SGs is heated up in core region and goes to SGs through hot legs. Hottest part in primary side of RCS is pressurizer. - Examine the temperature distribution at 400 s. What are the differences from 19/109 the 80% power operating condition? Since reactor power is returned from ~80% to 100%, hot leg temperature is little higher than that of 80% power condition. Fig. 3.2-4 Temperature distribution at 80%FP initial condition Fig. 3.2-5 Temperature distribution at 400 s Trend Graph Tab The trend graphs in trend graph tab show on-line X-Y graphs for user-selected variables in an input file. The user can also examine major volume and junction parameters and minor edit variables during the transient by selecting the parameters through the dialog box. These trend graphs are appeared in separated window. Multiple variables can be drawn in a graph window and additional trend windows can be created by user’s request. - Before initiating a reactor power increase, you can assure if the calculation is reached the steady state condition by examining the trend graphs for reactor power, pressurizer and steam generator pressures, etc. 20/109 Fig. 3.2-6. Reactor power at 100%FP Fig. 3.2-7. Turbine flow (kg/s) - Increase the turbine load to 100% in 0.1%/s rate at 20 s. - Examine the turbine stop valve flow rate and reactor power at 130 s. Turbine load increased to 91% because we are increasing it by 0.1%/s. Turbine stop valve flow is increasing as soon as we start to open turbine stop valve. With some delay, reactor power is increasing by reactor regulating system. Fig. 3.2-8. Turbine flow rate (kg/s) Fig. 3.2-9. Reactor power increase from 80%FP to 100%FP - Examine the pressurizer and SG pressures and levels at 130 s. Pressurizer and SG pressures does not change much because these are controlled by pressurizer pressure control and feed water control. Pressurizer level is decreasing a little because power increase is slower than increase of heat removal rate. But it will be recovered by pressurizer level control. SG levels are not changing much since feedwater flow rate is controlled by feedwater control 21/109 system. Fig. 3.2-10. PRZ/SG pressure (MPa) Fig. 3.2-11. PRZ/SG level (%) - Examine the turbine stop valve flow rate and reactor power at 320 s. Turbine load reached to 100% at 220 s. Turbine stop valve flow rate and reactor power reaches to 100% condition and then, stabilized with small fluctuation. Fig. 3.2-12 Turbine flow (kg/s) Fig. 3.2-13 Reactor power stabilizing to 100%FP - Examine the reactor power and turbine stop valve flow rate at 1020 s. Power and flow through the turbine stop valve reached to 100% of full power condition and stabilized by reactor regulating system. 22/109 Fig. 3.2-14 Reactor power stabilizing to 100%FP Fig. 3.2-15 Turbine flow (kg/s) - Examine the pressurizer and steam generator pressure and water level at 1020 s. Pressurizer and steam generator pressure and water level are changed a little in early transient but these are reached to the reference values for 100% of power by pressurizer pressure control and feedwater control system. Pressurizer pressure is larger than reference value for 100% reactor power at 1020 s. But it starts to decrease by pressurizer pressure control as you can see in Fig. 3.2-17. Fig. 3.2-16 PRZ and SG level (%) 3.3 Fig. 3.2-17 PRZ / SG pressure (MPa) Reactor trip The reactor scram event is initiated by setting the reactor scram during the nominal operating condition. This event is an operational transient which could occur due to 23/109 reactor shutdown rod insertion by operator’s intension. Since it is operational transient, it should not initiate the operation of safety system except auxiliary feedwater system. In order to initiate the transient, - It will automatically load the input file (100ic_NLOCA_r3.i) and the corresponding restart file of 100ic.r for 100% nominal operating condition when user executes APWRSimulator_visa. - Press “OK” button in project tab for initialization. Then it initializes the simulation condition specified in input and restart files and changes the screen to trend graph tab automatically after initialization. - Press “Run” speed button to simulate 100% nominal power condition. It asks the data saving frequency. You have to enter the data saving frequency in the dialog box as either a number of time advancement or a time interval for storing data. Then it will be started to run. - Pause on the simulation when you want to initiate a reactor scram. In order to pause on the execution, you can use speed button in upper part of simulator or set the time to pause. - Move to “interactive tab” to initiate the transient. Change the selection box from automatic to manual in the line of “Reactor Trip”. Press the toggle switch for trip status in target column to be true. Then the toggle switch will change from green color to red. Then press OK button at the bottom right. These will shutdown the reactor as shown in Fig. 3.3-1. Then, resume the execution by speed button in top left corner. 24/109 Fig. 3.3-1. Interactive Control Tab for Reactor Trip - Reactor is scrammed without delay as soon as manual reactor scram initiated. At the same time, turbine control valve is closed due to reactor trip signal. Main feedwater are isolated automatically due to reactor trip signal. As soon as main feedwater pumps are stopped, auxiliary feedwater pumps are started in operation. At ~ 4 s after reactor trip, steam bypass valves are opened to control the steam header pressure. You can examine the list of trips occurred by examining trip message window in left side of interactive control tab. - After 20~30 s, the reactor system is stabilized to hot shutdown condition. Nodalization Tab Since reactor shutdown is not an accident but an operational transient, you cannot see the dramatic change in nodalization window. - Before initiating reactor scram, you can see the void distribution in nominal operating condition in Fig. 3.3-2. Primary side of RCS is filled with water except pressurizer. Top half of pressurizer is filled with steam to control the RCS pressure. The secondary side of steam generator is divided into 4 parts; 25/109 downcomer, riser, ecomimizer and steam dome. The downcomer is filled with water and riser part is heat transfer region which removes the primary side heat to secondary side of steam generator. Heat transferred in riser part of steam generator is used to generate steam. The steam and water mixture in riser part are separated in steam separator. Steam flows to turbine through steam line and water is returned to downcomer. - Examine the void distribution at 200 s after reactor shutdown. What are the differences from the nominal operation condition? At 200 s after reactor shutdown, the void in steam generator riser part is disappeared because the heat transfer from primary to secondary side is decreased substantially. Fig. 3.3-2 Void distribution in 100%FP initial condition Fig. 3.3-3 Void distribution at 200 s after reactor scram Trend Graph Tab The trend graphs in trend graph tab show on-line X-Y graphs for user-selected variables in input file. In addition, user can examine major volume and junction parameters and minor edit variables during the transient by selecting the parameters through the dialog box. These trend graphs are appeared in separated window. Multiple variables can be drawn in a graph and additional trend windows can be created by user’s request. - Before initiating a reactor scram, you can assure if the calculation is reached the steady state condition by examining the trend graphs for reactor power, pressurizer and steam generator pressures, etc. 26/109 Fig. 3.3-4. Reactor power (100%FP) Fig. 3.3-5. PRZ / SG pressure (MPa) - Examine the pressurizer, SG pressures and reactor power at 30 s after reactor scram. As soon as reactor scram occurs, pressurizer pressure and steam line pressure increase due to turbine isolation valve closure. Due to manual shutdown rod insertion, reactor power is decreasing to decay heat level. Fig. 3.3-5. PRZ / SG pressures (MPa) Fig. 3.3-6. Reactor power after reactor scram - Examine the flows of main feedwater, auxiliary feedwater, turbine, and steam bypass at 30 s after reactor shutdown. Right after reactor scram occurs, main feedwaters are isolated. And auxiliary feedwater system is started due to low SG narrow range levels. To control the steam header pressure, steam bypass valves are opened for ~10 s and open and close periodically. 27/109 Fig. 3.3-8. Auxiliary feedwater flows (kg/s) Fig. 3.3-7. SG flows (kg/s) - Examine the reactor power and pressurizer, SG pressures at 300 s after reactor scram. Reactor power is slowly decreasing due to decrease of decay heat. Pressurizer pressure are maintained and stabilized due to pressurizer pressure control. Steam line pressure is periodically oscillating due to steam flow through steam bypass valve which is controlled by steam bypass valve control system. Fig. 3.3-9. Reactor power after reacor scram Fig. 3.3-10. PRZ / SG pressures (MPa) - Examine the flows of auxiliary feedwaters and steam bypass at 300 s after reactor shutdown. Auxiliary feedwater flow is stabilized at ~250 s. Steam bypass valve flow seldom appears to remove the decay heat. 28/109 Fig. 3.3-11. SG flows (kg/s) Fig. 3.3-12. Auxiliary feedwater flows (kg/s) 3.4 Turbine trip The turbine trip event is initiated by setting the turbine trip in nominal operating condition. This event is an operational transient which could be occur due to turbine stop valve close by operator’s intension. Since it is operational transient, it should not initiate the operation of safety system except auxiliary feedwater system. The simulation trend of this transient is very similar to reactor scram case. In order to initiate the transient, - It will automatically load the input file (100ic_NLOCA_r3.i) and the corresponding restart file of 100ic.r for 100% nominal operating condition when user executes APWRSimulator_visa. - Press “OK” button in project tab for initialization. Then it initializes the simulation condition according to input and restart files and the screen moves from project tab to trend graph tab automatically. - Press “Run” speed button to simulate the 100% nominal power condition. It asks the data saving frequency. You have to enter the data saving frequency in the dialog box as either a number of time advancement or a time interval for storing data. Then it will be started to run. - Pause on the simulation when you want to initiate a turbine trip. In order to pause on the execution, you can use speed button in upper part of simulator or set the time to pause by entering the time to pause and checking the check box in top-right corner. 29/109 - Move to “interactive tab” to initiate the transient. Change the selection box from automatic to manual in the line of “Turbine Trip”. Press the toggle switch in target column for trip status to be true. Then the toggle switch will change from green color to red as shown in Fig. 3.4-1. Then press OK button at the bottom right. These will close the turbine stop valve. Then, resume the execution by speed button in top left corner. Fig. 3.4-1. Interactive Control Tab for Turbine Trip - Turbine stop valve is closed without delay as soon as manual turbine trip initiated. A few seconds later, reactor is scrammed due to low steam generator narrow range level signal. Main feedwater are isolated automatically due to reactor trip signal. As soon as main feedwater pumps are stopped, auxiliary feedwaters are started to operation. At ~ 4 s after turbine trip, steam bypass valves are opened to control the steam header pressure. You can examine the trips occurred by examining trip message window in left side of interactive control tab. 30/109 - After 20~30 s, the reactor system is stabilized to hot shutdown condition. Nodalization Tab Since turbine trip is not an accident but an operational transient, you cannot see the dramatic change in nodalization window and void or temperature distribution of entire reactor system is similar to that of reactor trip case. - Before initiating reactor scram, you can examine the void distribution in nominal operating condition in Fig. 3.4-2. Primary side of RCS is filled with water except pressurizer. Top half of pressurizer is filled with steam to control the RCS pressure. The secondary side of steam generator is divided into 4 parts; downcomer, riser, ecomimizer and steam dome. The downcomer is filled with water and riser part is heat transfer region which removes the primary side heat to secondary side of steam generator. Heat transferred in riser part of steam generator is used to generate steam. The steam and water mixture in riser part are separated in steam separator. Steam flows to turbine through steam line and water is returned to downcomer. - Examine the void distribution at 200 s after turbine trip. What are the differences from the nominal operation condition? At 200 s after turbine trip, the void in steam generator riser part is disappeared because the heat transfer from primary to secondary side is decreased substantially. Fig. 3.4-2 Void distribution at 100%FP initial condition Fig. 3.4-3 Void distribution at 200 s after turbine trip Trend Graph Tab The trend graphs in trend graph tab show on-line X-Y graphs for user-selected variables in input file. By selecting the parameters through the dialog box, user can 31/109 examine major volume and junction parameters and minor edit variables during the transient. These trend graphs are appeared in separated window. Multiple variables can be drawn in a graph and additional trend windows can be created by user’s request. - Before initiating a reactor scram, you can assure if the calculation is reached the steady state condition by examining the trend graphs for reactor power, pressurizer and steam generator pressures, etc. Fig. 3.4-4. Reactor power (100%FP) Fig. 3.4-5. PRZ / SG pressure (MPa) - Examine the pressurizer, SG pressures and reactor power at 30 s after turbine trip. As soon as manual turbine trip is initiated, pressurizer pressure and steam line pressure increase due to turbine isolation valve closure. Due to manual turbine trip, reactor is scrammed according to low SG narrow range level signal at ~3 s after turbine trip. Fig. 3.4-6. PRZ / SG pressures (MPa) 32/109 Fig. 3.4-7. Reactor power after reactor scram - Examine the flows of main feedwater, auxiliary feedwater, turbine, and steam bypass at ~30 s. At 2 s after reactor scram occurs, main feedwaters are isolated. And auxiliary feedwater system is started due to low SG narrow range levels. To control the steam header pressure, steam bypass valves are opened for ~10 s and start to open and close periodically. Fig. 3.4-8. SG flows (kg/s) Fig. 3.4-9. Auxiliary feedwater flows (kg/s) - Examine the reactor power and pressurizer, SG pressures at ~300 s. Reactor power is slowly decreasing due to decrease of decay heat. Pressurizer pressure is maintained and stabilized by pressurizer pressure control system. Steam line pressure is periodically oscillating due to steam flow through steam bypass valve which is adjusted by steam bypass valve control system. Fig. 3.4-10. Reactor power after reactor scram Fig. 3.4-11. PRZ / SG pressures (MPa) - Examine the flows of auxiliary feedwaters and steam bypass at 300 s after reactor shutdown. Auxiliary feedwater flow is stabilized at ~250 s. Steam 33/109 bypass valve is seldom opened to remove the decay heat. Fig. 3.4-12. SG flows (kg/s) Fig. 3.4-13. Auxiliary feedwater flows (kg/s) Plant Mimic Tab - The plant mimic in mimic tab show overall plant status by using various instruments. It includes information to users such as various water levels, flow rates, and temperatures, etc. From the mimic for the turbine trip event, you could not see the dramatic changes compare to nominal operating condition. Examine the difference of the steam flow rates from steam generators, reactor power, hot/cold-leg temperatures compare to nominal operating condition. 34/109 Fig. 3.4-14. Plant mimic for turbine trip transient 35/109 4. MALFUNCTION TRANSIENT EVENTS 4.1 Loss of Main Feedwater Flow The loss of main feedwater flow accident is initiated by setting the main feedwater trip during the nominal operating condition. This event is an accident but the transient behavior is very similar to operational transient after reactor trip by reactor protection system. The transient for loss of main feedwater flow is similar to reactor scram. In order to initiate the transient, - It will automatically load the input file (100ic_NLOCA_r3.i) and the corresponding restart file of 100ic.r for 100% nominal operating condition when “APWRSimulator_visa” is executed. - Press “OK” button in project tab for initialization. Then it initializes the simulation condition according to input and restart files and the screen moves from project tab to trend graph tab automatically. - Press “Run” speed button to simulate the 100% nominal power condition. It asks the data saving frequency. You have to enter the data saving frequency in the dialog box as either a number of time advancement or a time interval for storing data. Then it will be started to run. - Pause on the simulation when you want to initiate a turbine trip. In order to pause on the execution, you can use speed button in upper part of simulator or set the time to pause by entering the time to pause and checking the check box in top-right corner. Fig. 4.1-1. Interactive Control Tab before and after main feedwater trip 36/109 - Move to “interactive tab” to initiate the transient. Change the selection box from automatic to manual in the line of “MFW trip”. Press the toggle switch in target column for trip status to be true. Then the toggle switch will change from green color to red as shown in Fig. 4.1-1. Then press OK button at the bottom right. These will be stopped main feedwater pump. Then, resume the execution by speed button in top left corner. - Main feedwater water flow is isolated without delay as soon as manual main feedwater trip initiated. At ~5 s later, reactor is scrammed due to low steam generator narrow range level signal. Turbine is isolated automatically due to reactor trip signal. Then, auxiliary feedwaters are started to operation. At ~ 5 s after turbine trip, steam bypass valves are opened to control the steam header pressure. You can examine the list of trips occurred by examining trip message window in left side of interactive control tab. - After 20~30 s, the reactor system is stabilized to hot shutdown condition. Nodalization Tab Since loss of main feedwater flow (LMFWF) is a mild transient, you cannot see the dramatic change in nodalization window from normal operating condition and void or temperature distribution of entire reactor system is similar to that of reactor trip case. - Before initiating loss of main feedwater flow, you can examine the void distribution in nominal operating condition in Fig. 4.1-2. Primary side of RCS is filled with water except pressurizer. Top half of pressurizer is filled with steam to control the RCS pressure. The secondary side of steam generator is divided into 4 parts; downcomer, riser, ecomimizer and steam dome. The downcomer is filled with water and riser part is heat transfer region which removes the primary side heat to secondary side of steam generator. Heat transferred in riser part of steam generator is used to generate steam. The steam and water mixture in riser part are separated in steam separator. Steam flows to turbine through steam line and water is returned to downcomer. - Examine the void distribution at 200 s after main feedwater trip. What are different from the nominal operation condition? At 200 s after main feedwater trip, the void in steam generator riser part is disappeared because the heat 37/109 transfer from primary to secondary side is decreased substantially. Fig. 4.1-2 Void distribution at 100%FP initial condition Fig. 4.1-3. Void distribution at 200 s after LMFWF Trend Graph Tab The trend graphs in trend graph tab show on-line X-Y graphs for user-selected variables in input file. By selecting the parameters through the dialog box, user can examine major volume and junction parameters and minor edit variables during the transient. These trend graphs are appeared in separated window. Multiple variables can be drawn in a graph and additional trend windows can be created by user’s request. - Before initiating a LMFWF, you can assure if the calculation is reached the steady state condition by examining the trend graphs for reactor power, pressurizer and steam generator pressures, etc. Fig. 4.1-5. PRZ / SG pressure (MPa) Fig. 4.1-4. Reactor power at 100%FP condition 38/109 - Examine the main feedwater flow and steam generator narrow range levels. As soon as LMFWF is initiated, the economizer and downcomer feedwater flows are terminated and steam generator water level is started to decrease. The steam through turbine stop valve is maintained until turbine stop valve is closed due to low steam generator narrow range level signal at ~5 s later. Fig. 4.1-6. SG flows (kg/s) Fig. 4.1-7. PRZ and SG levels (%) - Examine the pressurizer, SG pressures and reactor power for ~30 s. Reactor is scrammed with 2 seconds delay due to low SG narrow range level signal at ~7 s after LMFWF. Turbine is tripped due to reactor trip signal. As soon as turbine trip occurs, pressurizer pressure and steam line pressure increase due to turbine isolation valve closure. Fig. 4.1-8. PRZ / SG pressures (MPa) Fig. 4.1-9. Reactor power at 20 s after LMFWF - Examine the flows of auxiliary feedwater, and steam bypass for 30 s transient in Figs. 4.1-6 and 4.1-10. Auxiliary feedwater system is started due to low SG 39/109 narrow range levels. To control the steam header pressure, steam bypass valves are opened for ~10 s and start to open and close periodically. Fig. 4.1-10. Auxiliary feedwater flows (kg/s) - Examine the reactor power and pressurizer, SG pressures at 300 s after LMFWF. Reactor power is slowly decreasing due to decrease of decay power. Pressurizer pressure is maintained and stabilized by pressurizer pressure control system. Steam line pressure is periodically oscillating due to steam flow through steam bypass valve controlled by steam bypass control system. Fig. 4.1-11. Reactor power at 290 s after LMFWF Fig. 4.1-12. PRZ / SG pressures (MPa) - Examine the flows of auxiliary feedwaters and steam bypass at 300 s after LMFWF. Auxiliary feedwater flow is stabilized at ~250 s. Steam bypass valve is opened and closed to remove the decay heat in early stage of transient. 40/109 Fig. 4.1-13. SG flows (kg/s) Fig. 4.1-14. Auxiliary feedwater flows (kg/s) - Examine the SG narrow range level and auxiliary feedwaters flows at ~1500 s after LMFWF. SG water level is kept increase due to auxiliary feedwater flow. It should be turned off by operator. Turbine-driven auxiliary feedwater flow is stopped when SG level reaches a setpoint. Fig. 4.1-15. PRZ and SG level (%) Fig. 4.1-16. Auxiliary feedwater flow (kg/s) Plant Mimic Tab - The plant mimic in mimic tab show overall plant status by using various instruments. It includes information to users such as various water levels, flow rates, and temperatures, etc. From the mimic for the loss of feedwater event, you could not see the dramatic changes compare to nominal operating condition. Examine the difference of the steam flow rates from steam generators, reactor power, hot/cold-leg temperatures, and steam generator water levels compare to nominal operating condition. 41/109 Fig. 4.1-17. Plant mimic for loss of main feedwater transient - The information for secondary side of SGs is summarized in a standalone panel. In order to examine the secondary side parameter more precisely, you have to select sub-menu “Open Standalone Mimic” from the file menu. Then, it will show the directory which includes the mimic file. Select “panel_SG” to open the mimic for secondary side of SGs. Then, the standalone mimic for secondary side of SGs appears in a different window. This panel includes steam and feedwater flows, SG water levels, and SG pressures. Fig. 4.1-18 shows the various information before the transient begin and after 300 s. Before the transient start, steam flow and main feedwater flows for the steam generators are maintained in nominal level. But main feedwater flow and steam flow through turbine stop valve are terminated after LMFWF. The reactor is cooled by auxiliary feedwater flows, steam bypass flow after LMFWF. 42/109 Fig. 4.1-18(a) Secondary mimic for nominal condition Fig. 4.1-18(b). Secondary mimic at 300 s after a MFW trip 4.2 Single RCP trip The single RCP trip accident is initiated by setting one RCP trip during the nominal operating condition. This is a malfunction but the transient behavior is very similar to that for reactor trip transient. In order to initiate the transient, - It will automatically load the input file (100ic_NLOCA_r3.i) and the corresponding restart file of 100ic.r for 100% nominal operating condition when “APWRSimulator_visa” is executed. - Press “OK” button in project tab for initialization. Then it initializes the simulation condition according to input and restart files and the screen moves from project tab to trend graph tab automatically. - Press “Run” speed button to simulate the 100% nominal power condition. It asks the data saving frequency. You have to enter the data saving frequency in the dialog box as either a number of time advancement or a time interval for storing data. Then it will be started to run. - Pause on the simulation when you want to initiate a single RCP trip. In order to pause on the execution, you can use speed button in upper part of simulator or set the time to pause by entering the time to pause and checking the check box in top-right corner. 43/109 Fig. 4.2-1. Interactive Control Tab before and after single RCP trip - Move to “interactive tab” to initiate the transient. Change the selection box from automatic to manual in the line of “RCP 1A trip”. Press the toggle switch in target column for trip status to be true. Then the toggle switch will change from green color to red as shown in Fig. 4.2-1. Then press OK button at the bottom right. These will be stopped the RCP in loop 1A. Then, resume the execution by speed button in top left corner. - A RCP is isolated without delay as soon as manual single RCP trip initiated. At ~7 s later, reactor is scramed due to low loop 1A flow signal. Turbine and main feedwater is isolated automatically due to reactor trip signal. Then, auxiliary feedwaters are started to operation due to low SG narrow range signal. At ~ 5 s after turbine trip, steam bypass valves are opened to control the steam header pressure. You can examine the list of trips occurred by examining trip message window in left side of interactive control tab. - After a few ten seconds, the reactor system is stabilized to hot shutdown condition. Nodalization Tab Since single RCP trip is a mild transient, you cannot see the dramatic change in nodalization window and void or temperature distribution of entire reactor system is similar to that of reactor trip case. - Before initiating single RCP trip, you can examine the void distribution in nominal operating condition in Fig. 4.2-2. Primary side of RCS is filled with water except pressurizer. Top half of pressurizer is filled with steam to control 44/109 the RCS pressure. The secondary side of steam generator is divided into 4 parts; downcomer, riser, ecomimizer and steam dome. The downcomer is filled with water and riser part is heat transfer region which removes the primary side heat to secondary side of steam generator. Heat transferred in riser part of steam generator is used to generate steam. The steam and water mixture in riser part are separated in steam separator. Steam flows to turbine through steam line and water is returned to downcomer. - Examine the void distribution at 300 s after a single RCP trip. What are the differences from the nominal operation condition? At 300 s after a single RCP trip, the void in steam generator riser part and the water in steam dome are disappeared because the heat transfer from primary to secondary side is substantially decreased and steam flow out of SGs is ceased. Fig. 4.2-2 Void distribution at 100%FP initial condition Fig. 4.2-3. Void distribution at 300 s after a RCP trip Trend Graph Tab The trend graphs in trend graph tab show on-line X-Y graphs for user-selected variables in input file. The user can select major volume and junction parameters and minor edit variables during the transient through the dialog box in order to create additional graphs. These trend graphs are appeared in separated window. Multiple variables can be drawn in a graph window and additional trend windows can be created by user’s request. - Before initiating a single RCP trip, you can assure if the calculation is reached the steady state condition by examining the trend graphs for reactor power, pressurizer and steam generator pressures, etc. 45/109 Fig. 4.2-4. Reactor power (100%FP) Fig. 4.2-5. PRZ / SG pressure (MPa) - Examine RCP speed and cold leg flow rates. Since RCP 1A was tripped, RCP 1A speed is slowly coast-down due to large flywheel with large inertia. The speed for remaining RCPs is maintained with same speed. After RCP 1A tripped, loop 1A flow is decreasing and negative flow is established due to the pump head developed in loop 2A and 2B pumps. Loop 1B flow is increasing since the pump head in loop 1A is decreased. Loop 2A and 2B flow are maintained almost same as before. Fig. 4.2-6. RCP speed (RPM) Fig. 4.2-7. Cold leg flow (kg/s) - Examine the reactor power and pressurizer, SG pressures for ~30 s. Reactor is scrammed with 2 seconds delay due to low loop 1A flow signal at ~7 s after RCP 1A trip. Turbine is tripped due to reactor trip signal. As soon as turbine trip occurs, pressurizer pressure and steam line pressure increase due to turbine isolation valve closure. 46/109 Fig. 4.2-8. Reactor power at 20 s after a RCP trip Fig. 4.2-9. PRZ / SG pressures (MPa) - Examine the main feedwater flow and steam generator narrow range levels. As soon as RCP 1A trip is initiated, the economizer feedwater is decreased by steam generator water level control but downcomer feedwater flow is maintained without change since steam generator level control adjusts mainly the economizer feedwater flow. Steam generator water level is started to decrease slowly due to less economizer feedwater flow. Turbine is tripped by reactor trip signal and main feedwater is isolated after reactor scram. After main feedwater isolation, steam generator water level is decreasing more rapidly. Fig. 4.2-10. SG flows (kg/s) Fig. 4.2-11. PRZ / SG levels (%) - Examine the flows of auxiliary feedwater, and steam bypass for 30 s transient in Figs. 4.2-10 and 4.2-12. Auxiliary feedwater system is started due to low SG narrow range levels. To control the steam header pressure, steam bypass valves are opened at ~10 s after RCP trip. SG water levels and auxiliary feedwater flows between SG A and B are different from each other. This is due to the flow difference between primary loops. 47/109 Fig. 4.2-12. Auxiliary feedwater flows (kg/s) - Examine the reactor power and pressurizer, SG pressures at ~300 s. Reactor power is slowly decreasing due to decrease of decay heat. Pressurizer pressure is maintained due to pressurizer pressure control and steam line pressure are stabilized by steam bypass flow control. Steam line pressure is periodically oscillating due to steam flow through steam bypass valve. Fig. 4.2-13. Reactor power at 290 s after a RCP trip Fig. 4.2-14. PRZ / SG pressures (MPa) - Examine RCP speed and cold leg flow rates at ~300 s. Since RCP 1A was tripped, RCP 1A speed is slowly coast-down to zero. The speed for remaining RCPs is maintained with same speed. After RCP 1A tripped, loop 1A flow becomes negative and maintained at constant negative flow while loop 2A and 2B flow are increased a little. Loop 1B flow is increasing about 20%. 48/109 Fig. 4.2-16. Cold leg flow (kg/s) Fig. 4.-15. RCP speed (RPM) - Examine the flows of auxiliary feedwaters and steam bypass at 300 s. Auxiliary feedwater flow is increasing and stabilized at ~300 s. Steam bypass valves are open and closed before ~50 s to remove the decay heat. Fig. 4.2-18. Auxiliary feedwater flows (kg/s) Fig. 4.2-17. SG flows (kg/s) Plant Mimic Tab The plant mimic in mimic tab show overall plant status by using various instruments. It includes information to users such as various water levels, flow rates, and temperatures, etc. From the mimic during a RCP trip event, you could not see the dramatic changes compare to nominal operating condition. Examine the difference of the steam flow rates from steam generators, reactor power, hot/cold-leg temperatures, and steam generator water levels compare to nominal operating condition. 49/109 Fig. 4.2-19. Plant mimic at 300 s after a RCP trip - The information for secondary side of SGs is summarized in a standalone panel. Figs. 4.2-20~4.2-21 shows the various information before the transient begin and after 300 s. Before the transient start, steam flow and main feedwater flows for the steam generators are maintained in nominal level. But these are terminated after a RCP trip. Reactor is cooled by auxiliary feedwater flows, steam bypass flow after a RCP trip. 50/109 Fig. 4.2-21. Secondary mimic at 300 s after a RCP trip Fig. 4.2-20 Secondary mimic at 100%FP initial condition 4.3 Steam generator tube rupture This malfunction event is assumed a 5 steam generator U-tube rupture of steam generator 1. This accident condition is a hypothetical accident in a PWR plant. This break causes a loss of coolant of the primary side of reactor cooling system. - It will automatically load the input file (100ic_NLOCA_r3.i) and the corresponding restart file of 100ic.r for 100% nominal operating condition when “APWRSimulator_visa” is executed. - You have to change the input and restart files to simulate multiple steam generator tube rupture accident. First load the 100% power input file for LOCA (100ic_LOCA_r2.i) and the corresponding restart file of 100ic.r. These file could be loaded by choosing the project file from file menu instead to load the input and restart files one by one. To select the project file from file menu, select ‘open project’ and then choose the project file of ‘loca.mpj’ from directory window. Then it will automatically set up the 100% power operating condition for multiple SGTR simulation. - Press “OK” button in project tab for initialization. Then it initializes the simulation condition according to input and restart files and the screen moves from project tab to trend graph tab automatically. - Press “Run” speed button to simulate the 100% nominal power condition. It asks the data saving frequency. You have to enter the data saving frequency in the dialog box as either a number of time advancement or a time interval for 51/109 storing data. Then it will be started to run. - Pause on the simulation when you want to initiate a 5 steam generator U-tube rupture (SGTR) of steam generator 1. In order to pause on the execution, you can use speed button in upper part of simulator or set the time to pause by entering the time to pause and checking the check box in top-right corner. In this example, multiple SGTR is initiated at 20 s. - Move to “interactive tab” to initiate a SGTR. Change the selection box from automatic to manual in the line of “SGTR1”. Press “SGTR1” toggle switch for trip. Then the toggle switch will change from green color to red. This will break the steam generator tubes as shown in Fig. 4.3-1. Then press OK button at the bottom right. Then, resume the execution by speed button in top left corner. The SGTR occurrence can be confirmed by examining the trip message window. Fig. 4.3-1. Interactive Control Tab for SGTR in SG 1 - Reactor is scrammed with 2 seconds delay after reaching pressurizer low pressure setpoint at ~253 s. At the same time, turbine is terminated in operation. Main feedwater are isolated automatically due to reactor trip signal. Auxiliary 52/109 feedwater system is started. And high pressure safety injection system is initiated with 20 s delay by low pressurizer pressure signal. You can examine these in trip message window in left side of interactive control tab as shown in Fig. 4.3-2. - It is normal to trip the reactor by operator based on high radiation signal. But it is ignored in this example. According to the emergency operation procedure, operator should isolate the affected SG by closing the MSIV and feedwater valves for SG 1 (In this example, SG is isolated at 350 s). You can isolate the affected SG by using interactive control panel as shown in right side of Fig. 4.32. Fig. 4.3-2. Trip message and interactive control window at 350 s - At ~500 s, primary pressure and secondary pressure for an affected SG is equalized and reactor operator should stabilize the reactor according to the emergency operational procedure. But we are not treated the stabilizing process by operator in this example. Nodalization Tab 53/109 This is a unique feature in this simulator. Since the engine for this simulator is based on best-estimate system code, it could predict a complex accident condition close to real situation. Confidence in its fidelity makes it possible to show the distribution of major parameters. - Before initiating SGTR, you can see the void distribution in nominal operating condition. Primary side of RCS is filled with water except pressurizer. Top half of pressurizer is filled with steam to control the RCS pressure. The secondary side of steam generator is divided into 3 parts; downcomer, riser, and steam dome. The downcomer is filled with water and riser part is heat transfer region which removes the primary side heat to secondary side of steam generator. Heat transferred in riser part of steam generator is used to generate steam. The steam and water mixture in riser part are separated in steam separator. Steam flows to turbine through steam line and water is returned to downcomer. - Press liquid temperature button in bottom-right corner. Then, you can examine the liquid temperature distribution in nominal operating condition. - Examine the void distribution at 100 s. Where is void filled first? Fig. 4.3-3. Void distribution at 20 s Fig. 4.3-4. Void distribution at 100 s - At ~100 s, pressurizer water level is started to decrease as shown in Fig. 4.3-4. Water in primary side of RCS is discharged through the break and pressurizer level is decreasing. - Examine the void distribution at 350 s just before the affected SG is isolated. At ~283 s, high pressure safety injection is started. Water in steam generators is almost stagnant due to low heat transfer from the primary sides. And steam 54/109 generator pressure is controlled by steam bypass flow control system. The upper part of vessel becomes vacant. Fig. 4.3-5. Void distribution at 350 s Fig. 4.3-6. Void distribution at 500 s - After 500 s, upper part of pressure vessel is filled with vapor and is almost identical with void distribution before SG isolation. This is due to primary and secondary SG pressure becomes equalized at ~ 350 s. Trend Graph Tab The trend graph shows on-line X-Y graphs for user-selected variables in the input file. The X-Y graphs appear in trend graph tab in all transients. Therefore, it is better to choose major parameters which are interested in every transient. The user can select and examine major volume and junction parameters and minor edit variables during the transient through the dialog box to create additional graphs. These trend graphs are appeared in separated window. Multiple variables can be drawn in a graph window and additional trend windows can be created by user’s request. - Before initiating SGTR, you can assure if the calculation is reached the steady state condition by examining the trend graphs for reactor power, pressurizer and steam generator pressures, etc. 55/109 Fig. 4.3-7. Reactor power at 100%FP initial condition Fig. 4.3-8. PRZ / SG pressure (MPa) - Examine the pressure and water level of pressurizer and steam generator at ~100 s. As soon as break occurs, pressurizer pressure starts to decrease. Pressurizer and intact SG water levels are decreasing but affected SG water level is increasing because the primary water flows into affected SG through the break. Fig. 4.3-9. PRZ / SG pressure (MPa) Fig. 4.3-10. PRZ / SG level (%) - Examine the break flow and main feedwater flow at ~100 s. As soon as break occurs, the break flow from primary side to secondary side of SG starts to increase and then, slowly decrease because the pressure difference between primary and secondary pressure is decreasing. Main feedwater flow for affected SG is decreased by feedwater flow control system due to SG water level increase. 56/109 Fig. 4.3-11. Break flow (kg/s) Fig. 4.3-12. Feedwater flow (kg/s) - Examine reactor power and pressurizer pressure at ~300 s. Reactor is shut down due to low pressurizer pressure signal at ~255 s. Before reactor scram, reactor power is slowly increased due to reactor regulating control and reactivity feedback. After reactor shutdown, primary pressure decreases more rapidly and secondary pressure is increasing due to turbine stop. Fig. 4.3-13. Reactor power at 300 s Fig. 4.3-14. PRZ /SG pressure (MPa) - Examine steam bypass flow and auxiliary feedwater flow at ~300 s. After reactor scram, turbine flow and main feedwater flow is ceased and steam bypass valves are opened by steam bypass valve control system to control the steam generator pressure. Auxiliary feedwater flows are also initiated at the almost same time. 57/109 Fig. 4.3-15. Steam bypass flow (kg/s) Fig. 4.3-16. Auxiliary feedwater flow (kg/s) - Examine safety injection flow and pressurizer, SG liquid level at ~350 s. High pressure safety injection system is started with some delay after low pressurizer pressure signal. Pressurizer water level keeps decreasing after the break and decreasing speed is increased after reactor scram. SG water level is decreasing rapidly after turbine trip. At ~350 s, the affected SG is isolated in this example. SG isolation includes MSIV close and auxiliary feedwater stop for the affected SG. Fig. 4.3-17. High pressure safety injection flow (kg/s) Fig. 4.3-18. PRZ / SG water level (%) - Examine auxiliary feedwater flow and pressurizer pressure at ~1000 s. As soon as affected SG is isolated, auxiliary feedwater into SG 1 is ceased. Primary and secondary side pressures of the affected SG become almost identical. And the break flow is stopped due to no pressure difference. 58/109 Fig. 4.3-19. Auxiliary feedwater flow (kg/s) Fig. 4.3-20. PRZ / SG pressure (MPa) Plant Mimic Tab - The plant mimic window shows major parameters through some selected indicators as shown in Fig. 4.3-21. The panel mimic can be created to efficiently show the trip information, valve positions using LED indicators, flows, level, etc. through various instruments. Users can create additional mimics if they want. 59/109 Fig. 4.3-21. Plant mimic at ~500 s 4.4 Cold Leg #1 SBLOCA This malfunction event is assumed a 3% cold leg #1 break. This accident condition is a hypothetical accident in a PWR plant. This break causes a loss of coolant accident (LOCA) event. - It will automatically load the input file (100ic_NLOCA_r3.i) and the corresponding restart file of 100ic.r for 100% nominal operating condition when “APWRSimulator_visa” is executed. - You have to change the input and restart files to simulate Loss-of-coolant accident. First load the 100% power input file for LOCA (100ic_LOCA_r2.i) and the corresponding restart file of 100ic.r. These file could be loaded by choosing the project file from file menu instead to load the input and restart files one by one. To select the project file from file menu, select ‘open project’ and then choose the project file of ‘loca.mpj’ from directory window. Then it will automatically set up the 100% power operating condition for LOCA simulation. 60/109 - Press “OK” button in project tab for initialization. Then it initializes the simulation condition according to input and restart files and the screen moves from project tab to trend graph tab automatically. - Press “Run” speed button to simulate the 100% nominal power condition. It asks the data saving frequency. You have to enter the data saving frequency in the dialog box as either a number of time advancement or a time interval for storing data. Then it will be started to run. - Pause on the simulation when you want to initiate a 3% cold leg #1 SBLOCA. In order to pause on the execution, you can use speed button in upper part of simulator or set the time to pause by entering the time to pause and checking the check box in top-right corner. In this example, a 3% cold leg #1 SBLOCA simulation is initiated at 10 s. - Move to “interactive tab” to initiate a break. Change the selection box from automatic to manual in the line of “3% SBLOCA1”. Press “3% SBLOCA1” toggle switch for trip. Then the toggle switch will change from green color to red as shown in Fig. 4.4-1. This will break the cold leg #1 pipe. Then press OK button at the bottom right. Then, resume the execution by speed button in top left corner. The 3% SBLOCA occurrence can be confirmed by examining the trip message window. 61/109 Fig. 4.4-1. Interactive Control Tab for 3% Cold Leg #1 SBLOCA - Reactor is scrammed with 2 seconds delay after reaching pressurizer low pressure setpoint at ~27.3 s. At the same time, turbine is terminated in operation. Main feedwater are isolated automatically due to reactor trip signal. You can examine these in trip message window in left side of interactive control tab. - For the conservative simulation, all 4 RCPs are stopped to protect RCPs as an operator’s action at ~30 s. 62/109 Fig. 4.4-2. Interactive Control Tab for RCP trip - Safety injection system is initiated with 20 s delay after low pressurizer pressure signal. You can examine by trip message window. Nodalization Tab This is a unique feature in this simulator. Since the engine for this simulator is based on best-estimate system code, it could predict a complex accident condition close to real situation. Confidence in its fidelity makes it possible to show the distribution of major parameters. - Before initiating SBLOCA, you can see the void distribution in nominal operating condition. Primary side of RCS is filled with water except pressurizer. Top half of pressurizer is filled with steam to control the RCS pressure. The secondary side of steam generator is divided into 3 parts; downcomer, riser, and steam dome. The downcomer is filled with water and riser part is heat transfer region which removes the primary side heat to secondary side of steam generator. Heat transferred in riser part of steam generator is used to generate steam. The steam and water mixture in riser part are separated in steam separator. Steam flows to turbine through steam line and water is returned to downcomer. 63/109 - Press liquid temperature button in bottom-right corner. Then, you can examine the liquid temperature distribution in nominal operating condition. - Examine the void distribution at 30 s. Where is void filled first? Fig. 4.4-3. Void distribution at 30 s Fig. 4.4-4. Void distribution at 50 s - At ~30s, pressurizer water level is started to decrease. At ~50 s, upper parts of reactor core fills with void because RCS water is discharged through the break and upper head of pressure vessel and pressurizer is filled with void. - Examine the void distribution at ~60 s. At ~57 s, high pressure safety injection is started. Water in steam generators is almost stagnant due to low heat transfer from the primary sides. And steam generator pressure is controlled by steam generator pressure control system. Examine the void distribution at ~100 s. The upper part of vessel becomes vacant. Fig. 4.4-5. Void distribution at 60 s Fig. 4.4-6. Void distribution at 100 s - After ~300 s, upper part of pressure vessel is filled with vapor and cold legs 64/109 become partially filled with vapor. Sometime later, water in pump suction legs is cleared due to pressure buildup in upper head and flows to downcomer of pressure vessel. At ~500 s, loop seal is cleared. During the transient, core is filled with two-phase water. Therefore, core is not heated and stayed in low temperature. Fig. 4.4-7. Void distribution at 300 s Fig. 4.4-8. Void distribution at 1000 s Trend Graph Tab The trend graph shows on-line X-Y graphs for user-selected variables in RELAP5 input file. The X-Y graphs appear in trend graph tab in all transients. Therefore, it is better to choose major parameters which are interested in every transient. The user can select major volume and junction parameters and minor edit variables during the transient through the dialog box to create additional graphs. These trend graphs are appeared in separated window. Multiple variables can be drawn in a graph window and additional trend windows can be created by user’s request. - Before initiating SBLOCA, you can assure if the calculation is reached the steady state condition by examining the trend graphs for reactor power, pressurizer and steam generator pressures, etc. 65/109 Fig. 4.4-9. Reactor power at 100%FP initial condition Fig. 4.4-10. PRZ / SG pressure (MPa) - Examine pressurizer pressure, liquid fraction in core region and downcomer, core liquid levels and reactor power change at ~30 s. As soon as break occurs, pressurizer pressure decreases. At ~ 13 s, core is started to fill with void. At ~27 s, reactor power is scrammed due to low pressurizer pressure signal. Fig. 4.4-11. PRZ / SG pressure (MPa) 66/109 Fig. 4.4-12. Core void fraction Fig. 4.4-13. Core / downcomer level (%) Fig. 4.4-14. Reactor power at 30 s - Examine the break flow rates and pressurizer water level. Due to discharge flow through the break, pressurizer water level starts to decrease as soon as break occurs. Fig. 4.4-15. Break flow (kg/s) Fig. 4.4-16. PRZ and SG level (%) - Examine reactor power and reactor coolant pump (RCP) speeds at ~100 s. Reactor power is decreasing due to reactor trip by low pressurizer pressure signal. And RCP speeds are started to coast down slowly due to RCP trip at ~30 s. 67/109 Fig. 4.4-17. Reactor power at 100 s Fig. 4.4-18. RCP speeds (RPM) - Examine cladding temperature and safety injection flow rate at ~100 s. Cladding temperature decreases because saturated water temperature decrease and core is covered by two-phase water. With 20 s delay after low pressurizer pressure signal, high pressure safety injection is started. Fig. 4.4-19. Cladding temperature (oC) Fig. 4.4-20. High pressure safety injection flow (kg/s) - Examine cladding temperature, core liquid level at 500 s. Cladding temperatures keep decreasing due to core fluid temperature decrease by primary pressure decrease. At ~400 s, core and downcomer collapsed level starts to recover. As long as core is covered by two-phase water, core heat-up can not occur. 68/109 Fig. 4.4-21. Cladding temperature (oC) Fig. 4.4-22. Core water level (%) Plant Mimic Tab - The plant mimic window shows major parameters through some selected indicators as shown in Fig. 4.4-23. The panel mimic can be created to efficiently show the trip information, valve positions using LED indicators, flows, level, etc. through various instruments. Users can create additional mimics if they want. 69/109 Fig. 4.4-23. Plant mimic at 500 s 4.5 Cold Leg #1 LBLOCA This malfunction event is assumed a guillotine break at the cold leg #1. This accident condition is the most limiting hypothetical accident in a PWR plant. This break causes a loss of coolant accident (LOCA) event. - It will automatically load the input file (100ic_NLOCA_r3.i) and the corresponding restart file of 100ic.r for 100% nominal operating condition when “APWRSimulator_visa” is executed. - You have to change the input and restart files to simulate Loss-of-coolant accident. First load the 100% power input file for LOCA (100ic_LOCA_r2.i) and the corresponding restart file of 100ic.r. These file could be loaded by choosing the project file from file menu instead to load the input and restart files one by one. To select the project file from file menu, select ‘open project’ and then choose the project file of ‘loca.mpj’ from directory window. Then it will 70/109 automatically set up the 100% power operating condition for LOCA simulation. - Press “OK” button in project tab for initialization. Then it initializes the simulation condition according to input and restart files and the screen moves from project tab to trend graph tab automatically. - Press “Run” speed button to simulate the 100% nominal power condition. It asks the data saving frequency. You have to enter the data saving frequency in the dialog box as either a number of time advancement or a time interval for storing data. Then it will be started to run. - Pause on the simulation when you want to initiate a guillotine break at cold leg #1. In order to pause on the execution, you can use speed button in upper part of simulator or set the time to pause by entering the time to pause and checking the check box in top-right corner. In this example, a coldleg #1 LBLOCA simulation is initiated at 10 s. - Move to “interactive tab” to initiate a break. Change the selection box from automatic to manual in the line of “CL1 LBLOCA”. Press “CL1 LBLOCA” toggle switch for trip. Then the toggle switch will change from green color to red as shown in Fig. 4.5-1. This will initiate the cold leg pipe #1 break. Then press OK button at the bottom right. Then, resume the execution by speed button in top left corner. The LBLOCA occurrence can be confirmed by examining the trip message window. 71/109 Fig. 4.5-1. Interactive Control Tab for Cold Leg #1 LBLOCA - Reactor is scrammed with 2 seconds delay after reaching pressurizer low pressure setpoint. At the same time, turbine stop valve is isolated and all 4 RCPs are assumed to be turned off by operater. Main feedwater are isolated automatically due to reactor trip signal. You can see these by examining trip message window in left side of interactive control tab. - For the conservative simulation, it is assumed that all 4 RCPs are stopped to protect RCPs by operator when reactor is tripped. - As pressure in primary side of RCS decreases below 40 bar, accumulator water is injected to the cold legs. Accumulators are filled with water and upper parts of accumulator are pressurized by nitrogen gas. It injects the water passively if RCS pressure becomes less then accumulator pressure. - Safety injection system is initiated with 20 s delay after low pressurizer pressure signal. You can examine by trip message window. Nodalization Tab This is a unique feature in this simulator. Many other simulators use a coarse mesh model and/or overly simplified physical models to satisfy real-time simulation requirement. Therefore most simulators could not simulate a complex two-phase phenomena which could be occurs in some accident conditions. Since the engine for this simulator is based on best-estimate system code, it could predict a complex accident condition close to real situation. Confidence in its fidelity makes it possible to show the distribution of major parameters. - Before initiating LBLOCA, you can see the void distribution in nominal operating condition. Primary side of RCS is filled with water except pressurizer. Top half of pressurizer is filled with steam to control the RCS pressure. The secondary side of steam generator is divided into 3 parts; downcomer, riser, and steam dome. The downcomer is filled with water and riser part is heat transfer region which removes the primary side heat to secondary side of steam generator. Heat transferred in riser part of steam generator is used to generate steam. The steam and water mixture in riser part are separated in steam separator. Steam flows to turbine through steam line and water is returned to downcomer. - Press liquid temperature button in bottom-right corner. Then, you can examine 72/109 the liquid temperature distribution in nominal operating condition. - Examine the void distribution at 3 s after LOCA. Where is void filled first? Fig. 4.5-2. Void distribution at 3 s after LOCA Fig. 4.5-3. Void distribution at 12 s after LOCA - Examine the void distribution at ~10 s after LOCA. At ~3 s after LOCA, void starts to appear in core region before pressurizer becomes empty. A few seconds later, water in upper parts of reactor core is discharged through the break. - Examine the void distribution at ~30 s after LOCA. Core is completely filled with vapor and cold legs and downcomer is partially filled with water due to water injection from accumulators. - Examine the void distribution at ~60 s after LOCA. Water in core starts to be filled due to water from accumulators and safety injection. This means that fuel cladding is quenched. Water in steam generators is almost stagnant due to low heat transfer from the primary sides. 73/109 Fig. 4.5-4. Void distribution at 30 s after LOCA Fig. 4.5-5. Void distribution at 60 s after LOCA - After 120s after LOCA, accumulator water injection is terminated and water injection by safety injection pumps is only source of water. After termination of accumulator water injection, fuel could be reheated if water source by safety injection pumps is not enough. In this example, fuel is not reheated and stabilized due to enough water injection as you can see the void distribution at ~150 s after LOCA in Fig. 4.5-7. Fig. 4.5-6. Void distribution at 120 s after LOCA Fig. 4.5-7. Void distribution at 150 s after LOCA Trend Graph Tab The trend graph shows on-line X-Y graphs for user-selected variables in input file. The X-Y graphs appeared in trend graph tab are appeared in all transients. Therefore, it is better to choose major parameters which are interested in every transient. The user can select major volume and junction parameters and minor edit variables during the transient through the dialog box to make additional graphs. These trend graphs are appeared in separated window. Multiple variables can be 74/109 drawn in a graph window and additional trend windows can be created by user’s request. - Before initiating LBLOCA, you can assure if the calculation is reached the steady state condition by examining the trend graphs for reactor power, pressurizer and steam generator pressures, etc. Fig. 4.5-8. Reactor power at 100%FP initial condition Fig. 4.5-9. PRZ / SG pressure (MPa) - Examine pressurizer pressure, liquid fraction in core region and downcomer, core liquid levels and reactor power change at 3 s after LOCA. As soon as break occurs, pressurizer pressure decreases and water in core region starts to boil and core is filled with void. Due to reactivity feedback, reactor power is decreasing. Fig. 4.5-10. PRZ / SG pressure (MPa) 75/109 Fig. 4.5-11. Core void fraction Fig. 4.5-12. Core / downcomer level (%) Fig. 4.5-13. Reactor power after reactor scram - Examine fuel rod cladding temperatures. Since core is almost filled with vapor, cladding temperature starts to increase. Examine also vessel side and hot leg side discharge flow rates. Red line stands for hot leg side break flow and green line for vessel side break flow. Since hot leg side is vaporized more than vessel side, discharge mass flow from vessel side is larger. Fig. 4.5-14. Break flow (kg/s) Fig. 4.5-15. Fuel cladding temperature (oC) - Examine reactor power and reactor coolant pump (RCP) speeds at 15 s after LOCA. Reactor power is decreasing more after control rod drop. And RCP speeds are started to coast down slowly due to RCP trip. 76/109 Fig. 4.5-15. Reactor power at 25 s Fig. 4.5-16. RCP speeds (RPM) - Examine cladding temperature and accumulator injection flow rate at 15 s after LOCA. Cladding temperature increases and then fuel rods are quenched. It is called as a blowdown peak cladding temperature curve. Violent flow behavior inside of core and reactor power reduction to decay power level make fuel rod quenching possible. As RCS pressure decreases below accumulator pressure, accumulator injection is started. Fig. 4.5-17. Cladding temperature (oC) Fig. 4.5-18. Accumulator injection flow (kg/s) - Examine cladding temperature, core liquid level and accumulator and safety injection flow rates at ~55 s after LOCA. Cladding temperature increases again and then fuel rods are quenched. It is called as a reflood peak cladding temperature curve. As core becomes completely dry, fuel rod temperature increases again since low heat transfer from rod to fluid. As safety injection flow starts to enter into core, fuel rod starts to quench. 77/109 Fig. 4.5-19. Cladding temperature (oC) Fig. 4.5-20. Core water level (%) Fig. 4.5-21. Accumulator flow (kg/s) Fig. 4.5-22. Safety injection flow (kg/s) - Examine cladding temperature, accumulator flow rates at ~120 s after LOCA. At ~110 s after LOCA, accumulator injection is terminated. Cladding temperature could be reheated due to water supply shortage. In this calculation, however, cladding temperature is slowly decreased even after termination of accumulation injection flow. 78/109 Fig. 4.5-23. Cladding temperature (oC) Fig. 4.5-24. Accumulator injection flow (kg/s) The plant mimic window shows major parameters through some selected indicators as shown in Fig. 4.5-25. The panel mimic can be created to efficiently show the trip information, valve positions using LED indicators, flows, level, etc. through various instruments. Users can create additional mimics if they want. Fig. 4.5-25. Plant mimic at 120 s after LOCA 79/109 4.6 Station Blackout The importance of a passive cooling system to cope with a prolonged Station BlackOut (SBO) accident has emerged after Fukushima accident. Passive cooling system for the steam generator (SG) in the most PWRs is a turbine-driven auxiliary feedwater (TD-AFW) system which is driven by steam flow from the S/Gs. If the SG level becomes too high in a few hours after the SBO accident initiation, however, the turbine in TD-AFW would be damaged due to a large amount of moisture in steam and the decay cooling capability via the SGs would not be available any longer. Therefore, the S/G water level should be controllable to prevent the turbine blade damage during an SBO accident. It is not possible to control the SG water level if DC battery is not available such as Fukushima accident. An SBO accident stands for a complete loss of all AC power including an alternative AC power and the EDGs. Even though there are a lot of the engineered safety features (ESFs) such as the SITs, SIPs and AFW system, most of them require the electrical power source except for the TD-AFW system and the relief valves of a safety-related class during an SBO accident. Therefore, all the ESF equipments which require AC power would be unavailable occurring with an SBO accident. From this assumption, available system components can be determined during an accident, hence, the initial condition for a postulated SBO accident can be summarized as Table 4.6-1. In a real SBO case, RCP seal leak has to be considered. However, it is neglected in this test simulation. Table 4.6-1 Component availabilities during an SBO accident System Primary Secondary Component Control/Scram Rod RCP PSV PZR heater / spray Charging / Letdown SIP SIT MFWP/CP MD- AFW TD- AFW SBCS MSIV MSSV ADV Function Power Source* Availability Reactor power control RCS forced cooling Pressure control Pressure control PRZ level control Coolant inventory Coolant inventory SG coolant inventory SG coolant inventory SG coolant inventory SG pressure control SG isolation SG pressure control SG pressure control G/E E S/E E E E A E/T E T A E S M/E O X O X X X O X X O X X O X *Power source type: E=Electricity, G=Gravity, S=Spring-loaded, T=Turbine, M=Manual, A=compressed Air 80/109 As shown in Table 4.6-1, only a few components such as PSVs, MSSVs, SITs and TD-AFW pumps will be guaranteed to work in the following analysis. Other components driven by compressed air are assumed to be unavailable because they are not the safety-related components. On the other hand, the reactor scram function will be available because the control rods including shutdown rods will be inserted into the core by a gravitational force without electric power. Figure below (Fig. 4.6-1) shows the design of a turbine-driven auxiliary feedwater system of the Advanced PWR. It consists of the steam control valve (3), an auxiliary turbine (4), an emergency feedwater pump (5), condensate storage tank (6) which is the water source of the auxiliary feedwater, and the control panel (7) equipped with the SG level measurements and valve controller to control the SG (1) water level remotely in the main control room (MCR). The pump speed is controlled according to the steam flow rate which is determined by the steam control valve at normal state. 7 Offsite/ Emergency Power S/G Level Gauge & V/V controller 8 CST 6 V/V Control MSSV 3 M S L 2 AFW P/P 4 5 Steam Control V/V AFW TBN Exhausted steam Atmosphere S/G Level Signal S/G 1 Flow path of AFW Flow path of Steam Fig. 4.6-1 Turbine-driven auxiliary feedwater system To simulate this transient, you have to turn off every component which is required AC power source. - It will automatically load the input file (100ic_NLOCA_r3.i) and the corresponding restart file of 100ic.r for 100% nominal operating condition when “APWRSimulator_visa” is executed. - You have to change the input and restart files to simulate Station Blackout 81/109 accident. First load the 100% power input file for LOCA (100ic_LOCA_r2.i) and the corresponding restart file of 100ic.r. These file could be loaded by choosing the project file from file menu instead to load the input and restart files one by one. To select the project file from file menu, select ‘open project’ and then choose the project file of ‘loca.mpj’ from directory window. Then it will automatically set up the 100% power operating condition for SBO simulation. - Press “OK” button in project tab for initialization. Then it initializes the simulation condition according to input and restart files and the screen moves from project tab to trend graph tab automatically. - Press “Run” speed button to simulate the 100% nominal power condition. It asks the data saving frequency. You have to enter the data saving frequency in the dialog box as either a number of time advancement or a time interval for storing data. Then it will be started to run. - Pause on the simulation when you want to initiate a station black-out accident. In order to pause on the execution, you can use speed button in upper part of simulator or set the time to pause by entering the time to pause and checking the check box in top-right corner. In this example, a station black-out accident simulation is initiated at 20 s. - Move to “interactive tab” to initiate an accident. Change the selection box from automatic to manual. Press “Reactor trip”, “Turbine trip”, “MFW trip” trip toggle switch for trip. Set the area for spray valve 1A and 1B to zero. Turn off all RCPs. And set charging and letdown flow rate to zero. You have to all set high pressure safety injections, low pressure safety injection to zero. Also set motor driven auxiliary feedwater flow to zero. Set steam bypass valve area to zero. And set the area of four MSIVs to 100% since no power is available to close even if the steam generator level reaches to the high level setpoint. DC battery power is assumed to be available in this example. Then press OK button at the bottom right. These actions will initiate SBO accident. Then, resume the execution by speed button in top left corner. These actions will take care for the simulation of SBO. - As soon as SBO occurs, reactor is scrammed and turbine and all 4 RCPs are terminated in operation. Main feedwater and motor-driven auxiliary feedwater are isolated. You can see these by examining trip message window in left side of interactive control tab and trend graphs. 82/109 Fig. 4.6-2. Reactor power at 100 s Fig. 4.6-3. Turbine / main feedwater flow (kg/s) Fig. 4.6-4. RCP speeds (RPM) Fig. 4.6-5. PRZ level / SG narrow range level (%) - After the SG water level reaches the setpoint of a low SG level (23.5 %) (Fig. 4.6-5), the TD-AFW is actuated by the auxiliary feedwater actuation signal (AFAS) and auxiliary feedwater is supplied into SGs as shown in Fig. 4.6-6. The SG pressure maintains at ~80 bars by the actuation of the MSSV in the early stage of the accident (Fig. 4.6-7). Examine the MSSV flow by using trend graph. 83/109 Fig. 4.6-6. Auxiliary feedwater flow (kg/s) Fig. 4.6-7. MSSV flow (kg/s) - At ~1000 s after SBO accident, the system is stabilized as long as controlled turbine-driven auxiliary feedwater flow is maintained. As you can see in Figs. 4.6-8~4.6-13, RCS is cooled by steam flow through the main steam line safety valves and steam generator level is maintained by turbine-driven auxiliary feedwater flow. At the early stage of SBO accident, narrow range level of steam generators disappears and then water levels are recovered by turbine-driven auxiliary feedwater flow as time goes. The RCPs is completely stopped after slow coast down due to large inertia of RCP flywheels. Reactor power is decreases to decay heat level. And steam generator and primary pressure is stabilized. Fig. 4.6-8. Auxiliary feedwater flow (kg/s) 84/109 Fig. 4.6-9. MSSV flow (kg/s) Fig. 4.6-10 PRZ and SG levels (%) Fig. 4.6-11. RCP speeds (RPM) Fig. 4.6-12. Reactor power at 1000 s Fig. 4.6-13. PRZ / SG pressure (MPa) - Let us assume DC battery failure at ~1000 s after SBO. If the control panel is unavailable at certain condition due to loss of DC power which actually occurs in Fukusima, the stem position of the steam control valve (3) remains as it is. Afterwards, the SG water level will increase or decrease due to a flow mismatch between steam flow which depends on the SG pressure and feedwater flow according to the final valve area, and eventually the SG level control will lead to fail. Even though the steam control valve can be also controlled manually in local panel, it is impossible to control the SG water level properly without the information of SG level. Let us assume maximum turbine-driven auxiliary feedwater flow is maintained without changing (40 kg/s). - At ~2100 s after SBO accident, top of separator is filled with water and steam separation function is no more available. Then, the moisture from the SGs goes to the turbine of turbine-driven auxiliary feedwater system and turbine-driven 85/109 auxiliary feedwater system could be fail. As you can see in Fig. 4.6-14, secondary side of SGs is filled with water. Fig. 4.6-14. Void distribution at 2200 s Fig. 4.6-15. Auxiliary feedwater flow (kg/s) Fig. 4.6-16. PRZ and SG level (%) - Let us assume turbine-driven auxiliary feedwater pump failure. You can simulate by setting the turbine-driven auxiliary feedwater flow to be zero. We 86/109 could expect SG water will be dry-out since it has to remove reactor decay heat. Fig. 4.6-17. Void distribution at 9000 s Fig. 4.6-18. Void distribution at 11000 s Fig. 4.6-19. Void distribution at 12000 s Fig. 4.6-20. Void distribution at 13000 s Fig. 4.6-21. Void distribution at 14000 s Fig. 4.6-22. Void distribution at 15000 s - As expected, SG water is dried out at ~16000 s. Since SG losses heat removal capability, primary pressure gradually increases and finally reachs to pressurizer safety valve open setpoint as shown in Fig. 4.6-24. Pressurizer safety valve is repeatedly opened and closed to remove the decay heat by 87/109 mass and energy release through the pressurizer safety valve. You can realize the pressurizer safety valve open/close by trip messages and discharge flow rate in Figs. 4.6-25 and 4.6-26. After steam generator dry-out, steam flow through the steam line safety relief valve is terminated (Fig. 4.6-27). Fig. 4.6-23. Void distribution at 16000 s Fig. 4.6-24 PRZ /SG pressure at 16000 s Fig. 4.6-25. Trip message at 16000 s Fig. 4.6-26. PRZ SV flow at ~18500 s 88/109 Fig. 4.6-27. SG SV flow at ~18500 s Fig. 4.6-28 PRZ / SG level at ~18500 s - Due to primary water discharge through pressurizer safety valves (Fig. 4.6-30), primary water inventory is decreasing. At ~ 19100 s, water in vessel upper head is vaporized and filled with steam as shown in Fig. 4.6-29. Fig. 4.6-29. Void distribution at 19100 s Fig. 4.6-30. PRZ SV flow at ~ 19100 s - Primary water inventory is continuously decreasing (Fig. 4.6-31). Since water is discharged through the pressurizer safety valves at the top of pressurizer, pressurizer is filled with two-phase mixture while hot leg becomes empty. This phenomenon is very hard to be predicted and this is an advantage of using best-estimate system analysis code as an engine for the simulator. Fig. 4.6-32 shows void fractions in different elevation inside of core. 89/109 Fig. 4.6-31. Void distribution at 19500 s Fig. 4.6-32. Core void fraction at 19500 s - Primary water inventory remains only in lower part of vessel, loop seal, cold legs and pressurizer as shown in Fig. 4.6-33. Liquid fraction in core region is continuously decreasing (Fig. 4.6-34). You also can realize the low liquid level in Fig. 4.6-35. Due to low void fraction in core region, the upper part of core is uncovered. Therefore, fuel cladding and fuel temperatures are increasing as shown in Fig. 4.6-36. Fig. 4.6-33. Void distribution at 20200 s Fig. 4.6-34. Core void fraction at 20200 s 90/109 Fig. 4.6-35. Core/Downcomer level at 20200 s Fig. 4.6-36. Fuel cladding temp. at 20200 s - After ~21000 s, primary water inventory remains only in lower part of vessel, loop seal, and pressurizer as shown in Fig. 4.6-37. Although pressurizer is located above cold legs and hot legs, interphase drag force due to vapor discharge flow at pressurizer safety valves holds liquid in pressurizer from liquid drain. The upper part of core region is exposed to hot vapor and fuel temperature is increasing continuously. This may results the core melting if other recovery action is not taken place. Fig. 4.6-37. Void distribution at 21400 s Fig. 4.6-38. Fuel cladding temp. at 21400 s 91/109 5. MODEL DESCRIPTION 5.1 Reactor kinetic model The reactor power of this simulator is computed by the point reactor kinetics model which is the simplest model that can be used to compute the transient behavior of the neutron fission power in a nuclear reactor. The point reactor kinetics model assumes that power can be separated into space and time functions. This approximation is adequate for the cases in which the space distribution remains nearly constant. Therefore, the model may not be suitable to simulate transients for which the space distribution becomes important such as single rod ejection, rod drop, etc. The point reactor kinetics model computes both the immediate fission power and the power from decay of fission products. The immediate power is that released at the time of fission and includes power from kinetic energy of the fission products and neutron moderation. Decay power is generated as the fission products undergo radioactive decay. The point kinetics equations are where t n = = time (s) neutron density (neutrons/m3) v Ci = = = neutron flux (neutrons/m2-s) neutron velocity (m/s) group i delayed neutron precursor concentration (nuclei/m3) β = effective delayed neutron fraction = Λ = prompt neutron generation time ρ = reactivity 92/109 fi = = fraction of delayed neutrons of group i / βi = effective delayed neutron precursor yield of group i λi = decay constant of group i S = source rate density (neutron/m3-s) ψ = fission rate (fissions/s) f Pf = = macroscopic fission cross-section (1/m) immediate (prompt and delayed neutron) fission power = (MeV/s) immediate (prompt and delayed neutron) fission energy per Qf fission (MeV/fission) V Nd 5.2 = = volume (m3) number of delayed neutron precursor groups Thermal-hydraulic model The thermal-hydraulic model of this simulator consists of general field equations of mass, energy and momentum equations. Therefore, the same equations and solution scheme is used for primary system and steam generators. The thermal-hydraulic model is a transient, two-fluid model for flow of two-phase vapor/gas-liquid mixture that can contain noncondensable components in the vapor/gas. The thermal-hydraulic model solves eight field equations for eight primary dependent variables. The primary dependent variables are pressure (P), phasic specific internal energies (Ug, Uf), vapor volume fraction (void fraction) (αg), phasic velocities (vg, vf), noncondensable quality (Xn), and boron density (ρb). The independent variables are time (t) and distance (x). Noncondensable quality is defined as the ratio of the noncondensable gas mass to the total gaseous phase mass, i.e., , where Mn is the mass of noncondensable in the gaseous phase and Ms is the mass of the steam in the gaseous phase. The secondary dependent variables used in the equations are phasic densities (ρg, ρf), phasic temperatures (Tg, Tf), saturation temperature (Ts), and noncondensable mass fraction in noncondensable gas phase (Xni) for the i-th noncondensable species. The basic field equations for the two-fluid nonequilibrium model consist of two phasic continuity equations, two phasic momentum equations, and two phasic energy equations. The equations are recorded in differential stream tube form with 93/109 time and one space dimension as independent variables and in terms of time and volume-average dependent variables. The phasic continuity equations are αρ αρ αρ αρ where t Γ Γ = time (s) f, g = liquid and vapor volume fraction ρf, ρg = liquid and vapor density (kg/m3) A x = = flow area (m2) space distance (m) vf, vg = liquid and vapor velocity (m/s) f, g = liquid and vapor generation rate (kg/s-m3) Generally, the flow does not include mass sources or sinks, and overall continuity consideration yields the requirement that the liquid generation term be the negative of the vapor generation. The interfacial mass transfer model assumes that total mass transfer can be partitioned into mass transfer at the vapor/liquid interface in the bulk fluid and mass transfer at the vapor/liquid interface in the boundary layer near the walls. The phasic conservation of momentum equations are used in an expanded form and in terms of momenta per unit volume using the phasic primitive velocity variables vg and vf. The spatial variation of momentum term is expressed in terms vg2 of and vf2. This form has the desirable feature that the momentum equation reduces to Bernoulli’s equations for steady, incompressible, and frictionless flow. A guiding principle used in the development of the momentum formulation is that momentum effects are secondary to mass and energy conservation in reactor safety analysis and a less exact formulation (compared to mass and energy conservation) is acceptable, especially since nuclear reactor flows are dominated by large sources and sinks of momentum (i.e., pumps, abrupt area change). A primary reason for use of the expanded form is that is it more convenient for development of 94/109 the numerical scheme. The momentum equation for vapor phase is v g v g 1 P αgρg A αgρg A α g A α g ρ g B x A - α g ρ g A FWG v g t 2 x x (v g v f ) Γ g A v gi v g α g ρ g A FIG v g v f Cα g α f ρ m A t 2 , and the momentum equation for liquid phase is: v f 1 v 2 P α f ρ f A f α f A α f ρ f B x A - α f ρ f A FWG v f t 2 x x (v f v g ) Γ g A v fi v f α f ρ f A FIG v f v g Cα g α f ρ m A t . αf ρf A where P Bx = pressure (Pa) = Body force in x coordinate direction (m/s2) FWF, FWG FIG = vfi, vgi = = liquid and vapor wall drag coefficients (s-1) interphase drag coefficients (s-1) liquid and vapor interface velocity (m/s) C = virtual mass coefficient ρm = mixture density (kg/ m3) These equations come from the one-dimensional phasic momentum equations with the following simplifications: the Reynolds stresses are neglected, the phasic pressures are assumed equal, the interfacial pressure is assumed equal to the phasic pressures (except for stratified flow), the covariance terms are universally neglected (unity assumed for covariance multipliers), interfacial momentum storage is neglected, phasic viscous stresses are neglected, the interface force terms consist of both pressure and viscous stresses, and the normal wall forces are assumed adequately modeled by the variable area momentum flux formulation. The phasic continuity equations are multiplied by the corresponding phasic velocity, and are subtracted from the momentum equations. The force terms on the right sides are, respectively, the pressure gradient, the body force (i.e., gravity and pump head), wall friction, momentum transfer due to interface mass transfer, interface frictional drag, and force due to virtual mass. The terms FWG and FWF are part of the wall frictional drag, which are linear in velocity, and are products of the friction coefficient, the frictional reference area per unit volume, and the magnitude of the fluid bulk velocity. The interfacial velocity in the interface momentum transfer term is the unit momentum with which phase appearance or 95/109 disappearance occurs. The coefficients FIG and FIF are part of the interface frictional drag. The virtual mass term is simplified. In particular, the spatial derivative portion of the term is neglected. The reason for this change is that inaccuracies in approximating the spatial derivative portion of the term for the relatively coarse nodalizations used in system representations can lead to nonphysical characteristics in the numerical solution. The primary effect of the virtual mass term is on the mixture sound speed; thus, the simplified form is adequate. The phasic thermal energy equations are α g P 1 αgρg U g α gρ g U g v g A P αg vg A t A x x A x Q wg Q ig Γ ig h *g Γ w h 'g DISS g α f ρf U f 1 α f ρ f U f vf A P α f P α f vf A t A x x A x * ' Q wf Qif Γig h f Γ w h f DISS f where Uf , Ug = Qwf, Qwg = specific internal energy (J/kg) volumetric heat addition rate due to wall to fluid (W/m3) Qif, Qig = volumetric heat addition rate due to interface to fluid (W/m3) if, ig = liquid and vapor generation rate due to interface to fluid (kg/s-m3) vapor generation rate due to wall to fluid (kg/s-m3) energy dissipation function (W/ m3) specific enthalpy (J/kg) w DISS hf , hg = = = These equations come from the one-dimensional phasic thermal energy equations with the following simplifications: the Reynolds heat flux is neglected, the covariance terms are universally neglected (unity assumed for covariance multipliers), interfacial energy storage is neglected, and internal phasic heat transfer is neglected. The phasic specific enthalpies associated with bulk interface mass transfer are defined in such a way that the interface energy jump conditions at the liquid/vapor interface are satisfied. In particular, the and are chosen to be saturate vapor enthalpy and liquid enthalpy, respectively, for the case of vaporization and vapor enthalpy and saturate liquid enthalpy, respectively, for the case of condensation. The same is true for the phasic enthalpies associated with wall (thermal boundary layer) interface mass transfer. 96/109 The phasic energy dissipation terms, DISSg and DISSf, are the sums of wall friction and pump effects. The dissipation effects due to interface mass transfer, interface friction, and virtual mass are neglected. This is a reasonable assumption since these terms are small in magnitude in the energy equation. In the mass and momentum equations, interface mass transfer, interface friction, and virtual mass are important and are not neglected. The basic, two-phase, single-component model just discussed can be extended to include a noncondensable component in the gas phase. The noncondensable component is assumed to move with the same velocity and have the same temperature as the vapor phase, The steam/noncondensable mixture conditions can still be nonhomogeneous and nonequilibrium compared to the liquid and saturation conditions. The general approach for inclusion of the noncondensable component consists of assuming that all properties of the gas phase (subscript g) are mixture properties of the steam/noncondensable mixture. The quality, X, is likewise defined as the mass fraction based on the mass of the gas phase. Thus, the two basic continuity equations are unchanged. However, it is necessary to add an additional mass conservation equation for the total noncondensable component, given by 1 α gρg X n α gρg X n vg A 0 t A x Xn = total noncondensable mass fraction in the gas phase 5.3 Reactor control system The control systems available in this simulator are listed as following: (1) Pressurizer pressure control system (2) Pressurizer level control system (3) (4) (5) (6) Feedwater control system Steam bypass control system Reactor regulating system Reactivity control system In this section, brief model descriptions are provided for the each control system. Pressurizer pressure control system 97/109 The pressurizer pressure control system controls the reactor coolant system pressure within specified limits by use of pressurizer heaters and spray. In OPR1000, there are three pressurizer safety valves (PSVs) and two SDS valves on the top of pressurizer. And, there are no PORVs in pressurizer. PSVs and SDS valves cannot be used for pressure control. The figure below shows the logic diagram of pressurizer pressure control system. As shown in Fig. 5.3-1, the pressure error signal controls spray valve, proportional heaters. Actual pressure signal controls backup heaters. The error between reference pressure and measured pressure id adjusted through PID controllers. The pressurizer spray line connected to a cold leg. The spray valve starts to open when positive pressure difference is 25.6 psi and it is fully open when pressure difference becomes 76.8 psi. Since the pressurizer spays are operated by the pressure difference between cold leg and pressurizer, it is modeled to be off when RCP is tripped. There are two proportional heaters. The capacity of each heater is 150 kW and total power of the proportional heater is 0.3 MW. The heater power is maximized when negative difference pressure is over 25.0 psi. All pressurizer heaters are cut-off by pressurizer low level trip signal. And proportional heater power should be ‘0’ when PID controller output is ‘0’, that is there is no pressure difference because pressurizer spray control system does not consider continuous spray flow. There are total of 6 backup heaters. The total power of the backup heater is 1,500kW. The backup heaters are also cut-off by pressurizer low level trip signal. 98/109 Fig. 5.3-1: Pressurizer pressure control system Pressurizer level control system The pressurizer level control system minimized changes in the reactor coolant system coolant inventory by use of charging pump and letdown control valves in the CVCS. The maximum programmed pressurizer level is 52.6% at 568.3 oF and the minimum programmed level is 33% at 592.9oF. The figure below shows the logic diagram of pressurizer level control system. The level error between the pressurizer percent level and the reference level controls charging flow and backup heater power. The percent level deviation through PI sum controls letdown control valves. The reference percent level is a function of average loop temperature. 99/109 Fig. 5.3-2: Pressurizer level control system Steam generator three element level control system (Feedwater control system) The feedwater control system is designed to automatically control the steam generator downcomer water level during power operation between 5% and 100% as following conditions: a) 1% per minute ramp changes in turbine load between 5% and 15% reactor power and 5% per minute ramp changes in turbine load between 15% and 100% reactor power. b) 1% step changes in turbine load between 5% and 15% reactor power and 10% step changes in turbine load between 15% and 100% reactor power. 100/109 c) Loss of one of two operating feedwater pumps Feedwater control system controls feedwater flow by adjusting feedwater control valve position and feedwater pump speed. Input signals of feedwater pump speed control are as follows: a) Steam generator economizer feedwater valve position demand b) Steam generator downcomer feedwater valve position demand c) Feedwtaer pump speed setpoint demand The basic logic for feedwater control system is to control feedwater pump speed and feedwater control valves using compensated error composed of flow error signal and level error signal. Flow error signal is difference between steam and feedwater flow rate. Level error signal is difference between actual steam generator narrow range level and level setpoint. The figures below show the logic diagram of feedwater control system. Fig. 5.3-3: Feedwater control system (1/4) 101/109 Fig. 5.3-4: Feedwater control system (2/4) Fig. 5.3-5: Feedwater control system (3/4) 102/109 Fig. 5.3-6: Feedwater control system (4/4) Steam dump (bypass) control system Steam bypass control system (SBCS) performs following functions: - Modulate steam bypass valves to control secondary pressure. Quick opening steam bypass valves to compensate large amount of steam secondary pressure. Automatic withdrawal prohibits signal generation. Automatic motion inhibition signal generation. Reactor power cutback signal generation Turbine runback signal generation. The first two functions are modeled in the simulators since the control rod control system is not modeled. a) Modulation mode SBSC controls secondary steam pressure by modulation of steam bypass valves. The pressure error is generated by comparison between steam header pressure and modulation mode set pressure. This set pressure is adjusted 103/109 according to primary pressure. Fig. 5.3-7: Steam bypass control system : Modulation mode b) Quick opening mode If large pressure difference is generated quickly by unknown reason of primary side, SBCS opens steam bypass valves quickly to compensate this discrepancy. Quick opening group is divided into Group X and Group Y. Each group contains 6 steam bypass valves. If the pressure error is greater than the capacity of all steam bypass valves, SBCS generates reactor power cutback signal. Qick opening mode is to compate pressure difference caused by primary side. SBSC controls secondary steam pressure by modulation of steam bypass valves. The pressure difference is occurred by reactor trip due to loss of main feedwater pump, low average temperature, quick opening is blocked. 104/109 Fig. 5.3-8: Steam bypass control system : Quick opening mode Reactor regulating system Reactor regulating system (RRS) determines control rod speed and the direction of control rod movement based on the power difference and average reactor cooling system temperature error. Therefore, RRS produces two error signals, power error and temperature error signals. - - - Turbine load index (TLI): is generated turbine load in percent based on total steam flow. Power error signal: is produced by subtracting TLI from reactor power and this error signal is filtered and converted to temperature error signal to make one temperature error signal. Temperature error signal: The programmed reference temperature is generated based on TLI and temperature error signal is produced by the comparison between programmed reference temperature and average RCS temperature. The signal is stabilized through lead lag filter. Final error signal is calculated by subtracting temperature error from power error. CEDM cpntrol: the final error signal generates CEDM withdrawal demand, CEDM insertion demand, and CEDM speed demand based on the magnitude of error signal. If the high rate signal is produced, the CEDM speed will be 40 step/min. If high rate demand does not exist, CEDM speed will be 4 step/min. 105/109 Fig. 5.3-9: Reactor regulating system Reactivity control system Reactivity control system calculates total reactivity to be inserted in reactor core. The total reactivity consists of: 106/109 - Control rod worth controlled by RRS Scram reactivity by reactor protection system Rod drop worth by reactor power cutback system (RPCS) : not modeled in this simulator Boron worth by soluable boron in reactor coolant : not modeled in this simulator Fig. 5.3-10: Reactivity control system 107/109 5.4 Plant Protection system (PPS) The PPS continuously monitors selected safety-related parameters (such as neutron flux, pressurizer pressure, steam generator pressure and level) in a reliable fashion to assure, at all times that a known plant status is maintained. The PPS automatically initiates plant protective action in the form of initiation of the appropriate function whenever a monitored plant parameter reaches a predetermined level. Four redundant channels of the PPS are provided. The following reactor protection systems and trip logic are simulated in this simulator (1) Reactor trip (scram) The reactor trip system is designed to shutdown the reactor and maintain it shutdown when needed. These systems are automatically actuated. At specified setpoints, the reactor will shutdown by opening the circuit breakers that supply electrical power to control rods. The reactor trip system may be manually actuated. High reactor power trip High pressurizer pressure trip Low pressurizer pressure trip High steam generator level trip Low steam generator level trip Low steam generator pressure trip Low reactor coolant flow trip Manual trip (2) Safety injection actuation system (SIAS): The SIAS actuates the components necessary to inject borated water into the reactor coolant system. This provided emergency core cooling which limits core damage and assures an adequate shutdown margin. The actuation signal may be manually initiated by switches from the main control board and the auxiliary relay cabinet. Low pressurizer pressure. Low pressure setpoint is consistent with reactor trip setpoint. Manual 108/109 (3) Auxiliary feedwater actuation system (AFAS): The AFAS have two motor driven pumps and two turbine driven pumps. Steam supplied turbine driven pump is provided from common header ahead of MSIV. The AFAS delivers continuously auxiliary feedwater to the steam generator until normal water level has been reestablished. The actuation signal may be manually initiated and terminated if the automatic initiation signal has not been activated. Steam generator wide range low water level Manual (4) Turbine trip The turbine trip is equipped to protect the turbine and turbine is automatically tripped by reactor trip signal. The actuation may also be manually initiated. Reactor trip Manual (5) Main steam isolation system The MSIS is provided to initiate isolation of each steam generator to rapidly terminate steam blow down and feedwater flow, should a significant loss of steam generator mass inventory or pressure occur. The actuation may be manually initiated. Low steam generator pressure High steam generator level Manual (6) Main feedwater isolation The main feedwater isolation valves are equipped to isolate the economizer feed lines and the downcomer feedwater line. Each valve is equipped with an electro-hydraulic operator designed to fail closed on loss of electric power. The signal to shut the valves comes from either a manual signal sent from the main control board or a main steam isolation signal. The isolation valves will 109/109 completely shut within five seconds of a main steam isolation signal. Low steam generator pressure High steam generator level Manual (7) Safety valves The safety valves are providing overpressure protection for the primary and secondary sides of reactor system. These valves are completely passive system. Therefore, these could not close and/or open manually. Pressurizer safety valves Steam generator safety valves 110/109