1
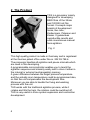
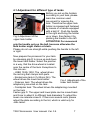
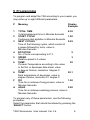
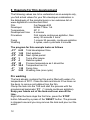
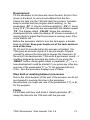
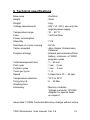
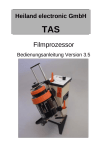
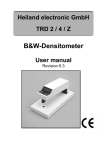
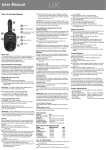
Heiland electronic GmbH
TAS
Filmprocessor
User manual Version 3.4
Content
1 General ___________________________________ 3
2 The Product _______________________________ 4
3 Safety regulations __________________________ 5
4 Installation ________________________________ 6
5 Programming ______________________________ 9
6 Example for film development _______________ 12
7 Warranty _________________________________ 14
8 Technical specifications ____________________ 15
2
1 General
Dear customer,
the TAS is a professional quality film processor. It will greatly
ease the development of films. To get the greatest benefit from
it, please read this manual carefully.
Packaging
Please keep the carefully constructed packaging for any
further shipment.
Repacking for shipment (please refer to Fig. 0)
Use only the original packaging for transportation and
shipment. First put the plastic back over the TAS and lay the
two smaller polystyrene formed blocks on the bottom of the
card box (A) . Then place the TAS into these blocks. Put the
two larger polystyrene formed blocks over the TAS (B). Put the
cuboid polystyrene blocks on the bottom and top of the unit
(C). Finally fill the whole cardbox with pads.
A
Fig. 1a/1b Repacking
C
TAS Filmrocessor User manual Ver. 3.4
B
C
3
2 The Product
TAS is a processor mainly
designed for developing
B&W films of the 35mm
and 120/220 roll film
format. It accepts major
brands of development
tanks, like Jobo,
Kindermann, Paterson and
Kaiser. It guarantees
reproducible results and
ends monotonous manual
tank agitation.
Fig. 2
This high quality product is made in Germany and is registered
at the German patent office under file no. 202 09 798.6.
The processor handles all agitation and pause intervals which
are used in film developing.
A programmable microcontroller enables you to teach the
agitation sequence and intensity easily and to store it either in
the internal or external (exchangeable) memory.
A given difference between the target process temperature
and the actually room temperature could be programmed also,
so that the unit compensates the development time.
Moreover you are able to handle the fixing and washing
process with the unit.
TAS works with the traditional agitation process, while it
rotates and tilts the tank, the rotation could be switched off.
TAS is very useful in Zone system expansion and contraction
development.
4
3 Safety regulations
§
§
§
§
§
§
§
§
§
§
§
Assure that the line voltage and frequency is the same as
the one indicated on the identification label on the power
supply unit or use a voltage transformer
Only use the original power supply unit.
Do not immerse the TAS or the power supply unit in any
kind of liquid.
To prevent electric shock do not open the power supply
unit or the processor itself. There are no user serviceable
parts inside.
To avoid fire hazard, use only a fuse of the same type,
voltage and current rating as the original one. The current
rating is 1,6A (amp) fast blow
If there is a voltage selector switch on the power supply, it
must be in position “24V”
If the case of the power supply unit or the cable is
damaged, unplug the power supply and replace it with an
original spare part.
The TAS indicates a running process by lighting an
LED display on the left side (Digit ‘P’). Keep your
hands and clothes away from the moving parts of the
unit at all times. While a process is running, the tank
starts and stops turning automatically. A double beep
is sounded, before the TAS starts to turn the tank.
The case should only be cleaned with a lightly dampened
soft cloth or chamois, if necessary with the addition of a
mild cleaner. Do not use solvents or abrasive materials.
Unplug the instrument when not in use for long time
periods.
For necessary repairs send instruments to manufacturer or
authorised service centre. Any unauthorised opening will
invalidate your guarantee.
TAS Filmrocessor User manual Ver. 3.4
5
4 Installation
Carry the processor using both handles. Try not to use only
one handle, because it might drop down.
Set it on a flat, level and stable surface, check that it does not
toggle.
Verify that the main voltage is the same as indicated on the
power supply. Connect the DC output of the power supply to
the rear side of the TAS. Then plug the power supply into the
wall socket. The processor will give a short beep and is now in
a stand by condition.
Your TAS processor is equipped with a flexible tank holder
system. Before you develop your first film with the TAS, we
recommend to set up the tank holders carefully to your
preferred tank and to practice inserting and removing the tank
several times.
6
4.1 Adjustment for different type of tanks
Before you set up the holders
according to your tank, please
A
learn the common used
movement for insering the
B
tank. Therefore the upper tank
holder is released and fastened
by means of a handle equipped
C
with a ball ‘A’. Push the handle
to the right and bring the holder
up or down, then fasten it by
Fig.3 Adjustment of the
pushing the handle to the left.
upper tank holder
ATTENTION: For movement
grip the handle only on the ball, because otherwise the
tank holder might clatter or block.
Please do not use strength while pushing the handle to the left
or right.
Now prepare the processor for your tank
by releasing grip D to move up and down
the lower tank holder. Select the position
in a way, that the drive wheel is located
F
near the centre of the tank. Exceptions to
this rule are:
- JOBO 1520+1530: The wheel drives
E
D
the red ring that clamps both parts.
- Kindermann tank 6 (1x35mm film): The
wheel drives the lower tank holder.
Fig.4 Adjustment of the
- Paterson tank: The wheel drives the
lower tank holder
adapterring mounted on the tank .
- Combiplan tank: The wheel drives the adapterring mounted
on the tank .
Fasten grip D. The upper and lower plate can be moved back
and force to adapt it to different tank diameters To adjust the
lower one release screw E. If there are several rests, please
adjust the plate according to the list, which is valid only for
Jobo tanks:
TAS Filmrocessor User manual Ver. 3.4
7
1st (outer) rest: Jobo 25xx, Jobo 1520+1530
2nd rest: Jobo 1510, 1520, 1540
Fasten screw E and put the tank on the lower plate.
By turning the knob F on the front side counter clockwise you
move the tank towards to the drive wheel, turning clockwise
increases the distance between the tank and the drive wheel.
The last step is to adjust the upper plate by loosening screw B.
Refer to following list for the rests of the upper tank holder.
1st (outer) rest:
Jobo 25xx
2nd rest:
Jobo 1520+1530
rd
3 (inner) rest:
Jobo 1510 or 1520
Fasten the screw B and lower the holder until it holds the tank.
Ensure that the upper plate fits into the lid of the Jobo tank
(which must be pressed in) or encircles the lid of the Paterson,
Kaiser or Kindermann tank.
If you have ordered TAS for tanks of different brands, the
upper and lower tank holder must be exchanged. Below find a
description containing the principal of exchanging, in special
cases there might be an attached sheet with additional hints.
Upper tank holder: Unfasten the screw B and remove the tank
holder. Insert the other tank holder, screw "B" is located on the
right side.
Lower tank holder: Loosen screw E and remove the tank
holder. Insert the other tank holder, choose the correct stop ,
insert an empty tank and do the fine tuning of the distance by
knob F.
After you are familiar with the procedure of selecting the right
tank dimension and loading the tank you can go on with
programming.
8
5 Programming
To program and adapt the TAS according to your needs, you
may enter up to eight different parameters.
P
Meaning
Display
Example
1
TOTAL TIME
Total development time in Minutes.Seconds
START CYCLE
Continues start agitation in Minutes.Seconds
NEXT CYCLES
Time of the following cycles, which consist of
a pause followed by turns, value in
Minutes.Seconds
ROTATION
No. of turns corresponding to P 3
SPEED
Relative speed in 5 values
TEMP.
Process-Temperature according to the value
in the film or developer data sheet, value
in degree Celsius, resolution 1degree C
TEMP.
Real temperature of developer, value in
degree Celsius, resolution 0.1 degree C
FIX
Time for a continues fixing process, value in
Minutes.Seconds
AQUA
Time for a continues washing process. value in
Minutes.Seconds
6.30
2
3
4
5
6
6.
F
A
1.00
0.25
5
3
20
20.1
1.00
2.00
To program any of these parameters, use the following
procedure:
Select the parameter that should be altered by pressing the
’SELECT’ button.
TAS Filmrocessor User manual Ver. 3.4
9
Then press and turn the
knob called ‘EDIT’ until the
desired value is displayed.
The parameters ‘1’ ‘F’ and
‘A’ could be altered in steps
of 10 seconds by turning
the knob ‘EDIT’ rapidly.
As mentioned on page 9
the parameters ‘6’ and ‘6.’
represent the temperature
of the developer. If you set
both parameters to the
same value, than the
programmed total
development time
(parameter 1) is executed. If
Fig. 5 Operating panel
you set parameter ‘6.’ to a
higher value then parameter ‘6’, then the processor shortens
the total development time, otherwise it extends the
development time. The formula for this compensation is in
accordance with the recommendations of the Film- or
developer manufacturer for standard B&W material.
ATTENTION: When using tanks with a volume of about
one litre or more, the max. speed setting is 3! Otherwise
the tank or the TAS may drop.
The parameter ‘F’ (for fixing) and ‘A’ for washing could also be
set to ‘0.00’ , in this case they are not executed.
All parameters are stored automatically in the internal or
external memory.
Now program in the described way all parameters according to
your preferred development procedure, then your TAS is ready
for working.
10
Using the external memory
modules will save time if you use
multiple process cycles. If you push
the module into the 9 pin male
connector on the rear side, the TAS
identifies this automatically, gives a
short beep and displays for one
second STO2 (Store2). Now this
Fig. 6 Memory module
memory has priority over the internal
one and all of the parameters inside the external module are
valid, could be altered or executed. The module should be
lettered, especially when using different modules.
Connecting and disconnecting is possible while power is
switched on.
Useful applications for additional memory modules are
· Different film-developer-combinations
· Several users, e.g. in a photo club
· Two bath development – the parameters for the second
bath are programmed in the internal memory first. Then
the external memory is connected and the parameters for
the first bath are programmed. Release the external
memory after the first bath is processed and start the
process for the second bath afterwards.
Connector for
24V DC Input
Connector for
ext. memory
Fuse
Fig. 7 Rear side of TAS, showing
module exchange
TAS Filmrocessor User manual Ver. 3.4
11
6 Example for film development
The following values are to be understood as an example only,
you find actual values for your film-developer combination in
the datasheets of the manufacturers or an extensive list at
www.digitaltruth.com/devchart.html.
Film
Fuji Neopan 400
Developer
Kodak T-Max 1+4
Temperature
20° C
Development time
6 minutes
Procedure
First minute continuous agitation, then
every 30 seconds 3 turns
Fixing
1 minute 30 seconds, continues agitation
Washing
5 cycles, each cycle lasts 2 minutes
The program for this example looks as follows
„P1“ 6.00 Total development time
„P2“ 1.00 Start agitation
„P3“ 0.30 Next cycles period
„P4“ 3
Turns after pause
„P5“ 4
Relative speed
„P6“ 20
Process temperature as it should be
„P6.“ 20.0 Temperature as it is
„F“
1.30 Fixing time
„A“
2.00 Washing time (one cycle)
Pre washing
The tank already contains the film and is filled with water of a
temperature of 20°C. Close the tank and knock it five times on
the desk, to remove air bubbles from the film.
Clamp the tank into the TAS and start the process with the
programmed parameter ‘P 1’ (1 minute continues agitation).
Keep your hands out of the tank and lever area all the
time.
Right after the tank stops the first time, press the ‘STOP’
button followed by a press of the ‘RESET’ button. The process
is stopped now and you may remove the tank and pour out the
water.
12
Development
Fill the developer in the tank and close the tank. Knock it five
times on the desk, to remove air bubbles from the film.
Clamp the tank into the TAS and start the process. A double
beep is emitted and the program starts working, i.e. the
parameters „P2“ (1 minute continues agitation), „P4“ (3 turns)
every “P 3“ (30 seconds) are executed with the relative speed
“P5“. The display called „VALUE“ shows the remaining
development time, while the display „P“ shows a sequence of
turning digits to signal that the process is running, even if the
motor stands still.
Before the processor starts to turn the tank again, a double
beep is emitted. Keep your hands out of the tank and lever
area all the time.
30, 20 and 10 seconds before the process is finished, the
TAS gives an acoustic signal of 2 second length. Prepare
yourself to remove the tank and to change the chemicals. At
the end of the development, TAS emits a permanent sound – it
could be stopped by pressing any button If you press the
„RESET“ button, the program resets to parameter „1“, i.e. a
new development could be started. If you press any other key
and one of the parameters “F” or “A” are programmed (not
0.00) , then the processor displays one of these.
Stop bath or washing between processes
Due to the short duration of this part of the process, we do not
recommend to execute this step in the processor.
Nevertheless you might use one of the parameters 1, F, or A
for this purpose.
Fixing
Fill the tank with fixer and close it. Select parameter „F“, ,
clamp the tank into the TAS and start the process.
TAS Filmrocessor User manual Ver. 3.4
13
Washing
Fill the tank with water with a temperature equal to the
developer and close it. Choose parameter „A“ and start
washing. You might repeat this step as often as you like.
That all – your film development is ready now.
7 Warranty
This instrument carries the manufacturer's warranty for the
period of two years from the date of purchase. Proof of
purchase is the invoice or receipt. Damage caused by
improper handling or unauthorised access invalidates the
guarantee. No warranty either expressed or implied is made of
this instrument regarding its quality, performance, suitability or
fitness for a particular purpose.
The manufacturer is not liable for direct, indirect, special,
incidental or consequential damages arising of the use or
inability to use this instrument or documentation even if
advised of the possibility of such damages. In particular the
manufacturer assumes no liability for any material including
negatives or photographs used with this instrument including
whatever costs of repairing, replacing or recovering such
materials.
This instrument has been carefully manufactured and tested
using flawless materials and state-of-the-art technology. In
case of failure return the instrument to an authorised service
agent accompanied by proof of purchase. Within the warranty
period, the manufacturer assumes the cost of replacement
parts and repair. The manufacturer reserves the right to
replace the instrument in lieu of repairing at its discretion.
14
8 Technical specifications
Base area
Height
Weight
Voltage requirements
Temperature range
Fuse
Power consumption
Stand By
Switched on, motor running
Tanks accepted
Program storage
Total development time
First cycle
Further cycles
Turns per cycle
Speed
Temperature selection:
Fixing time &
Washing time:
Accessory
: 25x32cm
: 32cm
: 6 kg
: 24V / 1A (DC), use only the
original power supply
: 10 ... 40 °C
: 1,6A fast blow
: 7 VA
: 24 VA
: Jobo, Kaiser, Kindermann,
Paterson
: Internal and external without
battery, minimum of 10000
program cycles
: 1 ... 60 min
: 1 sec... 2 min
: 1 sec ... 5 min
: 1...9
: 5 steps from 10 ... 40 rpm
: 15°C to 25°C
: 0.... 20 Min
: Memory modules
Voltage converter 12V/24V
Adapter for special tanks
on request.
Issue date:11/2006 Technical data may change without notice.
TAS Filmrocessor User manual Ver. 3.4
15
Ó Copyright
Wolfgang Walberer
Mittelweg 21
D-35647 Waldsolms
Germany
phone: ++49 (0)172 6672609
email: [email protected]
and
Heiland electronic GmbH
Schulstrasse 8
D-35579 Wetzlar
Germany
Phone: ++49 (0)6441 26978
Fax:
++49 (0)6441 26988
email:
[email protected]
Internet:
http://www.heilandelectronic.de