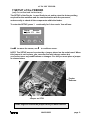
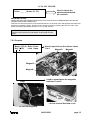
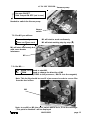
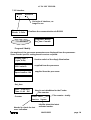
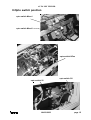
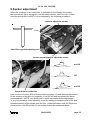
1
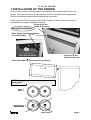
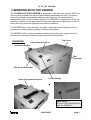
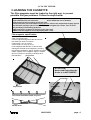
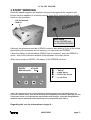
SERVICE MANUAL
for
INDX
AUTO FILM FEEDER
Warnung: Diese Anleitung ist nur für qualifizierte Service Techniker bestimmt.
Warning: For the use of qualified service personnel only.
Avertissement: Réservé au personnel de service qualifié.
FEEDER V3.1 r02 and up
03/2003 AN
Function:
When replacing the standard feed table of the COLENTA INDX-NDT Film Processors, the
fully compatible feeder can be interfaced to the processor. (feeder and standard feed tray
of the INDX units are fully exchangeable). The feeder is gear driven from the processor
and will automatically synchronise the speed of the feed rollers in the feeder to the processor
speed. The feeder and processor are connected by an electronic interface. The feeder is
activated as soon as the signal “No Error in the Processor” and “Processor Sensorbar
Free” is transferred to the feeder controller and the automatic mode push button is pressed.
A vacuum operated “sucker” system lifts the staked films in the magazine between the
feed rollers of the feeder, which then transfer the film to the entrance rollers of the processor.
The feeder can operate in two different modes:
Automatic mode:
This mode is activated by pressing a push button. When the processor is “Ready” and no
error is sent to the feeder, the automatic, sensor controlled, film feeding sequence starts.
The feeder will stop automatically as soon as all films are removed from the magazine by
the “suckers”, or if an error occurs in the processor which signals a stop instruction to the
feeder controller, or the operator presses the manual mode push button.
Manual mode:
a) With the feeder working in automatic mode and then selecting the manual mode
by the action of a push button switch, the automatic feeding of film from the
magazine will stop (no further film will be supplied by the vacuum suckers to the
feed rollers). This action releases the manual film feed slot and as soon as the last
automatically fed film has entered the processor. The release of the manual film
feed slot is indicated by a green LED (the automatic feed mode is signalled to the
operator by a red LED)
After the operator has finished manually loading films and then wants to return to the
automatic mode to continue the feeding of films from the magazine, he selects automatic
mode by the action of a push button switch and once the last manually fed film has
entered the processor, the feeder will switch to automatic mode.
b) After the feeder, when working in automatic mode, has completely emptied the
magazine it will automatically switch from automatic mode into manual mode,
thereby releasing the manual film feed slot – the feeder can now be used in the
same way as the Standard feed tray of the COLENTA INDX 43 I.
The various steps for the automatic film feeding as well as all eventual errors in the
feeder are indicated on the display of the feeder unit. As well as the before mentioned
red and green LED indication, the manual mode conditions are also indicated on the
display.
The capacity of the feeder is mainly determined by the processing cycle of the processor
(in-feed speed of the processor). When small films are to be fed via the magazine, the
whole width of the feeder / processor can be utilised by using multi track feeding /
processing.
Film magazine specification:
# Max. Film size 43x48cm
# Min. film size 6x12cm
# Film magazine designed to take all common
film sizes from 6x12 to 43x48cm.
# Film width: 6 cm up to 43cm
# Film length: 12 cm up to 48 cm
# The magazine will take film of various sizes,
utilising the full width of the magazine, providing
film-stacking facilities for approx. 60 films per stack.
# Max. capacity of the magazine: approx. 6 stacks
(6x12cm, 6x24cm or 6x48cm) of 60 films each,
total 360 films
Film magazine
Dimensions:
COLENTA
INDX431
Film Processor
COLENTA
INDX43i
Film Processor
Voltage – 230V AC 50 Hz
(supplied from the Film Processor)
Weight approx. 25 – 30 kg
(without magazine)
AUTO NDT FEEDER
1.INSTALLATION OF THE FEEDER
Due to safety reasons during transport, the feeder is not installed directly from the
factory. This has to be done at the costumer side from qualified service personnel.
See the illustrationen below which explains the procedure:
Firstly, place the Film Processor (without the Feeder) on site and level the unit as
mentioned in processor installation manual.
Screw to fix the
feeder to the proc.
Mechanical installation:
Gear, driven from the processor
to run the feeder.
PROCESSOR DRIVE
Screw to fix the
feeder to the proc.
Place the feeder on the processor as shown:
NOTE: during installation, take care to mentioned
drive gears!
OK !
WRONG !
AN 03/2003
page 1
AUTO NDT FEEDER
When the feeder is installed, fix the screws!
Screw to fix the
feeder to the proc.
Screw to fix the
feeder to the proc.
Gear, driven from the processor
to run the feeder.
Electrical installation:
Power cord, the
electrical power
needed from the
feeder is supplied
from the processor
Interface cable
(RS232)
AN 03/2003
page 2
AUTO NDT FEEDER
2.WORKING WITH THE FEEDER
The COLENTA AUTO NDT FEEDER is designed for use with most types of NDT-Xray
films currently available (as per the specifications mentioned previously). A vacuum
sucker lift assembly automatically positions each film from the casette into the
infeedrollers of the Feeder transport system.The FEEDER is completely driven by the
processor, that means the processor provides both electrical and gear drive to the out
feed rollers (this prevents speed synchronisation problems).
The FEEDER has its own electronic controller, which also monitor signals from the
processor to control system workflow (Interface Handshake).
The FEEDER itself is using a seperate installed control electronic, signals from the
processor are provided for better workflow (Interface Handshake).
OVERVIEW:
Top Cover
Lid for manual feed-in
Processor display
Film
Processor
Slot for feeder casette
Open lid for manual feed-in
Feeder display
Main switch
For the FILM PROCESSOR
and the FEEDER!
AN 03/2003
page 3
AUTO NDT FEEDER
3.LOADING THE CASSETTE
The Film magazine must be loaded in the right way, to prevent
possible film jam problems. Follow the steps below:
# Load only in darkroom.
# Use only one film size per track
# The samallest film size is 6x12cm.
# The widest film size is 43x48cm
# Fix the plug-in bars according to the film sizes.
# Centre the films per track between 2 plug-in bars. Position the stop bracket slightly against
the filmstack, leaving a space of a few millimeters and tighten the screws. This, to avoid
the possibility of film feeding problems.
# Each stack may contain max. 60 films of the same size.
# Make sure the magazine is closed properly with a click.
Film magazine specification:
# Max. Film size 43x48cm
# Min. film size 6x12cm
# Film magazine designed to take all common
film sizes from 6x12 to 43x48cm.
# Film width: 6 cm up to 43cm
# Film length: 12 cm up to 48 cm
# The magazine will take film of various sizes,
utilising the full width of the magazine, providing
film-stacking facilities for approx. 60 films per stack.
# Max. capacity of the magazine: approx. 6 stacks
(6x12cm, 6x24cm or 6x48cm) of 60 films each,
total 360 films
plug-in bars
ATTENTION!
Never load films when the
feeder is in AUTO MODE!
filmstack (max:60pcs,
one size)
stop bracket
plug-in bars
plug-in bars
stop bracket
The casette should be loaded very even,
stop bracket
not like this!!
AN 03/2003
page 4
AUTO NDT FEEDER
3.START WORKING
Place the loaded magazine as detailed in the previous page into the magazine slot.
Ensure that the magazine is in position and the cover-lid for manual feeding is closed switch on the processor.
Lid for manual
feed-in
Main switch
For the FEEDER and
the FILMPROCESSOR!
Obviously the processor must be in READY mode for start working, if any of the critical
parameters of the processor are not reached, you can’t start the FEEDER.
Check the display of the processsor (READY has to be shown), when an ERROR is
active - refer to the instruction booklet of the processor for further actions.
When the processor is READY, the display of the FEEDER will show:
READY
07:24.23
Manual mode
Run
3......Setup*
8......page down
6......move the cuors
7......to confirm
*Note: The Setup menu is for service and factory setting purposes only. The Setup-menu set
processor-specific values. This values should not be changed by the customer. Although you can
select these menus, scroll through the data and also make changes, saving the changed data is
disabled. Only an authorized service technician can re-programme these values.
Regarding this, see the informations on page 9....
AN 03/2003
page 3
AUTO NDT FEEDER
4.USING THE DISPLAY
NDT FEEDER
Version.........
After switching on the main switch, the feeder
program first will start an initialization cycle. The
software code will be shown for some seconds.
Revision of software
Time
When the initialization cycle is done, the display
will show: (first page)
Additional the green LED is blinking, that confirms
that the feeder is ready for manul feeding.
READY
07:24.23
Manual mode
Run
green LED
Now the there are 2 options:
1) To use the manual feed option, for feeding sheet by sheet
2) To start the automatic mode in order to feed the film from the
magazin automatically into the processor
add1) For manual feeding: press 1x 7 , the green LED will be on continually, the
display will show:
Processor READY
Manual mode
Now open the cover leed-for manual film feed
and start loading films sheet by sheet. Ensure
straight loading of the films to prevent any
possible film jams. When no films are loaded
in time, the display will show the indication „no
films“ and after that the controller will jump
back to the above mentioned first page menu.
WARNING: After the manual feed process
is activated, the intake rollers of the feeder
are driven by the main motor of the
processor. So never put your fingers into
the film feed slot!
AN 03/2003
page 4
AUTO NDT FEEDER
add2)
To start the automatic mode, use 1 time 6 , the green LED will stop blinking and
now activate a red blinking light. This confirms that the FEEDER is now ready for auto
feed. To start the cycles, press 7 1 time. The feeder will now start working in auto
mode - the red LED will illuminate continually.
P1 READY
Auto mode
When the auto mode is activated,
the disply will look like this:
07:59
Run
red LED
Important: Due the fact that the automode of the feeder can be used under
normal light condition, ensure that the cover for the film cassette is closed.
Important: Never place any films
into the cassette when
the feeder is in auto mode. This
can cause serious problems in
the feeder!
Cassette
cover
Close cover
After starting the auto mode, the feeder
will first check if there are films
in the magazine. In no films have
been loaded into the casette, the display
will indicate this as shown. Obviously the
same message will also be displayed after
the last film is fed from Feeder to processor.
Before starting the auto mode, close the
cover of the manual film feed slot. If open,
the feeder will not start working until the
cover is closed. The following indication
will be shown:
AN 03/2003
Magazin empty
page 5
AUTO NDT FEEDER
add2.1)
The COLENTA feeder offers you the possibility to break the current auto feed cycle, in
order to process some „important“ films in between using the manual film feed option.
To do that follow the steps below::During auto feed, the display will show:
(The red LED is on => Auto mode)
To stop an auto feed cycle, press 8 , display =
Now you must wait unitl the last film has exited the
feeder to the processor.
Dont`t feed. BUSY
ST:..... Cr:.......
BUSY feeding !
When this is done, the feeder will unlock the cover lid for the manual film feed slot
(during auto feed, the lid of the manuel feed-in is locked) and the display will show the
same indication as mentioned on page 4 Use the described procedure there for feeding
manually.
To start again the auto mode, follow the instuctions mentioned on page 5.
5.Speed synchronization:Feeder& Film Processor
The Filmprocessor (in the following reffered to „processor“) has 9 production
programme channels available. This feature allows the operator to pre-programme
different parameters eg. Temp., Dev-time and Repl.-rates into selected programmes for
specific production needs. When changing between processor speeds (Dev Time) the
feeder transport speed must also be re-programmed to the processor speed - This is
done automatically by the feeder software.
During a reprogramme cycle.........
Different programes,
please wait!
Different speeds,
please wait!
AN 03/2003
Calculating x%
.........................
page 6
AUTO NDT FEEDER
6.ERROR CODES of the FEEDER
When an ERROR appears:
Feeder error!
......................
If ever an Error appears, compare the message on the display with the listed
error codes below adn on the next page for corrective actions. When an error is
detected in Automode, the feeder will automatically stop the current load cycle.
The operator must then acknowledge the message: to do that press 2 x times 3.
(this will re-initialize the Feeder software) and then follow the instructions below and on
the next page.
Message
Action
Setup invalid
Reprogram the SETUP of the feeder
according page7. Especially after a
new EPROM was installed.
Motor overrun
------------------------------------------------------
Motor overload/
Check magazin
Drive system for M1 is blocked or running
hard, check the drive system and the belt
tension.
The filmmagazin is not in or not in proper
position. Check position of magazin.
Magazin open
The filmmagazin is not in, or not in proper
position. Check position of magazin.
Cover opened
Close the lid for manual feed-in of the
feeder.
(cover switch)
Dropped film
--------------------------------------------------------
Vacuum failure
Apper when the on or more sucker(s) lost
vacuum during lifting film. Check position of
suckers, check entrance situation of film at
input rollers
Can`t catch film
Check the position of the sucker(s) on the
film. See page 16 „Sucker adjustment“
AN 03/2003
page 7
AUTO NDT FEEDER
Message
Action
Can not separate films: 1 2 3 4
The Feeder can not separate two or more
films on the mentioned position (sticky films)
In this case the feeder must stop the
current cycle and return the film into
the magazin. Open the magazin, check and
try to run again.
Proc. off or NC
The processor is switched off (main switch
in “0” position or the interface cable is not
connected.
Proc. Stand By
The processor is in stand-by mode. The
user can feed manually or can start the
automatic mode.
Don’t feed. BUSY
The user cannot feed films or cannot start
the automatic mode. This message appears
when the film is under the sensors of the
processor.
Processor READY
The processor processes the film but the
(input sensor is empty). The operator can
feed manually or can start the automatic
mode.
Processor ERROR
Low position
Some error has occurred in the processor.
Refer to the instruction booklet for the
processor for further actions.
Call for Service personnel
Film doesn’t delivered
Call for Service personnel
AN 03/2003
page 8
AUTO NDT FEEDER
7.SETUP of the FEEDER
(only for authorized technicians)
The SETUP of the Feeder is used firstly to set and to store the factory setting
required for the workflow und the communication with the processor,
and secondly to check all the components within the feeder.
To enter the SETUP, press 3 continually for 3-4 seconds. You will see:
Setup
Service
Adjust P1 Use
Use 6 to move the cursor, use 7 to confirm a menu.
NOTE: The SETUP menue is protect by a jumper placed on the main board. When
this jumper is not in place, you can enter and also change values but
you cannot store any modifications or changes. For this you must place a jumper
as shown below:
Feeder
Software
Jumper on ST23
Don’t forget to remove the jumper when you have finished.
AN 03/2003
page 9
AUTO NDT FEEDER
7.1.SETUP
Scan time 03sec
8
Stop on error 1
(1-yes, 0-no)
8
Make tests 0
(1-yes, 0-no)
8
Sync processor 1
(1-yes, 0-no)
8
Speed calk.
time 180 sec
8
C_Proport. 08.0
C_Intergral 0.30
8
C_Differ.
0.03
Interval
0.3 s
8
Have OLP 1
(1-yes, 0-no)
8
RS232 on 1
(1-yes, 0-no)
8
Baud rate 0-4800
1-9600 2-19200 2
8
Recive timeout
03 sec
8
Opto Sensors 1
(1-yes, 0-no)
8
Jump Time 04
8
The SETUP menue shows you the following:
Time were the vakum will be build up for one sucker.
In case there is an error, the feeder has to stop.
Self test cycles during film loading.
Needed to synchronice the feeder and the proc. speeds
Required time for the feeder, to change the speed of the
feed rollers, after the processor speed has been
changed
Needed for internal calculation for the feeder.
Needed for internal calculation for the feeder.
Needed for internal calculation for the feeder.
Needed for internal calculation for the feeder.
Has to be 1, when a proc. is connected. Has to be 0
when the feeder has to work without a processor (stand
alone for testing)
The feeder is communicating with the processor via
RS232.
Communication speed for RS232.
Needed for RS232
The sensorbar below the cassette is activated or not.
Used to define the additional movement of the motor
when the film was delivered to feed-in rollers. This to
prevent that the suckers are touching the film.
G1x G2x G3x G4x
8
Used to deactivate the gate-switches, just in case one of
them is not working OK. After replacement the switch
should be reactivated again.
Language 0
8
Used to change the language used on the display
Save Cancel
Use Save to store or Cancel to exit.
AN 03/2003
page 10
AUTO NDT FEEDER
7.1.2 SETUP Vales
Software: FDR V3.1r04
FEEDER
S e tu p (P la c e th e ju m p e r)
S c a n tim e : [s e c ]
S to p o n e rro r: [1 = ye s , 0 = n o ]
M a k e te s ts : [1 = ye s , 0 = n o ]
S yn c p ro c e s s o r: [1 = ye s , 0 = n o ]
S p e e d c a lc tim e : [s e c ]
C _ P ro p o rt.:
C _ In te g ra l:
C _ D iffe r.:
In te rva l: [s ]
H a ve O L P : [1 = ye s , 0 = n o ]
R S 2 3 2 o n : [1 = ye s , 0 = n o ]
B a u d ra te :
[0 -4 8 0 0 1 -9 6 0 0 2 -1 9 2 0 0 ]
R e c e ive tim e o u t: [s e c ]
O p to s e n s o rs [1 = ye s , 0 = n o ]
J u m p tim e
G 1x G 2x G 3x G 4x
(x= 1 = a c tive / x= 0 n o t a c tive )
Language
0 -E n g 1 -F ra n c e
Range
03
1
0
1
180
0 8 ,0
0 ,3 0
0 ,0 3
0 ,3
1
1
2
03
1
4
4 tim e s 1
0
01
0
0
0
060
0 0 ,0
0 ,0 0
0 ,0 0
0 ,1
0
0
0
-
10
1
1
1
240
9 9 ,9
9 ,9 9
9 ,9 9
9 ,9
1
1
2
01
0
0
0
/
15
1
6
1
0 - 9
NOTE: to use this software, on the processor must be installed the software
MF800 V2.8r05!!
AN 03/2003
page 10A
AUTO NDT FEEDER
M1 M2 Interface
Inputs
Outputs
7.2.SERVICE
The SERVICE menue shows you the following:
8.2.1 Inputs
Vac
1
Suc
1
SP
1
S1
0
Move2
0
HPos
0
Mag2
1
Manual
0
GA2
0
GA3
0
S2
0
1-yes, 0-no
Move1
1
Vac......Vakum or not
Suc......not in use
SP........Setup protection
S1.......opto-switch
see page 15
S2.......opto-switch
see page 15
Move1.......opto-switch
Move2.......opto-switch
HPos........opto-switch
see page 15
see page 15
see page 15
1-yes, 0-no
Mag1
1
Mag1.....Magazin in or not
Mag2.....not in use
Manual....status of lid for manual feed-in
1-yes, 0-no
GA1
0
GA4
0
The „Gates 1 to 4“ are used to
check if there is one film or two
films loading. These gates are
measuring the film thickness.
To check operation:0=>0 no film
1=>1 film OK to the processor
0=>1=>0 2 films, return back to the
cassette....“cannot seperate film..“
This point has to be used to adjust the gates:
Place a film through the gates and follow the
corresponding gate signal on the display:
0...no film
1=>1 film OK to the processor
0=>1=>0 2 films
AN 03/2003
page 11
AUTO NDT FEEDER
Used to check the
optosensorbar below
the cassette.
S-bar: _ _ _ _ (S-bar: 0 1 2 3)
IMPORTANT NOTICE:
WHEN TESTING THE FEEDER WITH BLACK TEST FILM THE OPTO SENSOR BAR WITHIN THE
CASSETTE MUST BE TURNED OFF.
Failure to turn the sensor bar to the off mode will result in no film been seen and therefore the feeder will
assume the cassette is empty. The film sensor can be turned off by entering the SET-UP mode of the
feeder and setting Optosensor data from 1 to 0 (1=ON, 0=OFF)
IMPORTANT: RE-SET OPTOSENSOR BACK TO 1 (ON) WHEN
PLACING THE FEEDER INTO NORMAL FILM PRODUCTION
MODE.
7.2.2 Outputs
Magn1 (2,3,4) Open Close
Key 1 (1,2)
Lock Open
Used to open/cloese the vakum valves
1 to 4
Magnet2
Magnet1
8
Magnet3
Magnet4
Key1
Used to open/cloese the magnetic
switched 1 and 2:
Key2
....for the manual film feed cover
........for the film magazine
AN 03/2003
page 12
AUTO NDT FEEDER
Vacuum pump
Vacuum ON OFF
Add. Output ON OFF (not in use)
Needed to switch the Vacum pump
Vacum
switch
7.2.3 for M1 you will see:
Run continuosly
Phase run Phase cont
M1 will start to work continuosly
7)
M1 will start working step by step (7
M1 will start continuosly but
with some breaks
inbetween
M1
7.2.4 for M2......
Run Speed:+-254 Used to start M2.
Dir: FORW
Used to change the direction of M2
(FORW: to the processor; BACK: into the magazin)
Note: This facility should be used if a jam occurs in order to rescue film
from the feed rollers.
M2
Note: to run M1 or M2, the cover switch has to be in, if not the message :
„This point is disabled“ will be displayed
AN 03/2003
page 13
AUTO NDT FEEDER
7.2.5 Interface
RS232
Electrical
Old style of interface, no
longer in use
Rec pack: xy
Errors: 0 Clear
Confirms the communication via RS232
7.3. ADJUST
ProgramX Modify
Set_time Counter
ProgramX Modify
As mentioned, the processor parameters are displayed from the processor.
Some Feeder specific settingsmust be set as required:
Display light 1
(1-yes, 0-no)
Used to switch of the disply illumination.
Processor speed
038.0 cm/min
supplied from the processor
Calculate speed
Speed number 104
supplied from the processor
Save Cancel
Set_time
Date: 16.06.2003
Time: 11:48 OK
Used to set date&time for the Feeder.
Film counter
Counter
Cntr1 Cntr2
Last err. Vacum
Needed to check the last
error indication.
Film counter - totally
Informs about the latest
activated sucker.
AN 03/2003
page 14
AUTO NDT FEEDER
8.Opto switch position
opto switch Move1
opto switch Move2
opto switch HPos
opto switch S2
opto switch S1
AN 03/2003
page 15
AUTO NDT FEEDER
9.Sucker adjustment
When the message „Can´t catch film“ is indicated on the display, this means
the opto-sensor bar is seeing film, but the sucker cannot „catch“ the film. In this
case the sucker MAY HAVE TO be re-adjusted by the following procedure:Loose to adjust the sucker
Insert the suppiled adjusting tool.
Loosen screw lightly to adjust the sucker
not OK
OK
not OK
Vacum Sucker on the film
Now, run the Lift motor (M1) in Phase mode (see page 13) and observe the position
of the suckers on the film very carefully. If not OK use and turn slowly the above
mentioned tool - NOTE: turn slowly and in small increments as the adjustment
is very very sensitive. After adjusting, check by making a complete cycle of M1 and
followthe position of the sucker onto the film - repeat procedure until OK.When the
suckers are in the OK position fix the locking screws as mentioned above.
AN 03/2003
page 16
10.MAINTENANCE
The COLENTA AUTO FEEDER is almost user maintenance-free. The surface of the
feeder can be cleaned with a slightly moist, soft and non-linting cloth. Any commercial
cleaning agent may be used provided it does not contain any solvents and/or acids. The
feeder may be disconnected from the processor for maintenance purpose so that film
processing does not have to be interrurupted.
IMPORTANT:
Neither water nor moisture must penetrate into the feeder during cleaning.
COLENTA reserves the right to modify and improve their equipment in order to adapt
them to the latest technological developments.
NOTES
NOTES