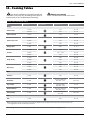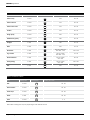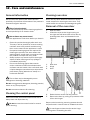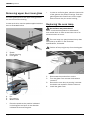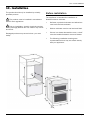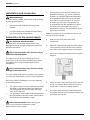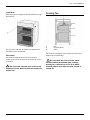
1
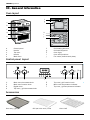
Built in
Double Electric Oven
User & Installation Guide
LAM4601
LAMONA Appliances
Dear Customer,
Congratulations on your choice of oven which has been designed to give you excellent service.
The user manual will help you use your product quickly and safely.
•
•
•
•
Please read this user manual before installing and using the oven.
Always follow the safety instructions.
Keep this user manual within easy reach for future reference.
Please read any other documents supplied with the product.
Explanation of symbols
Throughout this user manual the following symbols are used:
Important information or useful tips about usage.
Warning for possible hazards to health and property.
Warning possibility of electric shock.
This product’s packaging material is recyclable. Help recycle it and protect the
environment by dropping it off in the municipal receptacles provided for this purpose.
Your product also contains a great amount of recyclable material. It is marked with this
label to indicate the used appliances that should not be mixed with other waste. This
way, the appliance recycling organised by your manufacturer will be done under the
best possible conditions, in compliance with European Directive 2002/96/EC on Waste
Electrical and Electronic Equipment. Contact your town hall or your retailer for the used
appliance collection points closest to your home. We thank you doing your part to protect
the environment.
02_
User manual LAM4601
Index
01 - Before using the oven
05
02 - Safety
Important Information
General
Safety for children
Safety when working with electricity
05
05
06
07
07
03 - General information
08
04 - Preparation
Initial use
Tips for energy saving
First cleaning of the appliance
Initial heating
09
09
09
09
09
05 Operation modes
Operating modes
10
10
06 How to operate the main oven
How to use the main oven
Select a temperature and operating mode
Shelf positions
Switch off the oven
11
11
11
11
11
07 How to operate the top oven
How to use the top oven
Select a temperature and operating mode
Shelf positions
Switch off the oven
12
12
12
12
12
08 - How to operate the Grill
How to use the grill
Switch on the grill
Shelf positions
Switch off the grill
13
13
13
13
13
09 - How to operate the timer
How to operate the oven timer
Switch on fully automatic operation
Switch on semi-automatic operation
Interrupting the cooking process
How to activate the program lock
How to use the alarm clock
Setting the alarm clock
Switching off the alarm
14
14
14
14
15
15
15
15
15
10 Cooking and baking advice
16
11 Cooking tables
17
12 Care and maintenance
General information
Cleaning the control panel
Cleaning the door
Removal of the oven door
Removing the inner door glass
Replacing the oven Lamp
19
19
19
19
19
20
21
13 Installation
Before installation
Installation and connection
Cooling Fan
21
21
22
23
24
15 Troubleshooting
25
16 Your Guarantee
26
Index _ 03
LAMONA Appliances
04_
User manual LAM4401
Important instructions and warnings for safety and environment
•This appliance can be used by children aged from 8 years and above
and persons with reduced physical, sensory or mental capabilities or
lack of experience and knowledge if they have been given supervision
or instruction concerning use of the applian ce in a safe way and
understand the hazards involved.
Children shall not play with the appliance. Cleaning and user mainte nance shall not be made by children without supervision.
•The appliance and its accessible parts become hot during use. Care
should be taken to avoid touching heating elements. Children less
than 8 years of age shall be kept away unless continuously
supervised.
•Do not use steam cleaners to clean the appliance as this may cause an
electric shock.
ons”.
•If the power connection cable for the product is damaged, it must be
persons in order to avoid a hazard.
•During use the appliance becomes hot. Care should be taken to avoid
touching heating elements inside the oven.
•The appliance must be installed so that it can be completely
disconnected from the network. The separation must be provided
lation, according to construction regulations.
•Accessible parts may become hot during use. Young children should
be kept away.
•Do not use harsh abrasive cleaners or sharp metal scrapers to clean
the oven door glass since they can scratch the surface, which may
result in shattering of the glass.
•Rear surface of the oven gets hot when it is in use. Make sure that the
gas/electrical connection does not contact the rear surface; other wise, connections can get damaged.
•Ensure that the appliance is swit
fore replacing the lamp to
avoid the possibility of electric shock.
Safety_ 05
LAMONA Appliances
01 - Before using the Oven
•
Make sure that you have removed all packaging, wrappings, stickers and
surface.
from the oven’s
•
It is recommended that you clean and wash the oven’s surface before using for the
time.
02 - Safety
This appliance is for domestic cooking
purposes only. It must not be used for other
purposes, for example room heating. It is not
designed for any other uses such as room heating
or drying towels and dish cloths. Commercial use
will void the guarantee.
The manufacturer shall not be liable for any damage
caused by improper use or handling errors
General
This product is not intended to be used by persons
with physical, sensory or mental disorders or
unlearned or inexperienced people (including
children) unless they are supervised by a person
who will be responsible for their safety or who will
instruct them accordingly in the use of the product.
Children must be supervised to prevent them from
tampering with the product.
•
Connect the product to an earthed outlet
protected by a fuse of suit-able capacity
as stated in the “Technical
table. Our company shall not be liable for
any problems arising due to the product not
being earthed in accordance with the local
regulations.
•
Do not operate the product if the power cable
is damaged. Call
service agent.
•
Do not carry out any repairs or
on the product. However, you may remedy
some the problems that do not require any
See Troubleshooting,
repairs or
page 23.
•
WARNING FIRE RISK Do not place aluminium foil, baking trays
or cook on the base of this oven, doing so
will cause permanent damage to your
appliance and cabinetry with the potential
06_ Before Using the oven
•
Never wash down the product with excessive
water, as there is the risk of electric shock!
•
Never use the product when your judgment or
coordination is impaired by the use of alcohol
and/or drugs.
•
Product must be disconnected from the mains
during installation, maintenance, cleaning and
repair procedures.
•
Repair procedures must always be performed
by
service agents. The manufacturer
shall not be held responsible for damages
arising from procedures carried out by
unauthorised persons, which may also void
the guarantee.
•
Be careful when using alcoholic drinks in
your dishes. Alcohol evaporates at high
temperatures and may cause
since it can
ignite when it comes into contact with hot
surfaces.
•
Do not heat closed tins and glass jars in the
oven. The pressure that would build-up in the
tin/jar may cause it to burst.
•
materials close
Do not place any
to the product as the sides may become hot
during use.
•
Do not place baking trays, dishes or aluminium
foil directly onto the bot-tom of the oven. The
heat accumulation might damage the oven
and it’s enamel surfaces.
•
Do not operate the product if it is defective or
has any visible damage.
•
Keep all ventilation slots clear of obstructions,
as this may cause premature failure of the
oven element.
User manual LAM4601
Product may become hot when it is in use. Please
be careful not to touch these hot surfaces.
Always use heat resistant oven gloves when putting
dishes in or removing dishes from the hot oven.
Do not use the product if any door glass is removed
or damaged.
Rear surface of the oven may get hot when it is in
use. Make sure that the electrical connections do
not contact the rear surface; otherwise, connections
may be damaged.
Do not trap the mains cable and do not route it over
hot surfaces. The cable insulation may melt and
cause a fire as a result of a short circuit.
Safety when working with
electricity
Any work on electrical equipment and systems
should only be carried out by authorised and
qualified persons.
In case of any damage, switch off the product and
disconnect it from the mains. To do this, turn off the
fuse at the fuse box.
Make sure that fuse rating is compatible with the
product.
Make sure that the product function knobs are
switched off after every use.
Product must be installed by a qualified person in
accordance with the regulations in force. Otherwise,
the guarantee may become void.
Safety for children
Electrical products can be dangerous to children.
Keep children away from the product when it is
operating and do not allow them to play with or near
the product.
“CAUTION: accessible parts of the oven may
become hot when the oven or grill is in use. Children
should be kept away until the product has cooled
down.”
Do not store any items above the appliance that
children may reach for.
When the door is open, do not load any heavy object
on it and do not allow children to sit on it. The door
or door hinges may be damaged.
The packaging materials will be dangerous for
children. Keep the packaging materials away
from children. Please dispose of all parts of the
packaging according to environmental standards.
Safety _ 07
d
5
1
e
LAMONA Appliances
e
4
2
3
03 - General Information
2
1
Oven layout
f
f
g
g
2
2
a
2
2
1
1
b
1
1
c
d
h
h
i
i
j
j
5
5
4
4
e
3
3
2
2
1
1
a.
Control panel
b.Handle
2
c.
Top2 oven
2
dHandle
1
e
Main
Oven
1
f
g
4
3
2
1
1
2
1
5
5
4
4
5
3
3
2
2
1
1
1
2
3
Main oven thermostat knob
f
Main oven function knob
g
3
Digital
timer
3
Top2 oven / grill thermostat knob
4
5
6
7
h
h
i
i
j
j
1
2
2
1
1
Accessories
5
4
e
b
h
i
j
3
2
Oven tray / grill pan
1
3
3
5
f
g
h
i
j
c
5
4
3
2
Grill pan wire rack / trivet
1
08_ General Information
h
i
6
7
Top oven/ grill function knob
Main oven temperature indicator
Top oven / grill temperature indicator
2
2
1
1
a
Grill heating element
Grill shelf supports
Oven Light
Oven shelf positions
Fan motor (behind steel plate)
2
1
1
2
3
4
1
1
h
h
i
i
4
j
j
3
h
i
j
3
3
2
2
1
1
2
2
i.
j.
2
1
5
5
4
4
3
3
2
2
1
1
f f.
f g.
g h
g
Control panel layout
5
5
5
4
4
Oven shelf
d
User manual LAM4601
04 - Preparation
Initial use
3
Initial heating
4
Before using the oven the clock time must be
set. If the clock time is not set, the main oven will
not work.
It is recommended to heat up the product for
about 30 minutes and then switch it off. Thus, any
production residues or layers will be burnt off and
removed.
3
3
1.
2.
3.
4.
3
5.
6.
3
e
f
g
h
Buttons for:
e. Alarm clock
f. Cooking time
g. End of cooking time
h. Switch on automatic
Keys for time adjustment:
i.
Minus button
j.
Plus button
1.
2.
f
g
h
f
i
3.
i
j
g
h
i
j
First cleaning of the appliance
1.
2.
Remove all packaging materials.
Wipe the surfaces of the appliance with a
damp cloth or sponge and dry with a clean
cloth
6
Take the tray and the wire grid out of the oven.
Close the oven doors.
Select Fan and Grill cooking
Select the highest oven & grill power levels;
See How to use the electric oven, pages 8-11.
Operate oven & grill for about 30 minutes.
Turn off your oven & grill and allow to cool.
4
4
4
5
5
5
4
4
6
Small amounts of smoke& fumes may emit
during the initial heating process; this is normal,
c at all times anddensure
however monitor the oven
that the room is well ventilated.
To set the time of day, press and hold button
‘ ’
Whilst continuing to hold button ‘ ’ set
the time of day by pressing buttons ‘ ’ or
‘ h ’. Thei clock jwill increase or decrease in
one minute eincrements.
Ifgyou press
f
h and ihold
3 seconds
button ‘ e ’ or ‘ f ’ for g
h the time
i willj
advance
quickly
j
Once a time is set release all buttons
5
Tips for saving energy
The following information will help you to use your
appliance in an ecological way, and to save energy:
•
•
j
•
•
•
•
•
Use dark coloured or enamel coated cookware
in the oven as the heat transmission will be
better.
Perform a preheating operation if it is advised
in the user manual or cooking instructions.
Do not open the door of the oven frequently
during cooking.
Try to cook more than one dish in the oven at
the same time whenever possible. You can
place two cooking vessels onto the wire shelf.
Cook one dish after another. The oven will
already be hot.
You can save energy by switching off your oven
a few minutes before the end of the cooking
time. Do not open the oven door.
Defrost frozen dishes before cooking them if
possible.
c
c
c
d
d
c
c
d
The surface may get damaged by some detergents
or cleaning materials.
Do not use aggressive detergents, cleaning powder/
cream or any sharp objects.
Preparation _ 09
LAMONA Appliances
05 - Operating modes
Operating modes
All functions for the ovens and grill are listed in this section.
The order of operating modes shown here might deviate from the arrangement on your appliance.
Oven lamp
The oven is not heated. Only the oven
lamp is lit, the outside cooling fan can also
be running to protect cabinets from heat.
Top and bottom heat
Top and bottom heat is used. The
foodstuffs are heated simultaneously
from above and below. Suitable for cakes,
cookies and casseroles. For best results
Cook with one tray only.
Bottom heat
Only bottom heat is used. Is particularly
suitable for dishes, such as pizza, which
are required to be baked from bottom.
Defrost
The oven is not heated. Only the fan (in
the rear wall) is in operation. Frozen
granular food can be thawed slowly at
room temperature, and cooked food can
be cooled down.
Fan Cooking
The element & fan (in the rear wall) are
both in operation. Hot air is distributed
evenly and quickly all over the cavity by
the fan. In most cases, preheating is not
required. This mode is suitable when
several levels are used for the cooking
and an even temperature is required
thought the oven cavity .
10_ Operating Modes
Grill-small
The inner grill element in the top oven is
in operation. This is suitable for small or
medium-sized portions
Ensure correct shelf position is used, set
the temperature to maximum level, and
turn the food as required to ensure even
cooking.
Grill -Full
The full grill element in the top oven is in
operation. This is suitable for grilling
larger dishes
Ensure correct shelf position is used, set
the temperature to maximum level, and
turn the food as required to ensure even
cooking.
User manual LAM4601
06 - How to operate the main oven
How to use the main oven
As1your appliance has2two ovens please ensure that
the appropriate function and thermostat control are
selected for the oven you wish to use.
- Main oven
Select temperature
1
& operating mode
Shelf positions
2
3 positions as illustrated
The main oven has 5 shelf
below
1
It is important to position the wire shelf into the
runners correctly.
2
3
5
4
3
2
1
a
e
b
f
g
h
i
j
Please ensure shelves are fully inserted before
closing
2 the oven door, failure to do so could lead to
damage to the door.
a
a.
b.
b
Main oven thermostat knob
Main oven function knob
The operating modes of the electric oven are
selected with the function knob. The temperature is
adjusted with the thermostat knob.
1.
2.
Set thermostat knob to the desired
temperature.
Set function knob to the required operating
mode.
The oven heats up to the adjusted temperature
and maintains it. During heating, the temperature
indicator light will remain on until the desired
temperature is reached.
e
f
g
h
i
j
1
Warning
-Do not place aluminium foil or baking
trays on the base of the oven. This can lead to
permanent damage to your appliance.
Warning –Do not place plates, dishes or trays on
the floor of the top oven cavity when main oven is
in use.
Warning - Do not use the oven or grill cavity for
storage
5 when not in use.
4
Switch off electric oven
3
Turn function
knob and thermostat knob to off
2
position (top).
1
3
2
1
How to operate the main oven _ 11
d
LAMONA Appliances
07 - How to operate the tope oven
How to use the Top oven
6 ensure7that
As4your appliance has5
two ovens please
the appropriate function and thermostat control are
selected for the oven you wish to use.
- Top oven / Grill
Select temperature
4
5
& operating mode
6
Shelf positions
The top oven has 2 shelf positions as illustrated
below
It is important to position the wire shelf into the
runners correctly.
7
f
2
g
1
c
d
Please ensure shelves are fully inserted before
closing the oven door, failure to do so could lead to
5
damage to the door.
4
c
d
c.
d.
Top oven thermostat knob
Top oven function knob
1.
Set thermostat knob to the desired
temperature.
Set function knob to the required operating
mode.
2.
The oven heats up to the adjusted temperature
and maintains it. During heating, the temperature
indicator light will remain on until the desired
temperature is reached.
Warning -Do not place aluminium foil or baking
3 on the base of the oven. This can lead to
trays
permanent damage to your appliance.
2
1
Warning
–Do not place plates, dishes or trays on
the floor of the top oven cavity when main oven is
in use.
Warning - Do not use the oven or grill cavity for
storage when not in use.
2
Switch off electric oven
f
g
Turn1 function knob and thermostat knob to off
position (top).
5
4
3
2
12_ How to operate the top oven
h
i
j
1
h
i
j
d
User manual LAM4601
08 - How to operate the Grill
e
How to use the grill
5 with a grill 6please ensure
7
As4your appliance is fitted
Shelf positions
Do not use the upper level for grilling.
that the appropriate function and thermostat
control are selected for the function you wish to use.
- Top oven / Grill
4
5
Switch on the grill
6
7
2
1
c
d
c
Put large or medium-sized portions on shelf
5
position
1 under the grill element for grilling.
•
Food which requires browning only should be
placed
under the hot grill, either in the grill
3
pan, or on the floor of the grill compartment,
2
according
to the depth of the dish. The grill
pan
wire grid can be removed.
1
•
Only use food for grilling which is suitable for
intensive grilling heat. Do not place the food
too high or too far back in the grill. This is the
hottest area and food may smoke, burn and
even catch fire.
d
c.
d.
Top oven thermostat knob
Top oven function knob
1.
Set the function knob to the half or full grill
symbol.
Set grill temperature.
Preheat for approximately 5 minutes, if it is
necessary.
2.
3.
•
The grill heats up to the adjusted temperature
and maintains it. During heating, the temperature
indicator light will remain on until the desired
temperature is reached.
Hot surfaces may cause burns! Close oven
door during grilling.
4
2
Warning -Do not place aluminium foil or baking
trays on the base of the oven. This can lead to
1
permanent
damage to your appliance.
Warning –Do not place plates, dishes or trays on
the floor of the top oven cavity when main oven is
in use.
Warning - Do not use the oven or grill cavity for
storage when not in use.
Switch
off the grill
5
4 control knob and thermostat knob to off
Turn grill
position (top).
3
2
1
How to operate the grill _ 13
2
3
LAMONA Appliances
2
09 - How to3operate the Timer
4
3
5
6
How to operate the oven timer
1
2
3.
e
b
b
e
b
f
ee
g
h
i
ff
j
Buttons for:
e. Alarm clock
f. Cooking time
g. End of cooking time
h. Switch on/off automatic mode
b
Next define the length of cooking time:
Keep
g button
h ‘ i’ pressed.
j
5. Set the desired lenght of the cooking time with
button ‘ ’ or ‘ ’. The clock will increase
or decrease
increments.
e inf one minute
g
h
i If j
you press and hold button ‘ ’ or ‘ ’ for 3
the
gg seconds
hh
ii time
jj will advance quickly.
6. Onec the desired cooking time is programed
d
ereleasef the ‘ g’ cbutton.
h
i
j
7. Put your dish into the oven.
8. Select the required operating mode and
temperature.
e
f
g
h
i
j
f 4.
The oven will switch on for the defined length of
cooking time prior to specified end time. During the
cooking process, the cooking symbol ( ) on the
display is lit.
3
2
2for3time adjustment:
3 Buttons
i.
Minus Button
1 j.2 Plus
a Button32
3b
2
4
3
34
56
4
5f completed
9. Once the cooking processehas been
g
h
i
3
3
and an alarm will sound and heating of the
4
4
5
oven will stop.
3indication “AUTO” on the display goes off.)
(The
The maximum time to be set for the end of the
cooking process is 23 hours and 59 minutes. In the
case of a power cut, the program will be cancelled.
and reprograming is needed.
2
3
a
Switch on fully
automatic operation
Switch on
semi-automatic operation
b
In this mode of operation, you can define when the
oven is to switch off automatically
First, difine the end time:
1. Keep button ‘ ’ pressed.
2. Set the desired end of cooking time with
button ‘ ’ or ‘ ’. The clock will increase
ingone minute
eor decrease
f
h increments.
i
j If
you press and hold button ‘ ’ or ‘ ’ for 3
seconds
quickly.
gi
h timei will advance
j
hf
jthe
1.
2.
b
b
e
b fh willglight
j
b findication
e (The
ge “AUTO”
i upjhon the idisplay.)
e
14_ How to operate the timer
b
3
10. Switch the oven off by rotating the thermostat
and/or the function knob to the off position
(top).
In this mode of operation, you can define when the
oven is to switch on/off automatically.
ge
3
Once desired end time is reached, release the
‘ ’ button.
3.
f
g
e
f
Keep button ‘ ’ pressed to define the finish
time or ‘ ’ to define the length of cooking.
Set the desired time with the ‘ ’ or ‘ ’
in
ebuttons.
f The time
g willhincrease
i or decrease
j
one
and
e minute
f increments.
g
hIf you press
i
j hold
button
i will j
f ‘ ge’ or ‘ fh’ for 3gseconds
i
jhthe time
advance quickly.
Once desired time is reached, release the
‘
h’ or ‘ ’i button.
j
c
d
c
c
c
c
ge
fh
gi
h
j
i
j
d
d
4.
5.
2
Deactivate the program lock
2
3
2
The oven is heated up to the set temperature and
process, the cooking symbol on the display
e (
lit.
1
6.
7.
8.
3
2
3
f) is
Once the cooking process has been
e completed
f
g
and an alarm will sound and heating of the
oven will stop.
Switch the oven off with the thermostat knob
and/or the function knob.
Finally press the ‘ ’ button to switch off the
automatic mode .
32
2
The
“AUTO”
on
goes
e indication
f
g
h the display
i
j off.
If you press button ‘ ’ during the cooking
process, the display will show the remaining cooking
time for a short moment.
a
1
2
a
e
b
2
f
g
33h
i
Interrupting
bthe cooking process
b
3
1.
2.
b
e
f
Keep button ‘ ’ pressed.
e
f
ge
Keep button ‘ ’ pressed until “0.00” is shown
as remaining cooking time on the display.
3. Release
e button
f bothgbuttons.h
i
j
4. gFinally press
to switch off the
h thei ‘ ’ button
j
automatic mode .
b
Switch the oven off by rotating the thermostat
and/or the function knob to the off position
(top).
a
2.
Keep buttons‘ ’ and ‘ ’ pressed
simultaneously for 8 seconds until “.On”
appears on the display
Press button ‘ ee’. f f
gg
hh
b
b
ii
The display will show “.oF” for 3 seconds and a key
g symbolh will appear.
i
j
(The oven timer is now locked.)
2.
4
3
3
3
The display will now show “.oN” for 3 seconds.
g (Now the
h oveni timerjcan be used again.)
How to use the minute
minder
4
h
i
3
j
ii
4
jj
5
43
In addition to using the timer for cooking, it can be
also used as a minute minder / alarm.
As soon as the defined period of time has expired,
the alarm will signal. The minute minder has no
influence on the functions of the oven.
3
Setting the minute minder
c
’pressed.
1.
Keep button ‘
2.
Set the desired time with the ‘ ’ or ‘ ’
e willf increase
g or decrease
h
iin
buttons. The time
one minute increments. If you press and hold
button
i will j
f ‘ ge’ or ‘ hf ’ for 3giseconds
j hthe time
advance quickly.
j e
3
3
j
44
c
h alarm
jh symbol
4 i on thej display lights5up.
fThe
gi clock
3.
Release ‘
’button.
c
When you press the ‘ ’ button while the timer is
activated, the display will show the remaining time
e
f
g
h
i
j
for a brief moment.
c
f
g
h
Switching off the alarm
Howbto Activate the program lock
1.
Keep buttons‘ ’ and ‘ ’ pressed
simultaneously for 8 seconds until “.oF”
appears on the display
Press button ‘ ee’. f f
gg
hh
e
e indication
f
g“AUTO”bhon the display
i
jgoes off.
a » The
5.
3
1.
Put your dish into the oven.
Select operating mode and temperature.
bbuntil the end of the cooking3
this temperature
2aa keeps
time that has been selected. During the cooking
1
f
4
The indication will “AUTO” light up on the display.
1
1
a
User manual LAM4601
3
1.
Press button ‘
c
d
i
j
’ to silence the alarm sound.
The timer symbol on the display will disappear
e
f
g
h
i
j
In order to cancel the minute minder
1. Keep button ‘ ’ pressed.
2. Simultaneously press the‘ ’ until until “0.00”
is shown as remaining time on the display.
3. Release button
e all thef buttons.
g
h
i
jj e
f
g
h
i
j
The timer symbol on the display will disappear
c
d
How to operate the timer _ 15
j
cc
LAMONA Appliances
10 - Cooking and baking advice
Risk of scalding by hot steam! Take care when
opening the oven door as steam may escape.
Tips for baking
• Use nonstick coated appropriate metal trays
and containers or heat-resistant silicone
moulds.
• Make best use of the space on the shelf.
• It is recommended to place the vessels in the
middle of the shelf.
• Select the correct shelf position before turning
the oven or grill on - don’t move oven shelves
when hot.
• Keep the oven door closed.
Tips for roasting
• Seasoning with lemon juice and black pepper
will improve the cooking performance when
cooking a whole chicken, turkey or a large
piece of meat.
• Meat with bones takes about 15 to 30
minutes longer to cook than a roast of the
same size without bones.
• Let meat rest in the oven for about 10 minutes
after the cooking time. The juices will be better
distributed throught the meat and will not run
out when the meat is cut.
• Fish in a heat proof dish should be placed at
the medium or lower level.
Tips for grilling
• Grilling is ideal for cooking meat, fish and
poultry and will achieve nice browning without
drying out the food. Flat pieces, meat skewers
and sausages are particularly suited for
grilling, as are vegetables with a high water
content, such as tomatoes and onions.
• Distribute the pieces to be grilled on the wire
rack.
• Use tray or grill pan under the wire rack in
order to collect dripping fat or juices.
• Adding some water to the grill pan will assist
with cleaning.
16_ Cooking and baking advice
Tips for baking cake
• If the cake is too dry, increase the temperature
by 10°C and decrease the cooking time.
• If the cake is wet, use less liquid or lower the
temperature by 10°C.
• If the cake is too dark on top, place it on
a lower shelf, lower the temperature and
increase the cooking time.
• If cooked well on the inside but sticky on the
outside use less liquid, lower the temperature
and increase the cooking time.
Tips for baking pastry
• If the pastry is too dry, increase the
temperature by 10°C and decrease the
cooking time. Dampen the layers of pastry with
a wash composed of milk, oil, egg.
• If the pastry takes too long to bake, pay
attention that the thickness of the pastry you
have prepared
• If the upper side of the pastry gets browned,
but the lower part is not cooked, make sure
that the amount of wash you have used for the
pastry is not too much at the bottom of the
pastry. Try to spread the wash equally over the
pastry for an even browning.
• Cook the pastry in accordance with the mode
and temperature given in the cooking table. If
the bottom part is still not browned enough,
place it on one lower shelf next time.
Tips for cooking vegetables
• If the vegetable dish runs out of juice and gets
too dry, cook it in a dish with a lid instead of
an open tray. Closed vessels will preserve the
juice of the dish.
• If a vegetable dish is not cooked, boil the
vegetables beforehand.
User manual LAM4601
11 - Cooking Tables
The values indicated in the tables below are
indicative. They may vary according to the type of
food as well as your preferences of cooking.
Baking and roasting
Level 1 is the bottom level in the oven.
MAIN OVEN COOKING TABLE
Dish
Cooking level
Oven Function
Temperature °C
Cooking Time min
Baking
1 Level
175
30 - 40
2 Levels
175
45 - 50
Cakes in mould*
1 Level
175
50 - 60
1 Level
175
25 - 35
Cakes in bun cases
2 levels
175
35 - 45
3 levels
180
45 - 55
Cakes in tray*
Sponge cake*
Cookies*
Dough pastry*
1 level
200
8 - 15
1 Level
175
25 - 30
2 levels
170 ... 190
35 - 45
3 levels
175
30 - 40
35 - 45
1 Level
200
2 levels
200
50 - 60
3 levels
200
55 - 65
25 - 35
1 Level
200
2 levels
200
35 - 45
3 levels
190
45 - 55
Lasagna*
1 level
200
30 - 40
Roast Beef
1 level
25 min at 250/max
then 180 ... 190
100 - 120
Leg of Lamb
1 level
25 min at 220
then 180 ... 190
70 - 90
Roasted chicken
1 level
25 min at 250/max
then 180 ... 190
55 - 65
Turkey (5.5kg)
1 level
15 min at 250/max
then 190
150 - 210
1 level
200
20 - 30
Rich pastry*
Meat
Fish
Fish
When cooking with 2 trays at the same time, place the deeper tray on the upper rack and the other one on the lower rack.
* It is suggested to perform preheating for all foods
If cooking requires preheating, heat the oven until the thermostat lamp goes out.
Cooking tables _ 17
LAMONA Appliances
TOP OVEN COOKING TABLE
Food
Cooking level
Oven Function
Temperature°C
Cooking Time min
Cakes in tray
1 Level
175
25 - 30
Cakes in mould
1 Level
175
25 - 30
Cakes in bun cases
1 Level
175
25 - 30
Cookies
1 Level
175
25 - 30
Dough pastry
1 Level
200
35 - 40
Filled Savoury pastry
1 Level
180
25 - 35
Lasagna
1 level
180
30 - 40
Pizza
1 level
200
15 - 20
Roast Beef
1 level
25 min at 250/max
then 180 ... 190
100 - 120
Leg of Lamb
1 level
25 min at 220
then 180 ... 190
70 - 90
Roasted chicken
1 level
15 min at 250
then 190
55 - 65
Turkey (5.5kg)
1 level
25 min at 250
then 190
150 - 210
Fish
1 level
200
20 - 30
GRILL COOKING TABLE
Food
Cooking level
Oven Function
Cooking Time (min)
Fish
1 Level
20 - 25
Sliced chicken
1 Level
25 - 30
Lamb chops
1 Level
20 - 25
Steak
1 level
25 - 30
Toast
1 Level
1-2
Please Note: cooking times may vary depending on their thickness of food
18_ Cooking tables
User manual LAM4601
12 - Care and maintenance
General information
Cleaning oven door
Service life of the product will extend and the
possibility of problems will decrease if the product is
cleaned at regular intervals.
Don’t use any harsh abrasive cleaners or sharp
metal scrapers for cleaning the oven door. They
could scratch the surface and damage the glass.
Risk of electric shock!
Switch off the electricity before cleaning appliance
to avoid possibility of an electric shock.
Removal of the oven door
1.
2.
Open the door.
Unlock the clips at the hinge housing on
the right and left hand sides of the door by
pressing them down as illustrated in the
diagram.
1.
2.
3.
Door door
Hinge
Oven
4.
5.
Raise the door to the half-way position.
Remove the door by pulling it up-wards to slide
it from the hinges.
Hot surfaces may cause burns!
Allow the appliance to cool down before you clean it.
•
•
•
•
Clean the product thoroughly after each use.
This way it will be possible to remove cooking
residues more easily and will avoid burning
them on the next time the appliance is used.
No special cleaning agents are required for
cleaning the product. Use warm water with
washing liquid, a soft cloth or sponge to clean
the product and wipe with a dry cloth.
Always ensure any excess liquid is thoroughly
wiped off after cleaning and any spillage is
immediately wiped dry.
Do not use cleaning agents that contain
acid or chloride to clean the stainless steel
surfaces and the handle. Use a soft cloth with
a liquid detergent (not abrasive) to wipe those
parts clean, paying attention to sweep in a
horizontal direction.
The surface may be damaged by some
detergents or cleaning materials.
Do not use aggressive detergents, cleaning powder/
cream or any sharp objects.
Do not use steam cleaners for cleaning.
Cleaning the control panel
Clean the control panel and control knobs with a
damp cloth and wipe them dry.
Do not remove the control knobs for control
panel cleaning.
Steps carried out during removing process should
be performed in reverse order to reattach the door.
Do not forget to close the clips at the hinge
housing when reinstalling the door.
Care and maintenance _ 19
LAMONA Appliances
Removing upper door inner glass
•
The inner glass panel of the upper oven/grill door
can be removed for cleaning.
In order to do this, use the spade supplied with the
oven as illustrated below.
In order to re-fit the glass, place the lower side
of the glass to the plastic housings. Push the
glass against the metal frame on the upper
side to secure the pins to the housing.
Replacing the oven lamp
Hot surfaces may cause burns!
Make sure that the appliance is switched off
and cooled down in order to avoid the risk of an
electrical shock or burns.
The oven lamp is a special electric lamp that
can resist up to 300°C. See Technical
specifications, for details.
Position of lamp might vary from the diagram.
1.
2.
3.
Spade
Plastic housing
Inner glass
1.
2.
3.
4.
4.
5.
6.
Pin
Pin housing
Metal Frame
•
Place the spade at the position indicated
in the diagram and push in the direction
indicated to remove the glass.
20_ Care and maintenance
Disconnect the product from mains.
Turn the glass cover counter clock-wise to
remove it.
Remove the oven lamp by turning it counter
clockwise and replace it with the new one.
Install the glass cover
User manual LAM4601
13 - Installation
The product should only be installed by suitably
qualified persons.
The product must be installed in accordance
with all local regulations.
Prior to installation, visually check the product
for any damage/defects. Do not install if any issues
are found.
Damaged products may cause risks to your own
safety.
Before installation
The appliance is intended for installation in
Howdens kitchen cabinets.
•
Surfaces, synthetic laminates and adhesives
used must be heat resistant.
•
Kitchen cabinets must be set level and fixed.
•
If there is a drawer beneath the oven, a shelf
must be installed between oven and drawer.
•
The following installation drawings are
representational and may not match exactly
with your appliance.
Installation _ 21
LAMONA Appliances
Installation and connection
1.
Material damage!
The door and/or handle must not be used for lifting
or moving the appliance.
•
We recommend 2 people handling of the
product.
•
Use the handle slots located at both sides of
the oven to move the appliance.
Connection to the mains supply
This appliance must be earthed!
Howdens shall not be held responsible for any
damage caused by using the appliance without an
earthed connection.
Risk of electric shock, short circuit or fire by
unprofessional installation!
This appliance must only be installed by a
qualified electrician, e.g. a local electricity
company or a NICEIC registered contractor,
to a suitable double-pole control unit with
a minimum contact clearance of 3 mm in
all poles. the work should be carried out
in accordance with IEE regulations. Failure
to observe this instruction may result in
operational problems and invalidation of the
appliance Guarantee.
Additional protection by a residual current circuit
breaker is recommended.
2.
Open the terminal block cover with
screwdriver.
3.
Pass the mains lead through the cable clamp
under the terminal and fix the mains lead to
main body with supplied screw via cable grip.
4.
Connect the cables according to the supplied
diagram.
5.
Close the cover of the terminal block once the
wiring is complete. Mains cable must not be
longer than 2 metres for safety reasons.
6.
The mains lead should be routed away from
the appliance and not be trapped between the
appliance and the wall.
The appliance may be connected to the mains
supply only by an authorized qualified person and
the appliance is only guaranteed after correct
installation.
Risk of electric shock, short circuit or fire by
damage of the mains lead!
The mains lead must not be clamped, bent, trapped
or come into contact with hot parts of the appliance.
If the mains lead is damaged, it must be replaced
by a qualified person.
•
•
The mains supply must correspond to the data
specified on the rating plate of the appliance.
The rating plate can be seen when the main
oven door is opened.
The appliance mains cable must correspond to
the specifications and the power consumption;
see Technical specifications, page.
Risk of electric shock. Before starting any
work on the electrical installation, please
disconnect the mains supply.
22_ Installation
User manual LAM4601
Installation
Slide the oven through the cabinet aperture, align
and secure.
Fix your oven with the 2 screws and washers as
indicated in the illustration.
Final check
Connect the appliance to the mains supply,
switch on the mains supply and check the oven’s
functions,
The clock time must be set in order for the
functions to work. Refer to initial use section for
further info.
Cooling fan
1Fan
2
Control panel
3Door
The Built-in cooling fan cools both the front of the
appliance and cabinetry.
Do not switch the oven off at the mains
isolation switch immediately after cooking.
Cooling fan continues to run for up to 20-30
minutes (approx) even after the oven control is
turned off.
Installation _ 23
LAMONA Appliances
14 - Technical specification
TECHNICAL INFORMATION
General
Voltage /Frequency
220-240 V ~ 50 Hz
Total power consumption
4.2kW
Fuse
min. 25 A
Cable type / section
H05VV-FG 4.0 mm2, 3 core or equivalent
Cable length
max. 2 m
Oven/Grill
External dimensions (height / width / depth)
900 mm/594 mm/567 mm
Installation dimensions (height / width / depth)
**890 or 900 mm/560 mm/min. 550 mm
Main oven
Fan Oven
Inner lamp
15/25 W
Power consumption
1.8 kW
Top oven
Conventional oven/Grill
Power consumption
2.2 kW
# Basics: Information on the energy label of electrical ovens is given in accordance with the EN 50304 standard. Those values are
determined under standard load with bottom-top heater or fan assisted heating (if any) functions.
Energy efficiency class is determined in accordance with the following prioritization depending on whether the relevant functions exist on
the product or not. 1-Cooking with eco-fan, 2- Turbo slow cooking, 3- Turbo cooking, 4- Fan assisted bottom/top heating, 5-Top and bottom
heating.
** See. Installation section.
•
•
•
Technical specifications may be changed without prior notice to improve the quality of the product.
Figures in this manual are schematic and may not exactly match your product.
Values stated on the product labels or in the documentation accompanying it are obtained in laboratory conditions in accordance
with relevant standards. Depending on operational and environmental conditions of the product, these values may vary.
24_ Technical specification
User manual LAM4601
15 - Troubleshooting
TROUBLESHOOTING GUIDE
Symptoms
Possible Cause
Solutions
Oven emits steam when it
is in use.
•
Food is being cooked with a high
water content
It is normal that steam escapes from food during cooking.
This is not a fault.
Product emits metal noises
while heating and cooling.
•
When the oven cavity heats up or
cools down parts will expand and
contract.
This is quite normal and the oven is designed to
accommodate such movement (this is not a fault).
Product does not operate
•
The mains fuse maybe defective or
has tripped
Check fuses in the fuse box. If necessary, replace or
reset them.
•
Product is not connected properly.
Check all power connections.
Oven light does not work.
Oven does not heat.
•
Oven bulb is defective
Replace oven bulb
•
Power is cut.
Check if there is power. Check the fuses in the fuse box. If
necessary, replace or reset the fuses.
•
Function and/or Temperature are
not set.
Set the function and the temperature with the Function
and/or Temperature knob/key.
•
The timer is not adjusted correctly
Reset the oven timer.
•
Power is cut.
Check if there is power. Check the fuses in the fuse box. If
necessary, replace or reset the fuses.
If you cannot eliminate the problem after following the instructions in this section, consult your
depot or the Authorized Service Agent. Never try to repair a nonfunctional product yourself.
Troubleshooting _ 25
LAMONA Appliances
16 - Your guarantee
Product Guarantee Details (UK only)
Your appliance has the benefit of a comprehensive manufacturer’s guarantee which covers the cost of
breakdown repairs. (Details of which are shown on your Proof of Purchase Document).
•
Any claim during the period of the guarantee (MUST BE ACCOMPANIED BY THE PROOF OF PURCHASE)
•
The product must be correctly installed and operated in accordance with the manufacturer’s
instructions and used for normal domestic purposes.
•
This guarantee does not cover accidental damage, misuse or alternations which are likely to affect the
product.
•
The guarantee is invalid if the product is tampered with, or repaired by any unauthorised person.
(The guarantee in no way affects your statutory or legal rights)
What to do if you need to report a problemPlease ensure you have ready:
•
The product’s model & serial numbers
•
Howdens Proof of Purchase document
•
Your full contact details
Call the Service Line on 0845 00 60 006
26_ Guarantee
User manual LAM4601
_ 27
LAMONA Appliances
Notes
28_
User manual LAM4601
Notes
_ 29
ISSUE v1-230712
If supplied, please stick your self adhesive product rating plate
here, or make a note of the product serial number below in the
box below for future reference.
Serial Number : ...........................................................................................
=