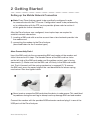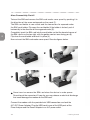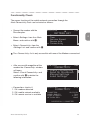
1
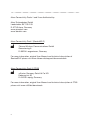
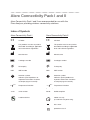
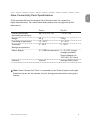
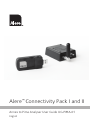
Alere™ Connectivity Pack I and II
Annex to Pima Analyser User Guide UG-PIMA-01
English
1
Alere Connectivity Packs I and II are distributed by:
Alere Technologies GmbH
Loebstedter Str. 103–105
D-07749 Jena, Germany
www.pimatest.com
www.alerehiv.com
2
Alere Connectivity Pack I (Samba3G-E)
M
3
Falcom Wireless Communications GmbH
Gewerbering 6
D-98704 Langewiesen, Germany
For more information, original User Manual and technical description of
Samba3G-E please visit www.falcom.de/support/documentation
Alere Connectivity Pack II (CT63)
4
M
m2mtec Germany GmbH & Co KG
Dohnanyistr. 30
D-04103 Leipzig, Germany
For more information, original User Manual and technical description of CT63
please visit www.ct63.de/downloads
5
2
Alere Connectivity Pack I and II
1
Alere Connectivity Pack I and II are recommended for use with the
Pima Analyser providing wireless connectivity solutions.
Index of Symbols
Alere Connectivity Pack I
Alere Connectivity Pack II
C
C
CE Mark
This product must be recycled or discarded according to applicable local and national regulations.
CE Mark
This product must be recycled or discarded according to applicable local and national regulations.
M
Manufacturer
M
Manufacturer
Catalogue number
Catalogue number
To keep dry
p
p
IMEI IMEI number
2ºC
40ºC
serial
Temperature limitation
2ºC
serial number
RoHS
Lead free device
40ºC
3
To keep dry
IMEI IMEI number
Attention symbol.
Indicates special problems or important information. Read the accompanying text carefully.
2
4
Attention symbol.
Indicates special problems or important information. Read the accompanying text carefully.
Temperature limitation
RoHS compliant
Indoor use only
(if used with A/C power only)
DC current
protection class II
5
1
1Introduction
2
2
Getting Started
3
3
Sending Data
4
4
Import of Configuration Files (optional)
5
5
Technical Support & Error Messages
Table of Content
6
8
8
9
10
1 Introduction
Scope of Delivery
Status LED
Prerequisites for the Use of Alere Connectivity Packs
Alere Connectivity Pack Specifications
Safety Warnings
2 Getting Started
11 Setting up the Mobile Network Connection
13 Functionality Check
1
2
3 Sending Data
15 Sending Results from Archiv
17 Sending Results at Shutdown
3
18 4 Import of Configuration Files (optional)
5 Technical Support & Error Messages
20 Technical Support
20 Error Messages
4
5
1 Introduction
1
Alere Connectivity Packs enable sending of result data from the archive of the
Pima Analyser to a defined remote FTP server using a mobile network modem
connected to the Pima Analyser via USB port.
Scope of Delivery
•
2
Alere Connectivity Pack I (catalogue no. 260400015) includes:
- Alere Samba3G-E
- USB extension cord
SIM card reader
3
USB connector
4
Status LED
5
6
1 Introduction
•
Alere Connectivity Pack II (catalogue no. 260400016) includes:
- CT63 Terminal
- A/C-D/C Power Adaptor including cord
- mini USB connection cord
- external FME antenna (connect to the CT63 Terminal when unpacking
the Connectivity Pack)
1
Access to
SIM card holder
2
3
USB 2.0 port
Power Connector
4
Status LED
5
FME antenna
RS232 connector
Alere Connectivity Pack
7
Status LED
1
The Status LED indicates various operating states of the mobile modems.
For the Connectivity Pack I the LED is blue, for the Connectivity Pack II the
LED is green. The different operating states are described in the table below.
2
Operating State
LED mode
modem is off
off
net search/not registered
fast blinking (1/sec)
registered full service
fast blinking (3/sec)
transmission is active
permanently on
Prerequisites for the Use of Alere Connectivity Packs
3
To use Alere Connectivity Packs a Pima Analyser operating software version
0.39.1 or higher is required.
Analysers with older software versions can be updated accordingly.
Please contact your local distributor or the technical support responsible for
your respective region for more information.
4
Connectivity also requires a SIM card with an active account from a local
network provider.
SIM cards are not within the scope of delivery for this product.
A designated FTP server needs to be available to receive the data sent by the
Pima Analyser. The Analyser has to be specifically configured to allow data
transmission to the FTP server.
Pima Analyser configuration needs to be performed by or in collaboration
with the FTP service provider (please refer to section 4 of this guide for
further information).
5
Note: Unless specified in a separate agreement Alere is neither responsible
for set up and operation of the FTP server nor for further processing and
use of transmitted data.
Other mobile network modems are not recommended for use with the
Pima Analyser. The responsibility for validation of such modems lies with
the user and Alere does not accept responsibility for the correctness of
transmitted data.
8
1 Introduction
Alere Connectivity Pack Specifications
1
(Data reproduced from the original User Manuals from the respective
legal manufacturers. For more information please refer to page two of this
document.)
Pack I
Pack II
Overall dimensions
(excluding connectors)
88.7 x 37.6 x 14.1
77 x 67 x 26
Weight
35 g
100 g
Operating temperature
10 - 40°C
10 - 40°C
Transport/
Storage temperature
2 - 40°C
2 - 40°C
Power Supply
5 V USB host powered
5 - 32 V/DC supply
through provided
Power Adaptor (at
100-240 V AC input)
Antenna
2
internal
3
external FME (male)
Note: Alere Connectivity Pack I is powered by the Pima Analyser and might
therefore impact on the number of tests being performed when running on
battery.
4
5
Alere Connectivity Pack
9
Safety Warnings
1
2
The Alere Connectivity modems utilize the GSM standard for cellular technology.
GSM is an internationally established standard for radio communication.
The modems are actually low power radio transmitters and receivers, similar to
GSM cellular phones. Most electronic equipment, for example in hospitals and
motor vehicles is shielded from radio frequency energy. However, radio waves
may affect some malfunctioning or improperly shielded electronic equipment.
Please consider special local or country specific safety standards, and where
applicable, the relevant wiring rules.
IMPORTANT for the efficient and safe operation of the Alere Connectivity
Packs in combination with the Pima Analyser, READ THIS
INFORMATION BEFORE USE!
3
Turn Alere Connectivity modems OFF in health care facilities when any
regulations posted in the area instruct you to do so.
Always ensure that the use of mobile modems is permitted. The modem may
present a hazard if used in proximity to personal medical electronic devices
(e.g. hearing aids or pacemakers), at hospitals, airports, planes, gas stations,
refueling points, blasting areas or in any other environment where explosives
may be present.
4
Install the modems at least 20 cm away from any part of the human body.
Before using the modems in your vehicle, check with the vehicle
manufacturer’s representative to determine if any on board electronic
equipment is adequately shielded from radio signals.
Operating the modem close to other electronic devices, such as antennas,
television sets, and radios may cause electromagnetic interference.
5
Never try to dismantle the Connectivity Packs and its components.
Any attempt will invalidate the warranty and can harm the user.
Do not use any other than the provided cords and components such as the
power adaptor for Connectivity Pack II.
Use Alere Connectivity Packs in combination with Pima Analyser only
indoors when connected to A/C power. When used outdoors disconnect from
mains and avoid direct contact with liquids of any kind.
10
1 Introduction
2 Getting Started
Setting up the Mobile Network Connection
Note: Every Pima Analyser needs to be specifically configured in order
to communicate with the FTP server. Configuration needs to be performed by
or in collaboration with the FTP service provider (please refer to section 4
of this guide for further information).
After the Pima Analyser was configured, two simple steps are required to
establish network connection:
1) inserting a SIM card with an active account from a local network provider into
the modem and
2) connecting the modem to the Pima Analyser
(described below for the 2 modem types)
1
2
Alere Connectivity Pack I
3
Insert the SIM card into the corresponding SIM card reader of the modem and
slide it forward until it stops. The beveled corner of the SIM card has to be
on the left side of the SIM card reader and the golden contact area is facing
downwards (1). Make sure that the SIM card sits firmly in the SIM card reader
slot. Push it forward until the spring mechanism is engaged (2). To remove
the SIM card, press the upper edge of the card downwards to release spring
mechanism. See also figures below.
4
1
2
5
Never insert or remove the SIM card when the device is under power. This could lead
to problems during the next log-in attempt and may damage SIM card and modem.
Connect the modem with the provided USB extension cord and plug it in one of the
USB ports of the Pima Analyser.
Alere Connectivity Pack
11
Alere Connectivity Pack II
1
2
To insert the SIM card remove the SIM card reader cover panel by pushing it in
the direction of the arrow embossed on the panel (1).
The SIM card holder is now visible and the connectors lie exposed under
the SIM card holder. Flip open the card holder (if the holder is locked, push it
horizontally in the direction of the engraved arrow) (2).
Completely insert the SIM card into the card holder so that the beveled corner of
the SIM card is on the top right, with the golden contact area facing you (3).
Flip close the card holder and lock it in place (4).
Now re-insert the SIM card reader cover panel. See also figures below.
1
2
3
4
3
4
5
Never insert or remove the SIM card when the device is under power.
Do not touch the connectors! If you do, you may release an electrical discharge
that could damage the modem or the SIM card.
Connect the modem with the provided mini USB connection cord and the
A/C-D/C Power Adaptor. Plug the USB cord in one of the USB ports of the
Pima Analyser and the Power Adaptor in an A/C power outlet.
12
2 Getting Started
Functionality Check
1
The proper function of the mobile network connection through the
Alere Connectivity Pack can be tested as follows:
• Connect the modem with the
Pima Anaylser.
• Select «Settings» from the «Main
Menu» and confirm with 〈.
• Select «Connectivity» from the
«Settings List» and confirm with 〈.
2010–11–04
11:05
Settings list
Date
Time
Service Export
Device Info
Connectivity
2
The «Connectivity» list is only accessible with one of the Modems connected.
• After successfull recognition of the
modem the «Connectivity» window
will open.
Select «Check Connectivity» and
confirm with 〈 to obtain the
following information:
2010-11-04
- «Connection» checks if:
1. OK: modem detected
2. OK: mobile network available
3. OK: remote service is available
2010–11–04
11:05
CONNECTIVITY
Check Connectivity
Send On Shutdown
Manual Settings
Load Settings
4
11:05
Connectivity
CONNECTION:
SIGNAL QUALITY:
LOGIN ATTEMPTS:
NETWORK REG.:
OK/OK/OK
54%
3 LEFT
HOME
SUCCESSFULLY CONNECTED
Alere Connectivity Pack
3
13
5
1
2
- «Signal Quality» checks the signal quality of the mobile network. The modem
has to be placed in a way that ensures sufficient GSM signal quality.
You must ensure that the location, at which you intend to use the modem,
is within the network coverage area. Degradation in signal quality can be the
result of a disturbance from another source, for example an electronic device in
the immediate vicinity.
To ensure fast and reliable data transmission signal quality should be stably
above 30%. Repositioning of the modem and/or the Pima Analyser may
improve signal quality.
- «Login Attempts» reports the remaining attempts to enter the correct
SIM card PIN. This function only applies to instruments with no preset PIN.
After 3 failed attempts, the SIM card will be locked.
3
- «Network Reg.» indicates the network the modem is currently registered in.
If «HOME» is displayed, the modem is registered in the home network of the
mobile network provider. If the «roaming» option is enabled in the «Mobile
Network» settings, «ROAMING» will be displayed. If instead «DENIED» is
displayed, check whether the «roaming» option is enabled. «DENIED» with
enabled «roaming» option indicates that the SIM card does not allow roaming.
In this case please contact the SIM card provider.
4
After successful completion of the connectivity check
«SUCCESSFULLY CONNECTED» will be displayed on the bottom of the screen.
If network connection could not be established an error message will be displayed
instead (please refer to section 5).
5
14
2 Getting Started
3 Sending Data
Sending Results from Archiv
• To send results with the Alere
Connectivity Packs go to «Main
Menu», select «Export» from the
«Results» window and confirm
with 〈.
• The Pima Analyser will prompt the
user to select a storage medium.
Use ⌱ and ⌲ to select mobile
modem and confirm with 〈.
2010-11-04
Results
View
Print
Export
Export and Delete
Delete
2010-11-04
select storage
Mobile Modem
11:30
1
2
11:30
3
• Either select «Send All» to send all
results in the list, or use ⌱ and ⌲
to select a result of interest and
confirm with 〈. Confirmed results
are marked by a (x).
2010–11–04
Send RESULTS
Send Unsent
Send All
Send Selected
36 67352
35 55687
11:30
4
After selecting one or more individual results, select «Send Selected» and
confirm with 〈 to send results to the remote service.
To send all results that were not sent previously, select «Send Unsent» and
confirm with 〈.
Alere Connectivity Pack
15
5
1
2
• The upload status as well as the
GPRS signal quality is indicated by
a progress bar. The upload can be
aborted at any time this window is
shown on the screen. Press ⌨ and
select «YES» to abort data transfer.
After confirmation with 〈 the
«Results» window will open. This
might take a couple of seconds.
2010–11–04
• The successful data transfer is
indicated by the following screen.
Confirm with 〈 to go back to the
«Result» window.
2010-11-04
Send Results
Sending
results
11:35
TOTAL:
SignaL:
11:35
Sending
successful
3
4
Should one of these checks discover an error, sending will be aborted
automatically.
Please refer to section 5 to learn more about Error Codes and Error Messages.
5
16
3 Sending Data
Sending Results at Shutdown
It is possible to change the settings on the Pima Analyser so that the Analyser
automatically notifies the operator of yet unsent results in the archive when the
Analyser is shut down.
By default this option is turned OFF. To change it, perform the following steps:
1
• Select «Send On Shutdown» from «Connectivity» list and confirm with (OK).
2
• Select favored option and confirm with 〈.
• Confirm again with 〈 to go back to the «Connectivity» list.
• Depending on the settings
described above the following
window will be displayed as a
reminder during the shut down
process (please refer to
Pima Analyser User Guide,
chapter 7 for instructions on how
to shut down the Analyser). Select
the respective option and confirm
with 〈.
2010-11-04
power off
Found 37 unsent
results. Send
now ?
11:35
3
YES
NO
4
Note: The Pima Analyser never sends out results without the active
confirmation by the operator. It is recommended to check whether the data
transfer was successful. If the transfer was successful, the Analyser will finish
the shut down process. If not, an error message will be displayed (please refer
to section 5).
5
Alere Connectivity Pack
17
4 Import of Configuration Files (optional)
1
2
3
If your Pima Analyser was delivered without pre-configured connectivity
settings, configuration can be done via importing of configuration files using
a USB storage device. These files need to be provided by or in collaboration
with the FTP service provider.
In preparation for the data import the Pima Analyser needs to be switched on
and the modem connected to the Analyser via one of the USB ports.
Note: Always use the USB cords provided with the Alere Connectivity Packs!
Inserting the modems directly into a USB port of the Analyser or using USB
cords with larger plugs may cause damage to the ports when a USB storage
device needs to be inserted at the same time.
• To import configuration files via
USB device select «Connectivity»
from the «Settings List» and confirm
with 〈. The Analyser will attempt
to recognize the modem indicated
by the message «Searching mobile
modem» displayed on the Analyser
screen.
Settings list
11:05
Date
Time
Service Export
Device Info
Connectivity
It may take up to 2 min for the Pima Analyser to recognize the modem for
the first time.
4
5
2010–11–04
• After successful recognition the
«Connectivity» window will open.
Then insert the USB storage device
with the configuration files in the
remaining USB port on the back
of the Pima Analyser. Go to «Load
Settings» and confirm with 〈.
18
2010-11-04
Connectivity
Check Connectivity
Send on Shutdown
Manual Settings
Load Settings
11:05
4 Import of Configuration Files
• The Access Code is generally
defined by the program supervisor.
If you were not given an Access
Code, please contact your program
supervisor or the entity that provided
the installation files.
2010-11-04
11:05
1
ACCESS CODE
2
• The «Service Update» window will
open (example displayed on the
right).
2010-11-04
Service Update
example.
example.
example.
example.
11:05
icmnp
icrsp
icsim
icspw
3
A list of all files needed for configuration is displayed, where
- the .icmnp file defines the mobile network provider
- the .icrsp file defines the FTP service provider
- the .icsim defines the PIN for the SIM card
- the .icspw file restricts access to certain setting options
(this is an optional file and may not be part of the configuration package).
4
• The .icmnp file is automatically selected.
Confirm with 〈 and the installation begins.
• After successful installation of the file, the whole list will be displayed again.
Use ⌱ and ⌲ to select the next file for installation.
5
Note: Every file needs to be individually selected and installed.
• After successful installation of all files press ⌨ to return to the «Connectivity» list.
The Pima Analyser is now configured.
Alere Connectivity Pack
19
5 Technical Support & Error Messages
1
The Pima Analyser performs a series of checks to ensure that all steps of the
process are completed successfully.
Should one of these checks discover an error, sending will be aborted
automatically.
2
3
Technical Support
For Technical Support please contact your local distributor or call the respective
number for your region:
Europe: +44 161 483 9032
[email protected]
Africa: +27 21 5315 999
Asia Pacific: +61 7 3363 7166
India: +91 11 45089400
Latin America: +57 2 6618916, +57 2 6618797
[email protected]
Russia & CIS: +972 8 9429 683
Error Messages
4
5
The following Error Codes and Messages may appear at any time during an
active data transfer or while checking the connectivity status. Please follow the
suggested action to resolve the problem. If it is not clear who your FTP service
provider or your SIM card provider is, please contact the organization that
provided you with the Pima Analyser or your local distributor.
In some instances the Pima Analyser will ask you whether to abort the
data transfer.
In this case it is recommended to select «YES» and confirm with 〈.
Then try again.
For any other problems or error messages, please contact your
Technical Support or your local distributor.
20
5 Technical Support & Error Messages
Error Code
Action
CONNECTIVITY ERROR:
257-260, 400-414, 420434, 550-573, 600-612;
657-660
Repeat sending.
If the problem persists contact the FTP service
provider.
Error Message
Action
Illegal ME
Use an authorized modem. Please contact your
Technical Support or local distributor.
Modem failed
Mobile modem not found
Modem does not respond
Modem is engaged
Memory failure
Please check if the modem is properly connected
to the Pima USB port. For Connectivity Pack I
check if the modem is powered and the blue LED
is blinking. Disconnect and reconnect it with the
Analyser. For Connectivity Pack II check if the
green LED is blinking. Check whether Connectivity
Pack II modem is connected to A/C power.
Try to power off Connectivity Pack II by unplugging
the power transformer and power it on again.
If the problem persists, please contact your
Technical Support or local distributor.
Sending failed
Operation failed
Failure at remote service
Network failed
Network timeout
No network service
Not allowed
No network service
available
No network service
Network service delays
Alere Connectivity Pack
1
2
3
Please check signal quality.
Repeat sending.
If the problem persists contact the FTP service
provider to confirm connectivity settings.
4
Please check signal quality.
Repeat sending from a different position and/or at
a later time.
If the problem persists confirm with the network
provider whether the network is available at your
position.
5
Repeat sending at a later time.
21
1
Network service denied
Please check whether the correct SIM card is
installed.
If the problem persists contact the FTP service
provider to confirm connectivity settings.
Network service failed
Please check signal quality.
Repeat sending from a different position and/or at
a later time.
2
Network not allowed
GPRS connection failed
3
4
5
Please check signal quality.
Repeat sending from a different position and/or at
a later time.
Please check in connectivity settings whether the
SIM card matches the network provider.
Invalid PIN
Please insert the correct PIN.
If the Pima Analyser is configured with a PIN
please check whether the correct SIM card is
inserted in the modem or contact the FTP
service provider to request a PIN.
PIN required
SIM PIN required
Please contact the FTP service provider to
request a PIN.
PUK required
SIM PUK required
Please contact your Technical Support or local
distributor.
SIM is not inserted
SIM not inserted
Failure at SIM
SIM failure
SIM busy
SIM wrong
No roaming allowed
Roaming not allowed
22
Please check if the SIM card is properly inserted in
the modem or damaged.
If the problem persists contact the FTP service
provider.
SIM card or connectivity settings do not allow
roaming. Please change settings or contact the
SIM card provider.
5 Technical Support & Error Messages
1
Remote service failed
Invalid remote service
Verification failed
Repeat sending.
If the problem persists contact the FTP service
provider.
Wrong APN
Please contact the FTP service provider to confirm
connectivity settings.
Failure
Please check whether the correct SIM card is
installed.
Please check if the modem is properly connected
to the Pima USB port. For Connectivity Pack I
check if the modem is powered and the blue LED
is blinking. Disconnect and reconnect it with the
Analyser. For Connectivity Pack II check if the
green LED is blinking.
Check whether Connectivity Pack II modem
is connected to A/C power. Try to power off
Connectivity Pack II by unplugging the power
transformer and power it on again.
Try to shut down and restart the Pima Analyser.
If the problem persists, please contact your
Technical Support or local distributor.
2
3
4
5
Alere Connectivity Pack
23
Alere Technologies GmbH
Loebstedter Str. 103–105
D-07749 Jena, Germany
www.pimatest.com
© 2012 Alere. All rights reserved.
AlereTM and PimaTM are trademarks of the Alere group of companies.
AN-01-UG-PIMA-01-02-EN
Revision date: 05-Dec-2012