1
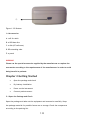
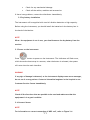
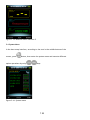
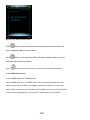
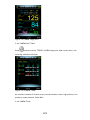
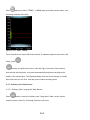
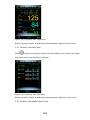
V460 AMBULATORY NIBP MONITOR Manual 1 QAM-V460-1112-2 1. INTRODUCTION 3 2. GETTING STARTED 10 3. FUNCTION INTERFACE 12 4. NIBP MEASURING 27 5. SOFTWARE INSTALLATION 37 6. SOFTWARE INTRODUCTION 38 7. TROUBLESHOOTING GUIDE 52 RETURNS POLICY 53 WARRANTY AND REGISTRATION 54 8. Tel: 0844 375 9000 Fax: 0333 321 0973 email: [email protected] url: www.daray.co.uk 2 Chapter 1 Introduction • For an overall introduction to the Blood Pressure Monitor, please refer to General Information. • For basic operating instructions, please refer to Button Function. • For allocation of interface sockets, please refer to Interfaces. • The safety statements presented in this chapter refer to the basic safety information that the operator of the device shall pay attention to and abide by. There are additional safety statements in other chapters or sections, which may be the same as or similar to the following, or specific to the operations. The following safety terms warning and caution are used throughout this manual to point out hazards and to designate a degree of level of seriousness. WARNING Indicates a potential hazard situation or unsafe practice that, if not avoided, could result in death or serious injury. CAUTION Indicates a potential hazard or unsafe practice that, if not avoided, could result in minor personal injury or product/property damage. NOTE Provides application tips or other useful information to ensure that you get the most from your product. WARNING • Possible explosion hazard if used in the presence of flammable anaesthetics or other flammable substances in combination with air, oxygen-enriched environments, or nitrous oxide. • You must verify if the device and accessories can work safely and normally before using. Ensure that the environment in which the device is operated 3 is not subject to any sources of strong electromagnetic interference, such as radio transmitters, mobile telephones, etc. Keep them far away. High level electromagnetic radiation emitted from such devices may greatly affect the instrument performance. • Dispose of the packaging material, observing the applicable waste control regulations and keeping it out of children’s reach. • Please choose the accessories which are approved or manufactured by the manufacturer, or else it may damage the device. • The monitor is only for use on one patient at a time. • When the monitor is wet, please stop using it and contact us. • If Luer lock connectors are used in the construction of tubing, there is a possibility that they might be inadvertently connected to intravascular fluid systems, allowing air to be pumped into a blood vessel. • When used with Electro-surgery equipment, you must give top priority to the patient safety. • It is recommended that you check if there is any damage on the monitor or the accessories regularly, if you find any damage, stop using it, and contact the biomedical engineer of the hospital or our Customer Service immediately. • In addition, the overall check of the monitor, including the safety check such as the leakage current, should only be performed by qualified personnel once every 12 months. NOTE • Please ensure the connecting computer is compliant with the requirements of IEC 60950, or else it may damage the device. • The software was developed per IEC60601-1-4. The possibility of hazards arising from errors in the software program is minimized. 4 • The Monitor shall comply with the standard EN1060 series: Part 1: General requirements; Part 3: Supplementary requirements for electro-mechanical blood pressure measuring systems (in course of preparation). CAUTION At the end of its service life, the product described in this manual, as well as its accessories, must be disposed of in compliance with the guidelines regulating the disposal of such products. If you have questions concerning disposal of the product, please contact us or one of our representatives. 1.1 General Information Environment: Temperature Working Transport and Storage 5˚C~40 ˚C -20˚C~55 ˚C Humidity Working Transport and Storage 15%~80% ≤95 % Altitude 80kPa~105kPa Power Supply 3 (V) DC P ≤2.4VA 5 Safety: This device is defibrillator protected. Note that no precautions specific to the device is required during defibrillation, and defibrillation discharge has no effect on the monitor. The equipment uses the gray silicone airway, in case of the effect to the equipment when defibrillation device is used on the patient. General instruction: The device is applied to Blood Pressure(BP) measure and monitor for adult, paediatric, and neonatal. It stores 300 records of common user and 358 of ambulatory Blood Pressure data. Every record includes the detailed measure time, systolic blood pressure, diastolic blood pressure, mean blood pressure, pulse rate, error message and record number, etc. This device has a user friendly operation interface, and adopts 2.4inch color LCD. It integrates data review function and display function which includes large-print single record data review, data list, BP data trends chart, the current time, data, power, alarm, etc. User can power on/off the monitor, start manual measure, set system parameters, etc. with five keys in the front panel. (Please refer to "Button Functions" part for detail). There are sound and light alarm functions where the buzzer intermittently beeps and the red light flashes to prompt low power. When the measure result exceeds the alarm limit, the colour of the measure results becomes red and an alarm sounds. The user can turn on or off the alarm sound if necessary. The cuff socket is located on the top of the device and the USB socket at the bottom of the device. The stored data can be transferred to a computer with the USB interface, and then various operations can be performed by using the PC software. (Please refer to "Software Functions" part for detailed contents) 6 NOTE If there is no operation in the common user mode, the device will turn off the backlight according to the "BACKLIGHT TIME" you set, and if there is no action for two minutes, the device will automatically turn off. When the backlight turns off in the Ambulatory Blood Pressure mode, the green indicator intermittently flashes to prompt the device is in running state. 1.2 Button Functions All the operations of the Blood Pressure Monitor can be completed with the buttons. The names of the buttons are listed on them. They are: Pressing and holding the button will start the system. When turning the monitor on and off, the red and green lights both flash once to prompt that the on or off operation is successful. Press it for a short time to return to the boot-strap interface. The text in the middle bottom of the screen indicates the function of this key. Whatever menu the system is in, press the button and the system will immediately execute the relevant function. The text in the left bottom of the screen indicates the function of this key. Such as: The button is the ‘alarm’ switch in the boot-strap interface, the ‘up’ key in the "SYSTEM MENU", and the ‘left’ key in the "TREND "chart. 7 The text in the right bottom of the screen indicates the function of this key. Such as: the button is the data review key of current user in the boot-strap interface, the ‘down’ key in the "SYSTEM MENU" and the ‘right’ key in the "TREND" chart Start/Stop button. If measuring, press this key to cancel the current measurement NOTE During uploading data with the USB, all of the buttons are disabled. If measuring, the measurement will be cancelled. NOTE During measurement, three buttons are all disabled. The rectangular mark in the screen moving with the operation of , buttons is known as the “cursor”. Operation can be performed in any position at which the cursor remains. When the item is not selected, the cursor is yellow; when selected, the cursor becomes red. 1.3 Interfaces For the convenience of operation, different kinds of interfaces are in different parts of the instrument. NIBP cuff socket is at the top. 8 NOTE • Cuff is connected to the monitor through the extended gas pipe. • ① Port of extended gas pipe • ② The socket for Gas pipe ① ② Figure 1.3.1 The top external airway At the bottom is the socket for USB ①the Socket for USB connects the data line to upload data. 9 ① Figure 1.3.2 Bottom 1.4 Accessories A- cuff for adult B- a USB data line C- a disk (PC software) D- BP extending tube E- a pouch WARNING Please use the special accessories supplied by the manufacturer or replace the accessories according to the requirements of the manufacturer in order to avoid being harmful to patients. Chapter 2 Getting Started • Open the package and check • Dry battery installation • Power on the instrument • Connect patient sensors 2.1 Open the Package and Check Open the package and take out the equipment and accessories carefully. Keep the package material for possible future use or storage. Check the components according to the packing list. 10 • Check for any mechanical damage. • Check all the cables, modules and accessories. If there is any problem, contact the distributor immediately. 2.2 Dry battery installation The instrument will be supplied with two 'AA' alkaline batteries or high capacity. Before using the instrument, you should install the batteries in the battery box in the back of the Monitor. NOTE When the equipment is not in use, you should remove the dry battery from the monitor. 2.3 Power on the instrument Press button to power on the instrument. The indicators will flash once, which shows the boot-strap is a success, when the button is released, the system will enter into the main interface. WARNING If any sign of damage is detected, or the instrument displays some error messages, do not use it on any patient. Contact a biomedical engineer in the hospital or our Customer Service Centre immediately. NOTE Check all the functions that are possible to be used and make sure that the equipment is in a good condition. 2.4 Connect Sensor NOTE For information on correct connection of NIBP cuff, refer to Figure 2.4. 11 Cuff Figure 2.4 Connection method Connect the sensor between the Monitor and the measure part of the patient. Chapter 3 Function Interface • Main Interface • System Menu 3.1 Main Interface Press to power on the instrument. The indicator will flash once, which show the boot-strap is a success, then when the button is released, the system will enter into the main interface. In common user mode, if there is no key-press operation during the time which system sets, the device will turn off LCD and enter into standby mode, if there isn’t any operation in the standby mode, the device will automatically turn off; the "RUN" indicator flashes once every 2 seconds to prompt the device is in a working state. When the power is low, the battery progress bar will show empty, at the same time the alarm sound occurs, and the red indicator flashes in fixed time. 12 In the Main Interface: The alarm-switch status is displayed in the left top of the screen; the button can switch the alarm status shortly. User bar displays the current patient type (adult, paediatric, neonatal), and the amount of the common user's data record. Current date and time is displayed in the middle top of the screen, this is shown in hours, minutes and seconds. The boot-strap interface is shown as the follow: Figure 3.1.1 Common user boot-strap interface 1 NOTE All interfaces except the trend retain power icon, alarm switch, as well as a small font of the current time. NOTE After the register overflow, the first record will be overwritten, “Overflow" message is shown in the boot-strap interface. The interface is shown as follows: 13 Figure 3.1.2 Common user boot-strap interface 2 3.2 Measuring Interface Measuring interface displays real-time cuff pressure and the current measurement information. In the measurement process, all buttons are disabled except the and the button. The measuring interface is shown as follows: Figure 3.2 Measuring interface 14 NOTE In any interface except the measurement, press key to exit current interface and back to the boot-strap interface. 3.3 Measure Result Interface The measure result includes: SYS: systolic blood pressure (mmHg/kPa) DIA: diastolic blood pressure (mmHg/kPa) PR: pulse rate (bpm) Figure 3.3.1 Measure results interface 1 If there is an error during the measurement, an error message text will appear on the screen. 15 Figure 3.3.2 Measure result interface 2 3.4 System Menu In the boot-strap interface, according to the text in the middle bottom of the screen, press button, then enter the system menu and execute different option operations by using keys. Figure 3.4.1 System menu 16 3.4.1 System setup Enter "SYSTEM SETUP" item in the [SYSTEM MENU], the following menu will show: Figure 3.4.2 System setup "SYSTEM SETUP" menu includes: "LANGUAGE" item has two choices: Chinese, English; "UNIT" item has two choices: mmHg, kPa; "USER PURVIEW" item cannot be changed. "MEASURE MODE" item has three options: adult, paediatric, neonatal, "BACKLIGHT TIME(s)"item has four choices: 15, 30, 60, and 120. NOTE "BACKLIGHT TIME" in the "SYSTEM SETUP" can be changed by the common user; backlight time in ambulatory blood pressure monitor (ABPM) is a fixed value of 5s. Select "ABPM SETUP" item in [SYSTEM SETUP] menu, the following menu will show: 17 Figure 3.4.3 ABPM Setup "AWAKE INTERVAL" (min/h) could be options: 15, 30, 60, and 120; "ASLEEP INTERVAL" (min/h) could be options: 15, 30, 60, 120, and 240; "AWAKE TIME" And "ASLEEP TIME" transformation unit are 30 minutes. 3.4.2 System Time Select "SYSTEM TIME" item in [SYSTEM MENU], the following menu will show: Figure 3.4.4 System time Select "CONFIRM" after time setup is complete. If the time change is successful, exit system time setup and return to the previous menu. Select "EXIT" to cancel the setting and return to the previous menu. 18 3.4.3 Data Delete Select "YES" in “DELETE DATA" menu of [SYSTEM MENU], after you press a certain key, the following menu will show: Figure 3.4.5 Data delete If "CONFIRM" is selected, the common user data will be deleted, if “EXIT" is selected, the operation will be cancelled. 3.4.4 Alarm Setup Select "Alarm Setup" item in [SYSTEM MENU], the following menu will pop up: Figure 3.4.6 Alarm setup 19 "Alarm switch" can control closing or unsealing of the sound alarm; The alarm is on or off according to the high and low limits which have been set up. When the pressure is higher than the high limit or lower than the low limit, the alarm will sound. The adjustable ranges of the high and low limits of the adult mode alarm are as follows: SYS ALM: 40~270 mmHg DIA ALM: 10~215 mmHg The adjustable ranges of the high and low limits of the paediatric mode alarm are as follows: SYS ALM: 40~200 mmHg DIA ALM: 10~150 mmHg The adjustable ranges of the high and low limits of the neonatal mode alarm are as follows: SYS ALM: 40~135 mmHg DIA ALM: 10~100 mmHg "DEFAULT" includes the main content: Measure mode: adult; Alarm parameter: User mode Adult Paediatric Neonatal High pressure high limit 140 120 100 High pressure low limit 90 70 60 20 Low pressure high limit 90 70 60 Low pressure low limit 40 40 20 Alarm switch: close; Measure unit: mmHg; Ordinary user backlight time: 15s; ABPM switch: close; Asleep time: 22:00; Asleep measurement interval: 30minutes; Awake measurement interval: 15minutes; Awake time: 7:00; Alarm switch: close. 3.4.5 ABPM Menu Select "ABPM" menu in [SYSTEM MENU], the following menu will show. Figure 3.4.7 ABPM In "ABPM" menu, "ABPM ON-OFF" select "ON", then prompt message of ABPM of the current user, such as: 21 Figure 3.4.8 ABPM prompt menu Press button, clear the ambulatory blood pressure measure data, and enter ambulatory Blood Pressure Mode; Press button, save ambulatory Blood Pressure measure data, and enter ambulatory Blood Pressure Mode; Press button, give up the choice, and return to the previous menu. 3.4.6 ABPM Data Review 3.4.6.1 ABPM "large-print" Data Review Select "ABPM Data" item in "ABPM" menu, the following interface will show: Every record is an interface, and display content includes: the current user, total of the current user record data, serial number of the record, stored time of the record, high pressure, low pressure, mean pressure, Pulse Rate. 22 Figure 3.4.9 ABPM "large-print" 3.4.6.2 ABPM Data "Table" Press button to select "TREND" in ABPM large-print data review menu, the following interface will show: Figure 3.4.10 ABPM "Table" An interface contains 5 records; every record includes a time, high pressure, low pressure, mean pressure, Pulse Rate. 3.4.6.3 ABPM Trend 23 Press button to select "TREND", in ABPM large-print data review menu, the following interface will show: Figure 3.4.11 ABPM "TREND" Trend interface can trace 100 record trends. If measuring data is more than 100 items, press , buttons can glide trend curve left and right, the scale of the vertical axis and the starting point, end point automatically adjusts according to the width of the stored data. The displayed dates that are at the bottom of trends show the trend for the first and last point of data recording time. 3.4.7 Ordinary User Data Review 3.4.7.1 Ordinary User" large-print" Data Review Press button, enter the ordinary user "large-print" data review in boot- strap interface, then the following interface will show: 24 Figure 3.4.12 Ordinary user "large-print" Display content is similar to ambulatory blood pressure large-print data review. 3.4.7.2 Ordinary User Data Table Press button to pop up the ordinary user data table in the ordinary user large- print data review, the interface is as shown: Figure 3.4.13 Ordinary user data table Display content is similar to ambulatory blood pressure large-print data review. 3.4.7.3 Ordinary User Measure Data Trends 25 Press button to pop up the ordinary user data table in the ordinary user data table, the interface is as shown: Figure 3.4.14 Trends Display content is similar to ambulatory blood pressure large-print data review. 3.5 ABPM Working Interface In ABPM working environment, backlight is only for 5 seconds, press any key to wake the backlight, ABPM working interface is as shown: Figure 3.5.1 ABPM working interface Long press button, the exit ABPM hint interface will show: 26 Figure 3.5.2 ABPM exiting prompt interface button to exit ABPM working environment, and enter the ordinary user Press working environment, and display the boot-strap interface; or Press button to exit the interface, and return the ABPM working interface. Chapter 4 NIBP Measuring 4.1 Introduction • The Non-invasive Blood Pressure (NIBP) module measures the blood pressure using the oscillometric method. • There are two modes of measurement available: manual, automatic. • Every mode displays the systolic, mean, diastolic blood pressure and pulse rate. • It is applicable for adult, paediatric, and neonatal usage. 27 WARNING • You must not perform NIBP measurements on patients with sickle-cell disease or under any condition which the skin is damaged or expected to be damaged. • For a thrombasthemia patient, it is important to determine whether measurement of the blood pressure shall be done automatically. The determination should be based on the clinical evaluation. • Ensure that the correct mode setting is selected when performing measurements on children and newborn (Refer to measuring mode menu setting), and use children and newborn special cuff. It can be dangerous to use the incorrect patient mode in error, because the upper adult blood pressure level does not apply to children and newborn. 4.2 NIBP Measuring WARNING • Before starting a measurement, verify that you have selected a setting appropriate for your patient (adult, paediatric or neonate.) • Do not apply the cuff to a limb that has an intravenous infusion or catheter in place. This could cause tissue damage around the catheter when infusion is slowed or blocked during cuff inflation. WARNING Make sure that the air conduit connecting the blood pressure cuff and the equipment is neither blocked nor tangled. 1. Plug in the air hose and switch on the system. 28 2. Apply the blood pressure cuff to the patient's upper arm following the instructions below (Figure4.2). • Ensure that the cuff is completely deflated. • Apply the appropriate size cuff to the patient, and make sure that the symbol "Φ" is over the appropriate artery. Ensure that the cuff is not wrapped too tightly around the limb. Excessive tightness may cause discoloration and eventual ischemia of the extremities. Figure 4.2 Use cuff NOTE The width of the cuff should be either 40% of the limb circumference (50% for neonates) or 2/3 of the upper arm length. The inflatable part of the cuff should be long enough to encircle 50-80% of the limb. The wrong size of cuff can cause erroneous readings. If the cuff size is in question, then use a larger cuff. Size of reusable cuff for neonate/children/adult Patient Type Infant Child Adult1 Adult2 Thigh Limb perimeter 10 ~19 cm 18 ~ 26 cm 25 ~ 35 cm 33 ~ 47 cm 46 ~ 66 cm Cuff width 8 cm 10.6 cm 14 cm 17 cm 21 cm Hose Cuff width 2.5 cm 3.2 cm 4.3 cm 5.1 cm Hose 1.5 m or 3m Size of disposable cuff for neonate/children/adult Size No. 1 2 3 4 Limb perimeter 3.1 ~ 5.7 cm 4.3 ~ 8.0 cm 5.8 ~ 10.9 cm 7.1 ~ 13.1 cm 29 1.5 m or 3m • Make sure that the cuff edge falls within the range of mark <->. If it does not, use a larger or smaller cuff that fits better. 3. Connect the cuff to the air hose. The limb chosen for taking the measurement should be placed at the same level as the patient's heart. If this is not possible you should apply the following corrections to the measured values: • If the cuff is placed higher than the heart level, add 0.75 mmHg (0.10 kPa) for each inch of difference. • If it is placed lower than the heart level, deduct 0.75 mmHg (0.10 kPa) for each inch of difference. 4. Check whether the measure mode is appropriately selected. (the measure mode displays in the boot-strap interface information area). 5. Press button on the front panel, and start a measurement. 4.3 Operation Hints 1. To start auto measuring: Access ABPM SETUP menu and pick the "ASLEEP INTERVAL “item and "AWAKE INTERVAL" item, in which the user may select the time interval value for auto measurement. After that, enter "ABPM" menu and select the entrance, enter into ABPM working environment, and the system is automatically inflated measurement in accordance with the setting time interval. WARNING Prolonged non-invasive blood pressure measurements in Auto mode may be associated with purport, ischemia and neuropathy in the limb wearing the cuff. When monitoring a patient, examine the extremities of the limb frequently for normal color, warmth and sensitivity. If any abnormality is observed, stop the blood pressure measurements. 30 2. To stop auto measuring: button at any time to stop auto During auto measuring, press measurement. 3. To start a manual measuring: • Press button to start a manual measuring in the ordinary user working environment. • button at During the idle period of auto measuring process, press any time to start a manual measurement. Then press button to stop manual measurement and the system continues executing automeasuring program. NOTE If you are in doubt about the accuracy of any reading(s), check the patient's vital signs by an alternative method before checking the functioning of the blood pressure monitor. WARNING If liquid is inadvertently splashed on the equipment or its accessories, or may enter the conduit or inside the monitor, contact local Customer Service Center. Measurement Limitations In different patient conditions, the oscillometric measurement has certain limitations. The measurement is in search of regular arterial pressure pulse. In those circumstances when the patient's condition makes it difficult to detect, the measurement becomes unreliable and measuring time increases. 31 The user should be aware that the following conditions could interfere with the measurement, making the measurement unreliable or longer to derive. In some cases, the patient's condition will make a measurement impossible. • Patient Movement Measurements will be unreliable or cannot perform if the patient is moving, shivering or having convulsions. These motions may interfere with the detection of the arterial pressure pulses. In addition, the measurement time will be prolonged. • Cardiac Arrhythmia's Measurements will be unreliable and may not be possible if the patient's cardiac arrhythmia has caused an irregular heartbeat. The measuring time thus will be prolonged. • Heart-lung Machine Measurements will not be possible if the patient is connected to a heart-lung machine. • Pressure Changes Measurements will be unreliable and may not be possible if the patient's blood pressure is changing rapidly over the period of time during which the arterial pressure pulses are being analyzed to obtain the measurement. • Severe Shock If the patient is in severe shock or hypothermia, measurements will be unreliable since reduced blood flow to the peripheries will cause reduced pulsation of the arteries. • Heart Rate Extremes Measurements cannot be made at a heart rate of less than 40 bpm and greater than 240 bpm. • Round Patient 32 The thick fat layer of body will reduce the measurement accuracy, because the fat that comes from the shock of arteries cannot access the cuffs due to the damping 4.4 NIBP Error Message and Explanations Explanation Cause Self-test failure A/D sampling error. Loose cuff Cuff is not connected correctly. Air leakage Air leakage in the valve or airway. Atmospheric pressure error Valve cannot be open. Signal is too weak It is over the range Object measuring the pulse is too weak or the cuff is loose. Object measuring blood pressure is over the measurement range. Excessive movement When measuring, signal the presence of excessive movement or pseudo-differential interference. Overpressure Cuff pressure is over the scope, ADU 300 mmHg, Newborn: 150mmHg. Saturated signal Movement or other factors lead to too big signal amplitude. Air leakage There is air leakage in the airway System failure There is something wrong with NIBP module, A/D sampling or soft of system after turning on the device. It spends too much time Adult: When cuff pressure is 2KPa (15mmHg,) it may spend 3 minute (180s). Newborn: When cuff pressure is 0.67KPa (5mmHg,) it may spend 90s. 4.5 Maintenance and Cleaning WARNING • Do not squeeze the rubber tube on the cuff. • Do not allow liquid to enter the connector socket at the front of the equipment. 33 • Do not wipe the inner part of the connector socket when cleaning the equipment. Reusable Blood Pressure Cuff The cuff can be sterilized by means of conventional autoclaving, gas, or radiation sterilization in hot air ovens or disinfected by immersion in decontamination solutions, but remember to remove the rubber bag if you use this method. The cuff should not be dry-cleaned. The cuff can also be machine-washed or hand-washed, the latter method may prolong the service life of the cuff. Before washing, remove the latex rubber bag, and for machine-washing, close the Velcro fastening. Allow the cuff to dry thoroughly after washing, then reinsert the rubber bag. 34 Figure 4.5 Replace rubber bag in cuff To replace the rubber bag in the cuff, first place the bag on top of the cuff so that the rubber tubes line up with the large opening on the long side of the cuff. Now roll the bag lengthwise and insert it into the opening on the long side of the cuff. Hold the tubes and the cuff and shake the complete cuff until the bag is in position. Thread the rubber tubes from inside the cuff, and out through the small hole under the internal flap. Disposable Blood Pressure Cuffs Disposable cuffs are intended for one-patient use only. Do not use the same cuff on any other patient. Do not sterilize or use autoclave on disposable cuffs. Disposable cuffs can be cleaned using soap solution to prevent infection. NOTE For protecting the environment, the disposable blood pressure cuffs must be recycled or disposed properly. 35 4.6 Transportation and Storage A. The packed device can be transported by ordinary conveyance or according to transport contract. The device cannot be transported mixed with toxic, harmful, or corrosive material. B. The packed device should be stored in a room with no corrosive gases and good ventilation. Temperature: -20°C~60°C; Humidity: ≤95%. 4.7 Key And Symbols Signal Description Warning – See User Manual SYS Systolic pressure MAP MAP pressure DIA Diastolic pressure PR Pulse rate (bpm) ADU Adult PED Paediatric NEO Neonatal ABPM Ambulatory Blood Pressure Monitor INFO Information Open the alarm sound indication Close the alarm sound indication WEEE (2002/96/EC) Type BF defibrillator proofed applied parts 36 SN IPX0 Serial number Ingress of liquids rank Chapter 5 Installation of the Software 5.1 Demand of editor Processor: Pentium IV 1.8G or more Operation System:Windows XP EMS memory: 256M and more Hard Disk: 40G or more Display: 17 inch or more CD-ROM USB: 2 or more Resolution of printer: 600 DPI 5.2 Installation of software 1. Place the CD-ROM in the CD-ROM compartment located on your computer. 2. If Auto Play for CDs is enabled, place CD in reader and follow instructions when they appear on the screen; otherwise follow install instructions below: 1. Open Windows Explorer 2. Click on the root CD-ROM directory 3. Double click file V460_Setup.exe 4. Follow the instructions on the screen 37 Chapter 6 Introduction to the software 6.1 The main interface When the settings of the users configuration information are finished, the main interface is entered, as the following pictured displays: ① ② Figure 6.1 The main operating interface ①Menu bar the main operating menu of this software ②Toolbar Shortcut keys for functions of frequent use 6.2 Patient File Path From the menu select "Down Load" and then select "Set File Path" the following dialog box will show. 38 Figure 6.2 Set file path "Patient File Path": Choose the downloading route of your case. As soon as the data are downloaded in computer, the case document will save this path. If you click on the "Always use default path", then data searches will always begin at the default path. 6.3 Wear Press the shortcut key ,the following dialog box will show. 39 Figure 6.3 Wear You can wear the device according to the picture above. Please read the "Note" Carefully before use. 6.4 Data download 6.4.1 Data download via USB Before you download data from the device, be certain that the device is connected to the computer. The downloaded patient data will be saved in your default computer path. Press the shortcut key , or from the menu select "Download" and then select "Do Download”. The following dialog box will appear, allowing you to select what data you want to download. 40 Figure 6.4.1 Select downloading mode The following dialog box will appear to show the progress as the data is transferred. Figure 6.4.2 Downloading progress bar 6.5 Choose patient data to edit Before beginning to edit, you should choose the case file which will be edited. Press shortcut key , or from the menu select "File" and select "Open data", the following dialog box will appear: 41 Figure 6.5 Patient file select The above dialog box lists the data files found in your current directory. You may use the drive and directory boxes to select a different drive or directory to search for patient files. The patient file information includes: patient name, patient ID, starting time, and file name. Select the patient file which will be edited, and then press the "Okay" button, you may now edit the data. 6.6 Delete data file If you feel that some patient data is not necessary, you can delete them. From the menu, select "File" and then select "Delete Data" to show the patient data delete interface, which is similar to the patient data select interface, as shown below: 42 Figure 6.6 Data file delete You are able to delete one single file or multiple files at the same time, to delete some files at the same time; you hold “Ctrl”, at the same time click on the file you wish to delete. After selection, click the "Okay" button, the "sure to delete" dialog box will be appear. Click "YES" to complete the delete operation. If you want to cancel, please click "NO". 6.7 Data file backup Sometimes, you may want to save one original copy before you edit a file, under this situation, you should backup patient data. Our software provides the function. From the menu, select "File" and then select "Copy data", then the following dialog box will appear, allowing you to select which data files to copy. 43 Figure6.7.1 Data file copy Select or deselect items by clicking on the rows using the mouse. When all desired selections have been made, select "Okay". The following dialog box will appear, allowing you to select the disk drive or directory to copy to. After completing, click "OK" to complete the operation. 44 Figure 6.7.2 Backup path settings 6.8 Edit Blood Pressure data Press the shortcut key , or from the menu select "Edit" and then select "Bp Data" the following dialog box will show. 45 Figure 6.8 Data edit page All the BP readings are shown in the above dialog box. *=6/60(10.0%): 60 represents the total data sum, 6 represents the data amount deleted, 10.0% stands for data present deleted. Number: stands for data collection serial number. Time: stands for collection time. Date: stands for collection date. BP: number before "/" stands for high blood pressure, number back "/" stands for low blood pressure, the unit is mmHg. HR: Heart rate. MAP: Mean pressure, the unit is mmHg . PP: Pressure difference between high and low blood pressure. The unit is mmHg . TC: error code(refer to chapter 7 ) Comment: character comment for data. You can edit the data. In the chart,'*'represents the data deleted ( the trending picture display, and not booking the statistics data). You can delete or add'*' by the left key of the mouse in the chart''*' area. in the comment bar, the data can comment with the character, the information display in the trending picture. 6.9 Trend Edit When you select the data file, the BP trend will be shown in the screen automatically. In other interfaces, you can press shortcut key the "BP trend" interface. The "Bp Trend" is shown as below: 46 enter Figure 6.9 BP trend When you move the mouse on the trend area, on the top of the trend area the detail data information about the mouse points will show, including the data serial number, collection time and collection date, high/low blood pressure value, heart rate, comment, etc. Press the left button on the mouse to delete or add the data point to be shown. 6.10 Histogram Press the shortcut key and the following interface will appear: 47 Figure 6.10 Histogram 6.11 Pie chart Press the shortcut key , the pie chart which BP data and HR analyse will show: 48 Figure 6.11 Pie chart The pie chart interface has 3 areas. On the left, some statistics can be displayed, such as maximum, minimum, and average value; the second area is pie chart; the third area is the opposite setting area for pie chart color and value. 6.12 Print Report After completing editing the BP data and patient diagnose information etc, the software will create a series of diagnostic reports, you can select these pages or some of them for printing . From menu select "Report" and then select "Configure Report". The following dialog box will appear: 49 Figure 6.12 Configure Report You can select an already existing report for print, you may also click "Edit Report" to edit the selected report. Click "Title" button, you may enter the title to print at the top of the printed report. Of course you can also click "Add Report" to add a new report. If you don't need the current report, you can also click "Delete Report" to delete it. The default paper size is: A4, from the menu selects "Report" and then select "Select printer", you can select a printer. From the menu, select "Report" and then select "Print preview", you can preview the page you selected. When you’re sure you want to print the report, press shortcut key or from menu select "Report" and then select "Print". 50 6.13 Send Cases to Net Server Figure 6.13 Select file to open In the file dialog box which you need to open, select stuff with the IP address and port number of server, and then select the file which you need to send to the server, and click "send" button. Currently the company's server IP address is: 121.22.39.182, port number: 6000. 51 Chapter 7 Troubleshooting guide Code Description in Report Editor Solution 1 No signal Check position of cuff, tighten cuff 2 Overreach movement Remain still during BP reading 4 Measurement timeout Check air hose connections and make sure the cuff is tight 85 Airway obstructed Check air hose connections and make certain air tubing is not crimped. 86 Measurement cancelled Push START/STOP button to start reading. 87 Cuff leak Check air hose and cuff 88 safety pause Retry reading, push START/STOP button. If problem persists return monitor for servicing. 89 cuff overpressure Check for blocked or kinked air hose. 90 Battery low Replace batteries. If problem persists return for servicing. 102 Self-check failed Return for servicing. 110 Out of range Retry again, if problem persists return for servicing. 115 System error Return for servicing. 52 Returns Policy IMPORTANT! Before returning your item, you must call us on 0844 375 9000 We want you to be completely satisfied with your purchase. If you need to return goods purchased from DARAY Ltd, please read the following information carefully. The DARAY Ltd returns policy provides guidance on when you can return goods we have supplied, and what you can expect from us once you do. To see our detailed returns policy and procedure visit www.daray.co.uk/returns TYPE OF RETURN DAMAGED GOODS Goods which are damaged on delivery Dead On Arrival (DOA) Goods which do not work REMEDY physically We must be notified within 24 hours of receipt. Goods which do not work on arrival or develop a fault within 28 days, we will advance replace the item. GOODS DEVELOPING A FAULT If the fault develops after 28 days, but within the Goods which have developed a warranty period, we will initiate the returns procedure. fault within the warranty period. NON WARRANTY If a fault develops outside the warranty period, we will Goods which have developed a initiate the returns procedure charges may be fault outside the warranty period. applicable. OTHER We will always try to help, but we cannot normally Any situation which is not covered offer a refund. by any of the above. For additional clarification, please refer to our terms and conditions at www.daray.co.uk/terms. In a small number of cases, we may determine that a replacement would not work any better than the original product we supplied. In such cases we will only offer a refund rather than a replacement for qualifying returns. Replacement bulbs and spare parts ordered on our website or from supplied part codes are not eligible for credit. We will accept returns and exchange for the correct item. If your purchase an item incorrectly you can return it within 14 days and it can be exchanged for another product of equal or higher value, excluding transportation charges incurred. Goods and packaging must be returned in their original condition. Under no circumstances will goods be accepted for return if they are damaged, have been subjected to improper handling or abuse or have been used. If you send us goods that do not qualify for return, you will invalidate your claim to any refund, and you will be obliged to compensate DARAY Ltd for the cost of return postage and any other reasonable costs incurred processing the goods. Your statutory rights are not affected. 8. WARRANTY TERMS AND CONDITIONS OF WARRANTY 1. To qualify for this warranty you must register on www.daray.co.uk or return to Daray Ltd (Daray) the duly completed warranty-registration form accompanying the product. 2. Daray warrants this product (excluding lamp) against faulty material and workmanship during the period of the warranty. The period of warranty is the period stated on your warranty card and commences on the date of purchase of the product. In the event that the product is not in good working order Daray will provide, during the warranty period, a free repair service within the United Kingdom. The warranty is subject to proof of purchase being provided; therefore, you should retain your original receipt. 2.1 The repair service consists of the provision of spare parts and/or replacement products (at Daray’s discretion) which will be provided on an exchange basis and will either be new, equivalent to new or reconditioned. All replaced spare parts and products shall become the property of Daray. 2.2 Daray’s only obligation under this warranty is the provision of the service as set out above. 2.3 All products are returned to Daray at the customer’s cost and risk. Products to be returned should be adequately packed. For the address to send returns to please visit www.daray.co.uk 3. Daray’s arrangements for providing service provided under this warranty may include the use of subcontractors. 4. This warranty does not cover damage or defects in the Product caused by or resulting from: • Wilful neglect or negligence by anyone other than Daray; • Improper use, storage or handling of the product; • Use of non-Daray approved parts (such as replacement lamps) not compatible with the Product; • Fire, accident or disaster; • Use of non-Daray modifications other than in accordance with Daray’s instructions; Attachment of fittings and accessories not approved by Daray; Repairs, modifications carried out by service personnel not approved by Daray; • Damage caused by chemical corrosion from cleaning agents not approved by Daray. • Failure to use or install the product in accordance with the manufacturer’s instructions. 5. Nothing in this warranty shall have the effect of restricting or excluding the liability of Daray in respect of: a) Death and personal injury caused by the negligence of Daray, or for fraud; b) Under the Consumer Protection Act 1987 to a person who has suffered damage caused by a defective product or to a dependant or relative of such a person; c) Direct damage to your property caused by the proven negligence of Daray. 6. This agreement does not give any rights other than those expressly set out above and in particular, Daray will not be responsible for any loss of income, profits or contracts or any direct or indirect consequential loss, damage caused to or suffered by the purchaser as a direct result of this agreement. 7. This warranty is offered (subject to these terms and conditions) in addition to, and does not affect your statutory rights. 8. Daray may disclose your details and other personal information to companies within the Daray group including any subsidiary company or sub contractor of Daray for the purposes of performing our obligations hereunder. 9. You must not resell outside the UK any products supplied by Daray and covered by the Export of Goods (Control) Order 1992 (or any law that replaces it) with out obtaining all necessary licences. You also agree not to sell the product in the UK if you know or think that the person buying the product intends to export it without getting the necessary licences. You agree to impose similar conditions to these on anyone you sell the product to. 10. These conditions shall in all respect be governed and construed in accordance with English law and the exclusive jurisdiction of the English courts. 54 DATE OF PURCHASE: PURCHASED FROM: ADDRESS: Privacy statement: DARAY will not pass on your details to any third party. Occasionally DARAY would like to send you information about our special offers and promotions. If you do not wish to receive such information, please tick here: SERIAL No: PRODUCT: Freepost Plus RRAS-YGXE-SLBC Daray Ltd Marquis Drive SWADLINCOTE DE12 6EJ FAX: PHONE: EMAIL: COMPANY: NAME: ALTERNATIVELY REGISTER ONLINE AT WWW.DARAY.COM TO VALIDATE YOUR WARRANTY PLEASE COMPLETE IN BLOCK CAPITALS AND RETURN IN A WINDOWED DL ENVELOPE TO OUR FREEPOST ADDRESS WARRANTY REGISTRATION Returns Policy Marquis Drive · Moira · Derbyshire · DE12 6EJ Tel: 0844 375 900056 · Fax: 0333 321 0973 email: [email protected] · URL: www.daray.co.uk