1
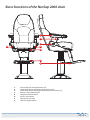
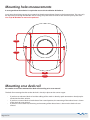
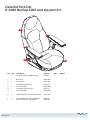
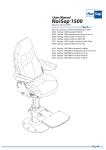
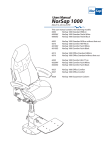
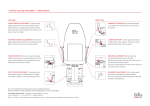
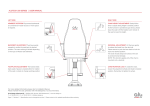
Users Manual
NorSap 2000
March 13, 2012 8:34 AM
This user manual contains the following models:
6630 NorSap 2000 H63-83cm
6631 NorSap 2000 Electrical H63-83cm
6632 NorSap 2000 H73-92cm
6633 NorSap 2000 Electrical H73-92cm
6634 NorSap 2000 Electrical without foot rest H43-50cm
6635 NorSap 2000 without foot rest H43-52cm
6640
6641
6642
6643
NorSap 2000 Yacht H63-83cm
NorSap 2000 Yacht Electrical H63-83cm
NorSap 2000 Yacht H73-92cm
NorSap 2000 Yacht Electrical H73-92cm
6644 NorSap 2000 Office H65-85cm
6645 NorSap 2000 Office H75-94cm
6646 NorSap 2000 Office without foot rest H45-54cm
DEL-085
Alternative foot rest for the NorSap 2000 foot rest
Table of contents
Introduction
Basic functions of the NorSap 2000 chair
Mounting holes measurements Mounting on a deck rail
Replacing seat pillows
Cabling of extra arm rest equipment
Changing the gas-suspension in the column
Changing the gas-suspension
for the back rest
Lowering the back rest for in-land shipping Replacing the column
Detailed Part lists
R-0080 NorSap 2000 seat top part list
Columns for NorSap 2000 series
DEL-3127 Original Foot rest
DEL-085 Alternative Foot rest
Care and maintenance of leather
Care and maintenance of fabric
Maintenance of moving parts
Safety
Shipping and storage specifications
2
3
4
4
5
6
6
6
7
7
8
8
9
10
10
11
11
11
11
11
Introduction
Congratulations with your purchase of a NorSap chair and thank you for your confidence in our company products.
NorSap is among the leading producers of helmsmen and operator seats for the maritime market.
This manual will assist you in making the best use of the functional capabilities of the NorSap chair and will ensure
you will quickly become familiar with its use. If you have any questions regarding the safe and effective operation of you NorSap chair or accessories after reading this manual, immediately contact our head office marketing
department for further assistance.
NorSap AS
Mjåvannsveien 35
NO-4626 Kristiansand
NORWAY
Telephone
+47 38 18 52 00
Telefax
+47 38 18 20 86
E-mail
[email protected]
Web
norsap.com
Page 2 of 12
Basic functions of the NorSap 2000 chair
1
2
3
5
4
6
7
8
1.
2.
3.
4.
5.
6.
7.
8.
Armrest lift and slide adjustments (x2)
Hand wheel for tilt adjustment of the armrest (x2)
Hand wheel release for height adjustment of the armrest (x2)
Back rest adjustment release
Height adjustment release
Swivel / turn release
Flip up foot rest plate
Foot rest height release
Page 3 of 12
Mounting holes measurements
A strong and level foundation is required to secure the installation of the base.
It may occur that during storage or transport that the telescope column fastens in the lower position. This can easily
be adjusted by fastening the lockable arm for swing, lift up the release handle at the same time pull up the chair.
Use six(6) M-Ø10 bolts to mount the pedestal.
137,5
137,5
295
372
Mounting on a deck rail
First make sure to have mounted the deck rail according to its user manual.
The bolts for mounting the chair to the deck rail is already in place on the carrier wagon.
•
•
•
Page 4 of 12
If you have an electrical deck rail and the cabling of the switch is done by quick-connections already implemented in the chairs column.
If you have a manual deck rail with release from seated position, the mounting of the release lever is shown
in the deck rails user manual.
If you have a basic deck rail, the wiring and mounting of the release lever is shown in the deck rails user
manual.
Replacing seat pillows
If your upholstery is damaged or worn, its recommended to replace the whole part. To re-fit new leather (or other
fabric) on existing cushions is not recommended.
If the chair is intended to be used under extreme conditions, an additional seat cover is advised. This comes in two
different materials, water repellent and fabric.
To replace the back rest cushion
1 - Tilt the backrest to an angle that allows you to reach the bolt marked on the illustrations below.
There are four screws, two under the panel, and two on the backside of the panel
(shown with red arrows).
The hand wheels needs also to be removed.
2 - Remove the bolt holding the gas strut in place.
3 - Remove the locking pin before dismounting the bolt holding the seat and backrest cushion to the seat frame.
You should now be able to loosen the back rest from the seat rest and replace with new one.
To replace the seat rest cushion
Tilt the backrest
to an angle that
allows you to
reach the bolt
marked on the
illustrations
below. Remount
the new seat
cushion.
Replacement of arm rest cushion
To replace the armrest pillows, use a
hex M5 bolt driver
to loosen two bolts
placed underneath
the armrest as
shown on the image. Replace with
new cushion.
Page 5 of 12
Cabling of extra arm rest equipment
The wires for the extra equipment is concealed as shown on the illustration.
To gain access to the interior the side panel needs to be loosened. There
are four screws, two under the panel, and two on the backside of the
panel (shown with red arrows. The hand wheel needs also to be removed.
The wire is put through the column top and down to the pedestal.
Remember to leave enough wire so that the rise/lower and swivel of the
chair is secured.
If the chair is capable of 360° you need to make sure the anti swivel bolt is in place before mounting
new equipment, to prevent tear of cables while turning.
Changing the gas-suspension in the column
Release the gas-strut top - inside the top
of the column by using a 13mm wrench.
Release the columns pedestal from its floor/
wagon mounting. Tilt the chair and loosen
the bolt shown on the image. Replace and
reverse.
Changing the gas-suspension
for the back rest
Release the marked bolts on the image, replace with new gas-strut.
Be sure to adjust the release wire to a operational function.
Page 6 of 12
Lowering the back rest for in-land shipping
The total height of the chair has the possibility to be reduced by 40cm - pull
the back rest release while pushing the back rest back and lift up the seat
pillow - releasing further travel of the seat.
This position is not suitable for operator use
- and should only be positioned when needed.
Replacing the column
To replace the column eight bolts on top of the .
1
2
Step 1
Tilt the seat top all the way
backwards, you gain extra
tilt if you lift up the seat
cushion while pulling the
backrest adjustment release
and the back trest backwards.
Step 2
Remove the eight bolts indicated 1 on the image.
Remove the wire end of the
gas-strut indicated with 2 on
the image.
Step 3
Remove the seat top while
making sure that the existing roller bolts on the top of
the column remains in place.
Reverse order for mounting
new column.
After remount function test the height release before finishing.
Page 7 of 12
Detailed Part lists
R-0080 NorSap 2000 seat top part list
1
4
3
5
2
Pos. Qty
1
Item Name
Complete NorSap 2000 seat top
Item No.
R-0080
1
2
1
1
Back rest
Seat pillow
PUTE-080
PUTE-079
3
3
4
4
1
1
1
1
Complete left arm rest Arm rest pillow
Complete right arm rest
Arm rest pillow
DEL-3134
PUTE-081H
DEL-3123
PUTE-081V
5
2
Hand wheel for arm rest adjustment
RATT-029
*
*
1
1
Gas strut for back rest adjustment
Wire for back rest adjustment
GAS-056
WIRE-017
Page 8 of 12
Rev.
Details
Columns for NorSap 2000 series
To find out what model your chair is flip up the seat and view the sticker underneath.
Pos. Qty Item Name
For article no.: 6630, 6640 H63-83cm
Complete column H505-700
Complete column Yacht Black H505-700
1
1
Replacement gas strut
*
1
Wire for gas strut release
Item No.
Rev.
DEL-1213
DEL-1213SO
GAS-058
WIRE-014
1
1
*
1
For article no.: 6631, 6641 H63-83cm
Complete column H505-700
Complete column Yacht Black H505-700
Replacement electrical lift
Replacement circuit card
DEL-3179
DEL-3179SO
ELDEL-044
ELDEL-055
1
1
*
1
For article no.: 6632, 6642 H73-92cm
Complete column H625-800
Complete column Yacht Black H625-800
Replacement gas strut Wire for gas strut release
DEL-1210
DEL-1210SO
GAS-058
WIRE-014
1
1
*
1
For article no.: 6633, 6643 H73-92cm
Complete column H625-800
Complete column Yacht Black H625-800
Replacement actuator Replacement circuit card
DEL-3180
DEL-3180SO
ELDEL-044
ELDEL-055
1
1
*
1
For article no.: 6634 H43-50cm
Complete column H280-360
Replacement actuator Replacement circuit card
DEL-3176
ELDEL-063
ELDEL-055
1
1
*
1
For article no.: 6635 H43-52
Complete column H280-360
Replacement gas strut
Wire for gas strut release
DEL-1216
GAS-025
WIRE-014
1
The five star legged versions of the chairs is identical as the ones with flange
except for the article numbers and the base and a slightly different height.
2
2
5
1
1
Foot rest padding
Wheel set (5) for Office chairs
‘Twist-lock’ Mounting set
STL-006
R-0077
R-0073
1
1
For article no.: 6644 H65-85cm
Complete column
Replacement gas strut
DEL-3184
GAS-058
1
1
For article no.: 6646 H45-54
Complete column
Replacement gas strut
DEL-3152
GAS-025
2
Page 9 of 12
DEL-3127 Original Foot rest
Pos. Qty Item Name
Complete foot rest
1
1
Gas strut for foot rest
Item No.
Rev.
DEL-3127
GAS-053
01
Details
1
DEL-085 Alternative Foot rest
Pos. Qty Item Name
Complete foot rest
1
1
Adjustable hand wheel 8X80
2
1
Shell Ø13X51
Page 10 of 12
Item No.
Rev.
DEL-085
01
RATT-018-80 A1
SAP-0576-51 01
Details
1
2
Care and maintenance of leather
Most leather qualities have originally received one or another type of surface protection treatment. When the
furniture is taken in use, grease from hand and neck will be in contact with the leather on a regular basis. Without
proper cleaning the leather will over a period of time leave grease spots or discoloration’s. To avoid this clean with
Soft Cleaner on a regular basis, we advise once a month. Use Leather Protection Cream or a leather cream with
impregnation 2-4 times a year. This will protect against spots, increase wear resistance and preserve the leathers
softness. By following these instructions you will ensure a long and lasting leather quality.
Avoid direct sunlight over a longer period of time.
Do not place a heat source within a distance of 20-30 cm.
Remove dust or vacuum, use Soft Cleaner once a month.
Contact us or an authorized leather producer or furniture dealer for more cleaning medium or
for further cleaning details.
Preferred supplier of cleaning medium is: Leather Master AS - 6220 Straumgjerde - NORWAY Tel +47 70 25 35 50 - Fax +47 70 25 35 58 - www.leathermaster.no - [email protected]
Care and maintenance of fabric
Remove dust or vacuum, use a neutral cleaning agent, such as soapy water when needed.
Maintenance of moving parts
The glide parts of the chair can be lubricated with a silicone based lubricant.
If the chair is on a deck rail, its important that the deck rails railway is NOT lubricated.
Safety
All moving parts has a potential squeezing hazard. Be sure to keep hands and fingers out of moving parts areas
when operating the chair.
Shipping and storage specifications
The chair should be shipped and stored in an upright condition.
No other materials should be shipped or stored on top of a the chair or deck rail.
The chair should be shipped and stored at temperatures between -20°C and +40°C.
The chair should not be operated until its been acclimatized between 0°C and +30°C.
The chair should be kept in a clean, dry environment.
Upon receipt, we recommend that the shipping packaging be immediately examined for damage. Any damage
should be noted on the delivery receipt and a request for inspection by the transportation company should be
made. The shipping packaging should be opened immediately and the chair or the deck rail examined for concealed shipping damage.
If the chair appears to be damaged,
a concealed bad order report should be
immediately filed with the transportation company.
Page 11 of 12
NorSap AS
Mjåvannsveien 35
N-4628 Kristiansand S
Norway
Tel +47 38 18 52 00
Web norsap.com
Email [email protected]