1
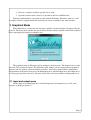
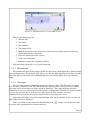
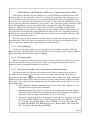
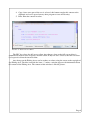
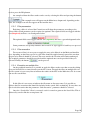
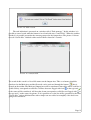
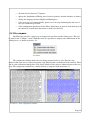
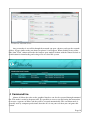
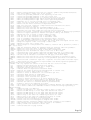
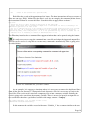
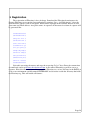
FilterAny
User Manual
Version 1.0 – Aug 11th, 2015
Table of Contents
1 Introduction......................................................................................................................................1
2 Graphical Mode................................................................................................................................3
2.1 Input and output areas...............................................................................................................3
2.1.1 Windows title....................................................................................................................4
2.1.2 Text status..........................................................................................................................4
2.1.3 Line numbering.................................................................................................................5
2.1.4 Text being edited...............................................................................................................5
2.1.5 Full screen text editor, undo, redo and text information buttons......................................5
2.1.6 Line and column where the cursor is................................................................................7
2.1.7 Buttons to control the temporary memory........................................................................7
2.2 Filters........................................................................................................................................9
2.2.1 Filters description..............................................................................................................9
2.2.2 Filter parameters..............................................................................................................10
2.2.3 Filter execution................................................................................................................10
2.2.4 Execution on multiple files.............................................................................................10
2.3 Configuration..........................................................................................................................13
2.4 File compare...........................................................................................................................14
3 File sharing through network..........................................................................................................15
4 Command line.................................................................................................................................16
4.1 Interactive mode.....................................................................................................................17
4.2 Simple command....................................................................................................................21
4.3 Script.......................................................................................................................................21
4.3.1 OverWrite........................................................................................................................21
4.3.2 DoNotOverWrite.............................................................................................................21
4.3.3 Append............................................................................................................................22
4.3.4 DoNotAppend.................................................................................................................22
4.3.5 FileMode.........................................................................................................................22
4.3.6 TextMode........................................................................................................................22
4.3.7 DOS.................................................................................................................................22
4.3.8 Unix.................................................................................................................................22
4.3.9 SYS.................................................................................................................................22
4.3.10 SET................................................................................................................................22
4.3.11 Encodings......................................................................................................................23
4.3.12 InputEncoding...............................................................................................................23
4.3.13 Detect............................................................................................................................23
4.3.14 OutputEncoding............................................................................................................23
4.3.15 Positioning parameters..................................................................................................23
4.3.16 Comments.....................................................................................................................23
4.3.17 Special characters..........................................................................................................23
5 Registration.....................................................................................................................................24
1 Introduction
The FilterAny was created to help on tedious tasks when working with text files. It is only
necessary to execute a sequence of filters to generate the expected result. In some cases that is
trivial, in other cases it can be compared to a simple puzzle.
Here are some tasks examples that some people probably had to do manually:
•
When copying a content from one tool to another one and having that adjusting the
position of the text manually.
•
When receiving one list with any information and having to verify one by one if there
are repeated information or not.
•
When copying something from Internet and that text came with strange text
characters in many places and it is necessary to remove one by one.
•
When having that move a text into a spreadsheet and having to position each
information in correct cell one by one.
This list of tasks is a small example of where FilterAny can be used. It is possible to use
some imagination and is clear to see many other situations where FilterAny can be used.
The concept of the tool is very simple. It is just necessary to copy and paste any text into the
Input Area, then a filter can be applied generating a filtered text into the Output Area. If it is
necessary to apply one another filter, then the content can be brought back to the Input Area with a
simple click on a button. This process is repeated until the expected result is reached.
The FilterAny interface is very simple.
Picture 1: FilterAny Main Window.
Picture 1 shows to the FilterAny main window with its 5 main areas. Areas 1 and 2 are the
Input Areas, the area 1 is the Main Input and the area 2 is the Auxiliary Input. The area 3 allows the
selection of the filter to be applied on the text that is on the Input Areas. Area 4 allows some
configurations for the selected filter. Area 5 is the Output Area. After the selected filter is applied
on the content of the Input Areas the result is generated on the Ouput Area.
Page 1
Picture 2: Sequence of execution of FilterAny.
The sequence of use of the FilterAny follows the steps indicated in picture 2. First it is
necessary to provide any content in the Input Areas. After that the desired filter is selected on Area
3. Configure the filter on area 4. Finally, execute the filter and the result is generated on the Output
Area. If it is still necessary to apply the filter then it is possible to exchange the content between the
Input and Output Area and the process is repeated until the desired result is reached.
Picture 3: Filter Configuration Area.
Each filter can be configured independently. Once a filter is selected the filter configuration
area is adapted automatically to the selected filter, as shown on picture 3. Amongst the
configuration items there is a button with a text icon called “Example”. It provides the texts
exemplifying the filter execution. There is another button with the label “Help” to get an
explanation about the filter. If the “Help” button is disabled then the help is on automatic mode and
each time a filter is selected it's instructions are presented automatically. Use the tool bar to enable
or disable this behavior.
The FilterAny also provide an execution through command line for advanced users. It is
possible to execute three types of action:
1. Execute a filter.
Page 2
2. Execute a sequence of filters specified on a script.
3. Open the console mode, where it is possible to interact with FilterAny.
With these information it is possible to work with the FilterAny. The filters name are well
descriptive and the example button and local help are always available in the main window.
2 Graphical Mode
When FilterAny is executed by the first time a profile selection window will appear, like the
picture 4. The basic mode enables the generic filters and the advanced profile enables the technical
filters targeting professionals of computer area.
Picture 4: Profile selection.
The graphical mode of FilterAny can be configured in many ways. The internal areas can be
altered in size, position and place. The FilterAny main window can use many different graphical
elements and use splitters, internal windows or frames, that is the standard initial configuration.
Independently of the mode being used, the Main Input Area, Auxiliar Input Area and Output Area
are always presented the same way, the same for the filter selection and filter configuration areas.
2.1 Input and output areas
All the input areas: Main Input Area, Auxiliar Input Area and Output area, use the same
structure according to picture 5.
Page 3
Picture 5: Standard structure of any Editing Area.
They use the following parts:
1. Window title.
2. Text status.
3. Line numbers.
4. Text being edited.
5. Manual indentation of the selected text, full screen text editor, undo, redo and text
information buttons respectively.
6. Line and column where the cursor is.
7. Visible area indication.
8. Buttons to control the temporary memory.
Each one of these parts has a very specific function:
2.1.1
Windows title
The window title indicate the purpose of the area that can be: Main Input Area, Auxiliar Input
Area and Output Area. The majority of the filteres use only the Main Input Area, but there are some
filters that consider the content of both Main Input Area and Auxiliar Input Area to produce the
output.
2.1.2
Text status
The text status show the information about the text being edited. Why FilterAny is initiated
the text status is “Initiated” also. This indicate that the editor is ready to receive new texts. Right
after some text is inserted the text status switch to “Modified”. This status indicates that these
information are not saved into a file. Depending on the configuration, FilterAny can indicate which
areas are not saved and if it is desired to save the content, or if the contents area saved
automatically or even if the contents area ignored and are not going to be saved.
Depending of the filter selected the Auxiliar Input Area can be disabled. In this case the text
status shows the word “Disabled”.
There is a button on the toolbar with the following icon:
text status will be updated with a content similar to:
. It starts a text verification. The
Page 4
236610 Byte(s), 42075 Word(s), 3960 Line(s), Type of the end line: UNIX.
This indicates that the text in the editing area is using 236610 bytes including the new line
characters. The new lines characters can use 1 or 2 characters depending on the type of the new
line. On UNIX type the new lines uses 1 byte only (hexadecimal character 13) and on DOS type
the new line uses 2 bytes (hexadecimal characters 10 and 13). The indication 42075 Word(s) refer
to the sequence of characters delimited by spaces, that is, dates, and other groups of characters. The
indication of 3960 Line(s) shows the number of lines including the empty lines that have no
characters. Finally, the indication of the type of the end of line can be DOS or UNIX. When
working with Windows operational system the preferred type should be DOS, otherwise the lines
can appear all in one line on many applications like the note pad. In case of working with Linux
then the preferred type should be the UNIX, otherwise the lines may end with the character “^M”
in case of using the editors such as “vi”.
The easiest way to insert content on the Input Areas is to copy and text from any tool into
some Input Area. This can be done by using the keys Ctrl+C to copy the text from the tool and
Ctrl+V to paste the content on any of the Input Areas of the FilterAny.
2.1.3
Line numbering
On the left side of the editing areas it is possible to see the number of each line. The line
where the cursor is will be painted with red color. When a text selection is done using the mouse or
the key board then the line numbers will be blinking.
2.1.4
Text being edited
The text stored on the editing area can be greater then the visible space. In this case use the
scroll bar to visualize the other parts of the text. This area is prepared to work with only text
characters and not with graphical characters or pictures.
2.1.5
Full screen text editor, undo, redo and text information buttons
The internal editors of FilterAny are compact to easy the fast editing of texts and filters
execution. In some circumstances, it is necessary to do a more detailed editor. To do that it is
. It is available on each of the three editing areas: Input, Ouput and
possible to use the button:
Auxiliar. Once the button is pressed the the editing area will be converted into a full screen editor,
like picture 6. This editor has some configurations on the bottom of the window. Here is a list of
each configuration:
1. Show tabulation: Allow the tabulations to be seen as arrows. This allow the user to
distinguish between spaces and tabulations.
2. White background: Each full screen editor has the background color of the original
editor inside the FilterAny. This configuration allows the background to be painted
with white colors for a better visualization in case it is necessary.
3. Text format: Depending on the text content the editor can color key works. Just select
one of the possible available types: ActionScript, Assember x86, BBCode, C, Closure,
C++, C Sharp, CSS, Delphy, Fortran, Groovy, HTML, Java, Javascript, JSP, Lisp,
Lua, Makefile, MXML, Perl, PHP, Properties files, Phyton, Ruby, SAS, Scala, SQL,
TCL, Unix Shell, Windows Batch and XML.
Page 5
4. Copy: Once some part of the text is selected, this button transfer this content to the
clipboard and can be pasted on any other program or area of FilterAny.
5. Print: Print the content in colors.
Picture 6: Full screeen editor.
The ESC key closes the full screen editor. Any changes done on the full screen editor is
automatically moved to the respective internal editor. If any text were selected, then this selection
is also preserved into the internal editor.
Any change on the Editing Areas can be undone or redone using the arrow on the top right of
any Editing Area. The blue icon with the letter “i” makes a window appear with information about
the content of the Editing Area. The content of this window is like the picture .
Page 6
Picture 7: Information about the text on any Editing Area.
2.1.6
Line and column where the cursor is
When the cursor is moved using either the mouse or the keyboard the indication of the cursor
location is updated on the lower left side of the Editing Area. It will be constantly updated to show
the current line number and column where the cursor is.
2.1.7
Buttons to control the temporary memory
On the bottom right side of the Editing Areas there is a set of buttons as shown on the picture:
8.
Page 7
Picture 8: Control of the temporary memory.
These buttons allow the transfer of the text to a temporary memory, visualize which texts area
that are stored on the memory and remove the texts that are no longer useful on the memory. To
add a text to the memory the bottom
can be used. The text is removed from the Editing Area
and is transferred to the temporary memory. To visualize the content on the Editing Area the
and
. To remove the content from the temporary memory the
following buttons can be used:
following button can be used:
. In between the buttons there is an indication of which content
from the last temporary memory that was moved to the Editing Area. In the example of the picture
8 the number 1/3 indicate that last content that was moved to the Editing Area was the number 1
and that exist 3 contents stored on the memory. All the contents stored on the memory will continue
to exist after FilterAny is closed. The next time FilterAny is executed all the contents on the
memory will be available automatically.
All Editing Areas allow a series of actions using the Pop-up Menu that can be opened using
the mouse right button. This menu can switch the content between the Editing Areas, search and
replace words, cut, copy, and paste from e to the operational system's clipboard, compare the
content between Editing Areas to visualize the similarities and differences, copy the column
number where the cursor is into a position parameter of a filter (this process will be covered later)
and finally switch the type of command line. The Pop-up Menu can be seen on picture: 9.
Page 8
Picture 9: Pop-up menu from the Editing Areas.
2.2 Filters
The filters area is where all the actions that can be applied on the Editing Areas can be found.
The filters are organized in categories and it's behavior can be identified by it's icon:
•
The filter can be executed in graphical mode and also on command line. This type of
filter can also be applied when the graphical mode is configured to work on multiples files
(the multiple files mode will be covered later).
•
This filter can only be executed in graphical mode. This type of filter do not apply when
the graphical mode is configured to multiple file mode.
•
This filter can only be executed when the graphical mode is configured to multiple file
mode and can be applied to binary files also. The filter can be executed on command line.
•
This filter can be executed in graphical mode and also on command line. This type of
filter do not apply when the graphical mode is configured to multiple file mode.
•
2.2.1
This filter uses the content of both Main and Auxiliar Areas to generate the Output Area.
Filters description
A full filter description of how a filter works can be visualized by selecting the desired filter,
clicking the button
and reading the text that appears on the Help Area. On the toolbar
there is the button
that activates the automatic help. When it is turned on there will be a green
sign over the question mark and the help text will be presented by selecting any filter, without the
Page 9
need to press the Help button.
An example of how the filter works can be seen by selecting the filter and pressing the button
. The example texts will appear on the Main Area, Output and, depending on the
filter, the example text will also appear on the Auxiliar Area.
2.2.2
Filter parameters
Each time a filter is selected the Control area will show the parameters according to the
selected filter. Each parameter can be required or optional. The required fields are flagged with the
text (Required) and have a red background color:
The optional fields area flagged with the text (Optional) and have a green background color:
Some parameters accept only numbers and no letters or signs appear if such keys are pressed.
2.2.3
Filter execution
To execute a filter it is necessary to supply the texts to be filtered on the Main and Auxiliar
area, depending on the filter type. In case the filter should be applied on only part of the text then
the part to be filtered should be selected. The texts outside the selection will remain unchanged.
The required parameters should be provided and the optional ones can be provided if they are
can be pressed.
relevant. Finally, the button
2.2.4
Execution on multiple files
On the graphical interface it is possible to apply the filters on the texts that are on the editing
areas and also on files at some directory on the file system. To apply the filter on multiple files on
the file system it is necessary first to indicate the names of the files on the Main Area. To do so one
can use the search filter:
In this filter it is necessary to indicate the file name or directory name. It is possible to
indicate the file extensions that should be included in the search, like: txt,html,log. In case there are
files in sub-directories then the parameter “Sub-directories” parameter should be selected.
Once the “Search files” filter is executed, a task is created to generate the list of files. This is
indicated by an alert like the on on picture: 10.
Page 10
Picture 10: Task created.
The task indication is presented on a window called “Task manager”. In this windows it is
possible to cancel a task when the button is in red and with text “Cancel Task”. When the task has
finished, it is possible to transfer the content generated to the Output Area. The picture 11 shows
the task “Search files” finished with a total of 10 files found in 2 seconds.
Picture 11: Task finished.
The result of this search is a list of file names on the Output Area. This set of names should be
transferred to the Main Area and the file mode can be activated through the button:
that is
located on the toolbar. The Main and Output Area will be transformed into tables where each line is
verified if they correspond to valid files. All lines that area flagged with icon
to the type and
to the status will be considered. All lines that do not correspond to valid files are flagged with to
the type and to the status. On picture 12 it is possible to see the list of files generated by the filter
“Search files” and an additional line with a simple text was added to exemplify a line that is not
going to be considered.
Page 11
Picture 12: List of files to be used on multiple files mode.
On picture 13 it is possible to see the file names converted into a table. Only the lines with type
and status
are going to be considered. After that it is possible to select a filter an indicate a
target directory.
Picture 13: List of files converted to a table after the multiple files
mode is turned on.
When the filter is executed a confirmation window will appear according to picture 14 where
the files on white background are the source files and the ones on yellow background are the target
files. In case the target directory is the same of the source directory than an indication that the files
are going to be overwritten will appear.
Page 12
Picture 14: Confirmation window for the filter execution
on multiple files.
2.3 Configuration
The graphical interface allow some configuration through the menu Option and then
Configuration. A window according to the picture 15 will be presented.
Picture 15: Configuration window of the graphical interface.
In this window it is possible to change:
Page 13
•
the look and feel between 72 options,
•
update the distribution of Editing Areas between splitters, internal windows or frames,
•
change the language between English and Portuguese,
•
if the areas are saved automatically, ignored, or a message informing that the areas is
not saved should be presented,
•
if the configuration parameters of the filters should have an icon to clean them up or if
the content is cleaned when the mouse is shake over the field.
2.4 File compare
The FilterAny provides a quick way to compare the text between the editing areas. This can
be done bu the “Compare” menu. With this menu it is possible to compare any combination of the
editirng areas, as shown on picture: 16.
Picture 16: Menu to compare
text areas.
The comparison window shows the texts being compared side by side. The plus sign
indicates that some text as added and a minus sign indicates that a content has been removed. There
can be some indications though lines. This shows blocks of lines that are identical between the two
texts. The comparison window has a similar format as compared with the picture: 17.
Picture 17: File comparison window.
Page 14
3 File sharing through network
It is possible to share the content of the editing areas through the network. To share file it is
necessary to use the button with an icon like a globe:
. It is available on the FilterAny toolbar. It
opens a window like the one on the picture: 18. In this window there are three buttons on the top
left corner of the window. Each button corresponds to one editing area: Main, Auxiliar and Output.
If any one of these buttons is pressed then an item on the “Items available” list is added. This item
store the current content of the editing area correspondent to the button pressed. This item is not yet
available on the network because the item is disabled. To make it available it is necessary to click
on the check box besides the work “Disabled” and enter a comment.
It is also possible to share binary and any other type of file with any size. To do that it is
necessary to use the button named “File”. This button creates on item on the “Items available” that
is specific to handle files. First it is necessary to click on “Open” button to select the file to be
shared. After that it is possible to enable the item and enter a comment.
The equipment being used can have many addresses. All these addresses, both IPv4 and IPv6,
are listed on the field “Addresses”. Select the best address format for your connection. All the
addresses generated by the server will be based on this selection.
The server is automatically started using port number 80. This number can be changed by
disabling the server using the item “Server active”, then providing the new port number and finally
enabling back the server through the item “Server active”.
While the server is still enabled it is possible to make the server show a message saying that
the server is about to be disabled. This allows the users connected to the server be aware that the
server will no longer be available soon.
On the bottom left side of the window there is a table that shows the items being download
and accessed by the user in real-time. This table shows the “Address” of the item being
downloaded and how many times it was accessed. It is possible to restart the counters by clicking
on the “Reset counter” button. Each time the server transfers any information then the light besides
the message “Server status” turns red.
The items on the “Items available” list can be enabled or disabled anytime. The items no
longer needed can also be removed using the “Delete” button.
Page 15
Picture 18: Network server.
Any person that is accessible through the network can open a browser and type the network
address. A page similar to the one shown on picture 19 will appear. When clicking on any of the
links from “Link” column will make the browser open another window with the content desired or
an indication for downloading and saving a file on a local file system.
Picture 19: Page opened through the network using a browser.
4 Command line
Almost all filters that exist on the graphical interface can also be executed through command
line. This mode is useful to frequent tasks. It is possible to create a text file having the instructions
to execute a sequence of filters and they will be executed automatically. This execution mode is
generally used by computer professional, therefore if it is not your case then you can ignore this
section.
Page 16
The command line mode is available through the executable FAConsole.exe it has to be
executed on a DOS window or on a Linux terminal. This executable allows the execution of a
single filter, the execution of a script stored on a simple text file that specifies the sequence of
filters to be executed, or work on interactive mode.
4.1 Interactive mode
The interactive mode is a good start to learn how to work with command line. To enter this
mode it is necessary to execute the FAConsole.exe without any parameter. When this file is
executed this program will show an initial text according to the text below:
FilterAny v1.0 - FilterAny Console Interface.
Type
Type
Type
Type
Type
Type
Type
"List" for the list of available filters command.
"Help <Command>" to receive the instructions for a specific command.
"Encodings" to list the available encodings.
"InputEncoding <Encoding>" to define the encoding of input files.
"Detect" to automatically detect input file encoding (not guaranteed).
"OutputEncoding <Encoding>" to define the encoding of output files.
"Quit" or "Exit" to close FilterAny Console.
Call "FAConsole [Command] [Required parameters] <Optional parameters>" to execute one single
command.
Call "FAConsole -script [Script file name]" to execute a sequence of commands stored on a text
file.
After that it is possible to provide commands. To list the available filter one should write
“List” and press enter. A full list of available filter will be presented:
List
Internal commands:
Set definition content - Set a definition to be reused on file, directory names and text
parameters.
Overwrite - Overwrite output files.
DoNotOverwrite - Skip the operation if output file exists.
Append - Output files will be appended if they exist.
DoNotAppend - Output files will no longer be appended if they exist.
SYS "Arguments..." - Execute a command on a separated process
All commands accept <optional positioning parameters> that is:
-s "number" Character to start the filter.
-e "number" Character to end the filter.
-ls "number" Line to start the filter.
-le "number" Line to end the filter.
Lines have precedence over characters
Commands:
ToUp
ToLo
FsUp
ToDs
ToUx
ToTa
ToSp
RemCB
RemCE
RemPB
RemPA
RemPC
RBet
ROut
RemSB
RemSE
Trim
RemBP
RemAP
Numb
ColS
-
Convert all or part of the main input content to upper case.
Convert all or part of the main input content to lower case.
This filter capitalize only the first letter of words from the main input.
Change the new lines from UNIX to DOS format.
Change the new lines to UNIX type.
Convert a certain number of consecutive spaces into a tabulation.
Convert tabulation into a specific number of consecutive spaces.
Remove a certain number of characters from the beginning of each line.
Remove a certain number of characters from the end of each line.
Remove a certain number of characters before a specific position in the line.
Remove a certain number of characters after a specific position in the line.
Remove all characters between two specific positions in the line.
Remove only the characters that are between the provided parameters.
Remove all characters, except the characters that are between the provided parameters.
Remove all spaces from the beginning of the lines.
Remove all spaces from the end of the lines.
Remove all spaces from the extremities of the line.
Remove a certain number of characters there are before a specific parameter.
Remove a certain number of characters there are after a specific parameter.
Change all characters by spaces except digits.
Replace any consecutive number of spaces by the Text parameter.
Page 17
Vald
- Remove invalid characters and allow only letters, symbols and provided characters.
Copy
- This filter makes a simple copy of the content.
ParB
- Inserts the provided parameter on the beginning of each line.
ParE
- Inserts the provided parameter on the end of each line.
ParP
- Inserts the provided parameter on a specific position in the line.
RPBP
- Add a provided parameter right before another specified parameter.
RPAP
- Add a provided parameter right after another specified parameter.
Enum
- Enumerate all or only the selected lines in ascending order.
RemD
- Leave only the top most first occurrence of a duplicated line.
EliD
- Remove also the first occurrence of duplicated lines.
EliN
- Keep only the first occurrence of duplicated lines and remove the others.
RemE
- Remove lines with no content.
RemC
- Remove the lines that have the provided parameter in it.
RemN
- Remove the lines that does not have the provided parameter in it.
RLen
- Eliminate the lines with length more and less than the specified.
Repl
- Replace the content of "Search for" parameter by the content of "Replace by" parameter.
RegE
- Search for regular expressions matches then replace them by new content.
RepC
- Append each line on itself a certain number of times.
SrtA
- Sort the all or the selected lines in ascendant order.
SrtD
- Sort the all or the selected lines in descendant order.
SrtAP - Sort in ascendant order based on the characters after a position.
SrtDP - Sort in descendant order based on the characters after a position.
SrtL
- The order are defined by the line length. The sorter first and longest are the last.
Shuf
- Change the sequence of the lines using a random order.
CombL - Append all lines into a single line.
MLnRS - If the "Step" is 2 then preserve line number 1, remove 2 and 3, preserve 4, remove 5
and 6 and so forth.
Swap
- Swap the characters before the parameter with the character after the parameter.
RmMain - Remove the lines that exist on both Main and Auxiliar Input.
RmNotM - Remove the lines that do not exist on both Main and Auxiliar Input.
Comb
- Append each line from Auxiliar Input to each line of Main Input.
Inte
- Intercalate the lines of Main Input with the Auxiliar Input on a regular step.
Comb
- Insert the text from Auxiliar Input into the Main Input according to the step.
MRepl - Use the list of "from/to" on the Auxiliar and apply on the Main Input.
RmMult - Remove the lines that has any of the parameters specified on the Auxiliar Input.
RWMult - Remove the lines that do not have any of the parameters specified on the Auxiliar
Input.
Ins
- Insert the text of Auxiliar Input into a specific line and column of the Main Input.
InPar - <html>Insert the text of Auxiliar input between each two<br/>specified parameters
replacing the previous content.</html>
RandR - Not only replace the content on the files but also on the file name.
Del
- Removes the specified files from the file system.
App
- Appends all the specified files into a single file.
MD5
- Calculate the MD5 code of all files.
DupW
- Indicate where are duplicated consecutive words.
Break - Restrict the length by moving the exceeding text to another line.
Srch
- Search for files to apply filters on them.
Math
- Execute a series of calculation. One calculation per line.
Rand
- Generates great variety of random data.
Tree
- Generates a directory tree from file system.
File
- Generates a file list from file system.
RDir
- Deletes a specific directory or an entire directory tree.
KnapF - Generates a file list in the format to the "Knapsack problem".
Knap
- Calculate a solution to "Knapsack problem" with many sacks.
Bean
- Generate the code for a Java Bean based on provided fields.
JSP
- Formats a JSP file by indenting all tokens.
BrkS
- Use a mask to split a string representing a computer message into individual fields.
ComS
- Use a mask to combine the individual fields to create the string representing a
computer message.
XML
- Indent the tags of a XML file.
ChUD
- Convert the character of a specific column to upper or lower case.
AWK1
- Execute the AWK Script 1 on the input text and show the result.
AWK2
- Execute the AWK Script 2 on the input text and show the result.
AWK3
- Execute the AWK Script 3 on the input text and show the result.
Start - Add an entry on the time list indicating the start of a task.
Stop
- Add an entry on the time list indicating the stop of a task.
Calc
- Calculate the time spend on a particular task.
AMto24 - Convert each line from English to Portuguese time format.
24toAM - Convert each line from Portuguese to English time format.
TxNum - Changes specific letters by numbers and the text continues to be readable.
TxErr - Swap letters positions and the text continues to be readable.
Morse - Simply convert each character to Morse code.
DownB - Download text such as page sources.
Page 18
Alr
- Alert if the content has a specific text.
Each filter has a code with approximated six letters. To show instructions of how to execute a
filter one can type “Help” followed by the filter's code. As an example, the command below shows
the instructions of how to execute the filter “Search for files to apply filters on them.”:
Help Srch
Search for files to apply filters on many files at the same time.
Usage: Srch "input file or %variable" "output file or %variable" -t1 "File or directory" -f1
"Extensions (Optional)" -c1 "Yes or No"
Use -t1 to indicate the file to be include or the directory that holds the files to be include
in the list. Use -f1 to indicate the file extension to be included. The extensions should be
separated by comma, like: "txt,xml,ini". If it is not provided then any file is included. Use -c1
to indicate if it is necessary to search on sub-directories or not.
The FilterAny interface has a command line support window that can be opened using the button:
. It is only necessary to copy the command into a text file and adapt the input and output files.
This file can be used as a script file to execute many commands automatically. This is going to be
described below.
Picture 20: Command line generator window.
As an example, let's suppose a situations where it is necessary to remove the duplicated lines
from all the files on directory C:\Temp and all sub-directories. First it is necessary to retrieve the
list of files. The result can be stored on a temporary file or into a memory variable. Initially the
result is going to be stored into the memory variable. There is no need to provide an input file to
the search filter therefore a predefined variable with empty content “%empty”.
Srch %empty %Variable_1 -t1 C:\\Temp -f1 TXT -c1 Yes
Command Srch executed successfully.
In this moment the variable created with name “Variable_1” has a content similar to the text
Page 19
below:
C:\Temp\directory_1\directory_1_1\file_1_1_A.txt
C:\Temp\directory_1\directory_1_1\file_1_1_B.txt
C:\Temp\directory_1\directory_1_1\file_1_1_C.txt
C:\Temp\directory_1\directory_1_2\file_1_2_A.txt
C:\Temp\directory_1\directory_1_2\file_1_2_B.txt
C:\Temp\directory_1\file_1_A.txt
C:\Temp\directory_1\file_1_B.txt
C:\Temp\file_A.txt
C:\Temp\file_B.txt
To apply a filter on all these files it is necessary to switch to file mode. This will make
FilterAny analyze all lines and identify the target files instead of treating of working as this was a
simple text:
Filemode
File mode activated.
Before executing the command to remove the duplicated lines it is possible to see how the
parameters for this filter should be written. This can be done by using the command “Help”:
Help RemD
Remove duplicated lines and leave only the top most first occurrence of a duplicated line.
Usage: RemD "input file or %variable" "output file or %variable" -c1 "Yes or No" -c2 "Yes or No"
<optional positioning parameters>
Use the -c1 parameter to not consider empty lines on the search for duplicated lines. Use the
-c2 parameter to not consider spaces and tabulations from the beginning and from the end of the
lines.
To execute the command RemD it is necessary to provide the input parameter. In this case
this list is stored on the memory variable created “Variable_1”. The output can be ignored because
the filter will not generate a text, but it will generate many files. This is why it is necessary to
provide the parameter “-TDir” to indicate the target directory. The two parameters -c1 and -c2 are
explained above. The files generated are according to the directory structure of the source directory.
These files can be used to execute another filter and this process can be repeated as many times as
necessary.
RemD %Variable_1 %Ignore -c1 Yes -c2 Yes -TDir C:\\Temp2
Success: C:\Temp2\directory_1\directory_1_1\file_1_1_A.txt
Success: C:\Temp2\directory_1\directory_1_1\file_1_1_B.txt
Success: C:\Temp2\directory_1\directory_1_1\file_1_1_C.txt
Success: C:\Temp2\directory_1\directory_1_2\file_1_2_A.txt
Success: C:\Temp2\directory_1\directory_1_2\file_1_2_B.txt
Success: C:\Temp2\directory_1\file_1_A.txt
Success: C:\Temp2\directory_1\file_1_B.txt
Success: C:\Temp2\file_A.txt
Success: C:\Temp2\file_B.txt
Command RemD executed successfully.
Page 20
4.2 Simple command
To execute a simple command it is necessary to execute the FAConsole.exe followed by the
filter selected with it's specific parameter. This mode is more restrictive because there is no way to
configure the FilterAny before executing the filter like: indicate the overwrite mode, activate the
file mode between others. Here is a filter execution through a simple command line:
FAConsole ToUp C:\\Temp\\file_A.txt C:\\Temp2\\file_A.txt
Command ToUp executed successfully.
4.3 Script
A sequence of commands can be stored in a script file, that is a simple text file created by any
simple text editor. This should be the preferred way of using FilterAny on command lines, because
the commands can be easily modified, reused, stored among other characteristics.
The first step a simple text file is created like the sample file C:\Script\Script.txt:
Srch %empty %Variavel_1 -t1 C:\\Temp -f1 TXT -c1 Yes
Filemode
RemD %Variavel_1 %Ignorar -c1 Yes -c2 Yes -TDir C:\\Temp2
The next step is to execute the FilerAny passing the name of the script file:
FAConsole -script C:\Script\Script.txt
The result of the execution is presented as follows:
O comando Srch executou com sucesso.
Modo arquivo ativado.
Sucesso: C:\Temp2\directory_1\directory_1_1\file_1_1_A.txt
Sucesso: C:\Temp2\directory_1\directory_1_1\file_1_1_B.txt
Sucesso: C:\Temp2\directory_1\directory_1_1\file_1_1_C.txt
Sucesso: C:\Temp2\directory_1\directory_1_2\file_1_2_A.txt
Sucesso: C:\Temp2\directory_1\directory_1_2\file_1_2_B.txt
Sucesso: C:\Temp2\directory_1\file_1_A.txt
Sucesso: C:\Temp2\directory_1\file_1_B.txt
Sucesso: C:\Temp2\file_A.txt
Sucesso: C:\Temp2\file_B.txt
O comando RemD executou com sucesso.
A execução do arquivos de script foi finalizada.
4.3.1
OverWrite
The command “OverWrite” can be inserted into the script file to indicate that if the files
being created already exist then they will be overwritten.
4.3.2
DoNotOverWrite
The standard behavior of FilterAny is to do not overwrite the target files if they exist. The
command “DoNotOverWrite” can be used in case the command “OverWrite” had been used and it
is desired to return back to the normal standard FilterAny behavior for security purpose.
Page 21
4.3.3
Append
This command indicates that if the target file exist then the text generated will be appended to
the previous content.
4.3.4
DoNotAppend
This command indicates that if the target file exist then the behavior will depend if the mode
“OverWrite” or “DoNotOverWrite” is activated. If the “OverWrite” is activated then the new
content will be written over the previous content, that is going to be lost. If the mode
“DoNotOverWrite” is activated then an error message will appear avoiding the lost of the previous
content.
4.3.5
FileMode
The “FileMode” is used to indicate that the input text to the filters should be interpreted as a
list of file names. The filter will be executed on each of these files one by one.
4.3.6
TextMode
The “TextMode” allows the return to the default mode of FilterAny, where the input texts are
treated as common texts. The filter is executed on this text and not interpretation of it's content is
done.
4.3.7
DOS
This command makes the end of line indications follow the DOS/Windows format.
4.3.8
Unix
This command makes the end of line indications follow the Unix/Linux format.
4.3.9
SYS
This command allows the execution of any program or executable from a Script of FilterAny.
The executable called by this command are free to perform any task. This brings a lot of flexibility
to the Script execution. To call any executable one can call:
SYS MyExe.exe parameter_1
4.3.10 SET
This command allow the creation of definitions related to source directories or files to be
used as source or target and can be called on many filters. The example below shows the use of the
SET command to define the source directory and the output file. The objective of this Script is to
generate a list of the content of a CD/DVD or BlueRay:
Set DRIVE D:\
Set DESTINATION "MyDVD_Content.txt"
Tree %empty %target -d1 DRIVE -c1 Yes -c2 Yes
Append
File %empty %target -d1 DRIVE -c1 Yes
Copy %target DESTINATION
Page 22
4.3.11 Encodings
The text files can be saved using many different encodings to show different types of special
characters according to the language being used. One file saved on one specific encoding can not
work when read using a different encoding. Ths command shows the list of available encodings
like: Big5, hp-roman8, IBM00858, IBM277, ISO-2022-CN, ISO-8859-1, Shift_JIS, US-ASCII,
UTF-16, UTF-8, windows-1250, x-IBM1025, x-MacRoman and many more.
4.3.12 InputEncoding
This command specify which encoding should be used when reading text files. This
command should be followed by the encoding name, that should be one of the encoding shown by
the “Encodings” command.
4.3.13 Detect
The FilterAny has a way to try to identify the file encoding before it is read. This method
generates good results, but it is not 100% guaranteed. Just issue “Detect” command to tell
FilterAny to try to identify the encoding automatically before reading any file.
4.3.14 OutputEncoding
This command is very similar to the “InputEncoding”, but it applies to the files generated by
FilterAny.
4.3.15 Positioning parameters
It is possible to indicate which part of the input file should be filtered. The standard behavior
is that the entire text is filtered. To restrict the content to be filtered it is possible based on the
characters position using the parameters -s and -e, for example:
ToUp Input.txt Output.txt -s 20 -e 80
In this example only the characters that are between position 20 and 80 are going to be
converted to upper case. The remaining characters will remain unchanged. To indicate the To
indicate the start and end based on line numbers it is possible to use the parameters-ls and -le, for
example:
ToUp Input.txt Output.txt -ls 5 -le 10
In this command only the characters that are between lines 5 and 10 are going to be
converted to upper case.
4.3.16 Comments
Any line that starts with “#” is considered a comment and does not influence the execution of
a Script.
4.3.17 Special characters
It is possible to use the tabulation and new line characters on the filters parameters. The
tabulation can be used by entering “!t!” and the new line can be entered using “!nl!”. In the
example below each tabulation in the input file is replaced by a new line and two tabulations:
Repl Input.txt Output.txt -f1 "!t!" -f2 "!nl!!t!!t!"
Page 23
5 Registration
The registration of FilterAny is free of charge. Download the FilterAny from internet site.
Execute FilterAny.exe or run the java application by running “Java – jar FilterAny.jar”. Once the
main interface appears click on “Register” button on the top right of the window. Provide at least
your name and email address. Accept the terms. A sequence of characters in a form of a square will
be generated like:
##############
#WzZZWURTTTEt#
#MTg0NTc0NzU0#
#OV1bUmVnaXN0#
#cmF0aW9uIFRl#
#c3RdW11bIC0g#
#IC0gIC0gXVty#
#ZWdpc3RyYXRp#
#b25AaG90bWFp#
#bC5jb21dW11b#
#MTM3ODUxNjA5#
#MzA0N10=#####
##############
Select this text using the mouse and copy the text using Ctrl + C keys. Paste the content into
an email and send it to [email protected]. A file named FilterAny.reg will be sent as a
response. Place this file in the same directory of the FilterAny.exe, or in a directory in the PATH, or
even set an environment variable named FILTERANY and associate it with the directory that holds
the FilterAny.reg. This will enable all features.
Page 24