1
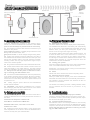
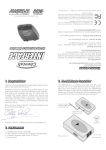
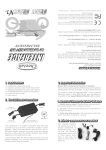
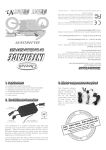
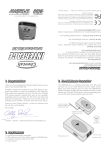
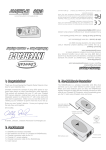
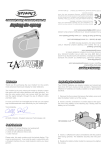
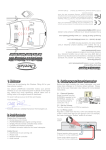
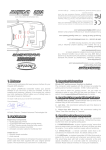
© 2009 Cheetah Advanced Technologies Ltd, Scotland.
All rights reserved.
This device complies with Part 15 of the FCC Rules. Operation
is subject to the following two conditions: (1) this device may not
cause harmful interference, and (2) this device must accept any
interference received, including interference that may cause
undesired operation.
THIS INTERFACE IS COMPATIBLE WITH
Cheetah Advanced Technologies Ltd. declares that this product
is in compliance with the essential requirements and other
relevant provisions of Directive 1999/5/EC.
If any problems persist, or to arrange a product return,
please email [email protected]
Europe & Rest of World - visit www.SpeedCheetah.com
USA & Canada - visit www.GPSdetector.com
Service & Support
If for any reason your Cheetah product develops a fault,
please check our Customer Service page on:
Limited Warranty
Cheetah Advanced Technologies Ltd. warrant our products
against all defects in materials and workmanship for a period
of one year from the date of the original purchase. Full
warranty terms and conditions available online at:
www.SpeedCheetah.com
Warranty Registration
Register online at www.SpeedCheetah.com
1 x In-line fuse unit (3 Amp)
1 x POWERSENSEnode engine running sensor
1 x Power cable
1 x RADARnode wireless transmitter
1 x RDI software card for the SR7 (inserted in RADARnode)
1 x Cheetah connector cable for the SR7
1 x User manual
Cheetah parts are pre-connected for your convenience. Our
2-pin mini connectors push-fit together and lock securely. To
unclip, press the lever down and gently pull them apart.
The RADARnode Transmitter
Over-ride cable for
Cheetah LASERnode
Test button
The RADARnode is a wireless transmitter (433 Mhz) that
connects up to your radar detector’s headphone and power
supply sockets. When your radar detector gives an alert, the
RADARnode digitally analyzes the alert’s acoustics and
transmits a radio code to your helmet display.
The small flying lead with half a bullet connector at the end
(plastic sheathed) is an over-ride cable for connecting to a
Cheetah Laser Jammer Interface in motorcycle installations.
The POWERSENSEnode is a clever “engine running” sensor that turns on power when you start up your motorcycle
and turns it off when you stop the engine. It’s an instant,
“ignition-switched” supply that makes it quick and easy for
anyone to create a safe power supply directly from the battery
terminals. It eliminates the need for direct wiring into your
bike’s electrical system.
Power socket
RDI Software card
Detector socket
In-line fuse unit with
battery connections
POWERSENSEnode
RADARnode
Power in
Escort SR7’s
Interface unit
Escort SR7
Display /
controller
Detector
Power
to radar head
Headphone
to Jammers
Cheetah connector cable
Jammer over-ride
Instal the RADARnode according to the diagram above.
Please note that the RADARnode transmitter is not waterproof so should always be positioned in the seat cavity.
2.1 The Cheetah connector cable must be connected to your
detector in two places:
the headphone socket - to digitally analyze detector tones
during radar and laser alerts, and
the power socket - to sense voltage changes during alerts.
2.2 Safely route the RDI connector cable from your SR7 to
the RADARnode transmitter underneath the motorcycle seat.
Secure the Cheetah cable to the bike wherever possible,
avoiding contact with any high temperature engine components or the exhaust system.
2.3 Plug it into the RADARnode socket marked DETECTOR.
2.4 Double check that the RDI software card and connector
cable are specific to your radar detector. The RDI software
card is pre-installed in the side of the RADARnode transmitter. Always ensure that the power is OFF before removing or inserting your RDI software card.
2.5 Connect the POWERSENSEnode and fuse pack directly
to the battery terminals. RED is positive, BLACK is negative.
There is no need to remove the leads from the battery. Just
loosen the nut on the clamp, slide in the spade terminal, and
re-tighten the nut.
2.6
Finally, plug the power cable into the RADARnode
socket marked POWER.
2.7 OPTIONAL - laser jammer installations only. Connect
the small flying lead with the bullet connector to the similar
over-ride cable on the Cheetah LASERnode.
3.1 You must change some of the menu items of the SR7 to
enable the RADARnode to correctly analyse the acoustics of
the alerts.
Fast Power On Sequence = PwrOn FST
Auto Mute is switched off = aMute OFF
Standard Audio tones, not LOUD = Tone STD
Volume level = 95%
3.2 Setting the volume level is critical. It may require some
minor adjustments in the level to allow the RADARnode to
function correctly with your individual SR7.
4.1 Starting up your system
The radar detector and VizAlert display work independently.
The POWERnode attached to the battery will automatically
turn on the power to the RADARnode transmitter and radar
detector when you start your motorcycle’s engine. It will
remain on for as long as the engine is running.
The VizAlert’s battery pack has a sliding ON/OFF switch. All
6 LEDs will flash once, at the same time, to confirm it is
switched on. When you power up your detector, the transmitter will begin to transmit to the VizAlert helmet receiver. The
VizAlert LED's will flash in a circular sequence when the
wireless link has been established.
4.2 Testing your system
Press and release the test button on the side of the RADARnode. The VizAlert will flash each LED in sequence.
Remember, your engine must be running for the transmitter
and detector to be powered up.
4.3 Alerts
Please refer to the VizAlert manual for interpreting alerts.
4.4 Switching off your system.
When you switch off your engine, power to the RADARnode
transmitter and radar detector is automatically switched off.
The VizAlert is motion sensitive and switches off after 10
minutes of no movement.
The VizAlert V2’s battery pack has a sliding ON/OFF switch
and an automatic shut off function if you leave it on by
accident.
5.1 Alerts are not given correctly by the VizAlert
Check the AUDIO TONES setting in the SR7’s menu is set
to standard, not loud. (Tone STD) If problem persists, adjust
the volume level slightly up or down.
5.2 Constant KU Band radar alert
RDI software card is not correctly installed. It must be fully
inserted into the slot on the side of the RADARnode. Switch
off power, then remove the card and re-insert flush. Always
ensure that the power is OFF before removing or inserting your RDI software card.