1
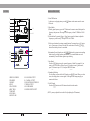
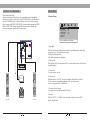
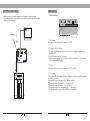
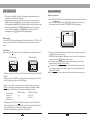
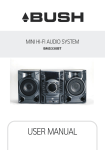
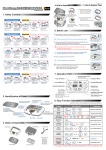
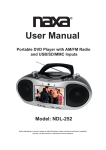
MD-001
DVD MINI COMPONENT SYSTEM
USER MANUAL
FOREWORD
Thanks
Dear Customer,
May we take this opportunity to thank you for purchasing this unit. We strongly
recommend that you read this User Manual carefully before attempting to operate
the unit and that you note the listed precautions.
1. Ensure a minimum distance of 5cm around the apparatus for sufficient ventilation.
2.The ventilation should not be impeded by covering the ventilation opening with
items, such as newspapers, table-clothes, curtains, etc.
3. No naked flame sources, such as lit candles should not be placed on the apparatus.
4. Where the mains plug is used as the disconnect device, the disconnect device shall
remain readily operable.
5. The apparatus should not be exposed to dripping or splashing and that no objects filled
with liquids, such as vases, should be placed on the apparatus.
6. The batteries should not be exposed to excessive heat such as sunshine, fire or the
like.
7. The mains plug is used as the disconnect device, the disconnect device shall remain
readily operable.
8.
This equipment is a Class II or double insulated electrical appliance. It has
been designed in such a way that it does not require a safety connection to
electrical earth.
9.
This lightning flash with arrowhead symbol within an equilateral triangle is
intended to alert the user of the presence of non-insulated “dangerous voltage”
within the product’s enclosure that may be of sufficient magnitude to constitute
a risk of electric shock.
Warning: To reduce the risk of electric shock, do not remove the cover (or back)
as there are no user-serviceable parts inside. Refer servicing to qualified
personnel.
The exclamation point within an equilateral triangle is intended to alert the user
to the presence of important operating and maintenance in the literature
accompanying the appliance.
TROUBLE SHOOTING
For your convenience, we have listed some methods to solve common problems you may
encounter when using this system. If the problem is not solved please contact the nearest
service center.
Fault type
Power supply does
not work
Possible Cause
Possible Solution
Power plug is not fully inserted
into the sockets
Fully insert the power plug
into the socket
The batteries are exhausted
Replace them with new ones
The remote control unit is not
directed at the remote control sensor
Please aim at the remote
control correctly
The unit is not connected properly
Reconnect the system
according to the illustration
TV is not set in the video mode
Set the TV in video mode
The scanning mode does not
match to the TV scanning
mode
Reset the scanning mode
No disc
Insert a disc
Inversed placement of disc
Replace the disc with the picture
upward
Disc is not compatible
for this device
Use a compatible disc
Audio wire is not connected
correctly
Connect the audio wire correctly
Wrong operation with amplifier
Operating the amplifier
referring to the illustration
Disc is not clean
Replace with a clean one or clean
the disc with a soft cloth
Remote does not work
No image on the TV
screen
Play is unavailable
No sound from speakers
Discontinuous sound
or distorted pictures
Disc is scratched
Replace with a new one
Disc is distorted
Invalid display on the
screen
Operation incorrect
Please refer to the user manual
22
SPECIFICATION
Disc type
CONTENT
DVD
VCD
CD
MP3
DVCD
SVCD
CD-R
MPEG4
Video format
Audio format
MPEG1, MPEG2, STEREO
FOREWORD.......................................................................................................1
CAUTIONS.........................................................................................................2
LIST OF MAIN PARTS......................................................................................2
PANELS..............................................................................................................3
REMOTE CONTROL.........................................................................................4
CONNECT TO THE TV-SET.............................................................................5
CONNECT TO THE AMPLIFIER.....................................................................6
SYSTEM CONNECTION..................................................................................7
BASIC OPERATIONS..................................................................................8-14
MENU SETUP.............................................................................................15-19
RADIO OPERATION.......................................................................................20
SPECIFICATION..............................................................................................21
TROUBLE SHOOTING...................................................................................22
NTSC, PAL, AUTO
Signal output
LIST OF MAIN PARTS
Output joint
L/R audio output, Video output,
and Coaxial output
Input joint
USB
Power supply
Max power
Frequency
S/N ratio for
audio signal
Operation condition
AC~240V/50Hz
20W
20Hz-20KHz
>80dB
+3dB
Weight A
Temperature : 5 C~35 C
Installation : on the flat horizontal surface
NOTE :
In most cases, for the DVD player to work correctly it depends on the disc you are
trying to play. Some features listed in the instruction manual may not work properly
due to disc problems.
21
Part 4: User's Manual 1 Copy
RADIO OPERATION
PANELS
1
1. Enter FM Function
In the turn-on or playing status, press the FM button on the remote control to enter
FM mode.
2
3
4
5
8
9
6
7
2. Select Bands
1) Directly input frequency: press the T/F button on the remote control, then input the
frequency that you want. The range of FM frequency is from 87.50MHz to 108.00
Mhz.
2) Select the band by pressing Tune- or Tune+ button: press this button to adjust the
frequency up or down a step. The step of FM is 0.05 MHz.
3) Select saved stations by pressing a number buttons. For example: press 10+ button
twice, 5 button once, you may select the 25th saved station. Press the CH- or CH+
button to switch the previous or next band.
10
11
12
13
1. DISPLAY SCREEN
2. STANDBY
3. SOURCE
4. STOP
5. PLAY/ENTER
6. DISC TRAY
7. USB PORT
8. VOLUME+/9. OPEN/CLOSE
15
14
4) Automatically search bands: press the SEARCH button, this system starts searching
bands from low to high frequency automatically. The searched bands are saved
automatically. Press this button again to stop searching.
3. Save Bands
Press the SAVE button to save the current frequency of band. For example: if you
want to save 99.30 MHz in 28th cell, press 10+ button twice and 8 button once,
press T/F button to input 9 9 3 0, then press the SAVE button.
10. L/R AUDIO OUTPUT
11. COAXIAL OUTPUT
12. FM ANTENNA INTERFACE
13. VIDEO OUTPUT
14. L/R SPEAKERS
15. POWER SUPPLY INPUT
4. Soundtrack Selection
To select Mono or Stereo while in FM mode, press MO/ST button. When you select
stereo, the display shows a stereo signal. If the signal is not strong enough, you
cannot select Stereo.
5. Exit FM mode
Press the DVD button to exit FM status and switch to other modes.
(NOTE: you may adjust the best radio effect by adjusting the FM antenna.)
20
MENU SETUP
REMOTE CONTROL
Preference Setup Page
..PARENTAL CTRL SETUP
PARENTAL
PASSWORD
NOTE:
1. Turn on the player, insert the batteries into the remote control, and direct the remote
control at the remote sensor on the front panel.
2. The distance of remote control should not exceed 7 metres, or else, it will be invalid.
3. If the remote control sensor or IR-radiator is closed, the remote control will not
operate or there will be an interference.
4. Interference from the high tension appliances, generating high frequency signal can
strongly influence the operation of remote control.
GO TO PREFERENCE PAGE
(This setup page is available while in “Eject” or “No disc” status)
1. Parental
This unit has 8 different age rating that can be selected. Move the cursor to select
one of them, then press “Play/Enter” button on the remote control to enter. You are
reminded to input the password.
2. Password
The original password of this unit is “1389” and you can change it to a new one.
DVD
STANDBY
SEARCH
FM
PAL/NTSC
OPEN/CLOSE
SAVE
MONO/STEREO
NUMBER
BUTTONS
MENU
TITLE
L/R/LANGUAGE
ZOOM
PROGRAM
OSD
PLAY/PAUSE
TIME/FREQUENCY
REPEAT
REPEAT A-B
SUBTITLE
ANGLE
CLEAR
SHUFFLE
STOP
ENTER
DIRECTION
SETUP
F.RWD/TUNEF.FWD/TUNE+
PREV./CHANNELNEXT/CHANNEL+
19
USB
MUTE
VOLUME+/RESET
MENU SETUP
CONNECT TO AMPLIFIER
Digital audio output setting
Connect coaxial output of the player to the corresponding inputs of the amplifier.
When a disc is in play or stop mode, press the SETUP button on the remote control to
open the DVD MENUsetup. Use direction buttons to move to the audio setup page.
Move the cursor to DIGITAL AUDIO SETUP, select the digital output and set SPDIF/
RAW or SPDIF/PCM. Then press the ENTER button to save the selected value.
To exit the setup menu, press the SETUP button again.
4.General Setup
..GENERAL SETUP ..
ANGLE MARK
CLOSE CAPTION
SCREEN SAVER
LAST MEMORY
S/W VERSION
DEFAULT
ON
OFF
OFF
OFF
GO TO GENERAL SETUP PAGE
1. Angle Mark
Coaxial output
Connected to video output
When the disc has multi-angle pictures, setting the Angle Mark displays a multi-angle
mark on the screen. This option has two settings:
ON: Display multi-angle mark
OFF: Multi-angle mark is not displayed
2.Close Caption
When playing a DVD, set this option to OFF to close the caption, choose the ON option
to open the caption.
Dolby Amplifier
3. Screen Saver
To set screen saver on or off.
4. Last Memory
When the option is set to “ON”, the system remembers the played discs contents.
The disc content is not remembered when the “OFF” option is selected.
Note: It is only available for VCD/DVD disc.
TV
5. Version (Software Version)
This option is used to display the model of this unit.
6. Default
Right speaker
Left speaker
5
While in “EJECT” or “NO DISC” status, this option is chosen to reset the DVD
player`s original setup.
18
CONNECT TO THE TV-SET
MENU SETUP
If your TV-set has an AV input, use the AV cable to connect the player to the TV-set.
Afterwards make sure the connection is right; by selecting AV status for your TV-set.
3. Audio Setup Page
ANALOG AUDIO SETUP
DIGITAL AUDIO SETUP
EQUALIZER
2. Digital Audio
a)Digital Output
When playing the audio or MPEG discs, coaxial terminal will be output in SPDIF/
RAW format. Meanwhile the connected amplifier must be able to decode the DIGITAL
or MPEG format.
SPDIF/PCM may be selected when the player is connected to a 2CH digital stereo
amplifier.
b) LPCM Output
LPCM (linear pulse code modulation) is a non-compressed audio digital technology.
There are two output modes: 48KHz, 96KHz.
3. Equalizer
1) Sound Mode
This option is used to select the different sound balanced effects, such as OFF, ROCK,
POP, LIVE, DANCE, TECHNO, CLASSIC, SOFT.
2) Bass Boost
It is used to adjust the sound effect of Bass boost to ON or OFF.
3) Super Bass
ON: sets the super bass on, and adjusts the super bass effect.
OFF: sets the super bass off.
4) Treble Boost
ON: sets the treble boost on and adjusts the treble effect.
OFF: sets the super treble boost off.
17
Audio L Video Input
1
Audio/Video Cable accessories
1. Analog Audio Setup
a) Downmix
LT/RT: audio output from Left and Right channel
Stereo: stereo audio output
b) Dual Mono
This option is used to set the mode of audio output, including L-Mono, R-Mono,
Mix-Mono and Stereo.
c) Dynamic
This option is used when Line output is selected for the compression mode. Linear
compression ratio is adjusted to acquire different compression effects.
Audio R
NOTES:
1. Before connecting the player to the TV-set; turn off and unplug both units.
2. When a disc is being played, we recommend changing the settings of the player in
order to make it compatible with the TV-set.
3. You can connect the player to the TV-set in different ways. Choose only one of them
as multiple connections negatively influence the source and picture quality.
6
MENU SETUP
SYSTEM CONNECTION
Before connection of acoustic equipment, pay attention to the picture below.
Each connection must be safe and firm. Only connect the power cable after you have
finished all the connections.
2. Video Setup Page
VIDEO OUTPUT CVBS
TV DISPLAY
16:9
TV TYPE
PAL
COLOR SETTING
Video output
FM Antenna
1. Video Output
This option is used to set the video output mode: CVBS.
2. TV Display (4:3PS, 4:3LB,16:9 )
Audio output
1) No matter which format you select, if the screen is a 4:3 display, the image will be
displayed in 4:3.
2) The DVD screen format can be changed.
3) When the screen displays in 4:3 and the display format of the DVD is 16:9, the image
will be compressed horizontally.
3. TV Type
This system supports the following formats: PAL, NTSC, AUTO.
Audio Output
4. Color Setting
You can adjust the video output of sharpness, brightness, contrast, gamma, hue, saturation
according to your favor.
The adjustable range of sharpness is: High, Medium and Low.
The adjustable range of brightness is: +/- 20 (default is 0).
The adjustable range of contrast is: +/- 16 (default is 0).
The adjustable range of hue and saturation are: +/- 9 (default is 0).
The adjustable range of gamma is: High, Medium, Low and None.
Left Channel
Right Channel
BASIC OPERATIONS
MENU SETUP
Press SETUP button on the remote control to open the menu setup function, the TV
screen will display the figure below. Press Left/Right direction buttons to move the
cursor to the different setup pages; Also press the direction buttons to move cursor
to the item you want, then press ENTER button again to enter the subdirectory.
1. Language Setup Page
LANGUAGE SETUP
OSD LANGUAGE
AUDIO
SUBTITLE
DISC MENU
ENG
ENG
ENG
ENG
GO TO LANGUAGE SETUP
1. OSD Language
This option is used to select the language of all the screen displays and setup menus.
You can set OSD language to English.
2. Audio (Language)
When playing DVD discs, the player will automatically play the default language of
the disc. This unit can play such languages as: English, Spanish, French, German,
Thai and Others.
3. Subtitle (Language)
When playing DVD discs, the player will automatically play the default subtitle
language of the disc. This unit can play the following languages as: English, Spanish,
French, German, Thai and Others. You can select any one as the subtitle language or
you can choose to close it.
4. Disc Menu (Language)
This unit has the following menu languages available: English, Spanish, French, German,
Thai and Others.
Preparation
1) Before turning on the unit, check that all the connections are correct and safely
inserted the plug in the corresponding power socket.
2) To open the disc tray, press the OPEN/CLOSE button on the remote control or the
front panel of the unit. Put the disc on the disc tray and press the OPEN/CLOSE
button again. The player will start loading and then playing the disc automatically.
Mute button
If you press the MUTE button while playing, sound signal will not be heard, but the
picture will remain. Press the MUTE button again or the VOL+/- buttons to resume
the previous volume level.
Select channel/language
While a VCD or a CD is playing, press the L/R/LANG.button to select one of the
playing modes: Mono L, Mono R, Mix-mono and Stereo. Press the button once to
switch to channel modes.
While a DVD is playing, use the L/R/LANG button to select sound language.
(Provided that a DVD- disc supports this function).
State indication
While playing a disc, press the OSD button and the following information will appear on
the display screen:
CD items: single elapsed, single remain, total elapsed, DR(directory remain).
VCD items: single elapsed, single remain, total elapsed, DR(directory remain), display off.
DVD items: title elapsed, title remain, total elapsed, total remain, display off.
Fast Forward and Rewind
While playing a disc, press the 7
or 8
button to fast forward and fast rewind.
The speed changes in the following way:
Fast Forward: 2 times faster, 4 times faster, 8 times faster, 16 times faster, 32 times
faster, play.
Fast Rewind: 2 times faster, 4 times faster, 8 times faster, 16 times faster,
32 times faster, play.
Previous and next
While playing a disc, press the PREV. button to go to the previous song or the NEXT
button to go to the next song.
Subtitle
If a DVD supports subtitle languages, use the SUB. button to select one of the several
languages: English, Spanish, French, German, Thai and Others.
BASIC OPERATIONS
Repeat
While in play mode , press the REPEAT button to set repeat mode.
1. For DVD, as you press the REPEAT button, the TV screen will displays: Chapter,
Title, All.
2. For VCD, CD, CD-R discs, press the REPEAT button, the screen will displays:
Track, All.
3. For MP3, JPEG and other media files, the screen will displays: Single, Repeat one,
Repeat Folder, Repeat off.
A-B Repeat
While in play mode, press the REP. AB button to set the section for repeating.
1. Press the REP.AB button once at the beginning of the section (A).
2. Press the REP.AB button at the end of the section (B). Section AB will automatically
be repeated.
3. Press the button again to exit.
Standby mode
To switch the unit to the standby mode, press the STANDBY button on the remote
control or on the front panel. Press it again to turn on the unit.
Title
If a DVD contains a directory volume, press the TITLE button to display the list of
titles in this disc. Use the direction button to move the cursor or digital buttons to select
the items that you want to play.
Volume setting
Press the VOL.+/-buttons to turn the volume up or down.
Stop
In play mode, press the STOP button once, the player will stop playing; the stop
position will be memorized. Press the ENTER button to continue playing from the
stop point.
If you press the STOP button twice, the stop position will not be memorized, press the
ENTER button, play will start from the beginning.
Play/ Pause
While playing a disc, press the PLAY/PAUSE button to pause, press the button again or
ENTER button to continue the playing.
Reset
In No Disc status, pressing the RESET button will return you to the original setup or the
default value.
BASIC OPERATIONS
USB
It is possible to listen to the Audio and watch Video/JPG files using the USB
device of this unit. Before operating, please switch to the DVD mode first.
1. Connect the USB device to the unit.
2. Press the USB button on the remote control, the player will automatically detect the
device. If the device is found, the player will automatically start playing its content or
menu of the device.
3. Press MENU to display the File browser. Press the direction buttons to select the files
you want and press ENTER to start playing.
Note: The method of playback for files which are saved on a media device is the
same as it is for other discs. For more information, see BASIC OPERATION.
4. Press DVD, FM button to other modes.
Note:
1) USB-Extension cable should have a max. length of 0.5 m.
2) Depending on the amount of data and media speed, it may take longer for the
system to read the contents of the media device. In some cases, reading time may
be as long as 60 seconds. This is not a malfunction.
3) Even when the files are in a supported format, some may not play or display
depending on the content.
BASIC OPERATIONS
MPEG4/JPEG playback
1. Put a MPEG4/JPEG-disc in the slot, and close the disc tray.
BASIC OPERATIONS
Menu
While playing a VCD, press the MENU button, PBC current state view mode will be
opened/close.
Note:
1. While playing a DVD, press the MENU button to go into the Root menu status.
2. Some pirate discs do not support this function.
Angle view selection
In play mode, press the ANGLE button to switch angle view(Only supported by some
discs).
2). Press the direction button 5
6
to move the cursor to the corresponding directory,
press the ENTER button to enter the next layer, and so on, until the desired
picture is found.
3). Number buttons or 9
:
button can be used to select pictures.
4). While playing JPEG files:
a. Press the ZOOM button and then press 7
8
buttons to zoom into the picture;
b. Press the navigation buttons 3
4
5
6
to flip or rotate an image;
c. Press the MENU button to return to the root menu. Use the direction button to
choose the content you want and press ENTER to play.
5). While playing, press the STOP button, it will go back to the root menu.
6). After you go into the subdirectory whilst playing a MPEG4 disc, while playing
MPEG4 disc, you can also select functions such as fast backward, fast forward,
pause etc.
Number buttons
While playing audio files, press the digital button to input the number of the required
track.
If the number of the track consists of two digits, press the 10+ button, then input the
second digit of the number. For instance, input16, press the 10+ button and then press
the 6 button.
Direction buttons
Press the direction buttons to move the cursor .
Enter
Press this button to enable the selected items.
PAL/NTSC
Press P/N button to switch TV system output from one of the following: PAL, AUTO,
NTSC.
Zoom
While in play mode , press the ZOOM button. The image on TV screen will be zoomed in
2 times, 3 times, 4 times,1/2times, 1/3times, 1/4times.
DVD title menu selection
DVD`s with more than one movie, background data, and /or songs are given the name
TITLE, while more sections are displayed under each TITLE, called Chapters.
Chapters can contain musical or video clips. While playing a DVD, press the TITLE
button, and the TITLE menu appears on the TV screen. (Available for DVDs that
contain more than one title menu.)
Press the direction buttons to move the cursor to the desired title menu, then press the
ENTER button to play it. If the title menu is represented by numbers, then press the
numeric buttons to select it directly.
Shuffle
While in play mode, press the SHUFFLE button. The tracks will be played in random mode.
Press this button again to cancel this function.
Program
• While playing a VCD or a CD, press
the " Program "key. The TV screen
shows:
01
02
03
04
05
06
07
08
09
• While playing a DVD, press the
" Program "key The TV screen
shows:
01
02
03
04
05
TT: CH:
TT: CH:
TT: CH:
TT: CH:
TT: CH:
06
07
08
09
TT: CH:
TT: CH:
TT: CH:
TT: CH:
TT: CH:
BASIC OPERATIONS
BASIC OPERATIONS
1. If the player is in the PBC ON status, while playing the programmed songs, this
operation will result in the PBC turning off.
2. Input the number that you want at the selected cursor point; move the cursor to
START, and press the ENTER button. The songs will play in the specified order.
3. While programming, press the CLEAR button to eliminate the digitals that you input.
4. To cancel programmed play: Press the PROGRAM button again, the cursor will
move to STOP automatically; press ENTER button, the cursor move to EXIT
automatically; press ENTER again to cancel programmed play.
Mp3 disc play function
1. Press the OPEN/CLOSE button on the front panel or the remote control to open the disc
tray. Insert a MP3 disc and press the OPEN/CLOSE button again to close disc tray.
The system will read the disc and the TV will display the following picture:
00:00 04:33
001/010
128Kbps
\
Mode selection
Press the SOURCE button on the front panel to select different modes: DVD, USB or FM.
Or you can press the DVD, FM or USB button on the remote control to enter related
mode.
Time selection
In play status, press T/F button, the TV screen displays the data of playing disc. Such as:
VCD disc display:
DVD disc display:
Current Playing Picture
COMPACT
DIGITAL VIDEO
BITRATE 72
Current Playing Picture
MENU
TRACK
XX/XX
DISC TIME X:XX:XX
TRACK TIME X:XX:XX
REPEAT
OFF
DVD
VIDEO
TOTAL ELAPSED X:XX:XX
BITRATE 72
MENU
TITLE
XX/XX
CHAPTER XX/XX
AUDIO 5.1CH
SUBTITLE OFF
TITLE ELAPSED X:XX:XX
1)There are 5 items on the VCD screen: Title, Disc time, Track time, Repeat, Time DISP
(Display)
2)There are 9 items on the DVD screen: Title, Track, Audio, Subtitle, Angle, TT(Total)
time, CH(Chapter) time, Repeat, Time DISP(Display).
Press the 5
or 6
buttons to move the cursor to the item you want to set, then press
ENTER to confirm and use the number buttons to input the corresponding numbers.
After it is done, the DVD player will start to play according to the setting.
CD disc display:
Disc time:--:-Track time:--:-Select track:--:xx
MP3 disc display:
---/xx
--:--
MPEG4 disc display:
SELECT:--GOTO:-:--:--
While playing CD or MP3, press T/F button to switch between the “Time Selection
(current song/chapter)” and “Song/Chapter Selection”; then input the digital you want.
The system begins playing from the specified time/song/charpter.
Note: The optional time range depends on the volume of discs.
Contents Area
01
02
03
04
2. Press the up/down direction buttons to move the cursor to a directory, then press the
ENTER button to enter the directory.
3. Move the direction buttons in the subdirectory or the file area, select a song with the
cursor, then press the ENTER button to play the song.
To select other songs under the current directory while playing, press up or down
direction buttons or the PREV. /NEXT buttons.
To change directories while playing, press the left direction button to move the icon
to the directory symbol, press the up/down buttons to select other directories, then
press the ENTER button.
While playing you can use such options as fast forward and rewind, pause, stop, ect.